

Questions or Concerns?
Please contact us Mon - Fri 9:00 AM - 5:00 PM PST
at (888) 402-1684 or email support@cosori.com
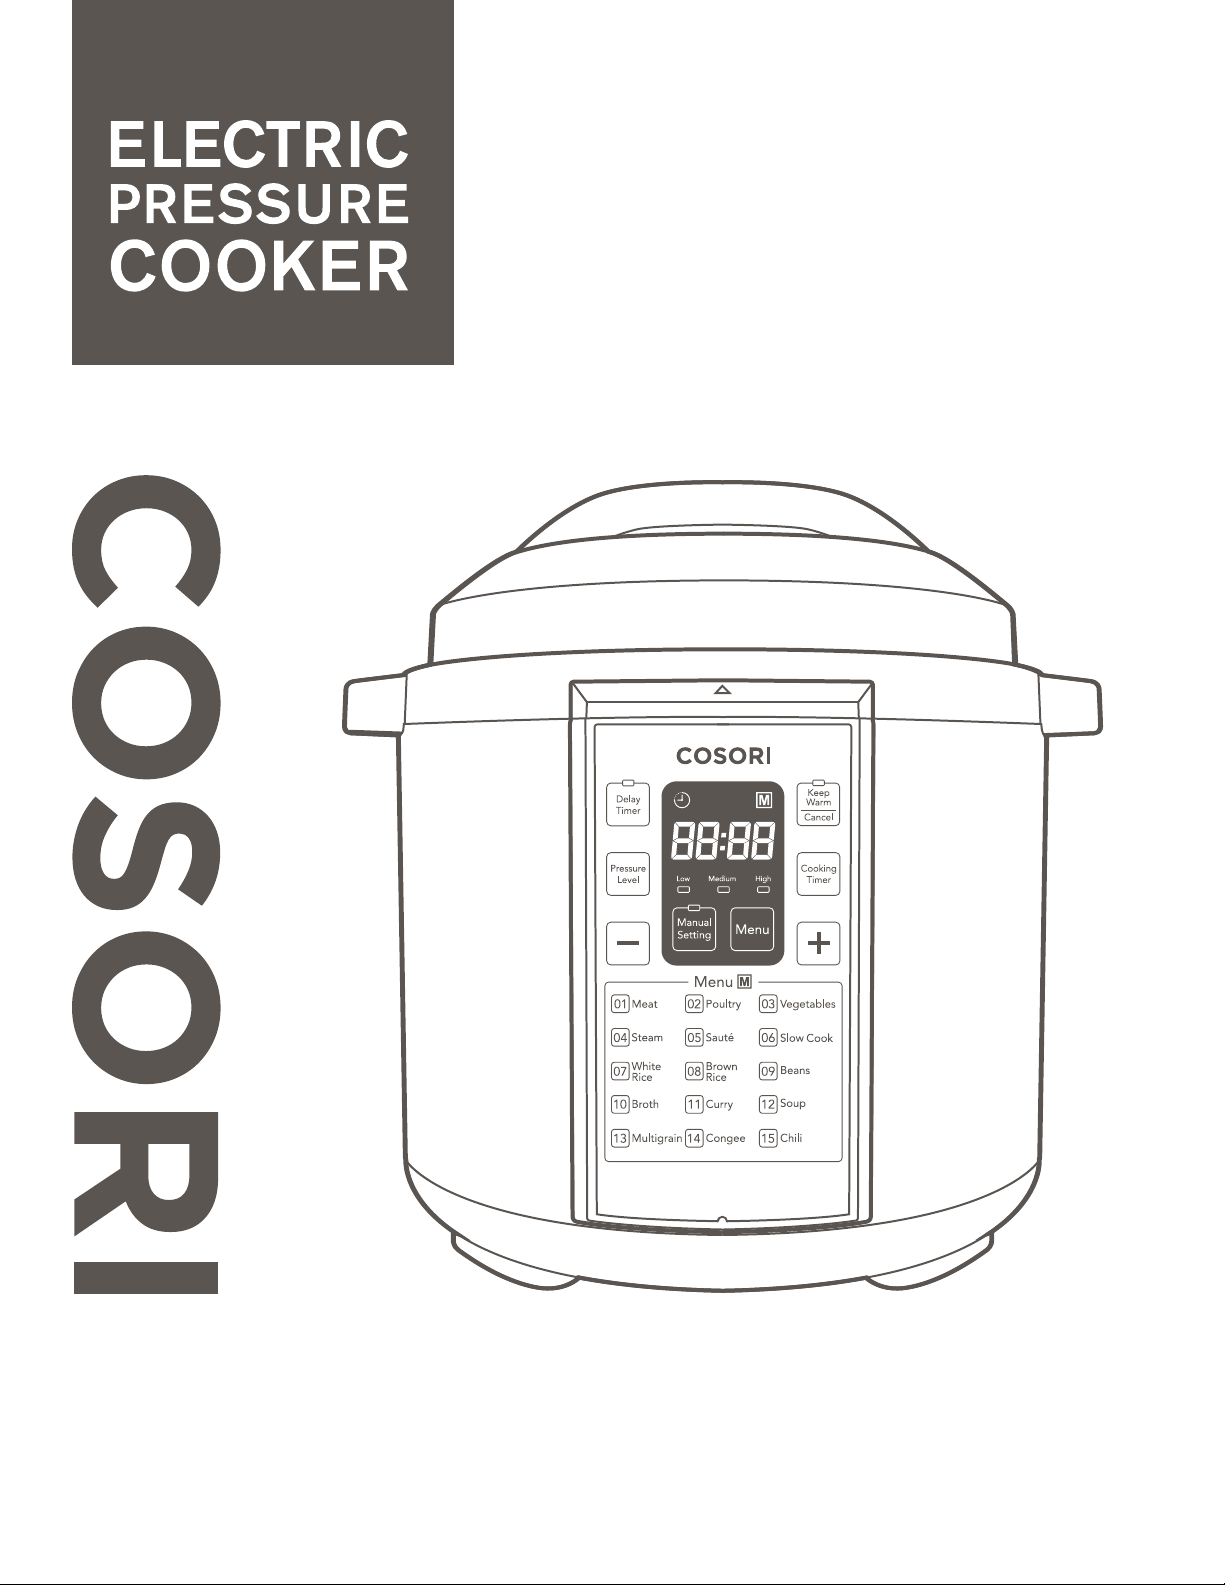
Model No.: C1156-PC


THANK YOU.
Thank you for purchasing the Electric Pressure Cooker by Cosori.
Prepare fresh meals with minimal operation or effort.
Should you have any questions or concerns while using your new
pressure cooker, feel free to reach out to our helpful customer support
team at 888.402.1684 or by email at support@cosori.com. We hope
you enjoy your new appliance!

TABLE OF CONTENTS
Safety Information
Product Diagram
Pressure Cooker
Control Interface
Button Controls
Digital Display
Operation
Preparing to Cook
Glass Lid
Manual Cooking Mode
Preset Cooking Mode
Delay Timer
Keep Warm
Safely Removing the Lid
Auto-Off Safeguard
Specifications
Mode Durations
Cleaning & Maintenance
Troubleshooting
Customer Support
Warranty Information
3
5
6
7
8
9
10
11
12
13
13
14
14
15
16
17
18
20
21

SAFETY INFORMATION
IMPORTANT SAFEGUARDS: Please read, understand, and comply with all of the instructions
provided in this manual before using the device. Failure to comply with the instructions given in this manual
and/or using the device in ways other than the ones mentioned in this manual may result in serious injury
and/or damage to the product.
Safety Use & Care
• This product is for household use only. Do not use outdoors.
• DO NOT use the pressure cooker for other than the intended use.
• To cancel any mode on the pressure cooker, press ‘Keep Warm/Cancel’. To turn off the pressure cooker,
unplug the power cable.
• DO NOT place the pressure cooker on or near hot gasses, electric burners or a heated oven.
• DO NOT operate the pressure cooker near water or fire or leave under direct sunlight.
• Keep out of reach of children. Keep close supervision when using near children.
• DO NOT operate the pressure cooker on an unstable table surface. Never operate the pressure cooker
on or near flammable materials such as newspaper or paper plates.
• DO NOT operate near walls, furniture, plants, or areas exposed to oil splatter.
• Keep the pressure cooker away from potential electrical shock. Do not immerse any electrical component
in water or other liquids.
• Make sure the lid is properly fastened before each use. Do not operate the pressure cooker if the lid
appears to be cracked, broken or bent.
• DO NOT operate the pressure cooker if the cord or plug appear to be damaged. Do not operate the
pressure cooker if the device malfunctions during normal operation. Return appliance to the nearest
authorized service facility for examination, repair, or adjustment.
• DO NOT attempt to replace any parts on the pressure cooker as it may cause shock, fire or serious injury.
• DO NOT let the cord hang over the edge of a table or counter or touch hot surfaces.
• To reduce the risk of electrical shock, cook only in the provided inner pot. Do not attempt to replace the
container or substitute it with another container.
• Always check the pressure anti-block shield, lid lock, and heating plate for any damage or clogging before
each use.
• Be aware that certain foods such as applesauce, cranberries, pearl barley, oatmeal or other cereals, split
peas, noodles, macaroni, rhubarb, spaghetti, and froth may clog the anti-block shield. When cooking these
foods, make sure to only fill the pressure cooker’s inner pot with no more than 3 liters of contents (do not
completely fill).
• Keep all parts of the pressure cooker clean after each use in order to prolong and maintain the
appliance’s service life.
• DO NOT fill the unit over 2/3 full. When cooking foods that expand during cooking such as rice or dried
vegetables, do not fill the unit over ½ full. Overfilling may cause a risk of clogging the vent pipe and
developing excess pressure.
• This device cooks with high pressures. Improper use may result in serious burning or scalding.
• DO NOT use the pressure cooker to deep fry or pressure fry foods with oil. Doing so may cause a fire
and/or serious injury.
• DO NOT move the pressure cooker or remove the lid while in operation.
• Use extreme caution when moving the pressure cooker when containing hot liquid or contents.
• DO NOT place your hands or face over the anti-block shield while the pressure cooker is in operation.
3
• After cooking, use extreme caution when removing the lid. Always open the lid away from you to avoid
skin contact with any heat or steam.
• When opening the lid after cooking, do not directly touch the inner pot with your hand(s). Doing so may
cause harmful burning or scalding.
• DO NOT open the cooker’s lid until the cooker has completely cooled and all the internal pressure has
been released. If the handles are too difficult to push apart, an indication light will turn on, indicating that
the cooker still contains pressure. Please wait for the light to turn off to open the device.
• DO NOT use the pressure cooker to store food or oil.
• DO NOT use abrasive detergents or scouring pads to remove burnt food. Soak the inner pot in warm,
soapy water, then remove excess food with a regular sponge.
• DO NOT touch the pressure cooker’s stainless steel surface while it’s cooking or heating.
• Operate only with a standard 120V US socket.
• DO NOT place foreign objects (such as any type of metal or plastic) in the pressure cooker. The pressure
cooker is intended only for food.
• DO NOT attempt to repair or modify the internal components or pieces in any way. Doing so may void
your warranty.
• DO NOT immerse or sprinkle with water or other liquids.
• DO NOT attempt to unplug the pressure cooker with wet hands. Do not unplug by forcefully pulling on
the cable.
• DO NOT exceed the max food level when filling the inner pot.
• Always unplug the cooker from the outlet when not in use, before removing parts, or cleaning. Allow it to
cool off before removing parts or cleaning.
• The use of accessory attachments is not recommended, as this may cause injuries.
• A short power supply cord is provided to reduce injuries resulting from entanglement and tripping. An
extension cord may be used if proper care is exercised. If an extension cord is used, the electrical rating
of the cord must be at least 20 A and 120 V. The extension cord must be arranged so that it will not drape
over the edge of a table or counter where it can be pulled by children or accidentally tripped over.
• DO NOT attempt to modify the fitted plug in any way.
• This appliance has a polarized plug (one blade is wider than the other). To reduce the risk of electric
shock, this plug is intended to fit into a polarized outlet only one way. If the plug does not fit fully into the
outlet, reverse the plug. If it still does not fit, contact a qualified electrician. Do not attempt to modify the
plug in any way.
SAVE THESE INSTRUCTIONS
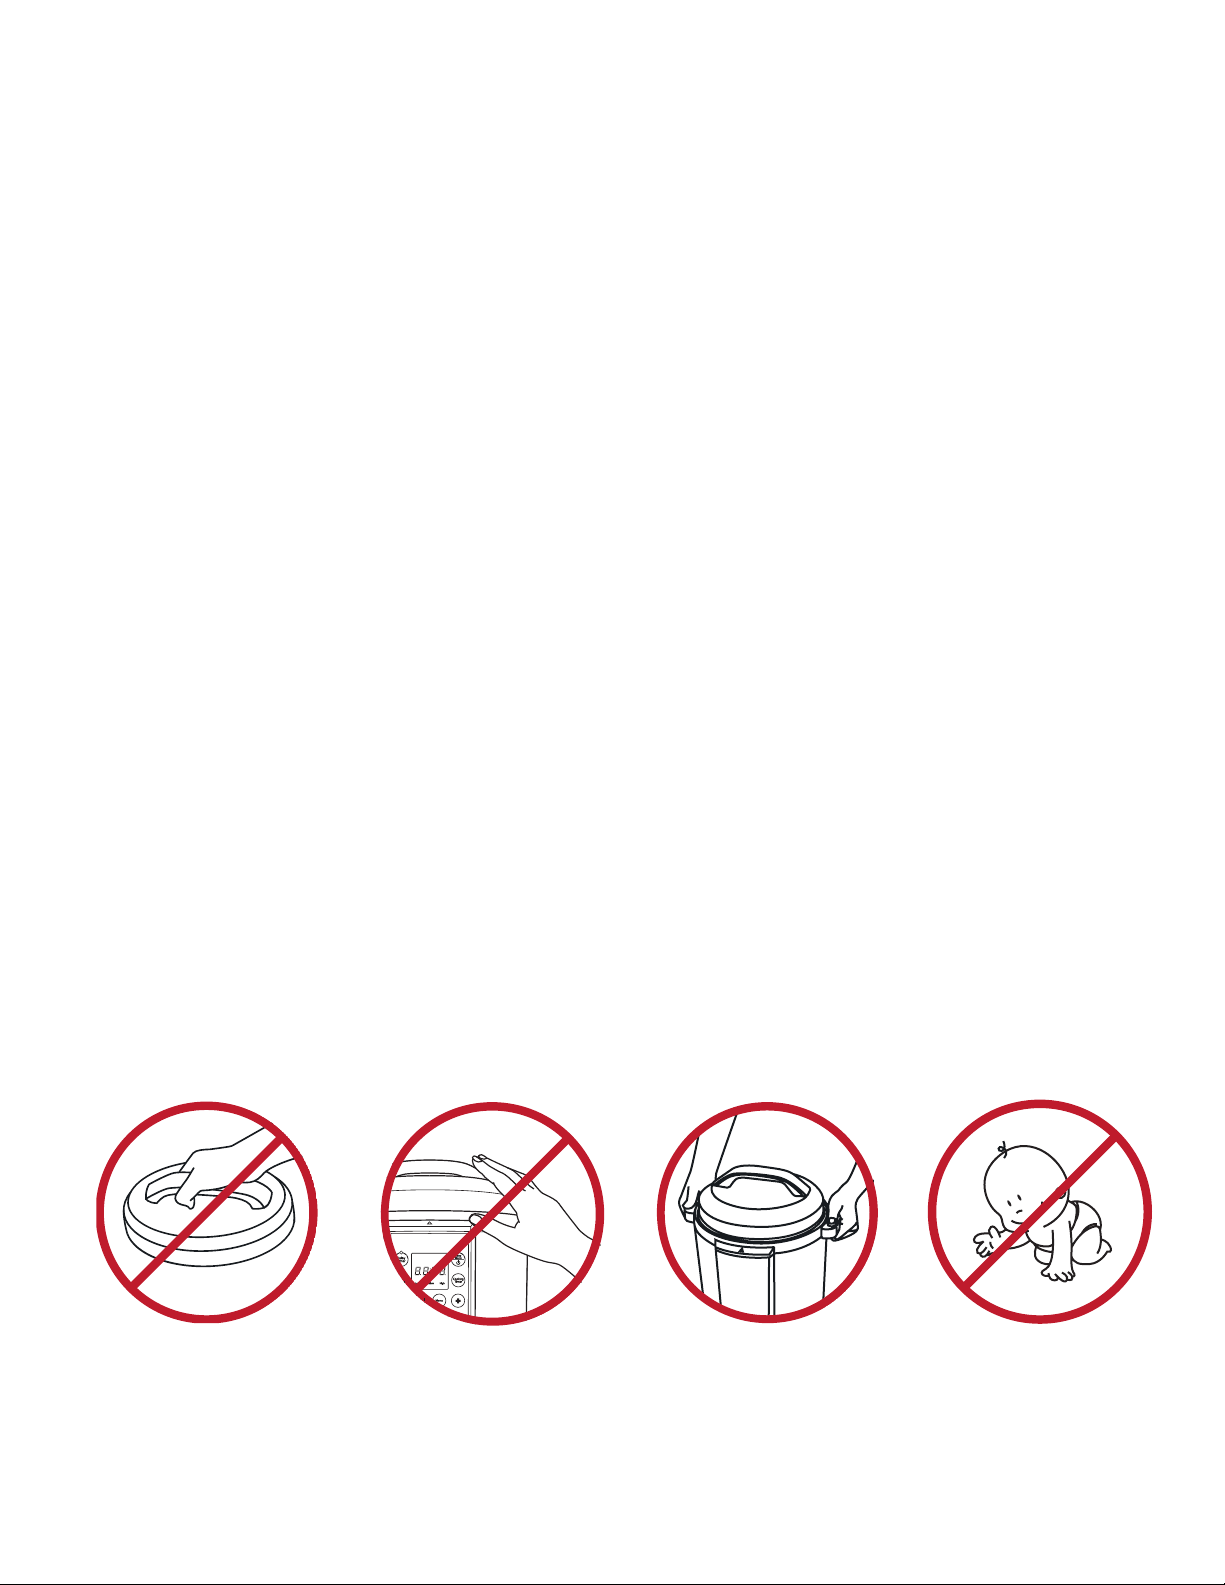
DO NOT use any
other lid.
DO NOT touch the
lid or stainless steel
surface while heating
or cooking.
When moving, hold
the pressure cooker
by the handles.
4
Keep out of reach of
infants and
young children.
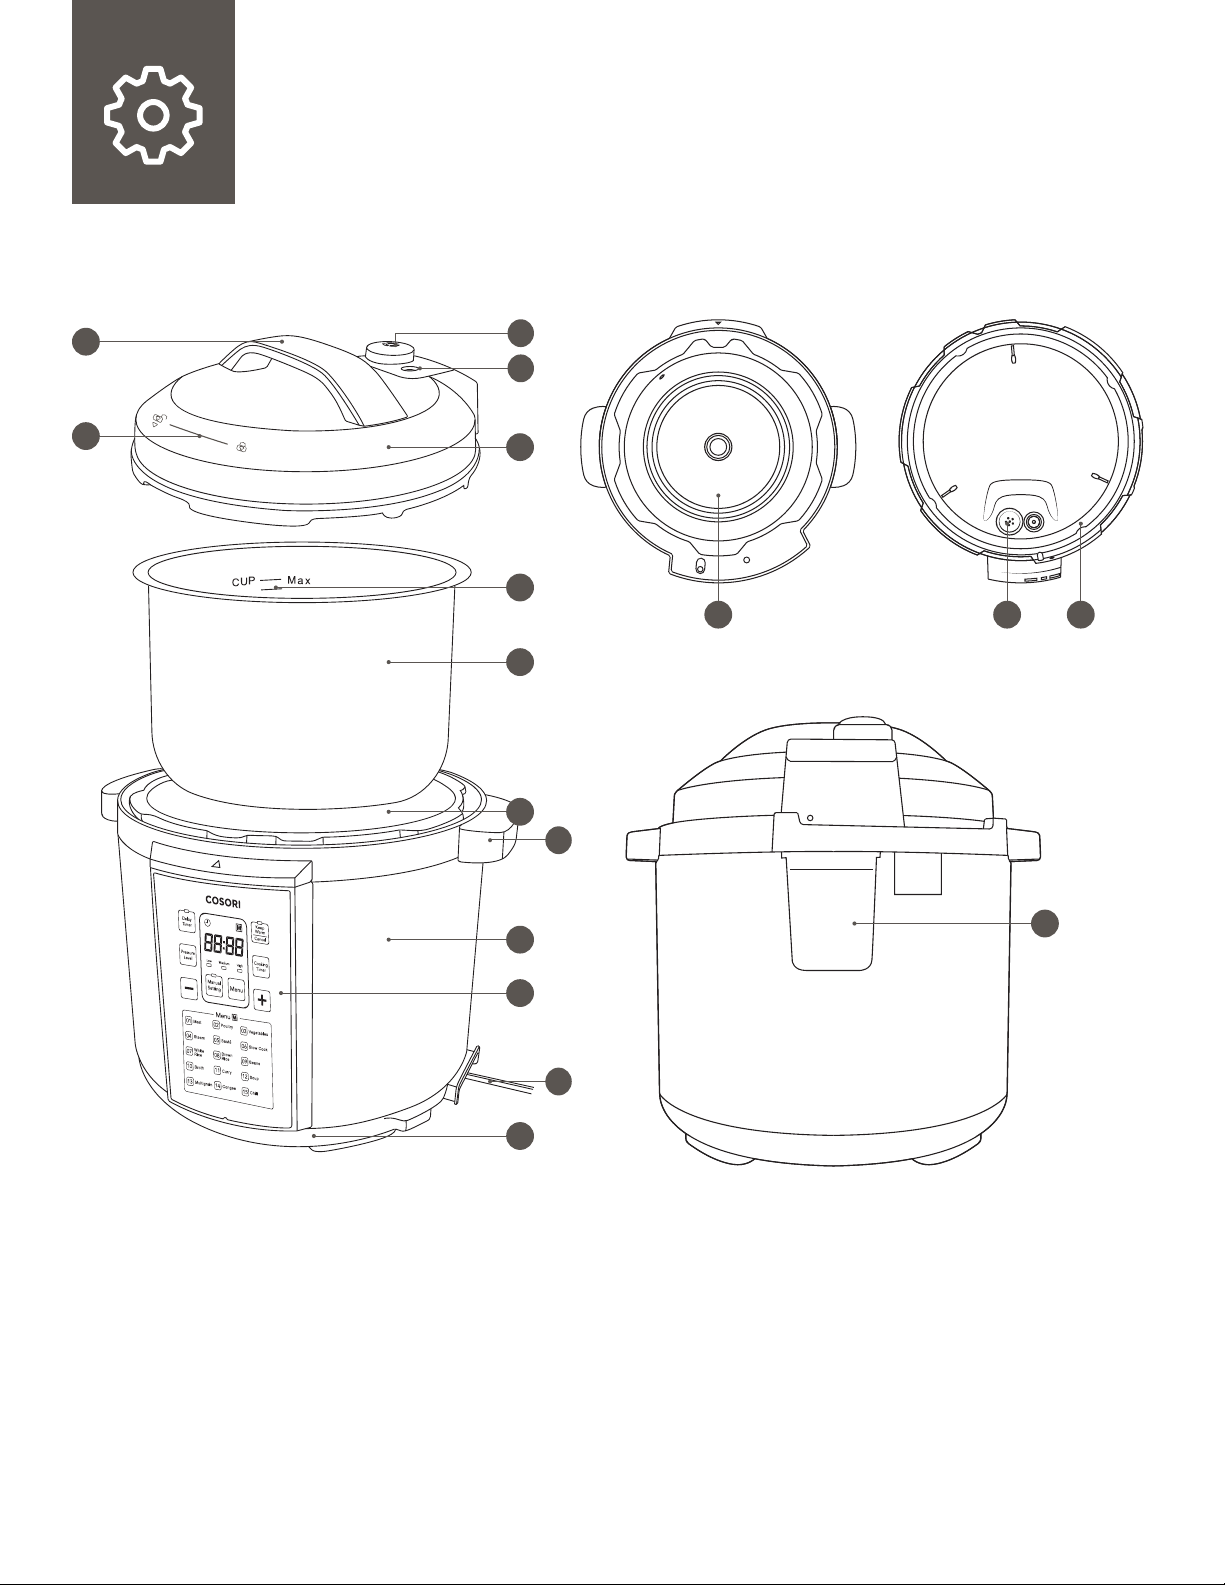
PRODUCT DIAGRAM
Pressure Cooker Inside of Cooker Inside of Lid
3
2
4
5
1
12
679
11
10
15
1. Lid
2. Lid position mark
3. Lid handle
4. Exhaust valve
5. Float valve
6. Sealing ring
7. Anti-block shield
8. Water collector
9. Heat plate
13
8
14
17
16
10. Outer pot
11. Inner pot
12. Measurement marks
13. Pressure cooker housing
14. Control panel
15. Cooker handles
16. Base
17. Power cord
5
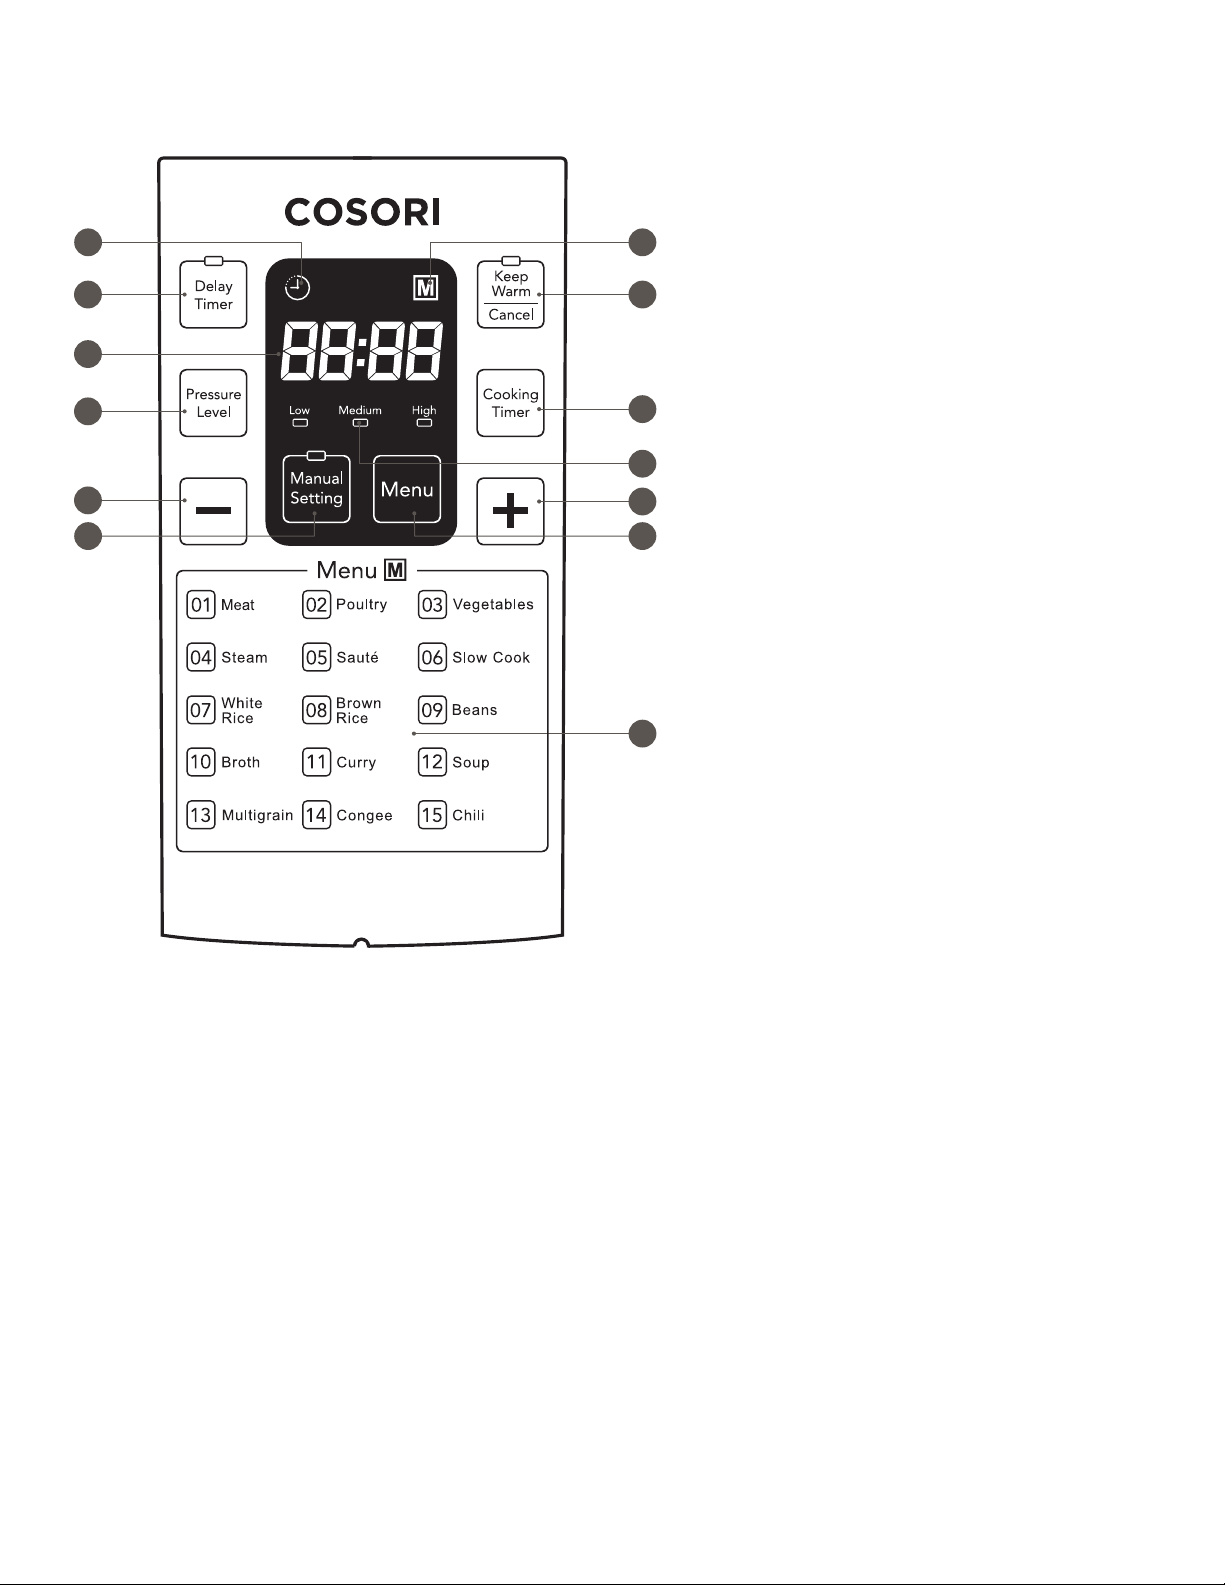
Control Panel
2 4
1
3
6
1213
11
1. Digital display
2. Delay timer button
3. Pressure level selection
4. Keep warm/cancel
5. Cooking timer button
6. Decrease value ‘-’
7. Manual setup
8. Menu
5
9. Increase value ‘+’
10. Preset modes
11. Pressure level indication
9
87
12. Preset mode on
13. Cooking timer on
10
6

Button Controls
Button Function Operation
Set cooking delay time.
Keep food contents
warm (140°F - 176°F /
60°C-80°C); Off/Cancel.
Manual cooking mode. While on standby mode, press ‘Manual Setting’ to
Manual Cooking Mode
While in manual cooking mode, press ‘Delay Timer’
to set the delay time by increments of 10 minutes
before cooking using the ‘-’ and ‘+’ buttons.
Preset Cooking Mode
After selecting a preset mode, press ‘Delay Timer’
to set the delay time by increments of 10 minutes
before cooking using the ‘-’ and ‘+’ buttons.
With the pressure cooker’s lid securely locked in
place, press the ‘Keep Warm’ button to keep the
food contents warm at 140°F - 176°F (60°C - 80°C).
This button also cancels a cooking setting or cycle
at any time.
enter manual cooking mode and adjust pressure
level, cooking and delay time.
Adjust pressure level
(Low, Medium, High).
Set manual cooking time. While in manual cooking mode, press ‘Cooking
Preset cooking mode. Press the ‘Menu’ button to enter preset cooking
Increase value.
Decrease value.
While in manual setting mode, press the ‘Pressure
Level’ button repeatedly to adjust the cooking
pressure level between high, medium and low.
Timer’ to set the pressure cooking time by minutes,
using the ‘-’ and ‘+’ buttons. (Default time is 30
mins; adjustment range is 1~60mins)
mode, then use the ‘-’ and ‘+’ buttons to select the
desired preset mode.
Use the ‘+’ button while selecting a preset mode or
setting delay time or cooking time to increase the
value.
Use the ‘-’ button while selecting a preset mode or
setting delay time or cooking time to decrease the
value.
7

Digital Display
Display Message
- - - -
OH
2:00
P01 - P15
30
Pressure cooker is on standby.
Pressure cooker on ‘Keep Warm’ mode.
Pressure cooker heating for cooking cycle in ‘Manual’ mode.
Pressure cooker on ‘Delay Timer’ mode.
Countdown time after entering pressure status.
Pressure cooker is in ‘Menu’ mode (adjustment range is P01~P15).
Pressure cooker cooking time in ‘Manual’ mode.
8

OPERATION
Preparing to Cook
NOTE:
• Thoroughly wash the inner pot before use. When you open or close the lid, a warning chime will occur.
• The minimum amount of liquid needed for cooking is 320 mL. Note that some recipes call for less than the minimum amount,
but this is acceptable because the liquid in the food counts toward the minimum amount. 320 mL is two full cups of the
included measuring cup.
1. Remove the lid from the pressure cooker, turning it counter-clockwise in order to unlock.
2. Check the sealing ring, float valve, anti-block shield, water collector and exhaust valve in order to ensure
they are clean and properly installed.
3. Remove the inner pot from the pressure cooker and place the food contents/ingredients in the
container, making sure you don’t exceed the marked maximum capacity.
4. Place the inner pot back into the pressure cooker.
NOTE: Make sure there is no food or liquid left inside the pressure cooker in the space between the inner and outer pot. If there
is any food or moisture, wipe the surface clean before proceeding.
5. Place the lid on the pressure cooker, aligning the with the on the lid. Turn the lid clockwise to align
the with the to lock the lid in place.
6. Ensure the water collector is empty and properly installed on the pressure cooker.
7. Set the exhaust valve to the steam sealing setting.
Continued on page 10
9

NOTE: The exhaust valve is located at the top of the lid.
Setting Function
Steam Seal
Seal steam created from high temperature and pressure.
Steam Exhaust
The pressure cooker will naturally vent steam created by high temperature and
pressure.
NOTE: While the pressure cooker is operating in the steam exhaust setting, keep your face and hands away from the exhaust
valve. Direct contact to steam may cause burning/scalding.
Glass Lid
The professional grade tempered glass lid is specifically designed for use with electric pressure cookers.
Put your electric pressure cooker in ‘Keep Warm’ mode and cover the inner pot with this glass lid to watch
your food cook without having to remove the lid. It can also be used in Sauté mode to prevent cooking oil
droplets from soiling your countertop. This lid also features a steam-release vent and stainless steel rim for
maximum convenience and durability. To reduce cleanup time, this glass lid is dishwasher safe.
10

Manual Cooking Mode
NOTE:
• Keep the pressure cooker’s lid locked in order to operate the control interface. For your safety, the pressure cooker will lock the
control interface when the lid is unlocked. To cancel settings at any time, press the Keep Warm/Off button.
• The default settings for Manual Mode are 30 minutes and High Pressure.
1. Plug the pressure cooker cable into a powered outlet. The pressure cooker will automatically turn on.
The digital display will blink ‘ - - - - ’, indicating that the pressure cooker is on standby.
2. Press the ‘Manual Setting’ button to enter manual cooking mode.
3. Press ‘Cooking Timer’ and use the ‘-’ and ‘+’ buttons to set the cooking time by minutes.
4. Press ‘Pressure Level’ repeatedly to select the cooking pressure.
5. Once you’ve selected a preset, wait for 10 seconds and the digital display will beep 3 times, indicating
confirmation.
NOTE: The pressure cooker will continue to display after confirmation as the cooker warms up and the pressure
inside increases. Once the cooker reaches operating pressure, the cooking time counts down to indicate the remaining time in
minutes.
Warming up Ready
11

Preset Cooking Mode
NOTE:
• Do not touch the pressure cooker’s stainless steel surface while it’s cooking or heating.
• All presets are programmed for high pressure, except for sauté and slow cook, which do not have pressure applied.
1. Plug in the pressure cooker cable into a powered outlet. The pressure cooker will automatically turn on.
The digital display will blink ‘ - - - - ’, indicating that the pressure cooker is on standby.
2. Press ‘Menu’ to enter preset selection.
3. Use the ‘-’ and ‘+’ buttons to select the number of your desired preset.
4. Once you’ve selected all of your settings, wait for 10 seconds and the digital display will beep 3 times,
indicating confirmation.
NOTE: The pressure cooker will continue to display the preset number after confirmation as the cooker warms up and the
pressure inside increases. Once the cooker reaches operating pressure, the cooking time counts down to indicate the remaining
time in minutes.
Warming up Ready
12

Delay Timer
NOTE: The Delay Timer function is not available with the Sauté or Slow Cook preset cooking modes.
The delay timer function is available if you want to delay the time cooking start time by a number of hours or
minutes (10 minute intervals).
While in manual cooking mode, or after selecting a cooking preset, press ‘Delay Timer’ once to set the delay
time before cooking by minutes (increments of 10) using the ‘-’ and ‘+’ buttons. Once you’ve selected all of
your settings, wait for 10 seconds and the digital display will beep 3 times, indicating confirmation.
Keep Warm
The pressure cooker will automatically revert to ‘Keep Warm’ mode after cooking is complete. The default
time for ‘Keep Warm’ mode is 12 hours. For best results, do not leave the ‘Keep Warm’ mode on for over 2
hours. The cooker will keep the contents warm at 140°F - 176°F (60°C - 80°C).
To cancel the ‘Keep Warm’ mode or a cooking setting or cycle at any time, press the ‘Keep Warm’ button.
13

Safely Removing the Lid
NOTE: For your safety, open the lid slowly. Do not open the lid before all pressure has escaped through the exhaust valve and the
float valve has completely fallen back into the lid.
Once cooking is complete, turn off the pressure cooker’s power by unplugging the power cable. You can
safely remove the lid following either of the two methods described below:
Method 1:
1. Let the cooker cool down on its own. Wait approximately 10 minutes until the float valve drops down
before opening the lid.
2. Turn the lid counterclockwise to unlock, then carefully lift the lid away from your face. Keep the lid over
the pressure cooker to allow any remaining steam to escape.
3. Completely remove the lid, keeping your face and exposed skin at a safe distance from the heat
released from the pressure cooker.
Method 2:
1. If set to the (steam seal), carefully move the exhaust valve to (steam exhaust), allowing the
steam to gradually escape from the pressure cooker (for solid food only).
2. The float valve will drop back into the lid when it is safe to open the pressure cooker.
3. Turn the lid counterclockwise to unlock, then carefully lift the lid away from your face. Keep the lid over
the pressure cooker to allow any remaining steam to escape.
4. Completely remove the lid, keeping your face and exposed skin at a safe distance from the heat
released from the pressure cooker.
Auto-Off Safeguard
The pressure cooker will automatically power off if it begins to overheat in order to protect the unit from a
circuit overload or a potential fire. This is an irreversible safeguard that cannot be overridden.
14

SPECIFICATIONS
Capacity: 6 quarts
Power Supply: AC 120V 60Hz
Rated Power: 1000W
Container Size: 8.66”
Working Pressure: 70 kPa
Keep Warm Temperature: 140°F - 176°F (60°C - 80°C)
Product Weight: 14.33kg
Product Dimensions: 320 x 320 x 354mm
Packaging Contents
1 x Electric Pressure Cooker
1 x Spoon
1 x Ladle
1 x Measuring Cup
1 x Glass Lid
1 x Sealing Ring
1 x User Manual
15

Mode Durations
Mode Duration (minutes) Mode Duration (minutes)
Meat
Poultry
Vegetable
Steam
Saute
Slow Cook
20
20
5
10
30
480
Broth
Curry
Soup
Multigrain
Congee
Chili
15
20
30
22 - 28
40
30
White Rice
Brown Rice
Beans
14 - 18
22 - 28
40
High Pressure
(Manual Mode)
Medium Pressure
(Manual Mode)
Low Pressure
(Manual Mode)
30
30
30
16

CLEANING & MAINTENANCE
NOTE: Allow the pressure cooker to cool down before cleaning any part of the unit.
Inner Pot
Do not use abrasive detergents or scouring pads to remove burnt food. Soak the inner pot in warm, soapy
water, then remove excess food with a regular sponge.
Rinse and dry the container thoroughly before next use.
Sealing Ring Cleaning
After each use, clean off excess oil and food from the lid and sealing ring with detergent and a soft brush.
To remove the sealing ring, gently pull the ring upwards, removing in from the inner lip of the lid. To re-install
the ring, gently press the ring into the inner lip of the lid, making sure it’s fully wrapped around the inner
metal ring of the lid.
NOTE:
• For your safety, check to ensure the sealing ring is properly installed before each use.
• Do not operate the pressure cooker if the sealing ring is damaged.
Float Valve
Keep the float valve clean between uses. To remove, gently slip off the plastic covering and slide the pin out
of the lid. Soak the plastic cover and plug in warm soapy water to clean, then rinse and dry thoroughly. To reinstall the pin, slide the pin back into the lid from the top, then re-apply the plastic cover.
Water Collector
The water collector contains the excess steam when the pressure cooker is in use. To keep odor-free, make
sure to empty and wash the water collector with detergent and warm water. Rinse and dry thoroughly before
replacing the water collector in the pressure cooker.
17

TROUBLESHOOTING
Issue Reason Solution
Unable to
close lid
Steam
leaking from
lid
Sealing ring is not installed
properly.
Sealing ring not installed
properly.
Sealing ring not clean. Turn off the pressure cooker and wait for it to
Sealing ring damaged. Do not operate the pressure cooker with a
Lid is not sealed properly. Turn off the pressure cooker and wait for it to
Gently press the ring into the inner lip of the lid,
making sure it’s fully wrapped around the inner
metal ring of the lid.
Turn off the pressure cooker and wait for it to
cool. Then, remove the lid from the pressure
cooker to gently press the ring into the inner lip of
the lid, making sure it’s fully wrapped around the
inner metal ring of the lid.
cool. Then, remove the sealing ring and wash with
warm water and gentle detergent, then re-install
the sealing ring into the lid.
damaged sealing ring.
cool. Then, carefully remove the lid. Place the lid
on the pressure cooker, aligning the with the
on the lid. Turn the lid clockwise to align the
with the to lock the lid in place.
Float valve
not raising
from pressure
Steam
escaping
from exhaust
valve
Not enough food content
in the pressure cooker
container.
Steam leaks from the lid or
exhaust valve.
The exhaust valve is in
steam exhaust position.
Add water and food to the inner pot according to
the recipe.
Make sure the exhaust valve is in the steam seal
setting and that the lid is properly sealed.
Use a utensil to carefully move the exhaust valve
to the steam seal setting.
Continued on page 19
18

Digital
display won’t
turn on
Power cable is not fully
plugged in.
Make sure the power cable is completely plugged
into a powered socket.
Rice not fully
cooked
Rice is too
soft
Not enough water in
container.
Lid opened too soon. After the cooking cycle completes, leave the lid
Too much water. Reduce water or add rice accordingly.
Add water accordingly.
on for an additional 5 minutes.
Error Codes
Error Code Reason Solution
E1
E2
Bottom sensor failure. Do not operate the pressure cooker; contact
customer support.
C1
E8
High temperature with no
contents inside the inner
pot.
Pressure switch failure. Do not operate the pressure cooker; contact
Unplug the pressure cooker to power it off. Add
food contents before powering on.
customer support.
19

CUSTOMER SUPPORT
Should you encounter any issues or have any questions regarding your new product, feel free to contact our
helpful Customer Support Team. Your satisfaction is ours.
CUSTOMER SUPPORT
Cosori Corporation
1202 N Miller St. Suite A
Anaheim, CA 92806
Phone: (888) 402-1684
Email: support@cosori.com
SUPPORT HOURS
Monday - Friday: 9:00 am - 5:00 pm PST
*Please have your order number ready before contacting customer support.
20

1 YEAR WARRANTY
Policy & Terms
Cosori warrants all products to be of the highest quality in material, craftsmanship and service for a
minimum of 1 year, effective from the date of purchase. Under the limited warranty, Cosori will replace
or refund any product found to be defective due to manufacturer flaws based on eligibility. Refunds will
be issued within 30 days of the date of purchase, otherwise, Cosori will replace products determined to
be defective under the remaining warranty period. This warranty extends only to personal use and does
not extend to any product that has been used for commercial use, rental use, or any other use in which
the product is not intended for. There are no warranties other than that expressly set forth with each
product. This warranty is non-transferrable. Cosori is not responsible in any way for any damages, losses
or inconveniences caused by equipment failure or by user negligence, abuse, or use noncompliant with the
user manual or any additional safety, use, or warnings included in the product packaging and manual.
Furthermore, Cosori is not liable for incidental or consequential damages of any nature resulting from the
use of this product.
This warranty does not apply to the following:
• Damage due to abuse, accident, alteration, misuse, tampering or vandalism.
• Improper or inadequate maintenance.
• Damage in return transit.
• Unsupervised use by children under 18 years of age.
Cosori and its subsidiaries assume no liability for damage caused by the use of the product other than for
its intended use or as instructed above and within the user manual. Some states do not allow this exclusion
or limitation of incidental or consequential losses so the foregoing disclaimer may not apply to you. This
warranty gives you specific legal rights and you may also have other rights which may vary from state to
state.
21

Questions or Concerns?
Please contact us Mon - Fri 9:00 AM - 5:00 PM PST
at (888) 402-1684 or email support@cosori.com
 Loading...