

High Speed Personal Blender
Model No.: C011-PB
COSORI SUPPORT:
Mon - Fri 9:00 AM - 5:00 PM PST
(888) 402-1684 | support@cosori.com


Thank You.
Thank you for purchasing the C011-PB Personal High Speed Blender by Cosori. We are
dedicated to providing our customers with high quality products to live life tastefully.
Should you have any questions or concerns about using your new product, feel free
to reach out to our helpful customer support team at (888) 402-1684 or by email at
support@cosori.com. We hope you enjoy your new product!
3

Table of Contents
Safety Information
Function Diagram
Set-up & Operation
Helpful Hints for Blending
Care & Maintenance
Troubleshooting
Warranty
Customer Support
Package Contents
1 x Cosori High Speed Personal Blender
1 x Blade attachment
1 x Storage lid
1 x Travel lid
2 x 24 oz Containers
1 x 12 oz Container
1 x User manual
5
7
8
10
10
11
12
12
13
4

Safety Information
IMPORTANT SAFEGUARDS:
Please read, understand, and comply
with all the instructions provided in this
manual before using the device. Failure to
comply with the instructions given in this
manual and/or using the device in ways
other than the ones mentioned in this
manual may result in serious injury and/or
damage to the product.
Safety Use & Care
• Read all instructions before using this
appliance.
• Check if the local power supply voltage
matches the voltage indicated on this
appliance before use.
• DO NOT place any part of this
appliance on or near a hot gas, electric
burner, or in a heated oven.
• DO NOT let cord hang over edge of
table or counter.
• DO NOT operate any appliance with
a damaged cord or plug or after the
appliance malfunctions or has been
damaged in any manner. Contact
customer support immediately if the
appliance malfunctions.
• Avoid contact with moving parts.
• DO NOT attempt to activate the
motor without using the container.
• DO NOT leave foreign objects, such as
spoons, forks, knives in the container
as this will damage the blades and
other components when operating
the appliance; doing so may also cause
injury.
• Handle this appliance with care; the
blades are sharp.
• DO NOT use attachments from other
kitchen appliances on this blender,
doing so may cause re, electric shock
or injury.
• The ingredients in the container should
not be exceed the MAX line.
• When making nut butters or oil based
foods, do not process for more than
one minute after the mixture starts
circulating. Over-processing can cause
dangerous overheating.
• Turn all controls o by pressing the
‘Start/Stop’ button and unplug the
blender when it is not in use, before
putting on or taking o parts, and
before cleaning.
• Never leave the appliance unattended
while it is running.
• DO NOT immerse the blender base
or power cord in water or other liquids,
doing so may cause electric shock or
injury.
• Always operate blender with two hands
to stabilize the appliance.
• To prevent overheating, never allow
the blender to run for more than one
minute at a time. Doing so may cause
permanent damage to the motor. If
the motor does overheat, unplug the
appliance and allow it to cool for at
least one hour before resuming use.
• DO NOT blend carbonated beverages.
Built up pressure may cause the
container to burst upon opening and
may result in injury.
• DO NOT blend hot liquids, always
start with room temperature or cold
ingredients when blending mixtures.
Blending hot liquid may cause pressure
to build up in the container, which can
erupt and result in injury.
• DO NOT allow mixtures to sit in the
container for long periods of time.
Fermented foods can cause pressure
to build up inside the container, which
can lead to ingredients bursting or
spraying out upon opening.
• If necessary, use a rubber spatula or
wooden spoon to remove food from
the sides of the container. Make sure
to turn the power o and unplug the
blender from the electrical outlet
before using the spatula.
• DO NOT blend non-food items in the
blender.
• DO NOT open or remove the
container until the blade stops running
completely to avoid hazard or damage
to the product.
5

• DO NOT put hands or other objects
into the blender base while the blender
is operating.
• Children over the age of 8 and persons
with disabilities are able to use this
appliance under close supervision. DO
NOT allow children to play with the
blender.
• DO NOT use outdoors.
• DO NOT attempt to operate the
blender if the blade assembly is not
properly attached to a container.
• DO NOT attempt to use the blade
assembly on another blender.
• DO NOT replace the blade assembly
using the blades from another blender.
• DO NOT attempt to disassemble this
device for any reason. If your blender is
broken or no longer functions properly,
immediately discontinue use and
contact customer support.
• Always use caution when replacing the
blade assembly after washing.
NOTE FOR PLUG:
This appliance has a polarized plug
(one blade is wider than the other). To
reduce the risk of electric shock, this
plug will t in a polarized outlet only one
way. If the plug does not t fully in the
outlet, reverse the plug. If it still does
not t, contact a qualied electrician.
Do not modify the plug in any way.
SAVE THESE
INSTRUCTIONS
HOUSEHOLD USE ONLY
6

Function Diagram
2 4
5
6 6
7
3
1
8
9
11
1. Blender Base
2. Start/Stop Button
3. Auto Blend Button
4. Pulse Button
5. Power Cord
6. Suction Cup Feet
7. Blade Assembly
8. Travel Lid
9. Storage Lid
10. 24 oz Containers
11. 12 oz Container
1010
Control PanelProduct Diagram
Button Function
Start/Stop Starts or stops the blender.
Auto Blend Pulses ingredients in 3 second
intervals with 1 second
breaks in between to achieve
a smooth consistency;
pulsing ingredients 10 times.
Pulse Press and hold the pulse
button to blend ingredients at
a high speed. Release at the
desired consistency.
7
Set-Up
Before Use
1. Remove all packaging and labels from
the blender. Inspect the blender for
damage and check to see if all parts
are included.
2. Wash all containers, lids, and blade
attachment with warm soapy water.
Thoroughly rinse all parts with water
and allow them to dry completely.
NOTE:
The containers, lids, and blade
assembly are dishwasher-safe; it is
recommended to place them on the
top rack for washing.
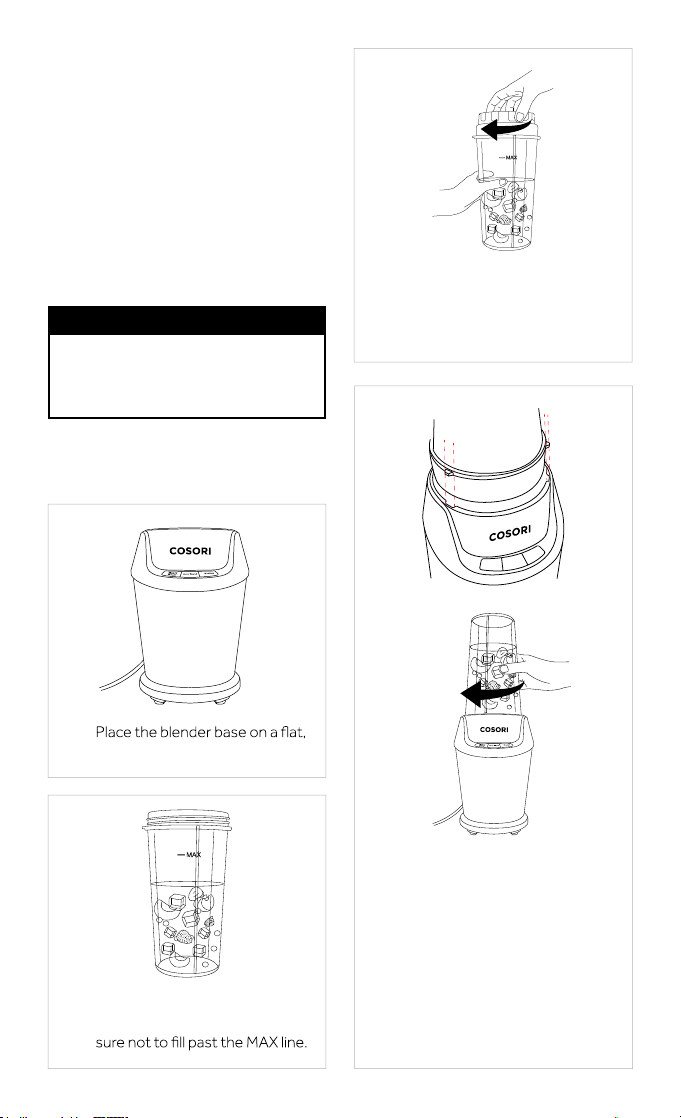
Operation
3. Screw on the the blade
assembly, making sure it
is secured tightly onto the
container.
1.
level surface.
2. Fill either the 24 oz. or 12 oz.
container with ingredients. Be
8
4. Place the container onto the
blender base, aligning the
tabs on the container with the
slots on the base. Lock the
container into place by twisting
it clockwise so that the tabs on
the container are secured to
the base. You will hear a clicking
sound that indicates the
container is secure.

5. Plug in the blender to a powered
electrical outlet. The blender will
beep, indicating that it is connected
to a power source.
6. Press the desired button to
start blending your ingredients.
9. Serve your culinary creation! Place
the travel lid on the container to take
your drink to-go, or place the storage
lid on the container to save for later.
10. Immediately clean the blade
assembly and container used to
blend food after each use.
NOTE:
• DO NOT operate the blender for
more than one minute at a time;
allow the blender to cool down for
at least 10 minutes when blending
multiple mixtures.
• DO NOT blend hot liquids.
• DO NOT attempt to remove the
container while the blender is
running.
• Although the blender is equipped
with suction cup feet, it is
recommended to hold the blender
steady with two hands for added
stability while blending mixtures.
7. Press the ‘Start/Stop’ button
once to stop the blender.
8. Unlock the container and
carefully remove the blade
attachment from the container.
9

Helpful Hints for
Care &
Blending
• Always make sure the blade
attachment is secured to the container
before blending.
• When making nut butters or oil based
foods, do not process for more than
one minute after the mixture starts
circulating. Over-processing can cause
the blender to overheat and possibly
malfunction.
• When blending cold drinks using ice
(i.e. margaritas or smoothies), it is
recommended that the ice cubes are
½ inch and there should be a 2:3 ratio
of ice to liquid. You can also use frozen
fruits as a replacement for ice to add
• Add liquids in small increments
until you have reached your desired
consistency. Adding too much liquid
can make your mixtures too runny,
while adding too little liquid will make
your mixtures too thick.
• Use the 12 ounce container for best
results when grinding food.
• Make sure to use no more than 3.5
ounces (100 g) of ingredients when
• If necessary, use a rubber spatula or a
wooden spoon to remove food from
the sides of the container. Make sure
blender from the electrical outlet
before using the spatula.
• Allow the blender to rest for at least 10
minutes in between uses when mixing
multiple mixtures.
Maintenance
1. After each use, rinse out any
remnants of the mixture with clean
water. If necessary, use a sponge or
soft-bristled cleaning brush to scrub
2.
mL) of warm water and a couple
drops of liquid dish detergent into
the container and reassemble the
blender with the blade assembly and
container.
3. Press the ‘Start/Stop’ button to turn
on the blender. Allow the blender to
run for about 10 seconds.
4.
container from the base and rinse
the container under running water.
5. If necessary, wipe down the base with
a damp clean cloth, then immediately
dry with a clean soft cloth. DO NOT
immerse the base in water or other
liquids to clean the blender.
6. Thoroughly dry all parts of the
blender, then reassemble the unit
again. Store the blender in a cool, dry
place.
NOTE:
• All parts of the blender, except for
the base, are dishwasher-safe. You
can also hand-wash the containers,
lids, and blade assembly.
• The blades are sharp. Always use
caution when cleaning the blade
assembly.
• Never use abrasive brushes or
cleaning pads on the any parts of
the blender.
10

Troubleshooting
Problem Cause Solution
Blender stops working
after long periods of
use.
Food spills out of
the container while
blending.
When blending on a
high speed, food does
not circulate or is
unevenly chopped.
Appliance cannot
turn on.
Food does not mix
well.
Food is chopped too
nely, or is too watery.
Blender does not
turn o after pressing
‘Start/Stop’.
Blender has overheated. Unplug the blender and allow
Blade assembly is not
secured properly.
There may be a trapped
air bubble inside of the
mixture.
The amount of food in the
blender exceeds the MAX
line.
Plug is loose. Make sure the plug is
Blade assembly is not
properly attached to the
base.
The wrong setting is being
used.
Food has been blended for
too long or too much liquid
has been added.
Unit is malfunctioning. Immediately unplug the
it to cool down for 10-20
minutes before blending.
Stop the blender, then make
sure the blade assembly is
properly attached.
Stop the blender and open up
the container. Use a rubber
spatula or wooden spoon to
mix ingredients, then resume
blending.
Reduce the amount of
ingredients in your cup by
pouring or scooping some of
the contents into a dierent
container.
connected properly to a
powered socket.
Make sure the blade
attachment is properly aligned
inside the housing.
Pulse ingredients for chopped
foods. Use the ‘Auto Blend’
feature or the ‘Start/Stop’
button to evenly blend foods.
Use short pulses for best
results.
blender and call customer
service.
11

Specifications
Power Supply: AC 120V / 60Hz
Rated Power: 800W
Max Capacity: 24 oz. (700 mL)
Dimensions (HxWxL): Blender Base: 7.9 x 5.2 x 5.9 in.
24 oz. Container: 7.6 x 4.1 in.
12 oz. Container: 5.2 x 4.1 x 6 in.
Warranty
Cosori warrants all products to be of the
highest quality in material, craftsmanship
and service for a minimum of 1 year,
Under the limited warranty, Cosori will
replace or refund any product found to
based on eligibility. Refunds will be issued
within 30 days of the date of purchase,
otherwise, Cosori will replace products
determined to be defective for the
remaining warranty period. This warranty
extends only to personal use and does
not extend to any product that has been
used for commercial use, rental use, or
any other use in which the product is not
intended for. There are no warranties
other than that expressly set forth with
each product. This warranty is nontransferrable. Cosori is not responsible
in any way for any damages, losses or
inconveniences caused by equipment
failure or by user negligence, abuse, or
use noncompliant with the user manual
or any additional safety, use, or warnings
included in the product packaging and
manual.
This warranty does not apply to the
following:
• Damage due to abuse, accident,
alteration, misuse, tampering or
vandalism.
• Improper or inadequate maintenance.
• Damage in return transit.
• Unsupervised use by children under 18
years of age.
Cosori and its subsidiaries assume no
liability for damage caused by the use of
the product other than for its intended
use or as instructed above and in the
user manual. Some states do not allow
this exclusion or limitation of incidental
or consequential losses so the foregoing
disclaimer may not apply to you. This
and you may also have other rights which
may vary from state to state.
Furthermore, Cosori is not liable for
incidental or consequential damages of
any nature resulting from the use of this
product.
12

Customer Support
Should you encounter any issues or
have any questions regarding your
new product, feel free to contact our
helpful Customer Support Team. Your
satisfaction is our goal!
CUSTOMER SUPPORT
Cosori Corporation
1202 N Miller St. Suite A
Anaheim, CA 92806
Phone: (888) 402-1684
Email: support@cosori.com
SUPPORT HOURS
Monday - Friday: 9:00 am - 5:00 pm PST
*Please have your order conrmation
number ready before contacting
customer support.
13

14


COSORI SUPPORT:
Mon - Fri 9:00 AM - 5:00 PM PST
(888) 402-1684 | support@cosori.com
16
 Loading...