

Page 1
CHILLER MODEL: CH1500, 2000 AND 3000
Operator’s & Installation Manual
Release Date: February 12, 2010
Publication Number: 621055837OPR
Revision Date: March 25, 2014
Revision: E
Visit the Cornelius web site at www.cornelius.com for all your Literature needs.
Page 2

The products, technical information, and instructions contained in this manual are subject to change without notice.
These instructions are not intended to cover all details or variations of the equipment, nor to provide for every possi
ble contingency in the installation, operation or maintenance of this equipment. This manual assumes that the person(s) working on the equipment have been trained and are skilled in working with electrical, plumbing, pneumatic,
and mechanical equipment. It is assumed that appropriate safety precautions are taken and that all local safety and
construction requirements are being met, in addition to the information contained in this manual.
This Product is warranted only as provided in Cornelius’ Commercial Warrant applicable to this Product and is subject to all of the restrictions and limitations contained in the Commercial Warranty.
Cornelius will not be responsible for any repair, replacement or other service required by or loss or damage resulting
from any of the following occurrences, including but not limited to, (1) other than normal and proper use and normal
service conditions with respect to the Product, (2) improper voltage, (3) inadequate wiring, (4) abuse, (5) accident,
(6) alteration, (7) misuse, (8) neglect, (9) unauthorized repair or the failure to utilize suitably qualified and trained per
sons to perform service and/or repair of the Product, (10) improper cleaning, (11) failure to follow installation, operating, cleaning or maintenance instructions, (12) use of “non-authorized” parts (i.e., parts that are not 100%
compatible with the Product) which use voids the entire warranty, (13) Product parts in contact with water or the
product dispensed which are adversely impacted by changes in liquid scale or chemical composition.
Contact Information:
To inquire about current revisions of this and other documentation or for assistance with any Cornelius product contact:
www.cornelius-usa.com
800-238-3600
-
-
Trademarks and Copyrights:
This document contains proprietary information and it may not be reproduced in any way without permission from
Cornelius.
This document contains the original instructions for the unit described.
CORNELIUS INC
101 Regency Drive
Glendale Heights, IL
Tel: + 1 800-238-3600
Printed in U.S.A.
Page 3

TABLE OF CONTENTS
Safety Instructions. . . . . . . . . . . . . . . . . . . . . . . . . . . . . . . . . . . . . . . . . . . . . . . . . . . . . . . . . . . . . . . . . 1
Read and Follow ALL Safety Instructions . . . . . . . . . . . . . . . . . . . . . . . . . . . . . . . . . . . . . . . . . . . . . 1
Safety Overview . . . . . . . . . . . . . . . . . . . . . . . . . . . . . . . . . . . . . . . . . . . . . . . . . . . . . . . . . . . . . . 1
Recognition . . . . . . . . . . . . . . . . . . . . . . . . . . . . . . . . . . . . . . . . . . . . . . . . . . . . . . . . . . . . . . . . . 1
Different Types of Alerts . . . . . . . . . . . . . . . . . . . . . . . . . . . . . . . . . . . . . . . . . . . . . . . . . . . . . . . . . . 1
Safety Tips . . . . . . . . . . . . . . . . . . . . . . . . . . . . . . . . . . . . . . . . . . . . . . . . . . . . . . . . . . . . . . . . . . . . . 1
Qualified Service Personnel. . . . . . . . . . . . . . . . . . . . . . . . . . . . . . . . . . . . . . . . . . . . . . . . . . . . . . . . 1
Safety Precautions. . . . . . . . . . . . . . . . . . . . . . . . . . . . . . . . . . . . . . . . . . . . . . . . . . . . . . . . . . . . . . . 2
Shipping And Storage . . . . . . . . . . . . . . . . . . . . . . . . . . . . . . . . . . . . . . . . . . . . . . . . . . . . . . . . . . . . 2
General Information. . . . . . . . . . . . . . . . . . . . . . . . . . . . . . . . . . . . . . . . . . . . . . . . . . . . . . . . . . . . . . . . 3
Introduction . . . . . . . . . . . . . . . . . . . . . . . . . . . . . . . . . . . . . . . . . . . . . . . . . . . . . . . . . . . . . . . . . . . . 3
Specifications . . . . . . . . . . . . . . . . . . . . . . . . . . . . . . . . . . . . . . . . . . . . . . . . . . . . . . . . . . . . . . . . 3
Specification Notes . . . . . . . . . . . . . . . . . . . . . . . . . . . . . . . . . . . . . . . . . . . . . . . . . . . . . . . . . . . 3
Location . . . . . . . . . . . . . . . . . . . . . . . . . . . . . . . . . . . . . . . . . . . . . . . . . . . . . . . . . . . . . . . . . . . . . . . 4
Electrical . . . . . . . . . . . . . . . . . . . . . . . . . . . . . . . . . . . . . . . . . . . . . . . . . . . . . . . . . . . . . . . . . . . . . . 4
Plumbing . . . . . . . . . . . . . . . . . . . . . . . . . . . . . . . . . . . . . . . . . . . . . . . . . . . . . . . . . . . . . . . . . . . . . . 5
Chiller with Reservoir . . . . . . . . . . . . . . . . . . . . . . . . . . . . . . . . . . . . . . . . . . . . . . . . . . . . . . . . . . 5
Chiller without Reservoir . . . . . . . . . . . . . . . . . . . . . . . . . . . . . . . . . . . . . . . . . . . . . . . . . . . . . . . 5
Start up . . . . . . . . . . . . . . . . . . . . . . . . . . . . . . . . . . . . . . . . . . . . . . . . . . . . . . . . . . . . . . . . . . . . . . . . . . 7
Water Flow Start Up. . . . . . . . . . . . . . . . . . . . . . . . . . . . . . . . . . . . . . . . . . . . . . . . . . . . . . . . . . . . . . 7
Chiller with Pump . . . . . . . . . . . . . . . . . . . . . . . . . . . . . . . . . . . . . . . . . . . . . . . . . . . . . . . . . . . . . 7
Chiller without Pump . . . . . . . . . . . . . . . . . . . . . . . . . . . . . . . . . . . . . . . . . . . . . . . . . . . . . . . . . . 7
Thermostat. . . . . . . . . . . . . . . . . . . . . . . . . . . . . . . . . . . . . . . . . . . . . . . . . . . . . . . . . . . . . . . . . . . . . 7
Standard Thermostat Eliwell IC902 . . . . . . . . . . . . . . . . . . . . . . . . . . . . . . . . . . . . . . . . . . . . . . . 7
Thermostat (Dual Set Point) . . . . . . . . . . . . . . . . . . . . . . . . . . . . . . . . . . . . . . . . . . . . . . . . . . . . . . . 8
Dual Point Adjustment . . . . . . . . . . . . . . . . . . . . . . . . . . . . . . . . . . . . . . . . . . . . . . . . . . . . . . . . . 8
Cooling Start Up. . . . . . . . . . . . . . . . . . . . . . . . . . . . . . . . . . . . . . . . . . . . . . . . . . . . . . . . . . . . . . . . . 8
Control Panel . . . . . . . . . . . . . . . . . . . . . . . . . . . . . . . . . . . . . . . . . . . . . . . . . . . . . . . . . . . . . . . . . . . 9
Maintenance . . . . . . . . . . . . . . . . . . . . . . . . . . . . . . . . . . . . . . . . . . . . . . . . . . . . . . . . . . . . . . . . . . . . . 10
Fluid Recommendations . . . . . . . . . . . . . . . . . . . . . . . . . . . . . . . . . . . . . . . . . . . . . . . . . . . . . . . . . 10
Safety Controls . . . . . . . . . . . . . . . . . . . . . . . . . . . . . . . . . . . . . . . . . . . . . . . . . . . . . . . . . . . . . . . . . . 11
High Pressure Control (HPC). . . . . . . . . . . . . . . . . . . . . . . . . . . . . . . . . . . . . . . . . . . . . . . . . . . 11
Low Temperature Control (LTC) . . . . . . . . . . . . . . . . . . . . . . . . . . . . . . . . . . . . . . . . . . . . . . . . 11
Low Pressure Control (LPC) . . . . . . . . . . . . . . . . . . . . . . . . . . . . . . . . . . . . . . . . . . . . . . . . . . . 11
Troubleshooting. . . . . . . . . . . . . . . . . . . . . . . . . . . . . . . . . . . . . . . . . . . . . . . . . . . . . . . . . . . . . . . . . . 12
Service . . . . . . . . . . . . . . . . . . . . . . . . . . . . . . . . . . . . . . . . . . . . . . . . . . . . . . . . . . . . . . . . . . . . . . . . . 14
Refrigeration Diagram . . . . . . . . . . . . . . . . . . . . . . . . . . . . . . . . . . . . . . . . . . . . . . . . . . . . . . . . . . . 14
Chiller Assembly . . . . . . . . . . . . . . . . . . . . . . . . . . . . . . . . . . . . . . . . . . . . . . . . . . . . . . . . . . . . . . . 15
Pump & Tank Assembly. . . . . . . . . . . . . . . . . . . . . . . . . . . . . . . . . . . . . . . . . . . . . . . . . . . . . . . . . . 17
Electrical Box Assembly. . . . . . . . . . . . . . . . . . . . . . . . . . . . . . . . . . . . . . . . . . . . . . . . . . . . . . . . . . 18
Wiring Diagram . . . . . . . . . . . . . . . . . . . . . . . . . . . . . . . . . . . . . . . . . . . . . . . . . . . . . . . . . . . . . . . . 19
Page 4

Page 5
CH1500, CH2000 & CH3000 Chiller Operator’s & Installation Manual
!
DANGER:
!
WARNING:
CAUTION:
!
!
WARNING:
!
SAFETY INSTRUCTIONS
READ AND FOLLOW ALL SAFETY INSTRUCTIONS
Safety Overview
• Read and follow ALL SAFETY INSTRUCTIONS in this manual and any warning/caution labels on the unit (decals, labels or
laminated cards).
• Read and understand ALL applicable OSHA (Occupational Safety and Health Administration) safety regulations before
operating this unit.
Recognition
Recognize Safety Alerts
This is the safety alert symbol. When you see it in this manual or on the unit,
be alert to the potential of personal injury or damage to the unit.
DIFFERENT TYPES OF ALERTS
Indicates an immediate hazardous situation which if not avoided WILL result in serious injury, death or equipment
damage.
Indicates a potentially hazardous situation which, if not avoided, COULD result in serious injury, death, or equipment
damage.
Indicates a potentially hazardous situation which, if not avoided, MAY result in minor or moderate injury or equipment
damage.
SAFETY TIPS
• Carefully read and follow all safety messages in this manual and safety signs on the unit.
• Keep safety signs in good condition and replace missing or damaged items.
• Learn how to operate the unit and how to use the controls properly.
• Do not let anyone operate the unit without proper training. This appliance is not intended for use by very young children or
infirm persons without supervision. Young children should be supervised to ensure that they do not play with the appliance.
• Keep your unit in proper working condition and do not allow unauthorized modifications to the unit.
QUALIFIED SERVICE PERSONNEL
Only trained and certified electrical, plumbing and refrigeration technicians should service this unit. ALL WIRING
AND PLUMBING MUST CONFORM TO NATIONAL AND LOCAL CODES. FAILURE TO COMPLY COULD
RESULT IN SERIOUS INJURY, DEATH OR EQUIPMENT DAMAGE.
© 2010-2014, Cornelius Inc. - 1 - Publication Number: 621055837OPR
Page 6

CH1500, CH2000 & CH3000 Chiller Operator’s & Installation Manual
!
WARNING:
CAUTION:
!
CAUTION:
!
SAFETY PRECAUTIONS
This unit has been specifically designed to provide protection against personal injury. To ensure continued protection
observe the following:
Disconnect power to the unit before servicing following all lock out/tag out procedures established by the user. Verify
all of the power is off to the unit before any work is performed.
Failure to disconnect the power could result in serious injury, death or equipment damage.
Always be sure to keep area around the unit clean and free of clutter. Failure to keep this area clean may result in
injury or equipment damage.
SHIPPING AND STORAGE
Before shipping, storing, or relocating the unit, the unit must be sanitized and all sanitizing solution must be drained
from the system. A freezing ambient environment will cause residual sanitizing solution or water remaining inside the
unit to freeze resulting in damage to internal components.
Publication Number: 621055837OPR - 2 - © 2010-2014, Cornelius Inc.
Page 7
CH1500, CH2000 & CH3000 Chiller Operator’s & Installation Manual
GENERAL INFORMATION
INTRODUCTION
Cornelius CH Series, Refrigerated Recirculating Water Chillers are designed to provide a continuous flow of clean
cooling water at a constant temperature and to handle a variety of closed loop and tank cooling applications.
The CH Series consists of a refrigeration system with associated operating controls housed in a sturdy sheet metal
cabinet. A standard pump and reservoir package provides a complete self-contained water cooling and circulating
system.
CH Series Chillers are designed to operate in a clean laboratory or industrial environment where ambient
temperatures range from 50
and provide a constant supply of cooling liquid to the application.
Specifications
The CH Series specifications are shown in Tab l e 1 .
Model CH1500 CH2000 CH3000
Cooling capacity, Watts/BTU/hr 5861/20000 7033/24000 9964/34000
Compressor 1.5 HP 2 HP 3 HP
Condenser Air Cooled
Temperature Controller
Pump
Reservoir (Capacity) 10 Gallons
Voltage (Full Load Amps)
Dimensions W x D x H (inches) 28 x 28 x 41
Inlet/Outlet Fitting Size 3/4-inch
o
F to 100o F. Once properly installed, CH Series Chillers run virtually maintenance free
Table 1.
o
Digital Display 40
1CS (10 GPM @ 35
PSI)
CH1502A 230/60/3 (10) CH2002A 230/60/3 (14) CH3002A 230/60/3 (18)
CH1503A 460/60/3 (5) CH2003A 460/60/3 (7) CH3003A 460/60/3 (9)
-100o F
2CS (12 GPM @ 50 PSI)
Specification Notes
1. The figures for power and cooling capacity are listed for air-cooled units with a circulation temperature of
68° F and ambient temperature of 80° F and standard pump.
2. Cooling capacity will be affected as follows: Derate 17% for 50 Hz operation. Derate 1% for each degree
Fahrenheit drop in recirculating temperature. Derate 0.5% for each degree Far en he it increase in ambient
temperature.
3. The operating water temperature range for water is 50°F (10
temperatures are required, the Technical Service Department must be contacted so the appropriate
ranges can be set.
4. All CH Series Chillers are thoroughly tested before leaving the factory to ensure that each unit meets these
specifications prior to shipment.
© 2010-2014, Cornelius Inc. - 3 - Publication Number: 621055837OPR
o
C) to 100°F (38°F). If uses of other fluids or
Page 8
CH1500, CH2000 & CH3000 Chiller Operator’s & Installation Manual
CAUTION:
!
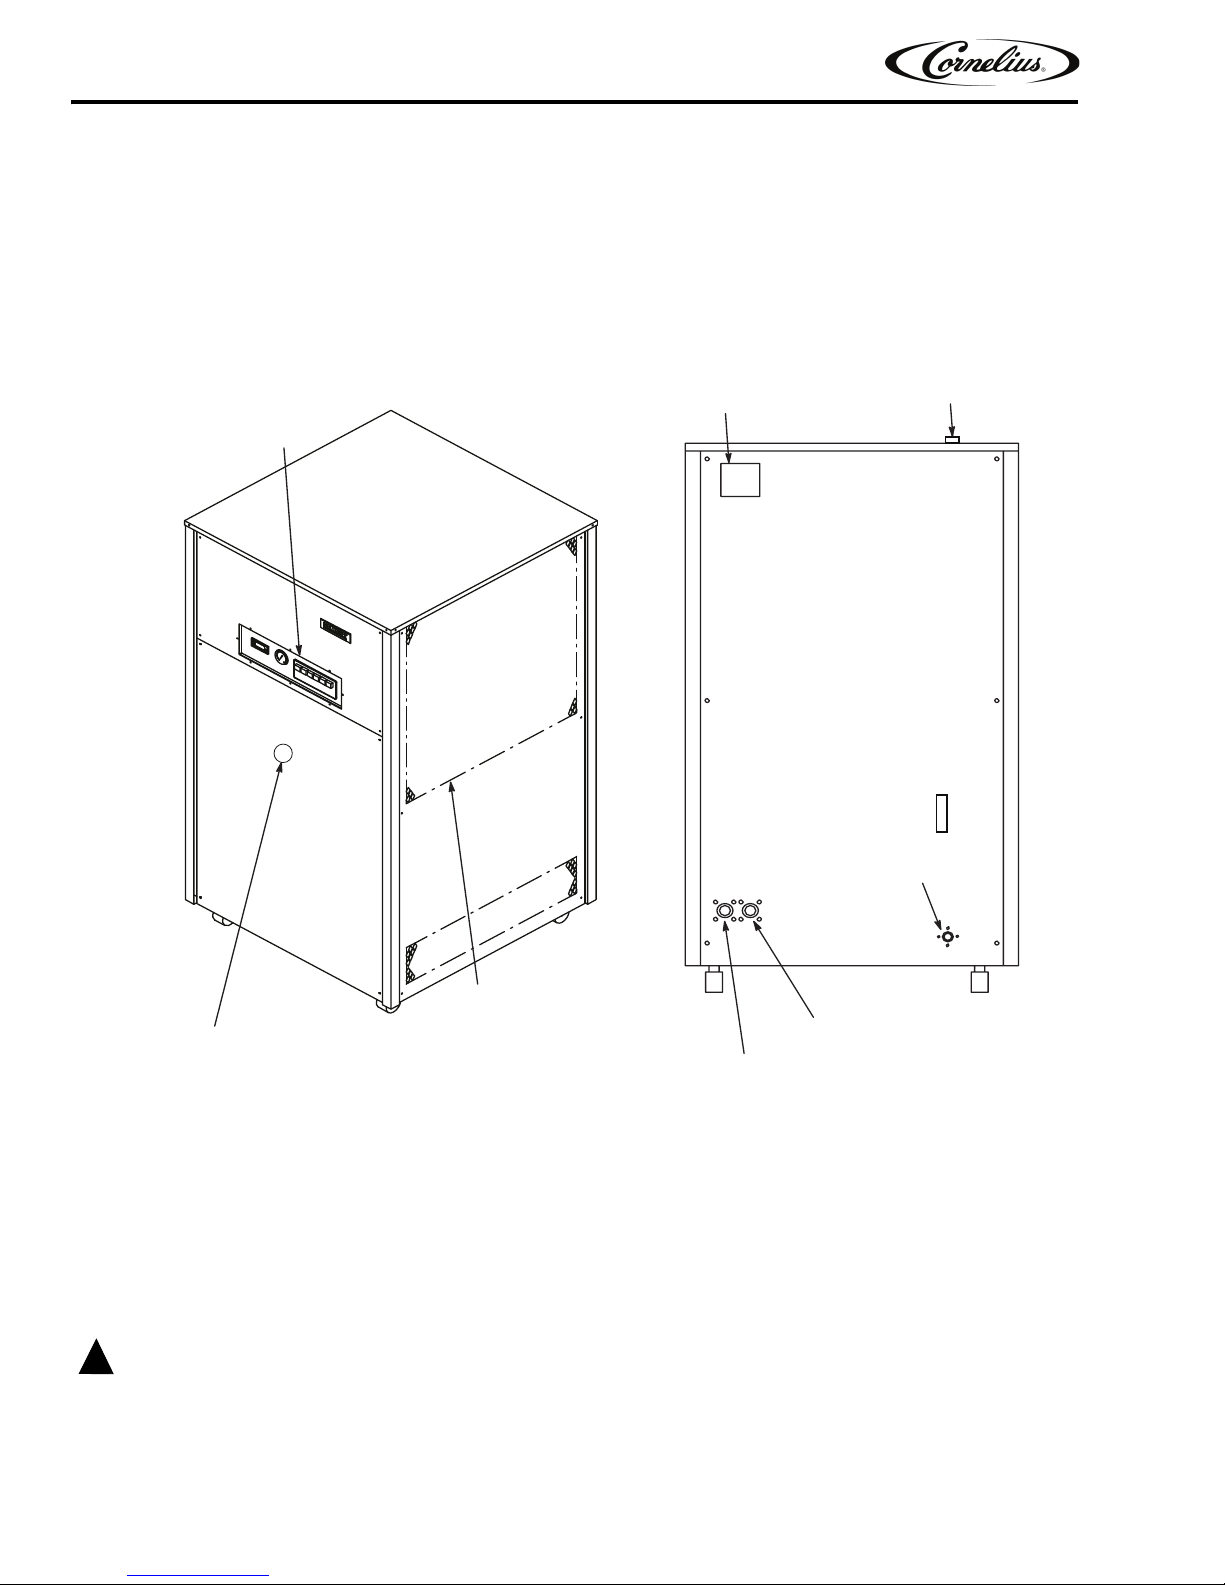
CONTROL PANEL
(SEE DETAIL)
PRESSURE GAUGE
AIR OUTLET
(AIR INLET ON
OPPOSITE SIDE)
WATER OUTLET
3/4 INCH
WATER INLET
3/4 INCH
ELECTRICAL JUNCTION BOX
TANK DRAIN
LEVEL SIGHT
GLASS
WATER FILL 3/4”
LOCATION
Install the Chiller indoors in a well ventilated area where ambient temperatures will never fall below 50o F or rise above
o
110
F. To obtain optimum cooling capacity, the ambient temperature should be 80o F or below.
Standard CH Chillers have air-cooled condensers. On air-cooled units it is important that the air intake and discharge
are not obstructed. Avoid hot air discharge from other equipment or enclosed areas where heat build-up could cause
a significant rise in ambient temperatures. A minimum of two feet of space on all four sides of the Chiller will be
sufficient to prevent obstruction.
ELECTRICAL
All wiring must conform to the National Electric Code and any applicable local codes. The chiller must be
PERMANENTLY wired by means of electrical conduit to a properly fused disconnect of proper amperage or wired to a
properly rated power cord and plugged into an outlet with the appropriate disconnect and amperage rating. The electrical
junction box located on the upper rear of the chiller, includes a four-terminal strip for power supply connections The DATA
PLATE, located beside the junction box, indicates the actual phase, voltage and amperage for each chiller.
On 3-phase applications, it is important that the rotation of the pump, when supplied, is correct. Running the pump in
reverse for more than a few seconds will result in permanent pump damage. When the pump is running, shaft rotation
must match the direction indicated on the pump housing. If the rotation is incorrect, reverse two of the three incoming
power supply leads. The Phase Protection/3-Phase Monitor Option prevents the pump from operating backwards.
See the option description.
Publication Number: 621055837OPR - 4 - © 2010-2014, Cornelius Inc.
Figure 1. Installation Details
Page 9

CH1500, CH2000 & CH3000 Chiller Operator’s & Installation Manual
RESERVOIR
LOW TEMP. CONTROL
FROM PROCESS
CHILLER INLET
EVAPORATOR
EVLAV SSAPYBPMUP
CHILLER OUTLET
TO PROCESS
CHILLER INLET
FROM PROCESS
EVAPORATOR
LOW TEMP. CONTROL
CHILLER OUTLET
TO PROCESS
BYPASS VALVE
PLUMBING
Follow standard plumbing practices and local codes in making water connections. The chiller inlet and outlet
connections are 3/4 inch. Flexible hoses and fittings are recommended for plumbing the system. A No. 20 mesh
strainer should be installed on the chiller inlet to prevent foreign particles from entering the system and should be
cleaned monthly (field installation, not provided with chiller). Lines should be routed with as few bends as possible.
Prevent lines from running near radiators, hot water pipes, etc. Any lengths of tubing that are exposed to high ambient
temperatures should be insulated to prevent condensation and/or significant liquid heat loss.
Chiller with Reservoir
The reservoir can be filled by removing the water fill cap located on the upper rear of the Chiller (See Fluid
Recommendations). After ensuring that the drain valve is closed, fill the reservoir via the full port with clean water until
the water level sight glass on the front of the unit indicates “FULL” the fill cap should then be reinstalled before
operation begins.
Chiller without Reservoir
The chiller and system piping should be filled with clean water or proper fluid ensuring that all air is purged from the
system.
Figure 2. Chiller Plumbing Schematic with Pump and Tank (Standard)
© 2010-2014, Cornelius Inc. - 5 - Publication Number: 621055837OPR
Figure 3. Chiller Plumbing Schematic, no Tank (Option)
Page 10

CH1500, CH2000 & CH3000 Chiller Operator’s & Installation Manual
CHILLER INLET
FROM PROCESS
EVAPORATOR
TELTUO RELLIHCLORTNOC .PMET WOL
TO PROCESS
Figure 4. Chiller Plumbing Schematic, no Pump, no Tank (Option)
Publication Number: 621055837OPR - 6 - © 2010-2014, Cornelius Inc.
Page 11

CH1500, CH2000 & CH3000 Chiller Operator’s & Installation Manual
START UP
WATER FLOW START UP
Chiller with Pump
It is important to check the pump rotation on the three phase units. Remove the lower side panel to expose the pump.
Turn the pump power switch to the “ON” position for a few seconds. Observe the motor shaft to ensure that it is turning
in the direction indicated by the arrow located on the pump housing. If the rotation is incorrect, reverse two of the three
incoming power supply leads at the terminal strip. After changing the leads, check the pump rotation again.
NOTE: Running the pump in reverse for more than a few seconds will result in permanent pump dam-
e.
ag
After ensuring that the system piping is f
to the “ON” position (press in). The pump power indicator should illuminate, indicating that the pump is operating.
ree from obstruction and that all valves are open, turn the pump power switch
All chillers with pumps are provided with a pressure regulating v
the factory to ensure that system pressure does not exceed the capabilities of the pump motor and/or piping.
If this valve requires adjustment, please contact the factor
and throttling valve can be added in the chiller inlet line in order to monitor and/or adjust the flow rate through the
chiller.
Once the flow has been established, the thermostat can be adjusted to the desired set-point.
alve on the pump discharge. This valve is preset at
y for proper setting procedure and pressures. A flow meter
Chiller without Pump
A flow meter and throttling valve can be added in the chiller inlet line in order to monitor and/or adjust the flow rate
through the chiller.
Once the flow has been established, the thermostat can be adjusted t
adjustment.
o the desired set-point. See thermostat
THERMOSTAT
(Temperature Controller)
Standard Thermostat Eliwell IC902
The following procedure should be followed to adjust the Eliwell IC902 thermostat temperature setting:
1. To set the “SET POINT”, press and
2. Press the “set” button again, the current “SET POINT” will display. Press the “UP” or “DOWN” button to
change the “SET POINT” to the desired temperature.
3. Press the “fnc” button twice to exit the program; the current liquid temperature will be displayed.
The thermostat has a range that has been preset at the factory. The range is 40
operation outside of this range is required, please contact the Technical Service Department.
release the “SET” button, “set” will display.
o
F (5o C) to 100o F (38o C). If
© 2010-2014, Cornelius Inc. - 7 - Publication Number: 621055837OPR
Figure 5. Eliwell IC902 Standard Thermostat
Page 12

CH1500, CH2000 & CH3000 Chiller Operator’s & Installation Manual
TEMP.
HIGHCONTROL
POWER
COOLING
PRESSURE PRESSURE
LOWLOW
POWER
PUMP
2 & 3
8 & 9
6
5
7
4
THERMOSTAT (DUAL SET POINT)
Dual Point Adjustment
1. To set the “SET POINT” for Level 1, press and release the “SET” button, Re1 should be displayed.
2. Press the “SET” button again, the current SET POINT TEMPERATURE should be displayed. Press the UP
or DOWN button to change the SET POINT.
3. To set the “SET POINT” for Level 2, press and release the “SET” button. Re2 should be displayed.
4. Press the “SET” button, the current SET POINT TEMPERATURE should be displayed. Press the UP or
DOWN button to change the SET POINT.
5. Press the fnc button to exit the program.
o
The thermostat has a range that has been preset at the factory. The range is 40
operation outside of this range is required, please contact the Technical Service Department.
F (5o C) to 100o F (38o C). If
Figure 6. Eliwel IC 915 Dual Point Thermostat
COOLING START UP
Once flow is established and the thermostat is set to the desired set-point, turn the control power switch to “ON”
(press in). All alarm indicators should be extinguished and the Chiller refrigeration system will cycle in order to
maintain the established set-point.
The refrigeration system is furnished with a Hot Gas Bypa
temperature tolerance by cycling the Hot Gas Bypass Solenoid (Compressor, Fan Motor and Circulating pump run
continuously).
Re-check the reservoir level to ensure that it is “FULL” (if so equipped)
The chiller is now ready for normal operation.
ss system that maintains the set-point within 1o F
and add water or proper fluid if necessary.
Publication Number: 621055837OPR - 8 - © 2010-2014, Cornelius Inc.
Figure 7.
Page 13

CH1500, CH2000 & CH3000 Chiller Operator’s & Installation Manual
CONTROL PANEL
1. TEMPERATURE INDICATOR/CONTROLLER (Thermostat) - Combines a precise temperature control
and accurate set ability with a convenient LED temperature readout that indicates system liquid temperature.
2. CONTROL POWER SWITCH - A simple (Push Button) switch with light indicator that switches power to
the control circuit (White). This switch must be “pressed in” for the Chiller to operate.
3. COOLING LIGHT - A green light that indicates refrigeration system operation. This light cycles on and off
in response to the thermostat.
4. HIGH PRESSURE ALARM LIGHT - A red light that indicates high refrigeration pressure.
5. LOW PRESSURE ALARM LIGHT - A red light that indicates low refrigeration pressure.
6. LOW TEMPERATURE ALARM LIGHT - A red light that indicates and abnormally low system fluid tempera-
ture.
7. PUMP POWER SWITCH (OPTIONAL) - A simple (Push Button) switch with a light indicator that switches
power to the chiller pump (White). This switch must be “pressed in” for the chiller to operate.
© 2010-2014, Cornelius Inc. - 9 - Publication Number: 621055837OPR
Page 14

CH1500, CH2000 & CH3000 Chiller Operator’s & Installation Manual
!
WARNING:
MAINTENANCE
Disconnect power to the unit before servicing. Follow all lock out/tag out procedures established by the user. Verify all
power is off to the unit before performing any work.
Failure to comply could result in serious injury, death or damage to the equipment.
The chiller requires very little normal maintenance.
1 On air-cooled chillers, the condenser fins should be cleaned by blowing compressed air through the con-
denser from the fan side as required to eliminate any dirt or debris that may accumulate over time. This can
severely reduce the performance of the chiller. Cleanable air filters are available as an option. Contact the
Technical Service Department for information.
2 On AIR-COOLED Chillers the condenser fan motor should be lubricated every 6–month with a few drops of
SAE10 oil.
3 The circulation system should be drained and flushed periodically to avoid build-up and possible restriction
of flow by contaminates.
4 The strainer at the Chiller inlet should be removed and cleaned monthly (field installed).
FLUID RECOMMENDATIONS
Chillers are designed to operate with water to provide maximum performance for temperatures of 50o F – 100o F.
Table 2.
Distilled Water Acceptable
De-Ionized Water (1-5 MEG/OHMS) Acceptable
De-Ionized Water (5+ MEG/OHMS)
Propylene Glycol (Lab & Industrial Grade)
Lab & Industrial Grade Ethylene Glycol
Mineral/Hydraulic Oils (Viscosity < 50 Centistrokes) Acceptable
Ethylene Glycol (Commercial/Automotive Anti-freeze)
Acidic/Basic Solutions (Above & below 6 PH) Not Acceptable
Mineral/Hydraulic Oils (Viscosity > 50 Centistrokes) Not Acceptable
For questions regarding special or other fluids contact Cornelius at 800-238-3600
To purchase lab or industrial glycol contact: Cornelius (800) 551-4423 - Part # 111521000, 5 Gal.
Acceptable with Stainless Steel & PVC only
*No Copper or Brass
Acceptable - 30% Glycol/70% Water
*For Applications with temperatures below 40
Acceptable - 30% Glycol/70% Water
*For Applications with temperatures below 40
NOT Acceptable
*Silicate Rust Inhibitors in automotive/commercial antifreeze damages pump seals and housing which lead to
failure.
o
F
o
F
Publication Number: 621055837OPR - 10 - © 2010-2014, Cornelius Inc.
Page 15

CH1500, CH2000 & CH3000 Chiller Operator’s & Installation Manual
SAFETY CONTROLS
Each chiller is provided with three standard safety controls. There controls are arranged in series in the control circuit
to automatically shut down the unit in the event that a condition exists which could be harmful to the refrigeration
system components.
High Pressure Control (HPC)
This control prevents system operation in the event that the high side pressure exceeds 250 PSIG. If this occurs,
check the following:
1 That the condenser and condenser air filter are clean and that the air inlets and outlets are unobstructed.
o
2 That the ambient temperature at the chiller location is below 110
3 That the fan blade is rotating.
Press the reset button located on the front of the High Pressure Control to restart the chiller. This control is
mounted in the lower left hand corner of the electrical box. If the control opens again, check the control setting with refrigeration gauges. If the setting is correct, contact the Technical Service Department.
Low Temperature Control (LTC)
This control prevents system operation in the event that the fluid inside the evaporator falls below 35o F. If this occurs,
check the following:
F.
1 That the thermostat set point is set at 40o F or greater.
2 That the flow through the system is greater than two gallons per minute.
This control is mounted in the lower left hand corner of the electrical box. It automatically resets itself once
the water temperature is restored to 38°F. The low temperature control may be adjusted for lower temperatures if a glycol solution is used. Contact the Technical Service Department for temperatures below those
stated here. Also see Fluid Recommendations on page .
Low Pressure Control (LPC)
This control prevents system operation in the event that the low side pressure falls below 21 PSI. If this occurs, check
the following:
1 That the thermostat set point is set at 40o F or greater.
2 That the flow through the system is greater than two gallons per minute.
3 That no bubbles are present in the sight glass.
4 That the water bypass valve allows flow through the chiller in a “dead head” situation.
This control is located to the right of the high pressure control in the electrical box. It automatically resets
itself once the low side pressure rises to approximately 41 PSI. If the control opens again, check the control setting with refrigeration gauges. If setting is correct, contact the Technical Service Department.
© 2010-2014, Cornelius Inc. - 11 - Publication Number: 621055837OPR
Page 16

CH1500, CH2000 & CH3000 Chiller Operator’s & Installation Manual
!
WARNING:
TROUBLESHOOTING
IMPORTANT: Only qualified personnel should service internal components or electrical wiring.
Disconnect power to the unit before servicing. Follow all lock out/tag out procedures established by the user. Verify all
power is off to the unit before performing any work.
Failure to comply could result in serious injury, death or damage to the equipment.
Trouble Probable Cause Remedy
Chiller does not operate, Control
Power Light O FF.
Pump does not operate. Pump
power light “OFF”.
Pump does not operate. Pump
power light “ON”.
A. Control Power Switch “OFF”.
B. No power.
C. Defective power supply connection.
D. Defective Control Power Switch
E. Defective Control Transformer
A. Pump power switch “OFF”.
B. Defective pump power switch.
C. Defective control transformer.
A. No water in reservoir.
B. Restriction in the line to or from the
chiller.
C. Open or defective pump overload
relay.
D. Defective pump contactor.
E. Defective pump motor or damaged
impeller.
A. Turn the Control Power Switch to the
“ON” position.
B. Check the fuse or circuit breaker.
C. Check wiring and correct loose or
poor connections.
D. Replace the switch.
E. Replace the transformer.
A. Turn the pump power switch to the
“ON” position.
B. Replace the switch.
C. Replace the transformer.
A. Fill reservoir.
B. Remove restriction.
C. Manually reset the relay or replace if
necessary and check amp setting on
overload.
D. Replace the pump contactor.
E. Replace the pump or impeller.
Chiller does not cool. Cooling
light “OFF”
Chiller does not operate. Cooling light “ON”. (low pressure
alarm light cycles on/off)
Publication Number: 621055837OPR - 12 - © 2010-2014, Cornelius Inc.
A. Defective thermostat A. Replace thermostat
A. Process water too cold
B. Low process water flow.
C. Defective expansion valve.
D. Refrigerant loss.
E. Water bypass valve failed.
F. Defective pump.
A. Increase the thermostat setting.
B. Ensure that there is adequate flow
through the process piping.
C. Replace the expansion valve.
D. Check the sight glass. If bubbles are
seen flowing through it, the chiller
needs to be leak tested and
recharged with refrigerant.
E. Consult technical service depart-
ment.
F. Replace pump.
Page 17

CH1500, CH2000 & CH3000 Chiller Operator’s & Installation Manual
High pressure alarm light “ON”.
(Low pressure alarm light cycles
ON/OFF).
High pressure alarm light is
“ON”.
Low temperature alarm.
A. Restricted condenser airflow.
B. Defective condenser fan and/or
motor.
C. Defective expansion valve.
D. Low or no condenser water flow.
A. Restricted condenser airflow.
B. Defective condenser fan and/or
motor.
C. Defective expansion valve.
D. Low or no condenser water flow.
A. Low or no process liquid flow.
B. Defective thermostat.
C. Process water too cold, below 35
A. Clean the fins of the condenser and
ensure that the air flow is not
restricted.
B. Check to ensure that the fan blade is
not blocked. Replace the fan motor, if
necessary.
C. Replace the expansion valve.
D. Ensure that there is adequate flow
through piping to condenser.
A. Clean the fins of the condenser and
ensure that the air flow is not
restricted.
B. Check to ensure that the fan blade is
not blocked. Replace the fan motor, if
necessary.
C. Replace the expansion valve.
D. Ensure that there is adequate flow
through piping to condenser.
A. Ensure that there is adequate flow
through the process piping.
B. Replace the thermostat.
C. Increase the thermostat setting.
° F
© 2010-2014, Cornelius Inc. - 13 - Publication Number: 621055837OPR
Page 18

CH1500, CH2000 & CH3000 Chiller Operator’s & Installation Manual
REMCOR PRODUCTS COMPANY
GL E NDA L E HE I G HT S , I L . 60139--2268
MODEL NO. SERIAL NO.PA R T N O .
VOLTS AMPS
R134AHZ PH
MADE IN U.S.A.
BAR CODE
®
TXV E QUALIZER
LINE
TXV S ENS ING
BULB
TXV
EVAPOR ATOR
COMPRESSOR
LOWPRESSURE
SWITCH
HIGH PRESSURE
SWITCH
SIGHT GLASS
FILTER/DRIER
LIQUID
RECEIVER
CONDENSER
LIQUID LINE
SOLENOID VALVE
HOT GAS BYPASS
VALVE
SERVICE
When servicing this Chiller, it is important to note the information contained on the data plate located in the upper rear
of the unit.
If technical assistance is needed, the phone technician will need the Model and Serial Number of your chiller. That
information is found on the data plate.
The Model and Serial Number are also needed when ordering replacement parts.
REFRIGERATION DIAGRAM
Figure 7. Unit Data Label
Figure 8. Refrigeration Piping Schematic with Hot Gas Bypass
Publication Number: 621055837OPR - 14 - © 2010-2014, Cornelius Inc.
Page 19

CHILLER ASSEMBLY
1
3
27
5
6
7
8
9
10
11
12
13
14
15
16
17
18
19
20
21
22
23
25
26
4
10
28
CH1500, CH2000 & CH3000 Chiller Operator’s & Installation Manual
Item
No.
1 22949 1/2” FPT Coupling
2 27866
3 28320 Dual Gray Cover
4 620049516 Side Panel Left
5 28321R Rear Panel
Part No. Name
Thermowell, Low Temp. Thermostat (Not Shown)
6 620049514 Upper Front Panel
7 28282R Lower Front Panel
8 6200498515 Lid
9 27585R Control Panel
10 22870 FPT Coupling
32386 Digital Thermostat
11
33319 Control Temp Dual Set Point
12 32989 Electric Box Assembly
13 31299 Fan
Figure 10. Chiller Exploded View
Item
No.
31298 Motor Fan 230Volt
14
31698 Motor Fan 460Volt CH3000
15 620311601 Switch Push Button
16 620311605 Red Indicator
17 620311606 Green Indicator
620049520
620049393
18
620050959 Comp 3HP 230 Volts CH3000
620054174 COMP- 3HP 460Volts CH3000
19 325577010 Accumulator
20 60686 Filter/Drier
620049394 Valve TXV For Chillers CH1500
21
620050960
Part No. Name
Comp Danfoss MTZ 028 1.5HP
CH1500
Comp- Danfoss MTZ 032 2HP
CH2000
Valve TXV (TUBE #8) Danfoss
CH3000
© 2010-2014, Cornelius Inc. - 15 - Publication Number: 621055837OPR
Page 20

CH1500, CH2000 & CH3000 Chiller Operator’s & Installation Manual
Item
No.
22
23
25 60685 Receiver
26 70893 Caster
27 620049517 Panel Right Side
Part No. Name
61083 Evapr Asy CH1500
60985 Evap Asy Foamed CH2000
61085 Evap Asy CH3000
61089 Condenser
60983 Cond CH2000
61090 Cond CH3000 Air Cool
Item
No.
28 70923 Handle Removable Panel
NS
NS
Part No. Name
61083Q9171 Cond-Asy Foamed CH1500
60985 Evap Asy Foamed CH2000
61085 Evap Asy Foamed CH3000
40122 Valve Water Reg
40199 Valve Water Regulating CH3000
* Call the Technical Service Department for
proper panel.
Publication Number: 621055837OPR - 16 - © 2010-2014, Cornelius Inc.
Page 21

PUMP & TANK ASSEMBLY
1
2
3
4
5
CH1500, CH2000 & CH3000 Chiller Operator’s & Installation Manual
Table 4. Pump & Tank Components
Item No. Part No. Name
15404R Thermowell, Temperature Control
1
32589 Temperature Probe
2
© 2010-2014, Cornelius Inc. - 17 - Publication Number: 621055837OPR
* Call the Service Dept. for proper pump identification.
51096 Tank Assembly
3
620408104 Pump
4
620710601 Pump CH2000, CH3000
40646 Valve By-Pass
5
Figure 11. Pump & Tank Exploded View
Page 22

CH1500, CH2000 & CH3000 Chiller Operator’s & Installation Manual
1
2
3
4
5
6
7
ELECTRICAL BOX ASSEMBLY
Figure 12. Electrical Box Assemby, Exploded View
Table 6. Electrical Box Assembly
Item
No.
1
31001 Low Temperature Thermostat
2 32804 Control Transformer
3 32992 Contactor, Compressor
4 60501 High Pressure Control
5 60502 Low Pressure Control
6 620314008 Contactor, Pump
620314002 Overload Relay, 1.0 to 1.4A
620314003 Overload Relay, 1.3 to 1.8A
7
620314005 Overload Relay, 2.2 to 3.1A
620314006 Overload Relay, 2.8 to 4.0A
620314007 Overload Relay, 4.5 to 6.5A
Part No. Name
Publication Number: 621055837OPR - 18 - © 2010-2014, Cornelius Inc.
Page 23

WIRING DIAGRAM
CH1500, CH2000 & CH3000 Chiller Operator’s & Installation Manual
© 2010-2014, Cornelius Inc. - 19 - Publication Number: 621055837OPR
Figure 10.
Page 24

CH1500, CH2000 & CH3000 Chiller Operator’s & Installation Manual
Publication Number: 621055837OPR - 20 - © 2010-2014, Cornelius Inc.
Page 25

Page 26

Cornelius Inc.
www.cornelius.com
 Loading...