

Page 1

Focus 3R
¼ to 5HP Single Phase
Bi-Directional
Regenerative DC Drive
Page i
Page 2

General Information
The manufacturer accepts no liability for, negligent or incorrect installation or adjustment
of the optional operating parameters of the equipment or from mismatching the variable
speed drive with the motor.
The contents of this User Guide are believed to be correct at the time of printing. In the
interests of a commitment to a policy of continuous development and improvement, the
manufacturer reserves the right to change the specifications of the product or its
performance, or the contents of the User Guide, without notice.
All rights reserved. No parts of this User Guide may be reproduced or transmitted in any
form or by any means, electrical or mechanical, without permission in writing from
Control Techniques.
Page ii
Page 3

Customer Support
Control Techniques
359 Lang Boulevard, Building B
Grand Island, New York 14072
U.S.A. Telephone: (716) 774-1193
It is Control Techniques’ goal to ensure your greatest possible satisfaction with the
operation of our products. We are dedicated to providing fast, friendly, and accurate
assistance. That is why we offer you so many ways to get the support you need.
Whether it’s by phone, fax or modem, you can access Control Techniques support
information 24 hours a day, seven days a week. Our wide range of services include:
Fax (716) 774-8327
You can FAX questions and comments to Control Techniques Just send a FAX to the
number listed above.
Website and Email www.emersonct.com
Website: www.emersonct.com
Email: info@emersonct.com
If you have Internet capabilities, you also have access to technical support using our
website. The website includes technical notes, frequently asked questions, release
notes and other technical documentation. This direct technical support connection lets
you request assistance and exchange software files electronically.
Technical Support (716) 774-1193 or (800) 893-2321
Email: pdtechsupport@emersonct.com
Control Techniques’ products are backed by a team of professionals who will service
your installation. Our technical support center in Grand Island New York is ready to help
you solve those occasional problems over the telephone. Our technical support center
is available 24 hours a day for emergency service to help speed any problem solving.
Also, all hardware replacement parts, if needed, are available through our customer
service organization.
When you call, please be prepared to provide the following information:
The type of controller or product you are using
What you were doing when the problem occurred
How you tried to solve the problem
Need on-site help? Control Techniques provides service, in most cases, the next day.
Just call Control Techniques’ technical support center when on-site service or
maintenance is required.
Customer Service (716) 774-1193 or (800) 367-8067
Email: customer.service@emersonct.com
Authorized Control Techniques distributors may place orders directly with our Customer
Service department. Contact the Customer Service department at this number for the
distributor nearest you.
Page iii
Page 4

“Warning” indicates a potentially hazardous situation that, if
not avoided, could result in death or serious injury.
“Caution” indicates a potentially hazardous situation that, if
not avoided, may result in minor or moderate injury.
“Caution” used without the safety alert symbol indicates a
potentially hazardous situation that, if not avoided, may result in property
damage.
Page iv
Page 5

Safety Considerations
Safety Precautions
This product is intended for professional incorporation into a complete system. If
you install the product incorrectly, it may present a safety hazard. The product
and system may use high voltages and currents, carry a high level of stored
electrical energy, or are used to control mechanical equipment that can cause
injury.
You should give close attention to the electrical installation and system design to
avoid hazards either in normal operation or in the event of equipment
malfunction. System design, installation, commissioning and maintenance must
be carried out by personnel who have the necessary training and experience.
Read and follow this safety information and instruction manual carefully.
Enclosure
This product is intended to be mounted in an enclosure that prevents access
except by trained and authorized personnel and prevents the ingress of
contamination. This product is designed for use in an environment classified as
pollution degree 2 in accordance with IEC664-1. This means that only dry, nonconducting contamination is acceptable.
Setup, Commissioning and Maintenance
It is essential that you give careful consideration to changes to drive settings.
Depending on the application, a change could have an impact on safety. You
must take appropriate precautions against inadvertent changes or tampering.
Restoring default parameters in certain applications may cause unpredictable or
hazardous operation.
Safety of Machinery
Within the European Union all machinery in which this product is used must
comply with Directive 89/392/EEC, Safety of Machinery.
The product has been designed and tested to a high standard, and failures are
very unlikely. However the level of integrity offered by the product’s control
function – for example stop/ start, forward/reverse and maximum speed – is not
sufficient for use in safety-critical applications without additional independent
channels of protection. All applications where malfunction could cause injury or
loss of life must be subject to a risk assessment, and further protection must be
provided where needed.
Page v
Page 6

General warning
Failure to follow safe installation guidelines can cause death or serious injury. The
voltages used in this unit can cause severe electric shock and/or burns, and could be
lethal. Extreme care is necessary at all times when working with or adjacent to this
equipment. The installation must comply with all relevant safety legislation in the country
of use.
AC supply isolation device
The AC supply must be removed from the drive using an approved isolation device or
disconnect before any servicing work is performed, other than adjustments to the
settings or parameters specified in the manual. The drive contains capacitors, which
remain charged to a potentially lethal voltage after the supply has been removed.
Grounding (Earthing, equipotential bonding)
The drive must be grounded by a conductor sufficient to carry all possible fault current
in the event of a fault. The ground connections shown in the manual must be followed.
Fuses
Fuses or over-current protection must be provided at the input in accordance with the
instructions in the manual.
Isolation of control circuits
The installer must ensure that the external control circuits are isolated from human
contact by at least one layer of insulation rated for use at the applied AC supply voltage.
Page vi
Page 7

Page 8

Table of Contents
Topic Page
Introduction 4
Motor Compatibility 5
Basic Control Modes/Feedback 6
Armature Voltage Feedback 6
Speed or Tach Feedback 6
Quick Stops 6
Receiving, Inspection, Storing 7
Performance Features 8
Nameplate Information 9
Nameplate Location 9
Catalog Number Definition 9
Specifications
Ratings Table 10
Performance Specifications 11
Operating Conditions 11
Internal Adjustments (Potentiometer) 11
Customer Selections (Jumpers) 11
Operator Functions 12
Control Circuit Specifications 12
Options 12
Dimensions 13-14
Option Kits & Descriptions 15-19
Customer Connections & Start-Up
Start-Up Guidelines 20
Incoming Power Requirements 21
Grounding 21
Motor Wiring 21-22
When viewing this document electronically, the Table of Content items
are active and will direct you to that topic by clicking on that item.
Page 2
Page 9

Table of Contents
Topic Page
Power Wiring 23-24
Control Wiring 25-32
Speed Pot Wiring 33
Customer Selections
Jumper Programming 34-38
Current Ranges 35
Current/Torque Control 35
LED Status Indicators 39
Potentiometer Adjustments 40-46
Basic Adjustments 41-42
Tuning Adjustments 43-44
Interconnect Drawings
Functional Block Diagram 48
Non-Regen Circuit Overview 49
Start-up Guide Worksheet 50-52
Initial Start-Up & Basic Test Setups 53
Installation of Option Kits 53
Motor Test 54-56
Trouble Shooting Guide 56-59
Light Bulb Test 61-62
Retrofitting Focus 3 to Focus 2 Applications 63-65
Application Notes 66
Tachometer Follower Application 67-68
Spare Parts 70
When viewing this document electronically, the Table of Content items
are active and will direct you to that topic by clicking on that item.
Page 3
Page 10
Introduction
This is the User’s Guide for Focus 3R (Regenerative) series of DC Drives. The Focus 3 is
a 3rd generation product of the long-standing Focus series. The Focus 1 was introduced back
in 1980 and the Focus 2 later in 1982. The Focus 2 was retired when the Focus 3 was
introduced as it took advantage of many technological advances in power electronics. The
Focus 3 Regen is a single-phase, bi-directional analog drive for DC motors with power ranges
from ¼ to 5HP.
Your Focus 3R is a general purpose regenerative DC motor speed controller that is
powered from either 115Vac or 230Vac single phase power. A regenerative (four quadrant)
drive is one that can provide motoring and regenerating torque for acceleration and deceleration
to overcome rated loads. There are a great many applications where regenerative drives
provide the most economical solution. A regenerative drive can slow down a motor faster than
the motors normal coasting rate and can stop overhauling load situations.
Both drives incorporate many features that are standard on high performance system
drives, such as dynamic stability and built-in signal follower adjustments. Focus 3 drives come
in two basic model variations- with and without enclosure
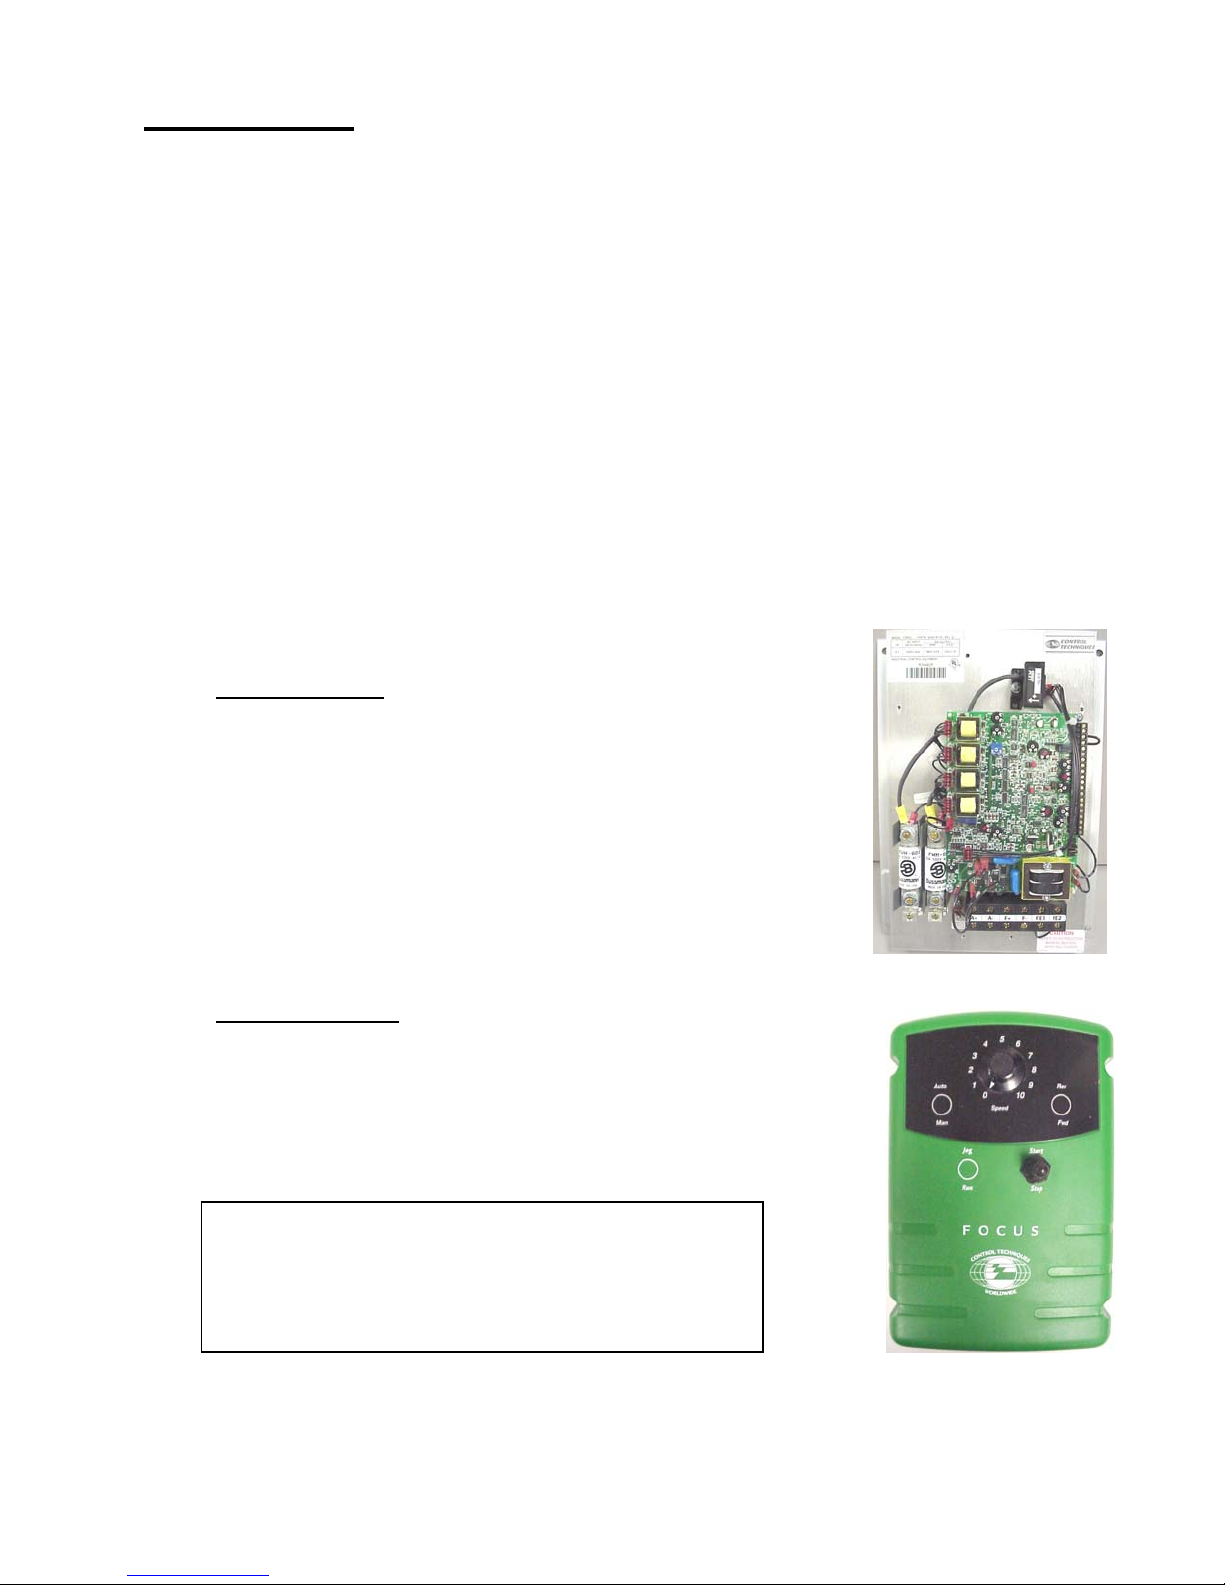
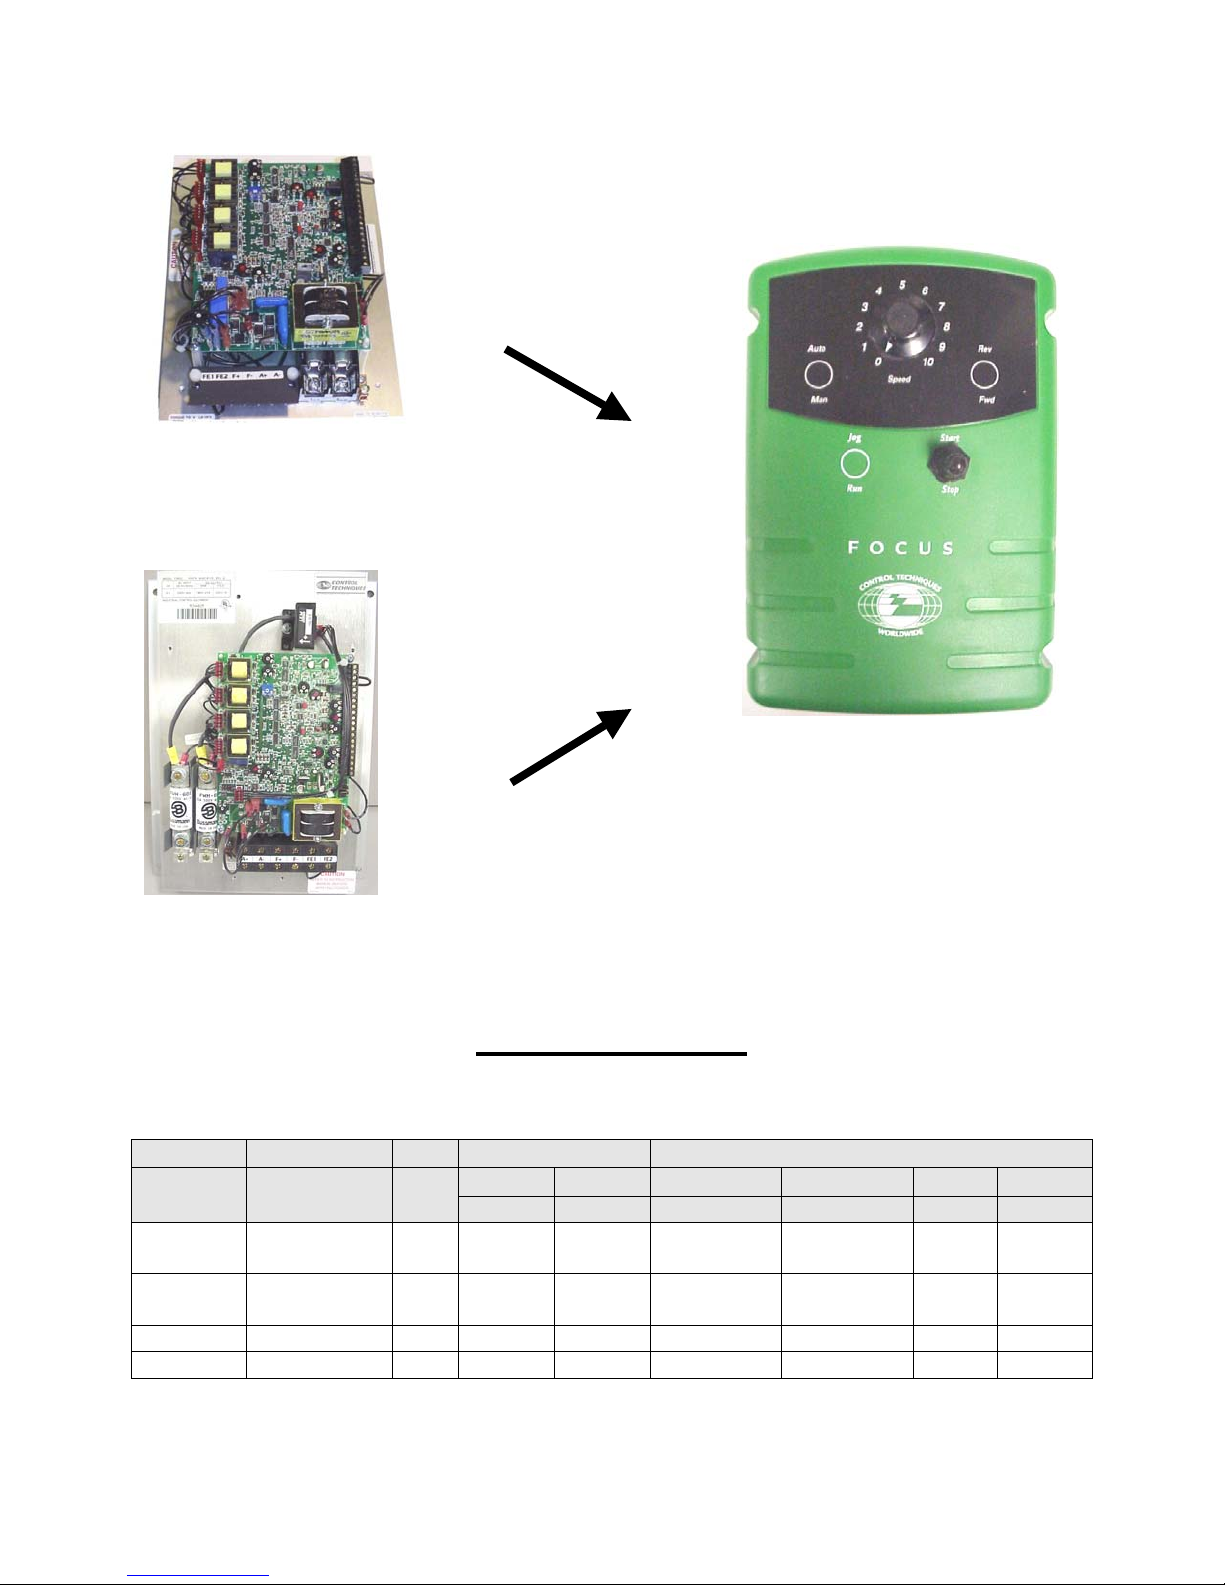
Chassis Model
.
The model without an enclosure is denoted as a chassis model.
The chassis model is intended for mounting within a User
supplied cabinet and where the User intends to provide remote
Start/Stop and Speed control signals.
(5 Hp model shown)
Enclosed Model
The Enclosed version comes to you already in a NEMA 4/12
enclosure that would allow the User to mount the Focus on a wall
or machine surface. The Enclosed version has Start/Stop and the
Speed Control adjustment on the front cover for convenient
operation.
For a complete overview of the Focus 3 product
line and available options, visit our website at:
www.emersonct.com or click the link below:
Focus 3 Catalog Section
Page 4
Page 11
Motor Compatibility
The Focus 3 was designed to run standard 90 Vdc or 180 Vdc Shunt Wound or Permanent
Magnet DC motors in both directions. The Focus 3 can run motors with other characteristics
(such as Universal motors) but one must review those requirements to insure compatibility.
Universal motors have commutator brushes but typically plug into the AC power line. Universal
motors are often used in tools such as Drills, Saws, Shop VAC’s, Routers, etc and typically
cannot be run in reverse.
Shunt Wound Motors that are controlled by single phase DC drives typically have 4 power
wires. Two of these are the Armature leads typically designated A1 & A2 or A+ & A-. The
other two power wires are the shunt field leads and typically designated F1 & F2 or F+ & F-.
The Focus 3 can supply up to 1 Amp for shunt field excitation (field current requirements
beyond 1A may damage field rectifier diodes). If your motor does not have Field Current
information on the nameplate, you can determine compatibility by measuring your motors Field
resistance using a calibrated ohmmeter.
Motors with:
90v Armatures typically require 100 Vdc for field excitation. In these cases, the Focus
3 requires 120vac input power and must be internally set for this input level. The motor
Field resistance should not be less than 100 ohms when cold.
180v Armatures typically require 200 Vdc for field excitation. In these cases, the Focus
3 requires 240vac input power and must be internally set for this input level. The motor
Field resistance should not be less than 200ohms when cold.
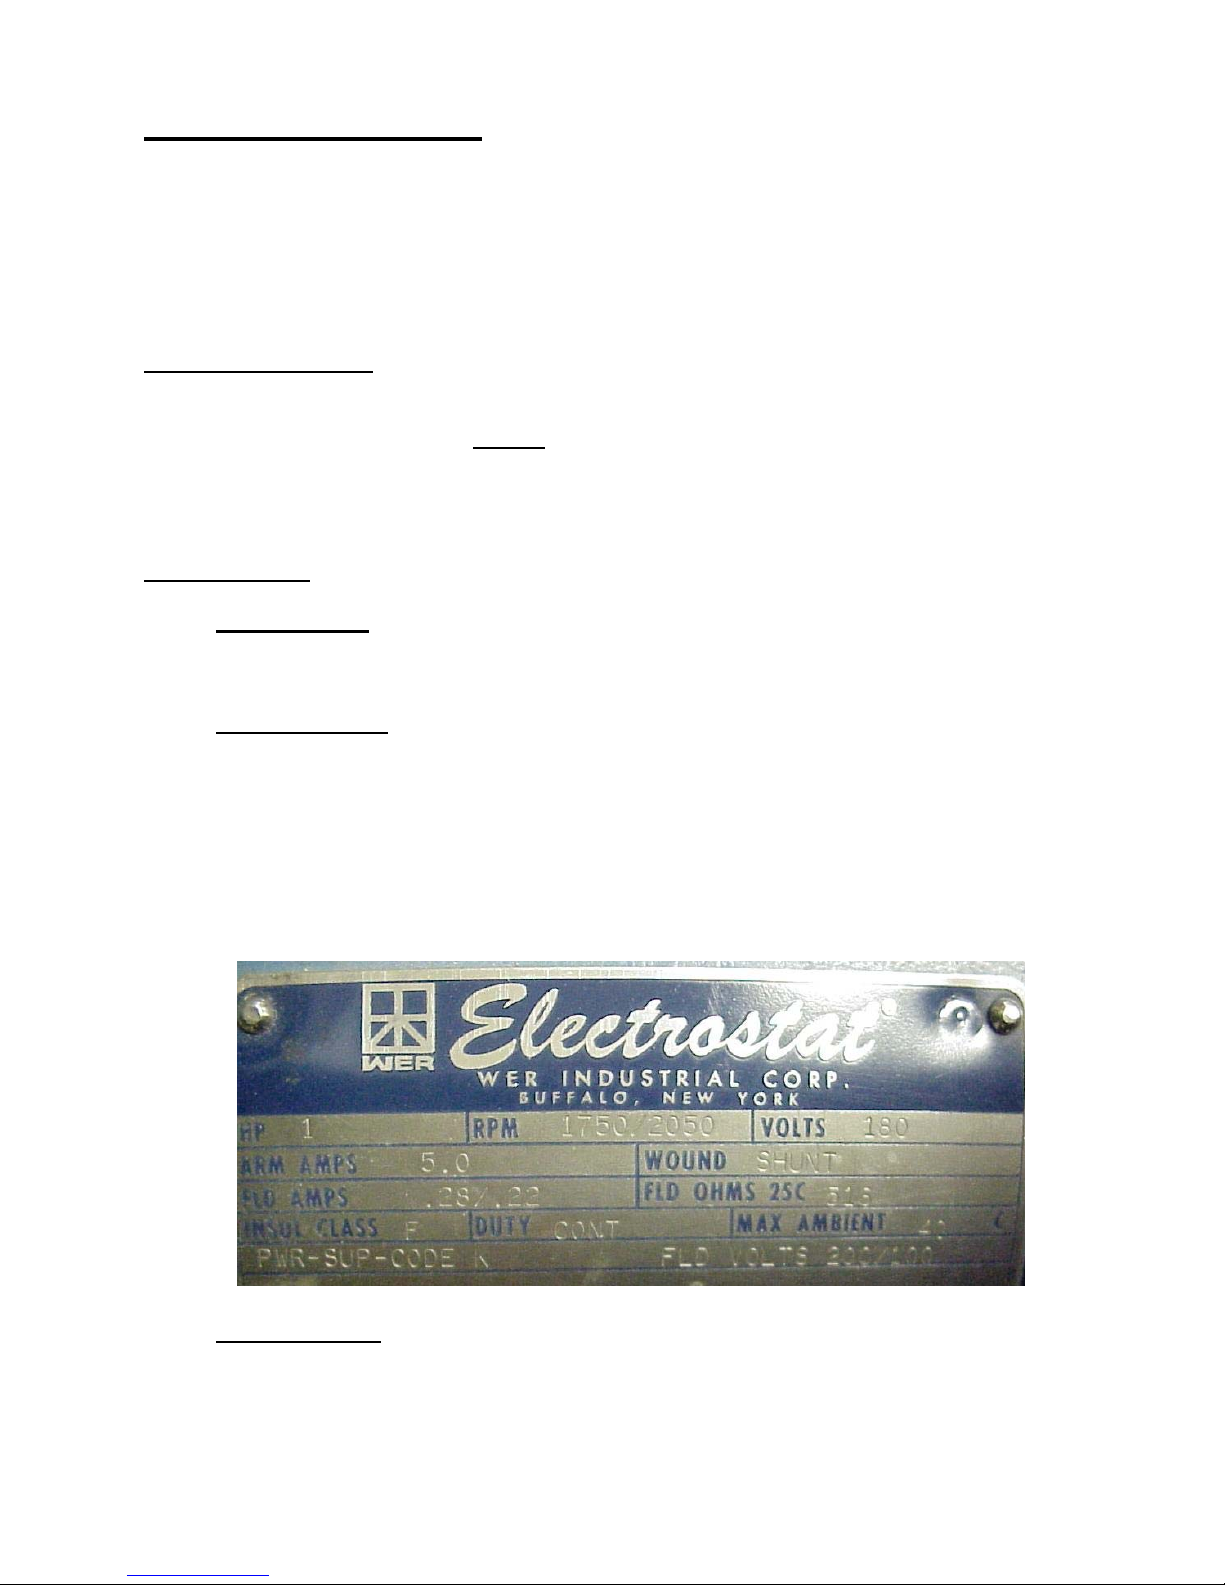
The motor nameplate information is key to determining compatibility. As seen below,
the motor below easily falls in the range of the Focus 1 operated from a 240vac supply.
The drive will supply 180v for the armature and 200v for the field ( this motor indicates
there are 2 field windings and for 200vdc they must be wired in series ). The field
current requirement is 0.28A which is well under the 1A maximum.
1 1750 / 2050 180
5.0 SHUNT
0.28/.22 518
FLD VOLTS 200/100
240v Armatures typically require 150 Vdc for field excitation. In these cases, the Focus
3 requires 240vac input power and must be internally set for this input level. The motor
field resistance should not be less than 150 ohms when cold and will require a series
resistor to drop the additional field supply voltage. Consult Control Techniques Technical
Support for additional information.
Page 5
Page 12
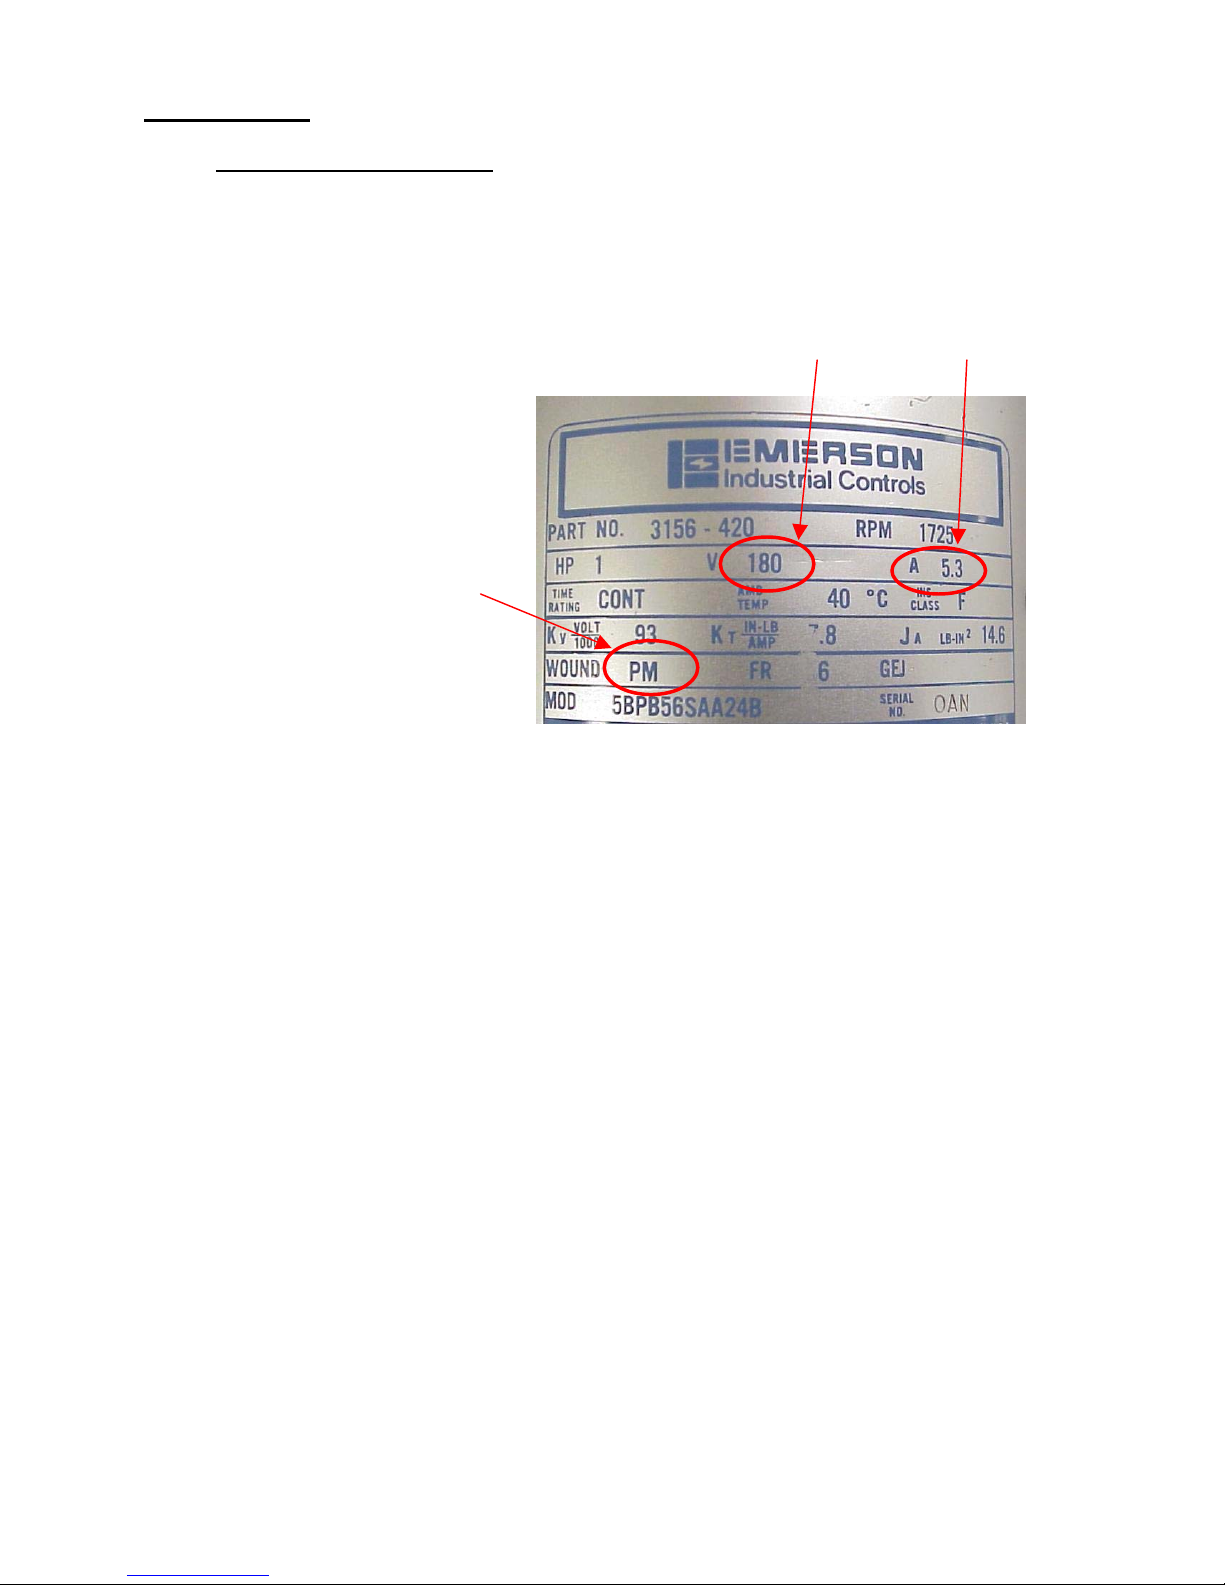
Motors with:
Permanent Magnet Motors typically have only 2 power wires. These are the Armature
leads and typically designated A1 and A2 or A+ and A-.
Armature
Voltage
Armature
Current
Page 6
Page 13

Speed Control
Armature Voltage Feedback
The Focus 3 can vary the speed of the motors mentioned above as a function of the
Speed potentiometer setting (or external speed command signal) by simply varying the
output Armature voltage (field excitation if used typically remains constant). A great
many motor applications do not require ultra precise speed control. Because of this, the
Focus 3 is factory set for Armature Voltage Feedback. Armature Voltage Feedback (or
simply Armature Feedback) does not require any special motor mounted speed
feedback device and is therefore inherently quite reliable and is capable of providing up
to 1% speed regulation.
Speed Feedback- Tachometer
Should more precise speed control be required, the Focus 3 can accommodate those
motors equipped with DC Tachometers (AC tachometers require an option kit). DC
tachometers output a linear voltage proportional to their RPM and can provide the Focus
3 with accurate motor speed feedback information. With good DC tachometers up to
0.5% speed accuracy can be achieved.
Tach failure will typically result in motor speed runaway. One who designs
systems with Speed Feedback devices such as DC tachometers should be
cognizant of this fault condition and must take machine design precautions
should this event occur.
We would recommend that all DC Drives be initially run using Armature Voltage
Feedback to verify operation even if Tach Feedback is the ultimate goal.
Quick Stops
The DB option provides a rather quick stopping action and provides motor turning
resistance when the drive is not in the RUN condition. The Focus 3R can be outfitted
with a Dynamic Braking resistor should this requirement be desired.
Regenerative drives are capable of stopping the motor more quickly than dynamic
braking by rapidly reducing the speed command to zero and then disabling the drive.
This requires the drive to be active and some external means of disabling the drive after
the motor reaches zero speed.
Power Outages
Shunt Wound Motors
Should a power outage occur, the drive would turn off and the motor would coast to rest.
If a Dynamic Braking resistor were employed there would typically be enough decaying
field strength to enable some faster stopping action.
Permanent Magnet Motors
Should a power outage occur, the drive would turn off and the motor would coast to rest.
If a Dynamic Braking resistor were employed, full Dynamic Braking force would be
exerted because the field is maintained by the motors internal permanent magnets.
Therefore, there would be motor turning resistance during power outages as well.
Note: DB Resistors require Contactor Option - See Options
Page 7
Page 14

General Information
r
Introduction
The purpose of this manual is to provide the user with the information needed to
install, start-up, and maintain the Focus 3 drive. This instruction manual should be read
in its entirety, paying special attention to the warning and caution notices, before
installation and before performing any start-up or drive maintenance.
Receiving
The user is responsible for inspecting the equipment thoroughly before accepting
the shipment from the freight company. Check the items received against the purchase
order. If any items are obviously damaged, do not accept delivery until the damage has
been noted on the freight paperwork.
Inspection
Before installation and start-up of the drive, inspect the unit for mechanical integrity
(i.e. loose parts, wires, etc). If physical damage was sustained during shipment, leave
the shipping container intact and notify the freight agent. After unpacking, check the
drive nameplate catalog number against the purchase order.
Storing
Store the drive in its shipping container prior to installation. If the drive isn’t used
for a period of time, store according to the following instructions in order to maintain
warranty coverage:
Clean, dry location
Ambient Temperature Range: -400C to 700C
: -400F to 1600F
Humidity: 95%, Non-condensing
Improper procedures can result in personal injury or equipment damage. Only
qualified electrical maintenance technicians familiar with electronic drives and thei
standard safety precautions should be permitted to install, start-up, or maintain this
apparatus.
Page 8
Page 15

PERFORMANCE FEATURES
• Solid State Full Wave Power Bridge -Uses generously rated power semiconductors for
Maximum reliability and long life.
• Four Quadrant Operation – The drive is capable of running in both the directions and
providing full braking torque in both directions.
• Control Circuit Isolation – The control circuitry is isolated from the drives power section
allowing signal common to be connected to earth ground or process signals referenced to
earth ground.
• Inner Current Loop Regulator - Inherent high bandwidth capability for fast response.
• Semiconductor Fusing - Both AC lines fused for maximum protection in case of short
circuit.
• AC Line Filter and Transient Voltage Suppressor Network - Eliminates interaction
between other drives or AC equipment.
• Current Limit Ranges - Selectable current limit ranges to match the drive to the motor
being used. Provides smooth acceleration of high inertia loads.
• Speed Regulator - 1 % accuracy armature voltage feedback with IR compensation or 0.5 %
accuracy with DC tachometer feedback. Regulation accuracy may be affected by the
tachometer selected.
• Current (Torque) Regulator -
2% accuracy armature current regulator allows the user to control motor torque instead of
speed.
• Circuit Board Indicators - Light emitting diodes (LEDs) on the control board indicate when
the drive is in Run Mode or the Current Limit is enabled.
• Remote Current Limit - Available by the simple addition of a potentiometer.
• Current Signal Follower lnput** - Allows the motor speed to be controlled by a current
signal from a commercially available transducer. The signal may be one of the following:
0 -5mA or 0-20mA
• Voltage Signal Follower lnput - Allows the motor speed to be controlled by a voltage
signal from a DC tachometer generator or a process voltage signal. It accepts an input with
a range of 0-200 Vdc.
• Auto/Manual Operation - Standard circuitry allows the drive to be controlled by the
operator speed potentiometer or by the current/voltage signal inputs.
• UL/cUL - All Focus 3 Drives are UL/cUL listed.
** Note: The Current Signal Follower Input on the Focus 3 Regenerative Drives is designed for 0
to 5 or 0 to 20 ma, not 1 to 5 or 4 to 20 ma. The circuitry can be adjusted to bias out the 1 or 4
milliamp current levels and the drive will follow the signals correctly. The difference is that if the
current input drops below the 1 or 5 ma level, the drive will rotate in the reverse direction ( as
much as 25% speed if the signal goes to zero). If a 1 to 5 or 4 to 20 ma signal is required on a
Focus 3 Regenerative Drives, it is recommended that the Focus 3 Signal Isolator board (F3NSBD)
be used since it has circuitry built in to block the reverse speed signal.
Page 9
Page 16
The Focus 3 comes in two basic model variations- with and without enclosure.
Chassis Model
The model without an enclosure is denoted as a chassis model. The chassis model is
intended for mounting within a User supplied cabinet and where the User intends to
provide remote Start/Stop and Speed control signals.
Enclosed Model
The Enclosed version comes to you already in a NEMA 4/12 enclosure that would allow
the User to mount the Focus on a wall or machine surface. The Enclosed version has
Start/Stop and the Speed Control adjustment on the front cover for convenient operation.
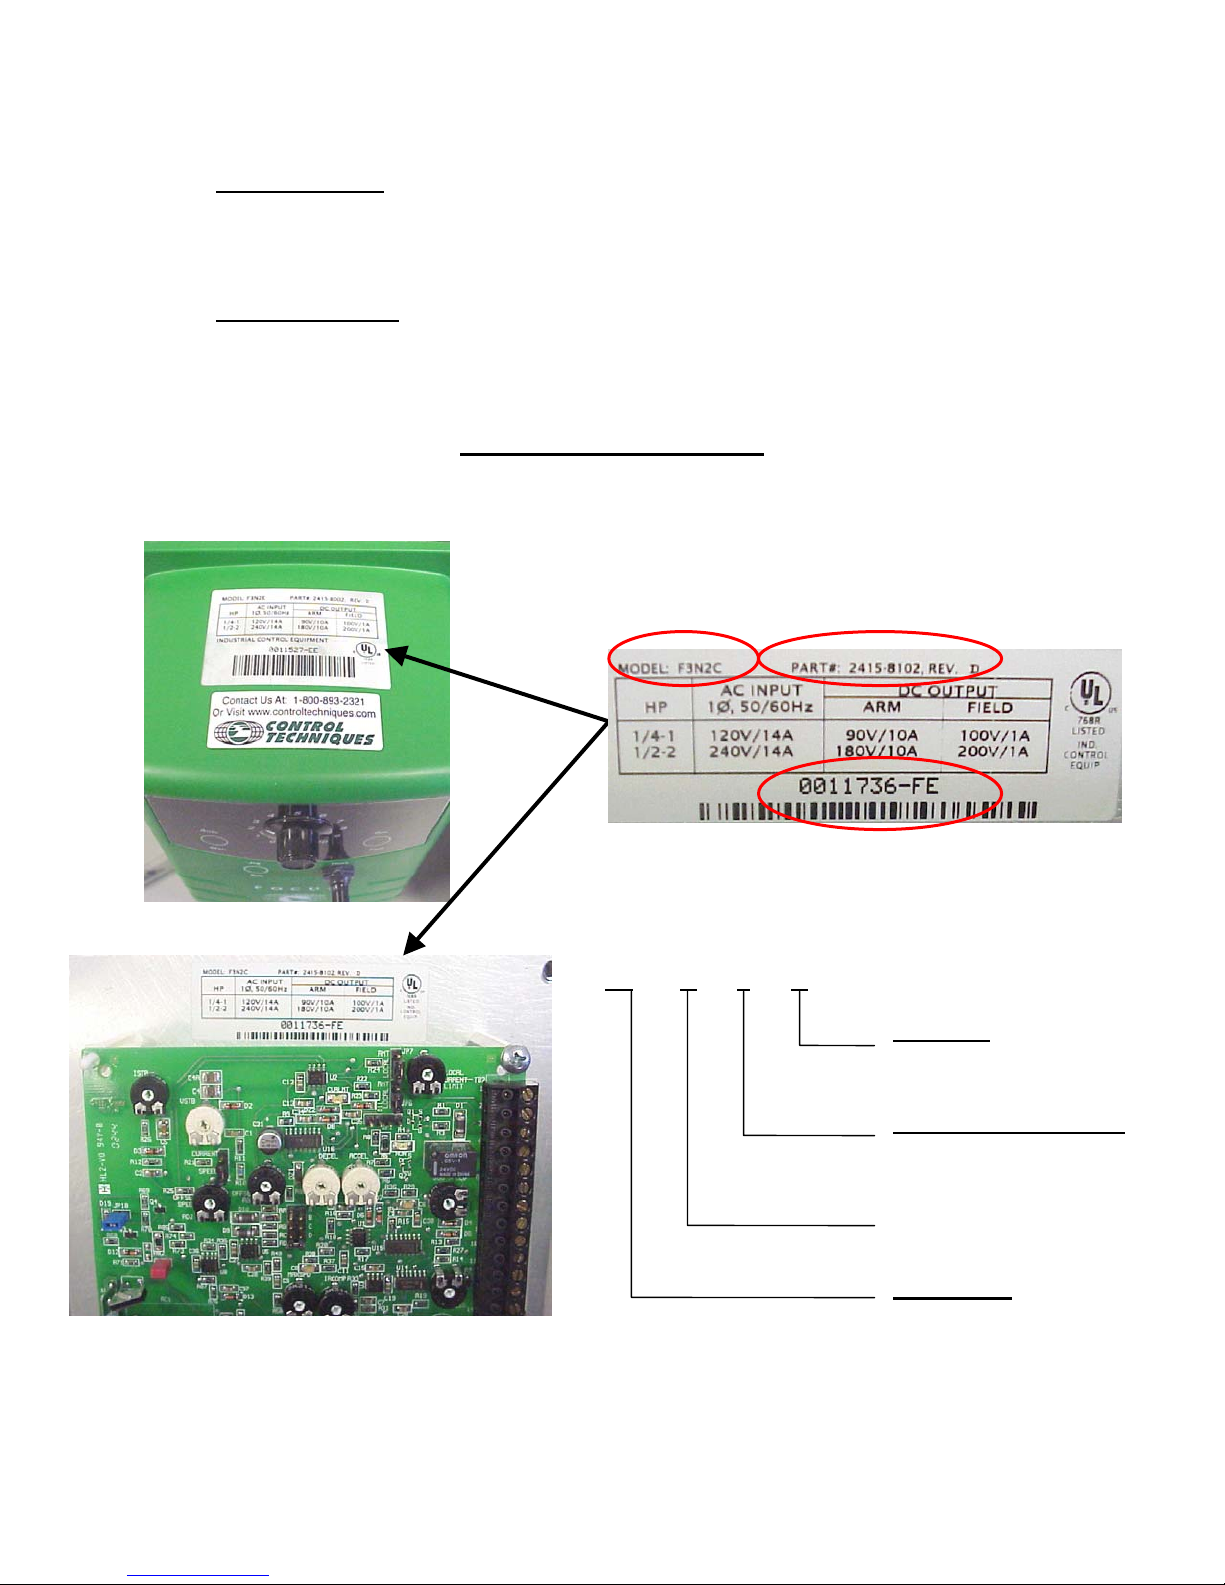
Nameplate Information
Enclosed Unit
Model #
Model Number Definition
F3 N 2 C
Part #
Serial #
Enclosure
Chassis (C)
Enclosed (E)
Max HP Rating @240vac
2 HP (2)
5 HP (5)
Always record the drive Model Number, Part Number and Serial Number for future
warranty situations and spare parts. A good location to record these is on the Start-up
Guide Worksheet on page #49.
Page 10
Non-Regen (N)
Regen (R)
Drive Family
Focus 3 (F3)
Page 17
Chassis Models
Enclosed Models
F3R2C
F3R2E
F3R5E
F3R5C
Specifications
Ratings
Input
AC
Catalog Enclosure HP 1Ø Max
Part #
F3R2C Chassis ¼ -1
½-2
F3R2E NEMA 4/12 ¼ -1
½-2
F3R5C Chassis 3-5 240 35 180 25 200 1
F3R5E NEMA 4/12 3-5 240 35 180 25 200 1
Volts Amps Volts Amps Volts Amps
120
240
120
240
14
14
14
14
Armature
DC Output
90
180
90
180
Armature Field Field
10
10
10
10
100
200
100
200
1
1
1
1
Page 11
Page 18

Page 12
Page 19

PERFORMANCE SPECIFICATIONS
Service Factor 1.0
Speed Regulation (95% Load Change):
Armature Voltage 1% of Max. Speed with IR Compensation
All other variables
(voltage regulated) 15% of Base Speed
Tachometer Feedback (DC) 0. 5% of Base Speed
Speed Range: 30:1
Efficiency:
Control Only 98%
Drive System (motor and control) 86% typically
DRIVE OPERATING CONDITIONS
Altitude (without derating) 3300Ft ( 1000meters )
Ambient Temperature:
Chassis Models 0-550C ( 32-130° F )
Enclosed (NEMA 4/12) 0-400C ( 32-104° F )
INTERNAL ADJUSTMENTS (POTENTIOMETERS)
Potentiometer Function Range
Maximum Speed 80-120% of Rated Speed
Minimum Speed 0-30% of Maximum Speed
IR Compensation 0-20% of Rated Voltage
Current Limit 0-150% of Selected Range
Acceleration Time 0.3-20 seconds (linear)
Deceleration Time 0.3-20 seconds (linear)
Jog Speed 0-30% of Full Speed command
Speed Loop Offset Adjustable
Velocity Loop Stability Adjustable
Current Loop Stability Adjustable
Current Signal Follower Gain Adjustable
Velocity Signal Follower Gain Adjustable
Signal Follower Zero Bias Adjustable
CUSTOMER SELECTIONS (JUMPERS)
Function Range
Input Voltage 120/240Vac
Control Mode Speed / Torque
Current Feedback range High / Medium / Low / Xlow
Current Limit Pot Selector Local / Remote
Armature Voltage level 90 Vdc/180 Vdc
Optional “M” Contactor Yes/No
Tachometer Feedback High/Low
Speed Feedback Selector Armature / Tachometer
Line Frequency 50/ 60Hz
Page 13
Page 20

OPERATOR FUNCTIONS
Chassis Enclosed
Speed Adjustment (Speed Pot) Standard Standard
Start/Stop Customer Supplied Standard
Auto/Manual Optional Optional
Run/Jog Optional Optional
Fwd/Rev Optional Optional
CONTROL CIRCUIT SPECIFICATIONS
Logic Control Power 24 Vdc
Speed Potentiometer 5000 ohms
Input Signal Requirement 10 Vdc @ 0.5mA
Control Circuit Isolation Standard with regen F3R models
Current Signal Follower (see note, page 8) 0-5mA or 0 - 20mA
Voltage Signal Follower 10 – 200 Vdc (at Maximum Speed)
FOCUS 3 OPTIONS
CATALOG
NUMBER DESCRIPTION
F3SE Enclosure Small (2HP), NEMA 4/12
F3LE Kits Large (5HP), NEMA 4/12
F3M112 “M” ¼ - 1HP @ 120V
F3M224 Contactor ½ - 2HP @ 240V
F3M524 Kits 3 - 5HP @ 240V
F3DB224 ½ HP @ 120V, 2HP @ 240V
F3DB1524 ¼ - 1/3 HP @ 120V, I .5HP @ 240V
F3DB124 Dynamic ¾ -1HP @ 240V
F3DB0524 Braking ½ HP @ 240V
F3DB112 Kits ¾ -1HP @ 120V
F3DB324 3HP @ 240V
F3DB524 5HP @ 240V
F3TS Toggle Switch, NEMA 4 /12
F3NSBD Signal Isolation Board
2450-9024 Remote Percent Speed Meter Kit
2450-9021 Remote RPM Speed Meter Kit
2950-9066 Remote Operator Station ( 3 Function )
2950-9068 Remote Operator Station ( 5 Function )
6160-9001 Ten-Turn Precision Potentiometer
Page 14
Page 21
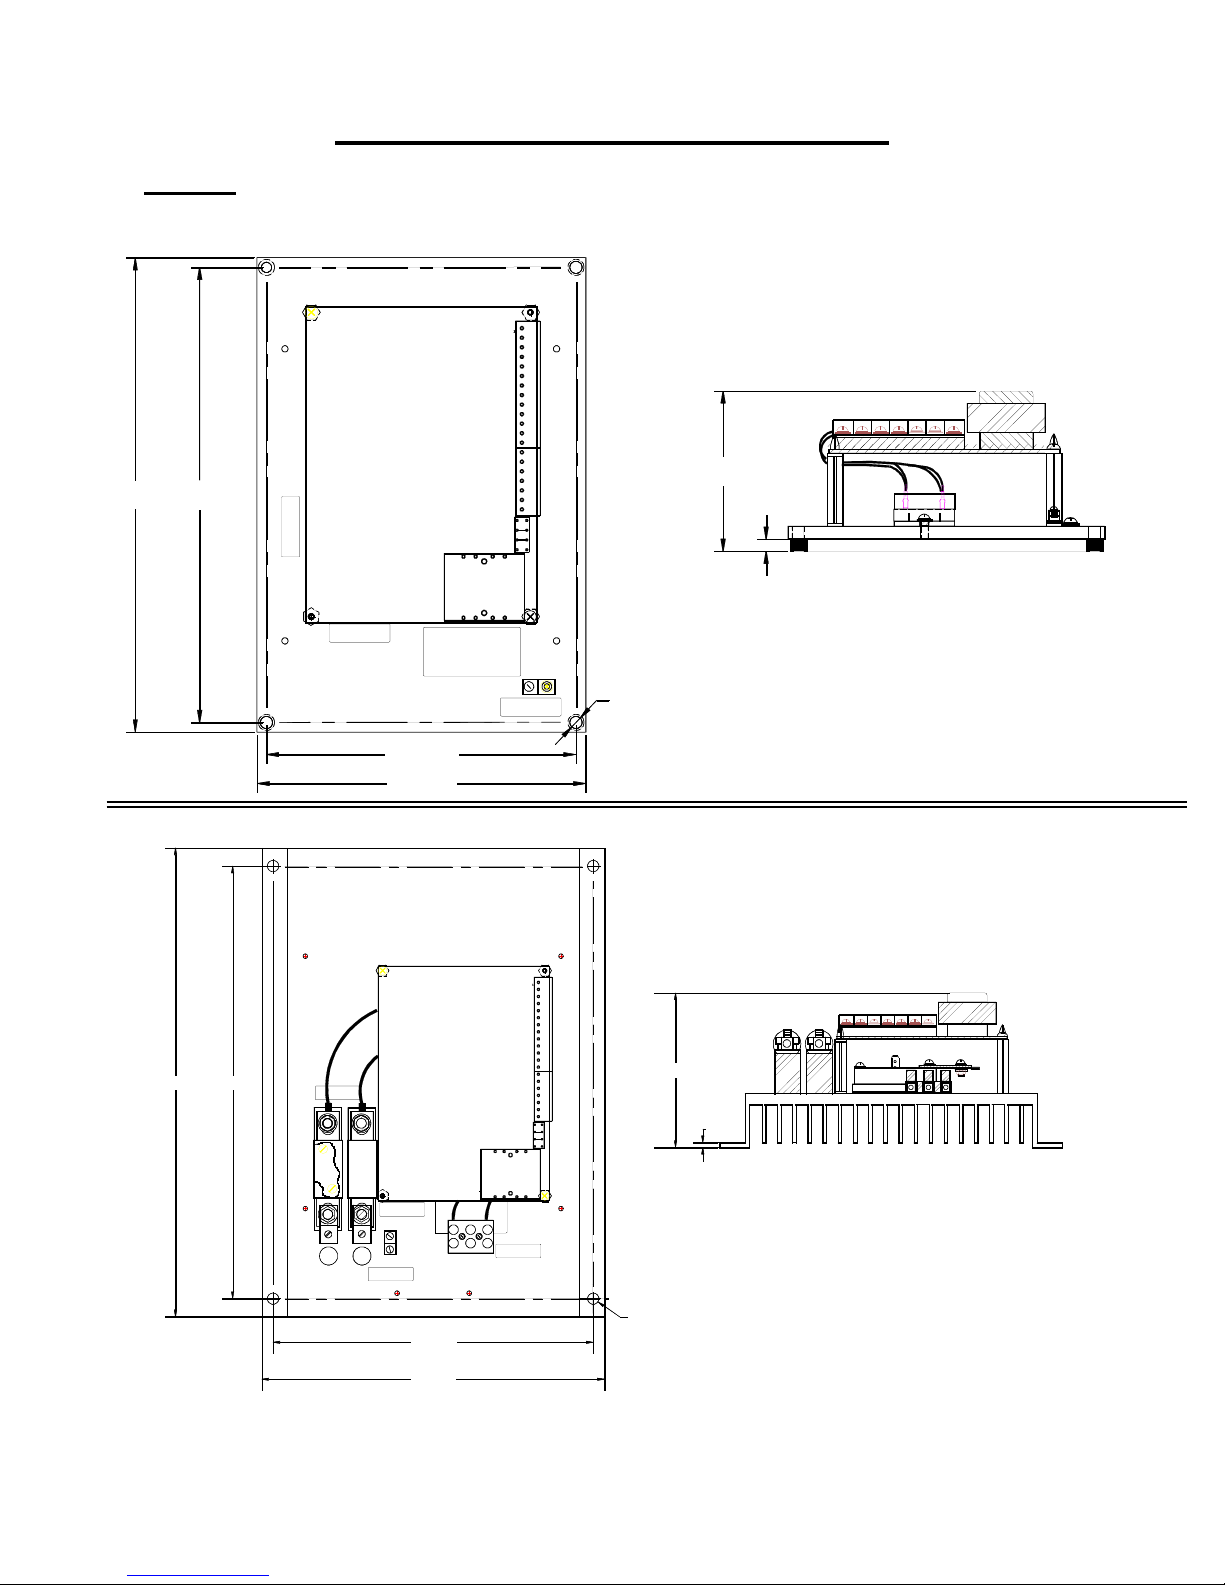
Focus 3 Chassis Dimensions
Chassis
Suitable for mounting in a user’s enclosure where internal temperatures will not exceed
550C or 1300F.
TB2
2
3
4
5
6
SMALL
REGEN
&
NON-REGEN
MOUNTING
9.75" 9.35"
7
8
9
10
11
12
13
14
15
16
17
18
19
20
B
D
B
C
C
A
A
E
JP11
8
1
T1
3.30"
AC1 AC2
0.25"
13.00"
12.00"
B B
1
LAL
0.168" (4 PLACES)
F3R2C
6.36"
6.75"
TB2
2
3
4
LARGE
REGEN
&
NON-REGEN
MOUNTING
A
TB1
2
5
6
7
8
9
10
11
12
13
14
15
16
17
18
19
20
B
D
B
C
C
A
A
E
JP11
8
1
4.50"
AC2 G2
0.13"
8.88"
9.50"
0.312" (4 PLACES)
F3R5C
Page 15
Page 22

Focus 3 Enclosed Dimensions
NEMA 4/12
Suitable for most well ventilated factory areas where industrial equipment is installed.
Locations subject to steam vapors, oil vapors, flammable or combustible vapors,
chemical fumes, and corrosive gases or liquids should be avoided unless an
appropriate enclosure has been supplied. Ambient temperature is not to exceed 400C.
5.93
9.35
4.63
12.00
6.36
8.88
0.168 Dia
(4 Places)
6.91
0.51
6.13
F3R2E
3.70
9.50
2.102.22
1.05
1.05
0.13
1.05
Page 16
Ø0.31
F3R5E
Page 23
Focus 3 Option Kits
r
f
f
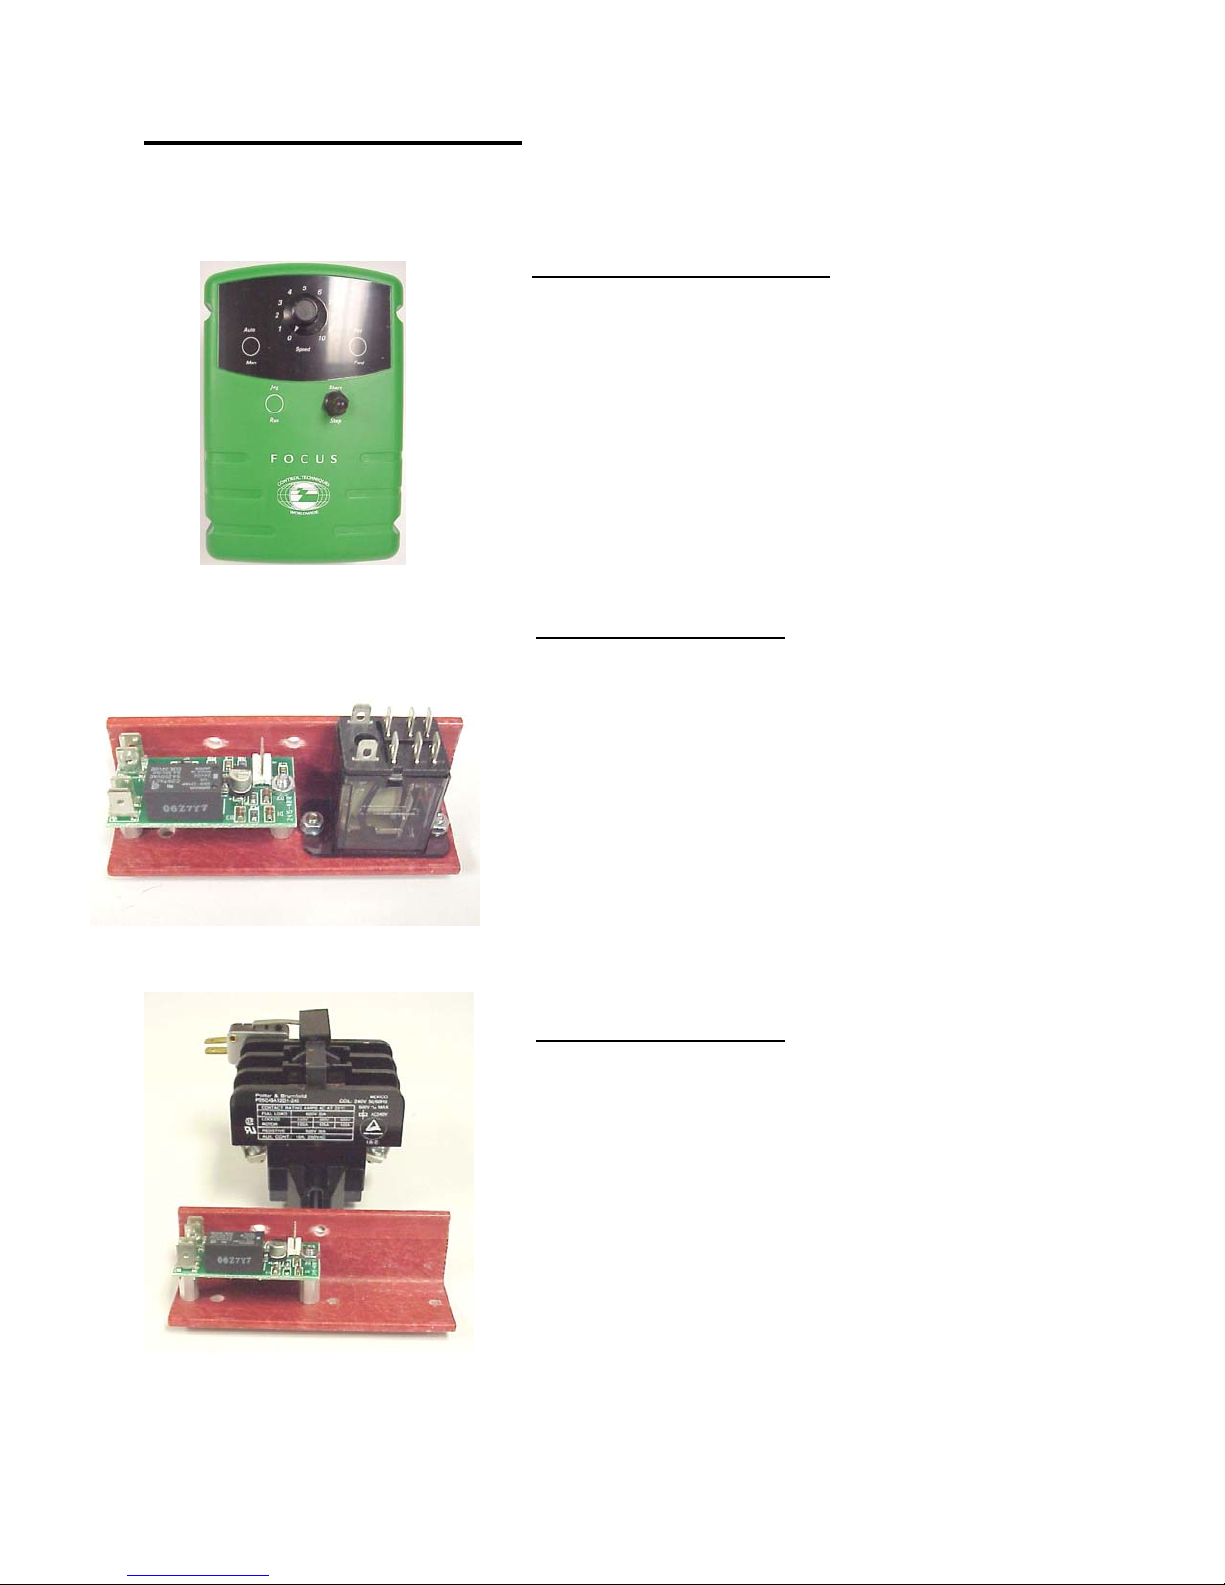
Focus 3 Enclosure Option – F3SE (small) up to 2HP
F3LE (large) 3-5HP
This kit provides the flexibility of stocking only Chassis
drives and adding the enclosure when required. It
reduces the number of stocked items to 6 (four chassis
drives and two covers) as opposed to eight (fou
enclosed drives and four chassis drives). It includes the
speed adjustment potentiometer and the start/stop
switch pre-wired to a plug-on terminal strip and all seals
to provide a NEMA 4/12-enclosure rating.
Focus 3 Contactor Kit – P/N F3M112 (1 HP,120vac)
P/N F3M224 (2 HP, 240vac)
This Kit includes a magnetic contactor that can be
mounted either in the Focus 3 enclosed unit or on the
chassis mount unit. It provides a positive disconnect o
the motor armature when the controller is stopped,
preventing motor rotation in the event of SCR mis-fire
due to line noise. This kit may also be required by local
and/or National Electrical Codes. This kit also includes
the DB (dynamic braking) poles, an auxiliary normally
open contact and all connection wires.
Focus 3 Contactor Kit– P/N F3M524 (3-5 HP, 240vac)
This Kit includes a magnetic contactor that can be
mounted either in the Focus 3 enclosed unit or on the
chassis mount unit. It provides a positive disconnect o
the motor armature when the controller is stopped,
preventing motor rotation in the event of SCR mis-fire
due to line noise. This kit may also be required by local
and/or National Electrical Codes. This kit also includes
the DB (dynamic braking) poles, an auxiliary normally
open contact and all connection wires.
Page 17
Page 24
Focus 3 Option Kits
r
r
f
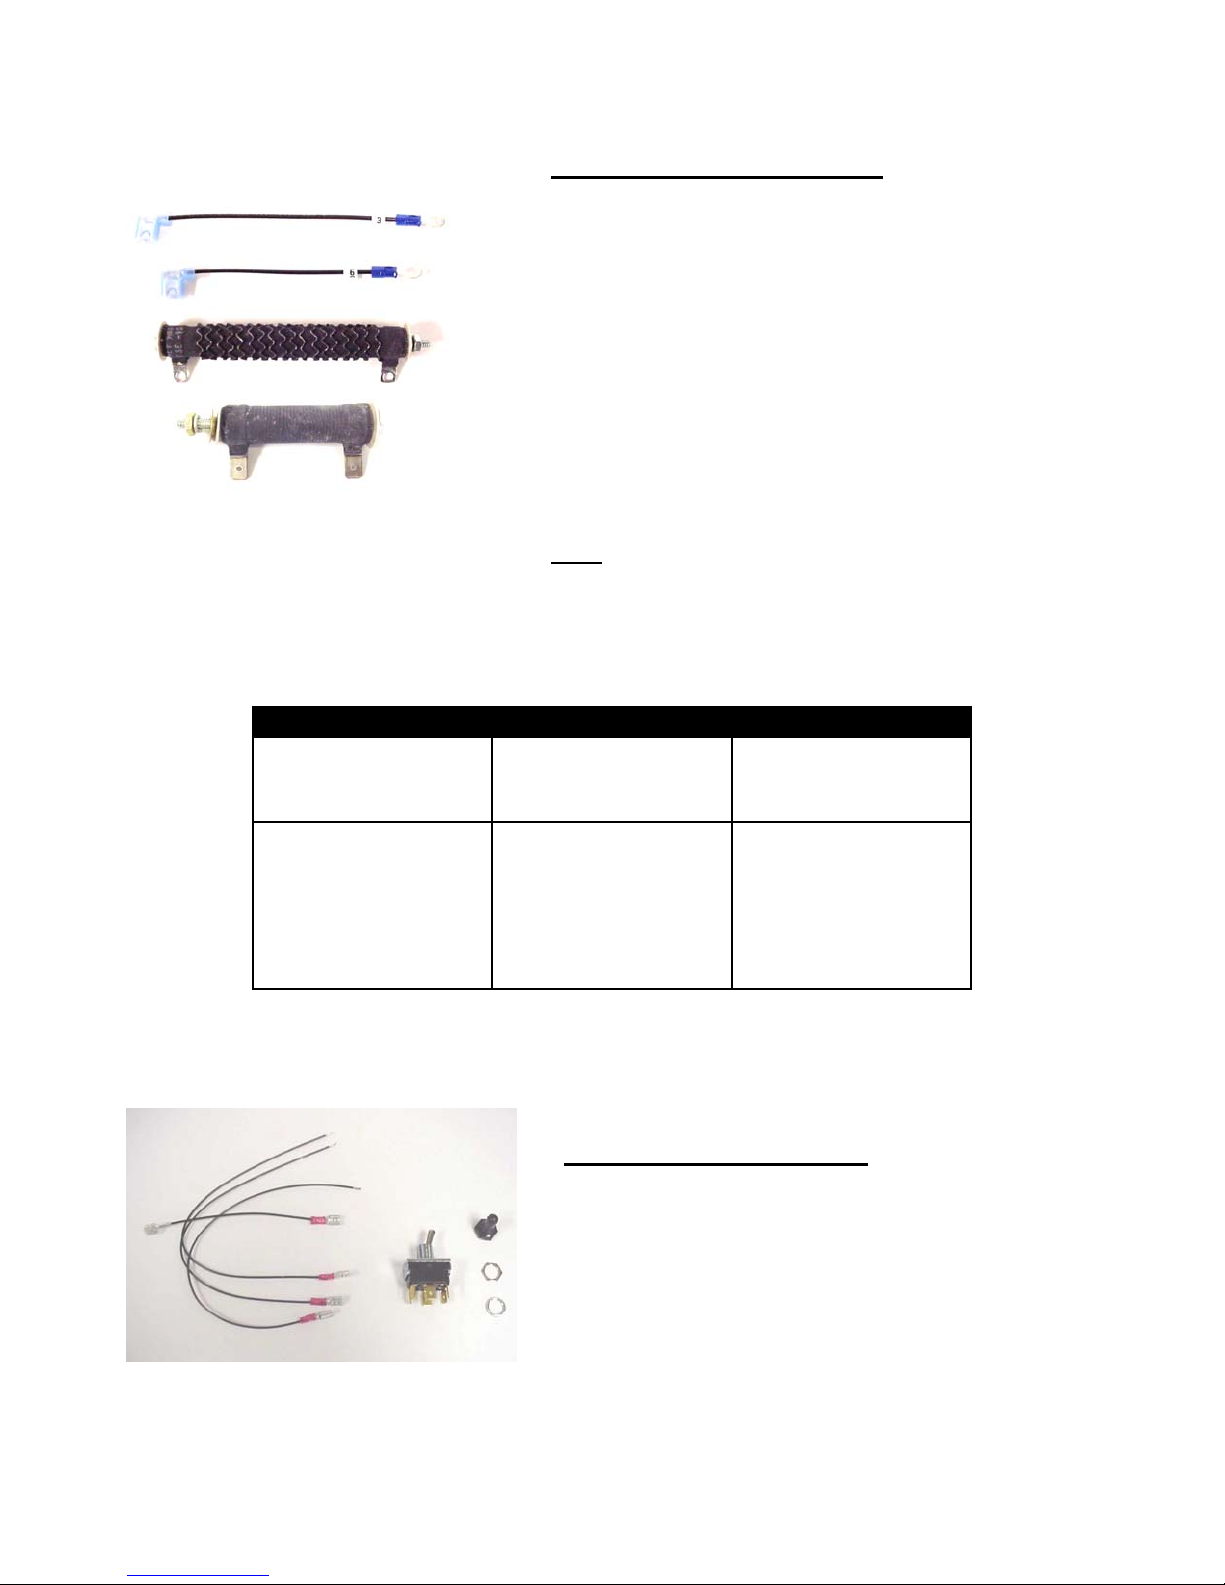
AC Input HP (Typical) Part Number
120 Vac
240 Vac
Focus 3 Dynamic Braking Kit
PN– See Table Below
For use with Focus 3 Contactor Kits. Dynamic
braking provides rapid motor stopping by quickly
dissipating the stored energy in the rotating moto
and load. These resistors have been sized in
accordance with Nema specifications for dynamic
braking.
“Providing 3 stops in rapid succession with the
load inertia equal to the motor inertia, then
cooling forever.”
Note: Large and small dynamic braking resistors
shown, ¼-2 HP use small and the 3-5 HP use the
large resistor.
1/4-1/3
1/2
3/4-1
1/2
3/4-1
1.5
2
3
5
F3DB1524
F3DB224
F3DB112
F3DB0524
F3DB224
F3DB1524
F3DB224
F3DB324
F3DB524
Page 18
Focus 3 Toggle Switch – P/N F3TS
This kit can be mounted in the drive enclosure cove
or remote mounted when used with chassis drives.
The kit includes the switch, NEMA 4/12 switch boot
and the connection wires for enclosure use. It is
used to provide one of the following functions:
Fwd/Rev, Run/Jog, or Auto/Manual. Up to 3 o
these kits may be used with the Drive cover.
Page 25
Focus 3 Option Kits
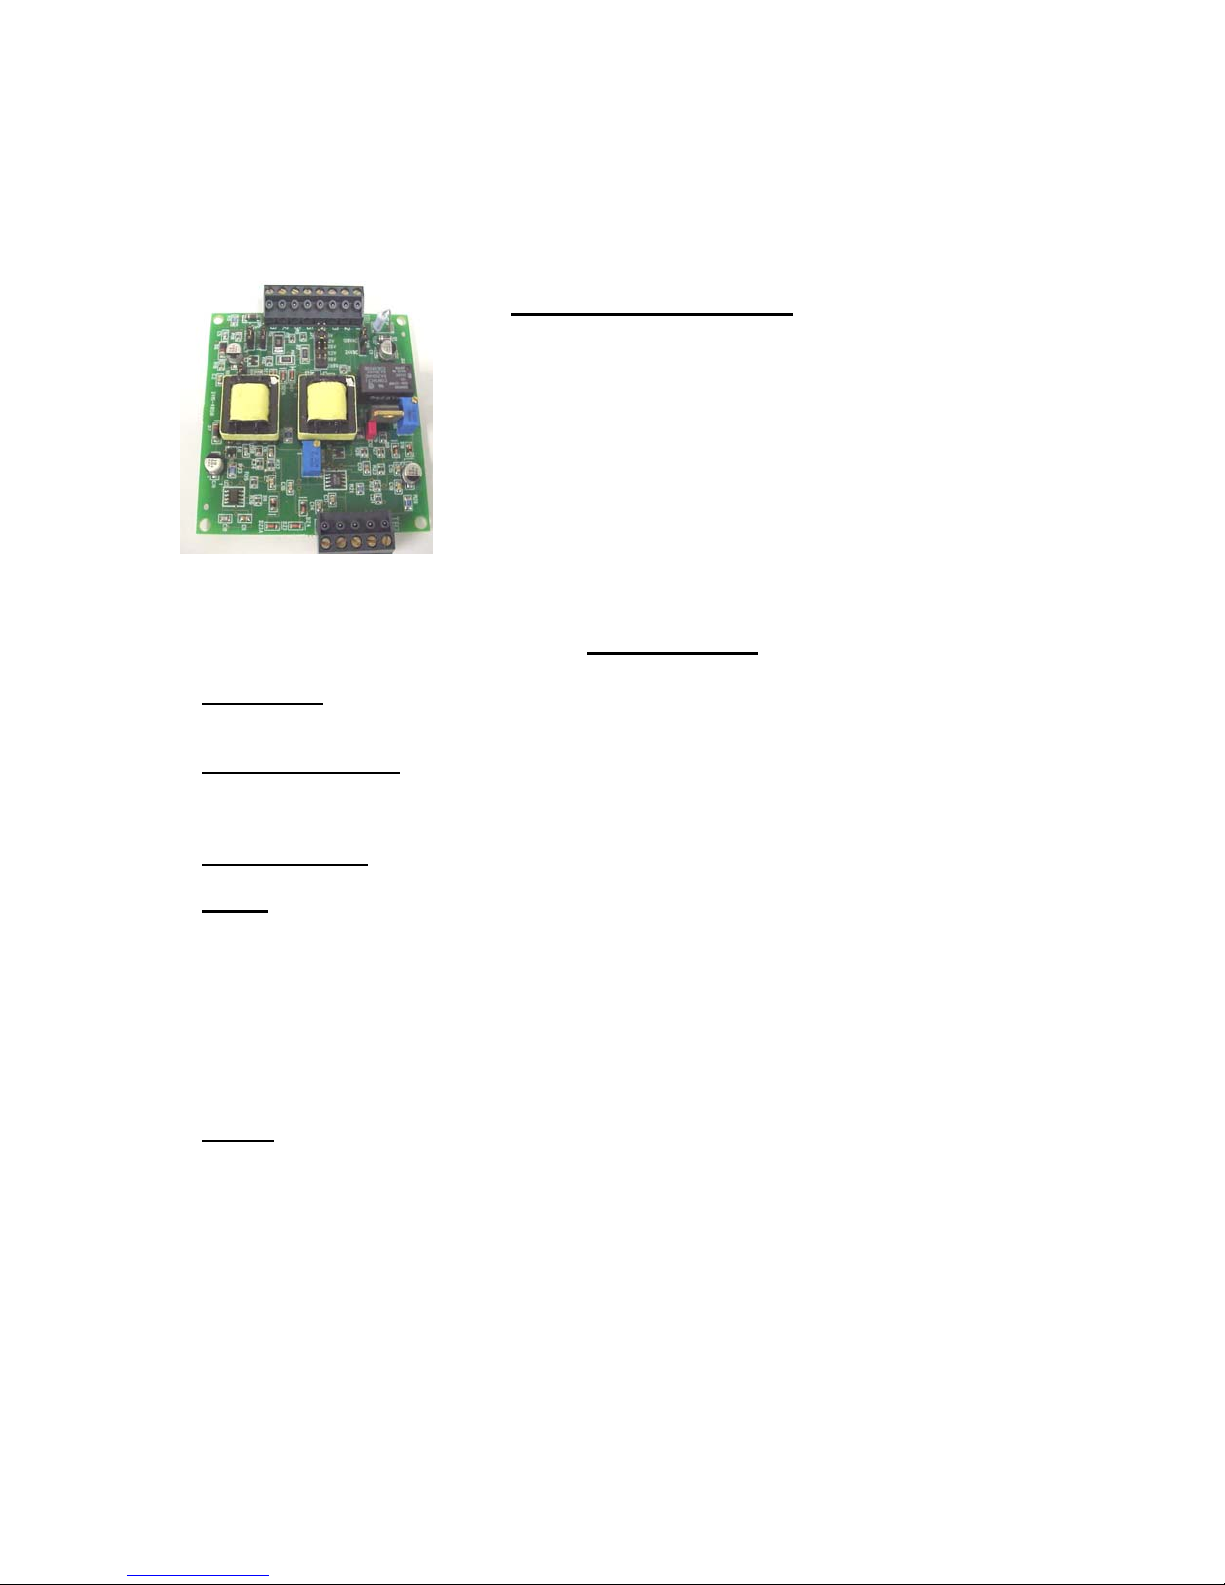
Signal Isolator Board – P/N F3NSBD
This option is used in applications where isolation is
required between an external control signal and the
motor controller (which may or may not be at earth
ground potential). It can be utilized to isolate a variety
of voltage or current signals (see specifications below).
It may also be used simply to isolate the speed
adjustment pot, and the pot power supply is included.
This option can be mounted in the enclosure or in a
piece of plastic track (included with kit).
Specifications:
Input Power: 17- 30 Vdc @ 50mA Max. (for control circuitry)
Control Relay (CRR): 24 Vdc @ 12.1 mA (JP5 = 24 Vdc)
120 Vac @ 20 mA (JP5 = 120 Vac)
Contact Type/Rating – 2 Form A / 1A @ 250 Vac
Isolation Voltage: 240 Vac Power Systems
2000 Vac Hi-Pot for 1 Minute
Inputs:
Voltage Ranges: 5,12,26,52,98 & 208 Vdc, 180 Ohms/volt
Current Ranges: 0-5 mA, 1-5 mA, 910 Ohms input impedance
0-20 mA, 4-20 mA, 250 Ohms input impedance
Speed Pot: 5Kohms, 2W (Includes +10 Vdc power supply for potentiometer)
Output: 0 to +10 Vdc (Uni-polar)
Application Note:
Although the Focus 3 Regenerative drives are isolated, this board is useful in
applications requiring control with a 4-20 milliamp speed reference since the drive was
designed for a 0-20 milliamp signal. It also adds an additional layer or isolation. In
addition, the adjustments on this board are multi-turn adjustment potentiometers
providing much finer adjustments than the ones on the drive.
Page 19
Page 26
Focus Family Options
r
Speed
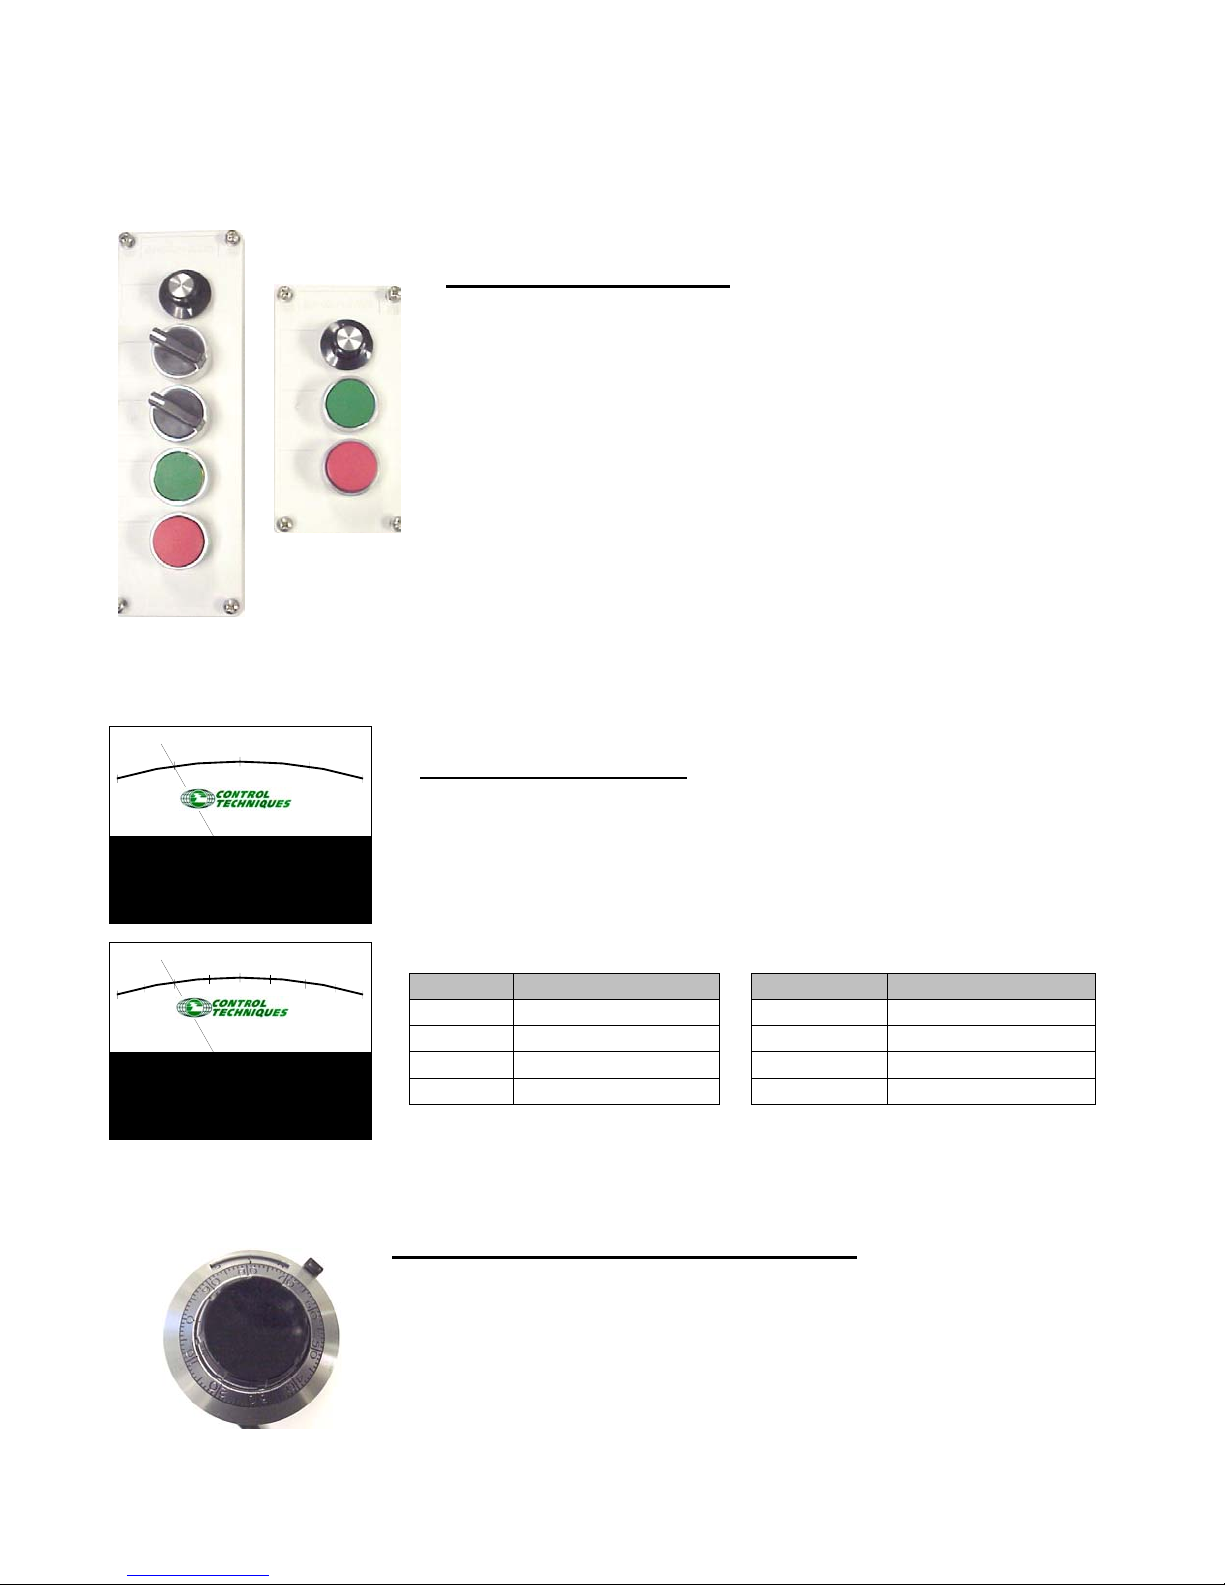
Remote Operator Station – P/N 2950-9068 /2950-9066
Speed
Run
Jog
Auto
Man
Start
Stop
25
0
25
50
75
100 100
Start
Stop
-
50
0
75
100
25
50
75
These NEMA 1 operator stations can be used to remotely
control Focus 1 and Focus 3 Motor Controllers. Two models
are available as shown. Both units include a Speed
Potentiometer, a green normally open start button and a red
normally closed stop button. The 2450-9068 also includes
two two- position switches with two contacts, 1 normally
open, 1 normally closed.
Remote Percent Meters – P/N See Accessories Catalog
This meter may be used to remotely display the motor speed in
percent of maximum speed. Included is a calibration board. It is
available in left zero (unidirectional applications) or 0-center (bidirectional applications) Meters supplied loose for customer
mounting.
P/N Meter P/N Calibration board
M1 Meter 0 - 100 C1 Cal+/-10vdc
M2 Meter 0 - 150 C2 Cal-90vdc
M3 Meter 100 –0 -100 C3 Cal-180vdc
M4 Meter 150 –0 -150
Ten-Turn Precision Speed Potentiometer – P/N 6160-9001
This is a multi-turn speed potentiometer. It provides a vernie
scale for precise and repeatable speed setting. A locking tab is
provided to prevent in advertent speed changes. It may be
mounted in either of the Focus 1 and Focus 3 enclosures or the
Remote Operator Station described above.
Page 20
Page 27

r
r
These options are
used with the
chassis mount
controls and
include Din rail for
panel mounting in
the customer’s
enclosure.
Speed Potentiometer – P/N SpdPot
This potentiometer can be used for either a remote speed
command potentiometer or a remote current limit
potentiometer.
120Vac Interface – P/N ACIF-2R-Focus – Run/Stop & Jog
This kit is available for the Focus series of drives. It is designed
to provide a 120-Vac interface for applications requiring
remotely mounted industrial operator devices (i.e. Operato
Stations shown on previous page).
120Vac Interface – P/N ACIF-6R-Focus – Run/Stop
Forward/Reverse, Jog and Auto/Manual
This kit is available for the Focus series of drives. It is designed
to provide a 120-Vac interface for applications requiring
remotely mounted Industrial operator devices (i.e. Operato
Stations shown on previous page).
Page 21
Page 28

Customer Connections & Start-Up
r
r
NOTE
Read this manual in its entirety, paying particular attention to the Warnings and Cautions
in each section before installing, starting, or maintaining this drive.
Improper procedures can result in personal injury or equipment damage. Only qualified
electrical maintenance technicians familiar with electronic drives and their standard safety
precautions should be permitted to install, start-up, or maintain this apparatus.
Start-up Guidelines
STEP 1: Receiving & Inspection Page 7
STEP 2: Drive Installation . . . Page 21
STEP 3: Power Wiring Pages 22-24
STEP 4: Control Wiring Pages 25-32
STEP 5: Jumper Programming Pages 33-37
STEP 6: Potentiometer Adjustments Pages 39-45
STEP 7: Start-up of Drive Page 48-54
Installation of this equipment must be done in accordance with the National Electrical
Code and all other applicable regional or local codes. Proper grounding, conducto
sizing, and short circuit protection must be installed for safe operation. Imprope
installation or operation of this control may cause injury to personnel or damage to
equipment.
Hazardous voltages may be present on external surfaces of ungrounded controls. This
can result in personal injury or equipment damage.
When performing visual inspections and maintenance, the incoming AC power must be
turned off and locked out. Hazardous voltages will be present until the AC power is
turned off. The drive contactor does not remove hazardous voltages when opened.
Page 22
Page 29

Incoming Power Requirements
A remote fused AC line disconnects or circuit breaker installed ahead of the control is required
by the NEC (National Electrical Code). The control is designed to accept single-phase AC line
voltage.
Grounding
The control must be connected to earth ground either via mounting screws provided by an
enclosure or chassis-installed screw or by using the Earth Ground lug provided on the drive
heatsink, for safety of operating personnel. The ground wire should be of the same gauge as
the AC Input wires and must be connected to the panel or enclosure frame for personal safety.
Wiring Guidelines for Focus DC Drives
Check drive nameplate data for conformance with AC power source and motor
AC
Catalog HP Fusing Max
Part # Volts Amps AWG Volts Amps AWG Volts Amps AWG
F3R2C ¼ -1
½-2
F3R2E ¼ -1
½-220Amp
F3R5E
F3R5E
F3R5E
F3R5E
3 60
5 60
20
Amp
250Vac
250Vac
Amp
500Vac
Amp
500Vac
120
240
120
240
240 24 #10 180 15 #10 200 1 #14
240 40 #8 180 25 #8 200 1 #14
Input
16
16
16
16
Wire Armature
#14 90
180
#14 90
180
DC Output Shunt Field
Armature Wire Field Field Wire
10
10
10
10
#14 100
200
#14 100
200
1
1
1
1
#14
#14
Notes:
All wiring based on 75° C copper wire, types FEPW, RH, RHW, THHW,
THW, THWN, XHHW, USE, ZW
Wire gauge size based on 30° C maximum ambient and no more than
three conductors in a raceway or cable and 1.25 service factor.
Please refer to National Electric Code Table 310-16 for additional
information.
Wiring must also meet all Local Codes.
Do not place knife switches, polarity reversing switches, reversing contacts in
the armature or field circuits.
During normal operation, keep all covers in place and cabinet doors shut.
Page 23
Page 30

Motor Thermal Switch
For Motor Thermostat wiring, see the “Control Wiring” section.
Wrong Motor Rotation
If the motor rotates in the wrong direction, one of the following changes will correct it:
Exchange Al and A2 output Motor Armature leads.
Or
Exchange Fl and F2 Motor Shunt field leads.
If DC Tachometer Feedback is being used, Tach wires will also need to be swapped.
Installation of Option Kits
Do not install option kits until you have verified the basic operation as outlined in the
Start-Up section.
Pre-installation of option kits before verification of basic drive operation will make
troubleshooting much more difficult. Option kits are often installed incorrectly and one
cannot determine if the drive was functional before kits were installed.
Page 24
Page 31

Drive Power Wiring
)
¼ - 2 HP Focus 3 Models
F3R2E & F3R2C
F+ F- A+ A-
A+ & A- are the motor
Armature leads
F+ & F- are a shunt wound
motors Field leads
( they will not be present on
Permanent Magnet or
Universal Motors
AC Line
Input
Earth
Connection
Page 25
Page 32

Drive Power Wiring
)
3 - 5 HP Focus 3 Models
F3N5E & F3N5C
AC Line
Input
Earth
Connection
A+ & A- are the motor
Armature leads
F+ & F- are a shunt wound
motors Field leads
( they will not be present on
Permanent Magnet or
Universal Motors
A+ A- F+ F-
Page 26
Page 33

Control Wiring
TERMINAL CONNECTIONS (TB2) & DESCRIPTIONS
Pin Number
1 +24 Vdc Supply: Powers the logic inputs to the drive. It is not intended
for it to be used to power external circuits. External use will void warranty.
2 Tie Point: It has no internal connections and is used as a tie point for
the Motor Thermal or Stop button connection. see Application Safety
3 Run Input: When +24 Vdc is applied to this terminal, the Run relay picks
up, the Speed loop and the Current loop are enabled, and the clamp on
the SCR firing circuits is released.
4 Run Relay Contact Output: Normally Open connection. Rated:
0.5amps @ 120VAC for non-inductive loads. It can be used as the seal-in
contact in a three-wire run circuit or as the run contact feedback in a twowire system.
5 Run Relay Contact: Relay common connection.
6 Run Relay Contact: Normally Closed connection. Rated: 0.5amps. @
120VAC for non-inductive loads.
7 Jog Input: When +24 Vdc is applied to this input, the output of the
accel / decel circuit is electronically disconnected from the speed loop and
the jog speed command (from the jog speed pot) is electronically switched
in. This jog speed command can be configured as a Thread speed
(maintained jog speed) by jumpering terminals TB2-3 & 4 in addition to the
Run/Jog connections already shown on page 30.
8 Jog Potentiometer Supply voltage input: This terminal is typically
connected to the +10 Vdc (TB2-9) speed pot supply when jog is required.
9 +10 Vdc Speed pot / Jog supply voltage: Maximum load is 5ma
therefore the recommended Jog Pot value would be 5K ohms
10 Standard Speed command input: Typically this input is connected to
the wiper of the speed pot wiper. Input impedance: 20Kohm.
11 -10 Vdc Speed pot / Jog supply voltage: Maximum load is 5ma
therefore the recommended Jog Pot value would be 5K ohms
Page 27
Page 34

TERMINAL CONNECTIONS (TB2) & DESCRIPTIONS
12 Drive Signal Common Connection: Drive circuit common connection.
13 Minimum Speed Potentiometer Connection: This terminal is used in
conjunction with the speed pot to provide a minimum speed setting. It is
compatible with the Forward/Reverse switch option.
14 Remote Current Limit Potentiometer: Wiper connection. Jumpers JP6
& JP7 must be set to RMT position. Shielded cable should be used for
wiring purposes if the pot is not mounted on the drive front cover. A
standard pot (5Kohm) may be used – see Accessories/Options
15 Remote Current Limit Potentiometer: Clockwise connection. Jumpers
JP6 & JP7 must be set to RMT position. Shielded cable should be used
for wiring purposes if the pot is not mounted on the drive front cover. A
5Kohm potentiometer should be used, see Accessories/Options
Note: Counter clockwise connection and shield should be connected to
terminal TB2 pin 12.
16 Auto/Manual Input: When +24 Vdc is applied to this terminal, the speed
command input to the accel/decel circuit is switched from the standard
speed pot input to the follower (current or voltage) speed command
derived from terminal TB2- pins 17 or 18. If the current/voltage follower is
the only signal used, terminals TB2- pins 2 & 16 must be jumpered.
17 Current Signal Follower Input: positive input for external mA current
source. Input impedance: 100 ohms. Range: 0-5mA or 0-20 mA
** Note: The Current Signal Follower Input on the Focus 3 Regenerative Drives is designed for 0
to 5 or 0 to 20 ma, not 1 to 5 or 4 to 20 ma. The circuitry can be adjusted to bias out the 1 or 4
milliamp current levels and the drive will follow the signals correctly. The difference is that if the
current input drops below the 1 or 5 ma level, the drive will rotate in the reverse direction ( as
much as 25% speed if the signal goes to zero). If a 1 to 5 or 4 to 20 ma signal is required on a
Focus 3 Regenerative Drives, it is recommended that the Focus 3 Signal Isolator board (F3NSBD)
be used since it has circuitry built in to block the reverse speed signal.
For more detailed information click on the “blue” F3NSBD above.
18 Voltage Signal Follower Input: positive input for external voltage
source. Input impedance: 1 Kohm/volt. Range: 0-200 Vdc.
19 DC Tachometer Input: negative input from motor mounted DC
tachometer. Input impedance: 120 Kohm in the high position and 13.5K
ohm in the low position. Range at maximum speed: 6.5 to 17.4 Vdc in the
low position and 60 –160 Vdc in the high position. Note: virtually any
tachometer voltage can be used with the addition of an external resistor in
series with the tach lead (consult factory it required).
20 DC Tachometer Input: positive input from motor mounted DC
tachometer. Note: Cable shield should also be connected to this terminal.
Page 28
Page 35

Terminal Block (TB2)
t
t
r
j
Installation
On chassis drives, the terminal block
(TB2) is installed so that control wires are
inserted into the terminal point from the
right side of the block. For enclosed drives,
the terminal block must be installed so
wires extend up (900 angle) from the drive
PC board. lf the control wires extend ou
to the side, there is not sufficien
clearance space for the enclosure
cover.
If the customer supplied moto
thermal is not used, pins 1 & 2 must be
umpered or the drive will not start.
NOTE:
Enclosed
Units
Wire Entry
Chassis
Units
Wire Entry
Shielded wire (2 or 3 conductor) is
recommended for speed command and
other signal wire connections. Shields
should be taped off at the remote end. At
the drive, connect shields to the circuit
common, route wire away from high
current lines (i.e. AC lines and armature
wiring).
Recommended Cables and pots are
available from :
Control Techniques Service Center
@ 1-800-367-8067
Signal &
Control Wiring
Entry
Page 29
Page 36

Terminal Strip Connections
r
p
A
y
Enclosed Model
Standard Start / Stop & Speed Potentiometer Connections
Motor Thermal or Jumper
1
2
(customer supplied)
Sto
3
4
5
9
10
13
12
*
CW
Chassis Model
Start
Drive will not start without this. This
is intended for system interlock- see
pplication Safet
The Start/Stop Switch
And the Speed
Potentiometer are
supplied as shown on
the drive cove
The Chassis Model has no
operator devices connected to
the drive control terminal strip.
The only connections made
are connections from terminal
#3 to #4 which is required for
three wire Start/Stop controls.
The next four pages show various configurations of operator control devices and speed
(or current) adjustment potentiometers. These can be used on Chassis models, which is
typically the case, or the Enclosed models, which would require possible enclosure and
internal wiring changes. The two wire configuration (top of next page) is commonly used
for remote contol of the drive (i.e. PLC control).
Page 30
The Speed Potentiometer is
supplied “loose” with the drive.
Page 37

Optional Terminal Strip Connections
y
y
p
p
A
y
A
y
Note: It is strongly recommended that all remote control connections to the drive (i.e. speed pot,
start / stop etc.) are wired with shielded cable for noise immumity
1
2
3
4
10
12
* Jumper installed at factor
*
+
-
Two Wire ON / OFF
with remote 0 to +10Vdc Speed
command
1
2
3
4
5
9
10
13
12
1
2
3
4
5
Sto
Start
*
CW
* Jumper installed at factor
Motor Thermal or Jumper
(customer supplied)
Motor Thermal or Jumper
(customer supplied)
Sto
Start
Run/Jog
Drive will not start without this. This
is intended for system interlock- see
pplication Safet
Three Wire Start / Stop
With Uni-polar Speed Potentiometer
Drive will not start without this. This
is intended for system interlock- see
pplication Safet
Three Wire Start / Stop
with Run / Jog Selector Switch
7
8
*
9
10
13
12
CW
-
* When using Jog function, remove factory installed
jumper from terms 3 & 4
and add to terms #8 & 9
Page 31
Page 38

Typical Terminal Strip Connections
p
V
A
y
Note: It is strongly recommended that all remote control connections to the drive (i.e. speed pot,
start / stop etc.) are wired with shielded cable for noise immumity.
Drive will not start without this. This
Motor Thermal or Jumper
1
2
3
4
5
7
(customer supplied)
Sto
Start
Run/Jog
(Switch shown in
run position)
is intended for system interlock- see
pplication Safet
Three Wire Start / Stop
with Run / Jog Selector Switch
8
9
10
13
12
14
15
16
17
18
19
20
CW
With Uni-polar Speed Potentiometer
To Pin #1
With
Manual / Auto Speed command Selector
Switch
(Manual – Speed Pot)
+
+
-
I
-
-
DC Tachometer Input
+
Current Signal Input
Voltage Signal Input
(Auto – Either Current Signal
or
Voltage Signal)
With
DC Tachometer Feedback
Shielded cable should be 3 conductor with overall shield w/pot end tied off and dressed.
Cable and pots are available from Control Techniques Service Center @ 1-800-367-8067
Cable P/N 3CONCBL-XXX (XXX in feet)
Page 32
Page 39

Typical Terminal Strip Connections
p
A
y
Note: It is strongly recommended that all remote control connections to the drive (i.e. speed pot,
start / stop etc.) are wired with shielded cable for noise immumity. These are all low voltage
signals.
Drive will not start without this. This
is intended for system interlock- see
Motor Thermal or Jumper
1
2
3
4
5
7
(customer supplied)
Sto
Start
Run/Jog
(Switch shown in
run position)
pplication Safet
Three Wire Start / Stop
With Run / Jog Selector Switch
8
9
10
13
12
14
15
16
17
18
19
20
CW
Speed
Potentiometer
Current Limit
Potentiometer
CW
-
DC Tachometer Input
+
With
Uni-polar Speed Potentiometer
With
Remote Current Limit Potentiometer
With
DC Tachometer Feedback
The Current Limit potentiometer is
available from Control Techniques;
see accessories section, page 20
Shielded cable should be 3 conductor with overall shield w/pot end tied off and dressed.
Cable and pots are available from:
Control Techniques Service Center @ 1-800-367-8067
Cable P/N 3CONCBL-XXX (XXX in feet)
Page 33
Page 40

Typical Terminal Strip Connections
p
Note: It is strongly recommended that all remote control connections to the drive (i.e. speed pot,
start / stop etc.) are wired with shielded cable for noise immumity. These are all low voltage
signals.
Drive will not start without this. This
is intended for system interlock- see
Application Safety
Three Wire Start / Stop
With Run / Jog Selector Switch
With Forward / Reverse Switch
1
2
3
4
5
7
8
9
10
11
13
Motor Thermal or Jumper
(customer supplied)
Sto
Start
Run/Jog
(Switch shown in
run position)
Forward /
Reverse
(shown in
Forward)
CW
12
15
16
17
18
19
20
-
DC Tachometer Input
+
Speed
Potentiometer
Speed Potentiometer
With
DC Tachometer Feedback
The Current Limit potentiometer is
available from Control Techniques;
see accessories section, page 20
Shielded cable should be 3 conductor with overall shield w/pot end tied off and dressed.
Cable and pots are available from:
Control Techniques Service Center @ 1-800-367-8067
Cable P/N 3CONCBL-XXX (XXX in feet)
Page 34
Page 41

Standard Unipolar Speed Potentiometer Wiring
+10vdc
Ref.
Min Spd
Common
9
10
13
12
Cable should be 3 conductor with overall shield w/pot end
tied off and dressed. Cable and pots are available from:
Control Techniques Service Center @ 1-800-367-8067
Cable P/N 3CONCBL-XXX (XXX in feet)
Wiper
CWCCW
Speed Pot
Rear View
CCW=counter
clockwise
Speed Potentiometer P/N SpdPot
Page 35
Page 42

Customer Jumper Selections
Jumper Programming
Equipment damage and/or personal injury may result if jumper programming is
attempted while control is operational. Always lock out power at the remote
disconnect before changing jumper positions.
See page 36 for jumper locations
JUMPER DESCRIPTION RANGE FACTORY SETTING
JP1 Optional “M” Contactor Yes or No No Contactor
Sequencing Module (NO JUMPER)
JP2* Speed or Current Control Speed or Current Speed
Mode (see next page) (SPD) (CUR)
JP3 Tachometer Feedback Low (6.5-17.4 Vdc) or HI
Range (at max. speed) HI (60-160 Vdc)
JP4 Speed Feedback Selector Tachometer (TACH) or Armature
Armature (ARM)
JP6 Local or Remote Current Local or Remote (RMT) Local
Limit Pot Selector
JP7 Local or Remote Current Local or Remote (RMT) Local
Limit Pot
JP8 Armature Voltage LOW (90 Vdc) or HI (180 Vdc)
Level Selector HI (180 Vdc)
JP9 Current Feedback A thru D C
Range (see next page)
JP10 Line Frequency Selector 50 or 60Hz (w/ jumper) 60Hz
JP11 Input Voltage 120 or 240Vac 240Vac
Selector (see Table below)
Input Line Voltage JP11 Jumper Positions
120Vac A to E and B to D
240Vac
Items in BOLD RED are factory set positions
Page 36
A to C and B to C
Page 43

Current Feedback Range (JP9)
FOCUS Catalog DC Output Current JP9
Number (Amps) Jumper Position
2.6 No Jumper
(1/4 – 2 HP) 5.5 A
F3R2C 7.5 B
F3R2E 10 C
5.2 No Jumper
(3 – 5 HP) 11 A
F3R5E 15 B
F3N5E 20 C
25 D
Current Control Mode
Focus 3 Drives can be configured to operate in the Current Control Mode which is often
referred to as making the drive a “Current Regulator”. Since motor torque is directly
proportional to the armature current, a drive configured as a Current Regulator is often
referred to as a “Torque Regulator”.
*If using the Focus drive as Torque Regulator, make the following
adjustments:
JP2: Select current (CUR) control
JP4: Select tachometer (TACH) feedback, but do not use a tachometer.
JP9: Select the appropriate current feedback range.
ACCEL and DECEL pots: Set to full counterclockwise position.
LOCAL CURRENT LIMIT pot: Set to full clockwise position.
In torque control mode, the motor speed is determined by how much load there is on the
motor and the torque level set on the drive. If torque in the motor (as set by the Drive) is
set to a level higher than what is required to move the load, the motor will accelerate in
speed until either the load from the motor increases to the level set by the drive or the
drive reaches its maximum output voltage (as set by the line voltage).
In the case of a lightly loaded motor,
the motor could accelerate to almost twice-base speed under these conditions.
In this mode the user be aware of this and MUST PROVIDE OVERSPEED PROTECTION.
Page 37
Page 44

JP5
IR Comp
Positive
Or
Negative
JP2
Regulation
Mode
Speed /
Current
JP10
50 / 60 Hz
Operation
(in = 60Hz)
Programming Jumper Locations
Optional
Motor
Contactor
Control
Connection
JP6 / JP7
Current
Limit Pot
Selection
Local or
Remote
JP4
Armature/
Tachometer
JP8
Armature
Voltage
Range
JP9
Maximum
Output
Current
Selection
JP3
Tachometer
Feedback
Range
Selector
JP11
AC Input
Range
Selection
Page 38
Page 45

Jumper Programming
j
r
JP3-Tach Feedback Range
Lo - 6.5 to 17.4 Vdc
Hi - 60 to 160 Vdc
JP4 -------- Feedback Selector
Tachometer (Tach)
Armature (Arm)
JP8 --------- Armature Voltage
90 Vdc
180 Vdc
Bold Fonts indicate Factory Settings
JP11 ---- Input Voltage
120 Vac A to E
&
B to D
240 Vac A to C
Photo shown
umpered fo
240 Vac input
B to C
&
Page 39
Page 46

JP9 -- Max Output Current
y
(100%)
Removed - 2.7 A and less
A – 5.5 A
B – 6.4 A
C – 7.5 A
D – 10A
Select based on Armature
requirements
JP6 & JP7 --- Remote
Current Limit
Pot Select
Local – Uses Current
Limit pot on
Control Board
Bold Fonts indicate
Factor
Page 40
Settings
Remote – Uses remote
Current limit
Potentiometer
Page 47

LED Status Indicators
Run
Current
Run LED – This red led will illuminate any time the run relay is energised
Curr Lmt (Current Limit) LED – This yellow led will illuminate any time one
of the three conditions are met:
1. The drive is at the maximum output
current as set by the current limit
potentiometer and the selected position
of JP9
2. The motor is at the maximum output
voltage as possible based on the supply
voltage.
3. The motor armature is open circuit
( no motor connected )
Page 41
Page 48

Internal Adjustments I Potentiometers
Deceleration
Acceleration
Velocity
Stability
Maximum
Speed
Jog
Speed
Adjust
Local
Current
Limit
Minimum
Speed
Current
Follower
Voltage
Follower
Speed
Rate
Page 42
Current
Stability
Follower Zero
Bias Adjust
Page 49

Basic Customer Adjustments
A
r
A
f
j
Maximum Speed (MAX SPD)
The MAX SPD pot sets the maximum motor speed (80-120% of motor base
speed) allowed. It is factory preset to the midway position. Note: Do not exceed
motor nameplate maximum speed rating. With the motor running, turn the speed
pot on the drive enclosure cover/operator control panel fully clockwise while
monitoring actual motor RPM or by measuring the Armature Voltage on A+ & A-.
Then, adjust the MAX SPD pot on the control board to set the desired maximum
motor speed. Do not exceed the motors Armature Voltage nameplate rating.
Minimum Speed (MIN SPD)
The MIN SPD pot sets the minimum speed (0-30% of maximum speed
setting) at which the motor will run. It is factory preset at its full counterclockwise
position. With the motor running, turn the speed pot on the drive enclosure
cover/operator control panel fully counterclockwise. Adjust the MIN SPD pot
clockwise until the desired lowest motor speed is reached.
Acceleration and Deceleration Times (ACCEL / DECEL)
djust the ACCEL and DECEL pots clockwise to increase the linea
acceleration and deceleration times (0.3-30 seconds). These adjustments are
independent from each other. Note: Controlled deceleration time occurs when the
speed pot is turned down, but not when the start/stop switch is placed in the STOP
position. Note: When the drive is used in torque (current) control mode, the
CCEL/DECEL pots adjust how quickly the motor torque level changes as the
main torque pot is varied.
Local Current Limit (LOC ILMT)
Set the LOC ILMT pot to limit the motor armature current to 150% or less o
the motor nameplate rating. It should represent the lowest level consistent with
satisfactory operation. The pot is factory preset at 150% of the range selected by
umper JP9 (A-D).
The yellow Current Limit LED indicator light on the drive control board
illuminates when the armature current reaches 95-100% of the current limit setting.
Jog Speed (JOG SPD)
Adjust the JOG SPD pot clockwise to increase the speed (0-30% of full speed
reference) at which the motor will run when in jog mode. It is factory preset to its
full counterclockwise position.
Page 43
Page 50

Acceleration and Deceleration Times (ACCEL / DECEL)
v
A
v
v
The Focus 3 Regenerative DC Drive is a bi-directional drive, meaning that the drive can
follow speed reference ranging from (+)10vdc (full speed forward) to 0 to (-)10vdc (full
speed reverse). The acceleration and deceleration times are set by two potentiometers
on the control board. Since there are only two, one sets the time to change from
(+)10vdc to (–)10vdc while the other sets the time to change from (-)10vdc to (+)10vdc.
In essence, what this means is that the acceleration potentiometer sets the acceleration
time in the forward direction and the deceleration time in the reverse direction and vice
versa. The diagram below shows this graphically.
Time set by Acceleration potentiometer
Time set by Deceleration potentiometer
+10vdc
Forward
1
-10vdc
Reverse
Fwd
Accel
Fwd
Decel
Re
ccel
Time
Re
Speed
Re
Decel
Page 44
Page 51

Basic Customer Adjustments
Acceleration
and
Deceleration
Time adjustments
JOG
SPEED
Sets Jog
Speed
MAX SPD
Adjust for maximum Motor speed
MIN SPD
Adjust for
minimum
Motor speed
Local Current Limit
Limits maximum Output Current
Page 45
Page 52

Additional Tuning Adjustments
Internal Resistance Compensation ( IR COMP )
Compensation pot is used to overcome the motor’s natural tendency to slow
down as the load increases. If the motor slows down excessively as it is loaded, adjust
the IR COMP pot clockwise to recover speed lost during the loaded condition. The
motor will oscillate in speed or “hunt” if the IR COMP pot is adjusted too far clockwise.
If this pulsing of speed occurs, adjust the IR COMP pot counter clockwise until the
motor speed stabilizes.
If JP4 is set in the TACH position indicated tachometer feedback is being used,
turn the IR COMP pot fully counter clockwise otherwise instability will occur.
Note: If the drive is using the voltage or current signal follower, perform these
adjustments with the Auto/Manual switch in the Manual position.
Velocity Stability (VEL STAB)
The VEL STAB pot helps match the dynamic characteristics of the drive to the
dynamic characteristics of the DC motor and its load. The drive’s outer velocity loop
includes an electrical “lead” circuit to compensate for the mechanical “lags” that exist in
both the DC motor and its driven mechanical system. The VEL STAB pot adjusts the
time constant of this lead circuit.
Clockwise rotation causes the drive to respond more quickly to speed
command/speed feedback changes but increases the overshoot experienced by the
drive. Counterclockwise adjustment of this pot dampens the drive response. It is factory
preset at the midway position.
Current Stability (ISTAB)
The ISTAB pot matches the dynamic characteristics of the drive to the dynamic
characteristics of the DC motor armature. The drive’s inner current loop includes an
electrical “lead” circuit to compensate for the electrical “lag” that exists in the DC motor
armature current. The ISTAB pot adjusts the time constant of this lead circuit.
In torque (current) control applications, the velocity loop is bypassed and the
current loop is used. For speed (velocity) control applications, the current loop is fed
from the output of the velocity loop.
The current loop responds to current changes quickly. Therefore, the ISTAB pot
is very sensitive and harder to adjust properly. Clockwise rotation causes the drive to
respond more quickly to current changes, but the factory shipped setting is usually
adequate for most applications.
Speed Loop Offset (SPD OFFSET)
This pot is used to zero out any offsets in the speed loop amplifier. With the
speed pot set to zero (as well as the Min Spd pot, if used), adjust the SPD OFFSET so
any “creep” in the motor speed is eliminated with zero speed command. It is factory
preset to its midway position.
Page 46
Page 53

Additional Tuning Adjustments
Velocity Stability
(VSTB)
Adjust for speed loop
stability
IR Comp
Adjust for motor speed
droop due to load
Current Stability
(ISTB)
Adjust for current
loop stability
Speed Loop Offset
Adjust for zero creep
speed
Page 47
Page 54

Optional Tuning Adjustments
Speed Rate Feedback (Spd Rate Fdb)
Used with the VEL STAB pot, the SPD RATE FDB pot controls the relative magnitude of
the “lead” circuit in the velocity loop. Clockwise rotation reduces the drive’s velocity rate
of change and decreases the overshoot experienced by the drive. Normally used in
tachometer feedback applications, this pot is factory set to its full counterclockwise
position.
The following adjustments are only required when either the current follower input (i.e.
4-20 mA input) or the voltage follower input (i.e. tachometer follower) is used. Only one
of these inputs may be used. Terminal #16 must be tied to +24 Vdc (terminal #1) to
activate the follower input speed command; typically this selection is made by the
Auto/Manual selector switch (see page 31) .
Signal Follower Zero Bias (BIAS) used with Voltage Input (TB2-18)
The BIAS pot prevents “creep” in the motor speed by eliminating any unwanted
offset voltage levels in the voltage source. It may also be used to add a slight offset to
the voltage signal.
Signal Follower Zero Bias (BIAS) used with Current Input (TB2-17)
Adjust the BIAS pot so the drive is at zero speed when the minimum current
signal follower speed command (0-20 or 0 –5 mA) is applied.
If a 4-20mA (or 1-5mA) speed command is required, use the optional signal
isolation board (F3NSBD). SEE Note on page 8
Voltage / Speed Signal Follower Gain (SP REF GAIN)
The SP REF GAIN pot calibrates the User supplied Voltage Signal Follower
speed command (0 - 200 Vdc) so the motor reaches its rated voltage/speed when the
input voltage signal is set to its maximum value. It is factory preset to its full
counterclockwise position.
Current Signal Follower Gain (IREF GAIN)
The IREF GAIN pot calibrates the User supplied Current Signal Follower speed
command ( 0-5mA or 0-20mA ) so the motor reaches its rated voltage/speed when the
current signal is set to its maximum value. It is factory preset to its full clockwise
position. SEE Note on page 8
Page 48
Page 55

Optional Tuning Adjustments
Speed Rate
Zero Bias
Speed
Reference Gain
Current
Reference
Gain
Page 49
Page 56

Page 50
Page 57

Page 51
Page 58

Start-up Guide Worksheet
Improper procedures can result in personal injury or equipment damage. Only qualified electrical
maintenance technicians familiar with electronic drives and their standard safety precautions
should be permitted to install, start-up, or maintain this apparatus.
At this point all INPUT POWER must be OFF !
Obtain the following information:
Focus Drive Model
F3R2C or F3R2E Drive Serial Number
F3R5E or F3R5E Drive Part Number _____________
a) AC Input Line Voltage 240 Vac
120 Vac
b) Motor Nameplate Information: Armature Voltage _________Vdc
Armature Current _________A
Field Voltage _________Vdc
Field Current _________A
Rated RPM _________ rpm
c) Type of Speed Feedback Armature Voltage ( most common case )
DC Tachometer
Focus drives come to you factory set for Armature Voltage feedback. Even if your
motor is equipped with Tachometer for Speed feedback, we would strongly suggest
that you first run your motor using Armature Voltage initially. After you have set the
motors maximum speed in Armature Voltage feedback, you can check your
tachometers output to verify that it producing the correct output before actually using it.
d) Regulation Mode Speed ( most common case )
Torque ( read first ! )
Focus drives come to you factory set for Speed Regulation mode which is the most
common case. Even if your application requires Torque control, we would strongly
suggest that you first run your motor Speed Control initially. After you have verified
Page 52
Page 59

proper operation in the Speed mode, you could then switch over to Torque mode.
Page 53
Page 60

Focus 3 Jumper Setup Worksheet
Refer to the data recorded on the previous page for this worksheet
Refer to your motor nameplate data.
STEP 1 Does your motor have a shunt field winding?
If No go to STEP 5 otherwise go on.
STEP 2 Is your motor field current greater than 1.1A?
If No, go to STEP 3
If Yes STOP The Focus 3 Field Supply rectifier will be damaged!!!
Call Tech Support for a solution.
STEP 3 If your motor field voltage is 100 Vdc,
then you must use 120 Vac for Input Power ----- Set JP11 as shown
and Set JP8 to Low
then go to STEP 7
If you must use 240 Vac ----- Call Tech Support for a solution
otherwise go to STEP 4
: :
STEP 4 If your motor field voltage is 200 Vdc,
then you must use 230 Vac for Input Power ---- Set JP11 as shown
and Set JP8 to Hi
then go to STEP 7
otherwise STOP ---- Call Tech Support for a solution
STEP 5 If your motor armature voltage is greater than 110 Vdc,
then you should use 230 Vac for Input Power ---- Set JP11 as shown
and Set JP8 to Hi
then go to STEP 7
If you must use 120 Vac ---- Call Tech Support for a solution
otherwise go to STEP 7
STEP 6 If your motor armature voltage is less than 110 Vdc,
then you must use 115 Vac for Input Power ----- Set JP11 as shown
and Set JP8 to Lo
then go to STEP 7
: :
Page 54
Page 61

Armature Current Programming - (JP9) Current Feedback Range
STEP 7
Are you applying a Focus Model F3R2C or F3R2E ? If yes, then set jumper JP9 to the
letter that matches up most closely with your motors Armature Amp rating from the table below:
otherwise go to STEP 7a
FOCUS Catalog DC Output Current JP9
Number (A) Jumper Position
2.6 No Jumper
(1/4 – 2 HP) 5.5 A
F3R2C 7.5 B
F3R2E 10 C
then go to STEP 8
STEP 7a
Are you applying a Focus Model F3R5C or F3R5E? If yes, then set jumper JP9 to the
letter that matches up most closely with your motors Armature Amp rating from the table below:
otherwise go to STEP 7
FOCUS Catalog DC Output Current JP9
Number (A) Jumper Position
5.2 No Jumper
(3 – 5 HP) 11 A
F3R5C 15 B
F3R5E 20 C
25 D
Page 55
Page 62

Application Safety
When applying a motor drive in a manufacturing process, one must understand that the
motor drive merely provides the energy for a motor to turn and it will do so without
regard upon activation and command. There could be failure modes in any external
interface equipment and/or the Focus drive itself that could cause the motor to turn
suddenly at any speed or cause it to fail to stop on command without warning. When
considering Operator safety the Installer must include and employ additional
equipment to provide safeguards to insure Operator safety.
Consult all NEC and OSHA machine safety recommendations and guidelines.
These safeguards are the sole responsibility of the Installer. For these reasons, the
Installer must envision all, implement all and test or simulate all failure methods. The
Installer is responsible for his/her resulting implementation to insure safe and reliable
operation of the installation.
In addition, the Installer should provide the End User of his Installed system with a
System User’s Manual and instruct the User/Operator on correct/safe operation.
Instruction should include the demonstration and purpose of safety features that you the
Installer has included and the importance of periodic testing to insure they do indeed
operate as designed. The Installer should instruct, inform and warn his End User
customer against bypassing the safety permissives the Installer has provided.
NOTE: Without the use of the Contactor option, P/N 2400-9001 (or the Reversing
Contactor option, P/N 2400-9002, if reverse is required) potential motor movement in the
event of a power line disturbance (causing an SCR (power device) to misfire) can occur
since the motor is connected directly to the power circuit even when the drive is
disabled. It is highly recommended that one of these contactor kits be used to guard
against such occurrences.
Page 56
Page 63

Initial Start-Up
The following procedure is to verify proper operation of the drive in its simplest form as
a basic speed regulator with no option kits installed. It is assumed that the drive is in its
“out of box” condition with respect to jumper programming with the exception of what
was just changed in the previous pages, jumper setup worksheet.
Installation of Option Kits
Do not install option kits until you have verified the basic operation as outlined in the
Start-Up section.
Pre-installation of option kits before verification of basic drive operation will make
troubleshooting much more difficult. Option kits are often installed incorrectly and one
cannot determine if the drive was functional before kits were installed.
Page 57
Page 64

Initial Start-Up con’t
d
A minimal number of connections are made to the terminal strip (see diagrams
below). If the drive is an enclosed unit with operator devices (start/stop and
speed pot) only the jumper from terminal block TB2-1 to TB2-2 needs to be
made.
a) Type of Speed Feedback; In this procedure, leave jumper in armature
feedback (JP4 = ARM).
b) Regulation Mode: In this procedure, leave jumper in speed regulation
(JP2 = SPD).
For Chassis Units Only
ADD THIS
Add this
JUMPER
Jumper
Stop
Start
Speed
Pot
Enclosure
Cover
close to run
10
12
1
3
7
8
9
Drive run enable
Jog enable
+10vdc
FOCUS 3
Chassis Unit
Jog ref
0 to 30%
Regen
only
A+
A-
F+
F-
FE1
FE2
For Enclosed Units Only
1
2
3
4
5
9
Drive run enable
FOCUS 3
Enclosed Unit
Regen
only
A+
A-
F+
F-
FE1
FE2
A1
Motor
Armature
A2
F1
Motor Fiel
F2
Note:
Permanent
Magnet Motors
do not have
Field F1 & F2,
connections
A1
Motor
Armature
A2
F1
Motor Field
F2
Page 58
Page 65

Initial Start-Up con’t
1. Adjust Current Limit Pot labeled LOC ILMT, fully counter-clockwise.
Adjust Speed pot (enclosed unit) approximately 1/3 turn clockwise (from full CCW
position)
Adjust Jog pot (chassis unit) fully clockwise.
Power can now be Applied !
2. Start drive. Run light (red) and Current limit light (yellow) are illuminated.
3. Slowly adjust current limit pot clockwise (~1/4 turn) while watching motor shaft.
Verify that the motor rotates in the desired direction and that the motor slowly
accelerates to about 30% of rated speed (also note that current limit light goes out
when motor is running steady). If the motor rotates in the wrong direction, stop drive,
REMOVE AC POWER and then reverse the field leads, F1 and F2.
Re-apply power and repeat this step.
4. Stop Drive and Turn off AC Power.
Basic Setup with Tachometer Feedback
(go to step #8 if NO tachometer)
5. The drive can now be set up for tachometer feedback if required.
Set JP4 to “Tach” position
Connect tachometer signal to drive (- to #19, + to #20)
Set JP8 to “Hi” if the following calculated voltage is in the range 60 to 160 Vdc.
Set JP8 to “Low” if the following calculated voltage is in the range 6.5 to 17.4
Vdc.
Tach voltage at max speed = tach volts per 1000rpm X max motor rpm
1000
If the calculated voltage is NOT in the ranges listed above, consult factory.
Repeat steps 1 to 2 above then proceed to step 6.
6. Slowly adjust current limit pot clockwise (~1/4 turn) while watching motor shaft.
Verify that the motor rotates in the desired direction and that the motor slowly
accelerates to about 30% of rated speed (also note that current limit light goes out
when motor is running steady). If the motor continues to accelerate past ~30%
speed, tachometer is probably connected backwards. Stop drive, Turn off AC
POWER and then reverse the tachometer leads, re-apply power and repeat this
step. Stop Drive and Turn off AC Power when complete.
7. Drive can now be set-up for terminal strip connections as required by the particular
application. Refer to pages 30-32 for typical
Terminal Strip Connections.
Page 59
Page 66

8. Only do the next Step if the Drive is to be configuration as of Current or Torque
Regulator. Otherwise Drive can now be set-up for terminal strip connections as
required by the particular application. Refer to pages 30-32 for typical Terminal
Strip Connections.
Basic Setup for Current (Torque) Regulator
9. If the drive is to be set-up as a Current (torque) Regulator, set jumper JP2 to
“CURR” position and JP4 to “TACH” position but DO NOT connect a Tachometer.
The standard speed command input (TB2-#10) is now the drive current reference. The
accel / decel adjustments on the control board will now control the rate of change of
current.
Note that the drive is now controlling motor torque and NOT speed, therefore if
the current reference is set to a higher level than the torque required by the load,
the motor will run to speeds in excess of rated motor speed. In applications where this
over-speed condition can occur (such as a web break in a simple re-winder) an
external over-speed protection device must be added to the system.
Page 60
Page 67

Focus 3 Trouble Shooting Guide
IMPORTANT SAFEGUARDS
All work on the drive should be performed by personnel familiar with it and its
application. Before performing any maintenance or troubleshooting, read the
instructions and consult the system diagrams. Only minor adjustments should be
necessary on initial start-up, depending on the application. In addition, some common
sense maintenance needs to be followed.
MAKE SURE THAT ALL POWER SOURCES HAVE BEEN DISCONNECTED BEFORE MAKING CONNECTIONS OR TOUCHING INTERNAL PARTS.
LETHAL VOLTAGES EXIST INSIDE THE CONTROL ANYTIME INPUT POWER IS APPLIED, EVEN IF THE DRIVE IS IN A STOP MODE. A TURNING
MOTOR GENERATES VOLTAGE IN THE DRIVE EVEN IF THE AC LINE IS DISCONNECTED. EXERCISE CAUTION WHEN MAKING ADJUSTMENTS
WITH THE CONTROL DRIVING A MOTOR. NEVER INSTALL OR REMOVE ANY PC BOARD WITH POWER APPLIED TO THE CONTROL
KEEP IT CLEAN: The control should be kept free of dust, dirt, oil, caustic
atmosphere and excessive moisture.
KEEP IT COOL: The control should be located away from machines having a
high ambient temperature. On panel mount controls, air flow
across heatsinks must not be restricted by other equipment
within the enclosure.
KEEP CONNECTIONS The equipment should be kept away from high vibration
TIGHT: areas that could loosen connections or cause chafing of
wires. All interconnections should be re-tightened at time of
initial start-up and at least every six months.
THE DC MOTOR MAY BE AT LINE VOLTAGE EVEN WHEN IT IS NOT INOPERATION. THEREFORE,
NEVER ATTEMPT TO INSPECT, TOUCH OR REMOVE ANY INTERNAL PART OF THE DC MOTOR
(SUCH AS THE BRUSHES) WITHOUT FIRST MAKING SURE THAT ALL AC POWER TO THE
CONTROL AS WELL AS THE DC POWER TO THE MOTOR HAS BEEN DISCONNECTED.
The motor should be inspected at regular intervals and the following checks must be
made:
A. See that both the inside and outside of the motor are not excessively dirty. This can
cause added motor heating, and therefore, can shorten motor life.
B. If a motor blower is used, make sure that the air passages are clean and the impeller
is free to rotate. If air filters are used, they should be cleaned at regular intervals or
replaced if they are disposable. Any reduction in cooling air will increase motor
heating.
C. Inspect the commutator and brushes. Replace the brushes if needed. Make sure that
the proper brush grade is used.
D. The motor bearing should be greased per the manufacturer’s instructions as to type
of grease and maintenance frequency. Over greasing can cause excessive bearing
heating and failure. Consult the instructions supplied with the motor for more details.
Page 61
Page 68

TROUBLESHOOTING OVERVIEW
Fast and effective troubleshooting requires well-trained personnel supplied with the
necessary test instruments as well as a sufficient stock of recommended spare parts.
Capable electronic technicians who have received training in the control operation and
who are familiar with the application are well qualified to service this equipment.
Suggested Training
A. Study the system instruction manual and control drawings.
B. Obtain practical experience during the system installation and in future servicing.
C. Train in the use of test instruments.
Maintenance Records
lt is strongly recommended that the user keeps records of downtime, symptoms, results
of various checks, meter readings, etc. Such records will often help a service engineer
locate the problem in the minimum time, should such services be required.
General Troubleshooting
The most frequent causes of drive failure are:
A. Loose or broken wire connections.
B. Circuit grounding within the interconnections or the power wiring.
C. Mechanical failure at the motor.
DO NOT make adjustments or replace components before checking all wiring. Also
monitor all LED indicator lights before proceeding with troubleshooting checks, and
check for blown fuses.
lt should be noted that modern solid state electronic circuitry is highly reliable. Often
problems, which appear to be electrical, are actually mechanical. It is advised that the
motor be checked in the event of any drive problems. Refer to the motor owner’s
manual for maintenance and repair procedures.
Notes for a Troubleshooting Technician
A minimum knowledge of system operation is required, but it is necessary to be able to
read the system schematics and connection diagrams.
An oscilloscope may be needed to locate problem areas and to make adjustments.
However, the majority of problems can be solved by using a multimeter and by parts
substitution.
WHEN A TEST INSTRUMENT IS BEING USED, CARE MUST BE TAKEN TO INSURE THAT ITS
CHASSIS IS NOT GROUNDED EITHER BY A GROUNDING PLUG CONNECTION OR BY ITS
CASE BEING IN CONTACT WITH A GROUNDED SURFACE. EXTREME CARE MUST BE
TAKEN WHEN USING THE OSCILLOSCOPE SINCE ITS CHASSIS WILL BE ELECTRICALLY
Page 62
Page 69

BASIC TROUBLESHOOTING
This paragraph contains a basic list of symptoms of an improperly functioning control.
Included in the list are possible causes and corrective measures for each symptom
described.
BEFORE PROCEEDING WITH ANY MAINTENANCE OR TROUBLE-SHOOTING
ACTIVITY, ALL POWER SOURCES MUST BE DISCONNECTED.
CONTROL APPEARS TO BE DEAD:
A. Terminals TB2-1 and –2 on the main PC board not jumpered together - install either
a jumper or the Motor Thermostat between these terminals.
B. No AC power - apply AC power and measure L1 and L2 for correct voltage.
C. Blown line fuses - replace line fuses.
D. Loose connections -turn off AC power and tighten connections.
E. Control incorrectly wired - recheck all wiring.
F. Defective Start/Stop switch, component on main PC board, or rectifier cube replace bad components as required. ( See Critical Components )
G. Speed potentiometer set to zero - slowly advance from zero to begin motor rotation.
LINE FUSES BLOW OR MAIN CIRCUIT BREAKER TRIPS WHEN APPLYING AC POWER:
A. Control is wired to AC voltage exceeding control rating -rewire control to proper AC
voltage or use step-down transformer.
B. Rectifier cube, field diodes on main PC board, motor winding or suppressor network
shorted, or a short to ground is present - locate and remove short.
C. Improper wiring or jumper programming during installation.
D. Defective main PC board component - replace as required. (See Critical
Components )
E. Motor shaft jammed - determine cause and correct.
F. Excessive carbon dust from brushes in motor - determine cause and correct.
FUSES BLOW WHEN SPEED POTENTIOMETER IS ADVANCED FROM ZERO:
A. Motor is overloaded - reduce load as required.
B. Motor is defective - consult motor instruction manual and repair or replace motor
as required.
C. Current limit adjustment set too high - readjust
ACCEL TIME IS MUCH LONGER THAN EXPECTED:
A. Check Accel pot setting
B Motor overloaded – reduce or remove load and re-check
DECEL TIME IS MUCH LONGER THAN EXPECTED:
A. Check Decel pot setting
B. Motor is being overhauled by another motor in system or by inertia of the machine
MOTOR DOES NOT REACH FULL SPEED:
A. Motor is overloaded - correct overload condition.
B. Maximum Speed potentiometer (MAX) is set too low -adjust MAX potentiometer
clockwise.
C. Low AC line voltage (more than 10% below nominal) -check AC line voltage and
correct.
D. Current limit set too low – re-adjust.
E. Incorrect jumper programming of JP9 - follow programming procedure
F. Defective rectifier cube - replace as required. (See Critical Components )
Page 63
Page 70

Motor brushes worn - replace as specified in motor instruction manual.
G.
Page 64
Page 71

MOTOR RUNS IN WRONG DIRECTION:
A. The Al and A2 output leads to the motor are incorrectly
wired - exchange these leads.
B. On shunt wound motors only the shunt field Fl and F2 leads are incorrectly wired –
exchange these leads.
MOTOR DOES NOT MAINTAIN SPEED UNDER LOAD:
A. IRCOMP potentiometer is set too low - adjust clockwise
H. Motor is overloaded - correct overload condition.
I. Incorrect jumper programming – check jumpers.
J. Defective component on main PC board – replace (See Critical Components)
K. Current limit set too low – readjust.
L. Motor brushes worn - replace as specified in motor instruction manual.
MOTOR DOES NOT COME TO FULL STOP:
A. Minimum Speed potentiometer (MIN) is set too high -readjust
B. Defective speed or torque potentiometer, component on regulator PC
board, Start/Stop switch, or rectifier cube -replace as required.
(See Critical Components)
NO SPEED CONTROL:
M. Defective rectifier cube - replace as required (See Critical Components)
N. Defective component on main PC board - replace as required. (See Critical
Components )
O. Incorrectly wired or defective speed potentiometer - check the wiring.
P. Incorrect jumper programming - check jumper programming.
Q. If the control (after rechecking all the wiring for proper and secure connections) is
still inoperative, make the following voltage checks. Double check to make sure that
armature leads Al and A2 are not grounded.
F. High resistance ground on motor armature
VOLTAGE CHECK CHART
Step Function
Normal
Voltage
Readings
1
with AC
Voltage to
Rectifiers
120 Vac 240 Vac
±10% ± 10%
Power “on”
2*
Speed
0 to +10 0 to +10
Vdc Vdc
command
3 Field Supply
100 Vdc 200 Vdc
Voltage
4* Armature
0-90 Vdc 0-1 80 Vdc
Voltage
*Depends on the setting of the speed adjustment knob
Terminal
or Point
ACl
AC2
On
power
cube
10-12
+Fl
-F2
+Al
-A2
Probable Cause
Blown Fuses
Defective speed
adjustment
potentiometer or
circuit board assembly
Defective field diodes
defective encapsulated
bridge rectifier
assembly
Defective encapsulated
bridge rectifier ass’y, or
circuit board assembly
Page 65
Page 72

Basic Test Setup – Light Bulb Test
It is fairly easy to test Focus Drives on the bench. One does not have to use a motor to
verify basic operation. When working properly, the Focus basically creates a variable
voltage much like a light dimmer except the output is DC. The easiest way to check a
Focus on the bench without a motor is to connect the Armature output to a resistive
load. One could use a 75 watt light bulb screwed into a light bulb socket base as
shown below.
Basic Test Power Wiring
In order to test the Focus, one would need to setup the input for 115 Vac operation and
for basic Armature Voltage feedback. The drive should also be set for the lowest
current setting. Therefore before testing, one should record the settings before test so
that they could be reset back after the test.
Page 66
115VAC
Line Input
75 W
Page 73

Record Drive Set-up BEFORE performing Light bulb test
Before Test
Circle One
JP2 SPD CUR
JP4 ARM TACH
JP8 Hi Low
JP9 A B C D
: :
115 Vac 230 Vac
Operation
Test
JP2 SPD
JP4 ARM
JP8 Low
JP9 None
: :
115 Vac Operation
Basic Armature Circuitry Checkout
After the Focus is wired as shown on the previous page and the jumper set as indicated
above, 115 Vac power could be applied and the Focus should cause the light bulb to
vary in brightness from nothing to full brightness. One could measure the voltage
across the bulb and it should be about 90 Vdc at maximum brightness. This would
verify the basic Start/Stop, Speed command, Power Supply, Regulator and Power
Sections.
Field Supply Checkout
If one wants to check the Field Supply, power should be removed and the light bulb
moved over to the F+ and F- terminals (use a 75 W bulb or less for the field. Use of
greater than 75 W could permanently damage the Field rectifiers). Then upon
application of power, the light bulb should light to full brightness and the voltage across
the light bulb should measure about 100 Vdc.
If the Focus passes these basic tests, the drive should be OK and the drive
should be able to run a good motor at least in Armature Voltage feedback (JP4 in ARM).
Reset jumpers back to the “Before Test Recorded Settings” except for JP4 and re-
check.
If the motor has a shunt field, it should measure at least:
200 ohms if Nameplate indicates 200 Vdc Field
100 ohms if Nameplate indicates 100 Vdc Field
Page 67
Page 74

Retrofitting Focus 2 Drives with Contactor Reversing
with Focus 3 Regenerative Drives
In retrofitting a Focus 2 with a Focus 3 drive there are four key issues to examine;
physical size and mounting, location of power and signal connections, electrical
compatibility and available options.
1. Physical size and mounting:
The enclosed Focus 3 drives are all slightly smaller in physical size than
the Focus 2 drives, the mounting hole locations though are different.
The chassis versions of the Focus 3 drives are slightly larger the Focus 2 drives
unless the Focus 2 drive was supplied with the contactor option where as they
are equivalent in size.
10.19
Focus 2 2 HP & 5HP
Contactor Option
Mounting Plate
1.25
14.24
9.75 9.35
Focus 2 2 HP & 5HP
Enclosed Units
Focus 3 2HP
Chassis &
Enclosed Units
6.35
6.75
6.25
9.00
13.00 12.00
Focus 2 2 HP & 5HP
Chassis Units
9.73
10.38
Focus 3 5HP
Chassis & Enclosed Units
8.88
9.50
14.12
2. Power and signal connections:
Focus 2 – Power and Motor Connections across the top
Signal Connections down the left side
Focus 3 - Power and Motor Connections across the bottom
Signal Connections down the right
Page 68
Page 75

3. Electrical Compatibility:
The Focus 3 is electrically identical to the Focus 2 controller with the exception that the
terminal strip connections are slightly different due to the addition of extra standard
features. A comparison these two terminal strips are shown below.
Focus 2Focus 3
Stop
Speed
Potentiometer
Remote Current
Limit
(If used)
DC Tachometer Only
Start
Manual
Auto
Motor Thermal
Run
Jog**
Fwd
Rev
(-)
(+)
1
2
3
4
5
6
7
8
9
10
11
12
13
14
15
16
17
18
19
20
+24
Tie Point
Run Input
Run Run
Jog Input
Jog Pot
Supply
+10 Vdc
Speed
Ref.
-10 Vdc
Signal
Common
Min Spd
Pot
Remote Current
Limit Input
Auto/Manual
Input
Current Source
Input
Voltage Source
Input
Tach
Input
Tie Point
Run Input
Jog Input
+10 Vdc
Speed
Ref.
Min Spd
Pot
Signal
Common
Tach
Input
+24
Motor Thermal
1
Stop
2
Start
3
4
5
6
Run
7
8
9
10
11
12
13
Jog**
(-)
(+)
Speed
Potentiometer
DC Tachometer
or
AC Tachometer
Note: Fwd / Rev switch
connected to reversing board,
not shown
Page 69
Page 76

4. Available options: Focus 3 Focus 2
Jog at Jog Speed Standard Optional
Current/Voltage follower Standard Optional
Remote Current Limit Standard Optional
Nema 4/12** Standard Optional
AC Tach Feedback Optional Standard
Reference Isolator Available Not Available
Reversing Focus 3 Regen Drive Optional
** Enclosed Units
Page 70
Page 77

Application Notes
R
In order to provide continuing support for the Focus products (as well as all of our other
products): ( if this is being viewed electronically, click on any blue item for link )
Application Notes (CTANXXX)
Technical Notes (CTTNXXX)
Replacement Instructions (CTRIXXX)
and kit Instruction Sheets (CTISXXX) are posted on our web site
These documents provide a wide variety of information instantly available day or night.
Below is a list of currently available Application Notes :
Click on DC Drives if on website
Application
ev
Drive
Family Topic
Note #
CTAN 125 A Focus 3 Replacing Focus 2 with Focus 3 Drives
CTAN 130 1.1 Focus 3 Tach Follower Applications
CTAN 204 1.0 Focus 3 Power Wiring Guidelines
CTAN 213 1.1 Focus 3 Eddy Current Controller Retrofit
CTAN 215 1.0 Focus Family Earth Grounding & Isolation
CTAN 216 1.0 Focus 3 Eddy Current Replacement Solution
CTAN 235 1.0 Focus 3 Adjustable Brake / Dynamometer App’s
CTAN 240 1.0 Focus 3 Speed Master w/Torque Slave
CTAN 241 1.0 Focus 3 120vac Remote Control Pushbuttons
CTAN 243 1.0 Focus 3 Multiple Drives Running in Tandem
CTAN 244 1.0 Focus 3 Isolated Master Reference Board
Replacement Instruction for Control Board (CTRI1210) can be found at our website at:
www.emersonct.com or click the link below:
CTRI210
CTAN130 and CTAN 215 are given in the next few pages.
Page 71
Page 78

CTAN #130
r
r
Focus 3 Drives in Tachometer Follower Applications
There are many applications that require a second drive to follow the speed of
the first (or primary) drive. There are two basic methods used, the first is a parallel
method and the second is a cascaded method. In the parallel method the speed
command of the first drive is sent directly to the second drive (as a speed command)
while in the cascaded method, the speed feedback (tachometer) is directed to the
second drive as a speed command. A disadvantage to the parallel method is that if for
some reason the first drive slows down while in a current limit condition, for example,
the second drive would no longer follow since it may not be in a current limit condition.
This is not the case for the cascaded method since the drive is following the actual
speed of the first drive.
Maste
Focus Isolator
Focus 3 Drives
The Focus 3 isolator option (p/n F3NSBD) is ideally suited for this purpose
since it is powered directly by the Follower drive and connections are minimal.
For additional information go to the following link :
http://www.emersonct.com/download_usa/manuals/Kits/2415-3050.pdf
(F3NSBD)
Followe
Page 72
Page 79

Page 73
1
4
5
9
Drive run enable
A+
A-
F+
F-
FE1
FE2
Regen
only
A1
F1
F2
Motor
Armature
FOCUS 3
2
3
Stop
Start
Speed
Pot
10
12
Motor Thermal
Manual
Auto
16
18
(-)
(+)
20
19
1
4
5
9
Drive run enable
A+
A-
F+
F-
FE1
FE2
Regen
only
A1
A2
F1
F2
Motor
Armature
Motor Field
FOCUS 3
2
3
Stop
Start
Speed
Pot
10
12
Motor Thermal
Manual
Auto
16
T
(-)
(+)
20
19
TB2
TB2
5
8
3
4
5
Isolator Board
P/N 2415-4050
TB1
TB2
(+)
(-)
+24vdc
Input
Common
Output
A2
Motor Field
TB2
TB2
T
Focus 3 Regen Master / Follower Application
Page 80

Page 81

Page 75
Page 82

Critical Components and Replacement Parts
Main Control Board
Terminal Strips
13Pin
3470-50013
7 Pin
3470-50007
6045-4000
F3R2C & F3R2E
Speed Adjust Pot
3533-0502 –
Potentiometer
3549-002 - Knob
3550-005
Start / Stop Switch
6045-4005
F3R5C & F3R5E
Fuses
3701-506000
60 A, 500 Vac
Fuses
3705-032
15 A, 250 Vac
Power Block
3720- 4X2F
All Focus 3 Regens
These components are stocked and sold through the North American
Service Center. To order please contact Parts Dept @ 1-800-367-8067
Page 76
Page 83

INDEX
A
Adjustments · 2, 3, 20, 40, 43, 44, 45, 46, 47
Accel/Decel · 59
Current Limit · 8, 11, 26, 39, 55, 65
IR Comp · 11
Jog Speed · 11, 65
Potentiometers · 40
Stability · 11, 44
Tuning · 3, 44, 45, 46, 47
Application Notes · 3, 66
Auto Manual · 8, 12, 26, 44, 46
C
Chassis Model · 4, 9, 10, 11, 12, 13, 28
Contactor Kit · 6, 11, 12, 34
Control Wiring · 3, 20, 22, 25
Current Control · 34, 35, 66
Current Limit · 8, 11, 26, 39, 55, 65
D
DB · 6
Dynamic Braking · 6
E
Eddy Current Controller · 66
Enclosed Model · 4, 9, 11, 12, 14, 28, 65
J
Jumper Settings
Current Limit · 8, 11, 26, 39, 55, 65
Current Ranges · 3
Line Voltage · 34, 50
Jumpers · 3, 20, 34, 35, 36, 37, 51, 52
K
Kits
Installation · 2, 3, 12, 15, 16, 17, 22, 53
Option Kits · 2, 3, 6, 15, 16, 17, 22, 53
L
LED Indicators · 3, 39, 58
Current Limit · 8, 11, 26, 39, 55, 65
M
Model
Chassis · 4, 9, 10, 11, 12, 13, 28
Enclosed · 4, 9, 11, 12, 14, 28, 65
Motor
Compatibility · 2, 5, 64
Permanent Magnet · 5, 6
Shunt Wound · 5, 6, 21, 22
Wiring · 2
F
Field
Current · 5, 50
Field
Voltage · 50
Focus 1 · 4
Focus 2 · 3, 4, 63, 64, 65, 66
Fusing · 8, 21
I
Input
Line Voltage · 34, 50
Installation
Kits · 12
Isolation · 3, 12, 66
Isolaton · 3, 12, 66
N
Nema Rating · 4, 9, 10, 11, 12, 14, 65
Non-Regenerative · 3
O
Option
Kits · 2, 3, 6, 15, 16, 17, 22, 53
P
Power
Requirements · 2, 21
Wiring · 3, 20, 23, 24, 61, 66
R
Ratings · 2, 10
Regenerative · 65
Page 77
Page 84

S
T
Spare Parts · 3
Critical Components · 59, 60, 70
Specifications · 2, 10
Speed Command
4-20mA · 8, 46
Speed Control
Armature Voltage Feedback · 2, 6
Speed Pot · 3, 12, 26, 28
Tachometer Feedback · 11, 22, 34, 55
Start-Up · 2, 3, 20, 22, 53, 54, 55
Stopping
Quick Stopping · 2, 6
Terminals · 28, 29, 30, 31, 32, 46, 59, 60
Torque Control · 3, 8, 11, 35, 50, 56
Troubleshooting · 58
Tuning
Stability · 11, 44
W
Wiring
Control · 3, 20, 22, 25
Motor · 2
Power · 3, 20, 23, 24, 61, 66
Page 78
 Loading...