

Page 1

EF
www.controltechniques.com
Advanced User Guide
Commander SL
AC variable speed drive for 3
phase induction motors from
0.25kW to 4kW, 0.33hp to 5hp
Part Number: 0472-0078-01
Issue: 1
Page 2

General Information
The manufacturer accepts no liability for any consequences resulting from inappropriate, negligent or incorrect
installation or adjustment of the optional parameters of the eq uipment or from mismatching the var iable speed drive with
the motor.
The contents of this guide are believed to be correct at the time of printing. In the interests of commitment to a policy of
continuous development and improvement, the manufacturer reserves the right to change the specification of the product
or its performance, or the content of the guide without notice.
All rights reserved. No parts of this guide may be reproduced or transmitted in any form or by any means, electrical or
mechanical including, photocopying, recording or by an information storage or retrieval system, without permission in
writing from the publisher.
Drive software version
This product is supplied with the latest version of user-interface and machine control software. If this product is to be
used in a new or existing system with other drives, there may be some differences between their software and the
software in this product. These differences may cause the product to function differently. This may also apply to drives
returned from the Control Techniques Service Centre.
If there is any doubt, please contact your local Control Techniques Drive Centre or Distributor.
Environmental Statement
Control Techniques is committed to minimising the environmental impacts of its manufacturing operations and of its
products throughout their life cycle. To this end, we operate an Environmental Management System (EMS) which is
certified to the International Standard ISO 14001. Further information on the EMS, our Environment Policy and other
relevant information is available on request, or can be found at www.greendrives.com.
The electronic variable speed drives manufactured by Control Techniques have the potential to save energy and
(through increased machine/process efficiency) reduce raw materia l consumption and scrap throughout their long
working lifetime. In typical applications, these positive environmental effects far outweigh the negative impacts of product
manufacture and end-of-life disposal.
Nevertheless, when the products eventually reach the end of their useful life, they can very easily be dismantled into their
major component parts for efficient recycling. Many parts snap together and can be separated without the use of tools,
while other parts are secured with conventional screws. Virtually all parts of the product are suitable for recycling.
Product packaging is of good quality and can be re-used. Large products are packed in wooden crates, while smaller
products come in strong cardboard cartons which themselves have a high-recycled fibre content. If not re-used, these
containers can be recycled. Polythene, used on the protective film a nd bag s fr om wrap ping pr oduct, can be re cycled in
the same way. Control Techniques' packaging strategy favours easily recyclable materials of low environmental impact,
and regular reviews identify opportunities for improvement.
When preparing to recycle or dispose of any pr od uc t or pa ck ag ing , ple a se ob se rv e loca l leg islation and best practice.
Copyright © September 2006 Control Techniques Drives Ltd
Issue: 1
Software version: V01.04.00
Page 3

Contents
1 Introduction....................................................................................................................4
2 Default parameters ........................................................................................................5
3 Parameter description format.......................................................................................6
3.1 Software variable maximum term definitions .........................................................................................6
3.2 Parameter information ...........................................................................................................................6
3.3 Key to parameter codes .........................................................................................................................7
3.4 Sample/update times .............................................................................................................................7
4 Keypad and display.......................................................................................................9
4.1 Programming keys .. ... ... .... ... .......................................... .......................................... ..............................9
4.2 Control keys ..... .... ... ... ... .... ...................................... .... ... ... ... .... ... ... ........................................................9
4.3 Selecting and changing parameters ......................................................................................................9
5 Menu 0 ..........................................................................................................................11
Commander SL Advanced User Guide 3
Issue Number: 1 www.controltechniques.com
Page 4

Introduction Default parameters Parameter description format Keypad and display Menu 0
1 Introduction
This Advanced User Guide provides detailed information on the following features of Commander SL:
• Parameter types
• Keypad and display information
• Full parameter descriptions
The Commander SL
The Commander SL is an open loop AC variable speed inverter drive used to control the speed of an AC induction motor.
As default the Commander SL is set up in fixed boost mode (see Pr 41 on page 24). The drive produces a linear voltage to frequency profile to be
applied to the motor. At low speed, a voltage boost can be applied to the motor to increase starting torque in high starting torque application (see
Pr 42 on page 24).
The Commander SL can also be set up in open loop vector mode (see Pr 41 on page 24). In open loop vector mode, the drive uses an open loop
vector control strategy to maintain almost constant flux in the motor by dynamically adjusting the motor voltage according to the load on the motor. At
low speed, the drive will automatically increase the motor voltage to increase starting torque in high starting torque applications.
The AC supply is rectified through a bridge rectifier and then smoothed across high voltage capacitors to produce a constant voltage DC bus. The DC
bus is then switched through an IGBT bridge to produce AC at a variable voltage and a variable frequency. This AC output is synthesized by a pattern
of on-off switching applied to the gates of the IGBTs. This method of switching the IGBTs is known as Pulse Width Modulation (PWM).
Software Structure
The Commander SL's keypad and display can be used to change and monitor parameter values and also to change the terminal settings of the drive.
The parameter menu is structured to give an extreme ease of set-up for a simple drive for simple applications.
4 Commander SL Advanced User Guide
www.controltechniques.com Issue Number: 1
Page 5
Introduction Default parameters Parameter description format Keypad and display Menu 0
2 Default parameters
Setting default parameters sets all parameters back to their factory setting.
To set default parameters, set Pr 29 to Eur or USA. Eur sets 50Hz defaults, USA sets 60Hz defaults. See Pr 29 on page 19 for further details.
When default parameters are set, these parameters are automatically saved to the drives EEPROM.
Eur/USA parameter set differences
The following table gives the differences between Eur and USA default parameter sets:
Pr Description Eur default USA default Drive voltage rating
02 Maximum set speed 50.0 Hz 60.0Hz All
03 Acceleration rate 5.0 s/100Hz 33.0 s/100Hz All
04 Deceleration rate 10.0 s/100Hz 33.0 s/100Hz All
05 Drive configuration AV PAd All
07 Motor rated full load rpm 1500 rpm 1800 rpm All
08 Motor rated voltage 400 V 460V 400V
11 Start/Stop logic 0 4 All
39 Motor rated frequency 50.0 Hz 60.0Hz All
Commander SL Advanced User Guide 5
Issue Number: 1 www.controltechniques.com
Page 6
Introduction Default parameters
Parameter description format
Keypad and display Menu 0
3 Parameter description format
3.1 Software variable maximum term definitions
Table 3-1
Maximum Definition
FREQ_MAX
[1500.0Hz]
RATED_CURRENT_MAX
[999.9A]
DRIVE_CURRENT_MAX
[999.9A]
MOTOR1_CURRENT_LIMIT_MAX
[999.9%]
AC_VOLTAGE_SET_MAX
[480V]
DC_VOLTAGE_MAX
[830V]
POWER_MAX
[999.9kW]
The values given in square brackets indicate the maximum value allowed for the variable maximum.
Maximum frequency reference
FREQ_MAX = Pr 02
Maximum motor rated current
RATED_CURRENT_MAX ≤ 1.36 x Rated drive current
Maximum drive current
The maximum drive current is the current at the over current trip level and is given by:
DRIVE_CURRENT_MAX = rated drive current x 2
Maximum current limit settings
This maximum current limit setting is the maximum applied to the current limit.
Maximum output voltage set-point
Defines the maximum motor voltage that can be selected.
200V drives: 240V
400V drives: 480V
Maximum DC bus voltage
The maximum measurable DC bus voltage.
200V drives: 415V
400V drives: 830V
Maximum power in kW
The maximum power has been chosen to allow for the maximum power that can be output by the drive
with maximum AC output voltage, maximum controlled current and unity power factor. Therefore
POWER_MAX = √3 x AC_VOLTAGE_MAX x RATED_CURRENT_MAX x 2
3.2 Parameter information
3.2.1 Parameter types
There are two fundamental types of parameters in the drive, read only (RO) and read/write (RW). The read only parameters cannot be changed by
the user and are there to give the user useful information about the state of the drive. Read/write parameters are for the user to set up the way in
which the drive operates.
Parameters can be further broken down into Bit parameters and Non-bit parameters. Bit parameters are two state only (0 or 1) and if RW are used as
switches or two state input variables to the drive logic, or if RO indicate various drive conditions which are either true (1) or false (0). Non-bit
parameters have more than two values the range of each being given in the following descriptions.
3.2.2 Drive reset
A drive reset is required for a number of reasons:
• To reset the drive from a tripped state
• To initiate loading of default parameters
• To implement a change in the value of certain parameters
• To initiate the saving of parameters in EEPROM
The later two of these can be done while the drive is running.
The drive can be reset in one of four ways:
1. The drive will be reset with a 0 to 1 transition of the enable input when the drive is tripped, such that a dedicated reset terminal is not required.
2. The Stop/Reset key. If the drive is not in keypad mode, then the key has a drive reset function only. In keypad mode a drive reset can be done
while the drive is running by holding the Run key while the Stop/Reset key is activated. When the drive is not running the Stop/Reset key will
always reset the drive.
3.2.3 Storing drive parameters
When the keypad is used to edit a parameter, the parameter is stored when the mode key is pressed after adjustment has been made.
6 Commander SL Advanced User Guide
www.controltechniques.com Issue Number: 1
Page 7

Introduction Default parameters
Parameter description format
Keypad and display Menu 0
3.3 Key to parameter codes
With each parameter the following information block is given.
40 Number of motor poles
Coding
Range Auto 2P, 4P, 6P, 8P
Default Auto
Update rate Background
The top row gives the parameter number and the parameter name. The other rows give the following information.
3.3.1 Coding
The coding defines the attributes of the parameter as follows.
Coding Attribute
Bit 1 bit parameter
SP Spare: not used
FI
Txt Text: the parameter uses text strings instead of numbers.
VM Variable maximum: the maximum of this parameter can vary.
DP Decimal place: indicates the number of decimal places used by this parameter.
ND
RA Rating dependant: this parameter is likely to have different values and ranges with drives of different voltage and current ratings.
NV Not visible: not visible on the keypad.
RW Read/write: can be written by the user.
BU
PS Power-down save: automatically saved in drive EEPROM at power-down.
Bit SP FI Txt VM DP ND RA NV RW BU PS
111
Filtered: some parameters which can have rapidly changing values are filtered when displayed on the drive keypad for easy
viewing.
No default: when defaults are loaded (except when the drive is manufactured or on EEPROM failure) this parameter is not
modified.
Bit default one/unsigned: Bit parameters with this flag set to one have a default of one (all other bit parameters have a default of
zero. Non-bit parameters are unipolar if this flag is one.
3.3.2 Term definitions
Range
This gives the range of the parameter and the values it can be adjusted to.
Default
The default values given are the standard drive defaults.
Update rate
Defines the rate at which the parameter data is written by the drive or read and acted upon by the drive. Where background update rate is specified,
the update time depends on the drive processor load. Generally the update time is between 10ms and 100ms, however, the update time is
significantly extended when loading defaults.
3.4 Sample/update times
The sample/update times shown in the control terminal specification within the Commander SL Technical Guide are the default sample/update times
for the default terminal set-up.
These sample/update times are the sample or update times for the control microprocessor. The actual sample/update time maybe slightly longer due
to the design of the Commander SL.
3.4.1 Task routine times
There is a single line parameter description and this contains the update rate for each parameter. This time signifies the task routine time in the
software that the parameter is updated on. For a background task, the time depends on processor loading i.e. what functions the drive is carrying out.
Update rate Microprocessor update time Comments
2ms 2ms Updated every 2ms
5ms 5ms Updated every 5ms
21ms 21ms Updated every 21ms
128ms 128ms Updated every 128ms
Reset N/A Destination/source parameter changed on a Reset
B Background
BR Background read
BW Background write
Edit mode exit N/A
Updated as a background task. Update rate
depends on processor loading.
Parameter change actioned on exit of edit mode.
Parameter change automation saved.
Commander SL Advanced User Guide 7
Issue Number: 1 www.controltechniques.com
Page 8
Introduction Default parameters
From practical tests carried out:
Condition Minimum Maximum Average
Time for drive to respond to a run command 4.1ms 5.62ms 5.02ms
Time for the drive to respond to a stop command 2.82ms 3.94ms 3.31ms
Time for the drive to respond to a step change in analogue input voltage
Parameter description format
Keypad and display Menu 0
7.93ms
8 Commander SL Advanced User Guide
www.controltechniques.com Issue Number: 1
Page 9
Introduction Default parameters Parameter description format Keypad and display Menu 0
4 Keypad and display
The keypad and display are used for the following:
• Displaying the operating status of the drive
• Displaying a fault or trip code
• Reading and changing parameter values
• Stopping, starting and resetting the drive
Figure 4-1 Keypad and display
M
4.1 Programming keys
M
The MODE key is used to change the mode of operation of the drive.
The UP and DOWN keys are used to select parameters and edit their values. In keypad mode, they are used to increase and decrease the
speed of the motor.
4.2 Control keys
The START key is used to start the drive in keypad mode.
The STOP/RESET key is used to stop and reset the drive in keypad mode. It can also be used to reset the drive in terminal mode.
4.3 Selecting and changing parameters
M
Press and
release
Press and
release
STATUS MODE
or
M
PARAMETER VIEW MODE
Select parameter to view
orPress
Parameter number and parameter
value flashing alternately
M M
Parameters
saved
PARAMETER EDIT MODE
Change parameter value
orPress
Parameter value flashing
Press and
M
release
Press and
release
4 mins
timeout
NOTE
This procedure is written from the first power up of the drive and assumes no terminals have been connected, no parameters have been changed and
no security has been set.
Figure 4-2 Display modes
Hold
for 2s
Commander SL Advanced User Guide 9
Issue Number: 1 www.controltechniques.com
Page 10

Introduction Default parameters Parameter description format Keypad and display Menu 0
Pressing and releasing the MODE key will change the display from status mode to parameter view mode. In parameter view mode, the display
M
flashes the parameter number and the parameter value alternately.
Pressing and releasing the MODE key again will change the display from parameter view mode to parameter edit mode. In parameter edit mode,
M
the display flashes the value in the parameter.
Pressing the MODE key in parameter edit mode will return the drive to the parameter view mode. If the MODE key is pressed again then the
drive will return to status mode, but if either of the UP or DOWN keys are pressed to change the parameter being viewed before the MODE
key is pressed, pressing the MODE key will change the display to the parameter edit mode again. This allows the user to very easily change
M M
M
M
between parameter view and edit modes whilst commissioning the drive.
Status Modes
Left hand
display
When the drive is running, the display indicates the drive output frequency.
When in parameter edit mode, the UP and DOWN keys are used to change parameter values. This will increase or decrease the parameter
value by the minimum unit value on display.
To allow values to be changed more quickly, it is possible to press the MODE and UP or the MODE and DOWN keys together to allow
either 1000’s of units, 100’s of units, 10’s of units or units to be adjusted.
Example:
It is required that a deceleration ramp of 2500 seconds is required.
Select Pr 04 using the normal procedure.
Status Explanation
Drive ready The drive is enabled and ready for a start command. The output bridge is inactive.
Drive inhibited
The drive is inhibited because there is no enable command, or the drive is inhibited
during a trip reset.
DC injection braking DC injection braking current is being applied to the motor.
M M
• Press the MODE key to enter parameter edit mode
• Press the MODE and UP keys together
M
M
• Press the UP key to adjust the 100’s of units
• Press the MODE and UP keys together again
M
• Press the DOWN key once to adjust the 10’s of units
• Press the MODE key to go back to parameter view mode
• Press the MODE key again to go back to status mode
M
M
10 Commander SL Advanced User Guide
www.controltechniques.com Issue Number: 1
Page 11

Introduction Default parameters Parameter description format Keypad and display Menu 0
5 Menu 0
Table 5-1 Menu 0 parameters: single line descriptions
Par Description
01 Minimum set speed (Hz) 0.0
02 Maximum set speed (Hz) 50.0 60.0
03 Acceleration rate (s/100Hz) 5.0 33.0
04 Deceleration rate (s/100Hz) 10.0 33.0
05 Drive configuration AV PAd
06 Motor rated current (A) Drive rating
07 Motor rated speed (rpm) 1500 1800
08 Motor rated voltage (V) 230/400 230/460
09 Motor power factor (cos ϕ)0.85
10 Parameter access OPEn
11 Start/Stop logic select 0 4
15 Jog reference (Hz) 1.5
17 Enable negative preset speeds OFF
18 Preset speed 1 (Hz) 0.0
19 Preset speed 2 (Hz) 0.0
20 Preset speed 3 (Hz) 0.0
21 Preset speed 4 (Hz) 0.0
25 User security code 0
27 Power up keypad reference 0
29 Load defaults no
30 Ramp mode select 1
31 Stop mode select 1
32 Dynamic V to f select OFF
33 Catch a spinning motor select 0
35 Terminal T4 output mode selector Fr
37 Maximum switching frequency (kHz) 3
39 Motor rated frequency (Hz) 50.0 60.0
40 Number of motor poles Auto
41 Voltage mode select Fd
42 Low frequency voltage boost (%) 3.0
45 Software version
55 Last trip
56 Trip before Pr 55
57 Trip before Pr 56
58 Trip before Pr 57
81 Frequency reference selected
82 Pre-ramp reference
83 Post-ramp reference
84 DC Bus voltage
85 Motor frequency
86 Motor voltage
87 Motor speed
88 Motor current
91 Reference enabled indicator
92 Reverse selected indicator
93 Jog selected indicator
94 Analogue input 1 level
Read only diagnostic parameters
Default
Eur USA
Setting
Commander SL Advanced User Guide 11
Issue Number: 1 www.controltechniques.com
Page 12

Introduction Default parameters Parameter description format Keypad and display Menu 0
Figure 5-1 Menu 0 logic diagram
Analogue
input
T2
Digital I/O
T10
T9
T4
T6
T7
T8
B4
B3
Analogue
input 1
Sequencer
logic select
Stop mode
Input
terminals
Output
terminals
(%)
94
Start/stop
11
select
31
Key
XX
XX
Reference
selected
(Hz)
81
Jog
selected
93
Reverse
selected
92
Reference
enabled
91
Read-write (RW)
parameter
Read-only (RO)
parameter
Jog
reference
15
Speed clamps
Minimum
01
speed
Maximum
02
speed
1
0
1
X-1
Pre-ramp
reference (Hz)
1
0
0
0Hz
82
Post-ramp
reference
(Hz)
03
04
30
Ramps
Acceleration
rate
Deceleration
rate
Ramp mode
select
83
Motor
frequency
Motor control
85
Motor
voltage
86
Motor
speed
rpm
87
Current
measurement
DC bus
voltage
84
Motor current
88
06
07
08
09
32
37
39
40
41
42
Motor rated
current
Motor rated
speed
Motor rated
voltage
Motor power
factor
Dynamic V to f
select
Switching
frequency
Motor rated
frequency
No. of motor
poles
Voltage
mode select
Voltage
boost
Parameter
access
10
01 Minimum set speed
Coding
Bit SP FI Txt VM DP ND RA NV RW BU PS
11 11
Range 0.0 to 1500.0 Hz
Default 0.0
Update rate Background
Used to define drive minimum set speed. This can be overridden if the maximum set speed clamp Pr 02 is adjusted to be less than Pr 01. Inactive
during jogging. With Pr 17 set to On, Pr 01 is 0.0.
02 Maximum set speed
Coding
Bit SP FI Txt VM DP ND RA NV RW BU PS
111
Range 0.0 to 1500.0 Hz
Default
EUR: 50.0
USA: 60.0
Update rate Background
This parameter is a symmetrical limit on both directions of rotation.
Defines drive absolute maximum frequency reference. Slip compensation and current limit can increase the motor frequency further.
12 Commander SL Advanced User Guide
www.controltechniques.com Issue Number: 1
Page 13

Introduction Default parameters Parameter description format Keypad and display Menu 0
03 Acceleration rate
Coding
Bit SP FI Txt VM DP ND RA NV RW BU PS
111
Range 0 to 3200.0s/100 Hz
Default
Eur: 5.0
USA: 33.0
Update rate 5ms
Sets the acceleration rate of the motor in both directions in seconds/100Hz.
04 Deceleration rate
Coding
Bit SP FI Txt VM DP ND RA NV RW BU PS
111
Range 0 to 3200.0 s/100 Hz
Default
Eur: 10.0
USA: 33.0
Update rate 5ms
Sets the deceleration rate of the motor in both directions in seconds/100Hz.
05 Drive configuration
Coding
Bit SP FI Txt VM DP ND RA NV RW BU PS
111
Range AV, AI, AV.Pr, AI.Pr, Pr, PAd
Default
Eur: AV
USA: PAd
Update rate Actioned on exit of edit mode or drive reset.
This parameter is used to automatically set up the user control terminals to the required drive configuration. Other default parameters may also be
changed automatically by the drive configuration.
A change to Pr 05 is set on the exit of parameter edit mode or on a drive reset. The drive must be disabled, stopped or tripped for a change to take
place. If Pr 05 is changed while the drive is running, the parameter will return to its pre-altered value. Following a drive configuration change, the
parameters are automatically stored in EEPROM.
In all of the following settings, the status relay is set up as a drive healthy relay.
T9
OK Fault
T10
Configuration Description
AV Voltage input
AI Current input
AV.Pr Voltage input with 1 preset speed
AI.Pr Current input with 1 preset speed
Pr 4 preset speeds
PAd Keypad control
Commander SL Advanced User Guide 13
Issue Number: 1 www.controltechniques.com
Page 14
Introduction Default parameters Parameter description format Keypad and display Menu 0
y
t
t
e
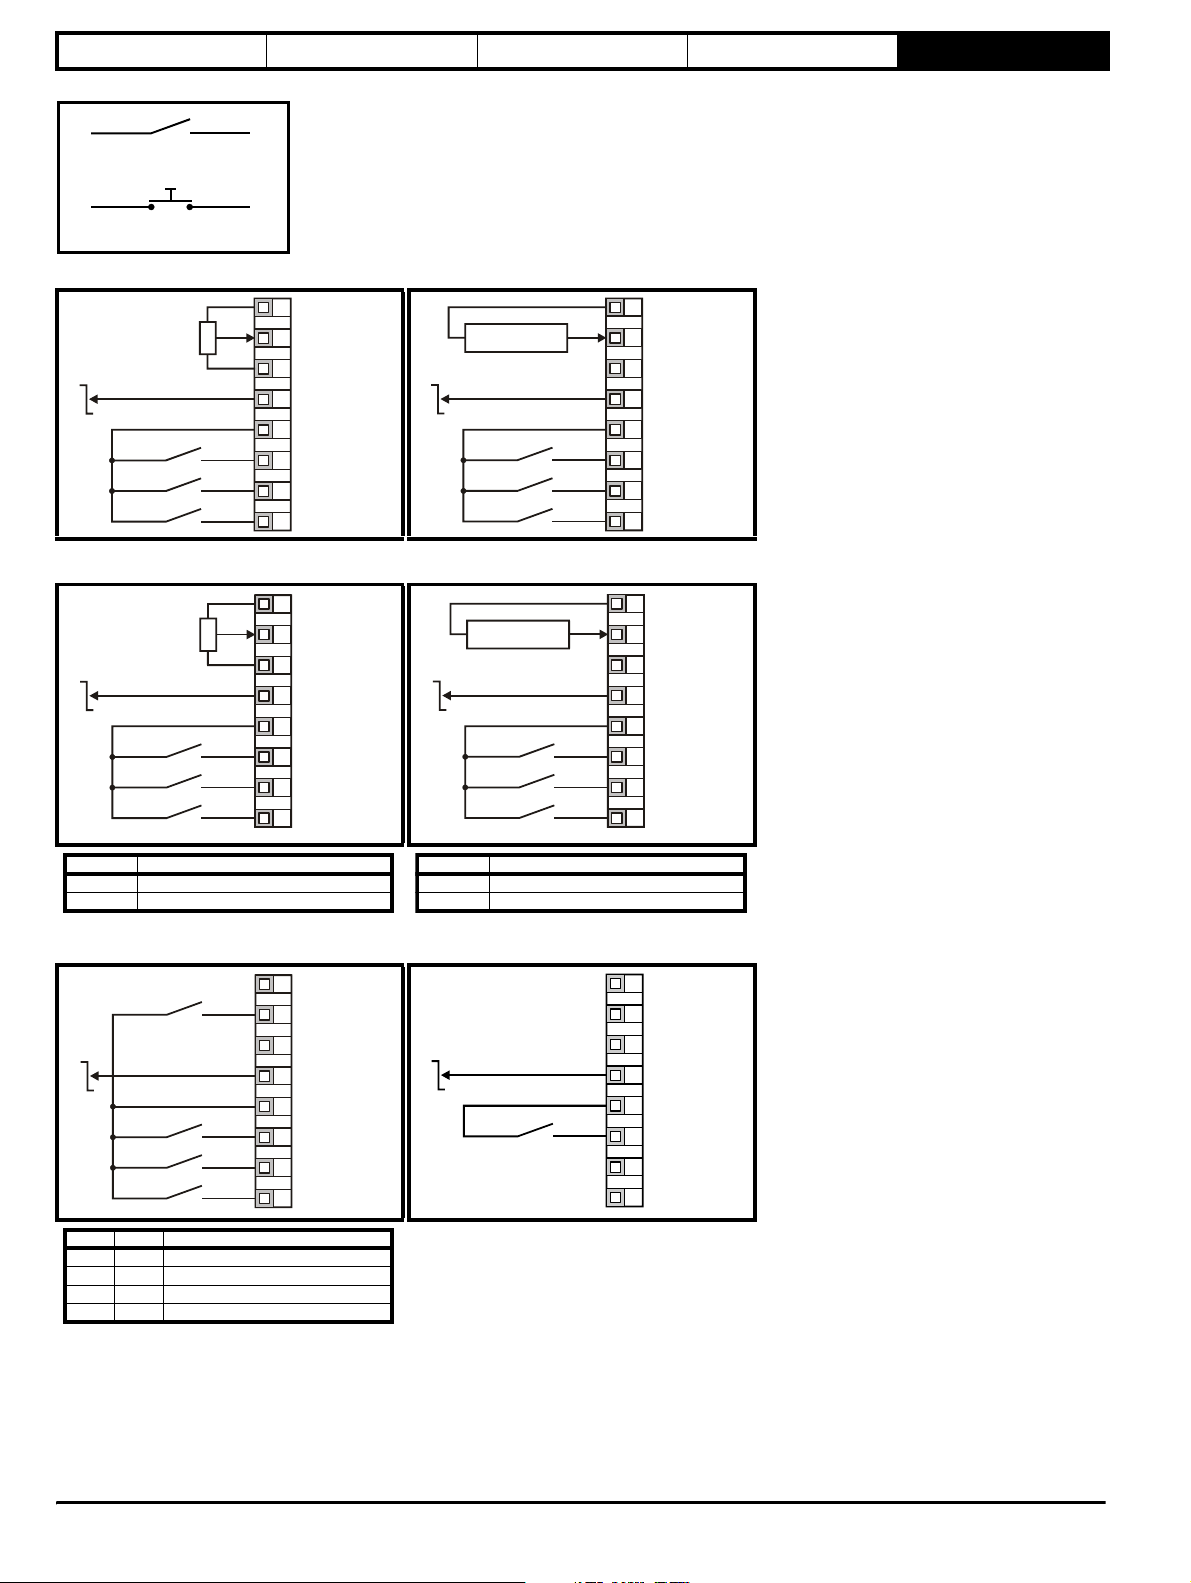
Figure 5-2 Key to switches
Latching switch
Momentar
switch
Figure 5-2 Pr 05 = AV Figure 5-3 Pr 05 = AI
T1
0V
reference input (AI)
0V
Current speed
+24V
10k
(2kmin)
0V
Voltage speed
T2
reference input (AV)
+10V reference
T3
output
Digital output
T4
(zero speed)
+24V output
T5
Drive enable/reset
T6
(USA: /Stop)
Run forward
T7
(USA: Run)
Run reverse
T8
(USA: Jog)
+24V
Figure 5-4 Pr 0 5 = AV.Pr Figure 5-5 Pr 05 = AI.Pr
T1
0V
Voltage speed
T2
reference input (AV)
+10V reference
T3
output
Digital output
T4
(zero speed)
+24V output
T5
Drive enable/reset
T6
(USA: /Stop)
Run forward
T7
(USA: Run)
Voltage speed
reference input /
T8
preset speed select
+24V
10k
(2kmin)
0V
T8 Reference selected
Open Voltage speed reference input (AV)
Closed Preset speed 2 (Pr 19)
+24V
Current speed
reference input (AI)
0V
T8 Reference selected
Open Current speed reference input (AI)
Closed Preset speed 2 (Pr 19)
T1
0V
Current speed
T2
reference input (AI)
+10V reference
T3
output
Digital output
T4
(zero speed)
+24V output
T5
Drive enable/reset
T6
(USA: /Stop)
Run forward
T7
(USA: Run)
Run reverse
T8
(USA: Jog)
T1
0V
Current speed
T2
reference input (AI)
+10V reference
T3
output
Digital output
T4
(zero speed)
+24V output
T5
Drive enable/reset
T6
(USA: /Stop)
Run forward
T7
(USA: Run)
Current speed
reference input /
T8
preset speed selec
Figure 5-6 Pr 0 5 = Pr Figure 5-7 Pr 05 = PAd
T1
0V
Not used
T2
+10V referenc
T3
output
Digital output
T4
(zero speed)
+24V output
T5
Drive enable/
T6
reset
T7
Not used
T8
Not used
+24V
T1
0V
T2
Reference select
+10V reference
T3
output
Digital output
T4
0V
(zero speed)
+24V output
T5
Drive enable/rese
T6
(USA: /Stop)
Run forward
T7
(USA: Run)
T8
Reference select
+24V
0V
T2 T8 Reference selected
Open Open Preset speed 1 (Pr 18)
Closed Open Preset speed 2 (Pr 19)
Open Closed Preset speed 3 (Pr 20)
Closed Closed Preset speed 4 (Pr 21)
14 Commander SL Advanced User Guide
www.controltechniques.com Issue Number: 1
Page 15

Introduction Default parameters Parameter description format Keypad and display Menu 0
06 Motor rated current
Coding
Bit SP FI Txt VM DP ND RA NV RW BU PS
12111
Range 0 to RATED_CURRENT_MAX A
Default Drive rated current
Update rate Background
The motor rated current should be set at the machine nameplate value for rated current.
This value is used in the following:
Current limit
Motor protection system
Slip compensation, see Pr 07
Vector mode voltage control, see Pr 08
Dynamic V to f control, see Pr 32 on page 21.
Pr 06 motor rated current must be set correctly to avoid risk of fire in the event of a motor overload.
WARNING
07 Motor rated full load rpm
Coding
Bit SP FI Txt VM DP ND RA NV RW BU PS
11
Range 0 to 9999
Default Eur: 1500, USA 1800
Update rate Background
The rated full load rpm is used with the motor rated frequency and No. of motor poles to calculate the rated slip of the induction machine in Hz.
Rated slip Motor rated frequency No. of motor pole pairs Motor full load rpm 60⁄×()– Pr 39 Pr 40 2⁄()Pr 07 60⁄()×[]–= =
The rated slip is used to calculate the frequency adjustment required to compensate for slip from the following equation:
Slip compensation Rated slip Active current Rated active current⁄×=
If slip compensation is required, this parameter should be set to the nameplate value, which should give the correct rpm for a hot machine.
Sometimes it will be necessary to adjust this when the drive is commissioned because the nameplate value may be inaccurate. Slip compensation will
operate correctly both below rated speed and within the field weakening region. Slip compensation is normally used to correct for the motor speed to
prevent speed variation with load. The rated load rpm can be set higher than synchronous speed to deliberately introduce speed droop. This can be
useful to aid load sharing with mechanically coupled motors.
NOTE
If Pr 07 is set to 0 or to synchronous speed, slip compensation is disabled.
NOTE
If the full load speed of the motor is above 9999rpm, slip compensation should be disabled. This is because a value above 9999 cannot be entered in
Pr 07.
08 Motor rated voltage
Coding
Bit SP FI Txt VM DP ND RA NV RW BU PS
1111
Range 0 to AC_VOLTAGE_SET_MAX V
Default
200V rating drive: 230V
400V rating drive: Eur: 400V, USA: 460V
Update rate 128ms
The rated voltage is used in conjunction with the motor rated frequency (Pr 39) to define the voltage to frequency characteristic applied to the motor.
NOTE
If the motor is not a standard 50 or 60 Hz motor, see Pr 39 on page 23 and adjust accordingly.
The following operating methods selected by Pr 41 are used to define the drive frequency to voltage characteristic.
Open-loop vector mode: Ur S, Ur A, Ur or Ur I
A linear characteristic is used from 0Hz to rated frequency, and then a constant voltage above rated frequency. When the drive operates between
rated frequency/50 and rated frequency/4, full vector based stator resistance (Rs) compensation is applied. However there is a delay of 0.5s when the
drive is enabled during which only partial vector based compensation is applied to allow the machine flux to build up. When the drive operates
Commander SL Advanced User Guide 15
Issue Number: 1 www.controltechniques.com
Page 16

Introduction Default parameters Parameter description format Keypad and display Menu 0
y
O
39
between rated frequency/4 and rated frequency/2 the Rs compensation is gradually reduced to zero as the frequency increases. For the vector
modes to operate correctly the stator resistance motor rated power factor (Pr 09) and voltage offset are all required to be set-up accurately.
Fixed boost mode: Fd
A linear characteristic is used from 0Hz to rated frequency, and then constant volt age above rated frequency. Low frequency voltage boost as defined
by Pr 42 is applied as shown below.
utput voltage char acteristic
Pr / 239Pr
39
Output
frequenc
Pr / 2
Voltage
boost Pr
Output
voltage
08
Pr
08
42
Square law mode: SrE
A square law characteristic is used from 0Hz to rated frequency, and then constant voltage above rated frequency. Low frequency voltage boost
raises the start point of the square law characteristic as shown below.
Pr
08
Pr + [(freq/Pr ) x (Pr - Pr )]
42 39 08 42
2
Pr
42
Pr
09 Motor rated power factor
Coding
Bit SP FI Txt VM DP ND RA NV RW BU PS
2111
Range 0.00 to 1.00
Default 0.85
Update rate Background
The power factor is the true power factor of the motor, i.e. the angle between the motor voltage and current. The power factor is used in conjunction
with the motor rated current (Pr 06) to calculate the rated active current and magnetising current of the motor. The rated active current is used
extensively to control the drive, and the magnetising current is used in vector mode Rs compensation. It is important that this parameter is set up
correctly.
16 Commander SL Advanced User Guide
www.controltechniques.com Issue Number: 1
Page 17

Introduction Default parameters Parameter description format Keypad and display Menu 0
10 Security status
Coding
Range OPEn, LoC
Default OPEn
Update rate Actioned on exit of edit mode
This read write parameter defines the level of security for menu 0.
Level Access permitted
OPEn All parameters can be accessed.
LoC
The LED keypad can adjust this parameter even when user security is set.
11 Start/stop logic select
Coding
Range 0 to 4
Default Eur: 0, USA: 4
Update rate Actioned on exit of edit mode or drive reset
This parameter changes the functions of terminals T6, T7 and T8, which are normally associated with the enabling, starting and stopping the drive.
Pr 11 Terminal T6 Terminal T7 Terminal T8 Latching
0 Enable Run Forward Run Reverse No
1 /Stop Run Forward Run Reverse Yes
2 Enable Run Fwd/Rev No
3 /Stop Run Fwd/Rev Yes
4 /Stop Run Jog Yes
A change to this parameter is only actioned when the drive is stopped, tripped or disabled. If the drive is active when this parameter is changed, the
parameter will return to its pre-altered value on exit of edit mode or drive reset.
NOTE
The function of terminal T8 is automatically changed by the setting of parameter Pr 05 if preset speeds are being used. See Pr 05 on page 13.
Bit SP FI Txt VM DP ND RA NV RW BU PS
1111
Lock security, so that the security code must be entered before a parameter can
be edited and set security status to OPEn.
Bit SP FI Txt VM DP ND RA NV US RW BU PS
1 111
Pr 11=0
T5
+24V
Enable
T6
Run Forward
T7
Run Reverse
T8
Pr 11=1
T5
+24V
/Stop
T6
Run Forward
T7
Run Reverse
T8
Pr 11=2
T5
+24V
Enable
T6
Run
T7
Forward/Reverse
T8
Commander SL Advanced User Guide 17
Issue Number: 1 www.controltechniques.com
Page 18

Introduction Default parameters Parameter description format Keypad and display Menu 0
Pr 11=3
T5
+24V
/Stop
T6
Run
T7
Forward/Reverse
T8
Pr 11=4
T5
+24V
/Stop
T6
Run
T7
Jog
T8
15 Jog reference
Coding
Bit SP FI Txt VM DP ND RA NV RW BU PS
111
Range 0.0 to 400.0 Hz
Default 1.5
Update rate 5ms
Defines the jog speed.
17 Allow negative references
Coding
Bit SP FI Txt VM DP ND RA NV RW BU PS
11
Default OFF
Update rate Background
OFF: Allow negative references disabled. Direction of rotation controlled by run forward and run reverse terminals.
On: Allow negative references enabled. Direction of rotation controlled by preset speed values (use run forward terminal)
Needs to be set if the user requires to change the direction of rotation with preset speeds. If it is not set, all negative preset speeds are treated as
zero.
NOTE
The analogue input is unipolar and setting this bit does not allow bipolar analogue references to be applied to the drive.
Analogue input scaling
FREQ_MAX
Pr
01
-100% 100%
FREQ_MAX
-100% 100%
-FREQ_MAX
Pr = 0
17
Pr = 1 (Allow negative references mode)
17
18 Commander SL Advanced User Guide
www.controltechniques.com Issue Number: 1
Page 19

Introduction Default parameters Parameter description format Keypad and display Menu 0
18 Preset speed 1
19 Preset speed 2
20 Preset speed 3
21 Preset speed 4
Coding
Range ±1500.0Hz
Default 0.0
Update rate 5ms
Defines preset speeds 1 to 4
The preset speeds are clamped by the maximum set speed (Pr 02).
NOTE
If the maximum speed clamp (Pr 02) is reduced from, for example 50Hz and is set below the preset speed values (Pr 18 to 21), the preset speeds will
follow the reduced maximum speed clamp value.
If the maximum speed clamp is then increased to its original value of 50Hz, the preset speeds will remain at the lower value set by the maximum
speed clamp.
Example:
Original values:
Maximum speed clamp reduced, preset speeds follow maximum speed clamp:
Maximum speed clamp increased, preset speeds remain at the lower value set by the maximum speed clamp:
Pr 02 = 50Hz
Pr 18 = 45Hz, Pr 19 = 42Hz, Pr 20 = 30Hz
Pr 02 = 40Hz
Pr 18 = 40Hz, Pr 19 = 40Hz, Pr 20 = 30Hz
Pr 02 = 50Hz
Pr 18 = 40Hz, Pr 19 = 40Hz, Pr 20 = 30Hz
Bit SP FI Txt VM DP ND RA NV RW BU PS
11 1
25 User security code
Coding
Range 0 to 999
Default 0
Update rate Background
If any number, other than 0 is programmed into this parameter the user security is applied so that no parameters except Pr 10 can be adjusted with
the LED keypad. When this parameter is read via an LED keypad and security is locked it appears as zero.
27 Power-up keypad reference
Coding
Range 0, LASt, PrS1
Default 0
Update rate N/A
Selects the value of the keypad reference on power-up.
Display Function
0 keypad reference is zero
LASt keypad reference is the last used value
PrS1 keypad reference is copied from Preset speed 1 (Pr 18)
29 Load defaults
Coding
Range no, Eur, USA
Default no
Update rate Actioned on exit of edit mode or drive reset
If this parameter is set to Eur or USA and edit mode is exited or the drive is reset when the drive is inactive, the selected default parameters will
automatically be loaded. After the parameters have been set to default values they are automatically saved to the drive’s internal EEPROM. The drive
Bit SP FI Txt VM DP ND RA NV RW BU PS
111
Bit SP FI Txt VM DP ND RA NV RW BU PS
111
Bit SP FI Txt VM DP ND RA NV RW BU PS
111
Commander SL Advanced User Guide 19
Issue Number: 1 www.controltechniques.com
Page 20

Introduction Default parameters Parameter description format Keypad and display Menu 0
must be in a disabled, stopped or tripped condition to allow default parameters to be set. If the drive is active the display will flash FAIL once and then
Pr 29 will be set back to no.
Display Function
no No action
Eur 50Hz default parameters are loaded
USA 60Hz default parameters are loaded
30 Ramp mode select
Coding
Bit SP FI Txt VM DP ND RA NV RW BU PS
11
Range 0 to 3
Default 1
Update rate Background
This parameter has 4 settings as follows:
0: Fast ramp
1: Standard ramp with normal motor voltage
2: Standard ramp with high motor voltage
3: Fast ramp with high motor volts
The acceleration ramp is not affected by the ramp mode, and the ramp output will rise at the programmed acceleration rate (subject to the current
limits programmed).
Fast Ramp
In modes 0 and 3, the output of the ramp will fall at the programmed deceleration rate (subject to the current limits). Fast ramp is normally used when
a braking resistor is fitted.
Standard Ramp
In modes 1 & 2, the voltage rising to the standard ramp level causes a proportional controller to operate, the output of which changes the demanded
current in the motor. As the controller regulates the bus voltage, the motor decelerates at a faster and faster rate as it approaches zero speed. When
the motor deceleration rate reaches the programmed deceleration rate the controller ceases to operate and the drive continues to decelerate at the
programmed rate.
Figure 5-3
Controller
operational
DC Bus voltage
Motor Speed
Programmed
deceleration
rate
t
In modes 0 and 1 the motor voltage is correctly set according to the motor rated voltage parameter, while in modes 2 and 3 the motor voltage is
allowed to go up to a factor of 1.2 times its normal value during deceleration. This higher voltage saturates the motor which increases the losses in the
motor and therefore reduces the amount of energy transferring from the motor to the DC bus for a given deceleration rate. For a given amount of
energy being dissipated by the drive at the regulated DC bus level, modes 2 and 3 will allow a faster deceleration than modes 0 and 1, providing that
the motor can stand the extra losses being dissipated in it.
NOTE
Mode 0 may cause an 0V trip if the programmed deceleration rate is too fast (mode 3 can be selected if desired but will cause the motor to heat up
more due to the higher losses in the motor when compared to mode 0).
20 Commander SL Advanced User Guide
www.controltechniques.com Issue Number: 1
Page 21

Introduction Default parameters Parameter description format Keypad and display Menu 0
31 Stop mode select
Coding
Range 0 to 4
Default 1
Update rate 2 ms
0: Coast stop
1: Ramp stop
2: Ramp stop + dc injection
3: DC Injection braking stop with detection of zero speed
4: Timed dc injection braking stop
Stopping is in two distinct phases: decelerating to stop, and stopped. (Table shows default values)
Stopping Mode Phase 1 Phase 2 Comments
0: Coast Inverter disabled
1: Ramp Ramp down to zero frequency
2: Ramp followed by DC injection Ramp down to zero frequency
3: DC injection with zero speed
detection
4: Timed DC injection braking stop
Once modes 3 or 4 have begun the drive must go through the ready state before being restarted either by stopping, tripping or being disabled.
Bit SP FI Txt VM DP ND RA NV RW BU PS
11
Drive cannot be re-enabled for
a specific time period which is
drive size dependant.
Wait for 1s with inverter
enabled
Inject DC at level of 100%
motor rated current for 1s
Low frequency current injection with
detection of low speed before next
phase
Inject DC at level of 100% motor
rated current for 1s
Inject DC at level of 100%
motor rated current for 1s
Inject DC at level of 100%
motor rated current for 1s
Delay in phase 2 allows rotor flux to
decay.
The drive automatically senses low
speed and therefore it adjusts the
injection time to suit the application. If
the injection current level is too small
the drive will not sense low speed
(normally a minimum of 50-60% is
required).
The total injection time is 1s for phase 1
and 1s for phase 2, i.e. 2s in total.
32 Dynamic V to f select
Coding
Range OFF or On
Default OFF
Update rate Background
OFF: Dynamic V to f select disabled
On: Dynamic V to f select enabled
Setting this bit to On enables dynamic V to f mode which is intended for applications where power loss should be kept to a minimum under low load
conditions. The V/f ratio is modified with load as follows:
If |active current| < 0.7 x rated active current
V/f ratio = Normal V/f ratio x (0.5 + (active current / (2 x 0.7 x rated active current)))
Else, if |active current| ≥ 0.7 x rated active current
V/f ratio = Normal V/f ratio
Although the rated frequency varies, the value shown as Pr 39 does not vary from that set by the user.
Bit SP FI Txt VM DP ND RA NV RW BU PS
11
Commander SL Advanced User Guide 21
Issue Number: 1 www.controltechniques.com
Page 22

Introduction Default parameters Parameter description format Keypad and display Menu 0
33 Catch a spinning motor select
Coding
Range 0 to 3
Default 0
Update rate Background
Pr 33 Function
0 Disabled
1 Detect positive and negative frequencies
2 Detect positive frequencies only
3 Detect negative frequencies only
When the drive is enabled with this bit at 0, the output frequency starts at zero and ramps to the required reference. When the drive is enabled and
this parameter has a non-zero value, the drive performs a start-up test to determine the motor speed and then sets the initial output frequency to the
synchronous frequency of the motor. The test is not carried out, and the motor frequency starts at zero, if the run command is given when the drive is
in the stop state, or when the drive is first enabled after power up with Ur I voltage mode, or when the run command is given in Ur S voltage mode.
NOTE
For the test to operate correctly it is important that the stator resistance is set up correctly. This applies even if fixed boost (Fd) or square law (SrE)
voltage mode is being used. The test uses the rated magnetising current of the motor during the test, therefore the rated current (Pr 06), and the
power factor (Pr 09) should be set to values close to those of the motor, although these parameters are not as critical as the stator resistance.
NOTE
Stationary lightly loaded motors with low inertia may move slightly during the test. The direction of the movement is undefined. Restrictions may be
placed on the direction of this movement and on the frequencies detected by the drive as in the above table.
Bit SP FI Txt VM DP ND RA NV RW BU PS
11
35 Terminal T4 output mode select
Coding
Range
Default Fr
Update rate Action on exit of edit mode
This parameter offers a simple control to change the functionality of the digital output.
Display Function
Fr Voltage proportional to motor speed
Ld Voltage proportional to motor load
A Voltage proportional to output current
Por Voltage proportional to output power
n=0 At zero speed
At.SP At speed
Lo.SP At minimum speed
hEAL Drive healthy
Act Drive active
ALAr General drive alarm
I.Lt Current limit active
At.Ld At 100% load
Bit SP FI Txt VM DP ND RA NV RW BU PS
111
Fr, Ld, A, Por, n=0, At.SP, Lo.SP, hEAL, Act, ALAr, I.Lt, At.Ld
22 Commander SL Advanced User Guide
www.controltechniques.com Issue Number: 1
Page 23

Introduction Default parameters Parameter description format Keypad and display Menu 0
37 Maximum switching frequency
Coding
Bit SP FI Txt VM DP ND RA NV RW BU PS
1111
Range 3, 6, 12, 18 kHz
Default 3
Update rate Background
Display Frequency (kHz)
33
66
12 12
18 18
This parameter defines the required switching frequency.
The drive may automatically reduce the actual switching frequency (without changing this parameter) if the power stage becomes too hot. The
switching frequency can reduce from 18kHz to 12kHz to 6kHz to 3kHz. An estimation of the IGBT junction temperature is made based on the heatsink
temperature and an instantaneous temperature drop using the drive output current and switching frequency.
If the temperature exceeds 135
o
C, the switching frequency is reduced if possible (i.e if the current switching frequency is >3kHz) to reduce the drives
losses and thus reduce the IGBT junction temperature.
If the load condition persists, the junction temperature may continue to rise. If the temperature exceeds 145
o
C and the switching frequency cannot be
reduced the drive will initiate an O.ht1 trip.
Every 20ms the drive will attempt to restore the set switching frequency if the higher switching frequency will not take the IGBT temperature above
o
C.
135
NOTE
The 18kHz switching frequency is not available on Commander SL size B and C, 400V units.
39 Motor rated frequency
Coding
Bit SP FI Txt VM DP ND RA NV RW BU PS
111
Range 0.0 to 1500.0 Hz
Default EUR: 50.0, USA 60.0
Update rate Background
The motor rated frequency and the motor rated voltage (Pr 08) are used to define the voltage to frequency characteristic applied to the drive ( see
Pr 08 on page 15). The motor rated frequency is also used in conjunction with the motor full load rpm to calculate the rated slip for slip compensation
(see Pr 07 on page 15).
40 Number of motor poles
Coding
Bit SP FI Txt VM DP ND RA NV RW BU PS
111
Range Auto, 2P, 4P, 6P, 8P
Default Auto
Update rate Background
Poles by text
Pole pairs
(value on display)
Auto 0
2P 1
4P 2
6P 3
8P 4
This parameter is used in the calculation of motor speed and in applying the correct slip compensation. When auto is selected the number of motor
poles is automatically calculated from the rated frequency (Pr 39) and the rated load rpm (Pr 07).
The number of poles = 120 x rated frequency / rpm rounded to the nearest even number.
Commander SL Advanced User Guide 23
Issue Number: 1 www.controltechniques.com
Page 24

Introduction Default parameters Parameter description format Keypad and display Menu 0
41 Voltage mode select
Coding
Range Ur S, Ur, Fd, Ur A, Ur I, SrE
Default Fd
Update rate Background
Ur S Stator resistance and voltage offset measured on each run signal
The stator resistance and the voltage offset are measured and the parameters for the selected motor map are over-written each time the drive is
given a run signal. This test can only be done with a stationary machine where the flux has decayed to zero. Therefore this mode should only be used
if the machine is guaranteed to be stationary each time the drive is enabled. To prevent the test from being done before the flux has decayed there is
a period of 1 second after the drive has been in the ready state during which the test is not done if the drive is re-started. In this case, previously
measured values are used.
Ur No measurements
The stator resistance and voltage offset are not measured. The user can enter the motor and cabling resistance into the stator resistance parameter.
However this will not include resistance effects within the drive inverter. Therefore if this mode is to be used, it is best to use another Ur mode to
measure the stator resistance, initially.
Fd Fixed boost mode.
Neither the stator resistance nor the voltage offset are used, instead a fixed characteristic with boost applied as defined by Pr 42 is used. (see Pr 08
on page 15)
NOTE
Fixed boost mode should be used for multiple motor applications
Ur A Stator resistance and voltage offset measured at first drive enable
The stator resistance and voltage offset are measured once, the first time the drive is enabled and run. After the test has been completed successfully
the mode is changed to Ur mode. The stator resistance and voltage offset are written to the parameters for the currently selected motor map and
these parameters along with this parameter are saved in the EEPROM.
NOTE
If the test fails the stator resistance and voltage offset are not updated, the mode is changed to Ur, but no parameters are saved. If the drive is
powered down and back up, the drive will carry out another autotune when the drive is enabled and run.
4 Ur I Stator resistance and voltage offset measured at each power-up and after a drive default
The stator resistance and voltage offset are measured when the drive is first enabled after each power-up and after a drive default.
5 SrE Square law characteristic
Neither the stator resistance nor the voltage offset are used, instead a fixed square law characteristic with boost applied as defined by Pr 42 is used.
(see Pr 08 on page 15)
Bit SP FI Txt VM DP ND NV RW BU PS
111
42 Low frequency voltage boost
Coding
Range 0.0 to 50.0% of motor rated voltage
Default 3.0
Update rate Background
The voltage boost level used in fixed boost mode and square law mode is defined by this parameter. See Pr 08 on page 15.
45 Software version
Coding
Range 0.00 to 99.99
Update rate N/A
The drive software version consists of three numbers xx.yy .zz. xx.yy is di splayed in this parameter. Where xx specifies a change that affects hardware
compatibility, yy specifies a change that affects product documentation, and zz specifies a change that does not affect the product documentation.
The zz number is shown on the drive’s rating label.
Bit SP FI Txt VM DP ND RA NV RW BU PS
111
Bit SP FI Txt VM DP ND RA NV RW BU PS
21 1
24 Commander SL Advanced User Guide
www.controltechniques.com Issue Number: 1
Page 25

Introduction Default parameters Parameter description format Keypad and display Menu 0
55 Last trip
56 Trip 1
57 Trip 2
58 Trip 3
Coding
Range 0 to 232
Update rate On drive trip
Contains the last 4 drive trips. Pr 55 is the most recent trip and Pr 58 the oldest. When a new trip occurs all the parameters move down one, the
current trip is put in Pr 55 and the oldest trip is lost off the bottom of the log. Possible trips for Commander SL are shown in Table 5-8 on page 25.
All trips are stored including HF trips which are numbered from 20 to 30. (HF trips numbered from 1 to 19 are not stored in the trip log.) UV trips are
not stored unless the drive is running when the trip occurs.
Table 5-8 Trip indications
String Cause of trip
UV*** DC bus under voltage - Low AC supply voltage.
OV
OI.AC** AC instantaneous over current.
O.SPd Overspeed
It.AC
O.ht1 Drive over-heat (IGBT junctions) based on thermal model (see Pr 37 on page 23)
O.ht2 Drive over-heat based on heatsink temperature
O.Ld1* +24V or Digital output overload
O.ht3
EEF
PH
rS
O.cL Overload on current loop input
HF20 - HF30 Hardware faults (See table Table 5-10 HF trips )
Bit SP FI Txt VM DP ND RA NV RW BU PS
11 11
DC bus over voltage.
Drive voltage rating Instantaneous trip
200V 415V
400V 830V
2
I
t on drive output current
Drive over-heat based on thermal model
The drive will attempt to stop the motor before tripping. If the motor does not stop in 10 seconds the drive trips
immediately.
Internal drive EEPROM failure. All the parameters are set to default. The trip can only be removed by entering a load
default command (see Pr 29 on page 19)
High input voltage phase imbalance or input phase loss. Normally a motor load of between 50 and 100% or drive rating is
required to trigger the trip. The drive will attempt to stop the motor before tripping.
Failure to measure resistance when starting in open-loop voltage modes 0 or 3. This is either because the resistance
exceeds the maximum measurable value or no motor connected to drive (see Pr 41 on page 24)
*The enable/reset terminal will not reset an O.Ld1 trip. Use the stop/reset key.
**This trip cannot be reset for 10 seconds.
***The UV trip is only stored in the drive’s trip log if the drive trips on UV while running.
Trips can be grouped into the following categories:
Category Trips Comments
Hardware faults HF01 to HF19
Self resetting trips UV
Non-resetable trips HF20 to HF30 Cannot be reset.
EEF trip EEF Cannot be reset unless a default parameter set has been loaded.
Normal trips All other trips Can be reset after 1.0s
Normal trips with extended
reset
Phase loss PH
OI.AC Can be reset after 10.0s
These indicate fatal problems and cannot be reset. The drive is inactive after one
of these trips and the display shows HFxx.
Under voltage trip cannot be reset by the user, but is automatically reset by the
drive when the supply voltage is within specification (See table Table 5-9 Under
voltage trip and restart levels )
The drive stops before tripping provided the drive motoring power is suitably
reduced after 500ms of detecting phase loss
Commander SL Advanced User Guide 25
Issue Number: 1 www.controltechniques.com
Page 26

Introduction Default parameters Parameter description format Keypad and display Menu 0
Table 5-9 Under voltage trip and restart levels
Drive voltage rating UV trip level UV restart level 0V trip
200Vac 175Vdc 215Vdc* 415
400Vac 330Vdc 425Vdc* 830
* These are the absolute minimum dc voltages that the drive can be supplied by.
Table 5-10 HF trips
HF fault code Reason for trip
01 to 03 Not used
04 Low DC bus at power up
05 No signal from DSP at start up
06 Unexpected interrupt
07 Watchdog failure
08 Interrupt crash (code overrun)
09 to 10 Not used
11 Access to the EEPROM failed
12 to 19 Not used
20 Power stage - code error
21 Power stage - unrecognised frame size
22 OI failure at power up
23 DSP software overrun
24 Not used
25 DSP Communications failure
26 Soft start relay failed to close, or soft start monitor failed
27 Power stage thermistor fault
28 Fan failure (current too high - only on drives with a fan)
29 Not used
30 Not used
It should be noted that although the UV trip operates in a similar way to all other trips, all drive functions can still operate, but the drive cannot be
enabled. Parameter values are only loaded from EEPROM if the supply voltage is low enough for the switch mode power supply in the drive to shut
down and then it is increased to restart the drive power supplies. The only differences between UV and other trips are as follows:
1. Power down save user parameters are saved when UV trip is activated.
2. The UV trip is self-resetting when the DC bus voltage rises above the drive restart voltage level.
3. When the drive is first powered up a UV trip is initiated if the supply voltage is below the restart voltage level. This does not save power down
save parameters. If another trip occurs during power-up it is the active trip in preference to the UV trip. If this trip is cleared and the supply voltage
is still below the restart voltage threshold a UV trip is then initiated.
The following alarm warnings and display indications will flash on the right hand display when they become active.
Table 5-11 Alarm Warnings
Display Condition
OVL.d Ixt overload
hot Heatsink/IGBT temperature too high (see Pr 37 on page 23)
Table 5-12 Display indications
Display Condition
AC.Lt Drive is in current limit
81 Frequency reference selected
Coding
Range ±1500.0 Hz
Update rate 5ms
Indication of the reference being used by the drive for system setup and fault finding.
Bit SP FI Txt VM DP ND RA NV RW BU PS
111
26 Commander SL Advanced User Guide
www.controltechniques.com Issue Number: 1
Page 27

Introduction Default parameters Parameter description format Keypad and display Menu 0
82 Pre-ramp reference
Coding
Range ±1500.0 Hz
Update rate 5ms
Indication of the reference being used by the drive for system setup and fault finding.
83 Post ramp reference
Coding
Range ±1500.0Hz
Update rate 21ms
Although the range for scaling purposes is ±1500 Hz, the actual parameter value can be increased beyond this range by the current limit controller
(up to 20% > than the maximum frequency).
This is shown on the drive’s display.
84 DC bus voltage
Coding
Range 0 to +DC_VOLTAGE_MAX V
Update rate Background
Voltage across the internal DC bus of the drive.
Bit SP FI Txt VM DP ND RA NV RW BU PS
111
Bit SP FI Txt VM DP ND RA NV RW BU PS
1 111
Bit SP FI Txt VM DP ND RA NV RW BU PS
111 1
85 Motor frequency
Coding
Range ±1500.0 Hz
Update rate 21 ms
Although the range for scaling purposes is ±1500Hz, the actual parameter value can be increased beyond this range by slip compensation. This
parameter gives the output frequency of the drive, i.e. the sum of the post ramp reference and the slip compensation.
86 Motor voltage
Coding
Range 0 to AC_VOLTAGE_MAX V
Update rate Background
This is the modulus of the r.m.s. fundamental line-to-line voltage at the inverter output.
87 Motor speed
Coding
Range ±9999 rpm
Update rate Background
The motor speed is calculated from the post ramp reference (Pr 83). The speed of rotation is calculated as follows:
speed 60 Frequency No. of pole pairs⁄× 60 Pr 83 Pr 40 2⁄()⁄×==
The result will be fairly accurate provided the slip compensation has been set up correctly with the rated full load speed parameter (Pr 07). This
calculation relies on the number of motor poles being set up correctly in Pr 40, or if auto mode is selected (Pr 40 = Auto) then it relies on a reasonably
accurate value of motor rated speed being set in Pr 07 to allow correct calculation of the motor poles.
Bit SP FI Txt VM DP ND RA NV RW BU PS
1 111
Bit SP FI Txt VM DP ND RA NV RW BU PS
111 1
Bit SP FI Txt VM DP ND RA NV RW BU PS
11
Commander SL Advanced User Guide 27
Issue Number: 1 www.controltechniques.com
Page 28

Introduction Default parameters Parameter description format Keypad and display Menu 0
A
88 Current magnitude (motor current)
Coding
Bit SP FI Txt VM DP ND RA NV RW BU PS
1121 1
Range 0 to DRIVE_CURRENT_MAX
Update rate Background
This parameter is the r.m.s. current from each output phase of the drive. The phase currents consist of an active component and a reactive
component. The three phase currents can be combined to form a resultant current vector as shown below:
ctive current
y
Resultant
output current
Pr
88
Reactive current
x
The resultant current magnitude is displayed by this parameter. The active current is the torque producing current, and the reactive current is the
magnetising or flux producing current.
91 Reference enabled indicator
92 Reverse selected indicator
93 Jog selected indicator
Coding
Bit SP FI Txt VM DP ND RA NV RW BU PS
11
Update rate 2ms
These flags are controlled by the drive sequencer. They select the appropriate reference as commanded by the drive logic.
94 Analogue input 1 level (terminal T2)
Coding
Bit SP FI Txt VM DP ND RA NV RW BU PS
11 1
Range 0.0 to 100.0%
Update rate 5 ms
This parameter displays the level of the analogue signal present at analogue input 1.
In voltage mode, this is a unipolar voltage input where the input range is 0 to +10V.
In current mode, this is a unipolar current input having a maximum measurable input of 20mA.
NOTE
If analogue input is 1 set-up as voltage input, and if the potentiometer is supplied from the drive’s +10V rail (terminal T3), they must have a resistance
>2kΩ.
28 Commander SL Advanced User Guide
www.controltechniques.com Issue Number: 1
Page 29

Page 30

0472-0078-01
 Loading...