

Page 1

Page 2
LANGUAGES
ENGLISH................................................................................................................1
FRANÇAIS ..........................................................................................................58
DEUTSCH ..........................................................................................................115
ESPAÑOL ..........................................................................................................172
ITALIANO ..........................................................................................................229
DUTCH ..............................................................................................................286
Page 3

ENGLISH
CONGRATULATIONS
Congratulations on the purchase of your new camera. Your camera has
been carefully engineered and manufactured to give you dependable
operation. Read this manual before operating the camera to become
more familiar with it.
This manual has been written and formatted with depth and detail so
that you can easily follow the instructions to maximize the features of
your camera.
1
Page 4
CAMERA
F
I
J
L
M
N
A
B
C
D
E
K
H
G
A
AWB
07 ⁄ 04 ⁄ 03 02:40PM
4
M
N
28/45
A
AWB
07 ⁄ 04 ⁄ 03 02:40PM
4
M
N
28/45
: Single Shot
: Continuous Shot
: Review
: Video Clips
CAMERA
Top/Front
OVER
OVER
VIEW
VIEW
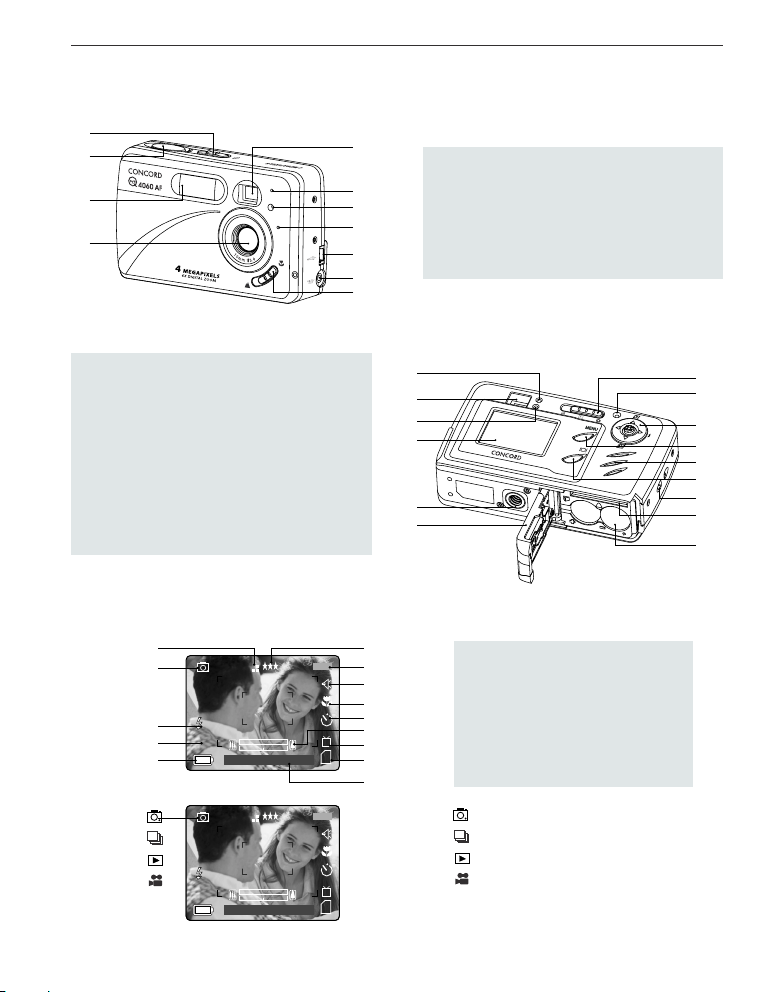
CAMERA OVERVIEW
1
2
3
4
12. Flash Ready LED
13. Viewfinder
14. Auto-Focus LED
15. LCD
16. Tripod Socket
17. Battery/Memory
Card Door
18. Mode Switch
19. Reset Button
LCD ICONS
20. Joystick/OK button/
21. MENU Button
22. Speaker
23. LCD On/Off Button
24. Wrist Strap Holder
25. Memory Card Slot
26. Battery Compartment
Zoom button/Flash
button
5
6
7
8
9
10
11
1. Power Switch
2. Shutter Button
3. Flash
4. Lens/ Lens Door
5. Viewfinder
6. Flash Sensor
Bottom/Back
12
13
14
15
16
17
2
A. Resolution
B. Camera Mode
C. Flash
D. White Balance
E. Battery Level
F. Image Quality
G. Frame Counter
7. Red-eye Reduction
LED/Self-Timer LED
8. Microphone
9. Mini-USB port
10. TV-Out port
11. Macro Mode Switch
H. Sound
I. Macro
J. Self-Timer
K. Zoom Bar
L. TV Option
M. Memory
N. Date / Time
18
19
20
21
22
23
24
25
26
Page 5

TABLE OF CONTENTS
CAMERA OVERVIEW ............................................................................................................................................2
Top/Front ........................................................................................................................................................2
Bottom/Back ....................................................................................................................................................2
LCD ICONS.....................................................................................................................................................2
GETTING STARTED ..............................................................................................................................................5
Package Contents ..........................................................................................................................................5
Camera Features ............................................................................................................................................5
Attaching the Wrist Strap.................................................................................................................................5
Loading the Batteries ......................................................................................................................................5
Turning the Camera On and Off......................................................................................................................6
Checking the Battery Level ............................................................................................................................6
Setting the Language, Date and Time ............................................................................................................7
Turning the LCD On and Off ..........................................................................................................................8
Internal Memory / Inserting the Memory Card ................................................................................................9
Setting the camera’s operational mode ........................................................................................................10
TAKING A PICTURE ............................................................................................................................................11
Taking a Picture with the Viewfinder..............................................................................................................11
Flash Ready LED ..........................................................................................................................................11
Taking a Picture with the LCD ......................................................................................................................12
Auto-Focus Lock ..........................................................................................................................................12
Setting the Flash ..........................................................................................................................................13
Digital Zoom ..................................................................................................................................................14
Using the main menu in camera mode ........................................................................................................15
Capture mode options ..................................................................................................................................16
Self Timer ......................................................................................................................................................17
Macro Mode ..................................................................................................................................................17
Continuous shooting......................................................................................................................................18
Image Resolution ..........................................................................................................................................18
Image Quality ................................................................................................................................................19
White Balance ..............................................................................................................................................19
Exposure Compensation ..............................................................................................................................20
Scene Selection ..........................................................................................................................................21
TAKING VIDEO CLIPS ........................................................................................................................................22
REVIEWING YOUR FILES ..................................................................................................................................22
Using Review Mode ......................................................................................................................................22
Reviewing Video Clips ..................................................................................................................................23
Enlarging Stored Pictures..............................................................................................................................23
Using the main menu in review mode ..........................................................................................................24
Deleting Your Files ........................................................................................................................................25
Using Thumbnail Mode ................................................................................................................................26
3
Page 6

CUSTOMIZING THE CAMERA SETTINGS ........................................................................................................27
Setup Menu and Features ............................................................................................................................29
Setting the Auto Off Time ..............................................................................................................................30
Setting the Language ....................................................................................................................................30
Setting the Date ............................................................................................................................................30
Setting the Time ............................................................................................................................................31
Setting the LCD Brightness ..........................................................................................................................31
Formating internal memory or memory card ................................................................................................32
RESTORE THE CAMERA TO FACTORY DEFAULT SETTINGS ......................................................................33
SOFTWARE INSTALLATION GUIDE ..................................................................................................................34
Computer System Requirements ..................................................................................................................34
Installation Requirements..............................................................................................................................34
Using the installer splash screen ..................................................................................................................35
Flow diagram for software installation ..........................................................................................................36
Identifying your operating system ................................................................................................................37
Installing the driver and DirectX 9 - Windows 98/98SE ................................................................................38
Installing DirectX 9 - Windows 2000 ............................................................................................................40
Installing ArcSoft PhotoImpression - all Windows users ..............................................................................41
Installing Adobe Acrobat Reader 5.1 - all Windows users (optional) ............................................................43
CONNECTING THE CAMERA TO THE COMPUTER ........................................................................................45
Downloading pictures and video clips onto your computer ..........................................................................45
Using ArcSoft PhotoImpression ....................................................................................................................46
Unplugging your camera from the computer ................................................................................................46
TV MODE..............................................................................................................................................................47
Connecting the camera to the television ......................................................................................................47
Using the TV as a Live Viewfinder................................................................................................................47
Reviewing pictures and video clips on your TV ............................................................................................47
ERROR MESSAGES............................................................................................................................................48
TROUBLESHOOTING..........................................................................................................................................49
GETTING HELP....................................................................................................................................................52
CAMERA SPECIFICATIONS................................................................................................................................53
SAFETY TIPS AND MAINTENANCE ..................................................................................................................55
Safety Tips ....................................................................................................................................................55
Precautions for the camera ..........................................................................................................................55
Precautions for batteries ..............................................................................................................................56
Precautions for SD Memory Cards ..............................................................................................................56
REGULATORY INFORMATION............................................................................................................................57
4
Page 7

GETTING STARTED
1
2
3
GETTING ST
GETTING ST
Package Contents
• Concord Eye-Q 4060AF
• Mini-USB Cable
• TV Out Cable
• User’s Guide/Quick Start Guide/Warranty Card
• Camera Case
•Wrist Strap
• 2x AA Alkaline Batteries
• CD-ROM (for Windows users only)
– USB Mass Storage Driver
– ArcSoft PhotoImpression 2000
– Adobe Acrobat Reader 5.1
– Microsoft DirectX 9
– Multilingual User’s Guide
Camera Features
•4 Megapixels, 2272 x 1704 Resolution
• 1.5” Color LCD
• 6x Digital Zoom
•Video Clips
• 16MB Internal Memory
• Compatible with Secure Digital (SD) memory cards (not included)
Attaching the Wrist Strap
Please attach the wrist strap to prevent dropping the camera.
ARTED
ARTED
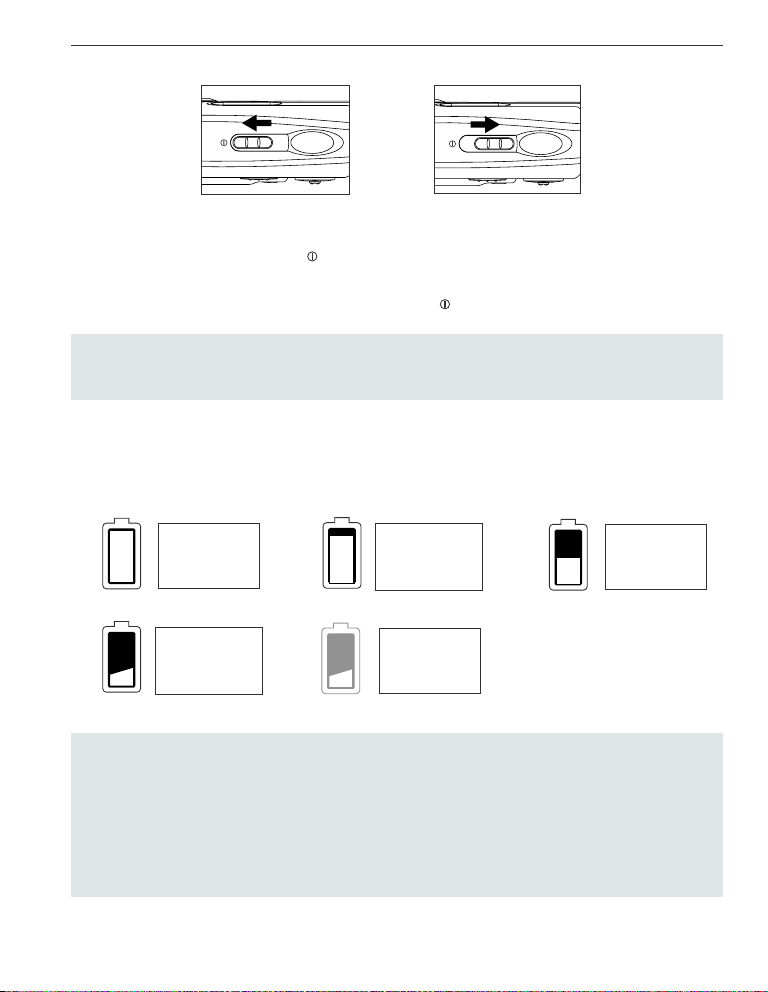
Loading the Batteries
fig.1.1 fig.1.2
The camera can use 2x AA alkaline, lithium or rechargeable batteries to operate.
1. Open the Battery/Memory Card door. (fig.1.1)
• Slide the door in the direction of the arrow marked on it, and lift it open.
2. Insert the batteries according to the polarity indicators on the top edge of the battery compartment. (fig.1.2)
3. Shut the Battery/Memory Card door by sliding it in the opposite direction of the arrow marked on it, and
close it securely. (fig.1.3)
fig.1.3
5
Page 8
TURNING THE CAMERA ON AND OFF
GETTING STARTED
fig.1.1 Camera On
fig.1.2 Camera Off
The Power Switch is located on the top of the camera.
1. Slide the Power Switch toward the ( ) icon to power the camera on. (fig.1.1)
• The lens cover will open.
• The LCD will turn on automatically
2. To turn the camera off, slide the Power Switch away from ( ). (fig.1.2)
Note:
To extend battery life, the camera will automaticallypower off after 60 seconds of inactivity. Press the
Shutter button to turn the camera back on.
Checking the Battery Level
There are 5 battery levels that are displayed on the LCD
1/4 battery
Batteries are full
and ready to use.
3/4 battery
capacity remains.
capacity remains.
Batteries are low
need to be
replaced soon.
Batteries are
empty, blinking
red and need to
be replaced.
1/2 battery
capacity remains.
Note:
• The camera's battery level indicator may not accurately reflect the state of a rechargeable battery even
the chargeable batteries have been fully recharged due to the inherent problem with rechargeable
batteries.
•To extend battery life, the camera will automatically power off after 60 seconds of inactivity. To change
this setting please refer to p.30.
• For better performance, please use NiMH rechargeable batteries.
• Remove the batteries from the camera if they will not be used for an extended period of time to prevent
corrosion or battery leaks.
6
Page 9
GETTING STARTED
SETTING THE LANGUAGE, DATE AND TIME
When the camera is powered on for the first time, the Language, Date and Time menus will appear.
Setting the Language
1. Turn the camera on.
• The Language Setup screen will appear on the LCD.
2. Press the joystick to highlight the language you would like to use.
3. Press the OK button to select by pressing the joystick in.
4. The next screen will read “Are You Sure?” press the joystick to select No
or Yes .
5. Press the OK button to confirm the selection by pressing the joystick in.
• If you select No, you will return to the Language select screen.
• If you select Yes, all menu screens will be displayed in the new language.
Each language will set the default setting for date format and TV option. To change these settings, please refer
to the Customizing the Camera Settings section on page 30.
Language(s) Date Format Setting TV Option
English / Español MM/DD/YYYY NTSC
Français / Deutsch DD/MM/YYYY PAL
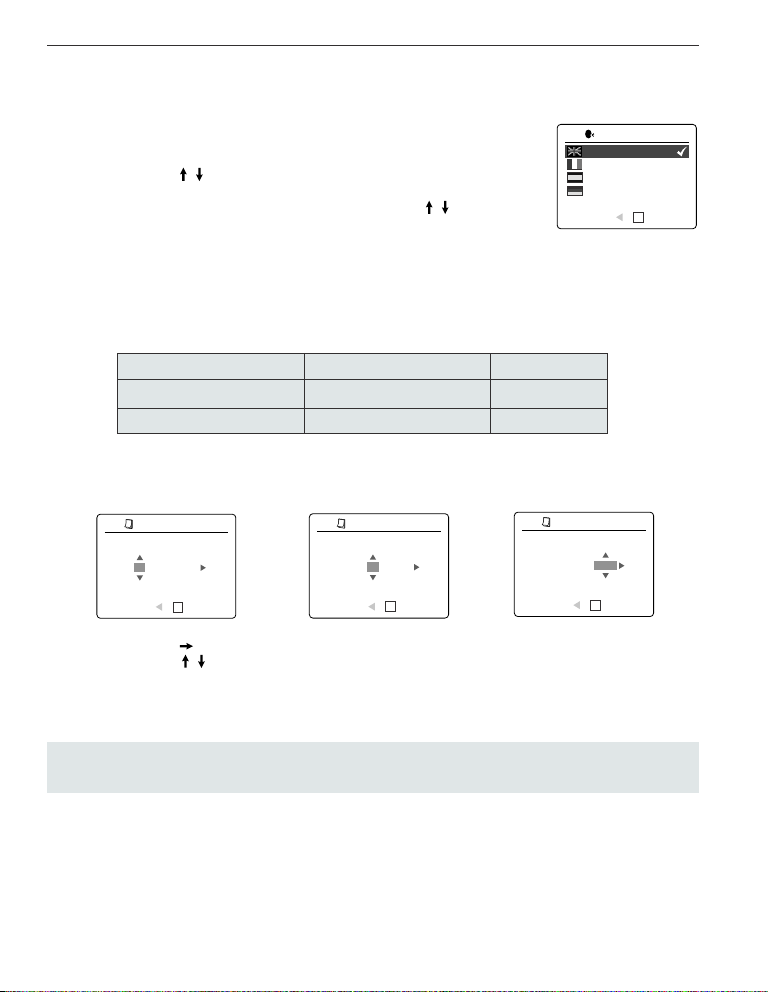
Setting the Date
1
ADJUST DATE
1
ADJUST DATE
1
ADJUST DATE
LANGUAGE OPTION
English
Français
Español
Deutsch
RETURN SET
OK
01 ⁄ 01 ⁄ 2003
RETURN SET
OK
01 ⁄ 01 ⁄ 2003
RETURN SET
OK
01 ⁄ 02 ⁄ 2003
OK
RETURN SET
1. Press the joystick to change the number in the blinking position until you reach the desired setting.
2. Press the joystick to highlight the month, day or year.
• The selection will blink when it is highlighted.
3. Repeat steps 1 and 2 until the date is set.
4. Press the OK button to set the date by pressing the joystick in.
Note:
• If the battery is removed or dead for more than 4 minutes, the date will return to its default setting.
7
Page 10
GETTING STARTED
ADJUST TIME
OK
01:01 AM
RETURN SET
ADJUST TIME
OK
01:01 AM
RETURN SET
01:02 AM
RETURN SET
ADJUST TIME
OK
A
AWB
07⁄ 04 ⁄ 03 02:40PM
4
M
N
28/45
Setting the Time
The time is displayed in hour, minute format.
1. Press the joystick to change the selection in the blinking position until you reach the desired setting.
2. Press the joystick to highlight the hour (HH), minutes (MM) or AM/PM.
• The selection will blink when it is highlighted.
3. Repeat steps 1 and 2 until the time is set.
4. Press the OK button to set the time by pressing the joystick in.
Note:
The time can be displayed in a 12-hour or 24-hour format. Please go to page.31 to change this setting.
If the battery is removed or dead for more than 4 minutes, the time will return to its default setting.
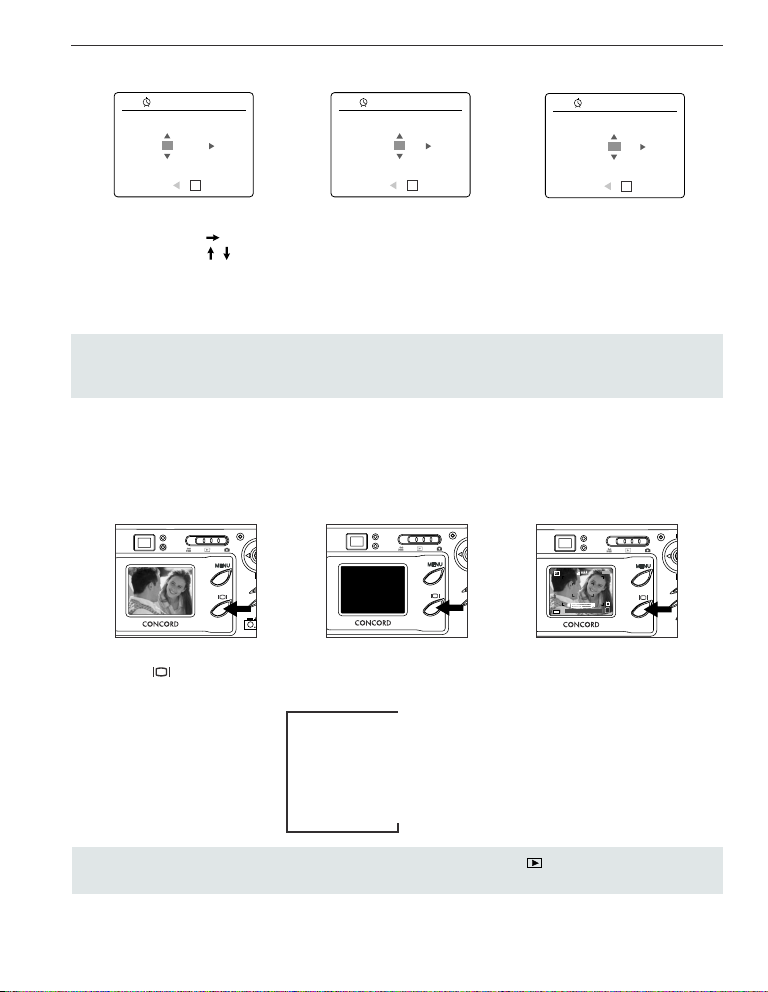
TURNING THE LCD/ICONS ON AND OFF
The camera has a 1.5” LCD which can frame subjects for image and video clip capture, review stored images
and video clips and to display the current camera settings.
1. Use the ( ) button to toggle the LCD mode. The LCD mode changes each time the button is pressed as
follows:
Icons off
LCD off
LCD on with icons
Note: In order to save battery power, you may turn off the LCD display in ( ) Review Mode, only the
LCD icons can be turned on or off.
8
Page 11
GETTING STARTED
!
INTERNAL MEMORY/INSERTING THE MEMORY CARD
Internal Memory
The camera is equipped with 16MB of internal memory, which can be used right away.
Status Memory in Use
Memory card is not inserted Internal Memory
Memory card is inserted Memory Card
NOTE!: When the memory card is inserted, the images and video clips stored in the internal memory will be
transferred automatically onto the memory card. Please insert a memory card with 16MB or greater of
available memory.
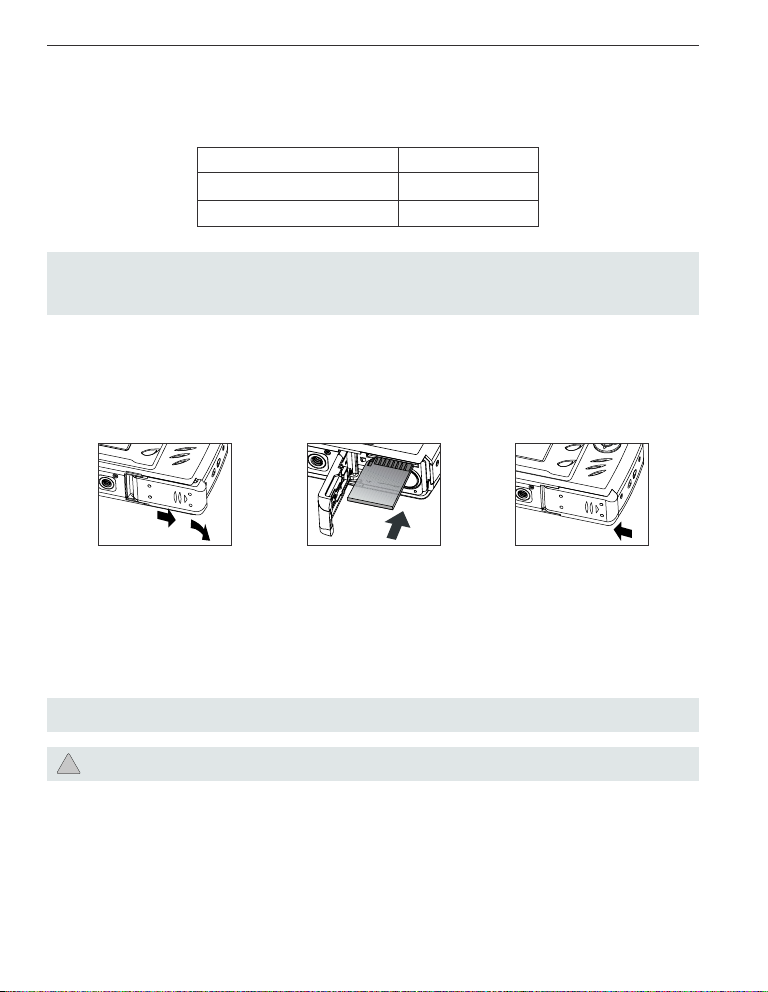
Inserting the Memory Card
In addition to having a 16MB internal memory, the camera can use Secure Digital (SD) memory cards to store
images and video clips.
fig.1.1
1. Open the Battery/Memory Card door.
• Slide the door in the direction of the arrow marked on it, and lift it open. (fig.1.1)
2. Insert the memory card as indicated by the diagram. (fig.1.2)
• Please insert the card in straight, not on an angle.
3. Shut the Battery/Memory Card door by sliding it in the opposite direction of the arrow marked on it, and
close it securely. (fig.1.3)
Note: The camera can support SD cards up to 512 MB.
If the memory card or internal memory is corrupted, the memory needs to be formatted. (p.32)
fig.1.2
fig.1.3
9
Page 12
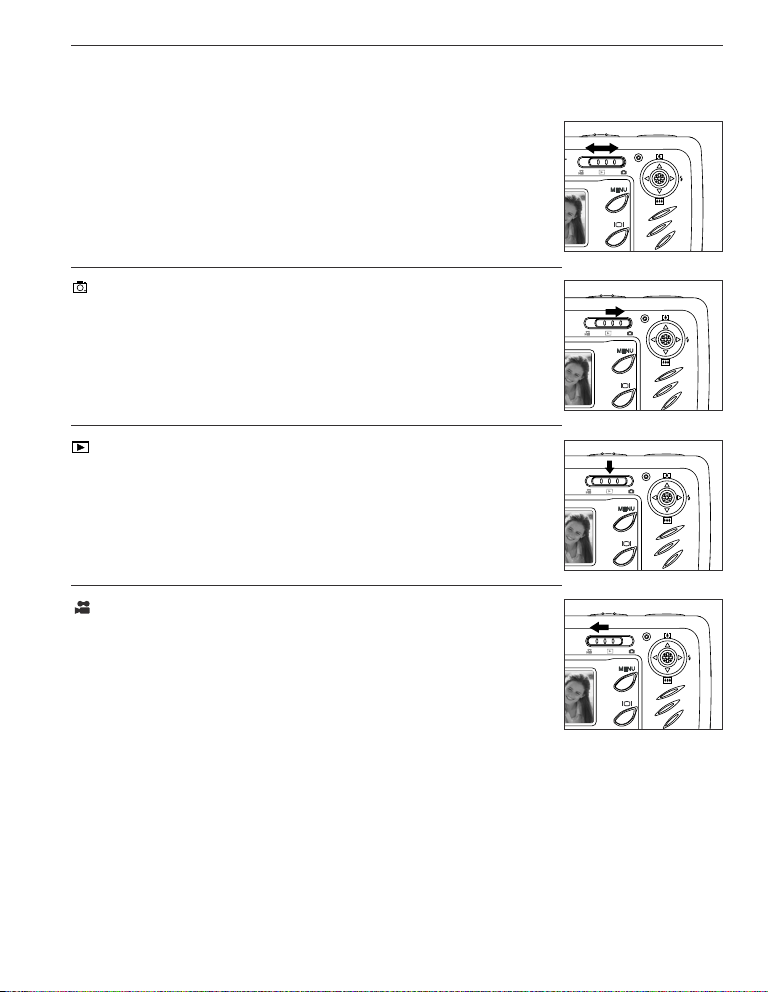
SETTING THE CAMERA’S OPERATIONAL MODE
The camera has 3 operational modes Camera Mode, Review Mode and Video Clip Mode.
1. To change the camera operational mode, slide the mode switch horizontally
to the corresponding position.
Camera Mode
Use the camera mode setting to take pictures or to customize your camera
settings for picture taking.
Review Mode
Use the review mode setting to browse through
images and video clips or to delete images
from the internal memory or memory card.
Video Clip Mode
Use video clip mode to capture video clips.
GETTING STARTED
10
Page 13
TAKING PICTURES
SINGLE SHOT
Taking a Picture with the Viewfinder at Distant Mode
M
4
fig.1.2
28/45
N
M
4
fig.1.1
28/45
N
Taking a picture with the viewfinder:
1. Turn the camera on.
2. Set the camera to ( ) Camera Mode and make sure the Macro Mode Switch is set to the ( ) Distant
Mode.
• The LCD can be switched off to conserve battery power by pressing the ( ) button.
3. Frame the subject in the viewfinder.
4. Press the shutter button half-way to activate the auto-focus until the green AF LED lights up. (For
information on Focus Lock, please go to page 12) (fig.1.1)
• The camera will focus the lens at different distances to find the correct focus range, and you will hear a
rapid click sound from the camera.
5. Press the shutter button fully to capture the image. (fig.1.2)
• The camera will beep when the image is captured if sound is activated.
• The camera will make a click sound.
• When the image has been captured, the Flash Ready LED next to the viewfinder will blink to indicate that
the image is being stored. (For more information on the Flash Ready LED status, please go to page 12)
FLASH READY LED
fig.1.3
fig.1.4
Flash Ready LED Status Description
Steady (fig.1.3) The camera is capturing a picture or video clip.
Hold the camera steady to prevent blurry pictures.
Blinking (fig.1.4) The flash is recharging. You may move the
camera in this mode.
Note: Do not power the camera off or switch modes while the camera is capturing or storing a picture or
video clip to prevent corrupting the picture or video clip being stored.
11
Page 14
TAKING A PICTURE WITH THE LCD AT DISTANT MODE
A
AWB
07 ⁄ 04 ⁄ 03 02:40PM
4
M
N
28/45
CAPTURE MODE
QUALITY SETUP
IMAGE SIZE
SCENE SELECTION
WHITE BALANCE
RETURN SELECT
CAMERA
Q
4
M
28/45
Taking a picture with the LCD:
1. Set the camera to ( ) camera mode and make sure the Macro Switch is set to
the ( ) Distant Mode.
2. Frame the subject in the LCD.
3. Press the shutter button half-way to activate the auto-focus lock until the green
AF LED lights up. (For more information on Focus Lock, please go to page 12)
(fig.1.1)
• The camera will focus the lens at different distances to find the correct focus
range, and you will hear a rapid click sound from the camera.
4. Press the shutter button fully to capture the image. (fig.1.2)
• The camera will beep when the image is captured if sound is activated.
• The camera will make a click sound.
• When the image has been captured, the Flash Ready LED next to the
viewfinder will blink to indicate that the image is being stored.
•Apreview of the image will be displayed on the LCD for 1 second and the
picture counter number displayed in the LCD will be updated.
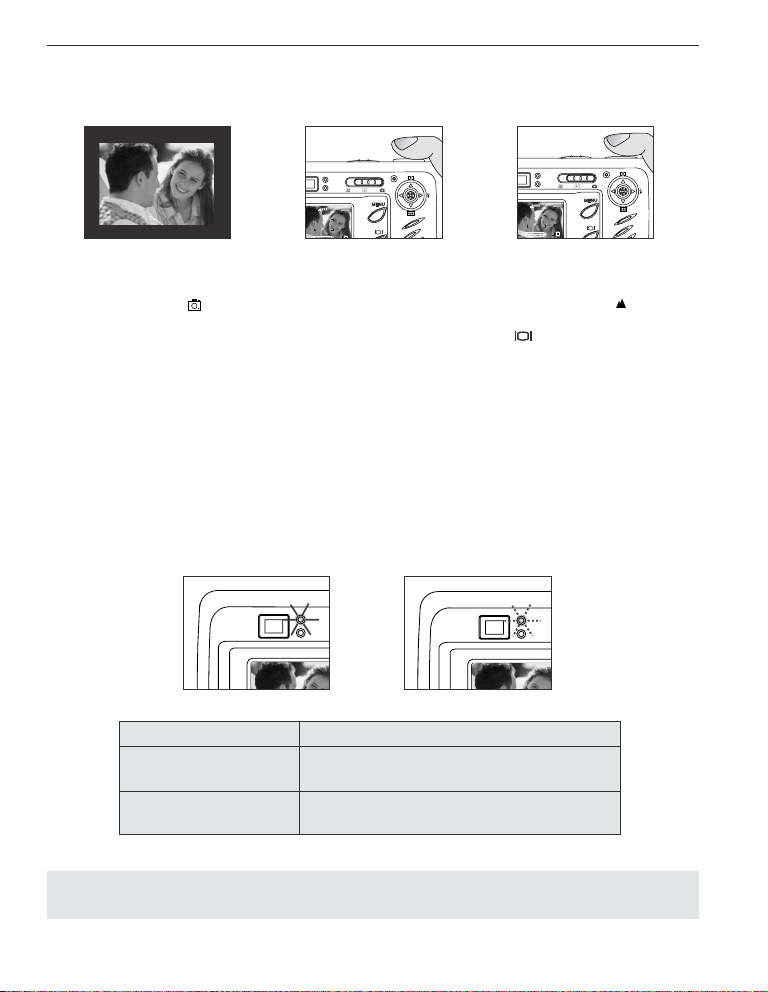
AUTO-FOCUS LOCK
This feature can be used to freeze the focus when the subject is not located in the
center of the picture at ( ) Distant Mode.
To use the focus lock:
1. Position the subject in the center of the red frame located in the LCD. (fig.1.3)
2. Press the shutter button halfway until the green Auto Focus LED lights up.
(fig.1.4)
TAKING PICTURES
CAPTURE MODE
SINGLE SHOT
CONTINUOUS SHOT
SELF-TIMER
RETURN SET
OK
M
4
28/45
fig.1.1
M
4
28/45
fig.1.2
A
AWB
fig.1.3
N
N
M
4
07 ⁄ 04 ⁄ 03 02:40PM
28/45
N
fig.1.5 fig.1.6
Auto Focus LED Status Description
Blinking (fig.1.5) The camera cannot find the best focus for the
scene.
Steady (fig.1.6) The subject is in focus.
12
M
4
fig.1.4
AWB
fig.1.7
A
28/45
M
4
07 ⁄ 04 ⁄ 03 02:40PM
28/45
N
Page 15
TAKING PICTURES
A
AWB
07 ⁄ 04 ⁄ 03 02:40PM
4
M
N
28/45
AWB
07 ⁄ 04 ⁄ 03 02:40PM
4
M
N
28/45
A
4
M
28/45
3. Recompose your picture. (fig.1.7)
• Keep the shutter pressed half-way while recomposing the picture.
4. Press the shutter button fully to capture the picture. (fig.1.8)
M
4
Note: The AF LED will continue blinking in the following conditions:
1. There are several subjects at different distances within the focus lock area.
Recompose the picture by moving the camera slightly.
28/45
fig.1.8
2. There is no color contrast. Recompose the picture with a subject that contains
more color.
3. There is insufficient lighting. Increase the lighting in the surrounding area.
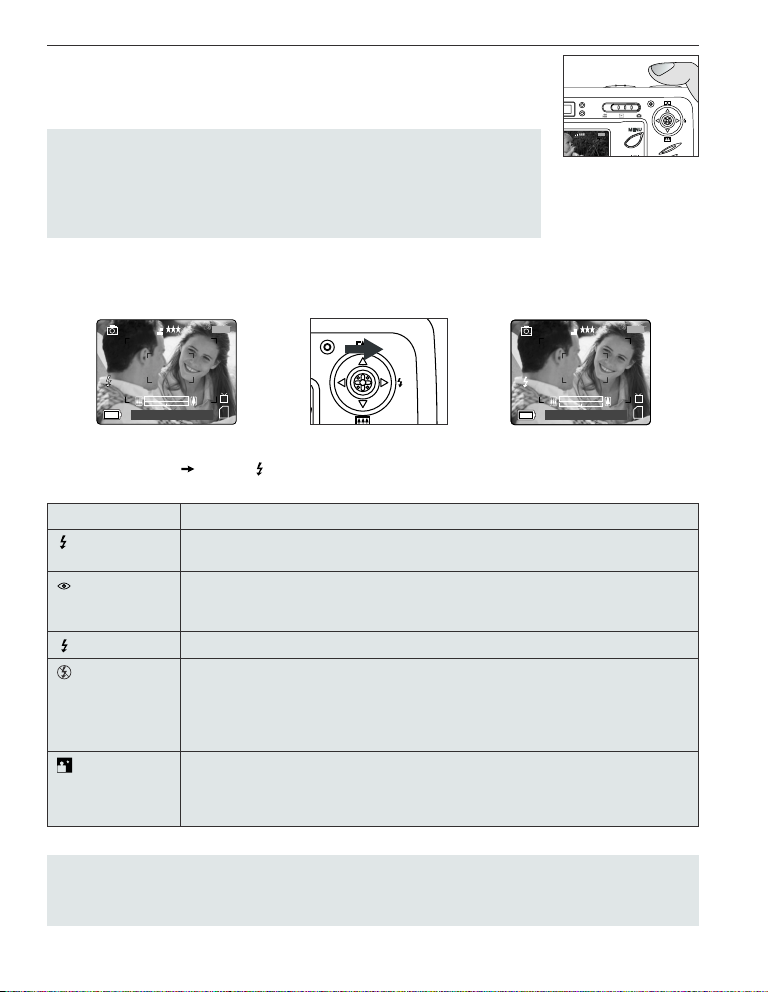
SETTING THE FLASH
How to set the flash:
1. Press the joystick toward ( ) repeatedly until the desired indicator appears on the LCD.
Flash Mode Description
Auto Flash The camera judges if a flash is required. If the environment is too dark, the flash will
Red-Eye Use this mode to significantly reduce the occurrence of “red- eye” in flash photography.
Reduction
Fill-in Flash Flash will fire in any lighting condition.
Flash off The flash will not fire in this mode. Please use this mode if you want to capture the
Night Mode A slow shutter speed is used in this mode to capture the lights in night scenes.
fire.
The camera will automatically detect when the flash is needed and the flash will fire
after a short delay.
mood of the ambient lighting or to use the available light in places where flash
photography is prohibited, such as museums.
•To prevent blurry pictures in low light situations, hold the camera steady when
pressing the Shutter button or mount the camera on a tripod.
•To prevent blurry pictures in low light situations, hold
the camera steady when pressing the Shutter button
or mount the camera on a tripod.
Note: The flash needs to recharge after it is fired. If the Shutter button is pressed while the flash is
charging, the Flash Ready LED will blink. Please wait a few moments and press the Shutter button again to
take a picture.
13
Page 16

TAKING PICTURES
TAKING A PICTURE WITH DIGITAL ZOOM
The camera can use up to 6x digital zoom to give your pictures up to 6x magnification.
M
4
28/45
A
AWB
07 ⁄ 04 ⁄ 03 02:40PM
Normal Mode
N
4x Zoom
How to use digital zoom:
1. Press the joystick to use digital zoom.
• The digital zoom bar displayed on the LCD screen will indicate the scale of magnification by changing its
color.
• 1x - 3x zoom - The white digital zoom bar will indicate digital zoom up to 3x.
• 4x zoom - The blue digital zoom bar will appear and 4x wil be displayed on the LCD. The blue frame will
display the area that will be captured. Use the blue frame to compose your picture.
• 6x zoom - The red digital zoom bar will appear and 6x will be displayed on the LCD. The red frame will
display the area that will be captured. Use the red frame to compose your picture.
Photography Hints -
Hold your camera steady while using Digital Zoom to prevent blurriness in the
photograph due to camera movement. It is recommended to either place your camera on a steady surface or
use a tripod. Also, please note that the image quality may degrade slightly with digital zoom.
Note: The digital zoom can only be monitored with the LCD and not through the optical viewfinder.
4X
6x Zoom
6X
14
Page 17
TAKING PICTURES
USING THE MAIN MENU IN CAMERA MODE
Q
FINE
NORMAL
ECONOMY
RETURN SET
CAMERA
CAPTURE MODE
Q
QUALITY SETUP
IMAGE SIZE
SCENE SELECTION
WHITE BALANCE
RETURN SELECT
CAMERA
+
EV COMPENSATION
–
SETUP
RETURN SELECT
OFF
PARTY INDOOR
BEACH SNOW
SUNSET
NIGHT LANDSCAPE
RETURN SET
FIREWORKS
NIGHT PORTRAIT
QUALITY SETUP
OK
SCENE SELECTION
OK
SCENE SELECTION
CAPTURE MODE
SINGLE SHOT
CONTINUOUS SHOT
SELF-TIMER
RETURN SET
RESOLUTION
M
4
2272 x 1704
M
3
2048 x 1536
M
2
1600 x 1200
M
1
1280 x 960
V
640 x 480
RETURN SET
OK
OK
OK
RETURN SET
+
EV COMPENSATION
–
00 EV
–
SET
OK
15
WHITE BALANCE
AUTO
AWB
SUNNY
FLUORESCENT
TUNGSTEN
OK
RETURN SET
+
Page 18
TAKING PICTURES
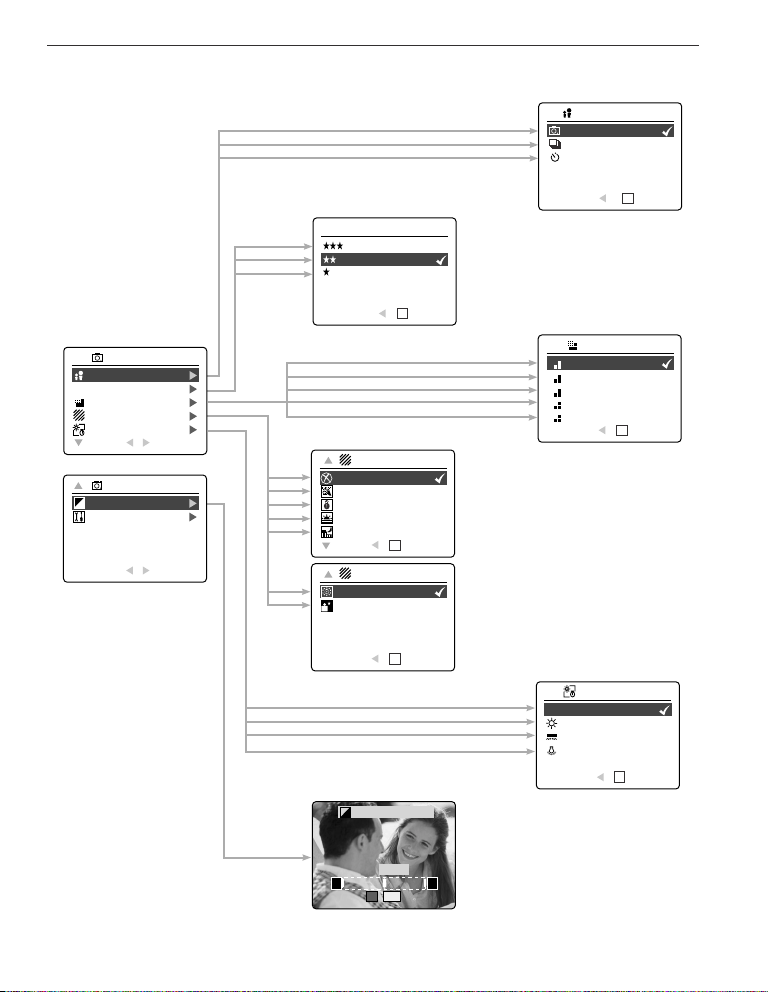
USING THE MAIN MENU IN CAMERA MODE
Follow the steps below to set the advanced shooting options in the camera through the Main Menu.
Using the ( ) Main Menu:
1. Turn the camera on.
2. Set the mode switch to ( ).
3. Press the MENU button to display the main menu.
4. Press the joystick until the desired option is highlighted.
5. Press the joystick to enter the submenu.
6. Press the joystick in the submenu to toggle between the options.
7. Press the OK button to make a selection.
• All selections will be marked by a red check mark.
8. To return to the previous menu, press the joystick .
9. To exit the menu at any time, press the MENU button.
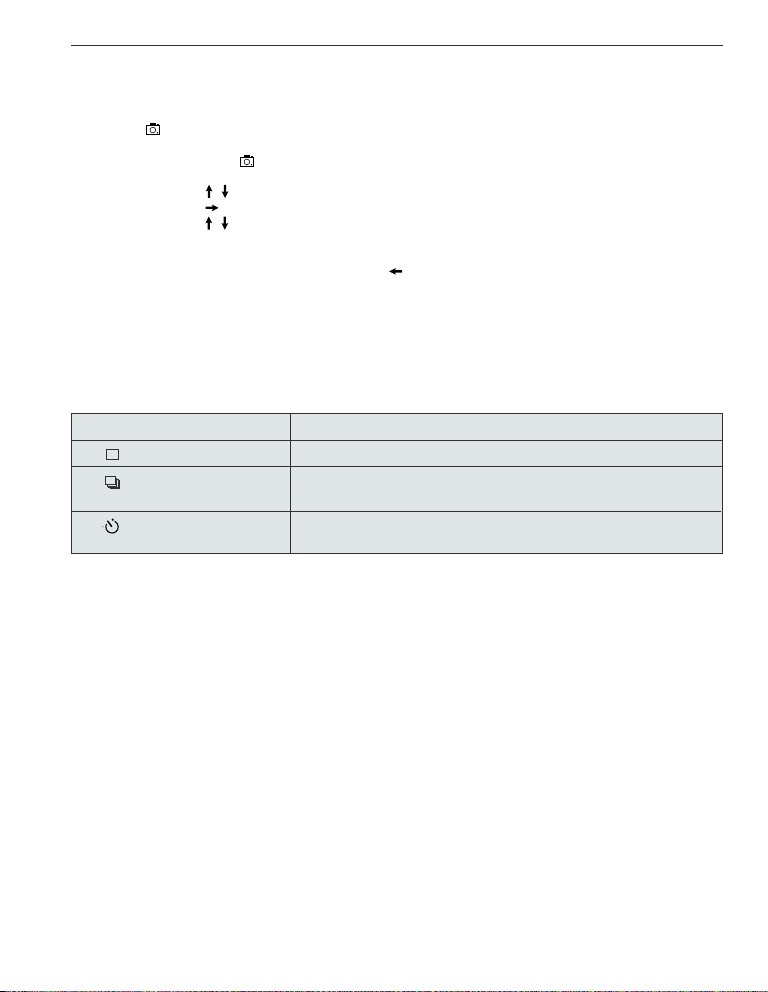
CAPTURE MODE OPTIONS
The capture mode menu has 3 features to choose from for taking pictures.
Capture Mode Option Description
( ) Single Shot The camera will take 1 picture at a time.
( ) Continuous Shooting The camera will take 7 pictures (at 1600 x 1200 pixels) in a row
( ) Self-Timer The camera will take a picture 10 seconds after the shutter
when the shutter button is fully pressed. The flash is disabled.
button is released.
16
Page 19
TAKING PICTURES
SINGLE SHOT
CONTINUOUS SHOT
SELF-TIMER
RETURN SET
CAPTURE MODE
OK
A
AWB
07 ⁄ 04 ⁄ 03 02:40PM
4
M
N
28/45
CAPTURE MODE
QUALITY SETUP
IMAGE SIZE
SCENE SELECTION
WHITE BALANCE
RETURN SELECT
CAMERA
Q
A
AWB
07 ⁄ 04 ⁄ 03 02:40PM
4
M
N
28/45
SELF-TIMER
How to use Self-Timer:
1. In ( ) Camera Mode, press MENU to display the main menu.
2. Press the joystick to enter capture mode.
3. Press the joystick to highlight ( ) Self-Timer.
4. Press the OK button to set the ( ) Self-Timer.
5. Place the camera on a flat surface or tripod.
6. Use the LCD to compose the picture, and then press the Shutter button to activate the Self-Timer.
The Self -timer LED will blink slowly for 7 seconds, faster for the remaining 3 seconds and then the image
will be captured.
Note:
• The Self-Timer is automatically deactivated once the image is taken.
•To deactivate the Self-Timer before taking a picture, follow the steps above and highlight another option
in the Capture Mode menu.
Photography Hints -
Since the Self-Timer LED indicator on the front of the camera flashes, you have time to join in the photograph
and know when the camera is done taking a picture when the Self-Timer LED light stops blinking.
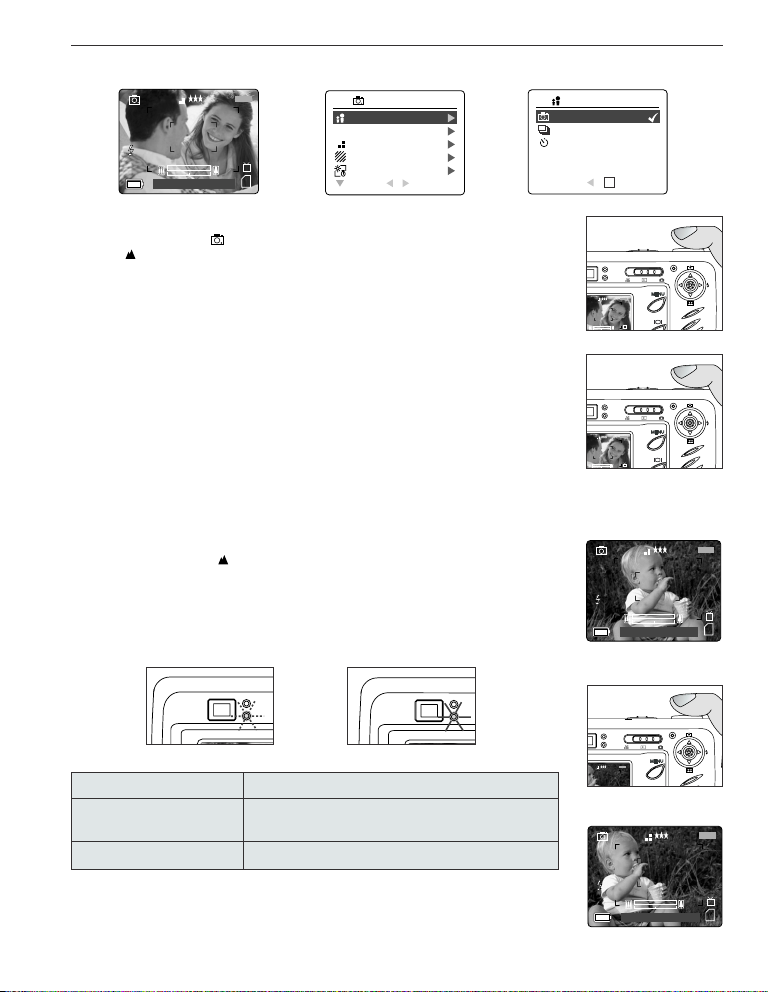
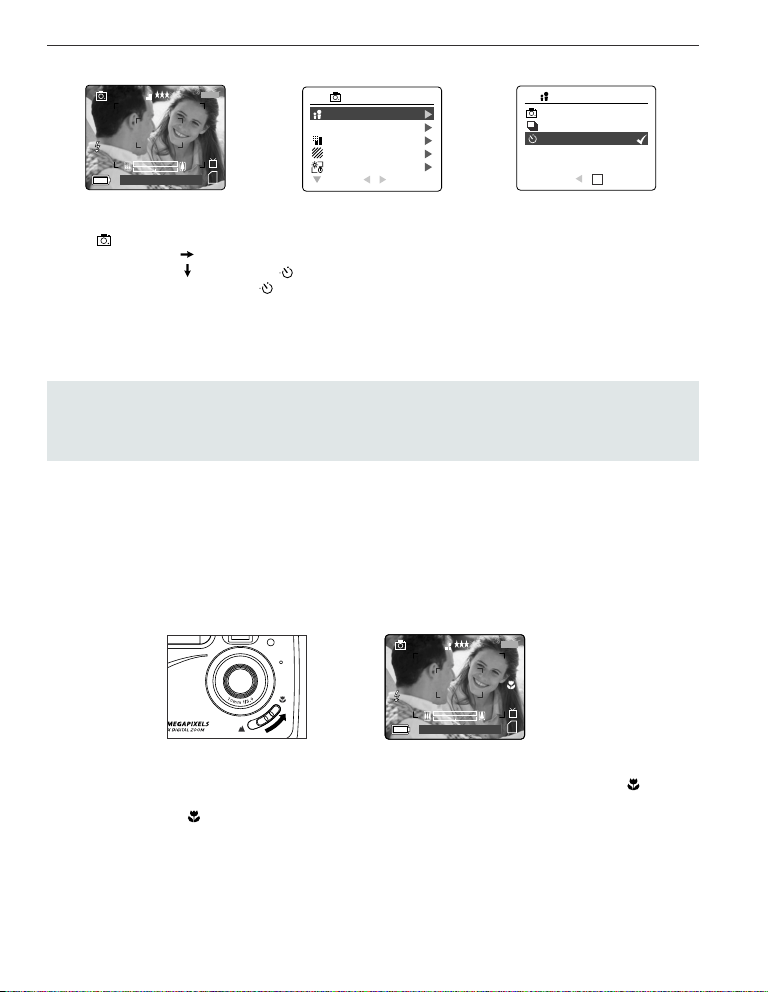
MACRO MODE - CLOSE-UP SHOOTING
This mode enables the camera to capture pictures in close distances.
Setting Macro Mode:
1. The Macro Mode Switch is located in the front of the camera. Slide the Macro Mode Switch to ( ) to set
the Macro mode.
• The Macro icon ( ) will be displayed on the LCD.
Taking a picture in Macro Mode:
1. Frame the subject in the LCD.
• The best shooting distance is at 20 cm. (0.7 ft)
2. Press the Shutter button fully to take the picture.
• Auto-focus is not available in Macro Mode. You can monitor the focus range through the LCD.
17
Page 20
TAKING PICTURES
A
AWB
07 ⁄ 04 ⁄ 03 02:40PM
4
M
N
28/45
CAPTURE MODE
QUALITY SETUP
IMAGE SIZE
SCENE SELECTION
WHITE BALANCE
RETURN SELECT
CAMERA
Q
SINGLE SHOT
CONTINUOUS SHOT
SELF-TIMER
RETURN SET
CAPTURE MODE
OK
A
AWB
07 ⁄ 04 ⁄ 03 02:40PM
4
M
N
28/45
CAPTURE MODE
QUALITY SETUP
IMAGE SIZE
SCENE SELECTION
WHITE BALANCE
RETURN SELECT
CAMERA
Q
2272 x 1704
2048 x 1536
1600 x 1200
1280 x 960
640 x 480
RETURN SET
RESOLUTION
OK
4
M
3
M
2
M
1
M
V
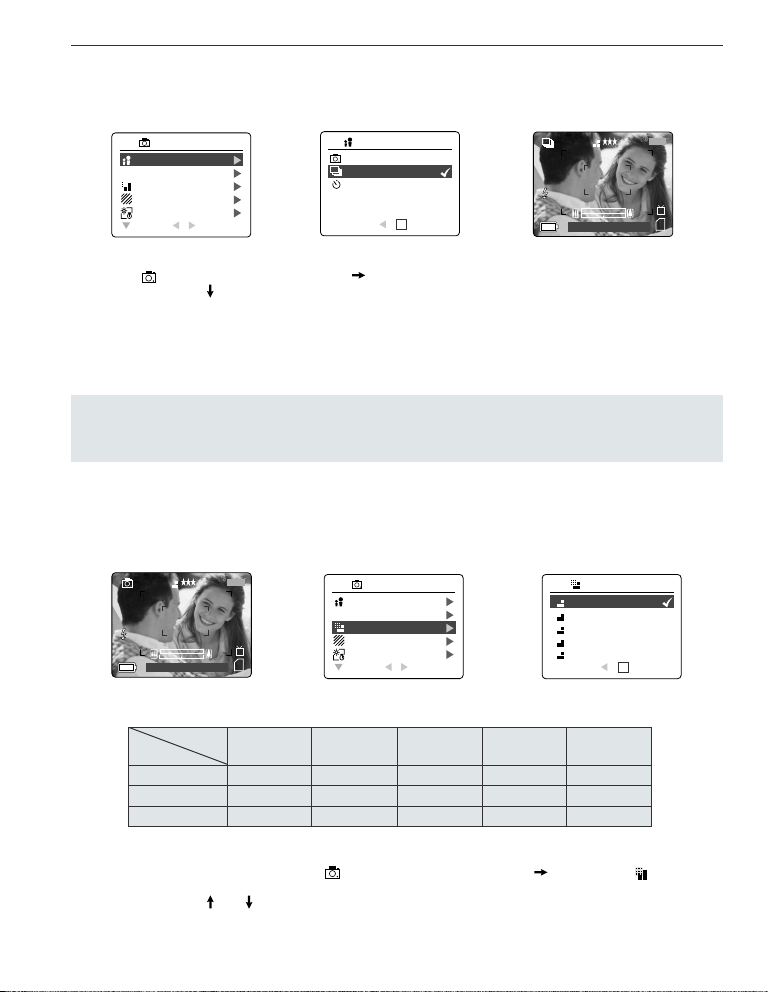
CONTINUOUS SHOOTING
This feature enables the camera to capture a continuous series of pictures while the shutter button is pressed
down.
Using Continuous shooting:
1. In the ( ) Main Menu, press the joystick to enter the Capture Mode submenu.
2. Press the joystick until Continuous Shot is highlighted, then press the OK button to enter the mode.
3. Frame the subject in the LCD screen and press the shutter button half-way to activate the focus until the
green AF LED lights up.
4. Press the shutter button fully to capture the pictures.
• The camera will capture images at approximately 3 images per second for a maximum of 7 images in the
1600x1200 resolution setting.
Note:
• In continuous shooting mode the flash is disabled as the recharging time will slow it down.
• The camera will only capture the pictures in the 1600 x 1200 resolution setting in this mode.
IMAGE RESOLUTION
Image Resolution determines the size of a captured image. Higher resolution images contain more details and
have larger file sizes.
Images Stored on 16MB memory (approx.):
How to change the resolution:
1. When Resolution is highlighted in the ( ) Main Menu, press the joystick to enter the ( )
2. Press the joystick or until the desired setting is highlighted.
3. Press the OK button to select the mode
4. Press the MENU button to return to picture taking mode.
Resolution
Quality
4MP 3MP 2MP 1.3MP VGA
(2272 x 1704) (2048 x 1536) (1600 x 1200) (1280 x 960) (640 x 480)
Fine 20 23 34 50 138
Normal 51 63 89 127 308
Economy 75 88 128 177 430
Resolution submenu.
18
Page 21
TAKING PICTURES
A
AWB
07 ⁄ 04 ⁄ 03 02:40PM
4
M
N
28/45
CAPTURE MODE
QUALITY SETUP
IMAGE SIZE
SCENE SELECTION
WHITE BALANCE
RETURN SELECT
CAMERA
Q
FINE
NORMAL
ECONOMY
RETURN SET
QUALITY SETUP
OK
Q
Q
Q
A
AWB
07 ⁄ 04 ⁄ 03 02:40PM
4
M
N
28/45
CAPTURE MODE
QUALITY SETUP
IMAGE SIZE
SCENE SELECTION
WHITE BALANCE
RETURN SELECT
CAMERA
Q
AUTO
SUNNY
FLUORESCENT
TUNGSTEN
RETURN SET
WHITE BALANCE
OK
AWB
A
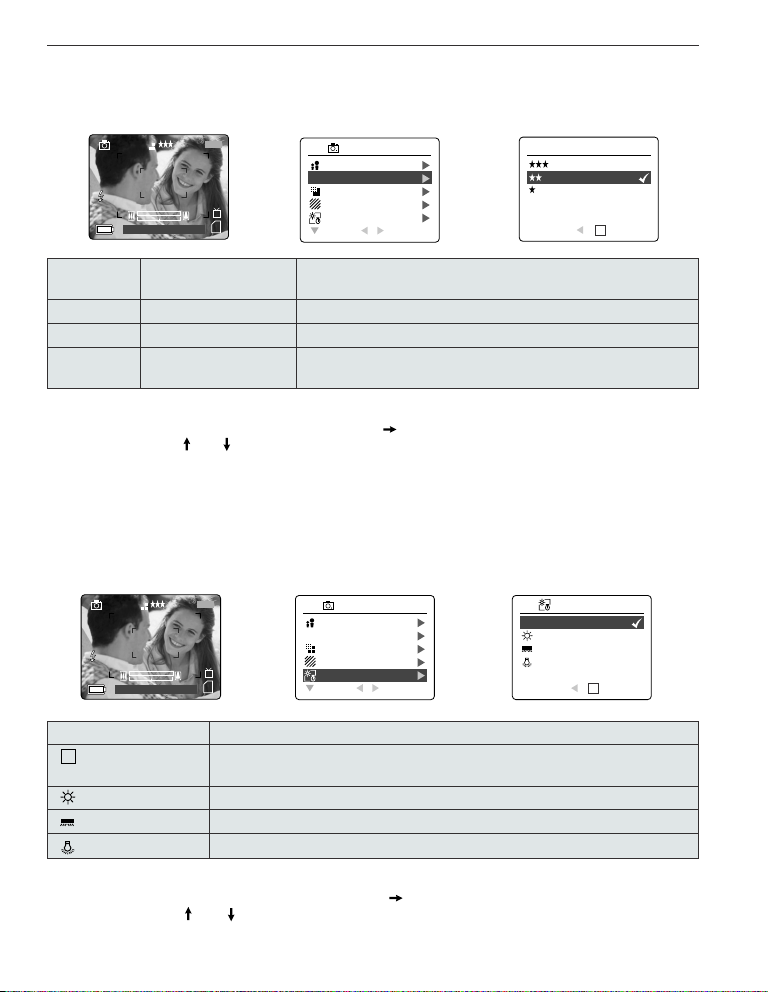
IMAGE QUALITY
The Image Quality setting determines the amount of compression used to reduce the size of the stored image
file in order to economize the space in memory card.
Quality JPEG Compression Description
Ratio
Fine 5:1 Fine image quality can be used for making prints.
Normal 11:1 Normal image quality can be used for general purpose pictures.
Economy 17:1 Economy image quality can be used for pictures that will be
sent via e-mail.
How to change the quality:
1. When ( ) Quality is highlighted, press the joystick to enter the ( ) Quality Setup submenu.
2. Press the joystick or until the desired setting is highlighted.
3. Press the OK button to select the Quality mode.
4. Press the MENU button to return to picture taking mode.
WHITE BALANCE
By default the camera uses Auto White Balance to best reproduce colors under different lighting conditions. For
mixed lighting conditions you can use the Auto White Balance.
White Balance Mode Description
Auto The camera will automatically choose the white balance setting. Use this
Sunny Use outdoors with sufficient sunlight.
Fluorescent Use indoors with fluorescent or ambient light conditions.
Tungsten Use indoors with tungsten light conditions.
setting in variable conditions.
How to change the White Balance:
1. When White Balance is highlighted, press the joystick to enter its submenu.
2. Press the joystick or until the desired setting is highlighted.
3. Press the OK button to select the White Balance mode.
4. Press the MENU button to return to picture taking mode.
19
Page 22
TAKING PICTURES
A
AWB
07 ⁄ 04 ⁄ 03 02:40PM
4
M
N
28/45
EV COMPENSATION
SETUP
RETURN SELECT
CAMERA
+
–
EV COMPENSATION
+
–
00 EV
–
+
SET
OK
+
–
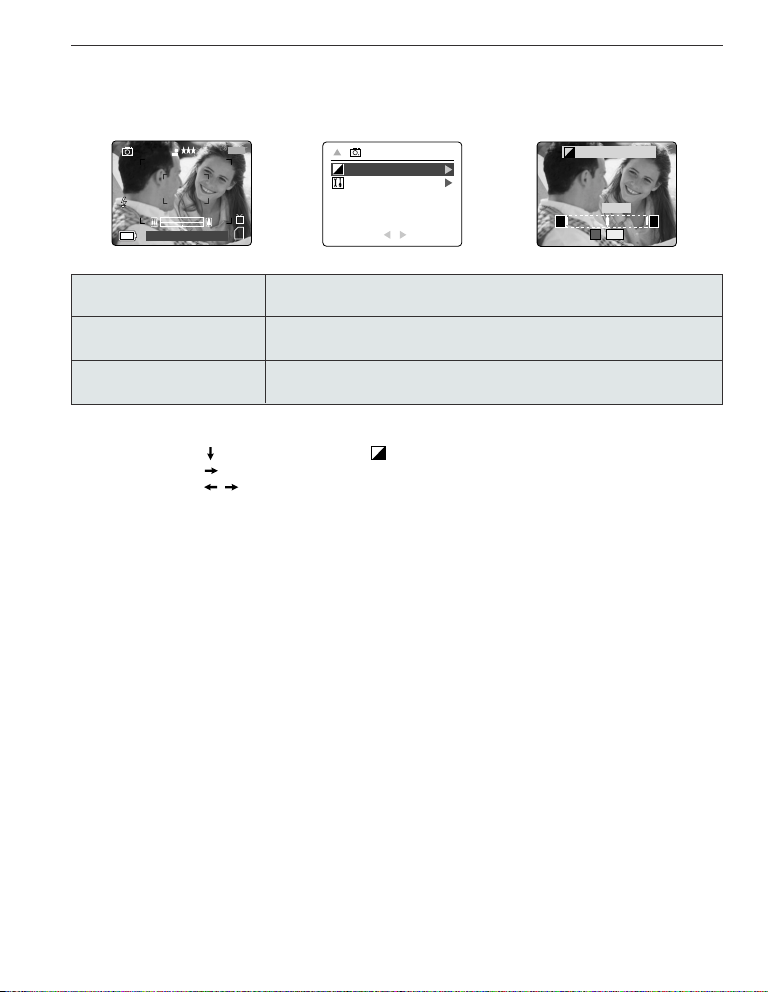
EXPOSURE COMPENSATION
The camera uses Auto Exposure to give you well exposed pictures under most conditions. If the main subject
turned out too light or too dark, you can use the Exposure Compensation feature to improve the result.
Exposure Compensation Description
Mode
+
–
How to use Exposure Compensation:
1. Press the joystick in the Main Menu until ( ) Exposure Compensation is highlighted.
2. Press the joystick to display the Exposure Compensation bar on the LCD.
3. Press the joystick to change the Exposure Compensation between - 1.8 to +1.8.
4. Press the OK button to select the desired value
• The camera will return to picture taking mode automatically after selecting.
Increasing the Exposure in pictures that are too dark, will make the
picture lighter.
Decreasing the Exposure in pictures that are too light will make the
picture darker.
20
Page 23
TAKING PICTURES
A
AWB
07 ⁄ 04 ⁄ 03 02:40PM
4
M
N
28/45
CAPTURE MODE
QUALITY SETUP
IMAGE SIZE
SCENE SELECTION
WHITE BALANCE
RETURN SELECT
CAMERA
Q
OFF
PART Y INDOOR
BEACH SNOW
SUNSET
NIGHT LANDSCAPE
RETURN SET
SCENE SELECTION
OK
SCENE SELECTION
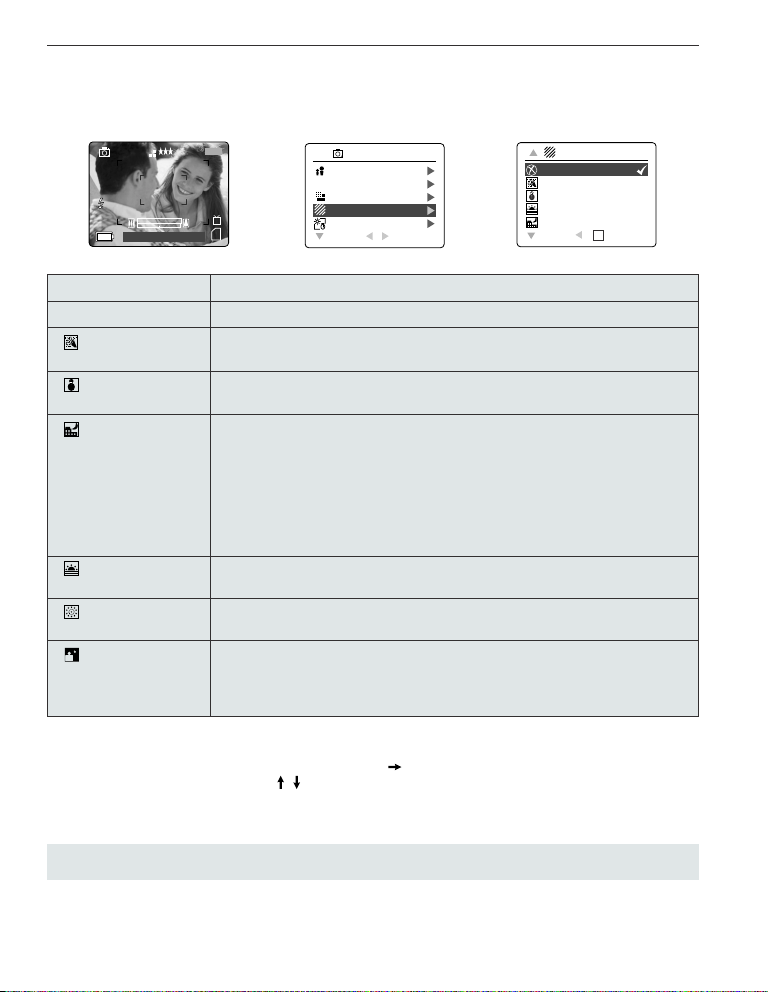
The default options in the camera can be used in most settings. The scene modes are helpful to quickly
optimize the various settings to best capture specific scenes.
Preset Scene Description
Off No Scene Selection (default).
Party/Indoor Use this mode in to capture the details of candlelit scenes or other indoor
Beach/Snow Use this mode to capture the details in high glare scenes such as snow or
Night Landscape A slow shutter speed is used to capture the lights in night scenes.
Sunset This mode captures the deep hues and color variations in sunsets and
Fireworks Use this mode to capture the burst of light from fireworks with a slower shutter
Night Portrait Use this mode to capture a subject illuminated with the lights in a night scene
background light conditions.
shining water.
Photography Tip: With the slow shutter speed there is a possibility of getting
blurry images due to camera movement.
To reduce blurring, you may do the following:
1. Set your camera to Night Landscape mode.
2. Place your camera on a tripod or sturdy surface area.
3. Set the camera to Self-Timer mode.
4. Press the shutter button.
sunrises.
speed.
with a slow shutter speed.
- Due to the slow shutter speed, place the camera on a tripod for better
picture quality.
How to set the scene selection:
1. When Scenes Select is highlighted, press the joystick to enter its submenu.
2. In the Scene menu, press joystick to choose between the options.
3. Press the OK button to select the Scene mode.
4. Press the MENU button to return to picture taking mode.
Note: The Scene Selection Mode will override the flash setting set by the flash button for one picture only.
21
Page 24
TAKING VIDEO CLIPS
07 ⁄ 04 ⁄ 2003 02:40
Press Shutter to Record
28 SEC
AKING VIDEO CLIPS
TTAKING VIDEO CLIPS
The camera can capture video clips.
Note: Video clips with audio feature is optional and it is available in some models only.
To record a video clip:
1. Slide the Mode Switch to ( ) Video Clip Mode.
2. Position the subject in the LCD.
3. Press the Shutter Button fully to capture a continuous video clip.
4. To stop recording, press the shutter button again.
Note: There is a time limit for each video clip. The time will vary depending on the amount of available
memory space. The alloted amount of recording time will appear on the top right hand corner of the screen.
The video clip capture will stop automatically when it reaches its time limit.
Video Clip Information
Resoluton: QVGA (320 x 240)
Frame rate: 30fps
File Format: AVI (Motion Picture)
Note: The Flash Ready LED will turn red when the camera is storing the video clip. Do not open the
battery door or turn the camera off while recording, or the video clip may not be stored.
Note:
• Higher capacity memory cards can take longer video clips.
• The Flash, Menu and LCD on/off buttons are deactivated in this mode.
• The focus and the digital zoom cannot change during recording.
REVIEWING
REVIEWING
YOUR FILES
YOUR FILES
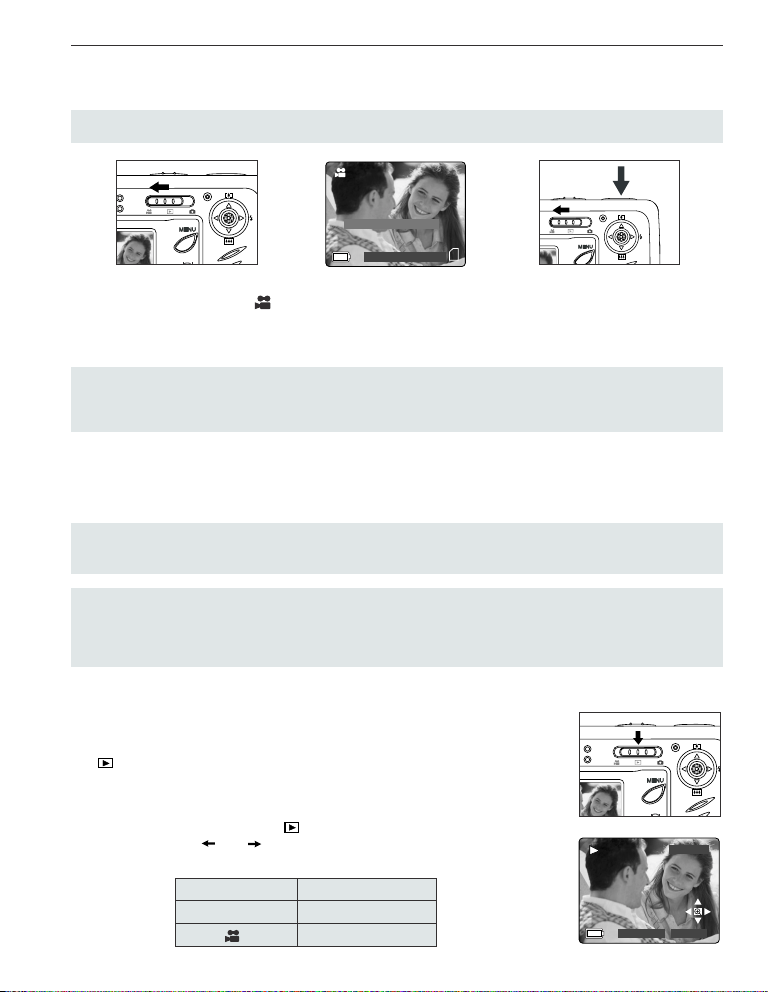
Using Review Mode
In ( ) review mode, you can review your stored pictures and video clips through
the LCD.
Using REVIEW mode:
1. Slide the Mode Switch towards ( ) .
2. Press the joystick or to scroll through each file.
• If a file is video clip, can be found in the upper right hand corner of the LCD.
File Indication File Type
No icon Still Picture (JPG)
Video Clip (AVI)
22
100-0001
2003:08:30 13:30:41
Page 25
REVIEWING YOUR FILES
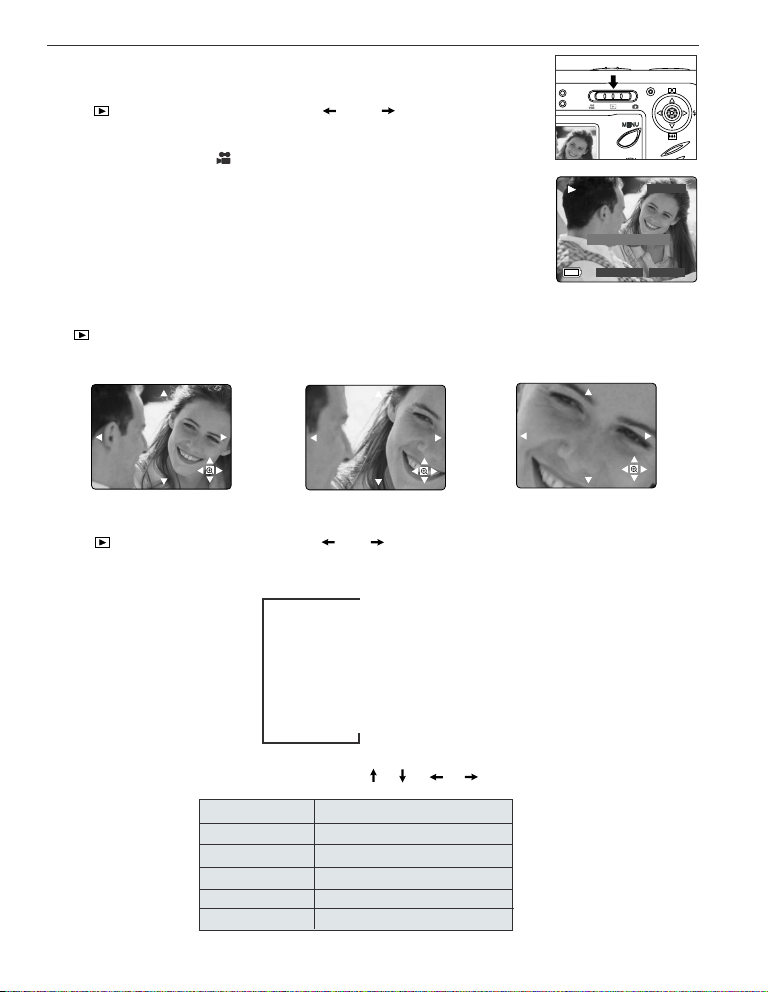
REVIEWING VIDEO CLIPS
How to review a video clip:
1. In ( ) Review Mode, press the joystick and to scroll through the
stored pictures and video clips.
• Only the first image of the video clip is shown.
2. When a video clip icon ( ) is displayed on the LCD, press the OK button to
play.
100-0001
press OK to view AVI
2003:08:30 13:30:41
ENLARGING STORED PICTURES
In ( ) Review Mode, you can enlarge a section of your stored picture to take a closer look at the subject on
the LCD. This feature is for viewing purposes only and it will not enhance the stored picture.
X2
X4
X6
How to enlarge:
1. In ( ) Review Mode, press the joystick or to scroll through the stored pictures and video clips.
2. While viewing a stored still image, press the OK button to use the "Enlargement" feature. Press the OK
button again to get different magnifications in the following order.
2x Enlargement
4x Enlargement
6x Enlargement
Normal Mode
3. In 2x, 4x and 6x mode you may press the joystick , , , to navigate in the picture.
Resolution Maximum Enlargement
2272 x 1704 6x
2048 x 1536 6x
1600 x 1200 4x
1280 x 960 4x
640 x 480 2x
23
Page 26

USING THE DELETE MENU
REVIEWING YOUR FILES
DELETE FILE
DELETE ONE
DELETE ALL
REVIEW
DELETE FILE
THUMBNAIL
SETUP
RETURN SELECT
RETURN SELECT
Using the Delete Menu in Review mode:
1. Turn the camera on.
2. Set the Mode Switch to ( ).
3. Press the MENU button to display the main menu.
4. Press the joystick to enter the Delete submenu.
5. To exit the menu, press the joystick .
6. Press the MENU button to return to the ( ) Main Menu.
0012/0012
MENU DELETE
Are You Sure?
No
Yes
OK
SELECT
DELETE ALL
YES
NO
OK
RETURN SET
Are You Sure?
No
Yes
SELECT
OK
OK
24
Page 27
REVIEWING YOUR FILES
2003:08:30 13:30:41
100-0001
DELETE FILE
THUMBNAIL
SETUP
RETURN SELECT
REVIEW
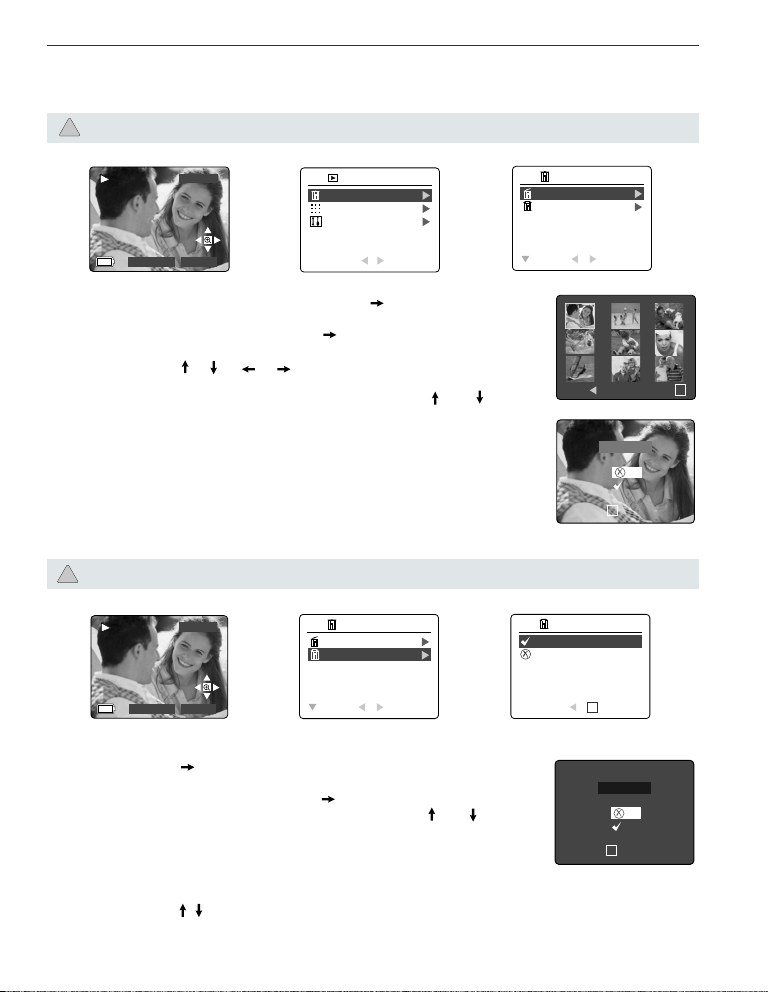
DELETING YOUR FILES
Delete One
Once a file is deleted, it cannot be recovered.
!
1. When Delete File is highlighted, press the joystick to enter the Delete File
submenu.
2. In the Delete File menu, press the joystick when Delete One is highlighted.
3. The next screen will display the stored pictures and video clips as thumbnails.
Press the joystick , , , to highlight the file you want to delete.
4. Press the OK button to select.
5. The next screen will read "Are You Sure?" press the joystick or to
highlight No or Ye s.
6. Press the OK button to select.
• If No is selected, no change will be made, and you will return to the Delete
One thumbnail view.
• If Yes is selected, the selected file will be deleted.
• Press the Menu button to exit Delete Mode.
Delete All
Once all files are deleted, they cannot be recovered.
!
DELETE FILE
DELETE ONE
DELETE ALL
RETURN SELECT
MENU DELETE
Are You Sure?
SELECT
OK
OK
No
Yes
100-0001
2003:08:30 13:30:41
DELETE FILE
DELETE ONE
DELETE ALL
RETURN SELECT
How to delete all files:
1. Press the joystick when Delete File is highlighted to enter the Delete File
submenu.
2. In the Delete File menu, press the joystick when Delete All is highlighted.
3. The next screen will read "DELETE ALL?" press the joystick or to
highlight No or Ye s.
4. Press the OK button to select.
• If No is selected, no change will be made, and you will return to the Delete
File Menu.
• If Ye s is selected, the next screen will read, "Are you sure?"
5. Press the joystick to select No or Yes. Press OK to select.
• If No is selected, no change will be made, and you will return to the Delete File Menu.
• If Yes is selected, ALL FILES will be deleted.
25
DELETE ALL
YES
NO
OK
RETURN SET
Are You Sure?
OK
No
Yes
SELECT
Page 28
REVIEWING YOUR FILES
2003:08:30 13:30:41
100-0001
DELETE FILE
THUMBNAIL
SETUP
RETURN SELECT
REVIEW
0012/0012
USING THUMBNAIL MODE
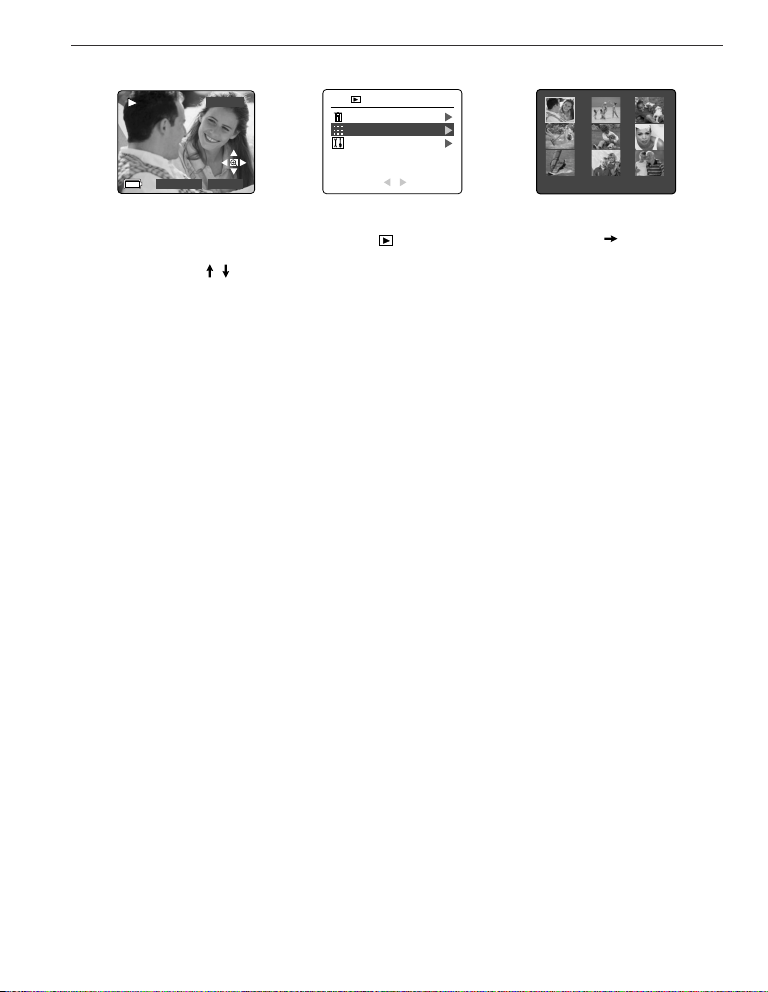
How to view your files:
1. When the thumbnail menu is highlighted in the ( ) Review Mode, press the joystick button to have
nine thumbnail images or video clips appear at once on the LCD display.
2. Press the joystick to highlight a picture or video clip.
• When the joystick is pressed up in the top row of thumbnails, the previous 9 files will be displayed
• When the joystick is pressed down in the bottom row of thumbnails, the next 9 files will be displayed.
3. Press the OK button to view the enlarged picture or video clip.
26
Page 29

CUSTOMIZING THE CAMERA SETTINGS
CUSTOMIZING THE CAMERA SETTINGS
CAMERA
+
EV COMPENSATION
–
SETUP
12
RETURN SELECT
SETUP
SET AUTO OFF TIME
TV OPTION
LANGUAGE OPTION
RESTORE DEFAULT
LCD BRIGHTNESS
RETURN SELECT
SETUP
FORMAT
1
ADJUST DATE
ADJUST TIME
TIME FORMAT
24
D
DATE FORMAT
M
RETURN SELECT
SETUP
CAMERA INFO
SOUND
SET AUTO OFF TIME
OFF
30 SEC
60 SEC
90 SEC
RETURN SET
TV OPTION
NTSC
N
PAL
P
RETURN SET
LANGUAGE OPTION
English
Français
Español
Deutsch
RETURN SET
DEFAULT
YES
NO
RETURN SET
OK
OK
OK
OK
RETURN SELECT
27
LCD BRIGHTNESS
–
SET
OK
FORMAT
Yes
No
RETURN SET
+
OK
Page 30
CUSTOMIZING THE CAMERA SETTINGS
FW REV: WKA04V05
FW P/N 10000-00
DATE: 2003/05/09
COMMENT:
RETURN
CAMERA INFO
ADJUST TIME
OK
01:01 AM
RETURN SET
ADJUST DATE
1
OK
01 ⁄ 01 ⁄ 2003
RETURN SET
12-HOUR
24-HOUR
RETURN SET
TIME FORMAT
12
24
OK
DD ⁄ MM ⁄ YYYY
MM ⁄ DD ⁄ YYYY
YYYY ⁄ MM ⁄ DD
RETURN SET
DATE FORMAT
D
M
OK
ON
OFF
RETURN SET
SOUND
OK
SET AUTO OFF TIME
TV OPTION
LANGUAGE OPTION
RESTORE DEFAULT
LCD BRIGHTNESS
RETURN SELECT
SETUP
FORMAT
ADJUST DATE
ADJUST TIME
TIME FORMAT
DATE FORMAT
RETURN SELECT
SETUP
1
CAMERA INFO
SOUND
RETURN SELECT
SETUP
D
M
12
24
EV COMPENSATION
SETUP
RETURN SELECT
CAMERA
+
–
CUSTOMIZING THE CAMERA SETTINGS
28
Page 31

CUSTOMIZING THE CAMERA SETTINGS
1
12
24
D
M
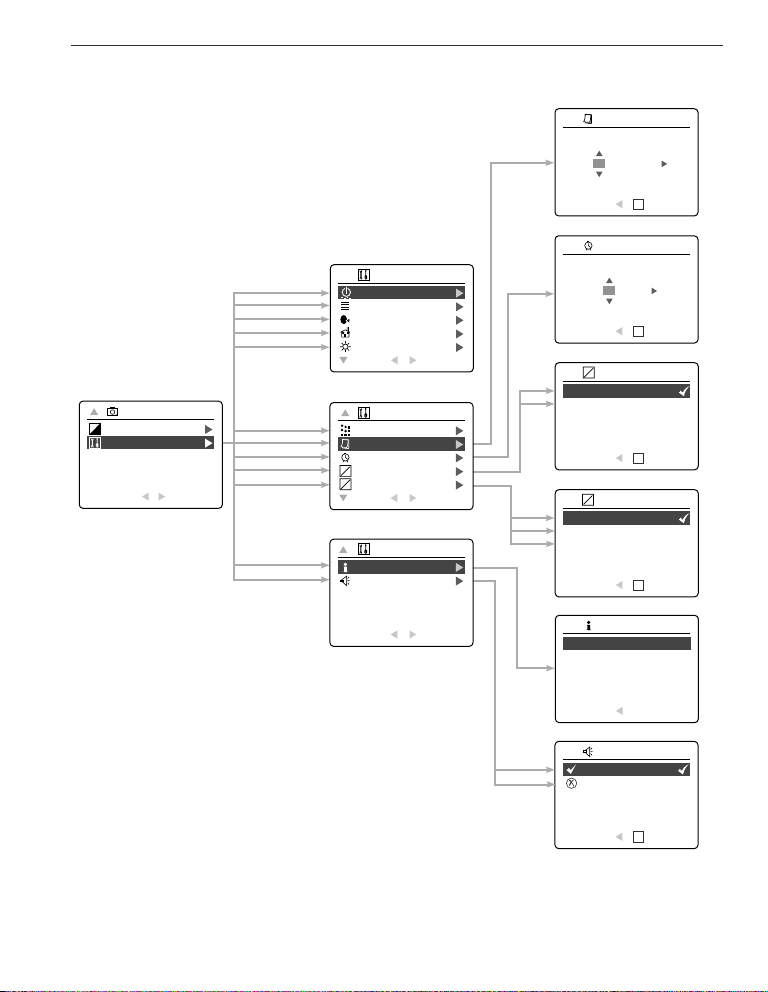
Using the Setup menu:
1. Turn the camera on.
2. Set the mode switch to ( ) or ( ).
3. Press the MENU button to display the main menu.
4. Press the joystick until Setup is highlighted.
5. Press the joystick to enter the Setup submenu.
6. In the Setup menu, press the joystick to highlight the option you wish to customize.
7. Press the joystick to enter the submenu of the highlighted option.
8. Use the joystick to adjust the setting and press the OK button to select.
9. Press the joystick to return to the previous menu OR press the MENU button to exit.
Setup Menu and Features
Setup Setting Options Description
Set Auto Off Time 30, 60, 90 This feature enables the camera to automatically turn off when it
is idle.
Off Deactivates the automatic power off option. (Page 30)
TV Option NTSC, PAL Sets the mode the camera needs to adapt to your TV. (Page 47)
Sound On, Off Activates or deactivates the audio feature in the camera. Note:
Audio is an optional feature available in some models only.
Language Option English Sets the language in your camera. (Page.30)
Français
Español
Deutsch
Restore Default Yes/No Sets all camera settings to the factory default. (Page 33)
LCD Brightness Sets the LCD brightness level. (Page 31)
Format Yes/No Formats the internal memory or the memory card by deleting all
files. (Page 32)
Camera Info FW Version Displays the camera version information.
FW Part No. This is for information purposes only.
Date
Comment
Adjust Date Month, Day, Changes the date in your camera.
Year
Adjust Time Hour, Minute, Changes the time in your camera.
AM or PM
Time Format 12-hour Changes the time format to a 12-hour or 24-hour format.
24-hour The time display is fixed to 24-hour format in ( ) Review Mode.
Date Format DD/MM/YYYY, Changes the date display.
MM/DD/YYYY, The date display is fixed to YYYY/MM/DD format in ( )
YYYY/MM/DD Review Mode.
29
Page 32

CUST
EV COMPENSATIION
SETUP
RETURN SELECT
CAMERA
+
–
SET AUTO OFF TIME
TV OPTION
LANGUAGE OPTION
RESTORE DEFAULT
LCD BRIGHTNESS
RETURN SELECT
SETUP
SET AUTO OFF TIME
TV OPTION
LANGUAGE OPTION
RESTORE DEFAULT
LCD BRIGHTNESS
RETURN SELECT
SETUP
English
Français
Español
Deutsch
RETURN SET
LANGUAGE OPTION
OK
OFF
30 SEC
60 SEC
90 SEC
RETURN SET
SET AUTO OFF TIME
OK
OMIZING THE CAMERA
CUST
OMIZING THE CAMERA
SETTINGS
SETTINGS
SETTING THE AUTO OFF TIME
Notes:
• When the camera is in auto off mode, turn the camera off then back on.
• The default setting is 60 seconds to conserve battery power.
SETTING THE LANGUAGE
To set the Language:
1. In the Setup menu, press the joystick until Language is highlighted.
2. Press the joystick to enter the Language submenu.
3. Press the joystick to highlight the desired language.
4. Press the OK button to set.
CUSTOMIZING THE CAMERA SETTINGS
SETTING THE DATE
1. In the Setup menu, press the joystick until Adjust Date is highlighted.
2. Press the joystick to enter the options.
3. Press the joystick to highlight the month (MM), date (DD) or year (YYYY).
• The selection will blink when it is highlighted.
4. Press the joystick to change the data in the blinking position until you
reach the desired setting then press OK.
Note:
• The date can be displayed in MM/DD/YYYY; DD/MM/YYYY or YYYY/MM/DD in ( ) Review Mode, the
date display is fixed to YYYY/MM/DD. Please go to page 28 to change this setting.
• If the battery is removed for more than 4 minutes, the date will return to its default setting.
• Set Date/Time! will appear on the LCD when the camera is turned on. Press the Shutter button slightly
to turn the reminder off.
30
1
ADJUST DATE
01 ⁄ 01 ⁄ 2003
RETURN SET
OK
Page 33

CUSTOMIZING THE CAMERA SETTINGS
SETTING THE TIME
1. In the Setup menu, press the joystick until Adjust Time is highlighted.
ADJUST TIME
2. Press the joystick to enter the options.
3. Press the joystick to highlight the hour (HH), minutes (MM) or AM/PM.
• The selection will blink when it is highlighted.
01:01 AM
4. Press the joystick to change the data in the blinking position until you
reach the desired setting then press OK.
RETURN SET
OK
Note:
• The time can be displayed in a 12-hour or 24-hour format In ( ) Review Mode, the time display is
fixed to 24-hour format. Please go to page 28 to change this setting.
• If the battery is removed for more than 4 minutes, the time will return to its default setting.
• Set Date/Time! will appear on the LCD when the camera is turned on. Press the Shutter button slightly
to turn the reminder off.
SETTING THE LCD BRIGHTNESS
CAMERA
+
EV COMPENSATIION
–
SETUP
RETURN SELECT
SETUP
SET AUTO OFF TIME
TV OPTION
LANGUAGE OPTION
RESTORE DEFAULT
LCD BRIGHTNESS
RETURN SELECT
How to set the LCD Brightness:
1. In the Setup menu, press the joystick until LCD Brightness is highlighted.
2. Press the joystick to display the LCD Brightness bar on the LCD.
3. Press the joystick / to adjust the brightness.
4. Press the OK button to select.
• The camera will return to picture taking mode or review mode.
31
LCD BRIGHTNESS
–
SET
OK
+
Page 34

FORMATTING THE INTERNAL MEMORY OR THE MEMORY CARD
!
EV COMPENSATIION
SETUP
RETURN SELECT
CAMERA
+
–
FORMAT
ADJUST DATE
ADJUST TIME
TIME FORMAT
DATE FORMAT
RETURN SELECT
SETUP
1
D
M
12
24
Yes
No
RETURN SET
FORMAT
OK
CUSTOMIZING THE CAMERA SETTINGS
CAUTION:
1. Formatting deletes all pictures and video clips from the memory.
2. Removing the card during formatting may damage the card.
3. Selecting the formatting feature while there is no memory card in the camera, will
cause the internal memory to format. All pictures and video clips on the internal
memory will be lost.
1. In the Setup menu, press the joystick until Format is highlighted.
2. Press the joystick to enter the Format submenu.
3. Press the joystick to highlight No or Yes.
4. Press the OK button to select.
If No is selected, no change will be made, and you will return to the Main Menu.
If Yes is selected, ALL FILES will be deleted.
Note: If MEMORY ERROR! is displayed on the LCD screen, this indicates that the internal memory or the
memory card is corrupted. Please format the memory to continue.
32
Page 35

RESTORE THE CAMERA TO FACTORY DEFAULT SETTINGS
Q
S
+
–
REST
ORE THE CAMERATT
REST
ORE THE CAMERA
To restore the default settings in your camera:
1. Press the joystick when Restore Default is highlighted in the camera.
2. Press the joystick to select No or Yes.
• When No is selected, no change is made.
• When Yes is selected, the Default settings will be restored. Please refer to the table below for the default
settings.
OPTION DEFAULT STATUS
Flash Auto Flash
Quality Fine
Resolution 2272 x 1704
Scene Selection OFF
White Balance Auto
Exposure Compensation 0
Auto Off 60 SEC
LCD Brightness Center
Sound ON (Audio is an optional feature available in some models only.)
Time Format 12 HOURS
Note: After the camera is set to default, the Language, Date and Time menus will appear when the camera
is turned on.
O F
O F
24 HOURS
ACTORORYY
ACT
DEF
DEF
AUL
T SETTINGS
AUL
T SETTINGS
33
Page 36

SOFTWARE INSTALLATION GUIDE
SOFTW
SOFTW
The software that comes with the Concord Eye-Q 4060AF includes driver, reader, and photo editor programs.
These programs transfer the pictures or video clips from your camera to your computer, and enable you to view
them on your computer screen. The following are the computer system requirements for these programs to be
installed.
Computer System Requirements
Windows
• 133MHz Pentium MMX processor or equivalent (300MHz Pentium II or better recommended)
• Microsoft Windows 98/98SE, Windows Me, Windows 2000 Professional, Windows XP Home / Professional /
• 275MB free hard disk space (extra 30MB for Adobe Acrobat Reader 5 and 65MB for Microsoft DirectX 9.0 if
• 64MB of RAM (128MB or more recommended)
• Minimum 800 x 600 display with 16-bit color (1024 x 768 with 24-bit color or better recommended)
• USB Port
• CD-ROM Drive
Macintosh
• Mac OS 9.0, 9.1, 9.2, 9.3 and X or later
• Power PC-based
• 32MB of RAM
• 640 x 480 display with Thousands of colors (Millions of colors recommended)
• Built-In USB Port
Installation Requirements
The installer will automatically detect which software applications need to be installed or if they are not
necessary. Please read the installation requirements before proceeding with the installation process.
ARE INST
ARE INST
Media Center
required)
ALLA
TION GUIDE
ALLA
TION GUIDE
System Windows Windows Windows Windows Macintosh
Install Camera Driver X
Install DirectX 9 X X
Install ArcSoft PhotoImpression X X X X
Install Adobe Acrobat
Reader 5.1
Camera automatically detected X X X X
by the computer (no driver
installation required)
98/98SE Me 2000 XP
34
Page 37

SOFTWARE INSTALLATION GUIDE
USING THE INSTALLER SPLASH SCREEN
The installer will automatically detect which software applications
need to be installed or if they are not necessary. This will be
indicated by the buttons on the splash screen that appears when the
CD-ROM is inserted into the computer:
Color Description
Yellow ( ) Required or highly recommended to install.
Gray ( ) Already installed or not necessary
Option Description
Camera Drivers The USB Mass Storage camera drivers enable the camera to become
Microsoft DirectX 9 DirectX 9 enables the movie playback applications on your computer to
ArcSoft PhotoImpression 2000 This photo software enables you to edit and enhance pictures.
Adobe Acrobat Reader 5.1 Adobe Acrobat Reader enables you to view the electronic version of the
User’s Guide Direct link to the electronic version of the User’s Guide in different
Concord Support Website Direct link to our camera support website. Please establish an internet
an external drive on your computer.
playback video clips that are captured with the camera.
User’s Guide.
languages. (All User’s Guides are saved in PDF format.)
connection before clicking on the link.
35
Page 38

SOFTWARE INSTALLATION GUIDE
FLOW DIAGRAM FOR SOFTWARE INSTALLATION
To transfer the pictures and video clips from the memory card, the camera must be connected to a computer
with the provided Mini-USB cable. Additional setup maybe required by some operating systems before
connecting the camera to the computer for the first time.
Identifying your operating system
Windows Windows 2000 Windows Mac OS
98/98SE p.38 Professional p.40 Me/XP p.37 9.x/10.x p.37
Installing the USB Installing
Mass Storage Drivers DirectX 9 p.40
and DirectX 9 p.38
Installing ArcSoft PhotoImpression 2000 p.41
Installing Adobe Acrobat Reader 5.1 (if needed) p.43
Connecting the camera to the computer p.45
Downloading pictures and video clips onto the computer p.45
Disconnecting the camera from the computer p.46
Data transfer may not function correctly if you have one of the operating systems listed below or you are using
an add-on USB adapter or USB hub.
• Windows 95
• Windows NT 3.51/4.0
• Mac OS 8.6 or lower
• Home built computer systems or computer systems without a factory installed operating system
• Home installed operating system or upgrade to the operating system.
36
Page 39

SOFTWARE INSTALLATION GUIDE
IDENTIFYING YOUR OPERATING SYSTEM
Windows
1. Right click the My Computer icon on your desktop, and go to Properties.
2. The System Properties Box will appear.
The information about your computer is listed under the system area.
3. Confirm that your computer is running one of the following operating systems and
proceed to the page in the chart for installation instructions:
System Proceed to page
Windows 98, Windows 98 Page 38
Second Edition
Windows 2000 Page 40
Windows Millennium Edition, Page 41
Windows XP Home Edition,
Windows XP Professional Edition,
Windows XP Media Center Edition
4. Press OK to close the window
For Windows 98/98SE/Me/2000, if the My Computer icon is not on your desktop, click Control Panel icon from
the Start Menu and double click on the System icon to open the System Property Box.
For Windows XP, if the My Computer icon is not on your desktop, click Control Panel icon from the Start Menu
and click on the Performance and Maintenance icon, then click on the System icon to open the System
Property Box.
Macintosh
1. In the Apple Menu on the Menu bar, select About this Computer.
2. A window will appear with the computers operating system version. Confirm that your computer is version 9
or higher.
No installation of software is necessary for Macintosh users, please go to Page 45 to connecting your camera
to the computer.
37
Page 40

SOFTWARE INSTALLATION GUIDE
INSTALLING THE DRIVER AND DIRECTX 9 – WINDOWS 98/98SE
NOTE: Do not connect the camera to your computer before the camera drivers and Microsoft DirectX 9
installation is completed.
Step 1 Make sure your camera is powered off and not connected to the computer.
Step 2 Make sure the computer is powered on and Windows 98 or 98SE is running.
Step 3 Close any other applications or software you may be running.
Step 4 Insert the CD-ROM included in your camera’s packaging into your computer’s CD-ROM Drive.
NOTE: If the installer does not start automatically within 30 seconds after the CD-ROM has
been inserted, click on "My Computer" either on the Desktop or in the Start Menu and locate
the CD-ROM Drive. Double click on the CD-ROM Drive icon for installation. Double-click on
the file named Install and proceed to Step 5.
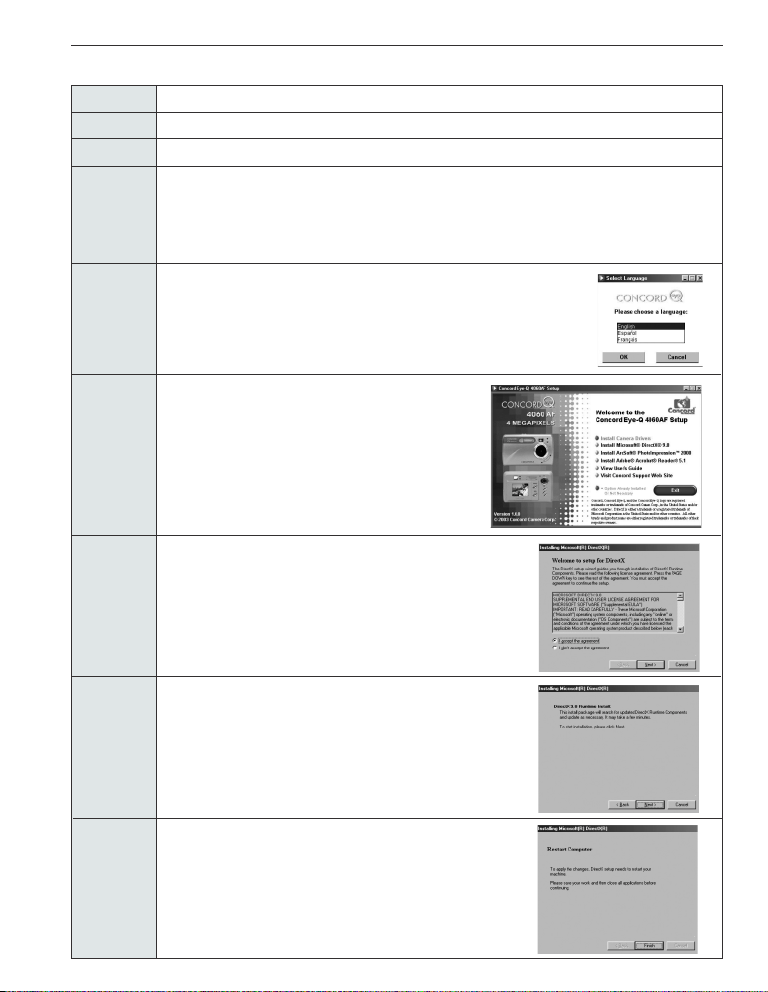
Step 5 Select the language. Click [OK]
Step 6 The installation screen will appear. Click on
Step 7 Click [Next >].
Step 8 The next dialog will prompt you to select the
Install Camera Drivers
components that will be installed. USB Mass Storage
Driver and DirectX 9 will be preselected.
The files will be saved in the Concord Eye-Q 4060AF
directory automatically.
OR
You may change the default folder by clicking
[Browse…] and selecting a different folder in your
computer.
Click [Next >]
38
Page 41

SOFTWARE INSTALLATION GUIDE
Step 9 Click [Install]
Step 10 Install progress bar
Step 11 The next screen will begin the DirectX setup.
Click [Next >]
Step 12 Click [Next >]
Step 13 Click [Finish]
Your computer will automatically reboot.
39
Page 42
SOFTWARE INSTALLATION GUIDE
INSTALLING DIRECTX 9– WINDOWS 2000
Step 1 Make sure your camera is powered off and not connected to the computer.
Step 2 Make sure the computer is powered on and Windows 2000 is running.
Step 3 Close any other applications or software you may be running.
Step 4 Insert the CD-ROM included in your camera’s packaging into your computer’s CD-ROM Drive.
NOTE: If the installer does not start automatically within 30 seconds after the CD-ROM has
been inserted, click on "My Computer" either on the Desktop or in the Start Menu and locate
the CD-ROM Drive. Double click on the CD-ROM Drive icon for installation. Double-click on
the file named Install and proceed to Step 5.
Step 5 Select the language. Click [OK]
Step 6 The installation screen will appear, click on Install
Step 7 The next screen will begin the DirectX setup.
Step 8 Click [Next >]
Step 9 Click [Finish]
Microsoft DirectX 9.0
Click [Next >]
Your computer will automatically reboot.
40
Page 43

SOFTWARE INSTALLATION GUIDE
INSTALLING ARCSOFT PHOTOIMPRESSION – ALL WINDOWS USERS
Step 1 Make sure your camera is powered off and not connected to the computer.
Step 2 Make sure the computer is powered on and Windows is running.
Step 3 Close any other applications or software you may be running.
Step 4 Insert the CD-ROM included in your camera’s packaging into your computer’s CD-ROM Drive.
NOTE: If the installer does not start automatically within 30 seconds after the CD-ROM has
been inserted, click on "My Computer" either on the Desktop or in the Start Menu and locate
the CD-ROM Drive. Double click on the CD-ROM Drive icon for installation. Double-click on
the file named Install and proceed to Step 5.
Step 5 Select the language. Click [OK]
Step 6 The installation screen will appear, Click on
Step 7 The Set- Up language window will appear, select the language
Step 8 Click [Next >]
Step 9 Click [Yes]
Install ArcSoft PhotoImpression 2000
from the drop down box and click OK.
41
Page 44

Step 10 Click [Next >]
SOFTWARE INSTALLATION GUIDE
Step 11 Make sure all two applications are checked and then
Step 12 Click [Next >]
Step 13 The screen will show the status of the installation
Step 14 Click [Finish]
click [Next >]
42
Page 45

SOFTWARE INSTALLATION GUIDE
INSTALLING ADOBE ACROBAT READER 5.1- ALL WINDOWS USERS (OPTIONAL)
Step 1 Make sure your camera is powered off and not connected to the computer.
Step 2 Make sure the computer is powered on and Windows is running.
Step 3 Close any other applications or software you may be running.
Step 4 Insert the CD-ROM included in your camera’s packaging into your computer’s CD-ROM Drive.
NOTE: If the installer does not start automatically within 30 seconds after the CD-ROM has
been inserted, click on "My Computer" either on the Desktop or in the Start Menu and locate
the CD-ROM Drive. Double click on the CD-ROM Drive icon for installation. Double-click on
the file named Install and proceed to Step 5.
Step 5 Select the language. Click [OK]
Step 6 The installation screen will appear, Click on Install
Step 7 Status bar.
Step 8 Click [Next >].
Adobe Acrobat Reader 5.1
43
Page 46

Step 9 The files will be saved into C:\Program
Files\Adobe\Acrobat 5.1 automatically.
OR
You may change the default folder by clicking [Browse…]
and selecting a different folder in your computer.
Click [Next >]
Step 10 Installation progress
SOFTWARE INSTALLATION GUIDE
Step 11 Select Yes, to restart the computer or No, to restart the
computer later.
Click [Finish >]
44
Page 47

CONNECTING THE CAMERA TO THE COMPUTER
CONNECTING THE CAMERATT
CONNECTING THE CAMERA
Note for Windows 98 and 98SE users: Do not connect the camera to your computer before the camera
drivers and Microsoft DirectX 9 installation is completed.
1. Power the camera on.
2. Connect the camera to the computer with the Mini-USB cable provided.
• Plug the larger end of the Mini-USB cable that is included with the camera into
your PC’s USB port. (Please refer to your computer’s documentation for more
information on the location of the USB port.)
• Plug the small end of the Mini-USB cable into the USB port located in the
Cable Connection panel on the side of the camera.
3. When the camera is connected to the computer for the first time, the camera
USB Mass Storage driver installation will begin. Please follow the on-screen
instructions to complete the installation.
O THE COMPUTER
O THE COMPUTER
DOWNLOADING PICTURES AND VIDEO CLIPS ONTO YOUR COMPUTER
Note: Windows 98/98SE users must install the camera driver first. (Page 38)
Note: Windows 2000 users must install DirectX 9 to view video clips on the computer. (Page 40)
Downloading files from the camera:
• Internal memory: Do not insert the memory card.
• Memory Card: Insert the memory card.
Caution: Do not attempt to open the battery/memory door to insert or remove the memory card and/or
batteries when the camera is connected to the computer.
FOR WINDOWS USERS
Downloading Pictures and Video Clips onto your computer:
1. Connect the camera to the computer.
2. Double-click on My Computer.
3. Double-click Removable Disk.
4. Double-click DCIM.
5. Double-click 100_4060.
• The stored pictures (JPG) and video clips (AVI) stored in the memory card will be displayed
6. Click and drag the files into a directory in your computer to save them.
•To select all files, click Edit > Select all.
FOR MACINTOSH USERS
1. Connect the camera to the computer.
• After a few moments, the external hard drive will appear on the desktop.
2. Double-click the “untitled” removable drive that is on your desktop.
3. Double-click DCIM.
4. Double-click 100_4060.
• The stored pictures (JPG) and video clips (AVI) stored in the memory card will be displayed.
5. Drag and drop the image you want to save in the computer.
•To select all files, click Edit > Select all.
Note: You may also transfer the stored pictures and video clips on your memory card onto your computer
by using a memory card reader (sold separately.)
45
Page 48

CONNECTING THE CAMERA TO THE COMPUTER
USING ARCSOFT PHOTOIMPRESSION
Windows Only
1. Connect the camera to the computer. (p.45)
2. Launch ArcSoft PhotoImpression software by
clicking on Start-Programs-ArcSoft Camera
Suite and choosing PhotoImpression from the
application list on your screen.
3. When the Application opens.
4. Click on the [Camera/ Scanner] button.(a)
5. Click on the drop-down list under Select Source
and choose Concord Camera.(b)
6. Click on the Camera/ Scanner
Icon. (c)
•Asecond window will appear
showing the contents (pictures) in the
memory card, and options on how to handle
them. (d)
7. Select the picture you would like to view, edit or
save by clicking on it. The selected image will be highlighted by a border. You may also click on Select All
(f) to choose all pictures.
8. Click on Get Photos (e).
9. The pictures will then be added to your album at the bottom of the application (g). To access these, click
CLOSE on the Camera Controls windows. Double-clic on the thumbnail to open.
10.You may now edit, save, print or further enhance your pictures using the buttons on the left hand side of the
screen. Please refer to ArcSoft's Software help secton for a tutorial on all the features PhotoImpression
offers.
UNPLUGGING YOUR CAMERA FROM THE COMPUTER
Windows 98/98SE:
1. Double-click on My Computer
2. Right-click on Removable Disk to display the menu.
3. Click on Eject in the menu.
4. Unplug the Mini-USB from the camera.
Windows ME/2000/XP:
1. Turn the camera off.
2. Click once on the "Unplug or Eject Hardware" icon on the right hand side of your task bar.
(fig.1.1)
3. Select “Stop Concord Eye-Q 4060AF USB Mass Storage Device”
4. Click [OK] in the “Safe to Remove Hardware” prompt.
5. Unplug the Mini-USB from the camera. (fig.1.2)
Macintosh:
1. Drag the “untitled” removable drive icon on the desktop to the Trash.
2. Unplug the Mini-USB cable from the camera.
fig.1.2
fig.1.1
46
Page 49

TV MODE
EV COMPENSATIION
SETUP
RETURN SELECT
CAMERA
+
–
SET AUTO OFF TIME
TV OPTION
LANGUAGE OPTION
RESTORE DEFAULT
LCD BRIGHTNESS
RETURN SELECT
SETUP
NTSC
PAL
RETURN SET
TV OPTION
OK
N
P
TV MODE - VIEWING AND DELETING YOUR FILES ON TV
The camera allows you to view individual files and record clips on the television. To begin, check your television
documentation to determine what video standard you should set your camera to either NTSC or PAL.
Changing the TV Mode setting:
1. Slide the Mode Switch to ( ).
2. Press the MENU button to view the ( ) Main Menu.
3. Press the joystick until Setup is highlighted.
4. Press the joystick to enter the Setup menu.
5. In the Setup menu press the joystick until TV is highlighted
6. Press the joystick to enter the TV submenu.
7. Press the joystick to change the setting to NTSC or PAL and press OK.
8. Press the MENU button to exit.
CONNECTING THE CAMERA TO THE TELEVISION
Connecting the camera to the television:
1. Connect the TV-Out cable into the jack marked VIDEO or VIDEO IN on your
television.
2. Turn on your television.
3. Set the television to video mode according to the instructions in the owner’s
manual. (This is usually channel 3, 4 or AV).
4. Turn the camera on by sliding the On/Off Switch ( ).
5. Connect the other end of the cable into the VIDEO port located in the cable
connection panel. (fig.1.1)
Using the TV as a Live Viewfinder:
1. Connect the camera to the TV.
2. Turn the camera on.
3. Slide the Mode Switch to ( ).
4. The TV will become a live viewfinder.
fig.1.1
Note: You may record your TV Mode session by using your VCR. Please refer to your VCR documentation
to learn more about recording.
Reviewing pictures and video clips on your TV:
1. In TV Mode, slide the Mode Switch to ( ).
2. Press the joystick to scroll through the saved pictures and video clips.
3. To customize your camera settings and to view more options, press the MENU button to display the TV
Menu on the TV screen.
• The TV menu will display the same Delete menu and Setup menu used in the camera. Please refer to
pages 24 and 27 for further information.
Viewing video clips:
1. When an AVI file is displayed on the TV, press the OK button to view.
47
Page 50

ERROR MESSAGES
Memory Error
07 ⁄ 04 ⁄ 03 02:40PM
Memory Full
07 ⁄ 04 ⁄ 03 02:40PM
Card Full
07 ⁄ 04 ⁄ 03 02:40PM
ERROR MESSAGES
ERROR MESSAGES
Error Messages on the LCD indicate if the memory is full or if there is a problem with the memory.
Note: If the internal memory or the memory card is corrupted, the LCD will read ERROR! The memory
needs to be formatted. Please format all files to continue. (Page.32)
48
Page 51

TROUBLESHOOTING
TROUBLESHOOTING
TROUBLESHOOTING
SYMPTOM
CAMERA
Cannot turn on the camera.
The camera/buttons do not
work.
The camera turns off during
usage.
PICTURES/VIDEO CLIPS
Picture/Video clip has poor
image quality.
TAKING PICTURES
Flash picture taken is too light.
Flash Picture taken is too dark.
Flash did not work.
POSSIBLE CAUSE
Batteries were not installed correctly.
Batteries are dead or weak.
Batter compartment door was not
closed correctly.
The camera needs to be reset.
The batteries are drained of power.
The Auto time off setting is too short.
Poor Lighting.
Lens is dirty.
Subject too close.
Subject is too close.
The flash is not needed.
Lighting condition is too bright.
The subject is too far away for the
flash to be affective.
Flash is not on.
The subject is in front of a bright light.
Lighting condition is too dark.
There was sufficient flash for the
picture and the flash did not fire. This
happens when the camera is set to
Auto Flash.
Camera’s flash has been turned off.
Flash did not charge.
POSSIBLE SOLUTION
Install batteries correctly using the direction
indicators indicators on the edge of the top
of the battery compartment.
Replace batteries.
Close the battery compartment properly.
Press the reset button on the back of the
camera with a pointed object such as a
pen, then power the camera off then on.
Replace the batteries with new ones.
Your camera comes with an Auto Time
Off setting, so if the camera is inactive
for a certain amount of time, it powers off
to conserve battery power. Please refer
to the Time-Out section on page 30 to
set your time limit.
Increase the lighting in the surrounding
area when taking picture and video clips.
Clean the lens with a soft cloth. See
the Camera Maintenance section.
Stand at least 3.3 ft. (1m) for the Distant
Mode away from the subject. And at
Macro Mode stand 0.66ft (20cm) away
from the subject.
Move the subject further away from the
camera.
Change the camera setting to Auto
Flash. See p.13.
Decrease exposure compensation. See
p.20.
Move the subject closer to the camera,
or move the camera closer to the
subject.
Turn the flash On.
Change the subject's position.
Increase the exposure compensation.
See p.20.
This is normal as your cameras
electronic light sensor is programmed to
only fire the flash when needed.
Turn the flash to Auto flash.
Verify that the Ready LED has stopped
blinking before taking a picture.
49
Page 52

TROUBLESHOOTING
SYMPTOM
Picture taken is blurry.
There is something wrong with
the color of your photographs.
Cannot take a picture or a
video clip.
Cannot take a picture or a
video clip when using an SD
memory card.
Picture is blurred when looking
through the viewfinder.
Part of the picture/ video clip is
missing.
Camera is not responding
during picture capture.
The shutter button does not
work.
LCD
The LCD display is dark.
The LCD screen looks milky
and/or scratched.
The LCD is not displaying
anything.
POSSIBLE CAUSE
Subject or camera was moved as the
picture was taken.
The focus was not locked before
taking the picture.
White balance is not set properly.
Memory is full.
Camera is not set in picture/video clip
taking mode.
Power is off.
Camera is in Auto Power off mode.
The SD card is locked or write
protected.
Viewfinder is dirty.
Something was blocking the lens
when taking the picture.
The picture was not centered correctly
in the viewfinder.
The battery level is low and the
camera does not have sufficient
power to complete picture capture.
The camera is not turned on.
The camera is processing a picture;
the ready LED light is still blinking.
Protective plastic film still in place on
the camera.
The LCD brightness level is set too
low.
Protective plastic film still in place on
the camera.
LCD is turned off.
The battery level is low.
POSSIBLE SOLUTION
Hold camera steady until picture is
taken.
Before taking a picture, press the
shutter button half-way to lock the
focus, and press the shutter button fully
to capture the picture. (p.12)
Reset the white balance feature to Auto,
or for the specific lighting in the
surrounding area.
Delete all pictures and continue
shooting.
Download the stored files to your PC
and delete the files from the camera
internal memory or memory card.
Insert a memory card with sufficient
memory available.
Set the camera to the proper mode for
recording video clips, or taking
photographs.
Turn the power on.
Turn the power on.
Remove the SD card from the card slot
and slide the lock switch to off.
Clean the viewfinder with a soft cloth or
cotton swab. See the Camera
maintenance section.
Keep hands, fingers, etc. away from the
lens when taking a picture.
Leave space around the subject when
centering the picture in the viewfinder.
Replace batteries.
Turn the camera on.
Wait until the light stops blinking before
attempting to take another picture.
Make sure the protective plastic film
covering the LCD during shipment, has
been removed.
Increase the brightness level on your
LCD to meet your personal needs. See
p.31 for setting the brightness.
Make sure the protective plastic film
covering the LCD during shipment, has
been removed.
Turn the LCD on, by pressing ( ).
Replace the batteries.
50
Page 53

TROUBLESHOOTING
SYMPTOM
VIEWING VIDEO CLIPS ON THE COMPUTER (WINDOWS 98/98SE/2000)
Cannot playback stored video
clips on the computer.
INSTALLING SOFTWARE AND DRIVERS
Camera is not responding
during picture download to the
PC.
Cannot transfer pictures to the
computer. The New Hardware
Wizard cannot locate drivers.
(Windows 98/98SE)
SD CARDS
The camera does not
recognize your SD Card.
POSSIBLE CAUSE
Video playback files are missing.
The operating system may not be
allocating adequate resources to
download the pictures.
The Mini-USB cable is not plugged
into the camera.
The Mini-USB cable is not plugged
into the computer.
The computer is not powered on.
The Software is not installed on the
computer.
Software is not fully or correctly
installed on the computer.
The card may not be SD certified.
The card may be corrupted.
No card is inserted in the camera.
POSSIBLE SOLUTION
Install Microsoft DirectX 9. (p.38)
Reset the camera by pressing the reset
button with a pointed object such as a
pen. Reboot the computer.
Check that the Mini-USB cable is
plugged into the camera.
Check that the USB cable is plugged
into the computer.
Turn your computer on.
Disconnect the Mini-USB cable from the
camera and the computer. Install the
camera software and drivers. (p.38)
Disconnect the Mini-USB cable from the
camera and the computer. Uninstall the
software: Start-Settings-Control PanelAdd/ Remove Programs. Re-install the
camera drivers. (See p.38)
Purchase a certified SD card.
Reformat the card.
Caution: Formatting erases all pictures
on the card. p.31
Insert a card into the card slot.
See p.9
51
Page 54

GETTING HELP
GETTING HELP
GETTING HELP
You can get help from our troubleshooting section, FAQ on our website or by contacting a customer support
representative.
Troubleshooting Section
If you need help with your camera, refer to the Troubleshooting section of this manual on page 49.
Website Customer Support/FAQ
Please visit our customer support website at: www.support.concord-camera.com to view the FAQ section.
Most support issues are answered in the Frequently Asked Questions (FAQ) section.
Customer Support
Before You E-mail or Call us
If you have questions concerning the operation of the camera or software installation, you can speak to or email a customer service representative. Please have the following information available:
Camera Information: Computer Information:
Name of camera model Operating System
Camera Serial Number Processor Speed (MHz)
Camera Info in camera (page 29): Computer Make and Model
FW Version Amount of memory
FW Part Number Exact Error message received
Date CD-ROM Part Number
Comment
For Camera Support please contact:
Toll Free in the US and Canada: Toll Free in Europe:
• (866) 522-6372 • UK: 0800-1696482
Monday – Friday 8:00am – 8:00pm • Spain: 900-973195
Saturday: 9am – 5pm • Germany: 0800-1800563
Sunday: 12pm – 4pm • Italy: 800-781883
Web: www.concord-camera.com • France: 0800-917599
Email: support@concord-camera.com
Toll:
• +31-53-4829779
Monday – Friday 09:00 – 18:00
Saturday & Sunday: closed
(Central European Time)
Email: support@concord-camera.com
For ArcSoft Technical Support on Photo Editing Software, please contact:
In the USA and Canada: In Europe:
ArcSoft, Inc. Arcsoft, Inc.
46601 Fremont Blvd. Unit, Shannon Industrial
Fremont, CA 94538 Estate
Monday – Friday Shannon, Co. Clare, Ireland
8:30AM - 5:30PM (PST) Tel: +353 (0) 61 702087
Tel: (510) 440-9901 Fax: +353 (0) 61 702001
Fax: (510) 440-1270 E-mail: europe@arcsoft.com
Web: www.arcsoft.com
E-mail: support@arcsoft.com
Note: Working hours are subject to change without prior notice.
52
Page 55

CAMERA SPECIFICATION
CAMERA
CAMERA
SPECIFICA
SPECIFICA
TIONS
TIONS
Sensor
Image Resolution
Lens
Zoom
Focusing Range
Exposure
Internal Memory
Storage Capacity
(Approx. with 16MB
of memory)
Removable Storage
LCD
Output Picture File
Format
Viewfinder
Self-Timer
Flash Unit
4 Megapixels (2272 x 1704 resolution)
2272 x 1704 4 Megapixels
2048 x 1536 3.1 Megapixels
1600 x 1200 2 Megapixels
1280 x 960 1.2 Megapixels
640 x 480 VGA
10.0 mm (equivalent to 48mm on 35mm format) f/3.0 – f/6.0, 4 groups, 5 elements all glass
6x Digital Zoom
Auto focus from 3.3 ft (1m) to infinity, macro from approx. 0.66 ft (20cm)
Auto exposure and auto white balance with manual presets
16 MB non-volatile memory
Resolution
Quality
Fine 20 23 34 50 138
Normal 51 63 89 127 308
Economy 75 88 128 177 430
SD memory card slot
1.5” TFT display with LED backlight, live viewfinder with 30 fps
JPG/EXIF
Optical reversed Galilean type with 80% coverage
Approximately 10 seconds with blinking red LED
Flash off, auto flash, fill-in flash, red-eye reduction and night mode
4MP 3MP 2MP 1.3MP VGA
(2272 x 1704) (2048 x 1536) (1600 x 1200) (1280 x 960) (640 x 480)
53
Page 56

Battery Life
Flash Distance
Power Source
Connectivity
System
Compatibility
Video Clips
Dimensions
PC Software
Accessories
100 photos with LCD monitor turned off
1m (3.28 ft) to 3m (9.84 ft)
2x AA Batteries
Mini-USB connection direct to PC or Mac
SD connection to SD card reader
Video connection direct to TV (NTSC/PAL)
Windows 98, 98SE, 2000, ME, XP and Mac OS 9 and higher
QVGA resolution, 30fps, AVI (Motion JPEG) format
100 x 61 x 38 mm
ArcSoft PhotoImpression, Adobe Acrobat Reader 5.1
CD-ROM for Windows:
– Camera Drivers
–Microsoft DirectX 9
– ArcSoft PhotoImpression 2000
– Adobe Acrobat 5.1
– Multilingual User’s Guide in PDF format
Multilingual User’s Guide
Multilingual Quick Start Guide
Mini-USB Cable
TV Cable
Wrist Strap
Pouch
2x AA Batteries
CAMERA SPECIFICATION
54
Page 57

SAFETY TIPS AND MAINTENANCE
SAFETY
SAFETY
Cleaning the camera body:
1. Please use a soft dry cloth to clean the camera.
Cleaning the lens, viewfinder and LCD:
1. Blow off dirt or dust with a blower or canned air.
2. Gently wipe the lens, viewfinder and/or LCD with a micro-fiber cloth.
3. To remove dirt or residue, moisten the cloth with lens cleaning fluid and gently wipe the lens, viewfinder
CAUTION: Do not apply the fluid directly onto the lens, viewfinder or LCD.
TIPS
TIPS
and/or LCD.
AND MAINTENANCE
AND MAINTENANCE
SAFETY TIPS
Precautions for the camera:
• Do not attempt to modify this camera in any way. This may cause a fire or electric shock or severe damage
to the camera.
• Do not use the flash in close proximity to people or animals. Positioning the flash too close to your subject's
eyes may cause eyesight damage.
• When taking photographs, never point the lens of the camera directly into very strong light. This may result
in permanent damage to the camera or your eyesight.
• Please do not use this product in close proximity to flammable or explosive gases as this could increase the
risk of explosion.
• For safety reasons keep this product and accessories out of reach of children or animals to prevent
accidents.
• Do not swallow batteries or small camera accessories.
• Keep the camera away from water and other liquids, and never let it get wet. Do not use outdoors when it is
raining or snowing.
• Should any form of liquid enter the camera, do not use it. Switch the camera off, and then remove the
batteries. Do not continue to use the camera as this may cause a fire or electric shock.
• Do not insert or drop metallic or inflammable foreign objects into the camera through access points e.g. card
slot and battery chamber. This may cause a fire or electric shock.
• Do not operate this camera with wet hands. This could pose a risk of electric shock.
• Under the environment with electrostatic discharge, the camera may malfunction and require the user to
reset the camera.
• Shielded cables must be used with this unit to ensure compliance with the Class B FCC limits.
• Please avoid using the camera in high or low temperature. Operation temperature range 32ºF - 104ºF (0ºC
- 40ºC).
• It is normal that the temperature of the camera body rises after being in use for a long period.
• Do not leave this camera in places subject to extremely high temperatures such as in a sealed vehicle,
direct sunlight or other places with extreme variances in temperature. Exposure to extreme temperatures
may adversely affect the camera's internal components and could cause a fire.
• Always use the camera and its accessories in a well-ventilated area.
55
Page 58

SAFETY TIPS AND MAINTENANCE
Precautions for batteries:
• Use 2x AA batteries only.
• Dispose of the batteries in a manner that complies with applicable laws.
• Leakage, overheating, or burst batteries could result in fire or injury.
• Do not short circuit, heat or dispose of batteries in fire.
• Do not use old batteries with new ones, or mix brands of batteries.
• Ensure the batteries are positioned correctly with regard to polarity (+/-).
• Allowing dust to accumulate in the camera over a long period is hazardous and in extreme circumstances
may cause a fire. It is best to clean your camera prior to seasonal periods of high humidity.
• Batteries may lose power if kept inside the camera for a long time without using. Please remove the
batteries while the camera is not in use.
• Do not use manganese batteries as they cannot supply sufficient power to support the camera's operations.
Batteries may not work normally under 32ºF (0ºC).
Precautions for SD Memory Cards:
• In the event of malfunction or damage, it is possible that data may be lost. Concord Camera is not
responsible in any way for such data loss.
• Do not touch the terminals with hands or metal objects.
• Keep dust, water and foreign objects away from the terminal section.
•Avoid heat, liquid and direct sunlight when using and for storage.
• Do not open the battery/card cover or remove the SD Memory Card while data is being read or written.
• Do not dismantle or modify.
• The recorded data may be lost if the card is affected by strong static electricity or electrical shock, or during
card repair or malfunction.
• When using SD Memory Cards do not change the attributes (read-only, etc.) of the files (pictures (JPEG) or
video clips (AVI) on the card. Doing so may prevent the camera from working properly when deleting, etc.
• Do not change the file names or the directory name of the pictures or video clips using a computer or save
files other than pictures or video clips taken by this camera onto the SD memory card. Pictures or video
clips that have been edited or added to the SD memory card with the computer may not play back and it
may cause the camera to malfunction.
• The SD Memory Card includes a write-protect switch. Sliding this switch downward prevents data from
being written to the card and pictures and video clips saved on the card are protected.
• Please note that pictures and video clips cannot be taken or deleted when the write-protect switch is on.
• When using a large-capacity card, writing, reading and deletion may take some time.
• Do not store the card in places with high humidity, dusty places or where static electricity or electromagnetic
fields are likely to occur.
• Images stored in the memory card may be ruined or damaged if you turn off the camera while it is in
process of reading, writing or formatting etc.
• SD cards are delicate electronic devices. Please do not bend or drop them
• Please do not place the SD card in or near to an environment of strong electronic or magnetic fields such as
loud speakers or TV receivers.
• Please keep the SD card in its bag or case when not in use.
• It's normal that the SD card is warm after use.
• Please make sure you switch off the camera before you remove the SD card.
• Do not open the battery/memory card door or remove the SD Memory Card while the camera is reading,
writing or formatting the card.
56
Page 59

REGULATORY INFORMATION
REGULATTORORYY
REGULA
FCC INFORMATION
FCC WARNING: This equipment meets the limits for a Class B digital device, pursuant to Part 15 of FCC rules.
Only the cable supplied with the camera should be used. Operation with other cables is likely to result in
interference to radio and TV reception and could void the user’s authorization to operate this equipment. This
device complies with Part 15 of the FCC Rules. Operation is subject to the following two conditions:
• This device may not cause harmful interference.
• This device must accept any interference received, including interference that may cause undesired
operation.
Changes or modifications not expressly approved by the manufacturer may void the user’s authority to operate
this equipment.
USER INFORMATION
NOTE: This equipment has been tested and found to comply with the limits for a class B digital device,
pursuant to Part 15 of the FCC Rules. These limits are designed to provide reasonable protection against
harmful interference in a residential installation. This equipment generates, uses and can radiate radio
frequency energy and, if not installed and used in accordance with the instructions, may cause harmful
interference to radio communications. However, there is no guarantee that interference will not occur in a
particular installation.
If this equipment does cause harmful interference to radio or television reception, which can be determined by
turning the equipment on and off, the user is encouraged to try to correct the interference by one or more of the
following measures:
• Reorient or relocate the receiving antenna.
• Increase the separation between the equipment and receiver.
• Connect the equipment into an outlet on a circuit different from that to which the receiver is connected.
• Consult the dealer or an experienced radio/TV technician for help.
VCCI INFORMATION
This is a Class B product, to be used in a domestic environment, based on the Technical Requirement of the
Voluntary Control Council for Interference (VCCI) from Information Technology Equipment. If this is used near a
radio or television receiver in a domestic environment, it may cause radio interference. Please install and use
the equipment according to this instruction manual.
- This product is in conformity with Directive 89/336/EEC.
INFORMA
INFORMA
TION
TION
Tested to comply
with FCC standards
for HOME OR OFFICE USE
Concord, Concord Eye-Q and the Concord Eye-Q logo are registered trademarks or trademarks of Concord Camera Corp., in the United States
and/or other countries. Microsoft and Windows are either registered trademarks or trademarks of Microsoft Corporation in the United States
and/or other countries. Mac and Macintosh are registered trademarks or trademarks of Apple Computer, Inc. in the U.S. and other countries. All
other brands and product names are either registered trademarks or trademarks of their respective owners.
57
Page 60

FRANÇAIS
FELICITATIONS
Félicitations pour l’achat de votre nouvel appareil photo numérique.
Votre appareil photo numérique a été soigneusement conçu et fabriqué
pour un fonctionnement efficace sur lequel vous pouvez compter. Pour
en connaître plus sur son fonctionnement, lisez ce guide avant d’utiliser
votre appareil.
Ce guide a été rédigé en portant attention aux détails et il est présenté
de manière à vous permettre de suivre aisément les directives qui y
sont contenues, et ce, afin que vous puissez profiter au maximum des
caractéristiques de votre appareil photo numérique.
58
Page 61

VUE D’ENSEMBLE DE L’APPAREIL PHOTO
F
I
J
L
M
N
A
B
C
D
E
K
H
G
A
AWB
07 ⁄ 04 ⁄ 03 02:40PM
4
M
N
28/45
A
AWB
07 ⁄ 04 ⁄ 03 02:40PM
4
M
N
28/45
: Photo Individuelle
: Photos en rafale
: Visonnage
: Séquences vidéo
VUE D’ENSEMBLE DE L
VUE D’ENSEMBLE DE L
’APP
’APP
Vue du haut/devant
AREIL
AREIL
PHOTOO
PHOT
1
2
3
4
12. DEL de flash
13. Viseur
14. DEL auto-focus
15. LCD
16. Écrou du trépied
17. Porte d’accès aux
piles et à la carte
mémoire
18. Cadran de sélection
de mode
19. Bouton de remise à
zéro
20. Bouton de navigation/
bouton OK/ bouton
zoom/bouton Flash
21. Bouton du menu
22. Haut-parleur
23. Interrupteur
arrêt/marche de
l’ACL
24. Dragonne
25. Logement de la carte
mémoire
26. Compartiment à piles
ICÔNES DE L’AFFICHAGE À CRISTAUX LIQUIDES
5
6
7
8
9
10
11
1. Bouton de mise en
2. Bouton de l’obturateur
3. Flash
4. Objectif et couvre-
5. Viseur
6. Capteur du flash
Vue du dessous/ derrière
12
13
14
15
16
17
A. Résolution
B. Mode Caméra
C. Flash
D. Équilibrage de blancs
E. Piles
F. Qualité
G. Compteur de fichiers
59
marche
objectif
7. DEL du retardateur /
de du réducteur des
yeux rouges
8. Microphone
9. Port USB
10. Port Vidéo
11. Commutateur de
mode Macro
H. Son
I. Macro
J. Retardateur
K. La barre du zoom
L. Option TV
M. Mémoire
N. Date / Heure
18
19
20
21
22
23
24
25
26
Page 62

TABLE DES MATIÈRES
VUE D’ENSEMBLE DE L’APPAREIL PHOTO ....................................................................................................59
Vue du haut/devant ......................................................................................................................................59
Vue du dessous/derrière ..............................................................................................................................59
Icônes de l'affichage à cristaux liquides........................................................................................................59
DESCRIPTION ET PRÉPARATION DE L’APPAREIL PHOTO ..........................................................................62
Contenu de l’emballage ................................................................................................................................62
Caractéristiques de l’appareil photo numérique............................................................................................62
Fixation de la dragonne.................................................................................................................................62
Chargement des piles dans l’appareil ..........................................................................................................62
Mise en marche et arrêt de l’appareil photo ................................................................................................63
Vérification de la charge des piles ................................................................................................................63
Sélection de la langue et réglage de la date et de l’heure ..........................................................................64
Mise en marche et arrêt de l’affichage à cristaux liquides (ACL) ................................................................65
Mémoire Interne/Insertion de la carte mémoire ............................................................................................66
Réglage du mode de fonctionnement de l’appareil photo ............................................................................67
PRISE DE PHOTO................................................................................................................................................68
Prise de photo - photo individuelle................................................................................................................68
DEL de Flash ................................................................................................................................................68
Prendre une photo en se servant de l’ACL ..................................................................................................69
Verrouillage de l’auto-focus ..........................................................................................................................69
Réglage du flash ..........................................................................................................................................70
Prise de photo à l’aide du zoom numérique ................................................................................................71
Utilisation du menu principal en mode fixe ..................................................................................................73
Modes de prise de vue disponibles ..............................................................................................................73
Retardateur....................................................................................................................................................74
Mode Macro ..................................................................................................................................................74
Prise de vue - photos en rafale ....................................................................................................................75
Résolution de l’image....................................................................................................................................75
Qualité de l’image..........................................................................................................................................76
Équilibrage de blancs....................................................................................................................................76
Réglage du temps de pose ..........................................................................................................................77
Sélection du milieu ambiant ..........................................................................................................................78
PRISE DE SÉQUENCES VIDÉO..........................................................................................................................79
VISUALISATION DES FICHIERS ........................................................................................................................79
Utilisation du mode Visualisation ..................................................................................................................79
Visualiser les séquences vidéo ....................................................................................................................80
Visualisation des fichiers ..............................................................................................................................80
Utilisation du menu principal en mode visualisation ....................................................................................81
Suppression des fichiers ..............................................................................................................................82
Utilisation du mode vignette ..........................................................................................................................83
60
Page 63

PERSONNALISATION DES RÉGLAGES DE L’APPAREIL................................................................................84
Menu et options de configuration..................................................................................................................86
Personnalisation des réglages de l’appareil photo ......................................................................................87
Choix de la langue ........................................................................................................................................87
Réglage de la date ........................................................................................................................................87
Réglage de l’heure ........................................................................................................................................88
Réglage de Luminosité écran ......................................................................................................................88
Formatage de la mémoire interne ou de la carte mémoire ..........................................................................89
RÉTABLISSEMENT DES RÉGLAGES PAR DÉFAUT DU FABRICANT DE L’APPAREIL................................90
GUIDE D’INSTALLATION ....................................................................................................................................91
Configuration nécessaire ..............................................................................................................................91
Exigences relatives à l’installation ................................................................................................................91
Utilisation de l’écran fugitif de l’installateur ..................................................................................................92
Ordinogramme de l’installation des logiciels ................................................................................................93
Identification de votre système d’exploitation................................................................................................94
Installation du pilote et de DirectX 9 - Windows 98/98SE ............................................................................95
Installation de DirectX 9 - Windows 2000 ....................................................................................................97
Installation d'ArcSoft PhotoImpression - tous les utilisateurs de Windows ..................................................98
Installation d'Adobe Acrobat Reader 5.1 (facultatif)....................................................................................100
CONNEXION DE L’APPAREIL PHOTO À L’ORDINATEUR ............................................................................102
Transfert de photos et de séquences vidéo vers votre ordinateur..............................................................102
Utilisation d'ArcSoft PhotoImpression ........................................................................................................103
Debranchement de votre appareil photo de l’ordinateur ............................................................................104
MODE TV............................................................................................................................................................104
Mode TV - visualisation et suppression de vos fichiers à partia d’un
téléviseur ....................................................................................................................................................104
Branchement de l’appareil photo au téléviseur ..........................................................................................104
Visualisation de photos et de séquences vidéo sur votre téléviseur ..........................................................104
MESSAGES D’ERREUR ....................................................................................................................................105
DIAGNOSTIC D'ANOMALIES............................................................................................................................106
COMMENT OBTENIR DE L’AIDE......................................................................................................................109
SPECIFICATION DE VOTRE APPAREIL-PHOTO ............................................................................................110
CONSIGNES DE SÉCURITÉ ET D’ENTRETIEN ..............................................................................................112
Conseils de sécurité ....................................................................................................................................112
Precautions pour l'appareil photo ................................................................................................................112
Precautions pour les piles ..........................................................................................................................112
Precautions pour le carte mémoire SD ......................................................................................................113
RENSEIGNEMENTS DE NATURE RÈGLEMENTAIRE ....................................................................................114
61
Page 64

DESCRIPTION ET PRÉPARATION DE L’APPAREIL PHOTO
1
2
3
DESCRIPTION ET PRÉP
DESCRIPTION ET PRÉP
Contenu de l’emballage
• Concord Eye-Q 4060AF
• Câble mini-USB
• Câble de sortie TV
• Guide de l’utilisateur/Guide pour un départ-éclair /Carte de garantie
• Étui pour l’appareil photo numérique
• Dragonne
•2 piles alcalines AA
• CD-ROM (uniquement pour les utilisateurs de Windows)
- Logiciel de pilotage USB à mémorisation de masse
- ArcSoft PhotoImpression 2000
- Adobe Acrobat Reader 5.1
- Microsoft DirectX 9
- Guide de l’utilisateur en plusieurs langues
Caractéristiques de l’appareil photo numérique
• Résolution de 4 mégapixels 2272 x 1704
• ACL couleur de 1,5 po (3,81 cm)
• Zoom numérique 6x
• Séquences vidéo
• Mémoire interne de 16 Mo
• Compatible avec les cartes mémoire numériques sécurisées SD (non incluses)
Fixation de la dragonne
Pour éviter d’échapper l’appareil, veuillez attacher la dragonne.
ARA
ARA
TION DE L
TION DE L
’APP
’APP
AREIL
AREIL
PHOTO O
PHOT
Chargement des piles dans l’appareil
fig.1.1 fig.1.2
Pour utiliser l’appareil photo numérique, vous pouvez utiliser 2 piles alcalines, au lithium ou rechargeables.
1. Ouvrez la porte d’accès aux piles et à la carte mémoire. (fig.1.1)
• Pour ouvrir, déplacer le volet dans le sens indiqué par la flèche et le soulever.
2. Insérer les piles selon les indicateurs de polarité sur la partie supérieure du logement des piles. (1.2)
3. Bien fermer le volet de la carte mémoire et des piles en le déplaçant dans le sens opposé de la flèche.
(fig.1.3)
fig.1.3
62
Page 65

DESCRIPTION ET PRÉPARATION DE L’APPAREIL PHOTO
MISE EN MARCHE ET ARRÊT DE L’APPAREIL PHOTO
fig.1.1 Appareil-photo sous tension
fig.1.2 Appareil-photo hors tension
L’interrupteur marche/arrêt est situé sur le dessus de l’appareil photo.
1. Pour mettre l’appareil sous tension, déplacer le bouton de mise en marche de l’appareil vers l’icône. (fig.1.1)
• La cache de l’objectif s’ouvrira.
•L’ACL s’allumera automatiquement.
2. Pour mettre l’appareil hors tension, déplacer le bouton de mise en marche dans le sens opposé à l’icône.
(fig.1.2)
Remarque:
Pour prolonger la vie de la pile, la caméra s’éteindra automatiquement au bout de 60 secondes d’inactivité.
Appuyez sur le bouton de l'obturateur pour remettre l’appareil en marche.
Vérification de la charge des piles
L’écran ACL affiche cinq niveaux de charge des piles.
Les piles sont
Chargées et
Prêtes à être
lisées.
La capacité de
batterie est à 3/4.
La capacité de
batterie est à 1/4.
Les batteries sont
le bas besoin
d'être remplacé.
Les piles sont
épuisées et
doivent être
remplacées.
La capacité de
batterie est à 1/2.
Remarque:
• Le témoin de charge des piles pourrait ne pas indiquer précisément l’état de la pile rechargeable même
si les piles ont été entièrement rechargées en raison d’un problème inhérent aux piles rechargeables.
• Afin de prévenir la corrosion ou la fuite des piles, retirez les piles de
l’appareil photo si vous prévoyez ne pas vous en servir pour toute période
de temps prolongée.
• Afin de prolonger la durée de vie des piles, l’alimentation de l’appareil photo sera automatiquement
coupée après 60 secondes de non-utilisation. Pour modifier ce réglage, veuillez consulter la p.87.
• Pour un meilleur rendement, veuillez utiliser des piles rechargeables NiMH.
63
Page 66

DESCRIPTION ET PRÉPARATION DE L’APPAREIL PHOTO
SÉLECTION DE LA LANGUE ET RÉGLAGE DE LA DATE ET DE L’HEURE
Lorsque l’appareil photo est mis sous tension pour la première fois, les menus se rapportant à la langue
d’utilisation, à l’heure ainsi qu’à la date seront affichés.
Sélection de la langue
1. Mettez en marche l’appareil photo.
•L’écran de sélection de la langue apparaîtra sur l’ACL.
2. Appuyez sur le bouton de navigation , afin de mettre en surbrillance la
langue que vous désirez utiliser.
3. Appuyez sur le bouton de navigation dedans OK pour effectuer votre choix.
4. Le prochain écran qui apparaîtra se lira « Êtes-vous certain? » appuyez sur le
bouton de navigation pour choisir entre Oui et Non.
5. Appuyez sur le bouton de navigation dedans OK pour effectuer votre choix.
• Si vous avez indiqué Non, vous reviendrez à l’écran de sélection de la langue.
• Si vous avez indiqué Oui, tous les écrans de menu seront dorénavant affichés dans la nouvelle langue
choisie.
Chaque langue possède sa propre configuration par défaut pour le formatage de la date et l’option TV. Afin de
modifier ces réglages, veuillez consulter la section Personnalisation des réglages de l’appareil photo à la p.87.
Langue (s) Réglage du format de la date Option TV
English / Español MM/DD/AAAA NTSC
Français / Deutsch DD/MM/AAAA PAL
Réglage de la date
OPTION LANGUE
English
Français
Español
Deutsch
RETOUR CONFIG
OK
1
RÉGLAGE DATE
01 ⁄ 01 ⁄ 2003
RETOUR
CONFIG
OK
1
RÉGLAGE DATE
01 ⁄ 01 ⁄ 2003
RETOUR
CONFIG
OK
1
RÉGLAGE DATE
01 ⁄ 02 ⁄ 2003
RETOUR
CONFIG
OK
1. Appuyez sur le bouton de navigation pour changer le numéro clignotant jusqu’à ce que vous ayez
atteint le réglage désiré.
2. Appuyez sur le bouton de navigation pour mettre en surbrillance le mois, la date et l’année.
• Le choix que vous avez fait clignotera lorsque mis en surbrillance.
3. Répétez les étapes 1 et 2 jusqu'à ce que la date soit placée.
4. Appuyez sur le bouton de navigation dedans OK pour programmer la date.
Remarque:
• Si une des piles est retirée pendant plus de 4 minutes, le réglage de la date reviendra à la configuration
par défaut.
64
Page 67

DESCRIPTION ET PRÉPARATION DE L’APPAREIL PHOTO
RÉGLAGE HEURE
OK
01:01 AM
RETOUR
CONFIG
RÉGLAGE HEURE
OK
01:01 AM
RETOUR
CONFIG
01:02 AM
RETOUR
CONFIG
RÉGLAGE HEURE
OK
A
AWB
07⁄ 04 ⁄ 03 02:40PM
4
M
N
28/45
Réglage de l’heure
L’heure est affichée en heures et en minutes.
1. Appuyez sur le bouton de navigation pour changer le choix clignotant jusqu’à ce que vous ayez atteint
le réglage désiré.
2. Appuyez sur le bouton de navigation pour mettre en surbrillance l’heure (HH), les minutes (MM) ou
l’avant-midi ou l’après-midi (AM/PM), selon le cas.
• Le choix que vous avez fait clignotera lorsque mis en surbrillance.
3. Répétez les étapes 1 et 2 jusqu'à ce que l'heure soit placée.
4. Appuyez sur le bouton de navigation dedans OK pour effectuer votre choix.
Remarque:
L’heure peut être affichée, au choix, par périodes de 12 heures ou de 24 heures. Veuillez consulter la p.88
afin de modifier ce réglage. Si une des piles est retirée pendant plus de 4 minutes, le réglage de l’heure
reviendra à la configuration par défaut.
MISE EN MARCHE ET ARRÊT DE L’AFFICHAGE À CRISTAUX LIQUIDES (ACL)
L’appareil photo est muni d’un ACL de 1,5 po (3,81 cm) pour vous permettre de cadrer vos sujets avant de
prendre leur photo ou de les filmer tout en vous permettant d’examiner les photos et séquences vidéo que vous
avez stockés. L’ACL affiche également les réglages, tels qu’ils se trouvent alors sur l’appareil.
1. Utilisez le bouton ( ) pour alterner entre les divers modes affichés sur l’ACL. Le mode affiché par l’ACL
change tel qu’indiqué ci-dessous chaque fois que vous appuyez sur le bouton :
Éteint les icônes
Éteint l’ACL
Écran ACL en fonction avec icônes
Remarque: Afin d’économiser la charge des piles, vous pouvez éteindre l’ ACL. En ( ) mode Visualiser,
seules les icônes LCD peuvent être allumées ou éteintes.
65
Page 68

DESCRIPTION ET PRÉPARATION DE L’APPAREIL PHOTO
!
Mémoire interne - Insertion de la carte mémoire
Mémoire interne
L'appareil photo dispose de 16 Mo de mémoire interne qui peuvent être utilisés immédiatement.
État Mémoire utilisée
Carte mémoire non insérée Mémoire interne
Carte mémoire insérée Carte mémoire
REMARQUE: les images et clips vidéo stockés dans la mémoire interne sont automatiquement transférés
sur la carte mémoire dès qu’elle est insérée. Introduire une carte mémoire avec une mémoire disponible de
16 Mo ou plus.
Insertion de la carte mémoire
En plus de sa mémoire interne de 16 Mo, l'appareil photo peut utiliser des cartes de mémoire SD pour
enregistrer des photos et des clips vidéo.
fig.1.1
1. Ouvrez la porte d’accès aux piles/à la carte mémoire.
• Pour ouvrir, déplacer le volet dans le sens indiqué par la flèche et le soulever.(fig.1.1)
2. Insérez la carte mémoire tel qu’indiqué sur le diagramme. (fig.1.2)
• Lors de l’insertion de la carte, assurez-vous qu’elle soit parfaitement droite par rapport à l’ouverture et
non pas en angle.
3. Refermez la porte d’accès aux piles/à la carte mémoire en le déplaçant dans le sens opposé de la
flèche.(fig.1.3)
Remarque: L'appareil-photo peut soutenir les cartes de SD jusqu'à 512 Mo.
Si la carte de mémoire ou la mémoire interne est corrompue, la mémoire doit être composée
fig.1.2
fig.1.3
66
Page 69

DESCRIPTION ET PRÉPARATION DE L’APPAREIL PHOTO
RÉGLAGE DU MODE DE FONCTIONNEMENT DE L’APPAREIL PHOTO
Votre appareil photo est doté de 3 modes opérationnels, soit: le mode Fixe, le mode Visualisation et le mode
Séquence vidéo.
1. Pour choisir un autre mode de fonctionnement, déplacer le commutateur de
mode à l’horizontale jusqu’à la position correspondante
Mode Fixe
Servez-vous du mode Fixe pour prendre des photos ou afin de personnaliser les
réglages pour la prise de vos photos.
Mode Visualisation
Utiliser ce paramètre pour visionner des photos et des clips vidéo ou pour
supprimer des photos stockées dans la mémoire interne ou sur la carte mémoire.
Mode Séquence vidéo
Servez-vous du mode Séquence vidéo pour filmer des séquences vidéo.
67
Page 70

PRISE DE PHOTO
PHOTO INDIVIDUELLE
Prise de photo au moyen du viseur en mode Distant
M
4
fig.1.2
28/45
N
4
fig.1.1
M
28/45
N
Prise de photo avec le viseur :
1. Mettez l’appareil en marche.
2. Régler l’appareil en mode Caméra ( ) et s’assurer que le commutateur de mode Macro est réglé en
mode Distant ( ).
• Afin d’économiser la charge des piles, l’ACL peut être éteint en appuyant sur le bouton ( ).
3. Cadrez le sujet à l’aide du viseur.
4. Pour effectuer la mise au point automatique, appuyer à mi-chemin sur le déclencheur jusqu’à ce que
s’allume le témoin vert AF pour la mise au point automatique. (Pour obtenir des renseignements sur le
verrouillage du focus, veuillez consulter la p.67) (fig.1.1)
•L’appareil déplace la lentille à des distances variées pour établir la mise au point appropriée, puis émet
un déclic.
5. Enfoncez à fond le bouton de l’obturateur afin de saisir l’image. (fig.1.2)
• Si la fonction audio a été activée, l’appareil photo émettra un signal sonore une fois l’image saisie.
•L’appareil émettra un son de déclic.
• Une fois l’image saisie, le DEL rouge situé tout près du viseur et indiquant que le flash est prêt clignotera
afin d’indiquer que l’image est en cours de mémorisation. (Pour obtenir des renseignements sur le DEL
indiquant que le flash est prêt, veuillez consulter la p.68)
DEL DE FLASH
fig.1.3
fig.1.4
État du DEL indiquant que le Description
flash est prêt
Stable (fig.1.3) L’appareil est en train de saisir une image ou une séquence vidéo.
Tenez l’appareil en position stable pour éviter les photos floues.
Clignotant (fig.1.4) Soit que le flash est en train de se recharger. Vous pouvez bouger
l’appareil lorsque vous êtes dans ce mode.
Remarque: Évitez d’interrompre l’alimentation de l’appareil ou de changer de mode lorsque l’appareil est
en train de saisir ou mémoriser une photo ou séquence vidéo, à défaut de quoi l’image ou la séquence
vidéo en cours de mémorisation pourrait être corrompue.
68
Page 71

PRISE DE PHOTO
A
AWB
07 ⁄ 04 ⁄ 03 02:40PM
4
M
N
28/45
MODE CAPTURE
QUALITÉ
RÉSOLUTION
SÉLECT. SCÈNES
ÉQUIL. BLANCS
RETOUR SÉLECTION
CAMÉRA
Q
PHOTO INDIVIDUELLE
PRISE CONTINUE
RETARDATEUR
RETOUR CONFIG
MODE CAPTURE
OK
4
M
28/45
PRISE DE PHOTO AU MOYEN DE L’ÉCRAN ACL EN MODE DISTANT
Prise de photo avec l’écran ACL :
1. Régler l’appareil en mode Caméra ( ) et s’assurer que le commutateur de
mode Macro est réglé en mode Distant ( ).
2. Cadrer le sujet à l’écran ACL.
3. Pour verrouiller la mise au point automatique, appuyer à mi-chemin sur le
déclencheur jusqu’à ce que s’allume le témoin vert AF pour la mise au point
automatique. (Pour obtenir plus de précisions sur le verrouillage de la mise au
point, consulter la page 69). (fig.1.1)
•L’appareil déplace la lentille à des distances variées pour établir la mise au
point appropriée, puis émet un déclic.
4. Enfoncez complètement le bouton d’obturateur pour prendre votre photo. (fig.1.2)
• Si la fonction audio a été activée, l’appareil photo émettra un signal sonore
une fois l’image saisie.
•L’appareil émettra un son de déclic.
• Une fois l’image saisie, le DEL rouge situé tout près du viseur et indiquant que
le flash est prêt clignotera afin d’indiquer que l’image est en cours de
mémorisation.
•L’image pourra être prévisualisée pendant 1 seconde sur l’ACL et le numéro
du compteur d’images affiché sur l’ACL s’ajustera en conséquence.
VERROUILLAGE DE L’AUTO-FOCUS
Cette fonction peut être utilisée pour figer la mise au point lorsque le sujet ne se
situe pas au centre de la photo lorsqu’en mode ( ) Distant.
Pour verrouiller l’auto-focus:
1. Placez le sujet au centre du cadre qui se trouve dans le viseur. (fig.1.3)
2. Appuyer à mi-chemin sur le déclencheur jusqu’à ce que le témoin vert AF de
mise au point automatique s’allume. (fig.1.4)
4
fig.1.1
4
fig.1.2
AWB
fig.1.3
M
M
A
28/45
N
28/45
N
M
4
07 ⁄ 04 ⁄ 03 02:40PM
28/45
N
fig.1.5 fig.1.6
État du DEL de Description
l’auto-focus
Clignotant (fig.1.5) L’appareil est en train de faire la mise au point.
Stable (fig.1.6) La mise au point du sujet est terminée.
69
M
4
fig.1.4
AWB
fig.1.7
A
28/45
M
4
07 ⁄ 04 ⁄ 03 02:40PM
28/45
N
Page 72

PRISE DE PHOTO
A
AWB
07 ⁄ 04 ⁄ 03 02:40PM
4
M
N
28/45
AWB
07 ⁄ 04 ⁄ 03 02:40PM
4
M
N
28/45
A
4
M
28/45
3. Recomposez votre image. (fig.1.7)
•Tenez le bouton d’obturateur enfoncé à mi-chemin pendant que vous
recomposez l’image.
4. Enfoncez complètement le bouton d’obturateur afin de prendre votre photo. (fig.1.8)
M
4
Note: L’indicateur lumineux de I’auto-focus continuera de clignoter dans les
conditions suivantes:
1. II y a à la fois des sujets proches et des sujets eloignés dans le même temps.
28/45
fig.1.8
Recomposez I’image avec le sujet qui est le plus proche ou le plus eloigné.
2. II y a seulement une couleur. Recomposez I’image avec un sujet qui contient
plus de couleurs.
3. II n’y a pas assez de lumière. Augmentez I’éclairage autour le sujet.
RÉGLAGE DU FLASH
Comment régler le flash:
1. Appuyer à plusieurs reprises sur la manette dans le sens de la flèche ( ) jusqu’à ce que le mode
souhaité s'affiche au moniteur ACL.
Mode flash Description
Auto-flash L’appareil juge de lui-même si un flash est requis. Si l’éclairage est insuffisant, le
Réduction des Servez-vous de ce mode pour réduire considérablement les « yeux rouges »
yeux rouges lorsque vous prenez une photo à l’aide d’un flash. L’appareil détectera
Flash d’appoint Le flash se déclenchera peu importe l’intensité de l’éclairage.
Flash éteint Dans ce mode, le flash ne se déclenchera pas. Veuillez utilisez ce mode si vous
Mode Nocturne Afin de capter les sources de lumière lors des scènes nocturnes, une faible vitesse
flash se déclenchera.
automatiquement lorsque le flash est requis et le flash se déclenchera au bout de
quelques secondes.
désirez saisir la lumière aMoiante ou pour utiliser l’éclairage disponible lorsque
l’utilisation d’un flash est interdite comme, par exemple, dans les musées.
• Afin d’empêcher que les images ne soient floues en raison du manque
d’éclairage, assurez-vous de ne pas bouger l’appareil lorsque vous enfoncez le
bouton d’obturateur ou montez l’appareil sur un trépied.
d’obturation est utilisée dans ce mode.
• Afin d’empêcher que les images ne soient floues en raison du
manque d’éclairage, assurez-vous de ne pas bouger l’appareil
lorsque vous enfoncez le bouton d’obturateur ou montez
l’appareil sur un trépied.
Remarque: Une fois qu’il a été déclenché, le flash doit se recharger. Si le bouchon d’obturateur est
enfoncé pendant que le flash se recharge, le DEL indiquant que le flash est prêt se mettra à clignoter.
Veuillez laisser quelques secondes s’écouler et enfoncez de nouveau le bouton d’obturateur afin de
prendre une photo.
70
Page 73

PRISE DE PHOTO
PRISE DE PHOTO À L’AIDE DU ZOOM NUMÉRIQUE
L’appareil photo permet d’utiliser un zoom numérique d’une puissance maximale de 6x et d’agrandir l’image
jusqu’à six fois sa grandeur réelle.
M
4
28/45
A
AWB
07 ⁄ 04 ⁄ 03 02:40PM
Mode Normal
N
Zoom 4x
Comment utiliser le zoom numérique:
1. Appuyez sur la manette pour vous servir du zoom numérique.
• La barre de zoom numérique affichée sur l’écran ACL indique l’échelle de grossissement en changeant
de couleur.
• Zoom 1x à 3x – La barre de zoom numérique blanche indique un grossissement numérique allant jusqu’à
3 fois.
• Zoom 4x – La barre de zoom numérique bleue apparaît et affiche sur l’écran ACL un grossissement
numérique de 4 fois. L’encadrement bleu indique l’étendue de ce qui a été pris en photo. Utilisez cet
encadrement pour cadrer votre photo.
• 6x zoom – La barre de zoom numérique rouge apparaît et affiche sur l’écran ACL un grossissement
numérique de 6 fois. L’encadrement rouge indique l’étendue de ce qui a été pris en photo. Utilisez cet
encadrement pour cadrer votre photo.
Trucs de photographe -
Lorsque vous utilisez le zoom numérique, assurez-vous que l’appareil soit stable afin d’empêcher que l’image
ne soit floue en raison du mouvement de l’appareil. Il est recommandé de poser votre caméra sur une surface
stable ou de vous servir d’un trépied.
Prenez note qu’il est également possible que la qualité de l’image soit légèrement inférieure, lorsque vous
utilisez le zoom numérique.
Remarque: Vous ne pouvez vérifier le zoom numérique qu’au travers de l’ACL et non pas en regardant à
travers le viseur.
4X
Zoom 6x
6X
71
Page 74

UTILISATION DU MENU PRINCIPAL EN MODE FIXE
Q
QUALITÉ
SUPÉRIEURE
NORMALE
ÉCONOMIQUE
RETOUR CONFIG
OK
CAMÉRA
MODE CAPTURE
Q
QUALITÉ
RÉSOLUTION
SÉLECT. SCÈNES
ÉQUIL. BLANCS
RETOUR SÉLECTION
CAMÉRA
+
COMPENSATION EV
–
CONFIGURATION
RETURN SELECT
SÉLECT. SCÈNES
OFF
FÊTE/INTÉRIEUR
MER/NEIGE
COUCHERS DE SOLEIL
PAYSAGE NOCTURNE
OK
RETOUR CONFIG
SÉLECT. SCÈNES
FEUX D'ARTIFICE
PORTRAIT DE NUIT
PRISE DE PHOTO
MODE CAPTURE
PHOTO INDIVIDUELLE
PRISE CONTINUE
RETARDATEUR
RETOUR CONFIG
RÉSOLUTION
M
4
2272 x 1704
M
3
2048 x 1536
M
2
1600 x 1200
M
1
1280 x 960
V
640 x 480
RETURN SET
OK
OK
OK
RETOUR CONFIG
+
COMPENSATION EV
–
00 EV
–
CONFIG
OK
72
ÉQUIL BLANCS
AUTO
AWB
SOLEIL
FLUORESCENT
TUNGSTÈNE
OK
RETOUR CONFIG
+
Page 75

PRISE DE PHOTO
UTILISATION DU MENU PRINCIPAL EN MODE FIXE
Suivez les diverses étapes indiquées ci-dessous afin de programmer, à partir du menu principal, les options
plus perfectionnées pour la prise de photos dont est doté votre appareil.
À partir du ( ) menu principal:
1. Mettre l’appareil en position Marche
2. Régler le commutateur de mode à ( ).
3. Appuyez sur MENU pour afficher le menu principal.
4. Appuyez sur le bouton de navigation dans un mouvement de va-et-vient jusqu’à ce que l’option
désirée ait été mise en surbrillance.
5. Appuyez sur le bouton de navigation à droite pour accéder au sous-menu.
6. À partir du sous-menu, appuyez sur le bouton de navigation pour alterner entre les diverses options.
7. Appuyer sur le bouton OK pour sélectionner.
•Toutes les sélections seront indiquées à l’aide d’un crochet rouge.
8. Pour revenir au menu précédent, appuyez sur le bouton de navigation vers la gauche.
9. Pour quitter le menu en tout temps, appuyez sur le bouton MENU.
MODES DE PRISE DE VUE DISPONIBLES
Le menu de prise de vue comporte 3 modes parmi lesquels vous pouvez choisir lorsque vous prenez vos
photos.
Mode de prise de vue Description
( ) Photo individuelle L’appareil prend 1 photo à la fois.
( ) Prise Continue L'appareil prend 7 photos d'affilée (à 1600 x 1200 pixels) en enfonçant
( ) Retardeur L’appareil prend la photo dix secondes après avoir relâché le déclencheur.
complètement le déclencheur. Le flash est désactivé.
73
Page 76

PRISE DE PHOTO
A
AWB
07 ⁄ 04 ⁄ 03 02:40PM
4
M
N
28/45
A
AWB
07 ⁄ 04 ⁄ 03 02:40PM
4
M
N
28/45
MODE CAPTURE
QUALITÉ
RÉSOLUTION
SÉLECT. SCÈNES
ÉQUIL. BLANCS
RETOUR SÉLECTION
CAMÉRA
Q
PHOTO INDIVIDUELLE
PRISE CONTINUE
RETARDATEUR
RETOUR CONFIG
MODE CAPTURE
OK
RETARDATEUR
Comment utiliser le retardateur:
1. En mode ( ) Caméra, appuyez sur MENU pour afficher le menu principal.
2. Appuyez sur le bouton de navigation pour accéder au mode de prise de vue.
3. Enfoncez le bouton de navigation pour mettre en surbrillance ( ) Retardeur.
4. Appuyer sur le bouton OK pour régler la minuterie automatique.
5. Placez l’appareil sur une surface plate ou fixez-la à un trépied.
6. Utilisez l’ACL pour composer l’image, puis enfoncez le bouton de l’obturateur afin d’activer le retardateur.
• Le témoin de la minuterie automatique clignote lentement pendant sept secondes, puis plus rapidement
pendant trois secondes, avant de saisir l’image.
Remarque:
• Le retardateur est automatiquement désactivé dès que la photo a été prise.
• Afin de désactiver le retardateur avant que la photo ne soit prise, suivez les étapes indiquées ci-dessus
et mettez une autre option en surbrillance dans le menu des modes de prise de vue.
Trucs de photographe -
Puisque le DEL du retardateur situé sur le devant de l’appareil clignote, vous avez le temps de vous placer
dans l’image avant que la photo ne soit prise. Lorsque le DEL du retardateur cesse de clignoter, c’est que la
photo a été prise.
MODE MACRO - PRISE DE VUE EN GROS PLAN
Ce mode permet à l’appareil de prendre des photos de près.
Programmation du mode Macro:
1. Le commutateur de mode Macro se trouve à l'avant de l’appareil. Déplacer le commutateur de mode Macro
Prise de photo en mode Macro:
1. Cadrez le sujet à l’aide de l’ACL.
2. Enfoncez complètement le bouton de l’obturateur pour prendre votre photo.
à ( ) pour choisir ce mode.
•L’icône du mode Macro ( ) sera affiché sur l’ACL.
• La distance de prise de vue ideale est a 20 cm (0,7 pi).
• Le mode Macro n’offre pas la fonction de mise au point automatique. La plage de mise au point est
affichee sur le moniteur ACL.
74
Page 77
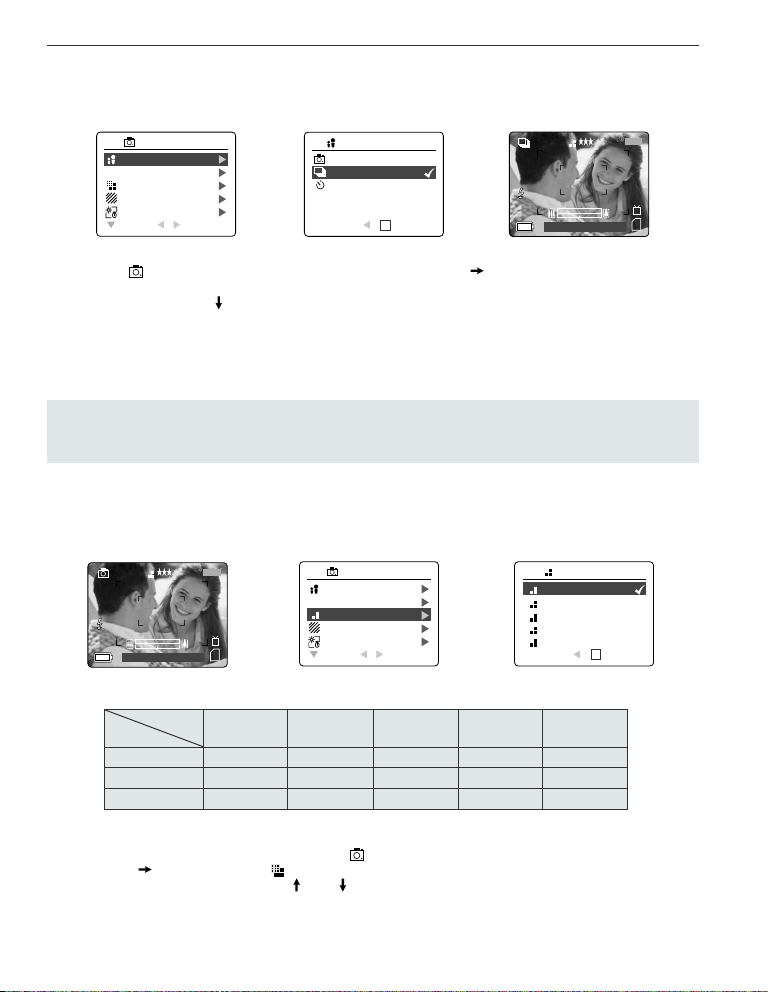
PRISE DE PHOTO
A
AWB
07 ⁄ 04 ⁄ 03 02:40PM
4
M
N
28/45
A
AWB
07 ⁄ 04 ⁄ 03 02:40PM
4
M
N
28/45
MODE CAPTURE
QUALITÉ
RÉSOLUTION
SÉLECT. SCÈNES
ÉQUIL. BLANCS
RETOUR SÉLECTION
CAMÉRA
Q
PHOTO INDIVIDUELLE
PRISE CONTINUE
RETARDATEUR
RETOUR CONFIG
MODE CAPTURE
OK
MODE CAPTURE
QUALITÉ
RÉSOLUTION
SÉLECT. SCÈNES
ÉQUIL. BLANCS
RETOUR SÉLECTION
CAMÉRA
Q
2272 x 1704
2048 x 1536
1600 x 1200
1280 x 960
640 x 480
RETOUR CONFIG
RÉSOLUTION
OK
4
M
3
M
2
M
1
M
V
PHOTOS EN RAFALE
Cette option permet à l’appareil de prendre une série de photos, l’une à la suite de l’autre, lorsque le bouton de
l’obturateur est enfoncé.
Comment prendre des photos en rafale:
1. Dans le ( ) menu principal, appuyez sur le bouton de navigation afin d’accéder au sous-menu du
mode de Prise de vue.
2. Appuyer sur la manette jusqu’à ce que la fonction Continuous Shot (Prise continue) soit indiquée en
surbrillance, puis appuyer sur le bouton OK de la manette pour passer à ce mode.
3. Cadrer le sujet à l’écran ACL et activer la mise en point en enfonçant à mi-chemin le déclencheur, jusqu’à
ce que le témoin vert AF de mise au point automatique s’allume.
4. Enfoncez complètement le bouton de l’obturateur pour prendre votre photo.
• L'appareil saisit environ trois images par seconde pour un maximum de sept images à 1600 x 2000.
Remarque:
• En mode photos en rafale, le flash est désactivé en raison du délai requis pour son rechargement.
• Dans ce mode, l’appareil ne saisit que des images à 1600 x 1200.
RÉSOLUTION DE L’IMAGE
La résolution de l’image détermine la dimension de la photo que vous prenez. Les images à haute résolution
sont mieux définies et la taille des fichiers est supérieure.
Photos enregistrées sur mémoire de 16MO (environ)
Résolution
Qualité
Supérieure
Normale
Économe
4MP 3MP 2MP 1.3MP VGA
(2272 x 1704) (2048 x 1536) (1600 x 1200) (1280 x 960) (640 x 480)
20 23 34 50 138
51 63 89 127 308
75 88 128 177 430
Comment modifier la résolution de l’image :
1. Lorsque Résolution est mis en surbrillance au ( ) menu principal, appuyerzsur la flèche du bouton de
navigation pour accéder au ( ) sous-menu de Résolution.
2. Appuyer sur le bouton de navigation ou jusqu’à ce que le réglage désiré soit en surbrillance.
3. Appuyer sur le bouton OK pour sélectionner.
4. Appuyez sur MENU pour retourner au mode de prise de vue.
75
Page 78

PRISE DE PHOTO
A
AWB
07 ⁄ 04 ⁄ 03 02:40PM
4
M
N
28/45
Q
Q
A
AWB
07 ⁄ 04 ⁄ 03 02:40PM
4
M
N
28/45
A
MODE CAPTURE
QUALITÉ
RÉSOLUTION
SÉLECT. SCÈNES
ÉQUIL. BLANCS
RETOUR SÉLECTION
CAMÉRA
Q
SUPÉRIEURE
NORMALE
ÉCONOMIQUE
RETOUR CONFIG
QUALITÉ
OK
Q
MODE CAPTURE
QUALITÉ
RÉSOLUTION
SÉLECT. SCÈNES
ÉQUIL. BLANCS
RETOUR SÉLECTION
CAMÉRA
Q
AUTO
SOLEIL
FLUORESCENT
TUNGSTÈNE
RETOUR CONFIG
ÉQUIL. BLANCS
OK
AWB
QUALITÉ DE L’IMAGE
Le réglage de la qualité de l’image détermine le taux de compression utilisé pour réduire la taille du fichier de la
photo enregistrée afin d’économiser l’espace disponible sur la carte mémoire.
Comment modifier la qualité de l’image :
1. Lorsque ( ) Qualité est mis en surbrillance, appuyez sur la flèche du bouton de navigation pour
2. Appuyez sur le bouton de navigation ou jusqu’à ce que le réglage désiré soit en surbrillance.
3. Appuyez sur le bouton de navigation dedans OK pour choisir le mode Qualité.
4. Appuyez sur MENU pour retourner au mode de prise de vue.
ÉQUILIBRAGE DE BLANCS
À défaut d’autre réglage, l’appareil utilise la fonction d’auto-équilibrage des blancs dont il est doté afin de
reproduire le plus fidèlement possible les couleurs, et ce, dans différentes conditions d’éclairage. Si l’éclairage
est inégal, vous pouvez utiliser l’auto-équilibrage des blancs.
Comment modifier l’équilibrage des blancs:
1. Lorsque Équilibrage des Blancs est en surbrillance, appuyez sur le bouton de navigation pour accéder
2. Appuyez sur le bouton de navigation ou jusqu’à ce que le réglage désiré soit en surbrillance.
3. Appuyez sur le bouton de navigation dedans OK vers l’intérieur pour choisir le mode Équilibrage des
4. Appuyez sur MENU pour retourner au mode de prise de vue.
Qualité JPEG Taux de Description
Supérieure 5:1 La qualité d’image supérieure peut être utilisée pour les impressions
Compression
et les agrandissements.
Normale 11:1 L’image de qualité normale peut servir pour les photos de tous les jours.
Économe 7:1 L’image de qualité économe peut servir pour les photos transmises par
courrier électronique.
accéder au sous-menu de ( ) Qualité.
Mode Équilibrage Description
des Blancs
Auto L’appareil choisira automatiquement le réglage pour équilibrer les blancs.
Servez-vous de ce réglage lorsque les conditions varient d’un instant à l’autre.
Ensoleillé Utilisez à l’extérieur lorsqu’il y a suffisamment de lumière.
Fluorescent Utilisez à l’intérieur à la lumière aMoiante ou sous un éclairage fluorescent.
Tungsten Utilisez à l’intérieur sous un éclairage à la lampe tungstène.
au sous-menu.
Blancs.
76
Page 79

PRISE DE PHOTO
A
AWB
07 ⁄ 04 ⁄ 03 02:40PM
4
M
N
28/45
+
–
COMPENSATION EV
CONFIGURATION
RETOUR SÉLECTION
CAMÉRA
+
–
COMPENSATION EV
+
–
OK
00 EV
–
+
CONFIG
RÉGLAGE DU TEMPS DE POSE
Votre appareil photo est doté d’une fonction d’auto-réglage du temps de pose qui vous procure des photos qui
seront correctement exposées dans la plupart des conditions. Si le sujet principal est trop pâle ou trop foncé
dans l’image, vous pouvez utilisez l’option de réglage du temps de pose pour améliorer le résultat final.
Compensation EV Description
+
–
Comment utiliser le mode de réglage du temps de pose:
1. Appuyez sur le bouton de navigation 'jusqu’à le mode ( ) Compensation EV est en surbrillance.
2. Appuyez sur le bouton de navigation pour afficher la barre Réglage du temps de pose sur l’ACL.
3. Appuyez sur le bouton de navigation pour modifier le réglage du temps de pose entre -1.8 jusqu’à
+1.8.
4. Appuyez sur le bouton de navigation dedans OK pour effectuer votre choix.
• L'appareil-photo retournera au mode de prise de vue.
En augmentant la durée du temps de pose des photos trop foncées, elles
deviendront plus pâles et mieux éclairées.
En diminuant la durée du temps de pose des photos trop pâles, elles
deviendront plus foncées.
77
Page 80

PRISE DE PHOTO
A
AWB
07 ⁄ 04 ⁄ 03 02:40PM
4
M
N
28/45
MODE CAPTURE
QUALITÉ
RÉSOLUTION
SÉLECT. SCÈNES
ÉQUIL. BLANCS
RETOUR SÉLECTION
CAMÉRA
Q
OFF
FÊTE/INTÉRIEUR
MER/NEIGE
COUCHERS DE SOLEIL
PAYSAGE NOCTURNE
RETOUR CONFIG
SÉLECT. SCÈNES
OK
SÉLECTION DU MILIEU AMBIANT
Les options par défaut dont est muni votre appareil peuvent être utilisées dans la plupart des milieux ambiants.
Les modes de sélection du milieu sont utiles pour obtenir rapidement les meilleurs réglages possibles en
fonction d’un milieu donné.
Réglage pré-établi en Description
fonction du milieu AMBIANT
Non Pas de scènes. (défaut)
Fête/à l’intérieur Utilisez ce mode pour saisir, en détails, les scènes à la chandelle ou
Plage/neige Utilisez ce mode pour saisir, en détails, les scènes où la lumière peut
Paysage Une faible vitesse d’obturation est utilisée pour saisir la lumière lors des
Coucher de Ce mode saisit les teintes et couleurs les plus riches des couchers et
Feu d’artifice En réduisant la vitesse d’obturation, vous pouvez utiliser ce mode pour
Portrait de Nuit Utiliser ce mode pour capturer un sujet illuminé avec les lumières de nuit
sous un autre éclairage intérieur d’ambiance.
être éblouissante, comme c’est le cas sur la neige ou sur l’eau par
temps ensoleillé.
scènes nocturnes. Truc de photographe : Vue que la vitesse
d’obturation est faible, il existe un risque que l’image soit brouillée en
raison du mouvement de l’appareil photo.
Pour empêcher que vos images soient floues, vous pouvez:
1. Régler votre appareil au mode Paysage nocturne.
2. Fixer votre appareil à un trépied ou le placer sur une surface solide.
3. Régler votre appareil en mode à retardateur.
4. Enfoncer le bouton de l’obturateur.
levers de soleil.
saisir les éclats lumineux du feu d’artifice.
avec une faible vitesse d’obturation.
-Vue que la vitesse d’obturation est faible, placez l’appareil sur un
trépied pour obtenir une meilleure qualité d’image.
Comment programmer le choix du milieu ambiant:
1. Lorsque Sélection du milieu ambiant est en surbrillance, appuyez sur le bouton de navigation pour
accéder au sous-menu.
2. Dans le menu Milieu ambiant, appuyez sur le bouton de navigation pour choisir entre les diverses
options.
3. Appuyez sur le bouton de navigation dedans OK pour choisir le mode Milieu ambiant.
4. Appuyez sur MENU pour retourner au mode de prise de vue.
Remarque: Le mode Sélection du milieu ambiant aura priorité, pour une photo seulement, sur le réglage
du flash effectué à l’aide du bouton du flash.
78
Page 81

PRISE DE SÉQUENCES VIDÉO
PRISE DE SÉQUENCES VIDÉO
PRISE DE SÉQUENCES VIDÉO
L’appareil peut saisir des séquences vidéo.
Remarque: La caracteristique des sequences video avec audio est facultative et elle n’est disponible que sur
certains modèles.
28 SEC
Déclencheur pour enreg.
07 ⁄ 04 ⁄ 2003 02:40
Pour enregistrer une séquence vidéo:
1. Déplacer le commutateur de mode en mode ( ) Séquence vidéo.
2. Placez le sujet dans le viseur ou ACL.
3. Enfoncez completement le bouton de l’obturateur pour débuter l’enregistrement d’un séquence vidéo non
interrompue.
4. Pour arrêter de filmer, appuyez à nouveau sur l’obturateur.
Remarque: Il y a une limite de durée pour chaque vidéoclip. Cette durée varie en fonction de la mémoire
disponible. La durée de filmage figure au coin supérieur droit de l’écran. Le tournage du vidéoclip s’arrêtera
automatiquement lorsque la limite de durée aura été atteinte.
Renseignements sur la séquence vidéo
Résolution : QVGA (320 x 240)
Fréquence de trames : 30 ips
Format du fichier : AVI
Remarque: Le DEL indiquant que le flash est prêt se mettra à clignoter lorsque l’appareil est en train de
mémoriser la séquence vidéo. Évitez d’ouvrir la porte d’accès aux piles ou de couper l’alimentation de l’appareil
pendant que le DEL clignote, à défaut de quoi la séquence vidéo ne pourra être enregistrée en mémoire.
Remarque:
• Les cartes mémoire à capacité supérieure peuvent prendre des séquences vidéo de plus longue durée.
•Dans ce mode, les boutons du flash et du menu ainsi que l’interrupteur marche/arrêt de l’ACL sont désactivés.
• La mise au point et le zoom ne peuvent être modifiés en cours d’enregistrement.
VISUALISATION DES FICHIERS
Utilisation du mode Visualisation
En mode Visualisation, vous pouvez examiner, à travers l’ACL, les photos et
séquences vidéo conservées en mémoire.
Utilisation du mode Visualisation:
1. Glissez la cadran de sélection de mode vers ( ).
2. Appuyez sur le bouton de navigation ou pour faire défiler chaque fichier.
• Si le fichier est un clip vidéo, l’icône est affichée dans le coin supérieur droit
de l’écran ACL.
Format du fichier Type de fichier
Pas d’icône Photo (JPG)
Séquence vidéo (AVI)
79
100-0001
2003:08:30 13:30:41
Page 82

VISUALISATION DES FICHIERS
VISUALISER LES SÉQUENCES VIDÉO
Comment visualiser une séquence vidéo:
1. En mode ( ) Visualisation, appuyez sur le bouton de navigation et
pour faire défiler les photos et séquences vidéo stockées en mémoire.
• Seule la première image de chaque séquence vidéo est montrée.
2. Lorsqu’une séquence vidéo ( ) est affichée sur l’ACL, appuyez sur le bouton
de navigation dedans OK pour effectuer la lecture.
VISUALISA
VISUALISA
TION DES FICHIERS
TION DES FICHIERS
Grossissement des photos conservées en mémoire
En mode ( ) de revue, vous pouvez agrandir une section de votre image stockée pour voir au sujet sur
l'affichage à cristaux liquides. Ce dispositif est pour le visionnement seulement et il n'augmentera pas l'image
stockée.
100-0001
press OK to view AVI
2003:08:30 13:30:41
X2
X4
X6
Comment procéder au grossissement:
1. En mode ( ) Visualisation, appuyez sur le bouton de navigation ou pour faire défiler les photos
et séquences vidéo conservées en mémoire.
2. Lors de la visualisation d’une image stockée en mémoire, appuyez sur le bouton de navigation dedans OK
pour utiliser l’option suivante.
Grossissement 2x
Grossissement 4x
Grossissement 6x
Mode Normal
3. En modes 2x, 4x et 6x, vous pouvez appuyez , , , pour vous déplacer dans l’image.
Résolution Grossissement maximum
2272 x 1704 6x
2048 x 1536 6x
1600 x 1200 6x
1280 x 960 6x
640 x 480 6x
80
Page 83

VISUALISATION DES FICHIERS
UTILISATION DU MENU DE SUPPRIMER
MENU SUPPRIMER
SUPPRIMER
MODE VISUALISATION
SUPPRIMER
VIGMETTES
CONFIGURER
RETOUR SÉLECTION
CETTE PHOTO
TOUT
RETOUR SÉLECTION
0012/0012
Êtes-vous sûr ?
OK
TOUT
Oui
Non
RETOUR CONFIG
Êtes-vous sûr ?
OK
Utilisation de Supprimer:
1. Mettez l’appareil en marche.
2. Régler le commutateur de mode à ( ).
3. Appuyez sur MENU pour afficher le menu principal.
4. Appuyez sur le bouton de navigation à droite pour accéder au sous-menu de Supprimer.
5. Pour revenir au menu précédent, appuyez sur le bouton de navigation vers la gauche.
6. Pour quitter le menu en tout temps, appuyez sur le bouton ( ) MENU.
Non
Oui
CONFIG
OK
Non
Oui
CONFIG
OK
81
Page 84

SUPPRESSION DES FICHIERS
2003:08:30 13:30:41
100-0001
!
2003:08:30 13:30:41
100-0001
!
SUPPRIMER
VIGMETTES
CONFIGURER
RETOUR SÉLECTION
MODE VISUALISATION
Suppression d’un seul fichier
Une fois effacé, un fichier ne peut plus être récupéré.
1. Lorsque Supprimer est en surbrillance, appuyez sur le bouton de navigation
pour accéder au sous-menu de Supprimer.
2. Dans le menu de Supprimer, appuyez sur le bouton de navigation lorsque
Supprimer Un est en surbrillance.
3. Le prochain écran affichera, sous forme vignette, les photos et séquences
vidéo stockées en mémoire. Appuyez sur le bouton de navigation , ,
, pour mettre en surbrillance le fichier que vous désirez supprimer.
4. Appuyez sur le bouton de navigation dedans (OK) pour effectuer votre choix.
5. Le prochain écran affichera: « Êtes-vous sûr? ». Appuyez sur le bouton de
navigation ou , selon le cas, pour mettre en surbrillance Non ou Oui.
6. Appuyez sur le bouton de navigation dedans OK pour effectuer votre choix.
• Si vous choisissez Non, aucune modification ne sera apportée et vous
retournerez au menu de Supprimer Un.
• Si vous choisissez Oui, le fichier que vous avez sélectionné sera supprimé.
• Appuyer sur le bouton Menu pour quitter le mode Supprimer.
Suppression de tous les fichiers
Une fois que tous les fichiers ont été effacés, ils ne peuvent plus être récupérés.
SUPPRIMER
CETTE PHOTO
TOUT
VISUALISATION DES FICHIERS
SUPPRIMER
CETTE PHOTO
TOUT
RETOUR SÉLECTION
SUPPRIMER
Non
Oui
SÉLECTION
OK
SUPPR. TOUT
OUI
NON
MENU
Êtes-vous sûr ?
OK
Comment supprimer tous les fichiers :
1. Appuyez sur le bouton de navigation lorsque Supprimer est en surbrillance
2. Dans le menu Supprimer, appuyez sur le bouton de navigation lorsque
3. Le prochain écran affichera : «SUPPR. TOUT?». Appuyez sur le bouton de
4. Appuyez sur le bouton de navigation dedans (OK) pour effectuer votre choix.
5. Appuyez sur le bouton de navigation pour mettre en surbrillance Non ou Oui. Appuyez sur le bouton
RETOUR SÉLECTION
afin d’accéder au sous-menu de Supprimer.
OK
RETOUR CONFIG
Êtes-vous sûr ?
Supprimer Tous est en surbrillance.
navigation ou , selon le cas, pour mettre en surbrillance Non ou Oui.
• Si vous choisissez Non, aucune modification ne sera apportée et vous
retournerez au menu de Supprimer.
• Si vous choisissez Oui, Le prochain écran affichera : « Êtes-vous sûr ? ».
de navigation dedans OK pour effectuer votre choix.
• Si vous choisissez Non, aucune modification ne sera apportée et vous retournerez au menu de
Supprimer.
• Si vous choisissez Oui, tous les fichiers seront supprimés.
OK
82
Non
Oui
SÉLECTION
Page 85

VISUALISATION DES FICHIERS
2003:08:30 13:30:41
100-0001
0012/0012
SUPPRIMER
VIGMETTES
CONFIGURER
RETOUR SÉLECTION
MODE VISUALISATION
UTILISATION DU MODE VIGNETTE
Comment visualiser vos fichiers:
1. Appuyez sur le bouton de navigation quand Minature est en surbrillance afin d’accéder au sous-menu
pour faire apparaître sur l’ACL, sous forme de vignettes, neuf photos ou séquences vidéo.
2. Appuyez sur le bouton de navigation pour mettre une photo ou séquence vidéo en surbrillance.
• Lorsque vous appuyez sur le bouton de navigation vers le haut, alors que vous êtes dans la rangée
supérieure des vignettes, les 9 fichiers précédents seront affichés.
• Lorsque vous appuyez sur le bouton de navigation vers le bas, alors que vous êtes dans la rangée
inférieure des vignettes, les 9 fichiers suivants seront affichés.
3. Appuyez sur le bouton de navigation dedans OK pour voir une version agrandie de la photo ou de la
séquence vidéo.
83
Page 86

PERSONNALISATION DES RÉGLAGES DE L’APPAREIL
PERSONNALISATION DES RÉGLAGES DE L’APPAREIL
CONFIGURATION
DÉSACTIVATION AUTO
OPTION TV
OPTION LANGUE
RÉGL. PAR DÉFAUT
LUMINOSITÉ ÉCRAN
RETOUR SÉLECTION
CAMÉRA
+
COMPENSATION EV
–
CONFIGURATION
RETOUR SÉLECTION
CONFIGURATION
FORMATAGE
1
RÉGLAGE DATE
RÉGLAGE HEURE
12
FORMAT HEURE
24
D
FORMAT DATE
M
RETOUR SÉLECTION
CONFIGURATION
INFO APPAREIL-PHOTO
SON
EXTINCTION AUTO
OFF
30 SEC
60 SEC
90 SEC
RETOUR CONFIG
OK
OPTION TV
NTSC
N
PAL
P
RETOUR CONFIG
OK
OPTION LANGUE
English
Français
Español
Deutsch
RETOUR CONFIG
OK
RÉGL.PAR DÉFAUT
Oui
Non
RETOUR CONFIG
OK
RETOUR SÉLECTION
84
LUMINOS. ÉCRAN
–
CONFIG
OK
FORM
FORMATAGE
OUI
NON
OK
RETOUR CONFIG
+
Page 87

PERSONNALISATION DES RÉGLAGES DE L’APPAREIL
VERSION FW : WKA04V05
RÉFÉRENCE FW : 10000-00
DATE 2003 4 28
COMMENTAIRE NO AUDIO
RETOUR
INFO APP. PHOTO
RÉGLAGE HEURE
OK
01:01 AM
RETOUR CONFIG
RÉGLAGE DATE
1
OK
01 ⁄ 01 ⁄ 2003
RETOUR CONFIG
12-HEURE
24-HEURE
RETOUR CONFIG
FORMATAGE HEURE
12
24
OK
DD ⁄ MM ⁄ YYYY
MM ⁄ DD ⁄ YYYY
YYYY ⁄ MM ⁄ DD
RETOUR CONFIG
FORMATAGE DATE
D
M
OK
ON
OFF
RETOUR CONFIG
SON
OK
DÉSACTIVATION AUTO
OPTION TV
OPTION LANGUE
RÉGL. PAR DÉFAUT
LUMINOSITÉ ÉCRAN
RETOUR SÉLECTION
CONFIGURATION
FORMATAGE
RÉGLAGE DATE
RÉGLAGE HEURE
FORMAT HEURE
FORMAT DATE
RETOUR SÉLECTION
CONFIGURATION
1
INFO APPAREIL-PHOTO
SON
RETOUR SÉLECTION
CONFIGURATION
D
M
12
24
COMPENSATION EV
CONFIGURATION
RETOUR SÉLECTION
CAMÉRA
+
–
PERSONNALISATION DES RÉGLAGES DE L’APPAREIL
85
Page 88

PERSONNALISATION DES RÉGLAGES DE L’APPAREIL
1
12
24
D
M
Pour utiliser le menu de configuration :
1. Mettez l’appareil en marche.
2. Réglez le cadran de sélection de mode à ( ) ou ( ).
3. Appuyez sur MENU pour afficher le menu principal.
4. Appuyez sur le bouton de navigation vers le bas jusqu’à ce que Configuration soit en surbrillance.
5. Appuyez sur le bouton de navigation pour accéder au sous-menu de Configuration.
6. Dans le menu de Configuration, appuyez sur le bouton de navigation pour mettre en surbrillance
l’option que vous désirez personnaliser.
7. Appuyez sur le bouton de navigation pour accéder au sous-menu de l’option en surbrillance.
8. Utilisez le bouton de navigation pour ajuster la configuration et appuyez sur le bouton de navigation dedans
OK pour faire votre choix.
9. Appuyez sur le bouton de navigation pour revenir au menu précédent OU appuyez sur MENU pour
quitter.
Menu et options de configuration
Réglage de Options Description
configuration
Extinction Auto. 30, 60, 90 Cette option permet à l’appareil de s’arrêter automatiquement
lorsqu’il est au repos.
Arrêt Désactive l’option d’arrêt automatique. (P.87)
Option TV NTSC, PAL Règle le mode de votre appareil pour qu’il s’adapte à votre
téléviseur. (P.104)
Son Marche, arrêt Active ou désactive, selon le cas, la fonction audio de
l’appareil. Remarque: La caractéristique audio est facultative
et n’est disponible que sur certains modèles.
Option Langue English Détermine la langue utilisée par l’appareil. (P.87)
Français
Español
Deutsch
Régle. par défaut Oui/Non Remet tous les réglages de l’appareil selon la configuration
par défaut du fabricant. (P.90)
Intensité lumineuse Règle le niveau d’intensité lumineuse de l’ACL. (P.88)
de l’ACL
Format
Oui/Non Formate la carte mémoire en supprimant tous les dossiers. (P.89)
Info. sur l’appareil Version FW Affiche, à titre indicatif seulement, les
No. pièce FW renseignements sur la version de l’appareil.
Date
Commentaires
Réglage date
Mois, jour, année Change la date dans votre appareil photo.
Réglage heure Heure, minute, Change l’heure dans votre appareil photo.
AM ou PM
Format heure 12 heures, Change le format de l’heure. L’affichage de l’heure est limité
24 heures au format 24 heures en ( ) mode Visualiser.
Format date DD/MM/YYYY, Change l’affichage de la date.
MM/DD/YYYY, L’affichage de la date est fixé au format AAAA/MM/JJ
YYYY/MM/JJ en ( ) mode Visualiser.
86
Page 89

PERSONNALISATION DES RÉGLAGES DE L’APPAREIL
COMPENSATION EV
CONFIGURATION
RETOUR SÉLECTION
CAMÉRA
+
–
DÉSACTIVATION AUTO
OPTION TV
OPTION LANGUE
RÉGL. PAR DÉFAUT
LUMINOSITÉ ÉCRAN
RETOUR SÉLECTION
CONFIGURATION
DÉSACTIVATION AUTO
OPTION TV
OPTION LANGUE
RÉGL. PAR DÉFAUT
LUMINOSITÉ ÉCRAN
RETOUR SÉLECTION
CONFIGURATION
OFF
30 SEC
60 SEC
90 SEC
RETOUR CONFIG
EXTINCTION AUTO
OK
English
Français
Español
Deutsch
RETOUR CONFIG
OPTION LANGUE
OK
PERSONNALISATION DES RÉGLAGES DE L’APPAREIL PHOTO
RÉGLAGE DU DÉLAI AVANT L’ARRÊT AUTOMATIQUE
Remarques:
• Lorsque l’appareil est en mode d’arrêt automatique, mettre l’appareil hors tension et depuis mettre
l’appareil sous tension.
• Afin d’économiser la charge des piles, le réglage par défaut du délai avant l’arrêt automatique est de 60
secondes.
CHOIX DE LA LANGUE
Pour choisir la langue:
1. À partir du menu Configuration, appuyez sur le bouton de navigation jusqu’à ce que Langue soit en
surbrillance.
2. Appuyez sur le bouton de navigation pour accéder au sous-menu de Langue.
3. Appuyez sur le bouton de navigation pour mettre en surbrillance la langue désirée.
4. Appuyez sur le bouton de navigation dedans OK afin de choisir la langue désirée.
RÉGLAGE DE LA DATE
1. À partir du menu Configuration, appuyez sur le bouton de navigation jusqu’à
ce que Réglage Date soit en surbrillance.
2. Appuyez sur le bouton de navigation .
3. Appuyez sur le bouton de navigation pour mettre le mois (MM), le jour (JJ)
ou l’année (AAAA) en surbrillance.
• Le choix que vous avez effectué clignotera lorsque mis en surbrillance.
4. Appuyez sur le bouton de navigation afin de changer les données
clignotantes, et ce, jusqu’à ce que vous obteniez le réglage désiré. Appuyez sur
le bouton de navigation dedans OK pour effectuer votre choix.
Remarque:
La date peut être affichée en MM/JJ/AAAA; en JJ/MM/AAAA ou en AAAA/MM/JJ (p.85).
•
• Si la pile est retirée pendant plus de 4 minutes, la date reviendra au réglage par défaut.
• Config. date/heure apparaîtra sur le LCD quand l'appareil-photo est allumé. Appuyez sur le bouton de
l’obturateur pour éteindre le rappel.
87
1
RÉGLAGE DATE
01 ⁄ 01 ⁄ 2003
RETOUR
CONFIG
OK
Page 90

PERSONNALISATION DES RÉGLAGES DE L’APPAREIL
RÉGLAGE DE L’HEURE
1. À partir du menu de Configuration, appuyez sur le bouton de navigation
RÉGLAGE HEURE
jusqu’à ce que Réglage Heure soit mis en surbrillance.
2. Appuyez sur le bouton de navigation .
3. Appuyez sur le bouton de navigation afin de mettre en surbrillance l’heure
01:01 AM
(HH), les minutes (MM), l’avant-midi ou l’après-midi (AM/PM).
• Le choix que vous aurez effectué se mettra à clignoter lorsque mis en
surbrillance.
RETOUR
CONFIG
OK
4. Appuyez sur le bouton de navigation afin de modifier les données clignotantes, et ce, jusqu’à ce que
vous obteniez le réglage désiré. Appuyez sur le bouton de navigation dedans OK pour effectuer votre
choix.
Remarque:
•L’heure peut être affichée en période de 12 ou de 24 heures (p.85).
• Si la pile est retirée pendant plus de 4 minutes, la date reviendra au réglage par défaut.
• Config. date/heure apparaîtra sur le LCD quand l'appareil-photo est allumé. Appuyez sur le bouton de
l’obturateur pour éteindre le rappel.
RÉGLAGE DE LUMINOSITÉ ÉCRAN
CAMÉRA
+
COMPENSATION EV
–
CONFIGURATION
RETOUR SÉLECTION
CONFIGURATION
DÉSACTIVATION AUTO
OPTION TV
OPTION LANGUE
RÉGL. PAR DÉFAUT
LUMINOSITÉ ÉCRAN
RETOUR SÉLECTION
LUMINOS. ÉCRAN
–
CONFIG
OK
+
Réglage la luminosité d'ACL:
1. À partir du menu de Configuration, appuyez sur le bouton de navigation jusqu’à ce que Luminosité
écran soit mis en surbrillance.
2. Appuyez sur le bouton de navigation pour afficher la barre réglage du Luminosité écran.
3. Appuyez sur le bouton de navigation / pour modifier la luminosité d'ACL.
4. Appuyez sur le bouton de navigation dedans OK pour effectuer votre choix.
• L'appareil-photo retournera au mode de prise de vue ou au mode de visonnage.
88
Page 91

PERSONNALISATION DES RÉGLAGES DE L’APPAREIL
!
COMPENSATION EV
CONFIGURATION
RETOUR SÉLECTION
CAMÉRA
+
–
FORMATAGE
RÉGLAGE DATE
RÉGLAGE HEURE
FORMATAGE HEURE
FORMATAGE DATE
RETOUR SÉLECTION
CONFIGURATION
1
D
M
12
24
OUI
NON
RETOUR CONFIG
FORMATAGE
OK
FORMATAGE DE LA MÉMOIRE INTERNE OU LA CARTE MÉMOIRE
ATTENTION :
1. Le formatage efface toutes les photos et séquences vidéo de la carte mémoire.
2. Le retrait de la carte mémoire lors du formatage peut l’endommager.
3. La sélection de la fonction de formatage lorsqu’il n’y a pas de carte mémoire
dans l'appareil entraîne le formatage de la mémoire interne. Toutes les photos
et tous les clips vidéo de la mémoire interne seront effacés.
1. À partir du menu de Configuration, appuyez sur le bouton de navigation jusqu’à ce que Format Carte
soit en surbrillance.
2. Appuyez sur le bouton de navigation pour accéder au sous-menu de Format.
3. Appuyez sur le bouton de navigation pour mettre en surbrillance Non ou Oui.
4. Appuyez sur le bouton de navigation dedans OK pour effectuer votre choix.
• Si vous avez choisi Non, il n’y aura aucune modification et vous retournerez au menu principal.
• Si vous avez choisi Oui, TOUS LES FICHIERS seront effacés.
Remarque: Si l’ACL affiche ERREUR DE MÉMOIRE!, cela signifie que la carte mémoire est corrompue.
Veuillez procéder au formatage de la mémoire pour continuer.
89
Page 92

RÉTABLISSEMENT DES RÉGLAGES PAR DÉFAUT DU FABRICANT DE L’APPAREIL
Q
S
+
–
RÉT
ABLISSEMENT DES RÉGLAGES P
RÉT
ABLISSEMENT DES RÉGLAGES P
’APP
AREIL
LL’APP
AREIL
Afin de rétablir les réglages par défaut de votre appareil :
1. Appuyez sur le bouton de navigation lorsque Rétablir Par Défaut est en surbrillance.
2. Appuyez sur le bouton de navigation pour choisir Non ou Oui.
Si vous choisissez Non, aucune modification ne sera effectuée.
Si vous choisissez Oui, les réglages par défaut seront rétablis. Veuillez consulter le tableau ci-dessous pour
connaître les réglages par défaut.
OPTION RÉGLAGE PAR DÉFAUT
Flash Auto
Qualité Supérieure
Résolution 2048 X 1536
Sélect. scènes En arrêt
Équilibrage de blancs AUTO
Réglage du temps de pose 0
Délai d’arrêt auto 60 sec
Int. Lum. de l’acl centre
Son EN MARCHE (La caractéristique audio est facultative et n’est
Format de l’heure 12 Heures
Remarque: Après le rétablissement des réglages par défaut, les menus de la langue, de la date et de
l’heure sont affichés lorsque l’appareil est mis en marche.
disponible que sur certains modèles.)
24 Heures
AR DÉF
AR DÉF
AUT DU F
AUT DU F
ABRICANT DE
ABRICANT DE
90
Page 93

GUIDE D’INSTALLATION DE LOGICIELS
GUIDE D’INST
GUIDE D’INST
Le guide d'installation de logiciel le logiciel qui vient avec le Concord Eye-Q 4060AF inclut le conducteur, le
lecteur, et les programmes de rédacteur de photo. Ces programmes transfèrent les images ou les agrafes
visuelles à partir de votre appareil-photo à votre ordinateur, et vous permettent de les regarder sur votre écran
d'ordinateur. Ce qui suit sont les conditions de système informatique pour ces programmes d'être installées.
Configuration nécessaire
Windows
• Processeur 133MHz Pentium MMX ou l’équivalent (300MHz Pentium II ou mieux recommandé)
• Microsoft Windows 98/98SE, Windows Me, Windows 2000 Professional, Windows XP Home /
Professional/Media Center
• 275 MO d’espace disponible sur disque dur (ajoutez 30 MO pour Adobe Acrobat Reader 5 et 65 MO pour
Microsoft DirectX 9.0, si nécessaire)
• 64 MO de RAM (128 MO ou plus est recommandé)
•Affichage d’un minimum de 800 x 600 en couleur de 16-bit (1024 x 768 en couleur 24-bit ou plus
recommandé)
• Port USB
• Lecteur CD-ROM
Macintosh
• Compatible avec Mac OS 9.0, 9.1, 9.2, 9.3 and X
• Macintosh Power PC
• 32 Mo de RAM minimum
• Moniteur 640 x 480 avec centaines de couleurs (millions de couleurs recommandés)
• Port USB
Exigences relatives à l’installation
L’installateur détectera automatiquement les logiciels devant être installés ainsi que ceux qui ne sont pas
requis. Veuillez consulter les exigences relatives à l’installation avant d’entreprendre le processus d’installation.
ALLA
TION DE LOGICIELS
ALLA
TION DE LOGICIELS
Système Windows Windows Windows Windows Macintosh
Installez le pilote de l’appareil X
photo
Installez DirectX 9 X X
Installez ArcSoft X X X X
PhotoImpression
Installez Adobe Acrobat
Reader 5.1
L’appareil est détecté X X X X
automatiquement par
l’ordinateur (aucune installation
de pilote n’est requise).
98/98SE Me 2000 XP
91
Page 94

GUIDE D’INSTALLATION DE LOGICIELS
UTILISATION DE L’ÉCRAN FUGITIF DE L’INSTALLATEUR
L’installateur détectera automatiquement les logiciels devant être
installés ainsi que ceux qui ne sont pas requis. Ceux-ci seront indiqués
par les boutons affichés par l’écran fugitif lorsque le CD-ROM est inséré
dans l’ordinateur :
Couleur Description
Jaune ( ) Requis ou fortement recommandée.
Gris ( ) Déjà installé ou non requis.
Option Description
Pilotes de l’appareil photo Les pilotes USB d’appareil photo pour mémorisation de masse
Microsoft DirectX 9 DirectX 9 permet aux fonctions de lecture vidéo de votre ordinateur de
ArcSoft PhotoImpression 2000 Ce logiciel de photo vous permet de modifier et d’améliorer vos photos.
Adobe Acrobat Reader 5.1 Adobe Acrobat Reader vous permet de consulter la version électronique
Manuel de l’utilisateur Lien direct à la version électronique du manuel de l’utilisateur en
Site Web du soutien de Lien direct à notre site Web de soutien technique pour nos appareils
Concord photo. Veuillez vous connecter à l’Internet avant de cliquer sur le lien.
permettent à votre appareil photo d’agir comme lecteur externe sur votre
ordinateur.
faire jouer les séquences vidéo que vous avez filmées à l’aide de votre
appareil photo.
du manuel de l’utilisateur.
plusieurs langues différentes. (Tous les manuels de l’utilisateur sont
sauvegardés en format PDF.)
92
Page 95

GUIDE D’INSTALLATION DE LOGICIELS
ORDINOGRAMME DE L’INSTALLATION DES LOGICIELS
Pour effectuer le transfert des photos et des séquences vidéo de la carte mémoire, celui-ci doit être relié à un
ordinateur à l’aide du câble Mini-USB fourni avec l’appareil. Certains systèmes d'exploitation peuvent, la
première fois, exiger une installation supplémentaire avant que vous ne puissiez relier l’appareil photo à
l’ordinateur.
Identification de votre système d’exploitation
Windows Windows 2000 Windows Mac OS
98/98SE p.95 Professional p.97 Me/XP p.94 9.x/10.x p.94
Installation du pilote USB Installation de
pour mémorisation de DirectX 9 p.97
masse et DirectX 9 p.95
Installation d’ArcSoft PhotoImpression 2000 p.98
Installation d’Adobe Acrobat Reader 5.1 (si nécessaire) p.100
Branchement de l’appareil photo sur l’ordinateur p.102
Transfert de photos et de séquences vidéo vers l’ordinateur p.102
Débranchement de l’appareil photo de l’ordinateur p.103
Si vous utilisez l’un des systèmes d’exploitation énumérés ci-dessous ou que vous utilisez un adaptateur ou un
concentrateur-répartiteur USB que vous avez ajouté à votre ordinateur, il se peut que le transfert de données
ne puisse s’effectuer correctement.
• Windows 95
• Windows NT 3.51/4.0
• Mac OS 8.6 ou versions antérieures
• Les systèmes informatiques fabriqués de manière artisanale ou les systèmes informatiques non muni d’un
système d’exploitation installé par le fabricant
• Les systèmes d’exploitation ou les mises à niveau à ces systèmes lorsqu’ils sont installés de manière
artisanale.
93
Page 96

GUIDE D’INSTALLATION DE LOGICIELS
IDENTIFICATION DE VOTRE SYSTÈME D’EXPLOITATION
Windows
1. Cliquez à droite sur l’icône My Computer de votre ordinateur personnel et
ouvrez Properties.
2. La cadre System Properties sera affiché.
Les renseignements sur votre ordinateur se trouvent sous la rubrique system.
3. Assurez-vous que votre ordinateur fonctionne avec l’un des systèmes
d’exploitation énumérés ci-dessous ouvrez la page correspondante du tableau
des directives d’installation:
Système Rendez vous à
Windows 98, Windows 98 Page 95
Deuxième édition
Windows 2000 Page 97
Windows Millennium Edition, Page 98
Windows XP Home Edition,
Windows XP Professional Edition,
Windows XP Media Center Edition
4. Appuyez sur le bouton de navigation dedans OK pour fermer la fenêtre.
Si votre ordinateur n’affiche pas l’icône My Computer, cliquez sur l’icône Control Panel à partir du menu
introductif et double-cliquez sur l’icône System afin d’accéder au cadre System Property.
Macintosh
1. à partir du menu Apple sur la barre du menu, choisissez About this Computer.
2. Une fenêtre sur laquelle sera affichée la version du système d’exploitation de l’ordinateur s’ouvrira. Assurezvous que votre ordinateur est de version 9 ou supérieure.
Aucune installation de logiciel n’est requise pour les utilisateurs de Macintosh. Veuillez vous rendre à la page
102 pour le raccordement de votre appareil à votre ordinateur.
94
Page 97

GUIDE D’INSTALLATION DE LOGICIELS
INSTALLATION DU PILOTE ET DE DIRECTX 9 – WINDOWS 98/98SE
REMARQUE: Ne branchez pas votre appareil photo à votre ordinateur avant d’avoir terminé l’installation du
pilote de l’appareil photo et de DirectX 9 de Microsoft.
Étape 1 Assurez-vous que votre appareil photo est hors tension et qu’il n’est pas relié à votre ordinateur.
Étape 2 Assurez-vous que votre ordinateur est sous tension et que Windows 98 ou 98SE fonctionne.
Étape 3 Fermez toute autre application ou tout autre logiciel que vous pourriez être en train d’utiliser.
Étape 4 Insérez dans le lecteur de votre ordinateur le CD-ROM inclus dans l’emballage de votre
Étape 5 Choisissez Français. Cliquez OK.
appareil photo.
REMARQUE: Si l’installateur ne démarre pas de lui-même à l’intérieur d’un délai d’une (30)
secondes à compter du moment où vous avez inséré le CD-ROM, cliquez sur "My Computer"
dans le desktop ou choisissez My Computer dans le menu de Start et trouvez le lecteur de
CD-ROM. Double-cliquez sur l’icône du lecteur de CD-ROM pour afficher son contenu.
Double-cliquez sur le fichier intitulé Install et rendez vous à l’étape 5.
Étape 6 L’écran d’installation sera affiché. Cliquez sur
Étape 7 Cliquez sur [Suivant >].
Étape 8 Le dialogue suivant vous demandera de choisir les
Installation des pilotes de la caméra.
éléments à installer. Le pilote USB pour mémorisation
de masse et DirectX 9 auront été pré-sélectionnés.
Les fichiers seront automatiquement sauvegardés dans
le répertoire de l’appareil Concord Eye-Q 4060AF.
OU
Vous pouvez modifier le dossier par défaut en cliquant
sur [Browse…] et en choisissant un dossier différent
dans votre ordinateur.
Cliquez sur [Suivant >]
95
Page 98

Étape 9 Cliquez sur [Installer]
Étape 10 Installez la barre de progression
GUIDE D’INSTALLATION DE LOGICIELS
Étape 11 Le prochain écran affiché débutera l’installation de Direct
Étape 12 Cliquez sur [Suivant >]
Étape 13 Cliquez sur [Finish]
X. Cliquez sur [Suivant >]
Votre ordinateur redémarrera automatiquement.
96
Page 99

GUIDE D’INSTALLATION DE LOGICIELS
INSTALLATION DE DIRECTX 9 – WINDOWS 2000
Étape 1 Assurez-vous que votre appareil photo est hors tension et qu’il n’est pas connecté à votre ordinateur.
Étape 2 Assurez-vous que l’ordinateur est sous tension et que Windows 2000 fonctionne.
Étape 3 Fermez tous les autres logiciels ou applications que vous pourriez être en train d’utiliser.
Étape 4 Insérez dans le lecteur de votre ordinateur le CD-ROM inclus dans l’emballage de votre
Étape 5 Choisissez Français. Cliquez OK.
appareil photo.
REMARQUE: Si l’installateur ne démarre pas de lui-même à l’intérieur d’un délai d’une (30)
secondes à compter du moment où vous avez inséré le CD-ROM, cliquez sur "My Computer"
dans le desktop ou choisissez My Computer dans le menu de Start et trouvez le lecteur de
CD-ROM. Double-cliquez sur l’icône du lecteur de CD-ROM pour afficher son contenu.
Double-cliquez sur le fichier intitulé Install et rendez vous à l’étape 5.
Étape 6 L’écran d’installation sera affiché, cliquez sur
Étape 7 Le prochain écran déclenchera l’installation de DirectX.
Étape 8 Cliquez sur [Suivant >]
Étape 9 Cliquez sur [Finish]
Installation de Microsoft DirectX 9.0
Cliquez sur [Suivant >]
Votre ordinateur redémarrera automatiquement.
97
Page 100

GUIDE D’INSTALLATION DE LOGICIELS
INSTALLATION D’ARCSOFT PHOTOIMPRESSION – TOUS LES UTILISATEURS DE WINDOWS
Étape 1 Assurez-vous que votre appareil photo est hors tension et qu’il n’est pas relié à votre ordinateur.
Étape 2 Assurez-vous que l’ordinateur est sous tension et que Windows 2000 fonctionne.
Étape 3 Fermez tous les autres logiciels ou applications que vous pourriez être en train d’utiliser.
Étape 4 Insérez dans le lecteur de votre ordinateur le CD-ROM inclus dans l’emballage de votre
Étape 5 Choisissez Français. Cliquez OK.
appareil photo.
REMARQUE: Si l’installateur ne démarre pas de lui-même à l’intérieur d’un délai d’une (30)
secondes à compter du moment où vous avez inséré le CD-ROM, cliquez sur "My Computer"
dans le desktop ou choisissez My Computer dans le menu de Start et trouvez le lecteur de
CD-ROM. Double-cliquez sur l’icône du lecteur de CD-ROM pour afficher son contenu.
Double-cliquez sur le fichier intitulé Install et rendez vous à l’étape 5.
Étape 6 L’écran d’installation sera affiché, cliquez sur
Étape 7 La fenêtre de dialogue pour l’installation sera affichée.
Étape 8 Installez la barre de progression
Étape 9 Cliquez sur [Yes]
Installation de ArcSoft PhotoImpression 2000
Choisissez la langue à partir de la liste dans la boîte à
défilement et cliquez sur OK.
98
 Loading...