

Page 1
Page 2

Table of Contents
En
INTRODUCTION
Package Contents ........................................................................................................................................................1
Safety Information..........................................................................................................................................................2
Parts Identification ........................................................................................................................................................3
Front ..........................................................................................................................................................................3
Back ..........................................................................................................................................................................3
Bottom........................................................................................................................................................................4
Monitor Screen Contents ..........................................................................................................................................4
REC mode ................................................................................................................................................................4
PLAY mode................................................................................................................................................................5
Changing the Display of Contents on the Monitor Screen ............................................................................................5
Attaching the Wrist Strap ..............................................................................................................................................6
PREPARATION
Power Requirements ....................................................................................................................................................7
Installing batteries..........................................................................................................................................................8
Replacing/Removing batteries from the camera ..........................................................................................................8
Battery level Indicator ................................................................................................................................................9
Turning the Camera On & Off........................................................................................................................................9
To turn on the camera ................................................................................................................................................9
To turn off the camera ..............................................................................................................................................10
Operating the Multi-controller ......................................................................................................................................11
Setting the Language ..................................................................................................................................................11
Setting the Date and Time ..........................................................................................................................................12
BASIC IMAGE RECORDING
Recording an Image ....................................................................................................................................................13
Using Zoom..............................................................................................................................................................13
Optical Zoom ......................................................................................................................................................13
Digital Zoom ........................................................................................................................................................14
Using the Flash........................................................................................................................................................15
About Red-eye Reduction ..................................................................................................................................15
Using the Self-timer ....................................................................................................................................................16
Specifying Image Size and Quality..........................................................................................................................16
To specify the image size ....................................................................................................................................16
To specify the image quality ................................................................................................................................17
OTHER RECORDING FUNCTIONS
Selecting the Focus Mode ..........................................................................................................................................18
Specifying the Auto Focus Area ..............................................................................................................................18
Using the Macro Mode ............................................................................................................................................19
Using the Infinity Mode ............................................................................................................................................19
Using Manual Focus ................................................................................................................................................19
Exposure Compensation (EV Shift) ............................................................................................................................20
Adjusting White Balance..............................................................................................................................................20
Adjusting White Balance Manually ..............................................................................................................................21
Using the NICESHOT Mode........................................................................................................................................21
Using the Movie Mode ................................................................................................................................................23
About the Histogram....................................................................................................................................................24
Selecting the Metering Mode ..................................................................................................................................25
Multi (Multi-pattern)......................................................................................................................................................25
Center weighted (Center-weighted) ........................................................................................................................25
Spot (Spot) ..............................................................................................................................................................25
Using the Filter Function..............................................................................................................................................25
Specifying Color Saturation ........................................................................................................................................26
Specifying Contrast......................................................................................................................................................26
Specifying Outline Sharpness ....................................................................................................................................26
Turning the On-screen Grid On and Off......................................................................................................................26
Turning Image Review On and Off..............................................................................................................................26
Specifying Power ON Default Settings........................................................................................................................27
Resetting the Camera..................................................................................................................................................27
Page 3

PLAYBACK
Basic Playback Operation ..........................................................................................................................................28
Zooming the Display Image ........................................................................................................................................28
Resizing an Image ......................................................................................................................................................29
Cropping an Image ......................................................................................................................................................29
Playing a Movie ..........................................................................................................................................................30
Viewing Pictures in Thumbnail Mode ..........................................................................................................................30
Rotating the Display Image ........................................................................................................................................31
DELETING FILES
Deleting a Single File ..................................................................................................................................................32
Deleting All Files ..........................................................................................................................................................32
FILE MANAGEMENT
Folders ........................................................................................................................................................................33
Memory Folders and Files ......................................................................................................................................33
Protecting Files ............................................................................................................................................................34
To protect a single file ..............................................................................................................................................34
To protect all files in memory ..................................................................................................................................34
DPOF ..........................................................................................................................................................................35
To configure print settings for a single image ..........................................................................................................35
To configure print settings for all images ................................................................................................................36
PRINT Image Matching II ............................................................................................................................................36
Exif Print ......................................................................................................................................................................36
Using USB DIRECT-PRINT ........................................................................................................................................36
OTHER SETTINGS
Specifying the File Name Serial Number Generation Method ....................................................................................38
Setting the Beep Sound ..............................................................................................................................................38
Specifying an Image for the Startup Screen ..............................................................................................................38
Formatting Built-in Memory ........................................................................................................................................39
USING A MEMORY CARD
Inserting an SD Card ..................................................................................................................................................40
Removing the SD card ................................................................................................................................................41
Formatting a Memory Card..........................................................................................................................................41
Memory Card Precautions ......................................................................................................................................41
Copying Files ..............................................................................................................................................................41
To copy all the files in built-in memory to a memory card ......................................................................................41
To copy a file from a memory card to built-in memory ............................................................................................42
VIEWING IMAGES ON A COMPUTER
Using the Camera with a Windows Computer ............................................................................................................43
Using a Memory Card to Transfer Images to a Computer ..........................................................................................43
Memory Data ..............................................................................................................................................................44
DCF Protocol ..............................................................................................................................................................44
Installing Software
Install the Software Driver ..........................................................................................................................................45
Installing Roxio PhotoSuite 5.0 SE..............................................................................................................................46
Using the Roxio PhotoSuite 5.0 SE ............................................................................................................................49
APPENDIX
Menu Reference ..........................................................................................................................................................50
REC mode ..................................................................................................................................................................50
PLAY mode..................................................................................................................................................................51
Indicator Lamp Reference ..........................................................................................................................................51
REC mode ..................................................................................................................................................................52
PLAY mode..................................................................................................................................................................52
Troubleshooting Guide ................................................................................................................................................53
Specifications ..............................................................................................................................................................55
GETTING HELP ..................................................................................................................................................................57
REGULATORY INFORMATION ..........................................................................................................................................58
En
Page 4
INTRODUCTION
INTRODUCTION
INTRODUCTION
En
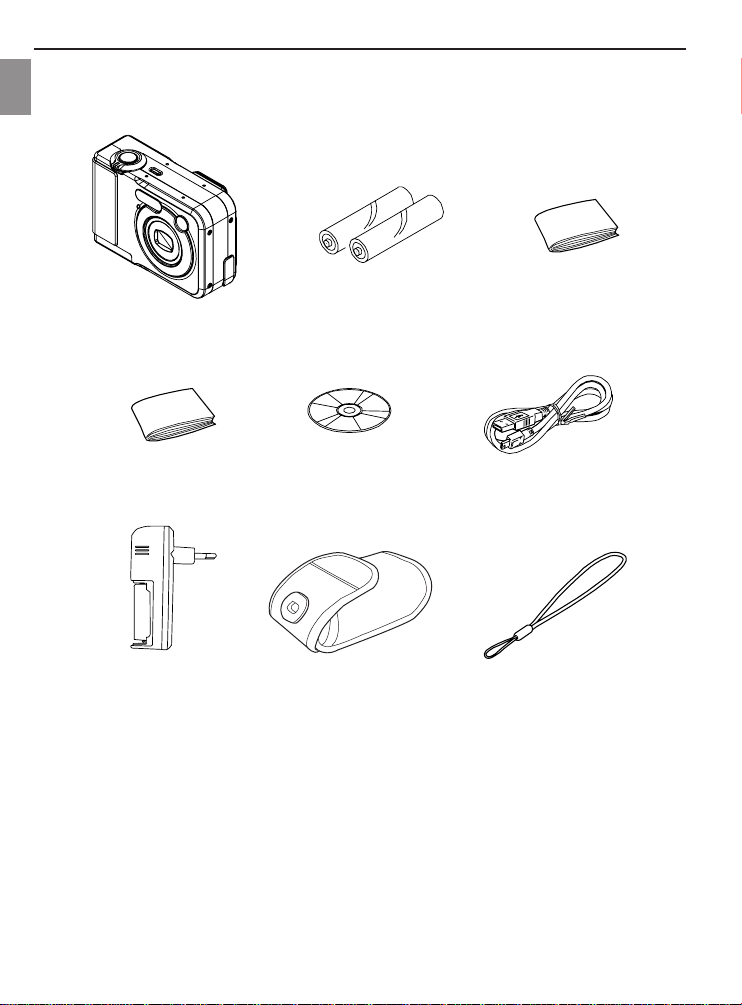
PACKAGE CONTENTS
Please contact your dealer immediately if any of the items below are missing or damaged.
Camera 2 AA-size rechargeable Quick Start Guide
User Manual CD-ROM USB Cable
Charger Unit Soft Case Wrist Strap
(The shape of the charger unit
plug varies according to country
or geographic area.)
nickel-metal hydride batteries
1
Page 5

INTRODUCTION
SAFETY INFORMATION
Thank you for purchasing this camera. Before use, please read the safety information and precautions
contained in the following sections to ensure safe use of this product.
• Never operate the camera inside of an aircraft or anywhere else where operation of such devices are
restricted. Improper use creates the risk of serious accident.
• Do not aim the camera directly at the sun or other intense light sources which could damage your eyesight.
• Do not try to open the case of the camera or attempt to modify this camera in any way. High-voltage internal
components create the risk of electric shock when exposed. Maintenance and repairs should be carried out
only by authorized service providers.
• Flashing too closely at the eyes of animals or people, especially youngsters, may cause eyesight damage.
Ensure that the camera is at least one meter (approx. 3.3 feet) away from infants when using the flash.
• Keep the camera away from water and other liquids. Do not use the camera with wet hands. Never use the
camera in the rain or snow. Moisture creates the danger of fire and electric shock.
• Keep the camera and its accessories out of the reach of children and animals to prevent accidents or
damage to the camera.
• If you notice smoke or a strange odor coming from the camera, turn the power OFF immediately and unplug
the AC adapter from the power outlet. Take the camera to the nearest authorized service center for repair.
Never attempt to repair the camera yourself.
• Use only the recommended power accessories. Use of power sources not stated or recommended for this
equipment may lead to overheating, distortion of the equipment, fire, electrical shock or other hazards.
• Never apply too much force when cleaning the surface of the lens. Doing so could scratch the surface of the
lens, thereby reducing the quality of pictures or even the possibility of malfunction.
• The camera may become slightly warm during usage. This does not indicate malfunction.
• If the exterior of the camera needs cleaning, wipe it with a soft-dust-free, dry cloth.
En
2
Page 6
INTRODUCTION
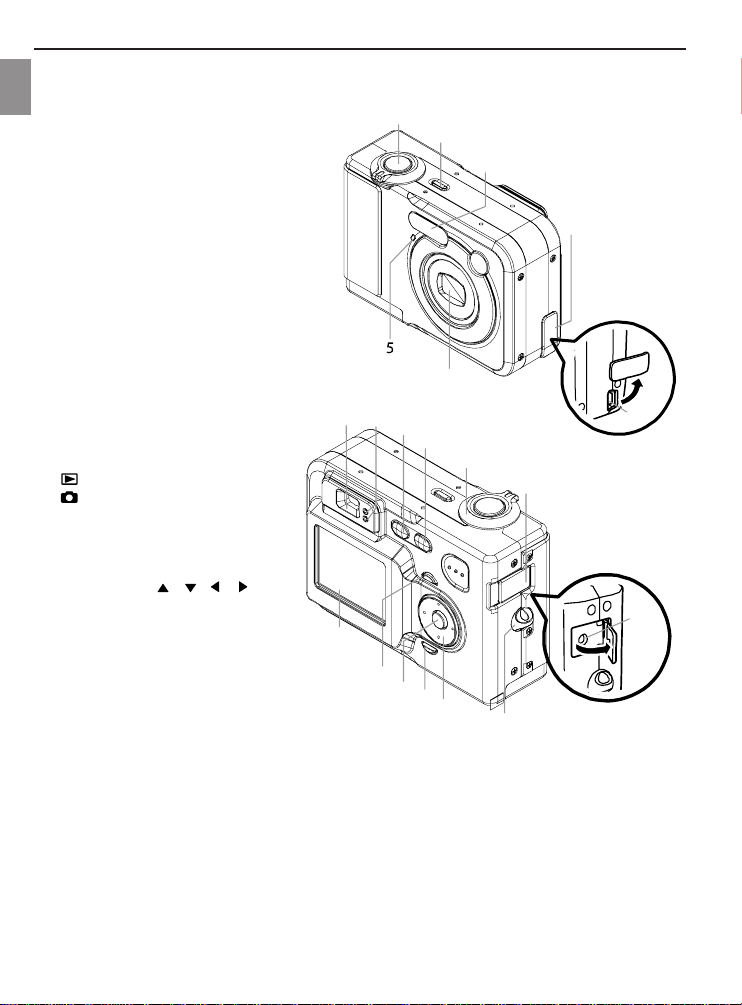
PARTS IDENTIFICATION
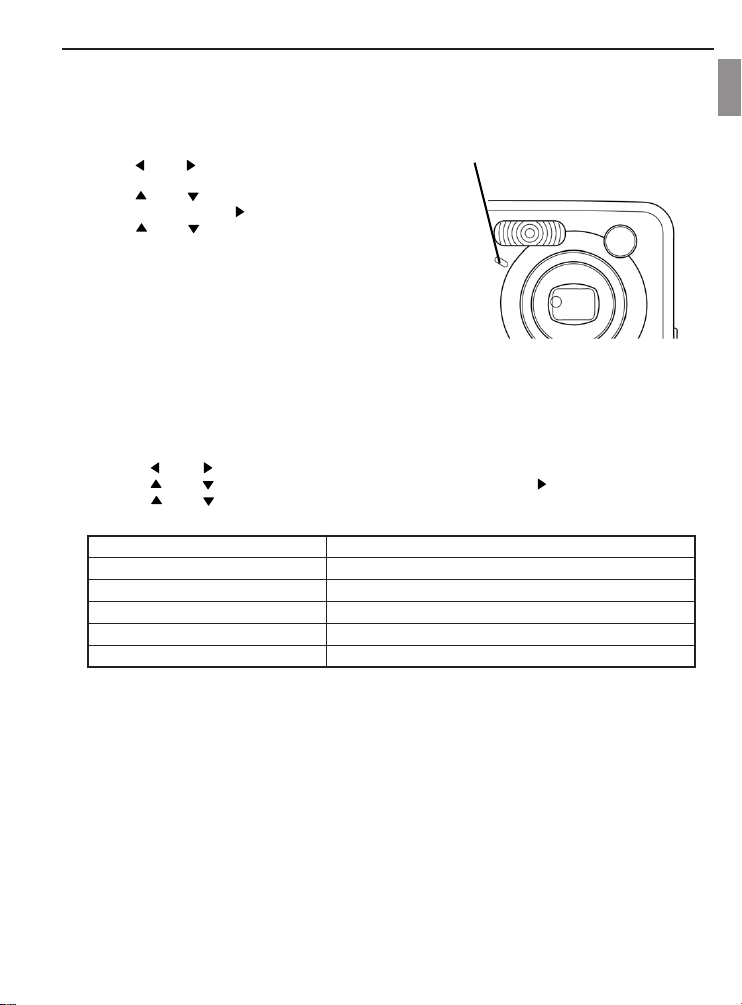
En
Front
1 Shutter release button
2 Power button [ON/OFF]
3 Flash
4Terminal cover
5 Self-timer lamp
6 Lens
7 [USB] port
Back
8Viewfinder
9 Operation lamp
10 (PLAY mode)
11 (REC mode)
12 Zoom controller
13 Terminal cover
14 [DC IN 3V] terminal
15 Strap ring
16 Multi-controller [ ][ ][ ][ ]
17 [DISP] button
18 [SET] button
19 [MENU] button
20 LCD Monitor
20
1
2
3
4
6
8
9
10
11
7
12
13
14
19
18
17
16
15
3
Page 7
INTRODUCTION
24
23
22
21
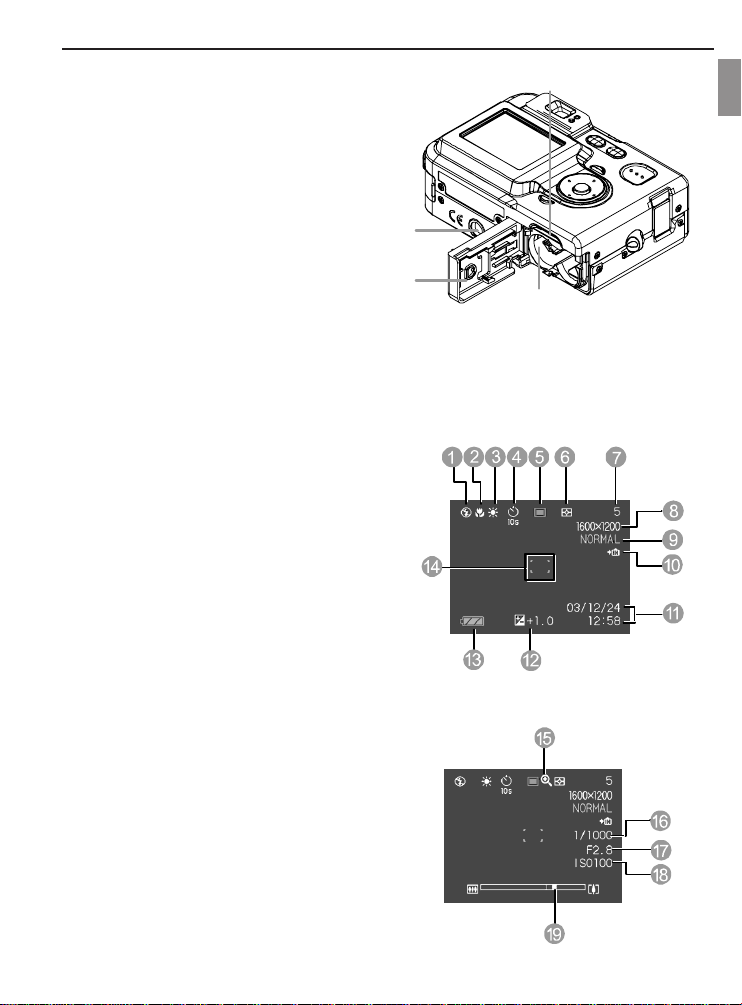
Bottom
21 Battery compartment cover
22 Tripod screw hole
• Use this hole when attaching to a tripod.
23 Memory card slot
24 Battery compartment
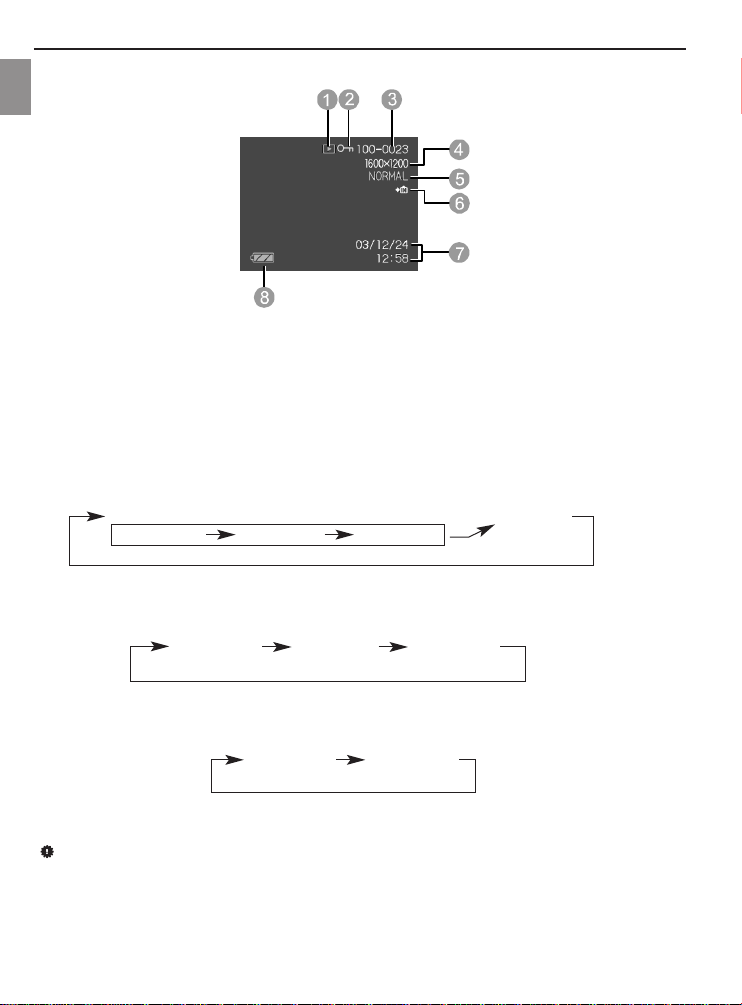
MONITOR SCREEN CONTENTS
The monitor displays various indicators and icons to represent the camera’s status and selected functions.
In Record [REC] mode
1. Flash Mode
2. Focus Mode
3. White balance
4. Self-timer
5. REC modes
6. Metering Mode
7. Memory capacity
8. Image size
9. Quality
10. Type of memory selected for storage
11. Date and time
12. EV value
13. Battery level
14. Focus frame
En
15. Digital zoom indicator
16. Shutter speed value
17. Aperture value
18. ISO sensitivity
19. Zoom indicator
4
Page 8
INTRODUCTION
In [PLAY] mode
En
1. PLAY mode file type (Snapshot, Movie) 5. Quality
2. Image protection 6. Memory selected for data storage
3. Folder number/File number 7. Date and time
4. Image size 8. Battery level
CHANGING THE DISPLAYOF CONTENTS ON THE MONITOR SCREEN
Press [DISP] button repeatedly to cycle through the different states of display in the following orders:
In [REC] [Snapshot] mode
MONITOR ON MONITOR OFF
Indicators ON Histogram ON Indicators OFF
In [REC] [NICESHOT] mode, [REC] [Movie] mode, [PLAY] [Snapshots] mode
Indicators ON Histogram ON Indicators OFF
In [PLAY] [Movie] mode
Indicators ON Indicators OFF
Please note:
• When recording movies in the Movie mode, the [DISP] button is inactive.
5
Page 9
INTRODUCTION
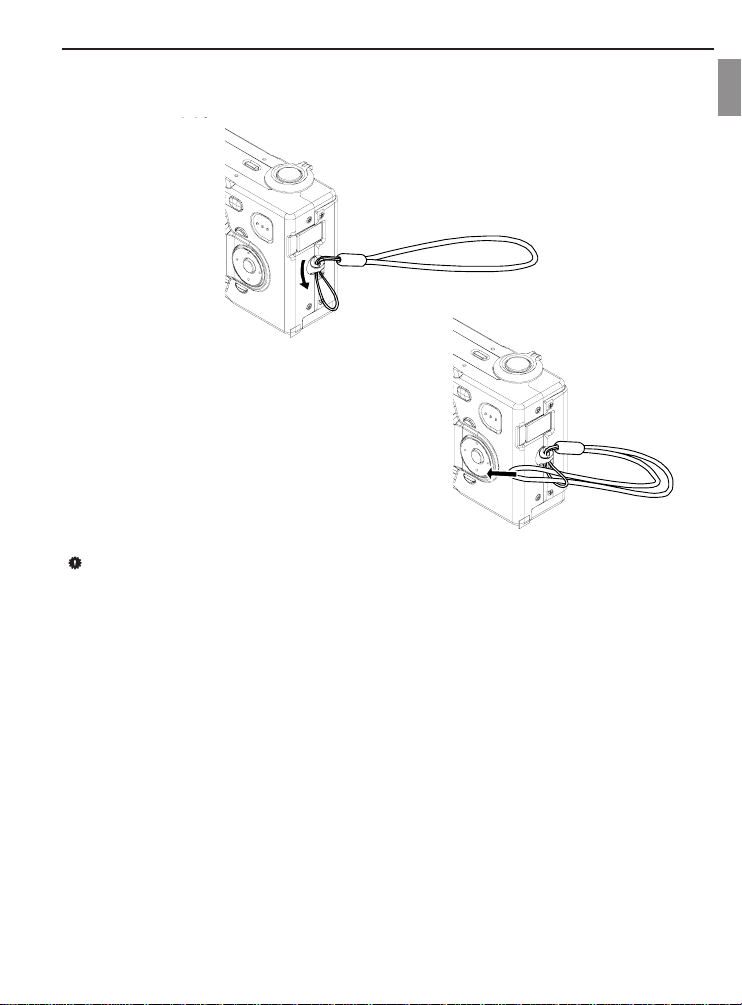
ATTACHING THE WRIST STRAP
Attach the wrist strap as illustrated
IMPORTANT!
• Be sure to use the wrist strap to avoid dropping the camera accidentally;
• When carrying the camera by the strap, don’t let it dangle to avoid shocks/damage to the exterior and/or
interior of the camera.
En
6
Page 10

PREPARING THE CAMERA
PREP
ARA
(41
ARA
o
TION
TION
F) or lower.
PREP
En
POWER REQUIREMENTS
The camera features a two-way power supply that can use either: 2 AA-size batteries or household AC current.
A set (two-piece pack) of AA-size rechargeable nickel-metal hydride batteries is supplied with the camera.
Recommended types of batteries include:
• AA-size rechargeable nickel-metal hydride batteries (a two-piece pack is supplied);
• AA-size lithium batteries: FR6 (optional)
• AA-size alkaline batteries: LR6 (optional)
Note:
• Proper operation cannot be guaranteed if other types of batteries are used other than those stated above.
• The batteries supplied are not charged initially; fully charge the batteries first before initial use.
• When powered by AA-size alkaline batteries (LR6), the camera may not operate at temperatures of 5
o
C
7
Page 11
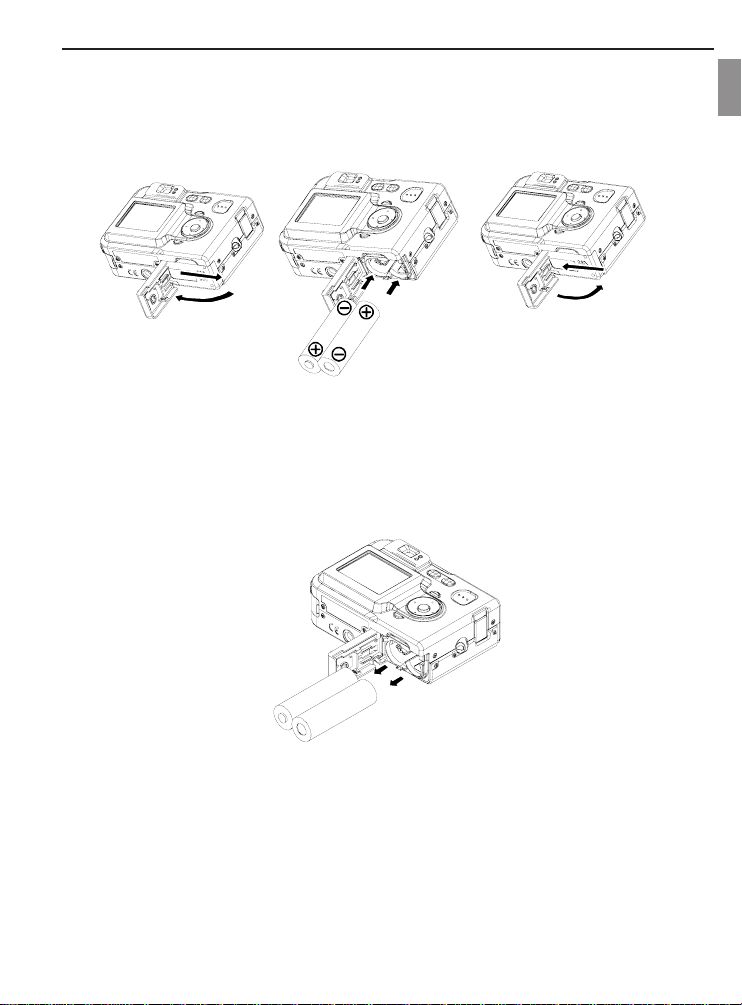
Installing batteries
1. Ensure that the camera is OFF.
2. Slide open the battery compartment lid. (See fig. 1)
3. Insert the batteries; minding the correct direction of polarities. (See fig. 2)
4. Close the battery compartment lid. (See fig. 3)
fig. 1 fig. 2 fig. 3
Replacing/Removing batteries from the camera
1. Ensure that the camera is turned OFF.
2. Slide open the battery compartment lid. (see fig. 1)
3. To remove the batteries, slightly tilt the camera to slide out the batteries. (see fig. 4)
4. To replace the batteries, mind the correct direction of polarities. (see fig. 2)
5. Close the battery compartment lid. (see fig. 3)
PREPARING THE CAMERA
En
fig. 4
8
Page 12
PREPARING THE CAMERA
Battery Level Indicator
En
The battery level indicator represents the level of power of the batteries. The meaning of each icon is as
follows:
Batteries are fully charged.
Battery power is not full, but sufficient for usage; should prepare a set of fresh batteries.
Battery power is running low, replace or recharge (rechargeable batteries only) batteries
immediately.
Batteries exhausted; replace them immediately with a set of fresh batteries or recharge
them if they are rechargeable.
Note: When is displayed, the camera will not record images.
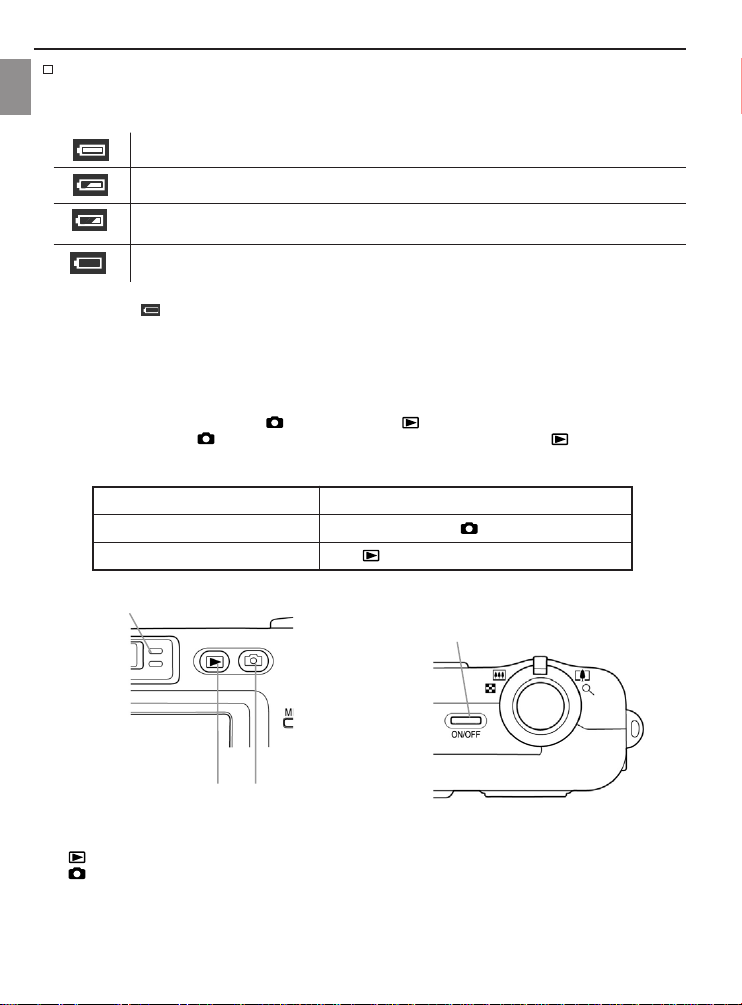
TURNING THE CAMERA ON & OFF
To turn ON the camera
Press either [ON/OFF] power button, [ ] (REC) button, or [ ] (PLAY) button.
By pressing [ON/OFF] or [ ], the camera enters the record (REC) mode, whereas if [ ] is pressed, the
camera will be in the play (PLAY) mode. After pressing one of the above-mentioned buttons, the green
operation LED blinks, and the camera is ON.
To enter this mode at startup: Press this button to turn on the camera:
REC Power button or [ ] (REC) button
PLAY [ ] (PLAY) button
1
4
1. Green operation LED
2. [ ] (PLAY)
3. [ ] (REC)
4. [ON/OFF] (Power button)
2
3
9
Page 13

PREPARING THE CAMERA
NOTES:
• When turning the camera ON/OFF or switching between modes, the lens extends and retracts. Ensure
that there are no obstacles (such as fingers or when camera is placed inside the soft case) obstructing
the lens’ extension or retraction. It is strongly recommended to attach and use the wrist strap (refer to the
seciton on ‘Attaching the Wrist Strap’) to avoid dropping the camera accidentally.
• When switching from REC mode to PLAY mode (by pressing [ ], the lens retracts after about 10
seconds.
• The camera is featured with an Auto Power OFF function to save power. If the camera turns OFF
automatically, press either [ON/OFF] power button, [ ] (REC) or [ ] (PLAY) to turn ON again.
To turn OFF the camera
Press the power button to turn OFF the camera.
En
10
Page 14
PREPARING THE CAMERA
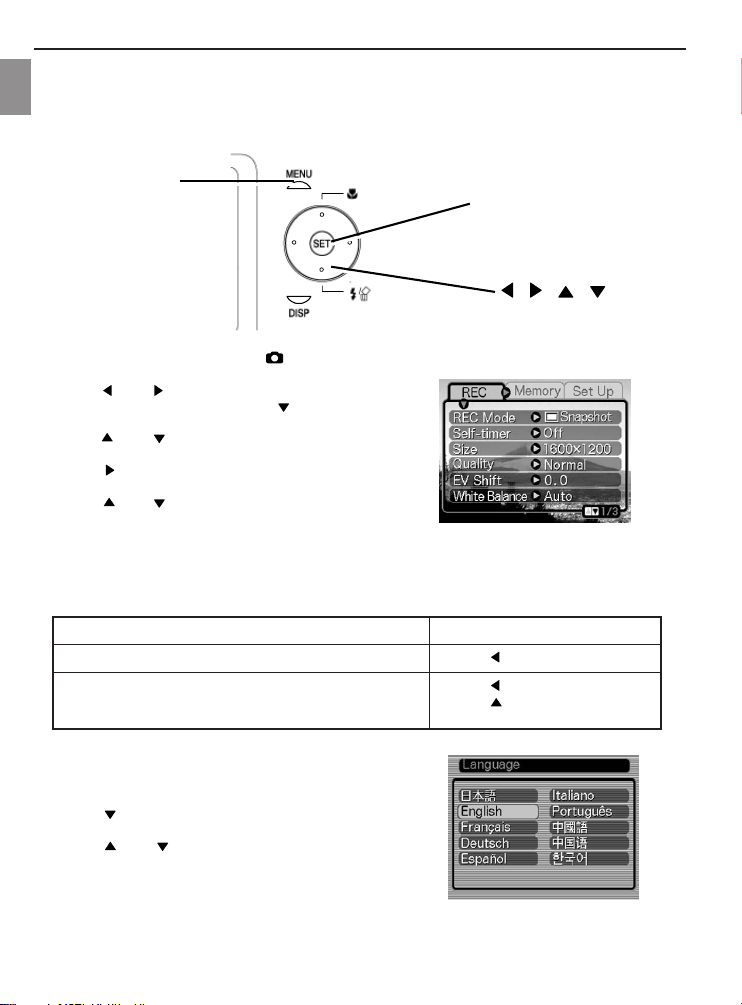
OPERATING THE MULTI-CONTROLLER
The multi-controller is for selecting an item in the menu, images, and confirmation of selection.
En
The following set of sample procedures shows the usage of the multi-controller to make selections when the
camera is in the REC mode.
[MENU]
[SET]
[ ] [ ] [ ] [ ]
1. Press [ON/OFF] (power button) or [ ] (REC) button.
2. Press [MENU]
3. Press [ ] or [ ] repeatedly to highlight and select
the desired tab, then press [SET] or [ ] to move the
highlight selector from the tab to the list of settings.
4. Press [ ] or [ ] repeatedly to scroll through and
select items related to recording images. Then press
either [ ] or [SET] to enter the sub-level of settings for
that selected item.
5. Press [ ] or [ ] repeatedly to move the highlight
selector to your desired setting.
6. Now, depending on your intent to make further
changes/selection of items or apply changes to only one
item, refer to the table below:
Apply the setting, then exit the menu screen. Press [SET]
Apply the setting, then return to item selection in step 4 above. Press [ ]
Apply the setting, then return to tab selection in step 3 above. Press [ ]
SETTING THE LANGUAGE
1. Follow steps 1 to 3 in the section ‘Operating the Multicontroller’ to select ‘Setup’ tab.
2. Press [ ] repeatedly to highlight and select
‘Language’, then press [SET].
3. Press [ ] or [ ] repeatedly to highlight and select
the desired language.
4. Press [SET] to confirm selection.
Press [ ] to move back to ‘Tab’
selection
11
Page 15
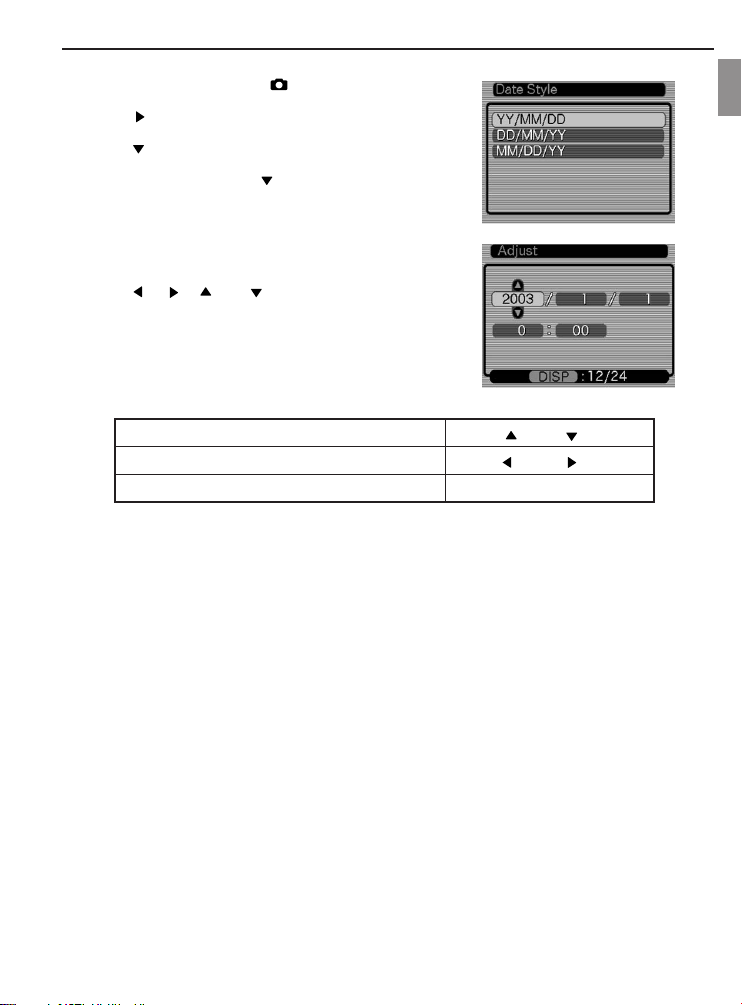
SETTING THE DATE AND TIME
1. Press the power button or the [ ] (REC) button.
2. Press [MENU].
3. Press [ ] repeatedly to highlight and select the ‘Setup’ tab,
and then press [SET].
4. Press [ ] repeatedly to highlight and select the Date Style,
and then press [SET].
5. Repeat step 2, 3 then press [ ] repeatedly to hightlight or
select ‘Adjust’, then press [SET].
6. Press [ ] [ ][ ] or [ ] repeatedly to set the current
date and time.
Change the setting Press [ ] and [ ]
Move the cursor between settings Press [ ] and [ ]
Toggle between 12-hour and 24-hour timekeeping Press [DISP]
PREPARING THE CAMERA
En
12
Page 16
BASIC IMAGE RECORDING
BASIC IMAGE RECORDING
BASIC IMAGE RECORDING
En
RECORDING AN IMAGE
Your camera automatically adjusts shutter speed to suit the brightness of the subject.
1. Press the power button or the [ ] (REC) button to turn ON the
camera.
2. Aim the camera at the subject while looking through the
viewfinder to include the desired subject within the frame.
• The focusing range of the camera in the Auto Focus mode is
approximately 60cm (23.6˝) to infinity (∞)
3. Press the shutter release button half way down to focus on the
image.
• The camera’s Auto Focus feature automatically focuses on
the image, one beep will sound when the camera has finished
metering, and the indicator beside the viewfinder will light
green.
• The shutter speed and aperture values appear on the LCD
monitor.
• If the subject is difficult to focus, the green LED blinks.
IN
Focus frame
4. After ensuring that the image is focused properly, press the
shutter release button the rest of the way down to record.
USING ZOOM
Your camera is equipped with two types of zoom: optical zoom and
digital zoom.
Optical Zoom
The range of the optical zoom factor is shown below.
Factor Range: 1X to 3X
(1X to 1.2X in the Macro Mode)
1. In the REC mode, slide the zoom controller left or right to
change the zoom factor.
13
Shutter button
Green operation lamp
(Green LED)
Zoom Controller
Page 17
BASIC IMAGE RECORDING
Zoom out Zoom in
2. Record the image.
NOTES:
• The optical zoom factor also affects the lens aperture.
• Use of a tripod is recommended to avoid jittery hand movement when using the telephoto setting (zoom
in).
Digital Zoom
Digital zoom is activated after you reach the maximum optical zoom factor (3X). It enlarges the part of the
image at the center of the image screen. The range of the digital zoom factor is shown below.
• Digital Zoom Factor Range: 3X to 12X
(in combination with optical zoom)
1. In the REC mode, press [MENU].
2. Press [ ] or [ ] repeatedly to highlight and select the ‘REC’ tab.
3. Press [ ] or [ ] repeatedly to highlight and select ‘Digital Zoom’, then press [ ].
4. Press [ ] or [ ] repeatedly to highlight and select ‘On’, then press [SET].
5. Slide the zoom controller towards [ ] to change the zoom factor.
• The lens will zoom to the maximum optical telephoto setting and stop. Release the lever and press it
toward [ ] again to further zoom the image digitally. The zoom indicator shows the current approximate
zoom factor.
En
Optical Zoom
1X 3X 12X
Current zoom factor
6. Record the image.
IMPORTANT!
• Digital zoom is disabled whenever the monitor screen is turned off.
14
Digital
Zoom
Page 18
BASIC IMAGE RECORDING
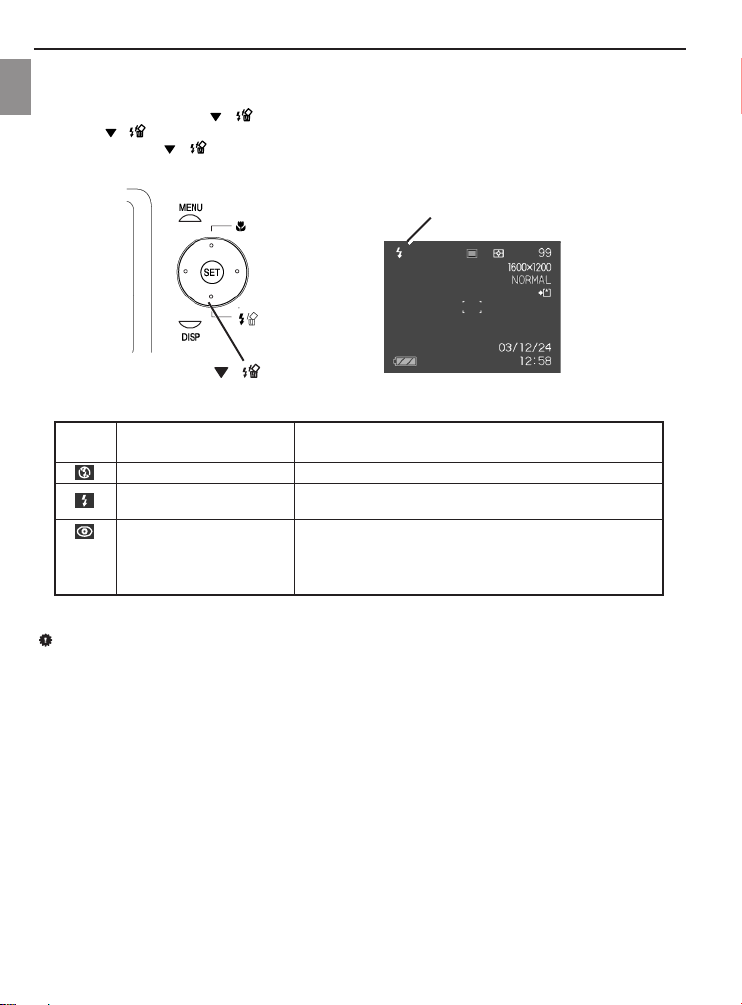
USING THE FLASH
Perform the following steps to select the desired flash mode.
En
1. In the REC mode, press [ ] repeatedly to select the flash mode.
2. Press [ ] to select the flash mode.
• Each press of [ ] cycles through the flash mode settings shown below on the LCD monitor.
3. Record the image.
Flash mode indicator
[ ]
Auto
Disable Flash
Enable Flash
Red-eye reduction, Auto
IMPORTANT!
• Image recording may not be performed if the shutter release button is pressed while the red operation
LED is blinking.
•You may not be able to achieve the desired results using a flash if the subject is too close or too far away.
About Red-eye Reduction
Using the flash to record at night or in a room with dim lighting can cause recorded images to show red spots
on the eyes of people. This is due to light emitted from the flash reflecting off of the retina of the eye. When
red-eye reduction is selected as the flash mode, the camera performs two pre-flash operations: the first flash is
for triggering the irises to close, then the second flash is for Auto Focus operation. And the final flash is for the
actual recording of the image.
The flash flashes automatically as required by the imagetaking environment’s lighting level.
The flash is disabled, so it does not flash.
The flash is enabled, so it would flash regardless of lighting
level.
The flash flashes automatically as required by the imagetaking environment’s lighting level, and the flash prestrobes before shooting to account for the red-eye
phenomenon.
15
Page 19
BASIC IMAGE RECORDING
USING THE SELF-TIMER
The self-timer includes two options: 2-second or 10-second delay of the shutter release after pressing the
shutter button.
1. In the REC mode, press [MENU].
2. Press [ ] or [ ] repeatedly to highlight and select
the “REC” tab.
3. Press [ ] or [ ] repeatedly to highlight and select
‘Self-timer’, then press [ ].
4. Press [ ] or [ ] repeatedly to highlight the
desired time delay of the self-timer, then press [SET].
5. Record the image.
• When the shutter release button is pressed, the
self-timer LED lights and the shutter releases after
the self-timer reaches the end of its countdown.
Self-timer lamp
SPECIFYING IMAGE SIZE AND QUALITY
You can specify the image size and image quality to suit the type of image you are recording.
To specify image size
1. In the REC mode, press [MENU].
2. Press [ ] or [ ] repeatedly to highlight and select the “REC” tab.
3. Press [ ] or [ ] repeatedly to highlight and select ‘Size’, then press [ ].
4. Press [ ] or [ ] repeatedly to highlight and select the desired setting, then press [SET].
Size Purpose
2560 x 1712 3:2 For printing large prints
2048 x 1536 For printing on normal-size paper
1600 x 1200 For printing on small-size paper
1280 x 960 For sending images by e-mail
640 x 480 Shoots more images
En
16
Page 20

BASIC IMAGE RECORDING
To specify image quality
1. In the REC mode, press [MENU].
En
2. Press [ ] or [ ] repeatedly to highlight and select the “REC” tab.
3. Press [ ] or [ ] repeatedly to highlight and select ‘Quality’, then press [ ].
4. Press [ ] or [ ] repeatedly to highlight and select the desired setting, then press [SET].
Quality Purpose
Fine Very high quality; larger file size
Normal Normal quality
Economy Lower quality; smaller file size
17
Page 21

OTHER RECORDING FUNCTIONS
[ ] .
Focus mode indicator
Spot Multi
OTHER RECORDING FUNCTIONS
OTHER RECORDING FUNCTIONS
SELECTING THE FOCUS MODE
You can select one of four different focus modes: Auto
Focus, Macro, Infinity, and Manual.
1. In the REC mode, press [ ] repeatedly.
• Each press of [ ] cycles through the various
focus mode settings, which include:
Auto Focus
Close-up focus (Macro)
∞
MF Manual focus
Specifying the Auto Focus Area
Follow the steps below to change the Auto Focus area used in the Auto Focus Mode and the Macro mode.
1. In the REC mode, press [MENU].
2. Press [ ] or [ ] repeatedly to highlight and select the “REC” tab.
3. Press [ ] or [ ] repeatedly to select “AF Area”, then press [ ].
4. Press [ ] or [ ] repeatedly to select the desired focus area, the press [SET].
Infinity focus
En
Setting Purpose
Spot Very limited range at the center of the screen.
Multi Automatic selection of the focus area where the subject
closest to the camera is located.
18
Page 22

OTHER RECORDING FUNCTIONS
Using the Macro Mode
Use the macro mode to take close-up shots. The following is the focus range in the Macro mode.
En
Range: Approximately 10cm to 70cm (3.9˝ to 27.6˝)
1. In the REC mode, press [ ] repeatedly until [ ] is displayed.
2. Record the image.
IMPORTANT!
• In the Macro mode, the optical zoom range is 1X to 1.2X.
Using the Infinity Mode
Use this mode when recording scenery and other far away images.
1. Press [ ] repeatedly until [
2. Record the image.
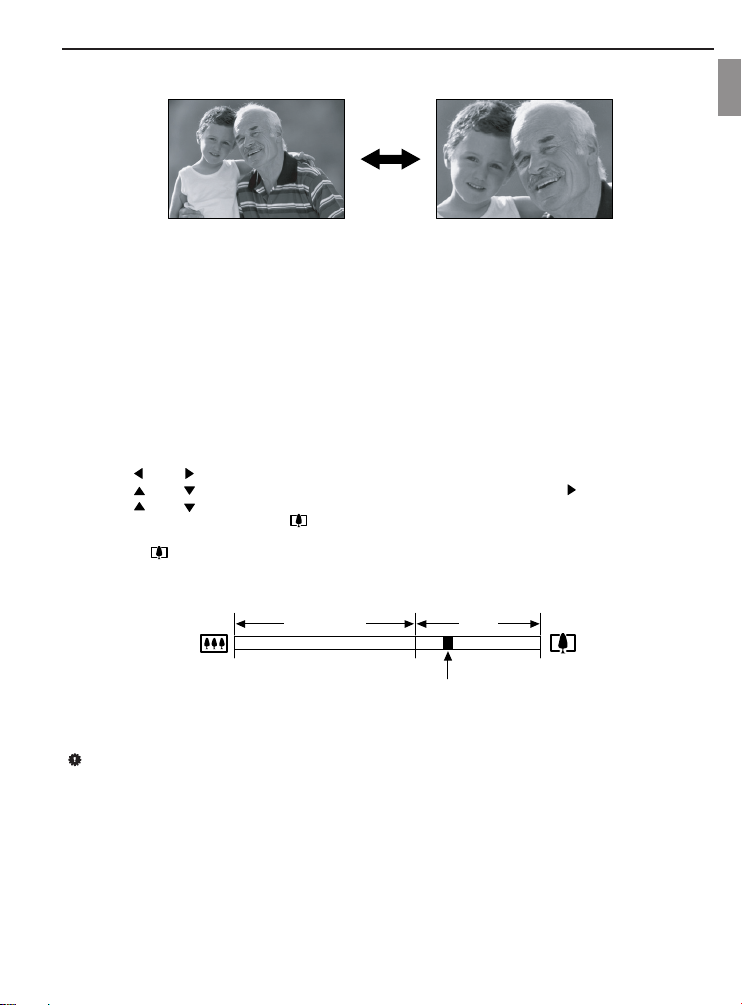
Using Manual Focus
With the Manual Focus mode selected, you can adjust the focus of an image manually. The following shows
focus ranges in the Macro mode for two optical zoom factors.
Optical Zoom Factor Approximate Focus Range
1X 10cm (3.9˝) to infinity (
3X 60cm (23.6˝) to infinity (
Macro Mode 10cm (3.9”) to 70cm (27.5”)
1. Press [ ] repeatedly until [MF] is displayed.
• At this point, a rectangle appears, which indicates that the
area within that boundary would be used for manual focus.
] is displayed.
∞
)
∞
)
∞
Boundary
2. While watching the image on the monitor screen, press [ ]
or [ ] repeatedly to focus.
[ ] Focuses out on the subject
[ ] Focuses in on the subject
3. Record the image.
19
Manual focus position
Page 23

OTHER RECORDING FUNCTIONS
EXPOSURE COMPENSATION (EV SHIFT)
Adjust the exposure compensation setting to compensate for certain light ‘conditions’ including: backlighting,
indirect indoor lighting, and dark backgrounds.
1. In the REC mode, press [MENU].
2. Press [ ] or [ ] repeatedly to highlight and select the
“REC” tab.
3. Press [ ] or [ ] repeatedly to highlight and select “EV
Shift”, and then press [ ].
4. Press [ ] or [ ] repeatedly to highlight and change the
exposure compensation value, and then press [SET].
•To cancel EV Shift, press [ ] or [ ] repeatedly to
adjust the value to 0.0.
• Performing an EV shift operation causes the metering
mode to switch automatically to center weighted
metering. Returning the EV shift value to 0.0 causes the
metering mode to change back to multi-pattern metering.
The settings can be adjusted in 1/3 steps in the range of
-2EV to +2EV.
ADJUSTING WHITE BALANCE
When the white balance mode is set to match the light source, the camera reproduces colors more accurately.
1. In the REC mode, press [MENU].
2. Press [ ] or [ ] repeatedly to highlight and select the
“REC” tab.
3. Press [ ] or [ ] repeatedly to highlight and select
“White Balance”, and then press [ ].
4. Press [ ] or [ ] repeatedly to highlight and set the
type of white balance mode, then press [SET].
En
Auto Auto Settings are automatically set by the camera
Daylight For recording outdoors on a bright, sunny day
Shade For recording under overcast, cloudy, shady or twilight skies
Tungsten For recording under tungsten lighting
Fluorescent For recording under fluorescent lighting
Manual Manual Peculiar lighting environment that requires manual control balance
20
Page 24

OTHER RECORDING FUNCTIONS
Adjusting White Balance Manually
White balance can be customized to obtain the optimal setting for the shooting conditions by setting the camera
En
to evaluate a subject such as a white piece of paper or cloth, or a photo-quality gray card.
1. In the REC mode, press [MENU].
2. Press [ ] or [ ] repeatedly to highlight and select the
“REC” tab.
3. Press [ ] or [ ] repeatedly to highlight and select
“White Balance”, and then press [ ].
4. Press [ ] or [ ] repeatedly to highlight and select
“Manual”.
5. Point the camera at a white piece of paper or similar
object under the lighting conditions for which you want to
set the white balance, and then press the shutter release
button.
6. Press [SET].
USING THE NICESHOT MODE
Selecting one of the 19 NICESHOT scenes automatically sets up the camera for recording a similar type of
image.
Example Sample Scene
Portrait
Pet Scenery
21
Page 25

OTHER RECORDING FUNCTIONS
Candlelight Portrait Children Collection Firework
Flower Food Monochrome Natural Green
En
Night Scene Portrait Night Scene Party
Retro Sundown Text Twilight
22
Portrait with Scenery
Page 26

OTHER RECORDING FUNCTIONS
1. In the REC mode, press [MENU].
2. Press [ ] or [ ] repeatedly to highlight and select the “REC” tab.
En
3. Press [ ] or [ ] repeatedly to highlight and select “REC Mode”, and then press [ ].
4. Press [ ] or [ ] repeatedly to highlight and select “NICESHOT”, and then press [SET].
• This enters the NICESHOT mode and displays a sample scene.
5. Press [ ] or [ ] repeatedly to highlight and select the desired sample scene, then press [SET].
6. Record the image.
IMPORTANT!
• Images recorded using a NICESHOT scene may not produce the results you expected due to different
shooting/lighting conditions as well as factors.
• After selecting a NICESHOT scene, you can change to a different one by pressing [SET] and using [ ]
and [ ] to scroll through available scenes. When the one you want is displayed, press [SET].
• After selecting a scene in NICESHOT mode, settings can be further tailored to suit the lighting
environment. However, be aware that NICESHOT settings revert to defaults when another NICESHOT
scene is selected or when changes are made to the recording mode or if the camera is turned OFF.
• Noise reduction processing is performed automatically when you are recording a night scene, fireworks,
or other images that require slower shutter speeds. Thus, it would take longer to record images at lower
shutter speeds.
USING THE MOVIE MODE
You can record movies of up to 60 seconds.
• Image Size: 320 x 240 pixels
• Maximum Movie Recording Duration – One Movie:
60 seconds
1. In the REC mode, press [MENU].
2. Press [ ] or [ ] repeatedly to highlight and select
the “REC” tab.
3. Press [ ] or [ ] repeatedly to highlight and select
“REC Mode”, and then press [ ].
4. Press [ ] or [ ] repeatedly to highlight and select
“Movie”, and then press [SET].
5. Aim the camera at the subject, then press the shutter
button.
• Movie recording continues for 60 seconds, or until
recording is stopped by a second press of the shutter
button.
• During recording, the monitor screen displays the
status of remaining recording time.
Remaining capacity
Remaining recording time
23
Page 27

OTHER RECORDING FUNCTIONS
ABOUT THE HISTOGRAM
The histogram is a graph for assisting in judging the brightness of the image to be recorded. The greater the
bias towards the left in the graph, the darker the image. The greater the bias towards the right, the brighter the
image. If the image is dark, adjust the exposure compensation to a positive number. Similarly, adjust the
exposure compensation to a negative number if the image is bright.
Histogram Examples
Dark Image Bright Image Balanced Image
SPECIFYING ISO SENSITIVITY
There are 5 speeds to choose from: Auto, 50, 100, 200 and 400. To select the ISO sensitivity setting that suits
the type of desired image to be recorded, follow the steps below:
1. In the REC mode, press [MENU].
2. Press [ ] or [ ] repeatedly to highlight and select the “REC” tab.
3. Press [ ] or [ ] repeatedly to highlight and select “ISO”, then press [ ].
4. Press [ ] or [ ] repeatedly to highlight and select the desired setting, then press [SET].
IMPORTANT!
• Higher ISO speeds increase the image noise. To take pictures with less image noise, use the lowest
possible, appropriate ISO speed.
En
24
Page 28

OTHER RECORDING FUNCTIONS
Selecting the Metering Mode
Use the following procedure to specify multi-pattern metering, spot metering, or center-weighted metering as
En
the metering mode.
1. In the REC mode, press [MENU].
2. Press [ ] or [ ] repeatedly to highlight and select the “REC” tab.
3. Press [ ] or [ ] repeatedly to highlight and select ‘Metering’, then press [ ].
4. Press [ ] or [ ] repeatedly to highlight and select the desired setting, then press [SET].
Multi (Multi-pattern):
Multi-pattern metering divides the image into sections and measures
the light in each section for a balanced exposure reading. The camera
automatically determines shooting conditions according to the
measured lighting pattern, and makes exposure settings accordingly.
This type of metering provides error-free exposure settings for a wide
range of shooting conditions.
Center weighted (Center-weighted):
Center-weighted metering measures light concentrating on the center
of the focus area. Use this metering method to override the camera’s
exposure setting and tailor exposure for unique conditions.
Spot (Spot):
Spot metering takes readings at a very small area. Use this metering
method to set exposure according to the brightness of the subject
without being affected by surrounding conditions.
IMPORTANT!
Changing the exposure compensation setting to a value other than 0.0 changes the metering mode setting
to “Center Weighted.” The metering mode changes back to “Multi” when the exposure compensation
setting is restored to 0.0.
Using the Filter Function
The camera’s filter function enables tinting of an image for recording.
1. Press [ ] or [ ] repeatedly to highlight and select the “REC” tab.
2. Press [ ] or [ ] repeatedly to highlight and select ‘Filter’, then press [ ] to change the filter setting.
3. Press [ ] or [ ] repeatedly to highlight and select the desired setting, then press [SET].
•Available filter settings are: Off, B/W, Sepia, Red, Green, Blue, Yellow, Pink, Purple
IMPORTANT!
• Using the camera’s filter feature produces the same effect as attaching a color filter to the lens.
25
Page 29

OTHER RECORDING FUNCTIONS
Specifying Color Saturation
Follow the steps below to control the intensity of the image being recorded.
1. In the REC mode, press [MENU].
2. Press [ ] or [ ] repeatedly to highlight and select the “REC” tab.
3. Press [ ] or [ ] repeatedly to highlight and select ‘Saturation’, then press [ ].
4. Press [ ] or [ ] repeatedly to select the desired setting, then press [SET].
Specifying Contrast
Follow the steps below to adjust the relative difference between the light areas and dark areas of the image
being recorded.
1. In the REC mode, press [MENU].
2. Press [ ] or [ ] repeatedly to highlight and select the “REC” tab.
3. Press [ ] or [ ] repeatedly to highlight and select “Contrast”, then press [ ].
4. Press [ ] or [ ] repeatedly to highlight and select the desired setting, then press [SET].
Specifying Outline Sharpness
Follow the steps below to control the sharpness of the image outlines.
1. In the REC mode, press [MENU].
2. Press [ ] or [ ] repeatedly to highlight and select the “REC” tab.
3. Press [ ] or [ ] repeatedly to highlight and select ‘Sharpness’, then press [ ].
4. Press [ ] or [ ] repeatedly to highlight and select desired setting, then press [SET].
Turning the On-screen Grid ON and OFF
There is an on-screen grid that can be displayed and used
as a guide to assist in composing and avoiding taking
lopsided pictures.
1. In the REC mode, press [MENU].
2. Press [ ] or [ ] repeatedly to highlight and select
the “REC” tab.
3. Press [ ] or [ ] repeatedly to highlight and select
‘Grid’, then press [ ].
4. Press [ ] or [ ] to highlight and select the desired
setting, then press [SET].
Turning Image Review ON and OFF
Image review displays an image on the monitor screen as soon as it is recorded. Follow the steps below to turn
image review ON and OFF.
1. In the REC mode, press [MENU].
2. Press [ ] or [ ] repeatedly to highlight and select the “REC” tab.
3. Press [ ] or [ ] repeatedly to highlight and select ‘Review’ , then press [ ].
4. Press [ ] or [ ] to highlight and select the desired setting, then press [SET].
En
26
Page 30

OTHER RECORDING FUNCTIONS
Specifying Power ON Default Settings
The camera’s “mode memory” feature is for customizing settings such as REC mode, flash mode, white
En
balance mode, ISO sensitivity, AF Area, metering mode, flash intensity, digital zoom mode and manual focus
position.
When ON is selected for a particular mode (in mode memory), the camera retains the status, regardless of
camera being turned ON/OFF. If OFF is selected for a mode (in mode memory), the camera restores the factory
setting for that mode.
1. In the REC mode, press [MENU].
2. Press [ ] or [ ] repeatedly to highlight and select the “Memory” tab.
3. Press [ ] or [ ] repeatedly to highlight and select the desired item to change settings, then press [ ].
4. Press [ ] or [ ] to activate or de-activate the mode.
Resetting the Camera
Follow the steps below to reset all of the camera’s settings to its factory settings as shown under the “Menu
Reference” on page 45.
1. In the REC mode or the PLAY mode, press [MENU].
2. Press [ ] or [ ] repeatedly to highlight and select the “Set Up” tab.
3. Press [ ] or [ ] repeatedly to highlight and select the ‘Reset’ tab, then press [ ].
4. Press [ ] or [ ] to select ‘Reset’, then press [SET].
•To exit without resetting, press [ ] or [ ] to select “Cancel”, then press [SET].
27
Page 31

PLAYBACK
PLA
YBACK
PLA
YBACK
Recorded images can be viewed with the built-in monitor.
Basic Playback Operation
Follow the steps below to scroll through files stored in the camera’s memory.
1. Press [ ] (PLAY) to turn on the camera.
• This enters the PLAY mode.
• If there is/are stored image(s), then an image appears. However, if no images are stored in memory, then
the message “There are no files” will be displayed.
2. Press [ ] (forward) or [ ] (back) repeatedly to scroll through files on the monitor screen.
NOTES:
• Holding down [ ] or [ ] scrolls images at high speed.
ZOOMING THE DISPLAYED IMAGE
Follow the steps below to zoom the image (displayed on screen) currently on monitor, by up to 4 times its
normal size.
1. In the PLAY mode, press [ ] or [ ] repeatedly to display the desired image.
2. Slide the zoom controller towards [ ] to enlarge the image.
(Press [DISP] to display an indicator that shows the current zoom factor.)
3. Press [ ], [ ], [ ] or [ ] repeatedly to shift the image up, down, left or right.
4. Press [MENU] to restore the image to its original size.
IMPORTANT!
•Amovie image cannot be enlarged.
• Depending on the original size of the recorded image, zooming an image to the full 4 times its original
size might not be possible in some cases.
En
28
Page 32

PLAYBACK
RESIZING AN IMAGE
Follow the steps below to change an image to one of the three sizes.
En
1600 x1200-pixel UXGA size
1280 x 960-pixel SXGA size
640 x 480-pixel VGA size
• VGA is the optimum image size for attachment to e-mail
messages or incorporation into Web pages.
1. In the PLAY mode, press [MENU].
2. Select the “PLAY” tab, select “Resize”, and then press [ ].
3. Press [ ] or [ ] to scroll through images and display the one
you want to resize.
4. Press [ ] or [ ] to select the setting you want, and then
press [SET].
IMPORTANT!
Resizing an image creates a new file that contains the image in the size you select. The file with the original
image also remains in memory.
An image recorded using the 2560 x 1712 (3:2) pixel size cannot be resized.
CROPPING AN IMAGE
Use the following procedure when you want to crop a portion of an
enlarged image and use the remaining part of the image as an e-mail
attachment, Web page image, etc.
1. In the PLAY mode, use [ ] and [ ] to scroll through images
and display the one you want to crop.
2. Press [MENU].
3. Select the “PLAY” tab, select “Trimming”, and then press [ ].
• This causes a cropping boundary to appear.
4. Use the zoom controller to make the cropping boundary larger or
smaller.
• The size of the cropping boundary depends on the size of the image on the display.
5. Press [ ], [ ], [ ], or [ ] to move the cropping boundary up, down, left, or right until the area of
the image you want to extract is within the boundary.
6. Press [SET] to extract the part of the image enclosed in the cropping boundary.
• If you want to cancel the procedure at any point, press [MENU].
IMPORTANT!
• Cropping an image creates a new file that contains the cropped image. The file with the original image
also remains in memory.
• For a 640 x 480 size image, you cannot change the size of the cropping boundary at all.
• An image recorded using the 2560 x 1712 (3:2) pixel size cannot be cropped.
29
Page 33

PLA
YING AA
PLA
YING
Follow the steps below to play back a movie that was recorded in the movie mode.
1. In the PLAY mode, press [ ] or [ ] repeatedly to scroll
through images until the desired movie to be played is
displayed.
2. Press [SET].
• This starts playback of the movie.
• The following operations can be performed, while a movie
is playing.
Fast forward or fast reverse the movie Press and hold [ ] or [ ]
Pause movie playback Press [SET]
Skip forward or back one frame while paused Press [ ] or [ ]
Cancel playback Press [MENU]
IMPORTANT!
You cannot repeat play a movie. To play a movie more than once, repeat the steps above.
MOVIE
MOVIE
PLAYBACK
En
VIEWING PICTURES IN THUMBNAIL MODE
The Thumbnail mode allows you to view up to nine images at a
time on the monitor.
1. In the PLAY mode, slide the zoom controller left ( ) briefly,
and then release it.
2. The selected image is highlighted.
3. Press [ ], [ ], [ ], or [ ] repeatedly to select an
image.
4. Slide the zoom controller right ( ) to display the selected
image in full screen size.
30
Selection boundary
Page 34

PLAYBACK
Rotating the Display Image
Follow the steps below to rotate the image 90 degrees and register the rotation information along with the
En
image. After you do this, the image is always displayed in its rotated orientation.
1. In the PLAY mode, press [MENU].
2. Select the “PLAY” tab, select “Rotation”, and then press [ ].
3. Press [ ] or [ ] to scroll through images until the one you want to rotate is on the monitor screen.
4. Press [ ] or [ ] to select “Rotate”, and then press [SET].
• This rotates the image 90 degrees to the right.
5. After you are finished configuring settings, press the [MENU] button to exit the setting screen.
IMPORTANT!
•You cannot rotate an image that is protected. To rotate such an image, first unprotect it. (see ‘Protecting
Files’)
•You cannot rotate movie images.
31
Page 35

DELETING FILES
DELETING FILES
A single file can be deleted or all stored files can be deleted all at once.
DELETING A SINGLE FILE
Follow the steps below to delete a single file.
1. In the PLAY mode, press [ ] .
2. Press [ ] or [ ] repeatedly to scroll through files
and display the one intended for deletion.
3. Press [ ] or [ ] to select “Delete”.
To exit the file delete operation without deleting any
images, press [ ] or [ ] to select “Cancel”.
4. Press [SET] to delete the file.
Repeat steps 2 to 4 above to delete other files, if needed.
5. Press [MENU] to exit the menu screen.
IMPORTANT!
• Think twice before deleting!! As deleted images cannot
be recovered.
•Aprotected file cannot be deleted. To delete a protected
file, unprotect it first. (See “Protecting Files”)
DELETING ALL FILES
Follow the steps below to delete all unprotected files in memory.
1. In the PLAY mode, press [ ] .
2. Press [ ] or [ ] repeatedly to highlight and select ‘All File Delete’, then press [SET].
3. Press [ ] or [ ] to select “Yes”.
To exit the file delete operation without deleting any images, select “No”, then press [SET].
4. Press [SET] to delete all the files.
DELETING FILES
En
32
Page 36

FILE MANAGEMENT
FILE MANAGEMENT
FILE MANAGEMENT
The file management capabilities of the camera make it easy to keep track of images. You can protect files
En
against deletion, and even use its DPOF feature to specify images for printing.
FOLDERS
Your camera automatically creates a directory of image storage folders in its built-in Flash memory or on the
memory card.
Memory Folders and Files
An image you record is automatically stored in a folder, whose name is a serial number. You can have up to
900 folders in memory at the same time. Folder names are generated as shown below.
Example: Name of the 100th folder.
Each folder can hold files numbered up to 9,999. Trying to store the 10,000th file in a folder causes the next
serially numbered folder to be created. Folder names are generated as shown below.
Example: Name of the 26th file.
• The actual number of files you will be able to store on a memory card depends on the image quality
DCPIC
100
Serial number (3 digits)
.JPG
DSCI0026
Extension
Serial number (4 digits)
settings, capacity of the card, etc.
33
Page 37

FILE MANAGEMENT
PROTECTING FILES
Once you protect a file, it cannot be deleted. Files can be protected individually or protection can be applied to
all files in memory with a single operation.
To protect a single file
1. In the PLAY mode, press [MENU].
2. Press [ ] or [ ] repeatedly to highlight and select ‘PLAY’
tab.
3. Press [ ] or [ ] repeatedly to highlight and select
‘Protect’, then press [ ].
4. Press [ ] or [ ] repeatedly to scroll through files and
display the desired one to protect.
5. Press [ ] or [ ] repeatedly to highlight and select “On”,
then press [SET].
•Afile that is protected is indicated by the [ ] mark.
•To unprotect a file, select “Off” in step 4, then press [SET].
6. Press [MENU] to exit the menu screen.
To protect all files in memory
1. In the PLAY mode, press [MENU].
2. Follow steps 2 and 3 (above) in the section “To protect a single
file”.
3. Press [ ] or [ ] repeatedly to highlight and select, then
press [SET].
To unprotect all files, press [SET] in step 3, and the setting
shows “All File: Off”.
4. Press [MENU] to exit the menu screen.
En
34
Page 38

FILE MANAGEMENT
DPOF
Digital Print Order Format (DPOF)
En
The camera is featured with DPOF, which essentially enables the user to select photos
(directly in the camera) for printing without using a computer. The DPOF file is written to
the camera’s memory card (or other medium), is read, then executed by DPOFcompatible/professional printing devices, in accordance with the file name and quantity
settings recorded on the card.
With this camera, you should always select images by viewing them on the monitor screen.
Do not specify images by file name without viewing the file contents.
DPOF Settings
File Name,
number of copies,
date
To configure print settings for a single image
1. In the PLAY mode, press [MENU].
2. Press [ ] or [ ] repeatedly to highlight and select the
‘PLAY’tab.
3. Press [ ] to highlight and select ‘DPOF’, then press [ ].
4. Press [ ] or [ ] to select “Select images”, then press [ ].
5. Press [ ] or [ ] repeatedly to display the desired image.
6. Press [ ] or [ ] to specify the number of copies to be
printed.
•You can specify up to 99 for the number of copies. Specify 00
if you do not want to have the image printed.
7. To turn ON date stamping for the prints, press [DISP] so [ ] is
displayed.
To turn OFF date stamping for the prints, press [DISP] so [ ]
is not displayed.
8. After all of the settings are set, press [SET] to confirm.
Note: Repeat steps 5 to 7 to configure other images for printing.
35
Page 39

To configure print settings for all images
1. Follow steps 1 to 3 in the section ‘To configure print
settings for a single image’
2. Press [ ] or [ ] repeatedly to highlight and select “All
images”, the press [ ].
3. Follow steps 6, 7, and 8 in the section ‘To configure print
settings for a single image’.
PRINT IMAGE MATCHING II
Images include PRINT Image Matching II data (mode setting and other camera
setup information). A printer that supports PRINT Image Matching II reads this
data and adjusts the printed image accordingly, so your images come out just
the way you intended when you recorded them.
• Seiko Epson Corporation holds the copyright for PRINT Image Matching
and PRINT Image Matching II.
EXIF PRINT
Exif Print is an internationally supported, open standard file format that makes it
possible to capture and display vibrant digital images with accurate colors. With
Exif 2.2, files include a wide range of shooting condition information that can be
interpreted by an Exif Print printer to produce better looking prints.
USING USB DIRECT-PRINT
Your camera supports USB DIRECT-PRINT. When connected directly to a
printer that supports USB DIRECT-PRINT, you can select images to be printed
and start the print operation directly from the camera.
• Use of the optional AC adapter is recommended when printing with USB
DIRECTPRINT.
FILE MANAGEMENT
En
1. Use the DPOF procedure on page 34 to specify the
images in file memory that you want to print.
2. Connect the AC adapter(not supplied) to the camera.
3. Use the USB cable that comes with the camera to
connect it to a printer.
4. Turn on the printer.
5. Press the camera’s power button.
USB
USB
36
Page 40

FILE MANAGEMENT
• This displays the print menu on the camera’s monitor
screen.
En
6. On the camera’s monitor screen, select “Print”, and
then press [SET].
• This automatically starts printing of the images you
specified with the DPOF procedure.
•Amessage appears on the monitor screen, followed
by the DPOF setting screen, if there are no DPOF
settings currently configured on the camera to
control the printing operation. If this happens,
configure the required DPOF settings and then
perform step 5 of the above procedure again.
7. The camera will turn off automatically when printing is complete.
IMPORTANT!
• See the documentation that comes with your printer for information about print quality and paper settings.
• Contact your printer manufacturer for information about models that support USB DIRECT-PRINT,
upgrades, etc.
•To interrupt an ongoing print operation, perform the required operation on the printer.
• The camera’s monitor screen will go blank after printing starts. A blank monitor screen does not
necessarily mean that printing is complete. Check the status of your printer to find out if printing is
complete.
37
Page 41

OTHER SETTINGS
OTHER SETTINGS
OTHER SETTINGS
SPECIFYING THE FILE NAME SERIAL NUMBER GENERATION METHOD
Follow the steps below to specify the method for generating the serial number used for file names.
1. In the REC mode or the PLAY mode, press [MENU].
2. Press [ ] or [ ] repeatedly to highlight and select ‘Set Up’ tab.
3. Press [ ] or [ ] repeatedly to highlight and select “File No.”, then press [ ].
4. Press [ ] or [ ] to change the setting, then press [SET].
Settings Purpose
Continue Store the last file number used and increment it, regardless of whether files are
Reset Find the highest file number in the current folder and increment it
deleted or whether the memory card is replaced with a new one
SETTING THE BEEP SOUND
Use the following procedure to turn the beep sound ON/OFF when you press a key ON and
OFF.
1. In the REC mode or the PLAY mode, press [MENU].
2. Press [ ] or [ ] repeatedly to highlight and select ‘Set Up’ tab.
3. Press [ ] or [ ] repeatedly to highlight and select “Beep”, then press [ ].
4. Press [ ] or [ ] to set beep sound to ON/OFF, then press [SET].
SPECIFYING AN IMAGE FOR THE STARTUP SCREEN
You can specify an image you recorded as the startup image, so it appears on the monitor for about two
seconds whenever you press the power button or [ON/OFF][ ] (REC) to turn ON the camera. The startup
screen image does not appear if you press [ ] (PLAY) to turn ON the camera.
1. In the REC mode or the PLAY mode, press [MENU].
2. Press [ ] or [ ] repeatedly to highlight and select ‘Set Up’ tab.
3. Press [ ] or [ ] repeatedly to highlight and select “Startup”, then press [ ].
4. Press [ ] or [ ] repeatedly to select desired image for startup, then press [SET].
Note: You can specify a snapshot image or a movie image that is two seconds (200KB) or less in length.
IMPORTANT!
• Selecting a new startup image overwrites anything that is already stored in startup image memory. Thus,
if you want to return to a previous startup image, you need to have a separate copy of that image in the
camera’s standard image memory.
En
38
Page 42

OTHER SETTINGS
FORMATTING BUILT-IN MEMORY
Formatting built-in memory deletes any data stored in it.
En
IMPORTANT!
• Note that data deleted by a format operation cannot be recovered. Check to make sure you do not need
any of the data in memory before you format it.
• Formatting built-in memory deletes all files, including protected files, the startup image, etc.
1. Check to make sure there is no memory card loaded in the camera.
• If there is a memory card loaded in the camera, remove it.
2. In the REC mode or the PLAY mode, press [MENU].
3. Press [ ] or [ ] repeatedly to highlight and select ‘Set Up’ tab, then press [ ] or [ ] repeatedly to
highlight and select “Format”, then press [ ].
4. Press [ ] or [ ] repeatedly to highlight and select “Format”, then press [SET].
39
Page 43

USING A MEMORY CARD
USING AA
USING
You can expand the storage capabilities of your camera by using a
commercially available memory card (SD memory card or MultiMediaCard). You
can also copy files from built-in flash memory to a memory card and vice versa.
MEMORYY
MEMOR
• Normally, files are stored in built-in flash memory. When you insert a
memory card, however, the camera automatically stores files to the card.
• Note that you cannot save files to built-in memory while a memory card is
installed in the camera.
• Use only SD memory card or MultiMediaCard with this camera. Proper operation is not guaranteed when
any other type of card is used.
• Certain types of cards can slow down processing speeds.
• SD memory cards have a write-protect switch, which you can use to protect against accidental deletion of
image data. Note, however, if you write protect an SD memory card, you must switch OFF writeprotection whenever you want to record to it, format it, or delete any of its files.
CARD
CARD
INSERTING AN SD CARD
1. Turn off the camera.
2. Slide the SD card slot/battery compartment lid in the
direction of the arrows to open the cover. (fig. 1)
fig. 1
3. Positioning the memory card so its back (the side with
metal contact slots) is facing in the same direction as
the camera’s monitor screen, carefully insert it into the
card slot, then gently push it in until it clicks. (If the card
does not insert properly into the slot do not push it in by
force. As it could damage either the card and/or the
camera.) (fig. 2)
En
4. Slide the SD card slot/battery compartment lid in the
direction of the arrows to close the cover. (fig. 3)
fig. 2
fig. 3
40
Page 44

USING A MEMORY CARD
REMOVING THE SD CARD
1. Follow steps 1 and 2 in the section ‘Installing an SD card’.
En
2. Gently press on the edge of the SD card until it clicks.
3. Take out the card and slide close the slot/battery compartment lid.
IMPORTANT!
• Never remove a card from the camera while the operation lamp is flashing. Doing so can cause the file
save operation to fail, and even damage the memory card.
FORMATTING AMEMORY CARD
Formatting a memory card deletes any data already stored on it.
1. Load the memory card into the camera.
2. Turn on the camera. Next, enter the REC mode or PLAY mode, and press [MENU].
3. Press [ ] or [ ] repeatedly to highlight and select ‘Set Up’ tab.
4. Press [ ] or [ ] repeatedly to highlight and select ‘Format’, then press [ ].
5. Press [ ] or [ ] repeatedly to highlight and select ‘Format’, then press [SET].
Memory Card Precautions
•We recommend that you first format a memory card after purchase; or whenever the card you are using
seems to be the cause of abnormal images.
• Before starting a format operation, check to make sure that the batteries are fully charged. Power
interruption during the format operation can result in improper formatting, and even damage the memory
card, causing it to be unusable.
COPYING FILES
Use the procedures below to copy files between built-in memory and a memory card.
IMPORTANT!
• Only snapshot and movie files recorded with this camera can be copied. Other files cannot be copied.
To copy all of the files in built-in memory to a memory card
1. Load the memory card into the camera.
2. Turn on the camera. Next, enter the PLAY mode, and press
[MENU].
3. Press [ ] or [ ] repeatedly to highlight and select the
“PLAY” tab.
4. Press [ ] or [ ] repeatedly to highlight and select “Copy”,
then press [ ].
• This starts the copy operation and displays the message
“Busy....Please wait...”.
• After the copy operation is complete, the monitor screen
shows the last file in the folder.
41
Page 45

USING A MEMORY CARD
To copy a file from a memory card to built-in memory
Follow the steps below to copy one file at a time.
1. Follow steps 1 to 4 in the section “To copy all of the files in built-in memory to a memory card”.
2. Press [ ] or [ ] repeatedly to highlight and select “Card Built-in”, then press [SET].
3. Press [ ] or [ ] repeatedly to select the desired file to copy.
4. Press [ ] or [ ] to highlight and select “Copy”, then press [SET].
•To copy more images, repeat steps 3 and 4 above.
5. Press [MENU] to exit the copy operation.
En
42
Page 46

VIEWING IMAGES ON A COMPUTER
VIEWING IMAGES ON AA
VIEWING IMAGES ON
After using the USB cable to establish a USB connection between the camera and your computer, you can use
En
your computer to view images in file memory and copy images to your computer’s hard disk or other storage
media. To do this, it is necessary to first install the USB driver (stored on the supplied CD-ROM) into your
computer.
COMPUTER
COMPUTER
USING THE CAMERA WITH A WINDOWS COMPUTER
To view and copy images and/or movies from your camera to a computer, drivers and software must be
installed first. For detailed instructions on driver and software installation, refer to the section ‘Install the
Software Driver’.
IMPORTANT!
• Low battery power can cause the camera to turn OFF suddenly during data communication. It is
recommended to use an AC adapter (optional) to power the camera during data communication.
• Do not try to establish a connection between the camera and computer before installing the USB driver
into the computer.
• If you want to transfer files from the camera’s built-in memory to a computer, make sure there is no
memory card loaded in the camera before connecting the USB cable.
USING A MEMORY CARD TO TRANSFER IMAGES TO ACOMPUTER
The procedures in this section describe how to transfer images from the camera to your computer using a
memory card.
Using a Computer with a Built-in SD Memory Card Slot
Insert the SD memory card directly into the slot. (Mind the positioning/insertion direction; forcefully pushing a
memory card into a slot can damage the card and/or the computer’s card slot. For instructions on
positioning/insertion direction, refer to the user documentation accompanying the computer.)
Using a Computer with a Built-in PC Card Slot
Use a commercially available PC card adapter (for an SD memory card/MMC). For full details, see the user
documentation that comes with the PC card adapter and your computer.
43
Page 47

VIEWING IMAGES ON A COMPUTER
Using a Commercially Available SD Memory Card Reader/Writer
See the user documentation that comes with the SD memory card reader/writer for details on how to use it.
Using a Commercially Available PC Card Reader/Writer and PC Card Adapter (for SD Memory Cards
and MMCs)
See the user documentation that comes with the PC card reader/writer and PC card adapter (for an SD
memory card/MMC) for details on how to use them.
MEMORY DATA
Images recorded with this camera and other data are stored in memory using DCF (Design rule for Camera
File System) protocol. DCF protocol is designed to make it easier to exchange image and other data between
digital cameras and other devices.
DCF Protocol
DCF devices (digital cameras, printers, etc.) can exchange images with each other. DCF protocol defines
camera format for image file data and the directory structure for file memory, so images can be viewed using
another manufacturer’s DCF camera or printed on a DCF printer.
En
44
Page 48

INSTALLING SOFTWARE
INST
ALLING SOFTW
INST
ALLING SOFTW
INSTALL THE SOFTWARE DRIVER
En
You must install the camera’s software drivers BEFORE connecting the camera to the computer. Once the USB
driver is installed, it is not necessary to install the USB driver again; unless you have replaced your computer
(either physical replacement or clean swept your hard disk).
The steps below are for Windows 98/98SE/Me/2000/XP users. The procedures described might not be an exact
match with the windows/dialog boxes that appear on your screen, due to different configurations, installed
programs, customized settings, etc. Nonetheless, the procedures would be much similar to the ones listed
below. When in doubt, follow on-screen instructions.
1. Start up your computer, and insert the software installation CD-ROM into the CD-ROM drive.
2. CAM-IN Suite III installer window appears.
3. Click ‘Camera Driver’.
4. ‘Choose Setup Language’ dialog box appears. Click [ ] to select the desired language, then click ‘OK’.
5. The computer automatically proceeds with installation, and later arrives at another window titled ‘USB Driver
setup for DigitalCAM’. Click ‘Next’ to continue.
6. The computer continues with automatic installation and arrives at the ‘InstallShield Wizard Completed’
window. Click ‘Finish’ to conclude installation.
Note: In Windows XP, the dialog box ‘Windows Logo Testing’ appears. Click ‘Continue Anyway’.
ARE
ARE
USB
7. The camera’s driver is now installed. Click ‘EXIT’ in the CAM-IN Suite III installer window.
8. Connect the USB cable (supplied) to the camera and your computer’s USB port.
9. Press [ON/OFF] power button on your camera. The green operation lamp blinks momentarily.
• For some operating systems, the ‘Found New Hardware…’ dialog box might appear on the computer
screen as it can automatically detect the camera’s file memory.
• In Windows XP, click ‘Next’ to install the software automatically, then ‘Windows Logo Testing’ dialog box
appears; click ‘Continue Anyway’. The computer automatically proceeds with installation. After it is
completed, another window appears, click ‘Finish’
45
Page 49

INSTALLING SOFTWARE
10.On your computer, double click ‘My Computer’; double click ‘Removable Disk’, then double click ‘DCIM’.
11. Then double click the folder that contains the desired images to view.
12.To view an image, double click on the file.
FOR MACINTOSH USERS
1. Power the camera on.
2. Connect the camera to the computer.
After a few moments, the external hard drive will appear on the desktop.
3. Double-click the "untitled" removable drive that is on your desktop.
4. Double-click DCIM.
5. Then double click the folder that contains the desired images to view.
The stored pictures (JPG) and video clips (AVI) stored in the memory card will be displayed.
6. Drag and drop the image you want to save in the computer.
To select all files, click Edit > Select all.
To terminate the USB connection, the procedures differ between the different operating systems.
For Windows 98/98SE/ME/XP users, press [ON/OFF] power button on the camera, ensuring that the green
operation lamp is no longer lit, then disconnect the USB cable from the camera and computer.
For Windows 2000 users, click the ‘card services’ icon (usually located next to the clock) to disable the
connection; ‘Stop DigitalCAM’ appears, click on it and the dialog box ‘Safe To Remove Hardware’appears,
then click ‘OK’. Now the USB cable can be safely unplugged from the camera and the computer.
For Macintosh users, drag the "untitled" removable drive icon on the desktop to the Trash. Unplug the MiniUSB cable from the camera.
INSTALLING ROXIO PHOTOSUITE 5.0 SE
Roxio PhotoSuite 5.0 SE is a photo editing application that is included for free in the software installation CDROM. To use this software, your computer should be running either Windows 98/98SE/Me/2000/XP.
1. Start up your computer, and insert the software installation CD-ROM into the CD-ROM drive.
2. The model selection screen appears, If it does not appear, double-click My Computer and find the CD-ROM
drive, then double-click the menu.
3. Click Roxio PhotoSuite 5.0 SE on the model selection
screen. Follow the on-screen instructions to install the software.
En
46
Page 50

INSTALLING SOFTWARE
4. A welcome window appears. Click Next to continue with the installation.
En
5. The ‘Software License Agreement’ window appears. To accept the license, click on ‘I accept the terms in the
license agreement’, then click Next . (If you do not accept the license agreement, click on ‘I do not accept
the terms in the license agreement’, then click Cancel. To exit installation, click Yes.)
6. Type your name in the ‘User Name:’ field. Then type the name of your organization in the ‘Organization:’
field. Select the option of “Install this application for:”. (Note: the option selection may not appear for some
editions of Windows operation system.) Then click Next.
7. Select a destination folder in which the software will be installed. For most users, ‘C:\Program files\’ is the
most appropriate choice. Then click Next.
47
Page 51

INSTALLING SOFTWARE
8. The ‘Shortcut on Desktop and Content Location’ window appears, check either one, both or none of the
boxes. Click Next to continue.
9. Read through the Release Notes, then click Next.
10. The ‘Ready to Install the Program’ window appears. Click Install.
Note: If ‘CAM-IN Suite III Installer’ installer is opened, some versions of windows operating systems might
display a 'Files in use' window, prompting you to close CAM-IN Suite III Installer window first. Close the
application, then click 'Ready' installation would been proceed automatically.
11. When installation is completed, click Finish to exit the InstallShield Wizard.
Please note: In some Windows operating systems, a window titled ‘Roxio PhotoSuite 5 Installer Information’
appears, prompting you to restart your system for the configuration changes to take effect. In that case, click
‘Yes’ to restart immediately or click ‘No’ to restart the system later. If the system is restarted, there would be
no need to perform step 12 below.
En
12. The ‘CAM-IN Suite III Installer’ window remains on screen. Click Exit.
48
Page 52

INSTALLING SOFTWARE
USING THE ROXIO PHOTOSUITE 5.0 SE
En
With Roxio PhotoSuite 5.0 SE you can edit, crop, and print photos that you download from your camera to the
computer. To start this program, click Start > Program > Roxio PhotoSuite 5 (for Windows 98/98SE/Me/2000
Users).
For Windows XP users, click Start>All Programs>Roxio PhotoSuite 5.
Note: If during installation, you checked the box next to ‘Place Shortcut on Desktop’, then your desktop would
include a shortcut icon. Double click it to start the program.
For information on how to use the program, click Help > Roxio PhotoSuite Help (or press F1). Also refer to the
application’s help documentation (not included) for further information.
49
Page 53

APPENDIX
APPENDIX
MENU REFERENCE
The following shows lists of menus that appear in the REC mode and PLAY mode, and their settings.
REC MODE
REC tab menuz
REC Mode
Self-Timer
Size
Quality
EV Shift
White Balance
ISO
AF Area
Metering
Filter
Sharpness
Saturation
Contrast
Flash Intensity
Grid
Digital Zoom
Review
Snapshot / NICESHOT / Movie
10 sec/2 sec
2560 x 1712 (3:2), 2048 x 1536, 1600 x 1200,
1280 x 960, 640 x 480
Fine / Normal / Economy
–2.0 / –1.7 / –1.3 / –1.0 / –0.7 / –0.3 / 0.0 / +0.3 / +0.7 / +1.0 /
+1.3 / +1.7 / +2.0
Auto / (Sunlight) / (Shade) / (Tungsten) /
(Fluorescent) / Manual
Auto, 50, 100, 200, 400
Spot / Multi
Multi / Center-weighted / Spot
Off / B/W / Sepia / Red / Green / Blue / Yellow / Pink / Purple
Soft / Normal / Hard
Low / Normal / High
Low / Normal / High
Weak / Normal / Strong
On / Off
On / Off
On / Off
APPENDIX
En
Memory tab menu
REC Mode
Flash
Focus
White Balance
ISO
AF Area
Metering
Flash Intensity
Digital Zoom
MF Position
On / Off
On / Off
On / Off
On / Off
On / Off
On / Off
On / Off
On / Off
On / Off
On / Off
50
Page 54

APPENDIX
Set Up tab menu
Beep On / Off
En
Startup On (Selectable image) / Off
File No. Continue / Reset
Date Style YY/MM/DD / DD/MM/YY / MM/DD/YY
Adjust Time setting
Language / English / Français / Deutsch / Español / Italiano / Português / /
Sleep 30 sec / 1 min / 2 min / Off
Auto Power Off 2 min / 5 min
Format Format / Cancel
Reset Reset / Cancel
/
PLAY MODE
PLAYtab menu
DPOF Select images / All images / Cancel
Protect On / All Files : On / Cancel
Rotate Rotate / Cancel
Resize 1600 x 1200 / 1280 x 960 / 640 x 480 / Cancel
Trimming -Copy Built-inCard / CardBuilt-in / Cancel
INDICATOR LAMP REFERENCE
The camera has three indicator lamps: a green operation lamp, a red operation lamp, and a self-timer lamp.
These lamps light and flash to indicate the current operational status of the camera.
51
Page 55

APPENDIX
There are three lamp flash patterns. Pattern 1 flashes once per second, Pattern 2 flashes twice per second,
and Pattern 3 flashes four times per second. The table below explains what each flash pattern indicates.
REC MODE
Operation Lamp
Green Red Red
Lit Operational (Power on, recording enabled)
Pattern 3 Flash is charging.
Lit Flash charging is complete.
Lit Auto Focus operation was successful.
Pattern 3 Cannot Auto Focus.
Lit Monitor screen is off.
Pattern 2 Storing image
Pattern 1 Storing movie
Pattern 1 Cannot charge flash.
Pattern 2 Memory card problem / Memory card is unformatted.
Lit Memory card is locked. / Cannot create folder.
Pattern 3 Low battery alert
Pattern 3 Formatting card
Pattern 3 Powering down
Lit USB connection
Self-timer
Lamp Meaning/Meaning Displayed
Pattern 1 Self-timer countdown (10 to 3 seconds)
Pattern 2 Self-timer countdown (3 to 0 seconds)
/ Memory is full. / Write error
PLAY MODE
Operation Lamp
Green Red Red
Lit Operational (Power on, recording enabled)
Pattern 3 One of the following operations is being performed:
Pattern 2 Memory card problem / Memory card is unformatted.
Lit Memory card is locked. / Cannot create folder. / Memory is full.
Pattern 3 Battery is Low
Lit USB connection
Self-timer
Lamp Meaning/Meaning Displayed
delete, DPOF, image protect, copy, format, power down
En
52
Page 56

APPENDIX
TROUBLESHOOTING GUIDE
En
Problem Cause Solution
Power does not turn on
Camera suddenly
turns OFF
The camera does not
take pictures
Auto Focus does not
focus properly
The flash doesn’t fire
Image is blurry or out of
focus
Batteries are inserted in the wrong
direction
The batteries are flat.
You are using the wrong type of
AC adapter.
Auto Power Off activated
The batteries are flat.
The camera is in the PLAY mode.
The flash is charging
Memory is full
SD card is not formatted correctly
The lens is dirty.
The subject is not located in the
center of the focus frame when you
compose the image.
The subject you are shooting is a
type that is not compatible with
Auto Focus operation
You are moving the camera.
Flash is set to OFF
You are using the Manual Focus
Mode and have not focused on the
image.
You are trying to use the Macro
Mode when shooting a scenery or
portrait shot.
You are trying to use Auto Focus or
the Infinity Mode when shooting a
close-up shot.
Reload batteries in the correct direction.
Charge or replace the batteries.
Use only the type of AC adapter specified for
this camera, DC IN 3V.
Turn power back on.
Charge or replace the batteries.
Press (REC) to enter the REC mode.
Wait for the flash to charge.
Insert a new SD card or delete any unwanted pictures
The card may be defective, use a new card.
Clean the lens.
Make sure the subject is centered in the
focus frame when composing the image.
Use manual focus
Mount the camera on a tripod.
Set the flash to any mode except OFF.
Focus on the image
Use Auto Focus for scenery and portrait
shots.
Use the Macro Mode for close-ups.
Image is not displayed
on the LCD monitor
Recorded images are
not saved in memory
An SD Card with non-DCIF images
(recorded by another camera) is
loaded
Camera powers down before the
save operation is complete.
Removing the memory card before
the save operation is complete.
53
This camera does not display non-DCIF
images.
When the battery indicator shows,
charge or replace the camera’s batteries.
Do not remove the memory card before the
save operation is complete.
Page 57

Cannot transfer images
to a computer after
connecting the USB
cable
Monitor screen is
All buttons and switches
are disabled.
OFF.
USB driver is not installed
USB communication is in progress.
The monitor screen is turned OFF
(in the REC mode).
Circuit problem caused by
electrostatic charge, impact, etc.,
while the camera was connected to
another device.
APPENDIX
En
Install the USB driver before you connect
the camera to a computer or before turning
on the camera.
After confirming that the computer is not
accessing camera memory, disconnect the
USB cable.
Press [DISP] to turn ON the monitor
screen.
Remove the batteries from the camera,
reinsert them, then try again.
54
Page 58

APPENDIX
SPECIFICATIONS
En
Camera body Compact / Metal
Image Resolution 5MP, 2560x1920
Image ratio w:h 4:3
Effective pixels 4,915,200
Sensor photo detectors 5.36 million
Sensor 1/1.8 " (7.18 x 5.32 mm) CCD
Color filter array RGB
Lens 8 - 24 mm(39-117mm equivalent to 35mm film)
ISO rating Auto, 50, 100, 200, 400 (Selectable)
Zoom 3x Optical / 4x Digital Zoom
Focusing Range Normal 60cm - infinity, Macro: 10-70 cm
Aperture Wide f2.8 - 4.9, Tele 4.9-8.4
White Balance Auto and 4 Preset: Fluorescent, Tungsten, Daylight & Shade.
Scene Selection 19 special scene selectable (Portrait, Scenery, Portrait with Scenery, Children,
Candlelight Portrait, Party, Pet, Flower, Natural Green, Sundown, Night Scene,
Night Scene Portrait, Fireworks, Food, Text, Collection, Black & White, Retro,
Twilight)
Min Shutter 1/8 sec
Max Shutter 1/2000 sec
Flash Unit Built-in. 4 modes: auto/off/on/Red-eye
Guide no.
Exposure compensation -2EV to +2EV in 1/3EV steps
Metering Center-Weighted, Spot & Multi-pattern
Tele: 60cm - 1.8M (approx. 2 ft – 6.5 ft), Wide 60cm - 3.2M (approx. 2 ft –13 ft)
Movie Clips Yes, 320 x 240, 15 fps, 60 sec @ 9.7MB Internal
Tripod mount Yes, Standard 1/4"
Self-timer 2 sec. / 10 sec.
Storage included 9.7 MB Internal
Storage Capacity
(9.7MB Internal)
Resolution 2560 x 1920
Fine 4 4 5 8 13 46
Normal 5 5 7122061
Economy 7 8 14 24 35 98
2560 x 1712 (3.2)
2048x1536 1600 x 1200 1280 x 960 640 x 480
Storage Type SD/MMC card
Compressed format JPEG (EXIF 2.2), supports DPOF
55
Page 59

APPENDIX
Quality Levels Fine, Normal, Economy
Viewfinder Optical with real image
LCD 1.6" TFT
LCD Pixels 85K
Playback zoom Ye s
USB Yes
Battery / Charger Yes
Battery AA (2) batteries (NiMH recommended)
Power Management 2 min. / 5 min. auto power off
Weight (inc. batteries) approx. 160 g w/o battery
Dimensions 88x 60.5 x 32.7 mm (3.5 x 2.4 x 1.3 in)
PC Software Incl. MGI
Accessories 2x AA rechargeable batteries + charger, camera pouch, USB cable,
wrist strap, User's Guide, Quick Start Guide, Software CD
System Compatibility Win 98/98SE, Win 2000, Win ME, Win XP, Mac OS 9.1, 9.2, 10.1 and 10.2
System Requirements 486MHz Pentium II Processor, 128Mbytes of RAM, at least 10Mbytes free hard
disk, 1024 x 768 display with 24-bit color (true color), 4x CD-Rom driver, one
free USB port
Multilanguage Support English, Japanese, Traditional Chinese, Simplified Chinese, German, French,
Spanish, Italian, Dutch, Korean (configuration may vary in different markets)
Drivers Mass Storage
Certifications CE/FCC
All specifications and design are subject to change without prior notice.
En
Concord, Concord Eye-Q and the Concord Eye-Q logo are registered trademarks or trademarks of Concord Camera Corp., in the United States
and/or other countries. Microsoft and Windows are either registered trademarks or trademarks of Microsoft Corporation in the United States
and/or other countries. Mac and Macintosh are registered trademarks or trademarks of Apple Computer, Inc. in the U.S. and other countries. All
other brands and product names are either registered trademarks or trademarks of their respective owners.
56
Page 60

GETTING HELP
GETTING HELP
GETTING HELP
En
You can get help from our troubleshooting section, FAQ on our website or by contacting a customer support
representative.
Troubleshooting Section
If you need help with your camera, refer to the Troubleshooting section of this manual on page 53.
Website Customer Support/FAQ
Please visit our customer support website at www.concord-camera.com to view the Frequently Asked
Questions (FAQ) by clicking the appropriate camera model picture in the “Camera Support “ Section. Most
support issues are answered in the FAQ section. You can also E-mail us by clicking the E-mail address link to
the customer support center in the “Camera Support” Section.
Customer Support
Before You E-mail or Call us
If you have questions concerning the operation of the camera or software installation, you can speak to or email a customer service representative. Please have the following information available:
Camera Information: Computer Information:
Name of camera model Operating System
Camera Serial Number Processor Speed (MHz)
For Camera Support please contact:
Toll Free in the US and Canada: Toll Free in Europe:
• (866) 522-6372 • UK: 0800-1696482
Monday – Friday 8:00am – 8:00pm • Spain: 900-973195
Saturday: 9am – 5pm • Germany: 0800-1800563
Sunday: 12pm – 4pm • Italy: 800-781883
Web: www.concord-camera.com • France: 0800-917599
For Camera Support via E-mail, please
contact us at www.concord-camera.com.
Toll:
• +31-53-4829779
Monday – Friday 09:00 – 18:00
Saturday & Sunday: closed
(Central European Time)
Computer Make and Model
Amount of memory
Exact Error message received
CD-ROM Part Number
• For Software Technical Support, please contact:
In the USA and Canada: In Europe:
Roxio Roxio
Web: www.roxio.com Web: www.roxio.com
Tel: 1(866) 279-7694 Tel: +49 2405-4508-9501
Fax: 1(408) 367-5200
Note: Working hours are subject to change without prior notice
57
Page 61

REGULATORY INFORMATION
REGULATTORORYY
REGULA
FCC INFORMATION
FCC WARNING: This equipment meets the limits for a Class B digital device, pursuant to Part 15 of FCC rules.
Only the cable supplied with the camera should be used. Operation with other cables is likely to result in
interference to radio and TV reception and could void the user’s authorization to operate this equipment. This
device complies with Part 15 of the FCC Rules. Operation is subject to the following two conditions:
• This device may not cause harmful interference.
• This device must accept any interference received, including interference that may cause undesired
operation.
Changes or modifications not expressly approved by the manufacturer may void the user’s authority to operate
this equipment.
USER INFORMATION
NOTE: This equipment has been tested and found to comply with the limits for a class B digital device,
pursuant to Part 15 of the FCC Rules. These limits are designed to provide reasonable protection against
harmful interference in a residential installation. This equipment generates, uses and can radiate radio
frequency energy and, if not installed and used in accordance with the instructions, may cause harmful
interference to radio communications. However, there is no guarantee that interference will not occur in a
particular installation.
If this equipment does cause harmful interference to radio or television reception, which can be determined by
turning the equipment on and off, the user is encouraged to try to correct the interference by one or more of the
following measures:
• Reorient or relocate the receiving antenna.
• Increase the separation between the equipment and receiver.
• Connect the equipment into an outlet on a circuit different from that to which the receiver is connected.
• Consult the dealer or an experienced radio/TV technician for help.
VCCI INFORMATION
This is a Class B product, to be used in a domestic environment, based on the Technical Requirement of the
Voluntary Control Council for Interference (VCCI) from Information Technology Equipment. If this is used near a
radio or television receiver in a domestic environment, it may cause radio interference. Please install and use
the equipment according to this instruction manual.
INFORMA
INFORMA
TION
TION
Tested to comply
with FCC standards
for HOME OR OFFICE USE
En
- This product is in conformity with Directive 89/336/EEC.
58
 Loading...