

Page 1

NEDERLANDS
1
Conceptronic CBTHS3
Handleiding
Gefeliciteerd met de aanschaf van uw
Conceptronic Bluetooth® Headset.
In deze handleiding wordt stap voor stap uitgelegd hoe u de
Conceptronic Bluetooth
®
Headset kunt instellen en gebruiken.
In geval van problemen adviseren wij u onze support-site te bezoeken
(ga naar: www.conceptronic.net
en klik op ‘Support’). Hier vindt u een
database met veelgestelde vragen waar u hoogstwaarschijnlijk de
oplossing voor uw probleem kunt vinden.
Heeft u andere vragen over uw product die u niet op de website kunt
vinden, neem dan contact met ons op via e-mail:
support@conceptronic.net
.
Voor meer informatie over Conceptronic producten kunt u terecht op
de Conceptronic website: www.conceptronic.net
.
1. Inhoud van de verpakking
De volgende onderdelen dienen aanwezig te zijn in de verpakking van
de Conceptronic Bluetooth
®
Headset:
1x Conceptronic Bluetooth
®
Headset
1x Oorbeugel voor de Bluetooth
®
Headset
2x Oorschuimsponsje voor de Bluetooth
®
Headset
1x Spannings-adapter, 5V DC, 0.2A
1x USB laadkabel
1x Meertalige handleiding
Page 2

NEDERLANDS
2
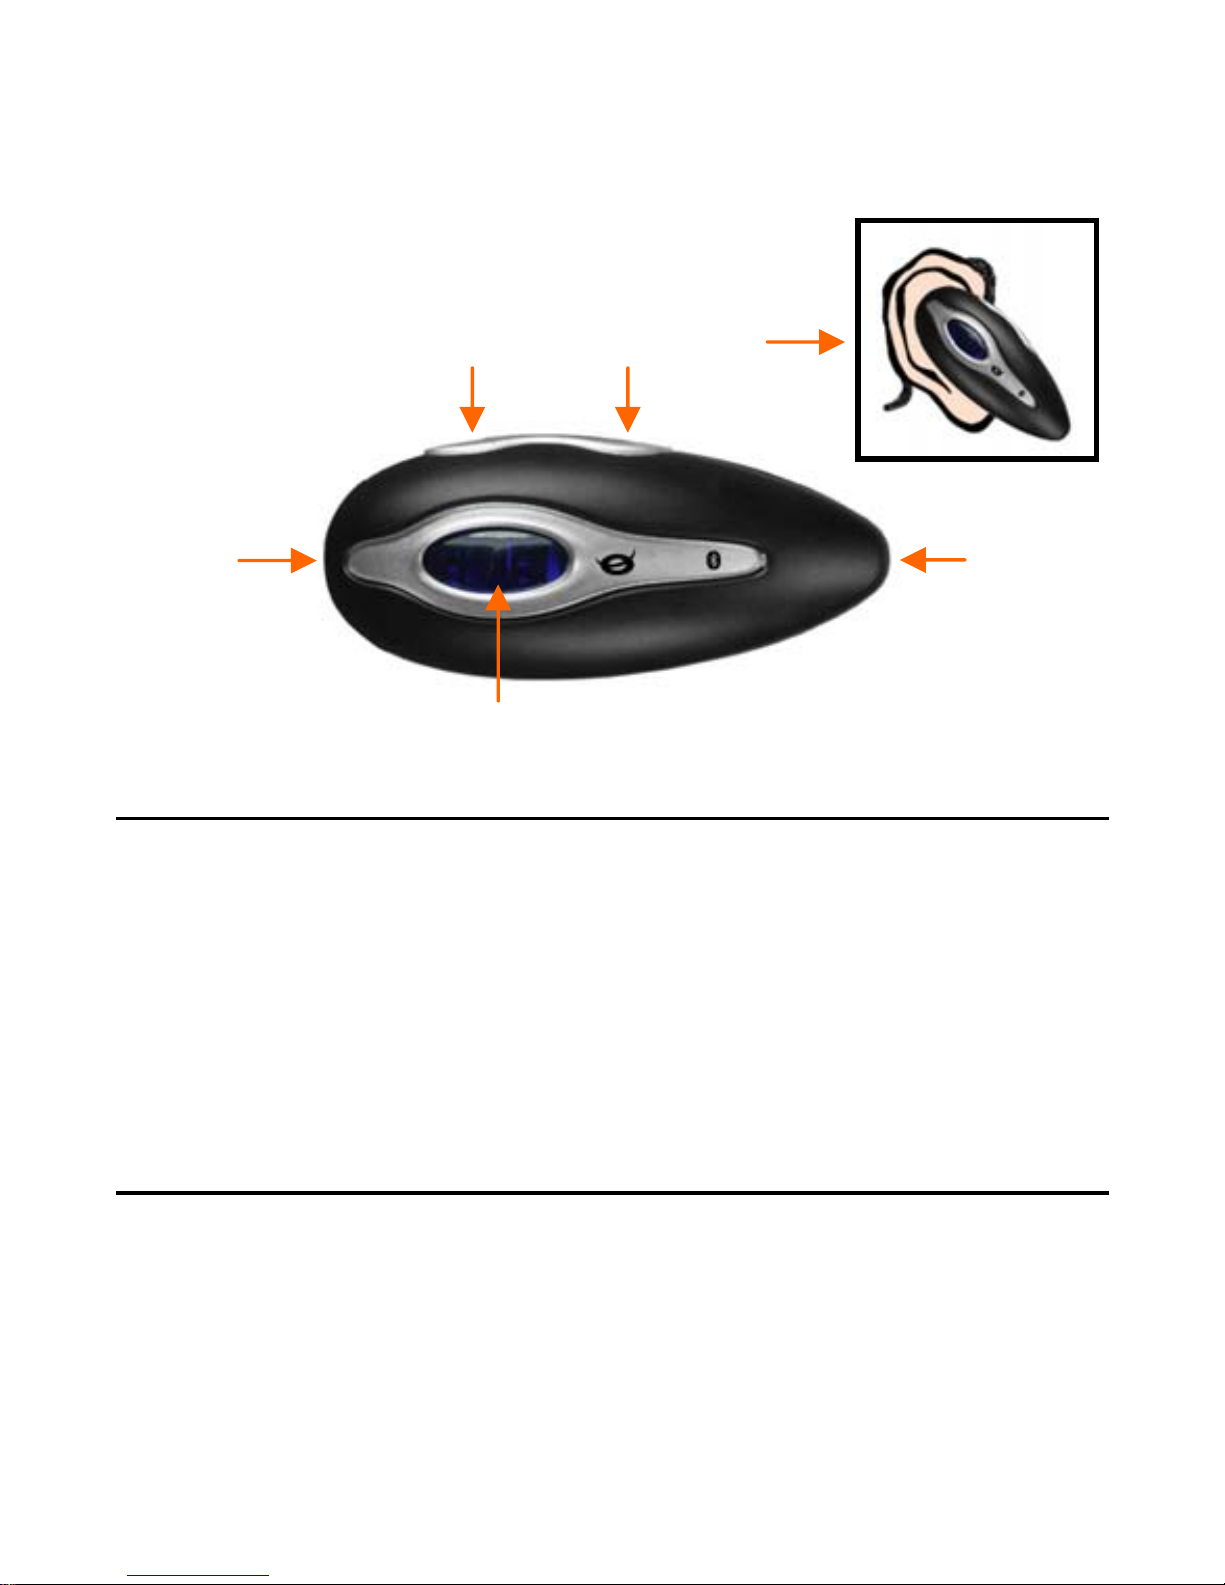
2. Uitleg van de Bluetooth
®
Headset
2.1
Beschrijving van de headset
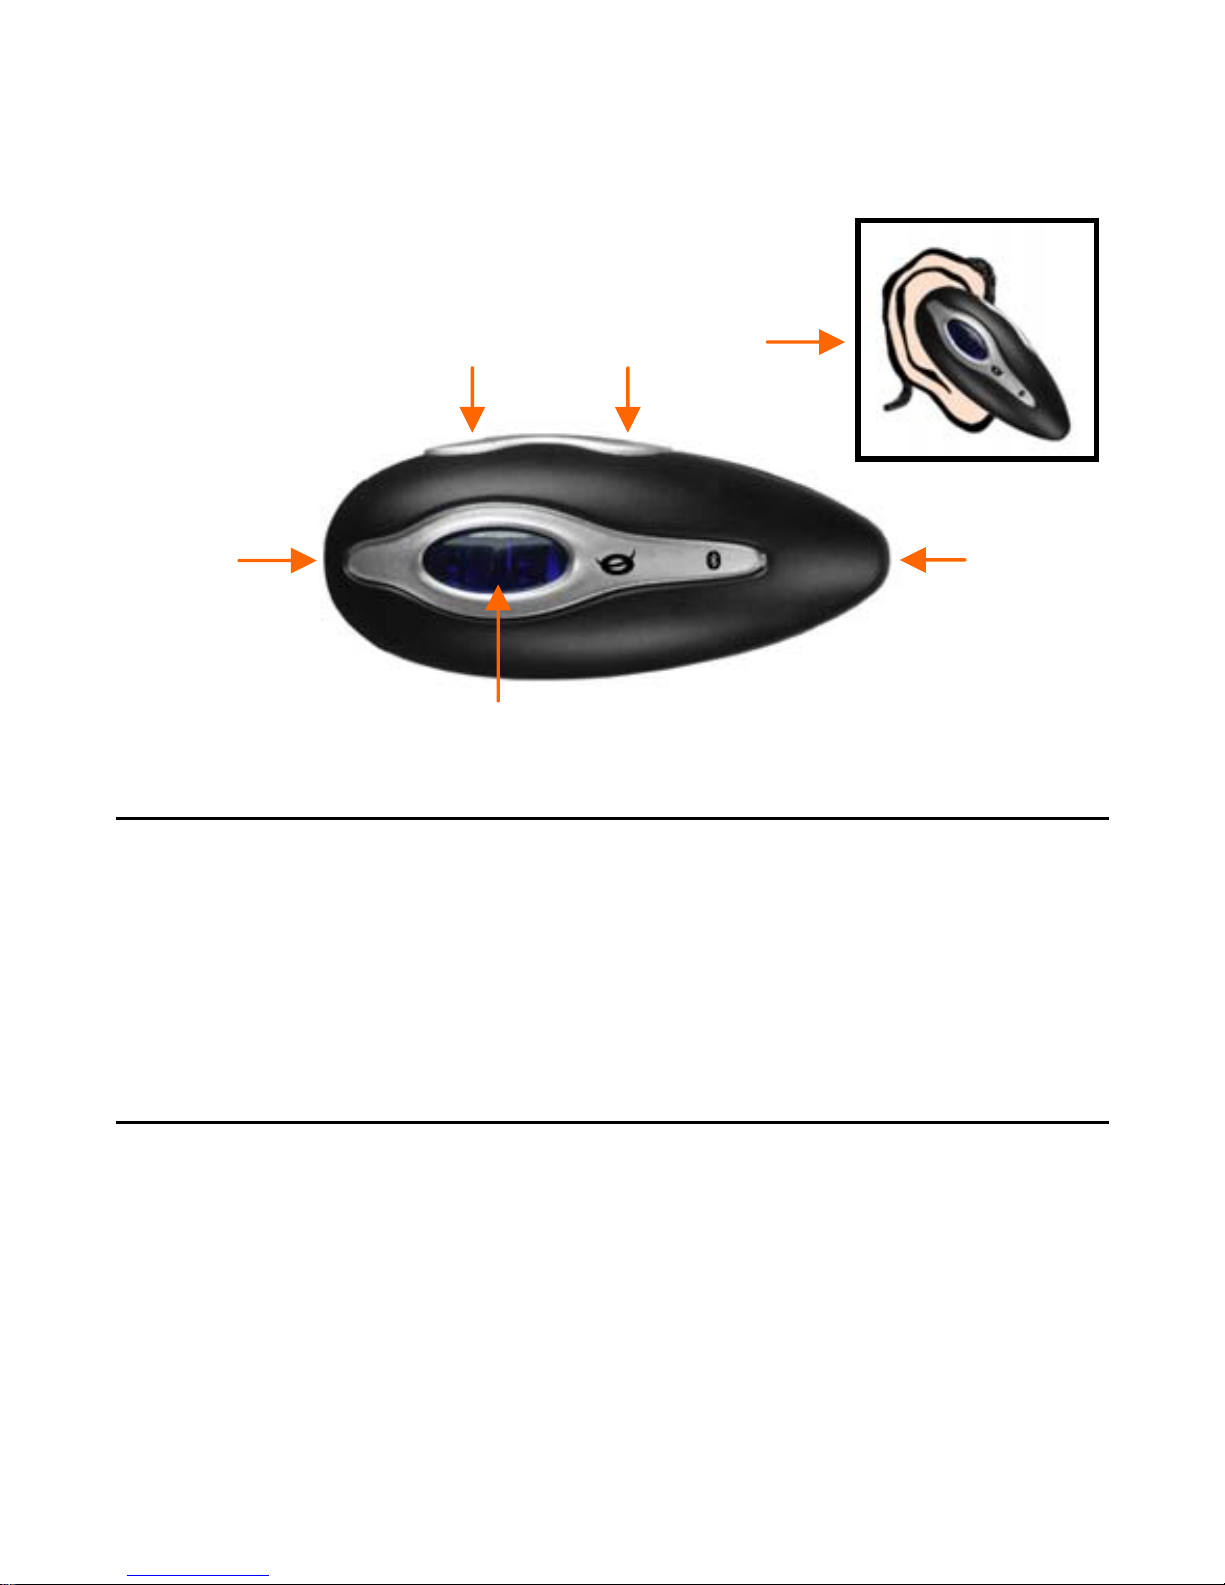
Nr Beschrijving
1 DC aansluiting (voor het opladen van de headset)
2 Schakel de headset in of uit / activeer Pairing Mode /
beantwoord, beëindig of weiger een gesprek / Activeer
Spraakbellen *
(De indicatie LED’s bevinden zich achter de knop)
3 Microfoon
4 Verlaag het Volume / Herhaal het laatst gekozen nummer *
5 Verhoog het Volume
6 Oorbeugel (als losse accessoire in de verpakking aanwezig)
* De werking van deze functie is afhankelijk van de mogelijkheden van
uw GSM. Controleer de handleiding van uw GSM voor informatie over
de ondersteuning van deze functie.
1
2
5 4
3
6
Page 3
NEDERLANDS
3
2.2 De Bluetooth
®
Headset mogelijkheden
De volgende opties kunnen gebruikt worden met de knoppen op de
headset:
In Stand-by:
Optie Knop Indruktijd Knop
Inschakelen 2 Lang (2~3 seconden)
Uitschakelen 2 Lang (3~4 seconden)
Pairing Mode inschakelen 2 Lang (+ 4 seconden) *
Gesprek aannemen 2 Kort
Laatst gekozen nr. herhalen 4 Lang (2 seconden)
Activeer spraakbellen 2 Lang (2 seconden)
Gesprek weigeren 2 Lang (3 seconden)
* De PIN Code van de Bluetooth® headset is ‘0000’. Deze kan niet
gewijzigd worden.
Tijdens een gesprek:
Optie Knop Indruktijd Knop
Gesprek naar GSM overzetten 2 + 5 Lang (2 seconden)
2e gesprek aannemen 2 Lang (+ 4 seconden)
Conferentiegesprek (3-weg) 5 Lang (2 seconden)
Microfoon uitschakelen 4 + 5 Lang (2 seconden)
Gesprek beëindigen 2 Kort
Volume verhogen 5 Kort (1 seconde)
Volume verlagen 4 Kort (1 seconde)
Page 4
NEDERLANDS
4
3. De batterij van de headset opladen
De headset heeft een ingebouwde Li-ion battery. Deze batterij moet
eerst volledig worden opgeladen voordat u de headset voor het eerst
kunt gebruiken. Bij de eerste keer opladen duurt de oplaadtijd
ongeveer 4 uur.
Als de Rode LED op de headset tijdens het gebruik knippert, is de
batterij bijna leeg. Het her-opladen van de batterij duurt ongeveer 2
uur.
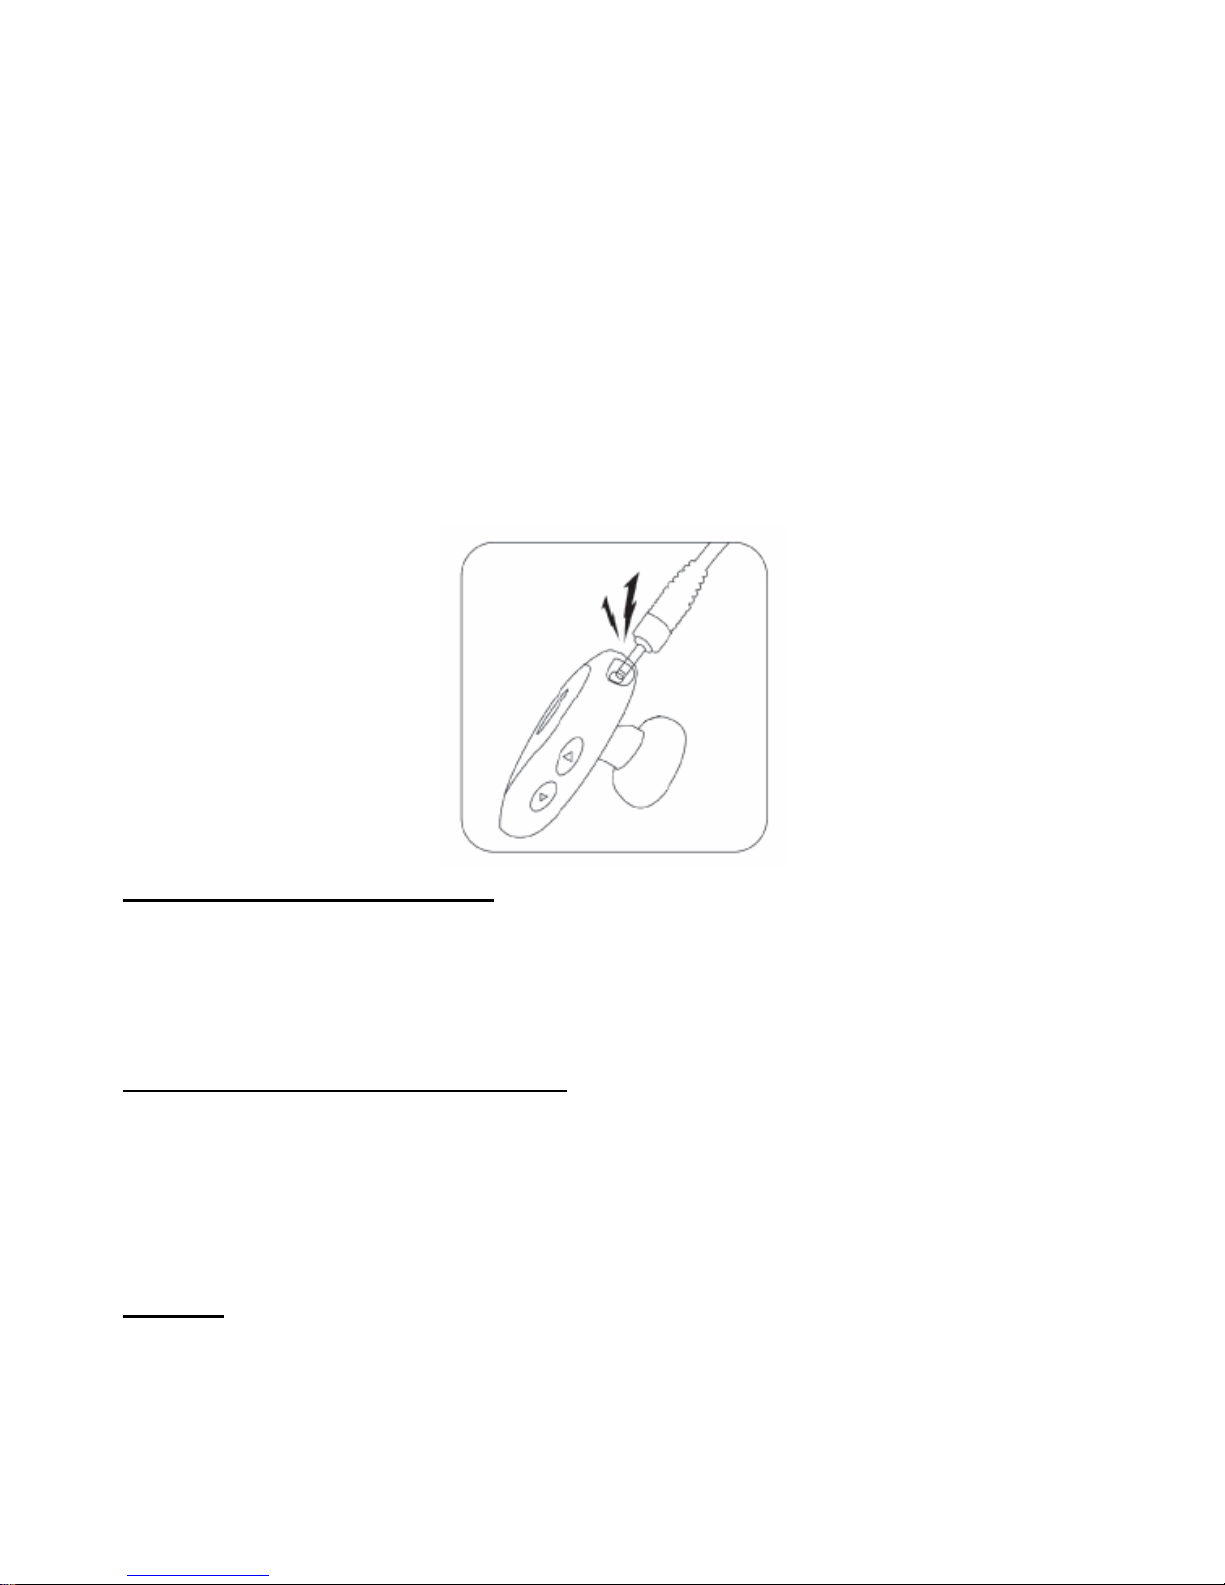
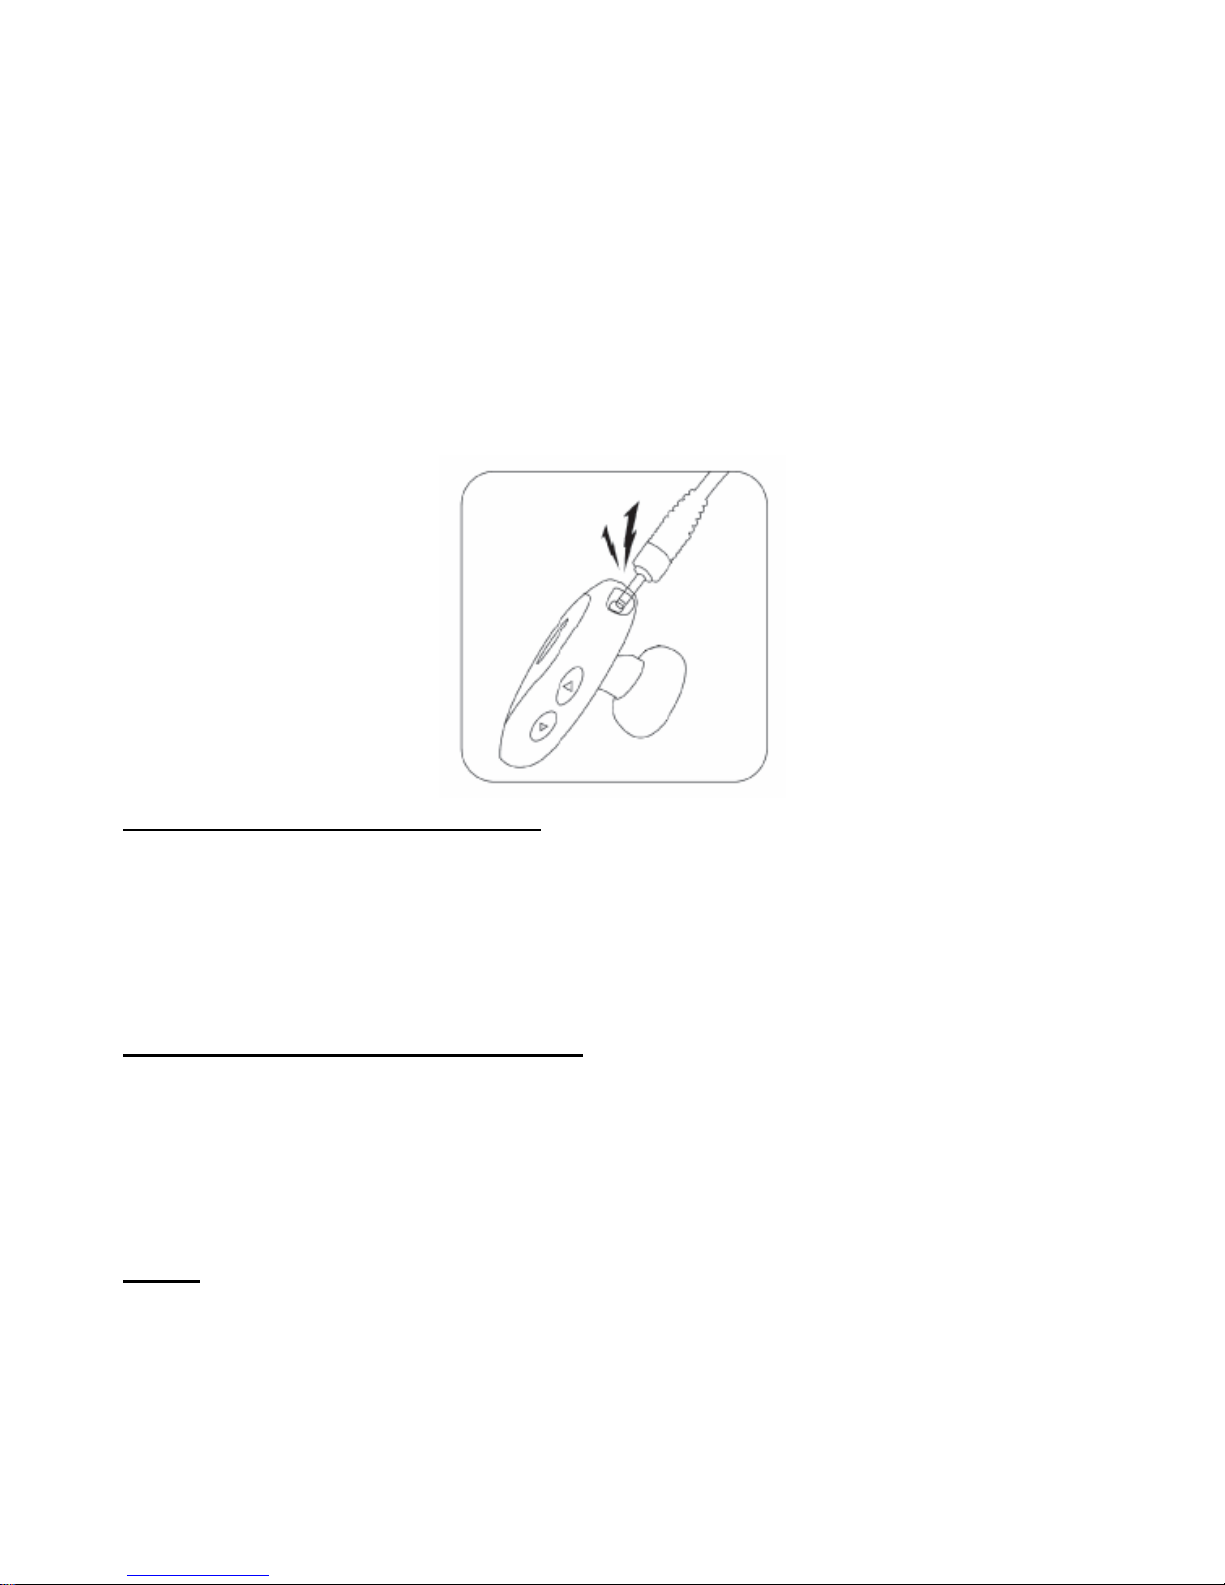
Opladen met de reislader:
Sluit de lader aan op een vrij stopcontact en op de DC ingang van de
headset. De rode LED zal aangaan. Als de batterij volledig is geladen
zal de rode LED uitgaan. Ontkoppel de lader van de headset.
Opladen met de USB laadkabel:
Sluit de USB laadkabel aan op een vrije USB poort van uw computer en
op de DC ingang van de headset. De rode LED zal aangaan. Als de
batterij volledig is geladen zal de rode LED uitgaan. Ontkoppel de USB
laadkabel van de headset.
Let op:
Het oplaadproces via de USB laadkabel kan langer duren dan
met de gewone lader, afhankelijk van het spannings-niveau
van de gebruikte USB poort.
Page 5

NEDERLANDS
5
4. De Bluetooth
®
headset koppelen met uw GSM
De headset dient eerst gekoppeld te worden met uw GSM voordat u
deze kunt gebruiken. ( De Bluetooth™ Functionaliteit van uw GSM dient
ingeschakeld te zijn)
Let op:
Controleer de handleiding van uw GSM voor Bluetooth™
koppelinstructies voordat u begint met het koppelen van de
headset.
A. Controleer of de Headset is uitgeschakeld.
B. Houd knop “2” (Blauw) meer dan 4 seconden ingedrukt. De
headset zal aangaan (Blauwe LED) en vervolgens in Pairing Mode
gaan (De blauwe en rode LED zullen knipperen).
C. Schakel Bluetooth™ in op uw GSM en volg de instructies in de
handleiding van uw GSM om te zoeken naar nieuwe Bluetooth™
apparaten.
D. De headset zal op uw GSM getoond worden als “CBTHS3”.
Selecteer de headset op uw GSM.
E. Uw GSM zal tijdens het koppelen vragen om een pincode. Voer de
code “0000” in om het koppelproces te voltooien.
F. Als het koppelproces is voltooid zal de Blauwe indicatie-LED
knipperen. De headset is nu in stand-by stand en zal automatisch
verbinding maken met uw GSM.
Let op: Als het koppelen tijdens een periode van ongeveer 1 minuut
niet lukt, zal de headset het koppelproces stoppen. U dient de
stappen A & B te herhalen om het koppelproces opnieuw te
activeren.
Page 6

NEDERLANDS
6
5. De Bluetooth
®
headset gebruiken
In- en uitschakelen:
Als de headset is uitgeschakeld, kunt u deze inschakelen door knop “2”
(Blauw) 2 seconden ingedrukt te houden.
Als de headset is ingeschakeld, zal deze automatisch een verbinding
maken met uw GSM.
Als de headset is ingeschakeld kunt u deze uitschakelen door knop “2”
(Blauw) 3 seconden ingedrukt te houden.
Een gesprek accepteren, beëindigen of weigeren:
Bij een inkomend gesprek zal er een beltoon via de headset worden
afgespeeld. Om het inkomende gesprek te accepteren drukt u kort op
knop “2” (Blauw).
Let op:
Sommige GSM’s verbreken automatisch de verbinding met de
headset als deze niet actief gebruikt wordt. In dit geval zult u
de beltoon niet over de headset horen. Druk op knop “2”
(Blauw) om de verbinding met de GSM te herstellen. Druk
vervolgens nogmaals op knop “2” (Blauw) om het gesprek aan
te accepteren.
Om een gesprek te beëindigen drukt u kort op knop “2” (Blauw).
Om een inkomend gesprek te weigeren drukt u 3 seconden op knop “2”
(Blauw).
Het volume tijdens een gesprek wijzigen:
Om het volume van de headset te verhogen drukt u op knop “5”.
Om het volume van de headset te verlagen drukt u op knop “4”.
U kunt ook het volume op uw GSM wijzigen.
Page 7

NEDERLANDS
7
Een nummer bellen:
Bel het nummer op uw GSM zoals u normaal gesproken doet. Wanneer
de GSM het gesprek activeert, zal het geluid automatisch overgezet
worden naar de headset.
Om Spraakbellen te activeren drukt u kort op knop “2” (Blauw). Nadat
u een korte toon hoort kunt u de naam van uw contactpersoon noemen.
Let op:
Uw GSM dient Spraakbellen te ondersteunen om gebruik te
kunnen maken van deze optie. Zie de handleiding van uw GSM
voor meer informatie over de optie Spraakbellen. Uw GSM
dient voorzien te zijn van Spraaklabels voor uw
contactpersonen.
Laatste nummer opnieuw bellen:
Houdt knop “4” ongeveer 2 seconden ingedrukt om het laatstgekozen
nummer opnieuw te bellen. Uw GSM zal het nummer opnieuw bellen.
Let op:
Uw GSM dient het bellen van het laatstgekozen nummer te
ondersteunen. Zie de handleiding van uw GSM voor meer
informatie over deze optie.
Een gesprek overzetten naar uw GSM:
U kunt het actieve gesprek overzetten van de headset naar uw GSM,
bijvoorbeeld als u uw auto verlaat. Om het gesprek over te zetten
houdt u de knoppen “2” (Blauw) en “5” ongeveer 2 seconden
ingedrukt. Na het horen van een korte toon zal het gesprek overgezet
worden naar uw GSM.
Page 8

NEDERLANDS
8
De microfoon uitschakelen tijdens een gesprek:
Om de microfoon van de headset tijdens een gesprek uit te schakelen
drukt u ongeveer 2 seconden op knop “4” en “5”. U zult korte tonen
horen door de headset zolang de microfoon is uitgeschakeld. Druk
nogmaals op knop “4” en “5” om de microfoon weer in te schakelen.
Een 2
e
gesprek accepteren:
Als er een 2e gesprek binnenkomt terwijl u al in een gesprek zit, kunt u
het huidige gesprek in de wacht zetten en het 2
e
gesprek aannemen.
Houdt knop “2” (Blauw) meer dan 4 seconden ingedrukt. Het actieve
gesprek wordt in de wacht gezet en het 2
e
gesprek wordt
geaccepteerd.
Om terug te schakelen naar het 1
e
gesprek drukt u nogmaals meer dan
4 seconden op knop “2” (Blauw). Het 2
e
gesprek zal in de wacht
worden gezet en het 1
e
gesprek zal opnieuw actief worden.
U kunt het actieve gesprek beëindigen door kort op knop “2”(Blauw) te
drukken. Het actieve gesprek wordt beëindigd en het gesprek dat in de
wacht staat zal actief worden.
Conferentiegesprek (3-weg):
Als u 2 gesprekken heeft aangenomen, (1 actief, 1 in de wacht) kunt u
een conferentiegesprek met beide gesprekken starten door knop “5”
ongeveer 2 seconden in gedrukt te houden. Het gesprek in de wacht zal
worden toegevoegd aan het actieve gesprek.
Veel plezier met het gebruik van uw
Conceptronic Bluetooth
®
Headset !
Page 9

ENGLISH
9
Conceptronic CBTHS3
User Guide
Congratulations on the purchase of your
Conceptronic Bluetooth® Headset.
The enclosed User Guide gives you a step-by-step explanation of how to
install the Conceptronic Bluetooth
®
Headset.
When problems occur, we advise you to go to our support-site (go to
www.conceptronic.net
and click ‘Support’. Here you will find the
Frequently Asked Questions Database.
When you have other questions about your product and you cannot find
it at our website, contact us by e-mail: support@conceptronic.net
.
For more information about Conceptronic products, please visit the
Conceptronic Web Site: www.conceptronic.net
.
1. Package Contents
The following items are present in the package of the Conceptronic
Bluetooth
®
Headset:
1x Conceptronic Bluetooth
®
Headset
1x Ear-hook for Bluetooth
®
Headset
2x Ear-piece sponge for Bluetooth
®
Headset
1x Power supply 5V DC, 0.2A
1x USB Charging Cable
1x Multi Language User Guide
Page 10
ENGLISH
10
2. The Bluetooth
®
Headset Explained
2.1
Functions of the buttons
Nr Explanation
1 DC Input (For charging the Headset)
2 Turn the headset on or off / Enter Pairing Mode / Answer, end
or reject a call / Activate Voice Dialing *
(The indication LED’s are behind the button)
3 Microphone
4 Decrease Volume / Redial the last call *
5 Increase Volume
6 Earhook (included as separate accessory in the package)
* The availability of this function depends on the design of your
mobile phone. Please refer to the manual of your mobile phone for
support on this function.
1
2
5 4
3
6
Page 11

ENGLISH
11
2.2 The Bluetooth
®
Headset Button Options
The following features can be accessed with the buttons:
In Standby:
Feature Button Button Press Duration
Power On 2 Long (2~3 seconds)
Power Off 2 Long (3~4 seconds)
Enter Pairing Mode 2 Very Long (+ 4 seconds) *
Answer a call 2 Short
Redial the last call 4 Long (2 seconds)
Activate Voice Dialing 2 Long (2 seconds)
Reject a call 2 Long (3 seconds)
* The PIN Code of the Bluetooth® Headset is ‘0000’. This setting
cannot be changed.
During a call:
Feature Button Button Press Duration
Transfer call to your phone 2 + 5 Long (2 seconds)
Accept Second Call 2 Very Long (+ 4 seconds)
Add waiting call to conference 5 Long (2 seconds)
Mute Microphone 4 + 5 Long (2 seconds)
End a call 2 Short
Volume Up 5 Short (1 second)
Volume Down 4 Short (1 second)
Page 12
ENGLISH
12
3. Charging the battery of the Headset
Your headset has a built-in Li-ion battery which must be fully charged
before you can use the headset the first time.
It takes up to 4 hours to fully charge the battery the first time.
If the Red LED of the headset blinks during use, the battery is almost
empty. It will take about 2 hours to recharge the battery.
Charge by the travel charger:
Plug the travel charger into a free wall outlet and connect the Power
Plug to the DC input of the headset. The red indicator will light up.
When the battery is full, the red indicator will be off. Remove the
travel charger from your headset.
Charge by the USB charge cable:
Plug the USB charge cable in a free USB port of your computer and
connect the Power Plug to the DC input of the headset. The red
indicator will light up. When the battery is full, the red indicator will
be off. Remove the USB charge cable from your headset.
Note:
When you charge your headset through the USB port of your
computer, the charging process can take longer, depending on
the supplied power of your USB port.
Page 13

ENGLISH
13
4. Pairing the Bluetooth
®
Headset with your phone
Before you can use the Headset with your mobile phone, you need to
pair the Headset with your mobile phone.
(Your mobile phone needs Bluetooth
®
Functionality enabled).
Note:
Before you start pairing, refer to the manual of your mobile
phone and check how to pair your mobile phone with
Bluetooth
®
devices.
A. Make sure the Stereo Headset is turned off.
B. Press and hold button “2” (Blue) on the headset for more than 4
seconds. The headset will turn on (Blue LED) and will enter
pairing mode (Blue and Red LED will flash alternatively).
C. Turn on your Bluetooth
®
mobile phone; follow the manual of your
mobile phone to activate the Bluetooth
®
device pairing process
and search for new Bluetooth
®
devices.
D. The headset will be shown as “CBTHS3” on your mobile phone.
Select the headset on your mobile phone.
E. Your mobile phone will prompt for a pin-code during pairing.
Enter “0000” to complete the pairing process.
F. When the pairing process is successfully completed the blue LED
on the headset will flash. The headset is now in standby mode
now and will connect to your mobile phone automatically.
Note: If pairing is not possible during a period of approximate 1
minute the process will be stopped. You will have to repeat
step A & B to initiate the pairing mode again.
Page 14

ENGLISH
14
5. Using the Bluetooth
®
Headset
Turning on and off:
If the Headset is turned off, press button “2” (Blue) for 2 seconds to
turn the Headset on.
When the Headset is turned on, it will automatically connect to the
mobile phone.
If the Headset is turned on, press button “2” (Blue) for 3 seconds to
turn the Headset off.
Accept, end and reject calls:
When you receive an incoming call, you will hear a ringtone through
the Headset. To accept an incoming call, press button “2” (Blue)
shortly.
Note:
Some mobile phones automatically disconnect the headset if
the connection is not used for a while. In this case, the
headset will not ring when there is an incoming call. Press
button “2” (Blue) to reconnect with the mobile phone. Press
button “2” (Blue) again to accept the incoming call.
To end a call, press button “2” (Blue) shortly.
To reject an incoming call, press button “2” (Blue) for 3 seconds.
Adjust the volume during calls:
To increase the volume of the Headset, press button “5”.
To decrease the volume of the Headset, press button “4”.
You can also adjust the volume on your mobile phone.
Page 15

ENGLISH
15
Dial calls:
Dial the phone number on your mobile phone like you normally do.
When the phone initiates the call the sound will automatically be
transferred to the Headset.
To activate the Voice Dialing on your mobile phone, press button “2”
(Blue) shortly. After you hear a notification beep, say the name of your
contact.
Note:
To use Voice Dialing your mobile phone needs Voice Dialing
support. Refer to the manual of your phone for the Voice
Dialing Function. To use Voice Dialing your mobile phone must
contain Voice Dialing records for your contacts.
Redial calls:
Press and hold the button “4” for about 2 seconds to initiate Redialing.
Your mobile phone will redial the last made call.
Note:
To use the Redialing function your mobile phone needs support
for Redialing. Refer to the manual of your mobile phone for
the Redialing Function.
Transfer calls:
You can transfer a call from your headset to your mobile phone, for
example when you are leaving the car.
To transfer the call to your mobile phone, press button “2” (Blue) and
“5” for about 2 seconds. You will hear a beep. The call will be
transferred to your mobile phone.
Page 16

ENGLISH
16
Mute the Microphone during calls:
To mute the microphone of the headset during calls, press button “4”
and “5” for about 2 seconds. You will hear beep sounds on the headset
during mute. To disable the mute function, press button “4” and “5”
again for about 2 seconds.
Accepting a second call:
If you receive a second call during a conversation, you can put the
current call on hold and accept the second call.
Press and hold button “2” (Blue) for more than 4 seconds. The first call
will be on hold and the second call will be answered.
To switch back to your first call, press and hold button “2” (Blue) for
more than 4 seconds. The second call will be on hold and the first call
will be active again.
You can the active call by pressing button “2” (Blue) shortly. The
active call will be ended and the other call will be activated.
3-Way conversation:
If you have 2 calls (1 active, 1 on hold), you can start a 3-way
conversation by pressing button “5” for about 2 seconds. The call on
hold will be added to the conversation.
Enjoy the use of the Conceptronic
Bluetooth
®
Headset !
Page 17

ESPAÑOL
17
CBTHS3 de Conceptronic
Guía del usuario
Felicidades por la compra de su
auricular Bluetooth® de Conceptronic.
Esta guía del usuario adjunta le orientará paso a paso sobre cómo
instalar el auricular Bluetooth
®
de Conceptronic.
En caso de surgir cualquier problema, visite nuestra página web de
asistencia técnica (haga clic en el apartado “Soporte” de
www.conceptronic.net
). En esa sección podrá consultar la base de
datos de Preguntas Frecuentes (F.A.Q).
Si tiene otras preguntas sobre nuestro producto y no las encuentra en
nuestro sitio web, póngase en contacto con nosotros por correo
electrónico: apoyo@conceptronic.net
.
Para más información sobre los productos de Conceptronic, visite el
sitio web de Conceptronic: www.conceptronic.net
.
1. Contenido del paquete
El paquete del auricular Bluetooth
®
de Conceptronic incluye los
siguientes componentes:
1x auricular Bluetooth® de Conceptronic
1x gancho de oreja para el auricular Bluetooth
®
2x esponjitas para el auricular Bluetooth
®
1x fuente de alimentación de 5 V de CC, 0,2 A
1x cable de carga USB
1x guía del usuario multilingüe
Page 18
ESPAÑOL
18
2. Descripción del auricular Bluetooth
®
2.1
Funciones de los botones
N.º Descripción
1 Entrada de corriente (para cargar el auricular)
2 Encender o apagar el auricular / Introducir el modo de
emparejamiento / Responder, finalizar o rechazar una
llamada / Activar marcación por voz *
(Los LED de indicación están detrás del botón.)
3 Micrófono
4 Bajar el volumen / Volver a marcar la última llamada *
5 Subir el volumen
6 Gancho de oreja (incluido como accesorio separado en el
paquete)
* La disponibilidad de esta función depende del diseño de su teléfono
móvil. Consulte el manual de su teléfono móvil para saber cómo
utilizar esta función.
1
2
5 4
3
6
Page 19

ESPAÑOL
19
2.2
Opciones de botón del auricular Bluetooth
®
Las funciones siguientes se pueden acceder con los botones:
En standby:
Función Botón Duración de la pulsación
del botón
Encendido 2 Larga (2~3 segundos)
Apagado 2 Larga (3~4 segundos)
Modo de emparejamiento 2 Muy larga (+ 4 segundos) *
Responder una llamada 2 Corta
Volver a marcar la última
llamada
4 Larga (2 segundos)
Activar marcación por voz 2 Larga (2 segundos)
Rechazar una llamada 2 Larga (3 segundos)
* El código PIN del auricular Bluetooth® es “0000”. Esta configuración
no se puede modificar.
Durante una llamada:
Función Botón Duración de la pulsación
del botón
Transferir la llamada al
teléfono
2 + 5 Larga (2 segundos)
Aceptar segunda llamada 2 Muy larga (+ 4 segundos)
Agregar una llamada en espera
a la conferencia
5 Larga (2 segundos)
Silenciar el micrófono 4 + 5 Larga (2 segundos)
Terminar una llamada 2 Corta
Subir el volumen 5 Corta (1 segundo)
Bajar el volumen 4 Corta (1 segundo)
Page 20

ESPAÑOL
20
3. Carga de la batería del auricular
Su auricular dispone de una batería de iones de litio que debe estar
totalmente cargada antes de utilizar el auricular por primera vez.
La batería tarda 4 horas en cargarse totalmente por primera vez.
Si el LED rojo del auricular parpadea durante su utilización, significa
que la batería está casi vacía. La recarga de la batería tardará unas dos
horas.
Carga mediante el cargador de viaje:
Enchufe el cargador de viaje a una toma de corriente y conecte el
cable de alimentación a la entrada de corriente del auricular. El
indicador rojo se encenderá.
Cuando la batería esté llena, el indicador rojo se apagará. Quite el
cargador de viaje de su auricular.
Carga mediante el cable de carga USB:
Enchufe el cable de carga USB a un puerto USB libre de su ordenador y
conecte el cable de alimentación a la entrada de corriente del
auricular. El indicador rojo se encenderá. Cuando la batería esté llena,
el indicador rojo se apagará. Quite el cable de carga USB de su
auricular.
Nota:
Al cargar su auricular mediante el puerto USB del ordenador,
el proceso de carga puede tardar más, en función de la
potencia de alimentación de su puerto USB.
Page 21

ESPAÑOL
21
4. Emparejamiento del auricular Bluetooth
®
con su
teléfono
Antes de utilizar el auricular con su teléfono móvil, necesita emparejar
el auricular con su teléfono móvil.
(Su teléfono móvil necesita tener activada la función Bluetooth
®
.)
Nota:
Antes de empezar el emparejamiento, consulte el manual de
su teléfono móvil para saber cómo se empareja su móvil con
dispositivos Bluetooth
®
.
A. Asegúrese de que el auricular estéreo está apagado.
B. Mantenga pulsado el botón “2” (azul) del auricular durante más
de 4 segundos. El auricular se encenderá (LED azul) y entrará en
modo de emparejamiento (el LED azul y rojo parpadeará
alternativamente).
C. Encienda su teléfono móvil Bluetooth
®
; siga el manual de su
teléfono móvil para activar el proceso de emparejamiento del
dispositivo Bluetooth
®
y busque nuevos dispositivos Bluetooth®.
D. El auricular se mostrará como “CBTHS3” en su teléfono móvil.
Seleccione el auricular en su teléfono móvil.
E. Su teléfono móvil le pedirá que introduzca un código pin durante
el emparejamiento. Introduzca “0000” para completar el
proceso de emparejamiento.
F. Cuando el proceso de emparejamiento se haya completado
satisfactoriamente, el LED azul del auricular parpadeará. El
auricular está ahora en modo standby y se conectará a su
teléfono móvil automáticamente.
Nota:
Si el emparejamiento no es posible durante un período de
aproximadamente 1 minuto, el proceso se detendrá. Deberá
repetir el paso A y B para iniciar de nuevo el modo de
emparejamiento.
Page 22

ESPAÑOL
22
5. Utilización del auricular Bluetooth®
Encendido y apagado:
Si el auricular está apagado, pulse el botón “2” (azul) durante 2
segundos para encenderlo.
Cuando el auricular esté encendido, se conectará automáticamente con
el teléfono móvil.
Si el auricular está encendido, pulse el botón “2” (azul) durante 3
segundos para apagarlo.
Aceptar, finalizar y rechazar llamadas:
Al recibir una llamada, oirá un tono de llamada por el auricular. Para
aceptar la llamada, pulse el botón “2” (azul) brevemente.
Nota:
Algunos teléfonos móviles desconectan automáticamente el
auricular si la conexión no se ha utilizado durante un rato. En
este caso, el auricular no sonará al recibir una llamada. Pulse
el botón “2” (azul) para volver a conectar con el teléfono
móvil. Pulse el botón “2” (azul) otra vez para aceptar la
llamada entrante.
Para finalizar la llamada, pulse el botón “2” (azul) brevemente.
Para rechazar la llamada, pulse el botón “2” (azul) durante 3
segundos.
Ajuste del volumen durante las llamadas:
Para subir el volumen del auricular, pulse el botón “5”.
Para bajar el volumen del auricular, pulse el botón “4”.
También puede ajustar el volumen en su teléfono móvil.
Page 23

ESPAÑOL
23
Marcación de llamadas:
Marque el número de teléfono en su teléfono móvil como hace
normalmente. Cuando el teléfono inicie la llamada, el sonido se
transferirá automáticamente al auricular.
Para activar la marcación por voz en su teléfono móvil, pulse el botón
“2” (azul) brevemente. Al oír el pitido de aviso, diga el nombre de su
contacto.
Nota:
Para utilizar la marcación por voz su teléfono móvil debe tener
esta función. Consulte en el manual de su teléfono cómo
utilizar la función de marcación por voz. Para utilizar la
marcación por voz, su teléfono móvil debe contener registros
de marcación por voz de sus contactos.
Marcación de la última llamada:
Pulse y mantenga pulsado el botón “4” durante unos 2 segundos para
iniciar la rellamada. Su teléfono móvil volverá a marcar el número de
la última llamada realizada.
Nota:
Para utilizar la función de rellamada, su teléfono móvil debe
tener esta función. Consulte en el manual de su teléfono móvil
cómo utilizar la función de rellamada.
Transferencia de llamadas:
Puede transferir una llamada de su auricular a su teléfono móvil, por
ejemplo al salir del coche.
Para transferir la llamada a su teléfono móvil, pulse el botón “2” (azul)
y “5” durante unos 2 segundos. Oirá un pitido. La llamada se
transferirá a su teléfono móvil.
Page 24

ESPAÑOL
24
Silenciar el micrófono durante las llamadas:
Para silenciar el micrófono del auricular durante las llamadas, pulse el
botón “4” y “5” durante unos 2 segundos. Oirá unos pitidos en el
auricular mientras el micrófono esté silenciado. Para desactivar esta
función, vuelva a pulsar el botón “4” y “5” durante unos 2 segundos.
Aceptar una segunda llamada:
Si recibe una segunda llamada durante una conversación, puede poner
en espera la llamada actual y aceptar la segunda llamada.
Pulse y mantenga pulsado el botón “2” (azul) durante más de 4
segundos. La primera llamada se mantendrá en espera y se responderá
a la segunda llamada.
Para volver a la primera llamada, pulse y mantenga pulsado el botón
“2” (azul) durante más de 4 segundos. La segunda llamada se
mantendrá en espera y la primera llamada volverá a estar activa.
Puede finalizar la llamada activa pulsando el botón “2” (azul)
brevemente. La llamada activa finalizará y se activará la otra.
Conversación a 3:
Si tiene 2 llamadas (1 activa, 1 en espera), puede iniciar una
conversación a 3 pulsando el botón “5” durante unos 2 segundos. La
llamada en espera se agregará a la conversación.
¡Disfrute con el auricular Bluetooth® de
Conceptronic!
Page 25

DEUTSCH
25
Conceptronic CBTHS3
Bedienungsanleitung
Wir gratulieren Ihnen zum Kauf Ihres
Conceptronic Bluetooth®-Headsets.
In beiliegender Hardware-Installationsanleitung wird Ihnen Schritt für
Schritt gezeigt, wie das Bluetooth™-Headset von Conceptronic
installiert werden muss.
Wenn Probleme auftreten sollten, besuchen Sie unsere Support-Seite
(unter www.conceptronic.net
) und klicken Sie auf ‚Support’. Dort steht
Ihnen unsere FAQ-Datenbank mit den häufig gestellten Fragen zur
Verfügung.
Wenn Sie weitere Fragen zu Ihrem Produkt haben, die Sie auf unserer
Webseite nicht beantworten können, kontaktieren Sie uns per E-Mail:
support@conceptronic.net
.
Detaillierte Informationen über Conceptronic Produkte finden Sie auf
unserer Webseite: www.conceptronic.net
.
2. Packungsinhalt
In der Verpackung des Conceptronic Bluetooth
®
-Headsets ist Folgendes
enthalten:
1x Conceptronic Bluetooth
®
-Headset
1x Ohrhaken für Bluetooth
®
-Headset
2x Schaumstoff für Ohrteil des Bluetooth
®
-Headsets
1x Netzteil 5V Gleichstrom 0,2A
1x USB-Ladekabel
1x Mehrsprachige Bedienungsanleitung
Page 26

DEUTSCH
26
2. Bedienungstasten des Bluetooth
®
-Headsets
2.1
Funktionen der Bedienungstasten
Nr. Erklärung
1 Gleichstrom-Eingang (für das Laden des Headsets)
2 Zum Ein-/Ausschalten des Headsets / Zum Aufrufen des
Pairing-Modus / Zum Beantworten, Beenden oder
Zurückweisen eines Anrufs / Zur Aktivierung der
Sprachwahlfunktion *
(Die LED-Anzeigen befinden sich hinter der Taste)
3 Mikrofon
4 Zum Reduzieren der Lautstärke / Wiederwahl der letzten
Rufnummer *
5 Zur Erhöhung der Lautstärke
6 Ohrhaken (als separates Zubehör in der Verpackung enthalten)
* Die Verfügbarkeit dieser Funktion hängt von der Kapazität Ihres
Mobiltelefons an. Lesen Sie bitte im Handbuch Ihres Mobiltelefons
nach, ob diese Funktion unterstützt wird.
1
2
5 4
3
6
Page 27

DEUTSCH
27
2.2 Optionen der Bedienungstasten des Bluetooth
®
-Headsets
Folgende Funktionen können mit den Bedienungstasten verwendet
werden:
Im Standby-Modus:
Funktion
Taste
Tastendruckdauer
Gerät einschalten 2 Lange (2-3 Sekunden)
Gerät ausschalten 2 Lange (3-4 Sekunden)
Pairing-Modus aufrufen 2 Sehr lange (mehr als 4
Sekunden) *
Einen Anruf beantworten 2 Kurz
Letzte Rufnummer
wiederwählen
4 Lange (2 Sekunden)
Sprachwahl aktivieren 2 Lange (2 Sekunden)
Einen Anruf zurückweisen 2 Lange (3 Sekunden)
* Der PIN-Code des Bluetooth®-Headsets ist ‚0000’. Diese Einstellung
kann nicht geändert werden.
Während eines Anrufs:
Funktion
Taste
Tastendruckdauer
Umleiten des Anrufs auf Ihr
Telefon
2 + 5 Lange (2 Sekunden)
Einen zweiten Anruf
annehmen
2 Sehr lange (mehr als 4
Sekunden)
Einen anklopfenden Anruf zur
Konferenz hinzufügen
5 Lange (2 Sekunden)
Mikrofon stumm schalten 4 + 5 Lange (2 Sekunden)
Einen Anruf beenden 2 Kurz
Lautstärke erhöhen 5 Kurz (1 Sekunde)
Lautstärke senken 4 Kurz (1 Sekunde)
Page 28

DEUTSCH
28
3. Laden der Batterie des Headsets
Ihr Headset hat eine integrierte Li-ion-Batterie, die vor der ersten
Inbetriebnahme des Headsets vollständig aufgeladen werden muss.
Das erste Mal dauert es bis zu 4 Stunden, bis die Batterie vollständig
aufgeladen ist.
Wenn die rote LED-Anzeige des Headsets während dessen Verwendung
blinkt, ist die Batterie fast leer. Es dauert ca. 2 Stunden, um die
Batterie aufzuladen.
Aufladen mit dem Mobilladegerät:
Stecken Sie das Mobilladegerät in eine freie Steckdose ein und stecken
Sie den Netzstecker im Gleichstromeingang des Headsets ein. Die
Anzeige leuchtet rot.Sobald die Batterie vollständig geladen ist,
erlischt die rote Anzeige. Trennen Sie dann das Mobilladegerät vom
Headset.
Aufladen über das USB-Ladekabel:
Stecken Sie das USB-Ladekabel in einen freien USB-Port Ihres
Computers ein und stecken Sie das Netzteil im Gleichstromeingang des
Headsets ein. Die Anzeige leuchtet rot. Sobald die Batterie vollständig
geladen ist, erlischt die rote Anzeige. Trennen Sie dann das USBLadekabel vom Headset.
Hinweis:
Wenn Sie das Headset über einen USB-Port Ihres Computers
aufladen, dauert der Ladevorgang eventuell länger. Dies
hängt von der Stromversorgung des USB-Ports ab.
Page 29

DEUTSCH
29
4. Pairen des Bluetooth
®
-Headsets mit Ihrem Telefon
Bevor Sie das Headset mit Ihrem Mobiltelefon verwenden können,
müssen Sie die beiden „pairen“.*
(Dazu muss Ihr Mobiltelefon die Bluetooth
®
–Funktion unterstützen.)
Hinweis:
Bevor Sie mit dem Pairing beginnen, lesen Sie im Handbuch
Ihres Mobiltelefons nach, wie dieser Vorgang mit
Bluetooth
®
-Geräten durchgeführt werden muss.
A. Stellen Sie sicher, dass das Headset ausgeschaltet ist.
B. Drücken Sie die Taste “2” (Blau) des Headsets und halten Sie
diese für mehr als 4 Sekunden gedrückt. Das Headset schaltet ein
(blaue LED-Anzeige) und tritt in den Pairing-Modus ein (blaue und
rote LED-Anzeige leuchten abwechslungsweise).
C. Schalten Sie Ihr Bluetooth
®
-Mobiltelefon ein, befolgen Sie die
Anleitung im Handbuch Ihres Mobiltelefons zur Aktivierung des
Pairing-Prozesses für Bluetooth
®
-Geräte und suchen Sie nach
neuen Bluetooth
®
-Geräten.
D. Das Headset wird auf Ihrem Mobiltelefon als „CBTHS3” angezeigt.
Wählen Sie das Headset auf Ihrem Mobiltelefon aus.
E. Während dem Pairing-Vorgang werden Sie von Ihrem Mobiltelefon
zur Eingabe eines Pin-Codes aufgefordert. Geben Sie den Code
„0000” ein, um den Pairing-Prozess abzuschließen.
F. Sobald der Pairing-Prozess erfolgreich abgeschlossen ist, blinkt
die blaue LED-Anzeige des Headsets. Jetzt befindet sich das
Headset im Standby-Modus und verbindet sich automatisch mit
Ihrem Mobiltelefon.
Hinweis:
Wenn das Pairing innerhalb von ungefähr einer Minute nicht
möglich ist, wird der Prozess gestoppt. In diesem Fall
müssen Sie die Schritte A & B wiederholen, um den PairingModus erneut zu starten.
Page 30

DEUTSCH
30
5. Verwenden des Bluetooth
®
-Headsets
Ein- und Ausschalten:
Wenn das Headset ausgeschaltet ist, drücken Sie die Taste „2” (Blau)
für 2 Sekunden, um das Headset einzuschalten.
Wenn das Headset eingeschaltet ist, verbindet es sich automatisch mit
dem Mobiltelefon.
Wenn das Headset eingeschaltet ist, drücken Sie die Taste „2” (Blau)
für 3 Sekunden, um das Headset auszuschalten.
Annehmen, Beenden und Zurückweisen von Anrufen:
Wenn Sie einen Anruf erhalten, zeigt Ihnen das Headset dies mit einem
Klingelton an. Um den eingehenden Anruf anzunehmen, drücken Sie
kurz die Taste “2” (Blau).
Hinweis:
Bei einigen Mobiltelefonen wird die Verbindung mit dem
Headset automatisch getrennt, wenn diese für eine gewisse
Zeit nicht verwendet wird. In diesem Fall ertönt im Headset
bei einem eingehenden Anruf kein Klingelton. Drücken Sie
die Taste “2” (Blau), um die Verbindung mit dem
Mobiltelefon erneut herzustellen. Drücken Sie die Taste “2”
(Blau) erneut, um den eingehenden Anruf anzunehmen.
Um einen Anruf zu beenden, drücken Sie kurz die Taste “2” (Blau).
Um einen eingehenden Anruf zurückzuweisen, drücken Sie die Taste
“2” (Blau) für 3 Sekunden.
Regeln der Lautstärke während einem Anruf:
Um die Lautstärke des Headsets zu erhöhen, drücken Sie die Taste
„5“.
Um die Lautstärke des Headsets zu reduzieren, drücken Sie die Taste
„4“.
Sie können die Lautstärke auch über Ihr Mobiltelefon regeln.
Page 31

DEUTSCH
31
Einen Anruf tätigen:
Wählen Sie, wie gewohnt, die Telefonnummer auf Ihrem Mobiltelefon.
Wenn das Telefon zu wählen beginnt, wird der Ton automatisch auf das
Headset übertragen.
Um die Sprachwahlfunktion auf Ihrem Mobiltelefon auszuwählen,
drücken Sie kurz die Taste "2" (Blau). Sagen Sie nach dem Piepton den
Namen Ihres Kontakts.
Hinweis:
Um die Sprachwahlfunktion verwenden zu können, muss Ihr
Mobiltelefon diese unterstützen. Lesen Sie bitte im
Handbuch Ihres Mobiltelefons nach, ob die
Sprachwahlfunktion unterstützt wird. Um die
Sprachwahlfunktion verwenden zu können, muss Ihr
Mobiltelefon Sprachwahlaufzeichnungen für Ihre Kontakte
enthalten.
Letzte Rufnummer wiederwählen:
Drücken Sie die Taste „4“ und halten Sie diese für ungefähr 2 Sekunden
gedrückt, um die Wiederwahl zu starten. Damit wählt Ihr Mobiltelefon
erneut die zuletzt gewählte Nummer.
Hinweis:
Um die Wiederwahlfunktion verwenden zu können, muss Ihr
Mobiltelefon diese unterstützen. Lesen Sie bitte im
Handbuch Ihres Mobiltelefons nach, ob die
Wiederwahlfunktion unterstützt wird.
Umleiten von Anrufen:
Sie können einen Anruf von Ihrem Headset auf Ihr Mobiltelefon
umleiten, zum Beispiel wenn Sie aus Ihrem Fahrzeug aussteigen.
Zum Umleiten des Anrufs auf Ihr Mobiltelefon, drücken Sie die Tasten
“2” (Blau) und “5” für ca. 2 Sekunden. Es ertönt ein akustisches Signal.
Der Anruf wird auf Ihr Mobiltelefon umgeleitet.
Page 32

DEUTSCH
32
Stummschalten des Mikrofons während einem Anruf:
Um das Mikrofon des Headsets während einem Anruf stumm zu
schalten, drücken Sie die Tasten “4” und “5” für ca. 2 Sekunden. Wenn
das Mikrofon stumm geschaltet ist, hören Sie akustische Signale auf
dem Headset. Um die Stummschaltung zu deaktivieren, drücken Sie
erneut die Taste “4” und “5” für ca. 2 Sekunden.
Einen zweiten Anruf annehmen:
Wenn Sie während einem Gespräch einen zweiten Anruf erhalten,
können Sie den gegenwärtigen Anruf in Warteposition setzen.
Drücken Sie die Taste “2” (Blau) und halten Sie diese für mehr als 4
Sekunden gedrückt. Damit wird der erste Anruf in Warteposition
gesetzt und Sie können den zweiten Anruf beantworten.
Um wieder auf den ersten Anruf umzuschalten, drücken Sie die Taste
“2“ (Blau) und halten Sie diese für mehr als 4 Sekunden gedrückt.
Damit wird der zweite Anruf in Warteposition gesetzt und Sie können
das erste Gespräch weiterführen.
Sie können den aktiven Anruf beenden, indem Sie kurz die Taste “2“
(Blau) drücken. Der aktive Anruf wird beendet und der andere Anruf
aktiviert.
Dreierkonferenz:
Wenn Sie zwei Anrufe haben (einen aktiven, einen in Warteposition),
können Sie eine Dreierkonferenz starten, indem Sie für ca. 2 Sekunden
die Taste "5" drücken. Damit kann auch der Anrufer in der
Warteposition am Gespräch teilnehmen.
Viel Spaß mit Ihrem Conceptronic
Bluetooth
®
-Headset !
Page 33

FRANÇAIS
33
CBTHS3 de Conceptronic
Guide d'Utilisation
Nous vous félicitons d'avoir acheté votre
Casque Bluetooth ® de Conceptronic.
Vous trouverez dans le Guide d'Installation du Hardware fourni avec le
produit une explication détaillée de l'installation du Casque Bluetooth
®
de Conceptronic.
En cas de problème, nous vous conseillons de vous rendre sur notre site
de support technique (adresse :www.conceptronic.net
et cliquez sur
‘"Support". Vous y trouverez la Base de données de la Foire aux
Questions.
En cas de questions concernant votre produit et si vous n’obtenez pas
de réponse sur notre site web, n’hésitez pas à nous contacter par email : support@conceptronic.net
.
Pour plus d'informations concernant les produits Conceptronic, veuillez
consulter notre site web : www.conceptronic.net
.
1. Contenu du Coffret
Les éléments suivants sont fournis dans le paquet avec le Casque
Bluetooth
®
de Conceptronic :
1x Casque Bluetooth
®
de Conceptronic.
1x Fixation auriculaire pour le Casque Bluetooth
®
.
2x Éponges pour auriculaire du Casque Bluetooth
®
.
1x Alimentation électrique 5V CC – 0,2 A
1x Câble de chargement USB
1x Manuel d'utilisation en plusieurs langues
Page 34

FRANÇAIS
34
2. Explication du Casque Bluetooth
®
.
2.1 Fonctions des touches
Nº Explication
1 Entrée CC (Pour charger le Casque)
2 Allumer ou éteindre le casque / Entrer en Mode Connexion /
Répondre, terminer ou rejeter un appel / Activer la
Composition Vocale *
(Les voyants LED sont placés sous le bouton)
3 Micro
4 Augmenter le Volume / Recomposer le dernier appel *
5 Augmenter le Volume
6 Fixation auriculaire (fournie comme accessoire indépendant
dans le coffret)
* La disponibilité de cette fonction dépend de la configuration de
votre téléphone portable. Veuillez consulter le manuel de votre
téléphone portable pour savoir comment utiliser cette fonction.
1
2
5 4
3
6
Page 35

FRANÇAIS
35
2.2
Options du Bouton du Casque Bluetooth®
Les fonctions suivantes peuvent être activées avec les boutons :
En Pause :
Fonction Touche Durée de Pression sur le
Bouton
Allumer 2 Long (2~3 secondes)
Éteindre 2 Long (3~4 secondes)
Entrer en Mode Connexion 2 Très Long (+4 secondes) *
Répondre à un appel 2 Court
Recomposer le dernier appel 4 Long (2 secondes)
Activer la Composition Vocale 2 Long (2 secondes)
Refuser un appel 2 Long (3 secondes)
* Le Code PIN du Casque Bluetooth ® est ‘0000'- Ce paramètre ne
peut pas être modifié.
Pendant un appel :
Fonction Touche Durée de Pression sur le
Bouton
Transférer un appel à votre
téléphone
2 + 5 Long (2 secondes)
Accepter un Second Appel 2 Très Long (+4 secondes)
Ajouter un appel en attente à
la conversation
5 Long (2 secondes)
Éteindre le son du Micro 4 + 5 Long (2 secondes)
Terminer un appel 2 Court
Augmenter le Volume 5 Court (1 seconde)
Réduire le volume 4 Court (1 seconde)
Page 36

FRANÇAIS
36
3. Chargement de la batterie du Casque
Votre casque a une batterie intégrée au Li-ion qui doit être totalement
chargée avant que vous utilisiez le casque pour la première fois.
Le chargement complet de la batterie prend environ 4 heures la
première fois.
Si la LED Rouge du casque clignote pendant l'utilisation, la batterie est
pratiquement vide. Le rechargement de la batterie prendra environ 2
heures.
Chargement avec le chargeur de voyage :
Branchez le chargeur de voyage dans une prise murale libre et
branchez la Prise Électrice sur l'Entrée d'alimentation CC du casque. Le
voyant lumineux rouge s'allume. Lorsque la batterie est chargée,
l'indicateur rouge s'éteint. Enlevez le chargeur de voyage de votre
casque.
Chargement par le câble USB de chargement :
Branchez le câble de chargement USB dans un port USB libre de votre
ordinateur et branchez la Prise Électrice sur l'Entrée d'alimentation CC
du casque. Le voyant lumineux rouge s'allume. Lorsque la batterie est
chargée, l'indicateur rouge s'éteint. Enlevez le câble de chargement
USB de votre casque.
Remarque:
Lorsque vous chargez votre casque par le port USB de
votre ordinateur, le chargement peut prendre plus
longtemps, en fonction de l'énergie fournie par votre
port USB.
Page 37

FRANÇAIS
37
4. Connexion du Casque Bluetooth
®
avec votre téléphone
Avant d'utiliser le Casque avec votre téléphone portable, vous devez
connecter le Casque sur votre téléphone portable.
(Votre téléphone portable doit avoir la Fonction Bluetooth
®
disponible).
Remarque:
Avant de commencer la connexion, consultez le manuel
de votre téléphone portable et vérifiez que vous pouvez
connecter votre téléphone portable avec des dispositifs
Bluetooth
®
.
A. Vérifiez que le Casque Stéréo est bien éteint.
B. Appuyez et maintenez enfoncée la touche "2" (Bleue) sur le
casque pendant plus de 4 secondes. La led bleue du casque
s'allume et le casque entre en mode connexion (les leds bleue et
rouge clignotent en alternance).
C. Allumez votre téléphone portable Bluetooth
®
; consultez le
manuel
de votre téléphone portable pour activer le processus de
connexion de dispositif Bluetooth ® et cherchez les nouveaux
dispositifs Bluetooth®
.
D. Le casque est affiché comme "CBTHS3" sur votre téléphone
portable. Sélectionnez le casque sur votre téléphone portable.
E. Votre téléphone portable vous demandera un code pin pendant
la connexion. Entrez le code "0000" pour terminer l'opération de
connexion.
F. Lorsque la connexion est terminée et réussie, le voyant bleu LED
sur le casque clignote. Le casque est alors en mode pause et se
connectera à votre téléphone portable automatiquement.
Remarque:
Si la connexion est impossible pendant environ 1 minute,
l'opération s'arrête. Vous devrez alors recommencer les
étapes A & B pour reprendre le mode connexion.
Page 38

FRANÇAIS
38
5. Utilisation du Casque Bluetooth
®
.
Allumer et éteindre :
Si le Casque est éteint, appuyez sur le bouton "2" (Bleu) pendant 2
secondes pour allumer le Casque.
Lorsque le Casque est allumé, il se connecte automatique au téléphone
portable.
Si le Casque est allumé, appuyez sur le bouton "2" (Bleu) pendant 3
secondes pour éteindre le Casque.
Accepter, terminer et rejeter des appels :
Lorsque vous recevez un appel sur votre téléphone portable, vous
entendez un signal sur le Casque. Pour accepter un appel entrant,
appuyez sur le bouton "2" (Bleu) brièvement.
Remarque:
Certains téléphones portables déconnectent
automatiquement le casque si la connexion n'est pas
utilisée pendant un moment. Dans ce cas, le casque ne
sonne pas lorsqu'il y a un appel entrant. Appuyez sur le
bouton "2 (Bleu) pour vous reconnecter avec le
téléphone portable. Appuyez sur le bouton "2 (Bleu) à
nouveau pour accepter l'appel entrant.
Pour terminer un appel, appuyez sur le bouton "2" (Bleu) brièvement.
Pour rejeter un appel entrant, appuyez sur le bouton "2" (Bleu)
pendant 3 secondes.
Régler le volume pendant les appels :
Pour augmenter le volume du Casque, appuyez sur le bouton "5"
Pour réduire le volume du Casque, appuyez sur le bouton "4"
Vous pouvez aussi régler le volume sur votre téléphone portable.
Page 39

FRANÇAIS
39
Composer un numéro :
Composez le numéro de téléphone sur votre téléphone portable comme
vous le faites normalement. Lorsque le téléphone commence l'appel, le
son est automatiquement transféré sur le Casque.
Pour activer la Composition Vocale sur votre téléphone portable,
appuyez sur le bouton "2" (Bleu) brièvement. Après le signal, dites le
nom de votre contact.
Remarque:
Pour utiliser la Composition Vocale, vous devez disposer
de l'option Composition Vocale sur votre téléphone
portable. Consultez le manuel de votre téléphone pour
savoir s'il dispose de la Fonction Composition Vocale.
Pour utiliser la Composition Vocale, votre téléphone
portable doit contenir les enregistrements de
Composition Vocale.
Recomposer les appels >
Appuyez et tenez enfoncée la touche "4" pendant environ 2 secondes
pour lancer la Recomposition. Votre téléphone portable compose à
nouveau le dernier appel passé.
Remarque:
Pour utiliser la fonction Recomposition, vous devez
disposer de l'option Recomposition sur votre téléphone
portable. Consultez le manuel de votre téléphone
portable pour savoir s'il dispose de la Fonction
Recomposition.
Transfert des appels:
Vous pouvez transf'erer un appel de votre casque à votre téléphone
portable, par exemple lorsque vous sortez de la voiture.
Pour transférer un appel sur votre téléphone portable, appuyez sur les
boutons "2" (Bleu) et "5" pendant 2 secondes. Vous entendrez un bip
sonore. L'appel est transféré sur votre téléphone portable.
Page 40

FRANÇAIS
40
Éteindre le volume du micro pendant les appels :
Pour transférer un appel sur votre téléphone portable, appuyez sur les
touches "4" (Bleu) et "5" pendant 2 secondes. Vous entendrez un signal
sonore sur le casque pendant que le volume est éteint. Pour désactiver
la fonction de volume muet, appuyez sur les boutons "4" et "5" à
nouveau pendant environ 2 secondes.
Accepter un second appel :
Si vous recevez un second appel pendant une conversation, vous
pouvez mettre l'appel en cours en attente et accepter le second appel.
Appuyez et maintenez enfoncée la touche "2" (Bleue) pendant plus de
4 secondes. Le premier appel sera mis en attente et vous pourrez
répondre au second.
Pour revenir à votre premier appel, appuyez et maintenez enfoncée la
touche "2" (Bleue) pendant plus de 4 secondes. Le second appel sera
mis en attente et le premier appel sera de nouveau actif.
Pour mettre fin à l'appel actif, appuyez sur le bouton "2" (Bleu)
brièvement. L'appel actif sera mis terminé et l'autre appel sera activé.
Conversation à 3 :
Si vous avez 2 appels (1 actif, 1 en attente), vous pouvez démarrer une
conversation à 3 en appuyant sur la touche "5" pendant environ 2
secondes. L'appel en attente sera ajouté à la conversation.
Profitez bien de votre Casque Bluetooth®
de Conceptronic.
Page 41

ITALIANO
41
Conceptronic CBTHS3
Manuale d’uso
Vi ringraziamo per aver acquistato
l’Auricolare Bluetooth® di Conceptronic
Questo Manuale d’uso spiega passo a passo come installare l’Auricolare
Bluetooth®di Conceptronic.
In caso di problemi, vi consigliamo di visitare il nostro sito di supporto
(collegandovi su www.conceptronic.net
e facendo clic su “Support”),
dove si trova il database delle FAQ (Risposte alle domande più
frequenti).
In caso di domande di altro tipo riguardanti il prodotto, che non
appaiono nel nostro sito web, vi preghiamo di mettervi in contatto con
noi attraverso l’indirizzo di posta elettronica:
support@conceptronic.net
Per ulteriori informazioni sui prodotti Conceptronic, potete visitare il
sito web Conceptronic: www.conceptronic.net
1. Contenuto della confezione
La confezione contenente l’Auricolare Bluetooth® di Conceptronic è
composta dai seguenti elementi:
1x Auricolare Bluetooth® di Conceptronic
1x Gancio per orecchio dell’Auricolare Bluetooth®
2x Spugne per orecchio dell’Auricolare Bluetooth®
1x Alimentatore di corrente 5V DC, 0.2A
1x Cavo di ricarica USB
1x Manuale d’uso multilingue
Page 42

ITALIANO
42
2. Spiegazione dell’Auricolare Bluetooth®
2.1
Funzioni dei pulsanti
N. Spiegazione
1 Ingresso DC (per la ricarica dell’auricolare)
2 Accensione e spegnimento dell’auricolare / Accesso a modalità
di accoppiamento (pairing) / Rispondere, terminare o rifiutare
una chiamata / Attivazione chiamata a riconoscimento vocale*
(il LED si trovano dietro al pulsante)
3 Microfono
4 Abbassa il volume / Comporre di nuovo l’ultima chiamata*
5 Alza il volume
6 Gancio per orecchio (come accessorio separato nella
confezione)
* La disponibilità o meno di questa funzione dipende dal tipo di
cellulare usato. Consultare il manuale del cellulare per ottenere
informazioni su questa funzione.
1
2
5 4
3
6
Page 43

ITALIANO
43
2.2
Opzioni di pulsante dell’Auricolare Bluetooth®
Attraverso i pulsanti è possibile accedere alle seguenti funzioni:
In Modalità standby:
Caratteristica Pulsante Durata pressione pulsante
Accensione 2 Lungo (2~3 secondi)
Spegnimento 2 Lungo (3~4 secondi)
Accesso modalità
accoppiamento (pairing)
2 Molto Lungo (+ 4 secondi) *
Rispondere a una chiamata 2 Breve
Comporre di nuovo l’ultima
chiamata
4 Lungo (2 secondi)
Attiva composizione vocale 2 Lungo (2 secondi)
Rifiutare una chiamata 2 Lungo (3 secondi)
* Il codice PIN dell’Auricolare Bluetooth® è ‘0000’. Tale parametro
non può essere modificato.
Durante una conversazione telefonica:
Caratteristica Pulsante Durata pressione pulsante
Trasferimento della chiamata
sul cellulare
2 + 5 Lungo (2 secondi)
Accettare una seconda
chiamata
2 Molto Lungo (+ 4 secondi)
Aggiungere una chiamata in
attesa alla conversazione
5 Lungo (2 secondi)
Silenziare il microfono 4 + 5 Lungo (2 secondi)
Terminare una conversazione 2 Breve
Alza il volume 5 Breve (1 secondo)
Abbassa il volume 4 Breve (1 secondo)
Page 44

ITALIANO
44
3. Caricamento della batteria dell’Auricolare
L’auricolare è dotato di una batteria Li-ion incorporata che deve essere
caricata completamente prima di poter usare per la prima volta
l’apparecchio.
Sono necessarie quattro ore per caricare completamente la batteria
per la prima volta.
Se il LED rosso dell’auricolare lampeggia durante l’uso, significa che la
batteria è quasi vuota. Ci vorranno due ore circa per ricaricare la
batteria.
Caricamento mediante caricatore da viaggio:
Collegare il caricatore da viaggio a una presa a muro disponibile e
connettere la presa di alimentazione all’ingresso DC dell’auricolare. Il
LED rosso si accenderà. Una volta carica la batteria, il LED rosso si
spegnerà. Scollegare il caricatore da viaggio dall’auricolare.
Caricamento mediante cavo di ricarica USB:
Collegare il cavo di ricarica USB in una porta USB disponibile del
computer e connettere la presa di alimentazione all’ingresso DC
dell’auricolare. Il LED rosso si accenderà. Una volta carica la batteria,
il LED rosso si spegnerà. Scollegare il cavo USB dall’auricolare.
Nota:
quando viene ricaricato l’auricolare attraverso la porta USB del
computer, il processo di ricarica potrebbe essere più lungo, a
seconda del tipo di potenza fornita dalla porta USB.
Page 45

ITALIANO
45
4. Accoppiare l’Auricolare Bluetooth® con il cellulare
Prima di poter usare l’Auricolare con il cellulare, sarà necessario
accoppiare i due dispositivi (pairing).
(Il cellulare usato deve disporre della funzione Bluetooth
®
attivata).
Nota:
prima di iniziare il processo di accoppiamento, consultare il
manuale del cellulare per sapere come accoppiarlo con i
dispositivi Bluetooth
®
.
A. Assicurarsi che l’auricolare stereo sia spento.
B. Mantenere premuto il pulsante “2” (Blu) dell’auricolare per più
di quattro secondi. L’auricolare si accenderà (LED blu) ed entrerà
in modalità di accoppiamento (il LED blu e rosso lampeggeranno
alternativamente).
C. Accendere il cellulare Bluetooth
®
; seguire le istruzioni del
manuale per attivare il processo di accoppiamento Bluetooth
®
(pairing) e cercare nuovi dispositivi Bluetooth
®
.
D. L’auricolare apparirà con il nome di “CBTHS3” sul cellulare.
Selezionare l’auricolare nel cellulare.
E. Il cellulare richiederà un codice PIN durante il processo di
accoppiamento. Introdurre “0000” per terminare il processo.
F. Una volta portato a termine il processo di accoppiamento, il LED
blu dell’auricolare lampeggerà. Ora l’auricolare è in modalità
standby e si collegherà automaticamente al cellulare.
Nota: nel caso in cui l’accoppiamento non sia possibile per un minuto
circa, il processo verrà interrotto. Sarà necessario ripetere i
passi A e B per iniziare di nuovo il processo di pairing.
Page 46

ITALIANO
46
5. Come usare l’Auricolare Bluetooth®
Accensione e spegnimento:
Se l’auricolare è spento, premere il pulsante “2” (Blu) per due secondi
per accendere l’auricolare.
Se invece l’auricolare è acceso, si collegherà automaticamente al
cellulare.
Se l’auricolare è acceso, premere il pulsante “2” (Blu) per tre secondi
per spegnere l’auricolare.
Accettare, terminare e rifiutare una chiamata:
Quando viene ricevuta una chiamata entrante, si sentirà un tono
attraverso l’auricolare. Per accettare una chiamata entrante, premere
il pulsante “2” (Blu) brevemente.
Nota:
alcuni cellulari scollegano automaticamente l’auricolare se la
connessione non viene usata per un certo periodo di tempo. In
tal caso, l’auricolare non suonerà quando ci sarà una chiamata
entrante. Premere il pulsante “2” (Blu) per collegarlo di nuovo
al cellulare. Premere di nuovo il pulsante “2” (Blu) per
accettare la chiamata entrante.
Per terminare la chiamata, premere brevemente il pulsante “2” (Blu).
Per rifiutare una chiamata, premere il pulsante “2” (Blu) per tre
secondi.
Regolazione del volume durante uja conversazione telefonica:
Per alzare il volume dell’auricolare, premere il pulsante “5”.
Per abbassare il volume dell’auricolare, premere il pulsante “4”.
È anche possibile regolare il volume sul cellulare.
Page 47

ITALIANO
47
Realizzazione di una chiamata:
Comporre il numero di telefono sul cellulare in modo normale. Quando
il cellulare inizierà una chiamata, l’audio verrà automaticamente
trasferito all’auricolare.
Per attivare la composizione vocale sul cellulare, premere il pulsante
“2” (Blu) brevemente. Dopo avere ascoltato un bip di avviso, dire il
nome del contatto.
Nota:
per usare l’opzione di composizione vocale sul cellulare,
questo deve poter supportare tale funzionalità. Consultare il
manuale del cellulare per sapere come attivarla. Per usare
l’opzione di composizione vocale il cellulare deve contenere
contatti con composizione vocale.
Ricomporre un numero:
Mantenere premuto il pulsante “4” per circa due secondi per
ricomporre il numero. Il cellulare comporrà di nuovo il numero
dell’ultima chiamata realizzata.
Nota:
per usare l’opzione di ricomposizione numero sul cellulare,
questo deve poter supportare tale funzionalità. Consultare il
manuale del cellulare per sapere come.
Trasferimento chiamate:
È possibile trasferire una chiamata dall’auricolare sul cellulare,
premendo i pulsanti “2” (Blu) e “5” per due secondi circa. Si sentirà un
bip, dopo di che la chiamata verrà trasferita sul cellulare.
Page 48

ITALIANO
48
Silenziare il microfono durante una chiamata:
Per silenziare il microfono dell’auricolare durante una chiamata,
premere i pulsanti “4” e “5” per due secondi circa. Si sentiranno
diversi bip nell’auricolare quando verrà silenziato. Per disattivare la
funzione di silenzio, premere di nuovo i pulsanti “4” e “5” per due
secondi circa.
Accettare una seconda chiamata:
Se viene ricevuta una seconda chiamata mentre si sta parlando, si
potrà mettere in attesa la chiamata attiva e accettare la seconda
chiamata. Mantenere premuto il pulsante 2” (Blu) per più di quattro
secondi. La prima chiamata verrà messa in attesa e la seconda verrà
attivata.
Per cambiare e tornare alla prima chiamata, mantenere premuto il
pulsante “2” (Blu) per più di quattro secondi. La seconda chiamata
verrà messa in attesa e la prima verrà attivata di nuovo.
È possibile terminare la chiamata attiva premendo il pulsante “2” (Blu)
brevemente. La chiamata attiva verrà terminata e l’altra chiamata
verrà attivata.
Conversazione a tre:
Se si chiamate (una attiva e una in attesa), è possibile iniziare una
conversazione a tre, premendo il pulsante “5” per due secondi circa.
La chiamata in attesa verrà aggregata alla conversazione.
Divertitevi usando l’Auricolare
Bluetooth® di Conceptronic!
Page 49

PORTUGUÊS
49
Conceptronic CBTHS3
Manual do utilizador
Parabéns pela compra dos
Auriculares Bluetooth® da Conceptronic.
O Manual de Instalação Rápida incluído fornece-lhe uma explicação
passo a passo sobre como instalar os Auriculares Bluetooth
®
da
Conceptronic.
Quando tiver algum problema, aconselhamo-lo a consultar a nossa
página de suporte (vá a www.conceptronic.net
) e clicar em ‘Support’
(Suporte). Aí vai encontrar a Base de Dados das Perguntas Mais
Frequentes.
Quando tiver outras questões sobre o seu produto e não encontrar
resposta para elas na nossa página, contacte-nos por e-mail:
apoyo@conceptronic.net
Para mais informações sobre os produtos da Conceptronic, visite a
página web da Conceptronic em: www.conceptronic.net
1. Conteúdo da Embalagem
Existem os seguintes elementos na embalagem dos Auriculares
Bluetooth
®
da Conceptronic:
1x Auriculares Bluetooth
®
da Conceptronic.
1x Gancho para os auriculares Bluetooth
®
2x Esponjas para os auriculares Bluetooth
®
1x Fonte de alimentação 5 V DC, 0,2 A
1x Cabo USB de carregador
1x Manual do utilizador multilingue
Page 50

PORTUGUÊS
50
2. Explicação dos Auriculares Bluetooth
®
2.1
Funções dos botões
Nº Explicação
1 Entrada DC (Para carregar os auriculares)
2 Ligar ou desligar os auriculares / Entrar no Modo de
Acoplamento / Atender, terminar ou rejeitar uma chamada /
Activar a marcação por voz *
(As luzes de indicação estão por trás do botão)
3 Microfone
4 Diminuir o volume / Remarcar o último número *
5 Aumentar o volume
6 Gancho para a orelha (incluído como acessório separado na
embalagem)
* A disponibilidade desta função depende do design do seu telemóvel.
Por favor, consulte o manual do seu telemóvel para saber mais sobre
esta função.
1
2
5 4
3
6
Page 51

PORTUGUÊS
51
2.2
Opções dos botões dos Auriculares Bluetooth®
Pode-se aceder às seguintes funções através dos botões:
Em Standby:
Função Botão Duração de pressão do
botão
Ligar 2 Longa (2~3 segundos)
Desligar 2 Longa (3~4 segundos)
Entrar no Modo de
Acoplamento
2 Muito longa (+ 4 segundos)
*
Atender uma chamada 2 Curta
Remarcar o último número 4 Longa (2 segundos)
Activar a marcação por voz 2 Longa (2 segundos)
Rejeitar uma chamada 2 Longa (3 segundos)
* O código PIN dos Auriculares Bluetooth™ é ‘0000’. Esta configuração
não pode ser alterada.
Durante uma chamada:
Função Botão Duração de pressão do
botão
Transferir chamada para o seu
telefone
2 + 5 Longa (2 segundos)
Aceitar segunda chamada 2 Muito longa (+ 4 segundos)
Adicionar chamada em espera
a conferência
5 Longa (2 segundos)
Silenciar o microfone 4 + 5 Longa (2 segundos)
Terminar uma chamada 2 Curta
Aumentar o volume 5 Curta (1 segundo)
Diminuir o volume 4 Curta (1 segundo)
Page 52

PORTUGUÊS
52
3. Carregar a bateria dos Auriculares
Os seus auriculares têm uma bateria de Lítio Íon Polímero incorporada
que tem de ser carregada por completo antes de poder usar os
auriculares pela primeira vez. Demora cerca de 4 horas a carregar
completamente a bateria pela primeira vez.
Se a luz Vermelha dos auriculares piscar durante a utilização, significa
que a bateria está quase descarregada. Demora cerca de 2 horas a
recarregar a bateria.
Carregar com o carregador de viagem:
Meta o carregador de viagem numa tomada de parede livre e ligue a
ficha de alimentação à entrada DC dos auriculares. O indicador
vermelho acende.
Quando a bateria estiver carregada, o indicador vermelho apaga-se.
Retire o carregador de viagem dos auriculares.
Carregar com o cabo USB de carregamento:
Introduza o cabo USB de carregamento numa porta USB disponível do
seu computador e ligue a ficha de alimentação à entrada DC dos
auriculares. O indicador vermelho acende. Quando a bateria estiver
carregada, o indicador vermelho apaga-se. Retire o cabo carregador
USB dos auriculares.
Nota:
Quando carregar os seus auriculares através da porta USB do
seu computador, o processo de carregamento pode ser mais
demorado, dependendo da alimentação fornecida pela porta
USB.
Page 53

PORTUGUÊS
53
4. Acoplamento dos Auriculares Bluetooth® com o seu
telefone
Antes de poder usar os seus Auscultadores com o seu telemóvel tem de
acoplá-los ao telemóvel.
(O seu telemóvel tem de ter activada a Função Bluetooth
®
).
Nota:
Antes de dar início ao acoplamento, consulte o manual do seu
telemóvel para saber como fazer o acoplamento do seu
telemóvel com dispositivos Bluetooth
®
.
A. Assegure-se de que os Auriculares Estéreo estão desligados.
B. Carregue e segure no botão “2” (Azul) dos auriculares durante
mais de 4 segundos. Os auriculares ligam-se (luz azul) e entram
no modo de acoplamento (a luz azul e a vermelha piscam
alternadamente).
C. Ligue o seu telemóvel Bluetooth
®
, siga o manual do mesmo para
activar o processo de acoplamento do dispositivo Bluetooth
®
e
procurar dispositivos Bluetooth
®
novos.
D. Os auriculares aparecem como “CBTHS3” no seu telemóvel.
Seleccione os auriculares no seu telemóvel.
E. O seu telemóvel vai pedir um código pin durante o acoplamento.
Introduza “0000” para completar o processo de acoplamento.
F. Quando tiver concluído com sucesso o processo de acoplamento,
o indicador azul dos auriculares pisca. Os auriculares estão agora
no modo standby e ligam-se ao seu telemóvel automaticamente.
Nota:
Se não se conseguir fazer o acoplamento durante um período
de aproximadamente 1 minuto, o processo é interrompido.
Tem de repetir os passos A e B para iniciar novamente o modo
de acoplamento.
Page 54

PORTUGUÊS
54
5. Utilização dos Auriculares Bluetooth®
Ligar e desligar:
Se os auriculares estiverem desligados, carregue no botão “2” (Azul)
durante 2 segundos para ligá-los.
Quando os Auriculares estiverem ligados, ligam-se automaticamente ao
telemóvel.
Se os auriculares estiverem ligados, carregue no botão “2” (Azul)
durante 3 segundos para desligá-los.
Aceitar, terminar e rejeitar chamadas:
Quando receber uma chamada, vai ouvir um toque pelo auricular. Para
aceitar uma chamada, carregue no botão “2” (Azul) brevemente.
Nota:
Alguns telemóveis desligam automaticamente os auriculares se
a ligação não for usada durante um período de tempo. Neste
caso, os auriculares não tocam quando se recebe uma
chamada. Carregue no botão “2” (Azul) para voltar a
estabelecer a ligação com o telemóvel. Carregue novamente
no botão “2” (Azul) para aceitar a chamada.
Para terminar uma chamada, carregue no botão “2” (Azul)
brevemente.
Para rejeitar uma chamada, carregue no botão “2” (Azul) durante 3
segundos.
Ajustar o volume durante as chamadas:
Para aumentar o volume dos auriculares carregue no botão “5”.
Para diminuir o volume dos auriculares carregue no botão “4”.
Também pode ajustar o volume no seu telemóvel.
Page 55

PORTUGUÊS
55
Fazer chamadas:
Marque o número de telefone no seu telemóvel como costuma fazer.
Quando o telefone iniciar a chamada, o som é transferido
automaticamente para os Auriculares.
Para activar a Marcação por Voz no seu telemóvel, carregue no botão
“2” (Azul) brevemente. Quando ouvir um som de notificação diga o
nome do seu contacto.
Nota:
Para usar a Marcação por Voz, o seu telemóvel tem de suportar
essa função. Consulte o manual do seu telemóvel para ficar a
saber mais sobre a função de Marcação por Voz. Para usar a
Marcação por Voz, o seu telemóvel deve ter os comandos de
Marcação por Voz para os seus contactos.
Remarcação de chamadas:
Carregue e segure o botão “4” durante 2 segundos para iniciar a
Remarcação. O seu telemóvel vai remarcar o último número marcado.
Nota:
Para usar a função de Remarcação, o seu telemóvel tem de
suportar essa função. Consulte o manual do seu telemóvel para
ficar a saber mais sobre a função de Remarcação.
Transferência de chamadas:
Pode transferir uma chamada dos auriculares para o seu telemóvel, por
exemplo, quando sair do carro.
Para transferir a chamada para o seu telemóvel, carregue no botão “2”
(Azul) e “5” durante cerca de 2 segundos. Vai ouvir um bip. A chamada
é transferida para o seu telemóvel.
Page 56

PORTUGUÊS
56
Silenciar o microfone durante as chamadas:
Para silenciar o microfone dos auriculares durante as chamadas,
carregue nos botões “4” e “5” durante 2 segundos. Vai ouvir bips no
auricular durante o processo de silenciamento. Para desactivar a
função de silêncio, carregue nos botões “4” e “5” novamente durante
cerca de 2 segundos.
Aceitar uma segunda chamada:
Se receber uma segunda chamada durante uma conversa, pode colocar
a chamada actual em espera e aceitar a segunda chamada.
Carregue e segure no botão “2” (Azul) durante mais de 4 segundos. A
primeira chamada fica em espera e a segunda chamada é atendida.
Para voltar à primeira chamada, carregue e segure no botão “2” (Azul)
durante mais de 4 segundos. A segunda chamada fica em espera e a
primeira chamada fica activa novamente.
Pode terminar a chamada activa carregando no botão “2” (Azul)
brevemente. A chamada activa é terminada e a outra chamada é
activada.
Conversação a 3:
Se tiver 2 chamadas (1 activa, 1 em espera), pode iniciar uma conversa
a três carregando no botão “5” durante cerca de 2 segundos. A
chamada em espera é adicionada à conversação.
Divirta-se com os Auriculares Bluetooth®
da Conceptronic!
Page 57

MAGYAR
57
Conceptronic CBTHS3
Felhasználói útmutató
Köszönjük, hogy a Conceptronic Bluetooth®
fülhallgató készletét választotta.
A mellékelt felhasználó útmutató lépésről-lépésre elmagyarázza,
miként kell a Conceptronic Bluetooth
®
fülhallgató készletét telepítenie.
Ha probléma jelentkezne, azt tanácsoljuk, hogy keresse fel
terméktámogatást nyújtó webhelyünket (látogasson el a
www.conceptronic.net
honlapra, majd ott kattintson a „Support”-ra).
Itt található ugyanis a gyakran ismétlődő kérdések (GYIK) adatbázisa.
Ha a termékkel kapcsolatban további kérdése volna és arra választ
webhelyünkön nem talál, e-mailben is fordulhat hozzánk:
support@conceptronic.net
A Conceptronic termékekkel kapcsolatos további tájékozódás végett
látogasson el a Conceptronic webhelyére: www.conceptronic.net
.
1. A csomag tartalma
A Conceptronic Bluetooth
®
fülhallgató készletét tartalmazó csomagban
az alábbiak találhatók:
1x Conceptronic Bluetooth
®
fülhallgató készlet
1x Fülhorog a Bluetooth
®
fülhallgató készlethez
2x Szivacs a Bluetooth
®
fülhallgató készlethez tartozó fülhallgatóhoz
1x 5 V-os egyenáramú, 0,2 A-es tápegység
1x USB töltőkábel
1x Többnyelvű felhasználói útmutató
Page 58

MAGYAR
58
2. A Bluetooth
®
fülhallgató készlet magyarázata
2.1
Gombfunkciók
Sz. Magyarázat
1. Egyenáramú tápellátás bemenete (a fülhallgató készlet
töltéséhez)
2. A fülhallgató készlet be-, illetve kikapcsolása/Belépés
összepárosítási üzemmódba/Hívás fogadása, befejezése,
illetve elutasítása/Névbemondással történő tárcsázás*
(A kijelző LED-ek a gomb mögött vannak)
3. Mikrofon
4. Hangerő csökkentése/Az utoljára hívott szám újratárcsázása*
5. Hangerő növelése
6. Fülhorog külön tartozékként része a csomagnak)
* Ennek a funkciónak az elérhetősége függ a mobiltelefon
konstrukciójától. E funkció támogatásával kapcsolatban olvassa el
mobiltelefonja kézikönyvét.
1
2
5 4
3
6
Page 59

MAGYAR
59
2.2 A Bluetooth
®
fülhallgató készlet gombbal választható
lehetőségei
A gombok segítségével az alábbi jellemzők hozzáférhetők:
Készenléti helyzetben:
Jellemző Gomb A gomb lenyomásának
időtartama
Áramellátás be 2 Hosszan (2~3 mp)
Áramellátás ki 2 Hosszan (3~4 mp)
Belépés összepárosítási
üzemmódba
2 Nagyon hosszan (több mint
4 mp) *
Hívás fogadása 2 Röviden
Az utoljára hívott szám
újratárcsázása
4 Hosszan (2 mp)
A névbemondással történő
tárcsázás aktiválása
2 Hosszan (2 mp)
Hívás visszautasítása 2 Hosszan (3 mp)
* A Bluetooth® fülhallgató készlet PIN-kódja „0000”. Ez a beállítás
nem változtatható.
Hívás alatt:
Jellemző Gomb A gomb lenyomásának
időtartama
Hívás átirányítása saját
telefonjára
2 + 5 Hosszan (2 mp)
Másik hívás fogadása 2 Nagyon hosszan (több mint
4 mp)
Várakozó hívás bevonása
konferenciabeszélgetésbe
5 Hosszan (2 mp)
Mikrofon elnémítása 4 + 5 Hosszan (2 mp)
Beszélgetés befejezése 2 Röviden
Hangerő felerősítése 5 Röviden (1 mp)
Hangerő lecsökkentése 4 Röviden (1 mp)
Page 60

MAGYAR
60
3. A fülhallgató készlet elemének feltöltése
Ebben a fülhallgató készletben lítiumelem van, amelyet a fülhallgató
készlet első alkalommal történő használata előtt teljesen fel kell
tölteni. Négy órába is telhet, amíg az akkumulátort első alkalommal
teljesen feltöltik.
Ha a fülhallgató készlet piros LED-je használatkor villog, az elem szinte
teljesen lemerült. Kb. két órába telik az akkumulátor feltöltése.
Töltés útitöltővel:
Csatlakoztassa az útitöltőt szabad falicsatlakozóhoz, majd
csatlakoztassa a tápegység dugaszát a fülhallgató készlet egyenáramú
bemenetéhez. A piros jelzőfény ilyenkor kigyullad. Ha az akkumulátor
teljesen feltöltődött, a piros jelzőfény kialszik. Válassza le az útitöltőt
a fülhallgató készletről.
Töltés USB töltőkábellel:
Dugja be az USB töltőkábelt a számítógép valamelyik szabad USBportjába, majd csatlakoztassa a tápegység dugaszát a fülhallgató
készlet egyenáramú bemenetéhez. A piros jelzőfény ilyenkor kigyullad.
Ha az akkumulátor teljesen feltöltődött, a piros jelzőfény kialszik.
Válassza le az útitöltőt a fülhallgató készletről.
Megjegyzés:
Ha a fülhallgató készletet számítógépének USB-portján
keresztül tölti, a töltés — az USB-port által biztosított
tápellátástól függően — tovább tarthat.
Page 61

MAGYAR
61
4. A Bluetooth® fülhallgató készlet összepárosítása saját
telefonjával
A fülhallgató készletnek mobiltelefonnal együtt történő használata
előtt a készletet össze kell párosítania mobiltelefonjával.
(Mobiltelefonjának bekapcsolt Bluetooth
®
célalkalmassággal kell
rendelkeznie.)
Megjegyzés: Az összepárosítás megkezdése előtt olvassa el
mobiltelefonjának kézikönyvét, egyszersmind
ellenőrizze, hogyan kell mobiltelefonját Bluetooth
®
eszközökkel összepárosítania.
A. Ügyeljen arra, hogy a sztereó fülhallgató készlet ki legyen
kapcsolva.
B. Négy mp-nél tovább tartsa lenyomva a „2”-es (kék) gombot a
fülhallgató készleten. A fülhallgató készlet bekapcsol (kék LED),
majd összepárosítási üzemmódba lép (a kék és a piros LED
felváltva villog).
C. Kapcsolja be Bluetooth
®
mobiltelefonját; a Bluetooth® eszköz
összepárosítási folyamatának aktiválásához és új Bluetooth
®
eszközök kereséséhez kövesse a mobiltelefon kézikönyvében
közölteket.
D. A fülhallgató készlet „CBTHS3”-ként jelenik meg
mobiltelefonján. Jelölje ki mobiltelefonján a fülhallgató
készletet.
E. Mobiltelefonja az összepárosítás során PIN-kódot kér. Az
összepárosítási eljárás befejezéséhez írjon be „0000”-t.
F. Amikor az összepárosítás sikeresen befejeződött, a kék LED
villogni kezd a fülhallgató készleten. A fülhallgató készlet ezután
készenléti üzemmódba lép, majd automatikusan csatlakozik
mobiltelefonjához.
Megjegyzés: Ha hozzávetőlegesen egy perc alatt az összepárosítás
nem lehetséges, a folyamat leáll. Az összepárosítási
üzemmód újbóli kezdeményezéséhez meg kell ismételnie
az A és B lépésben közölteket.
Page 62

MAGYAR
62
5. A Bluetooth® fülhallgató készlet alkalmazása
Be- és kikapcsolás:
Ha a fülhallgató készlet ki van kapcsolva, a fülhallgató készlet
bekapcsolásához két mp-ig tartsa lenyomva a „2”-es (kék) gombot.
Ha a fülhallgató készlet be van kapcsolva, akkor automatikusan
csatlakozik a mobiltelefonhoz.
Ha a fülhallgató készlet be van kapcsolva, annak kikapcsolásához 3 mpig tartsa lenyomva a „2” (kék) gombot.
Hívások fogadása, befejezése, illetve visszautasítása:
Amikor bejövő hívást fogad, a fülhallgató készletből csengőhangot hall.
Bejövő hívás fogadásához röviden nyomja le a „2” (kék) gombot.
Megjegyzés:
Bizonyos mobiltelefonok automatikusan kiiktatják a
fülhallgató készletet, ha a kapcsolatot bizonyos ideig
nem veszik igénybe. Ebben az esetben a fülhallgató
készlet nem jelez csengetéssel, amikor hívás érkezik. A
mobiltelefonnal való kapcsolat újbóli kialakításához
nyomja le a „2”-es (kék) gombot. Bejövő hívás
fogadásához ismét nyomja le a „2”-es (kék) gombot.
A hívás befejezéséhez röviden nyomja le a „2”-es (kék) gombot.
Bejövő hívás visszautasításához 3 mp-ig tartsa lenyomva a „2”-es (kék)
gombot.
Hangerő beállítása a hívások alatt:
A fülhallgató készlet hangerejének növeléséhez nyomja le az „5”-ös
gombot.
A fülhallgató készlet hangerejének csökkentéséhez nyomja le a „4”-es
gombot.
A hangerőt mobiltelefonján is beállíthatja.
Page 63

MAGYAR
63
Számok tárcsázása:
Mobiltelefonján a telefonszámot ugyanúgy tárcsázza, mint szokta.
Amikor a telefon hívást kezdeményez, a hang automatikusan
átirányítódik a fülhallgató készletre.
A hangbemondással történő tárcsázásnak mobiltelefonján történő
aktiválásához nyomja le röviden a „2”-es (kék) gombot. Miután
hallotta a figyelmeztető hangjelzést, mondja be a felhívandó személy
nevét.
Megjegyzés: A hangbemondással történő tárcsázásnak mobiltelefonon
történő alkalmazásához arra is szükség van, hogy ezt a
funkciót a készülék támogassa. A hangbemondással
történő tárcsázás funkciójával kapcsolatban olvassa el
telefonjának kézikönyvét. Ahhoz, hogy a
hangbemondással történő tárcsázást használhassa,
mobiltelefonjának tartalmaznia kell az elérendő
személyekről kialakított, és a hangbemondással történő
tárcsázáshoz szükséges rekordokat.
Számok újratárcsázása:
Tartsa mintegy két mp-ig lenyomva a „4”-es gombot az újratárcsázás
kezdeményezéséhez. Mobiltelefonja az utoljára hívott számot
újratárcsázza.
Megjegyzés: Az újratárcsázás funkciójának alkalmazhatóságához
mobiltelefonjának támogatnia kell az újratárcsázás
funkciót. Az újratárcsázás funkciójával kapcsolatban lásd
a mobiltelefon kézikönyvét.
Hívások átirányítása:
Hívás átirányítható fülhallgató készletéről mobiltelefonjára, például
amikor kiszáll a kocsiból.Hívásnak a mobiltelefonra történő
átirányításához tartsa mintegy két mp-ig lenyomva a „2”-es (kék) és a
„5”-ös gombot. Hangjelzést hall majd. A hívás pedig átirányítódik
mobiltelefonjára.
Page 64

MAGYAR
64
Mikrofon elnémítása a hívások alatt:
A fülhallgató készlet mikrofonjának a hívások alatt történő
elnémításához mintegy két mp-ig nyomja le a „4”-es és „5”-ös
gombot. Az elnémítás alatt hangjelzést hall majd a fülhallgató
készletből. Az elnémítás funkció kikapcsolásához ismét tartsa lenyomva
mintegy két mp-ig a „4”-es és „5”-ös gombot.
Másik hívás fogadása:
Ha a beszélgetés során másik hívás érkezik, az első hívást
várakoztathatja, egyszersmind fogadhatja a másikat.
Tartsa több mint négy mp-ig lenyomva a „2”-es (kék) gombot. Az első
hívást ilyenkor várakoztatja, a második hívóval pedig beszélhet.
Ha vissza akar kapcsolni az elsőnek telefonálóhoz, tartsa több mint
négy mp-ig lenyomva a „2”-es (kék) gombot. A második hívást ilyenkor
várakoztatja, és ismét az első hívás lesz aktív.
Az aktív hívás a „2”-es (kék) gomb rövid lenyomásával befejezhető. Az
aktív hívás ilyenkor befejeződik, és a másik aktiválódik.
Háromrésztvevős beszélgetés:
Ha két hívása van már (az egyik aktív, a másik pedig várakoztatott), az
„5”-ös gomb mintegy két mp-ig történő lenyomásával háromrésztvevős
beszélgetést is kezdeményezhet. Ilyenkor a beszélgetés kiegészül a
várakoztatott hívással.
Kívánjuk, hogy örömmel használja a Conceptronic
Bluetooth
®
fülhallgató készletét!
Page 65

TÜRKÇE
65
Conceptronic CBTHS3
Kullanıcı Kılavuzu
Conceptronic Bluetooth® Kulaklığı
Satın Aldığınız İçin Tebrikler.
Ekteki Kullanıcı Kılavuzu, Conceptronic Bluetooth
®
Kulaklık
kurulumunun adım adım nasıl yapılacağı konusunda bilgi vermektedir.
Problem ortaya çıktığında, destek sitemize gitmenizi
(www.conceptronic.net
adresine gidiniz ve ‘Destek’ sayfasına
tıklayınız) tavsiye ederiz. Burada Sıkça Sorulan Sorular Veritabanını
bulacaksınız.
Ürününüz ile ilgili başka sorularınız olduğunda ve bunların yanıtını web
sitemizde bulamadığınız takdirde bize e-posta gönderin:
support@conceptronic.net
.
Conceptronic ürünleri ile ilgili daha fazla bilgi için lütfen Conceptronic
Web Sitesini ziyaret edin: www.conceptronic.net
1. Paket İçeriği
Conceptronic Bluetooth
®
Kulaklık paketinin içeriği aşağıdaki gibidir:
1x Conceptronic Bluetooth
®
Kulaklık
1x Bluetooth
®
Kulaklık için kulaklık kancası
2x Bluetooth
®
Kulaklık için kulaklık süngeri
1x Adaptör 5V DC, 0,2A
1x USB Şarj Kablosu
1x Çok Dilli Kullanıcı Kılavuzu
Page 66

TÜRKÇE
66
2. Bluetooth
®
Kulaklık Tanıtımı
2.1
Düğmelerin Fonksiyonları
Nr Açıklama
1 DC Giriş (Kulaklığın şarj edilmesi için)
2 Kulaklık açma ya da kapama / Eşleştirme Moduna Giriş / Bir
çağrıyı cevaplama, sonlandırma ya da reddetme / Sesli
Aramayı Etkinleştirme *
(Gösterge LED’leri düğmenin arkasındadır)
3 Mikrofon
4 Ses Azaltma / Son çağrıyı tekrar arama *
5 Ses Artırma
6 Kanca (pakete ayrı aksesuar olarak dahil edilmiştir)
* Bu fonksiyonun kullanılabilirliği, cep telefonunuzun tasarımına
bağlıdır. Lütfen bu fonksiyon ile ilgili destek almak için cep
telefonunuzun el kitabına müracaat edin.
1
2
5 4
3
6
Page 67

TÜRKÇE
67
2.2
Bluetooth® Kulaklık Düğme Seçenekleri
Aşağıdaki özelliklere düğmeler yardımıyla erişilebilmektedir:
Hazırda Bekleme Konumunda:
Özellik Düğme Düğme Basma Süresi
Güç Açma 2 Uzun (2~3 saniye)
Güç Kapama 2 Uzun (3~4 saniye)
Eşleştirme Moduna Giriş 2 Çok Uzun (+ 4 saniye) *
Çağrı Cevaplama 2 Kısa
Son Çağrıyı Tekrar Arama 4 Uzun (2 saniye)
Sesli Aramayı Etkinleştirme 2 Uzun (2 saniye)
Çağrı Reddetme 2 Uzun (3 saniye)
* Bluetooth® Kulaklık PIN Kodu ‘0000’dır. Bu ayar değiştirilemez.
Bir çağrı sırasında:
Özellik Düğme
Düğme Basma Süresi
Telefonunuza Çağrı Aktarma 2 + 5 Uzun (2 saniye)
İkinci Çağrıyı Kabul Etme 2 Çok Uzun (+ 4 saniye)
Konferansa Bekleyen Çağrı
Ekleme
5 Uzun (2 saniye)
Mikrofonu Sessize Alma 4 + 5 Uzun (2 saniye)
Çağrı Sonlandırma 2 Kısa
Sesi Artırma 5 Kısa (1 saniye)
Sesi Azaltma 4 Kısa (1 saniye)
Page 68

TÜRKÇE
68
3. Kulaklık pilinin şarj edilmesi
Kulaklığınız, ilk kullanımdan önce tamamen şarj edilmesi gereken dahili
bir Li-on pil içermektedir.
Tam olarak ilk şarj etme işlemi 4 saat kadar sürmektedir.
Kullanım sırasında kulaklığın Kırmızı LED’i yanıp sönüyorsa, pil
boşalmıştır. Pilin tekrar şarj edilmesi yaklaşık 2 saat sürer.
Seyahat şarj cihazı ile şarj etme:
Seyahat şarj cihazını boş bir prize takın ve güç fişini kulaklığın DC
girişine bağlayın. Kırmızı gösterge yanacaktır.
Pil dolduğunda kırmızı gösterge sönecektir. Seyahat şarj cihazını
kulaklığınızdan çıkarabilirsiniz.
USB şarj kablosu ile şarj etme:
USB şarj kablosunu bilgisayarınızın boş bir USB portuna takın ve Güç
Fişini kulaklığınızın DC girişine bağlayın. Kırmızı gösterge yanacaktır. Pil
dolduğunda kırmızı gösterge sönecektir. USB şarj kablosunu
kulaklığınızdan çıkarabilirsiniz.
Not:
Kulaklığınızı bilgisayar USB portundan şarj ettiğinizde, USB
portun besleme gücüne bağlı olarak şarj işlemi daha uzun
sürebilir.
Page 69

TÜRKÇE
69
4. Bluetooth
®
Kulaklığınızın telefon ile eşleştirilmesi
Kulaklığı cep telefonunuz ile kullanmadan önce Kulaklığın cep telefonu
ile eşleştirilmesi gerekir.
(Cep telefonunuzun Bluetooth
®
Fonksiyonu etkinleştirilmelidir).
Not:
Eşleştirmeye başlamadan önce cep telefonunuzun el kitabına
müracaat edin ve cep telefonunuzun Bluetooth
®
cihazları ile
nasıl eşleştirileceğini kontrol edin.
A. Stereo Kulaklığın kapalı olduğundan emin olun.
B. Kulaklık üzerindeki “2” no’lu (Mavi) düğmeye 4 saniyeden daha
uzun süre ile basılı tutun. Kulaklık açılır (Mavi LED) ve eşleştirme
moduna girer (Mavi ve Kırmızı LED karşılıklı olarak yanıp söner).
C. Bluetooth
®
cep telefonunuzu açın; Bluetooth® cihaz eşleştirme
işlemini etkinleştirmek için cep telefonunuzun el kitabına
müracaat edin ve yeni Bluetooth
®
cihazlarını araştırın.
D. Kulaklık, cep telefonunuzda “CBTHS3” olarak görülür. Cep
telefonunuzdan kulaklığı seçin.
E. Cep telefonunuz eşleştirme sırasında bir pin kodu isteyecektir.
Eşleştirme işlemini tamamlamak için “0000” girin.
F. Eşleştirme işlemi başarılı bir şekilde tamamlandığında kulaklık
üzerindeki mavi LED yanıp söner. Kulaklık artık hazırda bekleme
modundadır ve cep telefonunuza otomatik olarak bağlanır.
Not: Yaklaşık 1 dakika süreyle eşleştirme yapılamazsa işlem
durdurulur. Eşleştirme modunu tekrar başlatmak için A ve B
adımlarını tekrarlamanız gerekecektir.
Page 70

TÜRKÇE
70
5. Bluetooth® Kulaklığın Kullanımı
Açma ve kapama:
Kulaklık kapalı ise, açmak için “2” no’lu (Mavi) düğmeye 2 saniye
süreyle basın.
Kulaklık açıldığında otomatik olarak cep telefonuna bağlanacaktır.
Kulaklık açık ise, bunu kapatmak için “2” no’lu (Mavi) düğmeye 3
saniye süreyle basın.
Çağrı kabul etme, sonlandırma ve reddetme:
Çağrı aldığınızda Kulaklıktan bir zil sesi duyacaksınız. Gelen bir çağrıyı
kabul etmek için “2” no’lu (Mavi) düğmeye kısaca basın.
Not:
Bazı cep telefonları, bağlantı bir süre kullanılmadığında
otomatik olarak bağlantıyı kesmektedir. Bu durumda, gelen bir
çağrı varsa kulaklık çalmayacaktır. Cep telefonu ile tekrar
bağlantı kurmak için “2” no’lu (Mavi) düğmeye basın. Gelen
çağrıyı kabul etmek için “2” no’lu (Mavi) düğmeye basın.
Bir çağrıyı sonlandırmak için “2” no’lu (Mavi) düğmeye kısaca basın.
Gelen bir çağrıyı reddetmek için “2” no’lu (Mavi) düğmeye 3 saniye
süreyle basın.
Çağrı sırasında ses ayarı yapma:
Kulaklığın sesini artırmak için “5” no’lu düğmeye basın.
Kulaklığın sesini azaltmak için “4” no’lu düğmeye basın.
Cep telefonunuz üzerinden de ses ayarı yapabilirsiniz.
Page 71

TÜRKÇE
71
Arama yapma:
Cep telefonunuzdan normalde çevirdiğiniz gibi telefon numarasını
çevirin. Telefon bağlantısı kurulduğunda ses otomatik olarak Kulaklığa
aktarılacaktır.
Cep telefonunuzda Sesle Aramayı etkinleştirmek için “2” no’lu (Mavi)
düğmeye kısaca basın. Uyarı bip sesi duyulduktan sonra kişinin adını
söyleyin.
Not:
Sesle Arama özelliğini kullanmak için cep telefonunuzun Sesle
Arama desteği olması gerekmektedir. Sesle Arama Fonksiyonu
için telefonunuzun el kitabına müracaat edin. Sesle Aramayı
kullanmak için, cep telefonunuzun, kişiler için Sesle Arama
kayıtlarını içermesi gerekir.
Yeniden numara çevirme:
Yeniden numara çevirmek için “4” no’lu düğmeye yaklaşık 2 saniye
basılı tutun. Cep telefonunuz yapılan son aramayı yeniden arayacaktır.
Not:
Yeniden telefon etme fonksiyonunu kullanmak için cep
telefonunuzun bu özelliği desteklemesi gerekir. Yeniden
telefon etme fonksiyonu için cep telefonunuzun el kitabına
müracaat edin.
Çağrı aktarma:
Örneğin arabanızdan ayrılırken kulaklıktan cep telefonunuza çağrı
aktarabilirsiniz.
Cep telefonunuza çağrı aktarmak için, “2” (Mavi) ve “5” no’lu
düğmelere yaklaşık 2 saniye kadar basın. Bir bip sesi duyacaksınız. Cep
telefonunuza çağrı aktarılacaktır.
Page 72

TÜRKÇE
72
Çağrı sırasında Mikrofonu Sessize Alma:
Çağrı sırasında kulaklık setinin mikrofonunu sessize almak için “4” ve
“5” no’lu düğmelere yaklaşık 2 saniye basın. Sessize alma sırasında
kulaklıktan bip sesleri duyacaksınız. Sessize alma fonksiyonunu devre
dışı bırakmak için tekrar “4” ve “5” no’lu düğmelere yaklaşık 2 saniye
basın.
İkinci bir çağrıyı kabul etme:
Bir görüşme sırasında ikinci bir çağrı alırsanız devam eden görüşmeyi
beklemeye alabilir ve ikinci çağrıyı kabul edebilirsiniz.
“2” no’lu (Mavi) düğmeye 4 saniyeden daha uzun süre ile basılı tutun.
Birinci çağrı beklemeye alınacak ve ikinci çağrıya cevap verilecektir.
Birinci çağrıya geri dönmek için “2” no’lu (Mavi) düğmeye 4 saniyeden
daha uzun süre ile basılı tutun. İkinci çağrı beklemeye alınacak ve
birinci çağrı yeniden aktif olacaktır.
Çağrıyı aktif yapmak için “2” no’lu (Mavi) düğmeye kısaca basın. Aktif
çağrı sonlandırılacak ve diğer çağrı aktif olacaktır.
3’lü görüşme:
2 aramanız varsa (1 aktif, 1 beklemede) “5” no’lu düğmeye yaklaşık 2
saniye basarak 3’lü görüşme başlatabilirsiniz. Beklemede olan çağrı
görüşmeye katılacaktır.
Conceptronic Bluetooth
®
Kulaklığı
Kullanmanın Keyfini Çıkarın!
Page 73

PRODUCT SPECIFICATIONS
73
Hardware:
• Compliant with Bluetooth 2.0 Specification.
• Frequency Range : 2.4-2.48 GHz 79 Channel FHSS
• Power Class : Class 2
• Talk Time : Up to 10 hrs
• Standby Time : Up to 150 hrs
• Rx Sensitivity : 0.1% BER/PIN: -80dBm
• Antenna : Build in antenna
• Power Source : AC-DC Power Adapter (DC 5V)
• Dimensions : 58 x 11 x 25 mm (L x H x W)
• Weight : 12 g
Supported BT Profiles:
• Handfree Profile
• Headset Profile
Page 74

DECLARATION OF CE CONFORMITY
74
The manufacturer Conceptronic
Address Databankweg 7
3821 AL Amersfoort, the Netherlands
Hereby declares that the product
Type BLUETOOTH HEADSET
Product CBTHS3
Complies with following directives:
1999/5/EEC R&TTE directive:
Telecommunications Terminal Equipment and Satellite
Earth Station Equipment
89/336/EEC EMC directive:
Electromagnetic Compatibility
73/23/EEC Low Voltage Directive:
Electrical equipment designed for use within certain
voltage limits
The following standards were consulted to assess conformity:
ETSI 300 328-2/2000, EN 301 489-17-2000, EN 301 489-1-2000,
EN55022/9.98 Class B, EN 61000-3-2/3/4/1995, EN 50082-1/1994, EN
60950/1995
This product is for indoor use only. The purpose of this product is to
send and receive data trough the ether. This is a class 2 product and
the transmitted output power is less than 100mW.
Page 75

DECLARATION OF CE CONFORMITY
75
The CE symbol confirms that this product conforms to
the above named standards and regulations.
This product is suitable for all EU countries.
For France, the output power is restricted if used outdoor and in the
range 2454 to 2483,5 MHz.For Italy, depending on the usage, a general
authorization may be required.Pour tous les pays de I'UE. Pour la
France, pour une utilisationen extérieur, la puissance de sortie est
limitée dans la bande 2454 to 2483,5 MHz.Pertutti i paesi ell'EU.
Per I'Italia, secondo I'uso, un 'autorizzazione generale puô essere
richiesta.
Place and date of issue: Amersfoort, June 14
th
, 2007
Herman Looijen, Product Marketing Manager
 Loading...