Compuprint SP40 plus User Manual
User Manual
MAN 10239-01

User Manual
Compuprint Product Information
Thanks for choosing the Compuprint SP40plus printer.
Your printer is a reliable working equipment that will be very useful in your daily job.
Our printers have been designed to be compact and respectful of the work environment. They offer a wide range of features and multiple functions that confirm the high technological level reached by Compuprint printers.
To maintain these printing performances unchanged in the long run, Compuprint has developed its own specific branded consumables for each printer type (for example: ribbon cartridges for dot matrix printers, toner and OPC cartridges for laser printers, bubble ink jet cartridges for inkjet printers) that assure an excellent operation with high printing quality level reliability.
Compuprint recommends to use only its original Compuprint branded consumables with original packaging (identified by its holographic label). In this way, a proper use of the printer at quality level stated in the product characteristics can be assured. All typical usage problems related to not certified consumables may be avoided, such as an overall quality print level degradation and, often, the reduction of the product life due to the fact that the proper working conditions for the print heads, OPC cartridge and other printer parts are not assured.
Moreover, Compuprint does not only certify its consumables in terms of working conditions but also carefully controls their compliance with the international standard rules concerning:
no cancerous materials;
no flammability of the plastic materials; other standards
Compuprint advises the customers not to use products for which the compliance to this safety rules are not warranted. Finally seek your dealer or contact a COMPUPRINT office and be sure that are provided you the original Compuprint branded consumables.
FCC Notes
This equipment has been tested and found to comply with the limits for a Class B digital device, pursuant to Part 15 of the FCC Rules. These limits are designed to provide reasonable protection against harmful interference when the equipment is operated in a commercial environment. This equipment generates, uses and can radiate radio frequency energy and, if not installed and used in accordance with the instruction manual, may cause harmful interference to radio communications. However, there is no guarantee that interference will not occur in a particular installation. If this equipment does cause harmful interference to radio or television reception, which can be determined by turning the equipment off and on, the user is encouraged to try to correct the interference by one or more of the following measures:
o Reorient or relocate the receiving antenna.
o Increase the separation between the equipment and the receiver.
o Connect the equipment into an outlet on a circuit different from that to which the receiver is connected
o Consult the dealer or an experienced radio/TV technician for help.
A shielded Centronics IEEE1284 compliant bi-directional parallel cable, maximum length 3 meters (10 feet), and a shielded RS-232 serial cable, maximum length 15 meters (50 feet), are necessary for this device to meet the requirements of a Class B digital device pursuant to part 15 of the FCC rules.
The above specified cables are readily available as Personal Computer or Peripheral accessories from multiple retail outlets. Please consult your dealer for details concerning such cables and also for information about FCC rules for digital devices.
Changes or modifications to the device covered by this manual, which are not expressly approved by the party responsible for compliance, could void the user’s authority under the FCC rules to operate the equipment.
MAN10239-01 |
i |

User Manual
Canadian D.O.C. Radio Interference Regulation
This digital apparatus complies with the Canadian ICES-003 Class B limits for radio frequency emissions.
Cet appareil numérique est conforme aux limites de Classe B de la norme NMB-003 du
Canada.
EEC Regulations
This equipment conforms to the essential requirements of EU Directives 2006/95/EC, 2004/108/EC.
Per the applicable requirements of EU Directive 2006/42/EC (“machines”) sound pressure of this product (measured according to EN27779) does not exceed 70 dBA.
This product is also compliant to the EU directive 2002/95/EC (RoHS) and 2002/96/EC (WEEE).
MAN10239-01 |
ii |

User Manual
Table of Contents
Compuprint Product Information |
i |
FCC Notes |
i |
Canadian D.O.C. |
|
Radio Interference Regulation |
ii |
EEC Regulations |
ii |
Table of Contents |
iii |
Printer Presentation |
1 |
Unpacking the Printer |
1 |
Printer Parts |
2 |
Front View |
2 |
Rear View |
3 |
Inside View |
3 |
Printer Installation |
4 |
Installing the Power Cable |
4 |
Installing the Ribbon Cartridge |
5 |
Paper Handling |
9 |
Loading Paper |
9 |
The Operator Panel |
10 |
Function Keys |
10 |
Leds |
11 |
LCD display messages |
11 |
Software Driver Selection |
12 |
Connection to the Host |
13 |
Setting the Interface Parameters |
14 |
Parallel Interface |
14 |
Serial Interface |
14 |
USB Interface |
14 |
Printer Setup |
15 |
Entering the Printer Setup Mode |
15 |
Printing the Self Test Page |
15 |
Printing the Printer Setup Forms |
17 |
Filling the Printer Setup Forms |
20 |
Setup Parameters |
20 |
Offset Adjustments |
26 |
Reading the Preprinted Setup Forms |
27 |
Printer Setup Flow Chart |
28 |
Printer Setup through USB and RS232/C |
|
Ports |
29 |
Compuprint CDC RS-232 Emulation Driver |
|
Installation |
29 |
SP40Setup Utility Installation |
31 |
Remote Setup |
31 |
Read NVM |
32 |
Troubleshooting |
34 |
Paper Problems |
34 |
Paper Jams |
34 |
Paper Damaged after printing |
35 |
Hexadecimal Dump |
35 |
Error Handling |
36 |
Recoverable Errors |
36 |
Not-Recoverable Errors |
37 |
Ribbon Cartridge Problems |
38 |
Paper Specifications |
39 |
Cut Sheets |
39 |
Passbooks |
40 |
Passbooks with Horizontal Fold |
41 |
Passbooks with Vertical Fold |
42 |
Technical Specifications |
43 |
Serial Interface Connection |
44 |
User Information according the European |
|
Directive 2002/95/EC and 20003/108/EC |
45 |
MAN10239-01 |
iii |
User Manual
Printer Presentation
This dot-matrix printer is a multi-purpose printer for front office applications. Its compact structure is designed for integration in an ergonomic environment. The printer provides a high level of reliability, form-handling accuracy and data integrity.
Its main features are:
o Printing on a wide range of paper media: different types of cut sheets, multi-parts and passbooks. o High print pressure for multi-parts documents
o High print quality supplied by a 24 wire print head o High reliability paper handling
The straight paper path allows the printing on particular documents such as envelopes, multipart forms and passbooks.
o Automatic paper thickness adjustment
The print head detects the paper thickness for correct printing on any type of document. This printer can print also on documents with a variable thickness, such as passbooks.
oEasy paper handling
The operator places the paper on the front table and the printer loads it without any other user
intervention. The paper ejection towards the front or the rear of the printer allows an easy access to the printed document.
o Automatic document alignment feature
The printer checks automatically the alignment of the top margin of the document and adjusts it, if necessary. The printout is therefore performed correctly independently from the paper loading position.
o Standard parallel, serial and USB interface with automatic switch-over function. o Easy printer setup through an optically managed menu.
oSupported emulations: Epson 570, IBM Proprinter XL24E, XL24E AGM, IBM 2390+, 4722, 9068 and Olivetti PR40+, PR2, 2845.
Unpacking the Printer
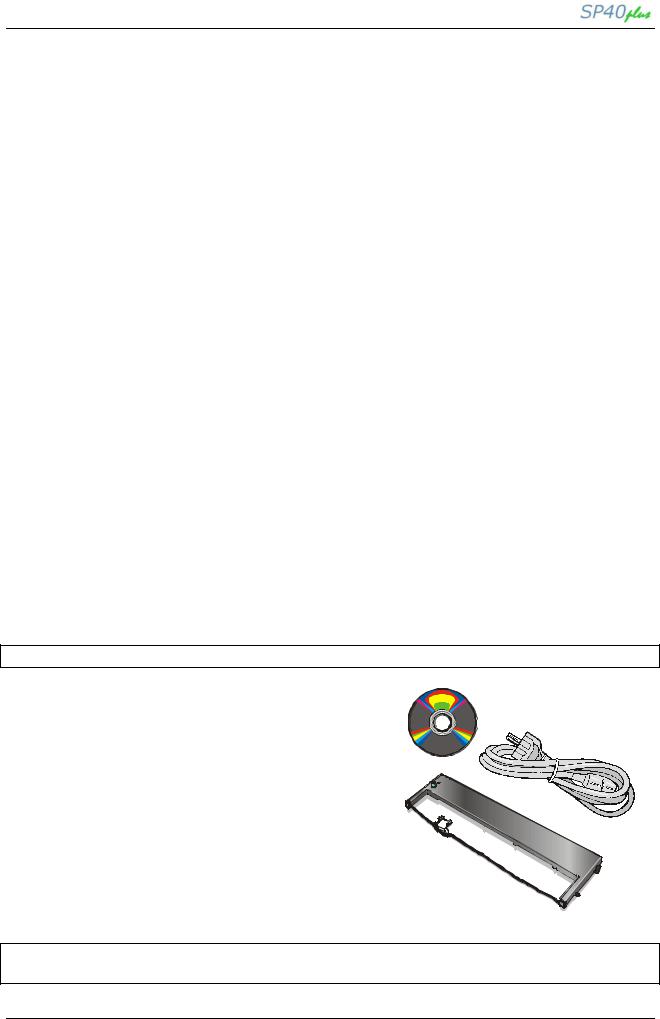
Together with the printer the following items are included in the shipment box:
Notify any damage to your supplier.
o Ribbon Cartridge o Power Cable
o CD-ROM with printer documentation and drivers. o Quick Reference Guide
Always keep the packing material in a safe place as you must repack the printer into it, when you need to move it.
MAN10239-01 |
1 |
User Manual
Printer Parts
Never remove any printer part unless it is expressly indicated in this manual.
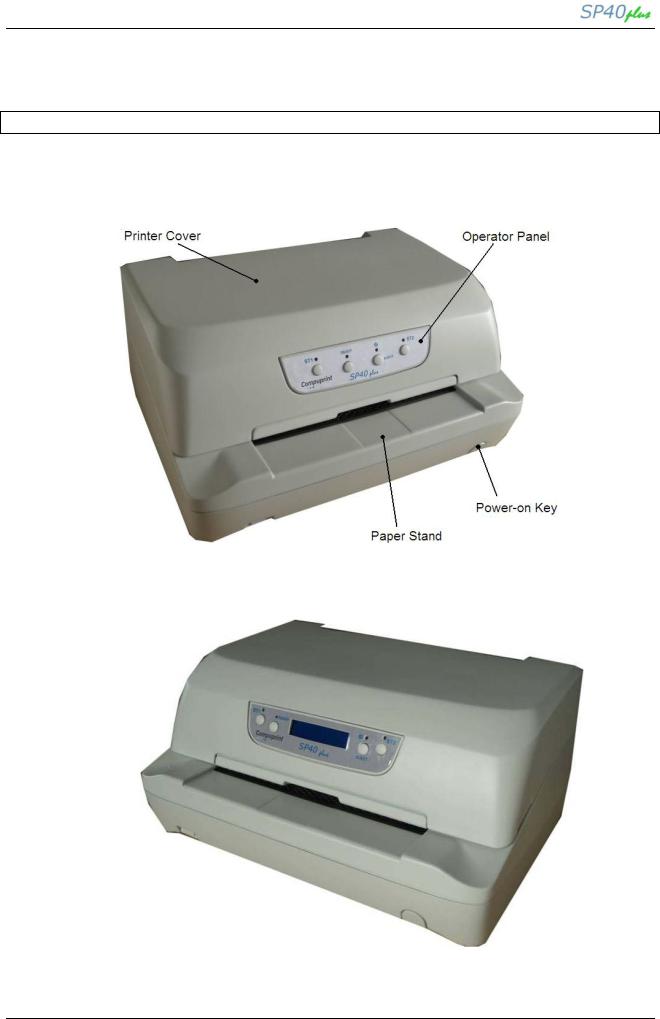
Front View
Model with operator panel without display
Model with operator panel with display
MAN10239-01 |
2 |
User Manual
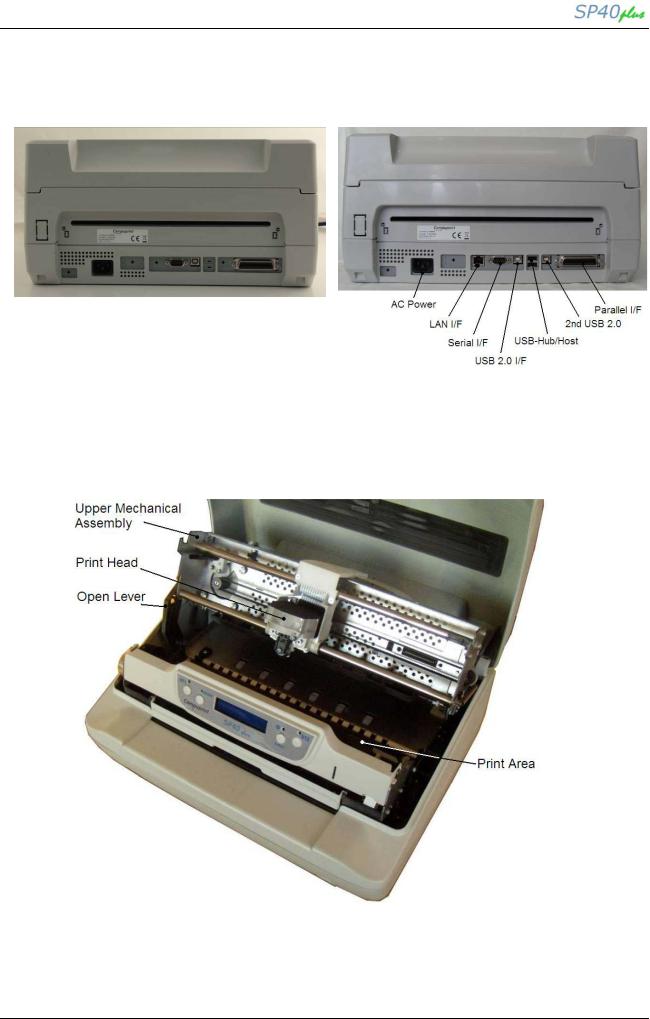
Rear view
Optional interfaces available (parallel, 2x Serial, USB, 2x USB-Hub, LAN)
Inside view
Inside View
MAN10239-01 |
3 |
User Manual
Printer Installation
Choosing a Suitable Location
Consider the following points when you choose the location for your printer:
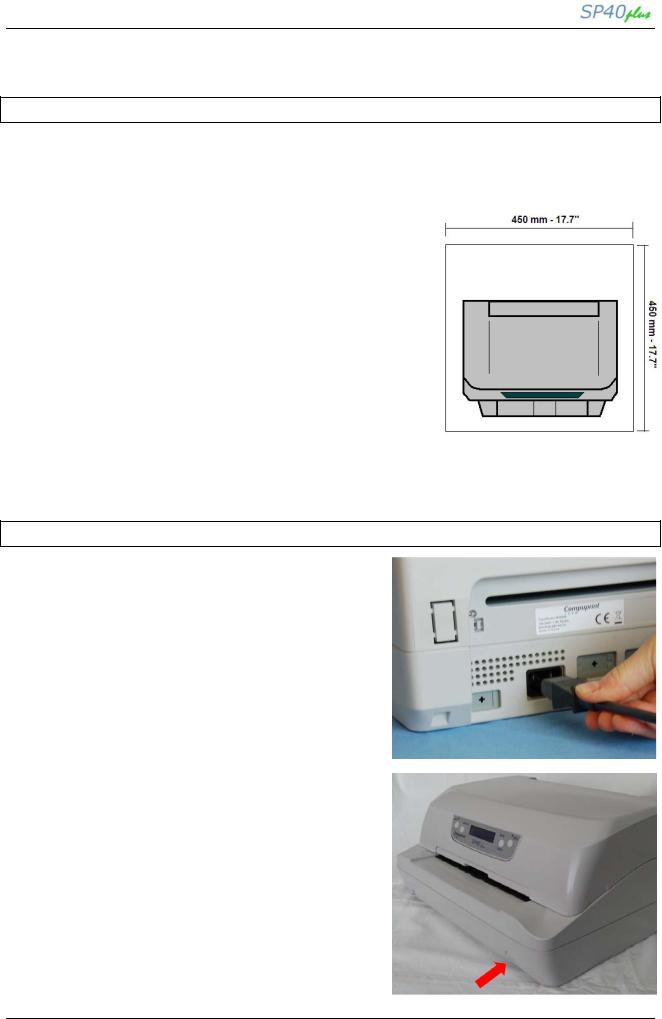
The distance between the printer and the host computer must not exceed the length of the interface cable; The location must be sturdy, horizontal and stable;
Your printer must not be exposed to direct sunlight, extreme heat, cold, dust or humidity;
When printing on standard paper formats, the paper comes out partially on the rear side of the printer. Make sure that behind the printer there is sufficient clearance to correctly move the paper.
Installing the Power Cable
1.Find the power cable connector and the rating plate on the rear side of the printer.
Always use a grounded outlet
2.Insert the power cable into the connector on the printer and the other end into a convenient mains outlet.
3.Press the  key on the right side of the printer front to power the printer on.
MAN10239-01 |
4 |
User Manual
Installing the Ribbon Cartridge
In order to avoid damaging the print head or mechanical gearings, this printer accepts only original Compuprint ribbon cartridges.
Therefore, if you install a not original cartridge, the printer may not work.
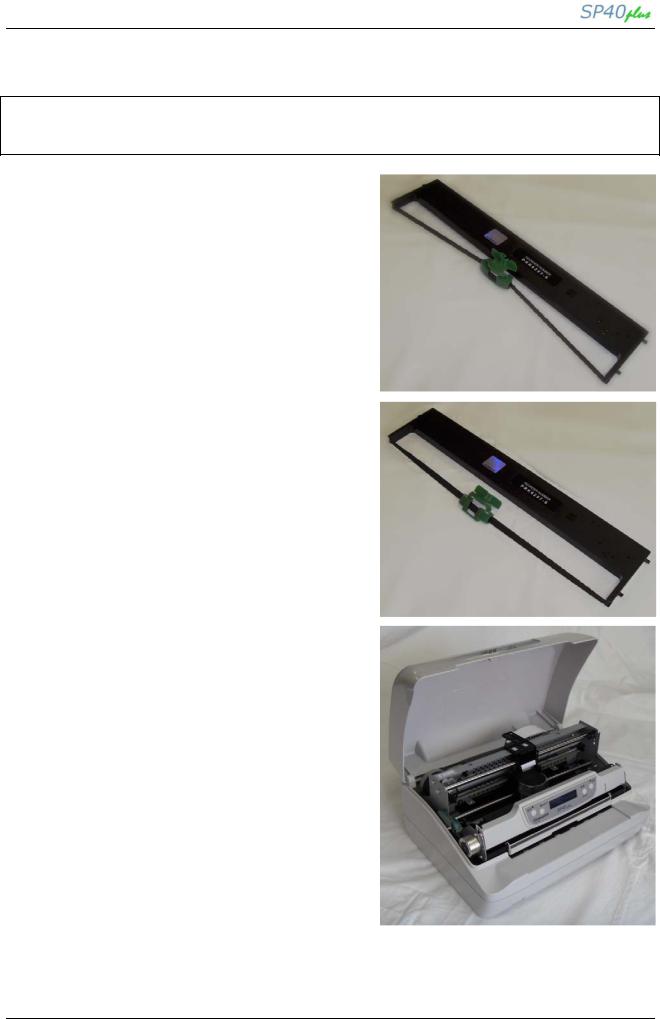
1.Remove the cartridge from its bag.
2.Unhook the green ribbon mask from the cartridge pins.
3.Open the printer cover.
The print head will automatically move in the middle of the printer.
MAN10239-01 |
5 |
User Manual
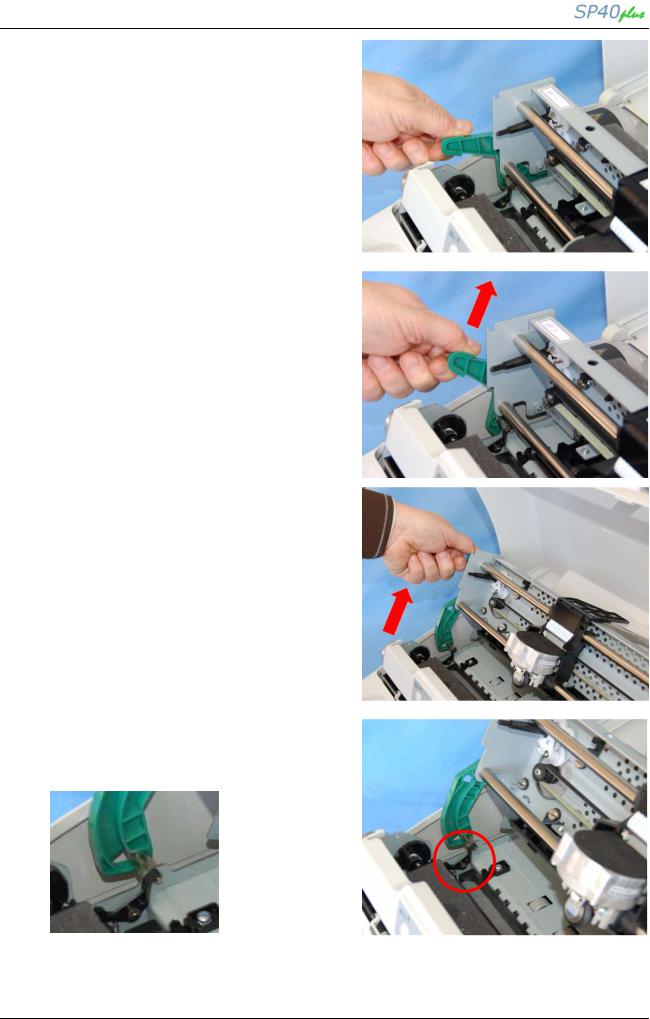
4.Open the upper mechanical frame. Locate the open green lever in the left side of the printer.
5.Unhook the green lever with the left hand towards the rear of the printer in the open position.
6.Then rise up the lever to its maximum position in order to completely open the head assembly.
7.Check for the “click” which means the
correct open lever position, showed in the inset picture.
MAN10239-01 |
6 |
User Manual
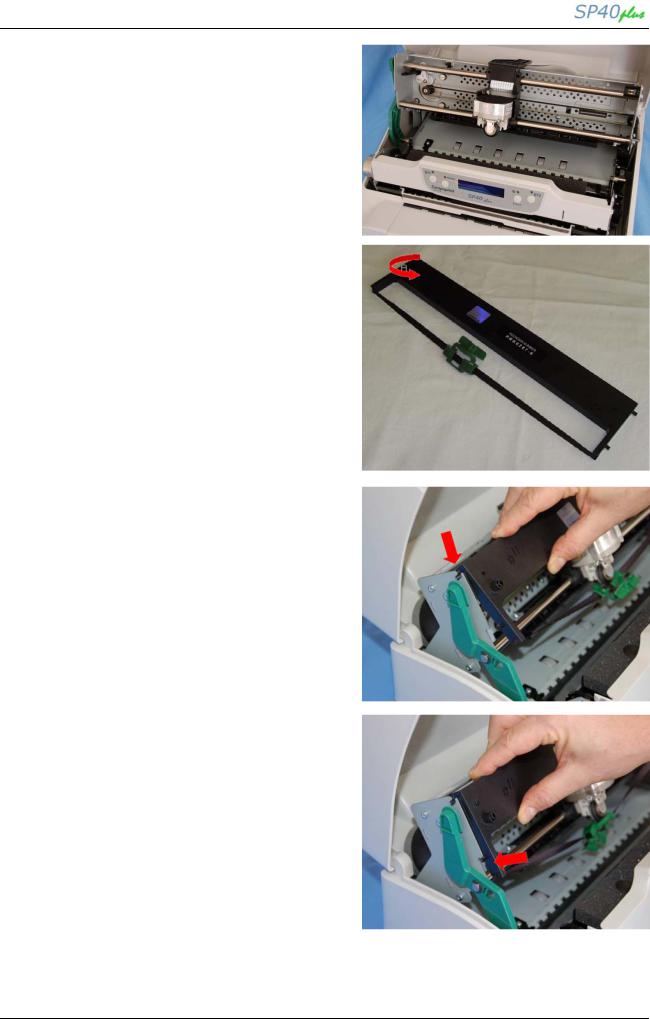
8.The printer is now ready to install the ribbon cartridge.
9.Turn the tension knob in the direction of the arrow to tighten the ribbon.
10.Insert the upper cartridge pins onto the corresponding grooves on both sides of the upper mechanical frame.
11.Then push the lower cartridge pins into the corresponding lower grooves on both
sides of the upper mechanical frame until it clicks into place.
MAN10239-01 |
7 |
User Manual
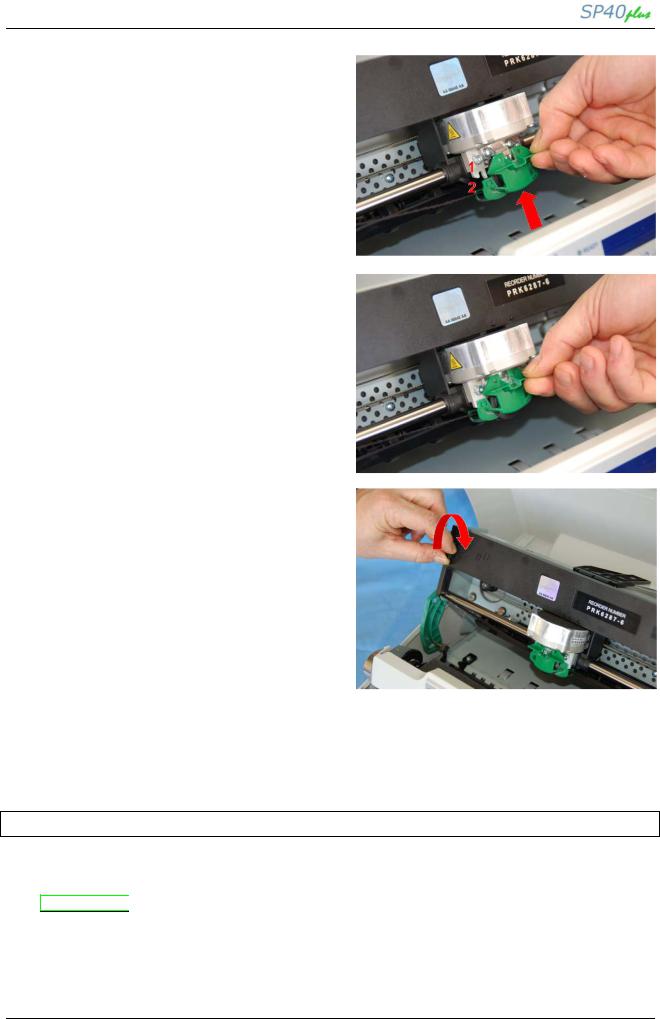
12.Insert the green plastic ribbon mask onto the print head. Pay attention to match the two pins
(2) on both sides of the green ribbon mask with the grooves (1) on both sides of the print head.
13.Push the green ribbon mask up until it clicks into place.
14.Turn the tension knob in the direction of the arrow to tighten the ribbon
15.Carefully pull down the green lever following the step 3, 4, and 5 in reverse order in order to securely close the Upper Mechanical Frame.
If you do not LOCK the Upper Mechanical Frame, the printer does not print correctly.
16.Close the printer cover.
Remark
The printer detects the Ribbon Genuine type and the amount of printed characters and stops in error if appearing.
See “Error Message ” later in this manual.
MAN10239-01 |
8 |
User Manual
Paper Handling
This printer is designed for versatile and reliable paper handling. The flat-bed mechanism allows the handling of special documents, such as multiple invoices, postcards, labels, passbooks and tickets.
The print head detects the paper edges automatically, the sheet can therefore be inserted in any position within the detection area according to the rules described in the following paragraph.
The paper alignment sensors determine the alignment of the upper paper margin, adjusting it if necessary.
Loading Paper
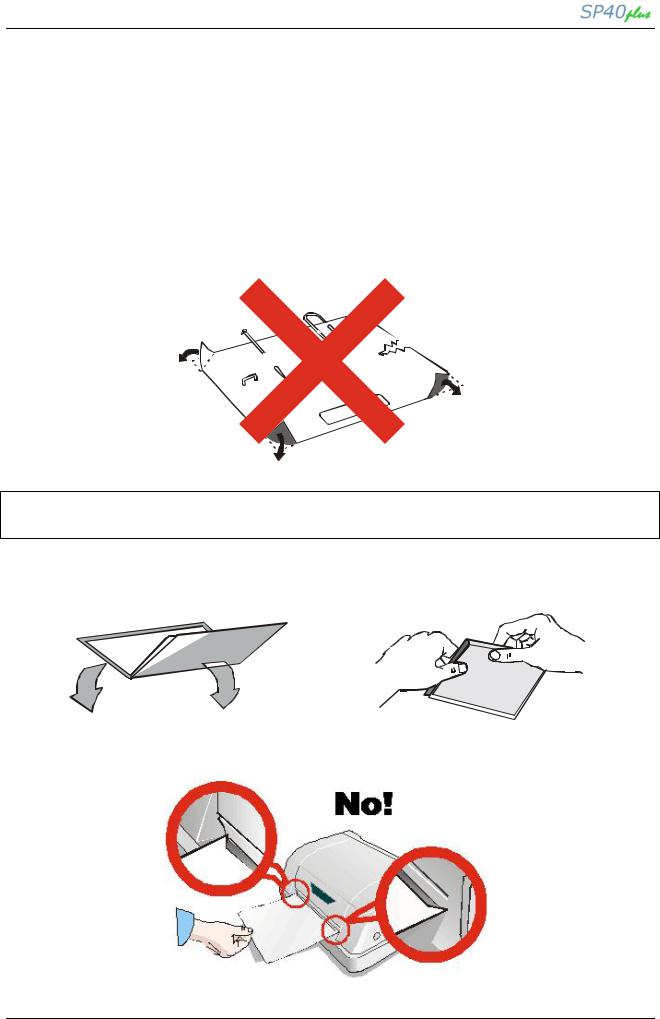
The inserted documents must not have folds, tears, pins, clips, staples or any foreign material.
|
Clip |
|
Pin |
Tear |
|
|
||
Staple |
|
Fold |
|
||
|
||
|
Foreign |
|
|
||
|
||
|
material |
|
If you insert damaged documents or paper with foreign material, you can seriously damage the printer.
Before inserting a passbook into the printer, open it and crease it in both directions along the binding stitch, so that the passbook lays flat on the paper stand when it is inserted into the printer.
The document may not exceed the limits of the paper stand.
MAN10239-01 |
9 |
User Manual
The Operator Panel
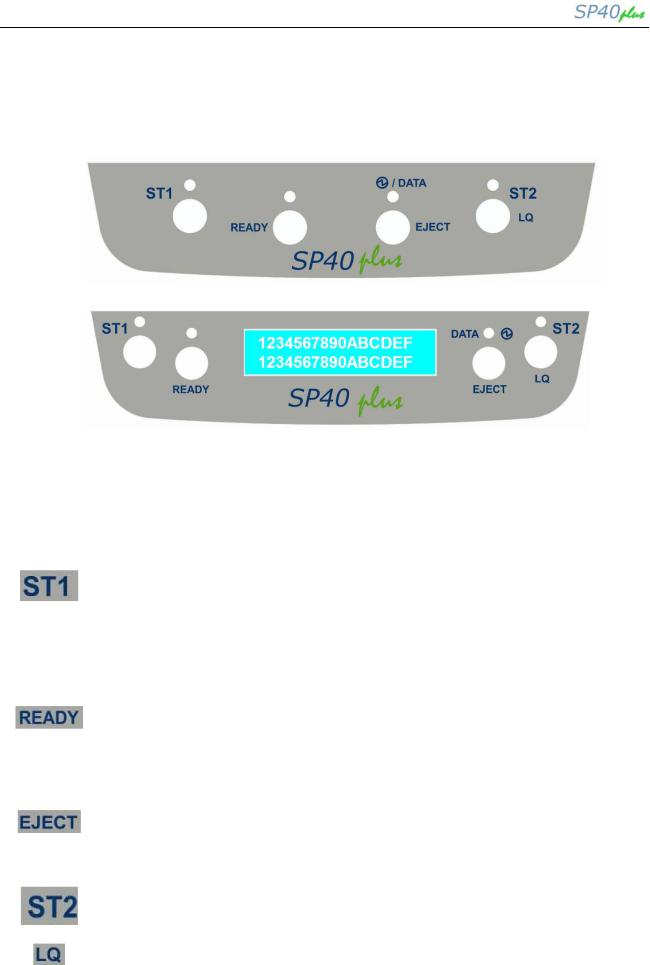
The operator panel is located in the middle of the printer cover and is composed of function keys and leds with which you can easily check the printer status and select the functions. Optionally it can be equipped with a wide LCD 2x16 characters display.
Function Keys
|
KEY |
|
NORMAL MODE |
SETUP MODE |
|
|
SPECIAL MODE |
||||||||||||
|
|
|
When using the IBM 4722, IBM 9068 and |
When the Printer is in |
When |
pressed |
while |
||||||||||||
|
|
|
the Olivetti protocols in two operators |
the Printer Setup mode, |
powering |
the |
printer on |
||||||||||||
|
|
|
(“booking”) mode, the application software |
pressing |
this |
key |
the |
with READY |
key |
selects |
|||||||||
|
|
|
determines the function of this key. |
operator |
selects |
the |
the |
T&D |
|
mode |
|||||||||
|
|
|
|
Configuration |
Page |
to |
(diagnostic). |
|
|
|
|||||||||
|
|
|
|
be printed. See “ |
Printer |
|
When |
pressed |
while |
||||||||||
|
|
|
|
|
Setup |
” later in this |
|
powering |
the |
printer on |
|||||||||
|
|
|
|
|
manual. |
|
|
|
|
|
|
|
with cover open enters in |
||||||
|
|
|
|
|
|
|
|
|
|
|
|
|
|
formware |
|
upgrading |
|||
|
|
|
|
|
|
|
|
|
|
|
|
|
|
procedure. |
|
|
|
||
|
|
|
Toggles the printer between Ready (on-line) |
If pressed in the Printer |
When |
pressed |
while |
||||||||||||
|
|
|
and Local (off-line) status. |
Setup |
mode, the printer |
powering |
the |
printer on, |
|||||||||||
|
|
|
|
prints the Self Test Page. |
selects the Printer |
Setup |
|||||||||||||
|
|
|
|
See “ |
Printer Setup |
” later |
Mode. |
|
|
|
|
||||||||
|
|
|
|
in this |
manual. |
|
|
|
|
|
When |
pressed |
while |
||||||
|
|
|
|
|
|
|
|
|
|
|
|
|
|
powering |
the |
printer on |
|||
|
|
|
|
|
|
|
|
|
|
|
|
|
|
with READY |
key |
select |
|||
|
|
|
|
|
|
|
|
|
|
|
|
|
|
the |
T&D |
|
mode |
||
|
|
|
|
|
|
|
|
|
|
|
|
|
|
(diagnostic). |
|
|
|
||
|
|
|
Pressing this key, when the printer is offline, |
|
|
|
|
|
|
|
|
|
|
|
|
|
|
|
|
|
|
|
or when the printer is online and no print |
|
|
|
|
|
|
|
|
|
|
|
|
|
|
|
|
|
|
|
data are in the buffer, the printer ejects the |
|
|
|
|
|
|
|
|
|
|
|
|
|
|
|
|
|
|
|
paper, if inserted (EJECT function). In the |
|
|
|
|
|
|
|
|
|
|
|
|
|
|
|
|
|
|
|
Olivetti protocols, the EJECT function may |
|
|
|
|
|
|
|
|
|
|
|
|
|
|
|
|
|
|
|
be performed only if the printer is offline. |
|
|
|
|
|
|
|
|
|
|
|
|
|
|
|
|
|
|
|
When using the IBM 4722, IBM 9068 and |
When the Printer is in |
When |
pressed |
while |
||||||||||||
|
|
|
the Olivetti protocols in two operators |
the Printer Setup mode, |
powering |
the |
printer on, |
||||||||||||
|
|
|
(“booking”) mode, the application software |
pressing |
this |
key |
the |
selects the HEX_DUMP |
|||||||||||
|
|
|
determines the function of this key. |
Setup |
Page |
selected |
mode. |
|
|
|
|
||||||||
|
|
|
When the printer is offline or when the |
with the ST1 key will be |
See “ |
Hexdump Mode |
” |
||||||||||||
|
|
|
printer is online and no print data are in the |
printed. |
See |
“ |
Printer |
|
later in |
this manual. |
|
|
|||||||
|
|
|
buffer, pressing this key, the printer toggles |
|
Setup |
” later in this |
|
|
|
|
|
|
|
||||||
|
|
|
between Letter Quality and Draft printing mode |
|
manual. |
|
|
|
|
|
|
|
|
|
|
|
|
|
|
|
|
|
(no Olivetti) |
|
|
|
|
|
|
|
|
|
|
|
|
|
|
|
|
|
|
|
|
|
|
|
|
|
|
|
|
|
|
|
|
|
|
|
|
|
MAN10239-01 |
10 |
|
|
|
|
|
|
|
|
|
|
|
|
|
|
|
|
|
User Manual
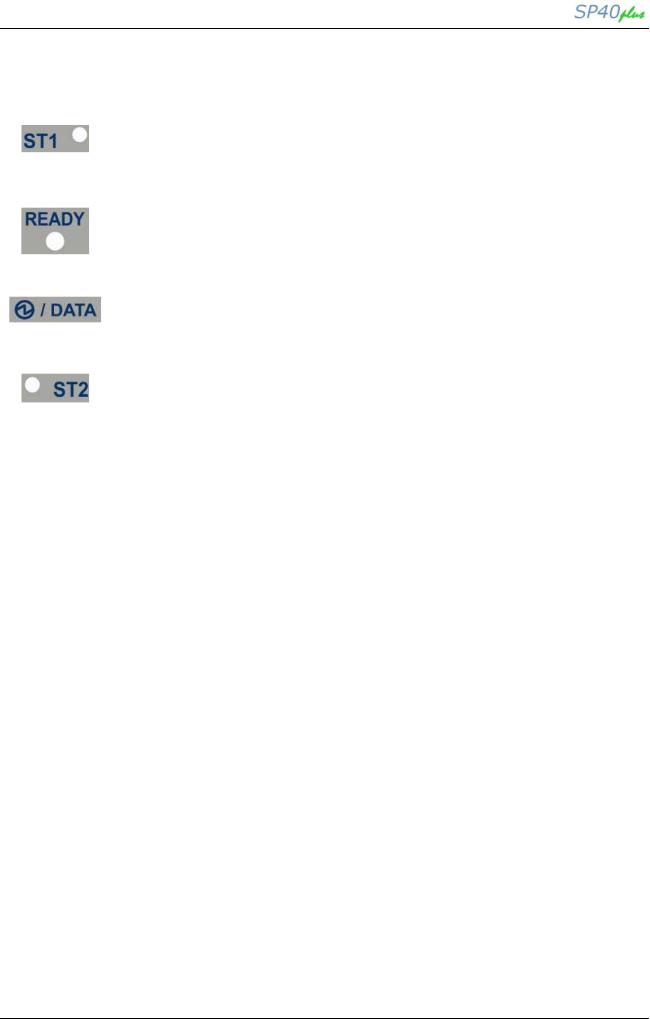
Leds
LED |
NORMAL MODE |
SETUP MODE |
|
|
SPECIAL MODE |
|||||||||||||
|
Lit if paper presence, Unlit without paper |
If the printer is in Setup |
Blinks, |
together |
with the |
|||||||||||||
|
(no Olivetti). |
Mode, |
this led |
indicates |
ST2 led, if a printer error |
|||||||||||||
|
When using the IBM 4722, IBM 9068 and |
which |
setup |
page |
is |
occurs. |
|
See |
“ |
Error |
|
|||||||
|
the Olivetti protocols in two operators |
selected for printing. See |
|
Message |
” later in |
this |
|
|||||||||||
|
(“booking”) mode, the ST1 led is under |
“ |
Printer Setup |
” later in this |
|
manual. |
|
|
|
|
||||||||
|
software control. |
|
|
manual. |
|
|
|
|
|
|
|
|
|
|
|
|
||
|
Lit, when the printer is ready (on line). |
If the printer is in Setup |
|
|
|
|
|
|
|
|||||||||
|
Unlit, when the printer is in local (off line). |
Mode, |
this led |
indicates |
|
|
|
|
|
|
|
|||||||
|
|
which |
setup |
page |
is |
|
|
|
|
|
|
|
||||||
|
|
selected for printing. See |
|
|
|
|
|
|
|
|||||||||
|
|
“ |
Printer Setup |
” later in this |
|
|
|
|
|
|
|
|||||||
|
|
|
|
manual. |
|
|
|
|
|
|
|
|
|
|
|
|
||
|
On, if the printer is powered on without |
Blinks if the printer is in |
|
|
|
|
|
|
|
|||||||||
|
data. |
Setup Mode. See “ |
Printer |
|
|
|
|
|
|
|
|
|||||||
|
Off, if the printer is powered off. |
|
Setup |
” later in |
this |
|
|
|
|
|
|
|
|
|||||
|
Blinks if the printer has data traffic or data |
|
manual. |
|
|
|
|
|
|
|
|
|
|
|
|
|
|
|
|
in the buffer. |
|
|
|
|
|
|
|
|
|
|
|
|
|
|
|
|
|
|
Lit when the Letter Quality print mode is |
If the printer is in Setup |
Blinks, |
together |
with the |
|||||||||||||
|
selected. Unlit when the Draft printmode is |
Mode, |
this led |
indicates |
ST1 led, if a printer error |
|||||||||||||
|
selected. |
which |
setup |
page |
is |
occurs. |
|
See |
“ |
Error |
|
|||||||
|
When using the IBM 4722, IBM 9068 and |
selected for printing. See |
|
Message |
” later in |
this |
|
|||||||||||
|
the Olivetti protocols in two operators |
“ |
Printer Setup |
” later in this |
|
manual. |
|
|
|
|
||||||||
|
(“booking”) mode, the S2 led is under |
|
|
manual. |
|
|
|
|
|
|
|
|
|
|
|
|
||
|
software control. |
|
|
|
|
|
|
|
|
|
|
|
|
|
|
|
|
|
LCD display messages (only for the model with it)
Upper line message |
Indication |
||||
Lower line message |
|
|
|
||
|
|
|
|
||
STARTING UP |
The printer initialization phase is starting-up. |
||||
..INIT.. |
The printer initialization phase is ended |
||||
SP40plus |
Rel. xxx |
The printer firmware release message |
|||
PRINTER READY |
The printer is in normal ready status showing the current Program and the current Font. |
||||
PROG1 |
DRAFT |
|
|
|
|
PRINTER READY |
The printer is in normal ready status in hex dump mode. |
||||
HEX-DUMP MODE |
|
|
|
||
PRINTER OFF-LINE |
The printer is in off-line status. |
||||
PUSH ON LINE |
|
|
|
||
PAUSE ON PRINT |
The printer is going in off-line status while data are in the buffer and ready to be printed. |
||||
PUSH ON LINE |
|
|
|
||
WAITING MEDIA |
Data are sent to the printer, the printer is waiting for the insertion of the paper. |
||||
INSERT |
MEDIA |
|
|
|
|
PRINTER BUSY |
The printer is currently printing showing the used Emulation and interface |
||||
EPSON PARALLEL |
|
|
|
||
SET UP |
The printer is in Set Up status and is waiting for a blank sheet to be loaded |
||||
See “ |
Printer Setup |
” later in this manual. |
|||
|
|
||||
SETUP PAG=CONF |
The |
printer is waiting |
for a Set Up operation selection. |
||
ST1=PAG |
ST2=PRT |
See “ |
Printer Setup |
” later in this manual. |
|
|
|
|
|||
NVM CHANGED |
The firmware of the printer has been updated and the NVM values have been resored to |
||||
the default parameters. |
|||||
|
|
||||
MAN10239-01 |
11 |
 Loading...