

Page 1
Apr 02
Compuprint PageMaster 402N
User Guide
Page 2

Apr 02
ii Compuprint PageMaster 402N User Guide
Trademarks
The following are trademarks or registered trademarks of their respective owners. Other product names mentioned in
this manual may also be trademarks or registered trademarks of their respective owners. Registered trademarks are
registered in the United States Patent and Trademark Office; some trademarks may also be registered in other
countries. Compuprint is a registered trademark of CPG International N.V. PostScript is a trademark of Adobe
Systems Incorporated for a page description language and may be registered in certain jurisdictions. Throughout this
manual, “PostScript Level 3” (PS-3) is used to refer to a set of capabilities defined by Adobe Systems for its
PostScript Level 3 page description language. Adobe, Adobe PhotoShop, Adobe PageMaker/Adobe Systems
Incorporated. Apple, AppleTalk, EtherTalk, LaserWriter, LocalTalk, Macintosh, TrueType/Apple Computer, Inc.
Banyan, VINES/Banyan. DEC, DECnet, LN03, VMS/Digital Equipment Corporation. Hewlett-Packard, HP, PCL,
HP-GL, HP-UX, LaserJet/Hewlett-Packard Co. IBM PC, Token-Ring/International Business Machines Corporation.
Intel/Intel Corporation. Microsoft, MS-DOS, Windows/Microsoft Corporation. Novell and NetWare/Novell, Inc. The
ENERGY STAR logo/United States Environmental Protection Agency. The ENERGY STAR emblem does not
represent EPA endorsement of any product or service. UNIX/UNIX Systems Laboratories. Ethernet/Xerox
Corporation.
Proprietary Statement
The digitally encoded software included with your PageMaster 402N is Copyrighted © 2002 by CPG International
N.V. All Rights Reserved. This software may not be reproduced, modified, displayed, transferred, or copied in any
form or in any manner or on any media, in whole or in part, without the express written permission of CPG
International N.V .
Copyright Notice
This manual is Copyrighted © 2002 by CPG International NV. All Rights Reserved. This manual may not be copied
in whole or in part, nor transferred to any other media or language, without the express written permission of CPG
International N.V.
The specifications of your printer and the content of this publication are subject to change without prior notice.
Every attempt has been made to verify the accuracy of the content herein.
◆ ◆ ◆
Page 3

Apr 02
Contents
Contents 1-iii
Preface 1-1
About this Manual 1-2
Scope 1-2
Overview 1-2
Printer Orientation 1-3
Conventions 1-3
About the Printer 1-4
Features 1-4
Available Configuration 1-5
Chapter 1 Getting Started 1-1
About this Chapter 1-2
Package Contents 1-2
CD-ROM Contents 1-2
Printer Location Requirements 1-3
Printer Weight and Dimensions 1-3
Space Requirements 1-3
Environment Requirements 1-4
Electrical Requirements 1-5
Page 4

Apr 02
iv Compuprint PageMaster 402N User Guide
Parts of the Printer 1-5
Optional Printer Accessories 1-8
Paper Path 1-9
Chapter 2 Using the Printer 2-1
Connecting the Printer to the AC Outlet 2-2
Turning Power On and Off 2-3
Connecting the Printer to the Host Computer 2-4
Selecting Print Media 2-4
Paper and Print Media To Avoid 2-4
Correct Paper Storage 2-4
Print Media Capacities 2-4
Print Media Weight, Type, and Size 2-6
Loading Print Media 2-7
Loading the Main Tray 2-7
Loading the Front Tray 2-10
Output Options for Oversize Print Media 2-17
Chapter 3 Understanding and Navigating the Control Panel
Menus 3-1
Control Panel Features 3-2
LCD Display 3-2
LED Indicators 3-3
Pushbuttons 3-3
Page 5

Apr 02
Compuprint PageMaster 402N User Guide v
Navigating the Control Panel Menus 3-4
Menu Structure 3-6
Paper Menu 3-6
Interface Menu 3-9
PS Menu 3-9
PCL Menu 3-11
System Menu 3-13
Quality Menu 3-15
Functions Menu 3-16
Status Menu 3-16
Chapter 4 Maintaining the Printer 4-1
Upgrading Printer Firmware 4-2
Upgrading Firmware Using the Parallel Interface 4-2
Upgrading Firmware Using the Network Interface 4-2
Replacing Printer Components 4-3
Replacing the Toner Cartridge 4-3
Replacing the Fuser 4-7
Replacing the Transfer Roll 4-10
Cleaning the Printer 4-14
Cleaning the Exterior 4-14
Cleaning the Interior 4-15
Cleaning Feed Rolls 4-19
Moving the Printer 4-26
Moving the Printer a Short Distance 4-26
Moving the Printer a Long Distance 4-26
Storing the Printer for Long Periods of Time 4-27
Chapter 5 Troubleshooting 5-1
Installation Problems 5-2
Inoperative Printer 5-3
No Ready Message 5-3
Noise, Smoke, or Smell 5-3
Paper Jams 5-4
Clearing an E1, E2-1 or E2-2 Paper Jam 5-6
Clearing an E3 or E4 Jam 5-14
Clearing an E0 Jam 5-23
Page 6

Apr 02
vi Compuprint PageMaster 402N User Guide
Clearing an E7 Jam 5-24
Clearing an E8 Jam 5-26
Print Image Quality Problems 5-27
Image is extremely faint and/or image contains blank areas 5-28
Entire Page is Blank 5-28
Image is extremely dark and/or white areas are not clean 5-29
Entire page is black 5-30
Black lines on the page 5-31
Ghost images on the page 5-31
Black Spots on the Page 5-32
Back of the Printed Page is Dirty 5-32
Finished Print is Damaged 5-33
Finished Image Rubs Off of the Page 5-34
Other Print Image Quality Problems 5-34
Miscellaneous Problems 5-35
Printer is Inoperative 5-35
Printer Operates Erratically 5-36
Printer Makes Unusual Noises 5-37
Room Lights Dim or Flicker When Printer Starts 5-38
Printer Interferes with Nearby Radio or Television Reception 5-38
Warning Messages and Error Messages 5-39
Warning Messages 5-40
Error Messages 5-41
Chapter 6 Using the Duplexer 6-1
About the Duplexer 6-2
Major Components of the Duplexer 6-2
Installing the Duplexer 6-2
Testing the Duplexer 6-5
Solving Duplexer Problems 6-6
Interpreting Duplexer Error Codes 6-6
Installation Problems 6-6
Clearing Duplex Paper Jams 6-7
Correcting Miscellaneous Duplexer Problems 6-8
Removing the Duplexer 6-12
Chapter 7 Using the 500 Sheet Feeder 7-1
About the 500 Sheet Feeder 7-2
Major Components of the 500 Sheet Feeder 7-2
Page 7

Apr 02
Compuprint PageMaster 402N User Guide vii
Installing the 500 Sheet Paper Feeders 7-3
Installing One Paper Feeder 7-3
Installing Two Paper Feeders 7-6
Testing the 500 Sheet Feeder 7-10
Selecting Print Media 7-10
Paper and Print Media To Avoid 7-10
Correct Paper Storage 7-11
Print Media Weight, Type, and Size 7-12
Loading Print Media 7-13
Loading the A4/Letter or A3/Ledger Paper Tray 7-13
Solving 500 Sheet Feeder Problems 7-16
Interpreting Paper Feeder Error Messages 7-17
Installation Problems 7-17
Clearing an E1, E2-1 or E2-2 Paper Jam 7-18
Correcting Miscellaneous Paper Feeder Problems 7-23
Maintaining the 500 Sheet Feeder 7-25
Cleaning Feed Rolls 7-25
Moving the 500 Sheet Feeder 7-29
Moving the Printer and 500 Sheet Feeder a Short Distance 7-29
Moving the Printer and 500 Sheet Feeder a Long Distance 7-29
Chapter 8 Using the High Capacity Feeder 8-1
About the High Capacity Feeder 8-2
Major Components of the High Capacity Feeder 8-3
Installing the High Capacity Feeder 8-3
Installing the High Capacity Feeder with a Paper Feeder 8-3
Installing Only the High Capacity Feeder 8-7
Testing the High Capacity Feeder 8-10
Selecting Print Media 8-10
Paper and Print Media To Avoid 8-10
Correct Paper Storage 8-11
Print Media Weight, Type, and Size 8-11
Loading Paper into the High Capacity Feeder 8-11
Solving High Capacity Feeder Problems 8-13
Interpreting High Capacity Feeder Error Messages 8-14
Installation Problems 8-15
Clearing a High Capacity Feeder Paper Jam 8-15
Correcting Miscellaneous High Capacity Feeder Problems 8-17
Page 8

Apr 02
viii Compuprint PageMaster 402N User Guide
Maintaining the High Capacity Feeder 8-19
Cleaning the Interior of the High Capacity Feeder 8-19
Cleaning the Exterior of the High Capacity Feeder 8-19
Cleaning Feed Rolls 8-20
Moving the High Capacity Feeder 8-21
Moving the High Capacity Feeder a Short Distance 8-21
Moving the High Capacity Feeder a Long Distance 8-21
Chapter 9 Using the Stacker 9-1
About the Stacker 9-2
Major Components of the Stacker 9-3
Installing the Stacker 9-3
Testing the Stacker 9-8
Solving Stacker Problems 9-8
Interpreting Stacker Error Messages 9-9
Installation Problems 9-9
Clearing an Stacker Paper Jam 9-10
Correcting Miscellaneous Stacker Problems 9-11
Maintaining the Stacker 9-14
Cleaning the Exterior of the Stacker 9-14
Moving the Stacker 9-14
Moving the Stacker a Short Distance 9-14
Moving the Stacker a Long Distance 9-14
Appendix A Safety Notes and Regulatory Compliance A-1
Safety Notes A-2
Regulatory Compliance A-2
Safety Compliance A-2
EMC Compliance A-3
Page 9

Apr 02
Preface
In this Chapter . . .
• “Welcome” on page 2
• “About this Manual” on page 2
• “About the Printer” on page 4
Page 10

Apr 02
2 Compuprint PageMaster 402N User Guide
About this Manual
Welcome
Thank you for selecting the Compuprint PageMaster 402N laser printer. This User Guide contains
important information about the operation and care of your printer. Please read this manual in its
entirety and keep it at hand for later reference.
About this Manual
Scope
This User Guide contains all of the information necessary to operate and care for your printer and
accessories. It is intended to be used with the pictorial unpacking instructions and the Installation
Guide, both included in the printer packaging. If you have not already unpacked and installed the
printer, please refer to these documents. This guide does not contain instructions for unpacking
and installing the printer.
Overview
This manual contains ten chapters and one appendix:
Preface
The Preface contains information about this guide and about the features and aavailable configurations of the printer.
Chapter 1: Getting Started
This chapter reviews the contents of the printer packaging, explains the parts of the printer, and
describes the space and environment requirements of the printer.
Chapter 2: Using the Printer
This chapter provides information concerning the daily use of the printer, including procedures for
connecting the printer and loading print media, and guidelines for selecting print media.
Chapter 3: Understanding and Navigating the Control Panel
This chapter explains the control panel and its functions, and also demonstrates how to navigate
throughout the various menus and submenus that allow you to view and change the printer settings.
Chapter 4: Maintaining the Printer
This chapter provides information about maintaining your printer. Although the printer requires
very little maintenance, with normal daily use you will need to perform some routine maintenance
procedures, including replacing consumable items and cleaning the printer. This chapter also contains information about moving and storing the printer.
Chapter 5: Troubleshooting
This chapter describes the problems that you may encounter when using your printer, and provides
procedures for resolving the problems. This chapter also lists the warning and error messages that
appear on the control panel display.
Chapter 6: Using the Duplexer
This chapter provides all of the information necessary to install, use, and maintain the duplexer.
Page 11

Apr 02
Compuprint PageMaster 402N User Guide 3
About this Manual
Chapter 7: Using the 500-Sheet Feeder
This chapter provides all of the information necessary to install, use, and maintain the 500-sheet
paper feeder option, including procedures for cleaning the feeder and removing paper jams.
Chapter 8: Using the High Capacity Feeder
This chapter provides all of the information necessary to install, use, and maintain the high capacity
feeder, including procedures for cleaning the feeder and removing paper jams.
Chapter 9: Using the Stacker
This chapter provides all of the information necessary to install, use, and maintain the stacker,
including procedures for cleaning and removing paper jams.
Appendix A: Safety Notes and Regulatory Compliances
This appendix describes cautions to take when installing, transporting, or operating the printer, and
also includes the applicable regulatory compliances.
Printer Orientation
Throughout this guide, the four sides of the printer are referred to as front, rear, right, and left. The
front of the printer is the side near the control panel, and the rear of the printer is opposite the
front. The left and right sides of the printer are defined as the sides to the left and right, respectively,
of a person who is facing the front of the printer.
Conventions
This following conventions are used throughout this manual to emphasize certain procedures or
information:
NOTE: A note is a tip or extra information that may be helpful in installing or using the printer.
CAUTION: A caution message provides information that may help you avoid equipment damage, process failure, or inconvenience. Read all caution messages carefully. Compuprint will
not be responsible for damage that results from improper use of the printer.
WARNING!
A warning message indicates the possibility of personal injury if a specific procedure is not performed exactly as described in the guide. Pay close attention to these sections and
read them fully to prevent possible injury. Compuprint will not be responsible for damage that
results from improper use of the printer.
Page 12

Apr 02
4 Compuprint PageMaster 402N User Guide
About the Printer
About the Printer
The Compuprint PageMaster 402N printer uses a data modulated laser beam and conventional
dry-ink xerographic processes to produce images up to 1200 dpi resolution at a paper output speed
of 40 pages per minute. The printer can accommodate both plain paper and other print media, and
feeds paper from either a main 500-sheet paper tray or from the front tray, which is designed to feed
special print media such as labels and transparencies.
There are four paper handling options available for the printer, including a Duplexer for two-sided
printing, a 500-Sheet Feeder for additional paper capacity or variety, a High Capacity Feeder for
even greater paper feeding options, and a High Capacity Stacker to hold and separate large print
jobs. There are also four replaceable components: the Toner Cartridge, the Fuser, the Transfer
Roller, and the High Capacity Feeder Feed Rolls.
You may connect the printer to either a local computer or a computer network system. Application
and print driver software on the computer controls image generation and print processing. The
computer sends the electronic image to the printer, where the printer turns the electronic image
into a black and white printed image.
Features
Your laser printer has the following features:
• Quality printing at a high speed
The printer has an output of 40 pages per minute with a resolution up to 1200 dpi.
• Flexible use of paper sources and delivery methods
The base configuration of the printer includes one 500-sheet universal paper feeder and a
front tray. You may also add the following options to the printer: additional 500-sheet Feeders, 2000-sheet High Capacity Feeder, High Capacity Stacker, and Duplexer.
• Easy operation
The easy-to-read control panel display clearly shows the status of printer operation. Control
panel pushbuttons allow you to access and view printer menus, submenus, and status messages.
• Single-element toner cartridge
The integrated toner cartridge contains both the toner and the photosensitive drum in a single housing, making replacement easy and convenient.
• Continuous printing of up to 3150 sheets
The printer can print up to 1000 sheets unattended when the stacker is installed, and can
print up to 3150 sheets attended when the high capacity feeder and one 500-sheet paper
feeder are installed.
•Network-readiness
The standard configuration of the printer includes an Ethernet Network Interface Card.
Page 13

Apr 02
Compuprint PageMaster 402N User Guide 5
About the Printer
Available Configuration
The Compuprint PageMaster 402N is available in the following configuration:
•Memory: 64 MB
• Resolutions: 600 x 600 dpi, and 1200 x 1200 dpi
• Paper Input: One 500-sheet A4/letter paper tray and one 150-sheet front tray for paper,
transparencies, envelopes, and other non-standard print media
• Paper Output: One 500-sheet face-down tray
• Interfaces: IEEE 1284 Parallel, 10/100BaseT, 10Base2
• Printer Languages: PCL6, Adobe Postscript 3
◆ ◆ ◆
Page 14

Apr 02
6 Compuprint PageMaster 402N User Guide
About the Printer
Page 15

Apr 02
Chapter 1
Getting Started
In this Chapter . . .
• “About this Chapter” on page 1-2
• “Package Contents” on page 1-2
• “Printer Location Requirements” on page 1-3
• “Parts of the Printer” on page 1-5
• “Optional Printer Accessories” on page 1-8
• “Paper Path” on page 1-9
Page 16
Apr 02
1-2 Compuprint PageMaster 402N User Guide
About this Chapter
About this Chapter
This chapter reviews the contents of the printer packaging, explains the parts of the printer, and
describes the space and environment requirements of the printer.
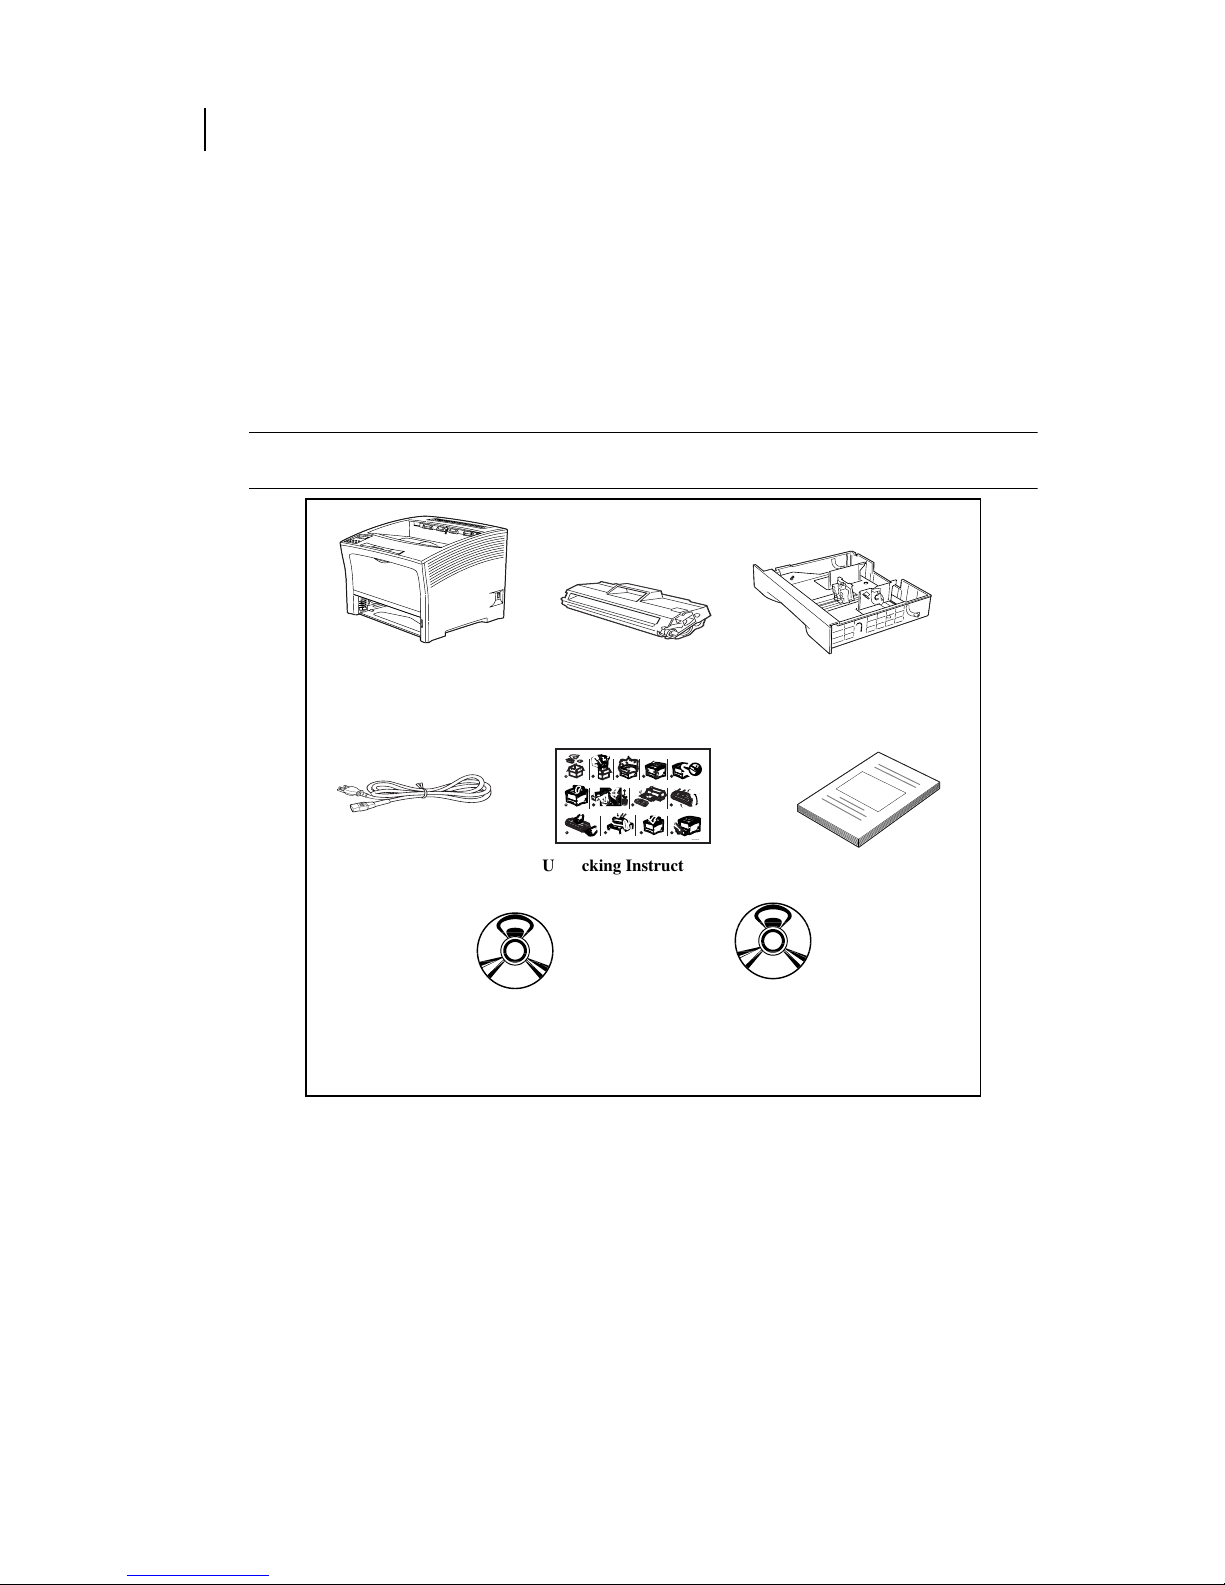
Package Contents
The items shown in the following figure are included in the printer packaging. If any items are
missing or damaged, contact your dealer.
NOTE: If you have not unpacked and installed your printer, please refer to the pictorial unpacking
instructions and the Installation Guide included in the printer packaging.
CD-ROM Contents
The two CD-ROMs provided with your printer include the following contents:
• PageMaster 402N Electronic Library CD-ROM
The Electronic Library CD-ROM contains printer drivers, software, and documentation
designed to help you fully utilize the printer, and also contains Adobe PostScript fonts that
match those available on the printer.
• Remote Control Software (RCS) CD-ROM
The RCS CD-ROM contains remote control software that enables your Network/System
Administrator to manage all of your network printers from a single desktop.
SIB007F
SIB011F
SIB101F
A4/Letter 500-sheet
Paper Tray
Printer main unit Toner Cartridge
Power Cord
Installation Guide
Compuprint
PageMaster 402N
Electronic Library
CD-ROM
Remote Control Software CD-ROM
1
6
10
11
12
13
7
8 9
2 3 4
5
1
2
3
2
3
4
1
GEG-99042
Unpacking Instructions
SIB008AF
Page 17
Apr 02
Compuprint PageMaster 402N User Guide 1-3
Printer Location Requirements
Printer Location Requirements
Printer Weight and Dimensions
This printer weighs approximately 55 lbs (25 kg) and should always be lifted by two people. The
dimensions of the printer are listed below.
• Printer Height: 15.6 in (395 mm)
• Printer Width (left to right): 19.3 in (490 mm)
• Printer Depth (front to back): 18.1 in (460 mm)
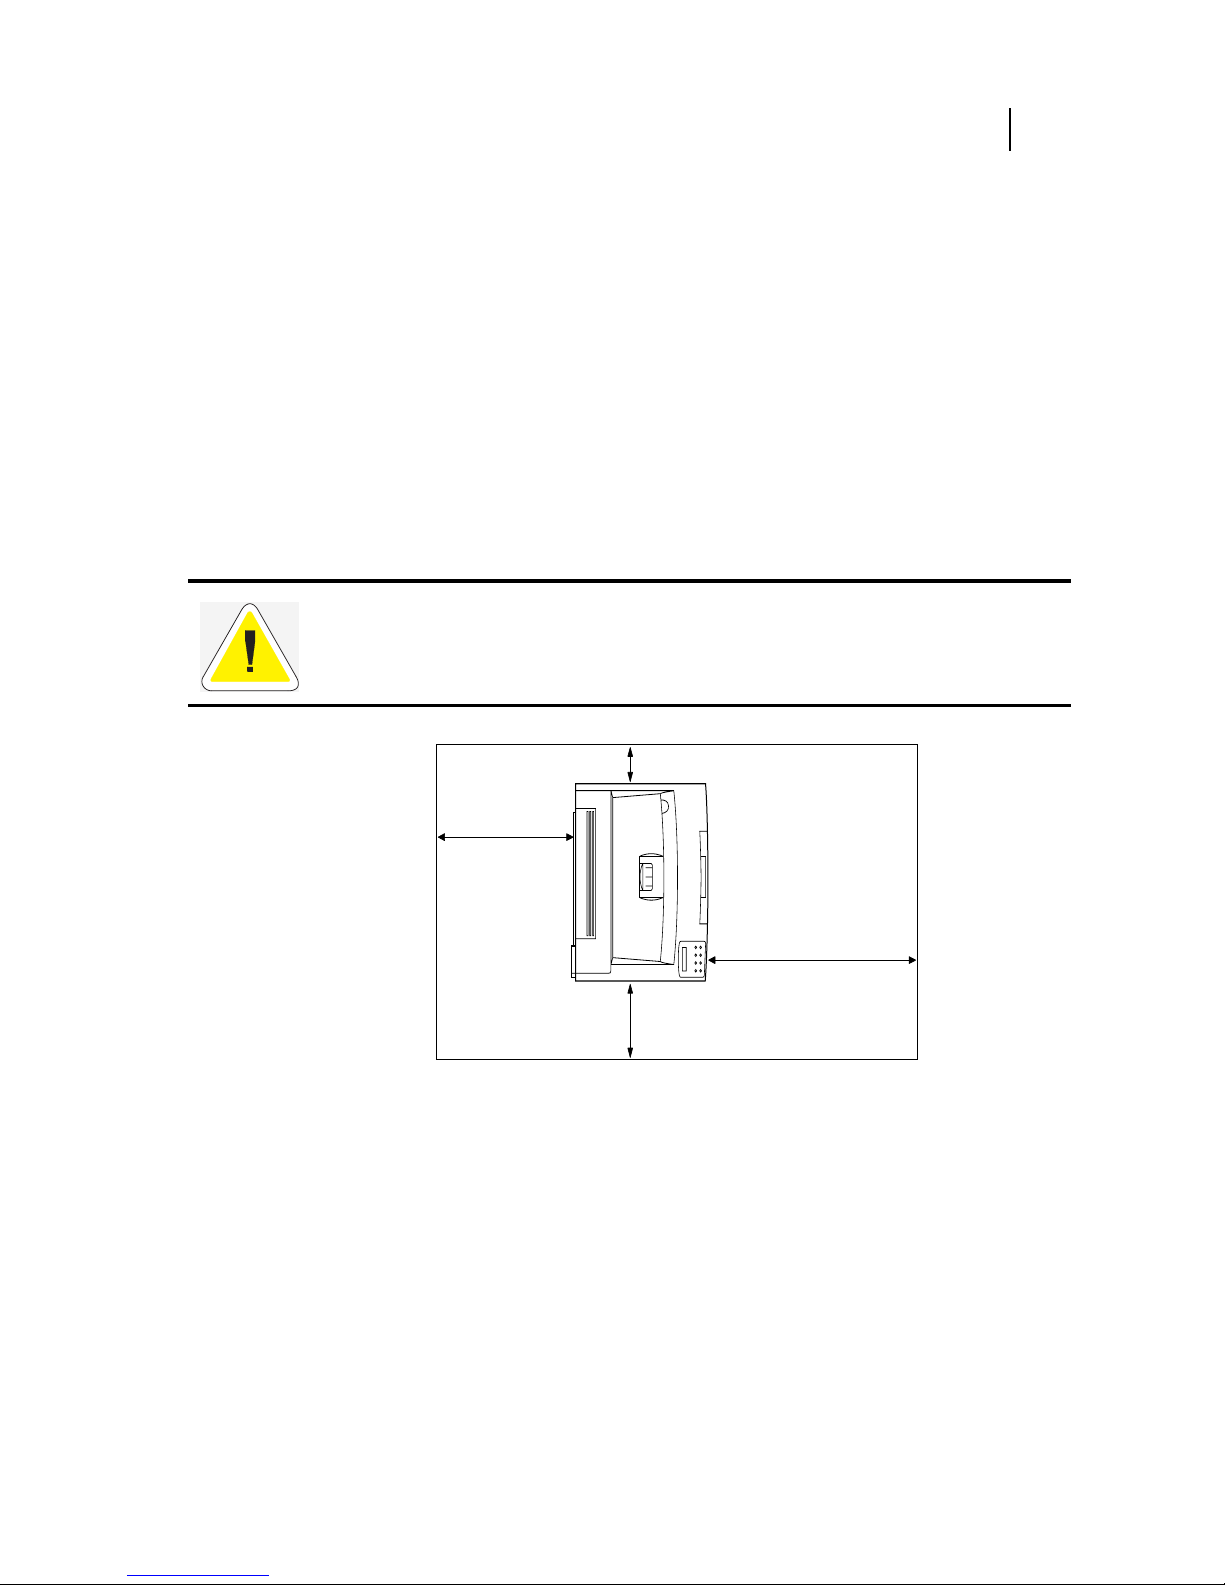
Space Requirements
A certain amount of space is required for proper operation of the printer and also for performing
printer maintenance and replacing consumables. The following figures indicate the necessary clearances for each side of the printer.
Figure 1-1: Top view of the printer.
CAUTION: There is a ventilation opening on the left side of the printer. To avoid overheating
and fire hazards, be sure to leave a clearance of at least 8 inches (200 mm) between this opening and the nearest wall or other surface.
4 inches
(100 mm)
30 inches
(760 mm)
8 inches
(200 mm)
20 inches
(500 mm)
Page 18
Apr 02
1-4 Compuprint PageMaster 402N User Guide
Printer Location Requirements
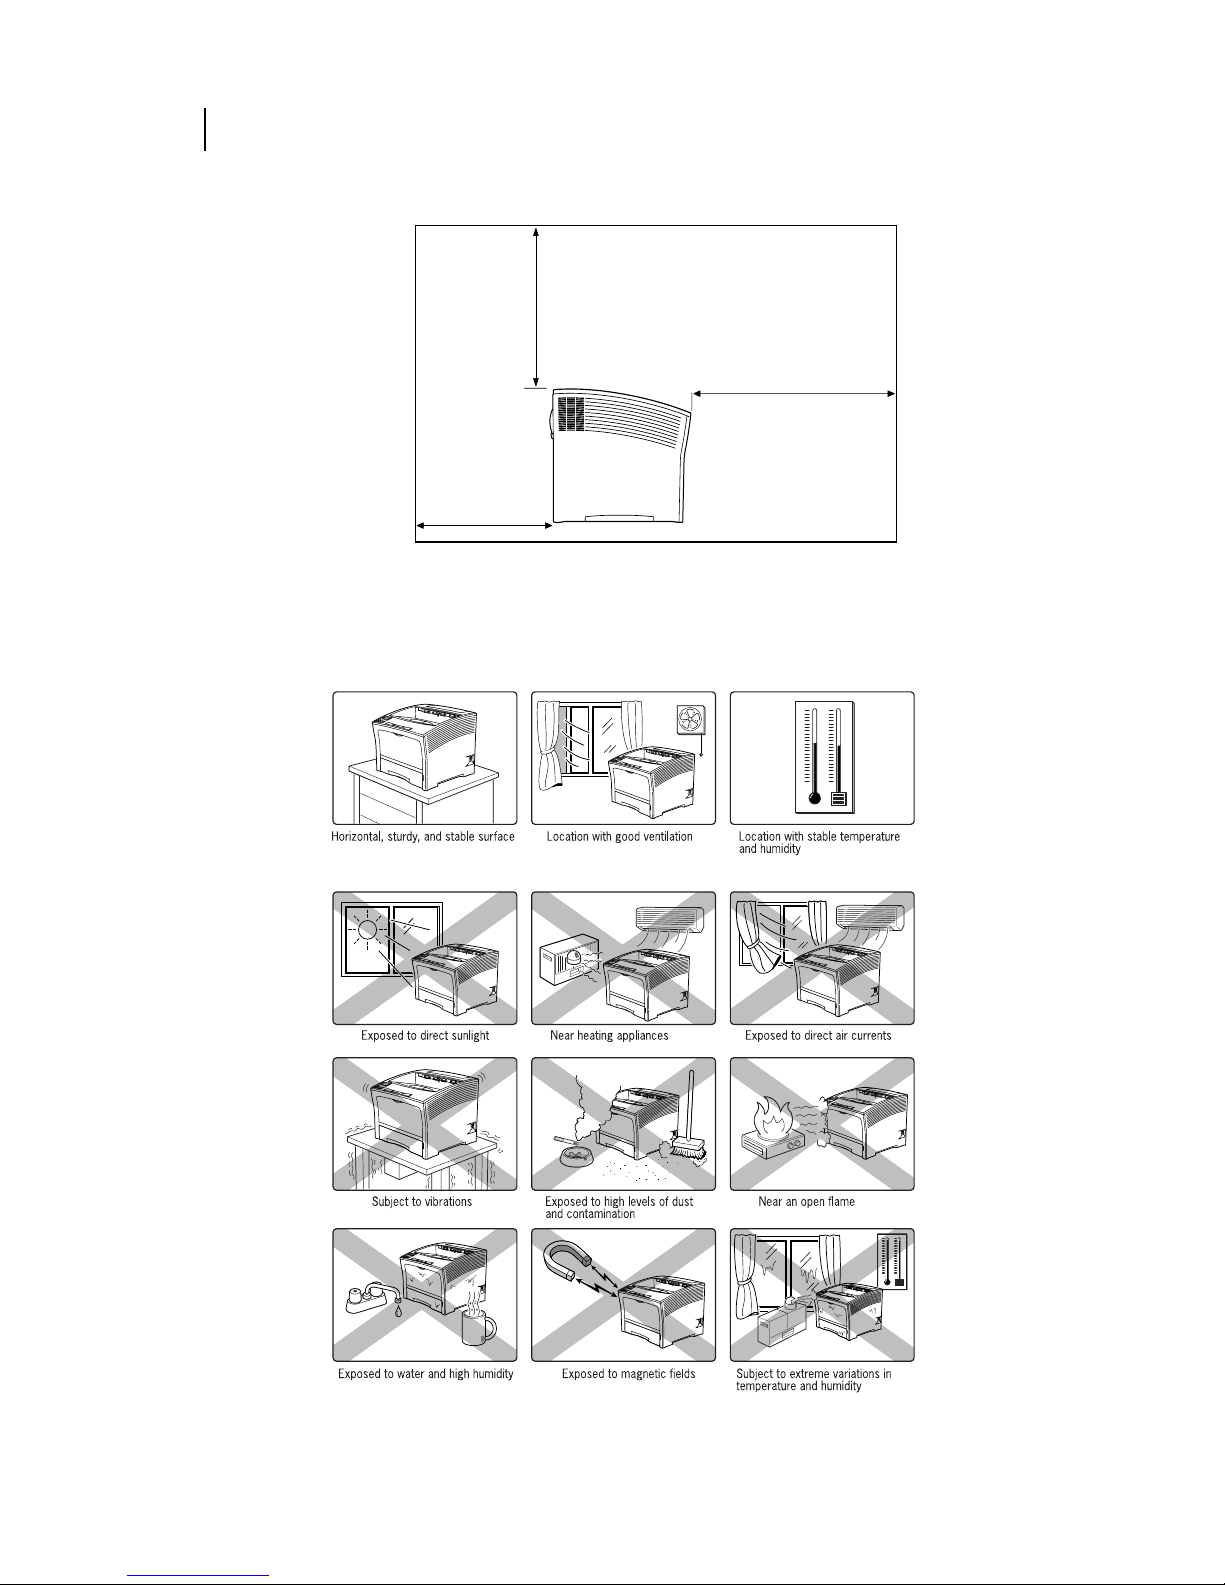
Figure 1-2: Side view of the printer.
Environment Requirements
Use the following guidelines to determine the best location for the printer:
20 inches
(500 mm)
20 inches
(500 mm)
30 inches
(760 mm)
Page 19
Apr 02
Compuprint PageMaster 402N User Guide 1-5
Parts of the Printer
Electrical Requirements
For correct printer operation, install the printer in a location where the AC wall outlet meets the
following electrical requirements.
• PageMaster 402N, 110V:
90~132 Volts AC grounded @ 50/60 Hz,
9 AMP current draw
• PageMaster 402N, 220V:
198~264 Volts AC grounded @ 50/60 Hz
4 AMP current draw
Parts of the Printer
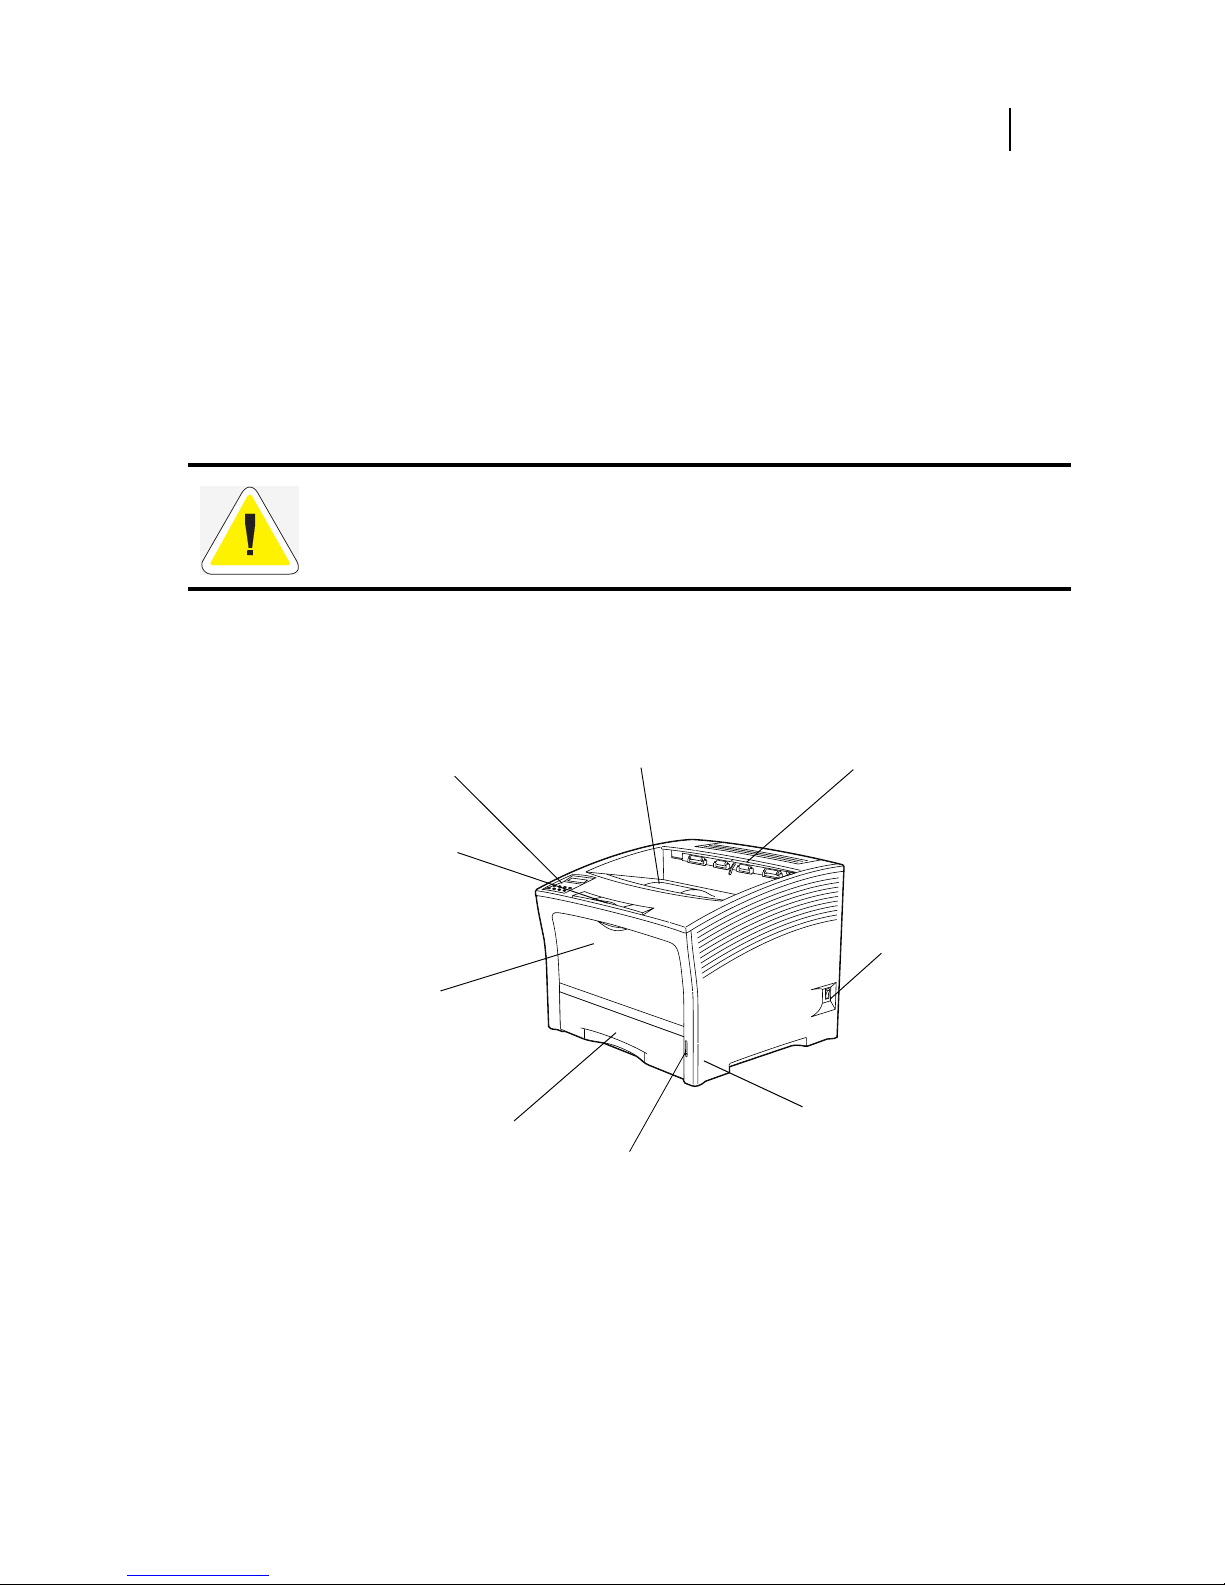
The following figures indicate the names and functions of the main parts of the printer.
Figure 1-3: Front of the Printer.
CAUTION: Never plug a 110VAC printer into a 220VAC wall outlet or plug the printer into a
wall outlet that does not meet the current draw requirement of the printer. Consult an electrician
if you are uncertain about the voltage rating of an AC wall outlet
500-sheet universal
paper tray
Holds paper up to Letter or A4 size.
Paper amount indicator
Indicates the approximate
remaining amount of paper.
Power switch
Turns the printer on
and off.
Control panel
Provides access to all
controls required to
operate the printer.
Front paper tray
Provides an alternate method of
feeding paper to the printer.
Accommodates various print
media including envelopes, transparencies, and labels.
Extension tray
Holds large paper
output.
Paper exit slot
Releases printed sheets
from the inside of the
printer.
Paper feeder
Holds the paper tray.
Paper output tray
Holds printed sheets.
Page 20
Apr 02
1-6 Compuprint PageMaster 402N User Guide
Parts of the Printer
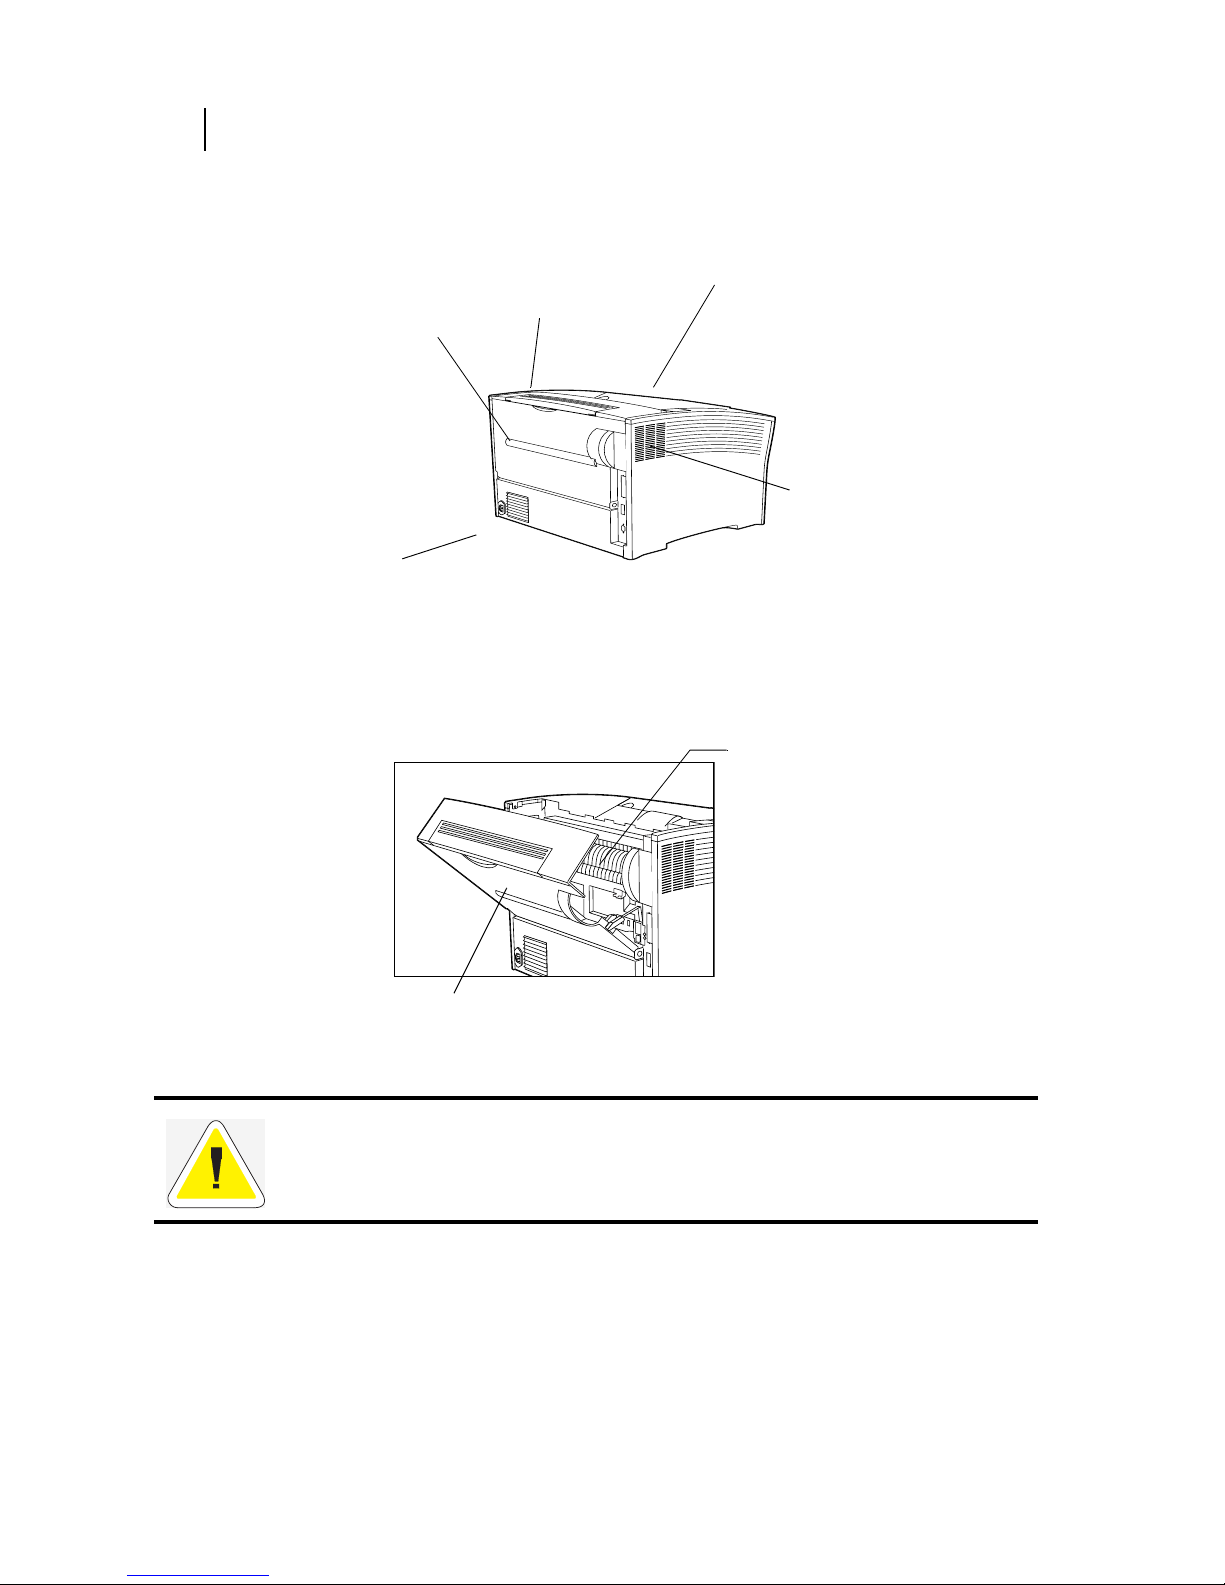
Figure 1-4: Rear of the Printer.
Figure 1-5: Internal Parts of the Printer.
SIB013F
To p c ov e r
Provides access to the
inside of the printer;
allows you to replace the
Toner Cartridge or remove
jammed paper.
Ventilation slot
Releases hot air produced inside the
printer to prevent
overheating.
Power cord
connector
Provides point of
connection for
power cord.
Rear cover
Provides access to the
rear of the printer;
allows you to remove
jammed paper.
Stacker cover
Mounted in the rear cover.
Covers the components used
when the optional stacker is
installed. Open the rear cover
when installing the stacker.
Fuser
Fixes toner onto the paper.
Rear cover
CAUTION: The fuser becomes very hot while the printer is operating. If you need to remove
the drum cartridge to remove a paper jam, turn the power off and wait at least 10 minutes
before removing the drum cartridge and touching the fuser.
Page 21
Apr 02
Compuprint PageMaster 402N User Guide 1-7
Parts of the Printer
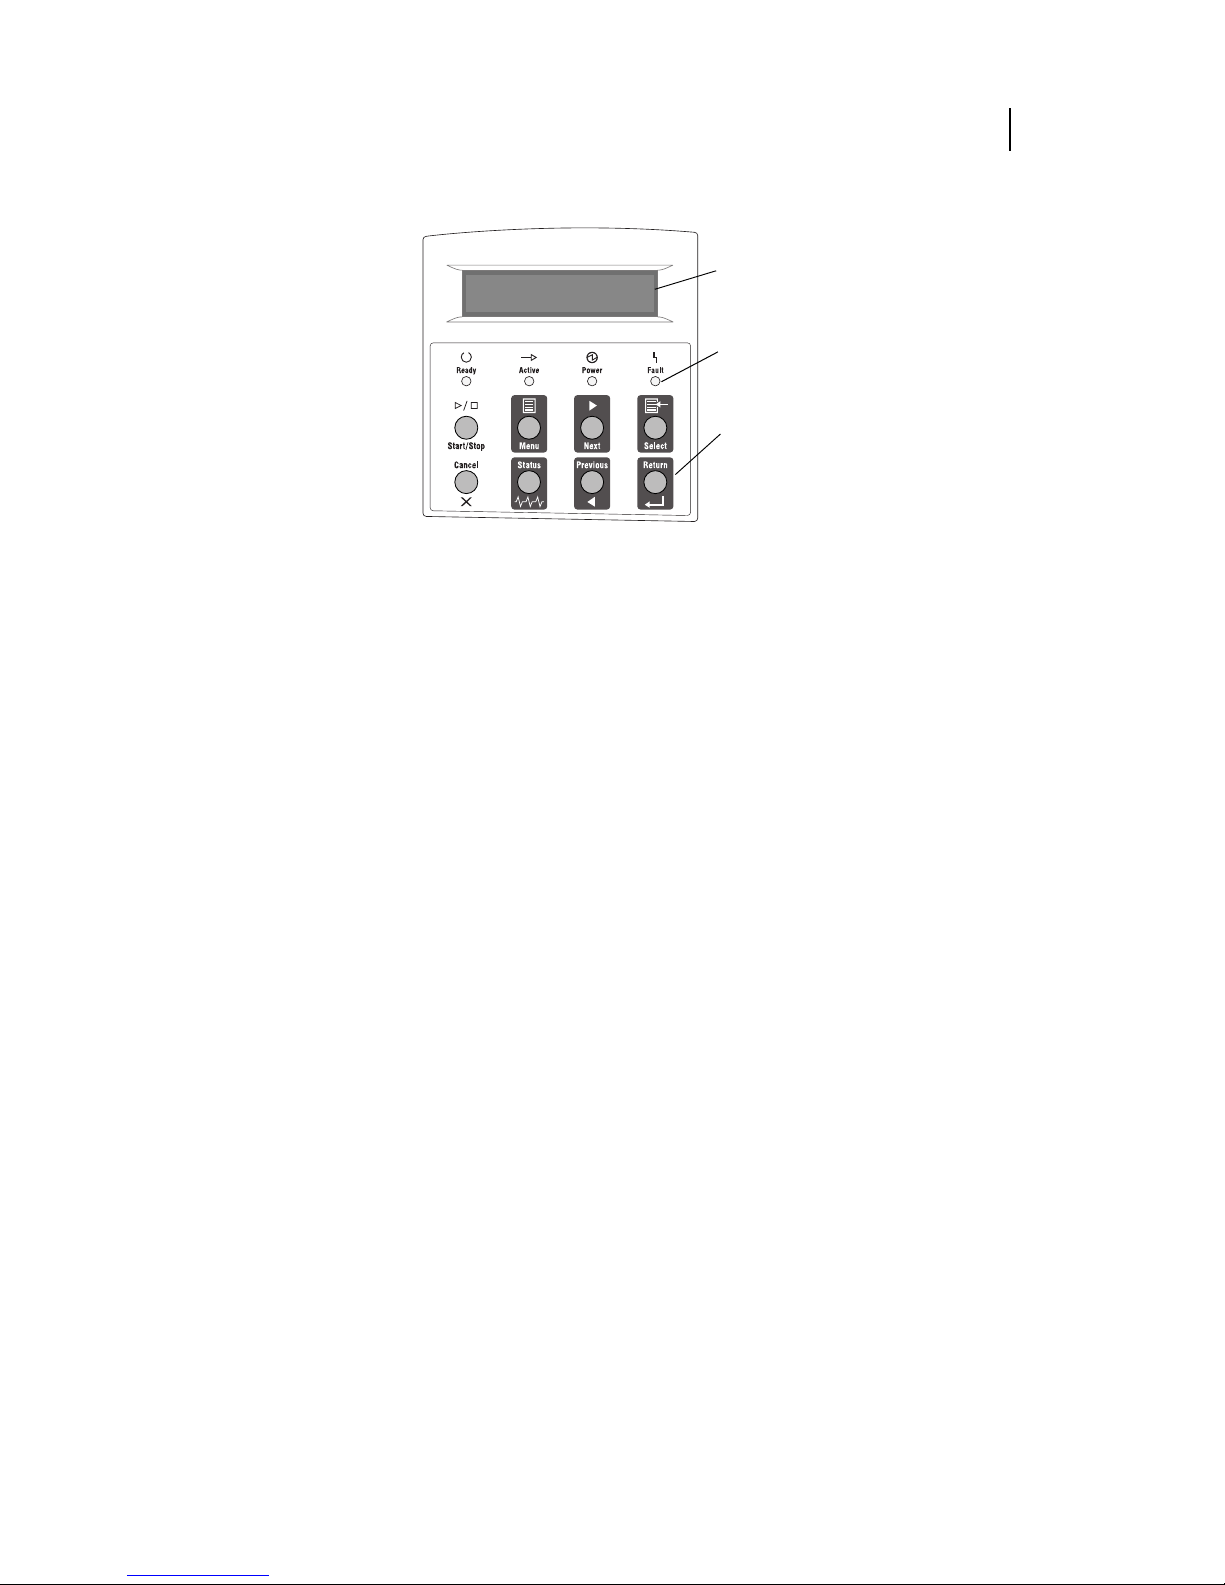
Figure 1-6: Control Panel.
LCD Display
Shows error messages and other
status messages; also displays
menus, submenus, and settings.
LED Indicators
Show printer status.
Pushbuttons
Allow you to navigate through
menus, place a printer offline, or
cancel a print job.
Page 22
Apr 02
1-8 Compuprint PageMaster 402N User Guide
Optional Printer Accessories
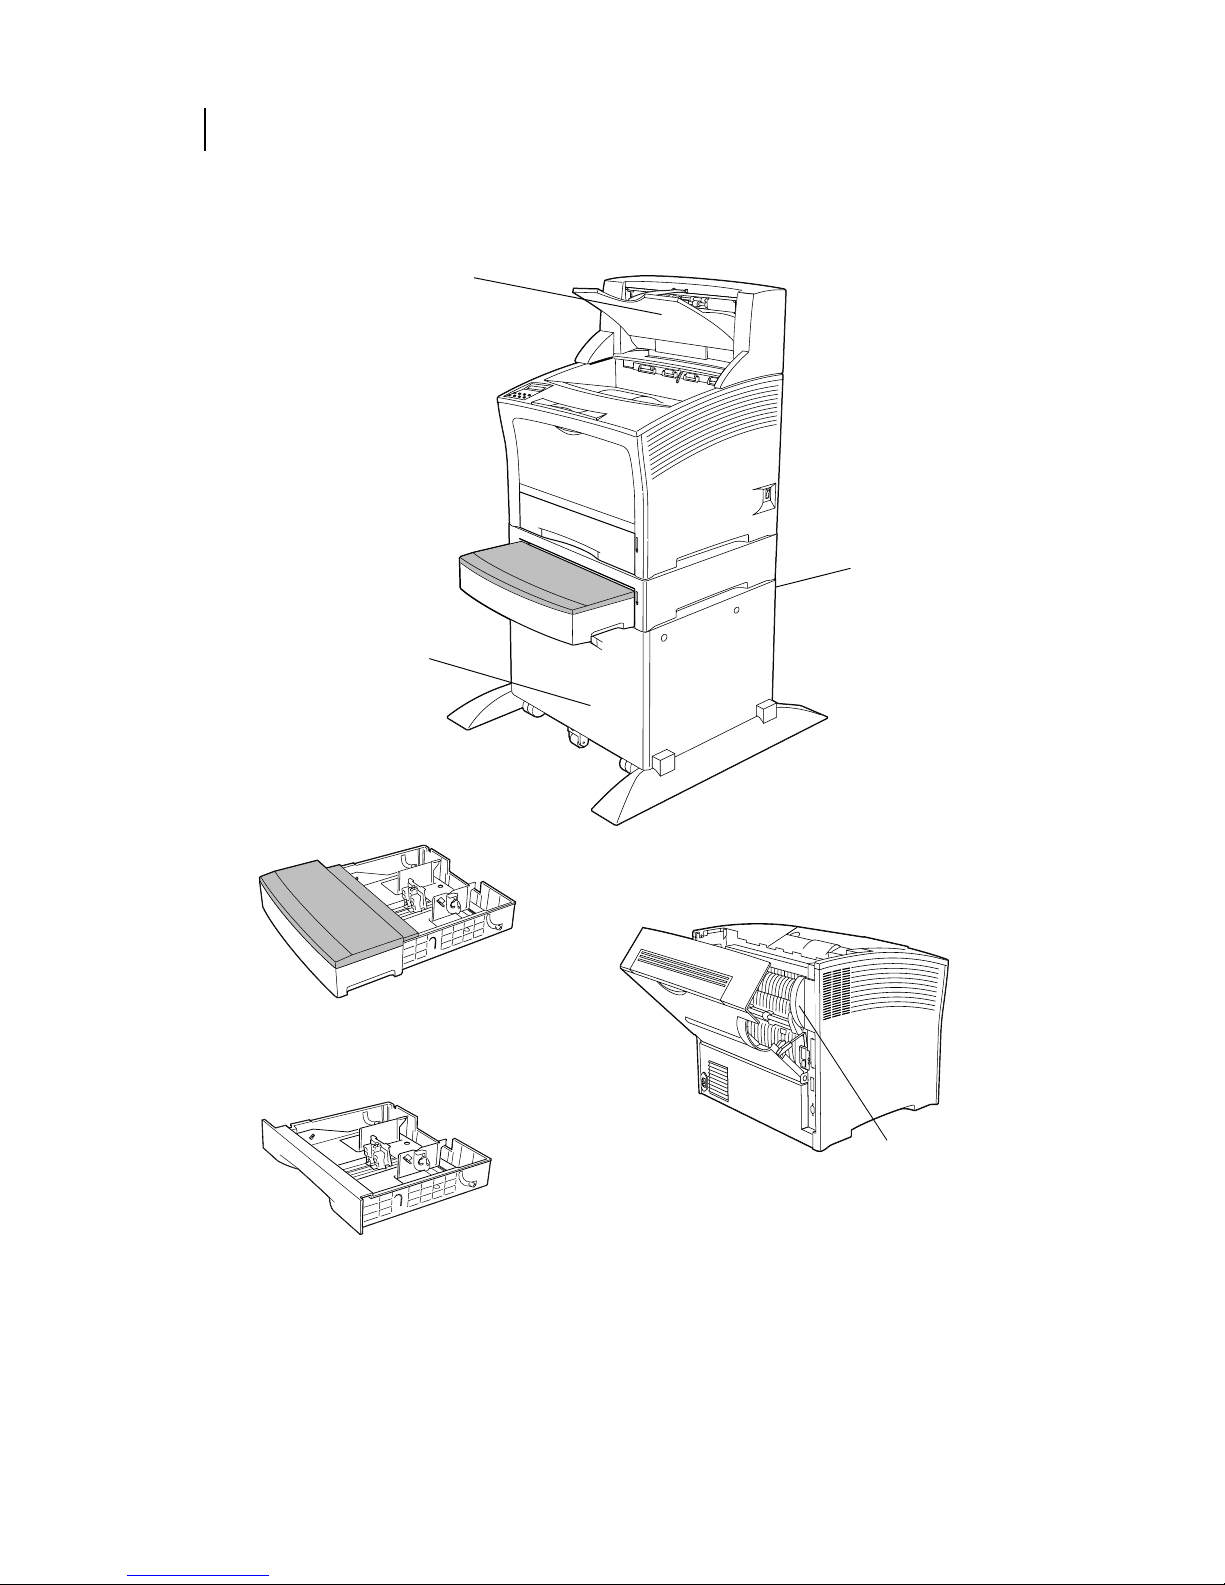
Optional Printer Accessories
The following figure shows all of the available accessories as installed on the printer:
Figure 1-7: Optional Accessories.
SIB094XB
Stacker
Holds and separates
large print jobs using an
offset.
Duplexer
Enables two-sided
printing.
High Capacity
Feeder (HCF)
Holds up to 2000
sheets A4 or Letter
paper. The printer can
accommodate one
500-sheet feeder when
the HCF is installed.
500-Sheet Feeder
Provides extra paper
capacity and oversize
paper feeding capability. The printer can
accommodate two
additional 500-sheet
feeders if the optional
HCF is not installed.
SIB008AF
A4/letter 500-sheet paper tray
Holds paper of various sizes, up to A4 or
letter.
A3 paper tray
Holds paper of various sizes,
up to A3.
Page 23

Apr 02
Compuprint PageMaster 402N User Guide 1-9
Paper Path
Paper Path
The following figure shows the path that paper travels through the printer:
1. The paper is initially fed from the front paper tray or one of the other paper trays.
2. The image is transferred from the photosensitive drum onto the paper.
3. The fuser fixes the toner permanently on the paper.
4. After passing through the duplex printing unit, the paper is fed once more through steps (2)
and (3).
5. The paper emerges onto the output tray, or the stacker if installed.
Figure 1-8: Paper Path.
◆ ◆ ◆
SIB016F
Page 24

Apr 02
1-10 Compuprint PageMaster 402N User Guide
Paper Path
Page 25

Apr 02
Chapter 2
Using the Printer
In this Chapter . . .
• “About this Chapter” on page 2-2
• “Connecting the Printer to the AC Outlet” on page 2-2
• “Turning Power On and Off” on page 2-3
• “Connecting the Printer to the Host Computer” on page 2-4
• “Selecting Print Media” on page 2-4
• “Loading Print Media” on page 2-7
• “Output Options for Oversize Print Media” on page 2-17
Page 26
Apr 02
2-2 Compuprint PageMaster 402N User Guide
Connecting the Printer to the AC Outlet
About this Chapter
This chapter provides information concerning the daily use of the printer, including procedures for
connecting the printer and loading print media, and guidelines for selecting print media.
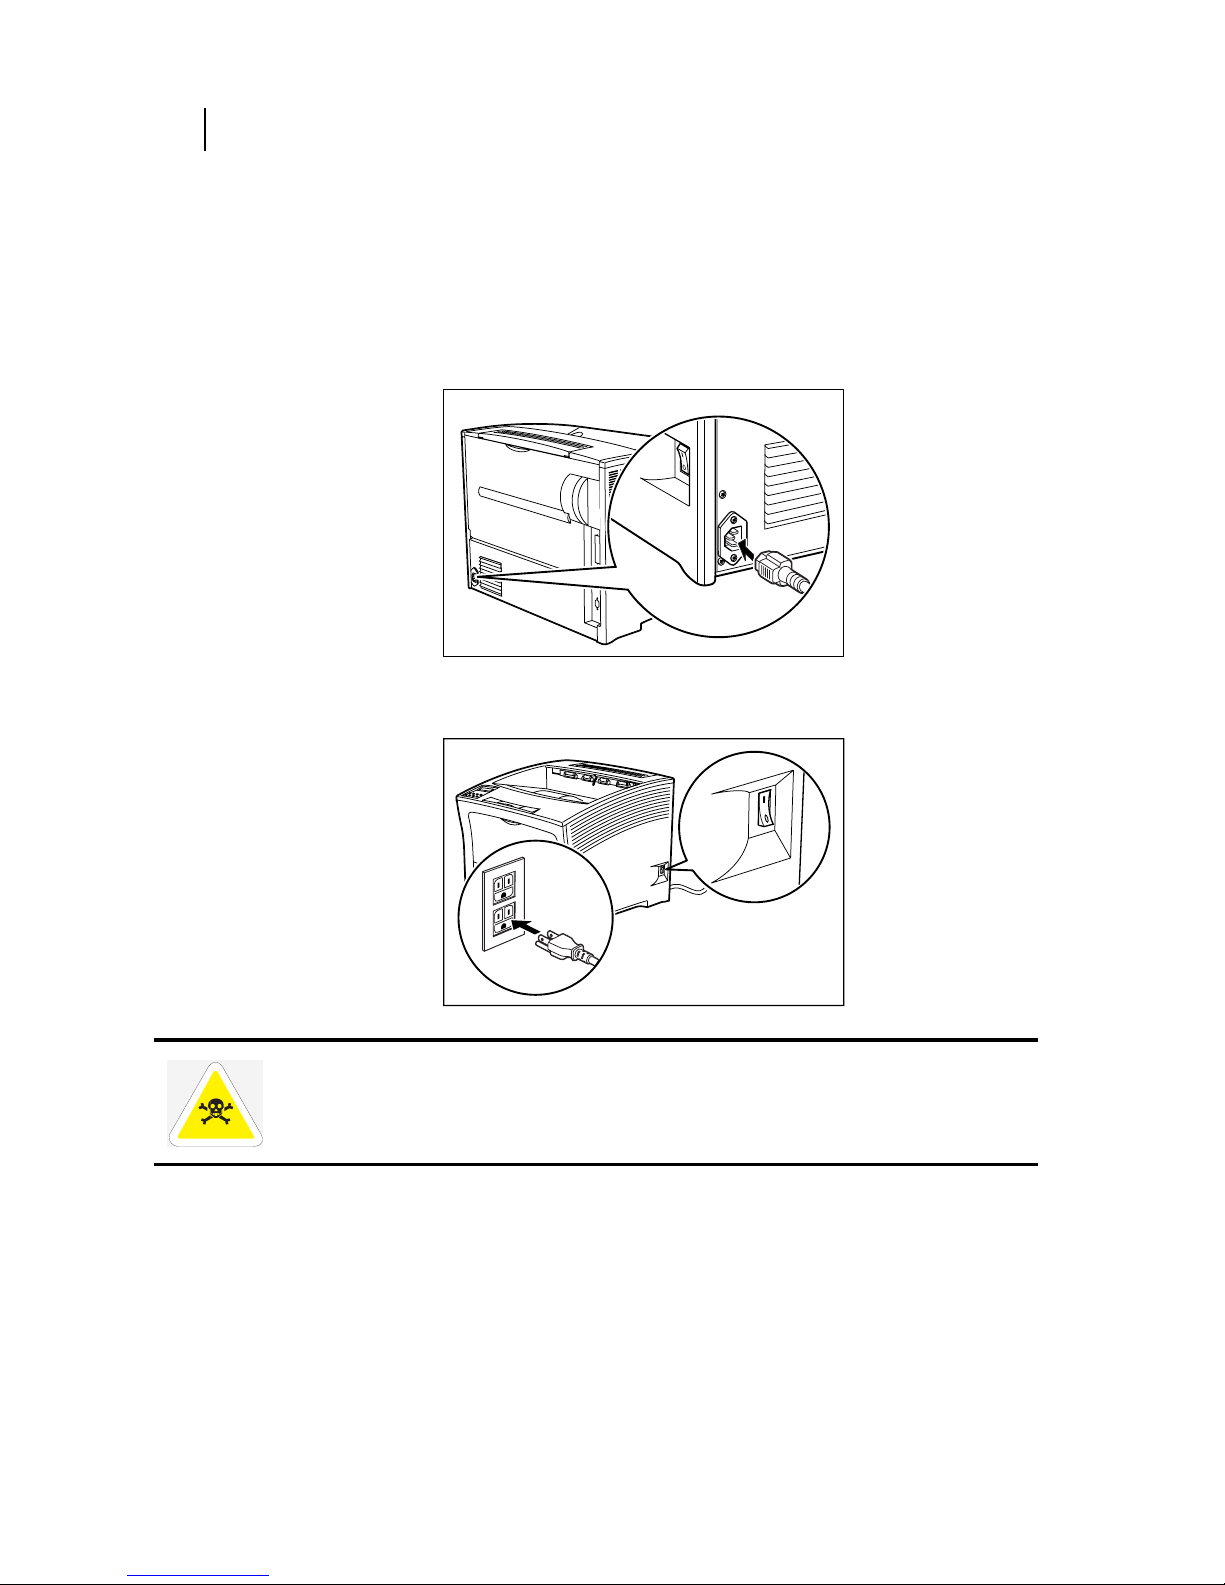
Connecting the Printer to the AC Outlet
1. Insert the power cord into the AC connector on the rear of the printer.
2. Verify that the power switch of the printer is in the [O] (off) position, then insert the plug of
the power cord into the AC outlet.
SIB048F
1
2
WARNING: Never touch the power cord or plug with wet hands, to prevent the risk of electric
shock. When disconnecting, always grasp the plug and do not pull on the cable. Damage to the
cord can lead to fire and electric shock.
Page 27

Apr 02
Compuprint PageMaster 402N User Guide 2-3
Turning Power On and Off
Turning Power On and Off
Use the following procedure to turn the printer on:
1. Turn the printer on by pressing [ I ] on the power switch on the right side of the printer.
The status message “Loading” appears on the display. This message indicates that the printer
is warming up and is not ready to print. After about 60 seconds, the status message changes
to “Ready”, indicating that the printer is ready to print.
NOTE: If an error message appears on the display after you turn the printer on, refer to “Warning Messages
and Error Messages” on page 5-39.
Use the following procedure to turn the printer off:
1. Turn the printer off by pressing the [ O ] on the power switch on the right side of the printer.
Loading
Ready
Page 28

Apr 02
2-4 Compuprint PageMaster 402N User Guide
Connecting the Printer to the Host Computer
Connecting the Printer to the Host Computer
You must connect the printer to your computer using an IEEE 1284 parallel cable. This cable is
user-supplied, the printer does not include this cable. The parallel port is the default port. To connect the printer to your computer using the parallel port, simply connect the parallel cable to the
parallel port on the printer, then connect the cable to your computer.
Selecting Print Media
Your printer can print on a variety of media, including plain paper, labels, transparencies, and envelopes. Always use print media that meet the guidelines for use with this printer. Print media that is
not recommended for use with this printer may cause frequent paper jams or poor print quality.
Paper and Print Media To Avoid
Do not use paper or print media that has any of the following characteristics:
• Does not meet the paper and media size and weight specifications for this printer
• Is not labeled for use with xerographic printers or xerographic copiers
• Cannot withstand temperatures of up to 310°F/155°C
• Is in a sealed package that is obviously damaged or wet
• Is excessively wrinkled, curled, torn, or warped
• Is folded or creased
• Has either an extremely slick surface or an extremely textured surface
• Has an exposed adhesive surface
• Has paper pieces glued or taped to the media
• Has staples or paperclips attached
• Is categorized as thermal paper, coated paper, or carbon paper
• Is an envelope that is embossed, is made of extremely thick paper, or is padded
• Is an envelope that has metal clasps
• Is a sheet of labels that has the backing sheet exposed between individual labels
Correct Paper Storage
It is important to store paper correctly prior to placing it in the printer, since improper storage can
cause frequent paper jams and poor print quality. Use the following guidelines when storing paper
for use in the printer:
• Store reams of paper on a flat surface, and always store them stacked horizontally.
• Store reams of paper in an area away from both direct sunlight and high humidity
• Open sealed reams only when you are ready to load the paper into the paper tray, and always
close and seal partial reams of paper.
• Do not stack partial reams of paper
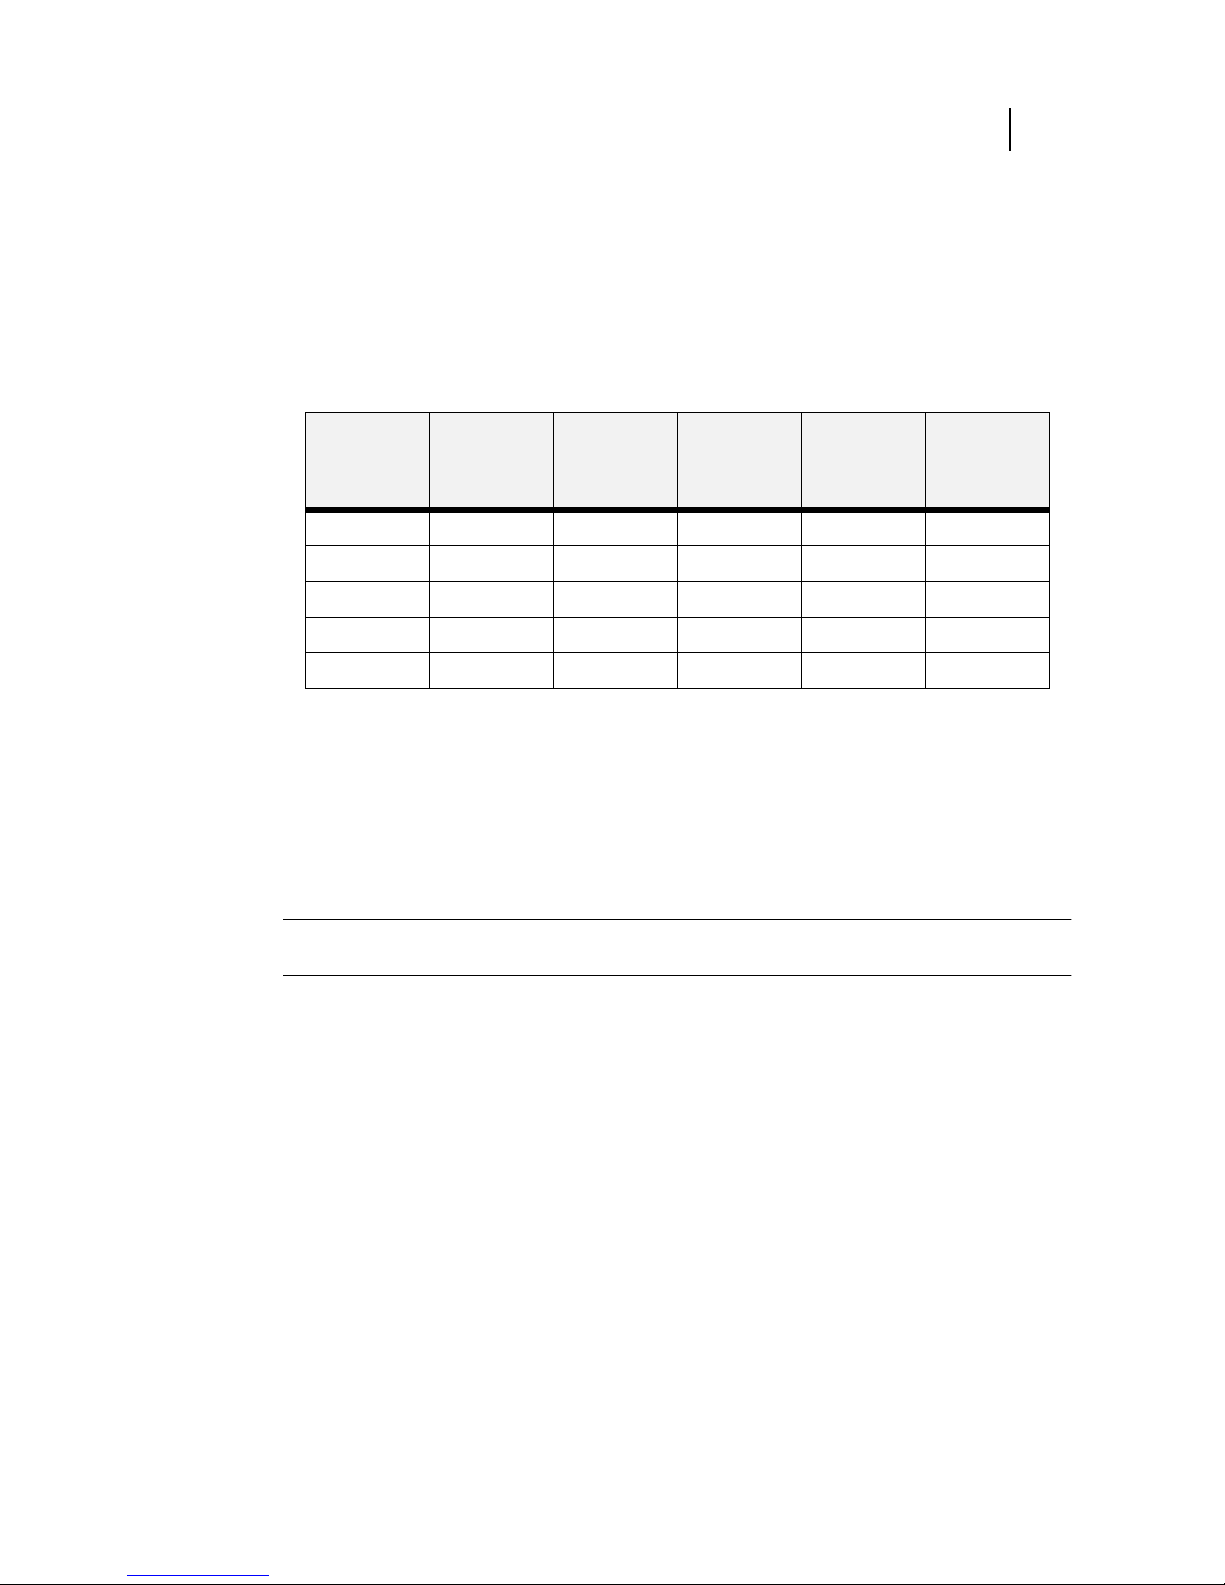
Print Media Capacities
Your printer can hold up to 3,150 sheets of standard weight paper, depending upon the options
installed. The printer can be configured in the following five variations:
Page 29
Apr 02
Compuprint PageMaster 402N User Guide 2-5
Selecting Print Media
• Printer (650 sheets)
• Printer with 500 sheet feeder(1150 sheets)
• Printer with two 500 sheet feeders (1650 sheets)
• Printer with high capacity feeder(2650 sheets)
• Printer with high capacity feeder and 500 sheet feeder (3150 sheets)
The following table shows the five configurations and the breakdown of paper capacity:
If you want to use paper that is an odd size or weight, you must use the front paper tray. The front
tray can hold the following quantities of non-standard print media:
• Envelopes : 10
• Transparencies: 30
•Labels: 30
•Paper: 150
NOTE: Expect a slight reduction in image quality when you print on envelopes, labels, transparencies, or
postcards.
Front Tray
(standard)
Tray 1
(standard)
Tray 2
(option)
Tray 3
(option)
High
Capacity
Feeder
(option)
Total Paper
Capacity
150 500 -- -- -- 650
150 500 500 -- -- 1,150
150 500 500 500 -- 1,650
150 500 -- -- 2,000 2,650
150 500 500 -- 2,000 3,150
Page 30
Apr 02
2-6 Compuprint PageMaster 402N User Guide
Selecting Print Media
Print Media Weight, Type, and Size
The following table defines print media that you can use in each of the paper sources, and also indicates the feed orientation—long edge feed (LEF) or short edge feed (SEF). If you have concerns
about a specific brand or type of media, try samples of the media to determine if the resulting
printer performance and print quality meet your expectations.
Paper Source Wei ght Paper Type and Feed
Direction
Paper Sizes
Accommodated
Letter/A4 Paper Tray
(main tray and optional
500 sheet A4/Letter
paper feeder)
16 to 24 lbs.
64 to 200g/m
2
A4 LEF 297 x 210mm
11.7 x 8.27 inches
Letter LEF 279.4 x 215.9mm
8.5 x 11 inches
Executive LEF 266.7 x 184.5mm
10.5 x 7.26 inches
Monarch LEF
(envelope)
190.5 x 98.4mm
7.5 x 3.87 inches
Statement LEF 215.9 x 139.7mm
8.5 x 5.5 inches
Com 10 LEF
(envelope)
241.3 x 104.8mm
9.5 x 4.13 inches
B5 LEF 257 x 182mm
10.1 x 7.2 inches
A5 LEF 210 x 149mm
8.27 x 5.9 inches
A6 LEF 100 x 148mm
3.94 x 5.83 inches
C5 LEF
(envelope)
229 x 162mm
9 x 6.4 inches
DL LEF
(envelope)
220 x 110mm
8.67 x 4.3 inches
Front Tray Envelopes
Transparencies
Labels
Standard Paper (LEF
and SEF)
Width:
3.0 to 12.0 inches
76.2 mm to 305 mm
Length:
3.87 to 20.0 inches
98.4 mm to 508 mm
Page 31

Apr 02
Compuprint PageMaster 402N User Guide 2-7
Loading Print Media
Loading Print Media
Loading the Main Tray
The 500-sheet paper tray that sits inside the printer can accommodate paper sizes up to letter or
A4. The tray has two length guides that are located on the sides of the tray, and one width guide
that is located near the center of the tray. These guides allow you to adjust the size of the area that
holds paper.
A3 Paper Tray
(optional 500 sheet A3/
Ledger paper feeder)
16 to 24 lbs.
60 to 135 g/m
2
A4 LEF/SEF 297 x 210mm
11.7 x 8.27 inches
Letter LEF/SEF 279.4 x 215.9mm
11 x 8.5 inches
Legal 13” SEF 330.2 x 215.9mm
13 x 8.5 inches
Legal 14” SEF 355.6 x 215.9mm
14 x 8.5 inches
A3 SEF 420 x 297mm
16.5 x 11.7 inches
B4 SEF 364 x 257mm
14.3 x 10.1 inches
Statement LEF 215.9 x 139.7mm
8.5 x 5.5 inches
Executive LEF 266.7 x 184.5mm
10.5 x 7.26 inches
Ledger SEF 431.8 x 279.4mm
11 x 17 inches
B5 LEF 257 x 182mm
10.1 x 7.2 inches
A5 LEF 210 x 149mm
8.27 x 5.9 inches
High Capacity Feeder 16 to 24 lbs.
60 to 135 g/m
2
A4 LEF 297 x 210mm
11.7 x 8.27 inches
Letter LEF 279.4 x 215.9mm
11 x 8.5 inches
Paper Source Wei ght Paper Type and Feed
Direction
Paper Sizes
Accommodated
Page 32

Apr 02
2-8 Compuprint PageMaster 402N User Guide
Loading Print Media
Use the following procedure to load paper into the 500-sheet A4/letter paper tray:
1
14
2
3
Page 33

Apr 02
Compuprint PageMaster 402N User Guide 2-9
Loading Print Media
NOTE: To avoid paper jams and other paper transportation problems, make sure the length and width guides
are adjusted to match the paper size and are locked firmly into place.
4
5
CAUTION: Do not overload the tray, and make sure the paper stack is beneath the retaining
clips on both sides of the tray. Fan paper before placing it in the tray, and place paper in the tray
with the print side up.
6
Page 34

Apr 02
2-10 Compuprint PageMaster 402N User Guide
Loading Print Media
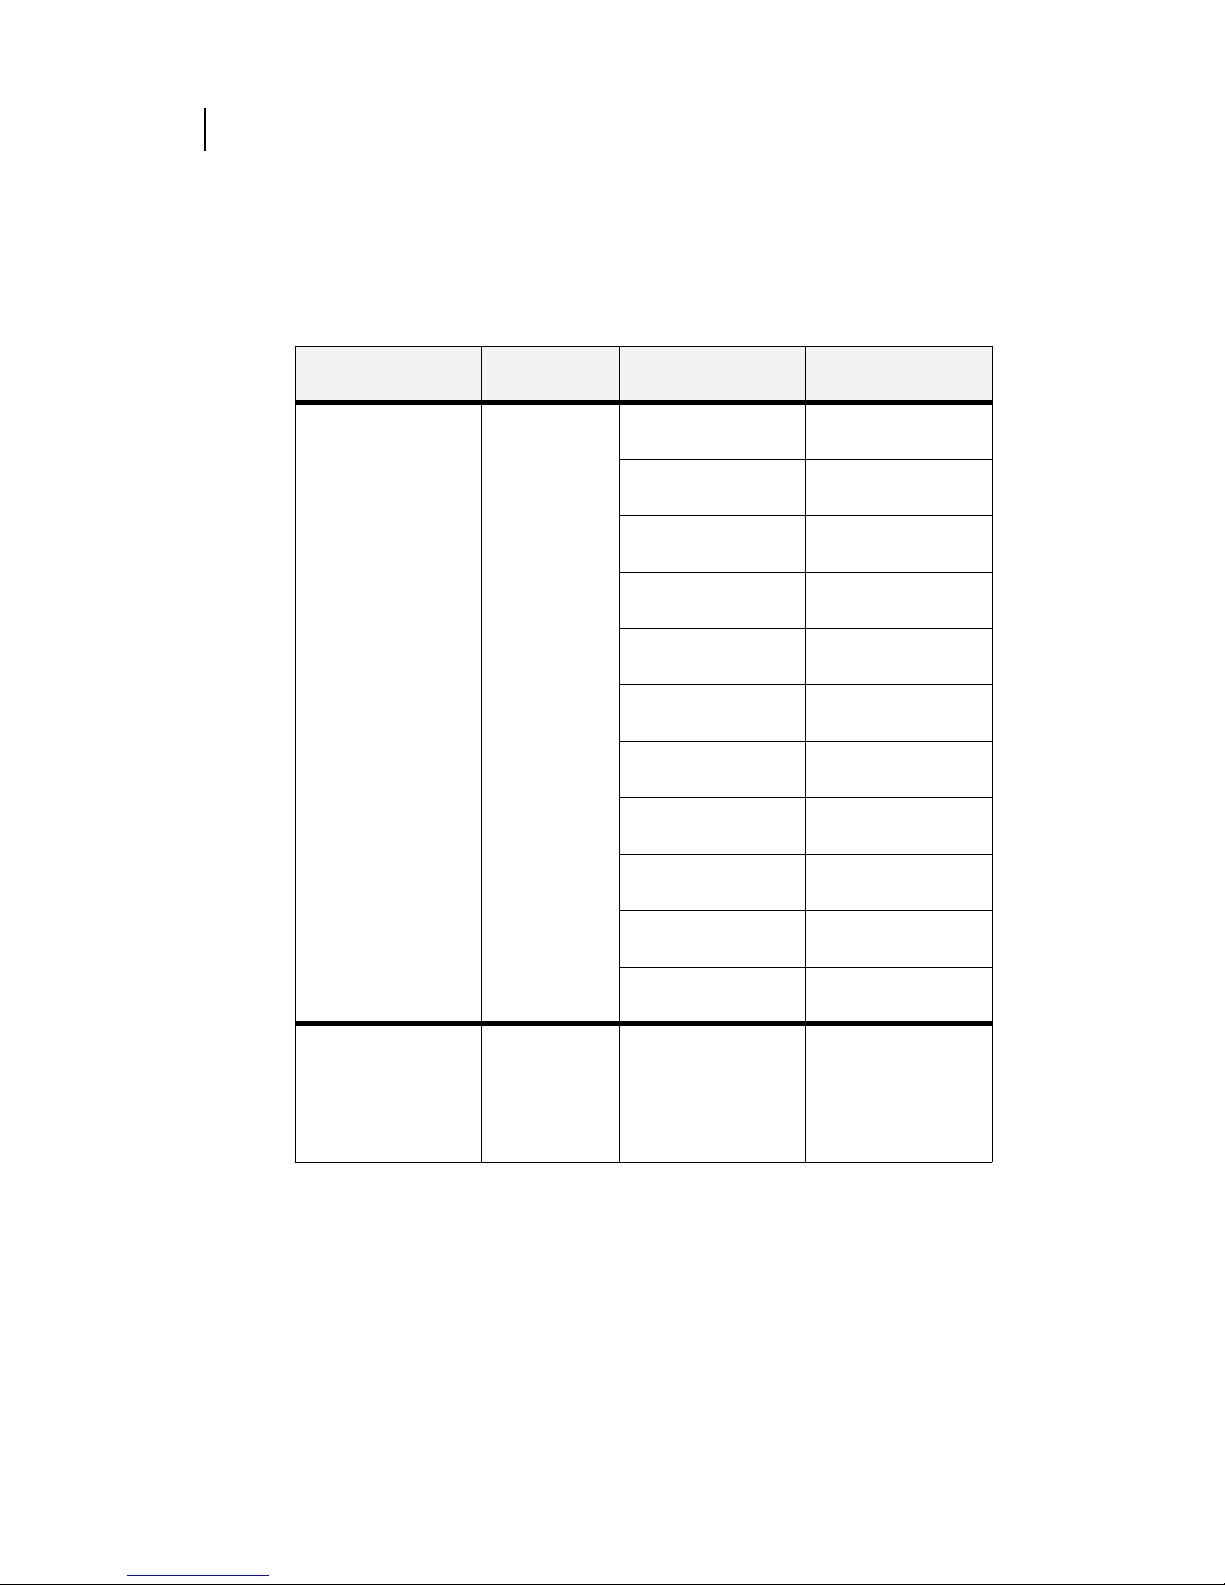
Loading the Front Tray
The front tray located on the front of the printer can accommodate a maximum of 150 sheets of
paper sizes up to A3 or 8.5 x 17 inches; the front tray can also accommodate a maximum of 30
sheets of standard labels, transparencies, or postcards, and a maximum of 10 standard envelopes.
The tray has two guides that are located on the left and right sides of the tray. These guides allow
you to adjust the size of the area that holds the print media. Use the following guidelines when
loading the front tray:
• Do not mix print media in the front tray; for example, do not load a stack that includes both
envelopes and standard paper. Load only one type of print media.
• Do not mix print media sizes in the front tray; for example, do not load a stack that includes
two or more different sizes of paper.
• Do not load print media that is obviously damaged, wet, creased, or wrinkled.
• Do not overfill the front tray.
7
8
Page 35

Apr 02
Compuprint PageMaster 402N User Guide 2-11
Loading Print Media
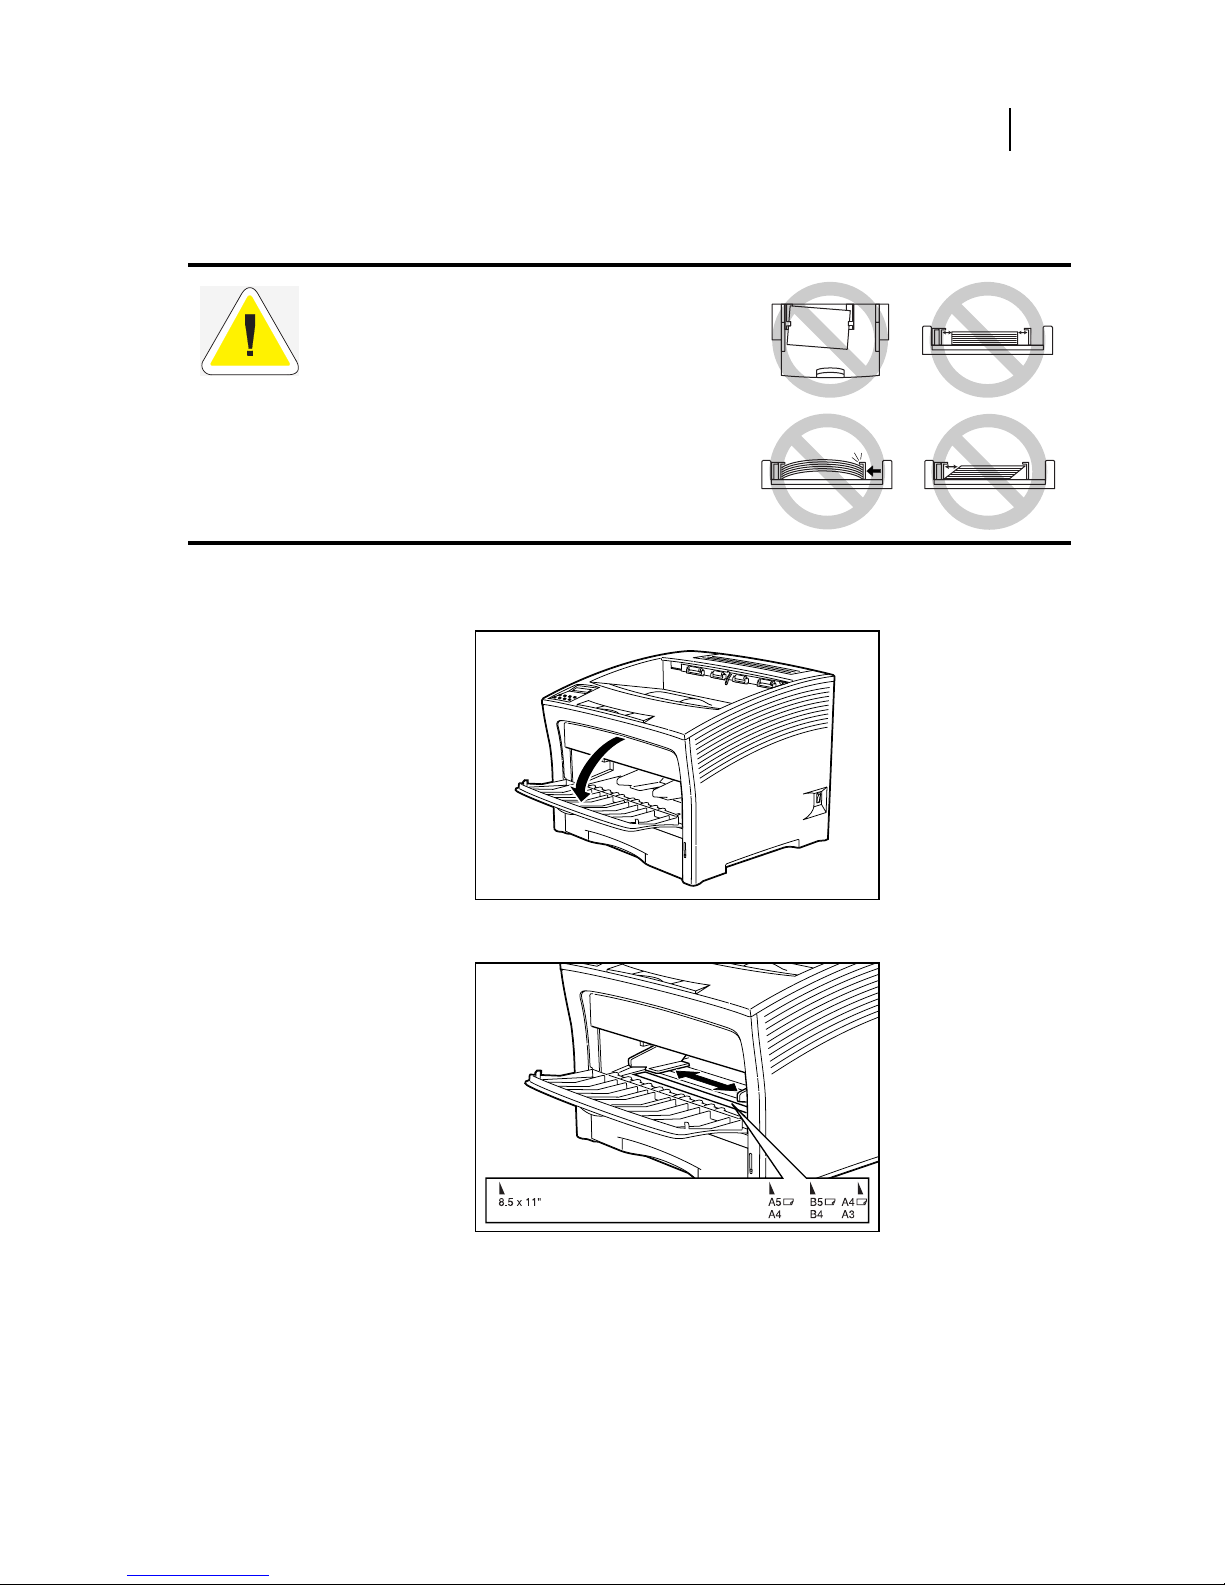
Loading Paper in the Front Tray
Use the following procedure to load paper in the front tray:
1. Open the front tray by pulling the hand grip on the top of the front tray cover.
2. Slide the paper guides so they match the size of the paper that you are loading.
3. Lift the front tray up and out as shown on the label inside the front tray.
4. Stack the paper that you will load in the front tray, making sure that the edges are aligned and
neat. Position the paper stack so the surface to be printed faces up.
5. Load the stack of paper into the front tray by sliding the stack between the paper guides and
then pushing the paper stack into the tray until it will not go any further.
Page 36

Apr 02
2-12 Compuprint PageMaster 402N User Guide
Loading Print Media
6. Check the paper stack to make sure it is not loaded at an angle and that the guides barely
touch the stack.
Loading Envelopes in the Front Tray
1. Open the front tray by pulling on the hand grip on the top of the tray.
2. Slide the paper guides all the way to the sides of the front tray.
3. Pull the front tray up and out of the printer, as shown on the label inside the front tray.
CAUTION: Do not press the guides tightly against
the stack; the guides should just barely touch the
stack of paper. Paper guides that are too tight can
cause feed jams.
Page 37

Apr 02
Compuprint PageMaster 402N User Guide 2-13
Loading Print Media
4. Open the flap of each envelope and place the envelopes in a neat and aligned stack that does
not exceed 10 envelopes.
5. Position the envelope stack so the surface to be printed faces up and the flaps are open.
6. Load the stack of envelopes into the front tray by sliding the stack between the paper guides
and then pushing the envelope stack into the tray until it will not go any further.
7. Slide the paper guide up against the stack of envelopes.
8. Check the envelope stack to make sure it is not loaded at an angle and that the guides barely
touch the stack.
CAUTION: Do not press the guides tightly against
the stack; the guides should just barely touch the
stack of paper. Paper guides that are too tight can
cause feed jams.
Page 38

Apr 02
2-14 Compuprint PageMaster 402N User Guide
Loading Print Media
Loading Transparencies into the Front Tray
1. Open the front tray by pulling on the hand grip on the top of the tray.
2. Slide the paper guides all the way to the sides of the front tray
3. Load transparencies into the front tray one at a time, sliding each transparency between the
paper guides and then pushing the transparency into the tray until it will not go any further.
4. Slide the paper guides up against the stack of transparencies.
Page 39
Apr 02
Compuprint PageMaster 402N User Guide 2-15
Loading Print Media
5. Check the transparency stack to make sure it is not loaded at an angle and that the guides
barely touch the stack.
Loading Postcards into the Front Tray
1. Open the front tray by pulling on the hand grip on the top of the tray.
2. Slide the paper guides all the way to the sides of the front tray
3. Position the postcard stack so the surface to be printed faces up.
CAUTION: Do not press the guides tightly against
the stack; the guides should just barely touch the
stack of paper. Paper guides that are too tight can
cause feed jams.
Page 40

Apr 02
2-16 Compuprint PageMaster 402N User Guide
Loading Print Media
4. Load the stack of postcards into the front tray, sliding the stack between the paper guides and
then pushing the stack of postcards into the tray until it will not go any further.
5. Slide the paper guides up against the stack of postcards.
6. Check the postcard stack to make sure it is not loaded at an angle and that the guides barely
touch the stack.
CAUTION: Do not press the guides tightly against
the stack; the guides should just barely touch the
stack of paper. Paper guides that are too tight can
cause feed jams.
Page 41
Apr 02
Compuprint PageMaster 402N User Guide 2-17
Output Options for Oversize Print Media
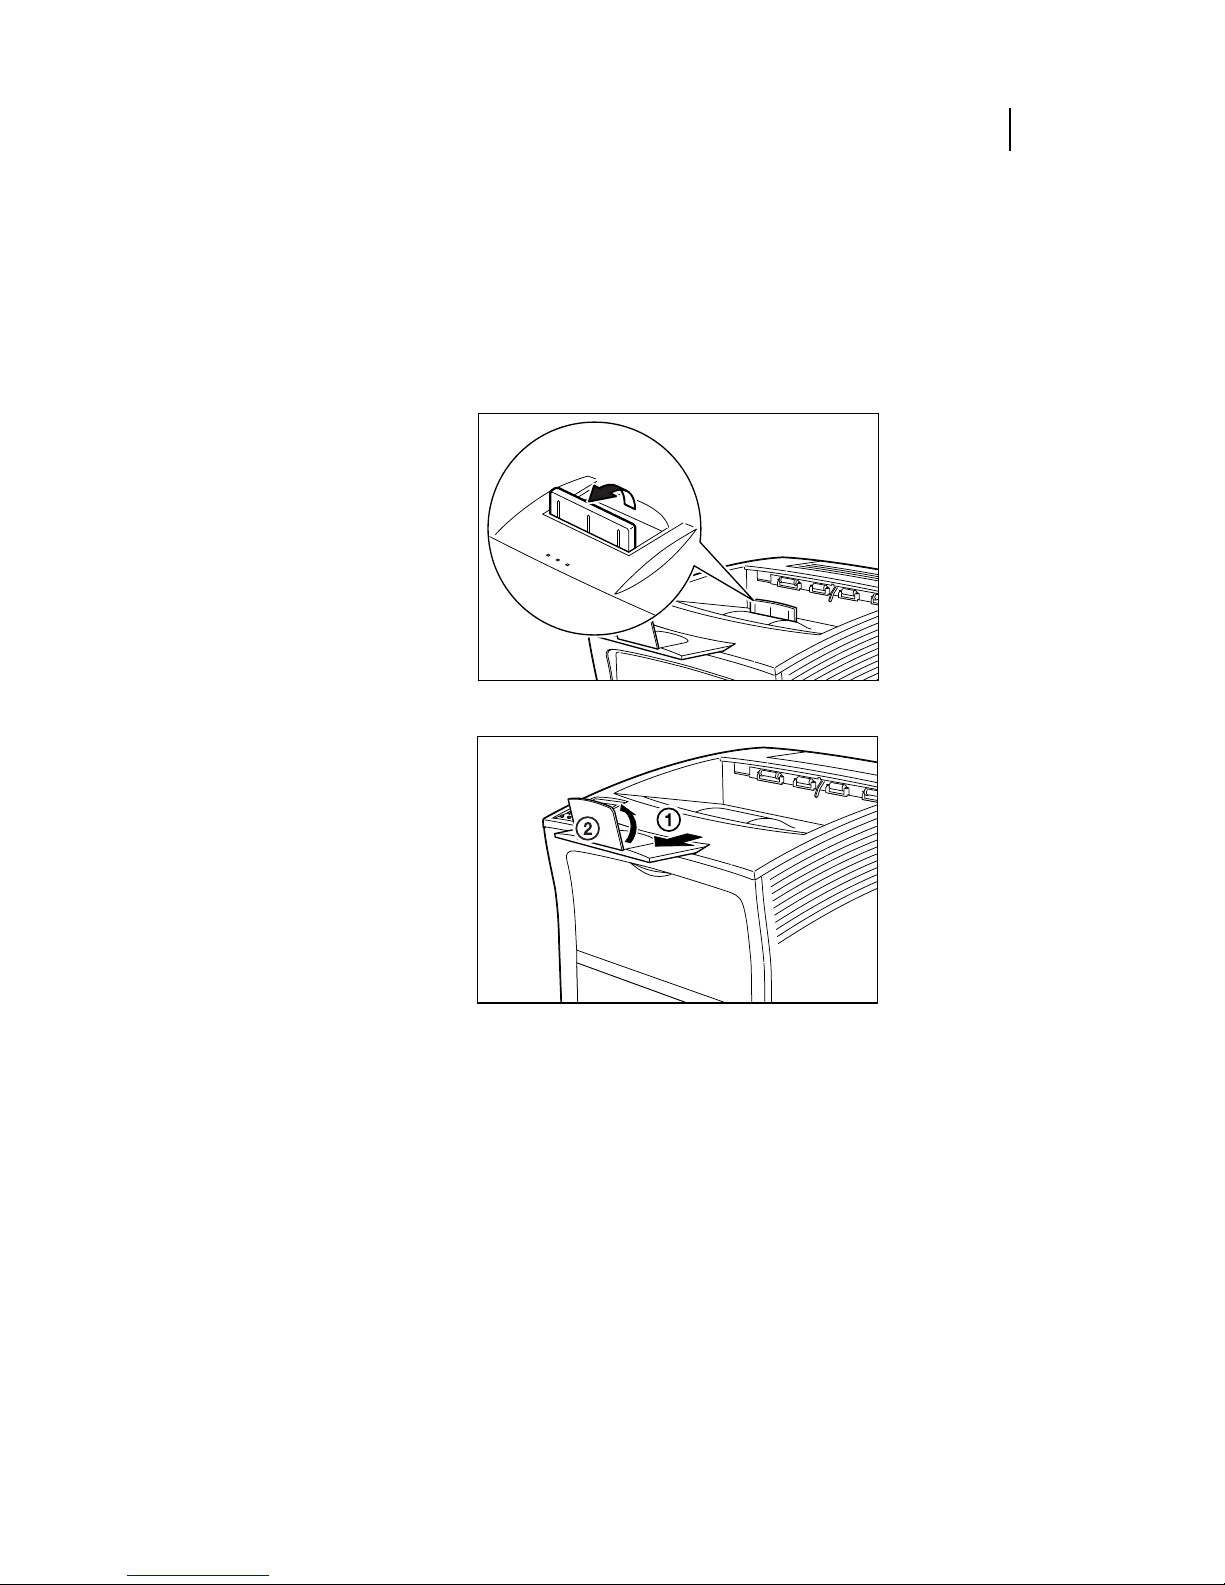
Output Options for Oversize Print Media
Non-standard paper sizes and types have a tendency to curl upon output, and may also have problems with static electricity that prevent the paper from stacking properly in the output tray. To help
prevent these problems, raise the paper stop on the top output tray when you are printing on
non-standard paper types, and pull out the extension tray and raise the oversize paper stop when
printing on oversize papers.
◆ ◆ ◆
Page 42

Apr 02
2-18 Compuprint PageMaster 402N User Guide
Output Options for Oversize Print Media
Page 43

Apr 02
Chapter 3
Understanding and Navigating
the Control Panel Menus
In this Chapter . . .
• “About this Chapter” on page 3-2
• “Control Panel Features” on page 3-2
• “Navigating the Control Panel Menus” on page 3-4
• “Menu Structure” on page 3-6
• “Paper Menu” on page 3-6
• “Interface Menu” on page 3-9
• “PS Menu” on page 3-9
• “PCL Menu” on page 3-11
• “System Menu” on page 3-13
• “Quality Menu” on page 3-15
• “Functions Menu” on page 3-16
• “Status Menu” on page 3-16
Page 44
Apr 02
3-2 Compuprint PageMaster 402N User Guide
Control Panel Features
About this Chapter
This chapter explains the control panel and its functions, and also demonstrates how to navigate
throughout the various menus and submenus that allow you to view and change the printer settings.
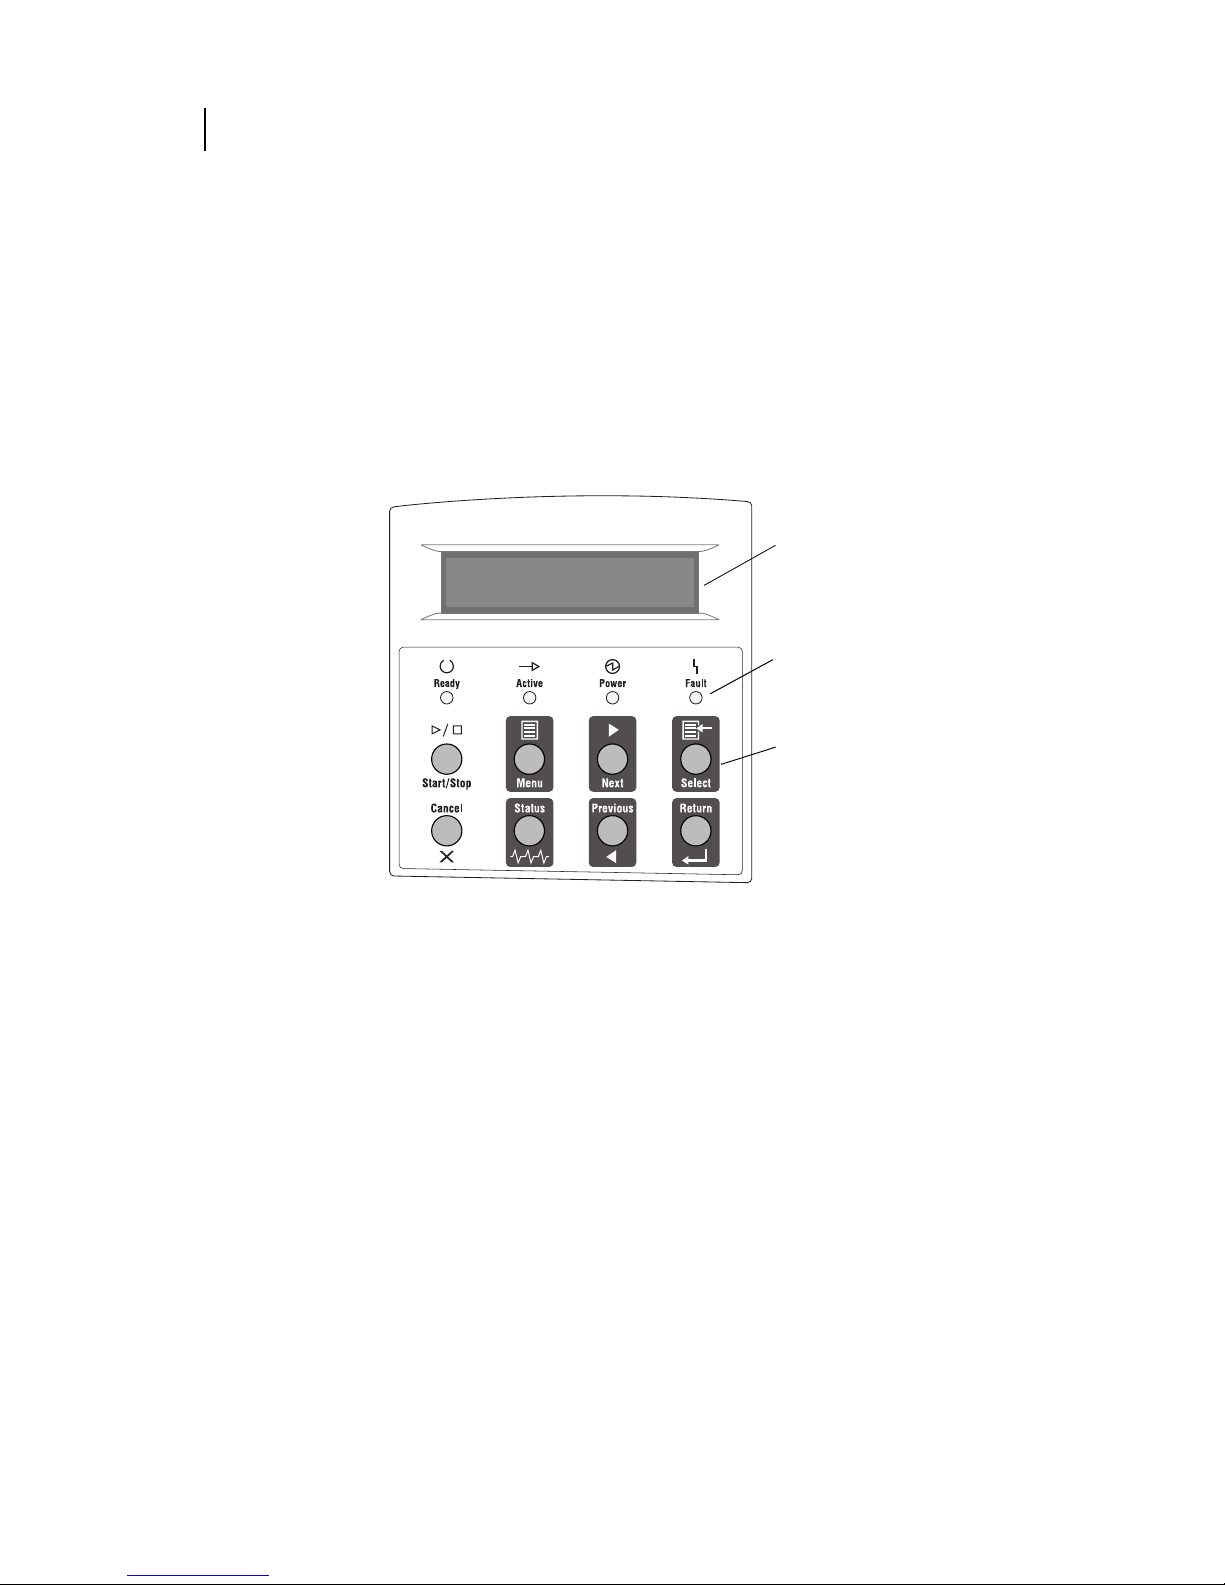
Control Panel Features
The control panel is located on the front of the printer, and contains the display, indicators, and
pushbuttons that allow you to view and change the printer settings.
The figure below shows the control panel features.
Figure 3-9: Control Panel.
LCD Display
The LCD display shows status and error messages that inform you of the current status of the
printer, and also displays menus, submenus, and printer settings when you are in the menu system.
The display contains two lines of text, each with a maximum of sixteen characters.
LCD Display
Pushbuttons
LED Indicators
Page 45

Apr 02
Compuprint PageMaster 402N User Guide 3-3
Control Panel Features
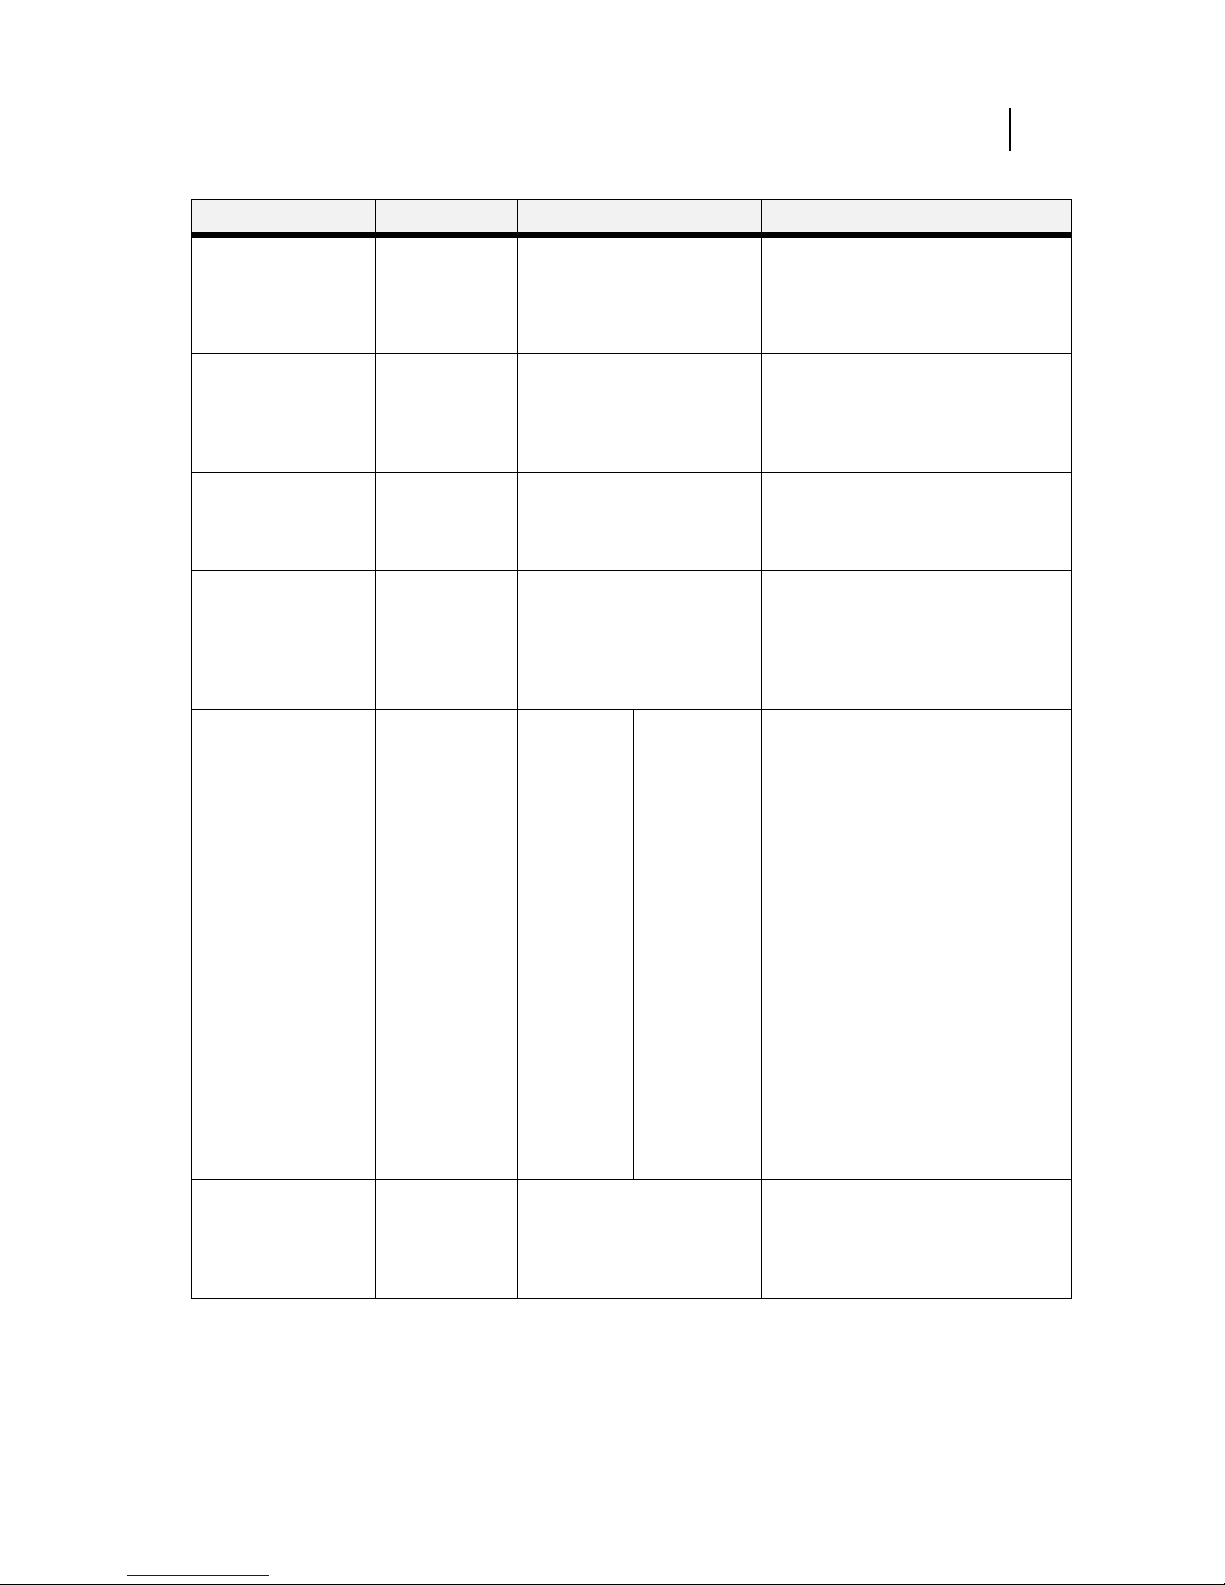
LED Indicators
The LED indicators also indicate printer status. The four indicators can each be on, off, or blinking, indicating different phases of printer operation. The table below explains the LED indicators.
Pushbuttons
The control panel pushbuttons allow you to access and navigate menus, and also assist you in recovering from printer errors. The table below explains the functions of the eight pushbuttons.
LED Color When Off When On When Blinking
Green Printer is NOT
READY
Printer is READY N/A
Green Printer is IDLE Printer is ACTIVE
(processing a job)
Printer is WAITING (a partial job
has been printed, and the printer
is waiting for additional job data)
Green POWER is off POWER is on Power Saver Mode ON
Yellow Printer is not in
error mode
There is an error that requires
user intervention, such as a
paper jam, a service call
required, etc.
N/A
Pushbutton Function
START/STOP—Push this button to start or stop the printer, or to exit the menu
system.
MENU—Push this button to enter the menu system.
NEXT—Push this button to move to the next menu, submenu, or setting within
the same level of the menu structure.
SELECT—Push this button to select the menu or submenu that is shown on the
second line of the display or to choose and save the setting shown on the second
line of the display.
CANCEL—Push this button to cancel an action.
Page 46

Apr 02
3-4 Compuprint PageMaster 402N User Guide
Navigating the Control Panel Menus
Navigating the Control Panel Menus
When you press the MENU button on the control panel, you enter the printer’s menu system. At
that point, the first line of the display contains the text “Menu”, indicating that you are in the
menu system. The second line of the display lists the active menu, which you can change by pressing the NEXT or PREVIOUS button.
If you press the NEXT button repeatedly, the second line of the display cycles through the main
menus in the following order:
•Paper Menu
• Interface Menu
•PS Menu
•PCL Menu
•System Menu
•Quality Menu
•Functions
NOTE: Additional menus and submenus may appear in the printer menu system when other options are
installed.
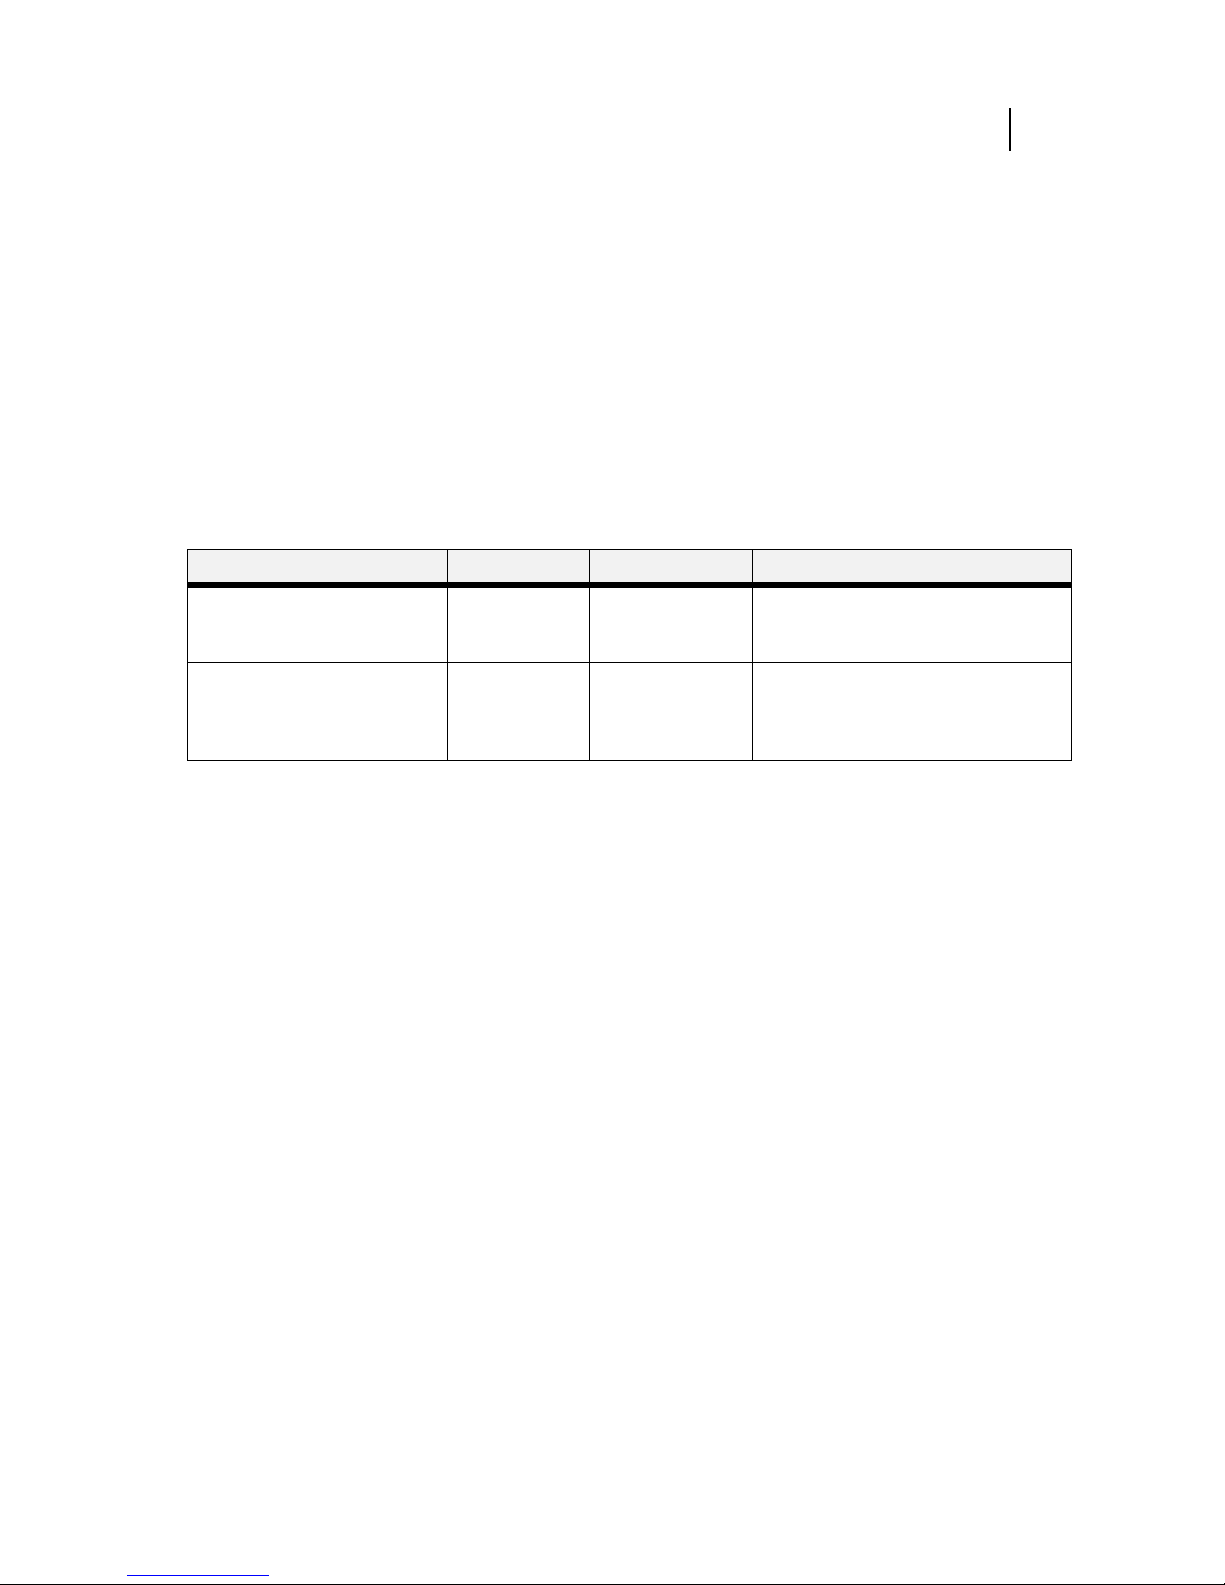
STATUS—Push this button to enter the Status Menu and view the current status of
printer.
PREVIOUS—Push this button to return to the previous menu, submenu, or option
within the same level of the menu structure.
RETURN—Push this button to move up one level in the menu structure to the
menu shown on the first line of the display.
Pushbutton Function
Menu
Paper Menu
Page 47

Apr 02
Compuprint PageMaster 402N User Guide 3-5
Navigating the Control Panel Menus
The following figure shows the sequence of pushbuttons and display messages that would allow you
to change the number of copies printed. This example illustrates the basic relationship between
menus and submenus and demonstrates how the NEXT, PREVIOUS, SELECT, and RETURN
buttons help you to navigate through the menus.
Figure 3-10: Navigating the Paper Menu.
1. Press the MENU button on the control panel.
2. Press the NEXT button until the text “Paper Menu” is shown on the second line of the dis-
play.
3. Press the SELECT button to enter the paper menu.
4. Press the NEXT button until the text “Copies” is shown on the second line of the display.
5. Press the SELECT button to enter the copies submenu.
6. Press the NEXT or PREVIOUS button to increase or decrease the number of copies printed.
7. Press the SELECT button to save this setting.
8. Press the START/STOP button to exit the menu system.
Menu
Paper Menu
Menu
Interface Menu
Menu
Paper Menu
Paper Menu
Copies
Copies
1
Copies
2
Copies
3
Paper Menu
Copies
Menu
Paper Menu
Page 48

Apr 02
3-6 Compuprint PageMaster 402N User Guide
Menu Structure
Menu Structure
The following figure shows the structure of the control panel main menus and submenus. For more
specific information about using and navigating the printer menu system, see the User Guide provided on the Electronic Library CD-ROM.
Figure 3-11: Printer Menu Structure.
NOTE: Additional menus and submenus may appear in the printer menu system when other options are
installed.
Paper Menu
The Paper Menu provides access to the printer settings for various paper-handling functions. Use
the following procedure to enter the paper menu:
1. Press the MENU button on the control panel.
2. Press the NEXT button until the text “Paper Menu” is shown on the second line of the dis-
play.
3. Press the SELECT button to enter the Paper Menu.
4. Press the NEXT button to move through the submenus: Copies, Default Source, Manual
Feed, Output Tray, Media Size/Type, Tr a y L i n k in g , Blank Pages, and Output Linking.
5. Use the procedures in the following table to access and change the printer paper-handling set-
tings:
Paper Men u
Copies
Default Source
Manual Feed
Output Tray
Media Size/Type
Fron t
Tray 1
Tray 2 (optional)
Tray 3 (optional)
Tray Linking
Blank Pages
Interface Menu
Port
Pa ra ll e l
Parallel Setup
Interpreter
Fo rm a t
Mode
PS Menu
Print PS Errors
Manual Feed TO
PCL Menu
Orientation
Font Source
Font Number
Pitch
Symbol Set
Macro Filter
Lines Per Page
CR mode
LF Mode
FF Mode
System Menu
Factory Defaults
Display Language
Powersaver
Wait Timeout
Job Timeout
Jam Recovery
Hex Print
Quality Menu
Resolution
Toner S a v e r
Functions
Reset Printer
Print Summary
Print Test
Print Fonts
Page 49
Apr 02
Compuprint PageMaster 402N User Guide 3-7
Paper Menu
Submenus Default Setting Available Settings Procedure for Changing Setting
Copies
This submenu allows
you to change the
number of copies
printed.
1 Numbers 1 - 999 1. Press NEXT or PREVIOUS to increase
or decrease the number of copies
printed.
2. Press SELECT to save this setting.
Default Source
This submenu allows
you to choose a default
paper source from a list
of all installed sources.
Tray 1 Front
Tray 1
Tray 2 (optional)
Tray 3 (optional)
1. Press NEXT or PREVIOUS to scroll
through the list of available sources of
paper.
2. Press SELECT to set a source as the
default.
Manual Feed
This submenu allows
you to turn the manual
feed on or off.
Off On
Off
1. Press NEXT or PREVIOUS to toggle
between ON and OFF.
2. Press SELECT to save this setting.
Output Tray
This submenu allows
you to choose a default
output tray from a list
of all installed output
trays.
Face Down Tray Face Down Tray
Offset Tray (optional)
1. Press NEXT or PREVIOUS to scroll
through the list of available output
trays.
2. Press SELECT to set a tray as the
default.
Media Size/Type
This submenu allows
you to set the media
size and type for the
Front Tray and set the
medial type for all other
trays.
Front Tray
Size: Letter LEF
Type: P l a in
Tray 1
Type: P l a in
Tray 2 (optional)
Type: P l a in
Tray 3 (optional)
Type: P l a in
Size
Front Tray:
Letter LEF,
A4 LEF, B5,
A5,
Statement,
Executive,
C5 Envelope,
DL
Envelope,
Com10
Envelope,
Monarch
Envelope,
Ledger, A3,
B4, Legal,
Folio, A4
SEF, Letter
SEF, B5 SEF
Ty pe
Front Tray:
Plain,
Transparency,
Prepunched,
Letterhead,
Colored,
Preprinted,
Bond, Label,
Card Stock,
Postcard,
Envelope,
Other
Other Trays:
Plain,
Transparency,
Prepunched,
Letterhead,
Colored,
Preprinted,
Bond, Other
1. Press NEXT or PREVIOUS to scroll
through the list of available sources of
paper.
2. Press SELECT to choose a tray.
3. Press NEXT or PREVIOUS to toggle
between MEDIA SIZE and MEDIA
TYPE.
4. Press SELECT to choose either.
5. Press NEXT or PREVIOUS to scroll
through the available sizes or types.
6. Press SELECT to set a size or type.
Tray Linking
This submenu allows
you to turn the tray
linking function on or
off.
On On
Off
1. Press NEXT or PREVIOUS to toggle
between ON and OFF.
2. Press SELECT to save this setting.
Page 50

Apr 02
3-8 Compuprint PageMaster 402N User Guide
Paper Menu
Blank Pages
This submenu allows
you to choose to either
print or not print blank
pages of a document.
Print Print
Do Not Print
1. Press NEXT or PREVIOUS to toggle
between PRINT and DO NOT PRINT.
2. Press SELECT to save this setting.
Output Linking
This submenu allows
you to turn the output
linking function on or
off.
Off On
Off
1. Press NEXT or PREVIOUS to toggle
between ON and OFF.
2. Press SELECT to save this setting.
Page 51

Apr 02
Compuprint PageMaster 402N User Guide 3-9
Interface Menu
Interface Menu
The Interface Menu provides access to the printer interface settings. Use the following procedure to
enter the interface menu:
1. Press the MENU button on the control panel.
2. Press the NEXT button until the text “Interface Menu” is shown on the second line of the
display.
3. Press the SELECT button to enter the interface menu.
4. Press the NEXT button to move through the submenus: Port Name.
5. Use the procedures in the following table to access and change the printer interface settings:
PS Menu
The PS Menu provides access to the PostScript settings. Use the following procedure to enter the
PS Menu:
1. Press the MENU button on the control panel.
2. Press the NEXT button until the text “PS Menu” is shown on the second line of the display.
3. Press the SELECT button to enter the PS menu.
4. Press the NEXT button to move through the submenus: Print PS Errors, and Manual Feed
TO.
5. Press the SELECT button to enter a submenu.
6. Use the procedures in the following table to access and change the PostScript settings:
Submenus Default
Setting
Available
Settings
Procedure for Changing Setting
Port
This submenu allows you
to choose the type of
interface.
(Port Name):On(Port Name):
On, Off
1. Press NEXT or PREVIOUS to toggle between
available ports.
2. Press SELECT to save this setting.
Parallel Setup
This submenu allows you
to set up the parallel
interface.
Interpreter:
Auto Switch
Format :
Raw
Mode:
Bidirectional
Interpreter:
Auto Switch
PCL
PostScript 3
Format :
Raw
Normal
Binary
Mode:
Bidirectional
Standard
1. Press NEXT or PREVIOUS to scroll through the
INTERPRETER, FORMAT, and MODE
submenus.
2. Press SELECT to choose a submenu.
3. Press NEXT or PREVIOUS to scroll through the
settings.
4. Press SELECT to choose and save a setting.
Page 52

Apr 02
3-10 Compuprint PageMaster 402N User Guide
PS Menu
Submenus Default
Setting
Available Settings Procedure for Changing Settings
Print PS Errors
This submenu allows you
to choose to either print or
not print PS errors.
Off On
Off
1. Press NEXT or PREVIOUS to toggle between ON
(print) and OFF (do not print).
2. Press SELECT to save this setting.
Manual Feed TO
This submenu allows you
to set the manual feed
timeout—the number of
seconds the printer shold
wait for a manual feed. A
setting of 0 will cause
printer to wait indefinitely
for a manual feed.
0 0 - 99999 1. Press NEXT or PREVIOUS to increase or decrease
each digit of the five-digit number.
2. Press SELECT to move to the next number.
3. Press SELECT after setting the last digit to save the
setting.
Page 53

Apr 02
Compuprint PageMaster 402N User Guide 3-11
PCL Menu
PCL Menu
The PCL Menu provides access to the PCL settings. Use the following procedure to enter the PCL
menu:
1. Press the MENU button on the control panel.
2. Press the NEXT button until the text “PCL Menu” is shown on the second line of the dis-
play.
3. Press the SELECT button to enter the PCL menu.
4. Press the NEXT button to move through the submenus: Print PS Errors, Manual Feed TO.
5. Press the SELECT button to enter a submenu.
6. Use the procedures in the following table to access and change the PCL settings:
Submenus Default Setting Available Settings Procedure for Changing Setting
Orientation
This submenu allows
you to choose the
orientation of the
page.
Portrait Portrait
Landscape
1. Press NEXT or PREVIOUS to
toggle between PORTRAIT and
LANDSCAPE.
2. Press SELECT to choose and save
an orientation.
Font Source
This submenu allows
you to choose a font
source.
Internal Internal 1. Press NEXT or PREVIOUS to
scroll through the available font
sources.
2. Press SELECT to choose and set a
source.
Font Number
This submenu allows
you to set the font
number.
0 Numbers 0-? 1. Press NEXT or PREVIOUS to
increase or decrease the font
number.
2. Press SELECT to save this
setting.
Pitch
This submenu allows
you to change the
pitch of text.
10.00 0.08 - 100.00 1. Press NEXT or PREVIOUS to
increase or decrease the pitch.
2. Press SELECT to save this
setting.
Symbol Set
This submenu allows
you to choose a
symbol set.
10U:PC-8 CP437 10U:PC-8 CP437
11U:PC-8 D/N
12U:PC-850
17U:PC-852
9T:PC-Turkish
19U:WIN Latin1
9E:WIN Latin2
5T:WIN Latin5
7J:Desk Top
10J:PS Text
13J:Ventura Intl
14J:Ventura US
6J:Microsoft Pub
8M:Math-8
PS:Math
6M:Ventura Math
15U:Pi Font
1U: Legal
1E: ISO4 UK
0U:ISO6 ASCII
0U:ISO11 Swedish
0I:ISO15 Italian
2S:ISO17 Spanish
1G:ISO21 German
0D:ISO60 Norweg.
1F:ISO69 French
9U:WIN3.0 Latin1
8U:Roman 8
0N:ISO 8859-1
2N:ISO 8859-2
5N:ISO 8859-5
1. Press NEXT or PREVIOUS to
scroll through the available
symbol sets.
2. Press SELECT to choose and set a
symbol set.
Page 54

Apr 02
3-12 Compuprint PageMaster 402N User Guide
PCL Menu
Macro Filter
This submenu allows
you to turn the macro
filter on or off.
Off On
Off
1. Press NEXT or PREVIOUS to
toggle between ON and OFF.
2. Press SELECT to save this
setting.
Lines Per Page
This submenu allows
you to change the
number of lines per
page.
64 5 - 128 1. Press NEXT or PREVIOUS to
increase or decrease the lines per
page.
2. Press SELECT to save this
setting.
CR Mode
This submenu allows
you top define the
action prompted by a
carriage return—a
carriage return equals
either a cariage
return alone, or a
carriage return and a
line feed together.
CR = CR CR = CR
CR = CR/LF
1. Press NEXT or PREVIOUS to
choose from CR=CR or
CR=CR/LF.
2. Press SELECT to save this
setting.
LF Mode
This submenu allows
you to define the
action prompted by a
line feed—a line feed
equals either a line
feed alone or a
carriage return and a
line feed together.
LF = LF LF = LF
LF = CR/LF
1. Press NEXT or PREVIOUS to
choose from LF=LF or
LF=CR/LF.
2. Press SELECT to save this
setting.
FF Mode
This submenu allows
you to define the
action prompted by a
form feed—a form
feed equals either a
form feed alone or a
carriage return and a
form feed together.
FF = FF FF = FF
FF = CR/FF
1. Press NEXT or PREVIOUS to
choose from FF=FF or
FF=CR/FF.
2. Press SELECT to save this
setting.
Page 55

Apr 02
Compuprint PageMaster 402N User Guide 3-13
System Menu
System Menu
The system menu provides access to system settings. Use the following procedure to enter the system menu:
1. Press the MENU button on the control panel.
2. Press the NEXT button until the text “System Menu” is shown on the second line of the dis-
play.
3. Press the SELECT button to enter the system menu.
4. Press the NEXT button to move through the submenus: Factory Defaults, Display Lan-
guage, Power Saver, Wait Timeout, Job Timeout, Jam Recovery, and Hex Print.
5. Press the SELECT button to enter a submenu.
6. Use the procedures in the following table to access and change the system settings:
Submenus Default Setting Available Settings Procedure for Changing Setting
Factory Defaults
This submenu allows you to reset the
printer to U.S. or Non-U.S. factory
defaults.
U.S. U.S.
Non-U.S.
1. Press NEXT or PREVIOUS to toggles
between U.S. and NON-U.S.
2. Press SELECT to choose and set the
factory defaults.
Display Language
This submenu allows you to change
the language of the display messages.
English English
French
German
Italian
Spanish
1. Press NEXT or PREVIOUS to scroll
through the available languages:
English, French (Francais), German
(Deutsch), Italian (Italiano), or
Spanish (Espanol).
2. Press SELECT to choose and set the
language.
Power Saver
This submenu allows you to set the
number of minutes the printer is idle
before it reverts to Power Saver
Mode.
15 0 - 999 1. Press NEXT or PREVIOUS to
increase or decrease the number of
minutes.
2. Press SELECT to save this setting.
Wait T i m e o u t
This submenu allows you to increase
or decrease the length of time (in
seconds) that the printer will remain
in the waiting state—a job is being
processed, no end-of-file has been
detected, and there is no more data to
process. This setting applies to both
PCL and PostScript print jobs.
20 0 - 99999 1. Press NEXT or PREVIOUS to
increase or decrease each digit of the
five-digit number.
2. Press SELECT set one digit and move
to the next digit.
3. Press SELECT after changing the last
digit to save this setting.
Job Timeout
This submenu allows you to increase
or decrease the time limit (in
seconds) for PostScript jobs. A 0
setting indicates no timeout. This
setting applies only to PostScript
jobs.
0 0 - 99999 1. Press NEXT or PREVIOUS to
increase or decrease each digit of the
five-digit number.
2. Press SELECT set one digit and move
to the next digit.
3. Press SELECT after changing the last
digit to save this setting.
Page 56

Apr 02
3-14 Compuprint PageMaster 402N User Guide
System Menu
Jam Recovery
This submenu allows you to turn jam
recovery on or off.
On On
Off
1. Press NEXT or PREVIOUS to toggle
between ON and OFF.
2. Press SELECT to save this setting.
Hex Print
This submenu allows you to print
hexadecimal characters.
Off On
Off
1. Press NEXT or PREVIOUS to toggle
between ON and OFF.
2. Press SELECT to save this setting.
Page 57
Apr 02
Compuprint PageMaster 402N User Guide 3-15
Quality Menu
Quality Menu
The Quality Menu provides access to the printer settings that are related to print quality. Use the
following procedure to enter the Quality Menu:
1. Press the MENU button on the control panel.
2. Press the NEXT button until the text “Quality Menu” is shown on the second line of the dis-
play.
3. Press the SELECT button to enter the system menu.
4. Press the NEXT button to move through the submenus: Resolution, Enhancement, and
To ne r S a ve r.
5. Press the SELECT button to enter a submenu.
6. Use the procedures in the following table to access and change the system settings:
Submenus Default Setting Available Settings Procedure for Changing Setting
Resolution
This submenu allows you to set the
resolution (dpi).
600 dpi 600 dpi
1200 dpi
1. Press NEXT or PREVIOUS to scroll
through the available resolutions.
2. Press SELECT to choose and set the dpi.
Toner Saver
This submenu allows you to
choose from several toner-saving
settings.
On On
Off
1. Press NEXT or PREVIOUS to toggle
between ON and OFF.
2. Press SELECT to save this setting.
Page 58

Apr 02
3-16 Compuprint PageMaster 402N User Guide
Functions Menu
Functions Menu
The Functions Menu provides access to several printer functions that can supply you with information about the printer and its settings. Use the following procedure to enter the Functions Menu:
1. Press the MENU button on the control panel.
2. Press the NEXT button until the text “Functions Menu” is shown on the second line of the
display.
3. Press the SELECT button to enter the system menu.
4. Press the NEXT button to move through the available functions: Reset Printer, Print Sum-
mary, Print test, and Print Fonts.
5. Use the procedures in the following table to execute the functions:
Status Menu
In addition to the main menus listed above, the printer also provides a status menu that allows you
to view the current settings for the input and output trays and the toner cartridge. Use the following procedure to enter the Status Menu:
1. Press the STATUS button on the control panel.
2. Press the NEXT button to move through the submenus: Front, Tray 1, Tray 2, Tray 3, Face
Down, and Toner.
3. Press the SELECT button to enter a submenu.
4. Use the procedures in the following table to view the status of the printer:
Functions Procedure for Executing Function
Reset Printer
This function resets the printer.
Press SELECT to reset the printer.
Print Summary
This function prints a list of all printer
settings:
Press SELECT to print a summary of the printer settings.
Print Test
This function allows you to print a single test
page or a continuous test page.
1. Press NEXT or PREVIOUS to toggle between
SINGLE PAGE and CONTINUOUS.
2. Press SELECT to print the test page(s).
Print Fonts
This function allows you to print Postscript or
PCL font lists.
1. Press NEXT or PREVIOUS to toggle between
POSTSCRIPT and PCL.
2. Press SELECT to select and print the specific fonts
list.
Submenu Procedure for Executing Function
Front
This submenu allows you to view
the current Media Size and Media
Type for the front tray.
1. Press NEXT or PREVIOUS to scroll through the media size,
media type, and level settings for the Front Tray.
2. Press SELECT to view a specific setting.
Page 59

Apr 02
Compuprint PageMaster 402N User Guide 3-17
Status Menu
◆ ◆ ◆
Tra y 1
This submenu allows you to view
the current Media Size, Media
Type, and Level for Tray 1.
1. Press NEXT or PREVIOUS to scroll through the media size,
media type, and level settings for Tray 1.
2. Press SELECT to view a specific setting.
Tra y 2
This submenu allows you to view
the current Media Size, Media
Type, and Level for Tray 2.
1. Press NEXT or PREVIOUS to scroll through the media size,
media type, and level settings for Tray 2.
2. Press SELECT to view a specific setting.
Tra y 3
This submenu allows you to view
the current Media Size, Media
Type, and Level for Tray 3.
1. Press NEXT or PREVIOUS to scroll through the media size,
media type, and level settings for Tray 3.
2. Press SELECT to view a specific setting.
Face Down Tray
This submenu allows you to view
the status of the face down tray.
1. Press SELECT to view the status of the Face Down Tray.
To ne r
Press SELECT to view the status of the toner cartridge.
Page 60

Apr 02
3-18 Compuprint PageMaster 402N User Guide
Status Menu
Page 61

Apr 02
Chapter 4
Maintaining the Printer
In this Chapter . . .
• “About this Chapter” on page 4-2
• “Upgrading Printer Firmware” on page 4-2
• “Replacing Printer Components” on page 4-3
• “Cleaning the Printer” on page 4-14
• “Moving the Printer” on page 4-26
• “Storing the Printer for Long Periods of Time” on page 4-27
Page 62

Apr 02
4-2 Compuprint PageMaster 402N User Guide
Upgrading Printer Firmware
About this Chapter
This chapter provides information about maintaining your printer. Although the printer requires
very little maintenance, with normal daily use you will need to perform some routine maintenance
procedures, including replacing consumable items and cleaning the printer. This chapter also contains information about moving and storing the printer.
Upgrading Printer Firmware
The executable firmware for the printer controller is stored in FLASH memory. You can easily
upgrade this firmware on site when a new version of code is available. The upgrade process involves
sending the new code, which is usually named with a .LOD extension, to the printer using either
the parallel or network interface. When the printer receives the file, it will automatically recognize it
as a firmware upgrade file and will program it into the FLASH memory. During this process the
printer will display information about each sub-file that it is receiving or programming. When finished, the printer displays the text “Upgrade Completed” and reboots, executing the new firmware.
Contact your dealer or service provider for more information about firmware upgrades.
Upgrading Firmware Using the Parallel Interface
To upgrade the printer using the parallel interface, go to the DOS prompt and use the copy command to copy the new file to the printer. For example, type “copy newversion.lod/b lpt1” at the
DOS prompt, where “newversion” is the name of the firmware upgrade file and “lpt1” is the printer
you would like to upgrade. Be sure to use the “/b” switch on the copy command line to ensure that
the data is sent in binary mode.
NOTE: If you are using a PC that is not running Windows or if you do not have any printer drivers installed
and configured to use the parallel interface, you will need to configure the parallel port for
permanent retry by entering the following command PRIOR to entering the copy command
discussed above: mode lpt1:,,p
If you are running Windows, you may get an error message during the upgrade process that
indicates that the printer is busy or that there is a printer error. This message box will contain
check-boxes for “Retry” or “Cancel”. DO NOT SELECT CANCEL. This error message is only a
result of the printer programming a large file into FLASH memory and will disappear once the
programming is completed.
Upgrading Firmware Using the Network Interface
To upgrade printer firmware using the network interface, simply send the new file to the printer
using whatever procedure you normally use to send a print file. This procedure varies depending on
the network environment.
Page 63

Apr 02
Compuprint PageMaster 402N User Guide 4-3
Replacing Printer Components
Replacing Printer Components
Replacing the Toner Cartridge
The toner cartridge contains the dry ink as well as the xerographic drum and associated components that create the xerographic image on a sheet of paper. The toner cartridge will eventually run
out of ink through normal use. When the toner is low, printed images will be uneven or very light.
Use the following guidelines when using or storing a toner cartridge:
• An unopened and correctly stored toner cartridge has a shelf life of approximately two years.
• Do not open the box containing the toner cartridge until you are ready to install the cartridge
into the printer.
• Store the toner cartridge box horizontally—not on end.
• Keep the cartridge out of the reach of children, and in an area where the temperature remains
between 32
°
F and 95°F and the humidity remains between 15% to 85%. If you bring a cold
toner cartridge into a warm room, wait a least an hour for the temperature to stabilize before
opening the cartridge box.
• Do not disassemble the toner cartridge.
• Toner is a safe material, but if you get any on your hands DO NOT wash them in hot water.
Use only cold water to wash off toner. Hot water sets the toner and makes it difficult to
remove.
• A shutter protects the photosensitive drum from ambient light. Do not open the drum shutter by hand.
Use the following procedure to replace the toner cartridge:
1. Place a drop-cloth or some paper on the table or floor near the printer.
Drum Shutter
CAUTION: Do not expose the new toner cartridge to strong light for more than a few minutes
before installing it into the printer.
WARNING! Do not dispose of used toner cartridges in an incinerator or in an open fire.
Page 64

Apr 02
4-4 Compuprint PageMaster 402N User Guide
Replacing Printer Components
2. Locate the finger grip near the top cover of the printer and pull the top cover up and back to
open it.
3. Remove the old toner cartridge from the printer and carefully place it on the drop-cloth.
Page 65

Apr 02
Compuprint PageMaster 402N User Guide 4-5
Replacing Printer Components
4. Remove the new toner cartridge from its packaging.
5. Rock the toner cartridge back and forth and then shake it horizontally to ensure that the
toner is evenly distributed.
6. Grasp the toner cartridge firmly and pull the sealing tape straight out from the cartridge.
Page 66

Apr 02
4-6 Compuprint PageMaster 402N User Guide
Replacing Printer Components
7. Slide the pegs on the toner cartridge into the channels on the inside of the printer, and lower
the toner cartridge into the printer.
8. Close the top cover.
Disposing of the Print Cartridge
1. Place the used toner cartridge inside the new toner cartridge box and seal the box.
2. Dispose of or recycle the used toner cartridge.
8
WARNING! Do not dispose of the old toner cartridge in an incinerator or in an open fire.
Page 67

Apr 02
Compuprint PageMaster 402N User Guide 4-7
Replacing Printer Components
Replacing the Fuser
The fuser melts the toner image into the paper to form a finished print. The fuser wears with normal use and can leave dirt or marks on printed sheets when worn. The normal life of a fuser is
approximately 200,000 A4/Letter size prints at 5% area coverage. Running high image density
prints or large format paper will cause the fuser life to be shorter.
NOTE: In the following procedure, the left and right sides of the printer are those to the left and right of a
person facing the rear of the printer.
Use the following procedure to remove and replace the fuser:
1. Turn the printer off by pressing the [ O ] on the power switch on the right side of the printer,
and disconnect the AC power cord from the wall outlet. Wait at least 30 minutes before proceeding to remove the fuser..
NOTE: If the high capacity stacker is installed, it is not necessary to remove it to replace the fuser; however,
removing the stacker will make it easier to access the fuser.
WARNING! The fuser becomes very hot during operation. Do not touch the fuser until it is
cool.
Page 68

Apr 02
4-8 Compuprint PageMaster 402N User Guide
Replacing Printer Components
2. Locate the hand grip on the rear of the printer and pull it toward you to open the rear cover.
3. Release the fuser by pressing the top of the fuser latch on the left side of the printer.
4. Grasp the handles at the ends of the fuser. Lift up on the left end slightly, move the fuser to
the left, then lift the fuser straight up and out of the printer.
Page 69

Apr 02
Compuprint PageMaster 402N User Guide 4-9
Replacing Printer Components
5. Remove the new fuser from its packaging, and remove the fuser shipping spacers by pulling
them in the direction shown in the figure below.
6. Grasp the fuser by the handles. Tilt the right end of the fuser downwards slightly and insert
the right end of the fuser under the catch on the right side of the printer frame.
7. Ensure that the fuser pins are properly placed into the holes in the printer frame by lifting up
on the right end of the fuser. The fuser should not move.
8. Press down on the left end of the fuser to seat it, then move the top of the fuser latch to the
right to lock the fuser into position.
Page 70

Apr 02
4-10 Compuprint PageMaster 402N User Guide
Replacing Printer Components
9. Close the rear cover.
10. Verify that the power switch of the printer is in the [O] (off) position, then insert the plug of
the power cord into the AC outlet.
11. Turn the printer on by pressing [ I ] on the power switch on the right side of the printer.
Replacing the Transfer Roll
The transfer roll is the electrically conductive rubber roll that transfers the toner image from the
drum onto the paper. The transfer roll wears with normal use, and eventually must be replaced. Use
the following procedure to replace the transfer roll:
SIB048F
1
2
Page 71

Apr 02
Compuprint PageMaster 402N User Guide 4-11
Replacing Printer Components
NOTE: This procedure involves removing the toner cartridge. To avoid getting toner on counters, floors,
and other surfaces, set the toner cartridge on a drop-cloth or some old newspaper after removing it
from the printer.
1. Turn the printer off by pressing the [ O ] on the power switch on the right side of the printer.
2. Locate the finger grip on the right side of the top cover and lift the top cover up and back.
3. Remove the toner cartridge from the printer and carefully place it on a drop-cloth or old
newspaper.
Page 72

Apr 02
4-12 Compuprint PageMaster 402N User Guide
Replacing Printer Components
4. Release the transfer roll by lifting up on the latches at either end. Carefully lift the roll out of
the clips and remove it from the printer.
5. Remove the new transfer roll from its packaging and hold it as shown below.
6. Press the ends of the new transfer roll into the clips on the paper transport. Rotate the locking
arm down into the locked position.
Do not touch the surface of the new transfer roll. Oil from your fingers can cause marks on
printed sheets.
Page 73
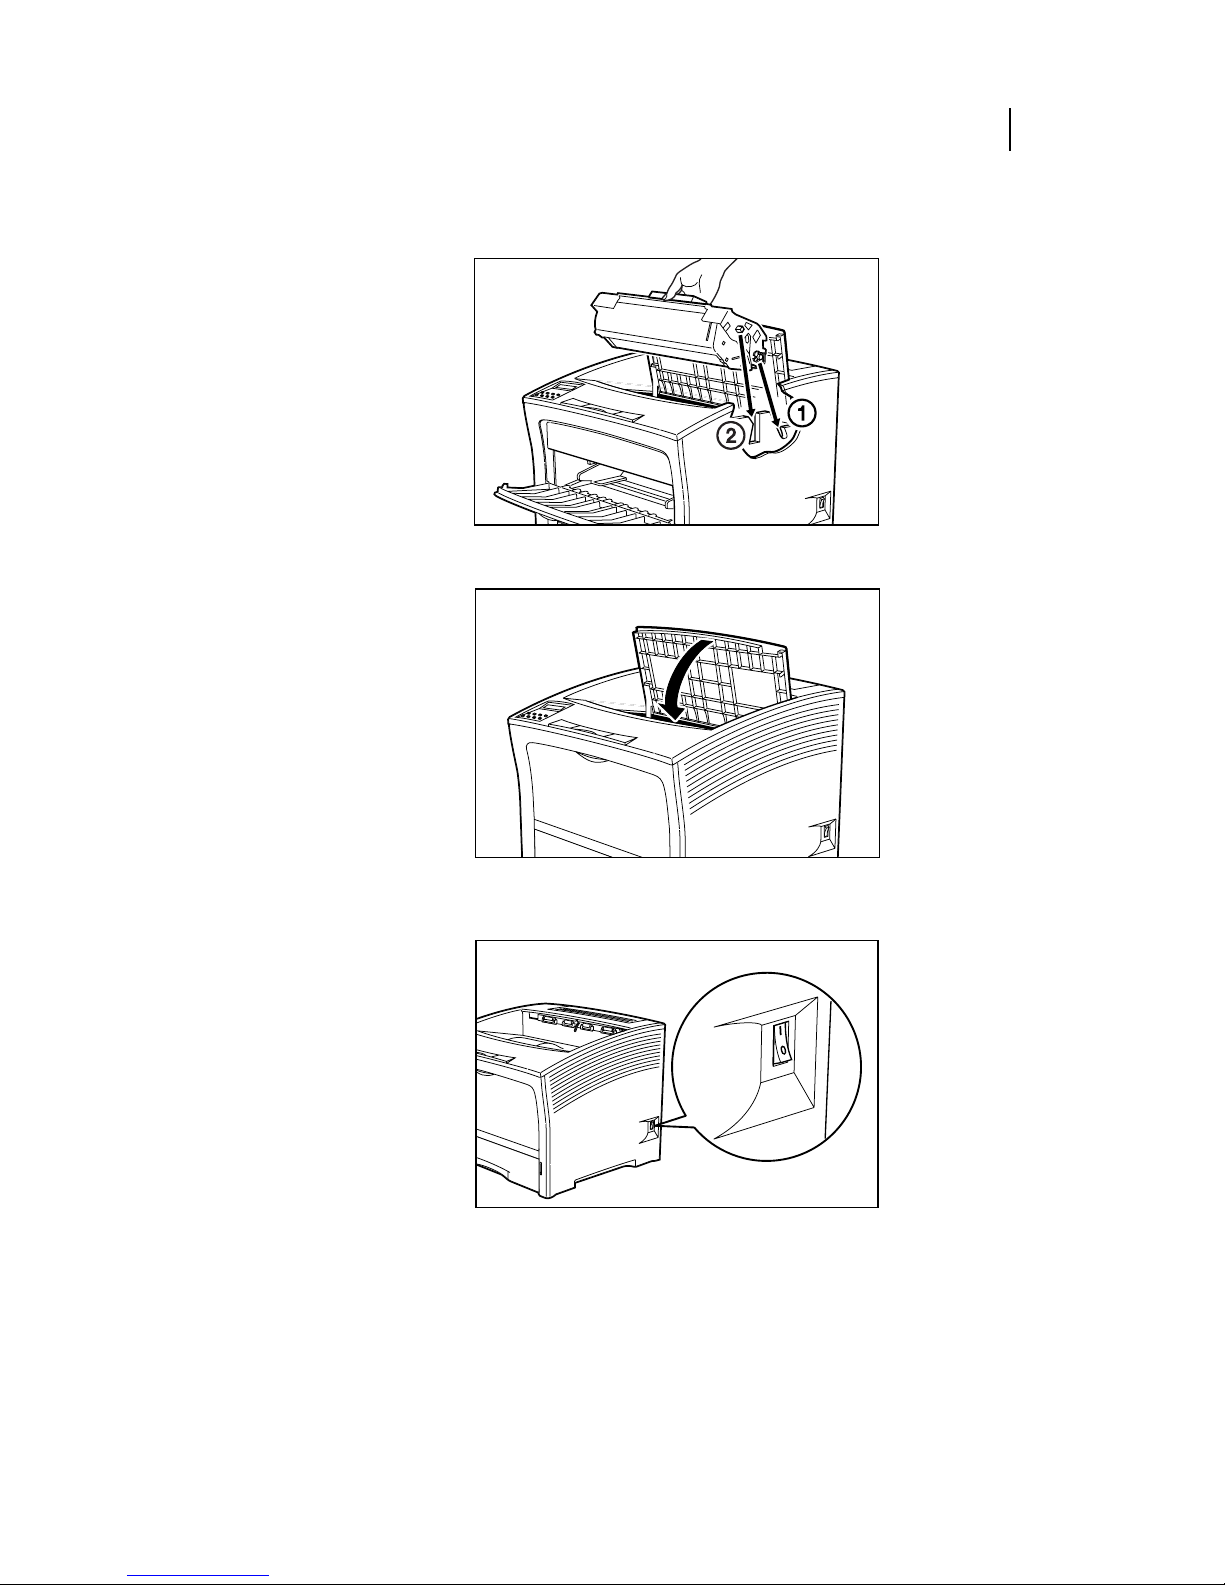
Apr 02
Compuprint PageMaster 402N User Guide 4-13
Replacing Printer Components
7. Slide the pegs on the end of the toner cartridge into the slots inside the printer, and lower the
toner cartridge into the printer.
8. Close the top cover.
9. Turn the printer on by pressing [ I ] on the power switch on the right side of the printer.
Page 74

Apr 02
4-14 Compuprint PageMaster 402N User Guide
Cleaning the Printer
Cleaning the Printer
Cleaning the Exterior
The covers and tray faces of the printer may collect dust and dirt through normal use. Although
exterior dirt should not affect printer performance, an occasional exterior cleaning helps maintain
the appearance of the printer appearance. Use the following procedure to clean the exterior of the
printer:
1. Turn the printer off by pressing the [ O ] on the power switch on the right side of the printer,
and disconnect the AC power cord from the wall outlet.
2. Using a soft cloth that is slightly damp with cold water, wipe the printer covers and tray faces.
Use a very mild, non-abrasive soap to remove heavy dirt and toner stains.U
3. Use a soft, dry cloth to thoroughly dry the covers and tray faces.
Do not use solvents or abrasive cleaners to clean printer covers. Use only cold water and a very
mild soap.
Page 75

Apr 02
Compuprint PageMaster 402N User Guide 4-15
Cleaning the Printer
4. Verify that the power switch of the printer is in the [O] (off) position, then insert the plug of
the power cord into the AC outlet.
5. Turn the printer on by pressing [ I ] on the power switch on the right side of the printer.
Cleaning the Interior
The interior of the printer does not generally need to be cleaned unless a paper jam drops toner
onto the paper path or you accidentally spill toner inside the printer when installing a new toner
cartridge. Use the following procedure to clean the interior of the printer only when necessary:
NOTE: This procedure involves removing the toner cartridge. To avoid getting toner on counters, floors,
and other surfaces, set the toner cartridge on a drop-cloth or some old newspaper after removing it
from the printer.
SIB048F
1
2
Since there is always the possibility of damaging delicate printer components by carelessness
or vigorous cleaning methods, Compuprint recommends that you clean the interior only when
you are instructed to do so by a service representative or in a troubleshooting procedure presented in this manual.
Page 76

Apr 02
4-16 Compuprint PageMaster 402N User Guide
Cleaning the Printer
1. Turn the printer off by pressing the [ O ] on the power switch on the right side of the printer,
and disconnect the AC power cord from the wall outlet.
2. Remove all of the paper from the main paper tray and from the front paper tray.
3. Locate the finger grip on the right side of the top cover and lift the top cover up and back.
Page 77

Apr 02
Compuprint PageMaster 402N User Guide 4-17
Cleaning the Printer
4. Remove the toner cartridge from the printer and carefully place it on a drop-cloth or old
newspaper.
5. Open all printer doors.
6. For minor cleaning, use a soft, dry cloth and carefully wipe only those areas of the printer
interior that appear to be dirty.
For major cleaning, use a small vacuum cleaner with a disposable bag and crevice tool attachment. Use a soft-haired brush to dislodge dirt and toner and sweep it into the vacuum nozzle.
7. Wipe the laser scanner window with a soft lint free cloth.
Page 78

Apr 02
4-18 Compuprint PageMaster 402N User Guide
Cleaning the Printer
8. Slide the pegs on the end of the toner cartridge into the slots inside the printer, and lower the
toner cartridge into the printer.
9. Close the top cover.
10. Reload all paper into the main paper tray and the front paper tray.
Page 79

Apr 02
Compuprint PageMaster 402N User Guide 4-19
Cleaning the Printer
11. Verify that the power switch of the printer is in the [O] (off) position, then insert the plug of
the power cord into the AC outlet.
12. Turn the printer on by pressing [ I ] on the power switch on the right side of the printer.
Cleaning Feed Rolls
Rubber feed rolls drive sheets of paper out of the front paper tray into the printer, and also drive
sheets of paper out of the main paper tray into the printer. These feed rolls wear with normal use
and eventually become coated with paper dust and must be cleaned. Frequent feed jams in the front
tray or main tray indicate that the feed rolls need to be cleaned.
Main Feed Roll
Use the following procedure to clean the main feed roll:
SIB048F
1
2
Page 80

Apr 02
4-20 Compuprint PageMaster 402N User Guide
Cleaning the Printer
1. Turn the printer off by pressing the [ O ] on the power switch on the right side of the printer,
and disconnect the AC power cord from the wall outlet.
2. Remove the main paper tray and set it on a flat level surface.
3. Open the front paper tray and pull the front feeder partially out of the printer.
Page 81

Apr 02
Compuprint PageMaster 402N User Guide 4-21
Cleaning the Printer
4. Reach into the main paper tray well and rotate the feed roll to the down position, as shown in
the figure below.
5. Using a soft cloth slightly moistened with plain water, carefully wipe the feed roll.
6. Rotate the feed roll back into the feed position.
7. Reinstall the front paper tray.
Page 82

Apr 02
4-22 Compuprint PageMaster 402N User Guide
Cleaning the Printer
8. Reinstall the main paper tray.
9. Verify that the power switch of the printer is in the [O] (off) position, then insert the plug of
the power cord into the AC outlet.
10. Turn the printer on by pressing [ I ] on the power switch on the right side of the printer.
Front Feed Rolls
Use the following procedure to clean the front feed rolls:
SIB048F
1
2
Page 83

Apr 02
Compuprint PageMaster 402N User Guide 4-23
Cleaning the Printer
NOTE: This procedure involves removing the toner cartridge. To avoid getting toner on counters, floors,
and other surfaces, set the toner cartridge on a drop-cloth or some old newspaper after removing it
from the printer.
1. Turn the printer off by pressing the [ O ] on the power switch on the right side of the printer,
and disconnect the AC power cord from the wall outlet.
2. Locate the finger grip on the right side of the top cover and lift the top cover up and back.
3. Remove the toner cartridge from the printer and carefully place it on a drop-cloth or old
newspaper.
Page 84

Apr 02
4-24 Compuprint PageMaster 402N User Guide
Cleaning the Printer
4. Look inside the empty toner cartridge cavity and locate the D shaped rubber front tray feed
rolls and the white plastic rolls next to them.
5. Using a soft cloth slightly moistened with plain water, carefully wipe the feed rolls.
6. Slide the pegs on the end of the toner cartridge into the slots inside the printer, and lower the
toner cartridge into the printer.
7. Close the top cover.
Page 85

Apr 02
Compuprint PageMaster 402N User Guide 4-25
Cleaning the Printer
8. Verify that the power switch of the printer is in the [O] (off) position, then insert the plug of
the power cord into the AC outlet.
9. Turn the printer on by pressing [ I ] on the power switch on the right side of the printer.
SIB048F
1
2
Page 86

Apr 02
4-26 Compuprint PageMaster 402N User Guide
Moving the Printer
Moving the Printer
Follow the guidelines below when lifting or moving the printer:
• The printer is very heavy, and should always be lifted by two people. The weight of the
printer without paper tray, toner cartridge, and paper is about 55 lbs (25 kg). Never attempt
to lift the printer alone.
• To lift the printer, have two individuals facing each other from the front and the rear of the
printer grasp the recessed areas on each side of the printer. Do not lift the printer by grasping
any area other than these recessed areas.
• When lifting the printer, maintain proper lifting posture to prevent injuries.
Moving the Printer a Short Distance
Use the following procedure to move the printer a short distance:
1. Turn the printer off by pressing the [ O ] on the power switch on the back of the printer.
2. Unplug the AC power cord from the AC wall outlet.
3. Disconnect the printer from the host computer.
4. Wait 30 minutes for the printer to cool.
5. Refer to Chapters 6 through 9 for instructions on moving installed paper-handling options.
6. Remove the toner cartridge and cover it with an opaque plastic sheet.
7. If the printer or the table the printer is on has casters, unlock the casters.
8. Move the printer to the new location.
9. Once the printer is in the new location, refer to the Installation Guide included in the origi-
nal printer packaging and in the Electronic Library CD-ROM for installation instructions.
Moving the Printer a Long Distance
Use the following procedure to move the printer a long distance:
1. Turn the printer off by pressing the [ O ] on the power switch on the right side of the printer.
2. Unplug the AC power cord from the wall outlet and from the back of the printer.
3. Disconnect the printer from the host computer.
4. Remove the paper from all of the paper trays.
SIB003F
Page 87

Apr 02
Compuprint PageMaster 402N User Guide 4-27
Storing the Printer for Long Periods of Time
5. Wait 30 minutes for the printer to cool.
6. Remove all installed paper-handling options. Refer to Chapters 6 through 9 for instructions
for removing installed paper-handling options.
7. Remove the toner cartridge and place it in an opaque plastic bag, then seal the bag with tape
and place it in a sturdy box.
8. Repack the printer, paper trays, AC power cord and toner cartridge into the original shipping
box or boxes.
9. Once the printer is in the new location, refer to the Installation Guide included in the origi-
nal printer packaging and in the Electronic Library CD-ROM for installation instructions.
Storing the Printer for Long Periods of Time
If you will not be using the printer for several months, use the following procedure to prepare the
printer for storage:
1. Turn the printer off by pressing the [ O ] on the power switch on the right side of the printer.
2. Unplug the AC power cord from the AC wall outlet.
3. Disconnect the printer from the host computer.
4. Remove the paper from all of the paper trays.
5. If you will be storing the printer for six months or longer, remove the toner cartridge and
place it in an opaque plastic bag, and seal the bag with tape.
NOTE: After prolonged inactivity the toner cartridge may degrade to the point where it is no longer usable
and must be replaced. Poor print quality and frequent paper jams may indicate that the toner has
solidified and that the drum has oxidized during storage.
6. Cover the printer with a plastic sheet and tape down the corners.
7. Store the printer in an area where the temperature and humidity are moderate, as described in
“Environment Requirements” on page 1-4.
NOTE: Do not stack other items on top of the printer when storing the printer.
◆ ◆ ◆
Page 88

Apr 02
4-28 Compuprint PageMaster 402N User Guide
Storing the Printer for Long Periods of Time
Page 89

Apr 02
Chapter 5
Troubleshooting
In this Chapter . . .
• “About this Chapter” on page 5-2
• “Installation Problems” on page 5-2
• “Paper Jams” on page 5-4
• “Print Image Quality Problems” on page 5-27
• “Miscellaneous Problems” on page 5-35
• “Warning Messages and Error Messages” on page 5-39
Page 90

Apr 02
5-2 Compuprint PageMaster 402N User Guide
Installation Problems
About this Chapter
This chapter describes the problems that you may encounter when using your printer, and provides
procedures for resolving the problems. This chapter also lists the warning and error messages that
appear on the control panel display.
There are four basic types of printer problems:
• Installation problems
If there is a problem with the printer when you first turn in on, refer to “Installation Prob-
lems” on page 5-2 for information about possible installation problems.
•Paper Jams
If there is a paper jam, refer to “Paper Jams” on page 5-4 for procedures to remove the jam.
• Print quality problems
If the finished prints delivered to the output tray display image problems such as image black
spots or vertical lines on the page, refer to “Print Image Quality Problems” on page 5-27 and
complete the procedure provided for the specific image problem that you have encountered.
• Miscellaneous problems
If you have a printer problem but the control panel does not display a warning message or
error message, refer to “Miscellaneous Problems” on page 5-35 and follow the directions for
correcting that problem.
Many of these printer problems are indicated by a warning or error message appearing on the control panel display. If the printer control panel displays a warning message or error message, refer to
“Warning Messages and Error Messages” on page 5-39 and complete the actions prescribed for the
specific warning or error message.
Installation Problems
It is common for simple oversights during printer installation to cause problems when you first turn
the printer on, resulting in noise, smoke, or smell; an inoperative printer; or the absence of a ready
message on the control panel.
Page 91

Apr 02
Compuprint PageMaster 402N User Guide 5-3
Installation Problems
Inoperative Printer
If you have problems turning on the printer, check the possible causes listed in the table below. If
the printer will not start after checking these items, turn the printer off, disconnect the power cord
from the AC outlet, and contact your dealer or an authorized service provider.
No Ready Message
After warming up, the printer control panel displays the text “Ready”, indicating that the printer is
ready to print. If the printer does not show this message, but shows an error message instead, refer
to “Warning Messages and Error Messages” on page 5-39 to determine the appropriate action for
the specific error message that is shown. If the printer does not display either the “Ready” message
or an error message, contact your retailer or sales representative.
Noise, Smoke, or Smell
If you notice unusual noise, smoke, or smell after turning the printer on, turn the printer off immediately and disconnect it from the AC wall outlet. Use the following procedure to determine the cause
of and alleviate the problem:
Description Possible Cause Action
There is no power. The power switch is not set to
[ I ] (on).
Check the power switch.
See “Step 7: Connecting the Power Cord and
Turning the Printer On” on page 1-15. of the
Installation Guide.
The power cord is not properly
plugged into an AC outlet or
into the AC connector on the
rear of the printer.
Set the power switch to [ O ] (off) and then
connect the power cord firmly to the AC
connector and to the AC outlet.
See “Step 7: Connecting the Power Cord and
Turning the Printer On” on page 1-15. of the
Installation Guide.
Voltage of the AC power is not
correct.
Verify that the AC outlet is rated for the voltage
of your printer. See “Electrical Requirements”
on page 2-5. of this guide.
The fuse on the power cord is
not functioning. (UK only)
Verify that the fuse on the power cord is intact.
(UK only)
The AC wall outlet is not
functioning.
Verify that voltage is present at the AC wall
outlet by connecting another electrical device
to the outlet. If power does not flow to the other
device, check the AC wall outlet circuit
breakers for a tripped breaker.
There is interference from other
electrical devices on the same
circuit.
Unplug all electrical devices from the AC wall
outlet circuit, and then reconnect only the
printer. Turn printer power on.
Thermal sensors may have shut
down the printer.
Turn the printer off and wait 20 minutes, then
turn the printer back on.
Power is frequently
interrupted.
The printer is malfunctioning. Turn the printer off and disconnect the power
cord from the AC outlet. Contact your dealer or
an authorized service provider.
Page 92

Apr 02
5-4 Compuprint PageMaster 402N User Guide
Paper Jams
1. Refer to the pictorial unpacking sheet and the Installation Guide included in the printer
packaging and make sure you have removed all shipping spacers and protective tape from the
inside of the printer, the paper trays, and the toner cartridge.
2. Open the covers on the printer and carefully inspect the fuser area. Remove any pieces of
paper that may be stuck in the fuser.
3. Check the inside of the printer for any obviously broken or detached parts. If you find a bro-
ken part, contact your retailer or sales representative.
4. Check the exterior of the printer for broken covers. If you find a broken cover, contact your
retailer or sales representative.
5. Verify that the AC wall outlet is the correct voltage for your printer.
6. Remove any paper you have loaded in the main tray, check the inside of the tray well for stray
sheets of paper, and reload the paper into the main tray.
7. Connect the printer to the AC wall outlet and turn the printer on by pressing the [ I ] on the
power switch on the right side of the printer.
8. If this procedure does not eliminate the noise, smoke or smell, or if the problem returns, turn
the printer off, unplug the AC power cord from the AC wall outlet, and contact your retailer
or sales representative.
Paper Jams
Paper jams are generally the most common and reoccurring problem encountered when using any
printer. Paper may jam anywhere along the paper path—from the paper tray to the output tray.
Sensors within the printer constantly monitor paper travel, so when a sheet of paper fails to arrive at
a certain point within a specific time, the printer interprets that to mean that the paper has stopped
between two sensors along the paper path. The printer then displays a Paper Jam error message that
corresponds to that specific jam.
When paper gets jammed inside the printer, printing stops and an error code indicating the position of the jam appears on the display.
Error Code Paper Jam Location
E0 At the high capacity feeder
E1 At the regi sensor
E2-X Between the paper feed section (front paper tray or main tray) and
the toner cartridge
E3 Between the toner cartridge and the fuser unit
E4 At the paper exit slot
E7 At the duplexer
E8 At the stacker
Page 93

Apr 02
Compuprint PageMaster 402N User Guide 5-5
Paper Jams
Figure 3-12: Paper Jam Locations and Error Codes.
The most common causes of paper jams are:
• The printer is not placed on a level surface.
• The print media does not conform to the specifications.
• The paper is not loaded correctly in the front paper tray or the cassette.
• The paper is wrinkled or curled.
• The paper guide is not set correctly.
Occasional paper jams result from simple things such as static electricity sticking paper together—
causing several sheets to feed at the same time—or from the feed rolls becoming slippery from an
accumulation of paper dust. Occasional paper jams usually require minor user intervention that
involves reloading the paper or cleaning the feed rolls.
Paper Feeders
(optional)
Stacker
(optional)
E3
E8
E7
E2-1
Duplexer
(optional)
E1
E4
E2-2
E7
Page 94

Apr 02
5-6 Compuprint PageMaster 402N User Guide
Paper Jams
Frequent paper jams can be caused by anything from foreign material in the paper path to a broken
or malfunctioning component. Frequent paper jams may require involved user intervention that
includes replacing a consumable item or calling a service technician to troubleshoot and correct the
problem.
Clearing an E1, E2-1 or E2-2 Paper Jam
If an E1, E2-1 or E2-2 error code precedes the error message on the first line of the control panel
display, paper has jammed somewhere between the feed area and the registration sensor. Use the following procedure to clear a paper jam in this location:
1. Remove any printed pages from the output tray.
2. Open the top cover and the front tray cover.
Page 95

Apr 02
Compuprint PageMaster 402N User Guide 5-7
Paper Jams
3. If the jam occurred while feeding from the front paper tray, remove all paper from the front
tray, including any paper that may be jammed inside the tray.
4. If the jam occurred while feeding from the main paper tray, remove the main paper tray.
Page 96

Apr 02
5-8 Compuprint PageMaster 402N User Guide
Paper Jams
5. Remove any jammed or wrinkled paper from the paper tray.
6. Remove any jammed paper from the inside of the paper tray well.
Page 97

Apr 02
Compuprint PageMaster 402N User Guide 5-9
Paper Jams
7. If the jam occurred while feeding from Tray 2 or 3, remove the paper tray associated with that
feeder and inspect the inside of the paper tray well, removing any jammed paper.
Page 98

Apr 02
5-10 Compuprint PageMaster 402N User Guide
Paper Jams
8. Open the rear door of the feeder for tray 2 or tray 3 and remove any jammed paper, then close
the rear door of the feeder
Page 99

Apr 02
Compuprint PageMaster 402N User Guide 5-11
Paper Jams
9. Remove the front tray by lifting up slightly and pulling the tray out from the printer.
10. Remove the toner cartridge.
11. Remove any jammed paper from the toner cartridge well.
Page 100

Apr 02
5-12 Compuprint PageMaster 402N User Guide
Paper Jams
12. Reinsert the front tray into the printer.
13. Reload any paper into the front tray.
14. Close the front tray cover.
 Loading...