

Page 1
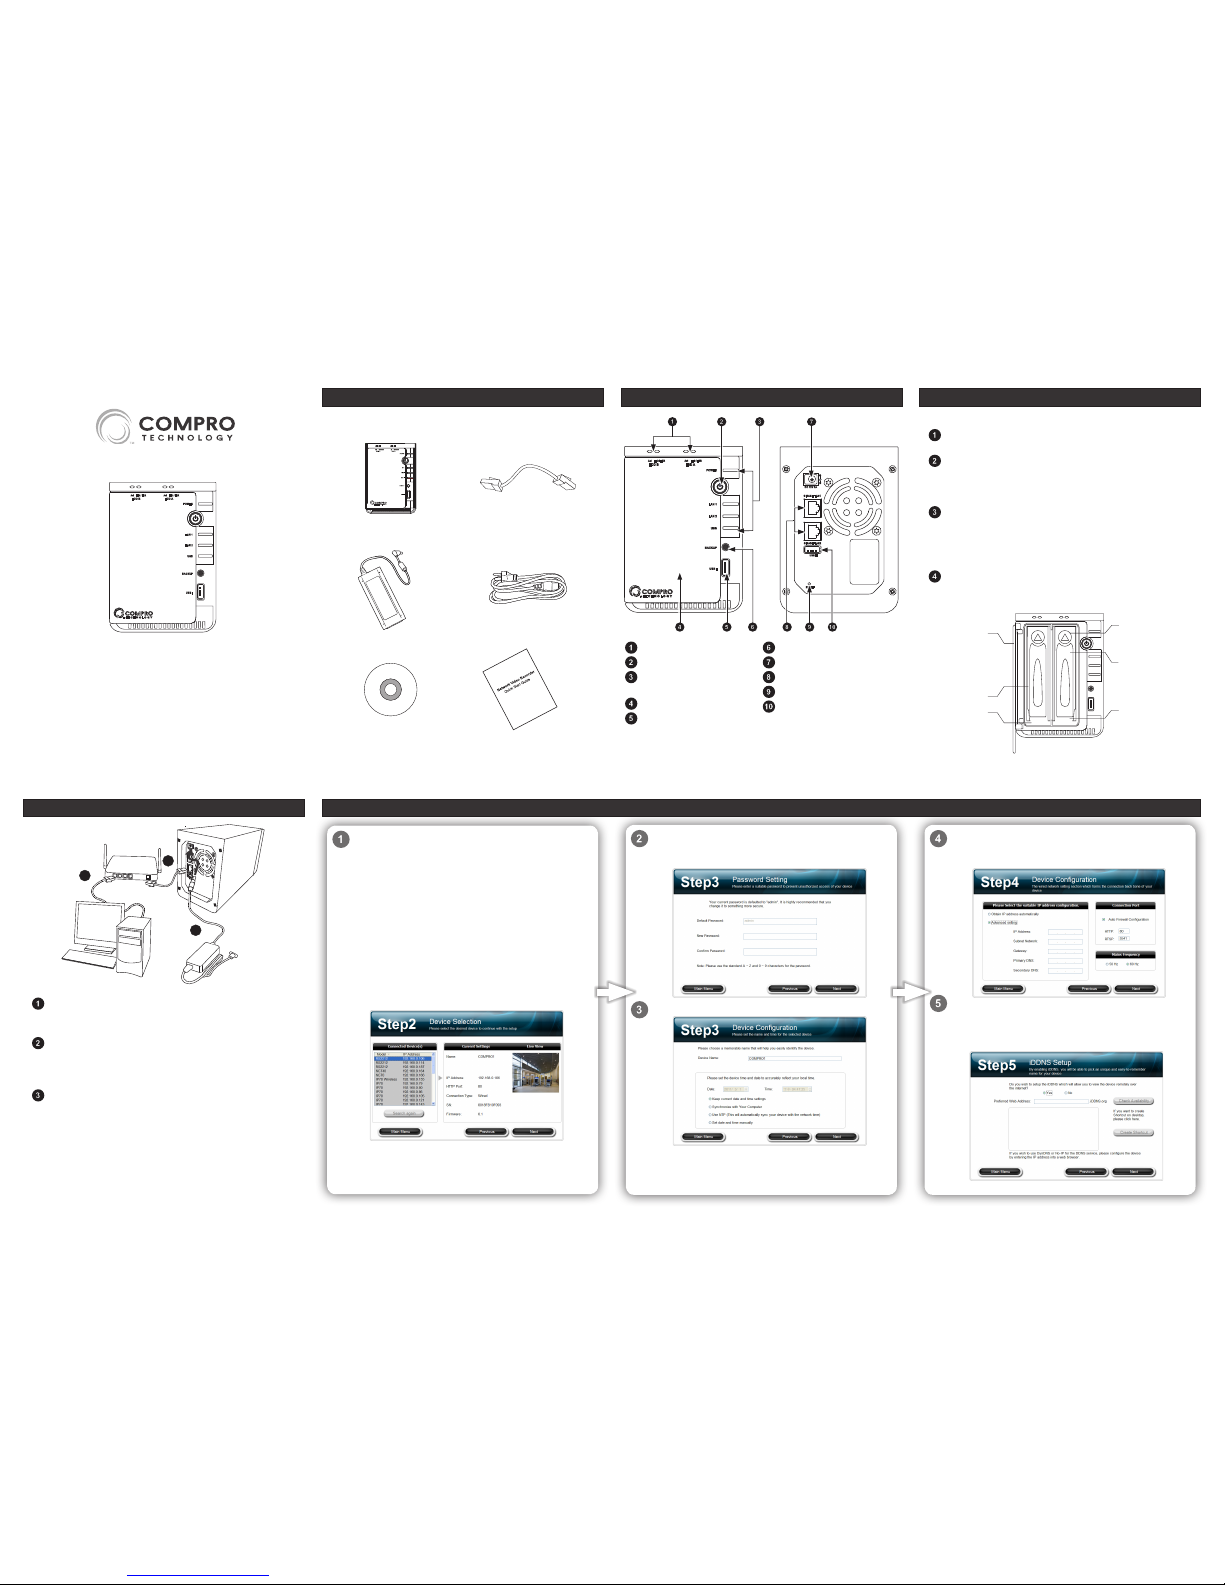
Insert the installation CD into your CD-ROM drive, and the
iWizard installer will start automatically (or manually run
the "iWizard.exe"). Afterwards, you will be asked to select the
displayed language. Then choose [Device Setup], and click on
the type of Compro surveillance product you wish to install, and
select a model from the list. Then hit [OK] and proceed with the
st step.
In step , connect the device according to the illustration. In
step , The wizard searches for all the available Compro IP
surveillance products on your LAN network. Select your device
from the list, and then the live video and device information will
be showed on the right. You may also double-click on any item
on the "Connected Device(s)" list to view its live video in web
browser. (Meanwhile, the Windows Security Alert dialog may
appear. Please click [Unblock] to unblock it from rewall. )
Note: If "Autorun" has been disabled in your computer, please
browse the contents of the installation CD and double-click the
"iWizard" executable to run the setup wizard.
We recommend you enter a new password to protect your
device. You can also click [Next] to skip this step. (The default
password is “admin”.)
Please check the device name and its date and time setting.
Choose to obtain IP address automatically (DHCP) or manually
congure IP address. Also congure your connection port and
local power line frequency here.
If you want to use iDDNS service, please click [Yes] and input
your desired address name. Then press [Check Availability]
button to check if the entered address has been used. Refer to
the user manual for the detailed information on Compro iDDNS.
Package Contents
Please check the package contents. If anything is missing, please don’t
hesitate to contact your local distributor.
Network video recorder
(HDD not included)
RJ- LAN cable
Power adaptor (DCV) Power cord
Network Video Recorder
Installation CD Quick installation guide
Installing Hard Disk Drive
Follow the steps below to install a new hard drive.
Power o the NVR. Open then front lid, and then push the hard
drive release button to release the lever from its locked position.
Pull the lever slightly outward, and gently pull the hard drive
tray out. Then align the mounting holes on the hard drive to
match the hard drive tray, and use screws to fasten the hard
drive to the tray.
Slide the hard drive tray into the drive bay. Then gently push
the hard drive tray to ensure a secure connection between
the drive connector and the SATA connector inside the NVR.
Finally, push the lever to to its locked position and close the
front lid.
To install a second hard disk drive, repeate the previous steps.
If you intend to use RAID , it is recommended to install two
identical hard drives to avoid data incompatibility.
HDD Release
Button
Lever
Drive Bay 1
Front Lid
Drive Bay 2
HDD Tray
Note: When intending to install a single hard disk drive into the
NVR system, please install it in the primary drive bay (HDD A).
Connecting the Cables
1
2
3
LAN cable from PC to hub/router: If your LAN cable from PC has
been connected to the Cable/ADSL modem, please re-connect it
to the LAN port of your hub/router.
LAN cable from NVR to hub/router: Use the bundled RJ- LAN
cable to connect the 2nd LAN port of the NVR to the LAN port of
your hub/router. The number LAN port, for the time being, is not
used by default.
Power: Attach the power adaptor to the NVR's power connector
located at its rear panel. Then connect the power plug to a power
outlet.
Note: This NVR supports UPS devices through its rear USB port.
To use the UPS, connect the USB cable from your UPS to the USB
port on the NVR. Then connect the power cord from your UPS to
a power outlet, and attach the NVR's power adaptor and connect
the power plug to your UPS.
Initial Software Setup
Hardware Layout
Drive status indicators
Power button
Power/LAN/USB status
indicator
Front lid
USB port
One-touch backup button
Power adaptor port
Gigabit LAN ports
Reset button
USB port
Note:
For the time being, only LAN port is available for use.
RS-2208
RS-2212
Network Video Recorder
Quick Installation Guide
Page 2
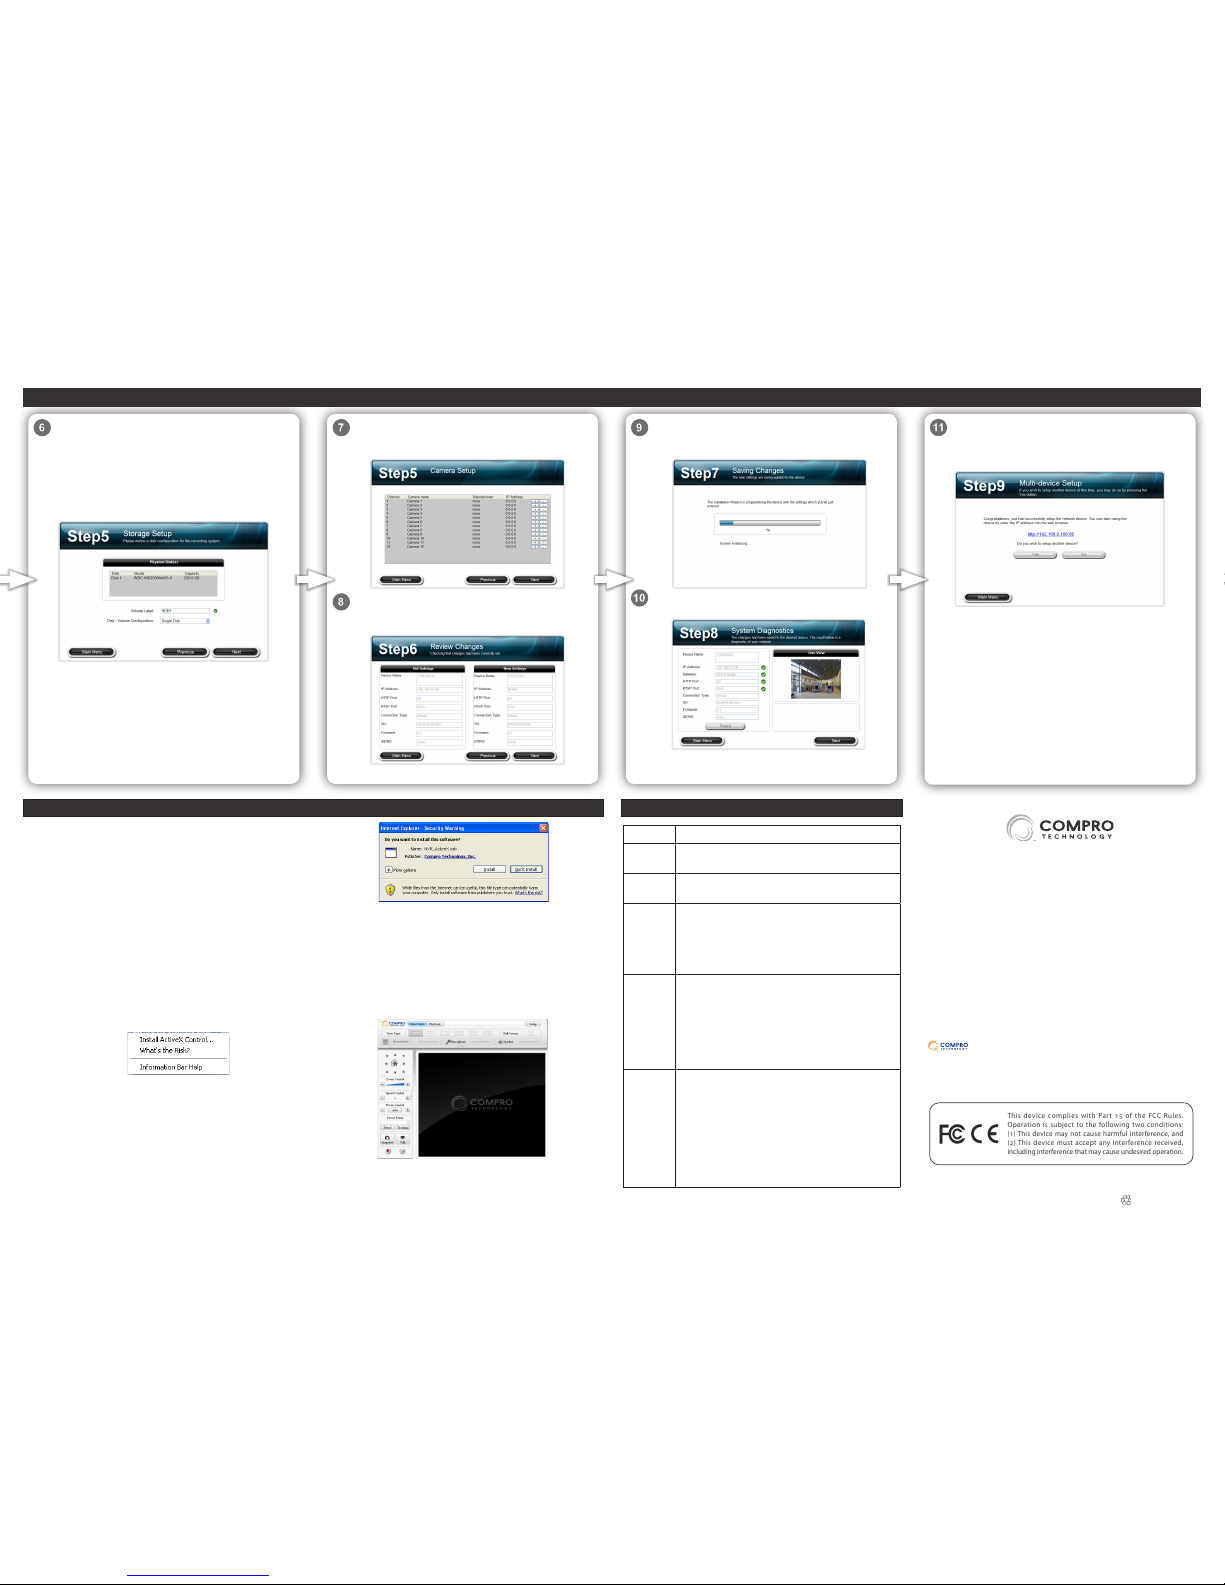
Set up your camera channels by clicking the plus sign icon
to launch Camera setup wizard. Click the minus sign icon to
remove a camera from the list.
Here it displays the old and new settings. When ready, click
[Next] to continue. Click [Previous] if you wish to change
settings you've made so far.
Select your volume configuration and enter the volume
name. You can also choose to create a RAID-, RAID-, or
JBOD disk volume provided that you have installed more
than one hard disk drive. When ready, click [Next], and then a
confirmation dialog box appears. Click [Yes] to proceed. (The
volume will be formatted later). Choose "Unassign" for "volume
conguration" if you wish to set up your storage device later via
the web interface.
Note: When creating a RAID- or RAID- disk volume, make
sure you use two individual disks of identical or similar capacity.
Otherwise, you won't be able to use all the available space on
your hard disk drive (that has more capacity than the other one).
The iWizard will load the new settings into your device.
Please wait patiently and DO NOT interrupt the process. (The
disk formatting process may take a while).
The iWizard runs system diagnosis based on your network
settings and will alert you for inappropriate settings.
You can click the link on the screen to directly access your
device on your web browser. If you want to set up another
device from scratch, click [Yes]. Click [No] to proceed with the
next step to install ComproView.
Compro Technical Support Information
Before you request technical support, please check the troubleshooting
section in the user manual. You may fill out the online form (www.
comprousa.com/feedback/) or directly email to [email protected].
Compro Technology, Inc.
www.comprosecurity.com | Tel. +886 2 2918 0169 | Fax +886 2 2915 2389
3F, No.12, Alley 6, Lane 45, Pao Shin Road, Hsintien District, New Taipei City
231, Taiwan, R.O.C.
© 2011 Compro Technology, Inc. All rights reserved.
No part of this document may be copied or reproduced in any form or by
any means without the prior written consent of Compro Technology, Inc.
Compro Technology reserves the right to make revisions to this publication
without obligation to notify any person or entity of any such changes.
Compro Technology is the registered logo of Compro
Technology, Inc. All other company and product names mentioned in this
document are registered trademarks of the respective companies.
P/N: 3GA0310716
This device complies with Part 15 of the FCC Rules.
Operation is subject to the following two conditions:
(1) This device may not cause harmful interference, and
(2) This device must accept any interference received,
including interference that may cause undesired operation.
Accessing the NVR via Internet Explorer
Now you can log in to your NVR on Internet Explorer. To do so, rst you
need to know the current IP address of your NVR, assuming the NVR
and your PC have been connected to your LAN network or the Internet.
Compro recommends using the iWizard tool to scan for your NVR on
the network. The IP address is revealed in the search result.
Having determined the NVR’s IP address, you may now:
1. Open the Internet Explorer on your Windows system.
2. Enter the NVR's IP address in the address bar. (e.g. ...)
3. An "Enter Network Password" window that requests the user name
and password will appear; enter your user name and password (both
are "admin" by default) and hit OK.’
4. After valid user name and password are entered, Internet Explorer
will prompt the installation of NVR software from 'Compro
Technology, Inc.’
5. Click on the warning message and choose to install the ActiveX.
6. And then the reconrmation dialog will appear on the screen. Please
press [Install] to install the program.
7. Meanwhile, the Windows Security Alert dialog box may pop up.
Please click [Unblock] to unblock it from rewall.
8. Afterwards, Internet Explorer may pop up a Security Warning dialog
box asking "Do you want to run this ActiveX control." Please hit [Run]
twice to run both the "Compro NVR LiveView ActiveX" and "Compro
NVR Remote Playback ActiveX."
9. Now you have successfully logged in and can start monitoring and
managing your NVR on the Internet Explorer.
LED Indication
Power
(Green)
• Green – NVR is powered on.
LAN
(Not used)
• N/A
LAN
(Green/
Red)
• Green – Successfully obtained IP address via DHCP
mode.
• Red – NVR is unable to obtain IP address; when using
static IP or PPPoE, it indicates a failure in network
connection test.
USB
(Green/
Red)
• Green – Successfully mounted a USB storage device;
this indicator starts blinking when the NVR is backing
up data; when data backup completes, the indicator
goes o.
• Red – Failed to mount a USB storage device; Data
backup failed (due to insufficient disk space or
otherwise).
HDD A/B
(Green/
Red/Blue)
Link / ERR:
• Green – HDD is installed and mounted successfully.
• Red – HDD is installed but unsuccessfully mounted
(possiblly caused by an unformatted disk or
unsupported disk format).
Act:
• Blue – This indicator ashes in blue when the HDD is
being accessed.
LED Status Indicators
Initial Software Setup
 Loading...