

Page 1

b
COMPAQ IPAQ POCKET PC
H3800 SERIES
GETTING STARTED GUIDE
Title.fm Page i Thursday, August 16, 2001 1:44 PM
Page 2

ii
NOTICE
The information in this d ocument is
subject to change without notice.
COMPAQ COMPUTER CORPORATION SHALL NOT BE LIABLE FOR
TECHNICAL OR EDITORIAL
ERRORS OR OMISSIONS CONTAINED HEREIN; NOR FOR INCIDENTAL OR CONSEQUENTIAL
DAMAGES RESULTING FROM THE
FURNISHING, PERFORMANCE, OR
USE OF THIS MATERIAL.
This document contains information protected by co pyright. No part
of this document may be photocopied or reproduced in any form
without prior written consent from
Compaq Computer Corporation.
© 2001 Compaq Computer Corporation.
Compaq, the Compaq logo, and
iPAQ are trademarks of Compaq
Information Technologies Group,
L.P. in the US and other countries.
Microsoft, MS, ActiveSync, Windows, Windows NT, and the Windows logo are trademarks of
Microsoft Corporation. Intel is a
trademark of Intel Corpora tion. All
other product names mentioned
herein may be trademarks of their
respective companies. Compaq
shall not be liable for technical or
editorial errors or omissions contained herein. The information in
this document is pr ovided “as is”
without warranty of any kind and is
subject to change without notice.
The warranties for Compaq products are set forth in the express
limited warranty statement acco mpanying such products. Nothing
herein should be cons trued as constituting an additional warranty.
Compaq iPAQ Pocket PC H3800
Series Getting Started Guide
First Edition September 2001
Part Number 254638-001
Legal.fm Page ii Thursday, August 16, 2001 1:45 PM
Page 3

iii
Contents
Getting Acquainted . . . . . . . . . . . . . . . .1
What Is in the Box? . . . . . . . . . . . . . . . . . . . . 1
Register . . . . . . . . . . . . . . . . . . . . . . . . . . . . 5
Set Up Your Compaq iPAQ Pocket PC . . . . . . .5
Set Up Synchronization . . . . . . . . . . . . . . . . .8
Navigate through the Interface . . . . . . . . . . . 13
Enter Information. . . . . . . . . . . . . . . . . . . . .21
Communicating . . . . . . . . . . . . . . . . . .31
Work with Contacts. . . . . . . . . . . . . . . . . . .31
Scheduling . . . . . . . . . . . . . . . . . . . . . .34
Use the Today Screen . . . . . . . . . . . . . . . . .34
Use the Calendar. . . . . . . . . . . . . . . . . . . . .38
Use Tasks . . . . . . . . . . . . . . . . . . . . . . . . . . 40
Using Software . . . . . . . . . . . . . . . . . . 43
Use Microsoft Reader . . . . . . . . . . . . . . . . . 43
Regulatory Notices . . . . . . . . . . . . . . . 45
Federal Communications Commission Notice 45
Canadian Notice. . . . . . . . . . . . . . . . . . . . . 46
Avis Canadien . . . . . . . . . . . . . . . . . . . . . . 46
European Union Notice . . . . . . . . . . . . . . . . 46
Battery Warning . . . . . . . . . . . . . . . . . . . . . 47
Airline Travel Notice . . . . . . . . . . . . . . . . . . 47
Power Cords . . . . . . . . . . . . . . . . . . . . . . . 47
Hardware Specifications . . . . . . . . . . 49
System Specifications. . . . . . . . . . . . . . . . . 49
Physical Specifications . . . . . . . . . . . . . . . . 50
Operating Environment . . . . . . . . . . . . . . . . 51
GS 5x3TOC.fm Page iii Thursday, August 16, 2001 1:46 PM
Page 4

iv
Routine Care and Battery Guidelines . .52
Routine Care. . . . . . . . . . . . . . . . . . . . . . . . 52
Battery Guidelines . . . . . . . . . . . . . . . . . . . .52
GS 5x3TOC.fm Page iv Thursday, August 16, 2001 1:46 PM
Page 5

1
What Is in the Box?
Getting Acquainted
To use your Compaq iPAQ™
Pocket PC H3800 series most
effectively, start by learning how to
• register your Compaq iPAQ
Pocket PC
• set up your Compaq iPAQ
Pocket PC
• set up synchronization
• navigate through the interface
• enter information
Because your Compaq iPAQ
Pocket PC uses some power to
maintain files in RAM and the
clock, you need to recharge the
battery regularly. Keep the Compaq
iPAQ Pocket PC connected to the
universal cradle or the AC adapter
while you are at your desk. The
best policy is to keep the Compaq
iPAQ Pocket PC connected to your
computer when working at yo ur
desk and carry your AC adapter
and DC adapter plug with you
when traveling.
Charge your Compaq iPAQ
Pocket PC for three hours before
you first use it.
CAUTION: Because most of
the applications and data you
install on your Compaq iPAQ
Pocket PC are held in memor y,
you will need to rein stall them if
the battery completely discharges.
What Is in the Box?
Your Compaq iPAQ Pocket PC
ships with
• the Getting Started Guide
• Compaq iPAQ Pocket PC Companion CD-ROM
– Microsoft® ActiveSync 3.5
software on the Companion
CD-ROM
– Add-on software and
applications
– detailed eBook guide, which
you can copy to your
Compaq iPAQ Pocket PC
01 Getting Acquainted.fm Page 1 Thursday, August 16, 2001 1:46 PM
Page 6

2
What Is in the Box?
– interactive Flash guide
available on the CD-ROM
– comprehensive printable
reference guide
• a universal cradle for both USB
and serial connections
• a protective cover pack
•an extra stylus
• an AC adapter
• a rubber retainer
• a DC adapter plug
If items are missing, contact Customer Support at the numbers provided in the Worldwide Telephone
Numbers booklet.
01 Getting Acquainted.fm Page 2 Thursday, August 16, 2001 1:46 PM
Page 7

3
What Is in the Box?
Front Panel
1 Stylus: push to eject, push to lock
2 Power Indicator: amber flash = charging;
amber solid = charged; green = alarm
3 Power Button
4 Speaker: alarms, recording s
5 Color Display
6 Programmable Applic ation Buttons 1-4 (left
to right): naviga te to applications, default:
button 1 is Calendar, button 2 is Contacts,
button 3 is Inbox, button 4 is iPAQ Task
7 Navigation Button: scroll through a list
8 Record/Applica tion Button 5
9 Light sensor: adjusts backlight
- Stereo Headphone Jack
q Active Bluetooth Indicator: flashes when
Bluetooth radio is on (Blu etooth models only)
w Microphone
01 Getting Acquainted.fm Page 3 Thursday, August 16, 2001 1:46 PM
Page 8

4
What Is in the Box?
Top Panel
1 Stereo Headphone Jack
2 Microphone
3 Hidden Infrared Port: beams information
with other mobile devices
4 Stylus: push to eject, push to lock
5 Secure Digital (SD) Expansion Slot: holds
a Secure Digital (SD) card
01 Getting Acquainted.fm Page 4 Thursday, August 16, 2001 1:46 PM
Page 9

5
Register
Register
You can receive the latest information on your Compaq iPAQ
Pocket PC, as well as special
offers on Compaq iPAQ Pocket PC
accessories and software, by registering with Compaq online at
http://www.compaq.com/register
or by completing and ma iling the
Register Now* card included in the
shipping box.
*Not available in all coun tries
Set Up Your Compaq
iPAQ Pocket PC
Set up your Compaq iPAQ
Pocket PC by first charging it with
the AC adapter or the universal
cradle. Use the universal cradle to
Bottom Panel
1 Charging/Comm unications Port: connec t
to universal cradle, USB, or ser ial cable
2 Unit Reset Switch: reset with stylus
3 Expansion Pack C onnector: connect to
an optional Expansion Pack
01 Getting Acquainted.fm Page 5 Thursday, August 16, 2001 1:46 PM
Page 10

6
Set Up Your Compaq iPAQ Pocket PC
synchronize your Compaq iPAQ
Pocket PC with your computer.
CAUTION: For synchronization
to work properly, install
Microsoft ActiveSync 3.5 before
you first connect your Compaq
iPAQ Pocket PC to your computer.
Because your Compaq iPAQ
Pocket PC uses some power to
maintain RAM and the clock, you
need to recharge the battery regu larly. Keep the Compaq iPAQ
Pocket PC connected to the universal cradle or the AC ad apter
while you are at your desk. The
best policy is to keep the Compaq
iPAQ Pocket PC connected to your
computer when working at your
desk and carry your AC adapter
with you when traveling.
Charge your Compaq iPAQ
Pocket PC for three hours before
you first use it.
CAUTION: Some of the applications on your Compaq iPAQ
Pocket PC are held in RAM
memory, you will need to reinstall those applications if the
battery completely discharges.
Charge with the AC adapter
Charge your Compaq iPAQ
Pocket PC with the AC adapter.
Use the AC adapter to charge your
optional expansion pack, if you
have purchased o ne. For more
information about expansion
packs, see Expanding Func tionality
with Expansion Pa cks in the eBook
guide, the printable reference
guide, or the Flash guide available
on the CD-ROM.
Charge your Compaq iPAQ
Pocket PC for three hours before
you first use it.
The standard adapte r works in any
household outlet. You can also purchase one that works in yo ur car’s
cigarette lighter or a 12-v olt power
outlet.
CAUTION: Use only Compaq
recommended AC adapters.
1 Locate the AC adapter
2 Plug the AC adapter into an
outlet
01 Getting Acquainted.fm Page 6 Thursday, August 16, 2001 1:46 PM
Page 11

7
Set Up Your Compaq iPAQ Pocket PC
3 Insert the DC adapter plug
into the bottom of your Compaq iPAQ Pocket PC
4 Insert the AC adapter plug
into the DC adapter plug
5 Hold the DC adapter plug to
the AC adapter with the rubber retainer
Charge with the universal
cradle
Charge your Compaq iPAQ
Pocket PC with the universal cradle. Use the universal cradle to
• synchronize with your computer
• recharge the battery of an
optional expansion pack, if you
have purchased one (for example, recharge the battery of the
Dual-slot PC Card Expansion
Pack)
Charge your Compaq iPAQ
Pocket PC for three hours before
you first use it.
CAUTION: For synchronization
to work properly, install
Microsoft ActiveSync 3.5 before
you first connect your Compaq
01 Getting Acquainted.fm Page 7 Thursday, August 16, 2001 1:46 PM
Page 12

8
Set Up Your Compaq iPAQ Pocket PC
iPAQ Pocket PC to your computer.
1 Install Microsoft
ActiveSync 3.5
Insert the Compaq iPAQ
Pocket PC Companion CD -ROM
Follow the instructions in th e
installation wizard
For more help, click on the
Microsoft ActiveSync 3.5 Help
button during installation
2 Locate the universal cradle
3 Insert the AC adapter plug
into the DC adapter plug
4 Attach either the USB or
serial cable to your computer
If you have a Microsoft
Windows NT 4.0 operating
system on your computer, you
must use a serial cable
5 Slide the bottom of your
Compaq iPAQ Pocket PC into
the universal cradle and push
firmly
The charge light blinks when
your Compaq iPAQ Pocket P C is
recharging the battery
The charge light is solid
(non-blinking) when the battery
is fully charged.
Microsoft ActiveSync 3.5 opens
on your computer and
recognizes your Compaq iPAQ
Pocket PC
01 Getting Acquainted.fm Page 8 Thursday, August 16, 2001 1:46 PM
Page 13

9
Set Up Synchroniza tion
Set Up Synchronization
Synchronizing allows you to share
information between you r Compaq
iPAQ Pocket PC and your comput er
or your server. Please note that y ou
should set up synchronization
when you first connect your Compaq iPAQ Pocket PC to your computer.
Synchronize with your
computer
CAUTION: For synchronization
to work properly, install
Microsoft ActiveSync 3.5 before
your Compaq iPAQ Pocket PC is
connected to your computer for
the first time.
During installation,
• create partnerships, which
allow you to synchronize information with multiple computers
• select the information to synchronize with your Compaq
iPAQ Pocket PC, for example,
Contacts, Calendar, Inbox,
Tasks, Favorites, Files, Notes,
and AvantGo
1 Insert the Compaq iPAQ
Pocket PC Companion
CD-ROM
2 Follow the instructions in the
installation wizard
For more help, click on the
Microsoft ActiveSync 3.5 Help
button during installation
3 The information you select
will automatically synchro-
nize when your installation is
complete
Synchronize information
Synchronizing allow s you to share
information between your Compaq
iPAQ Pocket PC and your computer. Please note that you should
have set up synchronization when
you first connected your Compaq
iPAQ Pocket PC to your computer.
By default, Microsoft
ActiveSync 3.5 continuously synchronizes with information on your
computer automatically. Manually
synchronize infor mation with your
Compaq iPAQ Pocket PC at any
time you are connected to your
computer.
01 Getting Acquainted.fm Page 9 Thursday, August 16, 2001 1:46 PM
Page 14

10
Set Up Synchronization
1 Insert your Compaq iPAQ
Pocket PC into the universa l
cradle or cable
2 From your computer, open
Microsoft ActiveSync 3.5
From the Start menu, click
Programs and click Microsoft
ActiveSync 3.5
3 Click Sync
Turn on the screen
When you turn on the screen of
your Compaq iPAQ Pocket PC for
the first time, you are guided
through Welcome screens. Follow
the instructions to
• realign your screen
• learn about the styl us
• learn about the po p-up menus
• select your time zone
1 Press the Power button to
turn on the screen
2 Follow the instructions on the
Welcome screens
01 Getting Acquainted.fm Page 10 Thursday, August 16, 2001 1:46 PM
Page 15

11
Set Up Synchroniza tion
Change the backlight
settings
1 From the Start menu, tap
Settings
2 Tap Sys te m
3 Tap Backlight
4 Select the backlight settings
On the Battery Power tab,
select when to use the backl ight
on battery power
On the External Power tab,
select when to use the backl ight
on external power
On the Brightness tab, select
the level of brightness for the
backlight
Hint: Slide the bar to the lowest
level to conserve the most
power
01 Getting Acquainted.fm Page 11 Thursday, August 16, 2001 1:46 PM
Page 16

12
Set Up Synchronization
Tips
I cannot see anything on the
screen
1 Make sure the screen is on
Press the power button
2 Make sure the Compaq iPAQ
Pocket PC is connected to
the AC adapter and the universal cradle
Plug the AC adapter into an
outlet
Insert the DC adapter p lug into
the universal cradle
Insert the AC adapter plug into
the DC adapter plug
I cannot keep my battery
charged
Always keep the Compaq iPAQ
Pocket PC connecte d to a universal
cradle or AC adapter when you are
not using it
In the backlight settings slide th e
bar to the lowest level to conser ve
the most power
I do not see the charge light
blinking when my Compaq
iPAQ Pocket PC is connected to
the universal cradle
1 Make sure the universal cra-
dle is plugged into an outlet
2 Make sure the bottom of your
Compaq iPAQ Pocket PC is
pushed firmly into the universal cradle
3 Determine if the unit is fully
charged. The charge light
does not blink when the unit
is fully charged.
From the Start menu, tap
Settings
Tap Sys te m
Tap Pow er
The backlight keeps turning off
The backlight turns off to conserve
power
On the Battery Power tab, change
the time the backlight stays on and
choose to have the backlight turn
on when you touch the scr een or
push a button
01 Getting Acquainted.fm Page 12 Thursday, August 16, 2001 1:46 PM
Page 17

13
Navigate through the Interface
My Compaq iPAQ Pocket PC is
not responding or an
application hangs
Perform a soft reset of your Compaq iPAQ Pocket PC
1 Insert the stylus into the unit
reset switch at the bottom of
your Compaq iPAQ Pocket PC
2 Press the switch for 1 second
I forgot my password
Perform a hard reset of your Compaq iPAQ Pocket PC
CAUTION: Because most of
the applications and data you
install on your Compaq iPAQ
Pocket PC are held in memory,
you will need to rein stall them if
you perform a hard reset.
1 Press and hold the two out-
side application buttons
2 Insert the stylus into the unit
reset switch at the bottom of
your Compaq iPAQ Pocket PC
3 Press the switch for 5 sec-
onds
4 To reactivate your Compaq
iPAQ Pocket PC, insert the
stylus into the un it reset
switch and press the swi tch
for 1 second or connect your
Compaq iPAQ Pocket PC to
the AC Adapter
Navigate through the
Interface
Navigate through the Com paq iPAQ
Pocket PC interface in three ways:
•tap
•tap and hold
• press application b uttons
Tap the screen with the pointed tip
of your stylus to open applications
and make selections. For exam ple, tap the Start menu to see a list
of applications availa ble.
Tap and hold an area on the screen
to see a pop-up me nu.
Press an application button on the
front panel to quickly turn on the
screen and open your Calendar or
your Contacts or make a recording.
Realign the screen
When you turn on the screen of
your Compaq iPAQ Pocket PC for
the first time, you are guided
through the alignment process.
Realign your screen if
01 Getting Acquainted.fm Page 13 Thursday, August 16, 2001 1:46 PM
Page 18

14
Navigate through the Interface
• the Compaq iPAQ Pocket PC
does not respond accurately to
your taps
• you perform a hard reset of you r
Compaq iPAQ Pocket PC
1 From the Start menu, tap
Settings
2 Tap Sys te m
3 Tap the Screen icon
4 Tap the Align Screen button
to begin the realignment process
5 Tap the cross-hair object at
each location to realign the
screen
Be precise when you tap the
cross-hair object
6 Tap OK
Open applications
Every applicati on on your Compaq
iPAQ Pocket PC is only two taps
away from any screen. Open any
application on your Compaq iPAQ
Pocket PC from the Start menu.
Hint: Open any application by
assigning it to an application button
1 Tap Start or the Microsoft
logo at the upper left of the
01 Getting Acquainted.fm Page 14 Thursday, August 16, 2001 1:46 PM
Page 19

15
Navigate through the Interface
screen on the menu bar to
open the Start menu
Otherwise, tap the appl ication
title on the menu bar to open
the Start menu
2 Tap Programs to see the
applications on your Compaq iPAQ Pocket PC
3 Tap the application title or
icon to open it
Minimize applications
From the application you would like
to minimize, tap the x
Close applications
Applications should close automatically as you open new applications. However, if your Compaq
01 Getting Acquainted.fm Page 15 Thursday, August 16, 2001 1:46 PM
Page 20

16
Navigate through the Interface
iPAQ Pocket PC is running slowly,
manually close applica tions.
1 From the Start menu, tap
Settings
2 Tap Sy ste m
3 Tap Me mor y
4 Tap Running Programs
5 Tap Stop All to close all appli-
cations
Otherwise, select an a pplication
and tap Stop
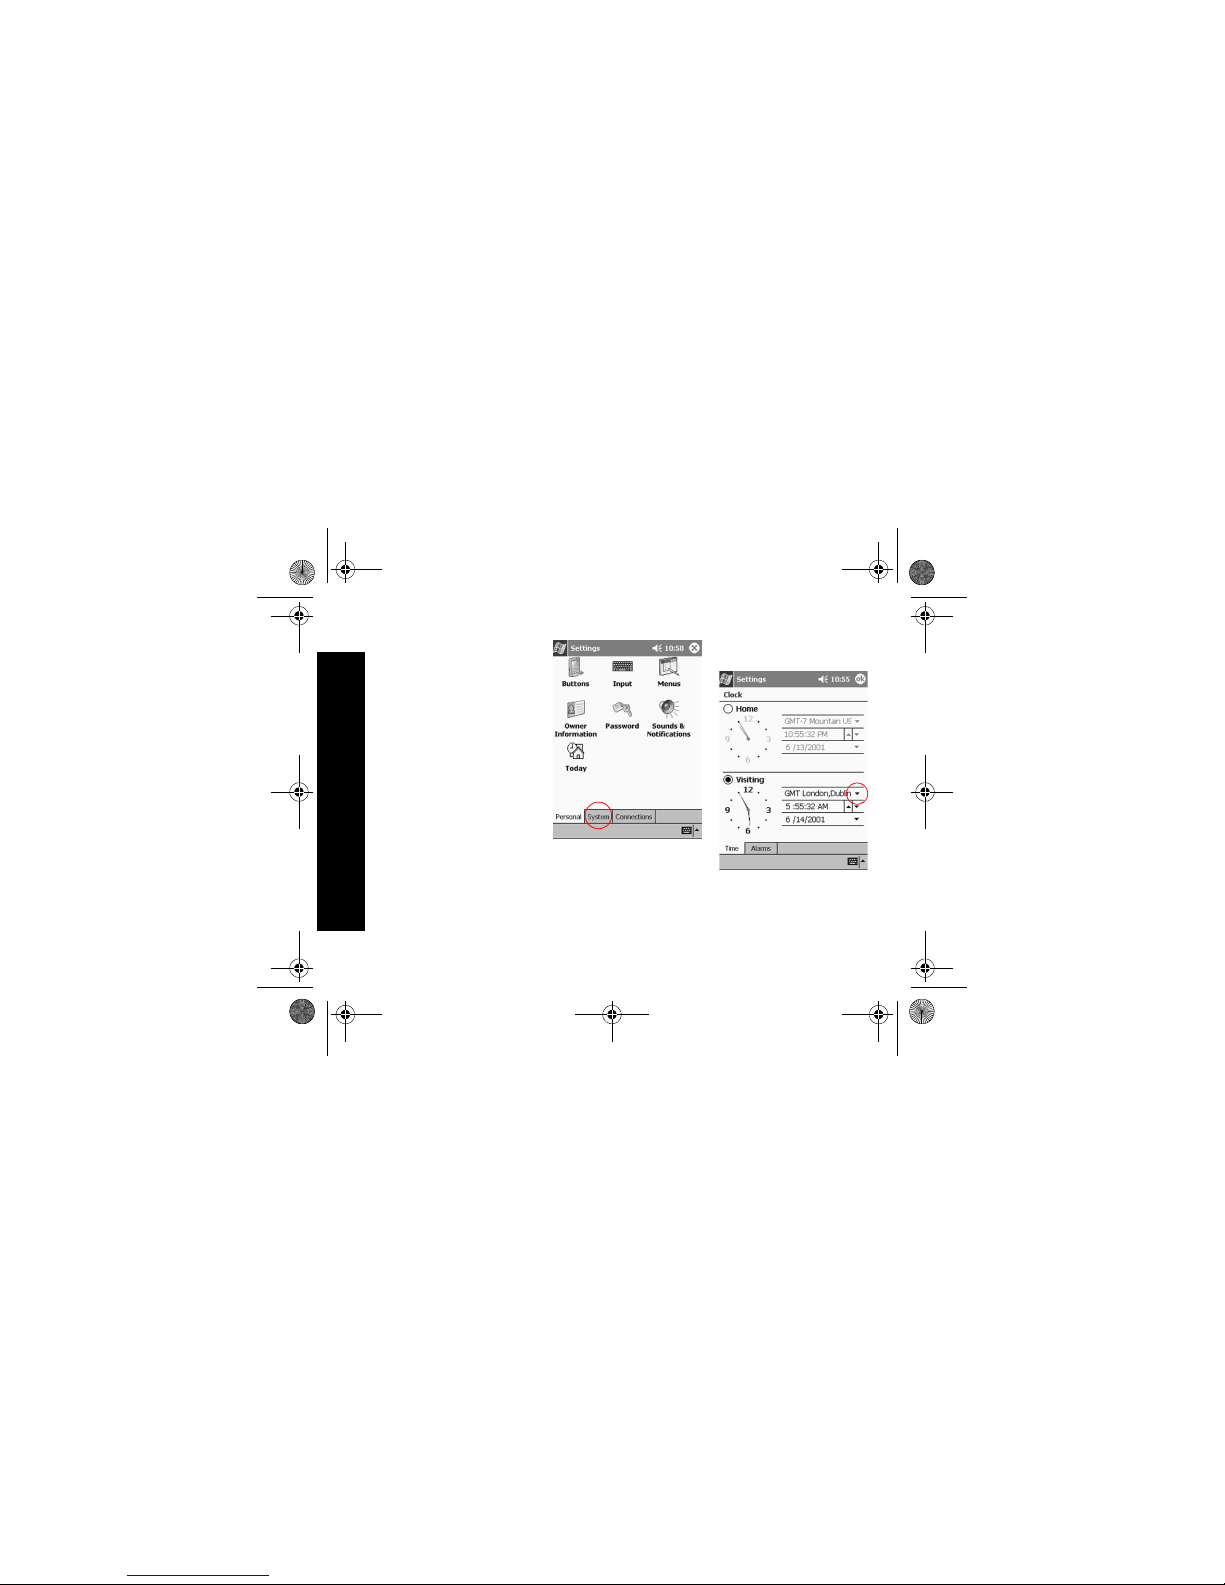
Set the time for home
When you turn on the screen of
your Compaq iPAQ Pocket PC for
the first time, you are guided
through setting the time. Set the
time again if
• the battery completely discharges
• you perform a ha rd reset of your
Compaq iPAQ Pocket PC
Hint: From the Today screen, tap
the clock icon to set the time.
1 From the Start menu, tap
Settings
01 Getting Acquainted.fm Page 16 Thursday, August 16, 2001 1:46 PM
Page 21

17
Navigate through the Interface
2 Tap Sy ste m
3 Tap Cl ock
4 Tap Ho me
5 Tap the time-zone down
arrow to select your location
and time zone
6 Tap the hour, minutes, or
seconds to select the time
you want to adjust
7 Tap the up or down arrow to
adjust the time
Otherwise, move the hands of
the clock with the stylus to
adjust the time
8 Tap AM or PM to change the
time to AM or PM
01 Getting Acquainted.fm Page 17 Thursday, August 16, 2001 1:46 PM
Page 22
18
Navigate through the Interface
9 Tap OK
10Tap Yes to save your clock
settings
Set the time for a location
you are visiting
Set the time for a location you are
visiting.
Hint: From the Today screen, tap
the clock icon to set the time.
1 From the Start menu, tap
Settings
2 Tap Sys te m
3 Tap Clo ck
4 Tap Visiting
5 Tap the time-zone down
arrow to select the location
and time zone
6 Tap the hour, minutes, or
seconds to select the time
you want to adjust
01 Getting Acquainted.fm Page 18 Thursday, August 16, 2001 1:46 PM
Page 23
19
Navigate through the Interface
7 Tap the up or down arrow to
adjust the time
Otherwise, move the hands of
the clock with the stylus to
adjust the time
8 Tap AM or PM to change the
time to AM or PM
9 Tap OK
10Tap Yes to save your clock
settings
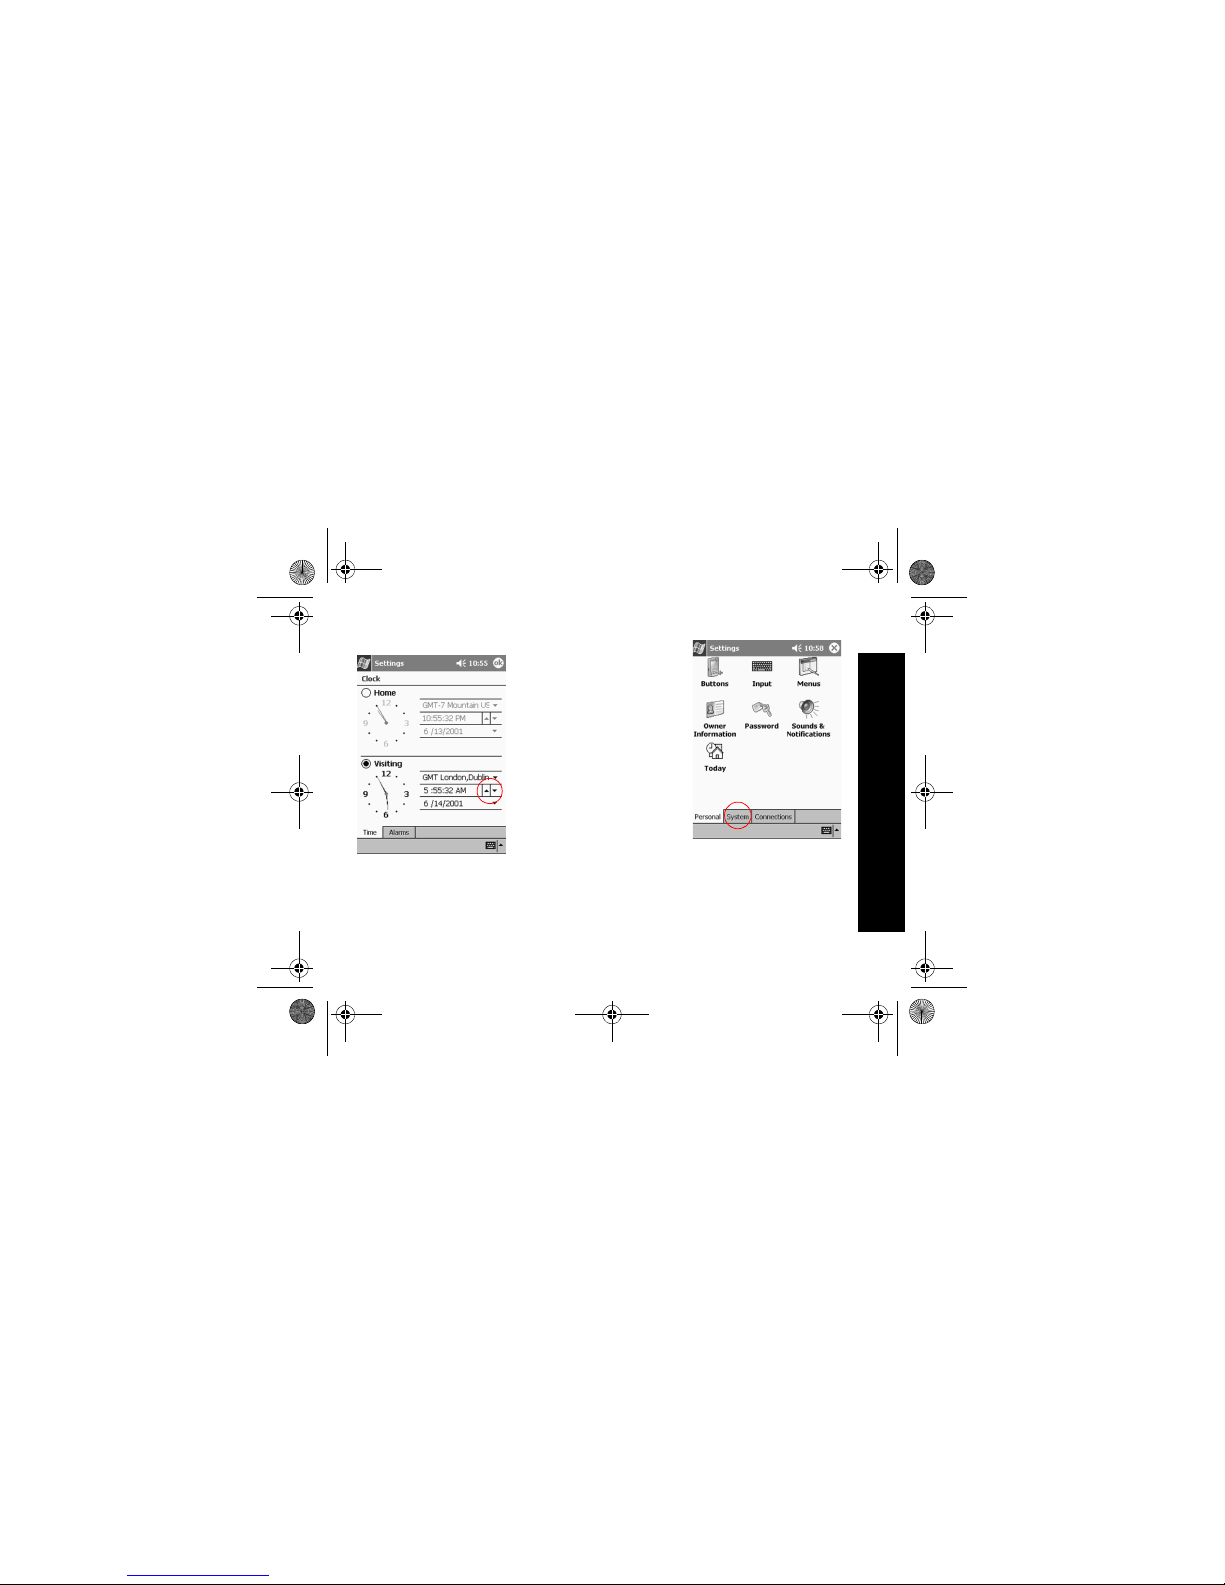
Set the date
When you turn on the screen of
your Compaq iPAQ Pocket PC for
the first time, set the date. Set the
date again if
• the battery di scharges completely
• you perform a hard reset of your
Compaq iPAQ Pocket PC
Hint: From the Today screen, tap
the clock icon to set the date.
1 From the Start menu, tap
Settings
2 Tap System
3 Tap Cl ock
01 Getting Acquainted.fm Page 19 Thursday, August 16, 2001 1:46 PM
Page 24
20
Navigate through the Interface
4 Tap the date down arrow to
see a calendar
5 Tap the left or right arrow to
move backward or forward
through the calendar
6 Tap a day to select the date
7 Tap OK
8 Tap Yes to save your date
settings
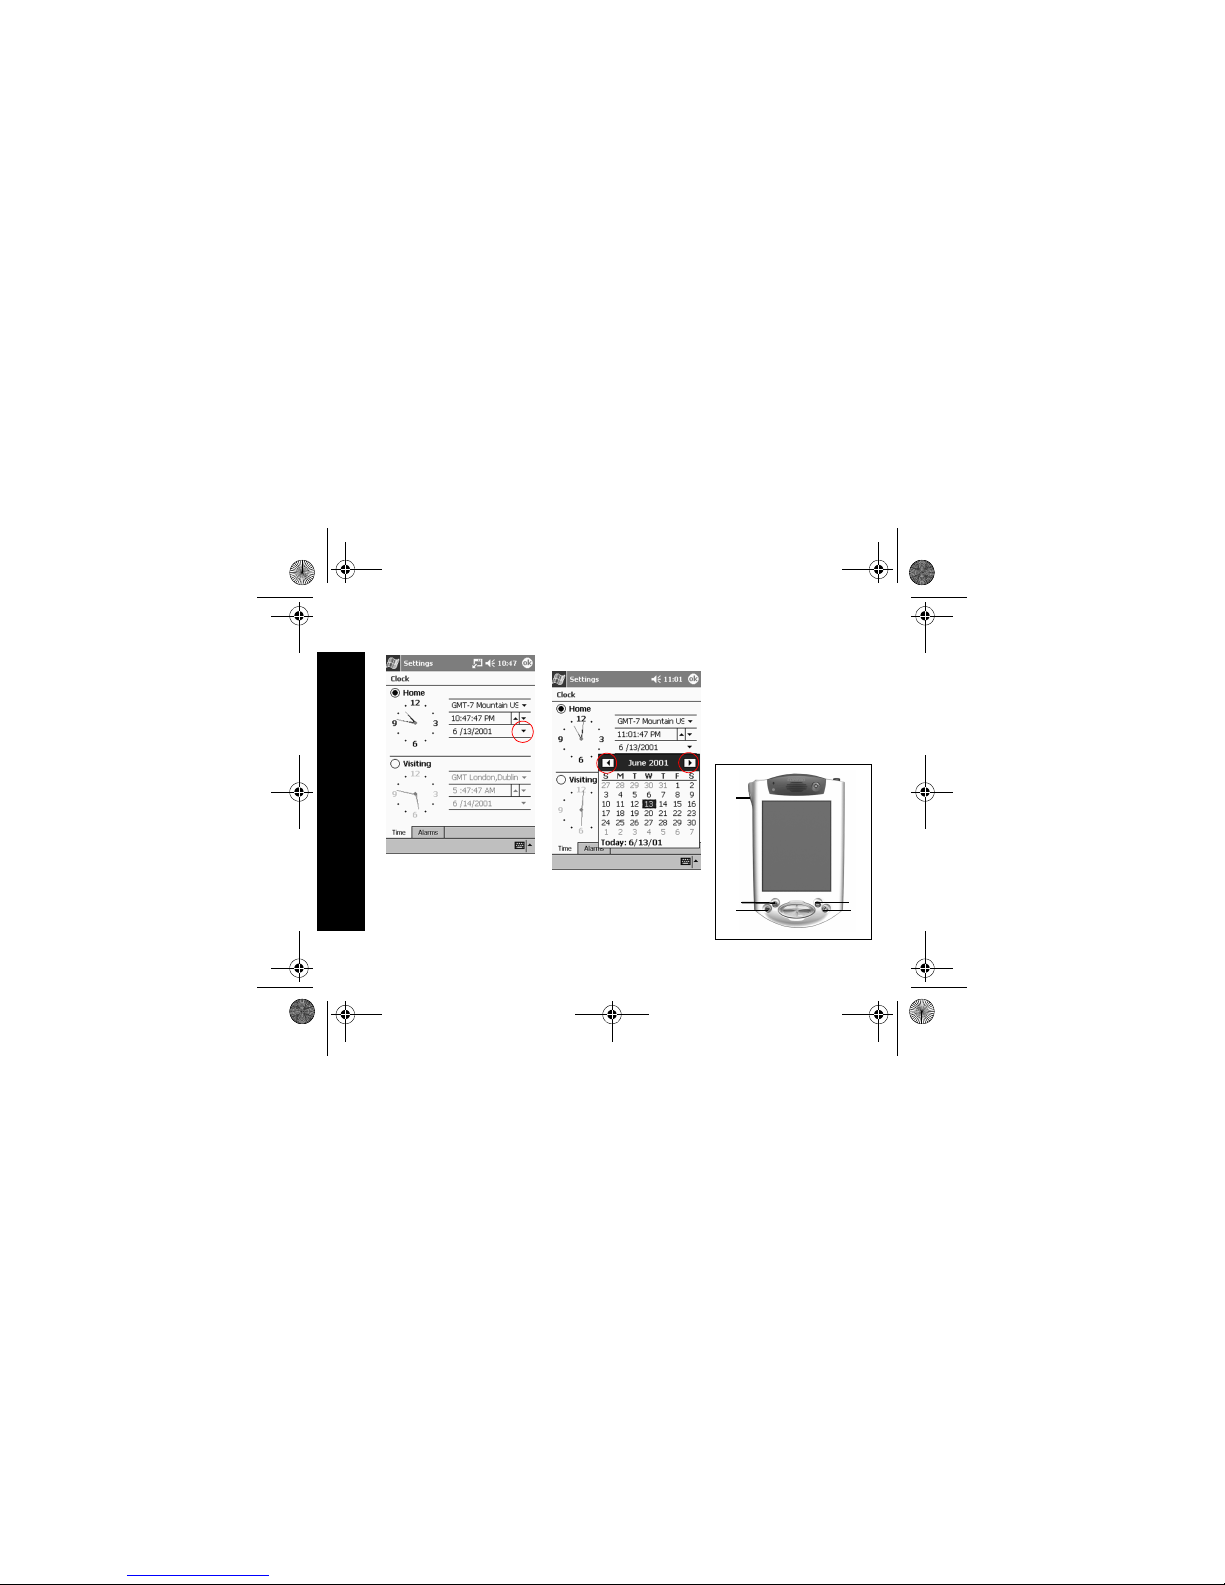
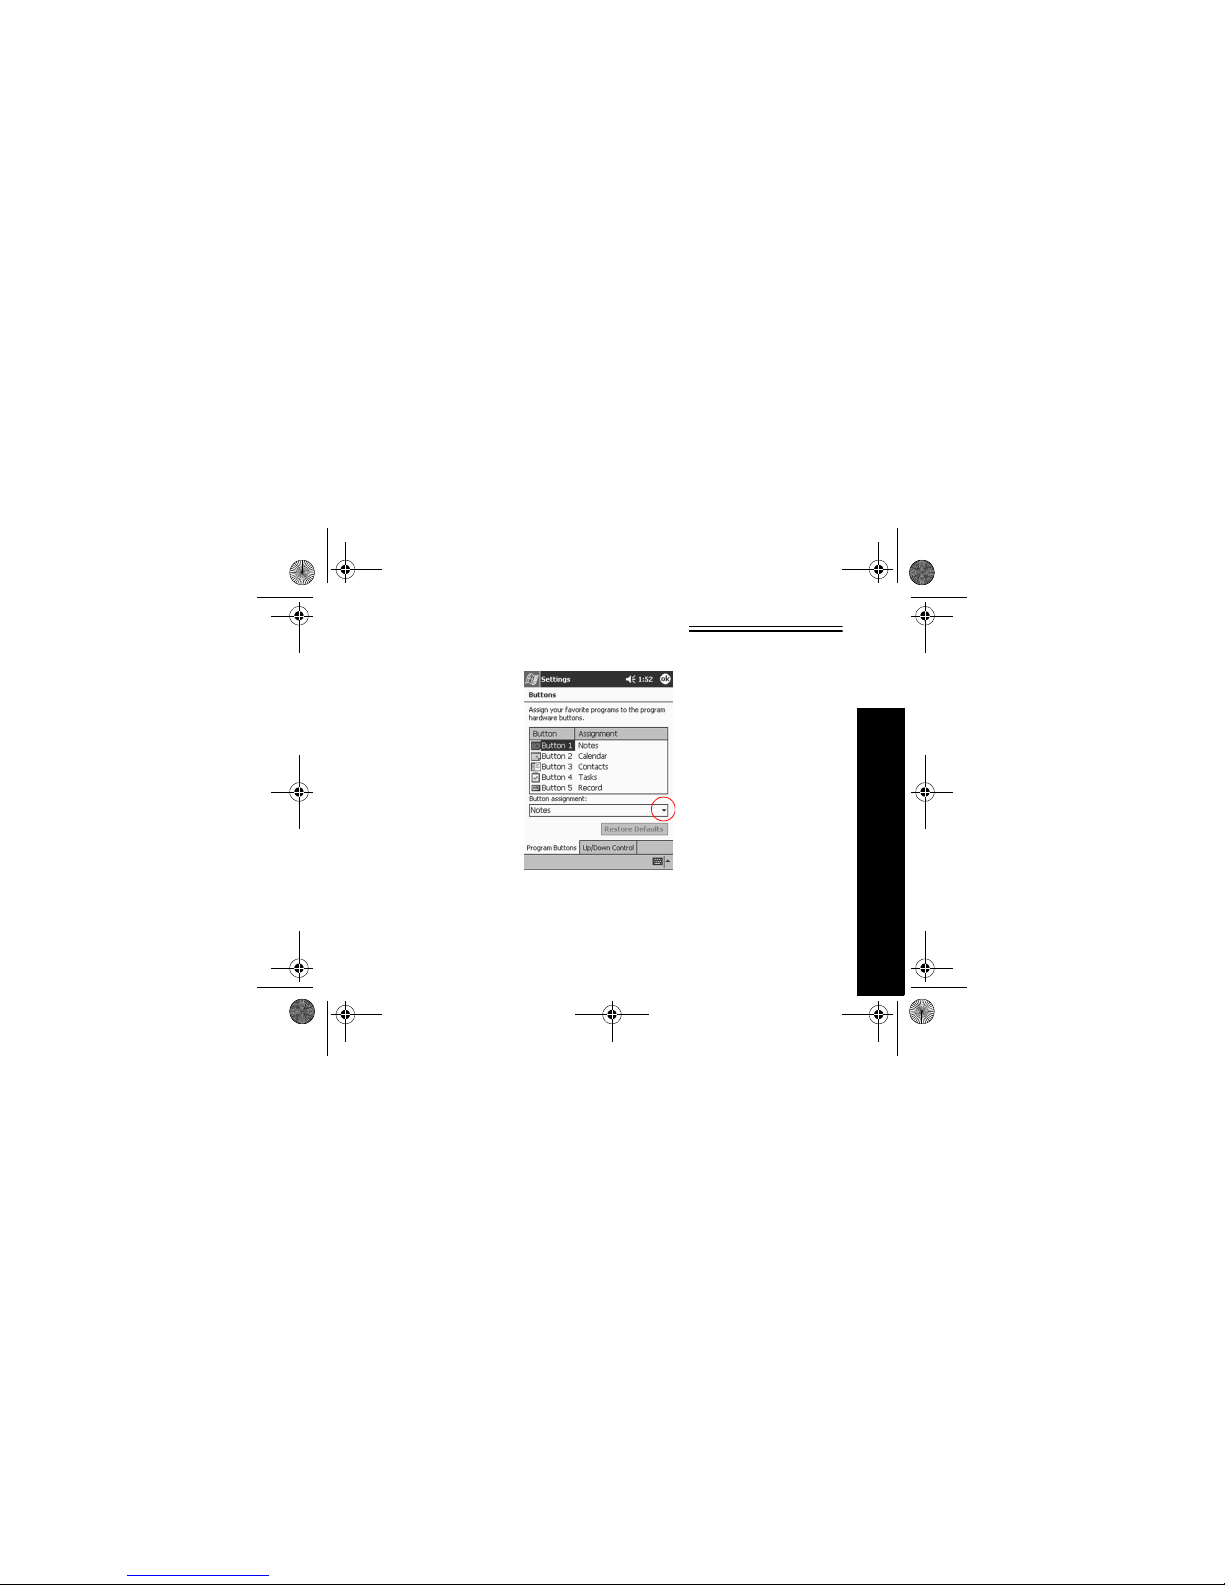
Customize the application
buttons
By pressing an application button
on the front panel, quickly open
your Calendar or your Contacts or
make a recording.
Customize the front panel buttons
to open other applications.
5
1
2
3
4
01 Getting Acquainted.fm Page 20 Thursday, August 16, 2001 1:46 PM
Page 25
21
Enter Information
1 From the Start menu, tap
Settings
2 Tap Bu tto ns
3 Tap the button you want to
change
4 Tap the button-assignment
down arrow to see a list of
applications
5 Tap an application
6 Tap OK to assign the applica-
tion to the button
Tips
I want to restore the default
assignments to the application
buttons
1 From the Start menu, tap
Settings
2 Tap Bu tto ns
3 Tap Restore Defaults
4 Tap OK
Enter Information
Enter letters, symbols, and numbers on the Compaq iPAQ
Pocket PC screen by
• tapping the Keyboard
• writing with the stylus and using
the Letter Recognizer to create
text
01 Getting Acquainted.fm Page 21 Thursday, August 16, 2001 1:46 PM
Page 26
22
Enter Information
• writing with the stylus and using
the Transcriber to create text
• writing with the stylus and using
the Block Recognizer to create
text
• drawing and writing with the
stylus
Tap the Keyboard, write with the
stylus and the Letter Reco gnizer,
write with the stylus and the Transcriber, and write with the stylus
and the Block Recognizer in any
application. Use the stylus and
draw and write on the screen in the
Notes application and from any
Notes tab in the Calendar, Contacts, and Tasks applications.
Please note that as you type or
write, the Compaq iPAQ Pocket PC
suggests words for you in a box
above the Keyboard, Letter Recog -
nizer, or Block Recognizer but not
in the Transcriber. Change when
the suggestions occur (for example, decide how many letters you
must enter before the Letter Recognizer will make suggestio ns) and
how many words are suggested.
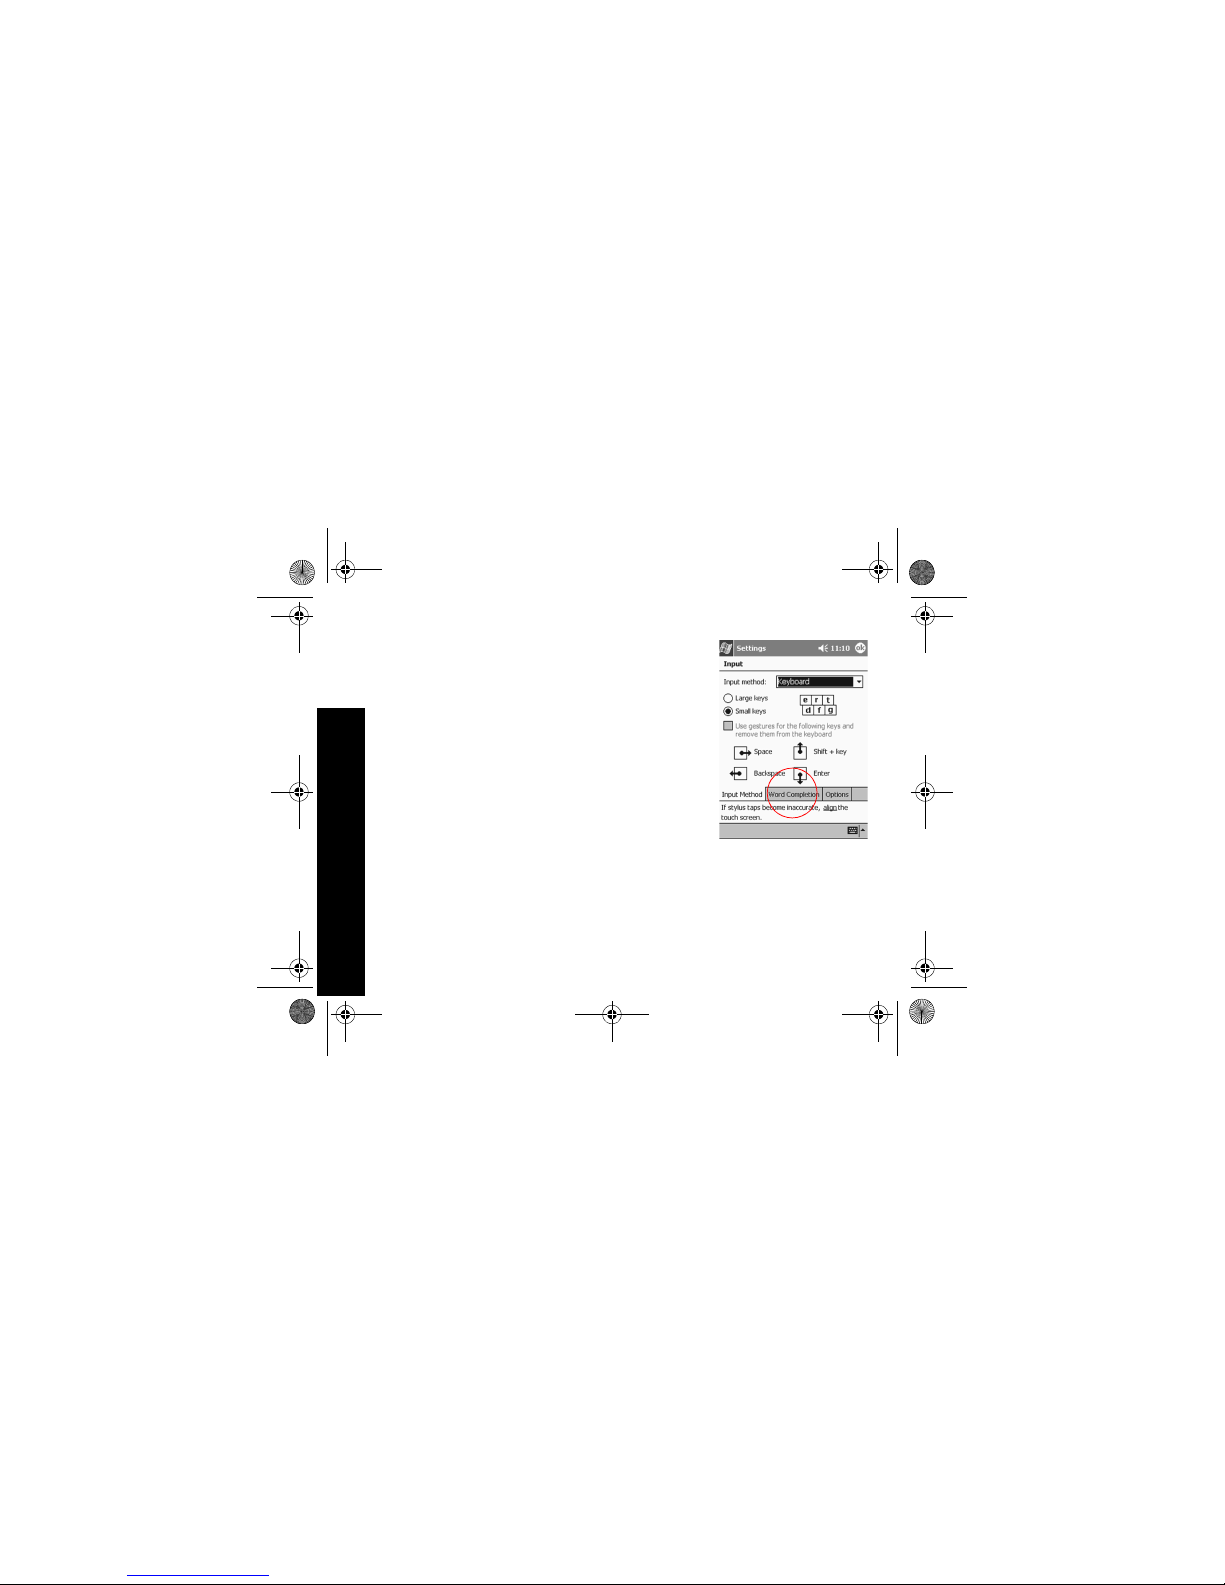
Change word suggestion
options
Change
• if words are suggested
• the number of lette rs you must
enter before a word is suggested
• the number of words that are
suggested per entry
1 From the Start menu, tap
Settings
2 Tap Input
3 Tap Wo rd Co mpl eti on
01 Getting Acquainted.fm Page 22 Thursday, August 16, 2001 1:46 PM
Page 27
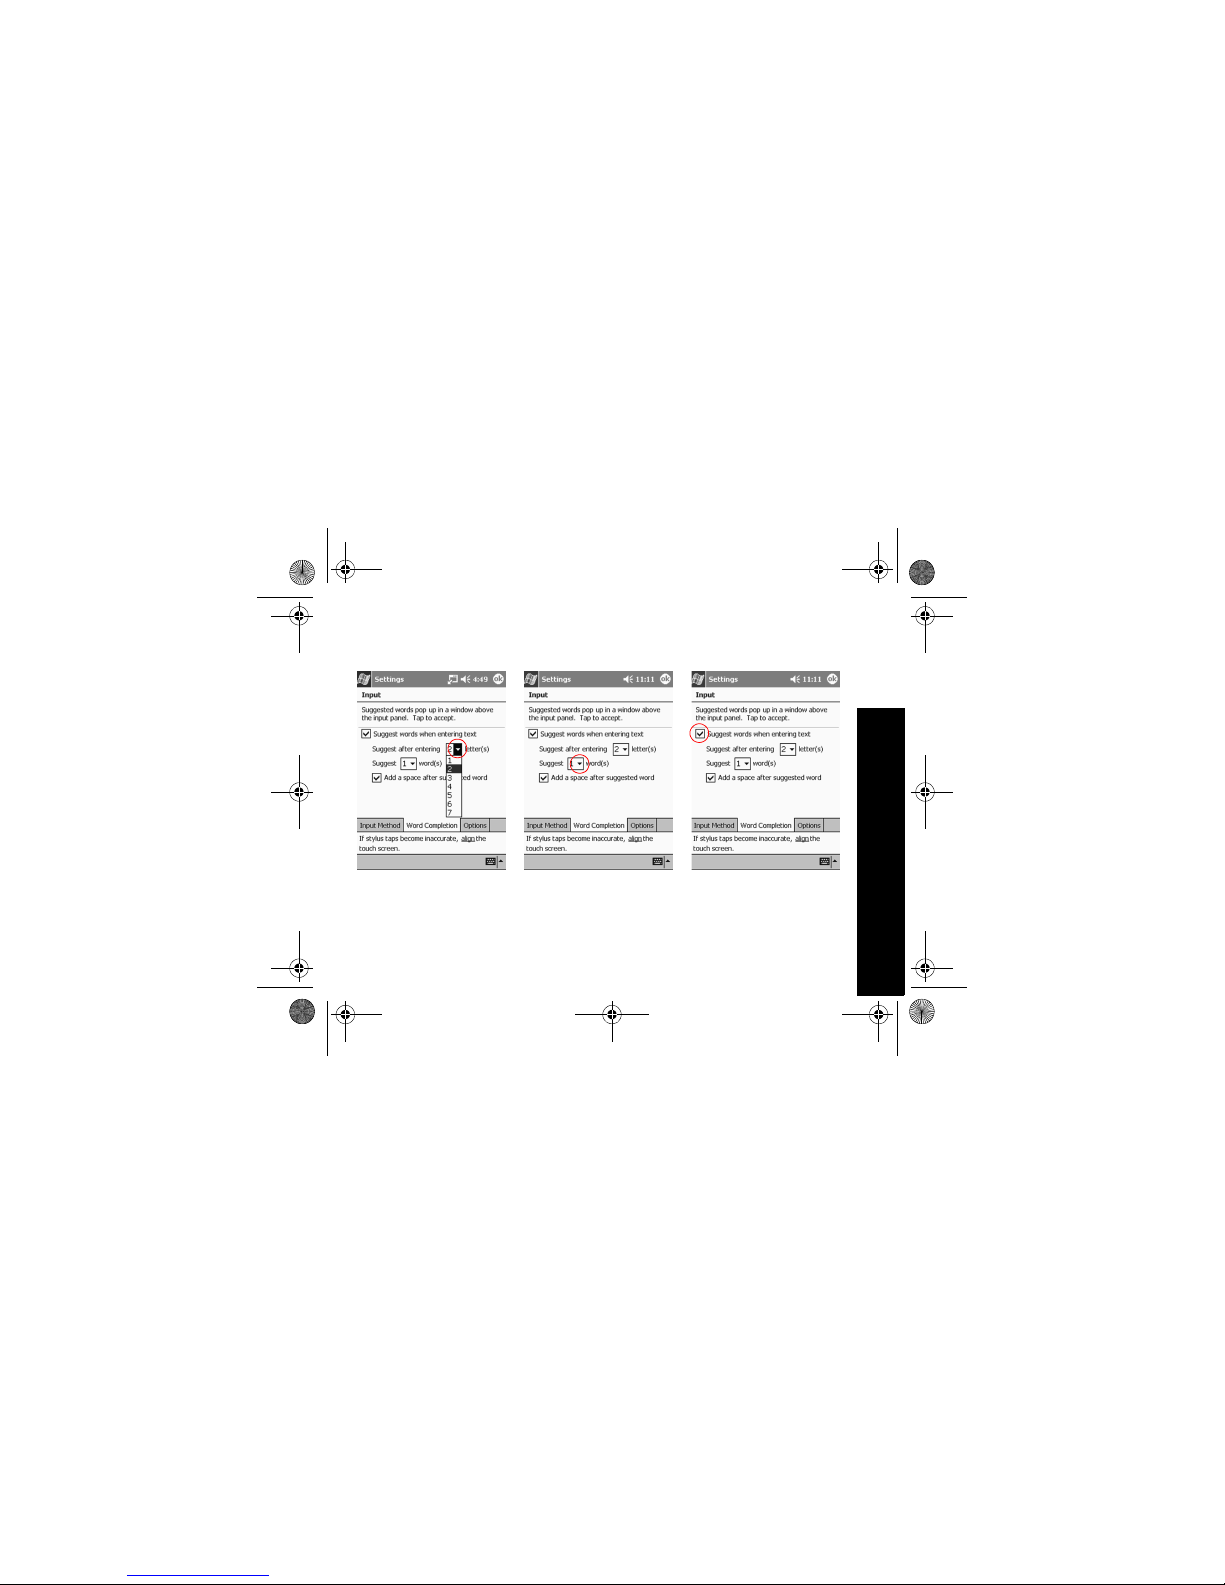
23
Enter Information
4 Tap the down arrow to
change the number of letters
needed for suggestion
5 Tap the down arrow to
change the number of words
to suggest
6 Tap to de-select Suggest
Words if you do not want any
suggestions
7 Tap OK to save your changes
01 Getting Acquainted.fm Page 23 Thursday, August 16, 2001 1:46 PM
Page 28
24
Enter Information
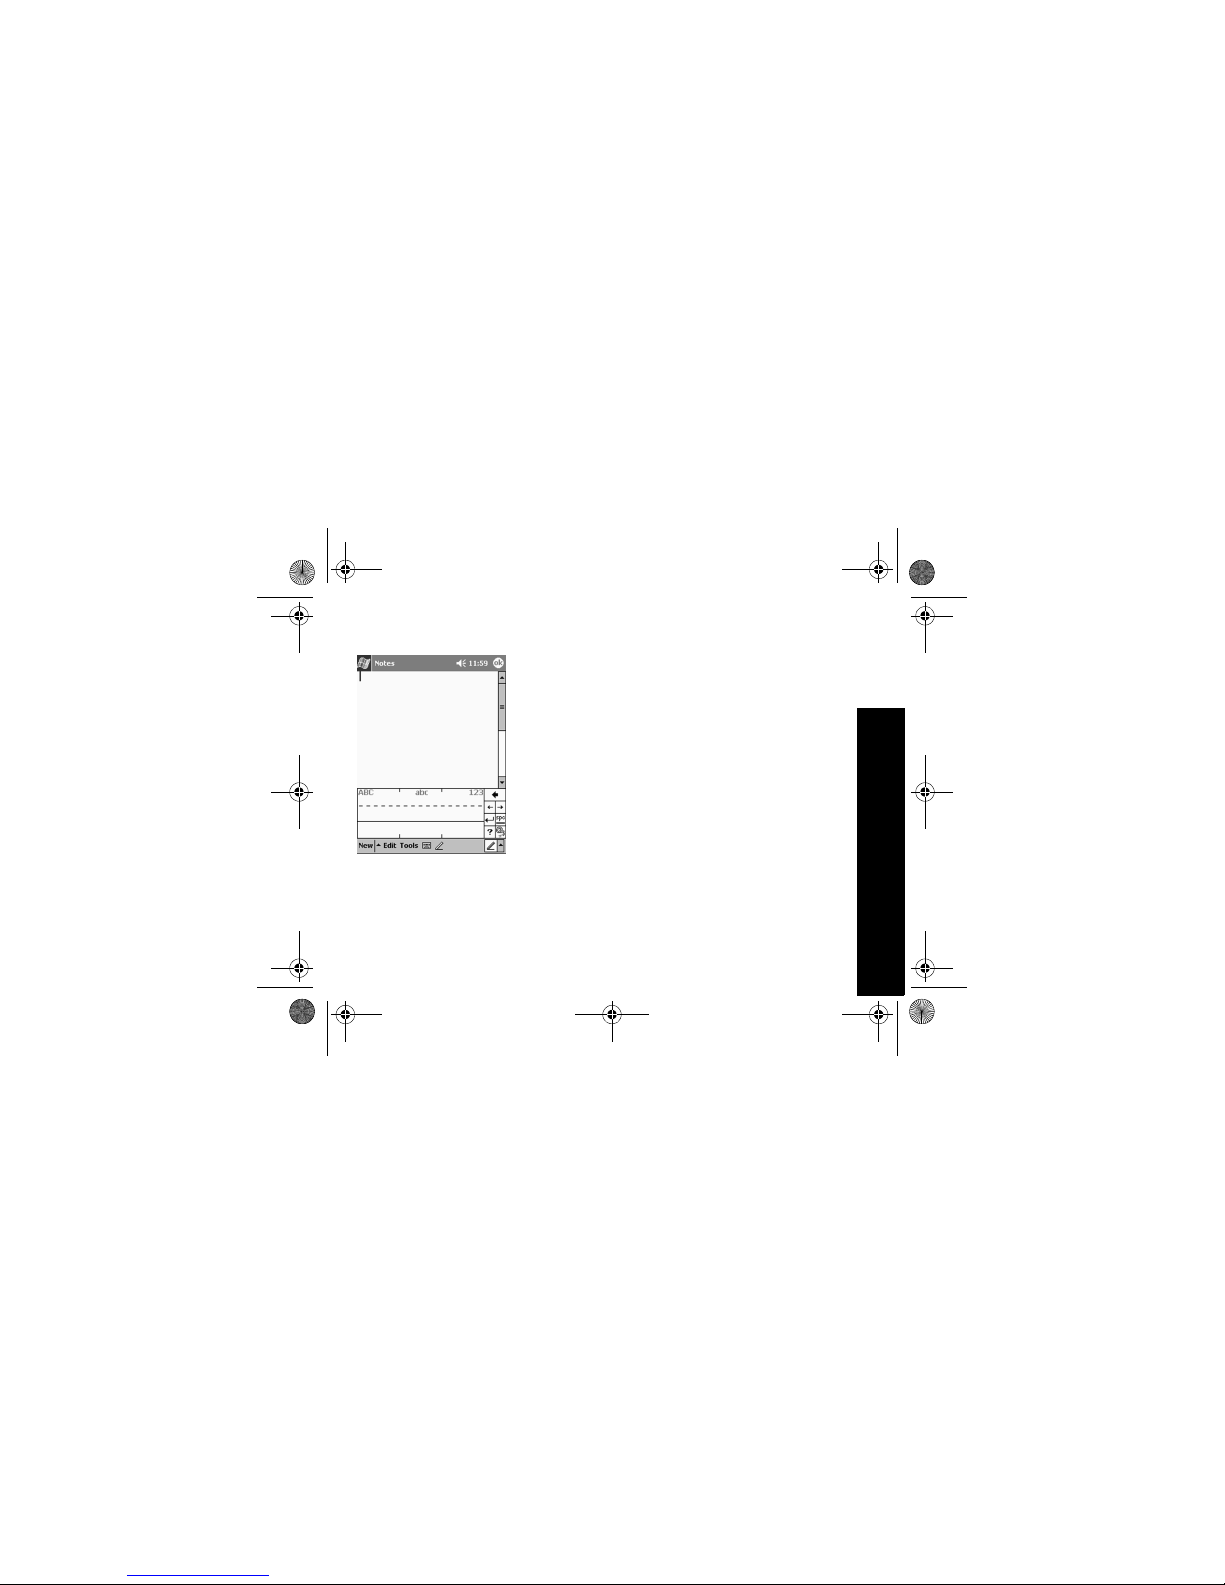
Type with the on-screen
Keyboard
Enter typed text directly on the
screen by tapping letters, numbers, and symbols on the Keyboard.
Hint: To see the symbols, tap the
123 or Shift key.
1 From any application, tap the
up arrow next to the Input
Panel button
2 Tap Keyboard to display a
keyboard on the screen
3 Tap a letter, symbol, or num-
ber to enter information
Write with the stylus and
the Letter Recognizer
Write letters, numbers, and symbols on the screen using the stylus
and the Letter Recognizer. Create
words and sentences by writing in
upper case (ABC), lower case
(abc), and symbols (123) in specific areas.
1 From any application, tap the
up arrow next to the Input
Panel button
2 Tap Letter Recognizer to see
a writing area
3 Write a letter or symbol
between the dashed line and
01 Getting Acquainted.fm Page 24 Thursday, August 16, 2001 1:46 PM
Page 29
25
Enter Information
baseline for the Letter Recognizer to work effectively
Write a letter between the
hatchmarks labeled ABC to type
text in upper case
Write a letter between the
hatchmarks labeled abc to type
text in lower case
Write a number or symbol
between the hatchmarks
labeled 123 to type symbols
4 What you write on the screen
will be converted to text
Write with the stylus and
the Transcriber
Write words, letters, numbers, and
symbols anywhere on the screen
using the stylus and the Transcriber.
1 From any application, tap the
up arrow next to the Input
Panel button
2 Tap Transcriber
3 Write anywhere on the
screen
4 What you write on the screen
will be converted to text
Write with the stylus and
Block Recognizer
Write letters, numbers, and symbols using the stylus and the Block
Recognizer. Create words and sentences by writing letters and numbers in specific areas.
1 From any application, tap the
up arrow next to the Input
Panel button
2 Tap Block Recognizer to see
a writing area
3 Write a word, letter, or sym-
bol between the hatchmarks
01 Getting Acquainted.fm Page 25 Thursday, August 16, 2001 1:46 PM
Page 30

26
Enter Information
Write a letter between the
hatchmarks labeled abc to type
text
Write a number or symbol
between the hatchmarks
labeled 123 to type a number or
symbol
4 What you write on the screen
will be converted to text
Draw and write on the
screen
Use the stylus as a pen to draw
and write on the screen in t he
Notes application or fr om the Notes
tab in
•Calendar
•Contacts
•Tasks
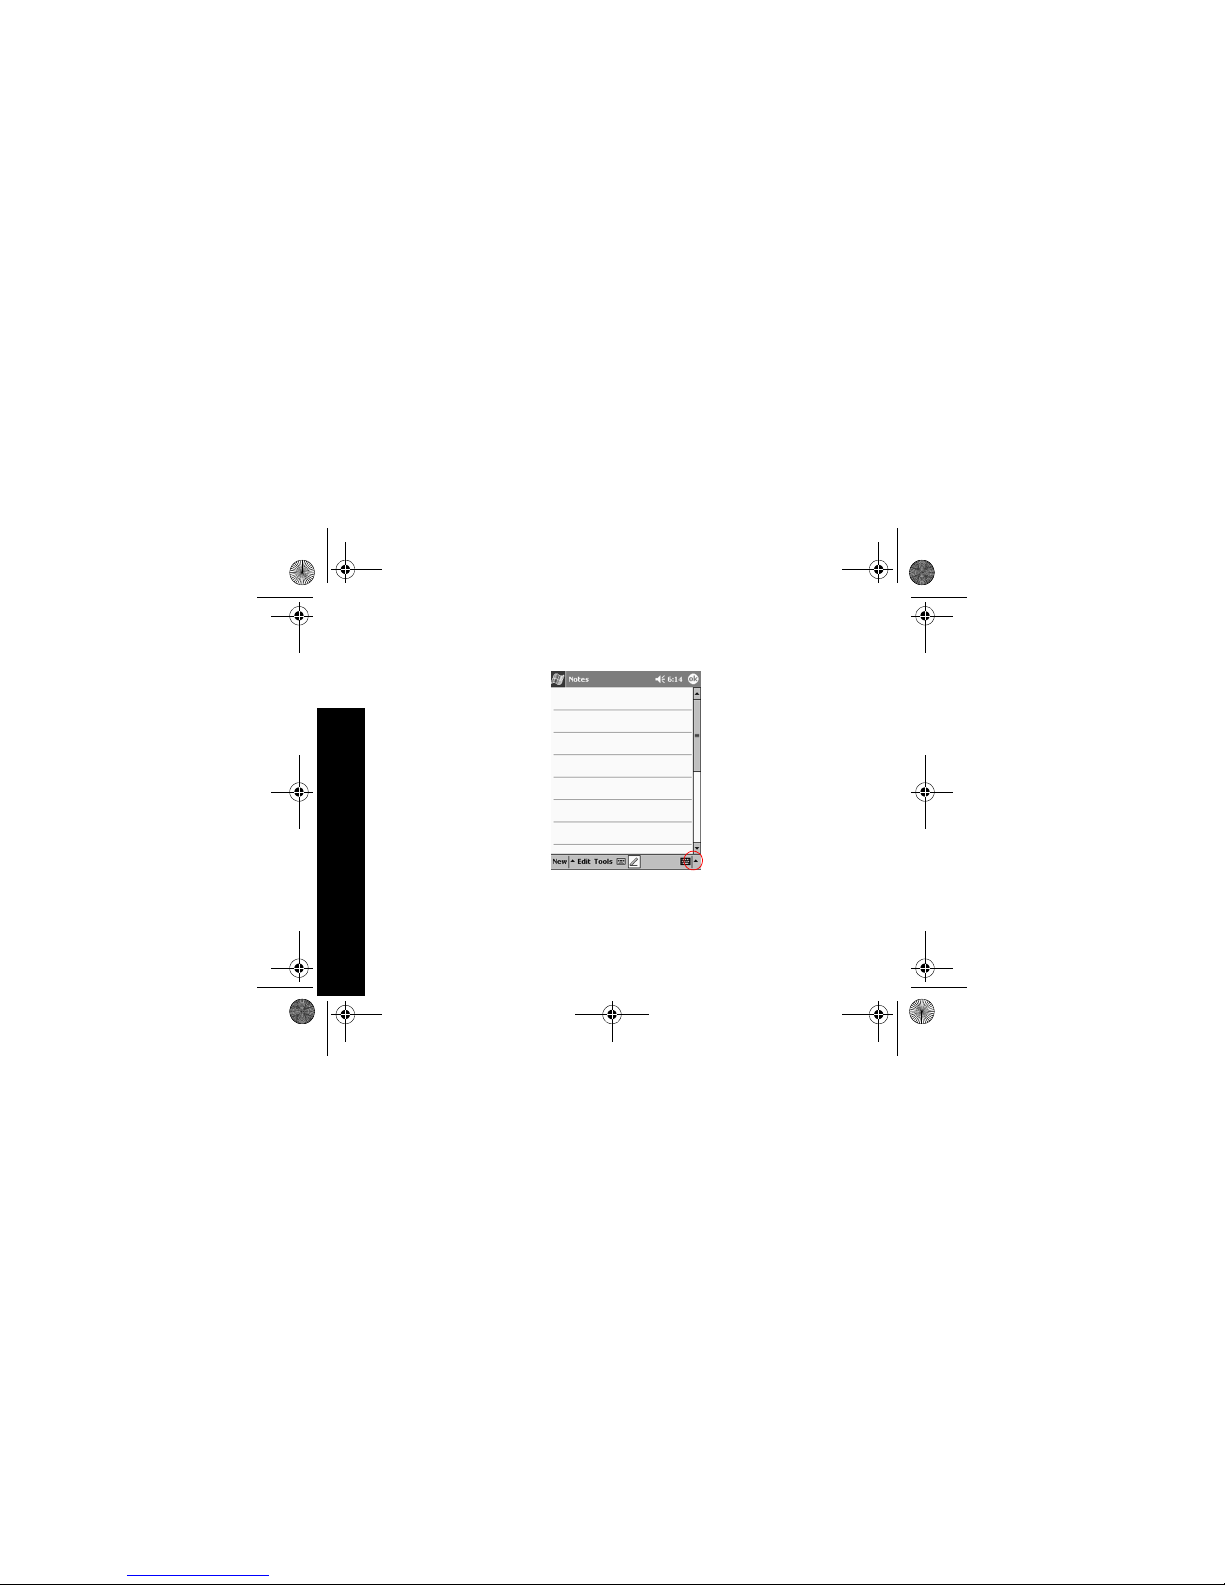
1 From the Start menu, tap
Notes
01 Getting Acquainted.fm Page 26 Thursday, August 16, 2001 1:46 PM
Page 31

27
Enter Information
2 Tap Ne w
Otherwise, tap the Notes tab in
Calendar, Contacts, or Tasks
and tap the Pen icon
3 Draw and write on the screen
4 Tap the Pen icon to de-select
it
5 Tap OK
Convert writing to text
Convert your writing to text when
you write with the pen in the Notes
application or from the Notes tab in
• Calendar
•Contacts
•Tasks
1 From the Start menu, tap
Notes
Otherwise, tap the Notes tab in
Calendar, Contacts, or Tasks
2 Tap a note to open it
3 Highlight the word(s) you
want to convert to text
01 Getting Acquainted.fm Page 27 Thursday, August 16, 2001 1:46 PM
Page 32

28
Enter Information
4 Tap Tools to see a pop-up
menu
5 Tap Recognize to convert
writing to text
If you select more than one
word to convert to text and one
is not recognized, all the other
words will be converted to text.
The unrecognized word will
remain written.
6 Tap OK
Tips
I want to address an e-mail
message, but I cannot find the
@ symbol
1 Tap the up arrow next to the
Input Panel button
01 Getting Acquainted.fm Page 28 Thursday, August 16, 2001 1:46 PM
Page 33

29
Enter Information
2 Tap Keyboard to display a
keyboard on the screen
3 Tap the Shift key
4 Tap the @ key where appro-
priate in an e-mail address
I cannot get the Letter
Recognizer to type the correct
letter
1 Make sure you are writing in
the appropriate area (for
example, ABC, abc, or 123)
2 Write letters without picking
up the stylus from the screen
Whenever possible, use one
continuous movement to write
letters
I did not get the correct word
conversion from writing to
text. Are there any other
possibilities?
1 Highlight the word(s) you
wrote
2 Tap Too ls
3 Tap Alternates to see a list of
words
4 Tap an alternate
You may want to write the word
again if the alternates are not
correct
01 Getting Acquainted.fm Page 29 Thursday, August 16, 2001 1:46 PM
Page 34

30
Enter Information
5 Tap OK
The application does not
recognize my writing
1 Write your letters close
together
2 Leave plenty of space
between words
3 Zoom in to improve character
recognition
4 Use the lined page
5 Write legibly and try to stay
between the lines
I want to change the words I
typed on the Keyboard or wrote
in the Letter Recognizer
1 Highlight the word(s) you
typed or wrote
2 Type or write over the
word(s)
Otherwise, tap and hold the
highlighted text to see a pop-up
menu with cut, copy, paste, and
clear options
01 Getting Acquainted.fm Page 30 Thursday, August 16, 2001 1:46 PM
Page 35

31
Work with Contacts
Communicating
Your Compaq iPAQ Pocket PC
H3800 series lets you communicate in many ways, such as working with contacts.
To take full advantage of the many
Compaq iPAQ Pocket PC functions,
ensure that you have installed
Microsoft ActiveSync 3.5 on your
computer before connecting your
Compaq iPAQ Pocket PC.
Work with Contacts
Enter and view information about
friends, family members, or business associates in the Contac ts
application.
Work with your contact inform ation
and do any of the following:
• create a contact
• view and edit a contact
Hint: Press the Contact application
button to navigate quickly to Contacts.
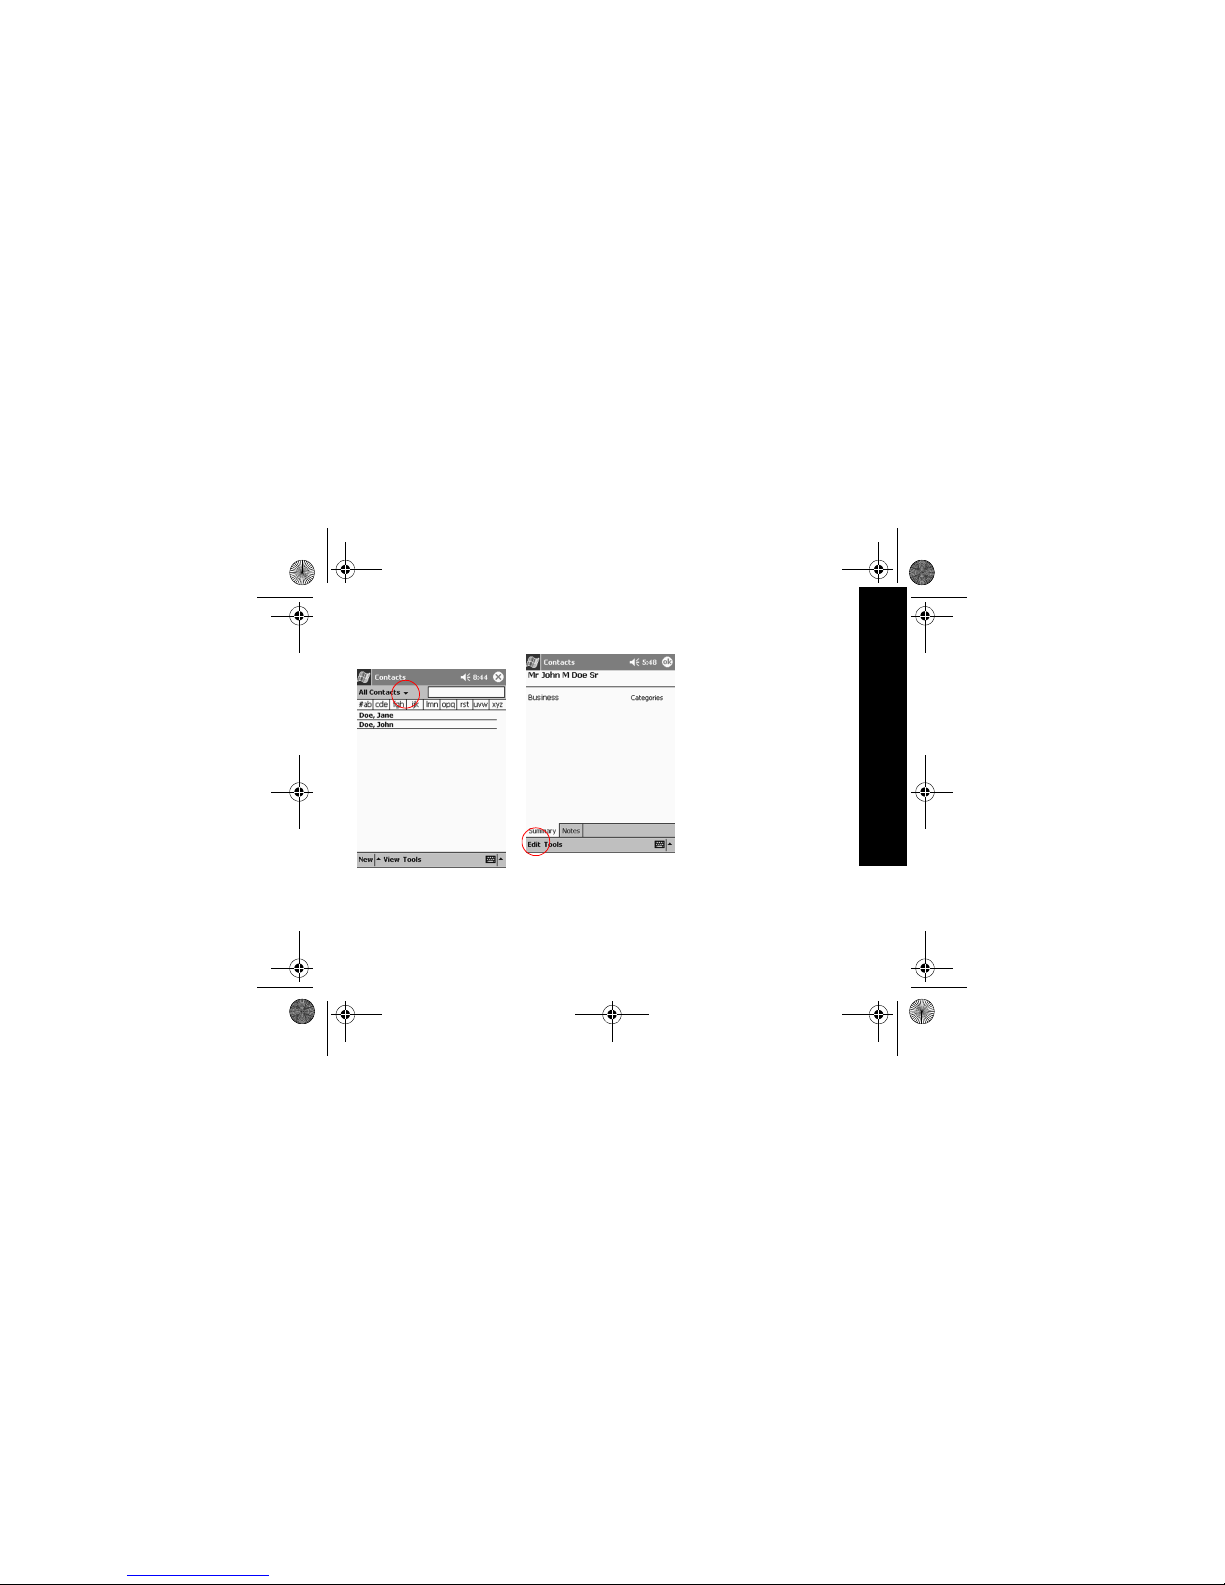
Create a contact
Hint: Create a contact from the
Tod ay s cree n.
1 From the Start menu, tap
Contacts
02 Communicating.fm Page 31 Thursday, August 16, 2001 1:47 PM
Page 36

32
Work with Contacts
2 Tap New to create a new
contact
3 Tap any item and enter infor-
mation
Scroll down to see more fi elds
4 Tap the down arrow next to
any item and enter additional
details about the item
For example, tap the Name
down arrow to enter the
contact’s title, first, middle, and
last name, and suffix
Tap anywhere outside the box to
stop entering details
5 Tap OK to save the contact
information and return to the
list of contacts
View and edit a contact
1 From the Start menu, tap
Contacts to display a list of
your contacts from the last
category selec ted
02 Communicating.fm Page 32 Thursday, August 16, 2001 1:47 PM
Page 37
33
Work with Contacts
2 Tap the down arrow next to
the category name to see the
list of categories
3 Tap a category name to see a
list of contacts placed in that
category
4 Tap a contact’s name
5 Tap Edit to see the contact
information
6 Edit the contact information
and tap OK to save the contact informat ion and return to
the list of contacts
02 Communicating.fm Page 33 Thursday, August 16, 2001 1:47 PM
Page 38

34
Use the Today Screen
Scheduling
Your Compaq iPAQ Pocket PC
H3800 series helps you keep track
of your schedule in many ways:
• see information at a glance on
the Today screen
• set appointments and create
reminders with the Cale ndar
• create a task list
Use the Today Screen
You see the Today screen when
you first turn on the screen of your
Compaq iPAQ Pocket PC. Use the
Today screen to view your
• owner information
• upcoming appointments
• unread and unsent messages
• tasks that need to be completed
From the Today screen, open the
New menu to create new
• appointments
•contacts
•e-mail
• Excel workbooks
•notes
•tasks
• Word documents
Create new information
from the Today screen
From the Today screen, create new
information, including
• appointments
•contacts
•e-mail
• Excel workbook informa tion
•notes
•tasks
• Word documents
For more information on creating
these items, see the appropriate
instructions for each task in this
guide. For example, to create a
new appointment, se e Schedule an
appointment and set a reminder.
03 Scheduling.fm Page 34 Thursday, August 16, 2001 1:48 PM
Page 39

35
Use the Today Screen
1 From the Start menu, tap
Tod ay
2 Tap New to open the New
menu
3 Tap to create a new item
Change information from
the Today screen
From the Today screen, change
information, including
• owner information
• upcoming appointments
• unread and unsen t messages
• tasks that need to be completed
For more information on changing
these items, see the appr opriate
instructions for each task in this
guide. For example, to create a
new appointment, se e Schedule an
appointment and set a reminder.
1 From the Start menu, tap
Tod ay
2 Tap the information you want
to change
03 Scheduling.fm Page 35 Thursday, August 16, 2001 1:48 PM
Page 40

36
Use the Today Screen
3 Enter or change the informa-
tion
4 Tap OK to save changes and
return to the Today screen
Otherwise, tap OK an d from the
Start menu, tap Today to return
to the Today screen
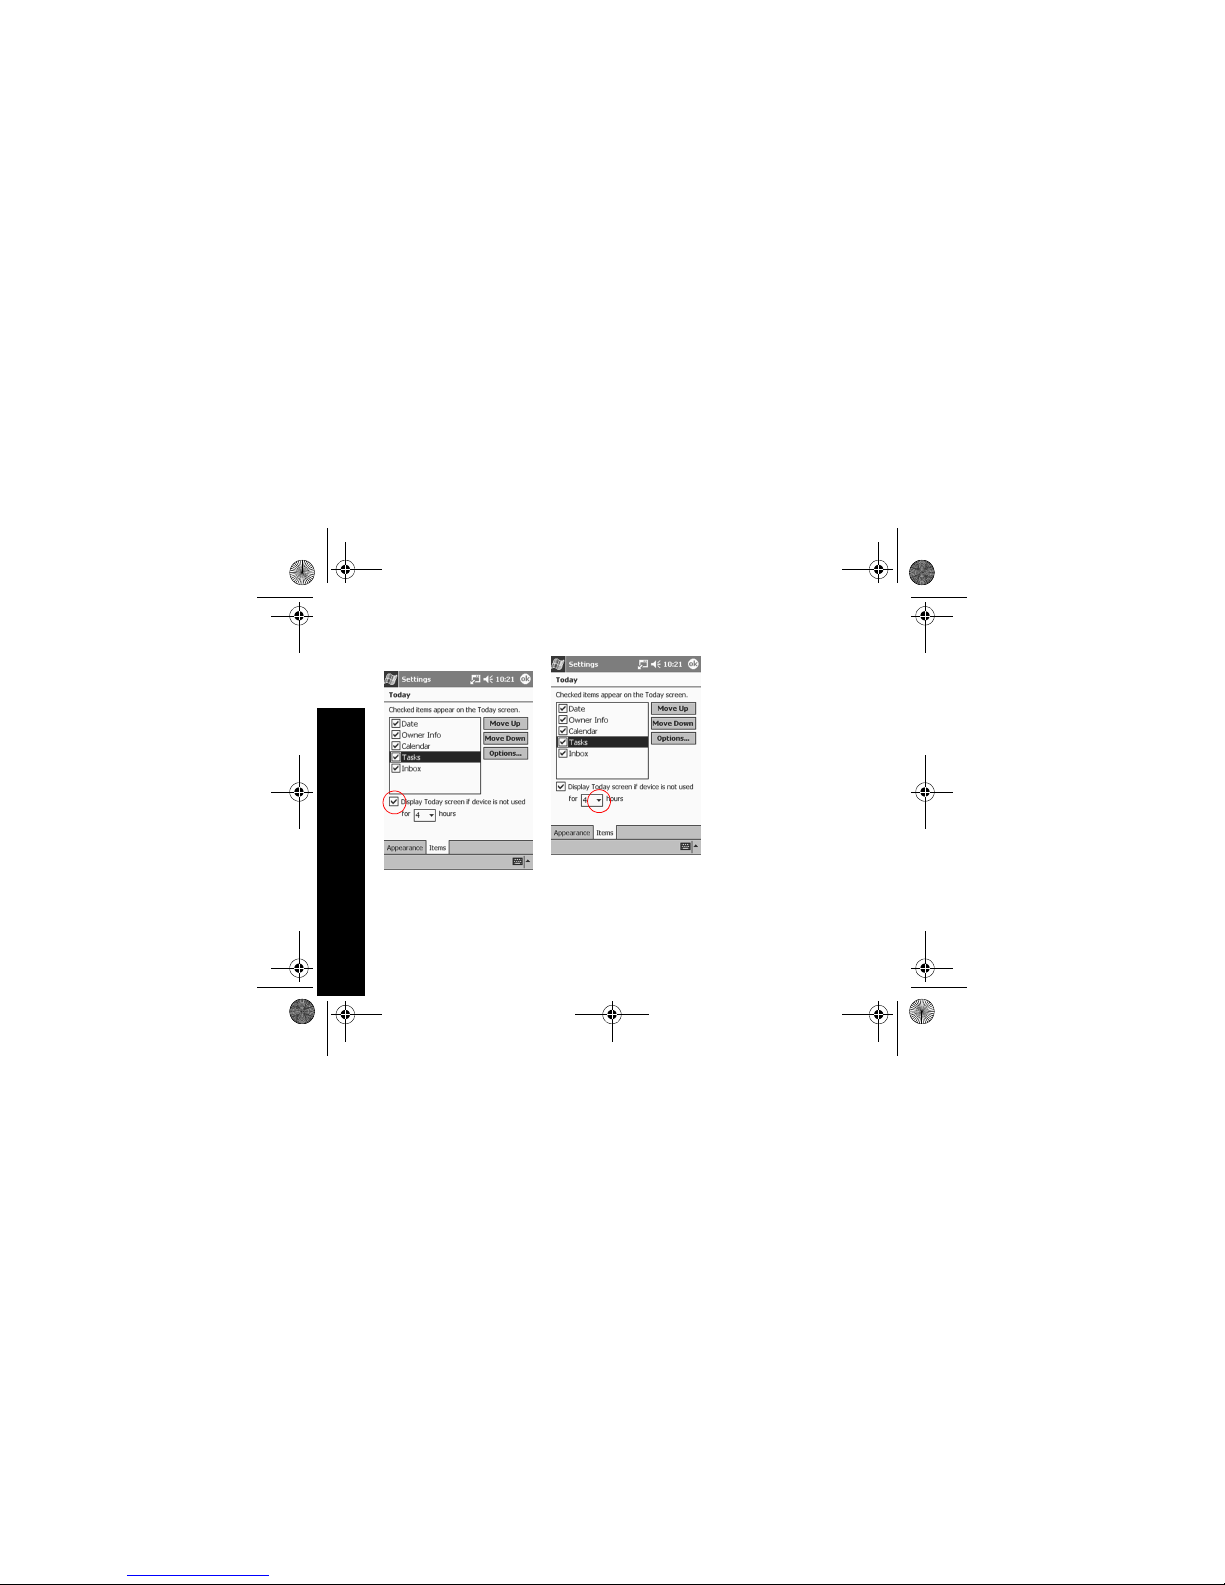
Customize the appearance
of the Today screen
From the Today Settings screen,
• add a picture as the background
• select the information you see
• set the order of the information
• decide when to see the Today
screen
1 From the Start menu, tap
Settings
2 Tap Tod ay
3 Add a picture
03 Scheduling.fm Page 36 Thursday, August 16, 2001 1:48 PM
Page 41

37
Use the Today Screen
Tap the checkbox to use your
picture as the background
Tap Browse to select a picture
from File Explorer
4 Tap Items to select or reorder
the information on the Today
screen
Tap to select an item
Tap Move Up or Move Down to
reorder the item; you cannot
move Date
Tap to select an item
Tap Options to select display
options for that item; you
cannot select options for Date ,
Owner Info, or In box
03 Scheduling.fm Page 37 Thursday, August 16, 2001 1:48 PM
Page 42
38
Use the Calendar
5 Tap Display to set a time
before the Today screen is
displayed
6 Tap the down arrow to select
the amount of time that
passes before you see the
Today screen
7 Tap OK
Use the Calendar
Use the Calendar to
• schedule appointments
•set reminders
View your calendar by
• agenda
•day
•week
•month
•year
Hint: Keep the amount of information in your appointments small to
conserve memory.
Hint: Press the Calendar application button to navigate quickly to
Calendar.
Look at your Calendar
By default, the Calendar first
appears in the Agenda view, which
provides the most detail about your
appointment.
03 Scheduling.fm Page 38 Thursday, August 16, 2001 1:48 PM
Page 43

39
Use the Calendar
1 From the Start menu, tap
Calendar
Schedule an appointment
and set a reminder
Hint: Keep the amount of information in your appointments small to
conserve memory.
Hint: Schedule an appointment and
set a reminder from the Today
screen.
1 From the Start menu, tap
Calendar
2 Tap New to schedule an
appointment
3 Enter the subject
Tap the down arrow to select a
predefined subject
If you do not enter a subject,
you see No subject in the field
4 Tap any item to enter addi-
tional inf ormation
03 Scheduling.fm Page 39 Thursday, August 16, 2001 1:48 PM
Page 44

40
Use Tasks
For example, to schedule an All
Day appointment, tap Type and
tap All Day
By default, a reminder of 15
minutes is set
5 Tap 15 and tap the down
arrow to change the time of
the reminder
6 Tap minute(s) to change the
unit of time
7 Tap OK to set the reminder
and schedule the appointment
Delete an appointment
Hint: Tap and hold an appoint ment
and choose Delete Appointmen t
from the pop-up menu to delete an
appointment.
1 From the Start menu, tap
Calendar
2 Tap an appointment to view it
3 Tap Too ls
4 Tap Delete Appointment
5 Tap Yes to delete the appoint-
ment permanently
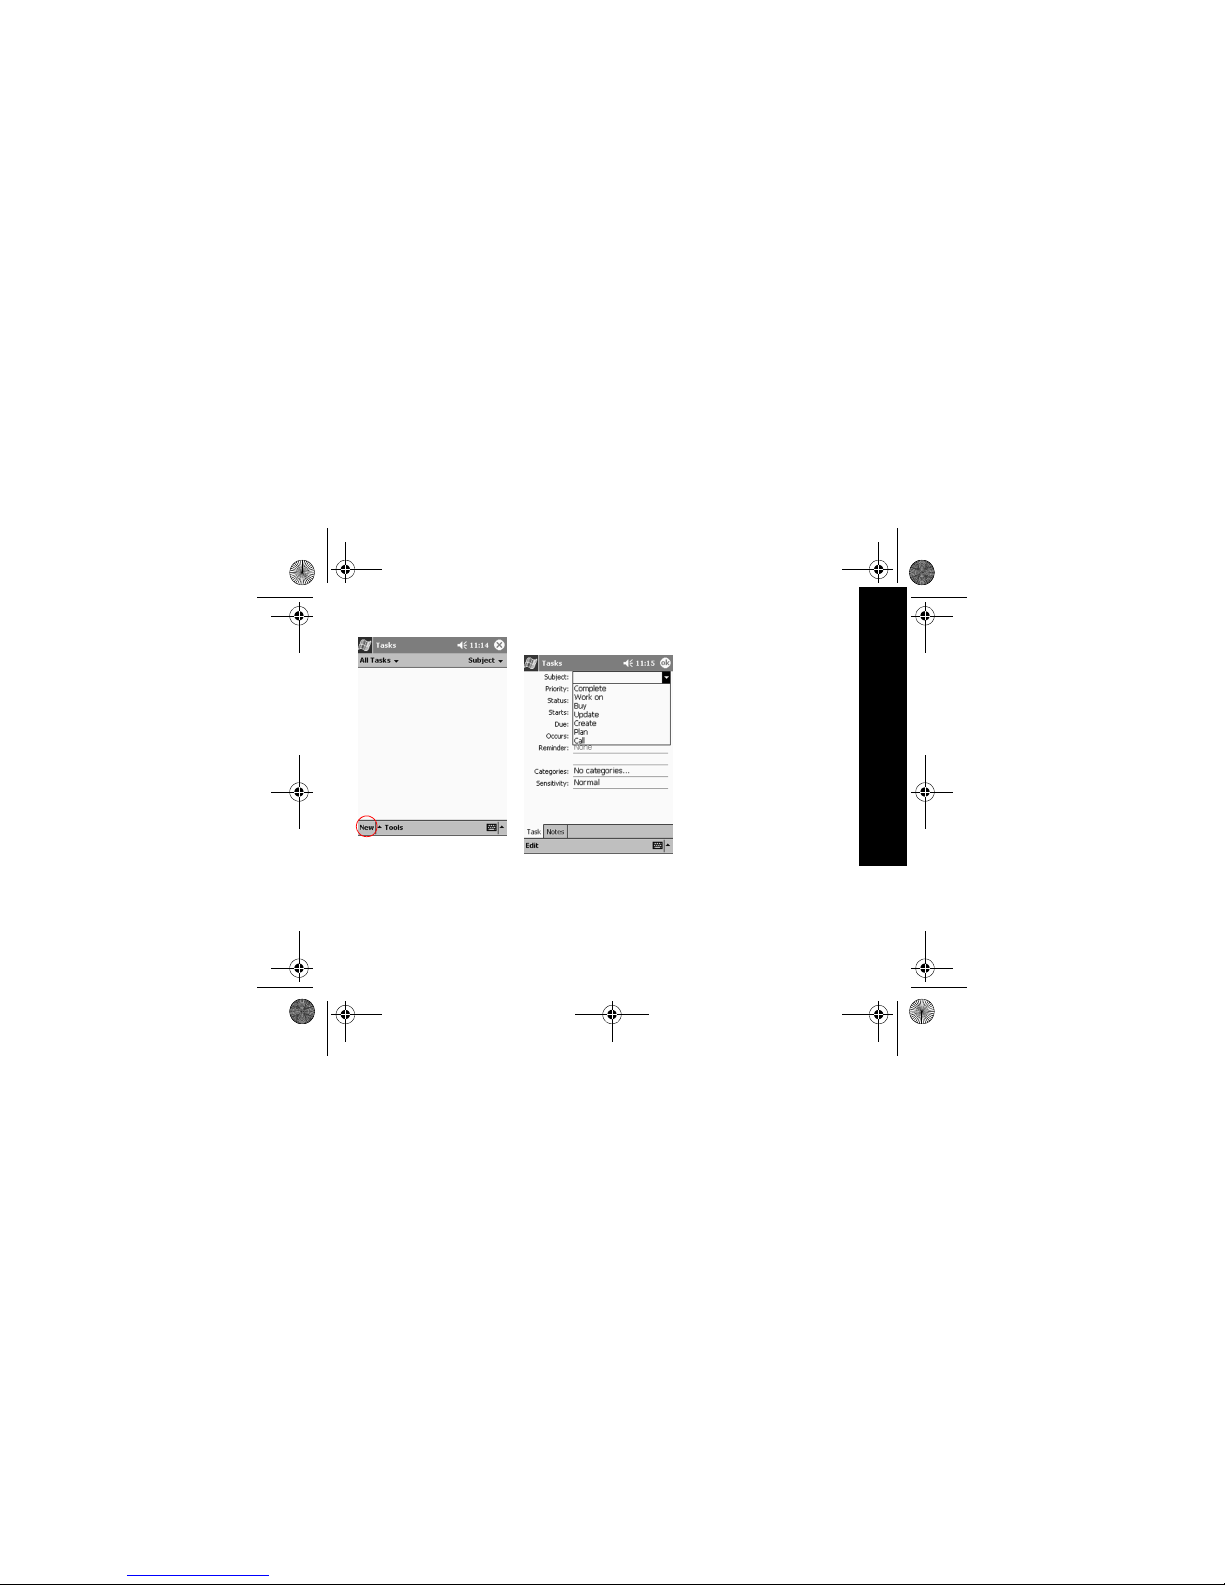
Use Tasks
Use Tasks to
•create new tasks
• delete a task
Create a task and set a
reminder
Hint: Create a task and set a
reminder from the Today screen.
1 From the Start menu, tap
Tas ks
03 Scheduling.fm Page 40 Thursday, August 16, 2001 1:48 PM
Page 45
41
Use Tasks
2 Tap New to create a new task
3 Enter the subject
Tap the down arrow to select a
predefined subject
If you do not enter a subject,
you see No subject in the field
4 Tap any item to enter addi-
tional information
For example, tap the Se nsitivity
field and tap Private to ma ke
the task private
5 Tap Due to add a due date for
the task
6 Tap Reminder and select
Remind me
7 Tap the date to select when
you want to be reminded
8 Tap OK to set the reminder
and create the task
Delete a task
Hint: Tap and hold a task and
choose Delete Task from the
pop-up menu to delete a task.
1 From the Start menu, tap
Tas ks
03 Scheduling.fm Page 41 Thursday, August 16, 2001 1:48 PM
Page 46

42
Use Tasks
2 Tap the task you want to
delete
3 Tap Tools
4 Tap De let e Ta sk
5 Tap Yes to permanently
delete the task
03 Scheduling.fm Page 42 Thursday, August 16, 2001 1:48 PM
Page 47

43
Use Microsoft Reader
Using Software
With the applications on your Compaq iPAQ Pocket PC H3800 series,
be up to date and organized even
away from your computer.
Use Microsoft Reader
Please note that a detailed eB ook
guide is available on the CD-ROM,
and you can also copy it to your
Compaq iPAQ Pocket PC.
Hint: You may need to activate
Microsoft Reader before you can
copy protected eBooks from the
Internet. You must have a Hotmail,
MSN, or Passport account to activate your read er.
Activate Microsoft Reader
Activate Microsoft Reader to copy
protected eBooks.
1 Connect your Compaq iPAQ
Pocket PC to your computer
2 Open Internet Explorer on
your computer
3 Go to
<http://das.microsoft.com/ac
tivate>
Read an eBook
Read your eBook from start to finish or select specific topics. If you
close your eBook and later want to
open it, your ebook will op en on
the last page you read.
1 From the Start menu, tap
Programs
2 Tap Microsoft Reader
3 Tap the title of your eBook
4 Tap the page number or left
and right arrows to move
04 Using Software.fm Page 43 Thursday, August 16, 2001 1:48 PM
Page 48

44
Use Microsoft Reader
backward and forward in the
book
Hint: To jump to a topic, tap a
link. Links can occ ur throughout
the text or table of contents. To
return from a link, tap the title
of the eBook and tap Return.
04 Using Software.fm Page 44 Thursday, August 16, 2001 1:48 PM
Page 49

45
Federal Communications Commission Notice
Regulatory Notices
Federal
Communications
Commission Notice
This equipment has been tested
and found to comply with the limits
for a Class B digital device, pursuant to Part 15 of the FCC Rules.
These limits are designed to provide reasonable prote ction against
harmful interference in a residential installation. This equi pment
generates, uses, and can radiate
radio frequency energy and, if not
installed and used in accor dance
with the instructions, may cause
harmful interference to radio communications. However, there is no
guarantee that interference wi ll not
occur in a particular installation. If
this equipment does cause harmful
interference to radio or television
reception, which can be determined by turning the equipment off
and on, the user is encouraged to
try to correct the interference by
one or more of the following measures:
• Reorient or relocate the receiving antenna
• Increase the separation
between the equipment and
receiver
• Connect the equipment into an
outlet on a circuit different from
that to which the receiver is
connected
• Consult the dealer or an experienced radio or television technician for help
Modifications
The FCC requires the user to be
notified that any changes or modifications made to this device that
are not expressly a pproved by
Compaq Computer Corporation
may void the Refere nce authority to
operate the equipment.
Cables
Connections to this device must be
made with shielded cables with
App A Regulatory Notices.fm Page 45 Thursday, August 16, 2001 1:49 PM
Page 50

46
Canadian Notice
metallic RFI/EMI connector hoods
in order to maintain complian ce
with FCC Rules and Regulations.
Declaration of Conformity
for products marked with
the FCC logo—United
States only
This device complies with Part 15
of the FCC Rules. Operation is subject to the following two conditions :
(1) this device may not cause
harmful interference, and (2) this
device must accept any interference received, including interference that may cause undesired
operation.
For questions rega rding your product, contact:
Compaq Computer Corporation
P. O. Box 692000, Mail Stop
530113
Houston, Texas 77269-2000
Or, call 1-800-652-6672
(1-800-OK COMPAQ)
For questions regarding th is FCC
declaration, contact:
Compaq Computer Co rporation
P. O. Box 692000, Mail Stop
510101
Houston, Texas 77269-2000
Or, call (281) 514-3333
To identify this product, refer to the
Part, Series, or Model numb er
found on the product.
Canadian Notice
This Class B digital apparatus
meets all requirements of th e
Canadian Interference-Causing
Equipment Regulations.
Avis Canadien
Cet appareil numérique de la
classe B respecte toutes les exigences du Règlement sur le matériel brouilleur du Can ada.
European Union Notice
Products bearing the CE marking
comply with both the EMC Directive (89/336/EEC) and the Low
Voltage Directive (73/23/EEC)
issued by the Commission of the
European Community and if this
product has telecommunication
functionality, the R&TTE Directive
(1999/5/EC).
Compliance with these directives
implies conformity to the following
European Norms (in parentheses
are the equivalent international
standards and regulations):
App A Regulatory Notices.fm Page 46 Thursday, August 16, 2001 1:49 PM
Page 51

47
Battery Warning
• EN55022 (CISPR 22) - Electromagnetic Interference
• EN55024 (IEC61000-4-2, 3, 4,
5, 6, 8, 11) - Electromagnetic
Immunity
• EN61000-3-3 (IE61000-3-3) Power Line Flicker
• EN 60950 (IEC60950) - Product Safety
Battery Warning
WARNING: This computer
contains an internal lithium
polymer batte ry pack. To reduce
the risk of fire or burns, do not
disassemble, crush, puncture,
short external contacts, or dispose of in fire or water.
Replacement should only be
done by a Compaq authorized
service provider using the Compaq spare part for this computer.
Airline Travel Notice
Use of electronic equipmen t
aboard commercial airc raft is at
the discretion of the airline.
Power Cords
If you were not provided with a
power cord for your Compaq iPAQ
Japanese Notice
App A Regulatory Notices.fm Page 47 Thursday, August 16, 2001 1:49 PM
Page 52

48
Power Cords
Pocket PC H3800 series or for an
AC power accessory intended for
use with your device, you should
purchase a power cord that is
approved for use in your country.
The power cord must be rated for
the product and for th e voltage and
current marked on the product’s
electrical ratings la bel. The voltage
and current rating of the cord
should be greater than the voltage
and current rating marked on the
product. In addition, the diameter
of the wire must be a minimum of
0.75 mm
2 /18AWG, and the length
of the cord must be between 5 feet
(1.5 m) and 6.5 feet (2 m). If you
have questions about the type of
power cord to use, contact your
Compaq authorized ser vice provider.
A power cord should be routed so
that it is not likely to be walked on
or pinched by items placed upon it
or against it. Particular atten tion
should be paid to the plug, electr ical outlet, and the point where the
cord exits from the product.
WARNING: To r edu ce t he r isk
of personal injury, electric
shock, fire, or damage to the
equipment:
Do not disable the power cord
grounding plug. The grounding
plug is an important safety feature.
Plug the equipment into a
grounded (earthed) electrical
outlet that is easily accessible
at all times.
Disconnect power from the
equipment by unplugging the
power cord from the electrical
outlet.
Do not place anythin g on power
cords or cables. Arrange them
so that no one may acci dentally
step on or trip over them.
Do not pull on a cord or cable.
When unplugging from the
electrical outlet, grasp the cord
by the plug.
WARNIN G: To re duce the ris k
of electrical shock, fire, or damage to the equipment:
Do not use converter kits sold
for appliances to power the
computer.
App A Regulatory Notices.fm Page 48 Thursday, August 16, 2001 1:49 PM
Page 53

49
System Specifications
Hardware Specifications
System Specifications
Feature Compaq iPAQ H3800 Series
Processor StrongARM SA-1110
Memory 32 MB SDRAM or greater
Display Color TFT, 240 x 320 pixels, 64K-color support, .24-dot pitch
Backlight Multi-level brightness adjustment, light sensor for automatic adjustment of
brightness level
Audio Speaker, 3.5 mm stereo headphone jack
Infrared IrDA, data transfer up to 115.2 Kb per second
Bluetooth Some models
App B Hardware Specifications.fm Page 49 Thursday, August 16, 2001 1:49 PM
Page 54

50
Physical Specifications
Physical Specifications
Communications Communication port, Expansion Pack connector
Indicators 3 mode alarm notification: flashing green LED, tone, pop-up message. Charge
active: flashing/solid amber LED, Bluetooth active: flashing/sound blue LED
Battery Lithium Polymer
Feature Compaq iPAQ H3800 Series
Compaq iPAQ Pocket PC H3800
US Metric
Height 5.3 in 135 mm
Width 3.3 in 84 mm
Depth .62 in 16 mm
Weight 6.7 oz 190 g
App B Hardware Specifications.fm Page 50 Thursday, August 16, 2001 1:49 PM
Page 55

51
Operating Environment
Operating Environment
US Metric
Temperature Operating 32° to 104°F 0° to 40°C
Nonoperating -22° to 140°F -30° to 60°C
Relative Humidity Operating 10 to 90% 10 to 90%
Nonoperating 10 to 90% 10 to 90%
Maximum altitude Operating 0-15,000 ft 14.7 to 10.1 psia
Nonoperating 0-15,000 ft 14.7 to 10.1 psia
App B Hardware Specifications.fm Page 51 Thursday, August 16, 2001 1:49 PM
Page 56

52
Routine Care
Routine Care and Battery Guidelines
Routine Care
To keep your Compaq iPAQ
Pocket PC H3800 series in good
condition and working properly, follow these guidelines:
• Keep your Compaq iPAQ
Pocket PC away from excessive moisture and temper ature
extremes. Do not expose your
Compaq iPAQ Pocket PC to liquids or precipitation.
• Do not place anything on top of
your Compaq iPAQ Pocket PC
to prevent damage to the
screen.
• Store your Compaq iPAQ
Pocket PC in a protective case
when not in use.
• Clean your Compaq iPAQ
Pocket PC by wi ping the screen
and the exterior with a soft,
damp cloth moistened only with
water.
• Avoid exposing your C ompaq
iPAQ Pocket PC to direct sunlight or strong ultraviolet light
for extended periods of time.
Also avoid scratching the surface of the screen and banging
it against hard objects.
• Only use the Compaq iPAQ
Pocket PC stylus to prevent
scratching the screen.
Battery Guidelines
Because of the type
of battery used in
your Compaq iPAQ
Pocket PC, follow
local regulations
regarding the safe disp osal of your
Compaq iPAQ Pocket PC. Your
Compaq vendor can ad vise you on
local regulations, and/ or the existence of any battery disposal programs in operation.
App C Routine Care-Battery.fm Page 52 Thursday, August 16, 2001 1:50 PM
Page 57

53
Battery Guidelines
The Compaq iPAQ Pocket PC
should not be disposed of along
with the general household waste.
In order to forward them to recycling or dispose of them prop erly,
please use the publ ic collection
system or return them to Compaq,
your authorized Compaq partners,
or their agents.
In North America, dispose of the
Compaq iPAQ Pocket PC by taking
advantage of the Compaq battery
recycling program. You will be p rovided with a posta ge-paid batter y
pack mailer pre-addressed to a
reclamation facility where t he metals are recycled.
CAUTION: To red uce the ris k
of electrical shock or damage to
the internal componen ts, do not
spray liquid directly on the
screen or allow excess liqu id to
drip inside your Compaq iPAQ
Pocket PC. Using soap or other
cleaning products on the scr een
may discolor the finish and
damage the screen.
App C Routine Care-Battery.fm Page 53 Thursday, August 16, 2001 1:50 PM
 Loading...