

Page 1

b
Compaq iPAQ Pocket PC
H3900 Series
Reference Guide
Document Part Number: 278853-001
May 2002
Page 2

The information in this document is subject to change without notice.
COMPAQ COMPUTER CORPORATION SHALL NOT BE LIABLE FOR
TECHNICAL OR EDITORIAL ERRORS OR OMISSIONS CONTAINED
HEREIN; NOR FOR INCIDENTAL OR CONSEQUENTIAL DAMAGES
RESULTING FROM THE FURNISHING, PERFORMANCE, OR USE OF
THIS MATERIAL.
This document contains information protected by copyright. No part of this
document may be photocopied or reproduced in any form without prior written
consent from Compaq Computer Corporation.
© 2002 Compaq Information Technologies Group, L.P.
Compaq, the Compaq logo, and iPAQ are trademarks of Compaq Information
Technologies Group, L.P. in the United States and/or other countries. Microsoft,
MS, ActiveSync, W indows, W indo ws NT, and the Windows logo are trademarks
of Microsoft Corporation in the United States and/or other countries. Intel is a
trademark of Intel Corporation. All other product names mentioned herein may
be trademarks of their respective companies. Compaq shall not be liable for
technical or editorial errors or omissions contained herein. The information in
this document is provided “as is” without warranty of any kind and is subject to
change without notice. The warranties for Compaq products are set forth in the
express limited warranty statement accompanying such products. Nothing
herein should be construed as constituting an additional warranty.
Printed in the U.S.A.
CAUTION: Text set off in this manner indicates that failure to follow
Ä
directions could result in damage to equipment or loss of
information.
WARNING: T e xt set off in this manner indicates that f ailure to follo w
Å
directions could result in bodily harm or loss of life.
Compaq iPAQ Pocket PC H3900 Series Reference Guide
First Edition May 2002
Part Number 278853-001
Page 3

Contents
1 Getting Acquainted
What is in the Box? . . . . . . . . . . . . . . . . . . . . . . . . . . . . . 1–2
Top Panel. . . . . . . . . . . . . . . . . . . . . . . . . . . . . . . . . . 1–3
Front Panel. . . . . . . . . . . . . . . . . . . . . . . . . . . . . . . . . 1–4
Bottom Panel . . . . . . . . . . . . . . . . . . . . . . . . . . . . . . . 1–4
Register Device . . . . . . . . . . . . . . . . . . . . . . . . . . . . . . . . 1–5
Know Your Charging Options. . . . . . . . . . . . . . . . . . . . . 1–5
Charge with the universal cradle. . . . . . . . . . . . . . . . 1–5
Charge with the AC Adapter. . . . . . . . . . . . . . . . . . . 1–7
Adjust the standby setting . . . . . . . . . . . . . . . . . . . . . 1–8
Change the backlight settings . . . . . . . . . . . . . . . . . 1–10
Customize Settings. . . . . . . . . . . . . . . . . . . . . . . . . . . . . 1–12
Realign the screen . . . . . . . . . . . . . . . . . . . . . . . . . . 1–12
Open applications . . . . . . . . . . . . . . . . . . . . . . . . . . 1–14
Minimize applications . . . . . . . . . . . . . . . . . . . . . . . 1–14
Close applications . . . . . . . . . . . . . . . . . . . . . . . . . . 1–14
Install applications. . . . . . . . . . . . . . . . . . . . . . . . . . 1–15
Set the time for home. . . . . . . . . . . . . . . . . . . . . . . . 1–16
Set the time for a location you are visiting . . . . . . . 1–18
Set the date. . . . . . . . . . . . . . . . . . . . . . . . . . . . . . . . 1–19
Customize the application buttons. . . . . . . . . . . . . . 1–20
Use iPAQ Backup . . . . . . . . . . . . . . . . . . . . . . . . . . 1–22
Back up files, registry and databases . . . . . . . . 1–22
Restore back up files, registry, and databases. . 1–26
Schedule a backup. . . . . . . . . . . . . . . . . . . . . . . 1–30
Monitor the battery . . . . . . . . . . . . . . . . . . . . . . 1–33
Reference Guide i
Page 4

Contents
Enter Information. . . . . . . . . . . . . . . . . . . . . . . . . . . . . . 1–36
Change word suggestion options. . . . . . . . . . . . . . . 1–36
Type with the On-screen Keyboard. . . . . . . . . . . . . 1–39
Write with the stylus and the Letter Recognizer . . . 1–40
Write with the stylus and the Transcriber . . . . . . . . 1–42
Write with the stylus and Block Recognizer. . . . . . 1–43
Draw and write on the screen . . . . . . . . . . . . . . . . . 1–44
Convert writing to text. . . . . . . . . . . . . . . . . . . . . . . 1–46
View Images. . . . . . . . . . . . . . . . . . . . . . . . . . . . . . . . . . 1–47
Locate an image. . . . . . . . . . . . . . . . . . . . . . . . . . . . 1–48
View image information . . . . . . . . . . . . . . . . . . . . . 1–50
Change the view . . . . . . . . . . . . . . . . . . . . . . . . . . . 1–51
Create a Slide Show. . . . . . . . . . . . . . . . . . . . . . . . . 1–51
Save a slide show. . . . . . . . . . . . . . . . . . . . . . . . . . . 1–54
Open a slide show . . . . . . . . . . . . . . . . . . . . . . . . . . 1–56
Sort image files . . . . . . . . . . . . . . . . . . . . . . . . . . . . 1–58
View slide show. . . . . . . . . . . . . . . . . . . . . . . . . . . . 1–60
2 Communicating
Connect to a Computer. . . . . . . . . . . . . . . . . . . . . . . . . . . 2–1
Sync with computer. . . . . . . . . . . . . . . . . . . . . . . . . . 2–2
Use the serial infrared (IR) connection . . . . . . . . . . . 2–3
Change synchronization settings. . . . . . . . . . . . . . . . 2–6
Move files . . . . . . . . . . . . . . . . . . . . . . . . . . . . . . . . . 2–9
Back up/restore using Active Sync 3.5 . . . . . . . . . . 2–10
Connect to the Internet or your Network . . . . . . . . . . . . 2–12
Use a modem card . . . . . . . . . . . . . . . . . . . . . . . . . . 2–12
Use an Ethernet/LAN card . . . . . . . . . . . . . . . . . . . 2–17
Synchronize links . . . . . . . . . . . . . . . . . . . . . . . . . . 2–20
Enter an Internet address (URL) . . . . . . . . . . . . . . . 2–21
Select from a favorites list. . . . . . . . . . . . . . . . . . . . 2–22
Use the Universal Remote . . . . . . . . . . . . . . . . . . . . . . . 2–23
Add a device . . . . . . . . . . . . . . . . . . . . . . . . . . . . . . 2–24
Turn on a device . . . . . . . . . . . . . . . . . . . . . . . . . . . 2–28
Add activities. . . . . . . . . . . . . . . . . . . . . . . . . . . . . . 2–30
Use the configuration icons. . . . . . . . . . . . . . . . . . . 2–33
ii Reference Guide
Page 5

Contents
Work with Contacts . . . . . . . . . . . . . . . . . . . . . . . . . . . . 2–34
Create a contact . . . . . . . . . . . . . . . . . . . . . . . . . . . . 2–34
View a list of contacts . . . . . . . . . . . . . . . . . . . . . . . 2–37
Edit contact information . . . . . . . . . . . . . . . . . . . . . 2–38
Categorize contacts . . . . . . . . . . . . . . . . . . . . . . . . . 2–39
Delete contacts. . . . . . . . . . . . . . . . . . . . . . . . . . . . . 2–43
Use the Inbox . . . . . . . . . . . . . . . . . . . . . . . . . . . . . . . . . 2–46
Set up e-mail . . . . . . . . . . . . . . . . . . . . . . . . . . . . . . 2–46
Create/send e-mail. . . . . . . . . . . . . . . . . . . . . . . . . . 2–48
Add an attachment. . . . . . . . . . . . . . . . . . . . . . . . . . 2–51
Receive e-mail. . . . . . . . . . . . . . . . . . . . . . . . . . . . . 2–53
Open e-mail . . . . . . . . . . . . . . . . . . . . . . . . . . . . . . . 2–55
Delete e-mail . . . . . . . . . . . . . . . . . . . . . . . . . . . . . . 2–57
Move e-mail. . . . . . . . . . . . . . . . . . . . . . . . . . . . . . . 2–59
Open folder . . . . . . . . . . . . . . . . . . . . . . . . . . . . . . . 2–62
Manage folders . . . . . . . . . . . . . . . . . . . . . . . . . . . . 2–63
Record Voice . . . . . . . . . . . . . . . . . . . . . . . . . . . . . . . . . 2–67
Make a recording. . . . . . . . . . . . . . . . . . . . . . . . . . . 2–67
Listen to a recording . . . . . . . . . . . . . . . . . . . . . . . . 2–69
Take Notes . . . . . . . . . . . . . . . . . . . . . . . . . . . . . . . . . . . 2–70
Create a note . . . . . . . . . . . . . . . . . . . . . . . . . . . . . . 2–71
3 Scheduling
Use the Today Screen. . . . . . . . . . . . . . . . . . . . . . . . . . . . 3–1
Create information. . . . . . . . . . . . . . . . . . . . . . . . . . . 3–1
Change information. . . . . . . . . . . . . . . . . . . . . . . . . . 3–2
Change Settings. . . . . . . . . . . . . . . . . . . . . . . . . . . . . 3–3
Use the Calendar . . . . . . . . . . . . . . . . . . . . . . . . . . . . . . . 3–5
Look at the calendar . . . . . . . . . . . . . . . . . . . . . . . . . 3–5
Change the calendar view . . . . . . . . . . . . . . . . . . . . . 3–6
Customize the calendar appearance. . . . . . . . . . . . . . 3–6
Schedule appointments . . . . . . . . . . . . . . . . . . . . . . . 3–7
Create reminders . . . . . . . . . . . . . . . . . . . . . . . . . . . . 3–8
Delete appointments . . . . . . . . . . . . . . . . . . . . . . . . . 3–9
Categorize appointments . . . . . . . . . . . . . . . . . . . . . . 3–9
Request meetings. . . . . . . . . . . . . . . . . . . . . . . . . . . 3–11
Reference Guide iii
Page 6

Contents
Use Tasks. . . . . . . . . . . . . . . . . . . . . . . . . . . . . . . . . . . . 3–12
Create a task. . . . . . . . . . . . . . . . . . . . . . . . . . . . . . . 3–12
Create a task quickly . . . . . . . . . . . . . . . . . . . . . . . . 3–13
Delete a task. . . . . . . . . . . . . . . . . . . . . . . . . . . . . . . 3–14
Sort tasks . . . . . . . . . . . . . . . . . . . . . . . . . . . . . . . . . 3–15
Change appearance of tasks. . . . . . . . . . . . . . . . . . . 3–16
4 Using Software
Use Pocket Word . . . . . . . . . . . . . . . . . . . . . . . . . . . . . . . 4–1
Open a Word document. . . . . . . . . . . . . . . . . . . . . . . 4–2
Create. . . . . . . . . . . . . . . . . . . . . . . . . . . . . . . . . . . . . 4–4
Change the Pocket Word options . . . . . . . . . . . . . . . 4–6
Find more help for Pocket Word. . . . . . . . . . . . . . . . 4–9
Use Pocket Excel . . . . . . . . . . . . . . . . . . . . . . . . . . . . . . 4–10
Open. . . . . . . . . . . . . . . . . . . . . . . . . . . . . . . . . . . . . 4–11
Create a Workbook . . . . . . . . . . . . . . . . . . . . . . . . . 4–12
Options. . . . . . . . . . . . . . . . . . . . . . . . . . . . . . . . . . . 4–14
Help . . . . . . . . . . . . . . . . . . . . . . . . . . . . . . . . . . . . . 4–17
Use Microsoft Reader . . . . . . . . . . . . . . . . . . . . . . . . . . 4–18
Activate . . . . . . . . . . . . . . . . . . . . . . . . . . . . . . . . . . 4–18
Copy. . . . . . . . . . . . . . . . . . . . . . . . . . . . . . . . . . . . . 4–19
Delete. . . . . . . . . . . . . . . . . . . . . . . . . . . . . . . . . . . . 4–19
Read an eBook. . . . . . . . . . . . . . . . . . . . . . . . . . . . . 4–22
Listen to an eBook. . . . . . . . . . . . . . . . . . . . . . . . . . 4–23
Annotate your eBook. . . . . . . . . . . . . . . . . . . . . . . . 4–24
Change the Microsoft Reader options. . . . . . . . . . . 4–27
5 Expansion Packs
Use the Single-Slot or Dual-Slot PC Card
Expansion Pack . . . . . . . . . . . . . . . . . . . . . . . . . . . . . . . . 5–1
Install the expansion pack . . . . . . . . . . . . . . . . . . . . . 5–2
Find information . . . . . . . . . . . . . . . . . . . . . . . . . . . . 5–2
iv Reference Guide
Page 7

Use the CompactFlash Card
Expansion Pack . . . . . . . . . . . . . . . . . . . . . . . . . . . . . . . . 5–2
Install the card expansion pack . . . . . . . . . . . . . . . . . 5–3
Find information . . . . . . . . . . . . . . . . . . . . . . . . . . . . 5–3
6 Expansion Cards
View the Content of Memory Cards . . . . . . . . . . . . . . . . 6–2
Use the Optional 802.11 Card for Wireless Connection . 6–3
Install the 802.11 card . . . . . . . . . . . . . . . . . . . . . . . . 6–3
Remove the 802.11 card . . . . . . . . . . . . . . . . . . . . . . 6–4
Find information . . . . . . . . . . . . . . . . . . . . . . . . . . . . 6–4
Use the Optional Modem Card . . . . . . . . . . . . . . . . . . . . 6–4
Install the modem card . . . . . . . . . . . . . . . . . . . . . . . 6–4
Remove the modem card. . . . . . . . . . . . . . . . . . . . . . 6–5
Find information about modem cards . . . . . . . . . . . . 6–5
Use Optional CompactFlash Card . . . . . . . . . . . . . . . . . . 6–5
Install the CF card . . . . . . . . . . . . . . . . . . . . . . . . . . . 6–6
Remove the CF card . . . . . . . . . . . . . . . . . . . . . . . . . 6–6
Find information . . . . . . . . . . . . . . . . . . . . . . . . . . . . 6–6
Use Optional Secure Digital Memory Card. . . . . . . . . . . 6–6
Introduction . . . . . . . . . . . . . . . . . . . . . . . . . . . . . . . . 6–6
Install the SD card . . . . . . . . . . . . . . . . . . . . . . . . . . . 6–7
Remove the SD card . . . . . . . . . . . . . . . . . . . . . . . . . 6–7
Find information . . . . . . . . . . . . . . . . . . . . . . . . . . . . 6–7
Contents
7 Troubleshooting
Reference Guide v
Page 8

Contents
A Regulatory Notices
Federal Communications Commission Notice. . . . . . . . . A–1
Modifications. . . . . . . . . . . . . . . . . . . . . . . . . . . . . . . A–2
Cables . . . . . . . . . . . . . . . . . . . . . . . . . . . . . . . . . . . . A–2
Declaration of Conformity for products marked with the
FCC logo—United States only . . . . . . . . . . . . . . . . . A–2
Canadian Notice. . . . . . . . . . . . . . . . . . . . . . . . . . . . . . . . A–3
Avis Canadien . . . . . . . . . . . . . . . . . . . . . . . . . . . . . . . . . A–3
European Union Notice . . . . . . . . . . . . . . . . . . . . . . . . . . A–3
Japanese Notice . . . . . . . . . . . . . . . . . . . . . . . . . . . . . . . . A–3
Battery Warning. . . . . . . . . . . . . . . . . . . . . . . . . . . . . . . . A–4
Airline Travel Notice . . . . . . . . . . . . . . . . . . . . . . . . . . . . A–4
Power Cords. . . . . . . . . . . . . . . . . . . . . . . . . . . . . . . . . . . A–4
B Hardware Specifications
System Specifications . . . . . . . . . . . . . . . . . . . . . . . . . . . B–1
Physical Specifications. . . . . . . . . . . . . . . . . . . . . . . . . . . B–2
Operating Environment . . . . . . . . . . . . . . . . . . . . . . . . . . B–2
C Routine Care and Battery Guidelines
Routine Care. . . . . . . . . . . . . . . . . . . . . . . . . . . . . . . . . . . C–1
Battery Guidelines . . . . . . . . . . . . . . . . . . . . . . . . . . . . . . C–2
Index
vi Reference Guide
Page 9

1
Getting Acquainted
To use your Compaq iPAQ™ Pocket PC H3900 Series most
effectively, start by learning how to:
■ Register your iPAQ Pocket PC
■ Charge your iPAQ Pocket PC
■ Navigate through the interface
■ Enter information
Because your iPAQ Pocket PC uses some power to maintain files
in RAM and the clock, you need to recharge the battery regularly.
Keep the iPA Q Pocket PC connected to the uni v ersal cradle or the
AC adapter while you are at your desk. The best policy is to k eep
the iP AQ Pocket PC connected to your computer when working at
your desk and carry your AC adapter and DC adapter plug with
you when traveling. Your iPAQ Pocket PC is shipped with a
charge on the battery. You may want to ensure that it is fully
charged before synchronizing.
CAUTION: Because most of the applications and data you install
Ä
on your iPAQ Pocket PC are held in memory, you will need to
reinstall them if the battery completely discharges.
Reference Guide 1–1
Page 10
Getting Acquainted
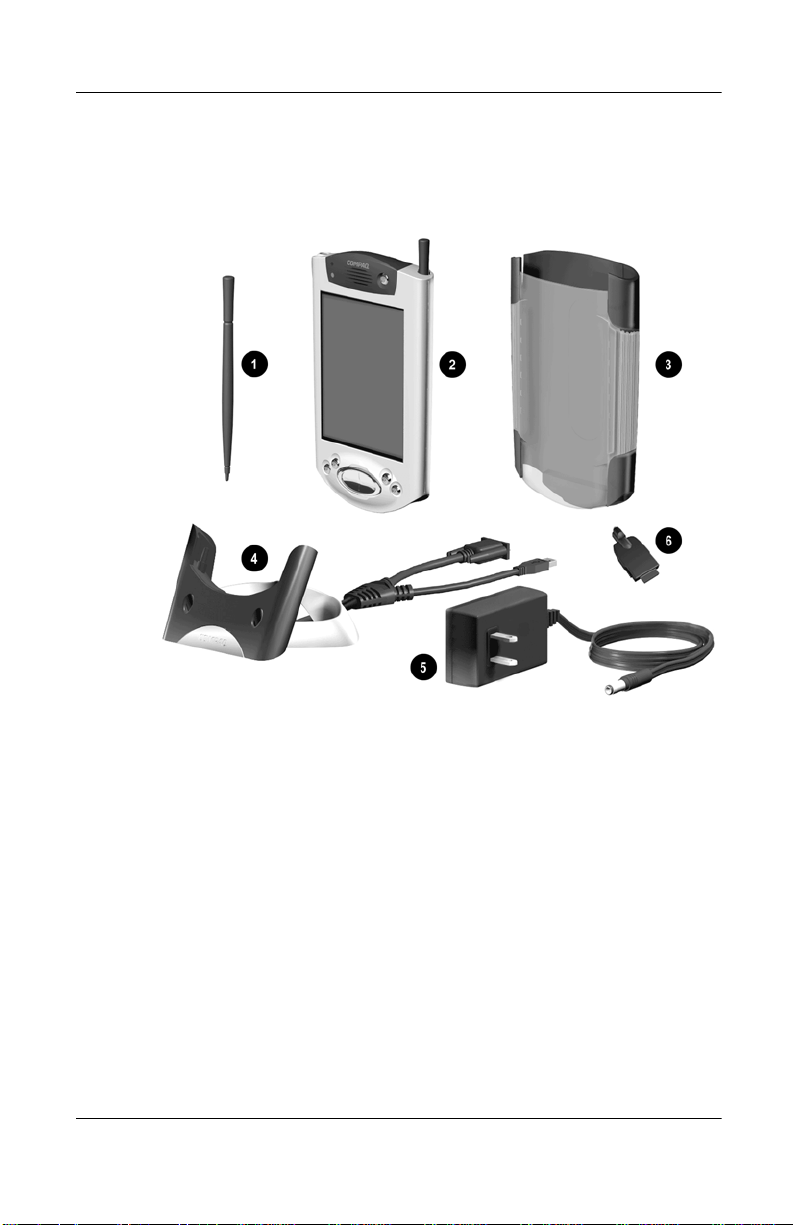
What is in the Box?
Your iPAQ Pocket PC ships with:
1 Extra stylus
2 iPAQ Pocket PC H3900 series
3 Protective cover pack
4 Universal cradle for both USB and serial connections with tether
5 AC adapter
6 DC adapter plug
1–2 Reference Guide
Page 11
The package also includes:
■ The Getting Started Guide
■ Compaq iPAQ Pocket PC Companion CD which contains:
❏ Microsoft® ActiveSync 3.5 software
❏ Add-on software and applications
❏ Detailed eBook guide, which you can copy to your
iPAQ Pocket PC
❏ Interactive reference guide
❏ Comprehensive printable reference guide in .pdf format
If items are missing, contact Customer Support at the numbers
provided in the Worldwide Telephone Numbers booklet.
Top Panel
1. StereoHeadphone Jack
2. Microphone
3. Infrared/Universal Remote Port:
beams information with other mobile
devices
4. Stylus:pushtoeject,pushtolock
5. Secure Digital Expansion Slot:holdsa
Secure Digital (SD) card
Getting Acquainted
Reference Guide 1–3
Page 12
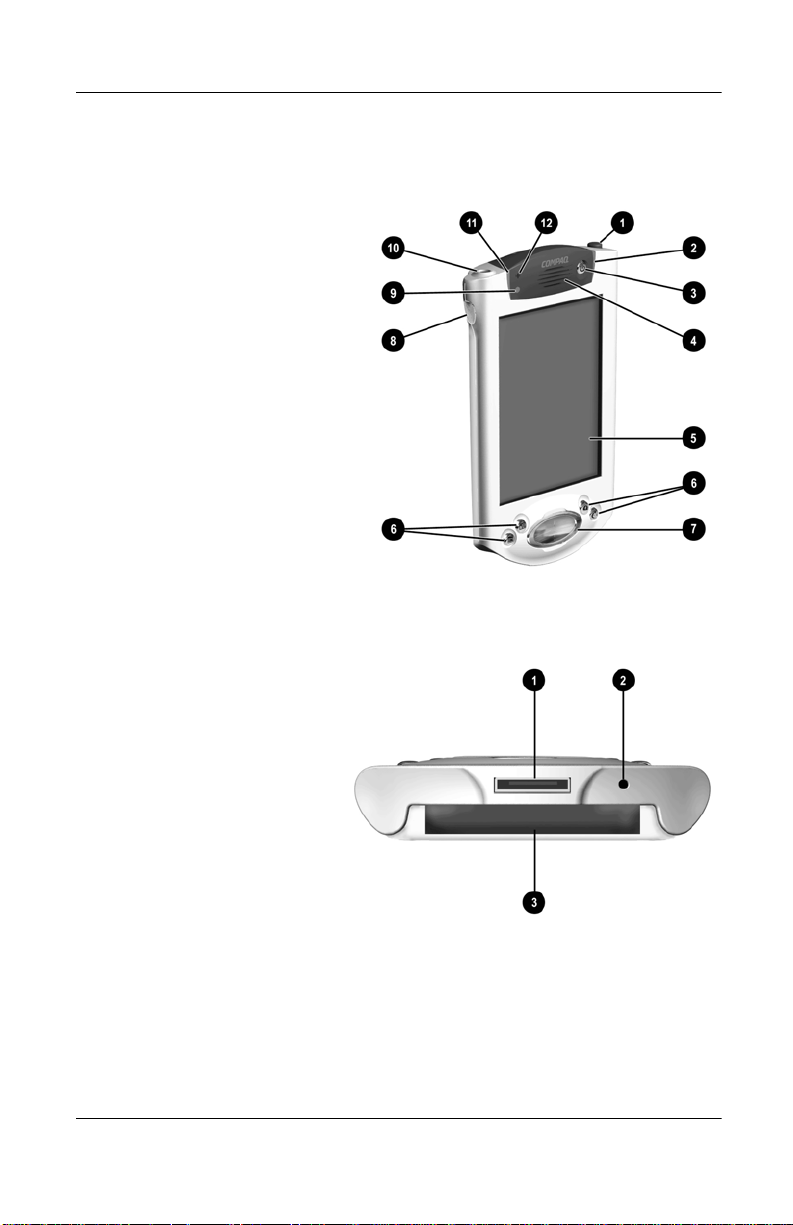
Getting Acquainted
Front Panel
1. Stylus:pushtoeject,pushtolock
2. Power Indicator: amber flash = charging;
amber solid = charged; green = alarm
3. Power Button
4. Speaker: alarms, recordings
5. Color Display
6. Programmable Application Buttons 1-4
(left to right): default setting for button 1 is
Calendar, button 2 is Contacts, button 3 is
Inbox, button 4 is iPAQTask
7. Navigation Button: scroll through a list
8. Record/Application Button
9. Light sensor: adjusts backlight
10. StereoHeadphone Jack
11. Active Bluetooth Indicator: flashes when
Bluetooth radio is on (Bluetooth models
only)
12. Microphone
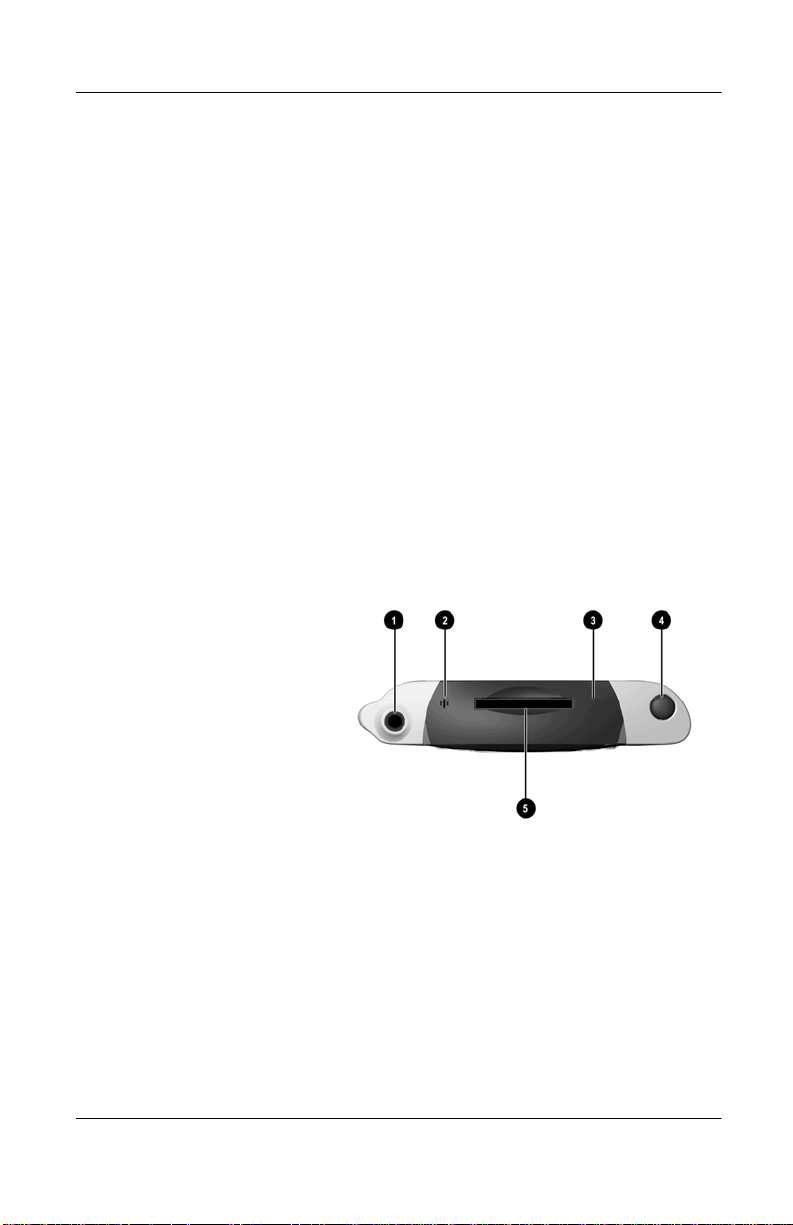
Bottom Panel
1. Charging/Communications Port:
connect to universal cradle, USB, or
serial cable
2. Unit Reset Switch: reset with stylus
3. ExpansionPack Connector: connectto
an optional Expansion Pack
1–4 Reference Guide
Page 13

Register Device
You can receive the latest information on your iPAQ Pocket PC
as well as special offers on iPAQ Pocket PC accessories and
software by mailing the Register Now card included in the
shipping box (North America units only).
Know Your Charging Options
Because your iPAQ Pocket PC uses some power to maintain the
clock and RAM, you need to recharge the battery regularly.
You can use the universal cradle or AC adapter to charge your
iPAQ Pocket PC.
CAUTION: Because most of the applications and data you install
Ä
on your iPAQ Pocket PC are held in memory (RAM), you will need
to reinstall them if the battery completely discharges.
Charge with the universal cradle
Getting Acquainted
You can charge your iPAQ Pocket PC with the universal cradle.
Use the universal cradle to:
■ Synchronize with your computer
■ Recharge the battery of an optional expansion pack, if you
have purchased one (for example, recharge the battery of the
Dual-Slot PC Card Expansion Pack)
Reference Guide 1–5
Page 14
Getting Acquainted
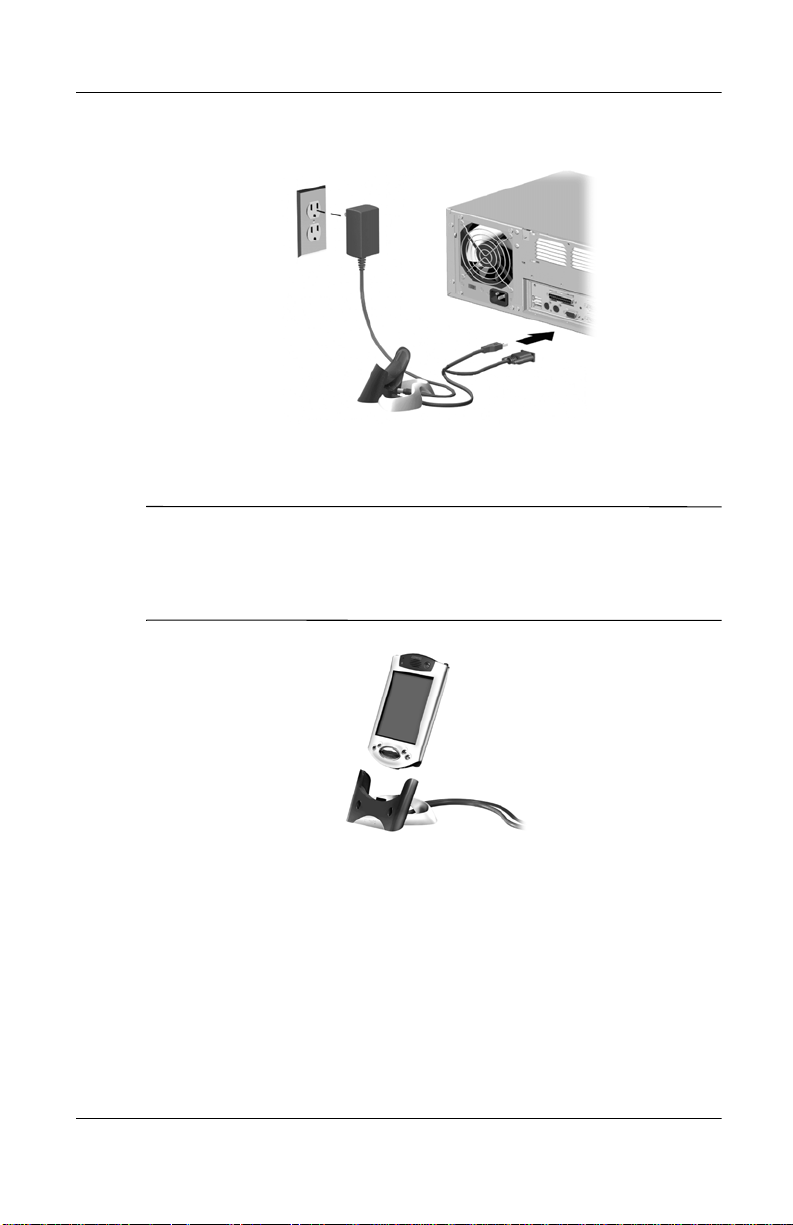
1. Plug the AC adapter of the universal cradle into an outlet.
2. Slide the bottom of your iPAQ Pocket PC into the universal
cradle and push firmly.
The amber charge light blinks when your iPAQ Pocket PC is
✎
recharging the battery.
The amber charge light is solid (nonblinking) when the battery is
fully charged.
3. Microsoft ActiveSync 3.5 opens on your computer and
recognizes your iPAQ Pocket PC.
1–6 Reference Guide
Page 15
Charge with the AC Adapter
You can charge your iPAQ Pocket PC using the AC adapter. If
you purchased an optional expansion pack, you can use the AC
adapter to recharge the battery of an optional expansion pack (for
example, recharge the battery of the Dual-Slot PC Card
Expansion Pack).
The standard adapter works in any household outlet. You can also
purchase one that works in your car’ s cigarette lighter or a 12-volt
power outlet.
CAUTION: Use only Compaq recommended AC adapters.
Ä
1. Locate the AC adapter.
2. Plug the AC adapter into an outlet.
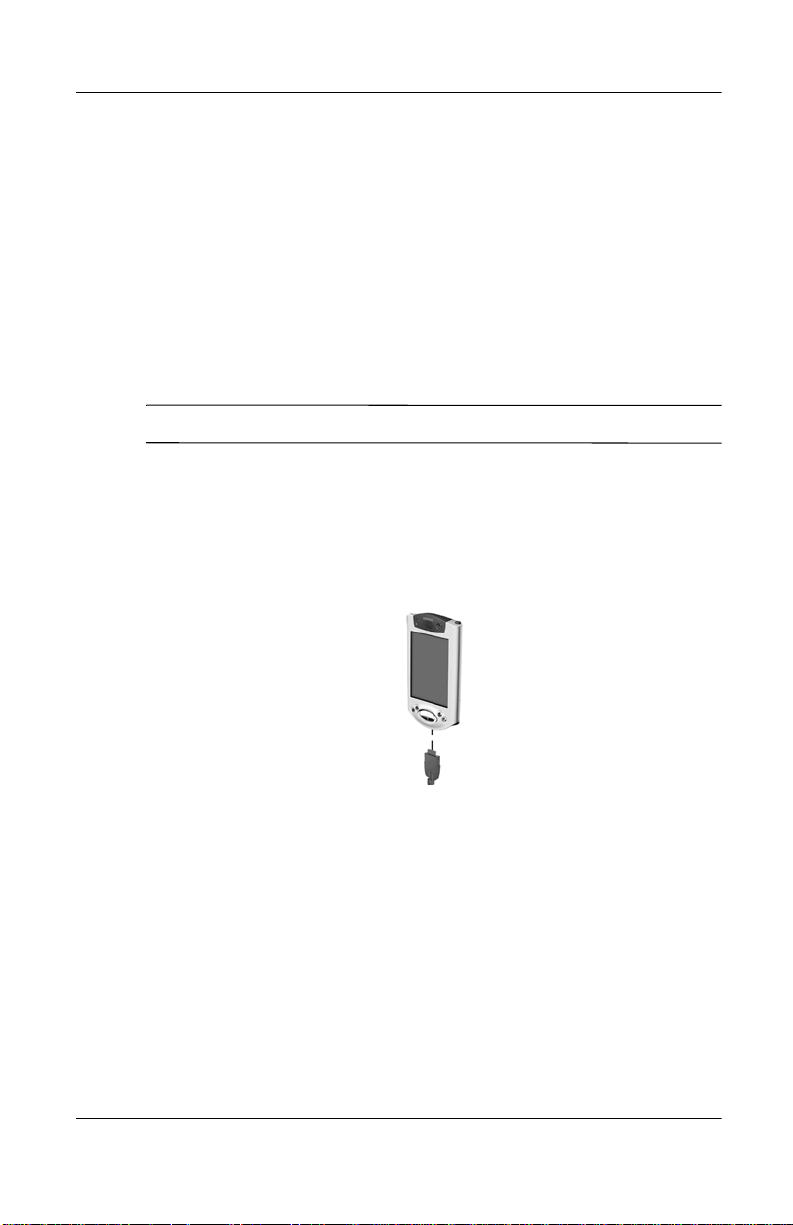
3. Insert the DC adapter plug into the bottom of your iPAQ
Pocket PC.
Getting Acquainted
Reference Guide 1–7
Page 16

Getting Acquainted
4. Insert the AC adapter plug into the DC adapter plug.
Adjust the standby setting
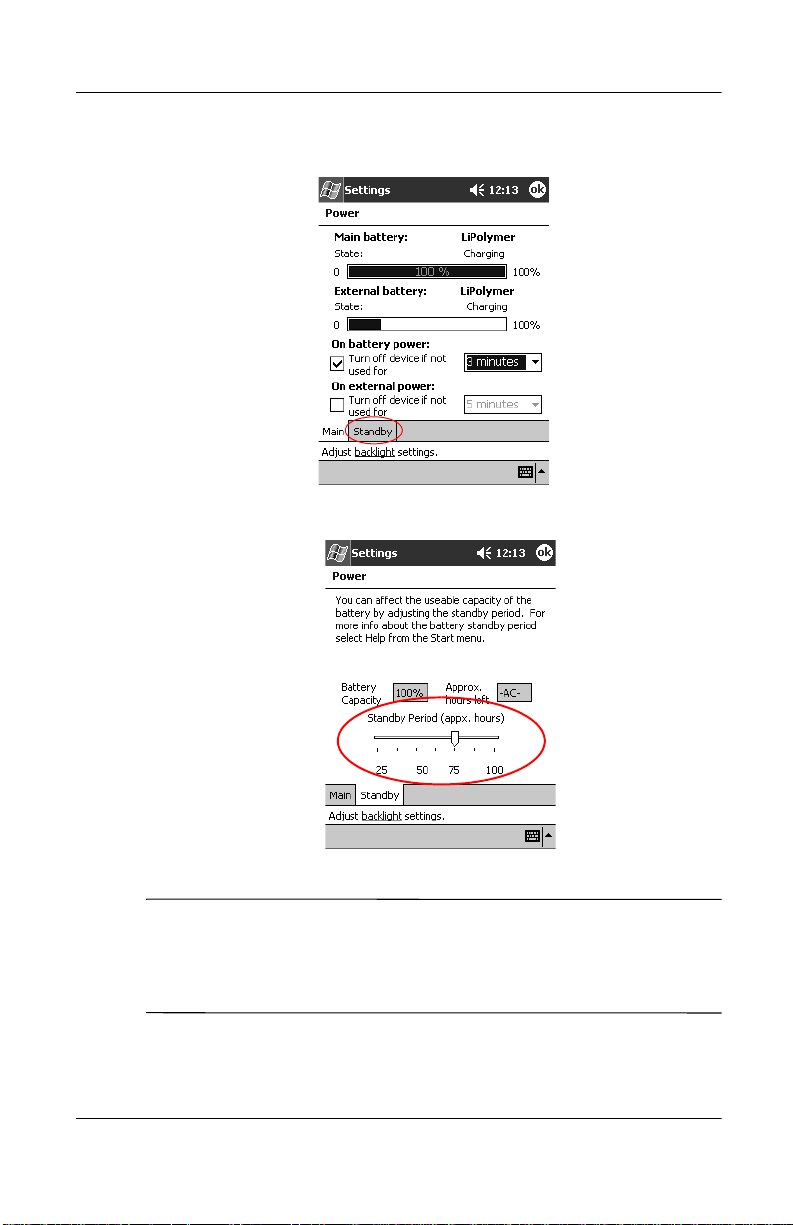
You can preserve battery time by adjusting the standby setting.
During standby, the unit turns off so very little power is being
consumed. This helps to preserve programs and data stored in
the RAM.
It is recommended that you select a lower standby period if you
use the Pocket PC for extended periods of time. A lower standby
period increases the usable battery time.
On the other hand, it is recommended that you select a higher
standby period if you leave your Pocket PC off for extended
periods of time without re-charging it. A higher standby period
decreases the usable battery time and allocates it for standby
usage.
For more information on using the Standby Setting, tap Help
from the Start menu.
1–8 Reference Guide
Page 17

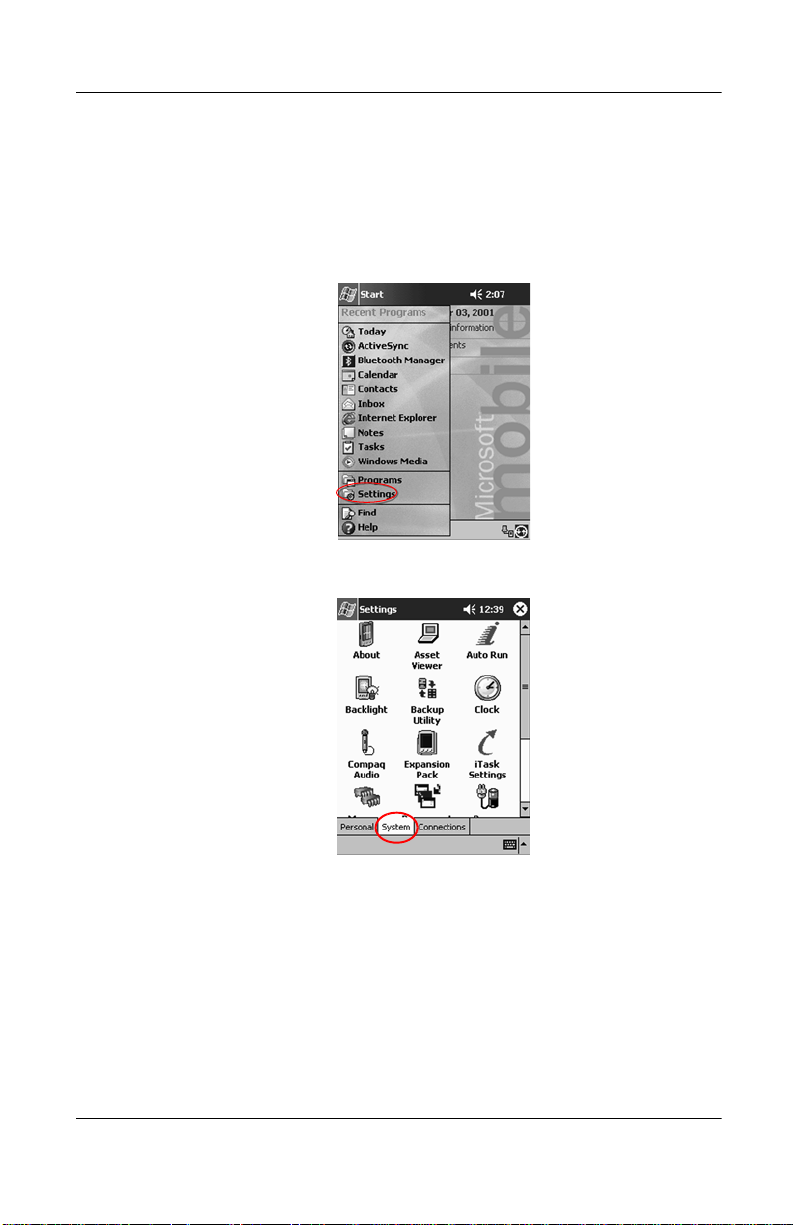
1. From the Start menu, tap Settings.
2. Tap System.
Getting Acquainted
3. Tap the Power icon.
Reference Guide 1–9
Page 18
Getting Acquainted
4. Tap Standby.
5. Drag the pointer to adjust the standby period.
A lower standby period setting increases the usable battery time.
✎
A higher standby period setting decreases the usable battery time
and increases the standby power to help preserve programs and
data in the RAM.
1–10 Reference Guide
Page 19
Change the backlight settings
You may want to change the backlight settings to conserve more
battery power.
1. From the Start menu, tap Settings.
2. Tap System.
Getting Acquainted
3. Tap Backlight.
Reference Guide 1–11
Page 20

Getting Acquainted
4. Select the backlight settings.
Changing the Backlight Settings
On the... Select when to use the...
Battery Power tab Backlight on battery power.
External Power tab Backlight on external power.
Brightness tab Appropriate level of backlight.
Slide the bar to the lowest level to conserve the
most power.
Customize Settings
You can navigate through the iPAQ Pocket PC interface in
three ways:
■ Tap
■ Tap and hold
■ Press application buttons
Tap the screen with the pointed tip of your stylus to open
applications and make selections. For example, tap the Start
menu to see a list of applications available.
Tap and hold an area on the screen to see a pop-up menu.
1–12 Reference Guide
Page 21
Press an application button on the front panel to quickly turn on
the screen and open your Calendar, Contacts, Inbox, or iTask, if
you have not changed the default settings to the buttons.
Realign the screen
When you turn on the screen of your iPAQ Pocket PC for the first
time, you are guided through the alignment process. Realign your
screen if:
■ The iPAQ Pocket PC does not respond accurately to your taps
■ You performed a hard reset of your iPAQ Pocket PC
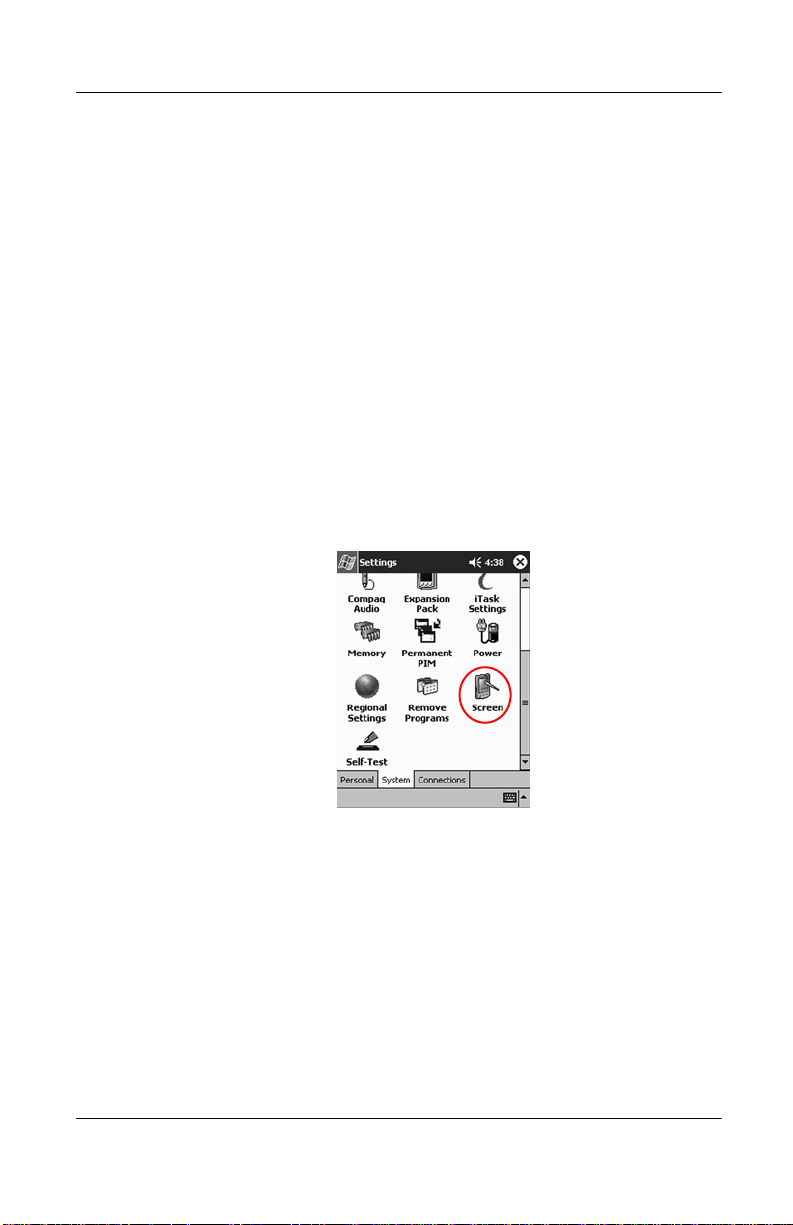
1. From the Start menu, tap Settings.
2. Tap System.
3. Tap the Screen icon.
Getting Acquainted
Reference Guide 1–13
Page 22

Getting Acquainted
4. Tap the Align Screen button.
5. Tap the cross-hair object at each location. Be precise when
you tap the cross-hair object.
6. Tap OK.
1–14 Reference Guide
Page 23

Open applications
Most applications on your iPAQ Pocket PC are only two taps
away from any screen. Open any application on your iPAQ
Pocket PC from the Start menu.
Hint:Open an application by assigning it to an application
button.
1. Tap Start or the Microsoft logo.
2. Tap Programs.
3. Tap the application title or icon.
Getting Acquainted
Minimize applications
From the application you would like to minimize, tap the x.
Close applications
Applications should close automatically as you open new
applications. Howev er , if your iPA Q Pock et PC is running slowly,
you can manually close applications.
1. From the Start menu, tap Settings.
2. Tap System.
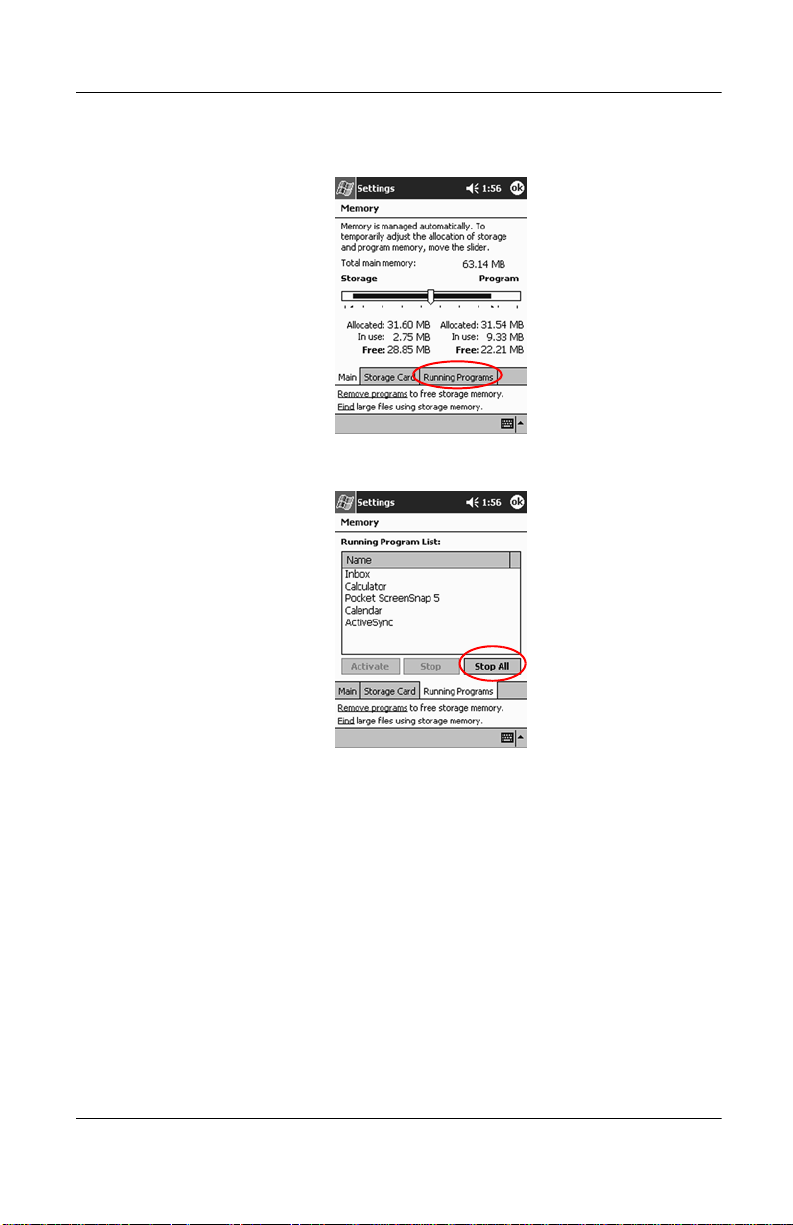
3. Tap Memory.
Reference Guide 1–15
Page 24
Getting Acquainted
4. Tap Running Programs.
5. Tap Stop All or select a particular application, then tap Stop.
Install applications
You can install applications on your iPAQ Pocket PC from your:
■ Computer by using Microsoft ActiveSync 3.5
■ iPAQ Pocket PC if the application file has a .cab extension
■ iPAQ Pocket PC or your computer by copying an application
file that has an .exe or .cef extension
When installing applications, look for the correct version for the
iPAQ Pocket PC.
1–16 Reference Guide
Page 25

Getting Acquainted
Hint: Install important applications to the iPAQ File Store
folder located in the File Explorer on your iPAQ Pocket PC.
Applications in iPAQ File Store are held in R OM and will not
be lost if you perform a hard reset of your iPAQ Pocket PC or
if the battery loses its charge. iPAQ File Store can store
between 5 and 6 MB of information, depending on the model.
1. Follow the instructions in the installation wizard to install
applications from your computer.
2. Tap the application file in File Explorer and follow the
instructions in the installation wizard to install applications
from your iPAQ Pocket PC.
From the Start menu, tap Programs, then tap File Explorer
to open File Explorer.
3. T ap the application file to install and mo ve it to the Programs
folder on your iPAQ Pocket PC.
4. If your application does not run, insert the stylus for 1 second
into the Unit Reset switch on the bottom of your iPAQ
Pocket PC.
Set the time for home
When you turn on the screen of your iPAQ Pocket PC for the first
time, you are guided through setting the time. You will need to set
the time again if
■ The battery completely discharges
■ You perform a hard reset of your iPAQ Pocket PC
Hint: From the Today screen, tap the Clock icon to set
the time.
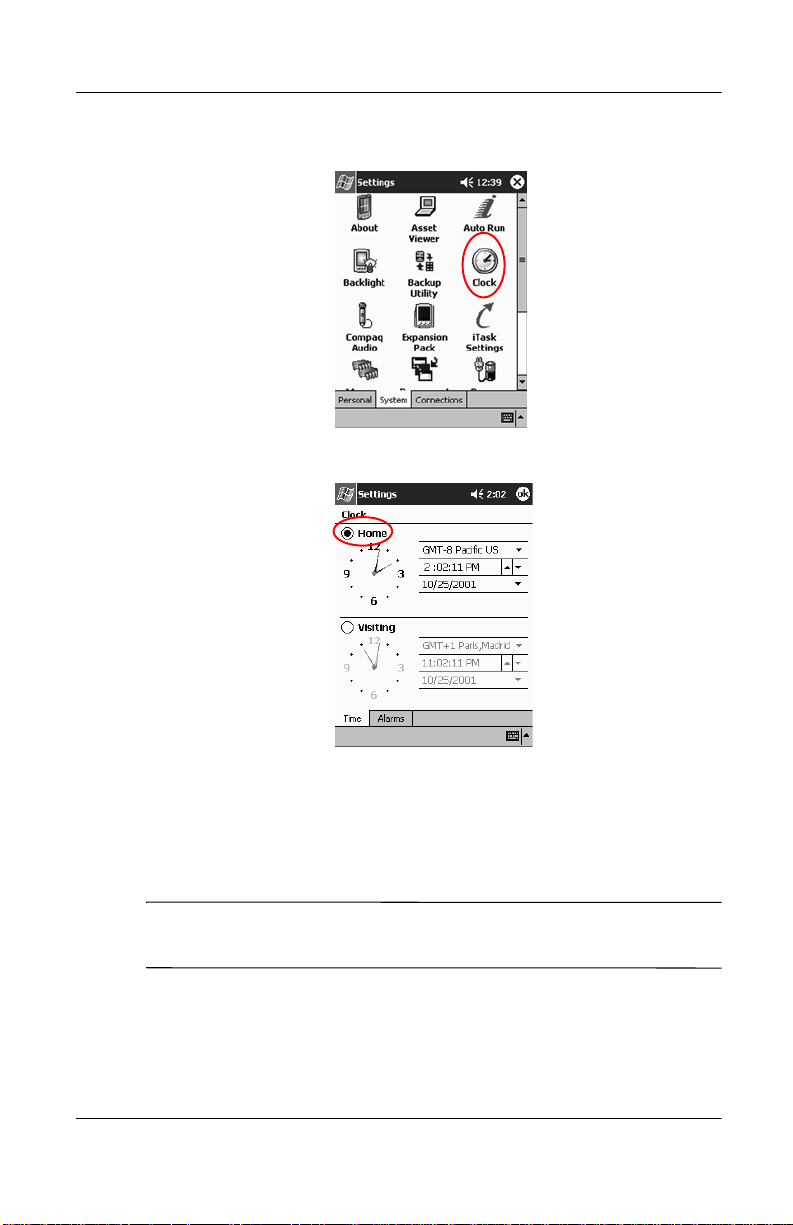
1. From the Start menu, tap Settings.
2. Tap System.
Reference Guide 1–17
Page 26
Getting Acquainted
3. Tap Clock.
4. Verify Home is selected or Tap Home.
5. Tap the time-zone down arrow, then select your home
time zone.
6. Tap the hour, minutes, or seconds, then use the up and down
arrows to adjust the time.
You can adjust the time by moving the hands of the clock with the
✎
stylus.
7. Tap AM or PM.
8. Tap OK.
1–18 Reference Guide
Page 27

Getting Acquainted
9. Tap Yes to save the time.
Set the time for a location you are visiting
Set the time for a location you are visiting.
From the Today screen, tap the Clock icon to set the time.
✎
1. From the Start menu, tap Settings.
2. Tap System.
3. Tap Clock.
4. Tap Visiting.
Reference Guide 1–19
Page 28

Getting Acquainted
5. T ap the time-zone down arrow, then select the time zone you
are visiting.
6. Tap the hour, minutes, or seconds, then use the up and down
arrows to adjust the time.
You can adjust the time by moving the hands of the clock
with the stylus.
7. Tap AM or PM.
8. Tap OK.
9. Tap Yes to save the time.
Set the date
When you turn on the screen of your iPAQ Pocket PC for the first
time, set the date. Set the date again if:
■ The battery discharges completely
■ You perform a hard reset of your iPAQ Pocket PC
■ From the Today screen, tap the Clock icon to set the date.
1. From the Start menu, tap Settings.
2. Tap System.
3. Tap Clock.
1–20 Reference Guide
Page 29

4. Tap the date down arrow.
5. Tap the left or right arrow to select a month and year.
6. Tap a day.
7. Tap OK.
8. Tap Yes to save the date.
Customize the application buttons
Getting Acquainted
You can quickly open your Calendar, Contacts, Inbox, or iTask
applications by pressing an application button on the front panel
of your iPAQ Pocket PC. If you want to open other applications
with those buttons, then you must change the default
assignments.
1. From the Start menu, tap Settings.
2. Tap Buttons.
Reference Guide 1–21
Page 30

Getting Acquainted
3. Tap the button you want to change.
4. Tap the button-assignment down arrow.
5. Tap an application.
6. Tap OK.
1–22 Reference Guide
Page 31

Use iPAQ Backup
iPAQ Backup protects your data from hardware failures, loss of
battery power, and accidental deletions.
Using iPAQ Backup, you can:
■ Back up and restore selected files, folders, and databases on
your Pocket PC
■ Copy the entire Pocket PC system state (for example, the
registry, user and system databases, and data files)
■ Schedule regular backup
Back up files, registry and databases
You can back up files, registry, and databases. A backup file can
be saved to a media (for example, storage card or hard drive) that
you could use for storing any other file.
1. From the Start menu, tap Programs.
Getting Acquainted
Reference Guide 1–23
Page 32

Getting Acquainted
2. Tap iPAQBackup.
3. Select files, folders, or databases from the tree view.
1–24 Reference Guide
Page 33

Getting Acquainted
4. Tap the ... button.
5. Enter a name and saving location for the back up data, then
tap OK.
6. Tap Options... to set backup options.
Reference Guide 1–25
Page 34

Getting Acquainted
7. Select whether to:
a. Compress and/or encrypt data
b. Exclude files from the backup
Selecting backup options
If you select... Then...
Compress Data The back up file will be smaller, but the
process will take longer.
Encrypt Data The backup file (*.sif) will be encrypted.
The user must enter an alphanumeric
password (6-15 digits) to proceed with
the backup then re-enter the password
to restore the data.
Stop Process Before Backup All active applications will be closed
prior to the backup.
Exclude iPAQ backup (*.sif), program (*.exe and
*.dll), log (*.log), and storage card files
are excluded from the backup.
8. Tap OK.
1–26 Reference Guide
Page 35

Getting Acquainted
9. Tap the Backup... button.
10. Tap the Start button.
Restore back up files, registry, and databases
1. From the Start menu, tap Programs.
Reference Guide 1–27
Page 36

Getting Acquainted
2. Tap iPAQBackup.
3. Tap the Restore tab.
1–28 Reference Guide
Page 37

4. Tap the ... button in the File field.
5. Select a back up file.
Getting Acquainted
Reference Guide 1–29
Page 38

Getting Acquainted
6. Select the data you want to restore from the tree view.
7. Tap Options... to set restore options.
It is recommended that you shut down all activ e applications prior
✎
to restoring files.
8. Tap OK.
1–30 Reference Guide
Page 39

9. Tap the Restore button.
10. Tap the Start button.
Schedule a backup
You can schedule a backup to run at a certain time and date.
1. From the Start menu, tap Programs.
Getting Acquainted
Reference Guide 1–31
Page 40

Getting Acquainted
2. Tap iPAQBackup.
3. Tap the Backup... tab.
4. Tap the Options button.
1–32 Reference Guide
Page 41

5. Tap the Schedule button.
6. Select Enable Scheduled Start Up.
Getting Acquainted
Reference Guide 1–33
Page 42

Getting Acquainted
7. Select one of the Frequency radio buttons.
Selecting a frequency for backup
If you select... Then the backup will...
Once Begin at a designated future time and
date.
Daily Occur at the same time each day.
Weekly Occur on a scheduled day at a certain
time each week.
8. Tap OK.
Monitor the battery
You can monitor the state of the battery and be notified when the
battery falls below a specified threshold. You can then elect to:
■ Dismiss which cancels the notification and battery
monitoring service
■ Snooze for a certain period of time then receive the battery
notification again
■ Run which starts the iPAQ Backup program
1. From the Start menu, tap Programs.
1–34 Reference Guide
Page 43

2. Tap iPAQBackup.
3. Tap the Backup... tab.
4. Tap the Options button.
Getting Acquainted
Reference Guide 1–35
Page 44

Getting Acquainted
5. Tap the Schedule button.
6. Select Enable Battery Monitor.
7. Select a Threshold(%) value.
The Threshold(%) value must be between 90% and 10%.
✎
8. Tap OK.
1–36 Reference Guide
Page 45

Enter Information
You can enter letters, symbols, and numbers on the iPAQ
Pocket PC screen by:
■ Tapping the Keyboard
■ Writing with the stylus and using the Letter Recognizer,
Transcriber, or Block Recognizer to create text
■ Drawing and writing with the stylus
You can tap the keyboard or write with the Letter Recognizer,
Transcriber, or Block Recognizer in any application.You can use
the stylus to draw and write on the screen in the Notes application
and from any Notes tab in the Calendar, Contacts, and Tasks
applications.
As you type or write, the iPAQPocket PC suggests words for you
✎
in a box above the Keyboard, Letter Recognizer, or Block
Recognizer but not in the Transcriber. You can determine when
the suggestions occur (for example, decide how many letters you
must enter before the Letter Recognizer will make suggestions)
and how many words are suggested.
Getting Acquainted
Change word suggestion options
You can determine:
■ If words are suggested
■ The number of letters you must enter before a word is
suggested
■ The number of words that are suggested per entry
■ If you do not want any words suggested, tap the check box
next to “Suggest Words When Entering Text.”
Reference Guide 1–37
Page 46

Getting Acquainted
1. From the Start menu, tap Settings.
2. Tap Input.
1–38 Reference Guide
Page 47

Getting Acquainted
3. Tap Word Completion.
4. Determine how many letters you want to type before a
suggestion is made, then tap the down arrow associated with
letters.
Reference Guide 1–39
Page 48

Getting Acquainted
5. Determine how many words you want suggested, then tap the
down arrow associated with words.
6. Tap OK.
Type with the On-screen Keyboard
You can enter typed text directly on the screen by tapping letters,
numbers, and symbols on the Keyboard.
To see the symbols, tap the 123 or Shift key.
✎
1. From any application, tap the up arrow next to the Input
Panel icon.
1–40 Reference Guide
Page 49

Getting Acquainted
2. Tap Keyboard to display a keyboard on the screen.
3. Tap a letter, symbol, or number to enter information.
4. Tap OK.
Write with the stylus and the Letter Recognizer
You can write letters, numbers, and symbols on the screen using
the stylus and the Letter Recognizer. You create words and
sentences by writing in upper case (ABC), lower case (abc), and
symbols (123) in specific areas.
1. From any application, tap the up arrow next to the Input
Panel button.
Reference Guide 1–41
Page 50

Getting Acquainted
2. Tap Letter Recognizer.
3. Write a letter or symbol between the dashed line and
baseline.
a. Write a letter between the hatch marks labeled ABC to
b. Write a letter between the hatch marks labeled abc to
c. Write a number or symbol between the hatch marks
display in upper case.
display in lower case.
labeled 123.
Hint:You should write characters between the dashed line
and baseline for the character recognizer to work effectively.
If you are writing a letter like “p, ” write the top portion within
the dashed line and baseline, and the tail portion below the
baseline.
If you writing a letter like “b,” write the bottom portion
within the dashed line and baseline, and the top portion above
the dashed line.
4. What you write will be converted to text.
1–42 Reference Guide
Page 51

Getting Acquainted
Write with the stylus and the Transcriber
You can write words, letters, numbers, and symbols anywhere on
the screen using the stylus and Transcriber.
1. From any application, tap the up arrow next to the Input
Panel button.
2. Tap Transcriber.
3. Write on the screen.
4. What you write will be converted to text.
Reference Guide 1–43
Page 52

Getting Acquainted
Write with the stylus and Block Recognizer
You can write letters, numbers, and symbols using the stylus and
Block Recognizer. You create words and sentences by writing
letters and numbers in specific areas.
1. From any application, tap the up arrow next to the Input
Panel button.
2. Tap Block Recognizer.
3. Write a word, letter, or symbol between the hatch marks.
a. Write a letter between the hatch marks labeled “abc” to
type text.
b. Write a number or symbol between the hatch marks
labeled “123” to type numbers or symbols.
1–44 Reference Guide
Page 53

4. What you write will be converted to text.
Draw and write on the screen
Use the stylus as a pen to draw and write on the screen in the
Notes application or from the Notes tab in Calendar, Contacts, or
Tasks.
1. From the Start menu, tap Notes.
Getting Acquainted
Reference Guide 1–45
Page 54

Getting Acquainted
2. Tap New. Otherwise, tap the Notes tab in Calendar, Contacts,
or Tasks, then tap the Pen icon.
3. Draw and write on the screen.
4. Tap the Pen icon.
5. Tap OK.
1–46 Reference Guide
Page 55

Convert writing to text
Convert your writing to text when you write with the pen in the
Notes application or from the Notes tab in:
■ Calendar
■ Contacts
■ Tasks
1. From the Start menu, tap Notes. Otherwise, tap the Notes tab
in Calendar, Contacts, or Tasks.
2. Tap a note to open it.
Getting Acquainted
3. Tap Tools.
Reference Guide 1–47
Page 56

Getting Acquainted
4. Tap Recognize.
To convert a particular word or phrase, highlight it before you tap
✎
Recognize. If you select more than one word and one is not
recognized, all the other words will be converted. The
unrecognized word will remain written.
.
5. Tap OK.
View Images
You can use the iPAQ Image Viewer to view BMP, JPEG, and PNG
images.
Using the Image Viewer, you can:
■ Create a slide show of images
■ Sort and rotate images
■ Adjust the timing between images in a show
■ Set a variety of transition effects
1–48 Reference Guide
Page 57

Locate an image
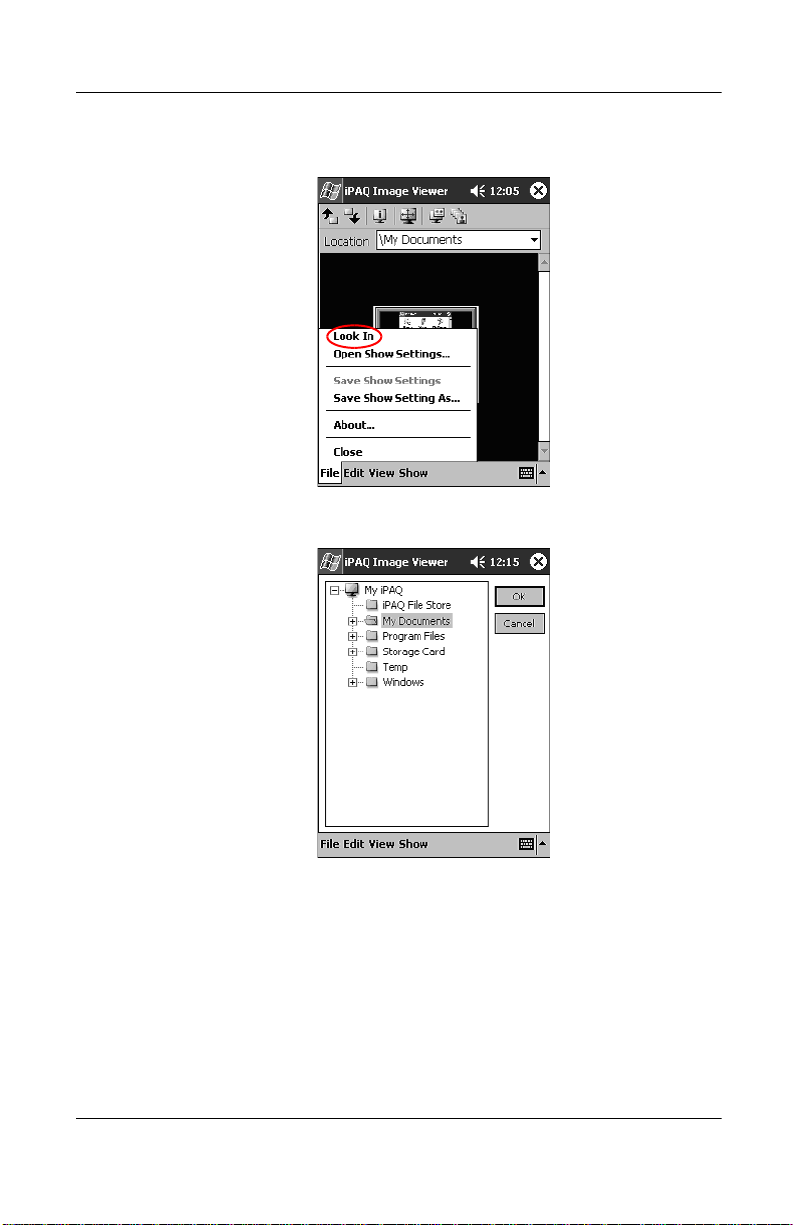
1. From the Start menu, tap Programs.
2. Tap iPAQ Image Viewer.
Getting Acquainted
Reference Guide 1–49
Page 58
Getting Acquainted
3. Tap File, then Look In.
4. Select a file from the tree structure, then tap OK.
1–50 Reference Guide
Page 59

View image information
You can view the image size and type, date taken and modified,
color, and file size of an image.
1. Locate an image (see section “Locate an image”).
2. Tap image to select it.
Getting Acquainted
3. Tap View, then Image Information.
Reference Guide 1–51
Page 60

Getting Acquainted
Change the view
Images are displayed in the thumbnail view by default. The
iPAQ Image Viewer opens showing the images in the Thumbnail
View. This is the default setting when opening images in the
iPAQ Image Viewer.
You can change the view to full screen by:
■ Double clicking a thumbnail
■ Tapping View, then Full Screen
■ Tapping the View Full Screen icon
Create a Slide Show
You can put images together to create a slide show and control
display options like:
■ Orientation
■ Zoom
■ Image Quality
■ Transition Effect
■ Timing
1–52 Reference Guide
Page 61

1. From the Start menu, tap Programs.
2. Tap iPAQ Image Viewer.
Getting Acquainted
Reference Guide 1–53
Page 62

Getting Acquainted
3. Tap Show, then Set up Show....
4. Select images for the show and modify any image settings.
To change settings for all images in the show, click the Select All
✎
button.
5. Tap OK.
1–54 Reference Guide
Page 63

Save a slide show
You can save the show settings and use them again.
1. From the Start menu, tap Programs.
2. Tap iPAQ Image Viewer.
Getting Acquainted
3. Create slide show (see section “Create a slide show”).
Reference Guide 1–55
Page 64

Getting Acquainted
4. Tap File, then Save Show Settings or Save Show
Settings As.
5. Enter the name and location where you want to save the
settings.
6. Tap OK.
1–56 Reference Guide
Page 65

Open a slide show
You can open a saved show settings.
1. From the Start menu, tap Programs.
2. Tap iPAQ Image Viewer.
Getting Acquainted
Reference Guide 1–57
Page 66

Getting Acquainted
3. Tap File, then Open Show Settings...
4. Select the show setting.
1–58 Reference Guide
Page 67

Sort image files
You can sort images in the show.
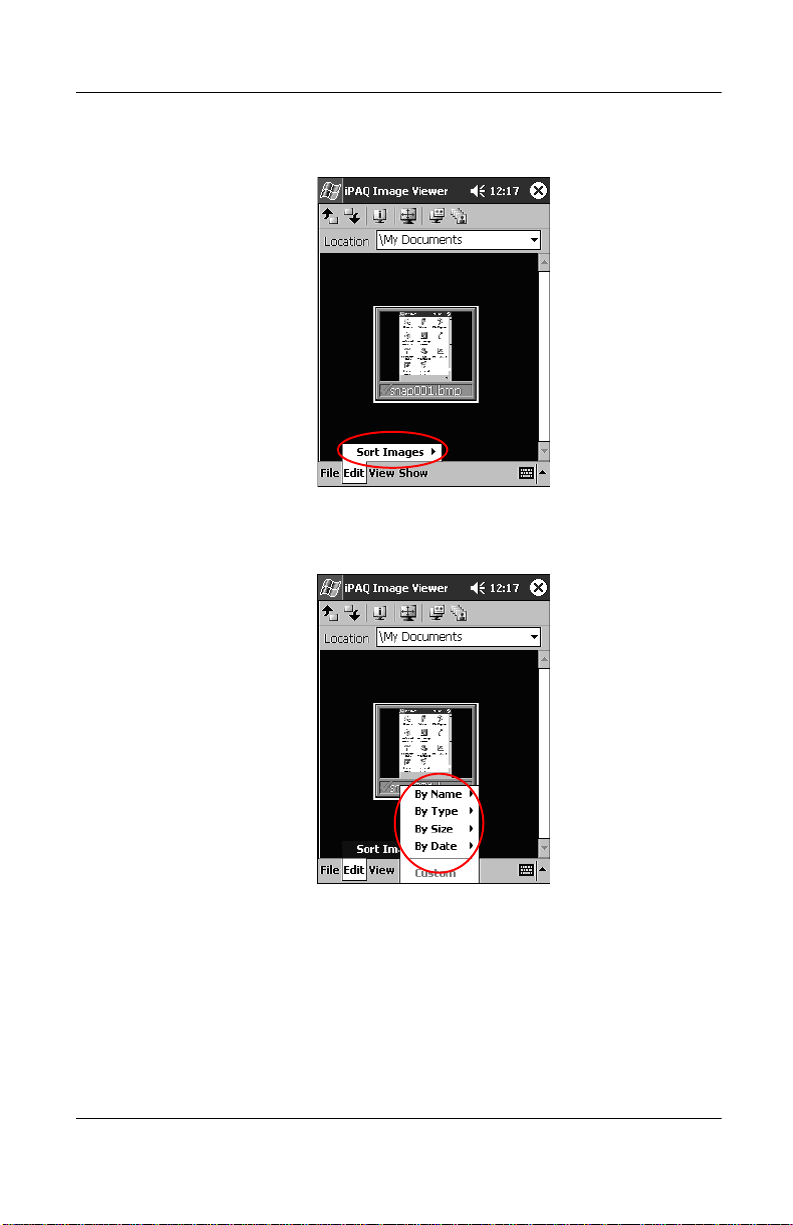
1. From the Start menu, tap Programs.
2. Tap iPAQ Image Viewer.
Getting Acquainted
Reference Guide 1–59
Page 68
Getting Acquainted
3. Tap Edit, then Sort Images.
4. Select sort order. You can sort by ascending or descending
name, type, size, or date.
1–60 Reference Guide
Page 69

View slide show
1. From the Start menu, tap Programs.
2. Tap iPAQ Image Viewer.
Getting Acquainted
3. Create (see section “Create a slide show”) or open existing
slide show (see section “Open a slide show”).
Reference Guide 1–61
Page 70

Getting Acquainted
4. Tap Show, then View Show.
5. Select how to advance the images in the sho w. You can select
to manually advance, automatically advance, or use a loop.
1–62 Reference Guide
Page 71

Your Compaq iPAQ Pocket PC H3900 Series lets you
communicate in many ways:
■ Connect to a computer
■ Connect to the Internet or your network
■ Communicate with other devices
■ Create and organize contacts
■ Use the e-mail Inbox
■ Record messages with the microphone
■ Take notes
Connect to a Computer
You connect your iPAQ Pocket PC to your computer using
Microsoft ActiveSync 3.5 and either a USB or serial cable and a
cradle or an infrared connection.
2
Communicating
With Microsoft ActiveSync 3.5, you can
■ Synchronize information manually or automatically with
applications on your computer
■ Synchronize information on your server while connected to
your computer
■ Move files to and from your computer
Reference Guide 2–1
Page 72

Communicating
■ Install applications on your iPAQ Pocket PC
■ Back up and restore information using the Microsoft
ActiveSync 3.5 Backup/Restore utility
Sync with computer
CAUTION: For synchronization to work properly, install Microsoft
Ä
ActiveSync 3.5 before you connect your iPAQ Pocket PC to your
computer.
During installation, you can
■ Create partnerships, which allow you to synchronize
information with multiple computers
■ Select the information to synchronize with your iPAQ
Pocket PC (for example, Contacts, Calendar, Inbox, Tasks,
Favorites, Files, Notes, and AvantGo)
Hint: If you have selected to synchronize files, you should
drag and drop the selected files from your computer to the
synchronized folder for your Compaq iPAQ Pocket PC on
your desktop. If you named your Pocket PC, PC1, when you
created your partnership, then the synchronized folder is
named “PC1.”
When you synchronize, the files move to your iPAQ
Pocket PC.
1. Insert the Compaq iP AQ Pocket PC Companion CD into your
computer.
2–2 Reference Guide
Page 73

2. Follow the instructions in the installation wizard. For more
help, click the ActiveSync Help button during installation.
The information you selected will automatically synchronize
when your installation is complete.
Use the serial infrared (IR) connection
After setting up a connection with a USB or serial cable and a
cradle, synchronize your iPAQ Pocket PC and your computer
using an infrared connection if you have an infrared port or an
infrared USB adapter installed on your computer. The infrared
connection option works only on computers that have
Windows 98, Me or 2000 operating systems installed.
Communicating
1. “Sync with computer” using a USB or serial cable and a
cradle.
2. Follow your computer manufacturer’s instructions to install
and set up an infrared port.
3. Place your iPAQ Pocket PC and the infrared port so they are
unobstructed and within 12 inches of each other.
Reference Guide 2–3
Page 74

Communicating
4. From the Start menu, tap ActiveSync.
5. Tap Tools.
6. Tap Connect via IR.
2–4 Reference Guide
Page 75

Communicating
7. From your computer, open Microsoft ActiveSync.
From the Start menu, click Programs, then click
Microsoft ActiveSync.
8. From the File menu, select Connection Settings.
Reference Guide 2–5
Page 76

Communicating
9. Click “Allow serial cable or infrared connection to this
COM port.”
10. Click the down arrow and choose Infrared Port (IR).
11. Align the IR ports to establish a connection.
12. Move the devices away from each other to disconnect.
Change synchronization settings
You can change your synchronization settings for Microsoft
ActiveSync 3.5 to:
■ Change when your iPAQ Pocket PC synchronizes with your
computer
■ Change when your iPAQ Pocket PC synchronizes with your
server
■ Change the type of connection from your iPAQ Pocket PC to
your computer (for example, serial, USB, or infrared
connections)
■ Select the files and information to synchronize with your
computer
2–6 Reference Guide
Page 77

Communicating
■ Select the files and information you do not want to
synchronize with your computer (for example, e-mail
attachments)
■ Determine how conflicts between information on your
iPAQ Pocket PC and information on your computer are
handled
1. From your computer, open Microsoft ActiveSync.
From the Start menu, click Programs, then click
Microsoft ActiveSync.
2. From the Tools menu, click Options.
a. On the Sync Options tab, select the files and information
to synchronize with your computer.
b. On the Sync Mode tab, select when your
iPAQ Pocket PC synchronizes with your computer.
Reference Guide 2–7
Page 78

Communicating
c. On the Rules tab, determine how conflicts between
3. From the File menu, click Connection Settings. Select the
type of connection that will be allowed between the iPAQ
Pocket PC and computer.
information on your iPAQ Pock et PC and information on
your computer are handled.
2–8 Reference Guide
Page 79

Move files
If you have not selected to synchronize files, move files to and
from your computer using Explore in ActiveSync 3.5 and
Windows Explorer.
Hint: You should move important information to the iPAQ
File Store folder located in the File Explorer on your iPAQ
Pocket PC. Information in iPAQ File Store is held in ROM
and will not be lost if you perform a hard reset of your iPAQ
Pocket PC or if the battery loses its charge. iPAQ File Store
can store between 5 and 6 MB of information, depending on
the model.
CAUTION: You should move your files directly into My Documents
Ä
or into a folder inside your My Documents f older , so the applications
on your iPAQ Pocket PC can find your files.
1. From your computer, open Microsoft ActiveSync.
From the Start menu, click Programs, then click
Microsoft ActiveSync.
Communicating
2. Click Explore.
Reference Guide 2–9
Page 80

Communicating
3. Double-click to open your synchronized Pocket PC.
4. Right-click the Start menu, then select Explore.
5. Drag and drop your files between your Pocket PC and
Windows Explorer. ActiveSync 3.5 converts the files, so that
they can be used by the Pocket Office applications if
necessary.
Back up/restore using Active Sync 3.5
You should back up information to your computer and restore
information from your computer to your iPAQ Pocket PC to help
reduce the chance of losing information.
Restoring your information replaces the current information on
your iPAQ Pocket PC with the information saved in your backup.
2–10 Reference Guide
Page 81
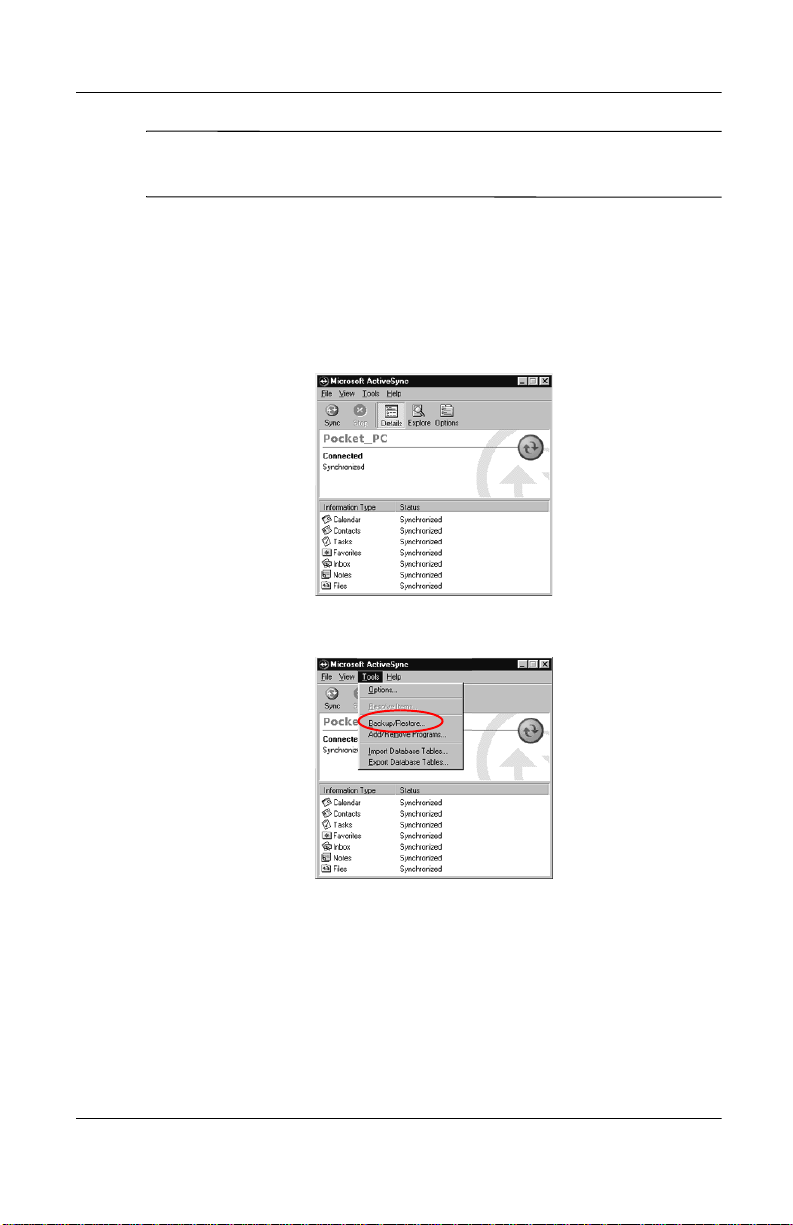
Close all applications on your iPAQ Pocket PC before restoring
✎
your information.
1. Make sure your iPAQ Pocket PC is connected to your
computer.
2. From your computer, open Microsoft ActiveSync.
From the Start menu, click Programs, then click
Microsoft ActiveSync.
3. From the Tools menu, click Backup/Restore.
Communicating
Reference Guide 2–11
Page 82
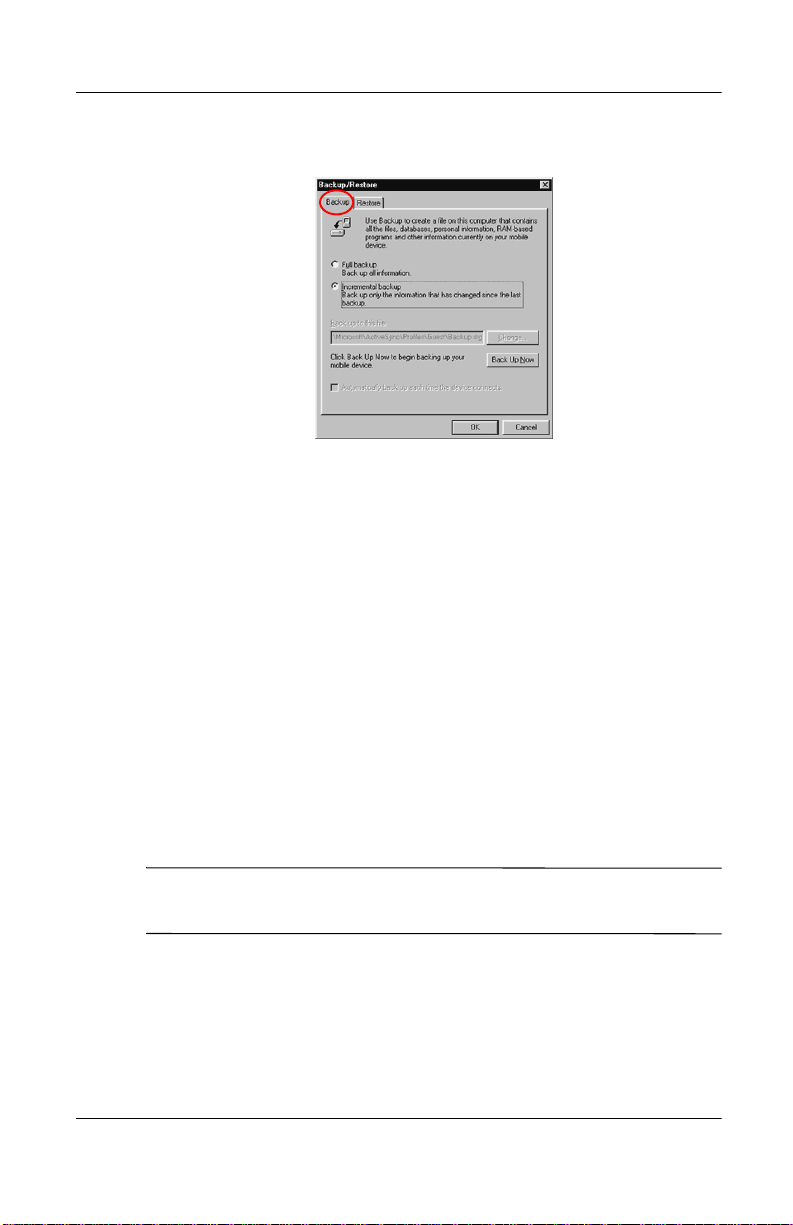
Communicating
4. Click the Backup or Restore tab, then select your options.
5. Click Backup Now or Restore Now.
Connect to the Internet or your Network
To send and receive e-mail with Inbox and view Web sites with
Pocket Internet Explorer, you must set up a remote connection
using a modem card or an Ethernet/LAN card.
To disconnect, remove the card from your iPAQ Pocket PC.
Use a modem card
To connect to the Internet with a modem card, you need a phone
line, a dial-up Internet Service Provider, and an optional
Single-Slot or Dual-Slot PC Card Expansion Pack, Expansion
Pack Plus, or CompactFlash (CF) Card Expansion Pack.
Insert your modem card before trying to set up a modem
✎
connection.
2–12 Reference Guide
Page 83

Communicating
1. Insert your modem card into your Single-Slot or Dual-Slot
PC Card Expansion Pack, Expansion Pack Plus, or
CompactFlash (CF) Card Expansion Pack.
a. Most of the popular modem card drivers are included on
your iPAQ Pocket PC, so your modem card should be
recognized.
b. If your modem card is not recognized, follow your
modem manufacturer’s instructions to install the modem
card driver on your computer.
2. From the Start menu, tap Settings.
3. Tap the Connections tab.
4. Tap the Connections icon.
Reference Guide 2–13
Page 84

Communicating
5. Make sure Internet Settings is selected.
6. Tap Modify.
7. Tap New.
8. Enter a name for the connection, select the modem type, then
select the correct baud rate for that modem.
9. If you need to enter the TCP/IP settings, tap Advanced, then
tap TCP/IP.
2–14 Reference Guide
Page 85

10. Select “Use specific IP address.”
11. Enter your IP address.
12. Tap OK.
13. Tap Next.
Communicating
Reference Guide 2–15
Page 86

Communicating
14. Enter the phone number for your Internet Service Provider,
then tap Next.
15. Tap Finish to set up the modem connection.
2–16 Reference Guide
Page 87

16. Tap OK to return to the Connections window.
17. Tap OK to return to Settings.
Communicating
Use an Ethernet/LAN card
To connect to the Internet or to your network using an
Ethernet/LAN card, you need:
■ A computer with an Ethernet card
■ A computer set up for TCP/IP and a client for Microsoft
Networks
Reference Guide 2–17
Page 88

Communicating
■ An Ethernet hub or a crossover cable to plug in your
iPAQ Pocket PC
■ A Single-Slot or Dual-Slot PC Card Expansion Pack or a
CompactFlash (CF) Card Expansion Pack
1. Insert your Ethernet/LAN card into your iPAQ Pocket PC.
If your Ethernet/LAN card is not recognized, follow your
Ethernet card manufacturer’s instructions to install the
Ethernet card driver.
2. Do one of the following:
If you are using a DHCP server, the network settings should
be entered for you automatically.
If you are not using a DHCP server, enter your network
settings.
a. From the Start menu, tap Settings.
2–18 Reference Guide
Page 89

Communicating
b. Tap the Connections tab, then tap Network Adapters.
c. Tap the name of your Ethernet driver, then tap the
Properties button.
Reference Guide 2–19
Page 90

Communicating
d. Tap the Name Servers tab.
e. Enter the server information.
f. Tap OK to save the server information.
g. Tap OK to save the network settings.
h. Tap OK to return to the Connections screen.
Synchronize links
You can synchronize links to Web sites from your Favorites list
on your computer to view them offline with Pocket Internet
Explorer.
1. From the Start menu on your computer, click Programs.
2–20 Reference Guide
Page 91

2. Click Internet Explorer.
3. Click Favorites to see the list of links to your favorite
Web sites.
4. To save a Web site link to Mobile Favorites, open the Web
site, then click Create Mobile Favorite.
If you have selected Favorite as information to be
synchronized and you are connected, ActiveSync 3.5 begins
synchronizing with your iP AQ Pocket PC once you add a link
to Mobile Favorites.
5. Follow the instructions in Synchronize information to
manually synchronize your favorite links.
Enter an Internet address (URL)
With Pocket Internet Explorer and a connection to the Internet,
you can view Web sites on your iPAQ Pocket PC by typing a
URL in the Address bar.
Web sites that use HTML 4.0, DHTML, animated GIF images,
✎
and Java applets may not work correctly in Pocket Internet
Explorer.
Communicating
1. From the Start menu, tap Internet Explorer.
Reference Guide 2–21
Page 92

Communicating
2. Tap View, then Address Bar.
3. Enter the address (URL) in the Address bar.
4. Tap the Go icon.
Select from a favorites list
With Pocket Internet Explorer and a connection to the Internet,
you can view Web sites on your iPAQ Pocket PC by selecting a
Web site from your Favorites list.
Web sites that use HTML 4.0, DHTML, animated GIF images,
and Java applets may not work correctly in Pocket Internet
Explorer.
2–22 Reference Guide
Page 93

Communicating
1. From the Start menu, tap Internet Explorer.
2. Tap the Favorites icon and the Web site you want to view.
Use the Universal Remote
With the Universal Remote, you can:
■ Control and operate infrared supported office, entertainment,
and home automation equipment
■ Set up favorite channels
■ Share the remote with others
■ Create unique personal settings
Reference Guide 2–23
Page 94

Communicating
Add a device
You can set up your univeral remote to control up to 12 de vices in
a room. The universal remote comes pre-programmed with codes
for thousands of infrared supported devices. You can download
other codes from the Nevo web site.
1. From the Start menu, select Nevo.
You can choose Start, Programs, then Nevo.
2. Look for your device on the wheel.
3. Select one of the following:
a. Tap the Add Devices icon.
b. Tap the device if the wrench icon displays.
c. Tap the wrench icon, then Add Device.
2–24 Reference Guide
Page 95

Communicating
4. Tap Next.
5. Select your device from the Device list, then tap Next.
Reference Guide 2–25
Page 96

Communicating
6. Select the setup method. It is recommended to search for your
device by manufacturer’s brand name.
7. Tap Next.
8. Select your device from the Selection list.
2–26 Reference Guide
Page 97

Communicating
9. Tap the test icon to test whether you can power on and off
your device. If not, try another code and repeat step 9.
10. Tap Next.
11. Enter a name for the device, then tap Next.
Reference Guide 2–27
Page 98

Communicating
12. Select an icon for your device. The universal remote
automatically assigns an icon to your device, but you can
change it.
13. Tap Next to view your device on the wheel.
Turn on a device
1. From the Start menu, select Nevo.
You can choose Start, Programs, then Nevo.
2–28 Reference Guide
Page 99

Communicating
2. Click a device on the wheel to position it at the top of the
wheel.
3. Tap the Power button.
Reference Guide 2–29
Page 100

Communicating
Add activities
You can customize the keys on devices to switch activities.
1. Tap the Activity icon.
2. Click Next.
2–30 Reference Guide
 Loading...