

Page 1

b
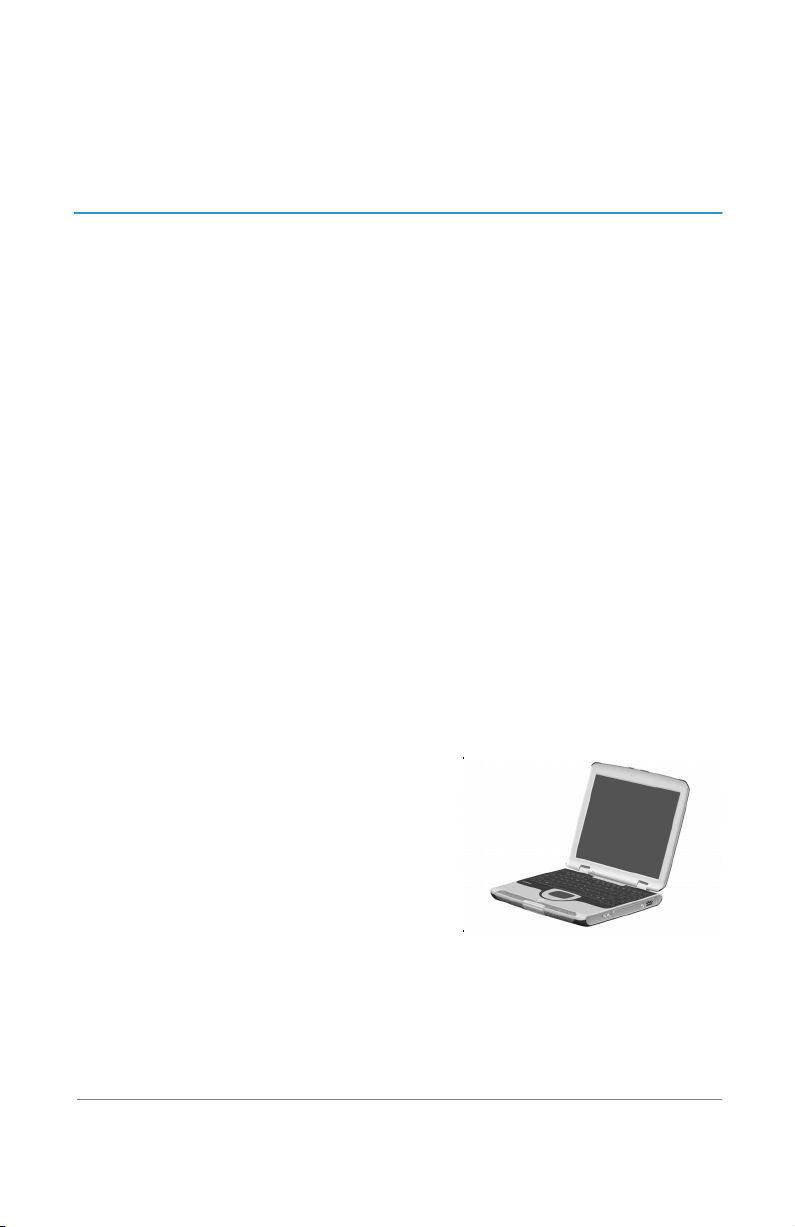
Mobile Internet PC User’s Guide
Presario 700 Series
Document Part Number: 253697-XX1
August 2001
Page 2

© 2001 Compaq Computer Corporation
Compaq and the Compaq logo are trademarks of Compaq Information
Technologies Group, L.P. Microsoft, MS-DOS, and Windows are trademarks of
Microsoft Corporation. All other product names mentioned herein may be
trademarks of their respective companies.
Compaq shall not be liable for technical or editorial errors or omissions
contained herein. The information in this document is provided “as is” without
warranty of any kind and is subject to change without notice. The warranties for
Compaq products are set forth in the express limited warranty statements
accompanying such products. Nothing herein should be construed as
constituting an additional warranty.
Mobile Internet PC User’s Guide
Presario 700 Series
First Edition (August 2001)
Document Part Number: 253697-XX1
Page 3

Contents
1 Introduction
Where Can I Find Information? . . . . . . . . . . . . . . . . . . . . 1–2
Documentation. . . . . . . . . . . . . . . . . . . . . . . . . . . . . . 1–2
Viewing or Printing a Guide on the CD . . . . . . . . . . 1–3
Symbols and Graphics . . . . . . . . . . . . . . . . . . . . . . . . . . . 1–5
Symbols . . . . . . . . . . . . . . . . . . . . . . . . . . . . . . . . . . . 1–5
Graphics. . . . . . . . . . . . . . . . . . . . . . . . . . . . . . . . . . . 1–5
Safety . . . . . . . . . . . . . . . . . . . . . . . . . . . . . . . . . . . . . . . . 1–6
Turning off your Notebook PC . . . . . . . . . . . . . . . . . 1–6
Protecting Your Notebook During
an Electrical Storm . . . . . . . . . . . . . . . . . . . . . . . . . . 1–7
2 Your Notebook at a Glance
Front of Your Notebook. . . . . . . . . . . . . . . . . . . . . . . . . . 2–2
Common Features . . . . . . . . . . . . . . . . . . . . . . . . . . . 2–2
Lower Front Panel . . . . . . . . . . . . . . . . . . . . . . . . . . . 2–3
Easy Access Buttons and Lights . . . . . . . . . . . . . . . . 2–4
Function Key Combinations . . . . . . . . . . . . . . . . . . . 2–6
Left and Right Panels. . . . . . . . . . . . . . . . . . . . . . . . . . . . 2–7
Components on Left Side . . . . . . . . . . . . . . . . . . . . . 2–7
Components on Right Side . . . . . . . . . . . . . . . . . . . . 2–8
Back Panel . . . . . . . . . . . . . . . . . . . . . . . . . . . . . . . . . . . . 2–9
Components on Back. . . . . . . . . . . . . . . . . . . . . . . . . 2–9
Underside . . . . . . . . . . . . . . . . . . . . . . . . . . . . . . . . . . . . 2–10
Components on Underside. . . . . . . . . . . . . . . . . . . . 2–10
Mobile Internet PC User’s Guide v
Presario 700 Series
Page 4

Contents
3 Using Your Notebook
Power On! . . . . . . . . . . . . . . . . . . . . . . . . . . . . . . . . . . . . 3–2
Plugging and Unplugging AC Power . . . . . . . . . . . . 3–3
Turning Your Notebook On and Off . . . . . . . . . . . . . 3–4
Using Battery Power . . . . . . . . . . . . . . . . . . . . . . . . . 3–6
Using Keyboard and Pointing Device . . . . . . . . . . . . . . . 3–9
Using the TouchPad Instead of a Mouse. . . . . . . . . . 3–9
Tapping and Double-Tapping . . . . . . . . . . . . . . . . . 3–10
Edge Motion . . . . . . . . . . . . . . . . . . . . . . . . . . . . . . 3–12
Easy Access Buttons . . . . . . . . . . . . . . . . . . . . . . . . . . . 3–13
Reprogramming the Easy Access Buttons. . . . . . . . 3–13
Storage Drives . . . . . . . . . . . . . . . . . . . . . . . . . . . . . . . . 3–14
Identifying Your Storage Drives . . . . . . . . . . . . . . . 3–14
Security . . . . . . . . . . . . . . . . . . . . . . . . . . . . . . . . . . . . . 3–15
Using the Security Slot . . . . . . . . . . . . . . . . . . . . . . 3–15
Power-On Password . . . . . . . . . . . . . . . . . . . . . . . . 3–15
4 Common Tasks
S-Video Connection. . . . . . . . . . . . . . . . . . . . . . . . . . . . . 4–2
Switching Between Displays. . . . . . . . . . . . . . . . . . . 4–2
Connecting and Enabling S-Video . . . . . . . . . . . . . . 4–3
Software and Hardware . . . . . . . . . . . . . . . . . . . . . . . . . . 4–5
Adding and Removing Software . . . . . . . . . . . . . . . . 4–5
Installing Hardware Devices . . . . . . . . . . . . . . . . . . . 4–6
Upgrading your Notebook’s Memory . . . . . . . . . . . . 4–6
Modem . . . . . . . . . . . . . . . . . . . . . . . . . . . . . . . . . . . . . . 4–10
Connecting a Modem Cable . . . . . . . . . . . . . . . . . . 4–10
Connecting a Network Cable. . . . . . . . . . . . . . . . . . 4–12
vi Mobile Internet PC User’s Guide
Presario 700 Series
Page 5

5 Using the CD or DVD Drive
CD or DVD Drive . . . . . . . . . . . . . . . . . . . . . . . . . . . . . . 5–2
Inserting a Disc . . . . . . . . . . . . . . . . . . . . . . . . . . . . . 5–2
Removing a Disc . . . . . . . . . . . . . . . . . . . . . . . . . . . . 5–3
Manually Ejecting a Disc . . . . . . . . . . . . . . . . . . . . . 5–4
Audio CDs and DVD Video Discs. . . . . . . . . . . . . . . . . . 5–5
Playing Audio CDs . . . . . . . . . . . . . . . . . . . . . . . . . . 5–5
Playing Non-DVD Video Discs . . . . . . . . . . . . . . . . 5–6
DVDs . . . . . . . . . . . . . . . . . . . . . . . . . . . . . . . . . . . . . . . . 5–7
Using the DVD Player. . . . . . . . . . . . . . . . . . . . . . . . 5–7
On-Screen Controls . . . . . . . . . . . . . . . . . . . . . . . . . . 5–7
Identifying Your DVD Region Setting . . . . . . . . . . . 5–8
CD-RW Basics. . . . . . . . . . . . . . . . . . . . . . . . . . . . . . . . 5–10
Installing CD-RW Software . . . . . . . . . . . . . . . . . . 5–10
Accessing CD-RW Software
User Information . . . . . . . . . . . . . . . . . . . . . . . . . . . 5–11
Using CD-RW Software . . . . . . . . . . . . . . . . . . . . . 5–12
Preventing Buffer Underrun Errors . . . . . . . . . . . . . 5–13
6 Caring for Your Battery
Battery Care . . . . . . . . . . . . . . . . . . . . . . . . . . . . . . . . . . . 6–2
Storing the Battery. . . . . . . . . . . . . . . . . . . . . . . . . . . 6–4
Recycling the Battery . . . . . . . . . . . . . . . . . . . . . . . . 6–5
Battery Calibration. . . . . . . . . . . . . . . . . . . . . . . . . . . . . . 6–6
Calibrating the Battery. . . . . . . . . . . . . . . . . . . . . . . . 6–6
Maximizing Battery Operating Time . . . . . . . . . . . . 6–8
Power Management . . . . . . . . . . . . . . . . . . . . . . . . . . . . 6–10
What Is Power Management? . . . . . . . . . . . . . . . . . 6–10
Fixing a Low-Battery Condition . . . . . . . . . . . . . . . 6–13
Contents
Mobile Internet PC User’s Guide vii
Presario 700 Series
Page 6

Contents
7 Preventive Maintenance
External Care of Your Notebook . . . . . . . . . . . . . . . . . . . 7–2
Cleaning the Exterior of your Notebook . . . . . . . . . . 7–2
Cleaning the Keyboard . . . . . . . . . . . . . . . . . . . . . . . 7–3
Cleaning the Display Screen . . . . . . . . . . . . . . . . . . . 7–4
Cleaning the TouchPad . . . . . . . . . . . . . . . . . . . . . . . 7–4
Cleaning the External Mouse . . . . . . . . . . . . . . . . . . 7–5
Caring for Your Notebook. . . . . . . . . . . . . . . . . . . . . 7–6
8 Solutions
Basic Solutions. . . . . . . . . . . . . . . . . . . . . . . . . . . . . . . . . 8–2
Backup Utilities . . . . . . . . . . . . . . . . . . . . . . . . . . . . . 8–2
Compaq Help and Support . . . . . . . . . . . . . . . . . . . . 8–3
Helpful Hints . . . . . . . . . . . . . . . . . . . . . . . . . . . . . . . 8–5
Finding Solutions Quickly. . . . . . . . . . . . . . . . . . . . . 8–6
Solution Tables. . . . . . . . . . . . . . . . . . . . . . . . . . . . . . . . . 8–7
Audio and Video . . . . . . . . . . . . . . . . . . . . . . . . . . . . 8–7
Battery and Power . . . . . . . . . . . . . . . . . . . . . . . . . . 8–11
Mass-Storage . . . . . . . . . . . . . . . . . . . . . . . . . . . . . . 8–12
Games and Internet . . . . . . . . . . . . . . . . . . . . . . . . . 8–14
Keyboard and TouchPad . . . . . . . . . . . . . . . . . . . . . 8–16
Memory and PC Cards . . . . . . . . . . . . . . . . . . . . . . 8–18
Glossary
Index
viii Mobile Internet PC User’s Guide
Presario 700 Series
Page 7
1
Introduction
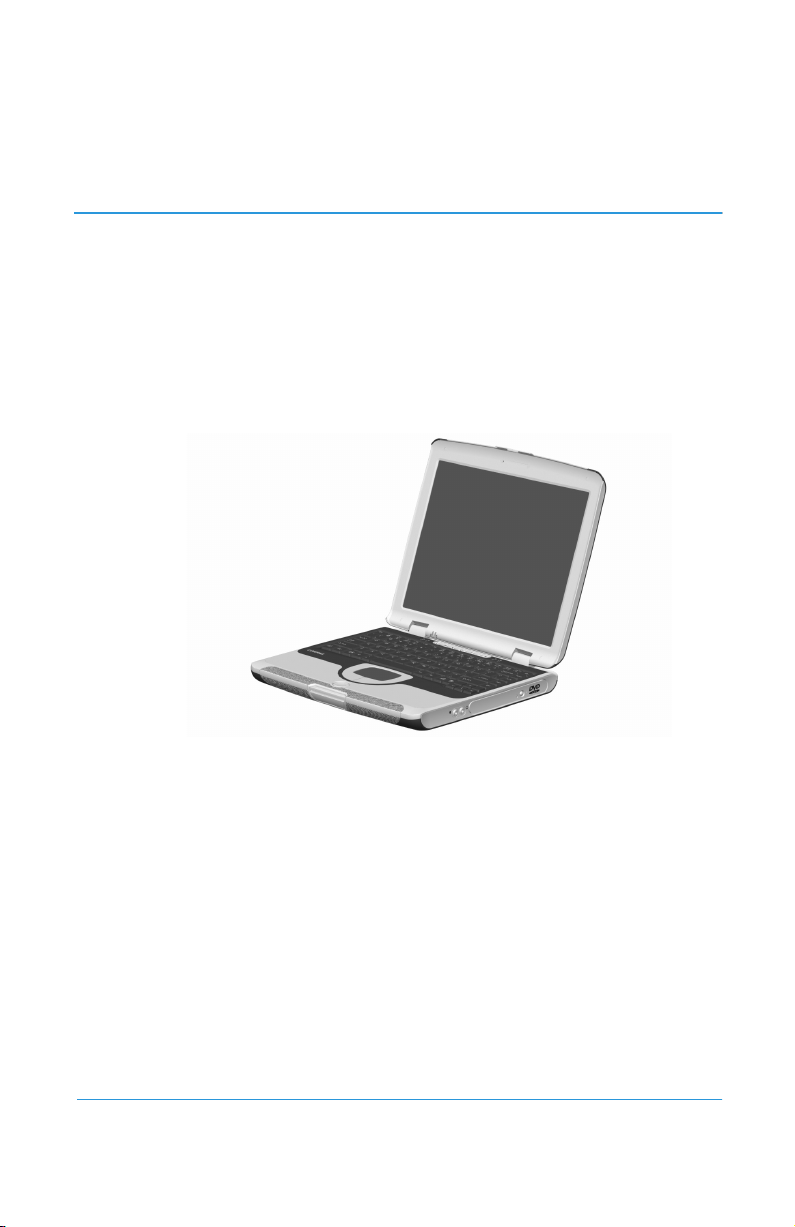
Congratulations! As the owner of a new Compaq Notebook
computer, you have joined the worldwide community of mobile
computer users. After your Notebook is set up and connected to
the Internet, you can explore vast regions of information,
entertainment, and services online.
To help you access the information you need on your Notebook,
this chapter covers the following main topics:
Where Can I Find Information?, 1-2
■
Symbols and Graphics, 1-5
■
Safety, 1-6
■
The Mobile Internet PC User’s Guide is designed for both
experienced computer users and beginners. This easy-to-scan
guide helps you find the information you want as quickly as
possible. It’s also designed to familiarize you with the following:
Features you’ll want to try
■
during the first few days or
weeks
Keeping your Notebook
■
running smoothly
Solving common problems
■
as they occur
Mobile Internet PC User’s Guide 1–1
Presario 700 Series
cad goes here
Page 8

Introduction
Where Can I Find Information?
All the information you’ll need to use the basic features of your
new Notebook is available in the documents included with your
Notebook. Some of these documents are printed and some are
provided on the Documentation Suite CD.
Documentation
Your new Notebook computer came with documentation
containing helpful reference material. If you have access to the
Internet, you can also view these and other documents on the
Compaq Web site. See the “Online Help and Support” section in
Chapter 8 for specific Web site information.
The Warranty Statement and Poster are included in your kit.
■
The Mobile Internet PC User’s Guide, and Safety and
■
Comfort Guide can be found on CD.
Additional documents to those described here may vary per
Note
✎
region.
Getting Started Poster
This poster shows you how to set up your Notebook. When you
finish, fold the poster and store it with your documents for future
use. For more information about the hardware that came with
your new Notebook, see “Your Notebook at a Glance” later in this
guide.
1–2 Mobile Internet PC User’s Guide
Presario 700 Series
Page 9

Mobile Internet PC User’s Guide
This easy-to-scan guide explains how to set up your Notebook
and get acquainted with its features. It also introduces:
Common computer tasks
■
The Internet
■
Notebook maintenance
■
Solutions for computer problems
■
Compaq service and support tools
■
Introduction
Did you know...
S
Safety and Comfort Guide are also available on the Compaq Web
Site. See the “Online Help and Support” section in Chapter 8 for
specific Web site information.
The Mobile Internet PC User’s Guide and the
Safety and Comfort Guide
This document explains how to protect your equipment from
damage, protect yourself from injury, and ensure your comfort
while using your Notebook.
Warranty Certificate
The warranty details the Compaq commitment to service during
the warranty period. Keep the warranty certificate in a safe place
for future reference.
Mobile Internet PC User’s Guide 1–3
Presario 700 Series
Page 10

Introduction
Viewing or Printing a Guide on the CD
For information about using the CD drive, including instructions
for inserting or removing a CD, refer to Chapter 5, “Using the CD
or DVD Drive.”
To view or print a document on the Documentation Suite CD:
1. Insert the Documentation Suite CD into the CD drive.
2. Select a guide from the Documentation Suite menu.
3. If Adobe Acrobat Reader information is displayed and you are
asked to respond, follow the instructions on the screen to accept
the Adobe Acrobat Reader license agreement. (Acrobat Reader is
a software application that enables you to view and print the
documents on the Documentation Suite CD. You will also use
Acrobat Reader to view and print some documents available on
the Internet.)
4. For information about closing Acrobat Reader or using it to
view or print a document on the Documentation Suite CD, click
the Help button near the top of the Adobe Acrobat Reader
window.
1–4 Mobile Internet PC User’s Guide
Presario 700 Series
Page 11

Symbols and Graphics
Symbols
The following words and symbols have special meaning in this
guide and in the electronic documentation:
WARNING: Text set off in this manner indicates that failure to follow
Å
directions in the warning could result in bodily harm or loss of life.
CAUTION: Text set off in this manner indicates that failure to follow
Ä
directions could result in damage to equipment or loss of
information.
Introduction
Did you know...
S
information that may help you solve a problem.
Text set off in this manner provides helpful hints that make
Tip
J
using your Notebook easier and faster.
See also
☞
or another page in this document that has related information.
Note
✎
or interesting points of information.
Text set off in this manner refers to another document
Text set off in this manner provides commentary, sidelights,
Text set off in this manner provides important
Graphics
The illustrations shown and features described in this document
may differ slightly from those provided with your Notebook
computer.
Mobile Internet PC User’s Guide 1–5
Presario 700 Series
Page 12

Introduction
Safety
WARNING: To reduce the risk of electric shock and damage to the
Å
equipment, read the Safety and Comfort Guide.
Did you know...
S
plug all power cords into a high-quality surge protector. If you
have a dedicated telephone line for the modem, buy a surge
protector with a telephone jack.
To protect your equipment from power surges,
Turning off your Notebook PC
To shut down your Notebook properly, complete the following
steps:
1. Close all open programs.
2. Shut down the Windows operating system by selecting the
Start menu from the taskbar, select the Turn Off Computer
icon, then select the Turn Off button.
If the Notebook does not turn off automatically, press and
Note
✎
hold the Power
not recommended under normal circumstances.
3. Unplug the power cord from the wall outlet and unplug the
modem line from the wall jack.
button until the Notebook shuts down. This is
ª
1–6 Mobile Internet PC User’s Guide
Presario 700 Series
Page 13

Protecting Your Notebook During
an Electrical Storm
During an electrical storm, you should take the following
precautions to protect your Notebook from damage. You should
immediately disconnect your Notebook from the power source.
After your Notebook is safely disconnected from AC power,
Tip
J
you can run your Notebook on battery power.
If you are not using a surge protector, unplug all power cords
■
from the wall outlets.
Disconnect your Notebook from the wall outlets.
■
Turn off the power button on all surge protectors.
■
If a telephone line from your Notebook is plugged directly
■
into the wall jack (without going through a surge protector),
unplug the line from the wall jack.
Introduction
Mobile Internet PC User’s Guide 1–7
Presario 700 Series
Page 14
Your Notebook at a Glance
Before you begin using your new Notebook computer, you’ll
want to look at some of the basic components.
To help you locate your Notebook’s components, this chapter
covers the following main topics:
Front of Your Notebook, 2-2
■
Left and Right Panels, 2-7
■
Back Panel, 2-9
■
Underside, 2-10
■
2
To open your new Notebook, push the Display Release Latch
and gently lift up the lid.
Mobile Internet PC User’s Guide 2–1
Presario 700 Series
1
Page 15
Your Notebook at a Glance
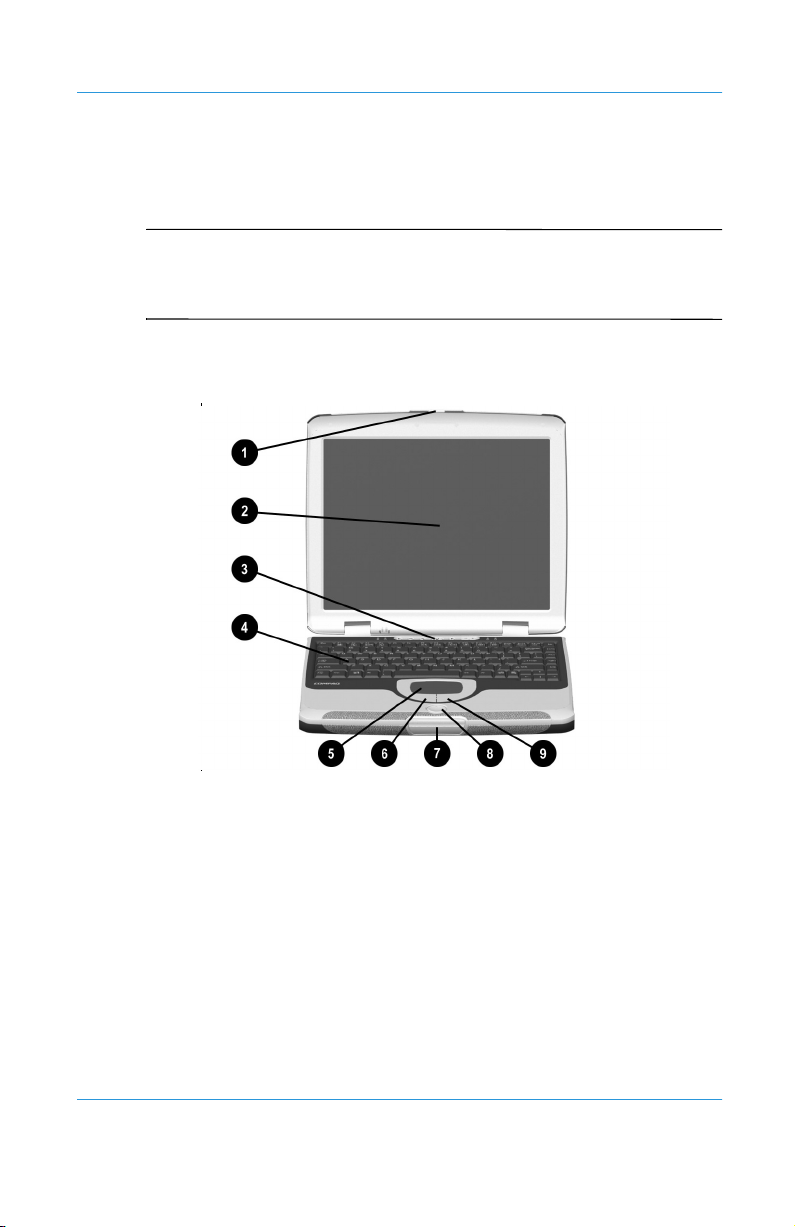
Front of Your Notebook
Open your Notebook and take a look at these components.
See also
☞
this guide to learn more about how to start and shut down your
“Turning Your Notebook On and Off” in Chapter 3 of
Notebook.
Common Features
1 Display Release Tab
2 Display
3 Power Button
4 Keyboard
5 TouchPad
cad goes here
6 Left TouchPad Button
7 Display Release Latch
8 Easy Scroll Button
9 Right TouchPad Button
2–2 Mobile Internet PC User’s Guide
Presario 700 Series
Page 16
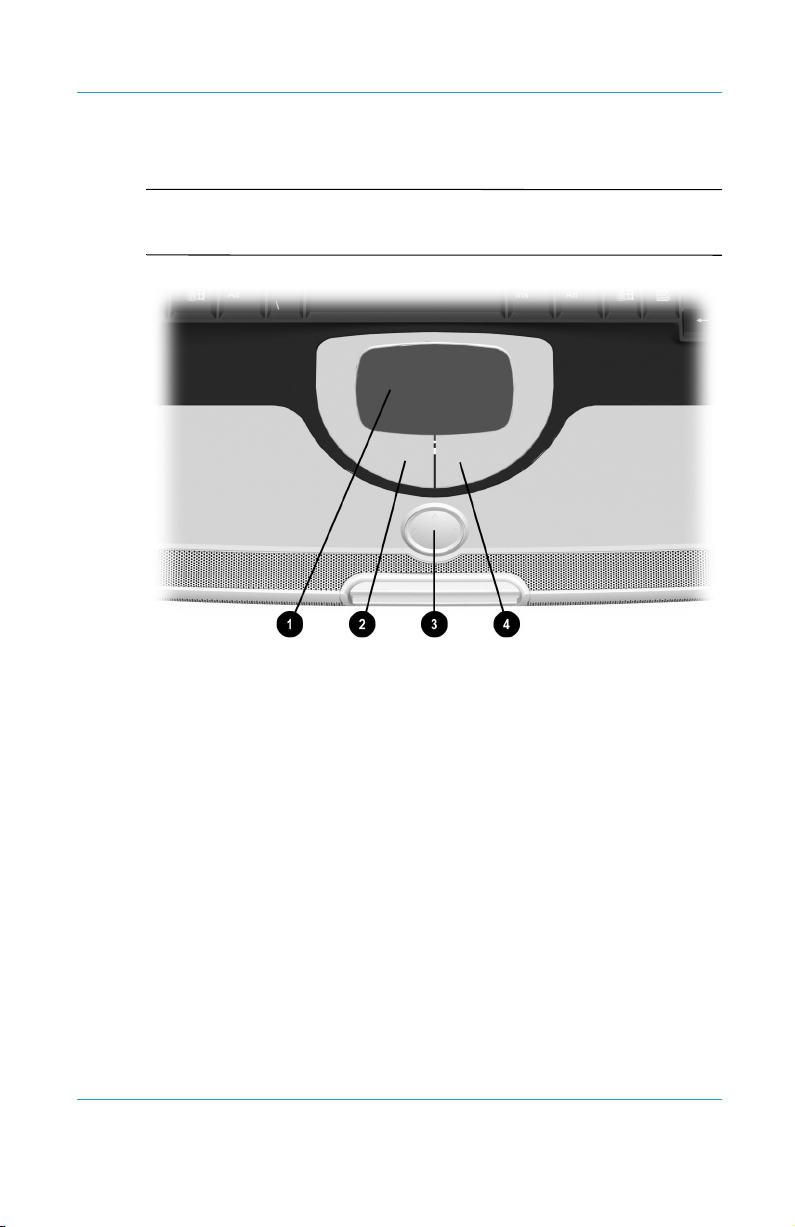
Lower Front Panel
Your Notebook at a Glance
See also
☞
of this guide for more information on using the TouchPad.
1 TouchPad
2 Left TouchPad Button
“Using Keyboard and Pointing Device” in Chapter 3
3 Easy Scroll Button
4 Right TouchPad Button
Mobile Internet PC User’s Guide 2–3
Presario 700 Series
Page 17
Your Notebook at a Glance
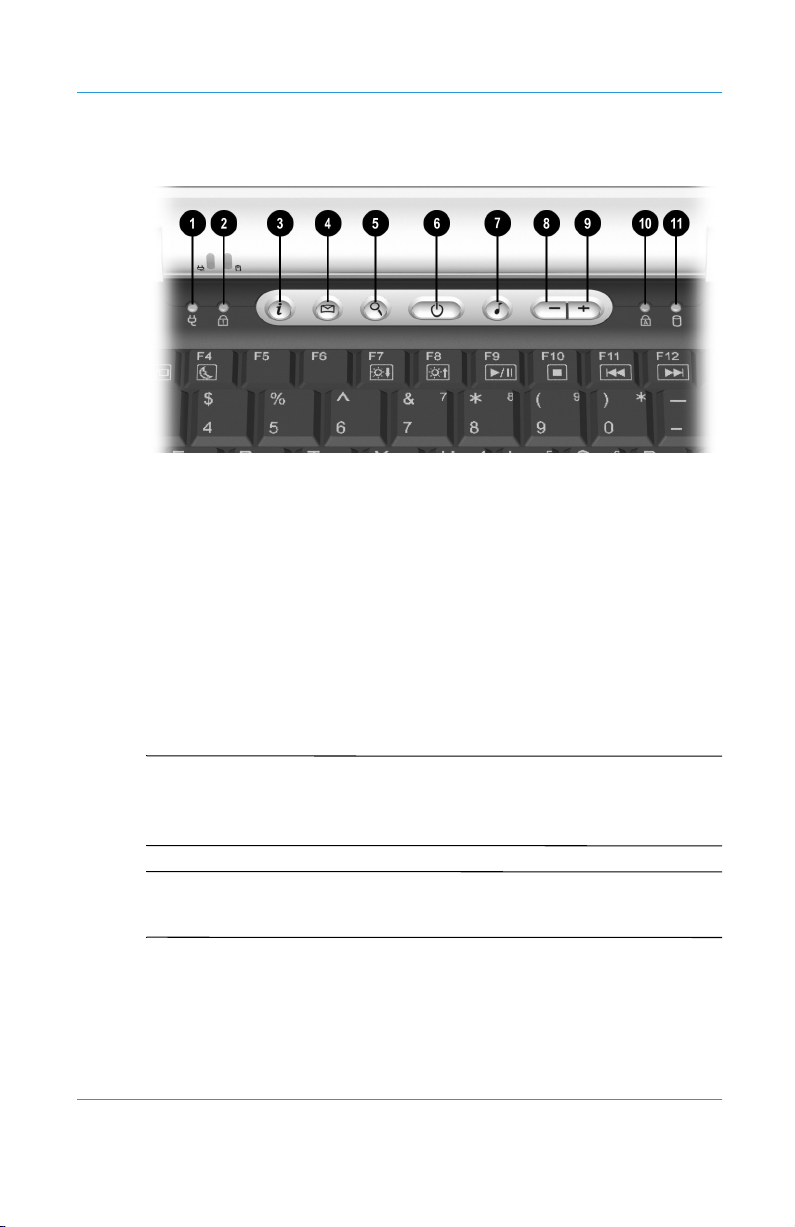
Easy Access Buttons and Lights
1 AC Adapter Light 7 Digital Audio Button
2 Num Lock Light 8 Volume Down Button
3 Instant Internet Access Button 9 Volume Up Button
4 Instant E-Mail Button - Caps Lock Light
5 Search Button q Hard Drive Access Light
6 Power Button
See also
☞
Chapter 3 of this guide to learn how to program the Easy Access
buttons to suit your needs.
Tip
J
same time mutes the sound. Repeat to un-mute the sound.
2–4 Mobile Internet PC User’s Guide
“Reprogramming the Easy Access Buttons” in
Pressing the volume down and volume up buttons at the
Presario 700 Series
Page 18

Button
M
Your Notebook at a Glance
Button
Description
Digital Audio Launches Windows Media Player to
Default Button Action
play MP3 music.
Instant Internet
•
Access
Instant E-mail Provides you with one-touch access
ƒ
Search Provides you with instant access to
a
Compaq Web
À
Fn+F1
G
Fn+F2
Key combinations, such as the example Fn+F1 used in these
Tip
J
solutions, mean that you should press and hold down the Fn key,
Site
Help and
Support
Provides your daily start point to the
Internet. It connects you to a
personalized Web page filled with
local weather, news, sports, and
financial information.
for sending and reading your e-mail.
news and information on the
Internet. Search for topics including
shopping, images, music, and
videos.
Connects instantly to Compaq for
product information, helpful hints,
performance updates, service, and
more.
Launches Compaq Help and
Support and provides your
Notebook with one-touch access to
Web-based service and support
information.
press the F1 key, and then release both keys simultaneously.
Mobile Internet PC User’s Guide 2–5
Presario 700 Series
Page 19
Your Notebook at a Glance
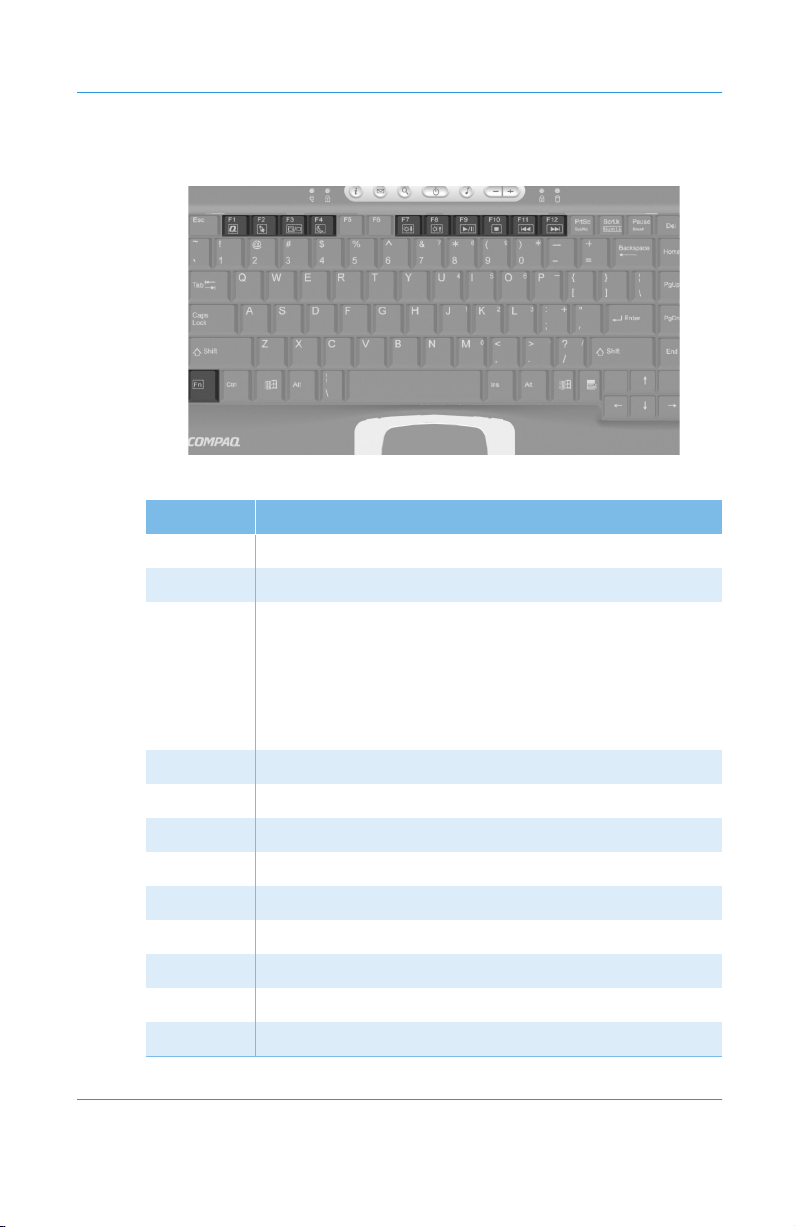
Function Key Combinations
cad goes here
The following (FN+function) keys have already been assigned.
Button Description
F1 Compaq Support Web site launch key
F2 Help launch key
F3 Switch between the display and external monitor in the
following order:
Display
■
External monitor
■
Display and external monitor
■
TV
■
F4 Sleep
F5 Unassigned
F6 Unassigned
F7 Brightness control down
F8 Brightness control up
F9 CD or DVD play/pause
F10 CD or DVD stop
F11 CD or DVD previous track
F12 CD or DVD next track
2–6 Mobile Internet PC User’s Guide
Presario 700 Series
Page 20

Left and Right Panels
Take a look at the left and right sides of your Notebook. The PC
card slot and the removable floppy drive are located on the left
side panel. The microphone jack, headphone jack, and optical
drive are located on the right side panel.
Your Notebook at a Glance
Did you know...
S
options that expand the capability of your Notebook.
PC Cards are credit card–sized removable
Components on Left Side
cad goes here
1 Security Lock Slot
2 Air Vent
3 PC Card Eject Button
4 PC Card Slot (Type I, II, or III)
5 Floppy Drive
6 Floppy Eject Button
Mobile Internet PC User’s Guide 2–7
Presario 700 Series
Page 21

Your Notebook at a Glance
Components on Right Side
1 Microphone Jack
2 Headphone Jack
3 Optical Drive
4 Optical Drive Activity Light
5 Optical Drive Eject Button
6 Manual Eject Hole
2–8 Mobile Internet PC User’s Guide
Presario 700 Series
Page 22
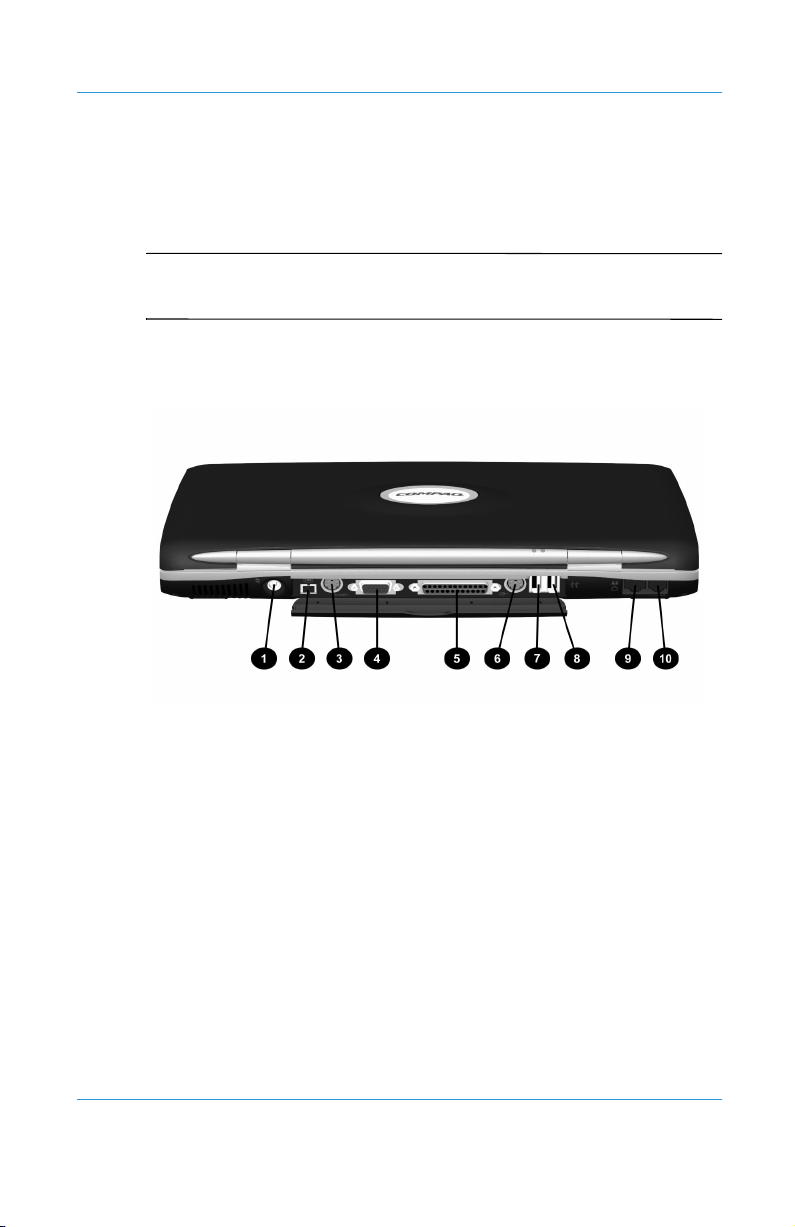
Back Panel
Take a look at the back of your Notebook. This is where you
connect external hardware such as a printer or external monitor.
Your Notebook at a Glance
See also
☞
guide for more information on attaching external devices.
“Installing Hardware Devices” in Chapter 4 of this
Components on Back
1 AC Adapter Connector
2 1394 Port (on select models)
3 S-Video (TV Output) Port
4 External Monitor (VGA) Port
5 Printer/Parallel Port
6 Keyboard/Mouse Port
7 USB Port (1)
8 USB Port (2)
9 10/100 Ethernet Port
- Modem Port
Mobile Internet PC User’s Guide 2–9
Presario 700 Series
Page 23
Your Notebook at a Glance
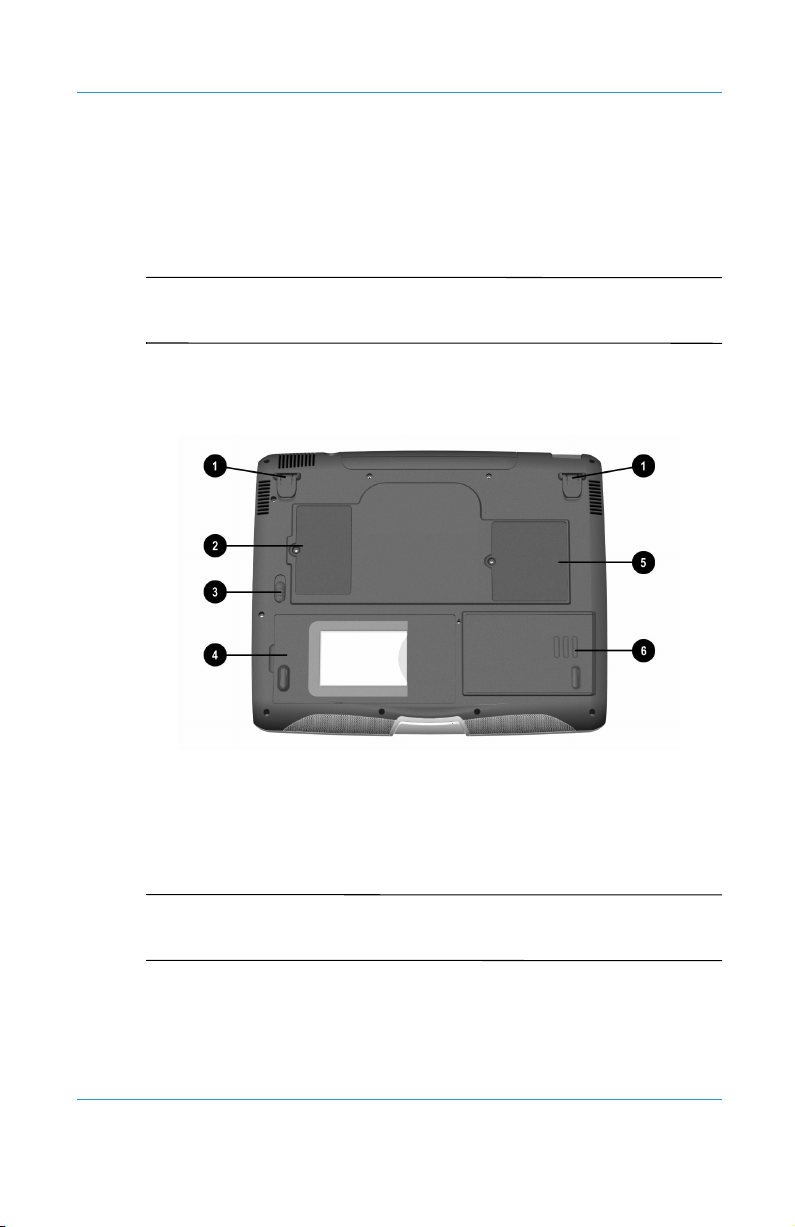
Underside
The memory compartment, main battery, battery release switch,
and the pop-up feet are located on the underside of your
Notebook.
Before contacting Compaq Customer Support, you will need
Tip
J
the serial number from the underside of your Notebook.
Components on Underside
cad goes here
1 Pop-up Feet
2 Expansion Memory
Compartment
3 Battery Release Switch
See also
☞
more information about the Battery Release Switch.
2–10 Mobile Internet PC User’s Guide
“Using Battery Power” in Chapter 3 of this guide for
4 Main Battery Compartment
5 Modem Compartment
6 Hard Drive Access Panel
Presario 700 Series
Page 24
Using Your Notebook
Your Notebook computer is designed for easy setup, use, and
upgrading. In this chapter, you’ll become familiar with your
Notebook features.
3
This chapter helps you to use your Notebook right out of the box,
by covering the following main topics:
Power On!, 3-2
■
Using Keyboard and Pointing Device, 3-9
■
Easy Access Buttons, 3-13
■
Storage Drives, 3-14
■
Security, 3-15
■
Mobile Internet PC User’s Guide 3–1
Presario 700 Series
Page 25

Using Your Notebook
Power On!
This section helps you get your Notebook set up and running.
Plugging and Unplugging AC Power
■
Turning Your Notebook On and Off
■
Using Battery Power
■
WARNING: To reduce the risk of electrical shock, fire, or damage to
Å
the equipment, do not use converter kits sold for appliances to
power your Notebook. Use only the Compaq adapter that came
with your Notebook or a Compaq replacement part.
CAUTION: High voltages can enter your Notebook through the
Ä
phone line connected to the modem. To protect your Notebook
during electrical storms, use a telephone line surge protector.
See also
☞
Comfort Guide for worldwide power information.
3–2 Mobile Internet PC User’s Guide
The “Government Approvals” section in the Safety and
Presario 700 Series
Page 26
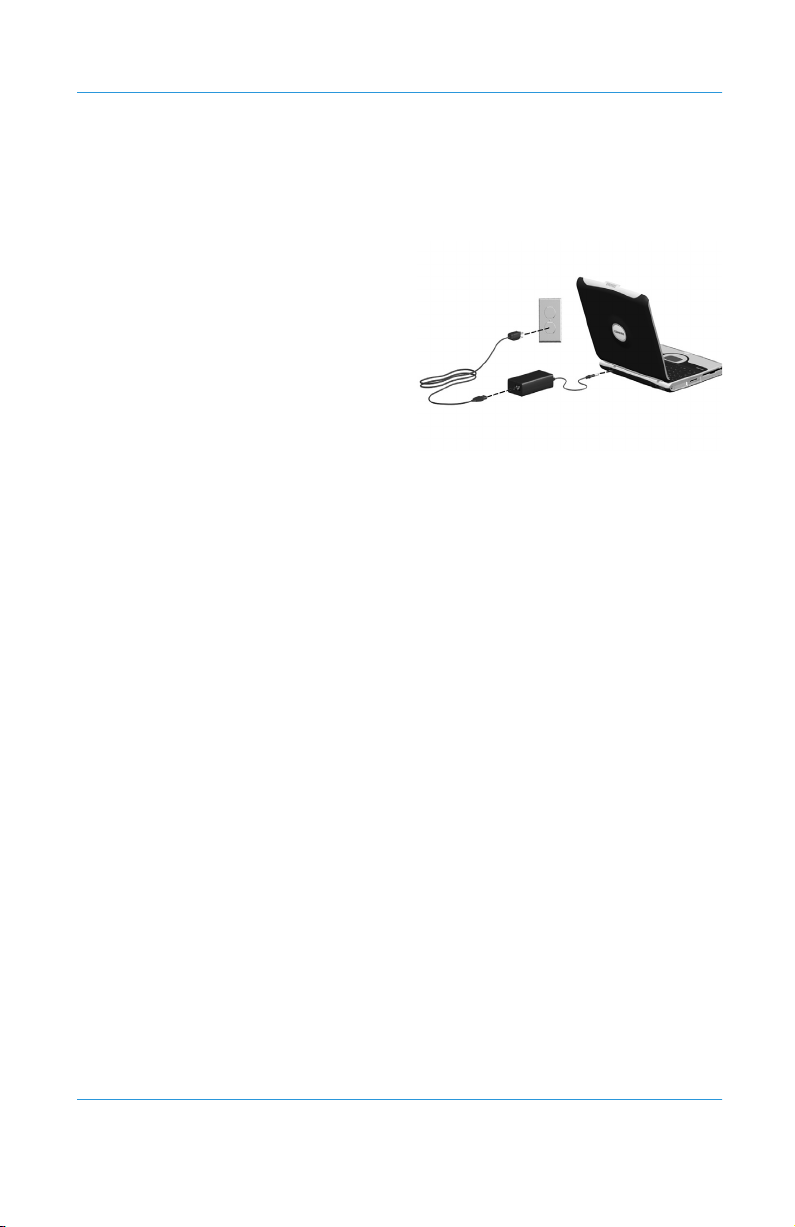
Plugging and Unplugging AC Power
Do’s
Ensure that you can
■
reach the electrical
outlet easily.
Unplug the AC adapter
■
from the electrical outlet
when you want to
disconnect AC power
from your Notebook.
When unplugging from
■
the electrical outlet, grasp the cord by the plug.
Don’ts
Do not leave the AC adapter plugged into the electrical outlet
■
when it is not connected to your Notebook.
Do not place anything on power cords or cables. Arrange
■
them so that no one accidentally steps on or trips over them.
Using Your Notebook
Surge Protectors
Using surge protectors and line conditioners can substantially
reduce the risk of electrical shock and aid in protecting your
Notebook from power-source problems.
During a power surge, the voltage level of electricity coming into
your Notebook can increase and cause data loss or system
damage. Protect your Notebook and peripherals by connecting
them to a surge suppressor, which absorbs voltage surges and
prevents them from reaching your Notebook.
Mobile Internet PC User’s Guide 3–3
Presario 700 Series
Page 27
Using Your Notebook
Why Use AC Power When I’ve Got a Battery?
When you’re not on the go, you’ll want to use your Notebook’s
AC adapter as your power source. This ensures that the battery is
always charged.
When your Notebook does not have a charged battery, you should
save your work and turn off your Notebook before unplugging it
from the AC power supply.
Did you know...
S
you can simply unplug it from AC power. Your Notebook
automatically switches to battery power.
When a charged battery is in your Notebook,
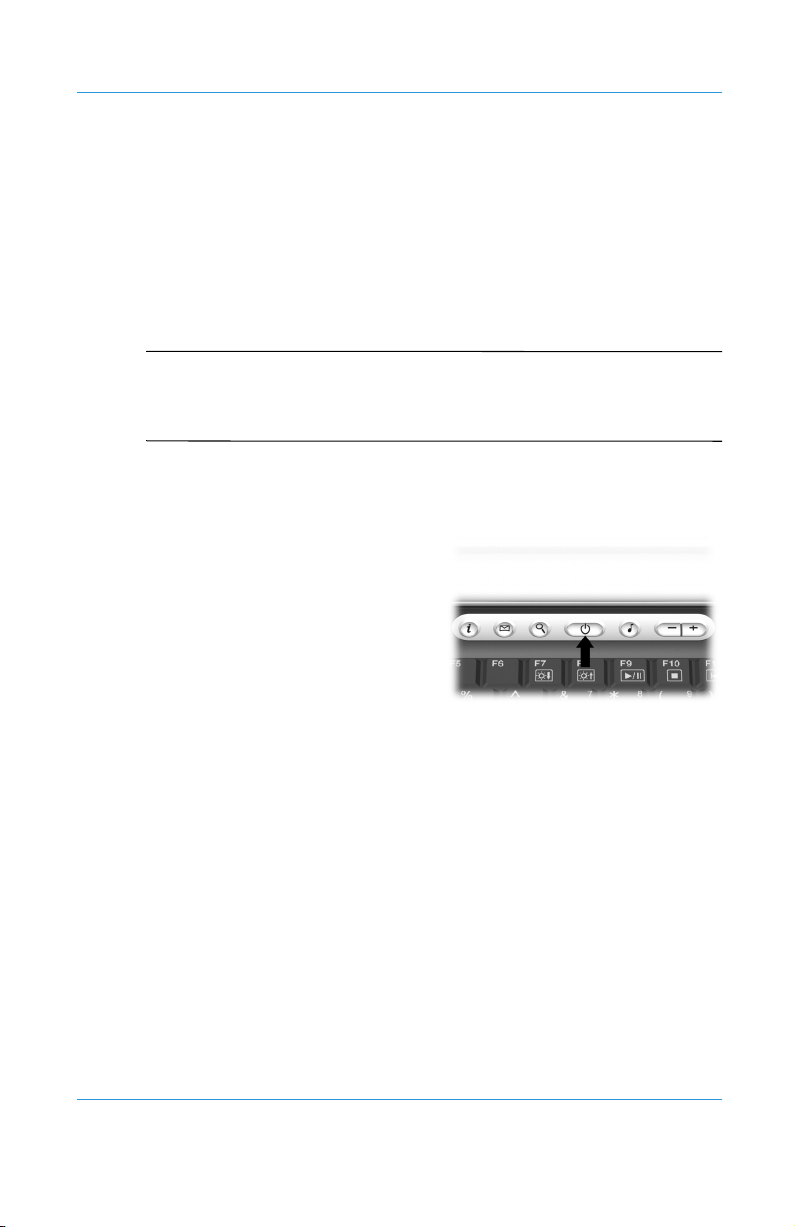
Turning Your Notebook On and Off
To turn on your Notebook, press
the Power
located at the top of the
keyboard.
To turn off your Notebook
properly, complete the following
steps:
1. Save your work and exit all open programs.
2. Shut down the Windows operating system by selecting the
Start menu from the taskbar. Select the Turn Off Computer
icon, then select the Turn Off button. Your Notebook will
turn itself off.
button, which is
ª
3–4 Mobile Internet PC User’s Guide
Presario 700 Series
Page 28

Power Button Functionality
When your Notebook is on, pressing the Power ª button places
your Notebook in Hibernation mode.
Using Your Notebook
Did you know...
S
When your Notebook enters this mode, the contents of the
memory are saved to the hard disk and your Notebook powers off.
The settings for the Power
Press and release the Powerªbutton once to enter
■
Hibernation mode.
Press and hold down the Powerªbutton to shut down your
■
Notebook.
Hibernation is a state of no power consumption.
button are as follows:
ª
Mobile Internet PC User’s Guide 3–5
Presario 700 Series
Page 29

Using Your Notebook
Using Battery Power
WARNING: Your Notebook contains a lithium-ion battery pack.
Å
Improper handling of the battery pack can result in fire and
chemical burns. Do not disassemble, crush, puncture, short
external contacts, dispose of in water or fire, or expose it to
temperatures higher than 140° F (60° C). Replace only with the
Compaq battery pack specified for your Notebook.
Did you know...
S
on or off. It continues charging until the battery is fully charged
or the AC power is disconnected.
The battery will lose its charge if not used for a long time.
Tip
The battery charges whether your Notebook is
J
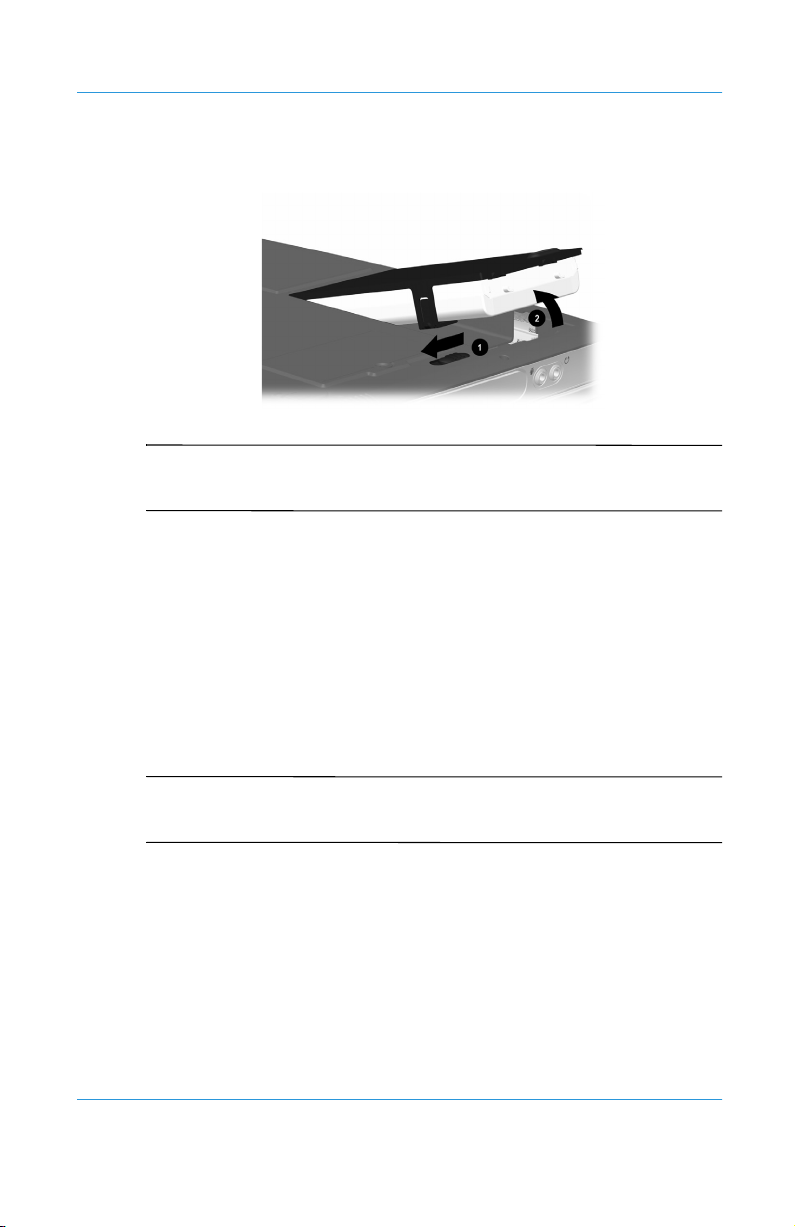
Inserting and Removing the Battery
To insert the main battery into the battery compartment, follow
these steps:
1. Turn your Notebook bottom side up.
2. Slide the Battery Release Switch outward. Lift up the
battery door.
3. Position the battery so that the battery label faces downward.
4. Insert the battery, front-edge first, into the keyed battery
compartment.
3–6 Mobile Internet PC User’s Guide
Presario 700 Series
Page 30
Using Your Notebook
5. Gently push down on the battery door until it snaps into
place.
See also
☞
for help in locating the Battery Release Switch.
To remove the battery, complete the following steps:
1. Save your files.
2. If the AC adapter is not connected, turn off your Notebook.
3. Turn your Notebook bottom side up and slide the Battery
4. Slide the battery out of the battery compartment.
Note
✎
inserted incorrectly.
“Components on Underside” in Chapter 2 of this guide
Release Switch on the underside of your Notebook outward.
Lift up the battery door.
The battery door will not close easily if the battery is
Mobile Internet PC User’s Guide 3–7
Presario 700 Series
Page 31

Using Your Notebook
Charging the Battery
See also
“Battery Care” in Chapter 6 of this guide.
☞
To charge the battery, insert the battery in the
battery compartment and connect your
Notebook to AC power. Leave your Notebook
plugged into the electrical outlet until the
Battery Charge
illuminated. This ensures that the battery is fully
charged.
If you will not be using your Notebook for an extended
Note
✎
period of time, Compaq recommends that you unplug the
electrical cord from the outlet and remove the battery while your
Notebook is not in use.
light is no longer
7
3–8 Mobile Internet PC User’s Guide
Presario 700 Series
Page 32

Using Your Notebook
Using Keyboard and Pointing Device
In this section you’ll learn how to select, click, and double-click
with the TouchPad:
Using the TouchPad Instead of a Mouse
■
Tapping and Double-Tapping
■
Edge Motion
■
See also
☞
guide for tips on keeping your TouchPad clean.
See also
☞
guide to learn how to attach an external mouse.
“External Care of Your Notebook” in Chapter 7 of this
“Installing Hardware Devices” in Chapter 4 of this
Using the TouchPad Instead of a Mouse
Just like the mouse, the TouchPad
lets you draw lines or point to
items on the Windows desktop.
Try dragging the pointer across
the screen by gently dragging
your finger across the TouchPad.
Left-Click
To left-click, press the Left TouchPad button. It is located directly
below the TouchPad. The Left TouchPad button works as the
select or drag button. To double-click an item, move the pointer
over the item and press the Left TouchPad button twice in rapid
succession.
Mobile Internet PC User’s Guide 3–9
Presario 700 Series
Page 33

Using Your Notebook
Right-Click
The Right TouchPad button works as the context menu or
special drag button. Move the pointer over the item and press the
Right TouchPad button to get context-sensitive options.
Easy Scroll Button
The Easy Scroll button is the equivalent of the right, left, up, and
down buttons of the scroll bars on the side and bottom of your
screen. To view other areas of a document or browser window,
press the Easy Scroll button in the desired direction.
The Easy Scroll button is only functional with some
Note
✎
software applications.
Tapping and Double-Tapping
Your TouchPad has a tapping feature that works like the left
mouse button. If enabled, you can tap once on the TouchPad to
select an object and tap twice to double-click.
To turn on the tapping feature, complete the following steps:
1. Use the Windows Start menu to open the Control Panel.
All references in this guide to Control Panel menu items
Note
✎
will use the Classic View, not the Category View. After opening
Control Panel, select Switch to Classic View.
3–10 Mobile Internet PC User’s Guide
Presario 700 Series
Page 34

Using Your Notebook
2. Double-click the Mouse iconz to open the Mouse
Properties dialog box.
cad goes here
3. Click the Tou ch tab.
4. Select Tap to Click to turn on the tapping feature.
5. Click OK to accept the changes and close the dialog box.
Did you know...
S
typing, drag the PalmCheck slider toward maximum.
Mobile Internet PC User’s Guide 3–11
Presario 700 Series
To help prevent accidental pointing while
Page 35

Using Your Notebook
Edge Motion
Edge Motion allows you to continue to scroll when your finger
reaches the edge of the TouchPad. When this feature is turned on,
the window continues to scroll until you lift your finger.
To turn on Edge Motion, complete the following steps:
1. Use the Windows Start menu to open the Control Panel.
2. Double-click the Mouse icon
Properties dialog box.
3. Click the Edge Motion tab.
4. Select When Dragging, Always, and When Scrolling to
turn on Edge Motion.
to open the Mouse
z
5. Click OK to accept the changes and close the dialog box.
3–12 Mobile Internet PC User’s Guide
Presario 700 Series
Page 36

Using Your Notebook
Easy Access Buttons
The Easy Access buttons, located above your Notebook’s
keyboard, automatically connect you to the Internet. These
buttons give you one-touch access to Internet activities or to
software applications.
Until your Internet or network services are configured, all buttons
launch the Internet Setup Wizard. After your Internet/network
services are set up, each button opens your default Web browser
and connects to pre-programmed applications.
Reprogramming the Easy Access Buttons
See also
☞
guide for descriptions of each button and its default action.
You can reprogram the Easy Access buttons to reflect your
personal preferences.
To reprogram your Easy Access buttons, complete the following
steps:
1. Use the Windows Start menu to open the Control Panel.
2. Double-click the Easy Access buttons
“Easy Access Buttons and Lights” in Chapter 2 of this
icon and follow
ÿ
the instructions provided.
Mobile Internet PC User’s Guide 3–13
Presario 700 Series
Page 37

Using Your Notebook
Storage Drives
Your Notebook stores your files and programs in the storage
drives. This section helps you in the following area:
Identifying Your Storage Drives
■
Identifying Your Storage Drives
Your floppy drive, hard drive, and CD,
DVD, CD-RW, or DVD/CD-RW drive
are designated with letters of the
alphabet, as well as with icons.
To determine your drive letters, complete
the following steps:
h
____
Standard 3½-inch
Floppy Drive
1. Use the Start menu to access the
My Computer icon
for each drive and corresponding
drive letters are displayed in the
My Computer window, under the
listing for ‘Hard Disk Drives’ and
‘Devices with Removable Storage.’
2. Use the icons to the right to identify
your drives.
. The icons
g
q
____
Local Hard Drive
æ
____
CD, DVD, CD-RW, or
DVD/CD-RW Drive
3–14 Mobile Internet PC User’s Guide
Presario 700 Series
Page 38

Security
To protect your files and programs, your Notebook provides
several security features. This section will cover:
Using the Security Slot
■
Power-On Password
■
Using the Security Slot
To use the security slot found on the side of your Notebook,
complete the following steps:
1. Insert a locking device
(such as a Kensington
lock) into the security slot.
Using Your Notebook
2. Turn the locking device
clockwise 90 degrees.
To remove the locking device,
turn the locking device
counter-clockwise 90 degrees
and remove the device from the slot.
cad goes here
Power-On Password
You can set a power-on password that will
secure the information you store on the
hard disk. When turning on your
Notebook, this password must be entered
before you can access your files.
Mobile Internet PC User’s Guide 3–15
Presario 700 Series
Page 39

Using Your Notebook
Setting the Password
To set the power-on password, complete the following steps:
1. Press the Power
2. After the Compaq logo is displayed, a cursor is shown in the
upper right corner of the screen for a few seconds. While the
cursor is visible, press the F10 key.
CAUTION: F10 Setup is for experienced users only. Changing
Ä
settings may affect the functionality of your Notebook.
CAUTION: Write your password down in a secure location. If you
Ä
forget or lose your password, a Compaq service technician must
reset your Notebook for you to be able to access your files.
3. From the Main option on the menu bar, use your arrow keys
to move to the Security menu bar item. The cursor should be
in the Set Supervisor Password field. Press the Enter key.
button to turn on your Notebook.
ª
4. Set your personal password, and press the Enter key. You
must confirm the password and press the Enter key again.
5. Press the Enter key at the Setup Notice screen to continue.
6. Move to Password on boot. Use the + or - keys to
select Enabled.
7. Use the arrow keys to select Exit from the menu bar.
8. Make sure that Exit Saving Changes is selected. Press the
Enter key.
9. Select Ye s to save your changes and exit.
Your power-on password is now set. Every time you turn on your
Notebook, resume working from hibernation mode, or access
F10 Setup, you must enter this password.
3–16 Mobile Internet PC User’s Guide
Presario 700 Series
Page 40

Using Your Notebook
Removing the Password
To remove a power-on password, complete the following steps:
1. Press the Power
2. Access F10 Setup as described in ‘Setting the Password’,
type your current password, and press the Enter key.
3. From the Main option on the menu bar, use your arrow keys
to move to the Security menu bar item. The cursor should be
in the Set Supervisor Password field. Press the Enter key.
4. Type your current password and press the Enter key.
5. In the spaces to enter your new password and confirm the
new password, press the Enter key.
6. Press the Enter key at the Setup Notice screen to continue.
7. Use the arrow keys to select Exit from the menu bar.
8. Make sure that Exit Saving Changes is selected. Press the
Enter key, then select Ye s to save your changes and exit.
Pressing the F9 key at any point within the setup returns
Tip
J
your Notebook to the default settings.
ª button to turn on your Notebook.
Mobile Internet PC User’s Guide 3–17
Presario 700 Series
Page 41

4
Common Tasks
Now that your Notebook computer is set up and running, you
may want to explore and learn about some of the common tasks
performed by your Notebook.
To help you take advantage of your Notebook’s common features,
this chapter covers the following main topics:
S-Video Connection, 4-2
■
Software and Hardware, 4-5
■
Modem, 4-10
■
Mobile Internet PC User’s Guide 4–1
Presario 700 Series
Page 42

Common Tasks
S-Video Connection
With an S-Video connection, you can play games on a bigger
screen or watch DVD movies on TV instead of on a Notebook
display.
This section helps you complete the following tasks:
Switching Between Displays (Function Key method)
■
Connecting and Enabling S-Video (Manual method)
■
Switching Between Displays
You can switch between your television and your display or
external monitor by pressing Fn+F3. The order in which they
change is:
Key
Combination
FN + F3 lcd + ext.
FN+F3(2X) lcd only tv only tv only
FN+F3(3X) ext. monitor
FN+F3(4X) ext. monitor
You must connect the S-Video cable before powering on the
Note
✎
system.
4–2 Mobile Internet PC User’s Guide
External
Monitor
monitor
only
TV Ext. Monitor +
TV
lcd only lcd +ext.
monitor
lcd only
only
Presario 700 Series
Page 43

Connecting and Enabling S-Video
Common Tasks
Did you know...
S
See your local electronics store dealer for an S-Video adapter.
To connect your Notebook and your television, you need an
S-Video cable to plug into your TV, VCR, or other device. These
cables can be purchased from a retail TV store or a computer
store.
You must connect the S-Video cable before powering on the
Note
✎
system.
To connect and enable S-Video, complete the following steps:
1. Connect your Notebook and your television with an S-Video
cable.
2. Use the Windows Start menu to open the Control Panel.
3. Click the Display icon
dialog box.
4. Click the Settings tab, then click the Advanced button to
open the S3 Gamma Plus Properties dialog box.
5. Click the S3 Display tab.
Your TV may not have an S-Video connector.
to open the Display Properties
&
Mobile Internet PC User’s Guide 4–3
Presario 700 Series
Page 44

Common Tasks
6. Click the TV icon to enable S-Video TV output.
7. Click Apply to accept the changes, then click OK to exit both
dialog boxes.
8. If your Notebook asks you to restart Windows, click OK for
the new settings to take effect.
Did you know...
S
much greater than the resolution of your TV. Image quality on the
TV varies from application to application.
4–4 Mobile Internet PC User’s Guide
The resolution of your Notebook display is
Presario 700 Series
Page 45

Software and Hardware
Discover how easy it is to add and
remove software, attach new hardware
devices, or reinstall deleted hardware
drivers. With easy-to-follow
instructions, you can completely and safely install or remove
software programs and hardware devices with no worries.
This section covers:
Adding and Removing Software
■
Installing Hardware Devices
■
Adding and Removing Software
Software can be installed from a CD or a floppy disk or
downloaded from a Web site. Many software CDs automatically
begin the installation process when placed in the CD drive. If you
have software that does not automatically begin the installation
process, you can install the software by using the Microsoft
Windows Add/Remove Programs utility.
Common Tasks
Installing Software from a CD or Floppy Disk
To install software from a floppy disk or from a CD that does not
automatically install, complete the following steps:
1. Close all programs.
2. Use the Windows Start menu to open the Control Panel.
icon to
3. Double-click the Add or Remove Programs
open the Add or Remove Programs dialog box.
4. Click Add New Programs.
Mobile Internet PC User’s Guide 4–5
Presario 700 Series
¤
Page 46

Common Tasks
5. Click the CD or Floppy button.
6. Insert the CD or floppy disk into the proper drive when
prompted by Windows, and click the Next button.
Windows finds the CD or floppy disk and begins the installation
process.
Installing Hardware Devices
To install a new hardware device such as a printer or gamepad to
your Notebook, complete the following steps:
1. Turn off your Notebook.
2. Connect the device to your Notebook according to the
instructions that come with it.
3. Turn on your Notebook.
Most hardware devices are plug-and-play compliant. Windows
will locate the proper device driver or prompt you to insert the
media provided by your hardware manufacturer. Follow the
on-screen instructions and use any floppy disk or CD that has
been provided by your hardware manufacturer.
You may need to restart your Notebook for the new hardware to
be recognized.
Upgrading your Notebook’s Memory
Did you know...
S
RAM (Random Access Memory). Your Notebook uses memory as
a scratch pad for all of its internal processes. When your
Notebook is turned off, the contents of its memory are lost.
To avoid losing information that is temporarily stored in your
Notebook’s memory, always save your work often to non-volatile
media, such as a floppy or your Notebook’s hard drive.
4–6 Mobile Internet PC User’s Guide
Memory is a volatile media also known as
Presario 700 Series
Page 47

You can easily upgrade your Notebook’s memory to take full
advantage of the latest applications and games. Your Notebook
can be upgraded to 384 MB of memory using PC 133 memory
modules, available from any Compaq retailer.
CAUTION: Electrostatic discharge can damage many electronic
Ä
components, including memory upgrade modules. Ensure that you
are suitably grounded before upgrading your Notebook’s memory.
To upgrade your Notebook’s memory, follow these steps:
1. Ensure that you have the memory upgrade available.
2. Turn off your Notebook and disconnect the AC adapter.
3. Turn your Notebook bottom side up.
Common Tasks
4. Remove the retaining screw
compartment cover and lift the cover
1
cad goes here
from the memory
.
2
Mobile Internet PC User’s Guide 4–7
Presario 700 Series
Page 48

Common Tasks
5. Gently pry outward the tabs that hold the memory module in
place. The memory module will dislodge and pop up at a
45° angle.
6. Grasp the edges of the memory module and remove it from
its socket.
7. Insert the upgrade memory module into the socket at a
45° angle, and gently push down on the sides of the upgrade
memory module until it snaps securely into place.
cad goes here
cad goes here
4–8 Mobile Internet PC User’s Guide
Presario 700 Series
Page 49

Common Tasks
Did you know...
S
are keyed. When inserting the memory module into its socket,
ensure that the module is correctly aligned with the socket.
8. Replace the memory compartment cover and secure it with
the retaining screw. Press down on the dimples located at
both edges of the cover (nearest the retaining screw) to snap it
in place.
The memory module socket and memory module
Mobile Internet PC User’s Guide 4–9
Presario 700 Series
Page 50

Common Tasks
Modem
The physical connection of a computer to the Internet is typically
through a telephone line. Your computer contains hardware called
a modem that sends and receives information over a standard
telephone line. On-screen instructions are provided that you must
follow when you set up your modem.
Did you know...
S
your area. Check with your ISP or local telephone company for
more information.
Did you know...
S
connection which is the most common way to connect to
high-speed Internet access.
High-speed Internet access may be available in
Your Notebook has a built-in Ethernet
Connecting a Modem Cable
A modem cable, which has a 6-pin RJ-11 connector at each end,
must be connected to an analog telephone line. Jacks for digital
PBX systems may resemble analog telephone jacks but are not
compatible with the modem. Immediately disconnect an
accidental connection to a digital line.
1. Plug the modem cable into the modem port on the computer.
2. Plug the other end of the modem cable into an analog jack.
Did you know...
S
you purchased the computer, you may need to use a
country-specific modem adapter and select a country-specific
modem configuration.
To use the modem outside the country in which
4–10 Mobile Internet PC User’s Guide
Presario 700 Series
Page 51

WARNING: To reduce the risk of electrical shock, fire, or damage to
Å
the equipment, do not plug a telephone cable into the RJ-45 jack.
3. For international use, plug the modem cable into the
country-specific modem adapter, as shown in the following
figure.
4. Plug the country-specific modem adapter into the wall jack.
Common Tasks
Mobile Internet PC User’s Guide 4–11
Presario 700 Series
Page 52

Common Tasks
Connecting a Network Cable
A network cable has an 8-pin RJ-45 connector at each end:
1. Plug the network cable into the RJ-45 port on the computer.
2. Plug the other end of the cable into a network jack.
4–12 Mobile Internet PC User’s Guide
Presario 700 Series
Page 53

5
Using the CD or DVD Drive
Who would ever have thought that
your home entertainment center
could fit in your lap or on a desktop?
Your Notebook computer allows you
to listen to your favorite music
and (on selected models) watch your
favorite movies almost anywhere
you go.
To help you understand what options lie at your fingertips and
how to use these options, this chapter covers the following main
topics:
CD or DVD Drive, 5-2
■
Audio CDs and DVD Video Discs, 5-5
■
DVDs, 5-7
■
CD-RW Basics, 5-11
■
cad goes here
Mobile Internet PC User’s Guide 5–1
Presario 700 Series
Page 54

Using the CD or DVD Drive
CD or DVD Drive
In this section, you will learn how to insert and remove CDs and
DVDs. This section covers:
Inserting a Disc
■
Removing a Disc
■
Manually Ejecting a Disc
■
Inserting a Disc
To load a disc into the disc drive, complete the following steps:
CAUTION: Improper handling of a CD or DVD can damage the disc
Ä
and could potentially damage the drive.
1. Press the Eject button located on the front of the drive.
2. Remove a disc from its protective case, holding the disc by its
center hole and outer edge to avoid touching the surface.
3. Place the disc, label side up (unless it is a double-sided
DVD), into the round area of the tray. Gently press the disc
down onto the center spindle of the tray until the disc snaps
into place.
cad goes here
5–2 Mobile Internet PC User’s Guide
Presario 700 Series
Page 55

CAUTION: Before closing the disc tray, ensure that the disc snaps
Ä
onto the spindle in the center of the tray. You can damage the disc
and your Notebook if the disc is not seated properly.
4. Push the tray back into the drive until the drive locks into
place.
Removing a Disc
To remove a disc from the drive,
complete the following steps:
1. Press the Eject button on the
drive.
2. Remove a disc from the tray, gently pushing down on the
center spindle while pulling up on the outer edges. Avoid
touching the surface of the disc.
3. Push the tray back into the drive until it locks into place.
Using the CD or DVD Drive
Mobile Internet PC User’s Guide 5–3
Presario 700 Series
Page 56

Using the CD or DVD Drive
Manually Ejecting a Disc
Did you know...
S
able to eject a disc from the CD or DVD drive. To remove a disc
without powering up your Notebook, you must eject the disc from
the drive manually.
If you need to eject a disc when the power is off, complete the
following steps to eject the disc manually:
1. Make sure the power is off and any external power sources
are disconnected.
2. Insert a small rod or pin, such as a paper clip (approximately
1/16 inch in diameter and at least 3/8 inch in length) into the
Manual Eject Hole and push firmly as shown in the
preceding figure.
3. Remove the disc from the tray.
If your Notebook power is off, you will not be
cad goes here
4. Gently push the tray back into the drive until it locks into
place.
5–4 Mobile Internet PC User’s Guide
Presario 700 Series
Page 57
Audio CDs and DVD Video Discs
In this section you’ll learn how to play audio and video discs with
your Notebook. This section covers:
Playing Audio CDs
■
Playing Non-DVD Video Discs
■
Playing Audio CDs
Using the CD or DVD Drive
Did you know...
S
audio CD. These keys are shown in “Function Key
Combinations” in Chapter 2 of this guide.
To play an audio CD, insert the disc
into the CD or DVD drive. After a
few seconds the Windows Media
Player opens and the disc
automatically starts playing.
If disc play does not start automatically, complete the following
steps:
1. Use the Windows Start menu to open the Windows Media
Player.
2. Click the Play button to begin playing the CD.
3. Click the Stop button to stop playing the CD.
To remove the disc from the drive, click the Eject button on the
CD or DVD drive.
You can also use the function keys to play an
Mobile Internet PC User’s Guide 5–5
Presario 700 Series
Page 58

Using the CD or DVD Drive
Playing Non-DVD Video Discs
To play a video disc, insert the disc into the
CD or DVD drive. After a few seconds, the
disc automatically starts playing.
If disc play does not start automatically,
complete the following steps:
1. Use the Windows Start menu to open the Windows Media
Player.
2. Select File, and then Open from the Windows Media Player
menu.
3. Click the Look in tab.
4. Locate and double-click the CD Drive
see a list of files and file folders.
5. Double-click the folder that contains the CD movie files.
6. Select a movie file and click the Open button. A viewing
window for the movie is displayed and the movie starts
playing.
icon. You should
æ
5–6 Mobile Internet PC User’s Guide
Presario 700 Series
Page 59

DVDs
Using the CD or DVD Drive
In this section you’ll learn how to play DVD discs with your
Notebook. This section covers:
Using the DVD Player
■
On-Screen Controls
■
Identifying Your DVD Region Setting
■
Your Notebook’s DVD drive reserves the best seat in the house
for you, so you can watch all your favorite movies anytime,
anywhere. The DVD player is simple and fun to use.
Did you know...
S
DVDs look like CDs, but they store movies. DVDs store about
28 times more information than video CDs.
DVD stands for Digital Versatile Disc.
Using the DVD Player
Did you know...
playback because it must first determine the type of media being
played.
For the best playback quality, close all open applications
Tip
J
while playing a DVD.
The DVD player is available only on selected models.
Note
The DVD drive will take a few seconds to start
✎
Mobile Internet PC User’s Guide 5–7
Presario 700 Series
Page 60

Using the CD or DVD Drive
On-Screen Controls
The on-screen controls allow you to quickly and easily access the
features of the WinDVD Player.
cad goes here
After the WinDVD Player is launched and active, use the
controls shown on the WinDVD Player panel to navigate through
the DVD titles. The WinDVD Player controls are designed to
look like controls on a stand-alone DVD player, so the controls
may seem familiar.
Keep in mind that not all options are available with all DVD
titles. Only the author of a title can include features. If a feature is
not available with a particular title, it will be grayed out and
inaccessible.
Identifying Your DVD Region Setting
Did you know...
S
match the drive’s region setting, you will see the message
“Playback of content from this region is not permitted.”
To close the player without changing the drive’s region setting,
click Cancel.
To change the region setting and play the DVD disc, select the
current region and click OK.
5–8 Mobile Internet PC User’s Guide
When attempting to play a DVD that does not
Presario 700 Series
Page 61

Using the CD or DVD Drive
Most DVD discs have a “region” setting that
limits the playback of the disc to specific
geographical regions. The region code on
the DVD drive must match the region code
on the DVD disc.
To change the DVD drive region, complete
the following steps:
1. With a DVD disc in the drive, open the WinDVD Player.
2. Click the Properties icon on the lower left corner of the
player to open the Properties dialog box.
3. Click the General tab.
cad goes here
4. Select the desired region in the Current regions section.
5. Click OK to return to the WinDVD Player.
Mobile Internet PC User’s Guide 5–9
Presario 700 Series
Page 62

Using the CD or DVD Drive
Did you know...
S
DVD drive five times. The fifth setting change you make becomes
the permanent region on the player. Each time you make a change
to the drive’s region setting, the remaining number of changes
allowed on the DVD drive is displayed.
You can only change the region code for the
5–10 Mobile Internet PC User’s Guide
Presario 700 Series
Page 63

CD-RW Basics
If your Notebook has a CD-RW drive and the Easy CD Creator
Kit, you can create your own audio and data CDs. This section
covers:
Installing CD-RW Software
■
Accessing CD-RW Software
■
Using CD-RW Software
■
Preventing Buffer Underrun Errors
■
Installing CD-RW Software
Using the CD or DVD Drive
Did you know...
own CDs. You can buy two types of media: CD-RW and CD-R.
CD-RW refers to compact discs (or drives) that are readable and
writable. CD-RW discs can hold more than 450 times the
information that can be stored on a floppy disk and CD-R media
can be played on most of the newer CD players, CD-ROM and
DVD-ROM drives. CD-R media can be written to only once.
However, you can write to CD-RW media using multiple
recording sessions until you close out the disc. CD-RW media can
be used to make backups of your personal CDs or hard disk.
These discs are reusable and can be erased and rewritten to
numerous times.
CD-RW software is only available on selected models.
Note
The CD-RW drive allows you to create your
✎
Mobile Internet PC User’s Guide 5–11
Presario 700 Series
Page 64

Using the CD or DVD Drive
Did you know...
You must close all other Windows programs
before installing CD-RW software.
To install CD-RW Software, complete the following steps:
1. After the CD is inserted, the CD-RW software installation
dialog box is displayed. Click the Next button to begin the
installation process.
2. Select the Complete option to install CD-RW software. Click
the Next button to continue the installation process.
3. At the screen advising you that installation is about to start,
click the Install button to begin copying files to your system.
4. When the installation is complete, click Finish.
Accessing CD-RW Software
User Information
The CD-RW software included with your Notebook comes with
step-by-step instructions and a complete user’s manual called
Online Help to answer any questions you might have about the
functionality of the software with your CD-RW Drive.
To access Online Help, click Help from the toolbar, then select
Contents and Index from the drop-down list.
5–12 Mobile Internet PC User’s Guide
Presario 700 Series
Page 65

Using CD-RW Software
CDs are created using the Easy CD Creator Kit (available on
select models). Various uses of the CD-RW drive are shown in the
following table:
Media Uses
Audio Create personal music CDs with your favorite music
tracks and MP3/WMA files.
Data Create a data CD to store data, such as files or folders
from the hard disk. This feature is useful for backing up
important files or sharing data with other people.
Direct CD Write files directly to a CD-R/CD-RW just like you copy
files to a disk drive. Drag-and-drop files from one drive
to another in Microsoft Explorer, without accessing
Easy CD Creator.
CD Copier Create an entire copy of a CD or a backup of data files.
Jewel
Case
Creator
Make custom jewel case inserts and CD labels to
indicate the title and contents of a CD. Labels are sold
separately.
Using the CD or DVD Drive
Confirm that the Easy CD Creator software has been
Note
✎
installed before you begin creating CDs.
Did you know...
S
be prompted to restart your Notebook. You must restart your
Notebook before you can begin using the software.
Did you know...
S
before installing CD-RW software.
Mobile Internet PC User’s Guide 5–13
Presario 700 Series
After installation of CD-RW software, you will
You must close all other Windows programs
Page 66

Using the CD or DVD Drive
Preventing Buffer Underrun Errors
Did you know...
S
disc unusable. If this occurs, it may be necessary to start over
with a new disc and then properly dispose of the old disc.
A buffer underrun is an error that occurs when the flow of data to
the CD-Recorder is interrupted. When a buffer underrun occurs,
the CD creation process is halted.
The following suggestions may help prevent buffer underruns:
Close other programs and disable tasks or applications
■
running in the background such as screen savers and virus
software.
Ensure that the temporary files created during CD recording
■
are created on the local hard disk, not in a directory on a
network drive.
To change the location where the temporary files are
Note
✎
stored, click Tools from the Easy CD Creator menu, select
Options, and then follow the on-screen instructions.
Do not attempt to record CDs from files on a network. If the
■
desired files are on a network, copy them to your local hard
disk before recording the CD.
In extreme cases, some errors may render your
A buffer underrun error can occur on single or dual optical
Note
✎
drive systems (CD-ROM, CD-RW, or DVD-ROM drives).
5–14 Mobile Internet PC User’s Guide
Presario 700 Series
Page 67

6
Caring for Your Battery
When you’re on the go, AC wall outlets are not always available
and sometimes you’ll want to use battery power. This chapter
shows you how to maintain and recharge your battery properly so
that your Notebook computer has the power necessary to
continue running.
This chapter covers the following main topics:
Battery Care, 6-2
■
Battery Calibration, 6-6
■
Power Management, 6-10
■
After you have read this chapter, you will be able to complete the
following tasks:
Increase the length of battery operating time
■
Correct a low-battery condition
■
Store your battery
■
Recycle your battery
■
Mobile Internet PC User’s Guide 6–1
Presario 700 Series
Page 68

Caring for Your Battery
Battery Care
Using the Battery
When AC wall outlets are not available or convenient, the battery
becomes the “lifeline” of your Notebook. In this section you will
become familiar with the following:
Using the Battery
■
Storing the Battery
■
Recycling the Battery
■
WARNING: If your Notebook contains a lithium battery pack,
Å
improper handling of the battery pack may result in fire and
chemical burns. Do not disassemble, crush, puncture, short
external contacts, dispose of in water or fire, or expose it to
temperatures higher than 140° F (60° C). Replace only with the
Compaq battery pack specified for your Notebook.
See also
☞
inserting, removing, and charging your battery.
Tip
Compaq recommends that you keep a battery installed. This
ensures that you have a charged battery when you need it.
6–2 Mobile Internet PC User’s Guide
“Using Battery Power” in Chapter 3 of this guide for
For safety reasons, when operating under AC power,
Presario 700 Series
Page 69

Checking Battery Power
To determine the amount of remaining battery power,
double-click the Battery Status or Power Meter icon located on
the right side of the Windows taskbar.
Caring for Your Battery
Mobile Internet PC User’s Guide 6–3
Presario 700 Series
Page 70

Caring for Your Battery
Storing the Battery
Your Notebook uses a Li-Ion (lithium-ion) battery. If you will not
be using your Notebook for an extended period of time (2 weeks),
you must take precautions to ensure that your battery is stored
correctly.
Use your Notebook until the battery is drained to 50 percent.
■
Remove the battery and store it separately.
■
You may store your battery within the following temperature
Tip
J
range: 32° F to 113° F (0° C to 45° C). To extend its operating
life, store the battery in a cool dry place.
Temperature plays an important role in recharging your
Tip
J
battery. To gain maximum capacity, allow both the battery and
your Notebook to cool to 68° F (20° C), which is room
temperature, before recharging the battery.
6–4 Mobile Internet PC User’s Guide
Presario 700 Series
Page 71

Recycling the Battery
In North America, dispose of
lithium-ion (Li-Ion) batteries by taking
advantage of the Compaq battery
recycling program. You will be
provided with a postage-paid battery
pack mailer pre-addressed to a
reclamation facility where the metals
are recycled.
Do not dispose of batteries with
general household waste. Dispose of or recycle them by using a
public collection system or returning them to Compaq, your
authorized Compaq partners, or their agents.
Caring for Your Battery
See also
☞
Comfort Guide for more information on recycling.
“Government Approvals” section of the Safety and
Mobile Internet PC User’s Guide 6–5
Presario 700 Series
Page 72

Caring for Your Battery
Battery Calibration
All batteries lose their charge if they have not been used for a
long period of time. In this section you will become familiar with
the following:
Calibrating the Battery
■
Maximizing Battery Operating Time
■
Calibrating the Battery
Recalibrating the battery simply
means recharging the battery to its
maximum capacity and resetting the
battery gauge to display the level of
charge accurately. You may notice that
the battery gauge does not correctly
display the battery charge level when
you first receive your Notebook or if
you have not used your Notebook for a
long period of time. If the battery gauge
becomes inaccurate, you must
recalibrate your battery.
To recalibrate the battery, complete the following steps:
1. Plug in the AC adapter.
2. Allow the battery to charge until the Battery Charge
turns off, showing that the battery is fully charged.
3. After the Battery Charge
AC adapter.
4. Turn on or restart your Notebook.
Do not plug in the AC adapter during the process or you will
Tip
J
have to start over with step 1.
6–6 Mobile Internet PC User’s Guide
7 light turns off, unplug the
Presario 700 Series
7
light
Page 73
Caring for Your Battery
Steps 5 through 8 prevent your Notebook from entering
Note
✎
Sleep mode. These steps also allow the battery to drain faster.
5. Use the Windows Start menu to open the Control Panel.
J
6. Click the Power Options
Options Properties dialog box.
You can use your Notebook while the battery is draining or
Tip
charging.
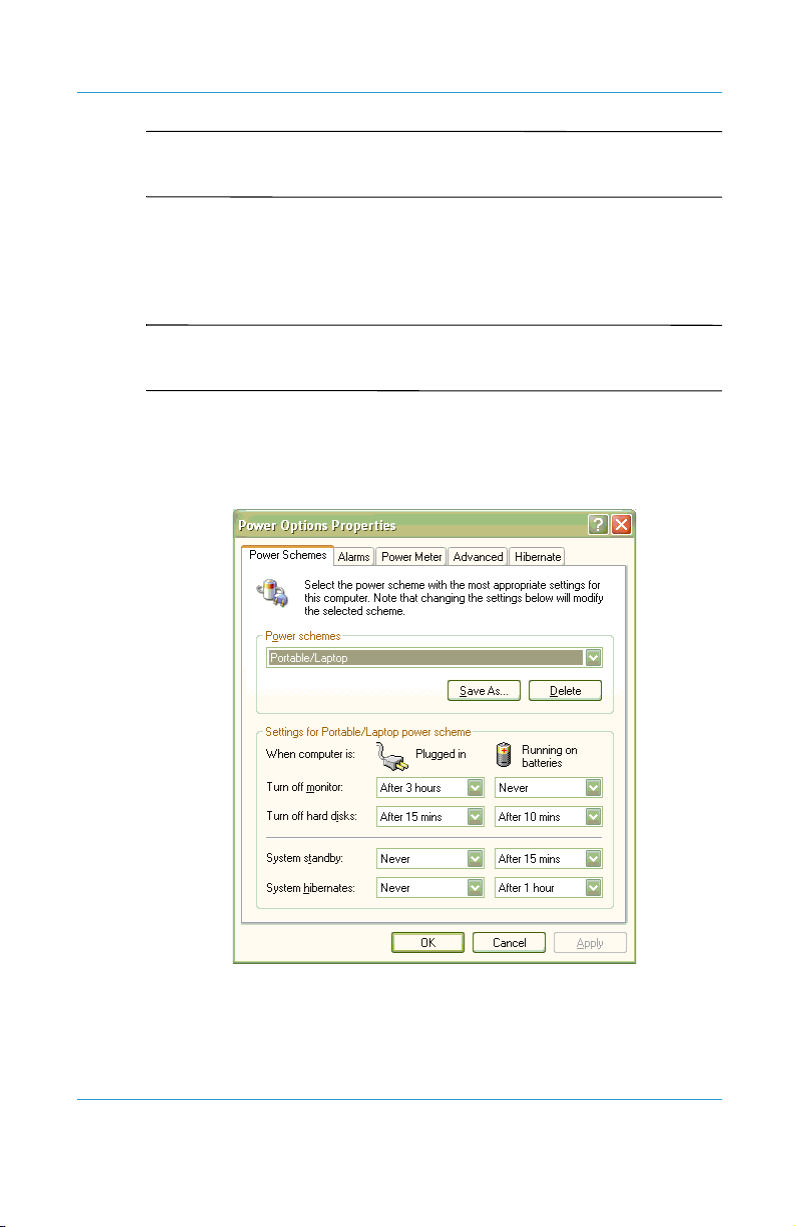
7. Click the Power Schemes tab and select the
Portable/Laptop scheme.
icon to display the Power
A
Mobile Internet PC User’s Guide 6–7
Presario 700 Series
Page 74

Caring for Your Battery
8. From the Running on batteries column:
a. In the Turn off monitor drop-down list, select Never.
b. In the Turn off hard disks drop-down list, select Never.
c. In the System standby drop-down list, select Never.
d. In the System hibernates drop-down list, select Never.
9. Let the battery drain until your Notebook reaches Hibernation
and turns off.
10. Plug in the AC adapter and restart your Notebook.
11. Return to the Power Options Properties dialog box, and
re-enter your power savings settings to the desired level.
Battery Charging Time
Battery charging time will vary based on the initial battery
charge, the type of battery, and the activity of your Notebook
while charging.
Your Notebook’s batteries charge much faster if the
Tip
J
Notebook is off while charging.
Maximizing Battery Operating Time
The battery operating time depends on your power management
settings. Your Notebook components, the options, and the
applications that you use also affect the operating time. This
section shows you how to increase the length of time you are able
to operate under battery power.
6–8 Mobile Internet PC User’s Guide
Presario 700 Series
Page 75

Caring for Your Battery
The display, processor, CD/DVD drive, and hard drive use the
most battery power. To maximize the battery operating time,
perform one or more of the following actions:
Press Fn+F7 to reduce the display brightness and to select a
■
short wait for your screen saver.
Select a screen saver that does not generate a lot of graphics
■
or motion.
Reduce audio volume or use headphones.
■
Exit modem programs when you are not using them.
■
Remove PC Cards when you are not using them.
■
Remove CDs or DVDs when you are not using them.
■
Use Sleep or Hibernation mode to turn off your Notebook
■
when you are not using it.
Mobile Internet PC User’s Guide 6–9
Presario 700 Series
Page 76

Caring for Your Battery
Power Management
Did you know...
S
protect your data and conserve battery and monitor life.
Notebooks have power-saving features that
What Is Power Management?
This section explains the following main topics:
Understanding Power Management
■
Starting and Ending Power Modes
■
Understanding Power Management
Power management lets you reduce your Notebook power
consumption. Your Notebook has two power management modes:
Hibernation is an energy-saving feature and safeguard that
■
saves information to the hard drive, then turns off your
Notebook. When you resume from Hibernation, your
information returns to the screen where you were previously
working. Your Notebook hibernates when the Power button is
pressed, when the battery has little power left, or when your
Notebook (operating on battery power) is in Sleep mode for
more than one hour.
Sleep, also called Standby, is an energy-saving feature that
■
reduces power to system components that are not being used.
When Sleep is initiated, your information is saved in Random
Access Memory (RAM), and the screen is cleared. Your
Notebook is still on, but the display is blank. When you
resume from Suspend, your information returns to the screen
where you were previously working.
6–10 Mobile Internet PC User’s Guide
Presario 700 Series
Page 77

Caring for Your Battery
Did you know...
S
takes longer than returning to information saved in Sleep but is
faster than returning to your information manually after
restarting your Notebook.
CAUTION: Although Sleep mode maintains system information
Ä
and open files, you will lose any unsaved information if you turn off
your Notebook before you end the Sleep mode.
Starting and Ending Power Modes
The following table shows you how to start and end the various
power modes of your Notebook.
Did you know...
S
Hibernation if your battery is low or after one hour of Sleep.
When your notebook is on AC power, it does not go into
Hibernation.
Returning to information saved in Hibernation
Your Notebook automatically goes into
Mobile Internet PC User’s Guide 6–11
Presario 700 Series
Page 78

Caring for Your Battery
If you want to... Then... Result/Indicators
Put your
Notebook to
Sleep manually
Wake your
Notebook from
Sleep manually
Put your
Notebook into
Hibernation
manually
Wake your
Notebook from
Hibernation
manually
Press the Fn+F4 keys. To
use Windows to put your
Notebook to Sleep, click
the Start button and select
the Standby option from
the shut down menus.
Press any key.
Press the
Power
ª button once. To
use Windows to put your
Notebook into
Hibernation, click the
Start button and select the
Hibernate option from the
shut down menus.*
Press the
Power
ª button once.
Power
blinks.
Power
stays on.
Power
off.
Power
stays on.
ª light
ª light
ª light is
ª light
* This feature is not available on all operating system platforms.
6–12 Mobile Internet PC User’s Guide
Presario 700 Series
Page 79

Fixing a Low-Battery Condition
If you will not be using your Notebook for an extended
Tip
J
period of time, Compaq recommends that you unplug the
electrical cord from the outlet and remove the battery while your
Notebook is not in use.
A low-battery condition exists
when the battery has less than 10
percent of its power remaining.
This section will show you how
to correct a low-battery condition
and what to do if your Notebook
loses all battery power.
When your Notebook loses all
battery power, it begins Hibernation, a process that cannot be
interrupted. If Hibernation has begun, you must allow your
Notebook to finish saving your information and shut off
automatically before you try to correct the low-battery condition.
The availability of an AC wall outlet will determine which
solution you should use to correct a low-battery condition.
Caring for Your Battery
Use one of the following options:
Connect the AC Adapter
■
Replace the Drained Battery with a Charged One
■
Suspend Your Work
■
Mobile Internet PC User’s Guide 6–13
Presario 700 Series
Page 80

Caring for Your Battery
Connect the AC Adapter
This solution allows you to continue working without being
interrupted and simultaneously charges the drained battery. You
don’t have to turn off your Notebook before connecting the AC
adapter. Your Notebook automatically switches to AC power
when you connect the AC adapter.
Did you know...
S
will charge whether your Notebook is on or off and will continue
to charge until the battery is fully charged or AC power is
disconnected.
When the AC adapter is connected, the battery
Replace the Drained Battery with a Charged One
If you cannot connect the AC adapter
but you have a charged battery, you
can change to battery power and
continue working. To replace the
drained battery with a charged one,
complete the following steps:
1. Save your work.
2. Turn off your Notebook (or
initiate Hibernation).
3. Replace the drained battery with
the charged one.
4. Press the Power
5. Resume your work.
When AC power becomes available, plug in the AC adapter and
replace your Notebook’s battery with the drained battery to
recharge it.
button to turn on your Notebook.
ª
6–14 Mobile Internet PC User’s Guide
Presario 700 Series
Page 81

Suspend Your Work
If you cannot plug in the AC adapter and you do not have a
charged replacement battery, start Hibernation by pressing the
Power
available, press the Power
and resume your work.
ª button. When a power source (AC or battery) becomes
Caring for Your Battery
ª button to turn your Notebook on
Did you know...
S
mode, it will not turn on until it is plugged into an AC adapter or
the drained battery is replaced with a charged one.
After your Notebook has entered Hibernation
Mobile Internet PC User’s Guide 6–15
Presario 700 Series
Page 82

7
Preventive Maintenance
Maintaining your Notebook by keeping it clean and keeping the
vents free from dust promotes longevity and higher performance.
If Notebook components are not cleaned periodically, the
probability of system failure increases.
The information in this chapter provides helpful instructions for
the maintenance and care of your Notebook.
This chapter covers the following main topic:
External Care of Your Notebook, 7-2
■
Mobile Internet PC User’s Guide 7–1
Presario 700 Series
Page 83

Preventive Maintenance
External Care of Your Notebook
This section covers:
Cleaning the Exterior of your Notebook
■
Cleaning the Keyboard
■
Cleaning the Display Screen
■
Cleaning the TouchPad
■
Cleaning the External Mouse
■
Caring for Your Notebook
■
Cleaning the Exterior of your Notebook
CAUTION: When you shut down your Notebook, the power turns
Ä
off. However, some electrical currents may still be flowing through
the Notebook. To completely disconnect power from the Notebook,
unplug the power and modem cables from the wall outlets and
remove the battery.
Use a damp, lint-free cloth to clean the keyboard, the Notebook’s
exterior, and other external parts on your Notebook.
CAUTION: Do not use household cleaning solvents because they
Ä
will damage the finish on your Notebook.
7–2 Mobile Internet PC User’s Guide
Presario 700 Series
Page 84

Cleaning the Keyboard
You should clean the
keyboard periodically to rid it
of dust, lint, and any other
foreign particles that may
become trapped beneath the
keys. Use a can of
compressed air with a straw
extension attached to blow air
in and around the keys.
Cleaning the keyboard prevents keys from sticking and jamming.
It also makes typing a more pleasant experience.
CAUTION: Do not use liquids of any kind on the keyboard, because
Ä
they may permanently damage your keyboard.
CAUTION: Do not use a regular vacuum cleaner for cleaning the
Ä
keyboard because you may deposit normal household debris on
the surfaces rather than remove it.
Preventive Maintenance
Foam swabs or cosmetic applicators are preferred to cotton
Tip
J
swabs because cotton can add rather than remove lint.
Mobile Internet PC User’s Guide 7–3
Presario 700 Series
Page 85

Preventive Maintenance
Cleaning the Display Screen
The surface of your display screen may look fuzzy or smudged.
You can use a soft, damp, lint-free cloth to wipe the screen clean.
If the display screen requires any additional cleaning, use an
antistatic screen cleaner or pre-moistened antistatic wipes.
CAUTION: Never spray water or any other cleaning fluids or
Ä
chemicals directly on the screen. You may permanently damage
your Notebook.
Cleaning the TouchPad
Grease and dirt on the TouchPad
can cause your cursor to jump
around on the display screen.
To avoid this problem, periodically
clean the TouchPad with a damp
cloth. Remember, before using your
Notebook, always wash your hands
if they are dirty.
7–4 Mobile Internet PC User’s Guide
Presario 700 Series
Page 86

Cleaning the External Mouse
WARNING: Always disconnect the power from your Notebook and
Å
disconnect any other peripherals before attempting to clean your
Notebook or any of its components.
Give your Notebook a safe home. If your Notebook is
Tip
J
consistently exposed to direct sunlight, consider moving it. The
heat from the sun shining on the display screen can reduce its
performance and cause glare.
If you are using an external mouse and the precision control of
the mouse pointer becomes difficult, cleaning the mouse can
substantially improve its performance.
To clean the external mouse, complete the following steps:
1. Turn the mouse over and rotate the circular plate
about 1/4-inch counter-clockwise until it pops
loose. Most mice have an arrow to indicate the
direction to turn the plate.
Preventive Maintenance
2. Remove the ball from your mouse and clean it with
an antistatic wipe or a lint-free cotton cloth.
3. Spray the inside of the mouse with compressed air
in an aerosol can to remove loose debris and dust.
4. Replace the ball and the bottom plate.
Mobile Internet PC User’s Guide 7–5
Presario 700 Series
Page 87

Preventive Maintenance
Caring for Your Notebook
Did you know...
S
drawn in through the vents on the chassis and blown out through
the exhaust fan. It is important to keep the vents on the chassis
free of dust and debris. Brush any dust away from the vents with a
damp cloth but do not attempt to dismantle the Notebook to clean
dust from the inside of the Notebook. If you dismantle your
Notebook, you may permanently damage the components on your
Notebook.
The computer is designed to run demanding applications that
require PC Cards, CD-ROM drives, and large amounts of RAM
while maintaining full processor performance.
As a result of increased power consumption, it is normal for the
computer to feel warm to hot when being used for extended
periods.
This computer complies with international safety standards for
temperatures of user-accessible surfaces.
Your Notebook computer is designed as a durable product.
However, when you transport it, Compaq recommends that you
put it in a portable notebook carrying case. To enhance the life of
your system, follow these Do’s and Don’ts.
Your Notebook computer is cooled by air that is
7–6 Mobile Internet PC User’s Guide
Presario 700 Series
Page 88

Do’s
Don’ts
Preventive Maintenance
Carry and store your Notebook in a portable notebook
■
carrying case.
Keep floppy disks and modular disk drives away from
■
magnetic fields. Magnetic fields can erase data on your
floppy disks and on your hard drives.
Keep your Notebook away from extreme temperatures (for
■
example, in parked cars, near heaters, or near open windows).
Extreme temperatures can damage your Notebook or cause it
to perform poorly.
Use your Notebook only on a solid, flat surface and make
■
sure that no walls or objects are close enough to the vents to
reduce airflow.
Bump or drop your Notebook.
■
Put objects on top of it. Even if your Notebook is stored in a
■
durable carrying case, it is not made to support extra weight.
Leave the CD/DVD drive door open when it is not in use. The
■
door can be damaged.
Handle liquids around your Notebook. Exposure to almost
■
any liquid can result in expensive repairs that are not covered
under your warranty.
Expose your Notebook to dusty or dirty environments. Dust
■
and dirt can clog internal components and mechanisms.
Place the Notebook on surfaces that may block the vents
■
on the side or bottom of the unit, such as towels,
carpeting, and so on.
Mobile Internet PC User’s Guide 7–7
Presario 700 Series
Page 89

8
Solutions
You turn on your Notebook and it won’t
start. You try to print and nothing
happens. You get an error message that
prevents you from getting your work
done—and there’s no one around who
knows what to do. Help!
In this chapter you’ll learn easy ways to increase computer
performance and solve some basic computer problems.
This chapter covers the following main topics:
Basic Solutions, 8-2
■
Backup Utilities, 8-2
■
Compaq Help and Support, 8-3
■
Solution Tables, 8-7
■
If you cannot solve a problem yourself, you can contact Compaq
support for all the help you’ll need.
Mobile Internet PC User’s Guide 8–1
Presario 700 Series
Page 90

Solutions
Basic Solutions
Before you consult our extensive list of common solutions, try
these helpful hints. If you still need help, this section tells you
how to quickly find the solution.
In this section:
Backup Utilities
■
Compaq Help and Support
■
Helpful Hints
■
Finding Solutions Quickly
■
Backup Utilities
Using Backup Devices
To retrieve files that may have been lost or damaged, you should
back up your files regularly with a backup utility.
A backup utility will protect your data from accidental loss
because of a hardware or media failure by creating a duplicate
copy of the data on your hard drive on another storage device
such as a floppy disk, a tape drive, or another hard drive. In the
event that the original data on your hard drive is accidentally
erased or overwritten or becomes inaccessible because of a hard
drive malfunction, you can easily restore your data from the
backed up copy.
Backup utilities allow you to back up all the files on your
Notebook or select specific files and folders. For a partial backup
of selected files or folders, save to floppy disks. For a complete
hard drive backup, use backup devices such as tape drives,
external hard drives, or other high-capacity backup devices.
8–2 Mobile Internet PC User’s Guide
Presario 700 Series
Page 91

Compaq Help and Support
Your Notebook is equipped with Compaq Help and Support, an
integrated help and assistance tool from Microsoft and Compaq
that provides the following services:
Easy access to your Notebook’s built-in product information
■
Preventive care and maintenance assistance for your
■
Notebook
Links to online support and technical assistance
■
Accessing Compaq Help and Support
To access Compaq Help and Support, press Fn+F2 or
double-click the Help and Support icon on your Windows Start
Menu. The Help and Support window is displayed.
You can also access Compaq Help and Support by clicking
Tip
J
the Start button and pointing to Compaq Help and Support.
Use Compaq Help and Support when you need:
Solutions
Answers to questions about your hardware or software
■
Help installing new peripherals or software applications
■
A resolution to a hardware or software problem or error
■
Help restoring your Notebook’s settings and undoing
■
unsuitable changes
Access to the latest drivers, updates, downloads, and online
■
documentation
Access to online help and support from a qualified Compaq
■
support specialist
Mobile Internet PC User’s Guide 8–3
Presario 700 Series
Page 92

Solutions
Using Online Help and Support
for Additional Assistance
If you are unable to resolve the problem on your Notebook using
the troubleshooting and diagnostic features of Compaq Help and
Support, additional assistance is available online.
Compaq Help and Support provides integrated access to online
assistance, allowing you to post questions or issues to the
Compaq Customer Communities or to open a service request
online for a Compaq support specialist.
To post your question to the Compaq Customer Communities,
open Compaq Help and Support and click Join the Compaq
Customer Communities.
You may want to visit the following Compaq Web sites:
www.compaq.com/
consumersupport
http://web14.compaq.
com/falco/sp_list.asp
www.compaq.com/
communities
www.compaq.com/
athome/support/
consumeremail.htm
Did you know...
S
find collaborative assistance from other users like yourself. You
In the Compaq Customer Communities, you will
Support for desktops and mobiles,
printers, scanners, monitors, and iPAQ
Internet products
Original drivers, updates, and fixes (also
known as Softpaqs). Online
documentation including original product
manuals and user guides. Original product
warranty statements.
Keyword search site, where novices to
technical experts collaborate to share
knowledge, information and assistance.
E-mail a support specialist.
.
can search the community for existing discussions applicable to
your questions or issues, or you can post a new question for a
response from the community.
8–4 Mobile Internet PC User’s Guide
Presario 700 Series
Page 93

Solutions
If you require warranty support or technical assistance, you can
open a service request online by clicking Open an online service
event with a Compaq Support Specialist.
When you are prompted to fill out the e-mail form, ensure that
you include the following information before submitting the
form:
Product name and model
■
Serial number
■
Date of purchase
■
Brief description of the problem
■
Your e-mail address
■
Your online service request will be handled using e-mail between
you and your assigned Compaq support specialist.
Did you know...
S
Internet for online technical support, you can contact Compaq by
telephone. See your Warranty Statement for details.
If your Notebook is unable to connect to the
Helpful Hints
If you encounter minor problems with your Notebook, display, or
software, see the following list of general suggestions before
taking further action:
Ensure that your Notebook is plugged into the AC adapter
■
and that the adapter is plugged into a working electrical
outlet.
Ensure that your Notebook is turned on and the
■
Power
Adjust the brightness and contrast controls of the display.
■
Remove any floppy disks from the floppy drive before
■
turning on your Notebook.
Mobile Internet PC User’s Guide 8–5
Presario 700 Series
ª light or icon is lit.
Page 94

Solutions
Finding Solutions Quickly
To help you find a solution quickly, see the “Solution Tables”
section. The information in the tables is divided into three
columns:
1. Symptom — Describes the symptom or warning that
indicates a problem.
2. Problem — Identifies one or more reasons why the symptom
occurred.
3. Solution — Describes how you should try to fix the problem.
If the listed solution does not fix your problem, try another
solution for the symptom or try the solution a second time.
If a problem persists and you are unable to resolve it, contact
a Compaq authorized service provider. Refer to your
Warranty Statement for details.
8–6 Mobile Internet PC User’s Guide
Presario 700 Series
Page 95

Solution Tables
In this section you will find information on:
Audio and Video
■
Battery and Power
■
Mass-Storage
■
Games and Internet
■
Keyboard and TouchPad
■
Memory and PC Cards
■
Audio and Video
Symptom Problem Solution
Solutions
Audio
No sound. Volume has been
muted.
Your Notebook is in
Sleep mode. This is
identified when the
Power
ª light is
flashing.
Sound is too low. Volume is set too low. Click the
Mobile Internet PC User’s Guide 8–7
Presario 700 Series
On the taskbar, click
the Vol um e
then deselect the
Mute check box.
Press any key.
Volume • icon on
the taskbar, then
click the Vol um e
slider and drag it up,
or press the Volume
Up button.
• icon
Page 96

Solutions
Audio
(Continued)
Symptom Problem Solution
Sound is distorted. Volume is set too
high.
Click the
Volume
the taskbar, then
click the Vol um e
slider and drag it
down, or press the
Volume Down
button.
• icon on
Volume
missing from the
Windows taskbar.
• icon is
The Place volume
control icon in the
taskbar option has
not been selected.
1. Use the Start
menu to open the
Control Panel.
2. Double-click
Sounds and
Audio Devices.
3. Select Place
volume control
icon in the
taskbar and click
OK.
8–8 Mobile Internet PC User’s Guide
Presario 700 Series
Page 97

Video or Display
Symptom Problem Solution
Screen is blank. Your Notebook is in
Sleep mode. This is
identified when the
Power
ª light is
flashing.
Press any key.
Solutions
Display only fills part
of the screen.
The external monitor
display is selected.
Your resolution
settings are not set
properly.
Press the Fn+F3
keys to switch
between the LCD
display, external
monitor, TV-Out
(available on
selected models),
and simultaneous
display.
1. Use the Start
menu to open the
Control Panel.
2. Double-click
Display.
3. Click the
Settings tab.
4. In the Screen
area, click the
slider and drag it
to the desired
resolution.
5. Click OK to
accept the new
settings, then
close the
Control Panel
window.
Mobile Internet PC User’s Guide 8–9
Presario 700 Series
Page 98

Solutions
Video or Display
Symptom Problem Solution
Characters are
garbled or the
display flashes when
your Notebook is
connected to an
external monitor.
(Supported on selected models only)
Symptom Problem Solution
The digital
camcorder or 1394
device is not
working.
The external
monitor’s resolution
is set too high for
your Notebook.
1394 or Digital Video
The device is not on. Ensure that the
The device is not
connected.
(Continued)
Restart your
Notebook and reset
the Display settings
for a lower
resolution. See the
solution for “Display
only fills part of the
screen” for more
details.
device has been
turned on.
Ensure that the
device is connected
to the 1394 port.
The device drivers
are not set up
correctly.
Refer to the
instructions provided
with the device to set
up the drivers
correctly in
Windows.
8–10 Mobile Internet PC User’s Guide
Presario 700 Series
Page 99

Battery and Power
Symptom Problem Solution
Solutions
Battery
Battery gauge is not
accurate.
Battery charging
indicator does not
display and battery
does not charge.
Battery charge does
not last as long as
expected.
Battery charge does
not last as long as
expected.
Battery needs
calibrating.
Battery was exposed
to temperature
extremes.
Battery is not fully
drained.
Power Management
is disabled.
See “Calibrating the
Battery” in this guide
for details.
Keep the battery
within the
recommended
temperature ranges.
See “Battery Care” in
this guide.
Calibrate the battery.
See “Calibrating the
Battery” in this guide.
Reset the power
management
options. See
“Calibrating the
Battery” in this guide.
Mobile Internet PC User’s Guide 8–11
Presario 700 Series
Page 100

Solutions
Mass-Storage
Did you know...
S
DVDs, DVD/CD-RWs, floppies, and the hard disk.
Symptom Problem Solution
CD/DVD drive
cannot read a disc or
takes too long to
start.
DVD player
performance is poor
when running other
programs
simultaneously.
Display is corrupted
when playing some
DVD movies.
Mass-Storage media include CDs, CD-RWs,
CD or DVD Drive
The DVD drive takes
longer to start
because it must
determine the type of
media being played
before it can start.
DVD playback
requires large
amounts of
processing power;
therefore, the system
cannot process other
tasks simultaneously
at maximum
performance.
Copyright material at
beginning of movie
causes momentary
corruption.
Wait at least
30 seconds to let the
DVD drive determine
the type of media
being played. If disc
still does not start,
refer to the “Online
Help and Support”
section found earlier
in this chapter.
To p r ov id e m ax im um
performance, close
all other programs
while playing DVD
media. It may also
be necessary to
restart Windows to
free all resources.
Wait a few seconds
for video corruption
to clear up. If it does
not clear up, then
stop and restart the
DVD movie.
8–12 Mobile Internet PC User’s Guide
Presario 700 Series
 Loading...