

Page 1

INSTALLATION AND OPERATION MANUAL
CLFE(X)IPS
HIGH-POWER POE MID-SPAN INJECTOR
Important Safety Warning:
Read and keep these directions
Heed all warnings
Follow all instructions
Do not use this apparatus near water
Clean only with a dry cloth
Install in accordance with the manufacturer’s
instructions
This installation should be made by a qualified
service person and should conform to all local codes
See further safety instructions on Page 18
The ComNet™ CopperLine® CLFE8IPS and CLFE16IPS are 8 and 16 port high power
PoE midspans. They are compatible with 10/100/1000 BaseT Ethernet networks.
They meet IEEE 802.3af and IEEE 802.3at standards and deliver up to 37W per port
simultaneously on all ports without requiring power management. The PoE function
can be set up with Windows GUI or use the default plug and play option. No IP
settings or configurations are required and they are completely transparent to the
Ethernet network and higher layer protocols.
LED indicators are provided for rapidly ascertaining the operating status of the
device. See Figures 3 and 4 on Page 3 for LED explanations.
The CopperLine CLFE8IPS and CLFE16IPS models are 1 RU high and can be easily
installed in 19” racks. See Figure A on Page 17 for mounting instructions.
INS_CLFE(X)IPS_REV– 12/15/11 PAGE 1Tech SupporT: 1.888.678.9427
Page 2
INSTALLATION AND OPERATION MANUAL CLFE(X)IPS
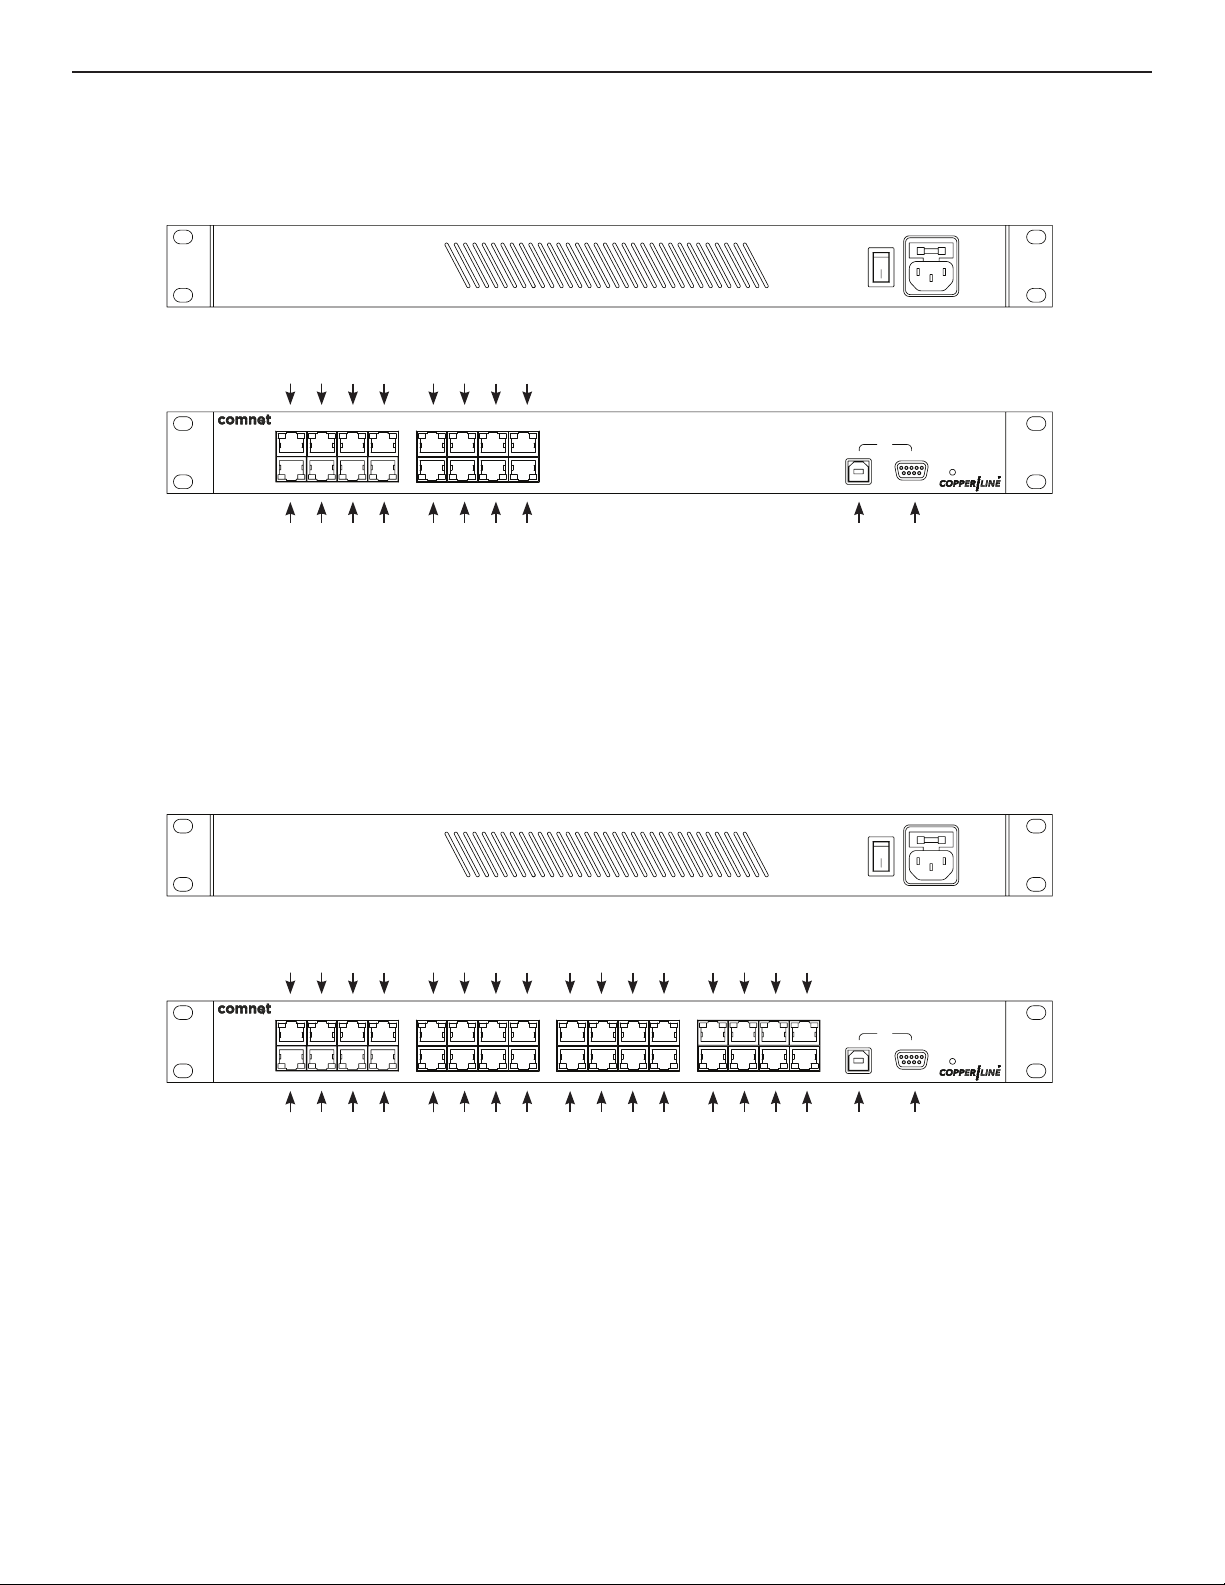
FIGURE 1 – CLFE8IPS
BACK
FRONT
CommunicationNetworks
Made in U.S.A
Port1
Output
Input
CAT5/6
Port2Port3 Port4
CAT5/6
CAT5/6
Port5
CAT5/6
Port6Port7 Port8
POweR SUPPly
CONNeCTiON
AC Power Cord Supplied
Setup
USB
RS-232
USB RS-232
CLFE8IPS
Hi PowerPOE Midspan
Power
FIGURE 2 – CLFE16IPS
BACK
FRONT
CommunicationNetworks
Made in U.S.A
CAT5/6 CAT5/6
Port1
Output
Input
CAT5/6 CAT5/6
Port2Port3 Port4
CAT5/6 CAT5/6
Port5
CAT5/6
Port6Port7 Port8
Port 10 Port11 Port 12
Port9
Port 13
CAT5/6
Port 14 Port 15 Port 16
POweR SUPPly
CONNeCTiON
AC Power Cord Supplied
Setup
USB
RS-232
USB RS-232
CLFE16IPS
Hi PowerPOE Midspan
Power
INS_CLFE(X)IPS_REV– 12/15/11 PAGE 2Tech SupporT: 1.888.678.9427
Page 3

INSTALLATION AND OPERATION MANUAL CLFE(X)IPS
Port 1
Port 2Port3 Port 4
Port 5
Port 6Port7 Port 8
Port 1
Port 2Port3 Port 4
Port 5
Port 6Port7 Port 8
INSTALLATION
Connect the unit to the included AC Power Adapter and plug into grounded power outlet.
Input
Output
Insert the network cable from the head end devices into Ethernet ports marked “Input”
Insert Network cable from PoE Device into Ethernet ports marked “Output.” The data from Input 1 will be
delivered through the corresponding Output 1, and so on.
Confirm PoE Device Operation
FIGURE 3 – POWER LED INDICATORS FIGURE 4 – ETHERNET LED INDICATORS
RED
OFF
POWER
Power is on
Power is off
GREEN
YELLOW
OFF
TRAFFIC (Standard) Link
Flashing – Connection is
OK with traffic
– Connection is OK
No connection No connection
–
FIGURE 5 – POSSIBLE ETHERNET CONFIGURATION
Multiple Configurations are possible. Consult ComNet Design Center.
CopperLine Managed High Power Midspan
NVR
Switch
CNGE2FE24MS
CLFE16IPS
CLFE1UTP CLFE1UTP
CLFE1UTP CLFE1UTP
≤3,000ft (914m) Cat-5
≤5,000ft (1524m) Coax
Da
ta + Power
PoE Camera
ta +Power
Da
PoE Camera
INS_CLFE(X)IPS_REV– 12/15/11 PAGE 3Tech SupporT: 1.888.678.9427
Page 4

INSTALLATION AND OPERATION MANUAL CLFE(X)IPS
Hardware Setup
Please follow the following steps to install the Midspan:
» Connect an AC power cable to the Midspan
» Use either a Serial (DB9) or a USB cable to connect the Midspan to the Host PC.
» Connect a PoE powered device (PD) to one of the Midspan ports using a Cat5/6 cable terminated in RJ45
connectors.
The Midspans are set to “Auto” mode by the factory. In this mode the Midspan works as a plug and play device and
automatically detects the PD and provided requested PoE power.
GUI Installation Procedure
Important Note: By running the GUI software you are accepting all terms and conditions of using this
software as noted in Appendix A.
The following section will guide you how to use the CLFE(X)IPS High Power PoE Midspan GUI.
After connecting the Midspan to the host computer using a USB or Serial cable run the GUI executable file (PoE_
GUI.exe) on the PC. It will open the firmware window.
GUI System Requirements
Recommended
Operating system: Windows XP, Vista and Windows7. It requires Microsoft .NET Framework installed on the
host computer.
Port Communication: Serial or USB port
Firmware Window
Warning: Upgrading firmware is not part of the normal operating procedure. It should only be performed at the
recommendation of the manufacturer by skilled personnel. Improper upgrading will affect equipment
performance and may result in rendering the equipment inoperative.
Host Port Selection:
The GUI will display all the available COMM ports present on the PC on the bottom row of the window. Select an
available serial or USB port to connect to the Midspan. Then click on “Connect” button. This will connect your PC to
the Midspan and the “Status” on the bottom of the window will display “Connected”. A USB cable is provided.
The GUI requires Microsoft .NET Framework installed If you are running the GUI for the first time on a host
computer with Windows XP you may need to visit Microsoft website to download and install Microsoft .NET
Framework.
Computers with Windows Vista and Windows 7 have the USB driver of the Midspan. If you are using Windows XP
and can not install USB driver automatically take the following steps:
Go to Property->Hardware->Device Manager->USB and update the driver.
INS_CLFE(X)IPS_REV– 12/15/11 PAGE 4Tech SupporT: 1.888.678.9427
Page 5

INSTALLATION AND OPERATION MANUAL CLFE(X)IPS
Figure 6: Firmware Window
User Input
Firmware File: Enter the firmware filename needs to be used. This is the firmware that will run inside the Midspan
for its operation. A new unit has all the necessary programing and does not need this step.
Status
Command
Progress: This bar will display the progress of commands.
Commands
Browse: The File browse dialog box will be opened to select the firmware file to be used.
Download: The image file selected using “Load” command will be used for download. Needs to be used when
the PoE system is in BOOTROM mode.
Save Image: Downloaded image will be saved in the EEPROM for auto-booting (Booting with out intervention of
the host).
Save Config: Saves the current running configuration in the EEPROM.
INS_CLFE(X)IPS_REV– 12/15/11 PAGE 5Tech SupporT: 1.888.678.9427
Page 6

INSTALLATION AND OPERATION MANUAL CLFE(X)IPS
System Configuration Window
The “System Configuration” window provides access to setting global configurations and status view of major
parameters.
Figure 7: System Configuration Window
User Inputs
Power Management Mode (PM) Power Management can be used in the following modes:
» None: Power Management will not be performed by the firmware. User needs to power up the ports manually.
» Static /w Priority: Power is budgeted statically based on selected violation type.
› If violation type is “Class Based”, then maximum permissible power for that class is budgeted.
› If violation type is “User Defined”, then the configured user-defined limit is budgeted.
› If violation type is “None”, then budgeted power is based on port mode.
› For Normal Mode the power budgeted is 16.2W
› For High Power Mode the power budgeted is based on ILIM/ICUT selected value.
· For ILIM/ICUT – 504/465 mA, the power budgeted is 22.5W
· For ILIM/ICUT – 563/545 mA, the power budgeted is 26.5W
· For ILIM/ICUT – 850/625 mA, the power budgeted is 31.6W
· For ILIM/ICUT – 850/725 mA, the power budgeted is 37.0W
» Static /wo Priority: Same as above except that port priority of the port is ignored.
» Static /wo Priority: Power is budgeted statically based on selected violation type.
› If violation type is “Class Based”, then maximum permissible power for that class is budgeted.
› If violation type is “User Defined”, then the configured user-defined limit is budgeted.
› If violation type is “None”, then budgeted power is based on port mode.
› For Normal Mode the power budgeted is 16.2W
INS_CLFE(X)IPS_REV– 12/15/11 PAGE 6Tech SupporT: 1.888.678.9427
Page 7

INSTALLATION AND OPERATION MANUAL CLFE(X)IPS
› For High Power Mode the power budgeted is based on ILIM/ICUT selected value.
· For ILIM/ICUT – 504/465 mA, the power budgeted is 22.5W
· For ILIM/ICUT – 563/545 mA, the power budgeted is 26.5W
· For ILIM/ICUT – 850/625 mA, the power budgeted is 31.6W
· For ILIM/ICUT – 850/725 mA, the power budgeted is 37.0W
» Dynamic /w Priority: The power is budgeted based on the load and priority of the port.
» Dynamic /wo Priority: The power is budgeted based on the Load.
ILIM/ICUT
Configuration: Set the Current Limit and Current Cut Limit (ILIM/ICUT).
Status
Chip ID Show the current PSE control Chip Revision.
SW Version Shows the current running firmware version.
Max Ports Shows the maximum number of Midspan ports detected by the software.
Power Available Shows the total available power for the Midspan.
Power Allocated Shows the total power allocated by the system. Power allocated varies based on the power
management mode selected.
Commands
Query Click on the “Query” to updates the status fields.
Apply Click on the “Apply” to configure the system with the inputted values.
INS_CLFE(X)IPS_REV– 12/15/11 PAGE 7Tech SupporT: 1.888.678.9427
Page 8

INSTALLATION AND OPERATION MANUAL CLFE(X)IPS
System View Window
The “System View” window enables viewing status of all ports on a single screen.
Figure 8: System View Window
Status
Power Available Shows the Midspan total available power.
Port Allocated Shows the total power allocated by the system. The allocated power varies based on the
selected Power Management Mode.
Power Delivering Shows the total power delivered on all active ports.
Port Shows the port numbers.
Port Status Shows the port status. The status is color coded as following for easy identification:
» Green = Delivering
» Blue = Searching
» Gray = Disabled
» Yellow = Requesting Power
» Orange = Test mode
» Red = Fault
INS_CLFE(X)IPS_REV– 12/15/11 PAGE 8Tech SupporT: 1.888.678.9427
Page 9

INSTALLATION AND OPERATION MANUAL CLFE(X)IPS
Port Power Shows the power currently delivered by the port. If the port is not in “Delivering” mode it will
show “N/A”.
Commands
Poll If the Poll box is checked it will enable continuous refreshing of parameters otherwise the
polling is disabled.
INS_CLFE(X)IPS_REV– 12/15/11 PAGE 9Tech SupporT: 1.888.678.9427
Page 10

INSTALLATION AND OPERATION MANUAL CLFE(X)IPS
Multiple Port Configuration Window
The Multiple “Port Configuration” window enables to apply same configuration to multiple ports in a single screen.
This is the fastest way to apply similar changes to multiple ports.
Figure 9: Multiple Port Configuration Window
User Input
Disable Check this box to disable selected ports. Check boxes “Disable”, “Enable” & “Force Power”
are mutually exclusive.
Enable Checking this box will enable selected ports.
Force Power Check this box to force selected the port to “Power On”. This will bypass detection,
classification and power management steps and no violation will be honored.
Reset Statistics Check the box to reset port statistics.
Detection Type Choose the detection type to be used for selected ports:
» “None” for bypassing detection
» “2-point” for 2-point detection
» “4-point” for 4-point detection
» “4-point+legacy” for 4-point followed by legacy
» “2-point+legacy” for 2-point followed by legacy
» “Legacy” for legacy detection only
» This option will be considered when next time detection is performed on those ports. This
will not affect ports in delivering state. To perform detection on a port perform disable and
enable the port again.
INS_CLFE(X)IPS_REV– 12/15/11 PAGE 10Tech SupporT: 1.888.678.9427
Page 11

INSTALLATION AND OPERATION MANUAL CLFE(X)IPS
Classification Choose the classification type for selected ports:
» “Bypass” for ignoring classification.
» “.3af” for IEEE 802.3af classification signature
Disconnect Type Choose the disconnect type for selected ports:
» “None” for disabling disconnect. Once powered on the port will be ON forever.
» “AC” for AC disconnects.
» “DC” for DC disconnects.
Violation Type Choose the violation type for selected ports during delivering state:
» “None” for bypassing violation checking.
» “Class Based” for limiting power based on the classification results. If classification is
bypassed then “Class-0” will be used in Normal Mode and “ILIM/ICUT” values in High
power mode.
» “User Defined” for limiting power based on user defined value.
Max Power Choose the user defined power value. This value is used if the “Violation Type” is “User
Defined”.
Power Inrush Control Choose the “Power Inrush Control” mode of selected port:
» “Normal” for IEEE 802.3af mode.
» “High Inrush” for Legacy devices which require more than 15.4W.For port to deliver more
than 15.4W appropriate ILIM/ICUT value needs to be selected and classification needs to
be bypassed.
» “Pre 802.3at” for devices supporting 802.3at. Use this mode for delivering more than
15.4W. Appropriate ILIM/ICUT value should be selected.
Select All Check “Select All” to select all ports. Otherwise check each port number to select the
corresponding port
Commands
Apply: Applies the user selected configuration on to the selected ports.
INS_CLFE(X)IPS_REV– 12/15/11 PAGE 11Tech SupporT: 1.888.678.9427
Page 12

INSTALLATION AND OPERATION MANUAL CLFE(X)IPS
Port Configuration Window
The “Port Configuration” window enables to configure a single port or view its status.
Figure 10: Port Configuration TAB Screen Shot
User Input
Port Enter the port number for which configuration needs to be changed or status needs to be
viewed.
Detection Type Selects the PD detection type to be used:
» “None” for bypassing detection
» “2-point” for 2-point detection
» “4-point” for 4-point detection
» “4-point+legacy” for 4-point followed by legacy.
» “2-point+legacy” for 2-point followed by legacy
» “Legacy” for legacy detection only.
The “Legacy” option will be considered the next time detection is performed on those ports.
This will not affect ports in delivering state. To perform detection on a perform disable and
enable the port again.
Classification Selects the PD classification type to be used:
» “Bypass” for ignoring classification.
» “.3af” for IEEE 802.3af classification signature
INS_CLFE(X)IPS_REV– 12/15/11 PAGE 12Tech SupporT: 1.888.678.9427
Page 13

INSTALLATION AND OPERATION MANUAL CLFE(X)IPS
Disconnect Type Selects the power disconnect type to be used.
» “None” for disabling disconnect. Once powered on the port will be ON forever.
» “AC” for AC disconnects.
» “DC” for DC disconnects.
Violation Type Selects the violation type to be used by the port during delivering state:
» “None” for bypassing violation checking.
» “Class Based” for limiting power based on the classification results. If classification is
bypassed then “Class-0” will be used in Normal Mode and “ILIM/ICUT” values in High
power mode.
» “User Defined” for limiting power based on user defined value.
Max Power Enter the user defined power value. This value is used if the “Violation Type” is “User
Defined”.
Power Inrush Control Selects the “Power Inrush” mode of the port:
» “Normal” for IEEE 802.3af mode.
» “High Inrush” for Legacy devices which require more than 15.4W.For port to deliver more
than 15.4W appropriate ILIM/ICUT value needs to be selected and classification needs to
be bypassed.
» “Pre 802.3at” for devices supporting 802.3at. For port to deliver more than 15.4W
appropriate ILIM/ICUT value to be selected.
Poll Status Check to enable polling of port. Uncheck to disable polling.
Status
Port Status Shows the port status. The status is color coded for easy identification.
» “Green” for delivering.
» “Blue” for searching.
» “Gray” for disabled.
» “Yellow” for Requesting Power
» “Orange” for Test mode.
» “Red” for Fault.
Class/Error Value Shows the class being detected in case of normal operation. Also it shows the error value in
case of a fault condition.
Remote PD Type Shows the Remote PD type.
Voltage Shows the output voltage of the port.
Curren t Shows the current being delivered.
Power Shows the power being delivered
Temperature Shows the junction temperature of the controller chip of that specific port.
INS_CLFE(X)IPS_REV– 12/15/11 PAGE 13Tech SupporT: 1.888.678.9427
Page 14

INSTALLATION AND OPERATION MANUAL CLFE(X)IPS
Overload Counter Shows how many times the port has been in overload status.
Short Counter Shows how many times the port has been shorted.
Power Denied
Counter Shows how many times the port has denied power to loads.
Invalid Detection
Counter Shows how many times the port has been detected an invalid load.
Commands
Disable Disables the port. Buttons “Disable”, “Enable” & “Force Power” are mutually exclusive.
Enable Enables the port. Buttons “Disable”, “Enable” & “Force Power” are mutually exclusive.
Force Power Forces the port to turn on power. This will bypass detection, classification and power
management checks. No violation will be honored. Buttons “Disable”, “Enable” & “Force
Power” are mutually exclusive.
Reset Statistics Resets all port statistics.
Apply Applies the user selected configuration on to the selected port.
INS_CLFE(X)IPS_REV– 12/15/11 PAGE 14Tech SupporT: 1.888.678.9427
Page 15

INSTALLATION AND OPERATION MANUAL CLFE(X)IPS
Appendix A
Software Acceptance Terms and Conditions
ACKNOWLEDGMENT
BY INSTALLING THE SOFTWARE, YOU ACKNOWLEDGE THAT YOU HAVE READ AND UNDERSTAND THE FORE
GOING AND THAT YOU AGREE TO BE BOUND BY ITS TERMS AND CONDITIONS. YOU ALSO AGREE THAT THIS
AGREEMENT IS THE COMPLETE AND EXCLUSIVE STATEMENT OF AGREEMENT BETWEEN THE PARTIES AND
SUPERSEDES ALL PROPOSED OR PRIOR AGREEMENTS, ORAL OR WRITTEN, AND ANY OTHER COMMUNICATIONS
BETWEEN THE PARTIES RELATING TO THE LICENSE DESCRIBED HEREIN.
GRANT OF LICENSE
License for software use is hereby granted to user only provided purchase has been made from an authorized
Communication Networks (dba “ComNet”) dealer or authorized hereby authorized by ComNet. License is
not transferable and is limited to usage only. No permission is hereby given or granted to make any change,
modifications and is restricted only for its intended usage.
Operation or usage other than described will considered as a violation of intended use.
DISCLAIMER OF WARRANTY
Software is provided As Is with all faults. To the extent permitted by law, ComNet, its dealers. Distributors and other
appointed agencies hereby disclaim all warranties, whether expressed or implied, including and without limitations
warranties that the product is free of defects, merchantability, fit for a particular purpose and non-infringing. You
agree to bear the entire risk as to selection the proper for your purpose and as to the quality and performance of
the product.
LIMITATION OF LIABILITY
Except as required by law, ComNet and its distributors, directors, licensors, contributors and agents and all
associated in with ComNet in connection with the said software will not be liable for any damages arising out of
or in any way relating to this product and/or agreement the inability arising out of or in any way relating to this
agreement or the use of the product, and those products associated with said use of products, including limitation
damages for loss of physical property, goodwill, work stoppage, lost profits, loss of data and computer failure or
malfunction. Even if advised as the potential from such loss or damage regardless of the theory applied of contract,
tort or otherwise, which claims are based. ComNet, its associates and all others collective liability will be limited to
the cost of the product itself.
ARBITRATION
Any disagreement between the parties relating to any interpretation, construction, performance or breach of this
Agreement shall be settled by arbitration to be held in Fairfield Country, Connecticut, in accordance with the laws
of the State of Connecticut in accordance with the rules then in effect of the American Arbitration Association. The
arbitrator may grant injunctions or other relief in such dispute or controversy. The decision of the arbitrator shall be
final, conclusive and binding on the parties to the arbitration. Judgment may be entered on the arbitrator’s decision
in any court having jurisdiction. The party bring arbitration agrees to incur the total costs and expenses of such
arbitration and shall pay their counsel fees and expenses.
INS_CLFE(X)IPS_REV– 12/15/11 PAGE 15Tech SupporT: 1.888.678.9427
Page 16

INSTALLATION AND OPERATION MANUAL CLFE(X)IPS
MISCELLANEOUS
This Agreement constitutes the entire agreement between ComNet and you concerning the subject matter hereof,
and it may only be modified by a written amendment signed by an authorized executive of ComNet.
» Except to the extent applicable law, if any, provides otherwise, this Agreement will be governed by the laws of
the state of Connecticut, U.S.A., excluding its conflict of law provisions. It is further agreed that if one or more
provision of this agreement are held to be illegal or unenforceable under applicable Connecticut law, such
illegal or unenforceable portion(s) shall be limited or excluded from this Agreement to the minimum extent
required that this Agreement shall otherwise remain in full force and effect and enforceable in accordance with
its terms.
» This Agreement will not be governed by the United Nations Convention on Contracts for the International Sale
of Goods.
» If any part of this Agreement is held invalid or unenforceable, that part will be construed to reflect the parties’
original intent, and the remaining portions will remain in full force and effect.
» A waiver by either party of any term or condition of this Agreement or any breach thereof, in any one instance,
will not waive such term or condition or any subsequent breach thereof.
» Except as required by law, the controlling language of this Agreement is English.
» You may assign your rights under this Agreement to any party that consents to, and agrees to be bound by, its
terms; ComNet may assign its rights under this Agreement without condition.
» This Agreement will be binding upon and will inure to the benefit of the parties, their successors and permitted
assigns.
INS_CLFE(X)IPS_REV– 12/15/11 PAGE 16Tech SupporT: 1.888.678.9427
Page 17

INSTALLATION AND OPERATION MANUAL CLFE(X)IPS
INSTALLATION CONSIDERATIONS
The CLFE8IPS and CLFE16IPS can be installed as Standalone modules or can
be rack-mounted with the addition of the provided 19-Inch Rack-Mounting
Ear Brackets.
FIGURE A
Dimensions are for the ComNet™ CopperLine® CLFE8IPS and CLFE16IPS modules
1.75"
(4.45cm)
17" (43.2cm)
12" (27cm)
INS_CLFE(X)IPS_REV– 12/15/11 PAGE 17Tech SupporT: 1.888.678.9427
Page 18

IMPORTANT SAFETY INSTRUCTIONS CLFE(X)IPS
• Read and keep these directions.
• Heed all warnings.
• Follow all instructions.
• Do not use this apparatus near water.
• Clean only with a dry cloth.
• Install in accordance with the manufacturer’s instructions.
• This installation should be made by a qualified service person and should
conform to all local codes.
• DO NOT bundle UTP or Coax signals in the same conduit as high-voltage
wiring.
• To reduce the risk of fire or electrical shock, do not expose these products
to rain, moisture, dripping or splashing.
• No objects filled with liquids, such as vases, shall be placed on the
equipment.
• DO NOT install the unit in a place where the operating ambient
temperature exceeds 50ºC.
• Make sure that the external power supply output voltage is in the
recommended range.
• Do not install near any heat sources such as radiators, heat registers, stoves
or other apparatus (including DVRs) that produce heat.
• Protect the power cord from being walked on or pinched, particularly at
the power source, convenience receptacles and the point where they exit
from the apparatus.
WARNING: To reduce the risk of fire or electric shock, do not expose this
apparatus to rain or moisture. This apparatus shall not be
exposed to dripping or splashing and no objects filled with
liquids, such as vases shall be placed on the apparatus.
WARNING: This apparatus is a Class I product. This product must be
connected to a mains socket outlet through an AC to DC
power supply.
WARNING: The mains plug is used as the disconnect device and shall
remain readily operable.
• Only use attachments/accessories specified by the manufacturer.
• Unplug this apparatus during lightning storms or when unused for long
periods of time.
• Refer all servicing to qualified service personnel. Servicing is required
when the apparatus has been damaged in any way, such as when a power
supply cord or plug is damaged, liquid has been spilled, objects have
fallen inside the apparatus, the apparatus has been exposed to rain or
moisture, do not operate normally or has been dropped.
• The mains plug is used as the disconnect device and shall remain readily
operable.
3 CORPORATE DRIVE | DANBURY, CT 06810 | USA
T: 203.796.5300 | F: 203.796.5303 | TECH SUPPORT: 1.888.678.9427 | INFO@COMNET.NET
8 TURNBERRY PARK ROAD | GILDERSOME | MORLEY | LEEDS, UK LS27 7LE
T: +44 (0)113 307 6400 | F: +44 (0)113 253 7462 | INFO-EUROPE@COMNET.NET
© 2012 Communication N etworks. A ll Rights Reser ved. “ComNet ,” the “ComN et Logo,” “CopperL ine” and the “CopperLine Log o” are registere d trademarks of C ommunication Net works.
INS_CLFE(X)IPS_REV– 12/15/11 PAGE 18Tech SupporT: 1.888.678.9427
 Loading...