

Page 1

User Manual
COLOR VIDEO SLAVE PHONE CAV-70HS
• Thank you for purchasing COMMAX products.
• Thank you for purchasing COMMAX products.
• Please carefully read this User’s Guide (in particular, precautions for safety) before using a product and follow
• Please carefully read this User’s Guide (in particular, precautions for safety) before using a product and follow
instructions to use a product exactly.
instructions to use a product exactly.
• The company is not responsible for any safety accidents caused by abnormal operation of the product.
• The company is not responsible for any safety accidents caused by abnormal operation of the product.
Page 2

Table of Contents
Table of Contents ··············································· 1
1. Greeting ························································ 1
2. Warnings and caution ······································· 2
3. Part name and function ······································ 4
4. User Setting ···················································· 4
5. Telephone function ··········································· 6
6. Talk with other households ·································· 6
7. Ext. call function ·············································· 7
8. Guard station call function ·································· 8
9. Individual entrance call function···························· 8
10. Common entrance call function ·························· 9
11. Door release function ······································· 9
12. Master call function ······································· 10
13. Detour function ············································ 10
14. Factory Initialization function ···························· 10
15.How to use common entrance camera ················· 11
16. Guard Security Alarm Function ·························· 12
17. Connection ················································· 12
18. Installation and how to wiring ··························· 13
19. Safe operation guide ······································ 13
20. Contents ···················································· 14
21. Specication ················································ 14
1. Greeting
Thank you for purchasing a Commax product.
Please read this manual before use and follow its instruction in full.
This common method system is a security enhancing and convenient system capable
of being installed at apartments to protect residences and report any abnormalities to
the Guardhouse.
1
Page 3

2.
Warnings and caution
Please follow the things described below in order to prevent any
danger or property damage.
Prohibition.
Warning
Caution
It may cause a serious damage or
injury if violated.
It may cause a minor damage or
injury if violated.
No disassembly
No touch
Must follow strictly.
Shows plugging out the power cord
without an exception
Shows the warning and caution for an electric shock.
Shows the warning and caution for a fire.
Warning
Please don’t use several
products at the same time on
one power socket.
·It may cause a fire due to an
ab
normal overheating.
Please don’t install the
product in the place where
there is much oil, smoke or
humidity.
·It may cause an electric
shock or fire.
Power & Installation
Please don’t bend the power
cable excessively or it may
cause an electric shock.
·fire when using a damaged
power cable.
Please don’t install the
product with the lightening
and thunder.
·It may cause an electric
shock or fire.
Please don’t handle the power
cable with a wet hand.
·It may cause an electric
shock.
Please don’t use and connect
this product with other
products with different rated
voltage
·It may cause a disorder or
fire.
Please plug out the power
cable from the socket when
not using it for a long period
of time.
·It may shorten the product
lifespan or cause a fire.
When installing the product
that generates heat, please
install the product away from
the wall (10cm) for the
ventilation.
·It may cause a fire due to
the increased internal
temperature.
2
Page 4

Warning
Please don’t disassemble,
repair or rebuild this product
arbitrarily (please contact the
service center if a repair is
needed.
·It may cause an electric
shock or fire.
Cleaning & UsePower & Installation
Please plug the power cable
firmly into the inner end
·It may cause a fire.
Please be careful when using
an AC circuit breaker since
there is a possibility of an
electric shock.
If an abnormal sound, burning
smell or smoke is coming out
of the product, please plug out
the power cable and contact a
service center.
·It may cause an electric
shock or fire.
Caution
Please hold the plug tightly
when unplugging the power
cable (a part of the copper
wire may be disconnected if
the grabbing is only made on
the cord when pulling out the
cable).
·It may cause an electric
shock or fire
Please check the use voltage
and current for the DC-only
products and use the
appropriate rectifier.
·It may cause a fire.
Please don’t insert any
metallic or burnable materials
into the ventilation hole.
·It may cause an electric
shock or fire.
When connecting the power
cables after cutting the cable,
please install the product with
power off
·It may cause an electric
shock or fire
Please avoid direct rays of the
sun or heating devices at a
time of installation.
·It may cause a fire.
Please use only the designated
batteries for the products of
using DC power.
·It may cause an electric
shock or fire.
When installing the product,
please fix it firmly while using
the wall-mounting unit and
screws.
·It may cause an injury from
the falling object.
Please don’t install the
product on an unstable place
or small support board.
·It may cause an injury if it
falls down while in use.
When cleaning the product,
please rub it with a soft and
dry cloth after plugging out
the power cable. (Please don’t
use any chemical products
such as wax, benzene, alcohol
or cleanser.)
Please don’t drop the product
on the ground and don’t apply
a shock .
·It may cause a failure.
Please use the designated
connection cable within the
maximum calling distance
designated for the product
·It may reduce the product
performance.
Cleaning & Use
3
Page 5

3. Part name and function
No
1
2
3
4
CONTENTS CONTENTS CONTENTS
LCD
POWER LED
MICROPHONE
MONITORING BUTTON
No
5
GUARD CALL BUTTON
DOOR OPEN BUTTON
6
MENU BUTTON
7
TALK BUTTON
8
No
SPEAKER
9
POWER SWITCH
10
4. User Setting
After Menu screen appears, you can change setting with below 4 buttons
Menu start and finish :[ ] (Menu button -‘[ ] ’)
SELECT : [ ] (Guard button-‘[ ] ’)
Move upward /move right : [ ] (Door release button –‘▲’ / ‘▶’)
Move downward /move left : [ ] ( Monitor button–‘▼’ / ‘◀’)
After pressing MENU button in Video call or monitoring mode, you can change settings for DOOR
VIDEO SET(BRIGHTNESS / CONTRAST/ COLOR), UTILITY (ADDITIONAL FUNCTION) and
INFORMATION (product information)
4
Page 6

4-1.
DOOR VIDEO SET (BRIGHTNESS / CONTRAST/ COLOR control function).
After moving to menu with MENU button, press SELECT button to move to the menu below.
(1) BRIGHTNESS : control BRIGHTNESS
(2) CONTRAST : control CONTRAST
(3) COLOR : control COLOR
You can control from 0 to 20 level. Initial level is set for level 10
※ how to set
After moving to menu with your desired MENU from ‘DOOR VIDEO SET’, press SELECT
button to move to the menu below
(4) RESET: reset display setting
※ how to set
After moving to RESET from DOOR VIDEO SET, press SELECT button for RESET.
Select YES with move button.
Complete your setting by pressing SELECT button
(5) EXIT: Return to EXIT of initial menu
4-2. UTILITY (additional function)
After moving to MENU with button, press SELECT button to move to below screen
(1) SPEAKER VOLUME: control call volume (You can only adjust during a call)
There are 3 levels of volume control options and default is level 2
※ how to set
After moving to SPEAKER VOLUME from UTILITY, press SELECT button for SPEAKER VOLUME.
Select your desired setting.
Complete your setting by pressing SELECT button
(2) CHIME-BELL VOLUME : control ringing tone
You can control from 0(MUTE) to 3 level. Initial level is set for level 2.
※ how to set
After moving to CHIME-BELL VOLUME from UTILITY, press SELECT button for CHIME-BELL VOLUME.
Select your desired setting.
Complete your setting by pressing SELECT button.
(3) SCREEN MODE: set display ratio
※ how to set
After moving to SCREEN MODE from UTILITY, press SELECT button for SCREEN MODE.
With ▲/▼ button, select your desired setting.
Complete your setting by pressing SELECT button.
♠ ZOOM :4:3 display is changed into full display mode (default)
♠ 4:3 : actual ratio of camera.
♠ WIDE : display is changed into 16:9 display mode
(4) EXIT : Return to EXIT of initial menu
5
Page 7

4-3. INFORMATION (product information.)
After entering to menu by pressing menu button, you can move to INFORMATION and check product
information
() MODEL : Shows product name
() VERSION : Shows program version
() HOME ID : Shows current building No. / Household No
() SLAVE ID : Shows current slave ID.
() TOUCH : Shows touch program version
() VIDEO : Shows current camera output standard. (NTSC / PAL)
() SOURCE : This indicates location of current video (Household door unit & Lobby entrance)
4-4. EXIT
Exit from menu
Telephone function
5.
( When the call is finished, please end it by pressing the call button)
1) Receiving a call
This device (videophone) supports only incoming calls, not outgoing. When an
incoming call is detected, the Call lamp will blink and a bell will ring. Press the Call
button to answer the call, as indicated by the steadily lit Call lamp.
2) Being Paged by the individual entrance While in a Call
a) A soft Chime tone will sound and the visitor will be displayed on screen.
b) Press the call button while in a call. (LED will blink.)
c) If you press the Call button again, a call with the Entrance will start.
3) Being Paged by the Common Entrance While in a Call
a)
A soft Chime tone will sound while in conversation and the visitor will be displayed
on screen.
b) While in conversation, press the Call button. (LED will blink)
c) If you press the Call button again, a call with the Common Entrance will start.
4) Being Paged by the Guardhouse (or by another Household) While in a Call.
a) A soft Chime tone will sound.
b) Press the Call button while in conversation. (LED will blink)
c)
If you press the Call button again, a call with the Guard station(or other households)
will start.
Talk with other households
6.
1) Being Paged by Other Households
The Call lamp will blink and a Melody tone will sound when being paged by another
household. Press the Call button to answer the page, as indicated by the steadily lit
Call lamp. When finished with the conversation, press the Call button again to end the
call.
6
Page 8

2) Being Paged from the Individual entrance While in a Call with another Household
a) A soft Chime tone will sound while connected to another household, and the visitor
will be displayed on screen.
b) Press the Call button while staying connected to the other household.
(LED will blink)
c) Press the Call button once more.
d) The current call will end and a new call will start.
3) Being Paged from the Common entrance while Connected to another Household
a) A soft Chime tone will sound while connected to another household, and the visitor will
be displayed on screen.
b) Press the Call button while staying connected to the other household. (LED will blink)
c) Press the Call button once more.
d) The current call will end and a new call will start.
Ext. call function
7.
1) Being Paged from an Extension
The Call lamp will blink and a Melody tone will sound when being paged from an
extension. Press the Call button to answer the page, as indicated by the steadily lit Call
lamp. When finished with the conversation, press the Call button again to end the call.
2) Being Paged from the Household Porch while Connected to an Extension
a)
A soft Chime tone will sound while connected to an extension, and the image of the
visitor will be displayed.
b) Press the Call button while staying connected with the extension. (LED will blink)
c) Press the Call button once more.
d) The current call will end and a new call will start.
3) Being Paged from the Common entrance while Connected to an Extension
a)
A soft Chime tone will sound while connected to the extension, and the visitor's
image will be displayed on the screen.
b) Press the Call button while staying connected to the extension. (LED will blink)
c) Press the Call button once more.
d) The current extension call will end and a new call will start.
4) Incoming Call while Connected to an Extension
a) A soft Bell will sound while connected to the extension.
b) Press the Call button while staying connected to the extension. (LED will blink)
c) Press the Call button once more.
d) The current extension call will end and a new call will start.
※ Alarm function operates interlocked with other equipment while staying connected to
the extension.
1. Call with Master equipment: marked in only Master
2. Call with other Slave equipment: marked in the equipment which makes a call.
7
Page 9

Guard station call function
8.
1) Being Paged by the Guardhouse
The Call lamp will blink and a Melody tone will sound when being paged by the
Guardhouse. Press the Call button to answer the page, as indicated by the steadily lit Call
lamp. When finished with the conversation, press the Call button to end the call.
2)
Being Paged by the Household Porch while Connected to the Guardhouse
a)
A soft Chime tone will sound while connected to the Guardhouse, and the visitor will be
displayed on screen.
Press the Call button while staying connected to the Guardhouse. (LED will blink)
b)
c) Press the Call button once more.
d) The current call will end and a new call will start.
3) Incoming Call while Connected to the Guardhouse
a) A soft Bell will sound while connected to the Guardhouse.
b) Press the Call button while staying connected to the Guardhouse. (LED will blink)
c) Press the Call button once more.
d) The current call will end and a new call will start.
4) Paging the Guardhouse
a) Press the Call button.( standby sound "toot” will be heard)
b) Press the Guard button. (Paging Time: 30 seconds)
c)
When answered by the Guardhouse, register the household number and ext.
setting.
※ This guard station call function is used when you set the ext. number to this slave phone
when installing first. (using interlocked with Master and Guard station)
Individual entrance call function
9.
1) Paging the Household Videophone from the Entrance
a) A Chime tone will sound, and the visitor will be displayed on screen.
(The screen will turn off 30 seconds after the page)
b) Press the Call button to answer.
(The call is limited to 1 minute from the moment of pressing the Call button)
When finished with the conversation, press the Call button to end the call.
2) Being Paged by the Guardhouse While Connected the Entrance
a) Soft Melody tone will sound while connected to the entrance.
b) Press the Call button while connected to the entrance. (LED will blink)
c) Press the Call button again.
d) The current call will end, and a new call will start. (LED will turn on)
3) Being Paged by the Common entrance While Connected to the Entrance
a) Soft Chime tone will sound while connected to the entrance.
b) Press the Call button while connected to the entrance. (LED will blink)
c) Press the Call button again.
d) The current call will end, and a new call will start. (LED will turn on)
8
Page 10

4) Incoming Call while Connected to the Entrance
a) Soft Bell will sound while connected to the entrance.
b) Press the Call button while connected to the entrance. (The Call lamp will blink)
c) Press the Call button again.
d) The current call will end, and a new call will start. (LED will turn on)
5) Monitoring the entrance
a) Press the monitoring button on stand-by mode (you can check the entrance)
b) End it by pressing the monitoring button once again.
While monitoring, make a call with entrance by pressing the call button.
When finished with the conversation, press the Call button to end the call.
Common entrance call function
10.
1)
Paging the Household Videophone from the Common entrance
a) Chime tone will sound, and the visitor will be displayed on screen.
(The screen will turn off 30 seconds after the page)
b) Press the Call button to answer.
(The call can be made for 1 minute from the moment of pressing the Call button)
c) Pressing the Open button while connected to the Common entrance will release it.
Press the Call button again to end.
2) Being Paged by the Household Porch while Connected to the Common entrance
a)
Soft Chime will sound while connected to the Common entrance, and the Entrance
lamp will blink.
b)
Press the Call button while connected to the Common entrance. (LED will blink)
c) Press the Call button again.
d) The current call will end, and a new call will start. (LED will turn on)
3) Incoming Call while Connected to the Common entrance
a) Soft Bell will sound while connected to the Common entrance.
b) Press the Call button while connected to the Common entrance. (LED will blink)
c) Press the Call button again.
d) The current call will end, and a new call will start. (LED will turn on)
Door release function
1 1.
※ By pressing the door release button, door can be released while talking with
entrance(individual/common)
※ While calling with common entrance the call will be ended automatically after door
release.
9
Page 11

1 2.Master call function
1) How to call master related to extension number (Setting master ext. : no.1)
a) On standby mode, enter the call standby mode by pressing the call button. (sound
"toot”)
b)
Press the priority MENU button. (calling Master)
☞
Caution : in case of MENU button, it operates as original function unless the call
standby mode.
Detour function
1 3.
※ When the Away Mode is set from the Household, pages by visitors from the Common
entrance or Household Porch are automatically forwarded to the Guardhouse to be
answered by the Guard on duty.
※ Away Mode cannot be set with this Videophone, but enabling the Away Mode through
another videophone will have all pages from the Common entrance and the Household
Porch to be forwarded to the Guardhouse.
Factory Initialization function
1 4.
※ On pressing door release button and guard button for 3seconds at the same time,
product reset is done with “beep”sound.
☞
Caution : On execution of initialization function, all the information such as household
setting and screen adjustment
※ Initial value of initialization
a)
Building and household number: Building 1234 household number 5678
b)
Ext. ID : 0
c)
Receiving delivery service status: no delivery service reception
10
Page 12
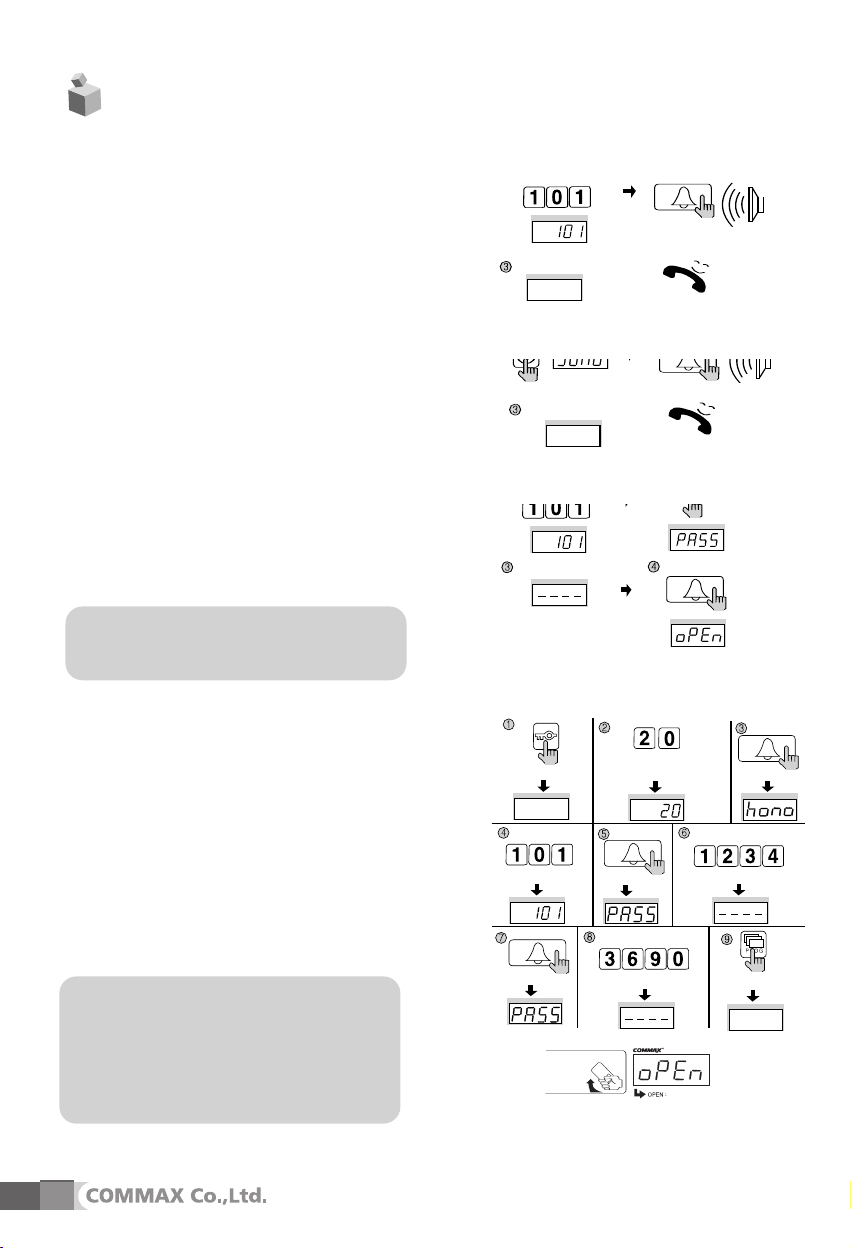
How to use common entrance camera
15.
1) To call the household
a) Press the household number ex) household 101 => 1,0,1
b) Household number appears on FND
c) Press the call button (E: shape of bell)
d) Conversation begins when household picks up the
phone.
2) Paging a guard station
a) Press the guard button(shape of police officer)
b) ‘Guard’ appears on FND.
c) Press the Call button(E: shape of bell)
d) ‘Guard’ blinks on FND with call sound.
e) Conversation begins when guard station pick up the
phone.
3) Opening the door with PIN
a) Press the household number.
b) Press the Key button(K: shape of key).
c) ‘PASS’ blinks on FND.
d) Press the household PIN.
e) ‘___’ appears on FND.
f) Press the Call button.
g) ‘OPEN’ message blinks on FND and door will open.
[Reference for use]
If you don’t recall household PIN, please contact a
guard station or management station.
4) Registering household PIN
a) Press the Key button(K: shape of key)
b) Press program number ‘20’
c) Press the Call button(E: shape of bell). ‘hono’ message
blinks on FND.
d) Press the household number.
e) Press the Call button(E: shape of bell). ‘PASS’ message
blinks on FND.
5) When you want to open the door with wireless card
key(optional), put the distributed wireless card key(RF Card) to
the window at the bottom of camera lense. Then, door will
open with the message of ‘OPEN’ on FND.
[Reference for use]
If unregistered card comes close to the sensor,
①
guard station unit has to be informed the
situation automatically with the call. Please
register RF card first at management office first.
If nothing has been changed, the card cannot
②
be used.
Enter theHousehold Number.
ex) unit 101
Call button (E).
Wait for a reply
Press the Guard button.
Wait for a reply
Enter the Household Number.
ex) To open the door of unit 101
Enter the Household PIN.
Electronic Key button (K).
Household Number. ex) 101
Press the
Call button (E).
Please the Card Here
Press the Call button (E).
Press the Call button (E).
Press the Program Number (20).
Press the
Call button (E).
Enter the new Household PIN.
ex)3690
Press the page button.
A paging tone will sound.
Press the
Press the Page button.
A paging tone will sound.
Press the Electronic key button.
Press the Page button.
Press the
Call button (E).
Enter the old PIN. ex)1234
Press the Program button (P).
OPEN DOOR
11
Page 13

Guard Security Alarm Function
16.
* This Videophone sounds alarms when emergency situations are detected, but those alarms
cannot be canceled through this unit.
* Please use other Videophones (With Cancel/Reset Feature) to cancel emergency alarms.
*
This function is impossible to generate the sound which can be heard when interlocked with
other video phones.
1) Emergency : Pressing the Emergency button when needed will sound the corresponding
alarm (Electronic Gun) from the unit.
2) Warning 1 : The corresponding alarm (Fire Truck) will sound when Warning 1 is detected.
3)
Warning 2 : The corresponding alarm (Ambulance) will sound when Warning 2 is detected.
4) Security : The corresponding alarm (Police Siren) will sound when burglar is detected.
☞
☞
Caution : in case of alarm, it will sound loudly regardless of volume switch.
Connection diagram
17.
12
Page 14
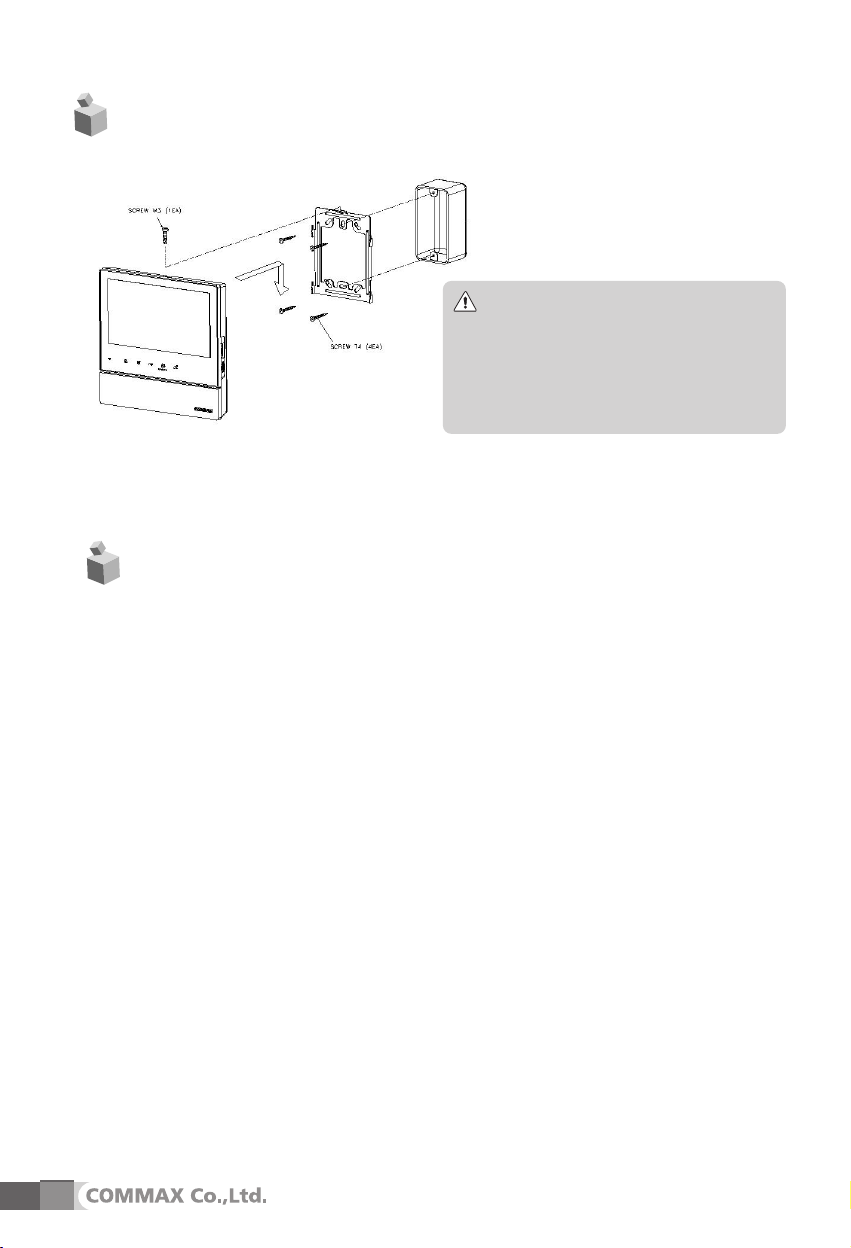
Installation and how to wiring
18.
Note
주의사항
① Avoid the range of direct sunlight
① 직사광선이 비치는 곳은 피하십시오.
② Recommended height is pertinent
② 설치높이는 145~150Cm 정도가
from 1450 ~ 1500mm
적당합니다.
③ Avoid the installation near magnetic
③ 가스, 자력, 습기 등이 많은 곳은 설치를
피하십시오.
activity, humid temperatures and gas
19.
Safe operation guide
- Make sure to turn on the product.
- In case if physical damage or operation failure is detected, do not hesitate to contact
Service Center.
- All electric power must be blocked by the building blocking device.
- Do not place water bottles or flowerpots upon the product.
- Please, turn the power off when installing or repairing the product.
13
Page 15

Contents
20 .
▶ When more than one videophone is connected to the system and one of those
videophones are in use, the call cannot be made by another videophone within that
system.
▶ Also, incoming pages while a call is being made are only heard through the
videophone in which that call is being held from.
▶ When an emergency situation occurs, emergency alarm will be sounded by all
installed videophones, and the Cancel/Reset feature can only be performed through
videophones supporting that feature.
▶ This videophone is able to call the guard, wireless phone(ext. 5) and Master
phone(ext. 1) but in other places (common entrance, other households, local loop
and so on), only receiving is available.(Master interlocking function)
Specification
21 .
Model
Spec
Transmission style
Rated Voltage
Power consumption
Conversation
Display
Call sound
Screen
Distance
Working Temperature
CAV-70HS
MASTER 6 lines
100~240V~, 50/60 Hz (FREE VOLTAGE)
Max: 12W, Standby: 3W
Hands free mode(Voice Switch circuit)
17.78 cm(7') COLOR TFT-LCD(digital)
- Entrance : two types of 3 tones electric chime bell
- Guard station : Melody
60±10 SEC(During conver sation), 30±10SEC(During monitoring)
MASTER : Ø 0.65 CABLE / 30m
0℃~+40℃
14
Page 16

513-11, Sangdaewon-dong, Jungwon-gu, Seongnam-si, Gyeonggi-do, Korea
Int’l Business Dept. Tel. : +82-31-7393-540~550 Fax. : +82-31-745-2133
Web site : www.commax.com
PM0270AS0010
Printed In Korea / 2013.09.104
 Loading...