

Page 1

User Manual
Color Video Door Phone CAV-43MHG / CAV-43MHG(M)
� Thank you for purchasing COMMAX products.
•Thank you for purchasing COMMAX products.
� Please carefully read this User’s Guide (in particular, precautions for safety) before using a product and follow
•Please carefully read this User’s Guide (in particular, precautions for safety) before using a product and follow
instructions to use a product exactly.
instructions to use a product exactly.
� The company is not responsible for any safety accidents caused by abnormal operation of the product.
•The company is not responsible for any safety accidents caused by abnormal operation of the product.
Page 2

Table of Contents
1. Greeting ················································································· 1
2. Warnings and caution ································································ 2
3. Part names and functions ··························································· 4
4. Usage instruction ····································································· 4
5. User Setting ············································································ 7
6. System Setting ········································································10
7. How to use lobby phone ····························································11
8. Installation ·············································································12
Wiring method ········································································12
9.
10. Component ··········································································14
11. Specications ·······································································14
Greeting
1
.
●
Thank you for purchasing a COMMAX product
●
Please, use the product after carefully reading this Manual
●
This type of videophone can be used in apartments, villas and other buildings as a
multifunctional device with door opening, telephone conversation and guard station
control function
1
Page 3

Warnings and caution
2.
Please follow the things described below in order to prevent any
danger or property damage.
Prohibition.
Warning
Caution
It may cause a serious damage or
injury if violated.
It may cause a minor damage or
injury if violated.
No disassembly
No touch
Must follow strictly.
Shows plugging out the power cord
without an exception
Shows the warning and caution for an electric shock.
Shows the warning and caution for a fire.
Warning
Please don’t use several
products at the same time on
one power socket.
·It may cause a fire due to an
abnormal overheating.
Please don’t
product in the place where
there is much oil, smoke or
humidity.
·It may cause an electric
shock or fire.
Power & Installation
install the
Please don’t bend the power
cable excessively or it may
cause an electric shock.
·fire when using a damaged
power cable.
Please don’t install the
product with the lightening
and thunder.
·It may cause an electric
shock or fire.
Please don’t handle the power
cable with a wet hand.
·It may cause an electric
shock.
Please don’t use and connect
this product with other
products with different rated
voltage
·It may cause a disorder or
fire.
Please plug out the power
cable from the socket when
not using it for a long period
of time.
·It may shorten the product
lifespan or cause a fire.
When installing the product
that generates heat, please
install the product away from
the wall (10cm) for the
ventilation.
·It may cause a fire due to
the increased internal
temperature.
2
Page 4

Warning
Please don’t disassemble,
repair or rebuild this product
arbitrarily (please contact the
service center if a repair is
needed.
·It may cause an electric
shock or fire.
Cleaning & UsePower & Installation
Please plug the power cable
firmly into the inner end
·It may cause a fire.
Please be careful when using
an AC circuit breaker since
there is a possibility of an
electric shock.
If an abnormal sound, burning
smell or smoke is coming out
of the product, please plug out
the power cable and contact a
service center.
·It may cause an electric
shock or fire.
Caution
Please hold the plug tightly
when unplugging the power
cable (a part of the copper
wire may be disconnected if
the grabbing is only made on
the cord when pulling out the
cable).
·It may cause an electric
shock or fire
Please check the use voltage
and current for the DC-only
products and use the
appropriate rectifier.
·It may cause a fire.
Please don
metallic or burnable materials
into the ventilation hole.
·It may cause an electric
Please avoid direct rays of the
sun or heating devices at a
time of installation.
·It may cause a fire.
’t insert any
shock or fire.
When connecting the power
cables after cutting the cable,
please install the product with
power off
·It may cause an electric
shock or fire
Please use only the designated
batteries for the products of
using DC power.
·It may cause an electric
shock or fire.
When installing the product,
please fix it firmly while using
the wall-mounting unit and
screws.
·It may cause an injury from
the falling object.
Please don’t install the
product on an unstable place
or small support board.
·It may cause an injury if it
falls down while in use.
When cleaning the product,
please rub it with a soft and
dry cloth after plugging out
the power cable. (Please don’t
use any chemical products
such as wax, benzene, alcohol
or cleanser.)
Cleaning & Use
Please don’t drop the product
on the ground and don’t apply
a shock .
·It may cause a failure.
Please use the designated
connection cable within the
maximum calling distance
designated for the product
·It may reduce the product
performance.
3
Page 5

Part names and functions
3.
MonitorHandset
Power Switch
Power LED
Monitor Button
Guard Button
Menu Button
Door Open Button
.
Caution : When you are holding the handset while the hook switch is off and
※
someone may push the button of camera, you may lose your hearing
because of high volume of calling sound.
Call from the individual entrance
4-1.
① When the visitor presses the call button, an electronic chime sound rings and the
isitor’s image appears on the monitor.
v
② By picking up the handset, you can talk with the visitor. If you press door release
button, door will be released.
Door release works only while talking and it is possible only when the door camera
(
is interlocked with door release function.)
③ When you receive the call from (Lobby / Guard Station) during the conversation
with the individual entrance, the electronic chime sound rings. Then, press the
(Lobby: monitoring button / Guard Station: guard button) from t
to finish the conversation with the individual entrance and have a conversation
with (Lobby / Guard Station).
④ Screen will be turned off after 60 sec automatically, press the monitoring button to
heck again.
c
⑤ If you put down the handset, talking is finished and turns to stand-by mode.
he video phone
4
Page 6

4-2. Call from the Lobby
① Visitor’s image will be shown on the monitor with emitting chime sound when a
visitor presses the call button.
②
By picking up the handset, you can talk with the visitor.
(Screen will be turned off after 60 sec automatically from the b
conversation)
③ When you receive the call from individual entrance during the conversation with
Lobby , the electronic chime sound rings. Then, press the monitoring button from
the video phone to finish the conversation with lobby and have a conversation
with visitor.
④ When you press the door release button in the middle of conversation, the lobby
gate will be opened with switchgear sound and the conversation will be finished.
4-3. Conversation with Guard
(1) Call from the guard
① The sound of call will be emitted when it has a call from guard.
② By picking up the handset, you can talk with the guard.
③ If there is a call from door while you are communicating to a person at guard
station, it chimes and the image of visitors is shown. Then, press the
monitoring
and have a conversation with visitor
button from the video phone to finish the conversation with guard
eginning of
(2) Calling the guard station
① You can talk with guard station by picking up the handset and pressing guard call
button.
② Conversation will begin when a guard station responds.
5
Page 7

4-4. Monitoring.
When you receive initial call , your device automatically searches for the
door camera and displays OSD accordingly
with Door camera
Display
Display with no Door camera
By pressing monitor button, display above appears. If you press button of your
desired
space (monitoring[ ], guard[ ]), you can monitor according space. (Door, Lobby, )
- Monitoring (DOOR/LOBBY)function time is 30secs
- You can talk by picking up the handset while monitoring(DOOR/LOBBY)
- You can monitor only certain lobby with pre-set ID
6
Page 8
.
•After Menu screen appears, you can change setting with below 4 buttons
Menu start and finish :[ ] (Menu button -‘[ ] ’)
SELECT : [ ] (Guard button-‘[ ] ’)
Move upward /move right : [ ] (Door release button –‘▲’ / ‘▶’)
Move downward /move left : [ ] ( Monitor button–‘▼’ / ‘◀’)
After pressing MENU button in Video call or monitoring mode, you can change
settings for DOOR(LOBBY), VIDEO SET(BRIGHTNESS / CONTRAST/
COLOR), UTILITY (ADDITIONAL FUNCTION) and INFORMATION (product
information)
5-1. Display setting
DOOR(LOBBY) VIDEO SET (BRIGHTNESS / CONTRAST/ COLOR control
function).
After moving to menu with MENU button, press SELECT button to move to the
menu below.
(you can control LOBBY VIDEO
(1) BRIGHTNESS : control BRIGHTNESS
(2) CONTRAST : control CONTRAST
(3) COLOR : control COLOR
You can control from 0 to 20 level. Initial level is set for level 10
※ how to set
After moving to menu with your desired MENU from ‘DOOR VIDEO SET’,
press SELECT button to move to the menu below
(you can control ‘LOBBY VIDEO SET’ while you are talking with lobby.)
SET while you are talking with lobby.)
(4) RESET: reset display setting
※ how to set
7
Page 9

After moving to RESET from DOOR VIDEO SET, press SELECT button for
RESET.
Select YES with move button.
Complete your setting by pressing SELECT button
※ Notice :Display control and reset function adjusts each video(DOOR/LOBBY)
collectively
(5) EXIT: Return to EXIT of initial menu
5-2. UTILITY(additional function)
After moving to MENU with MENU button, press SELECT button to move to
below screen.
(1) CHIME-BELL VOLUME : control ringing tone
You can control from 0(MUTE) to 3 level. Initial level is set for level 2.
※ how to set
After moving to CHIME-BELL VOLUME from UTILITY, press SELECT button
for CHIME-BELL VOLUME.
Select your desired setting.
Complete your setting by pressing SELECT button.
(2)SCREEN MODE: set display ratio
※ how to set
After moving to SCREEN MODE from UTILITY, press SELECT button for
SCREEN MODE.
With ▲/▼ button, select your desired setting.
Comple
♠ ZOOM :4:3 display is changed into full display mode (default)
♠ 4:3 : actual ratio of camera.
♠ WIDE : display is changed into 16:9 display mode
te your setting by pressing SELECT button.
8
Page 10

(3)EXIT: Return to EXIT of initial menu
☞Tip: ringing tone simple volume control function
While you are calling or monitoring, there appears volume control icon on
the screen. You can control ringing tone volume by pressing door open
button.
Ringing tone volume control(door open button): Every time you press
button once,
Ringing tone changes 0 ~3 stages. Control your desired volume by
pressing button several times.
(The changed volume is reflected immediately. The according setting
screen disappears automatically.)
5-3. INFORMATION(product information)
After entering to menu by pressing menu button, you can move to
INFORMATION and check product information
(1) MODEL : Shows product name
(2) VERSION : Shows program version
(3) HOME ID : Shows current building No. / Household No
(4) TOUCH : Shows touch program version
(5) VIDEO : Shows current camera output standard. (NTSC / PAL)
(6) SOURCE : This indicates location of current video
(Household door unit & Lobby entrance)
5-4. EXIT
9
Page 11

6.
You can set HOME SET(Household information setting) and INFORMATION(Product
information check) after pressing menu button for 3 seconds in stand by mode.
6-1. HOME SET (Household information entry)
Move to HOME SET from System setting mode and select below
(1) HOME ID : Setting Building No. and Household No
※ How to set
① Move to HOME ID from HOME SET and select
② After selecting the number with ▶ / ◀, press the SELECT button and fill it in from
first. : Default on household no is 8 digit numbers. Blanks are marked with 0.
(ex : Building no : 101 Household no : 1 (0101 - 0001)
※ Wrong number can be modified with ◁ button.
③ When finish inputting 8-digit number, press the select button to save it.
(2) PASSWORD :Setting Household Password
※ How to set
① Move to PASSWORD section from HOME SET and select below
② Enter numerical numbers by using moving button (Initial building/household No. are
set “1234”. You should change password to use)
※ Warning : For security reason, do not use repeated No
※ Numbers such as 0000, 1234, 4321 are prohibited to use for security reason
(3) LOBBY ID : Set Lobby entrance ID to monitor
※ How to set
① Move to LOBBY ID section from HOME SET and select below
② Enter numerical numbers out of 01~39 by using moving button
(Initial Lobby entrance ID No. is set “01”)
③ Complete setting by pressing “select” button
EXIT : Go back to system setting
10
Page 12
6-2. INFORMATION(product information)
In MENU mode, move to INFORMATION and check out Product Information
(1) MODEL : Product Name
(2) VERSION : Product Version
(3) HOME ID : Currently set Buil
ding No. & Household No.
(4) TOUCH : Touch program Version
6-3. EXIT
7.
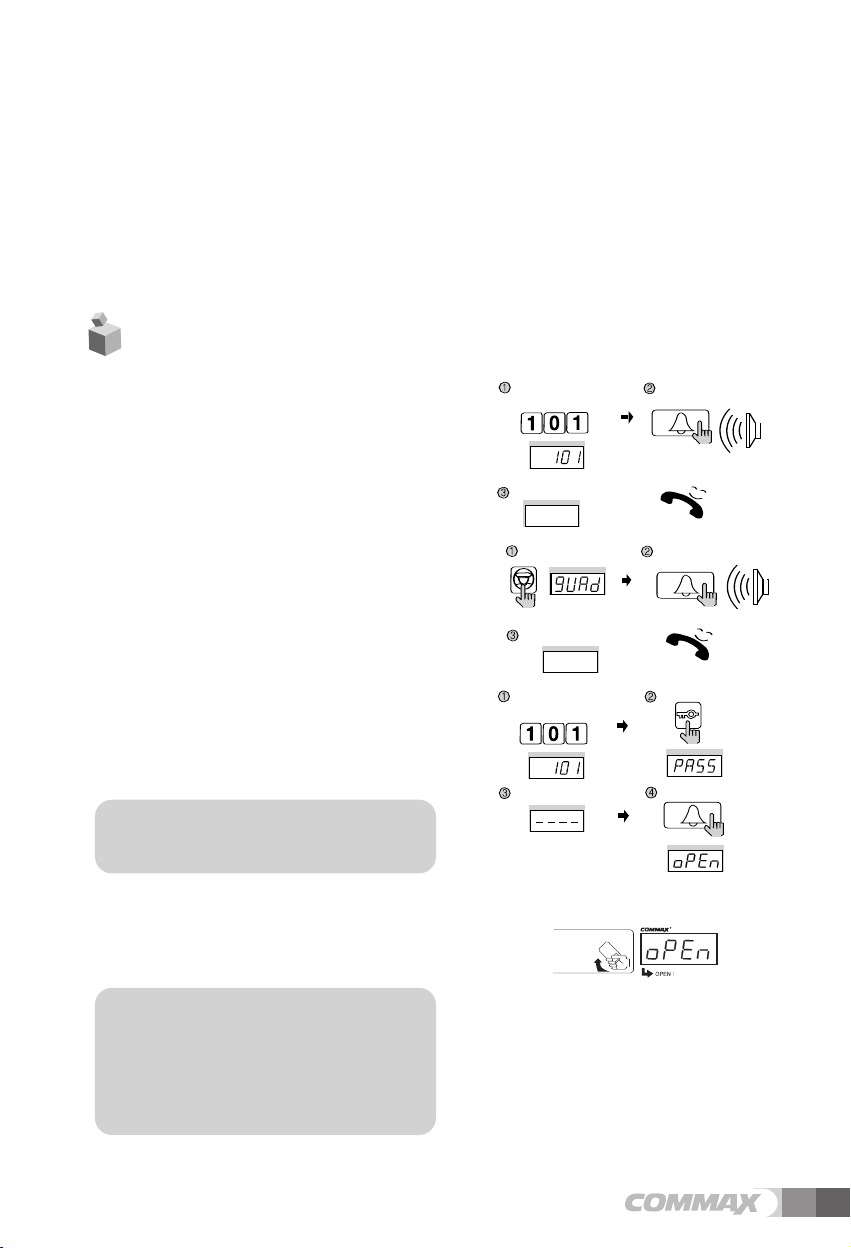
1) When paging the household
Enter the household number you want to cal.1
●
ex) household 101
Household number appears on FND
●
Press the Call button (E)
●
Conversation begins when they answer.
●
1, 0, 1
⇒
2) When paging guard station
Press the guard button
●
‘gUAd’appears on FND
●
Press the Call button (E)
●
Emit call house along with flickering of ‘gUAd’.
●
Conversation begins when guard station answers.
●
3) Opening the door with RF card
Press the Household number
●
Press the Key button (K)
●
Letters of ‘PASS’ flicker on the FND.
●
Press the 4-digit password.
●
Appears ‘----’ on the FND.
●
Press the Call button
●
Door is open with flickering of ‘oPEn’ on FND .
●
[Reference for use]
Contact guard station or management station if you
don’t remember the password
4) Opening the door with registered RF card (optional function)
●
Put the RF card on the sensor positioned right below of
camera lens to open the door. Door will be opened along
with a message of ‘oPEn’ on FND.
Please the Card Here
[Reference for use]
1. If you try to open the door with unregistered RF
card, it will be notified to guard station. Please
try again after registering it at the guard station
or management office.
2. If RF card still doesn’t work after proper
registering procedure, it is not usable card.
Enter theHousehold Number.
ex) unit 101
Press the
Call button (E).
Wait for a reply
Press the Guard button.
Wait for a reply
Enter the Household Number.
ex) To open the door of unit 101
Enter the Household PIN.
Press the Call button (E).
Press the Call button (E).
Press the page button.
A paging tone will sound.
Press the Page button.
A paging tone will sound.
Press the Electronic key button.
Press the Page button.
OPEN DOOR
11
Page 13
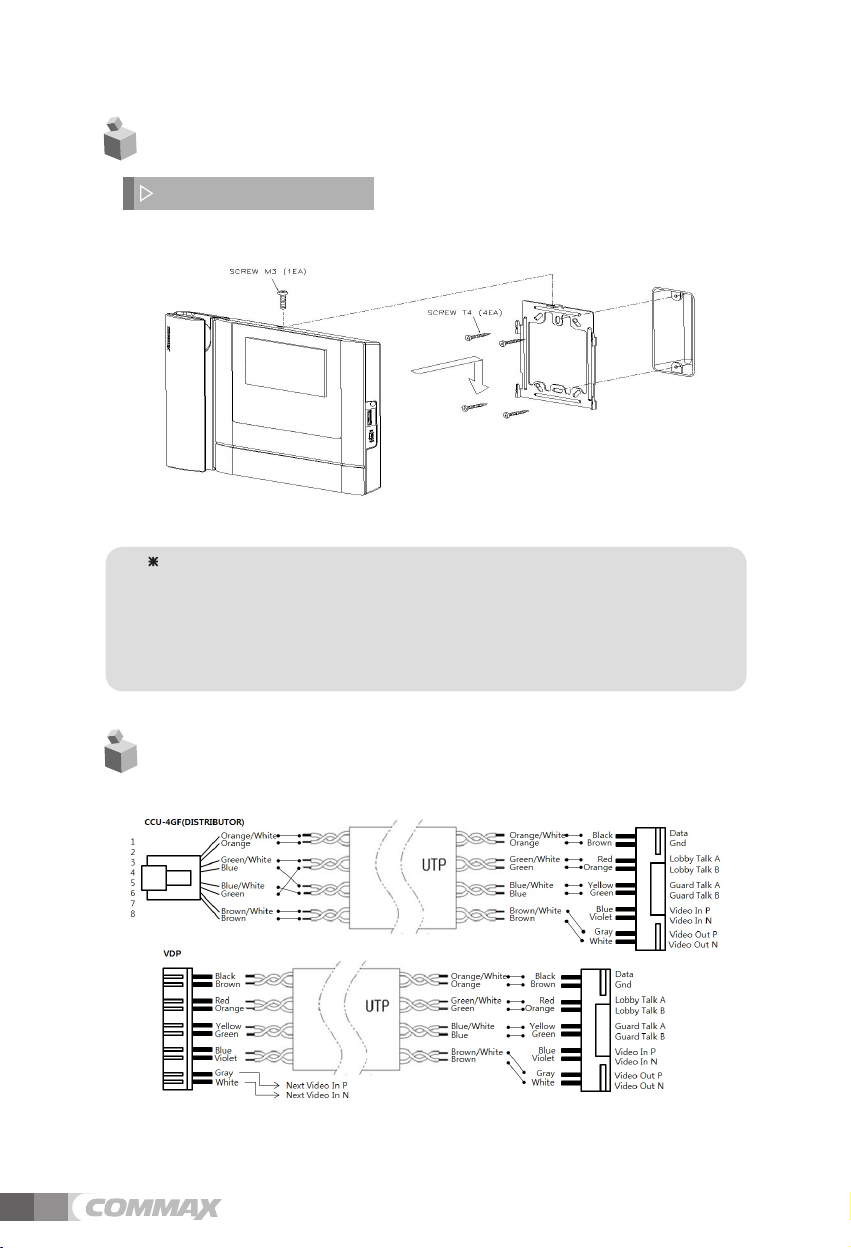
8
. Installation
▷
Monitor install
Note
Avoid installing the product in the area of direct sunlight.•
• The position of the unit's body should fit the standard height range
(Recommended height range is 1450 ~ 1500mm.)
• Avoid installing the product exposed to gas exposure, magnetic force,
in humid temperat ures, as it may damage t he condition and
performance of the product.
at
ion
12
9. Wiring method
Page 14

Cautions for wiring
※
If it is to be installed near high voltage line, please use coaxial cable for grounding
1)
Keep the cable out of the sheath exposure to prevent to be shorted
2)
Be sure to turn off the monitor before you connect the monitor with cameras.
3)
Be careful of the polarity of the cable when you connect the monitor with cameras
4)
5)
Lobby Entrance
In case of connecting between lobby panel & monitor, please connect them VD/IN(DN),
VD/OUT(UP) in order. Wire for transferring video signal between lobby & monitor
13
Page 15

10. Component
11. Specifications
14
Spec
Transmission style
Rated Voltage
Power consumption
Conversation
Display
Calling sound
Talk duration
Distance
Working Temperature
Dimension
Model
0 ~+40℃ (32℉ ~ 104℉)
CAV-43MHG / CAV-43MHG(M)
CAMERA :4 lines, LOBBY : 8 lines
MAX : 10W, Stand-by : 2W
HAND-SET mode
4.3" COLOR TFT-LCD (DIGITAL)
Entrance(Door/Lobby) : Electronic chime, Guard station : Melody
Standby : 30sec Conversation : 60sec, Guard station : 3min
Individual camera : 30m (Ø 0.5 - Line Impedance:3ohm)
Common lobby : 300m (UTP), Guard station : 1Km
243.0(W) X 168.0(H) X 30.0(D)
Page 16

513-11, Sangdaewon-dong, Jungwon-gu, Seongnam-si, Gyeonggi-do, Korea
Int’l Business Dept. Tel. : +82-31-7393-540~550 Fax. : +82-31-745-2133
Web site : www.commax.com
PM0243MHG010
Printed In Korea / 2017.01.104
 Loading...