

Comelit Planux Memo Video User Manual
IT - EN - FR - NL


IT
INDICE
INTRODUZIONE
AVVERTENZE ......................................................................................................4
DESCRIZIONE MONITOR ...................................................................................5
FUNZIONE TASTI ................................................................................................5
MENU PLANUX MEMO VIDEO ...........................................................................6
GUIDA CROMATICA ............................................................................................ 6
VIDEOFONIA
RISPONDERE AD UNA CHIAMATA .....................................................................7
DESCRIZIONE MENU VIDEOFONIA ..................................................................7
VIDEO SEGRETERIA ..........................................................................................7
VISUALIZZARE UNA REGISTRAZIONE .............................................................8
ELIMINARE UNA REGISTRAZIONE ...................................................................8
MANI LIBERE .......................................................................................................8
IMPOSTA MELODIE .............................................................................................8
REGOLAZIONE VOLUMI .....................................................................................9
ATTUA TORI .......................................................................................................... 9
RINOMINARE ATTUATORI ..................................................................................10
TELECAMERE .....................................................................................................10
RINOMINARE TELECAMERE .............................................................................11
INTERCOMUNICANTI .........................................................................................12
RINOMINARE INTERCOMUNICANTI .................................................................12
SETUP
DESCRIZIONE MENU SETUP ............................................................................13
LINGUA ................................................................................................................13
BLOCCO TASTI E TOUCH ..................................................................................13
IMPOSTA DATA E ORA ........................................................................................14
INFORMAZIONI ...................................................................................................14
CONDIZIONAMENTI ............................................................................................14
AVANZATE
ACCESSO MENU AVANZATE .............................................................................15
DESCRIZIONE MENU AVANZATE ......................................................................15
PROGRAMMAZIONE TASTI ................................................................................16
CONFIGURAZIONE VIDEO SEGRETERIA .........................................................17
ATTUA TORI .......................................................................................................... 17
AGGIUNGERE ATTUATORI.................................................................................17
MODIFICA CODICE ATTUATORE .......................................................................18
ELIMINARE ATTUATORI......................................................................................18
TELECAMERE .....................................................................................................19
AGGIUNGERE TELECAMERE ............................................................................19
MODIFICA CODICE TELECAMERA .................................................................... 20
ELIMINARE TELECAMERE .................................................................................20
INTERCOMUNICANTI .........................................................................................21
AGGIUNGERE INTERCOMUNICANTE...............................................................21
MODIFICA INDIRIZZO INTERCOMUNICANTE...................................................22
ELIMINARE INTERCOMUNICANTE....................................................................22
INTERCOM SELETTIVO......................................................................................23
AGGIUNGERE INTERCOM SELETTIVO ............................................................23
ELIMINARE / MODIFICARE INTERCOM SELETTIVO........................................24
DESCRIZIONE MENU INDIRIZZI ........................................................................24
IMPOSTAZIONE CODICE STAFFA ..................................................................... 24
IMPOSTAZIONE MONITOR PRINCIPALE / SECONDARIO ...............................25
IMPOSTAZIONE INDIRIZZO MULTIPLO .............................................................25
IMPOSTAZIONE INDIRIZZO INTERCOM ...........................................................25
CALIBRAZIONE TOUCH .....................................................................................26
IMPOSTA INGRESSO ..........................................................................................26
RESET TOT ALE ................................................................................................... 26
RESET CONFIGURAZIONI .................................................................................27
AGGIORNAMENTO CONFIGURAZIONI .............................................................27
AGGIORNAMENTO PRODOTTO ........................................................................ 27
TEMPO TRASMISSIONE .....................................................................................27
NUMERO DI TRASMISSIONI ..............................................................................27

INTRODUZIONE
4
IT
AVVERTENZE
Comelit Group S.p.A. declina ogni responsabilità per un utilizzo improprio degli apparecchi, per modifi che
effettuate da altri a qualunque titolo e scopo, per l'uso di accessori e materiali non originali. Attenzione! Al fi ne di
ridurre il rischio di guasti e scosse elettriche:
• Non aprire l'apparecchio o effettuare personalmente riparazioni. In caso di necessità richiedere l'intervento di
personale qualifi cato.
• Non inserire oggetti nè versare liquidi all'interno del dispositivo.
• Pulire con un panno inumidito con acqua. Evitare Alcool e altri prodotti aggressivi.
Fonts are (c) Bitstream (see below). DejaVu changes are in public domain.
Glyphs imported from Arev fonts are (c) Tavmjong Bah (see below)
Bitstream Vera Fonts Copyright
------------------------------
Copyright (c) 2003 by Bitstream, Inc. All Rights Reserved. Bitstream Vera is a trademark of Bitstream, Inc.
Permission is hereby granted, free of charge, to any person obtaining a copy of the fonts accompanying
this license ("Fonts") and associated documentation fi les (the "Font Software"), to reproduce and distribute
theFont Software, including without limitation the rights to use, copy, merge, publish, distribute, and/or sell
copies of the Font Software, and to permit persons to whom the Font Software is furnished to do so, subject
to the following conditions:
The above copyright and trademark notices and this permission notice shall be included in all copies of one
or more of the Font Software typefaces.
The Font Software may be modifi ed, altered, or added to, and in particular the designs of glyphs or
characters in the Fonts may be modifi ed and additional glyphs or characters may be added to the Fonts, only
if the fonts are renamed to names not containing either the words "Bitstream" or the word "Vera".
This License becomes null and void to the extent applicable to Fonts or Font Software that has been modifi ed
and is distributed under the "Bitstream Vera" names.
The Font Software may be sold as part of a larger software package but no copy of one or more of the Font
Software typefaces may be sold by itself.
THE FONT SOFTWARE IS PROVIDED "AS IS", WITHOUT WARRANTY OF ANY KIND, EXPRESS OR
IMPLIED, INCLUDING BUT NOT LIMITED TO ANY WARRANTIES OF MERCHANTABILITY, FITNESS
FOR A PARTICULAR PURPOSE AND NONINFRINGEMENT OF COPYRIGHT, PATENT, TRADEMARK,
OR OTHER RIGHT. IN NO EVENT SHALL BITSTREAM OR THE GNOME FOUNDATION BE LIABLE
FOR ANY CLAIM, DAMAGES OR OTHER LIABILITY, INCLUDING ANY GENERAL, SPECIAL, INDIRECT,
INCIDENTAL, OR CONSEQUENTIAL DAMAGES, WHETHER IN AN ACTION OF CONTRACT, TORT OR
OTHERWISE, ARISING FROM, OUT OF THE USE OR INABILITY TO USE THE FONT SOFTWARE OR
FROM OTHER DEALINGS IN THE FONT SOFTWARE.
Except as contained in this notice, the names of Gnome, the Gnome Foundation, and Bitstream Inc., shall not
be used in advertising or otherwise to promote the sale, use or other dealings in this Font Software without
prior written authorization from the Gnome Foundation or Bitstream Inc., respectively. For further information,
contact: fonts at gnome dot org.
Arev Fonts Copyright
-----------------------------Copyright (c) 2006 by Tavmjong Bah. All Rights Reserved.
Permission is hereby granted, free of charge, to any person obtaining a copy of the fonts accompanying this
license ("Fonts") and associated documentation fi les (the "Font Software"), to reproduce and distribute the
modifi cations to the Bitstream Vera Font Software, including without limitation the rights to use, copy, merge,
publish, distribute, and/or sell copies of the Font Software, and to permit persons to whom the Font Software
is furnished to do so, subject to the following conditions:
The above copyright and trademark notices and this permission notice shall be included in all copies of one
or more of the Font Software typefaces.
The Font Software may be modifi ed, altered, or added to, and in particular the designs of glyphs or
characters in the Fonts may be modifi ed and additional glyphs or characters may be added to the Fonts,
only if the fonts are renamed to names not containing either the words "Tavmjong Bah" or the word "Arev".
This License becomes null and void to the extent applicable to Fonts or Font Software that has been modifi ed
and is distributed under the "Tavmjong Bah Arev" names.
The Font Software may be sold as part of a larger software package but no copy of one or more of the Font
Software typefaces may be sold by itself.
THE FONT SOFTWARE IS PROVIDED "AS IS", WITHOUT WARRANTY OF ANY KIND, EXPRESS OR
IMPLIED, INCLUDING BUT NOT LIMITED TO ANY WARRANTIES OF MERCHANTABILITY, FITNESS
FOR A PARTICULAR PURPOSE AND NONINFRINGEMENT OF COPYRIGHT, PATENT, TRADEMARK,
OR OTHER RIGHT. IN NO EVENT SHALL TAVMJONG BAH BE LIABLE FOR ANY CLAIM, DAMAGES
OR OTHER LIABILITY, INCLUDING ANY GENERAL, SPECIAL, INDIRECT, INCIDENTAL, OR
CONSEQUENTIAL DAMAGES, WHETHER IN AN ACTION OF CONTRACT, TORT OR OTHERWISE,
ARISING FROM, OUT OF THE USE OR INABILITY TO USE THE FONT SOFTWARE OR FROM OTHER
DEALINGS IN THE FONT SOFTWARE.
Except as contained in this notice, the name of Tavmjong Bah shall not be used in advertising or otherwise
to promote the sale, use or other dealings in this Font Software without prior written authorization from
Tavmjong Bah. For further information, contact: tavmjong @ free. fr.
5
INTRODUZIONE
IT
Sab 05/09/09 16:07
Videofonia
Setup
12
3
11 10
9
87
654
1
2
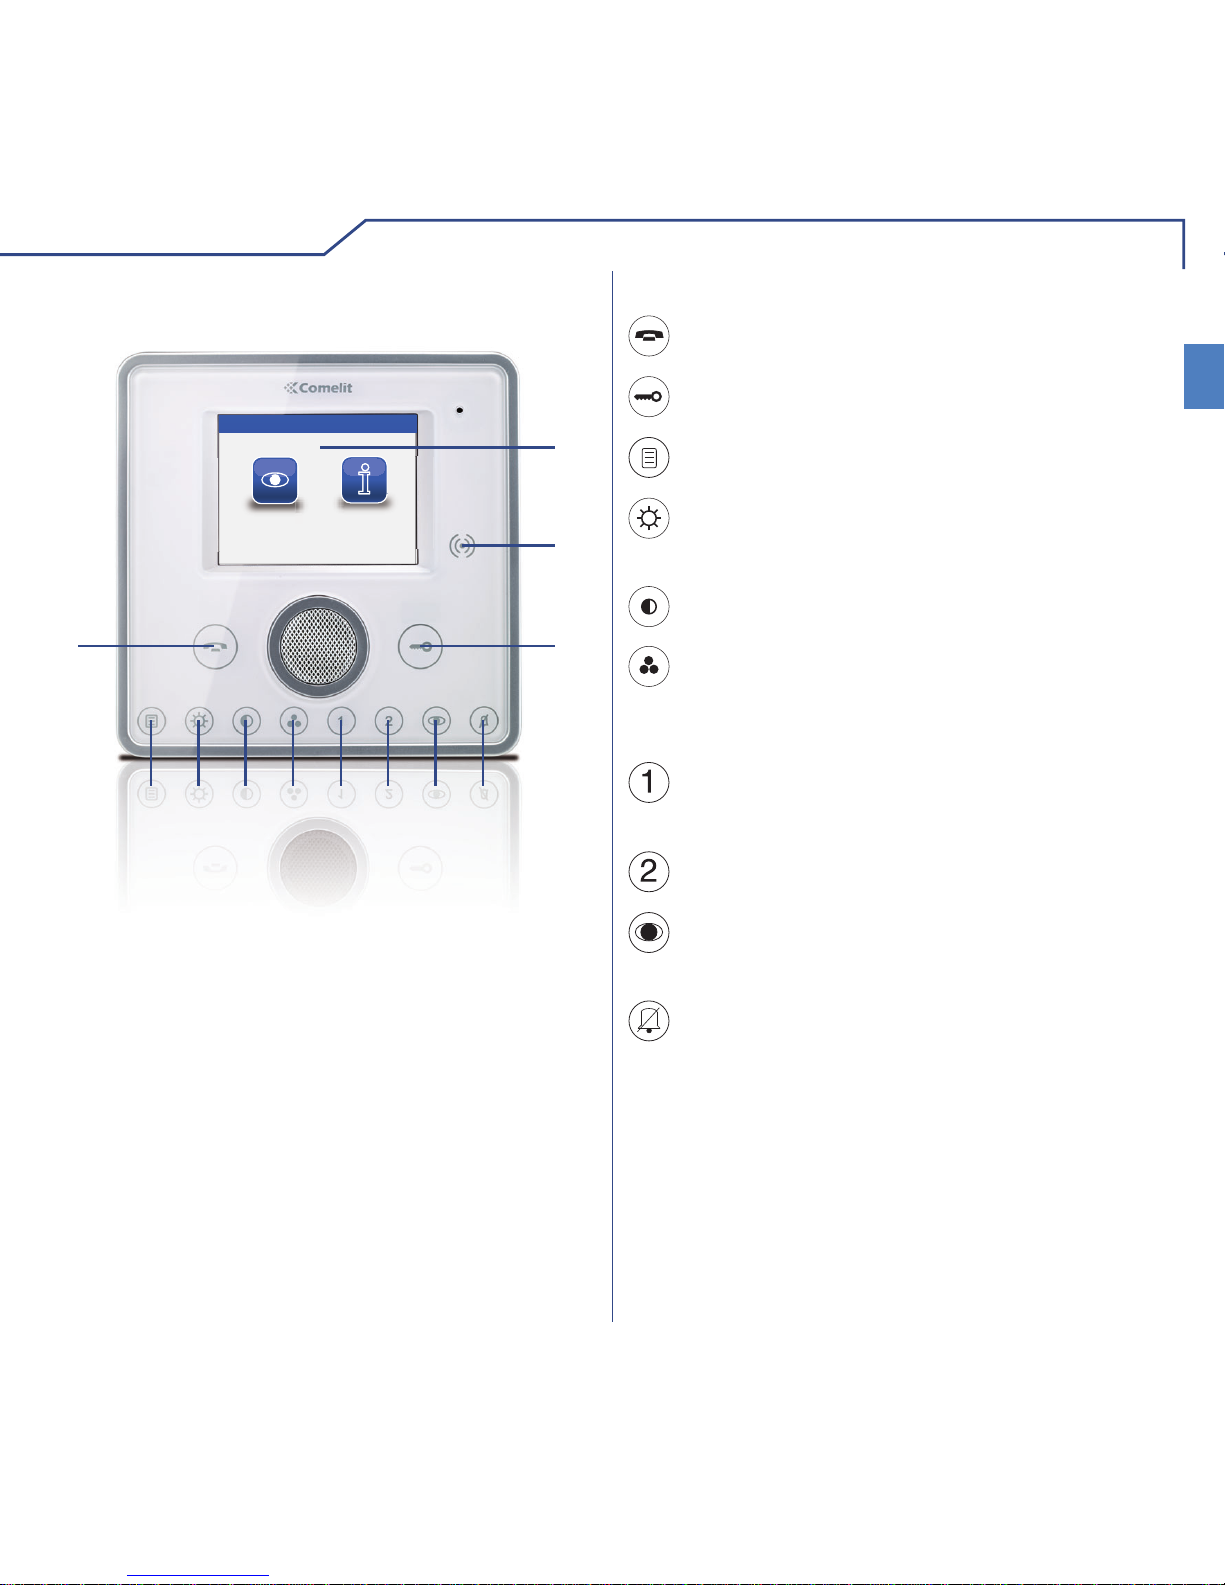
1 Touch screen
2 Sensore chiavetta
3 Tasto serratura
4 Tasto privacy / dottore (programmabile)
5 Tasto autoaccensione (programmabile)
6 Tasto programmabile 2
7 Tasto programmabile 1
8 Tasto colore
9 Tasto contrasto
10 Tasto luminosità
11 Tasto menu
12 Tasto fonica
DESCRIZIONE MONITOR
FUNZIONE TASTI
Tasto menu: permette di accendere o spegnere
il monitor del Planux Memo Video.
Tasto fonica: permette di attivare o disattivare
la conversazione con il posto esterno.
Tasto serratura: permette l’apertura della
serratura associata.
Tasto luminosità: permette la regolazione della
luminosità dell'immagine di una comunicazione
video.
Tasto contrasto: permette la regolazione del
contrasto dell'immagine di una comunicazione video.
T asto colore: permette la regolazione del colore
dell'immagine sul monitor. Per modifi carne il
valore, premere il tasto mentre è in corso una
comunicazione video.
Tasto programmabile 1: di fabbrica impostato
come chiamata a centralino secondario
(programmabile).
Tasto programmabile 2: di fabbrica impostato
come attuatore generico (programmabile).
Tasto funzione Privacy / Dottore (programmabile):
• La funzione Privacy permette l'esclusione della
chiamata dal posto esterno e dal centralino.
• La funzione Dottore permette l’azionamento
automatico dell’apriporta su chiamata da posto
esterno.
• La funzione Privacy + Dottore oltre a disattivare
la suoneria del citofono come nella funzione
Privacy, permette l’azionamento automatico
dell’apriporta su chiamata da posto esterno.
Il led rosso indica che la funzione scelta è
attivata.
Tasto autoaccensione: Permette l’accensione
del monitor e la visione del posto esterno video
(programmabile).
INTRODUZIONE
6
IT
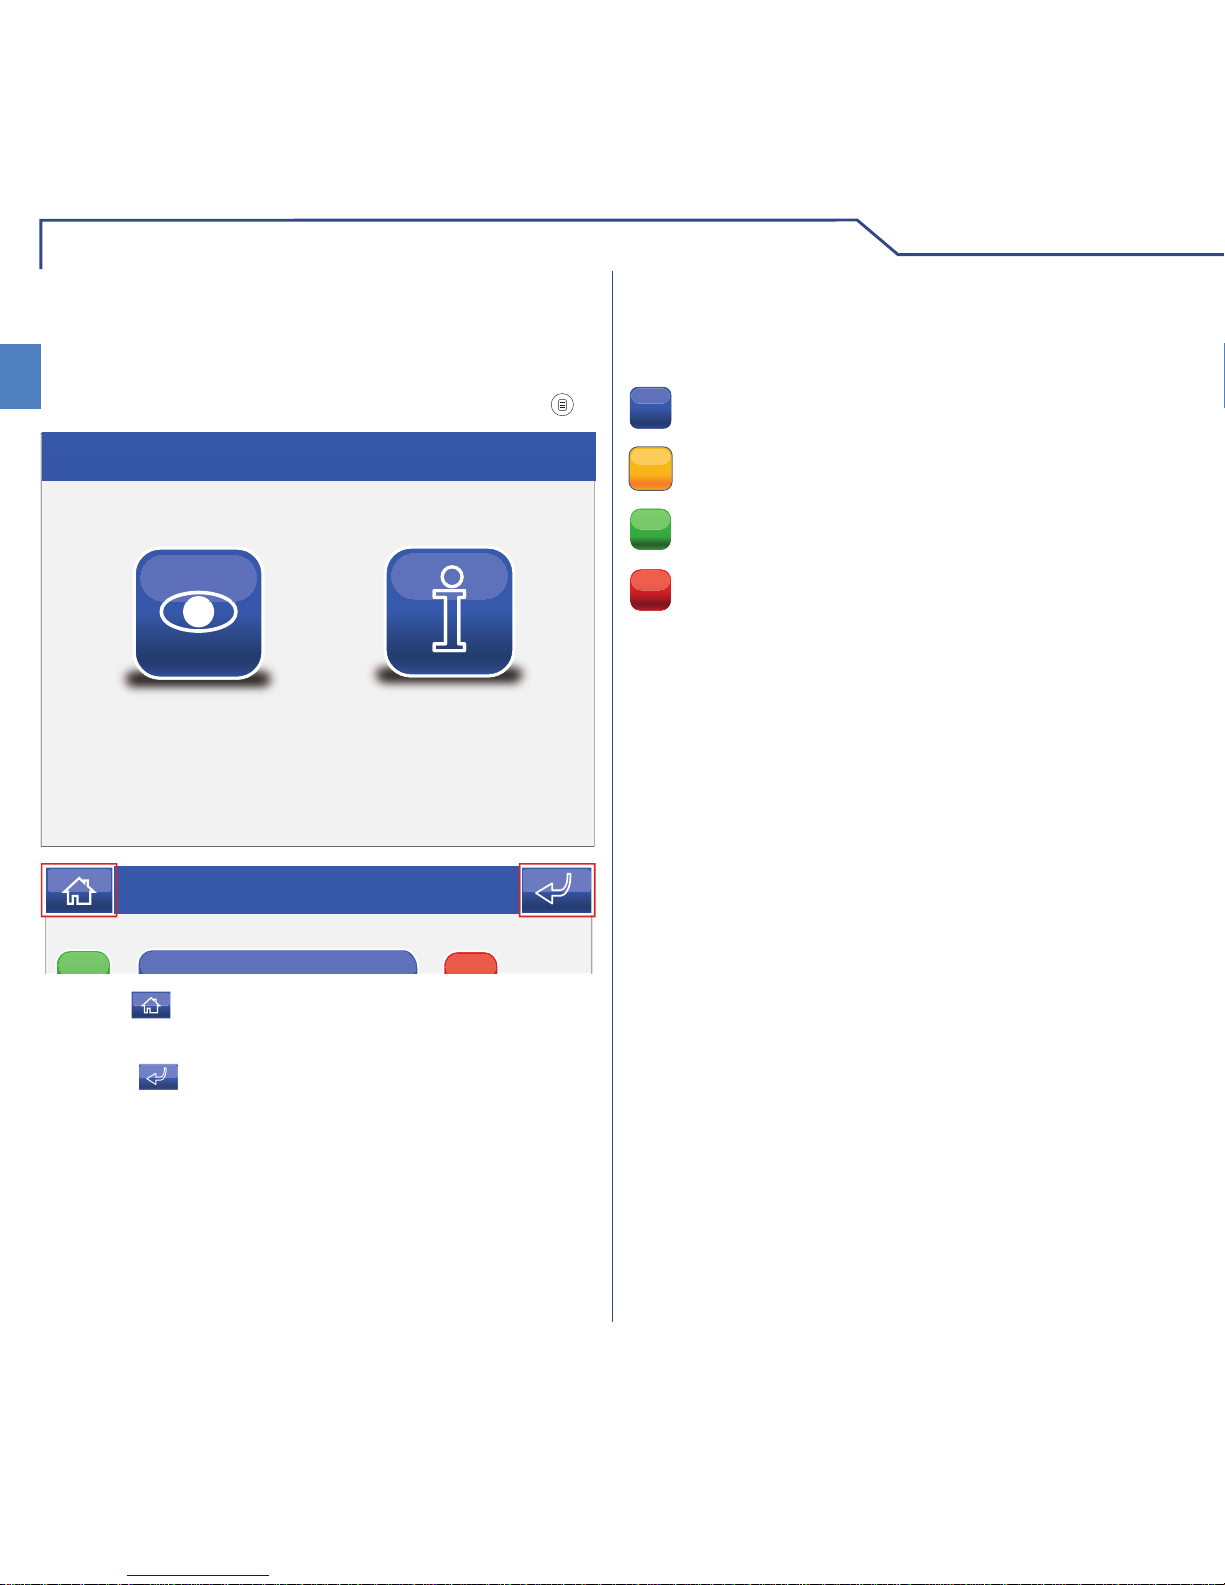
MENU PLANUX MEMO VIDEO
Per navigare attraverso il menu è suffi ciente toccare
con un dito l'icona della funzione desiderata.
Per accedere al menu principale premere il tasto
Sab 05/09/09 16:07
Videofonia
Setup
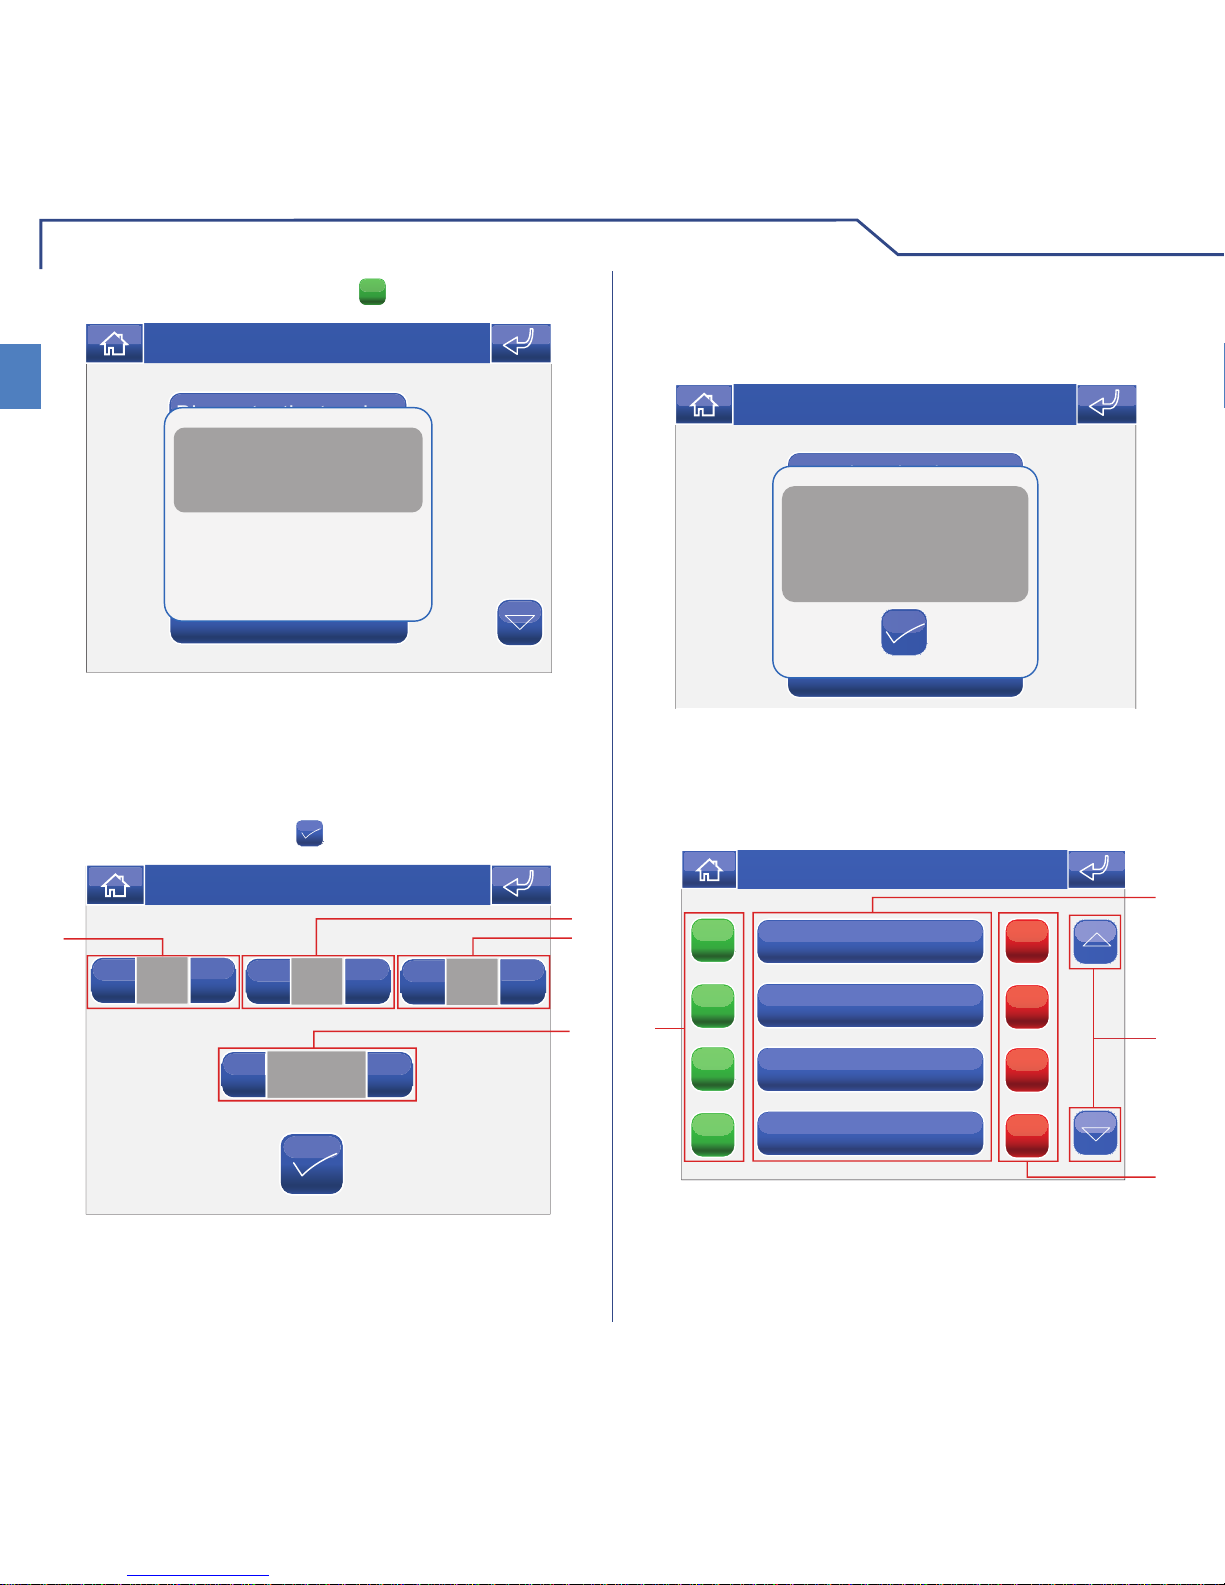
GUIDA CROMATICA
Le icone dei menu cambiano colore a secondo del
loro stato e della loro funzione:
: indica che la funzione non è attiva.
GIALLO: indica che la funzione è attiva.
ON
VERDE: premendo l'icona si attiverà la funzione
associata.
OFF
ROSSO: premendo l'icona si disattiverà la
funzione associata.
L'icona
permette di tornare immediatamente al
menu principale.
L'icona
permette di tornare alla schermata
precedente.
Sab 05/09/09 16:07
IT
7
VIDEOFONIA
Video segreteria
ON
OFF
Mani libere
Imposta melodie
Regolazione volumi
ON
OFF
1
2
4
3
Gio 21/06/12 - 16:07 0W
Attuatori
Telecamere
1
3
Gio 21/06/12 - 16:07 0W
Intercomunicanti
Centralino principale
3
C
11/01/2001 10:21 09/01/2001 8:22
07/01/2001 18:50
05/01/2001 9:48
1
2
3
Gio 05/09/09 - 16:07 0W
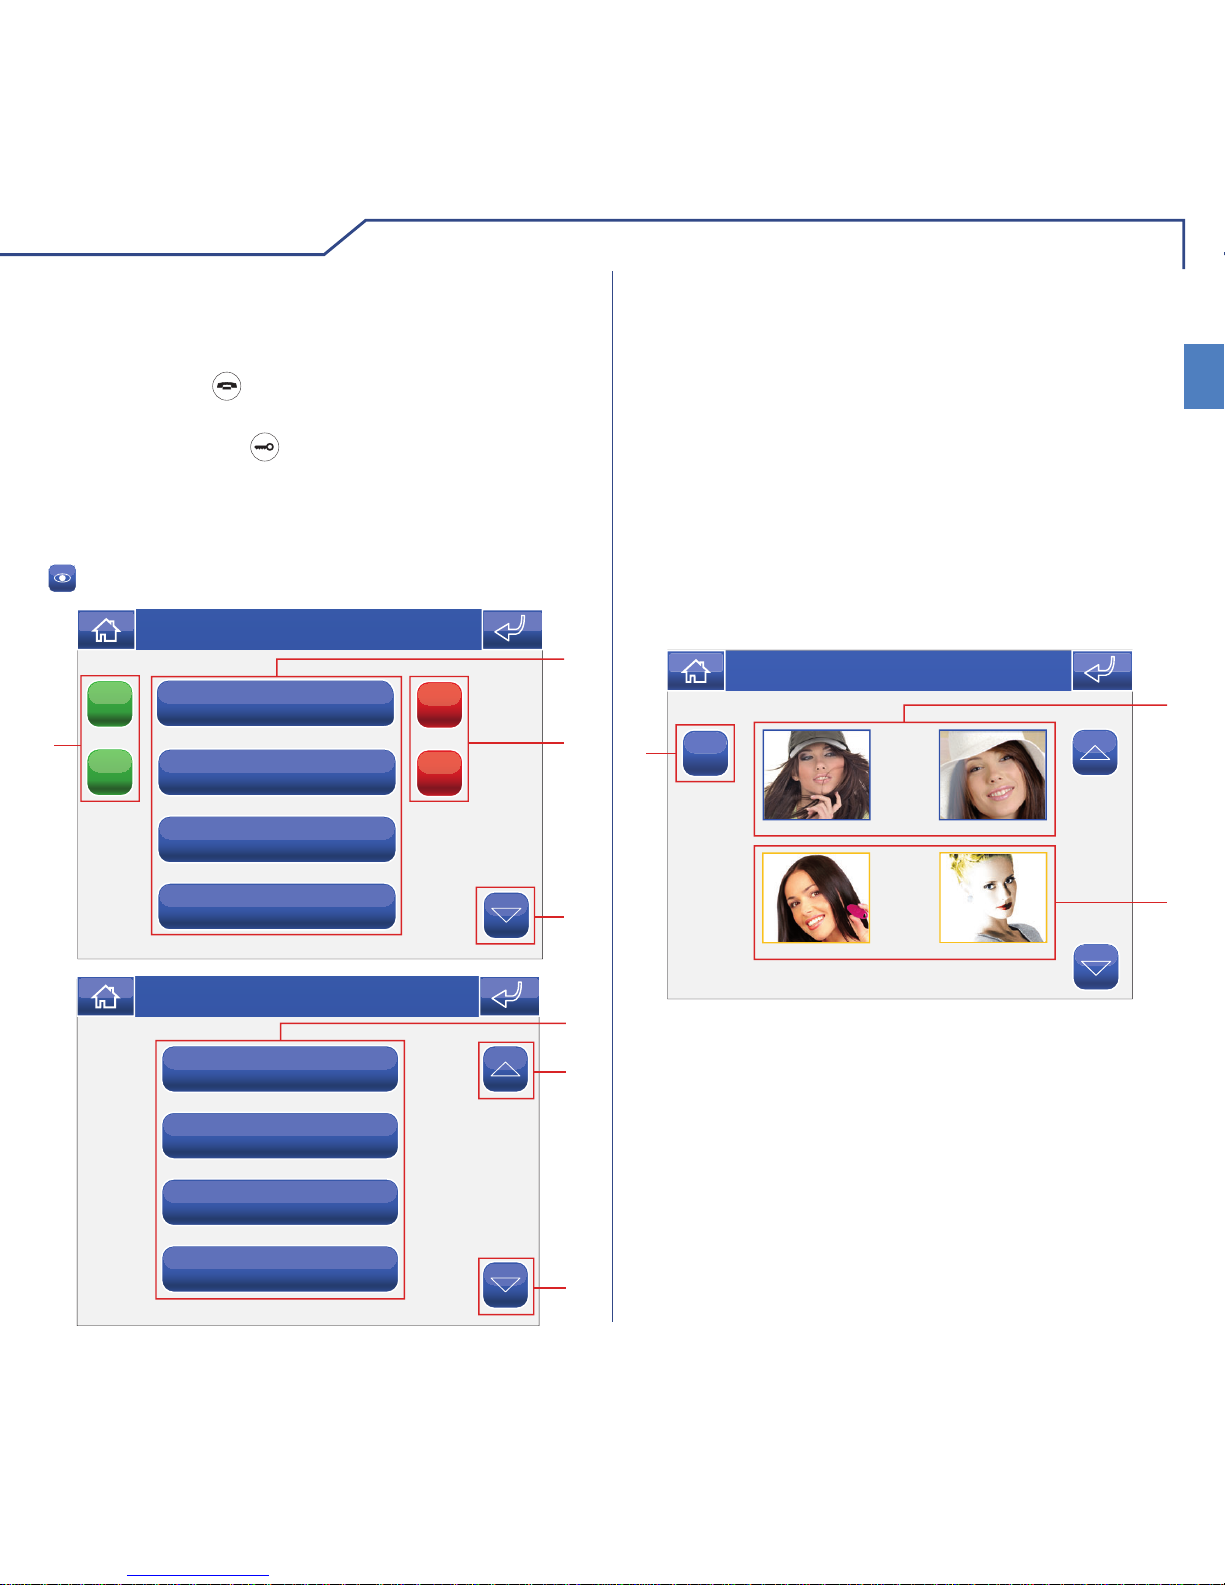
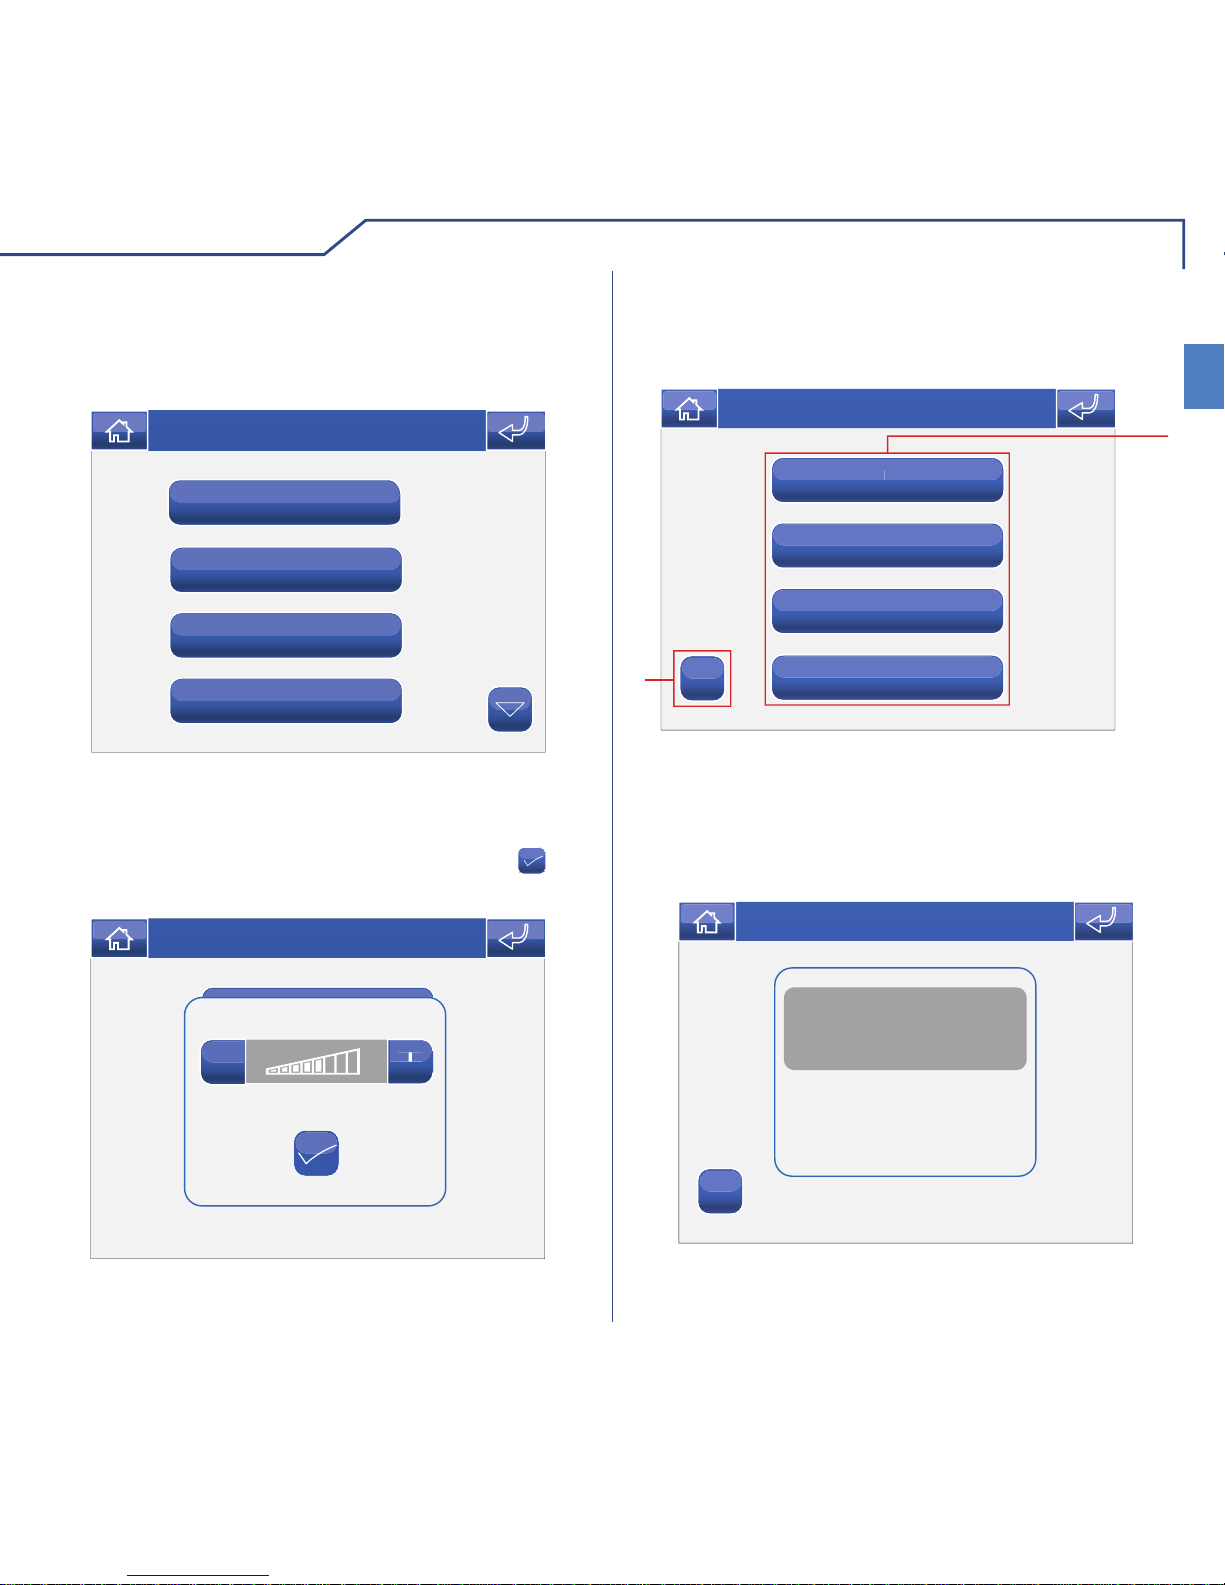
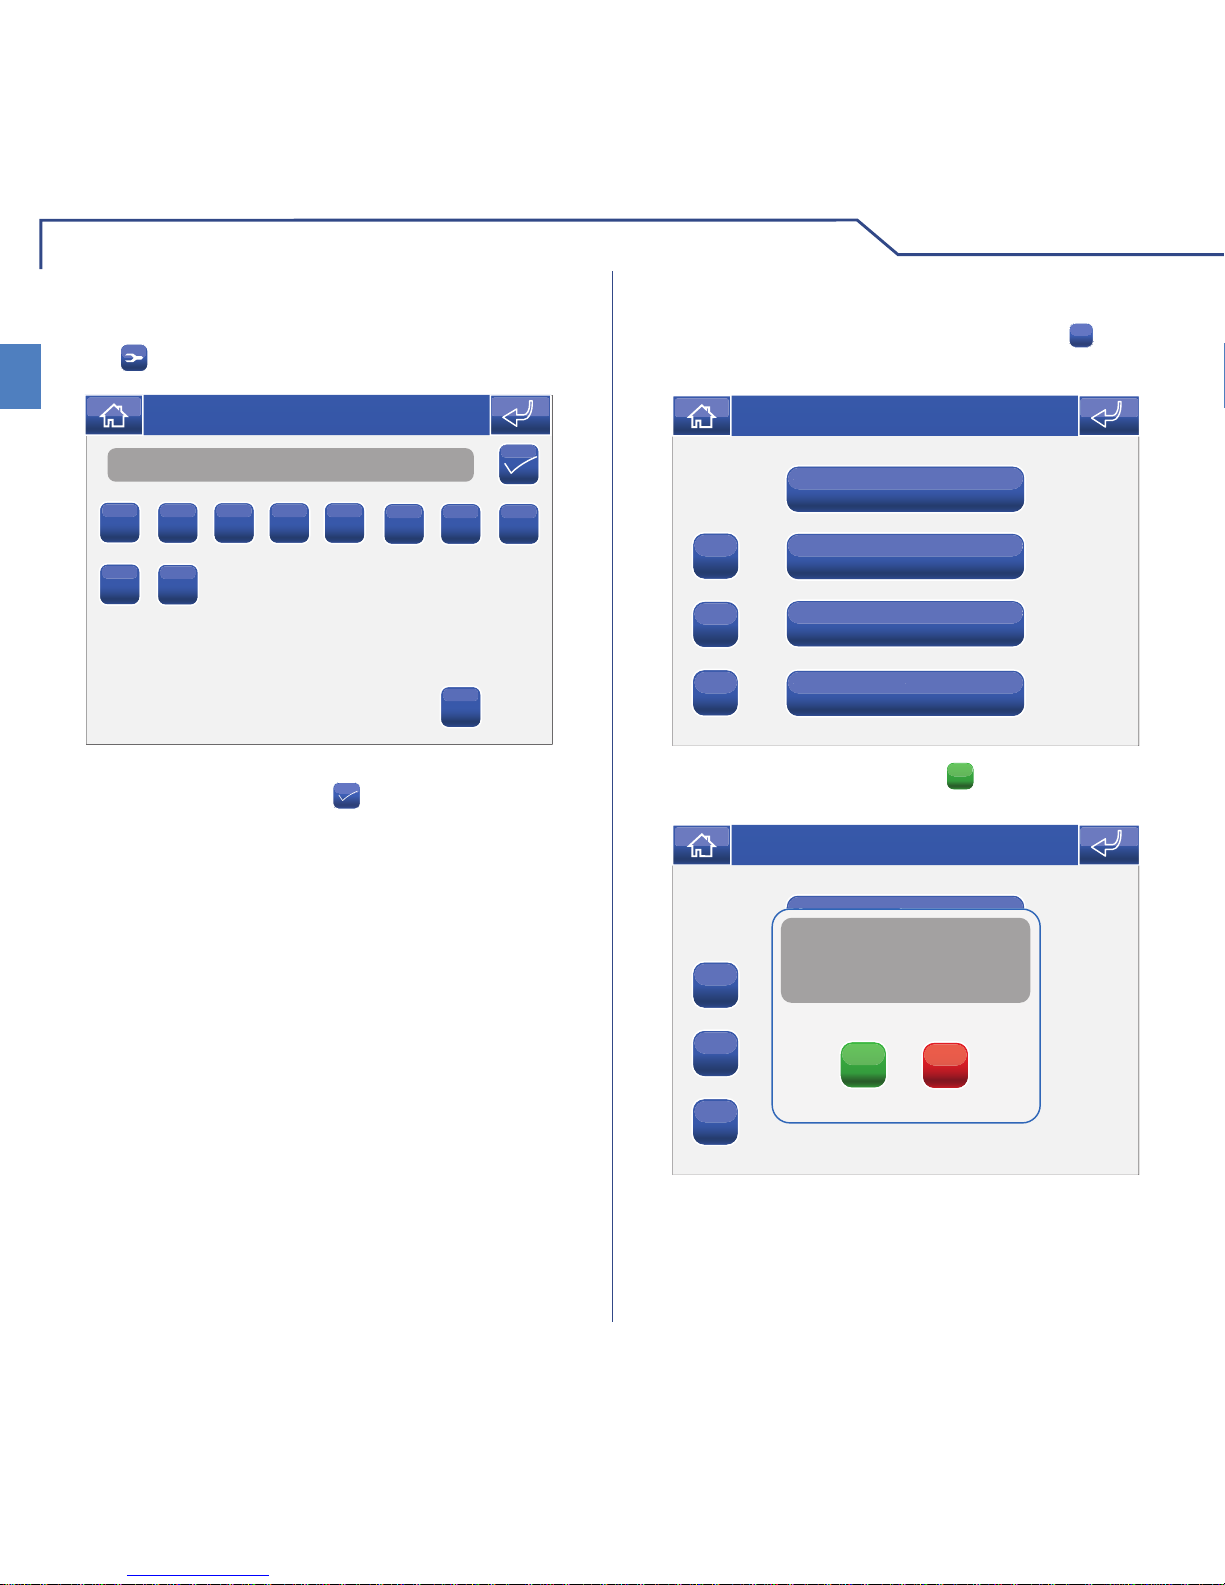
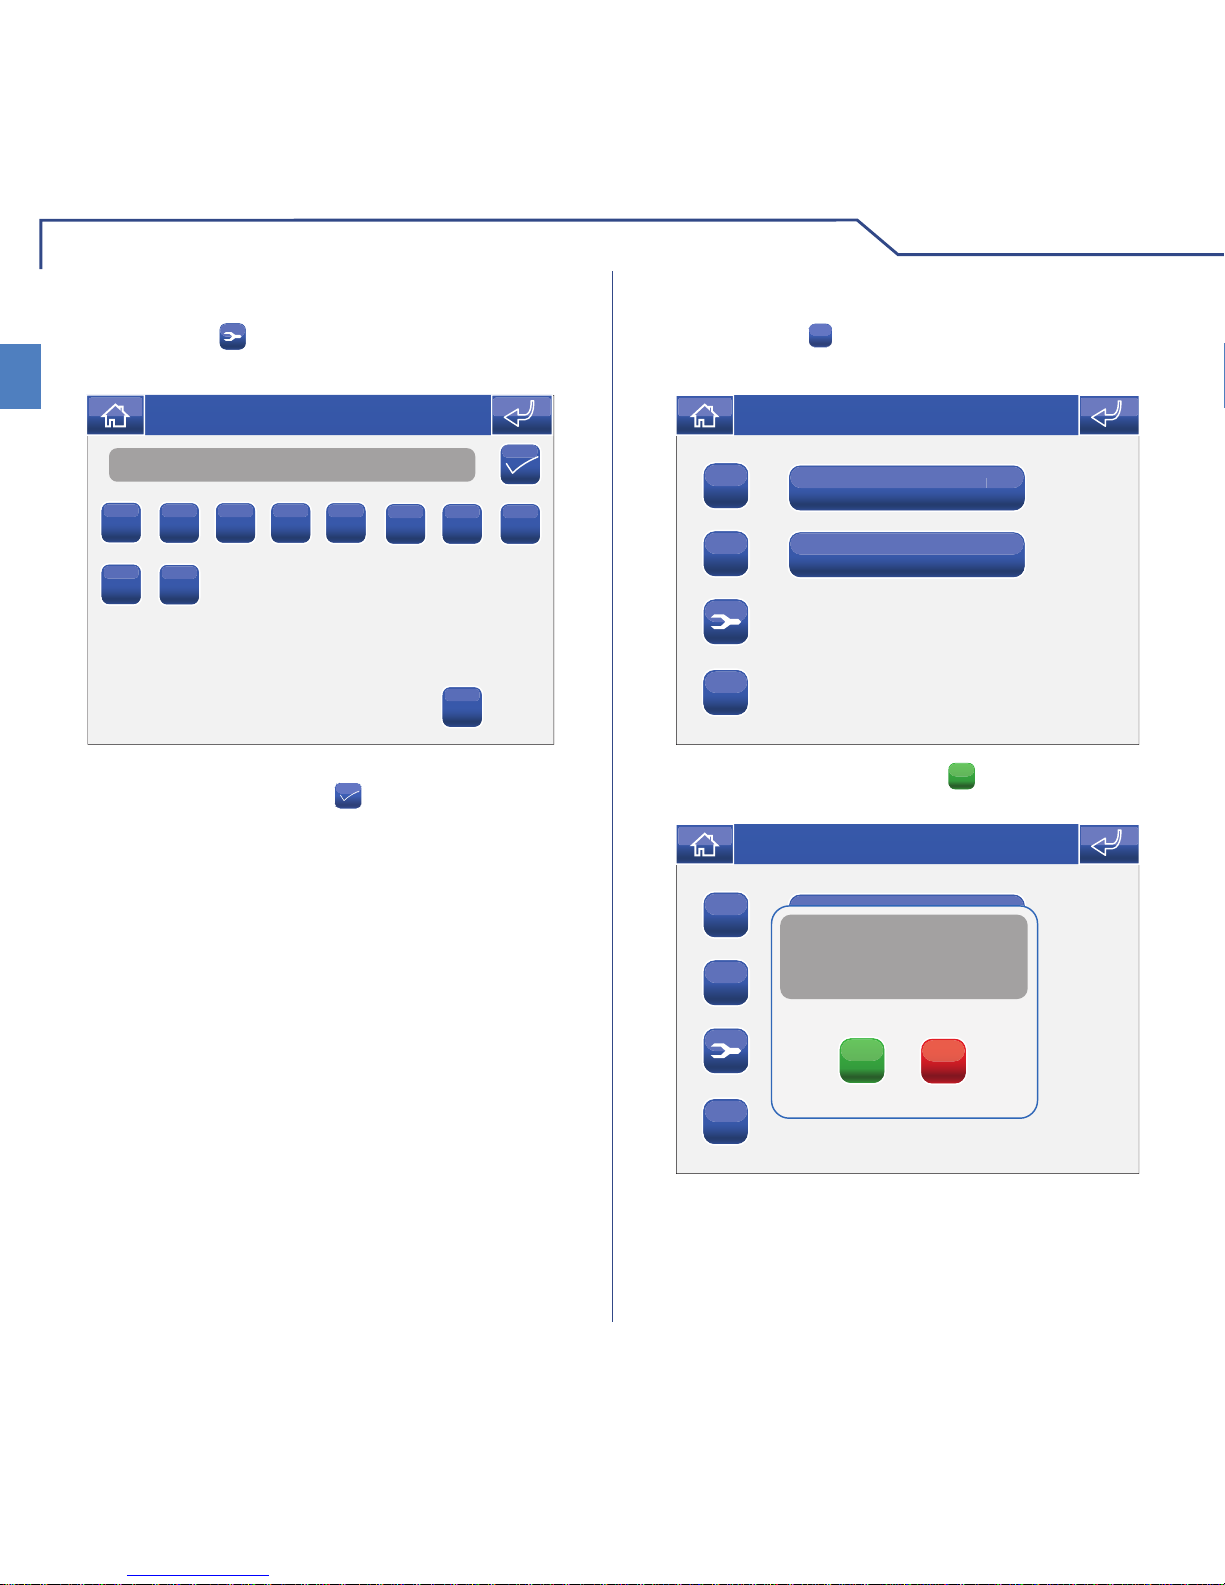
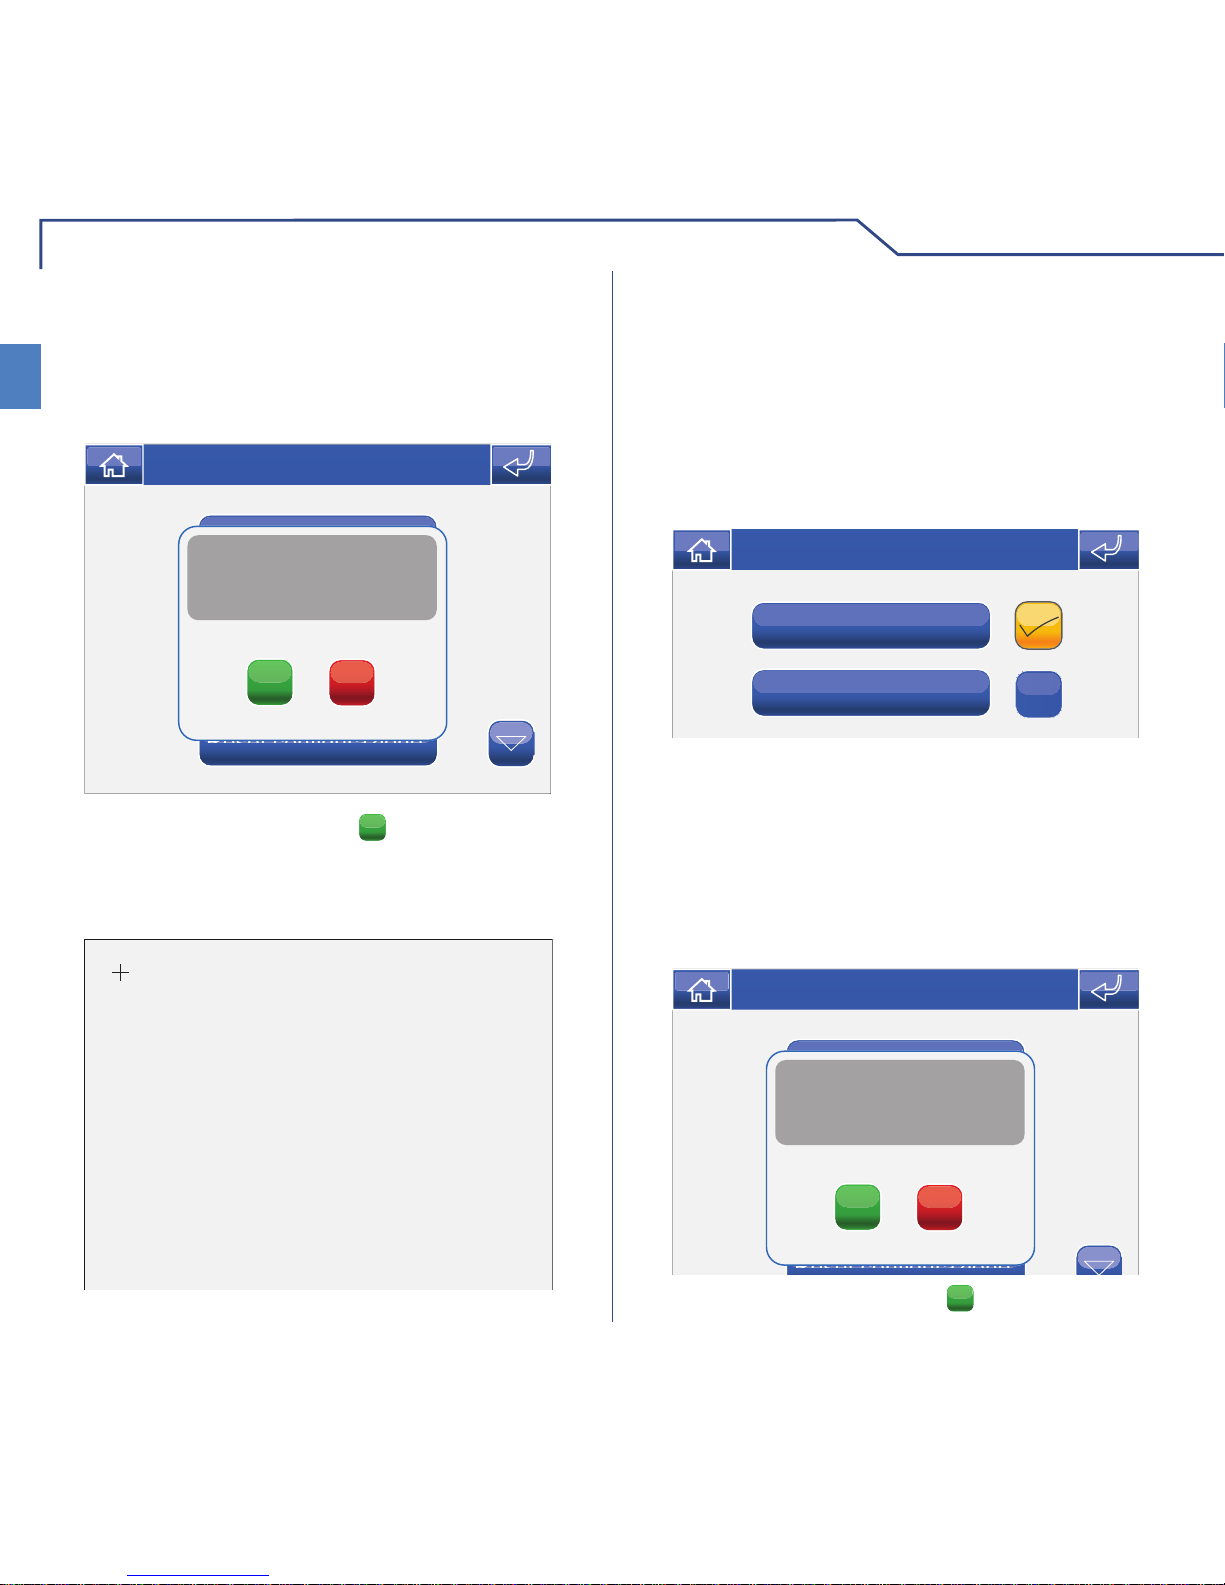
Per accedere al menu videofonia, premere l'icona
dal menu principale.
DESCRIZIONE MENU VIDEOFONIA
I LED dei tasti di fonica e serratura lampeggiano a
seguito di una chiamata.
Premere il tasto
per attivare la fonica con il posto
esterno chiamante.
Premere il tasto
per attivare la serratura
associata.
RISPONDERE AD UNA CHIAMATA
1 Funzioni disponibili nel menu videocitofonia.
2 Disattivazione della funzione associata.
3 Scorrimento della pagina.
4 Attivazione della funzione associata.
La funzione Video Segreteria, se attivata, permette
di registrare l'immagine dalla telecamera del posto
esterno quando viene inviata una chiamata per un
massimo di 100 registrazioni da 10 Max secondi
ciascuna.
VIDEO SEGRETERIA
Per visualizzare l'elenco delle registrazioni presenti
accedere al menu Videofonia > Video segreteria.
1 Registrazioni non visualizzate (cornice blu).
2 Registrazioni già visualizzate (cornice gialla).
3 Elimina registrazione.
Le registrazioni vengono salvate in formato .avi, nella
scheda SD sotto la cartella "Video" e possono essere
visualizzate anche su pc con Windows Media Player.
In assenza della scheda SD le registrazioni vengono
salvate nella memoria del Planux Memo Video (MAX
2 registrazioni).

VIDEOFONIA
8
IT
confermare eliminazione
messaggio video?
SI NO
Gio 21/06/12 - 16:07 0W
Chiamata esterna
Chiamata centralino
Chiamata fuori porta
Chiamata ind. multiplo
Melodia 3
Melodia 1
Melodia 2
Melodia 4
Gio 05/09/09 - 16:07 0W
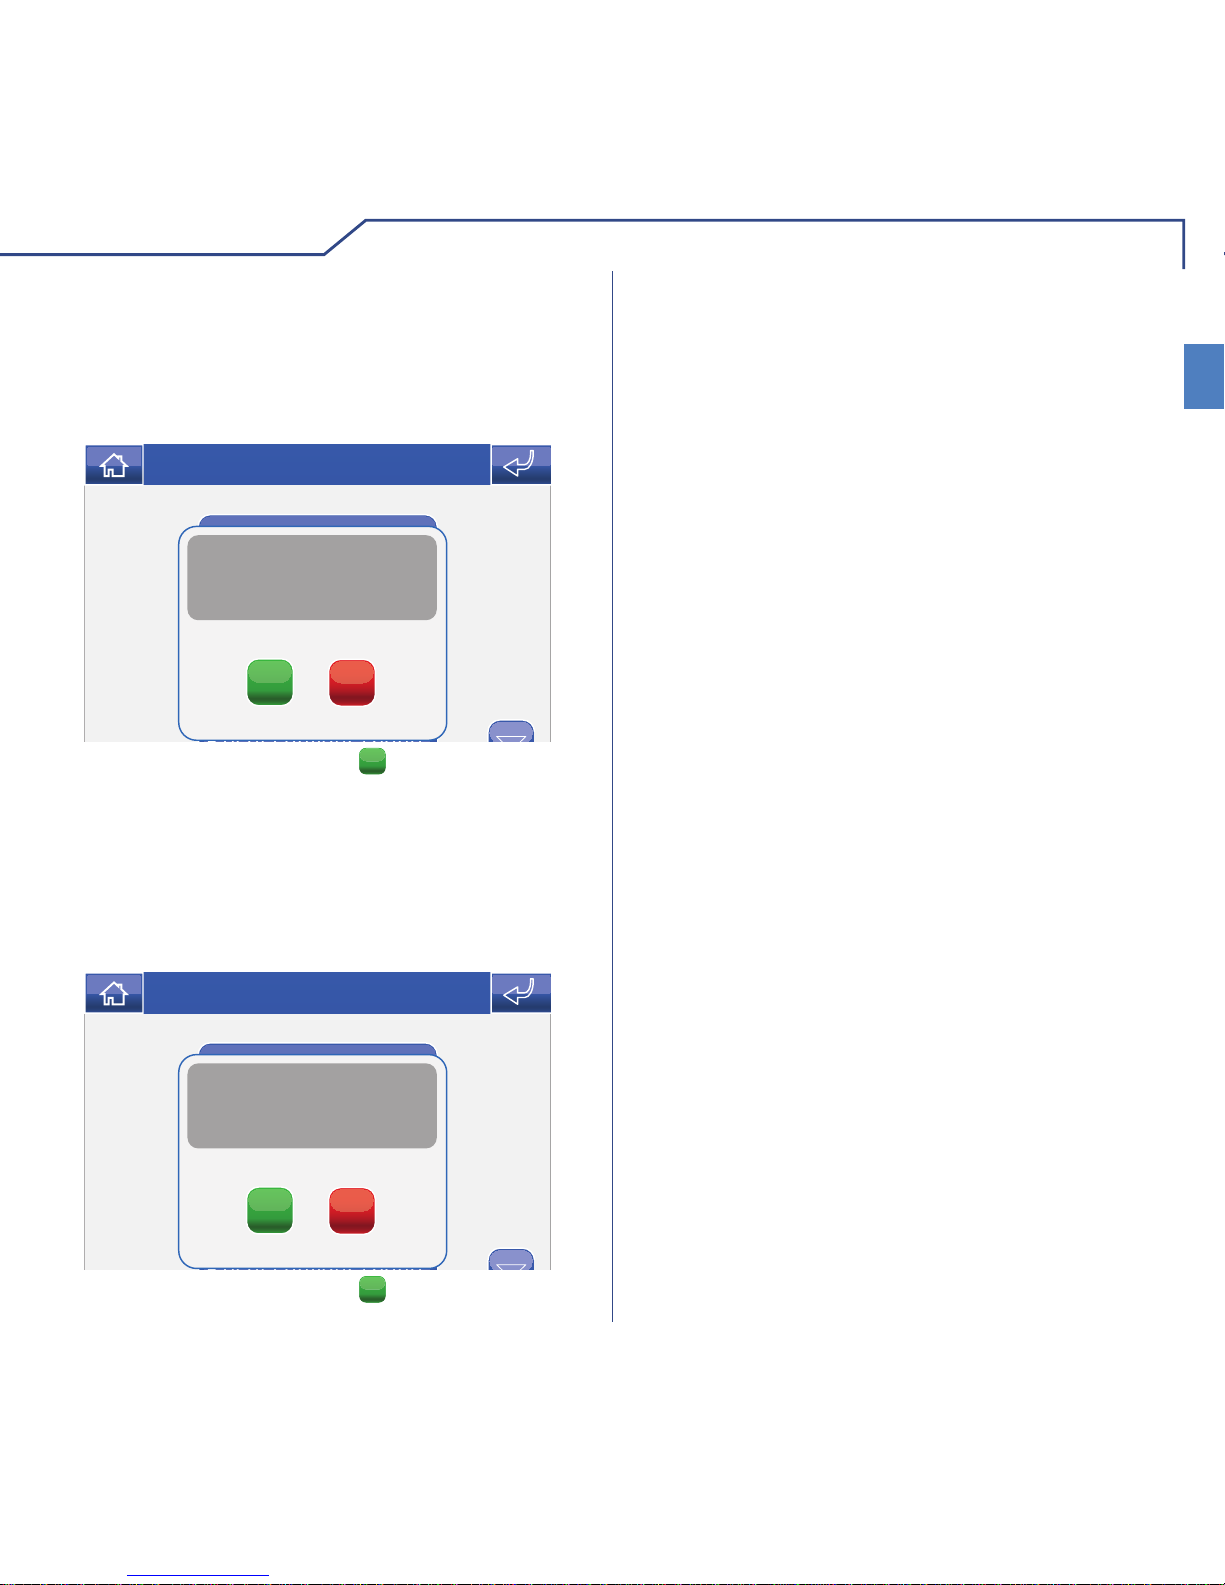
Per visualizzare una delle registrazioni, premere la
relativa icona.
VISUALIZZARE UNA REGISTRAZIONE
Al termine della riproduzione (MAX 10 secondi), il
sistema tornerà automaticamente alla schermata
precedente.
Per eliminare una delle registrazioni, premere l'icona
C
, successivamente l'icona della registrazione che
si desidera eliminare, quindi confermare.
ELIMINARE UNA REGISTRAZIONE
La funzione Mani Libere permette di attivare la fonica,
dopo una chiamata ricevuta, senza dover premere il
tasto
.
MANI LIBERE
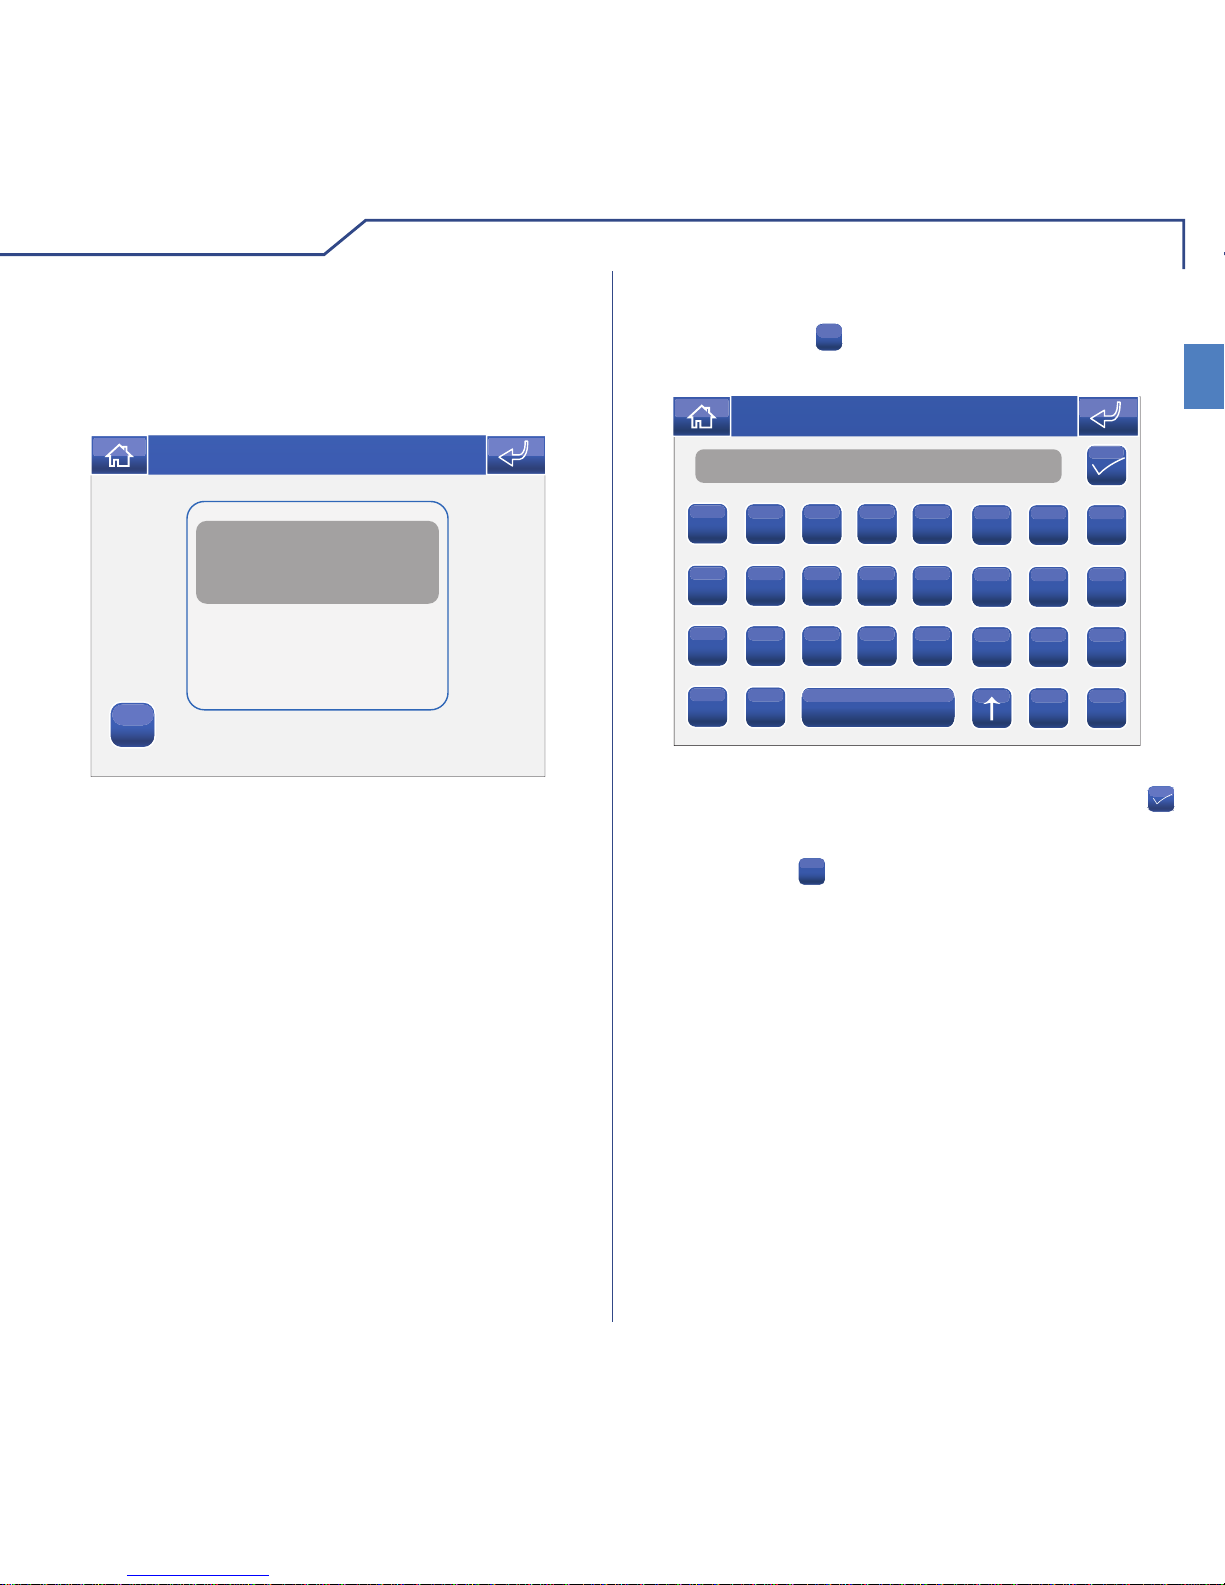
Per gestire le melodie del Planux Memo Video,
accedere al menu Videofonia > Imposta melodie .
IMPOSTA MELODIE
Selezionare il tipo di chiamata per cui si vuole
modifi care la melodia premendo l'icona desiderata.
Per ascoltare la melodia premere il nome desiderato
e successivamente l'icona a destra per memorizzare.
È possibile aggiungere delle suonerie personalizzate.
I fi le devo essere in formato .wav da 8Khz mono 16
bit. Inserire le melodie nella cartella "Wav" della
scheda SD per visualizzarle nell'apposito menu.
9
VIDEOFONIA
IT
Attuatore 1
Attuatore 2
Attuatore 3
Attuatore 4
ABC
1
2
Gio 05/09/09 - 16:07 0W
Suoneria
Audio
Audio intercom.
Tasti
Gio 21/06/12 - 16:07 0W
Suoneria
Audio
B
B
+
-
Gio 05/09/09 - 16:07 0W
Attuatore Generico
ABC
Comando attuatore effettuato
Gio 05/09/09 - 16:07 0W
REGOLAZIONE VOLUMI
Per regolare il volume della suoneria, dell'audio, dei
tasti o dei toni d'allarme accedere al menu Videofonia
> Regolazione volumi.
Selezionare la funzione per cui si intende variare il
volume premendo l'apposita icona. Alla comparsa
della schermata di regolazione, utilizzare le icone
+ e - per variare il volume e premere l'icona
per
confermare.
ATTUATORI
Per visualizzare l'elenco degli attuatori presenti,
accedere al menu Videofonia > Attuatori.
1 Attuatori disponibili. Altri dispositivi possono essere
aggiunti a cura dell'installatore.
2 Rinomina attuatori.
Per comandare un attuatore tra quelli della lista è
suffi ciente premere la relativa icona.
In caso non ci sia alcun attuatore, compare la scritta
"DISPOSITIVO NON PRESENTE".

VIDEOFONIA
10
IT
Nome
A
B C D E
F G H
I
J K L M
N O P
Q
R S T U
V W X
Y
Z
C
123
Gio 05/09/09 - 16:07 0W
Telecamera 1
Telecamera 2
Telecamera 3
Telecamera 4
ABC
1
2
Gio 05/09/09 - 16:07 0W
Attuatore Generico
ABC
Dispositivo non presente
Gio 05/09/09 - 16:07 0W
RINOMINARE A TTUATORI
Premere l'icona
ABC
e successivamente quella
dell'attuatore che si desidera rinominare.
Digitare il nome e/o il numero desiderato per la
descrizione dell'attuatore e premere l'icona
per
confermare.
Premere l'icona
123
per passare alla tastiera numerica.
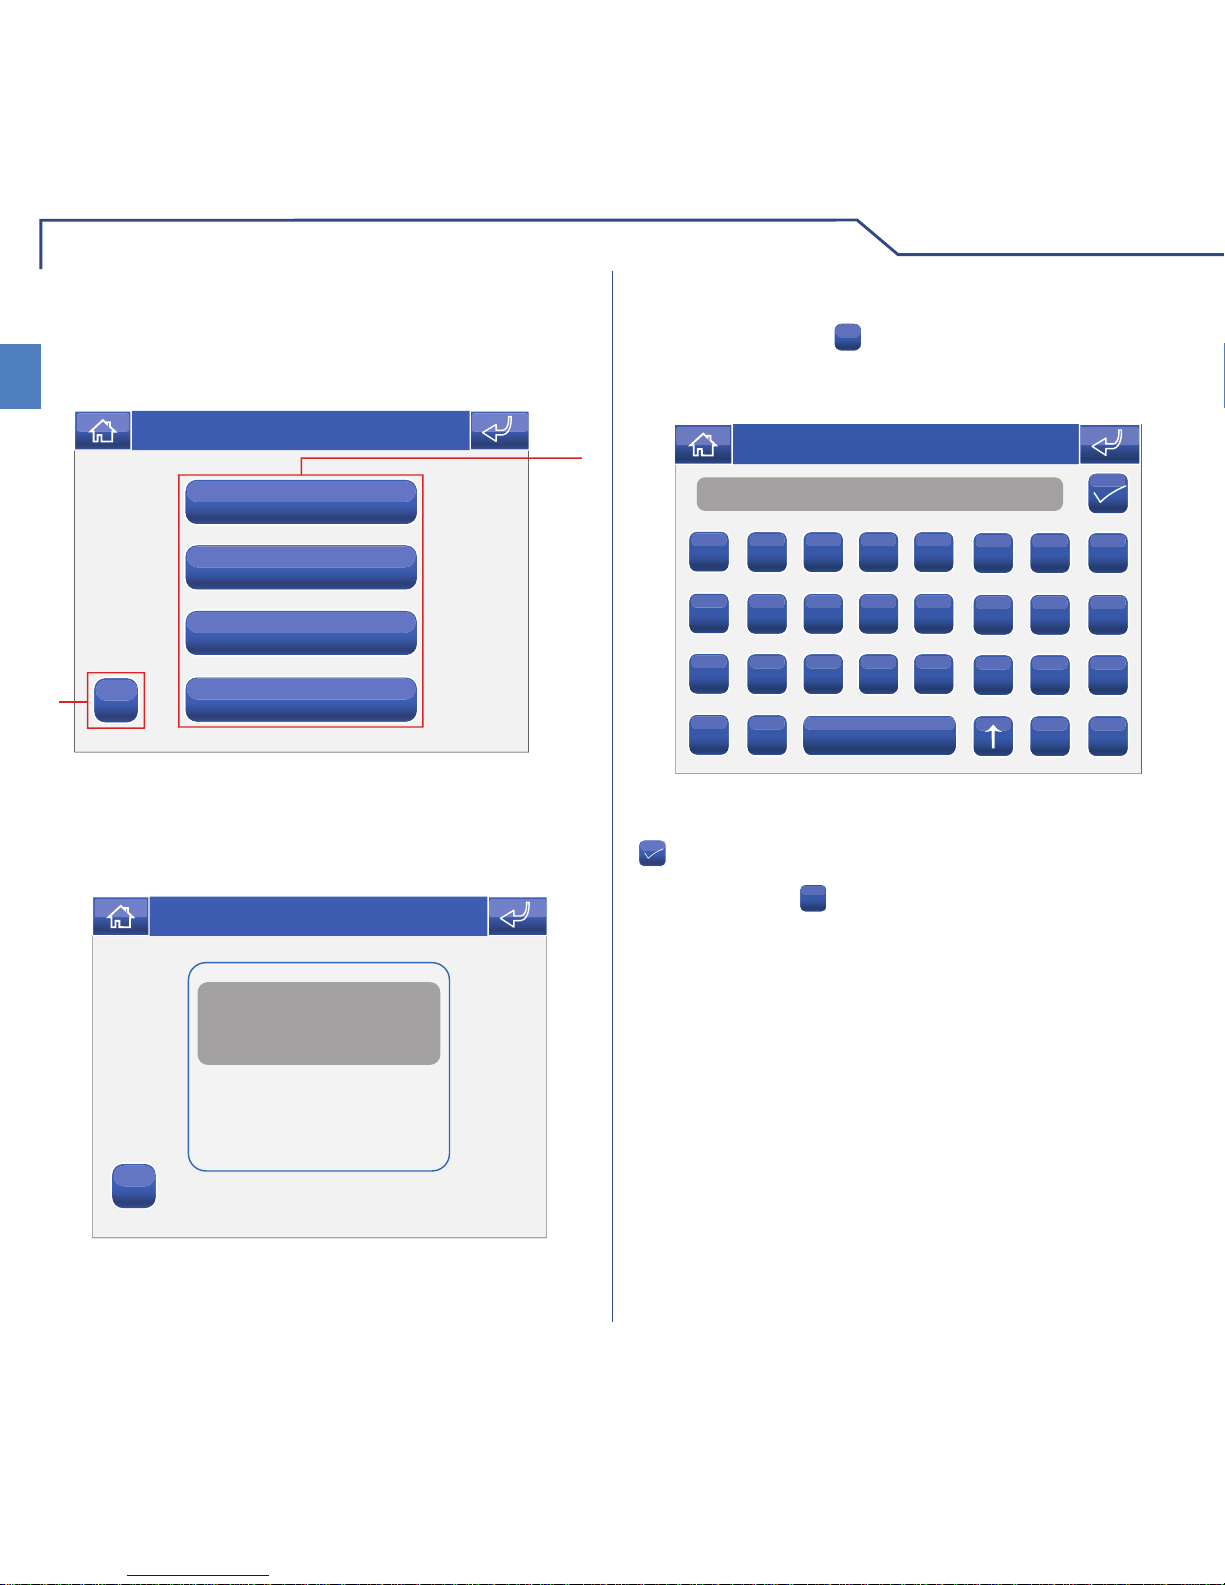
TELECAMERE
Per visualizzare l'elenco delle telecamere presenti,
accedere al menu Videfonia > Telecamere.
1 Telecamere disponibili. Ad ogni icona possono
essere associate fi no a 3 telecamere che possono
essere viste in sequenza insieme a quella del
posto esterno.
2 Rinomina Telecamere.
Per visualizzare l'immagine di una telecamera tra
quelle della lista è suffi ciente premere la relativa
icona.
11
VIDEOFONIA
IT
Attuatore Generico
ABC
Dispositivo non presente
Gio 05/09/09 - 16:07 0W
Nome
A
B C D E
F G H
I
J K L M
N O P
Q
R S T U
V W X
Y
Z
C
123
Gio 05/09/09 - 16:07 0W
In caso non ci sia alcuna telecamera, compare la
scritta "DISPOSITIVO NON PRESENTE".
Con l'immagine a video, per tornare al menu toccare
lo schermo; per visualizzare altre telecamere premere
nuovamente un'icona.
RINOMINARE TELECAMERE
Premere l'icona
ABC
e successivamente quella del
gruppo di telecamere che si desidera rinominare.
Digitare il nome e/o il numero desiderato per la
descrizione della telecamera e premere l'icona
per confermare.
Premere l'icona
123
per passare alla tastiera numerica.
IT
VIDEOFONIA
12
Intercomunicante 1
Intercomunicante 2
Intercomunicante 3
Intercomunicante 4
ABC
1
2
Gio 05/09/09 - 16:07 0W
Attuatore Generico
ABC
Intercomunicante effettuato
Gio 05/09/09 - 16:07 0W
INTERCOMUNICANTI
Per visualizzare l'elenco delle chiamate
intercomunicanti presenti, accedere al menu
Videofonia > Intercomunicanti.
1 Chiamate intercomunicanti disponibili
2 Rinomina chiamata intercomunicante.
Per effettuare una chiamata intercomunicante è
suffi ciente premere l'icona.
Nome
A
B C D E
F G H
I
J K L M
N O P
Q
R S T U
V W X
Y
Z
C
123
Gio 05/09/09 - 16:07 0W
RINOMINARE INTERCOMUNICANTI
Premere l'icona
ABC
e successivamente quella
della chiamata intercomunicante che si desidera
rinominare.
Digitare il nome e/o il numero desiderato per la
descrizione dell'intercomunicante e premere l'icona
per confermare.
Premere l'icona
123
per passare alla tastiera numerica.
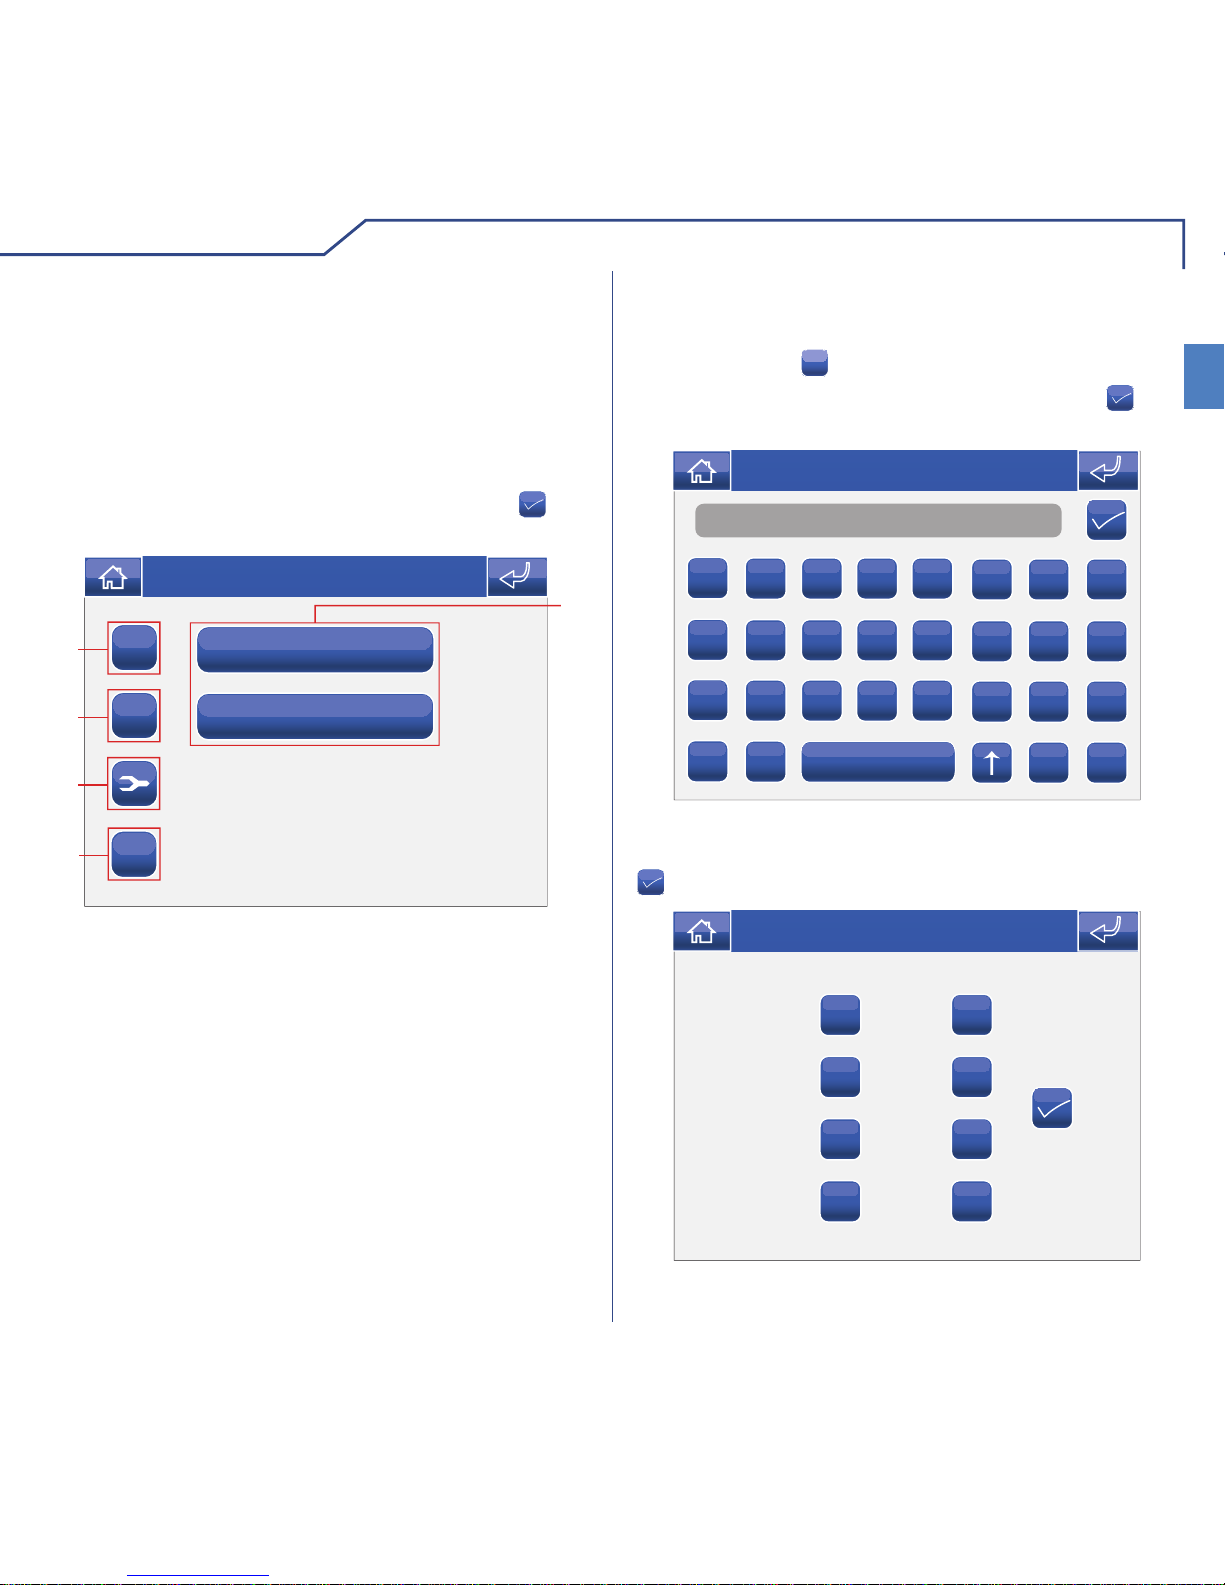
13
SETUP
IT
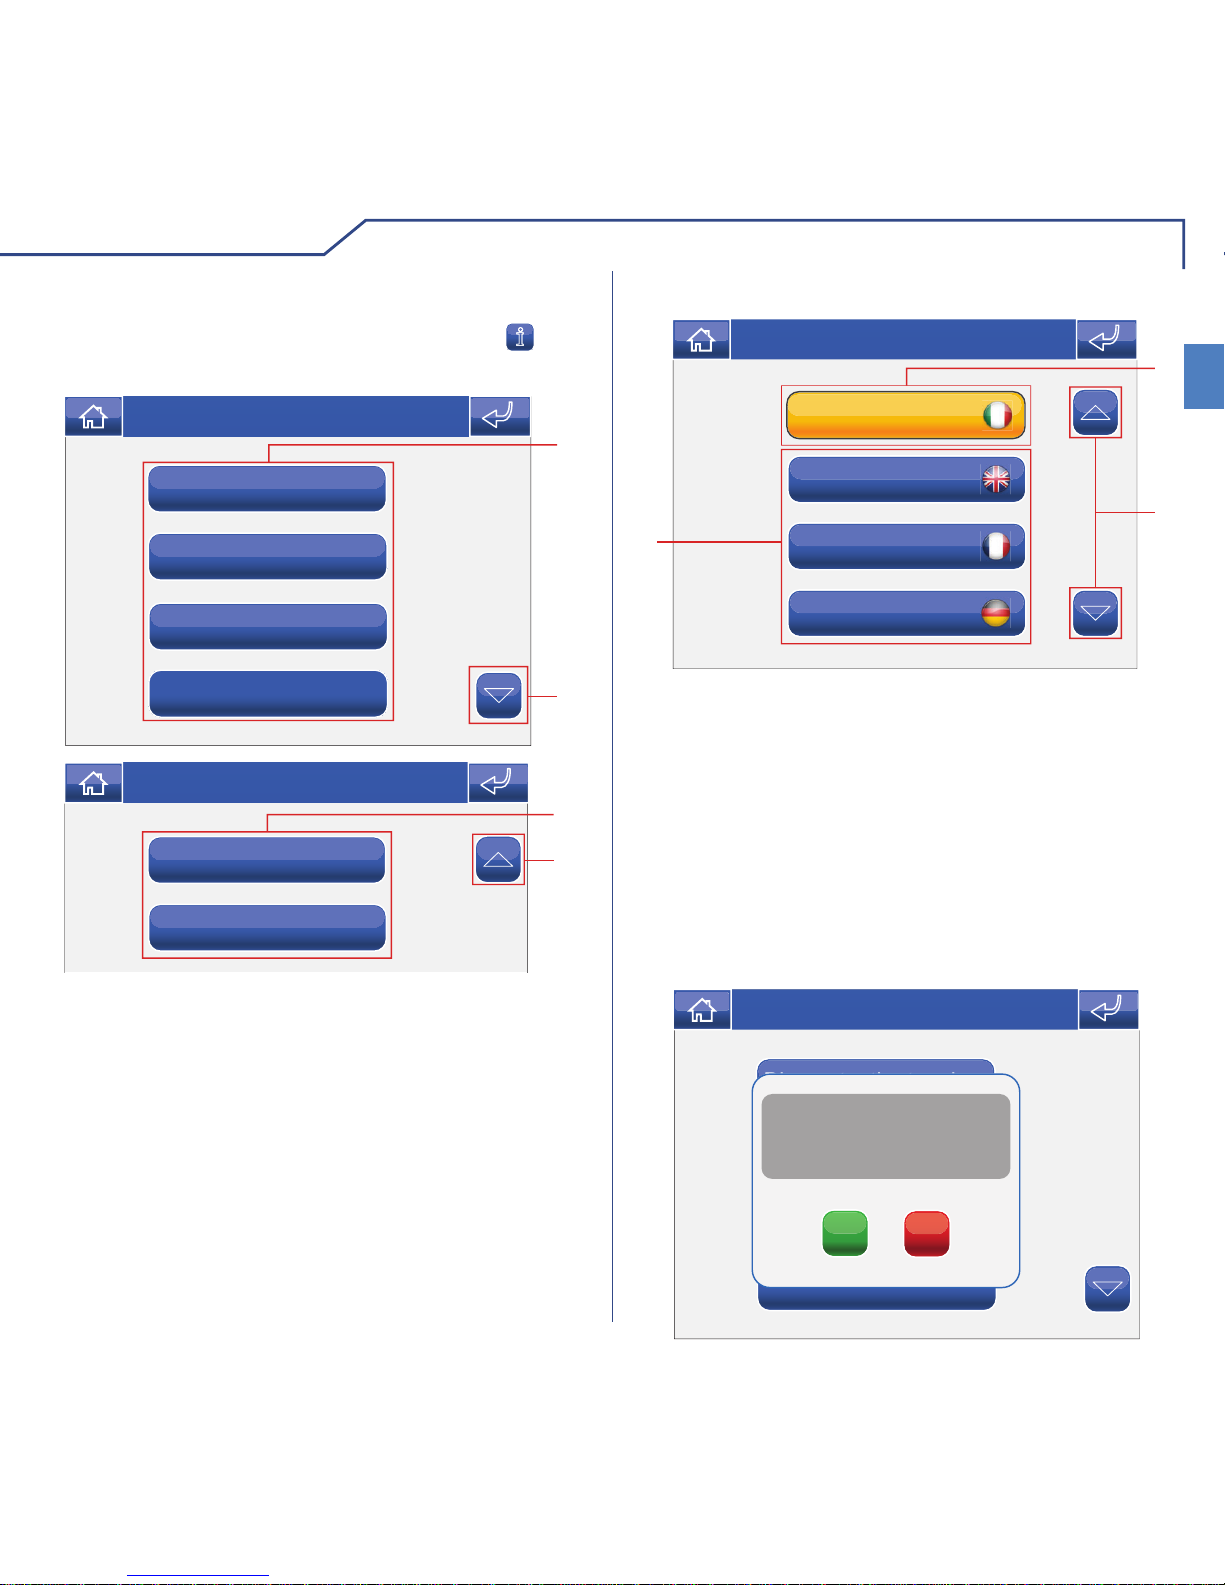
Pioggia
English
Français
Deutsch
Italiano
1
3
2
Gio 05/09/09 - 16:07 0W
1 Lingua in uso.
2 Scorrimento della pagina.
3 Lingue disponibili.
Per accedere al menu setup, premere l'icona
dal
menu principale.
DESCRIZIONE MENU SETUP
Informazioni
Imposta data e ora
Blocco tasti e touch
Lingua
2
1
Gio 21/06/12 - 16:07 0W
Avanzate
Condizionamenti
1
2
Gio 21/06/12 - 16:07 0W
1 Funzioni disponibili nel menu setup.
2 Scorrimento della pagina.
È possibile modifi care la lingua dei menu del
Planux Memo Video scegliendo tra quelle installate.
Accedere al menu Setup > Lingua.
LINGUA
Per selezionare la lingua, premere la relativa icona.
La funzione Blocco tasti e touch disattiva
temporaneamente i tasti e il touch screen del Planux
Memo Video. Le funzioni vengono riattivate dopo 60
secondi oppure a seguito di una chiamata ricevuta.
Per attivare la funzione premere l'icona "Blocco tasti
e touch".
BLOCCO TASTI E TOUCH
Informazioni
Imposta data e ora
Lingua
Blocco tasti e touch
Conferma blocco tasti e
touch screen per 60 secondi?
SI
NO
Gio 05/09/09 - 16:07 0W
SETUP
14
IT
Per impostare la data e l'ora accedere al menu
Setup > Imposta data e ora.
Agire sulle icone + e - per impostare i vari campi. Al
termine premere l'icona
per confermare.
IMPOSTA DATA E ORA
05
+
-
16:07
+
-
05
+
-
09
+
-
2
3
1
4
Gio 05/09/09 - 16:07 0W
1 Giorno.
2 Mese.
3 Anno.
4 Orario.
Per visualizzare la versione del software installato
accedere al menu informazioni.
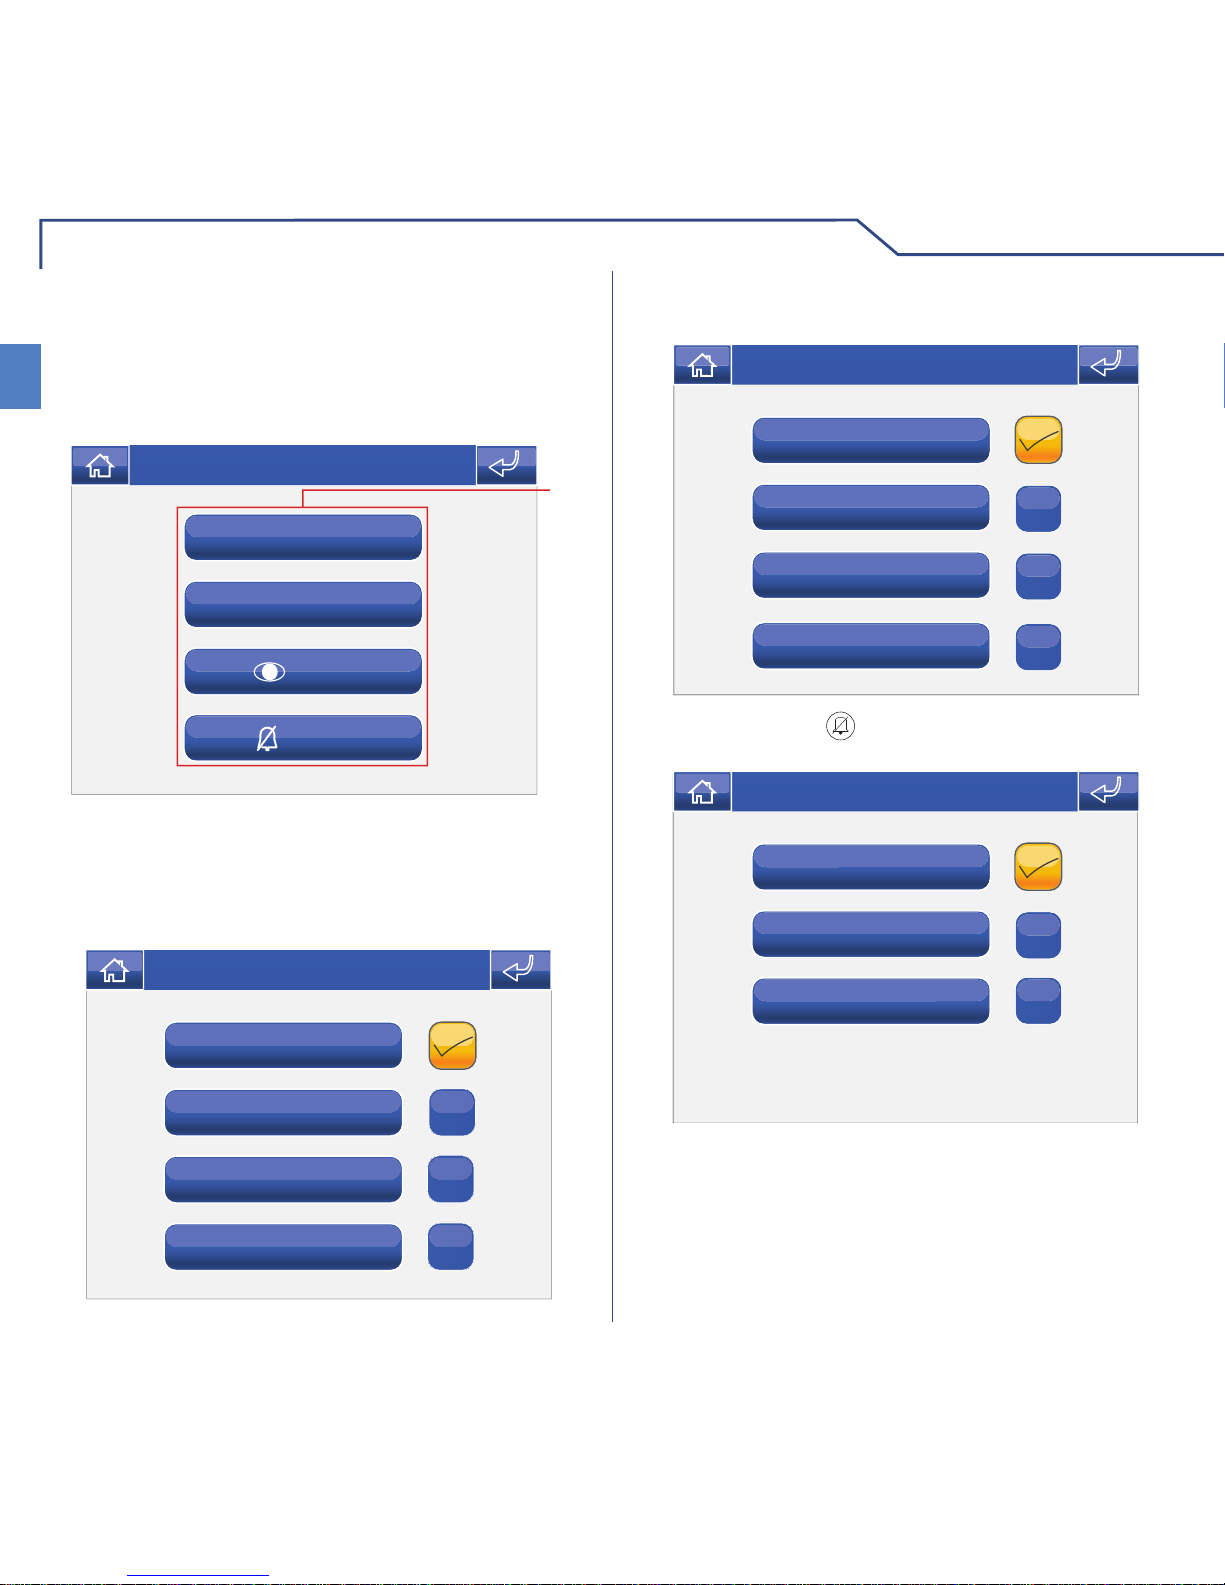
INFORMAZIONI
Regola volumi
Imposta melodie
Prog. tasti
Informazioni
B
VERS. SW: 1.5
VERS. EE: 1.3.2 6214C
SB CODE: 5P RANGE: 0 - 0
Indirizzo intercom. : 5
SLAVE
Gio 21/06/12 - 16:07 0W
Informazioni
Imposta data e ora
Lingua
Blocco tasti e touch
Blocco tasti attivato
Gio 05/09/09 - 16:07 0W
Confermare premendo l'icona SI.
CONDIZIONAMENTI
Questo menu è disponibile solo se il sistema prevede
delle uscite condizionate e se il monitor è impostato
come Master.
Uscita condizionata 3
Uscita condizionata 1
Uscita condizionata 2
Uscita condizionata 4
ON
ON
ON
ON
OFF
OFF
OFF
OFF
1
4
2
3
Gio 21/06/12 - 16:07 0W
1 Uscite disponibili.
2 Scorrimento della pagina.
3 Disattivazione uscita associata.
4 Attivazione uscita associata.
IT
15
AVANZATE
Accedere al menu Setup > Avanzate.
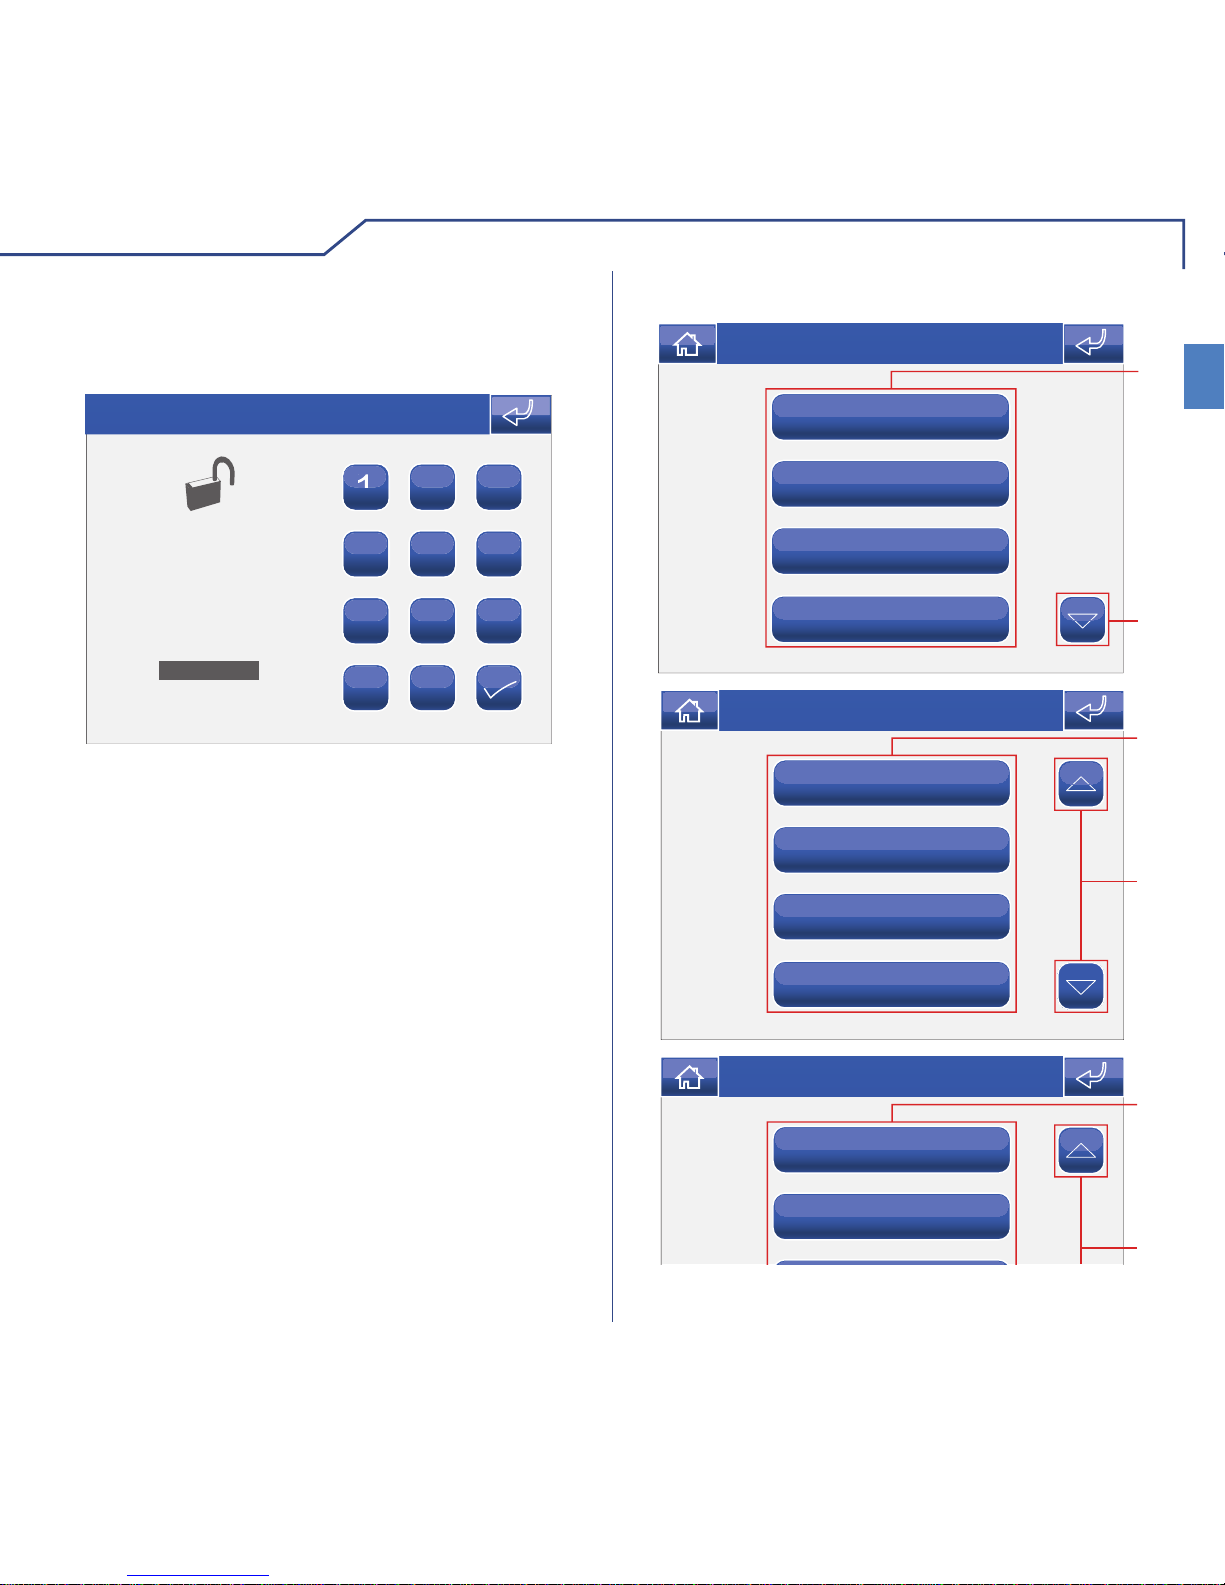
ACCESSO MENU AVANZATE
1
INSERIRE
PASSWORD
23
4
56
7
89
0
Gio 05/09/09 - 16:07 0W
C
Inserire la password installatore che di default è 1961.
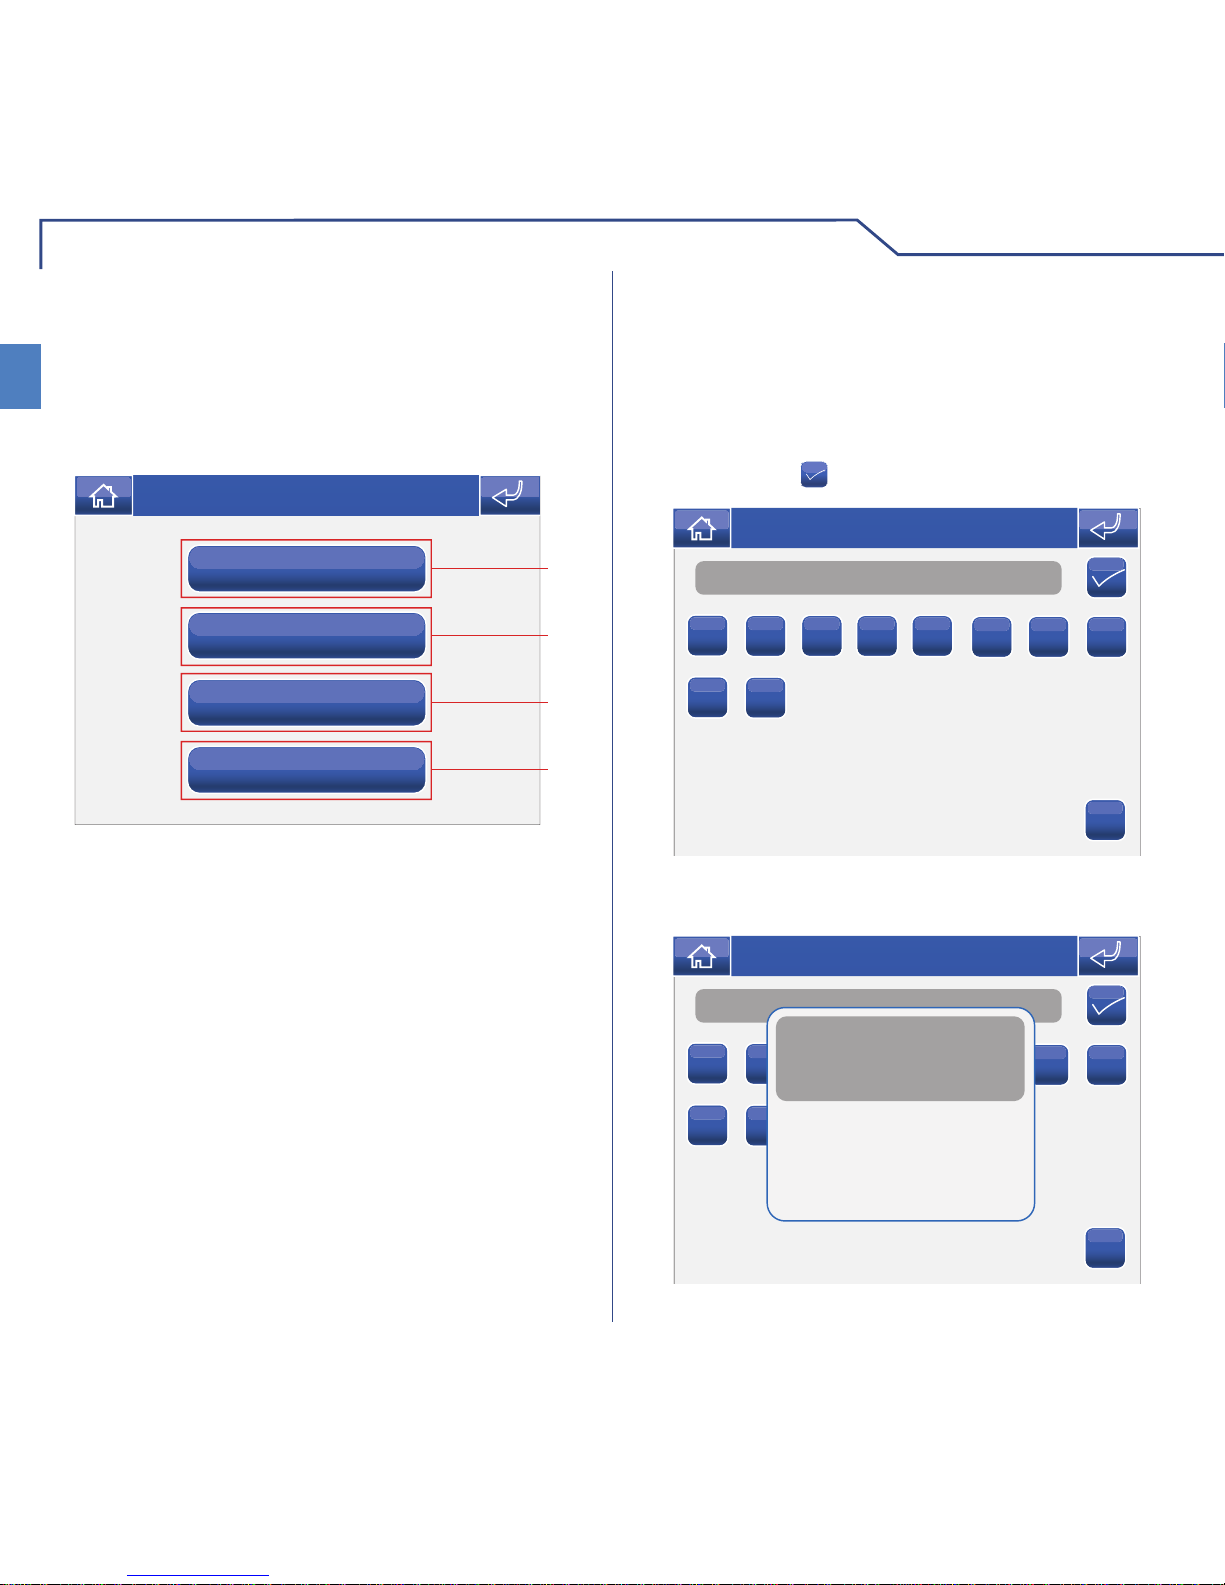
DESCRIZIONE MENU AVANZATE
Prog. Tasti
Conf. video segreteria
Attuatori
Telecamere
2
1
Gio 21/06/12 - 16:07 0W
Intercomunicanti
Intercom selettivo
Indirizzi
Calibrazione touch
2
1
Gio 21/06/12 - 16:07 0W
1 Funzioni disponibili nel menu Avanzate.
2 Scorrimento della pagina.
Imposta ingresso
Reset totale
2
1
Gio 21/06/12 - 16:07 0W
AVANZATE
16
IT
PROGRAMMAZIONE TASTI
Per programmare i tasti del Planux Memo Video
accedere al menu Setup > Avanzate > Prog. Tasti.
Tasto 1
Tasto 2
Tasto
Tasto
1
Gio 05/09/09 - 16:07 0W
1 Tasti programmabili.
Selezionare il tasto che si vuole programmare ( Es.
Tasto 1).
Intercomunicanti
Attuatori
Telecamere
Gio 21/06/12 - 16:07 0W
Centralino principale
Att. generico
Attuatore 1
Attuatore 2
Gio 05/09/09 - 16:07 0W
Attuatore 3
Premere l'icona della funzione desiderata per
accedere al sottomenu e visualizzare i moduli
disponibili.
Nel caso del tasto le funzioni disponibili sono:
Privacy + dottore
Dottore
Privacy
Gio 05/09/09 - 16:07 0W
Selezionare la funzione desiderata premendo l'icona
a destra della stessa.
Se durante la programmazione viene tolto il fl ag
da tutte le funzioni, il tasto viene disabilitato.
17
AVANZATE
IT
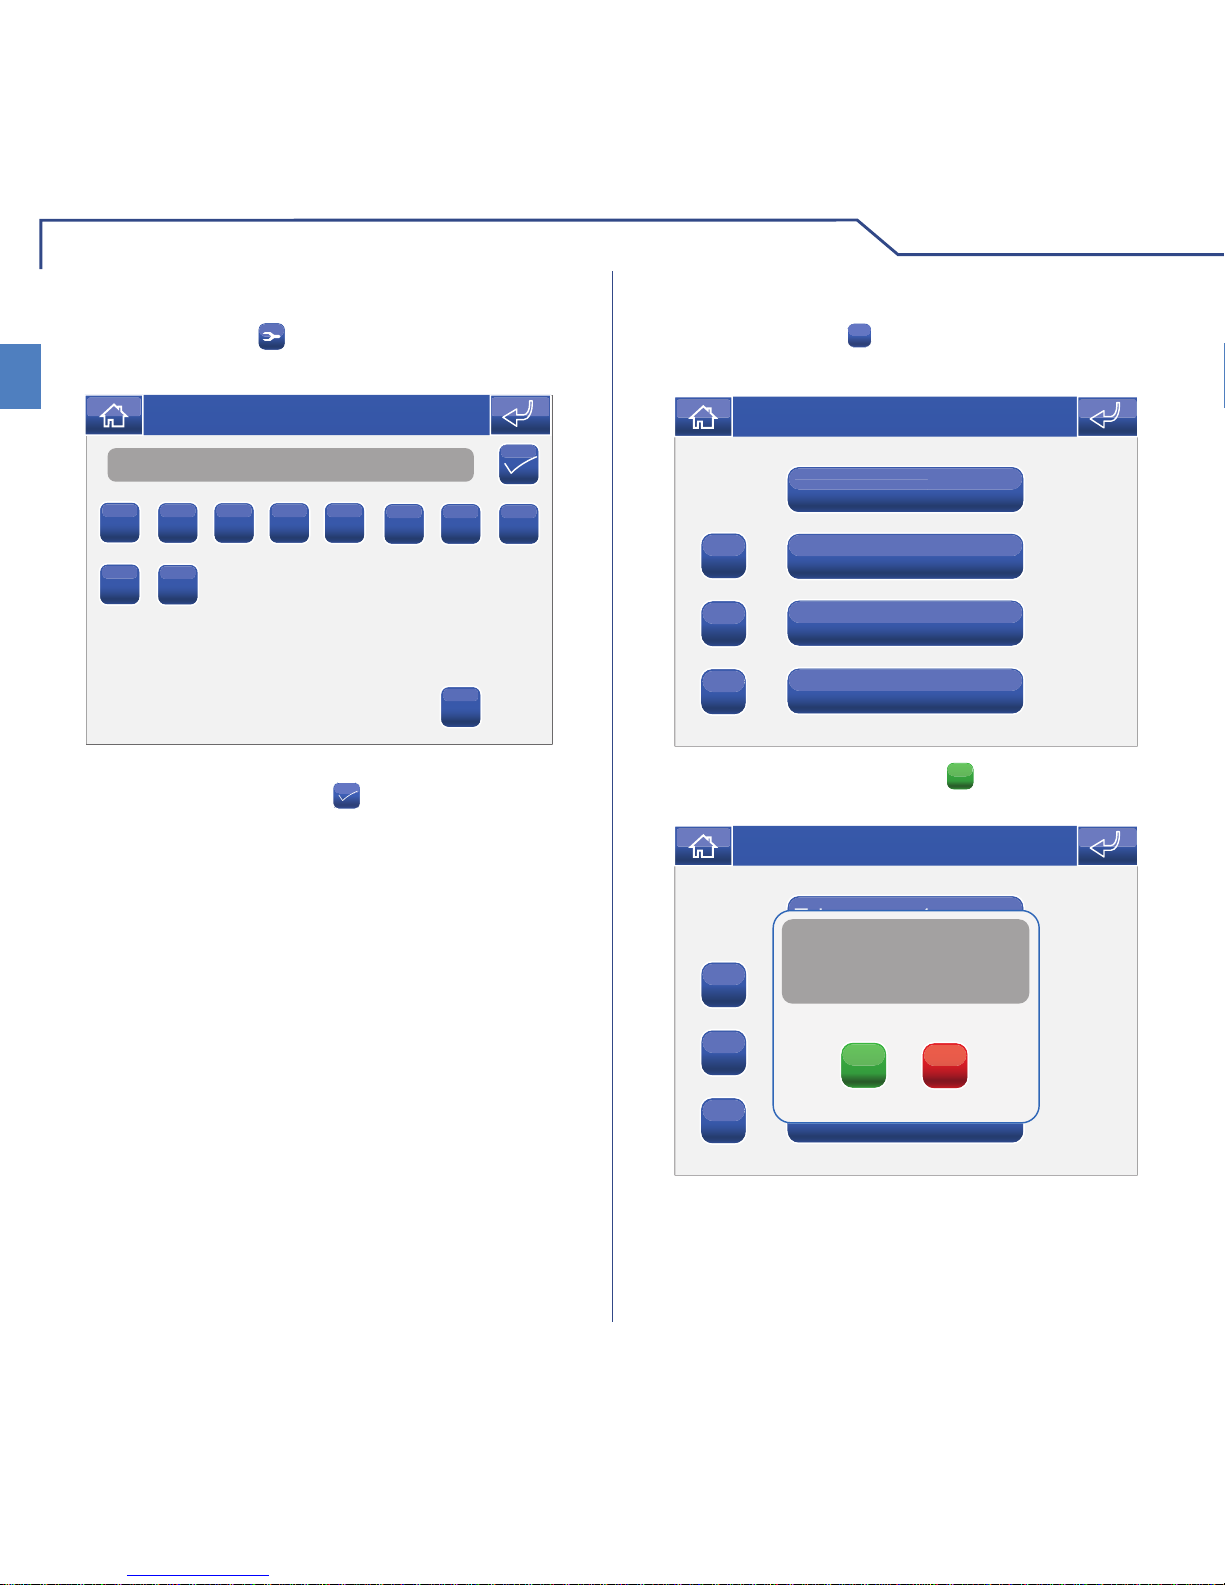
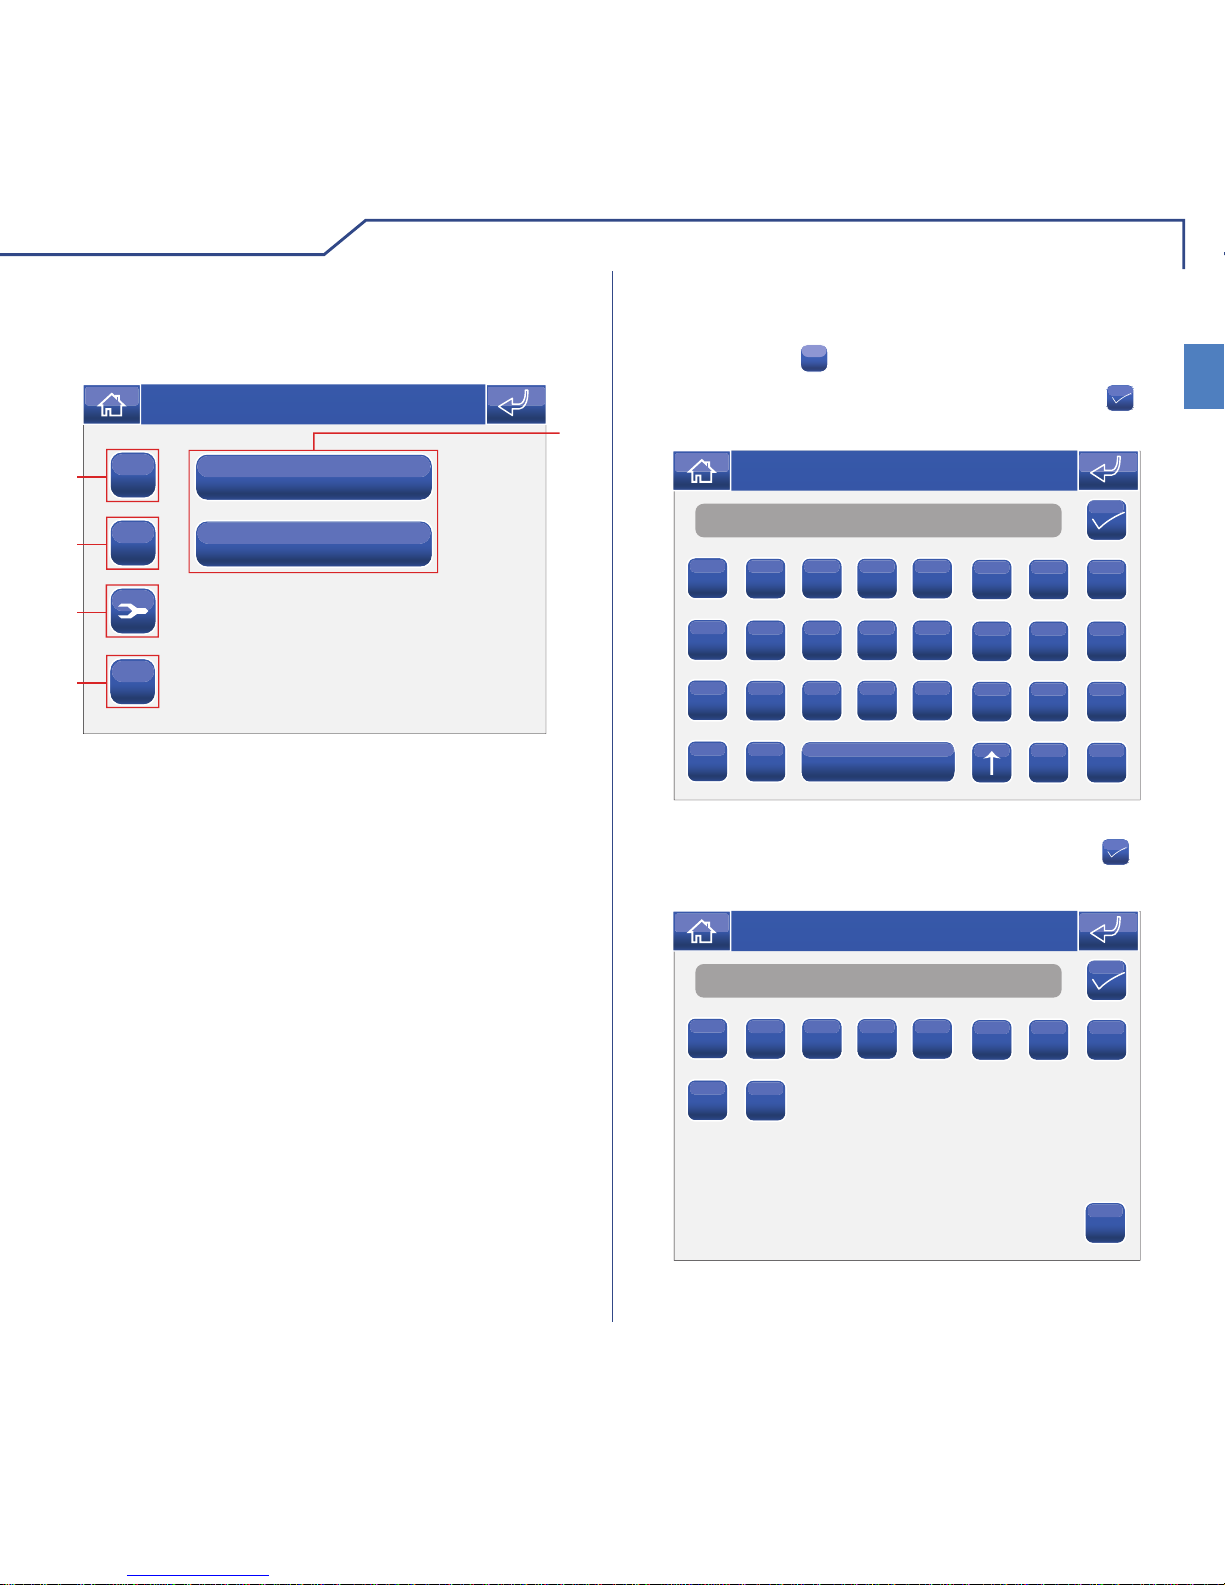
Per gestire gli attuatori accedere al menu Setup >
Avanzate > Attuatori.
ATTUATORI
Att. generico
Attuatore 1
Attuatore 2
ABC
C
+
5
1
3
2
4
Gio 05/09/09 - 16:07 0W
Attuatore 3
1 Attuatori disponibili.
2 Aggiungi attuatore.
3 Elimina attuatore.
4 Modifi ca codice attuatore.
5 Rinomina attuatore (vedi pag. 10).
Per aggiungere un attuatore premere l'icona
+
.
AGGIUNGERE A TTUATORI
Nome
A
B C D E
F G H
I
J K L M
N O P
Q
R S T U
V W X
Y
Z
C
123
Gio 05/09/09 - 16:07 0W
Inserire il nome desiderato e premere l'icona per
confermare.
Inserire il codice dell'attuatore e premere l'icona
per confermare.
Numero
1
2 3 4 5
6 7 8
9
0
C
Gio 05/09/09 - 16:07 0W
Per maggiori informazioni su Art. 1256 vedi Manuale
tecnico cod. 2G40000687.
CONFIGURAZIONE VIDEO SEGRETERIA
È possibile confi gurare la fuzione video segreteria
in modo che vengano registrate tutte le chiamate
videocitofoniche.
Gio 21/06/12 - 16:07 0W
Registra sempre
Durata registrazione
ON
OFF
3
2
1
accedere al menu Setup > Avanzate > Conf. video
segreteria.
1 Attivare la modalità “Registra sempre”.
2 Disattivare la modalità “Registra sempre”.
3 Variare la durata della registrazione (5 o 10
secondi).
AVANZATE
18
IT
MODIFICA CODICE ATTUATORE
Per modifi care il codice di un attuatore premere
l'icona
seguito dall'icona dell'attuatore.
255
1
2 3 4 5
6 7 8
9
0
C
Gio 05/09/09 - 16:07 0W
Inserire il codice desiderato usando la tastiera
numerica e premere l'icona
per salvare.
Per eliminare un attuatore premere l'icona
C
seguito
dall'icona dell'attuatore.
ELIMINARE A TTUATORI
Att. generico
Attuatore 1
Attuatore 2
ABC
C
+
Gio 05/09/09 - 16:07 0W
Attuatore 3
Confermare premendo l'icona SI.
Attuatore 1
Attuatore 2
Attuatore 3
ABC
C
+
Conferma eliminazione
attuatore?
SI
NO
Gio 05/09/09 - 16:07 0W
19
AVANZATE
IT
Per gestire le telecamere accedere al menu Setup >
Avanzate > Telecamere.
TELECAMERE
Telecamera 1
Telecamera 2
Telecamera 3
Telecamera 4
1
ABC
C
+
5
3
2
4
Gio 05/09/09 - 16:07 0W
1 Telecamere disponibili.
2 Aggiungi telecamera.
3 Elimina telecamera.
4 Modifi ca codice telecamera.
5 Rinomina telecamera (vedi pag. 11).
Per aggiungere una telacamera premere l'icona +.
AGGIUNGERE TELECAMERE
Nome
A
B C D E
F G H
I
J K L M
N O P
Q
R S T U
V W X
Y
Z
C
123
Gio 05/09/09 - 16:07 0W
Inserire il nome desiderato e premere l'icona per
confermare.
Inserire il codice della telecamera e premere l'icona
per confermare.
Numero
1
2 3 4 5
6 7 8
9
0
C
Gio 05/09/09 - 16:07 0W
Per maggiori informazioni su Art. 1259C (modulo
telecamera scorporata) vedi Manuale tecnico
cod. 2G40000690.
AVANZATE
20
IT
Premere l'icona C seguito dall'icona della
telecamera.
ELIMINARE TELECAMERE
Confermare premendo l'icona SI.
MODIFICA CODICE TELECAMERA
Premere l'icona seguito dall'icona della
telecamera.
220
1
2 3 4 5
6 7 8
9
0
C
Gio 05/09/09 - 16:07 0W
Inserire il codice desiderato usando la tastiera
numerica e premere l'icona
per salvare.
Telecamera 1
Telecamera 2
Telecamera 3
Telecamera 4
ABC
C
+
Gio 05/09/09 - 16:07 0W
Telecamera 1
Telecamera 2
Telecamera 3
Telecamera 4
ABC
C
+
SI
NO
Conferma eliminazione
telecamera?
Gio 05/09/09 - 16:07 0W
21
AVANZATE
IT
Per gestire gli intercomunicanti accedere al menu
Setup > Avanzate > Intercomunicanti.
INTERCOMUNICANTI
Intercomunicante 1
Intercomunicante 2
1
ABC
C
+
5
3
2
4
Gio 05/09/09 - 16:07 0W
1 Chiamate intercomuncianti disponibili.
2 Aggiungi chiamata intercomunicante.
3 Elimina chiamata intercomunicante.
4 Modifi ca indirizzo intercomunicante.
5 Rinomina chiamata intercomunicante (vedi pag.
12).
Per aggiungere una chiamata intercomunicante
premere l'icona
+
.
AGGIUNGERE INTERCOMUNICANTE
Nome
A
B C D E
F G H
I
J K L M
N O P
Q
R S T U
V W X
Y
Z
C
123
Gio 05/09/09 - 16:07 0W
Inserire il nome desiderato e premere l'icona per
confermare.
Inserire l'indirizzo del posto interno che si desidera
associare alla chiamata e premere l'icona
per
confermare.
Numero
1
2 3 4 5
6 7 8
9
0
C
Gio 05/09/09 - 16:07 0W
AVANZATE
22
IT
MODIFICA INDIRIZZO INTERCOMUNICANTE
Premere l'icona seguito dall'icona della chiamata
intercomunicante.
2
1
2 3 4 5
6 7 8
9
0
C
Gio 05/09/09 - 16:07 0W
Inserire l'indirizzo desiderato usando la tastiera
numerica e premere l'icona
per salvare.
Premere l'icona
C
seguito dall'icona della chiamata
intercomunicante.
ELIMINARE INTERCOMUNICANTE
Confermare premendo l'icona SI.
Intercomunicante 1
Intercomunicante 2
ABC
C
+
Gio 05/09/09 - 16:07 0W
Intercomunicante 1
Intercomunicante 2
ABC
C
+
Gio 05/09/09 - 16:07 0W
SI
NO
Conferma eliminazione
intercomunicante?
23
AVANZATE
IT
Per gestire le chiamate intercom selettivo accedere al
menu Setup > Avanzate > Intercom selettivo.
INTERCOM SELETTIVO
Intercom selettivo 1
Intercom selettivo 2
1
ABC
C
+
5
3
2
4
Mer 31/07/13 - 08:31
Inserire il nome desiderato e premere l'icona per
confermare.
1 Chiamate intercom selettivo disponibili.
2 Aggiungi intercom selettivo.
3 Elimina intercom selettivo.
4 Modifi ca intercom selettivo.
5 Rinomina intercom selettivo.
Una volta create, le chiamate intercom
selettivo potranno essere trovate sotto il menu
“Intercomunicanti” (vedi pagina 12).
Per aggiungere una chiamata intercom selettivo
premere l’icona
+
.
AGGIUNGERE INTERCOM SELETTIVO
Nome
A
B C D E
F G H
I
J K L M
N O P
Q
R S T U
V W X
Y
Z
C
123
Mer 31/07/13 - 08:31
Inserire il nome desiderato e premere l'icona per
confermare.
Selezionare gli indirizzi intercom dei posti interni che
si desidera associare alla chiamata e premere l'icona
per confermare.
1
2
3
4
5
6
7
8
Mer 31/07/13 - 08:31
AVANZATE
24
IT
IMPOSTAZIONE CODICE STAFFA
Numero
1
2 3 4 5
6 7 8
9
0
C
Gio 05/09/09 - 16:07 0W
Accedere al menu Setup > Avanzate > Indirizzi >
Codice simplebus. Inserire il codice della staffa e
premere l'icona
per confermare.
Ogni staffa del sistema viene identifi cata mediante il
proprio codice; tale codice deve essere un numero
compreso tra 1 e 240.
In caso non fosse inserita la scheda SD compare il
seguente messaggio:
1
1
2 3 4 5
6 7 8
9
0
C
Errore scheda SD
parametro salvato in flash
Gio 05/09/09 - 16:07 0W
ELIMINARE / MODIFICARE
INTERCOM SELETTIVO
Per eliminare o modifi care una chiamata intercom
selettivo seguire le istruzioni a pag 21.
DESCRIZIONE MENU INDIRIZZI
Codice simplebus
Monitor
1
2
Gio 21/06/12 - 16:07 0W
Indirizzo multiplo
Indirizzo intercom
3
4
1 Menu impostazione codice staffa.
2 Menu impostazione monitor principale / secondario.
3 Menu impostazione indirizzo multiplo.
4 Menu impostazione indirizzo intercom.
25
AVANZATE
IT
IMPOSTAZIONE MONITOR
PRINCIPALE / SECONDARIO
Principale
Principale multiplo
Sab 05/09/09 16:07
Secondario
Accedere al menu Setup > Avanzate > Indirizzi >
Monitor.
Selezionare l'impostazione premendo l'icona a destra
della stessa.
Rispettare i limiti descritti negli schemi di installazione
del Manuale tecnico dell’articolo 20001001K (cod.
2G40000849), e del Manuale tecnico dell’articolo
6214C (cod.2G40000877 o foglio tecnico FT/SBC/22).
IMPOSTAZIONE INDIRIZZO MULTIPLO
Indirizzo minimo
Indirizzo massimo
1
2
Gio 21/06/12 - 16:07 0W
1 Imposta indirizzo di partenza del range.
2 Imposta indirizzo fi nale del range.
Accedere al menu Setup > Avanzate > Indirizzi >
Indirizzo multiplo.
Attivando la funzione “Indirizzo multiplo” il monitor
suonerà ogni volta che verrà chiamato un indirizzo
simplebus compreso nel range impostato.
IMPOSTAZIONE INDIRIZZO INTERCOM
1
2
3
4
5
6
7
8
Gio 21/06/12 - 16:07 0W
Selezionare l’indirizzo intercom che si desidera
assegnare al monitor.
Accedere al menu Setup > Avanzate > Indirizzi >
Indirizzo intercom.
AVANZATE
26
IT
CALIBRAZIONE TOUCH
Nel caso in cui il touch screen non dovesse rispondere
correttamente al tocco è possibile calibrarlo.
Accedere al menu Setup > Avanzate > Calibrazione
touch.
Lingua
Imposta data e ora
Comandi condizionati
Reset configurazione
B
B
B
CONFERMARE
LA CALIBRAZIONE
SI
NO
Gio 05/09/09 - 16:07 0W
Confermare premendo l'icona SI.
Per calibrare il touch screen è suffi ciente tenere
premuto per 2 secondi la croce che comparirà in 3
posizioni diverse.
Tenere premuto 2 secondi
IMPOSTA INGRESSO
È possibile assegnare 2 diverse funzioni all’ingresso
CFP-CFP presente sulla morsettiera della staffa:
• Chiamata fuori porta (CFP)
• Funzione allarme (viene inviato un segnale di
allarme simplebus al centralino).
Accedere al menu Setup > Avanzate > Imposta
ingresso.
Funzione CFP
Funzione allarme
Gio 21/06/12 - 16:07 0W
Selezionare la funzione premendo l'icona a destra
della stessa.
RESET TOTALE
La funzione elimina ogni impostazione fatta dall'utente
e le impostazioni videocitofoniche, riportando il
sistema allo stato originale di fabbrica.
Accedere al menu Setup > Avanzate > Reset totale.
Lingua
Imposta data e ora
Comandi condizionati
B
B
B
Confermare reset configurazione
utente ed impianto?
SI
NO
Gio 05/09/09 - 16:07 0W
Confermare premendo l'icona SI.
27
AVANZATE
IT
RESET CONFIGURAZIONI
La funzione elimina tutte le impostazioni
videocitofoniche.
Accedere al menu Setup > Avanzate > Reset
confi gurazione.
Lingua
Imposta data e ora
Comandi condizionati
B
B
B
Confermare reset configurazione
impianto?
SI
NO
Gio 21/06/12 - 16:07 0W
Confermare premendo l'icona SI.
AGGIORNAMENTO PRODOTTO
Per un aggiornamento software del prodotto,
rivolgersi al proprio installatore o direttamente al
centro assistenza Comelit Group S.p.A..
AGGIORNAMENTO CONFIGURAZIONI
La funzione aggiorna tutte le impostazioni
videocitofoniche.
Accedere al menu Setup > Avanzate > Aggiorna
confi gurazioni.
Lingua
Imposta data e ora
Comandi condizionati
B
B
B
Confermare
aggiornamento configurazione ?
SI
NO
Gio 21/06/12 - 16:07 0W
Confermare premendo l'icona SI.
TEMPO TRASMISSIONE
Il tempo di trasmissione determina la velocità con cui
vengono inviati i comandi sulla linea dati.
Più alto è il valore, maggiore sarà il tempo tra l’invio di
un comando e l’altro.
Es: Poniamo di avere 5 luci in un area e di inviare il
comando di accesione di tutte quante.
• Se il valore è impostato a 1, passerà 1 decimo di
secondo tra l’accensione di una luce e l’altra.
• Se il valore è impostato a 5, passeranno 5 decimi di
secondo tra l’accensione di una luce e l’altra.
NUMERO DI TRASMISSIONI
Il numero di trasmissioni è il numero di tentativi che
vengono effettutati per l’invio di dati sulla linea.

CONTENTS
MODIFYING AN ACTUATOR CODE .................................................................... 43
DELETING ACTUATORS ..................................................................................... 43
CAMERAS ............................................................................................................44
ADDING CAMERAS ............................................................................................. 44
MODIFYING A CAMERA CODE...........................................................................45
DELETING CAMERAS ......................................................................................... 45
INTERCOMS ........................................................................................................46
ADDING AN INTERCOM......................................................................................46
MODIFYING AN INTERCOM ADDRESS .............................................................47
DELETING AN INTERCOM..................................................................................47
SELECTIVE INTERCOM......................................................................................48
ADDING A SELECTIVE INTERCOM....................................................................48
DELETING / MODIFYING A SELECTIVE INTERCOM ........................................49
ADDRESSES MENU DESCRIPTION ..................................................................49
SETTING THE BRACKET CODE ........................................................................49
SETTING A MONITOR AS MAIN / SECONDARY ................................................50
SETTING A MULTIPLE ADDRESS ......................................................................50
SETTING THE INTERCOM ADDRESS ...............................................................50
CALIBRATING THE TOUCH-SCREEN ................................................................51
SET INPUT ........................................................................................................... 51
TOTAL RESET .....................................................................................................51
RESET CONFIGURATIONS ................................................................................52
CONFIGURATION UPDATE ................................................................................52
TRANSMISSION TIME .........................................................................................52
PRODUCT UPDATE ............................................................................................52
NUMBER OF TRANSMISSIONS .........................................................................52
EN
INTRODUCTION
WARNINGS ..........................................................................................................29
DESCRIPTION OF THE MONITOR ..................................................................... 30
KEY FUNCTIONS ................................................................................................30
PLANUX MEMO VIDEO MENU ...........................................................................31
GUIDE TO COLOURS .........................................................................................31
DOOR ENTRY MONITORS
ANSWERING A CALL ..........................................................................................32
DOOR ENTRY MONITORS MENU DESCRIPTION ............................................32
VIDEO MEMORY .................................................................................................32
VIEWING A RECORDING ....................................................................................33
DELETING A RECORDING..................................................................................33
HANDS-FREE ......................................................................................................33
SETTING MELODIES ..........................................................................................33
ADJUSTING THE VOLUME .................................................................................34
ACTUATORS ........................................................................................................34
RENAMING ACTUATORS ...................................................................................35
CAMERAS ............................................................................................................35
RENAMING CAMERAS .......................................................................................36
INTERCOMS ........................................................................................................37
RENAMING INTERCOMS....................................................................................37
SETUP
SETUP MENU DESCRIPTION ............................................................................38
LANGUAGE..........................................................................................................38
LOCKING THE KEYPAD AND T OUCH-SCREEN ................................................38
SETTING THE DATE & TIME...............................................................................39
INFORMATION .....................................................................................................39
CONDITIONS .......................................................................................................39
ADVANCED
ACCESSING ADVANCED MENUS ......................................................................40
ADVANCED MENUS DESCRIPTION ..................................................................40
KEY PROGRAMMING .........................................................................................41
VIDEO MEMORY SETUP ....................................................................................42
ACTUATORS ........................................................................................................42
ADDING ACTUATORS ......................................................................................... 42

29
INTRODUCTION
EN
29
W ARNINGS
Comelit Group S.p.A. declines any responsibility for improper use of the apparatus, for modifi cations made by third
parties for any reason or purpose, and for the use of accessories and materials which are not originals. Caution! In order
to reduce the risk of faults and electric shocks:
• Do not open the apparatus or carry out any repairs yourself. If necessary , request the services of qualifi ed personnel.
• Do not insert objects or pour liquids into the device.
• Clean using a damp cloth. Do not use alcohol or other aggressive products.
Fonts are (c) Bitstream (see below). DejaVu changes are in public domain.
Glyphs imported from Arev fonts are (c) Tavmjong Bah (see below)
Bitstream Vera Fonts Copyright
-----------------------------Copyright (c) 2003 by Bitstream, Inc. All Rights Reserved. Bitstream Vera is a trademark of Bitstream, Inc.
Permission is hereby granted, free of charge, to any person obtaining a copy of the fonts accompanying
this license ("Fonts") and associated documentation fi les (the "Font Software"), to reproduce and distribute
theFont Software, including without limitation the rights to use, copy, merge, publish, distribute, and/or sell
copies of the Font Software, and to permit persons to whom the Font Software is furnished to do so, subject
to the following conditions:
The above copyright and trademark notices and this permission notice shall be included in all copies of one
or more of the Font Software typefaces.
The Font Software may be modifi ed, altered, or added to, and in particular the designs of glyphs or
characters in the Fonts may be modifi ed and additional glyphs or characters may be added to the Fonts, only
if the fonts are renamed to names not containing either the words "Bitstream" or the word "Vera".
This License becomes null and void to the extent applicable to Fonts or Font Software that has been modifi ed
and is distributed under the "Bitstream Vera" names.
The Font Software may be sold as part of a larger software package but no copy of one or more of the Font
Software typefaces may be sold by itself.
THE FONT SOFTWARE IS PROVIDED "AS IS", WITHOUT WARRANTY OF ANY KIND, EXPRESS OR
IMPLIED, INCLUDING BUT NOT LIMITED TO ANY WARRANTIES OF MERCHANTABILITY, FITNESS
FOR A PARTICULAR PURPOSE AND NONINFRINGEMENT OF COPYRIGHT, PATENT, TRADEMARK,
OR OTHER RIGHT. IN NO EVENT SHALL BITSTREAM OR THE GNOME FOUNDATION BE LIABLE
FOR ANY CLAIM, DAMAGES OR OTHER LIABILITY, INCLUDING ANY GENERAL, SPECIAL, INDIRECT,
INCIDENTAL, OR CONSEQUENTIAL DAMAGES, WHETHER IN AN ACTION OF CONTRACT, TORT OR
OTHERWISE, ARISING FROM, OUT OF THE USE OR INABILITY TO USE THE FONT SOFTWARE OR
FROM OTHER DEALINGS IN THE FONT SOFTWARE.
Except as contained in this notice, the names of Gnome, the Gnome Foundation, and Bitstream Inc., shall not
be used in advertising or otherwise to promote the sale, use or other dealings in this Font Software without
prior written authorization from the Gnome Foundation or Bitstream Inc., respectively. For further information,
contact: fonts at gnome dot org.
Arev Fonts Copyright
-----------------------------Copyright (c) 2006 by Tavmjong Bah. All Rights Reserved.
Permission is hereby granted, free of charge, to any person obtaining a copy of the fonts accompanying this
license ("Fonts") and associated documentation fi les (the "Font Software"), to reproduce and distribute the
modifi cations to the Bitstream Vera Font Software, including without limitation the rights to use, copy, merge,
publish, distribute, and/or sell copies of the Font Software, and to permit persons to whom the Font Software
is furnished to do so, subject to the following conditions:
The above copyright and trademark notices and this permission notice shall be included in all copies of one
or more of the Font Software typefaces.
The Font Software may be modifi ed, altered, or added to, and in particular the designs of glyphs or
characters in the Fonts may be modifi ed and additional glyphs or characters may be added to the Fonts,
only if the fonts are renamed to names not containing either the words "Tavmjong Bah" or the word "Arev".
This License becomes null and void to the extent applicable to Fonts or Font Software that has been modifi ed
and is distributed under the "Tavmjong Bah Arev" names.
The Font Software may be sold as part of a larger software package but no copy of one or more of the Font
Software typefaces may be sold by itself.
THE FONT SOFTWARE IS PROVIDED "AS IS", WITHOUT WARRANTY OF ANY KIND, EXPRESS OR
IMPLIED, INCLUDING BUT NOT LIMITED TO ANY WARRANTIES OF MERCHANTABILITY, FITNESS
FOR A PARTICULAR PURPOSE AND NONINFRINGEMENT OF COPYRIGHT, PATENT, TRADEMARK,
OR OTHER RIGHT. IN NO EVENT SHALL TAVMJONG BAH BE LIABLE FOR ANY CLAIM, DAMAGES
OR OTHER LIABILITY, INCLUDING ANY GENERAL, SPECIAL, INDIRECT, INCIDENTAL, OR
CONSEQUENTIAL DAMAGES, WHETHER IN AN ACTION OF CONTRACT, TORT OR OTHERWISE,
ARISING FROM, OUT OF THE USE OR INABILITY TO USE THE FONT SOFTWARE OR FROM OTHER
DEALINGS IN THE FONT SOFTWARE.
Except as contained in this notice, the name of Tavmjong Bah shall not be used in advertising or otherwise
to promote the sale, use or other dealings in this Font Software without prior written authorization from
Tavmjong Bah. For further information, contact: tavmjong @ free. fr.
INTRODUCTION
30
EN
12
3
11 10
9
87
654
1
2
Sab 05/09/09 16:07
Door entry monitors
nitor
s
Setup
DESCRIPTION OF THE MONITOR
KEY FUNCTIONS
Menu key: switches the Planux Memo Video
monitor on and off.
Audio key: activates or de-activates
conversation with the external unit.
Door lock key: opens the corresponding door
lock.
Brightness key: adjusts the brightness of the
image displayed in a video message.
Contrast key: adjusts the contrast of the image
displayed in a video message.
Colour key: adjusts the colour of the image
displayed on the monitor. To change the setting,
press the key while video communication is in
progress.
Programmable key 1: factory-set as secondary
switchboard call (programmable).
Programmable key 2: factory-set as generic
actuator (programmable).
Privacy/Doctor function key (programmable):
• The Privacy function disables calls from the
external unit and switchboard.
• The Doctor function enables automatic
activation of the lock-release in response to a
call from the external unit.
• The Privacy + Doctor function, as well as
disabling the door-entry phone ringtone in the
same way as the Privacy function, also enables
automatic activation of the lock-release in
response to a call from the external unit.
The red LED indicates that the selected
function is active.
Self-ignition key: switches on the monitor and
displays the video feed from the external unit
(programmable).
1 Touch screen
2 Key sensor
3 Door lock key
4 Privacy / Doctor key (programmable)
5 Self-ignition key (programmable)
6 Programmable key 2
7 Programmable key 1
8 Colour key
9 Contrast key
10 Brightness key
11 Menu key
12 Audio key
 Loading...