

Page 1

IT
MANUALE
TECNICO
EN
TECHNICAL
MANUAL
MT SB 01
FR
MANUEL
TECHNIQUE
Centralino di portineria Art. 1998A
Porter switchboard Art. 1998A
Standard de conciergerie Art. 1998A
Assistenza tecnica Italia 0346/750090
Commerciale Italia 0346/750091
Comelit Group S.p.A. - Via Don Arrigoni 5 - 24020 Rovetta S. Lorenzo BG Italy - tel. (+39) 0346 750 011 - fax (+39) 0346 71436
www.comelit.eu www.simplehome.eu [email protected] [email protected] [email protected]
Technical service abroad (+39)0346750092
Export department (+39) 0346750093
Page 2
GROUP S.p.A.
Avvertenze
IT
• Effettuare l’installazione seguendo scrupolosamente le istruzioni fornite dal costruttore ed in conformità alle norme
vigenti.
• Tuttigli apparecchidevonoesseredestinatiesclusivamenteall’uso percuisonostaticoncepiti.Comelit Group S.p.A.
declinaogniresponsabilitàperunutilizzoimpropriodegliapparecchi,permodicheeffettuatedaaltriaqualunquetitolo
escopo,perl’usodiaccessoriematerialinonoriginali.
• Tutti i prodotti sono conformi alle prescrizioni delle direttive 2006/95/CE (che sostituisce la direttiva 73/23/CEE e
successiviemendamenti)eciòèattestatodallapresenzadellamarcaturaCEsuglistessi.
• Evitarediporreilidimontanteinprossimitàdicavidialimentazione(230/400V).
• Gliinterventidiinstallazione,montaggioeassistenzaagliapparecchielettricidevonoessereeseguitiesclusivamenteda
elettricistispecializzati.
• Nell'impiantoellettrico dell'ediciodeveessereprevistouninterruttoredireteonnipolare conun'aperturadi contattodi
almeno3mmingradodisezionarel'alimentazionedeldispositivo.
• Toglierel’alimentazioneprimadieffettuarequalsiasimanutenzione.
• Rimettereleprotezionisuimorsettiechiuderelosportellinodiispezionedopoogniintervento.
• Il dispositivo è conforme alla norma EN60950-1 relativa alla sicurezza di apparecchiature per la tecnologia
dell'informazione.
• Nontenerepremutoilganciofonicaconlacornettasollevata.
Warning
EN
• Install the equipment by carefully following the instructions given by the manufacturer and in compliance with the
standardsinforce.
• Alltheequipmentmustonlybeusedforthepurposeitwasdesignedfor.Comelit Group S.p.A.declinesanyresponsibility
forimproperuseoftheapparatus,formodicationsmadebythirdpartiesforanyreasonorpurpose,andfortheuse of
non-originalaccessoriesandmaterials.
• All theproductscomplywith the requirements of the 2006/95/CE directives(whichreplace directive 73/23/CEE and
subsequentamendments),ascertiedbytheCEmarkontheproducts.
• Donotrouteriserwiresinproximitytopowersupplycables(230/400V).
• Installation,mountingandassistanceproceduresforelectricaldevicesmustonlybeperformedbyspecialisedelectricians.
• Theelectricalsystemofthebuildingmustbettedwithanomnipolarmainsswitchwithacontactopeningofatleast3mm,
whichiscapableofisolatingthepowersupplyofthedevice.
• Cutoffthepowersupplybeforecarryingoutanymaintenancework.
• Placetheprotectionbackovertheterminalsandclosetheinspectiondooraftereveryprocedure.
• ThedeviceconformstostandardEN60950-1relatingtothesafetyofinformationtechnologyequipment.
• Donotpressandholdtheaudiohookwhilethehandsetislifted.
Avertissements
FR
• Effectuerl’installation en suivant scrupuleusement les instructions fourniesparle constructeur et conformément aux
normesenvigueur.
• Touslesappareilsdoiventêtrestrictementdestinésàl’emploipourlequelilsontétéconçus.La société Comelit Group
S.p.A. décline toute responsabilité en cas de mauvais usage des appareils, pour des modications effectuées par
d’autrespersonnespourn’importequelleraisonetpourl’utilisationd’accessoiresetmatériauxnond’origine.
• Touslesproduitssontconformesauxprescriptionsde ladirective2006/95/CE(quiremplacela directive73/23/CEEet
amendementssuccessifs).CelaestattestéparlaprésencedumarquageCE surlesproduits.
• Éviterdeplacerleslsdemontantàproximitédescâblesd’alimentation(230/400V).
• Les interventions d’installation, de montage et d’assistance aux appareils électriques doivent être effectuées
exclusivementpardesélectriciensspécialisés.
• L’installationélectriquedubâtimentdoitêtremunied’uninterrupteurderéseauomnipolaireavecuneouverturedecontact
d’aumoins3mmenmesuredesectionnerl’alimentationdudispositif.
• Couperl’alimentationavantd’effectuertouteopérationd’entretien.
• Remettrelesprotectionssurlesbornesetfermerlaported’inspectionaprèschaqueintervention.
• Le dispositif est conforme à la norme EN60950-1 relative à la sécurité des équipements pour la technologie de
l’information.
• Nepasmaintenirlecrochetphonieenfoncélorsquelecombinéestdécroché.
MT SB 01 2
Page 3

SOMMARIO
• INTRODUZIONE
- Vista generale 4
- Descrizione morsettiera 4
- Tasti di programmazione e display 5
- Tastiera alfanumerica 5
- Descrizione generica 5
• UTILIZZO
U1 Come rispondere a una chiamata
da posto interno
U2 Come rispondere a una chiamata
da posto esterno
U3 Come chiamare un posto interno 7
U4 Come inoltrare una chiamata da posto esterno a posto
interno
U5 Come mettere in comunicazione 2 interni tra loro
(funzione intercomunicante)
U6 Come chiamare un posto interno presente nella coda
chiamate
U7 Come utilizzare la rubrica 9
U8 Come inserire un nome in rubrica 9
U9 Come cercare un nome in rubrica 9
U10 Come cancellare un nome in rubrica 9
U11 Come modicare un nome in rubrica 10
U12 Come utilizzare l’apriporta 10
U13 Modalità di funzionamento giorno/notte 10
U14 Come attivare la funzione “Seguimi” (Follow me) 11
U15 Segnalazione allarmi 11
U16 Come attivare un relé supplementare 11
U17 Come chiamare un Centralino secondario da
Centralino principale
U18 Come chiamare un Centralino principale
da Centralino secondario
U19 Come rispondere a una chiamata da Centralino
secondario a Centralino principale
U20 Come rispondere a una chiamata da Centralino
principale a Centralino secondario
U21 Come attivare (MASTER) o disattivare (SLAVE) i
Centralini principali
• IMPOSTAZIONI
- Albero schermate menu 1-7 14
- I1-Modica ora 15
- I2-Modica data 15
- I3-Giorno / Notte automatico 15
- I4-Registrazione numeri brevi 16
- I5-Modica lingua 17
- I6-Scaricamento nomi da PC 17
- I7-Azzeramento totale dei nomi 17
• CONFIGURAZIONI
- Albero schermate menu 8 18
- C8.1- Impostazione modalità video 19
- C8.2- Modalità di chiamata 19
- C8.3- Tipo di Centralino (modalità Simplebus Top) 20
MT SB 01
- C8.4- Auto accensione interna ON/OFF 21
- C8.5- Chiamata tripla ON/OFF 21
- C8.6- Funzione contatto CH-CH 22
- C8.7- Funzionamento Centralino principale
+ Centralino secondario
- Tabella articoli Simplebus TOP 22
• SCHEMI DI COLLEGAMENTO
- SBC/06S Impianto citofonico con un ingresso
principale e centralino di portineria.
6
- SB2V/EN/103G Impianto videocitofonico Simplebus
b/n con 1ingresso principale e centralino di portineria.
6
- SB2V/EN/103PX Impianto videocitofonico Simplebus
Color con 1 ingresso principale e centralino di portineria.
- SB2V/EN/105G Impianto videocitofonico Simplebus
7
b/n con 2 ingressi principali e centralino di portineria.
- SB2V/EN/105PX Impianto videocitofonico
8
Simplebus Color con 2 ingressi principali e centralino di
portineria.
8
- SBC/08S Impianto citofonico con un ingresso
principale, n. secondari audio e centralino di portineria.
- SB2V/018APX Impianto Simplebus Color con modulo
telecamera scorporata Art. 1259C in modalità attuatore
generico e centralino di portineria.
- SB2V/026PX Impianto videocitofonico con 1 ingresso
principale e centralino di portineria abbinato al centralino
telefonico Art. 2906 per follow-me.
- SB2V/027PX Impianto citofonico con centralino di
portineria abbinato al centralino telefonico Art. 2906 per
follow-me.
- SB2V/EN/101G Impianto videocitofonico Simplebus
b/n con 1 ingresso principale, 3 secondari video e
11
centralino di portineria.
- SB2V/EN/101PX Impianto videocitofonico Simplebus
12
Color con 1 ingresso principale, 3 secondari video e
centralino di portineria.
12
- SB2V/EN/121G Impianto videocitofonico Simplebus
b/n con 2 ingressi principali, 3 secondari audio e
13
centralino di portineria.
- SB2V/EN/121PX Impianto videocitofonico Simplebus
13
Color con 2 ingressi principali, 3 secondari audio e
centralino di portineria.
- SBTOP/001PX Impianto videocitofonico Simplebus
TOP con 1 ingresso principale, 4 secondari e relativi
centralini di portineria secondari.
- SBTOP/002PX Impianto videocitofonico Simplebus
TOP con 2 ingressi principali, 4 secondari e centralino
di portineria principale.
- SBTOP/003PX Impianto videocitofonico Simplebus TOP
con 2 ingressi principali, 1 centralino di portineria principale,
2 secondari e relativi centralini di portineria secondari.
- SBTOP/004PX Impianto videocitofonico Simplebus
TOP con 1 ingresso principale, 4 secondari e 2 centralini
di portineria principali in congurazione SERIE.
- SBTOP/005PX Impianto videocitofonico Simplebus
TOP con 1 ingresso principale, 3 secondari e 2 centralini
di portineria principali in congurazione PARALLELO.
22
I T
63
64
65
66
67
68
69
70
71
72
74
76
78
80
82
84
86
88
MT SB 013
Page 4
GROUP S.p.A.
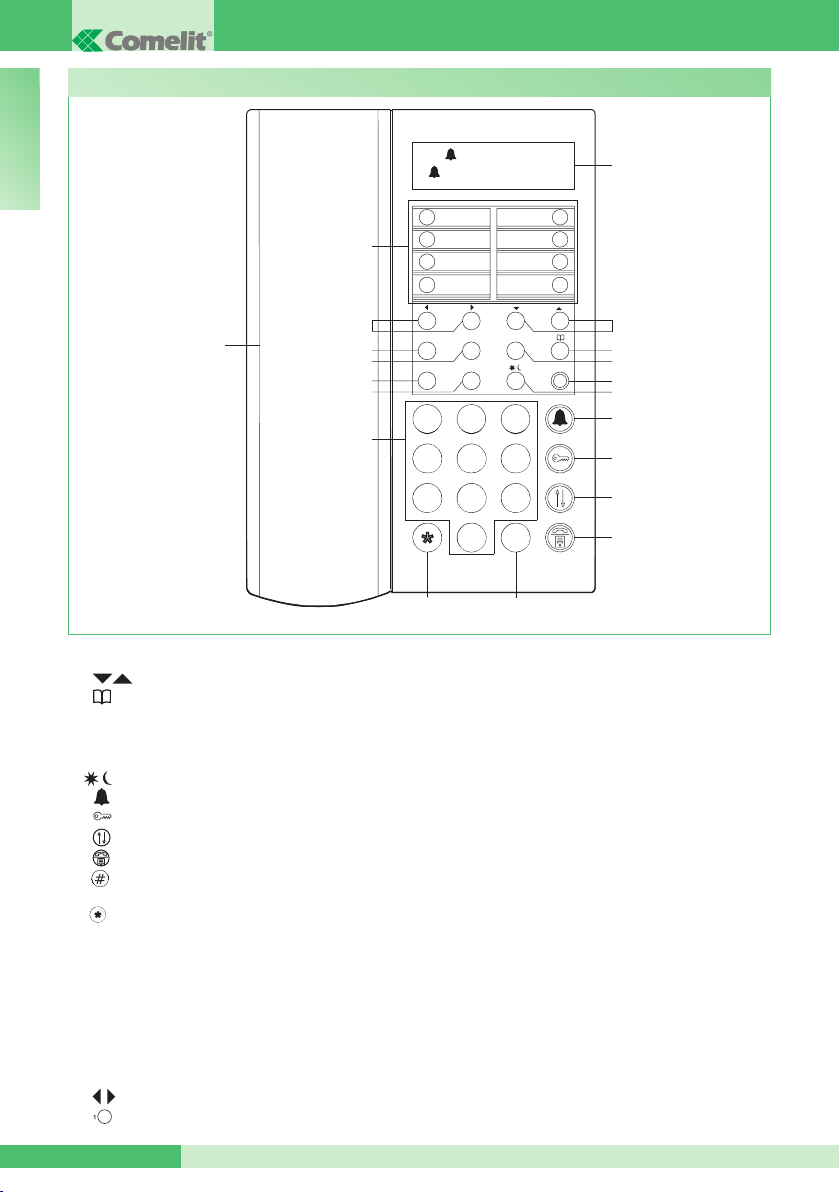
Vista generale
I T
18
1 Display segnalazione messaggi
2
3 Tasto rubrica
Tasti per scorrimento rubrica e menu
4 Tasto MENU
5 ON/OFF Accensione/spegnimento (tenere premuto
per 2 secondi)
6 Tasto giorno/notte
7 Tasto per invio chiamata
8 Tasto per apriporta
9 Tasto per trasferimento di chiamata
10 Tasto per mettere in attesa una chiamata
11 Tasto per chiamare il Centralino principale dal
Centralino secondario
12 Tasto per attivare un relé supplementare
13 Tastiera alfanumerica
14 A/V Tasto gestione “MASTER” “SLAVE” per
Centralini in serie principali o secondari
15 CANC Tasto di annullamento chiamata o
cancellazione dati inseriti
16 OK Tasto conferma
17 ESC Tasto di uscita dai menu
18 Cornetta
19 Tasti per scorrimento delle chiamate perse
20 Numeri brevi
A (---) AUTO 14:40
MER 12/03/10
1
2
20
3
4
19
17
16
15
14
13
ESC OK MENU
A/V
1 2 3
ABC DEF
4 5 6
4 5 6
7 8 9
7 8 9
12
0 #
0 #
MNOJKLGHI
WXYZTUVPQRS
11
ON/OFFCANC
1
5
6
7
8
2
3
4
5
6
7
8
9
10
Descrizione morsettiera:
24 ~ Alimentazione 24V AC
0 ~ Alimentazione 0V AC
LP1 LP2 Linea dati in arrivo da posto esterno
LM LM Linea dati verso i montanti
CH CH Contatto libero per “RIPETIZIONE DI
CHIAMATA” o “ABILITAZIONE MONITOR ESTERNO”
OUT OUT Contatto normalmente aperto che si
chiude inviando una chiamata video dal Centralino
verso un interno
C NO Contatto normalmente aperto per funzione
“SEGUIMI” (Follow me)
TX RX GND Seriale rs232 da connettere al PC
per poter scaricare i nomi della rubrica tramite
l’Art. 1249/A o al Centralino remoto negli impianti
multicentralino in serie o in parallelo.
MT SB 01 4
Page 5
1
2 3 4
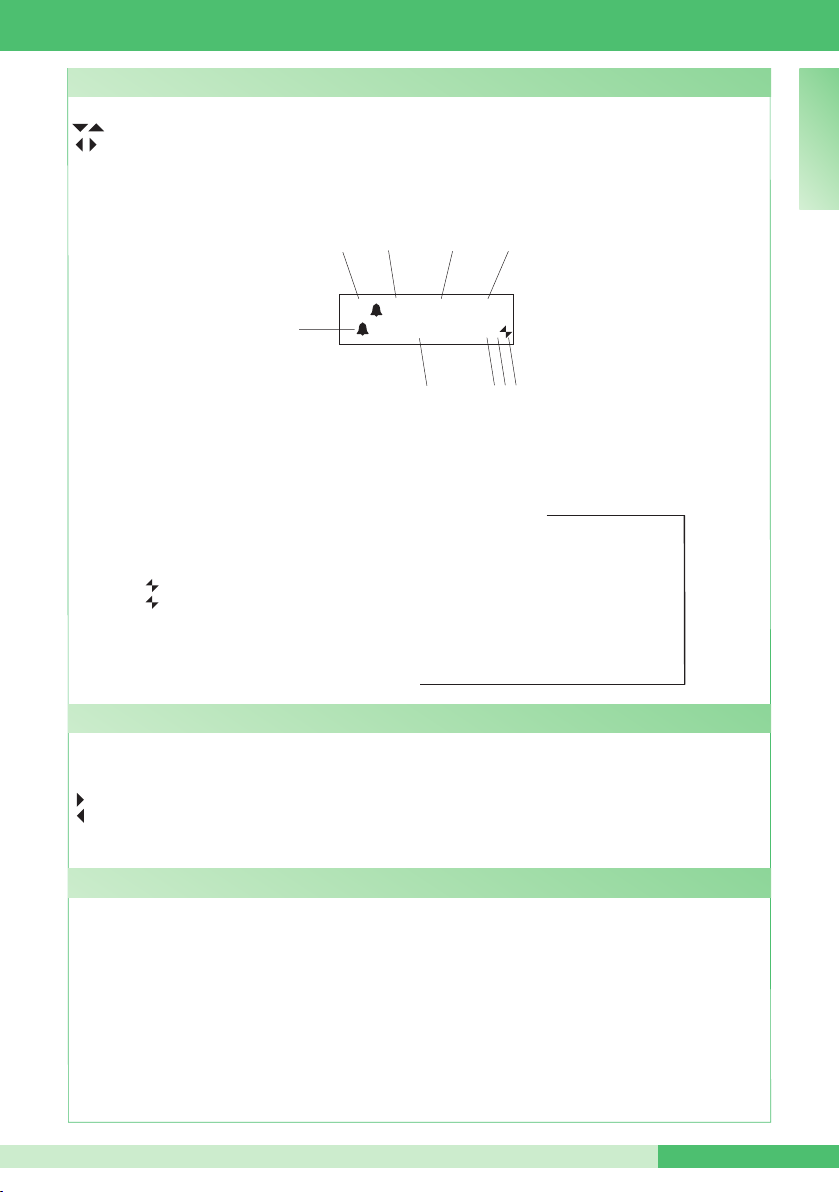
Tasti di programmazione e display
MENU Per entrare nei menu di programmazione
Permettono di selezionare le varie opzioni dei menu
Permettono di spostare il cursore per modicare i dati inseriti
OK Conferma della selezione visualizzata o inserimento dati
CANC Cancellazione dei dati immessi
ESC Annullamento della selezione e uscita dai menu di programmazione
Visualizzazioni da display del Centralino:
MT SB 01
I T
5
A (--) A
1 A modalità AUDIO
V modalità VIDEO
2 (- -) indica il numero di chiamate non risposte in modalità GIORNO
se compare la scritta NOTTE, indica il funzionamento in questa modalità
3 funzionamento in modalità AUTO viene visualizzato solo durante il funzionamento GIORNO
4 ora (ore: minuti)
5 presenza chiamate non risposte in modalità NOTTE
6 nome del giorno (Lun, Mar, ecc.) e data (giorno/mese/anno)
7 ! si ha una congurazione tra i 2 Centralini NON compatibile
? il Centralino non ha ancora rilevato la presenza del Centralino remoto
8 P indica il Cetralino congurato in parallelo
S indica il Cetralino congurato in serie
9 fissa indica il corretto funzionamento della linea seriale
lampeggiante indica il malfunzionamento della linea seriale
LM KO indica un corto circuito sulla linea montante, la scritta è accompagnata dalla ripetizione di
un tono acustico. Il Centralino riuta qualsiasi tentativo di chiamata o inoltro della stessa verso
i posti interni, vengono invece gestite normalmente tutte le chiamate in arrivo dal posto esterno.
!PC all’atto dell’attivazione da menu del punto 6- SCARICAMENTO NOMI DA PC,
indica che la seriale è pronta e in attesa dei dati da PC.
Tastiera alfanumerica
Per alcune funzioni la tastiera consente di digitare sia numeri che lettere, questo avviene premendo più volte lo
stesso tasto, ad esempio premendo il tasto 2, sul display appariranno in successione A - B - C - 2; premendo un
tasto differente, il cursore del display si posiziona sulla lettera successiva.
Sposta il cursore sulla lettera successiva
Sposta il cursore sulla lettera precedente
OK Conferma i dati inseriti
CANC Cancella i dati inseriti
Descrizione generica
Le funzioni principali del Centralino sono le seguenti:
• chiamare un posto interno
• ricevere chiamate dai posti esterni ed inoltrarle eventualmente ai posti interni
• ricevere chiamate ordinarie o di allarme dai posti interni
• comandare l’elettroserratura dei posti esterni
• attivare un relè
Il Centralino di portineria prevede inoltre:
• una gestione GIORNO/NOTTE che consente di abilitare le funzioni del Centralino solo in determinate fasce
orarie programmabili dall’utente;
• una CODA CHIAMATE, nella quale vengono memorizzate le chiamate provenienti dai posti interni alle quali
non è stato possibile rispondere;
• una RUBRICA la cui programmazione consente di identicare facilmente l’utente chiamante.
UTO 14:40
MER 12/03/10 ?P
6
7 8 9
disponibili
da IR.006
MT SB 015
Page 6
GROUP S.p.A.
Le seguenti funzioni sono quelle che caratterizzano
I T
il Centralino ed il suo modo di operare, sono tutte
accessibili in modo diretto senza ricorrere ai menu.
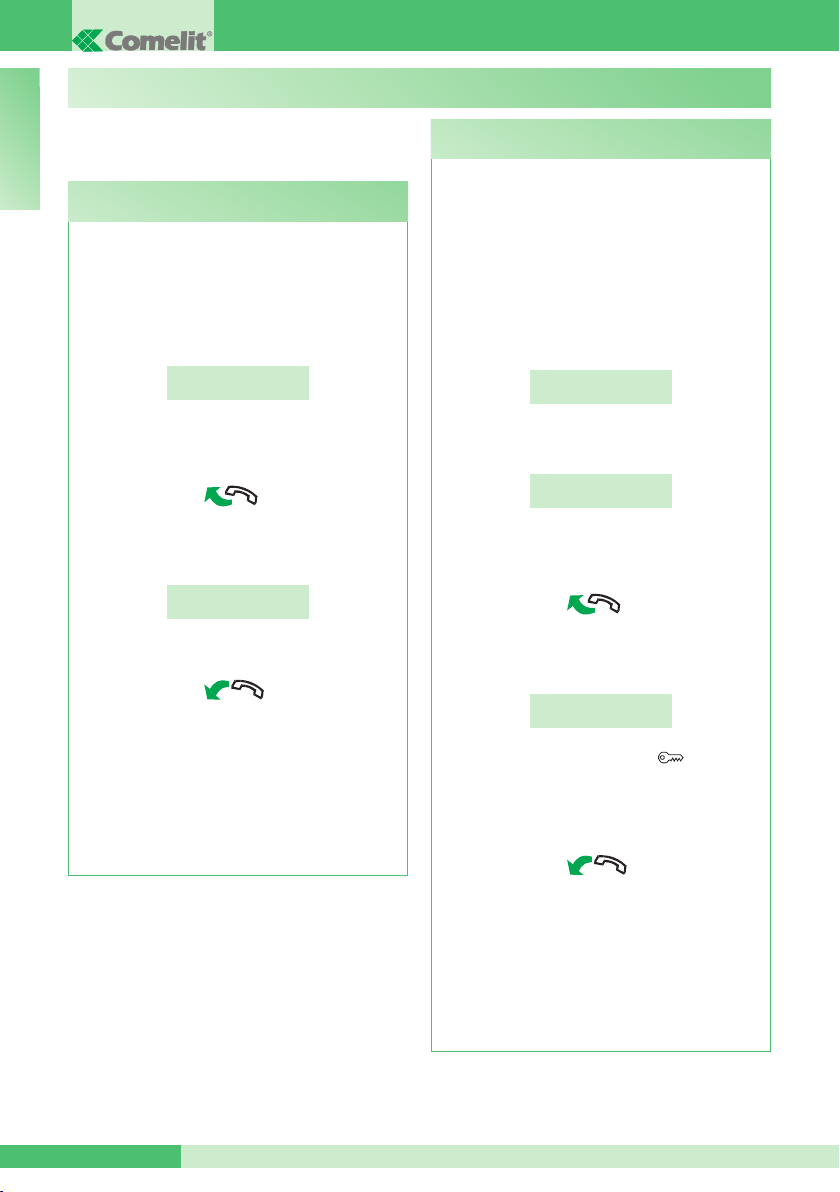
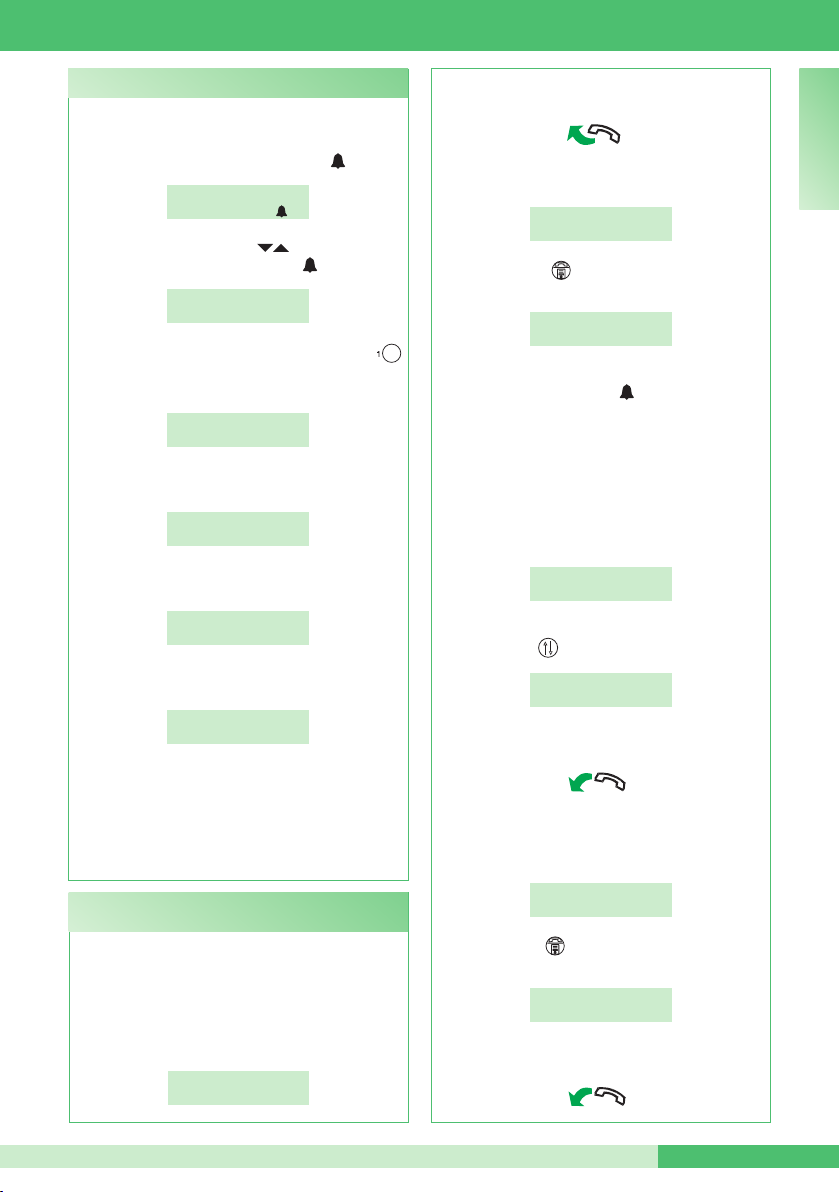
U1 Come rispondere a una chiamata da posto
interno
Quando il Centralino riceve una chiamata da un
posto interno:
- viene visualizzato il NOME del posto interno da cui
giunge la chiamata (se inserito nella rubrica, vedi “U8
COME INSERIRE UN NOME IN RUBRICA” pag. 9)
oppure l’indirizzo del chiamante (es. 002).
CHIAMATA DA
UTENTE 002
• per rispondere alla chiamata proveniente dal posto
interno sollevare la cornetta entro 30 secondi;
UTILIZZO
U2 Come rispondere a una chiamata da posto
U2 Come rispondere a una chiamata da posto
esterno
esterno
Il Centralino deve essere in modalità GIORNO, in
modalità NOTTE potrà rispondere alle sole chiamate
dirette al centralino.
Il Centralino può ricevere una chiamata da un posto
esterno:
- indirizzata direttamente a un posto interno e in
questo caso viene visualizzato il NOME del chiamato
(se esiste in rubrica un nominativo associato al codice
chiamato, vedi “U8 COME INSERIRE UN NOME IN
RUBRICA” pag. 9) o l’indirizzo del chiamato stesso
(es. 002).
- oppure indirizzata direttamante al Centralino
(indirizzo=240)
CHIAMATA PER
UTENTE 002
CHIAMATA PER
CENTRALINO
- il Centralino va in comunicazione con l’interno, la
durata massima della conversazione è di 2,5 minuti;
IN COMUNICAZIONE
CON UTENTE 002
- per terminare la conversazione riagganciare la
cornetta.
• per rifiutare la chiamata premere CANC.
ATTENZIONE!
Se il Centralino è occupato o il Centralinista è
momentaneamente assente e non può rispondere
entro 30 secondi, la chiamata verrà inserita nella
coda chiamate, vedi “U6 COME CHIAMARE UN
POSTO INTERNO PRESENTE NELLA CODA
CHIAMATE” pag. 8.
• per rispondere alla chiamata proveniente dal posto
interno sollevare la cornetta entro 30 secondi;
- il Centralino va in comunicazione con l’esterno, la
durata massima della conversazione è di 2,5 minuti;
IN COMUNICAZIONE
CON ESTERNO
- premere eventualmente il tasto per attivare
l’elettroserratura del posto esterno; se l’apriporta
viene eseguito si udiranno dei toni di conferma;
- per terminare la conversazione riagganciare la
cornetta.
• per rifiutare la chiamata premere CANC.
ATTENZIONE!
In modalità NOTTE (vedi “U13 MODALITÁ DI
FUNZIONAMENTO GIORNO/NOTTE” pag. 10) le
chiamate da posto esterno indirizzate a un posto
interno vengono visualizzate sul display, ma non
possono esser intercettate dal Centralino.
MT SB 01 6
Page 7
MT SB 01
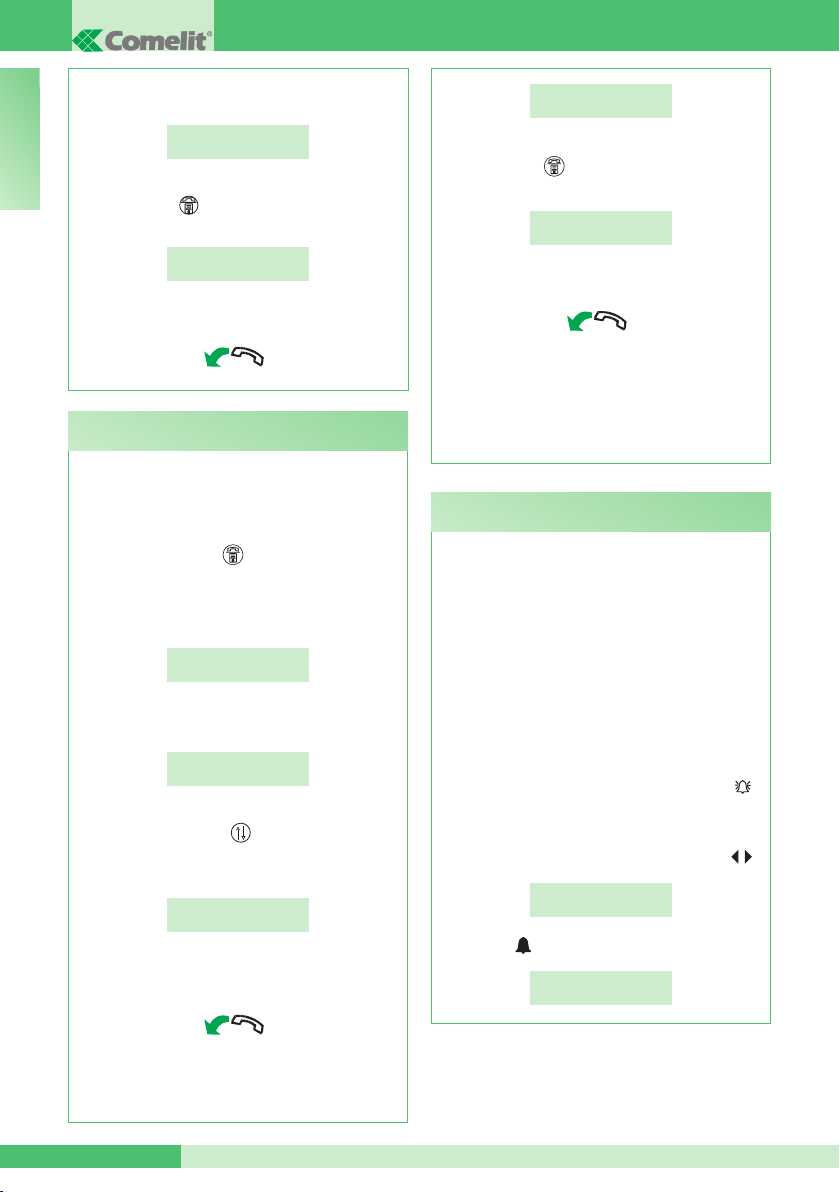
U3 Come chiamare un posto interno
Per chiamare un posto interno il Centralino può
utilizzare 3 modalità differenti:
• digitare il numero di interno* e premere .
UTENTE 002
PER CHIAMARE
• scorrere la rubrica con i tasti no a visualizzare
il nominativo desiderato e premere .
JENNIFER
CODICE: 002
• premere il numero breve corrispondente (es.
numero breve 1= codice memorizzato “002”, vedi
“I4- REGISTRAZIONE NUMERI BREVI” pag. 16).
CHIAMATA PER
JENNIFER
- se la chiamata è avvenuta correttamente:
CHIAMATO
UTENTE 002
- se la chiamata non è avvenuta correttamente:
UTENTE 002
NON DISPONIBILE
- se l’interno è occupato:
INTERNO
OCCUPATO
Quando l’interno chiamato entra in fonica, va in
comunicazione con il Centralino, la durata massima
della comunicazione è di 2,5 minuti.
*Il numero da digitare dipende dalla congurazione
del centralino vedi “C.8.2 - MODALITÁ DI CHIAMATA”
pag. 19; contattare il proprio installatore di ducia.
U4 Come inoltrare una chiamata da posto esterno
a posto interno
Quando il Centralino riceve una chiamata da un
posto esterno indirizzata a un posto interno:
- viene visualizzato il NOME del chiamato (se
esiste in rubrica un nominativo associato al codice
chiamato, vedi “U8 COME INSERIRE UN NOME IN
RUBRICA” pag. 9).
CHIAMATA PER
UTENTE 002
- per rispondere alla chiamata proveniente dal
posto esterno sollevare la cornetta entro 30 secondi;
I T
- il Centralino va in comunicazione con l’esterno, la
durata massima della conversazione è di 2,5 minuti;
IN COMUNICAZIONE
CON ESTERNO
- premere il tasto per mettere in attesa il posto
esterno;
CHIAMATA PER
UTENTE 002
- è ora possibile per il Centralino, chiamare l’interno
desiderato premendo il tasto .
Per inoltrare la chiamata ad un altro posto interno è
necessario chiamarlo (vedi “U3 COME CHIAMARE
UN POSTO INTERNO” pag. 7).
Quando l’interno chiamato entra in fonica, va in
comunicazione con il Centralino; se il posto esterno
è video, il monitor dell’utente chiamato si accende e
appare l’immagine dell’esterno.
IN COMUNICAZIONE
CON UTENTE 002
Per inoltrare la conversazione verso il posto esterno,
premere il tasto ;
CHIAMATA ESTERNA
INOLTRATA
- per terminare la conversazione riagganciare la
cornetta.
Se la chiamata non è avvenuta correttamente
o l’impianto è occupato, il posto esterno rimane
in attesa;
CHIAMATA PER
UTENTE 002
- premere il tasto per rimettersi in comunicazione
col posto esterno;
IN COMUNICAZIONE
CON ESTERNO
- per terminare la conversazione riagganciare la
cornetta.
MT SB 017
Page 8
GROUP S.p.A.
Se l’interno non accetta l’inoltro della conversazione,
il posto esterno rimane in attesa;
I T
CHIAMATA PER
UTENTE 002
- chiudere la conversazione col posto interno e
premere il tasto per rimettersi in comunicazione
col posto esterno;
IN COMUNICAZIONE
CON ESTERNO
- per terminare la conversazione riagganciare la
cornetta.
U5 Come mettere in comunicazione 2 interni tra
loro (funzione intercomunicante)
Quando il Centralino è in comunicazione con un
posto interno (es. 002) che desidera parlare con un
altro posto interno (es. 003):
- mettere in attesa l’interno con cui si è in linea (es.
002), premendo il tasto ;
- chiamare il posto interno desiderato (es. 003, vedi
“U3 COME CHIAMARE UN POSTO INTERNO”
pag. 7);
CHIAMATO
UTENTE 003
Quando l’interno chiamato entra in fonica, va in
comunicazione con il Centralino;
IN COMUNICAZIONE
CON UTENTE 003
Per inoltrare la conversazione verso l’altro posto
interno premere il tasto ; il posto interno (003)
entra in comunicazione col posto interno (002); la
durata massima della comunicazione è di 2,5 minuti;
INTERCOMUNICANTE
IN CORSO
- riagganciare la cornetta.
Premere CANC per resettare una chiamata
intercomunicante attiva da più di un minuto.
INTERNO
IN ATTESA
- chiudere la comunicazione col posto interno (003) e
premere il tasto per rimettersi in comunicazione
col posto interno (002);
IN COMUNICAZIONE
CON UTENTE 002
- per terminare la conversazione riagganciare la
cornetta.
ATTENZIONE!
Se il posto esterno chiama il Centralino durante
una chiamata intercomunicante tra posti
interni attiva da più di un minuto, questa viene
automaticamente resettata per permettere al
Centralino di gestire la chiamata in arrivo.
U6 Come chiamare un posto interno presente
nella coda chiamate
Quando il Centralino riceve una chiamata da
posto interno che non viene gestita entro 30 sec.
(operatore momentaneamente assente o occupato in
altra conversazione), questa viene automaticamente
memorizzata nella coda chiamate.
Se un posto interno ha chiamato più volte, viene
memorizzata solo la prima chiamata.
Il Centralino può memorizzare un numero massimo
di 10 chiamate inevase. L’undicesima chiamata
sostituisce la prima.
Se il Centralino di portineria è in modalità GIORNO,
sul display verrà indicato il numero delle chiamate
perse.
Se il Centralino è in modalità NOTTE, apparirà .
Per chiamare i posti interni presenti nella coda
chiamate occorre:
- visualizzare l’interno da chiamare tramite i tasti ;
RICHIAMA
UTENTE 002
- e premere ;
CHIAMATO
UTENTE 002
Se l’interno non accetta l’inoltro della conversazione
o quando l’impianto è occupato o se la chiamata
non è avvenuta correttamente, il posto interno
(002) rimane in attesa;
MT SB 01 8
Page 9
MT SB 01
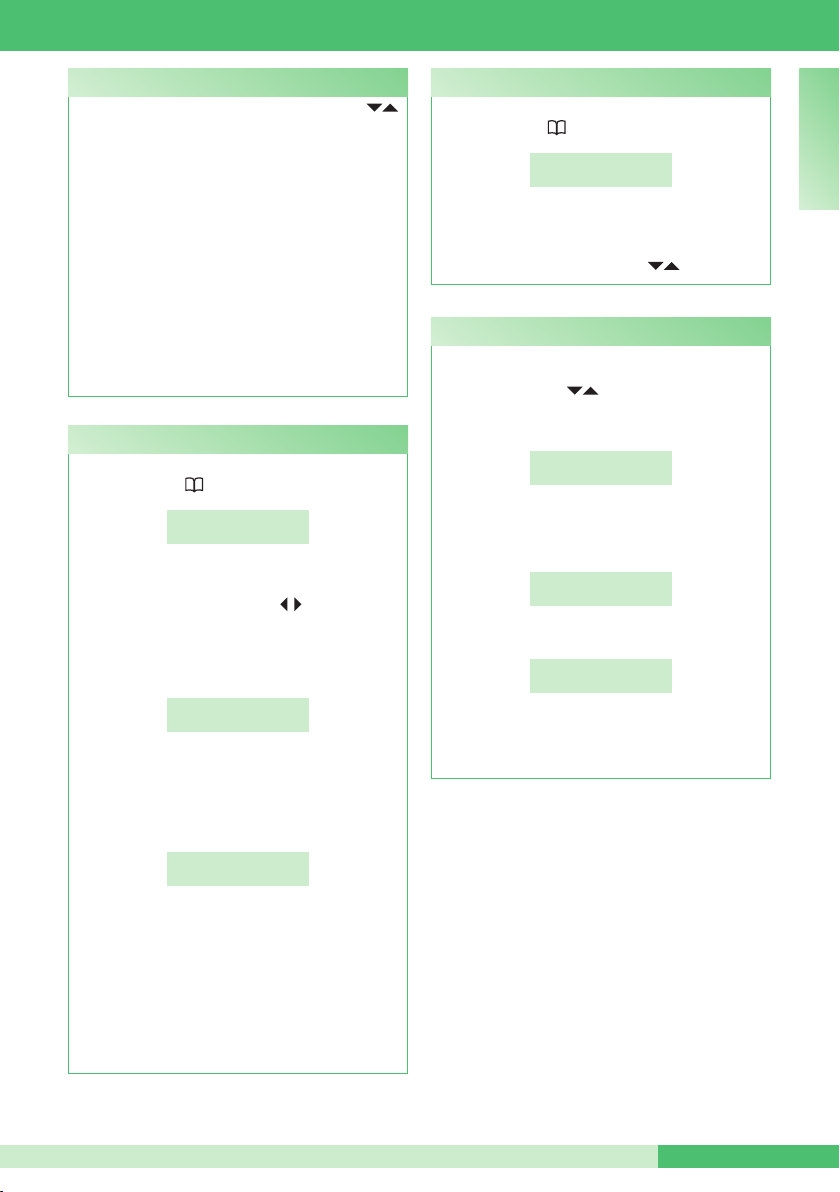
U7 Come utilizzare la rubrica
Si può scorrere la lista degli utenti con i tasti ;
per aumentare la velocità di scorrimento tener
premuto il tasto. Verranno visualizzati in serie il
NOME e il CODICE associati ad ogni utente.
Possono essere inseriti al massimo 1500 nomi
(in centralini con IR. pari o superiore a 006) che
abbiano al massimo 16 caratteri alfanumerici, ad
ogni nominativo deve essere associato un codice che
corrisponde a quello dell’interno desiderato.
É possibile inserire i seguenti caratteri speciali: Ä,
Å, Æ, Ö, Ü, Ø, ß tramite la pressione ripetuta del
tasto 1.
ATTENZIONE! Per inserire i nominativi si
può procedere scaricando un database da
PC servendosi dell’Art. 1249/A (vedi “I6-
SCARICAMENTO NOMI DA PC” pag. 17).
Qui di seguito il procedimento manuale.
U8 Come inserire un nome in rubrica
Se si vuole inserire un nome in rubrica:
- premere il tasto ;
INSERISCI NOME
_
- il cursore si posiziona sulla prima lettera.
Inserire il nome tramite la tastiera alfanumerica
spostandosi tra i cursori coi tasti , per cancellare
un carattere premere CANC;
- per confermare l’inserimento del nome premere il
tasto OK:
INSERISCI
CODICE SB
- digitare il codice tramite la tastiera alfanumerica
(vedi tabella corrispondenza nome-utente e indirizzo
a pag. 46A);
- per confermare l’inserimento del codice premere OK;
INSERISCI CODICE
INDIRETTO
U9 Come cercare un nome in rubrica
Se si vuole trovare un nome in rubrica:
- premere il tasto per due volte consecutive;
- inserire il nome anche con parte dell’estensione;
- per confermare la scelta premere il tasto OK.
Se sono presenti più utenti con l’iniziale inserita, è
possibile scorrere la lista coi tasti .
U10 Come cancellare un nome in rubrica
Se si vuole cancellare un nome in rubrica:
- visualizzare il nominativo da modicare scorrendo
la rubrica coi tasti oppure vedi “U9 COME
CERCARE UN NOME IN RUBRICA” pag. 9.
- premere il tasto CANC;
- premere il tasto OK, viene ora richiesto l’inserimento
della password (1998, questa password non può
essere modicata);
- per confermare l’eliminazione premere il tasto OK;
ATTENZIONE! Per la cancellazione dell’intera
rubrica vedi “I7-AZZERAMENTO TOTALE DEI
NOMI” pag. 17.
TROVA IL NOME:
_
VUOI CANCELLARE
IL NOME?
DIGITA PASSWORD
_ _ _ _
ELIMINAZIONE
IN CORSO
I T
- digitare il codice indiretto tramite la tastiera
alfanumerica solo se è attivata la modalità di
chiamata codice indiretto (vedi “C.8.2 -MODALITÁ
DI CHIAMATA” pag. 19).
- per confermare l’inserimento del codice premere OK;
- ora sarà possibile inserire un nuovo nominativo
oppure premere ESC per uscire.
MT SB 019
Page 10
GROUP S.p.A.
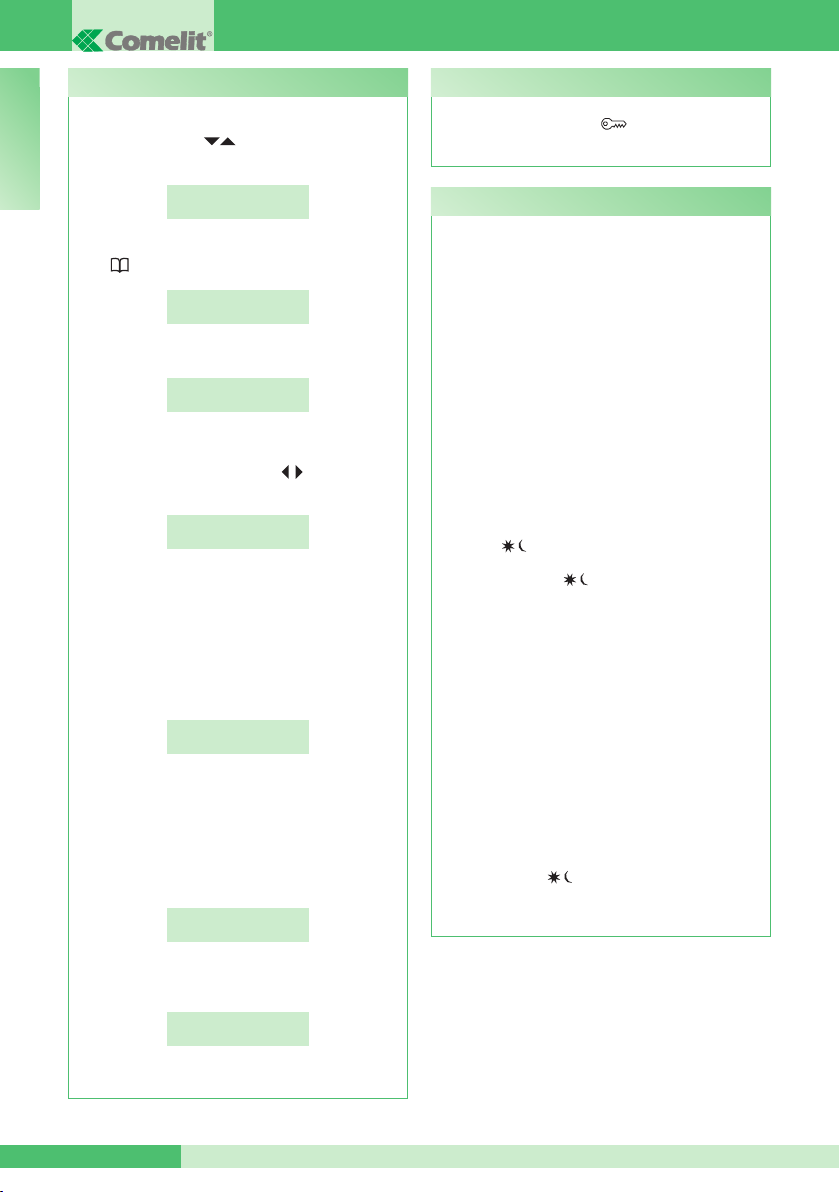
U11 Come modificare un nome in rubrica
Se si vuole modicare un nome in rubrica:
- visualizzare il nominativo da modicare scorrendo
I T
la rubrica coi tasti oppure vedi “U9 COME
CERCARE UN NOME IN RUBRICA” pag. 9.
JENNIFER
CODICE SB 001
- per confermare la scelta del nome premere il
tasto :
VUOI MODIFICARE
IL NOME?
- premere il tasto OK;
MODIFICA NOME:
JENNIFER
- il cursore si posiziona sulla prima lettera.
Modicare il nome tramite la tastiera alfanumerica
spostandosi tra i cursori coi tasti , per cancellare
un carattere premere CANC;
MODIFICA NOME:
NOEMI
- per confermare la modica del nome premere il
tasto OK;
premere ESC per uscire.
- verrà visualizzato il codice Simplebus dell’utente
in oggetto, per modicare il codice premere CANC
e inserire il nuovo numero tramite la tastiera
alfanumerica:
MODIFICA
CODICE SB 001
- per confermare la modica del codice Simplebus
premere OK;
premere ESC per uscire.
- se presente verrà visualizzato il codice Simplebus
indiretto dell’utente in oggetto, per modicare il
codice premere CANC e inserire il nuovo numero
tramite la tastiera alfanumerica:
MODIFICA CODICE
INDIRETTO 000001
U12 Come utilizzare l’apriporta
É possibile comandare l’elettroserratura del posto
esterno premendo il tasto ; se il comando viene
eseguito si udiranno dei toni di conferma.
U13 Modalità di funzionamento giorno/notte
Il Centralino di portineria ha la possibilità di funzionare
in due modalità operative:
- modalità GIORNO
- modalità NOTTE
In modalità GIORNO tutte le chiamate provenienti dal
posto esterno vengono ricevute dal Centralino, che
eventualmente le può inoltrare ai posti interni.
In modalità NOTTE il Centralino intercetta le chiamate
dal posto esterno, solo se indirizzate al Centralino
(codice 240). Le chiamate indirizzate ai posti interni
vengono visualizzate su display, ma non intercettate
dal Centralino.
La modalità di funzionamento può essere attivata in
2 modalità differenti:
• in modo manuale agendo sul tasto GIORNO/
NOTTE .
Premendo il tasto si cambia immediatamente
la modalità di funzionamento.
Sul display viene indicata la modalità operativa di
funzionamento:
- GIORNO con simbolo: (_ _)
- NOTTE viene indicata con la scritta NOTTE.
ATTENZIONE! La modalità NOTTE è disponibile
solo se esiste un posto esterno principale.
• in modo automatico (programmazione a cura
dell’installatore, vedi “I3-GIORNO/NOTTE
AUTOMATICO” pag. 15).
Comparirà la scritta AUTO solo durante
il funzionamento in GIORNO. Durante il
funzionamento in modo automatico è possibile
eseguire la commutazione GIORNO/NOTTE
manualmente ( ); in questo caso il modo
automatico viene escluso e si riattiva alla successiva
commutazione oraria programmata.
- per confermare la modica del codice indiretto
premere OK;
MEMORIZZAZIONE
IN CORSO...
- premere ESC per uscire.
MT SB 01 10
Page 11
U14 Come attivare la funzione “Seguimi”
(Follow me) (disponibile da IR.006)
Tramite questa funzione è possibile deviare le
chiamate destinate al Centralino verso apparecchi
telefonici locali o remoti.
Per attivare questa funzione tener premuto il tasto
GIORNO/NOTTE per almeno 3 sec., sul display
comparirà:
SEGUIMI
Per disabilitare ripetere l’operazione nchè sul
display comparirà la schermata iniziale:
A seguito di una chiamata, il Centralino suonerà
comunque e nchè l’apparecchio remoto non entra in
comunicazione, è possibile rispondere alla chiamata
dal Centralino annullando la funzione ”Seguimi”.
ATTENZIONE!
Per l’utilizzo di questa funzione deve essere
presente la centrale Art. 2906 con interfaccia Art.
2912. Rivolgersi al proprio installatore di fiducia.
Questa funzione è attivabile solo sul Centralino
impostato come secondario (vedi “C8.3 TIPO DI
CENTRALINO” pag. 20).
U15 Segnalazione allarmi (disponibile da IR.006)
Il Centralino può ricevere segnalazioni di allarme
provenienti dai posti interni in qualsiasi stato di
funzionamento (chiamata o conversazione).
Quando il Centralino riceve un allarme:
- emette un segnale acustico. Il segnale può essere
tacitato premendo un qualsiasi tasto del Centralino.
- viene visualizzata sul display la segnalazione di
allarme del primo utente che ha inviato l’allarme:
la segnalazione scompare quando il posto interno
risponde alla chiamata del Centralino (per effettuare
la chiamata premere il tasto ), o quando il
Centralinista procede alla cancellazione forzata
tramite il tasto CANC.
Qualora vi fossero più situazioni di allarme
contemporanee, viene creata una coda di allarmi
con le stesse modalità descritte nel paragrafo
“U6 COME CHIAMARE UN POSTO INTERNO
PRESENTE NELLA CODA CHIAMATE” pag. 8 e sul
display verrà visualizzato solo il numero degli allarmi
registrati (10 max).
Alla ricezione di una chiamata da posto esterno o
da posto interno, il Centralino esce dallo stato di
allarme per permettere la gestione della chiamata in
ingresso. Al termine della gestione della chiamata, lo
stato di allarme viene ripristinato.
ATTIVO
A D (_ _) 14:40
MER 12/03/10
ALLARME (04)
UTENTE 002
MT SB 01
U16 Come attivare un relè supplementare
(es. per attivare in modo indipendente e con un
comando dedicato: luci, contatti di allarme TVCC,
cancelli carrai, ingressi senza posto esterno o
altri dispositivi) (disponibile da IR.006)
Gli attuatori si possono attivare sia in modalità di
riposo, sia in modalità di conversazione verso il
posto esterno.
Per attivare l’attuatore:
- premere il tasto , verrà richiesto l’inserimento del
codice per attivare un attuatore specico, in caso di
codice mancante verrà attivato un attuatore generico;
ATTUATORE
CODICE:
- per confermare l’attivazione dell’attuatore premere
il tasto .
ATTENZIONE!
Per l’utilizzo di questa funzione deve essere presente
un posto esterno principale e degli attuatori Art.
1256. Rivolgersi al proprio installatore di fiducia.
U17 Come chiamare un Centralino secondario da
Centralino principale (disponibile da IR.006)
Per chiamare un Centralino secondario, il Centralino
principale può utilizzare una delle 3 seguenti modalità:
• digitare il numero del Centralino (es. 005 240) e
premere :
UTENTE: 005 240
PER CHIAMARE
• scorrere la rubrica con i tasti no a visualizzare
il nominativo e premere :
CENTRALINO 005
CODICE: 005 240
• premere il numero breve corrispondente (vedi “I4REGISTRAZIONE NUMERI BREVI” pag. 16).
- Se la chiamata è avvenuta correttamente:
CHIAMATO
UTENTE 005 240
- se la chiamata non è avvenuta correttamente:
UTENTE 005 240
NON DISPONIBILE
I T
MT SB 0111
Page 12
GROUP S.p.A.
- se l’impianto è occupato:
INTERNO
I T
OCCUPATO
Quando il Centralino chiamato solleva la cornetta,
va in comunicazione con il Centralino principale, la
durata massima della conversazione è di 2,5 minuti;
IN COMUNICAZIONE
CON UTENTE 005 240
- per terminare la conversazione riagganciare la cornetta.
ATTENZIONE!
Il Centralino secondario e il Centralino principale
in comunicazione tra di loro, non possono
inoltrare le chiamate o metterle in attesa.
U18 Come chiamare un Centralino principale da
Centralino secondario (disponibile da IR.006)
Per chiamare un Centralino principale da Centralino
secondario premere .
- Se la chiamata è avvenuta correttamente seguiranno
3 toni di conferma;
Quando il Centralino principale chiamato solleva
la cornetta, va in comunicazione con il Centralino
secondario, la durata massima della conversazione
è di 2,5 minuti;
CHIAMATA PER
CENTRALINO
- per terminare la conversazione riagganciare la cornetta.
- Se la chiamata non è avvenuta correttamente, se
l’impianto è occupato o se il Centralino principale
è inesistente; il display visualizza:
FUNZIONE
NON DISPONIBILE
e
TEST
LINEA PORTER OK
TEST
LINEA PORTER KO
ATTENZIONE!
Il Centralino secondario e il Centralino principale
in comunicazione tra di loro, non possono
inoltrare le chiamate o metterle in attesa.
U19 Come rispondere a una chiamata da
Centralino secondario a Centralino principale
(disponibile da IR.006)
Quando il Centralino principale riceve una chiamata
dal Centralino secondario:
- viene visualizzato il NOME del Centralino
secondario da cui giunge la chiamata (se inserito
nella rubrica, vedi “U8 COME INSERIRE UN
NOME IN RUBRICA” pag. 9) oppure l’indirizzo del
Centralino chiamante (es. 005 240).
CHIAMATA DA
UTENTE 005 240
005= indica la “zona”
240= indica l’ID generico del Centralino
• per rifiutare la chiamata premere CANC;
• per rispondere alla chiamata proveniente dal
Centralino secondario sollevare la cornetta;
- il Centralino principale va in comunicazione con
il Centralino secondario, la durata massima della
conversazione è di 2,5 minuti;
IN COMUNICAZIONE
CON UTENTE 005 240
- per terminare la conversazione riagganciare la
cornetta.
ATTENZIONE!
Se il Centralino è occupato o il Centralinista
è momentaneamente assente e non può
rispondere entro 30 secondi, essa verrà inserita
nella coda chiamate (vedi “U6 COME CHIAMARE
UN POSTO INTERNO PRESENTE NELLA CODA
CHIAMATE” pag. 8).
MT SB 01 12
Page 13
U20 Come rispondere a una chiamata da
Centralino principale a Centralino secondario
(disponibile da IR.006)
Quando il Centralino secondario riceve una chiamata
dal Centralino principale:
CHIAMATA PER
CENTRALINO
- per rispondere alla chiamata proveniente del
Centralino principale sollevare la cornetta;
- per terminare la conversazione riagganciare la
cornetta.
U21 Come attivare (MASTER) o disattivare
(SLAVE) i centralini principali
(disponibile da IR.006)
Nel caso di 2 Centralini principali in congurazione
serie (vedi pag. 86), agire in uno dei seguenti modi:
• premere il tasto A/V del Centralino attivo (MASTER),
comparirà la schermata:
*
1- MASTER
2 - SLAVE
MT SB 01
I T
- premere il tasto 2 per renderlo inattivo (SLAVE).
Il Centralino si spegne mentre l’altro Centralino si
accende in automatico diventando MASTER.
o
• premere ON/OFF del Centralino inattivo (SLAVE)
per accenderlo.
- premere il tasto A/V e comparirà la schermata:
*
1- MASTER
2 - SLAVE
- premere il tasto 1 per confermare che il Centralino
deve essere attivo (MASTER).
- premere ESC no a tornare alla schermata
principale.
L’altro Centralino si disattiva in automatico
diventando SLAVE.
MT SB 0113
Page 14

GROUP S.p.A.
IMPOSTAZIONI
Albero schemate menu 1-7
I T
1- MODIFICA ORA INSERISCI ORARIO
00:00
2- MODIFICA DATA INSERISCI DATA
00/00/00
3- GIORNO NOTTE
AUTOMATICO
4- REGISTRAZIONE
NUMERI BREVI
5 - MODIFICA
LINGUA
1- ON/OFF
2- IMPOSTA ORARI
3- PROGRAMMA
SETTIMANA
NUMERO BREVE XX
CODICE: XXX
*1 - ITALIANO
2 - INGLESE
3 - FRANCESE
4 - TEDESCO
5 - PORTOGHESE
6 - DANESE
7 - FINLANDESE
8 - OLANDESE
9 - SPAGNOLO
SERVIZIO
ATTIVO
SERVIZIO
DISATTIVO
ORARIO 01:
00:00
ORARIO 02:
00:00
ORARIO 03:
00:00
ORARIO 04:
00:00
LUNEDÍ
MODALITÁ : GIORNO
6- SCARICAMENTO
NOMI DA PC
7- AZZERAMENTO
TOTALE DEI NOMI
MT SB 01 14
SERVIZIO
ATTIVO
VUOI CANCELLARE
LA RUBRICA?
DIGITA PASSWORD:
_ _ _ _
Page 15
MT SB 01
Impostazioni
Questo capitolo è indirizzato al personale
qualicato che, dopo l’installazione, procederà
alla programmazione del Centralino di portineria,
tramite menu guidati e visualizzati sul display
raggiungibili dal menu principale. L’utente può usare
queste funzioni per variare alcune impostazioni
del Centralino (es.: lingua, data/ora, cancellazione
totale della rubrica, ecc.).
I1 - Modifica ora
- premere il tasto MENU e il tasto 1-MODIFICA ORA:
1-MODIFICA ORA
2-MODIFICA DATA
- il cursore si posiziona sulla prima cifra, inserire
l’orario tramite la tastiera alfanumerica spostandosi
tra i cursori con i tasti ;
- per confermare premere OK;
- premere il tasto ESC per tornare alla schermata
principale.
I2 - Modifica data
- premere il tasto MENU e il tasto 2-MODIFICA DATA;
- il cursore si posiziona sulla prima cifra, inserire la data
tramite la tastiera alfanumerica spostandosi tra i cursori
con i tasti ;
- per confermare premere OK;
- premere il tasto , nchè non viene visualizzato il
giorno desiderato;
- per confermare premere OK;
- premere il tasto ESC per tornare alla schermata
principale.
INSERISCI ORARIO
00:00
1-MODIFICA ORA
2-MODIFICA DATA
INSERISCI DATA
00/00/00
INSERISCI GIORNO
LUN
I3 - Giorno notte automatico
Si può decidere di organizzare la settimana
scegliendo per ogni giorno una delle seguenti tre
modalità di funzionamento:
• AUTO: il sistema passa dalla modalità GIORNO alla
modalità NOTTE negli orari programmati.
Non è possibile decidere diverse fasce orarie nei diversi
giorni in cui il sistema funziona in modalità AUTO.
• NOTTE: il sistema è in questa modalità per tutta
la giornata.
• GIORNO: il sistema è in questa modalità per tutta
la giornata.
E’ possibile impostare il sistema per consentire il
passaggio automatico dalla modalità GIORNO alla
modalità NOTTE in determinati orari programmabili
dall’utente. Gli ORARI impostabili sono al MAX 4.
E’ molto importante impostare in modo corretto gli
orari di commutazione da una modalità all’altra.
ORARIO 1: determina la prima commutazione: dalla
modalità NOTTE alla modalità GIORNO
ORARIO 2: determina la seconda commutazione:
dalla modalità GIORNO alla modalità NOTTE
ORARIO 3: determina la terza commutazione: dalla
modalità NOTTE alla modalità GIORNO
ORARIO 4: determina la quarta commutazione: dalla
modalità GIORNO alla modalità NOTTE.
In ogni caso devono sempre essere impostati tutti
e 4 gli ORARI.
Esempio:
Si vuole impostare il Centralino con questi parametri:
07:00 – 12:00 Funzionamento Giorno
13:00 – 22:00 Funzionamento Giorno
ORARIO 1: 07:00 » NOTTE / GIORNO
ORARIO 2: 12:00 » GIORNO /NOTTE
ORARIO 3: 13:00 » NOTTE / GIORNO
ORARIO 4: 22:00 » GIORNO /NOTTE
I3.1 - Attivazione/disattivazione
- premere il tasto MENU e visualizzare tramite i tasti
il menu 3-GIORNO NOTTE AUTOMATICO,
premere il tasto 3;
3-GIORNO NOTTE
AUTOMATICO
- premere il tasto 1-ON/OFF, per attivare o disattivare
la funzione;
1-ON/OFF
2-IMPOSTA ORARI
SERVIZIO
ATTIVO
SERVIZIO
DISATTIVO
- premere il tasto ESC per tornare alla schermata
principale.
I T
MT SB 0115
Page 16
GROUP S.p.A.
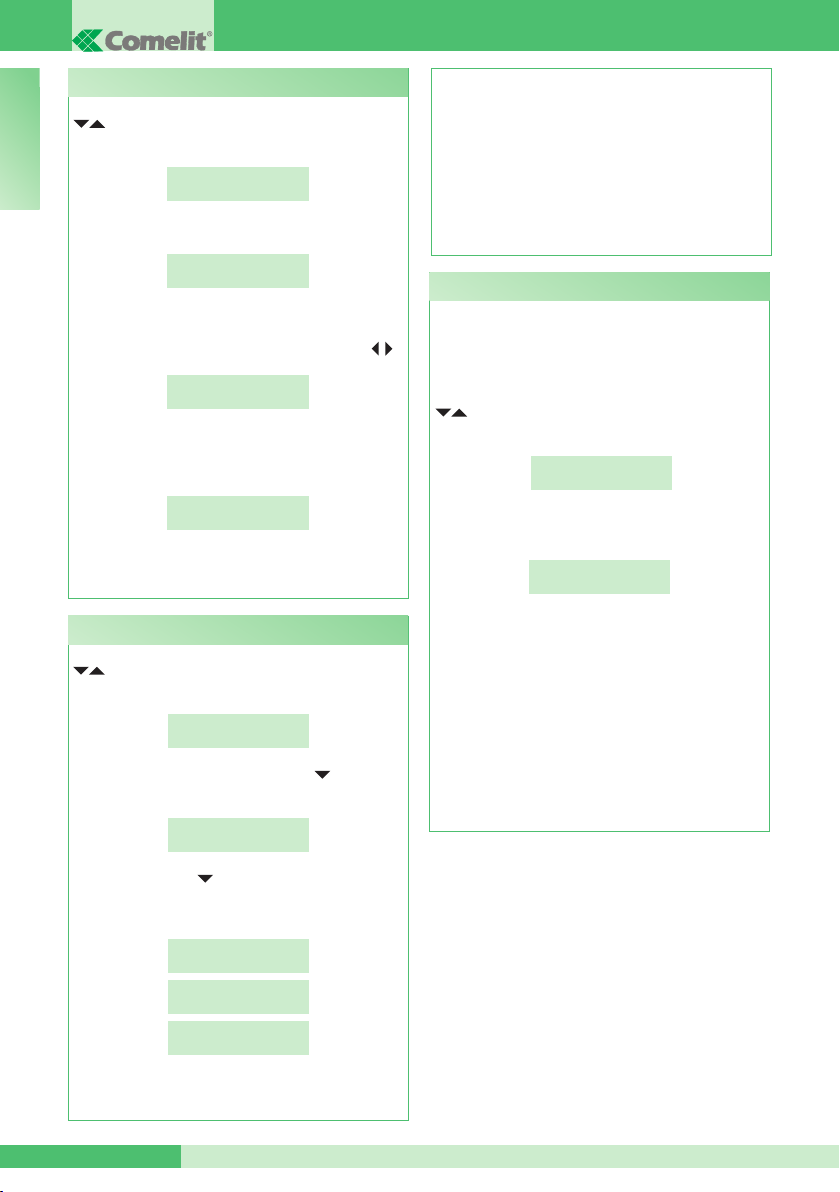
I3.2 - Impostazione orari in modalità auto
- premere il tasto MENU e visualizzare tramite i tasti
il menu 3-GIORNO NOTTE AUTOMATICO,
I T
premere il tasto 3;
3-GIORNO NOTTE
AUTOMATICO
- premere il tasto 2-IMPOSTA ORARI;
1-ON/OFF
2-IMPOSTA ORARI
- 00:00 è l’orario di default, il cursore si posiziona sulla
prima cifra, inserire l’orario tramite la tastiera
alfanumerica spostandosi tra i cursori con i tasti ;
ORARIO 1:
00:00
- per confermare e passare all’orario successivo
premere il tasto OK e ripetere le stesse operazioni
per tutti e 4 gli orari;
ORARIO 2:
00:00
- premere ripetutamente il tasto ESC per tornare alla
schermata principale.
- per confermare premere OK;
- premere ripetutamente il tasto ESC per tornare alla
schermata principale.
ATTENZIONE! I giorni programmati per il
funzionamento in modalità AUTO avranno tutti
le stesse fasce orarie impostate nella sezione
“I3.2 IMPOSTAZIONE ORARI IN MODALITÁ
AUTO” pag. 16.
I4 - Registrazione numeri brevi
Il numero breve permette di chiamare un interno
premendo direttamente il tasto a cui è associato
l’indirizzo dell’ utente.
Per memorizzare il numero breve:
- premere il tasto MENU e visualizzare tramite i tasti
il menu 4-REGISTRAZIONE NUMERI BREVI,
premere il tasto 4:
4-REGISTRAZIONE
NUMERI BREVI
- digitare il codice tramite la tastiera alfanumerica
(codice 000 di default):
NUMERO BREVE 01
CODICE: 000
I3.3 - Programmazione della settimana
- premere il tasto MENU e visualizzare tramite i tasti
il menu 3-GIORNO NOTTE AUTOMATICO,
premere il tasto 3;
3-GIORNO NOTTE
AUTOMATICO
- visualizzare tramite il tasto il menu
3-PROGRAMMA SETTIMANA, premere il tasto 3;
3-PROGRAMMA
SETTIMANA
- premere il tasto per selezionare una delle 3
modalità di funzionamento (MODALITÁ: AUTOGIORNO- NOTTE)
LUNEDÍ
MODALITÁ: AUTO
LUNEDÍ
MODALITÁ: GIORNO
LUNEDÍ
MODALITÁ: NOTTE
- per confermare e passare al giorno successivo
premere il tasto OK e ripetere le stesse operazioni
per tutti i giorni della settimana;
MT SB 01 16
N.B. la dicitura CODICE sarà:
- CODICE (di 3 cifre max): 000 per sistema Simplebus
- CODICE (di 3+3 cifre max): --- --- per sistema
Simplebus TOP
- CODICE (di 6 cifre max): ------ per sistema Simplebus
e Simplebus TOP con CODICE INDIRETTO
- per passare al numero breve successivo premere il
tasto OK e seguire le stesse operazioni;
- premere il tasto ESC per tornare alla schermata
principale.
Page 17
MT SB 01
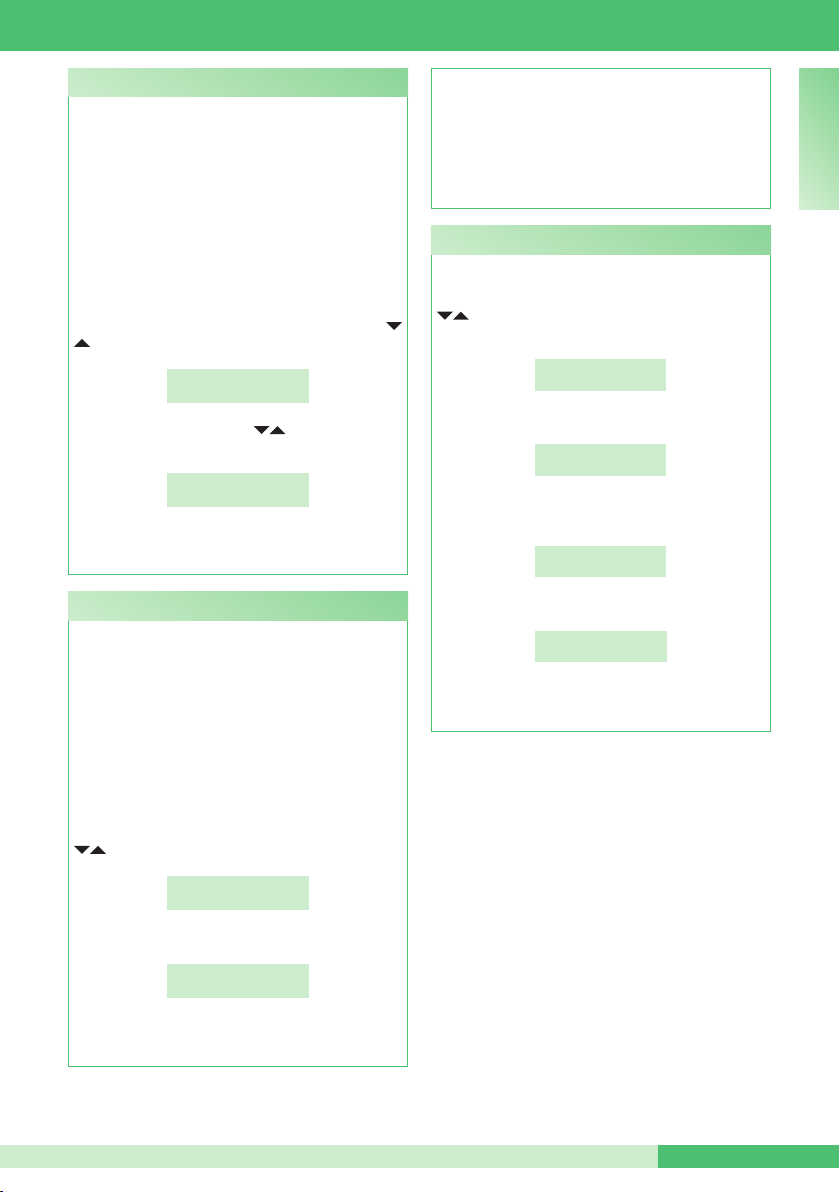
I5 - Modifica lingua
É possibile impostare la lingua selezionandola tra
le seguenti:
*1- Italiano (default)
2- Inglese
3- Francese
4- Tedesco
5- Portoghese
6- Danese
7- Finlandese
8- Olandese
9- Spagnolo
- premere il tasto MENU e visualizzare tramite i tasti
il menu 5-MODIFICA LINGUA, premere il tasto 5;
5-MODIFICA
LINGUA
- visualizzare tramite i tasti la lingua scelta e
premere il tasto corrispondente (es. 2 per l’inglese);
1-ITALIANO
*2-INGLESE
- premere ripetutamente il tasto ESC per tornare alla
schermata principale.
I6 - Scaricamento nomi da pc
É possibile inserire i nominativi nella rubrica
personale scaricandoli dal PC tramite l’Art. 1249/A.
Per eseguire questa operazione è necessario attivare
la funzione tramite menu, collegare il Centralino al
PC mediante l’apposito cavetto seriale e avviare il
software di scaricamento.
ATTENZIONE! ATTIVARE LA FUNZIONE SOLO
QUANDO SI DESIDERA SCARICARE I NOMI
DA PC. LA FUNZIONE RIMANE ATTIVA PER 1
MINUTO.
- premere il tasto MENU e visualizzare tramite i tasti
il menu 6-SCARICAMENTO NOMI DA PC;
6-SCARICAMENTO
NOMI DA PC
- premere ESC per tornare alla schermata principale
su cui verrà visualizzata la scritta “!PC” (per 1 minuto);
si può ora procedere allo scaricamento dei nomi
utilizzando l’Art. 1249/A, durante lo scaricamento il
Centralino non può effettuare o ricevere chiamate; il
servizio si disattiva automaticamente al termine dello
scaricamento.
I7 - Azzeramento totale dei nomi
Per cancellare la rubrica:
- premere il tasto MENU e visualizzare tramite i tasti
il menu 7-AZZERAMENTO TOTALE DEI
NOMI, premere il tasto 7;
7-AZZERAMENTO
TOTALE DEI NOMI
- ti verrà chiesto se vuoi cancellare la rubrica;
VUOI CANCELLARE
LA RUBRICA?
- per confermare premere il tasto OK e inserire la
password di conferma (1998);
DIGITA PASSWORD:
****
- per confermare premere il tasto OK;
ELIMINAZIONE
IN CORSO...
- a ne eliminazione verrà visualizzata la schermata
principale.
I T
- premere il tasto 6 per attivare la funzione:
SERVIZIO
ATTIVO
A partire dalla IR. 006 lo scaricamento nomi è
attivabile SOLO con RUBRICA VUOTA.
MT SB 0117
Page 18
GROUP S.p.A.
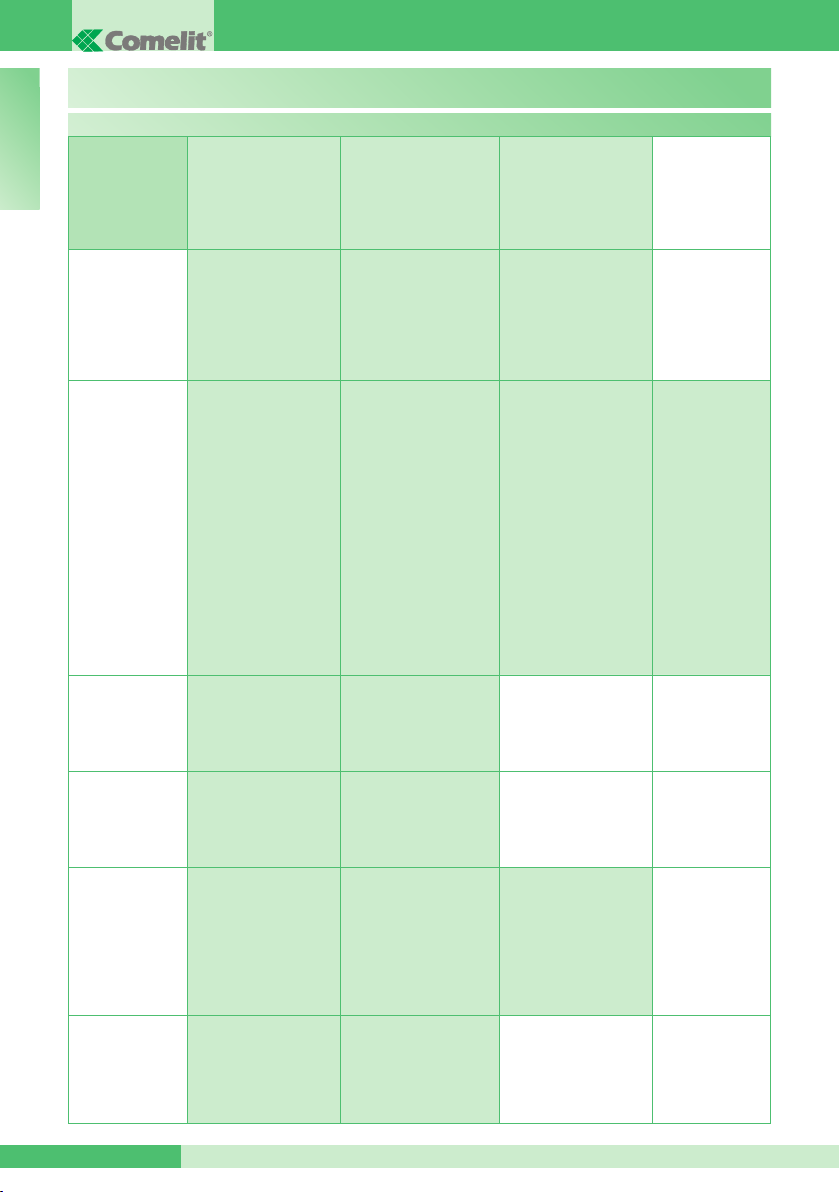
Albero schemate menu 8
I T
8 - OPZIONI
AVANZATE
CONFIGURAZIONI
1 - IMPOSTAZIONI
MODALITÁ VIDEO
SERVIZIO
ATTIVO
SERVIZIO
DISATTIVO (default)
1 - MOD. NORMALE
*
2 - MOD. DIRETTA
2- MODALITÁ DI
CHIAMATA
3- TIPO DI
CENTRALINO
4- AUTO ACC.
INTERNA ON/OFF
5- CHIAMATA
TRIPLA ON/OFF
6- FUNZIONE
CONTATTO CH-CH
*1 - COD. SIMPLEBUS
2 - COD. INDIRETTO
3 - COD. INDIRETTO
SENZA NOME
*1 - SECONDARIO
2 - PRINCIPALE
(modallità
SIMPLEBUS TOP)
SERVIZIO
ATTIVO
SERVIZIO
DISATTIVO (default)
SERVIZIO
ATTIVO
SERVIZIO
DISATTIVO (default)
*1 - RIP. CHIAMATA
2 - MONITOR EST.
*1 - FILTRO OFF
2 - FILTRO ON
*1 - CPS SINGOLO
2 - CPS PARALLELO
3 - CPS SERIE
*1 - CPS SINGOLO
2 - CPS PARALLELO
3 - CPS SERIE
*DURATA CONTATTO:
1 SEC
DURATA CONTATTO:
3 SEC
DURATA CONTATTO:
5 SEC
(funzione non
disponibile)
1 - MASTER
*2 - SLAVE
1 - LS-IN
*2 - LP-IN
1 - MASTER
*2 - SLAVE
7- FUNZIONAMENTO
CENTR. PRINC+SEC
MT SB 01 18
SERVIZIO
ATTIVO
SERVIZIO
DISATTIVO (default)
Page 19
C8.1 - Impostazione modalità video
(disponibile da IR.006)
É disattivata di default.
Attivando questa funzione sarà possibile effettuare
una chiamata video verso un posto interno. Il monitor
chiamato dal Centralino si accenderà consentendo
ad es. la visione delle telecamere scorporate
abbinate all’Art. 1259/A o all’Art. 1259C (vedi FT/
SB/13 o FT/SBC/05).
La modalità VIDEO può essere NORMALE o
DIRETTA.
In modalità NORMALE l’accensione del video
del posto interno avviene alzando la cornetta o
attivando la fonica alla ricezione della chiamata del
Centralino; mentre in modalità DIRETTA avviene
automaticamente alla ricezione della chiamata.
ATTENZIONE! Per il corretto funzionamento della
modalità DIRETTA è necessario che l’impianto
sia dotato di staffe, citofoni, scambi e miscelatori
in versione TOP (vedi “TABELLA ARTICOLI
SIMPLEBUS TOP” pag. 22).
Per attivare la funzione:
- premere il tasto MENU e visualizzare tramite i tasti
il menu 8-OPZIONI AVANZATE, premere il
tasto 8;
- premere il tasto 1 per attivare o disattivare la
funzione;
- se il servizio è stato attivato, verrà chiesto di
scegliere tra le 2 diverse modalità.
Premere il tasto 1 per la MODALITÁ NORMALE o il
tasto 2 per la MODALITÁ DIRETTA;
8-OPZIONI
AVANZATE
1-IMPOSTAZIONI
MODALITÁ VIDEO
SERVIZIO
ATTIVO
SERVIZIO
DISATTIVO
*
1-MOD. NORMALE
2-MOD. DIRETTA
MT SB 01
C8.2 - Modalità di chiamata (disponibile da IR.006)
Tramite questa funzione si sceglie la modalità di
chiamata manuale del Centralino, tra 3 diverse
modalità:
1- CODICE SIMPLEBUS (di default), la chiamata
avviene digitando il codice abbinato ad ogni utente.
• Se il tipo di impianto è SIMPLEBUS l’utente
citofonico è identicato da un campo Nome Utente
(opzionale) e da un campo Codice di 3 cifre
massimo (compreso tra 1 e 240).
ESEMPIO: Nome utente = Rossi; Codice = 015.
• Nel caso di impianto SIMPLEBUS TOP l’utente
citofonico è identicato dai campi Nome Utente
(opzionale) e da un campo Codice composto da
due parti: campo zona di 3 cifre massimo (compreso
tra 1 e 500) e campo utente tassativamente di 3
cifre (compreso tra 1 e 249).
ESEMPIO: Nome utente = Rossi; Codice = 25 015.
2- CODICE INDIRETTO, la chiamata avviene
digitando il codice indiretto di 6 cifre massimo.
Questo codice deve essere presente in rubrica e
associato all’utente provvisto di nome (obbligatorio)
e di codice Simplebus (o Simplebus TOP).
3- CODICE INDIRETTO SENZA NOME, vedi
modalità precedente, la differenza è che qui il campo
nome non è obbligatorio. In questa modalità verrà
richiesto FILTRO OFF o FILTRO ON, se attivato
consente la visualizzazione a display solo degli
utenti con campo nome inserito; mentre col ltro
disattivato verranno visualizzati tutti gli utenti.
Per attivare la funzione:
- premere il tasto MENU e visualizzare tramite i tasti
il menu 8-OPZIONI AVANZATE, premere il
tasto 8;
- visualizzare tramite il tasto il menu 2-MODALITÁ
DI CHIAMATA, premere il tasto 2;
- visualizzare la modalità scelta tramite i tasti ,
premere il tasto 1 per il COD. SIMPLEBUS, premere
il tasto 2 per il COD. INDIRETTO o il tasto 3 per il
COD. INDIRETTO SENZA NOME;
8-OPZIONI
AVANZATE
2-MODALITÁ DI
CHIAMATA
*
1-COD. SIMPLEBUS
2-COD. INDIRETTO
3-COD. INDIRETTO
SENZA NOME
I T
- se verrà scelto il 3- CODICE DIRETTO SENZA
NOME, verrà richiesta l’attivazione del ltro; premere il
tasto 1 per la disabilitazione o 2 per la sua attivazione;
*1-FILTRO OFF
2-FILTRO ON
MT SB 0119
Page 20
GROUP S.p.A.
C8.3 - Tipo di centralino (modalità Simplebus Top)
(disponibile da IR.006)
Il Centralino può essere SECONDARIO o PRINCIPALE.
I T
• Impostare SECONDARIO quando il Centralino
è utilizzato come SECONDARIO, in uscita dai
morsetti LM-LM degli scambi Art. 1424 (impianto
Simplebus TOP) (vedi schema SBTOP/001PX pag.
80); oppure quando il Centralino è utilizzato come
PRINCIPALE, in impianti Simplebus con scambi Art.
1224A o in un impianto con singolo montante e in
assenza di scambi.
ATTENZIONE! il Centralino SECONDARIO
non può essere congurato come Centralino in
PARALLELO.
• Impostare PRINCIPALE quando il Centralino
è utilizzato come PRINCIPALE in impianto
SIMPLEBUS TOP, quindi posizionato nella tratta
prima degli scambi Art. 1424 che deniscono le
zone/montanti (vedi schema SBTOP/002PX pag.
82).
Il Centralino SECONDARIO o PRINCIPALE deve
essere poi congurato come:
1- SINGOLO
2- PARALLELO
3- SERIE.
1- Selezionare SINGOLO quando il Centralino è
l’unico presente sull’impianto oppure l’unico che
serve un determinato montante.
2- In presenza di 2 Centralini principali o secondari che
servono il medesimo montante, la congurazione
PARALLELO, implica che entrambi i Centralini
saranno operativi con le stesse funzionalità (vedi
schema SBTOP/005PX pag. 88).
Il primo dei due che risponde a una chiamata
precluderà all’altro la possibilità di effettuare la
stessa operazione.
L’accensione o lo spegnimento di uno dei 2
provocherà automaticamente l’accensione o lo
spegnimento dell’altro.
Configurare entrambi i Centralini come
PARALLELO e impostare come LS-IN il Centralino
collegato sotto la linea LS-LS dello scambio Art.
1424; impostare come LP-IN quello posto sotto la
linea LPin-LPin dello scambio Art. 1424.
Per il Centralino PARALLELO non è possibile la
commutazione in NOTTE e la funzione GIORNO/
NOTTE AUTOMATICO (vedi “I3- GIORNO NOTTE
AUTOMATICO” pag. 15).
Nella schermata di riposo dei due Centralini dovrà
comparire P, che indica il Centralino congurato in
parallelo e l’icona ssa .
3- In presenza di 2 Centralini principali o secondari che
servono il medesimo montante, la congurazione
SERIE, implica che solo 1 dei 2 può essere
operativo (Centralino MASTER), mentre l’altro
è disattivo (Centralino SLAVE) (vedi schema
SBTOP/004PX pag. 86).
Congurare entrambi i Centralini come SERIE
MT SB 01 20
e il Centralino attivo sarà di volta in volta quello
impostato come MASTER. Per commutare un
Centralino da MASTER a SLAVE e viceversa
vedi “U21 COME ATTIVARE (MASTER)
O DISATTIVARE (SLAVE) I CENTRALINI
PRINCIPALI” pag. 13.
Nella schermata di riposo dei due Centralini dovrà
comparire S, che indica il Centralino congurato in
serie e l’icona ssa .
ATTENZIONE!
- se lampeggia indica che i 2 Centralini non
comunicano correttamente.
- se compare l’icona ! c’è un problema di
congurazione dei 2 Centralini (es. entrambi
MASTER o SLAVE, LP-IN o LS-IN oppure uno
SERIE e l’altro PARALLELO).
- se in un impianto Simplebus TOP (con scambi
Art. 1424), sono presenti sia Centralini principali
che secondari (vedi schema SBTOP/003PX pag.
84); per il corretto funzionamento dell’impianto è
necessario attivare su tutti i Centralini l’impostazione
“C8.7- FUNZIONAMENTO CENTR. PRINC+SEC”
pag. 22.
Come configurare un centralino principale
- premere il tasto MENU e visualizzare tramite i tasti
il menu 8-OPZIONI AVANZATE, premere il tasto 8;
- visualizzare tramite i tasti il menu 3-TIPO DI
CENTRALINO, premere il tasto 3;
- premere il tasto 2;
Il Centralino di default è congurato come CPS SINGOLO.
É ora possibile congurarlo come CPS PARALLELO
o CPS SERIE.
- per congurarlo come 2-CPS PARALLELO, premere
il tasto 2;
- per congurarlo come LS-IN premere tasto 1,
per congurarlo come LP-IN premere tasto 2;
- per congurarlo come CPS SERIE, visualizzare tramite
i tasti il menu 3-CPS SERIE, premere il tasto 3;
- per congurarlo come MASTER premere il tasto 1,
per congurarlo come SLAVE premere il tasto 2;
8-OPZIONI
AVANZATE
3- TIPO DI
CENTRALINO
1- SECONDARIO
*
2- PRINCIPALE
1- CPS SINGOLO
*
2- CPS PARALLELO
1- LS-IN
2- LP-IN
*
3- CPS SERIE
1- MASTER
2- SLAVE
Page 21
MT SB 01
Come configurare un centralino secondario
- premere il tasto MENU e visualizzare tramite i tasti
il menu 8-OPZIONI AVANZATE, premere il tasto 8:
- visualizzare tramite i tasti il menu 3-TIPO DI
CENTRALINO, premere il tasto 3;
- premere il tasto 1;
Il Centralino di default è congurato come CPS
SINGOLO.
É ora possibile congurarlo come CPS SERIE,
infatti la funzione 2-CPS PARALLELO NON É
DISPONIBILE;
- per congurarlo come CPS SERIE visualizzare tramite
i tasti il menu 3-CPS SERIE, premere il tasto 3;
- per congurarlo come MASTER premere il tasto 1,
per congurarlo come SLAVE premere il tasto 2;
C8.4 - Auto acc. interna on/off
(disponibile da IR.006)
É disattivata di default.
Questa funzione è disponibile solo per impianti
Simplebus non TOP ed è necessaria la presenza
delll’Art. 1259 per la visione ciclica di telecamere
scorporate.
Tramite questa funzione è possibile attivare o
disattivare l’autoaccensione inviata dai posti interni
con Centralino in modalità GIORNO.
Per attivare la funzione:
- premere il tasto MENU e visualizzare tramite i
tasti il menu 8-OPZIONI AVANZATE,
premere il tasto 8;
8-OPZIONI
AVANZATE
3- TIPO DI
CENTRALINO
*
1- SECONDARIO
2- PRINCIPALE
*
1- CPS SINGOLO
2- CPS PARALLELO
*
3- CPS SERIE
1- MASTER
2- SLAVE
8-OPZIONI
AVANZATE
- visualizzare tramite i tasti il menu 4-AUTO
ACC. INTERNA ON/OFF;
4-AUTO ACC.
INTERNA ON/OFF
- premere il tasto 4 per attivare o disattivare la funzione;
SERVIZIO
ATTIVO
SERVIZIO
DISATTIVO
C8.5 - Chiamata tripla on/off
(disponibile da IR.006)
É disattivata di default.
Tramite questa funzione è possibile attivare o
disattivare la chiamata tripla del Centralino verso i
posti interni.
La chiamata verrà così effettuata 3 volte consecutive
(nel caso di chiamata video: le prime 2 saranno
audio, la terza sarà video).
Per attivare la funzione:
- premere il tasto MENU e visualizzare tramite i tasti
il menu 8-OPZIONI AVANZATE e premere il
tasto 8;
8-OPZIONI
AVANZATE
- visualizzare tramite i tasti il menu 5-CHIAMATA
TRIPLA ON/OFF;
- premere il tasto 5 per attivare o disattivare la
funzione;
5-CHIAMATA
TRIPLA ON/OFF
SERVIZIO
ATTIVO
SERVIZIO
DISATTIVO
I T
MT SB 0121
Page 22
GROUP S.p.A.
C8.6 - Funzione contatto CH-CH
(disponibile da IR.006)
Tramite questa funzione è possibile assegnare la
I T
funzione al contatto CH-CH, di default la funzione
attivata è la ripetizione di chiamata e si potrà
scegliere la temporizzazione della chiusura del
contatto tra 1,3 e 5 secondi.
In alternativa è possibile attivare la funzione di monitor
parallelo o esterno; il contatto si chiuderà per tutta la
durata di una chiamata VIDEO da posto esterno.
Per attivare la funzione:
- premere il tasto MENU e visualizzare tramite i tasti
il menu 8-OPZIONI AVANZATE e premere il
tasto 8;
8-OPZIONI
AVANZATE
- visualizzare tramite i tasti il menu 6-FUNZIONE
CONTATTO CH-CH, premere il tasto 6;
6-FUNZIONE
CONTATTO CH-CH
- premere il tasto 1 per funzione RIPETIZIONE DI
CHIAMATA o il tasto 2 per funzione MONITOR
ESTERNO;
1-RIP CHIAMATA
2- MONITOR EST
- se si è digitato il tasto 1, verrà chiesta la DURATA
di CHIUSURA del CONTATTO, visualizzare tramite
i tasti il tempo scelto (1,3 o 5 sec.);
DURATA CONTATTO:
1 SEC
DURATA CONTATTO:
3 SEC
C8.7 - Funzionamento centr. princ+sec
(disponibile da IR.006)
É disattivata di default.
ATTENZIONE!
1 Questa funzione deve rimanere disabilitata per
evitare malfunzionamenti nel caso siano presenti
Centralini, staffe, citofoni, scambi e miscelatori con
IR. inferiore a quelli elencati nella tabella sotto.
2 Questa funzione deve essere attivata su tutti i
Centralini per il corretto funzionamento di impianti
Simplebus TOP (con scambi Art. 1424) che
utilizzano sia Centralini principali che secondari.
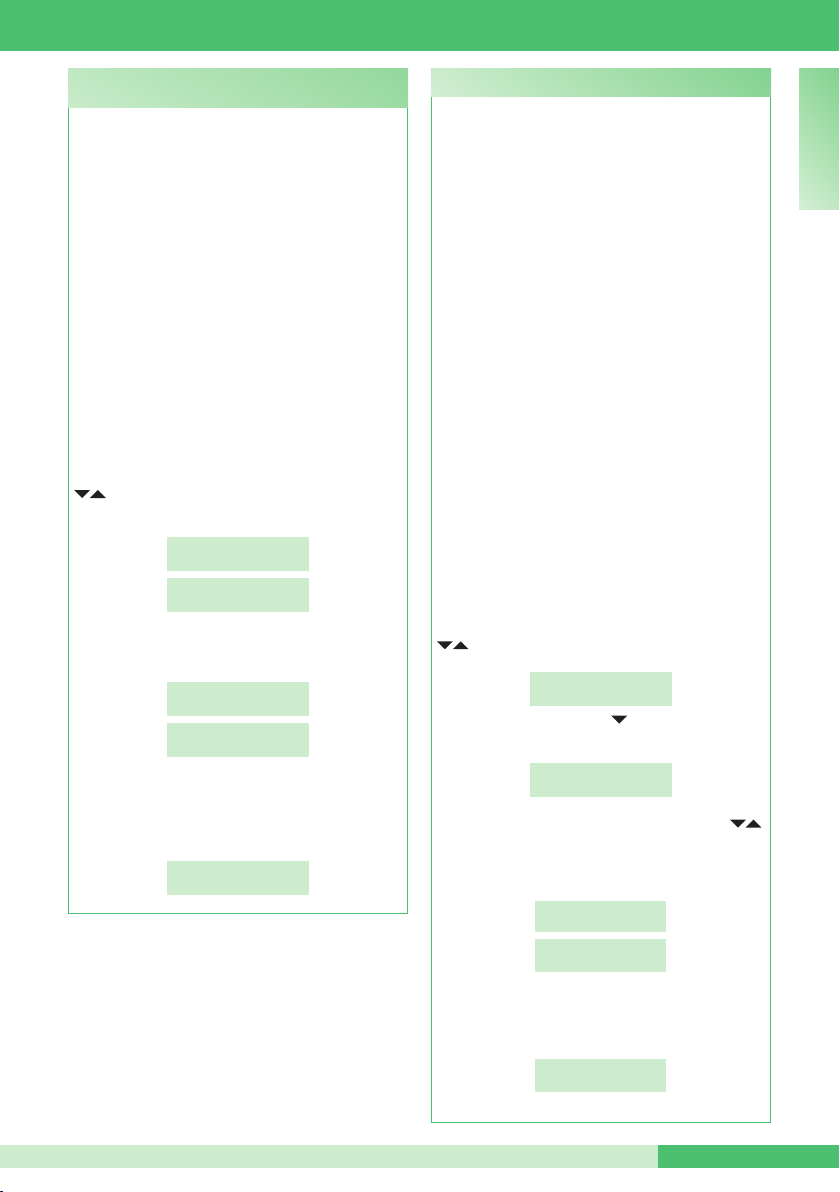
Per il corretto funzionamento di impianti con
Centralini principali e secondari è necessario che
l’impianto sia dotato di Centralini, staffe, citofoni,
scambi e miscelatori in versione TOP con IR. pari
o superiore a quelli elencati nella tabella a pag. 22.
Per attivare la funzione:
- premere il tasto MENU e visualizzare tramite i tasti
il menu 8-OPZIONI AVANZATE, premere il tasto 8;
8-OPZIONI
AVANZATE
- visualizzare tramite i tasti il menu
7-FUNZIONAMENTO CENTR. PRINC+SEC;
7-FUNZIONAMENTO
CENTR. PRINC+SEC
- premere il tasto 7 per attivare o disattivare la funzione;
SERVIZIO
ATTIVO
SERVIZIO
DISATTIVO
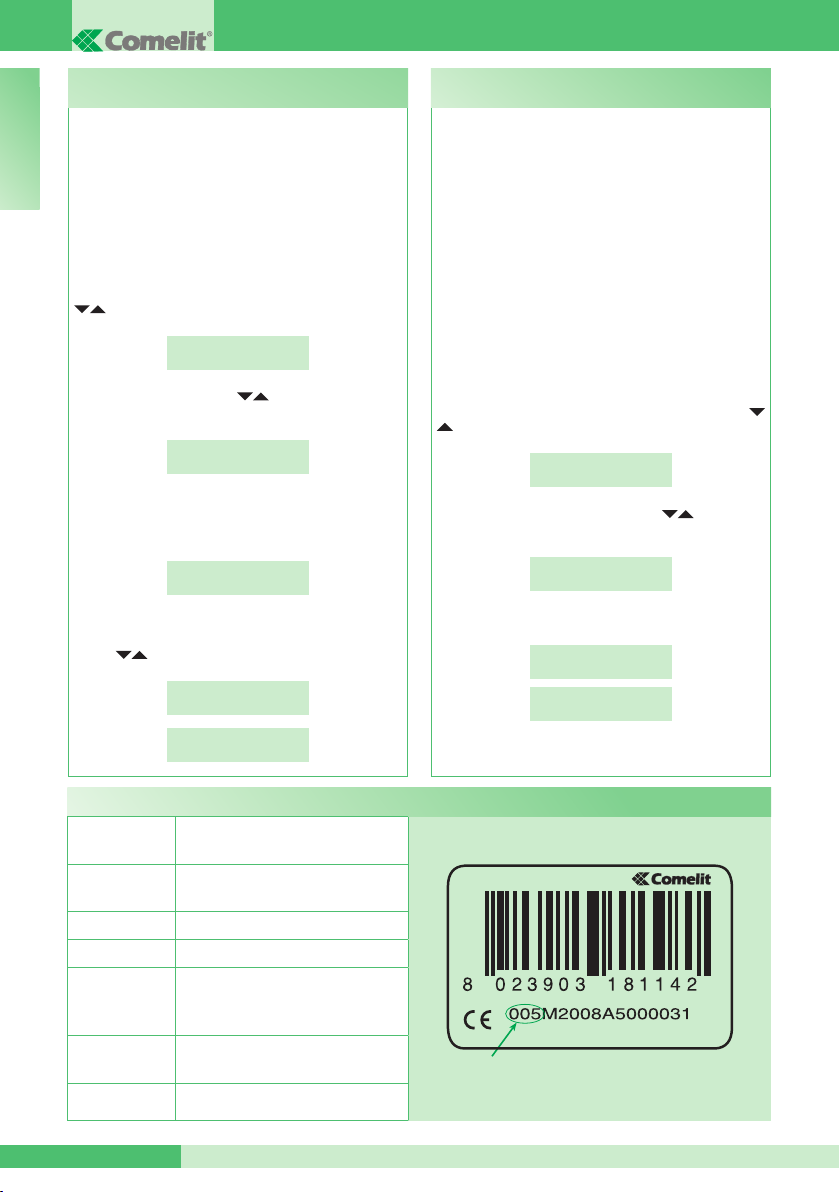
Tabella articoli Simplebus TOP
STAFFE
CITOFONI
SCAMBI
MISCELATORI
POSTI
ESTERNI
CENTRALINI
SOFTWARE
Art. 5714C IR. 007 - Art. 5814C IR. 002
Art. 6114C IR. 015
Art. 2608 IR. 006 - Art. 2610 IR. 008
Art. 2619 IR. 000 - Art. 2628 IR. 005
Art. 2638 IR. 006
Art. 1424 IR. 002
Art. 4888C IR. 013
Art. 1602 IR. 027 - Art. 1602VCF IR. 002
Art. 3340 IR. 021 - Art. 3342 IR. 021
Art. 3070/A IR. 010 - Art. 3072/A IR. 010
Art. 4660C IR. 013
Art. 1998A IR. 006 - Art. 1998V IR. 001
Art. 1998VC IR. 001
Art. 1249/A IR. 002
MT SB 01 22
IR.
Page 23

TABLE OF CONTENTS
• INTRODUCTION
- Overall view 24
- Description of terminal block 24
- Programming keys and display 25
- Alphanumeric keypad 25
- General description 25
• OPERATION
U1 How to answer a call from an internal unit 26
U2 How to answer a call from an external unit 26
U3 How to call an internal unit 27
U4 How to transfer a call from the external unit to an
internal unit
U5 How to set up communication between 2 internal
units (intercom function)
U6 How to call an internal unit listed in the call log 28
U7 How to use the directory 29
U8 How to enter a name in the directory 29
U9 How to nd a name in the directory 29
U10 How to delete a name in the directory 29
U11 How to change a name in the directory 30
U12 How to use the lock-release 30
U13 Day/night operating mode 30
U14 How to activate the “Follow me” function 31
U15 Alarm signalling 31
U16 How to activate an additional relay 31
U17 How to call a secondary switchboard from a main
switchboard
U18 How to call a main switchboard from a secondary
switchboard
U19 How to answer a call from a secondary switchboard to
a main switchboard
U20 How to answer a call from the main switchboard to the
secondary switchboard
U21 How to activate (MASTER) or deactivate (SLAVE) the
main switchboards
• SETTINGS
- Menu 1-7 screens tree diagram 34
- I1-Change time 35
- I2-Change date 35
- I3-Day / Night automatic mode 35
- I4-Recording speed number 36
- I5-Change language 37
- I6-Download names from PC 37
- I7-All names deleted 37
• CONFIGURATIONS
- Menu 8 screens tree diagram 38
- C8.1- Video mode conguration 39
- C8.2- Calling mode 39
- C8.3- Type of switchboard (Simplebus Top mode) 40
MT SB 01
- C8.4- Self-ignition ON/OFF 41
- C8.5- Triple call ON/OFF 41
- C8.6- Function CH-CH contact 42
- C8.7- Operation: main switchboard
+ secondary switchboard
- Table of Simplebus TOP products 42
• CONNECTION DIAGRAMS
- SBC/06S Door-entry phone system with one main
input and porter switchboard.
- SB2V/EN/103G Simplebus b/w video entry phone
system with one main input and porter switchboard.
- SB2V/EN/103PX Simplebus Color video entry phone
27
system with 1 main input and porter switchboard.
- SB2V/EN/105G Simplebus b/w video entry phone
28
system with 2 main inputs and porter switchboard.
- SB2V/EN/105PX Simplebus Color video entry phone
system with 2 main inputs and porter switchboard.
- SBC/08S Door-entry phone system with one main
input, n. secondary audio inputs and porter switchboard.
- SB2V/018APX Simplebus Color system with remote
camera module Art. 1259C in generic actuator mode and
porter switchboard.
- SB2V/026PX Video entry phone system with 1 main
input and porter switchboard used in conjunction with
telephone switchboard Art. 2906 for Follow me mode.
- SB2V/027PX Door-entry phone system with porter
switchboard used in conjunction with telephone
switchboard Art. 2906 for Follow me mode.
31
- SB2V/EN/101G Simplebus b/w video entry phone
system with 1 main input, 3 secondary video inputs and
porter switchboard.
32
- SB2V/EN/101PX Simplebus Color video entry phone
32
system with 1 main input, 3 secondary video inputs and
porter switchboard.
33
- SB2V/EN/121G Simplebus b/w video entry phone
system with 2 main inputs, 3 secondary audio inputs and
porter switchboard.
33
- SB2V/EN/121PX Simplebus Color video entry phone
system with 2 main inputs, 3 secondary audio inputs and
porter switchboard.
- SBTOP/001PX Simplebus Color video entry phone
system with 1 main input, 4 secondary inputs and
corresponding secondary porter switchboards.
- SBTOP/002PX Simplebus TOP video entry phone
system with 2 main inputs, 4 secondary inputs and
main porter switchboard.
- SBTOP/003PX Simplebus TOP video entry phone
system with 2 main inputs, 1 main porter switchboard,
2 secondary inputs and corresponding secondary porter
switchboards.
- SBTOP/004PX Simplebus TOP video entry phone
system with 1 main input, 4 secondary inputs and 2 main
porter switchboards congured in SERIES.
- SBTOP/005PX Simplebus TOP video entry phone
system with 1 main input, 3 secondary inputs and 2 main
porter switchboards congured in PARALLEL.
42
63
64
65
E N
66
67
68
69
70
71
72
74
76
78
80
82
84
86
88
MT SB 0123
Page 24
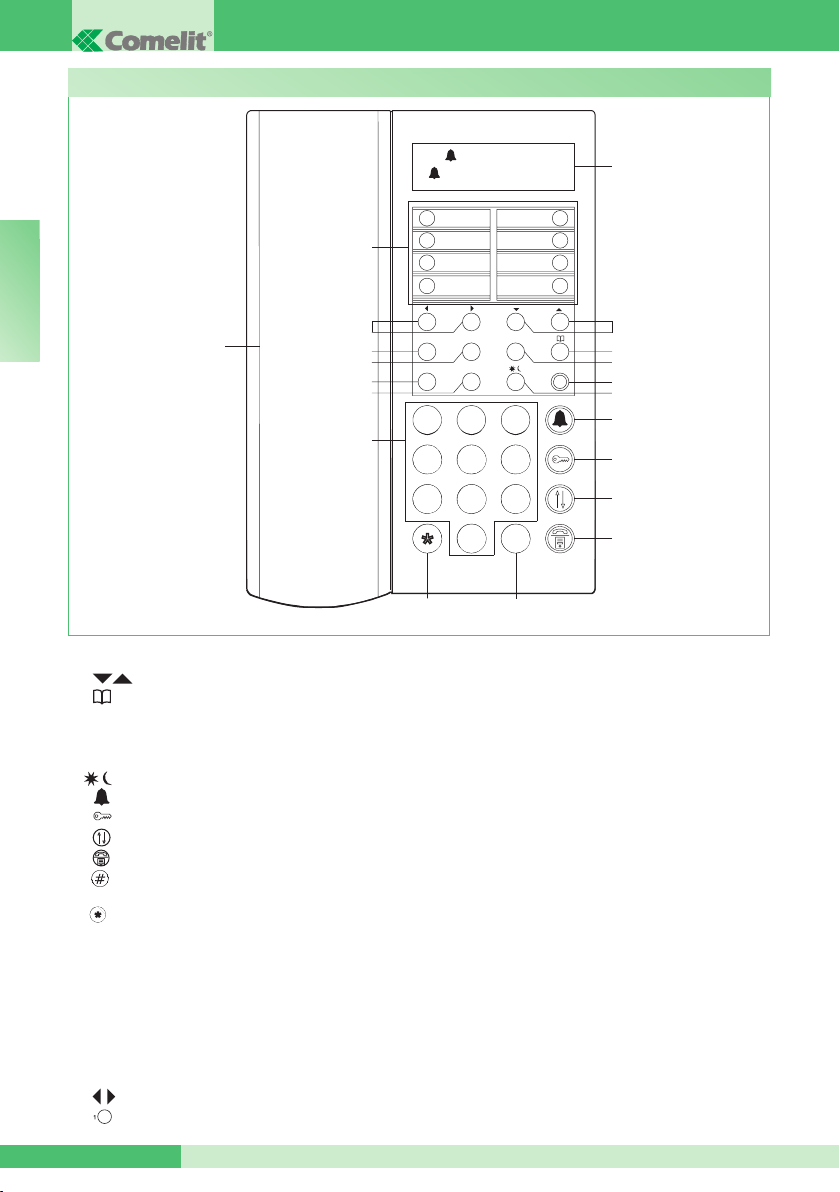
Overall view
GROUP S.p.A.
E N
18
1 Message indication display
2
3 Directory key
Directory and menu scroll keys
4 MENU key
5 ON/OFF Power on/off (press and hold for 2
seconds)
6 Day/night key
7 Call key
8 Lock-release key
9 Call transfer key
10 Call hold key
11 Key used to call the main switchboard from the
secondary switchboard
12 Key used to activate an additional relay
13 Alphanumeric keypad
14 A/V “MASTER” “SLAVE” control key for main or
secondary switchboards in series
15 CANC Key used to cancel a call or delete entered
data
16 OK Conrm key
17 ESC Exit menu key
18 Handset
19 Keys used to scroll through missed calls
20 Speed numbers
A (---) AUTO 14:40
MER 12/03/10
1
2
20
3
4
19
17
16
15
14
13
ESC OK MENU
A/V
1 2 3
ABC DEF
4 5 6
4 5 6
7 8 9
7 8 9
12
0 #
0 #
MNOJKLGHI
WXYZTUVPQRS
11
ON/OFFCANC
1
5
6
7
8
2
3
4
5
6
7
8
9
10
Description of terminal block:
24 ~24V AC power supply
0 ~0V AC power supply
LP1 LP2 Incoming data line from external unit
LM LM Data line to risers
CH CH Free contact for “CALL REP.” or “ENABLE
EXTERNAL MONITOR”
OUT OUT N.O. contact which closes, sending a
video call from the switchboard to an internal unit
C NO N.O. contact for “FOLLOW ME” function
TX RX GND Serial port rs232 for connection to the
PC in order to download the names in the directory
using Art. 1249/A, or for connection to the remote
switchboard in systems where several switchboards
are connected in series or in parallel.
MT SB 01 24
Page 25
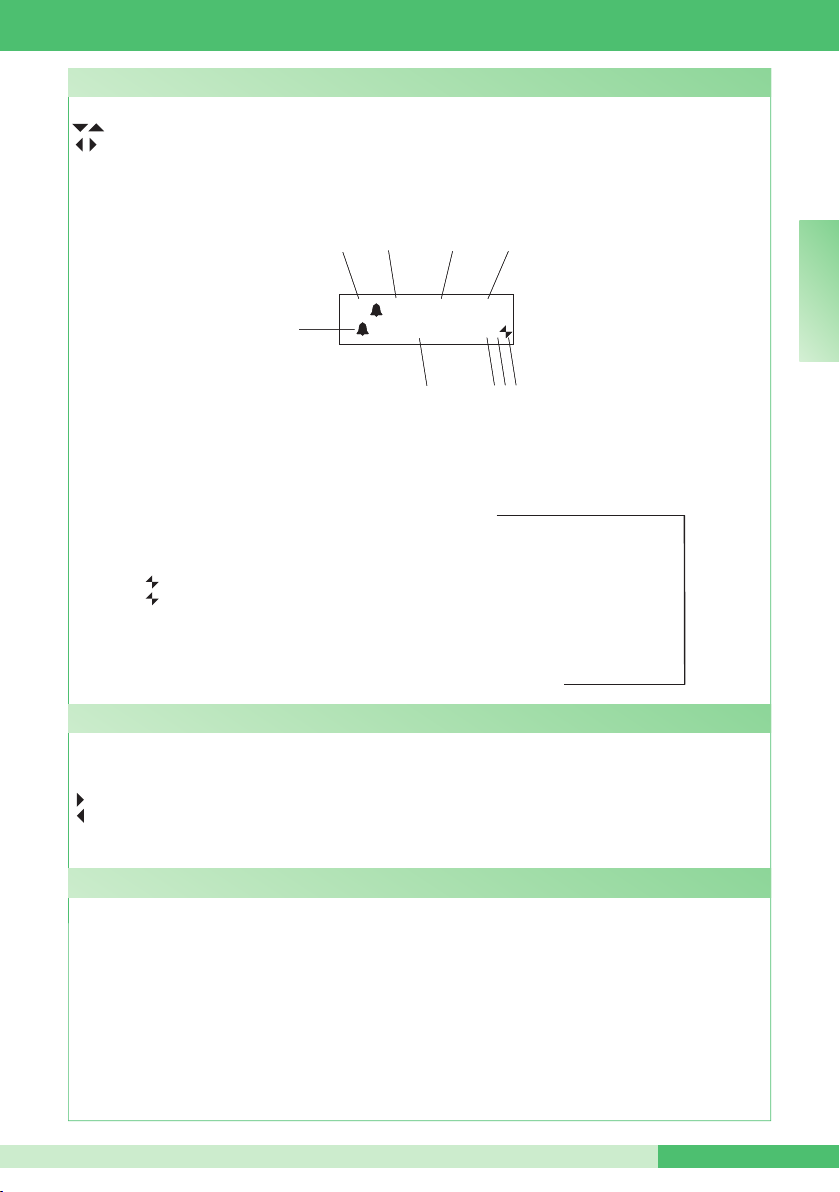
1
2 3 4
1
2 3 4
Programming keys and display
MENU To enter the programming menus
Can be used to select the various menu options
Can be used to move the cursor in order to change the entered data
OK Conrm the displayed information or data entered
CANC Delete the data entered
ESC Cancelling the selected option and exiting the programming menu
Switchboard display screens:
MT SB 01
1 A AUDIO mode
V VIDEO mode
A (--) A
5
5
A (--) A
UTO 14:40
UTO 14:40
MER 12/03/10 ?P
MER 12/03/10 ?P
6
7 8 9
2 (- -) indicates the number of unanswered calls in DAY mode
if the text NIGHT appears, it indicates the system is operating in this mode
3 operation in AUTO mode is only displayed during DAY mode
4 time (hours: minutes)
5 indication of unanswered calls in NIGHT mode
6 day (Mon, Tue, etc.) and date (day/month/year)
7 ! the 2 switchboards congured are NOT compatible
? the switchboard has not yet detected the presence of the remote switchboard
8 P indicates that the switchboard is congured in parallel
S indicates that the switchboard is congured in series
9 fixed indicates correct operation of the serial line
flashing indicates malfunctioning of the serial line
LM KO indicates a short circuit on the riser line, the text is accompanied by a tone which sounds
available
from R.I.006
repeatedly. The switchboard rejects any attempts to call or transfer calls to internal units;
however, all incoming calls from the external unit will be dealt with normally.
!PC when the menu for point 6- DOWNLOAD NAMES FROM PC is activated
indicates that the serial port is ready and waiting to receive data from the PC.
Alphanumeric keypad
For several of the functions, the keypad can be used to enter both numbers and letters; this can be done by
pressing the same button several times, for example if you press 2 several times, A - B - C - 2 will appear in
succession. If a different button is pressed, the cursor on the display will move onto the next letter.
Moves the cursor onto the next letter
Moves the cursor onto the previous letter
OK Conrms the data entered
CANC Deletes the data entered
General description
The main functions of the switchboard are as follows:
• call an internal unit
• receive calls from external units and transfer them to internal units as necessary
• receive routine or alarm calls from the internal units
• control external unit electric locks
• activate a relay
The porter switchboard also offers:
• DAY/NIGHT operation, which can only be used to enable switchboard functions in specic time bands
programmed by the user;
• a CALL LOG, in which the calls from internal units which could not be answered are stored;
• a DIRECTORY which can be programmed so as to identify the caller easily.
E N
MT SB 0125
Page 26
GROUP S.p.A.
The following functions are the main features of the
switchboard and its operating mode, these can all be
accessed directly, without using the menus.
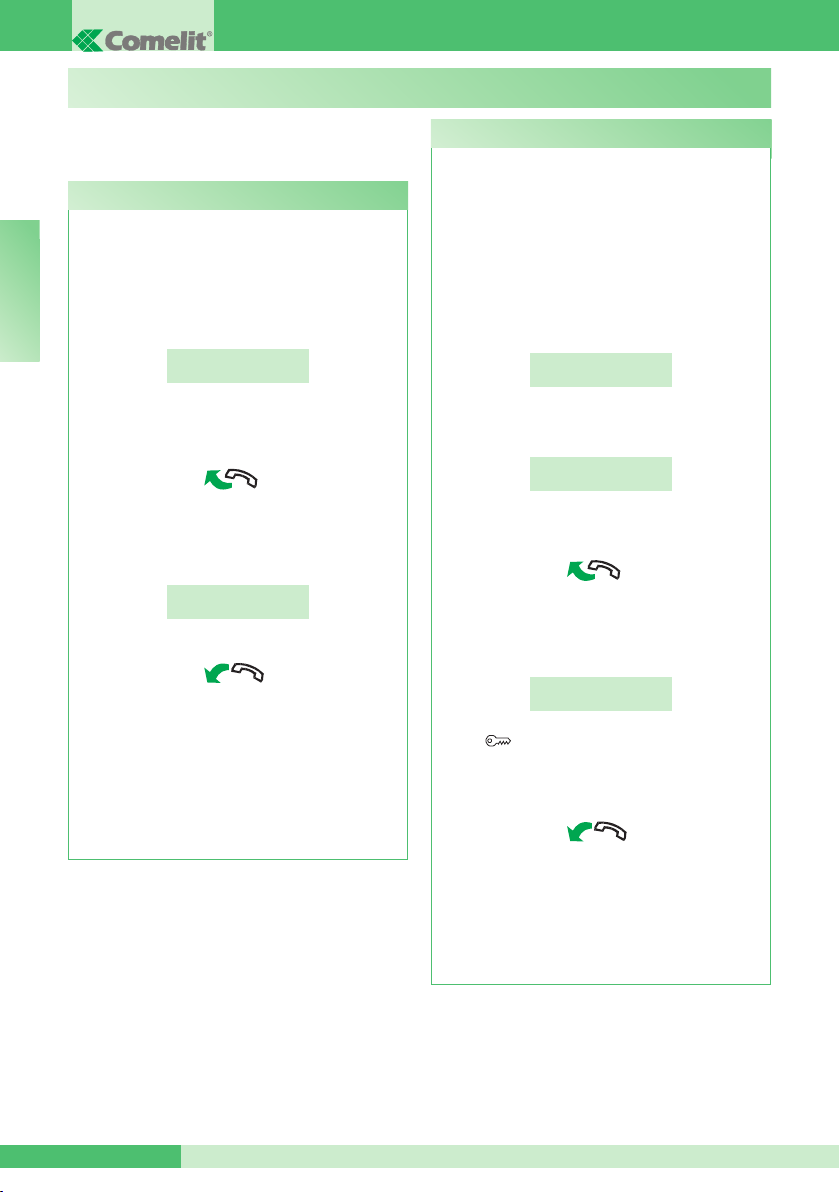
U1 How to answer a call from an internal unit
When the switchboard receives a call from an internal
unit:
- the NAME of the internal unit making the call (if
listed in the directory, see “U8 HOW TO ENTER
E N
A NAME IN THE DIRECTORY”, page 29) or the
address of the caller (e.g. 002) is displayed.
CALLED FROM
USER 002
• to answer the call originating from the internal unit,
lift the handset within 30 seconds;
OPERATION
U2 Come rispondere a una chiamata da posto
U2 How to answer a call from an external unit
esterno
The switchboard must be in DAY mode, in NIGHT
mode it will only answer direct switchboard calls.
The switchboard can receive a call from an external
unit:
- directly addressed to an internal unit, in this
case the NAME of the call recipient (if a name has
been assigned to the corresponding code in the
directory, see U8 “HOW TO ENTER A NAME IN THE
DIRECTORY”, page 29) or the address of the call
recipient (e.g. 002) is displayed.
- or directly addressed to the switchboard
(address=240)
CALL FOR
USER 002
CALL FOR
SWITCHBOARD
- the switchboard begins communicating with
the internal unit, the maximum duration of the
conversation is 2,5 minutes;
COMMUNICATING
WITH USER 002
- to end the conversation, hang up the handset.
• to reject the call, press CANC.
CAUTION!
If the switchboard is busy or the switchboard
operator is momentarily absent and cannot
answer within 30 seconds, the call will be added
to the log, see “U6 HOW TO CALL AN INTERNAL
UNIT LISTED IN THE CALL LOG”, page 28.
• to answer the call originating from the internal unit,
lift the handset within 30 seconds;
- the switchboard begins communicating with
the external unit, the maximum duration of the
conversation is 2,5 minutes;
COMMUNICATING
TO EXTERNAL UNIT
- press if necessary to activate the external unit
electric lock; if the lock-release is activated some
conrmation tones will be emitted;
- to end the conversation, hang up the handset.
• to reject the call, press CANC.
CAUTION!
In NIGHT mode (see “U13 DAY/NIGHT OPERATING
MODE”, page 30), calls from the external unit
directed to an internal unit appear on the display,
but cannot be intercepted by the switchboard.
MT SB 01 26
Page 27
MT SB 01
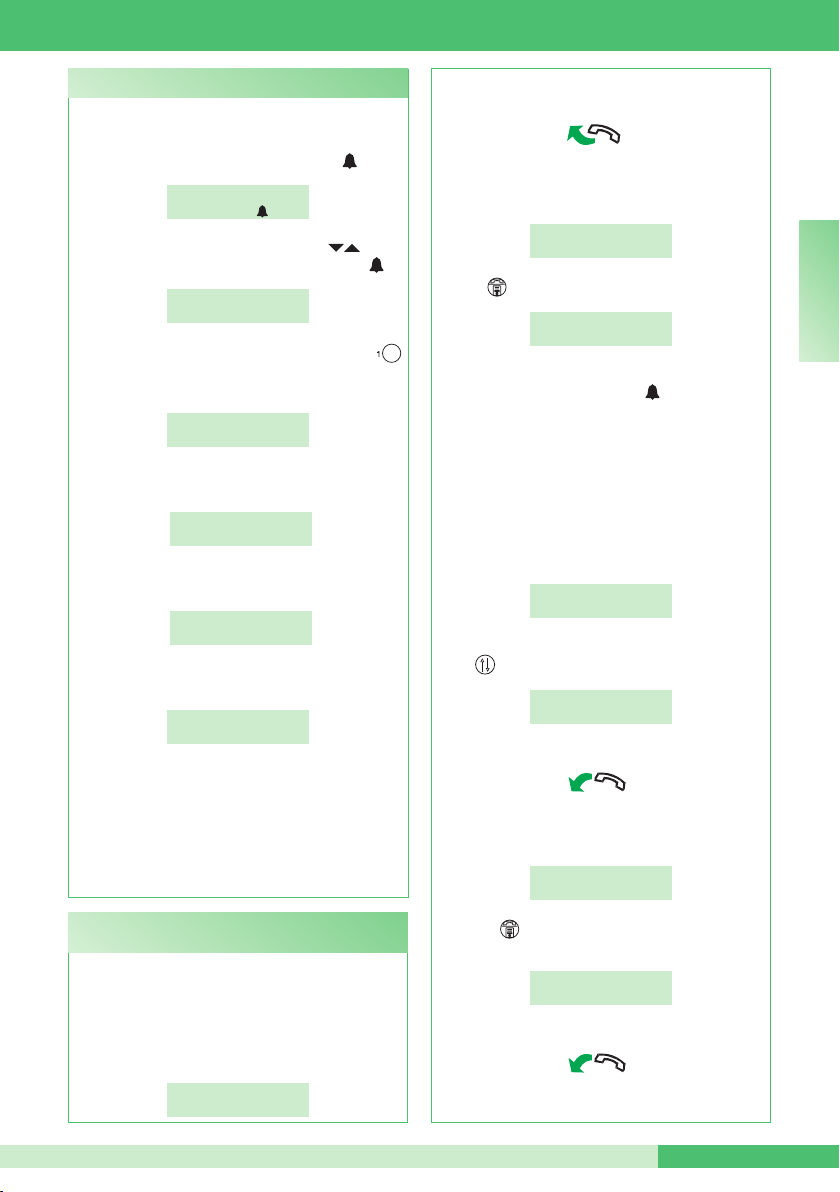
U3 How to call an internal unit
The switchboard can use 3 different methods to call
an internal unit:
• enter the internal unit number* and press .
USER 002
TO CALL
• scroll through the directory using the keys
until the desired name is displayed and press .
JENNIFER
CODE: 002
• press the corresponding speed number (e.g.
speed number 1= stored code “002”, see “I4RECORDING SPEED NUMBER” page 36).
CALL
JENNIFER
- if the call has taken place correctly:
CALLING
USER 002
- if the call has not taken place correctly:
USER 002
NOT AVAILABLE
- if the internal unit is busy:
BUSY
USER
When the internal unit connects to the audio
line, communication with the switchboard begins;
the maximum duration of the conversation is 2,5
minutes.
*The number to be entered depends on the
switchboard conguration see “C8.2 - CALLING
MODE” page 39; contact your usual installer.
U4 How to transfer a call from the external unit to
an internal unit
When the switchboard receives a call from an
external unit, directed to an internal unit:
- the NAME of the call recipient (if a name has
been assigned to the corresponding code in the
directory, see “U8 HOW TO ENTER A NAME IN
THE DIRECTORY”, page 29).
CALL FOR
USER 002
- to answer the call originating from the external unit,
lift the handset within 30 seconds;
- the switchboard begins communicating with
the external unit, the maximum duration of the
conversation is 2,5 minutes;
COMMUNICATING
TO EXTERNAL UNIT
- press to put the external unit on hold;
CALL FOR
USER 002
- it is now possible for the switchboard to call the
desired internal unit by pressing .
To transfer the call to another internal unit, you
will need to call it (see “U3 HOW TO CALL AN
INTERNAL UNIT”, page 27).
When the internal unit receiving the call is
connected to the audio line, it begins communicating
with the switchboard; if the external unit is a video
unit, the call recipient monitor switches on and the
image from the external unit appears.
COMMUNICATING
WITH USER 002
To transfer the conversation to the external unit,
press ;
EXTERNAL
CALL EFFECTED
- to end the conversation, hang up the handset.
If the call did not take place correctly or if the
system is busy, the external unit remains on hold;
CALL FOR
USER 002
- press to resume communication with the
external unit;
COMMUNICATING
TO EXTERNAL UNIT
- to end the conversation, hang up the handset.
E N
MT SB 0127
Page 28
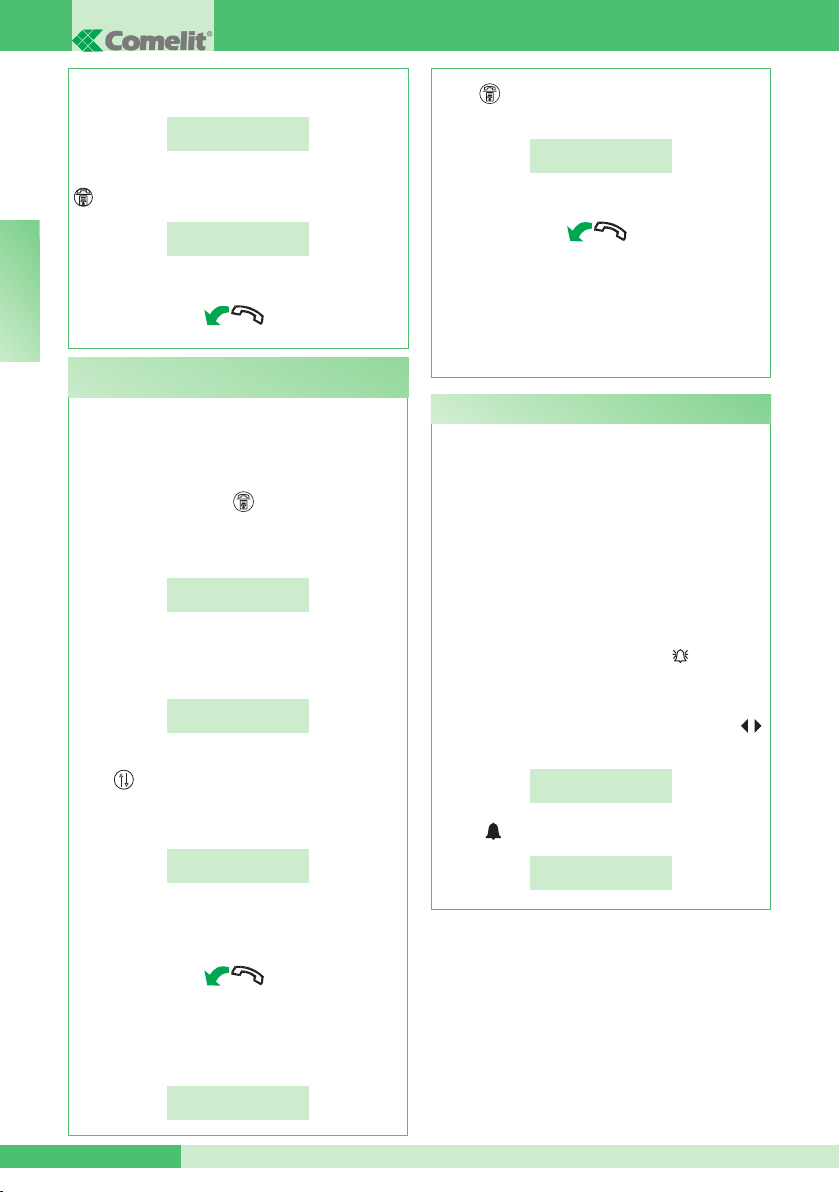
GROUP S.p.A.
If the internal unit does not accept the transferred
conversation, external unit remains on hold;
CALL FOR
USER 002
- cut off the conversation with internal unit and press
to resume communication with the external unit;
COMMUNICATING
TO EXTERNAL UNIT
- to end the conversation, hang up the handset.
E N
U5 How to set up communication between 2
internal units (intercom function)
When the switchboard is communicating with an
internal unit (e.g. 002) which is trying to speak with
another internal unit (e.g. 003):
- put the internal unit which is already connected (e.g.
002) on hold by pressing ;
- call the desired internal unit (e.g. 003, see “U3
HOW TO CALL AN INTERNAL UNIT”, page 27);
CALLING
USER 003
When the internal unit receiving the call is
connected to the audio line, it begins communicating
with the switchboard;
COMMUNICATING
WITH USER 003
To transfer the conversation to the other internal unit,
press ; internal unit (003) begins communicating
with internal unit (002); the maximum duration of this
communication is 2,5 minutes;
INTERCOM CALL
IN COURSE
- hang up the handset.
Press CANC to reset an intercom call which has
been active for more than one minute.
- cut off communication with internal unit (003) and
press to resume communication with internal
unit (002);
COMMUNICATING
WITH USER 002
- to end the conversation, hang up the handset.
CAUTION!
If the external unit calls the switchboard during
an intercom call between internal units which
has been underway for more than one minute, the
intercom call will be reset so that the switchboard
can deal with the incoming call.
U6 How to call an internal unit listed in the call log
When the switchboard receives a call from an internal
unit and it is not dealt with in the space of 30 sec.
(operator momentarily absent or busy with another
conversation), this is automatically stored in the call
log.
If an internal unit has called several times, only the
rst call will be logged.
The switchboard can log a maximum of 10
unsuccessful calls. The eleventh call replaces the
rst.
If the porter switchboard is in DAY mode, the number
of missed calls will appear on the display.
If the switchboard is in NIGHT mode, will appear.
To call the internal units listed in the call log, proceed
as follows:
- display the internal unit you wish to call using the
keys;
CALL BACK
USER 002
- press ;
CALLING
USER 002
If the internal unit does not accept the transferred
conversation, or when thesystem is busy, or if the
call has not taken place correctly, internal unit
(002) remains on hold;
USER
ON HOLD
MT SB 01 28
Page 29
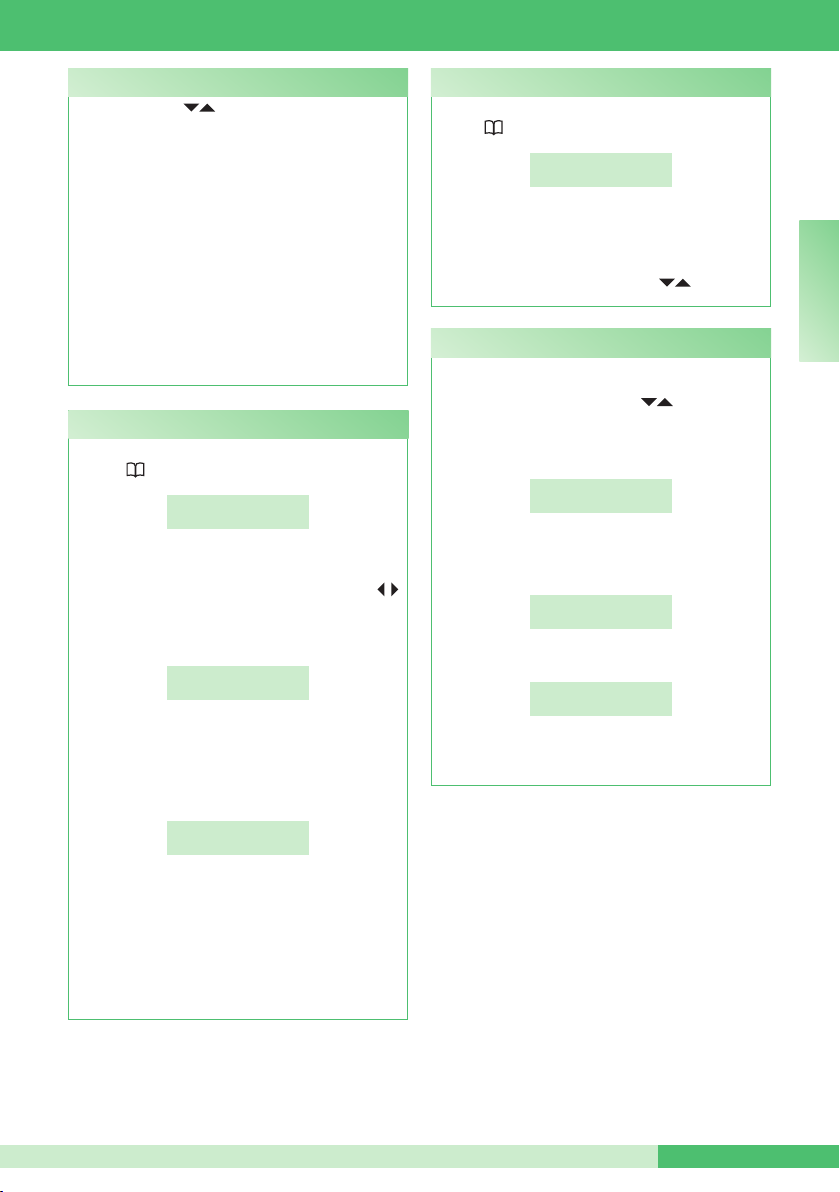
MT SB 01
U7 How to use the directory
You can use the keys to scroll through the list
of users; to increase the scrolling speed, press and
hold the key. The NAME and CODE associated with
each user will be displayed in sequence.
A maximum of 1500 names may be entered (in
switchboards with R.I. equal to or greater than 006)
with a maximum of 16 alphanumeric characters, and
each name must be assigned a code corresponding
to that of the desired internal unit.
The following special characters may be entered: Ä,
Å, Æ, Ö, Ü, Ø, ß, by repeatedly pressing 1.
CAUTION! To enter names, you may proceed by
downloading a database from a PC using Art.
1249/A (see “I6- DOWNLOAD NAMES FROM PC”,
page 37).
The manual procedure is outlined below.
U8 How to enter a name in the directory
If you wish to enter a name in the directory:
- press ;
ENTER NAME:
_
- the cursor will be positioned on the rst letter.
Enter the name using the alphanumeric keypad,
moving from one letter to the next using the
keys, to delete a character press CANC;
- press OK to conrm the name entry:
ENTER
CODE SB
- enter the code using the alphanumeric keypad (see
user name and address correspondence table on
page 46A);
- to conrm code entry press OK;
ENTER INDIRECT
CODE
U9 How to find a name in the directory
If you wish to nd a name in the directory:
- press twice in quick succession;
- enter the name, even using just part of the
extension;
- to conrm your selection, press OK.
If there are several users with the same initial, you
can scroll through the list using the keys.
U10 How to delete a name in the directory
If you wish to delete a name in the directory:
- view the name you want to delete by scrolling
through the directory using the keys, or see
“U9 HOW TO FIND A NAME IN THE DIRECTORY”,
page 29.
- press CANC;
- press OK, you will be asked to enter the password
(1998, this password cannot be modied);
- to conrm deletion press OK;
CAUTION! To delete all the names in the directory,
see “I7-ALL NAMES DELETED”, page 37.
FIND NAME:
_
DELETE NAME?
ENTER PASSWORD
DELETING...
_ _ _ _
E N
- only enter the indirect code using the alphanumeric
keypad if the indirect code calling mode has been
activated (see “C8.2 - CALLING MODE”, page 39).
- to conrm code entry press OK;
- it will now be possible to enter a new name;
alternatively press ESC to exit.
MT SB 0129
Page 30
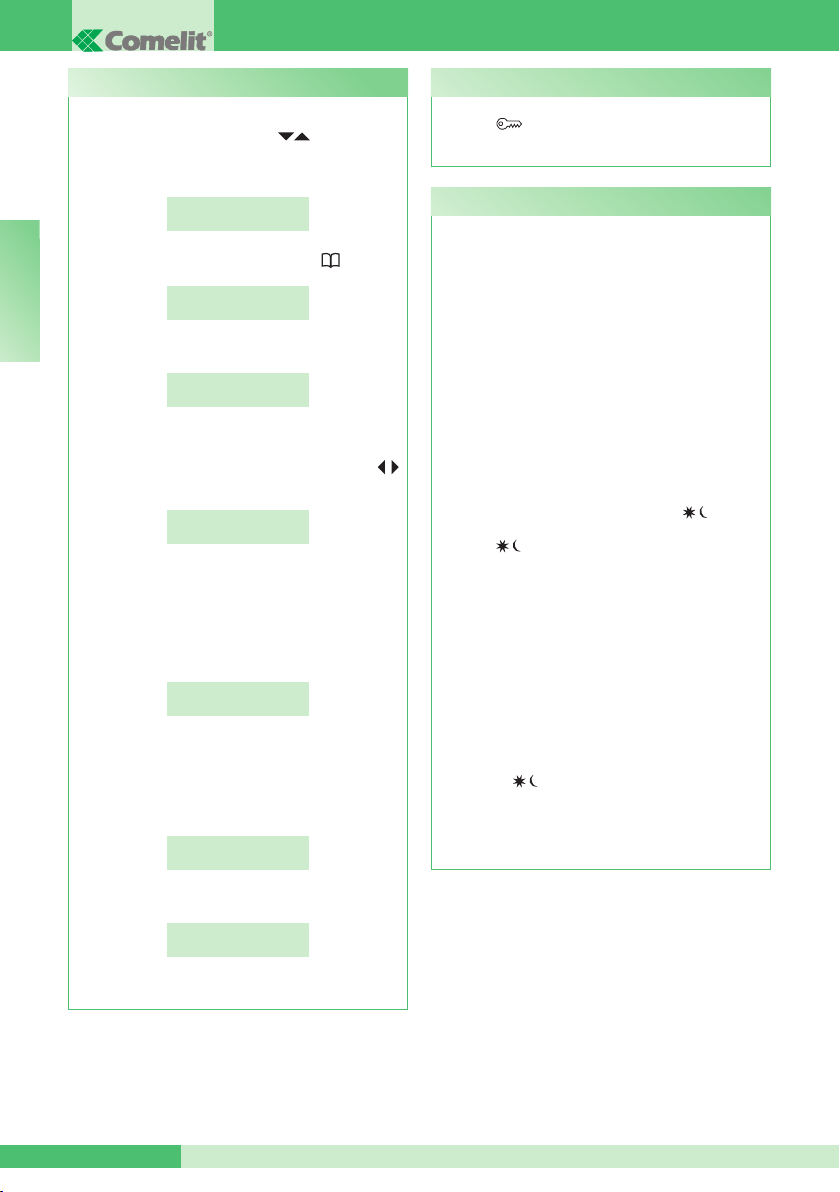
GROUP S.p.A.
U11 How to change a name in the directory
If you wish to change a name in the directory:
- view the name you want to change by scrolling
through the directory using the keys, or see
“U9 HOW TO FIND A NAME IN THE DIRECTORY”,
page 29.
JENNIFER
CODE SB 001
- to conrm the selected name, press :
E N
CHANGE
NAME?
- press OK;
CHANGE NAME:
JENNIFER
- the cursor will be positioned on the rst letter.
Change the name using the alphanumeric keypad,
moving from one letter to the next using the
keys, to delete a character press CANC;
CHANGE NAME:
NOEMI
- to conrm the name changes, press OK;
press ESC to exit.
- the Simplebus code for that user will be displayed, to
modify it press CANC and enter the new number using
the alphanumeric keypad:
CHANGE
SB CODE 001
- to conrm the Simplebus code change, press OK;
press ESC to exit.
- if present, the indirect Simplebus code for that user
will be displayed, to modify it press CANC and enter
the new number using the alphanumeric keypad:
CHANGE INDIRECT
CODE 000001
U12 How to use the lock-release
The external unit electric lock can be controlled by
pressing ; if the command is carried out, some
conrmation tones will be emitted.
U13 Day/night operating mode
The porter switchboard has two operating modes:
- DAY mode
- NIGHT mode
In DAY mode, all calls originating from the external
unit are received by the switchboard, which can
transfer them to the internal units as necessary.
In NIGHT mode, the switchboard intercepts calls
from the external unit, only if they are directed to the
switchboard (code 240). Calls directed to the internal
units appear on the display, but are not intercepted
by the switchboard.
The operating mode may be activated in 2 different
ways:
• manually, using the DAY/NIGHT key .
Press to change the operating mode
immediately.
The operating mode is indicated on the display:
- DAY with the symbol: (_ _)
- NIGHT is indicated with the text NIGHT.
CAUTION! NIGHT mode is only available if there
is a main external unit.
• in automatic mode (programming performed by
the installer, see “I3- DAY/NIGHT AUTOMATIC”,
page 35).
The text AUTO will only appear during operation
during the DAY. During operation in automatic
mode, DAY/NIGHT modes can be switched
manually ( ); in this case, automatic mode is
excluded and reactivated at the next programmed
switching time.
- to conrm the indirect code change, press OK;
STORING IN
MEMORY...
- press ESC to exit.
MT SB 01 30
Page 31
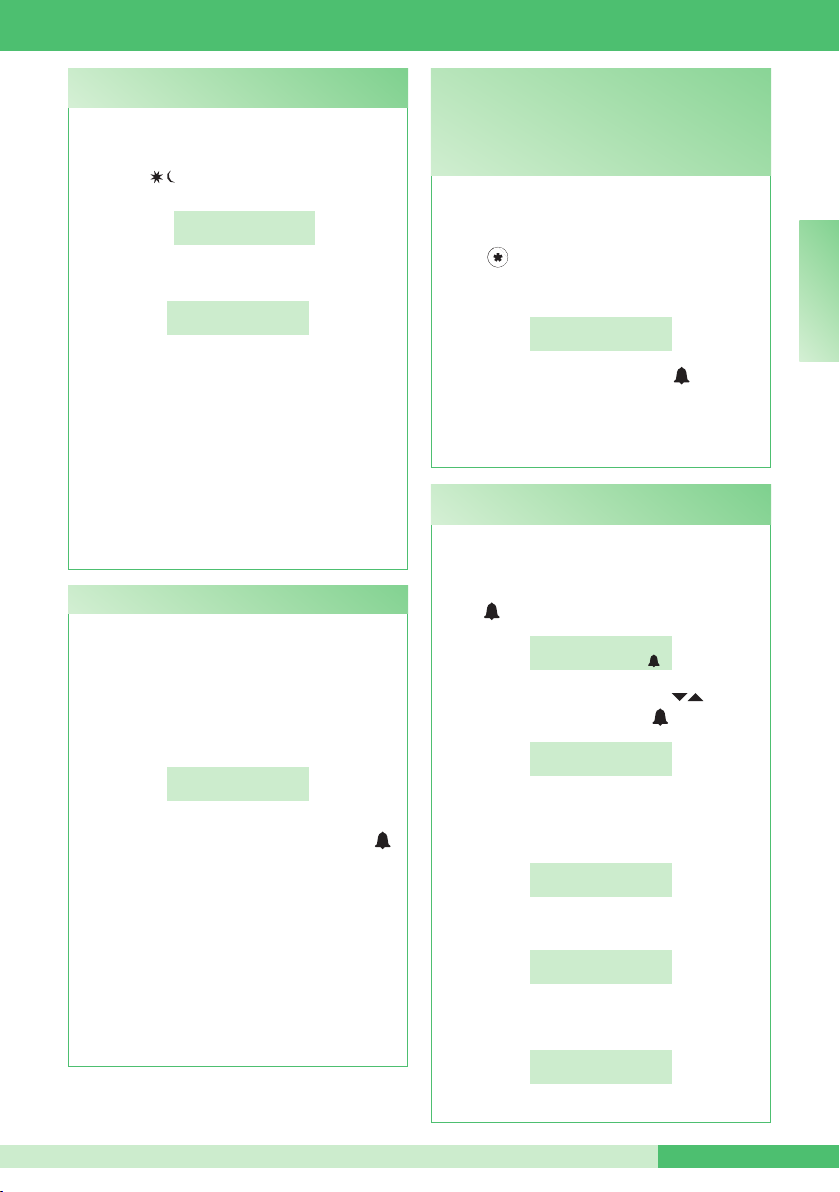
U14 How to activate the “Follow me” function
(available from R.I.006)
This function can be used to divert calls for the
switchboard to local or remote telephones.
To activate this function, press and hold the DAY/
NIGHT key for at least 3 sec., until the display
shows:
FOLLOW ME
To disable it, repeat the procedure so that the initial
screen appears on the display:
Once a call has been made, the switchboard will
ring until the remote device begins communicating;
the call can be answered from the switchboard by
cancelling the “Follow me” function.
CAUTION!
To use this function, telephone switchboard
Art. 2906 and interface Art. 2912 must be fitted.
Contact your usual installer.
This function can only activated for the
switchboard set as secondary (see “C8.3 TYPE
OF SWITCHBOARD”, page 40).
U15 Alarm signalling (available from R.I.006)
The switchboard can receive alarm signals
transmitted by internal units in any operating status
(call or conversation).
When the switchboard receives an alarm:
- an alarm sounds. The signal may be silenced by
pressing any of the buttons on the switchboard.
- the alarm signal for the rst user that activated the
alarm appears on the display:
the signal disappears when the internal unit answers
the switchboard call (to make the call, press ),
or when the switchboard operator forces a deletion
process using the CANC key.
If several alarm situations occur simultaneously,
an alarm code is created using the same methods
as described in the section “U6 HOW TO CALL
AN INTERNAL UNIT LISTED IN THE CALL LOG”
page 28, and only the number of alarms recorded
will appear on the display (max. 10).
When a call is received from an external or internal
unit, the switchboard exits alarm status so that the
incoming call can be dealt with correctly. Once the
call has been dealt with, alarm status is restored.
ACTIVE
A D (_ _) 14:40
WED 12/03/10
ALARM (04)
USER 002
MT SB 01
U16 How to activate an additional relay
(e.g. to activate the following independently and with
a specific command: lights, CCTV alarm contacts,
driveway gates, entrances without external units or
other devices)
Actuators can be activated in standby mode and
during conversation with an external unit.
To activate the actuator:
- press , you will be asked to enter the code to
activate a specic actuator. If there is no code a
generic actuator will be activated;
- to conrm actuator activation, press .
CAUTION!
To use this function, there must be an external unit
and actuators Art. 1256. Contact your usual installer.
U17 How to call a secondary switchboard from a
main switchboard (available from R.I.006)
When calling a secondary switchboard, the main
switchboard may use one of the 3 following methods:
• enter the switchboard number (e.g. 005 240) and
press :
• scroll through the directory using the keys until
the name is displayed and press :
• press the corresponding speed number (see “I4RECORDING SPEED NUMBER” page 36).
- If the call has taken place correctly:
- if the call has not taken place correctly:
- if the system is busy:
(available from R.I.006)
ACTUATOR
CODE:
USER: 005 240
TO CALL
SWITCHBOARD 005
CODE: 005 240
CALLING
USER 005 240
USER 005 240
NOT AVAILABLE
BUSY
USER
E N
MT SB 0131
Page 32
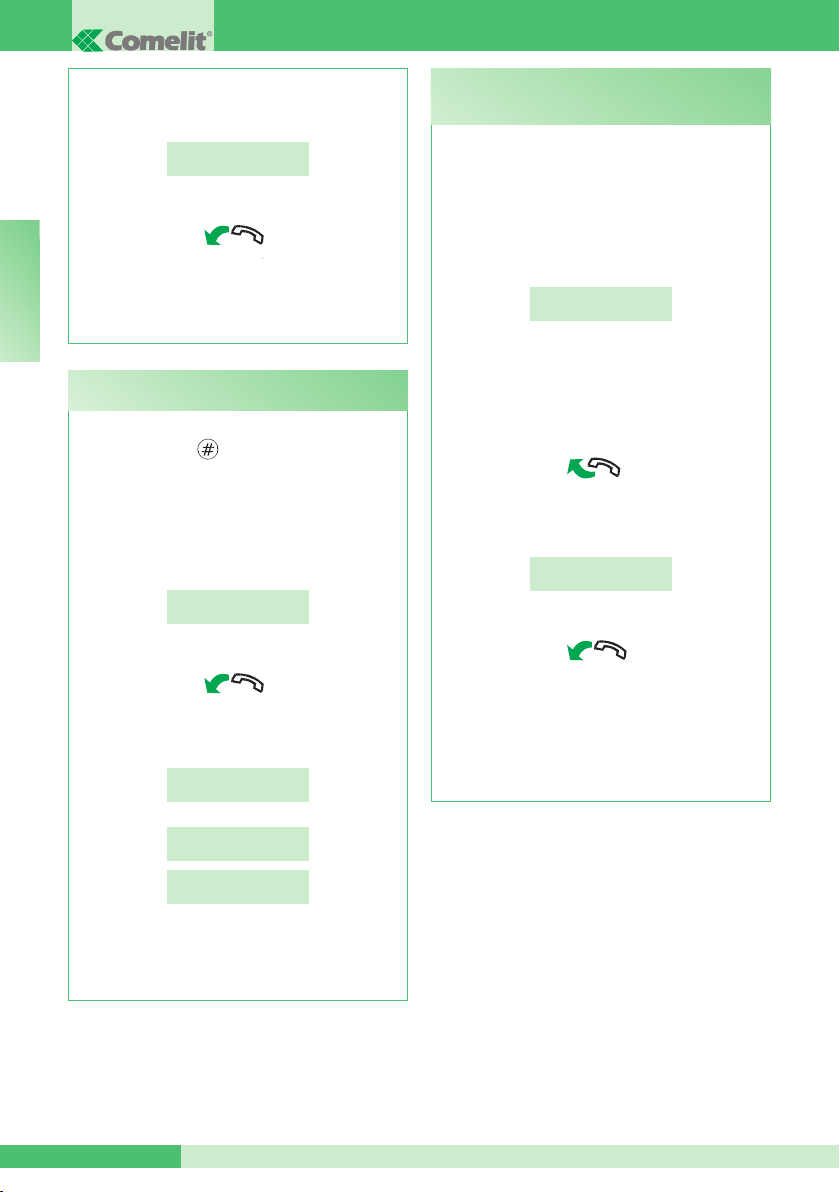
GROUP S.p.A.
When the switchboard handset is lifted,
communication with the main switchboard begins; the
maximum duration of the conversation is 2,5 minutes;
COMMUNICATING
WITH USER 005 240
- to end the conversation, hang up the handset.
CAUTION!
When the secondary switchboard and main
E N
switchboard are communicating with each other,
calls cannot be transferred or put on hold.
U18 How to call a main switchboard from a
secondary switchboard (available from R.I.006)
To call a main switchboard from a secondary
switchboard, press .
- If the call has taken place correctly, you will hear 3
conrmation tones.
When the main switchboard handset is lifted,
communication with the secondary switchboard
begins; the maximum duration of the conversation
is 2,5 minutes;
CALL FOR
SWITCHBOARD
- to end the conversation, hang up the handset.
U19 How to answer a call from the secondary
switchboard to the main switchboard (available
from R.I.006)
When the main switchboard receives a call from the
secondary switchboard:
- the NAME of the secondary switchboard making
the call (if listed in the directory, see “U8 HOW TO
ENTER A NAME IN THE DIRECTORY”, page 29) or
the address of the switchboard making the call (e.g.
005 240) is displayed.
CALLED FROM
USER 005 240
005= indicates the “zone”
240= indicates the general switchboard ID
• to reject the call, press CANC;
• to answer the call coming from the secondary
switchboard, lift the handset;
- the main switchboard begins communicating with
the secondary switchboard, the maximum duration
of the conversation is 2,5 minutes;
COMMUNICATING
WITH USER 005 240
- to end the conversation, hang up the handset.
- If the call has not taken place correctly, if the
system is busy or if the main switchboard does
not exist, the display shows:
FUNCTION
NOT AVAILABLE
and
SPEAKER LINE
TEST OK
SPEAKER LINE
TEST KO
CAUTION!
When the secondary switchboard and main
switchboard are communicating with each other,
calls cannot be transferred or put on hold.
MT SB 01 32
CAUTION!
If the switchboard is busy or the switchboard
operator is momentarily absent and cannot
answer within 30 seconds, the call will be added
to the log (see “U6 HOW TO CALL AN INTERNAL
UNIT LISTED IN THE CALL LOG”, page 28).
Page 33
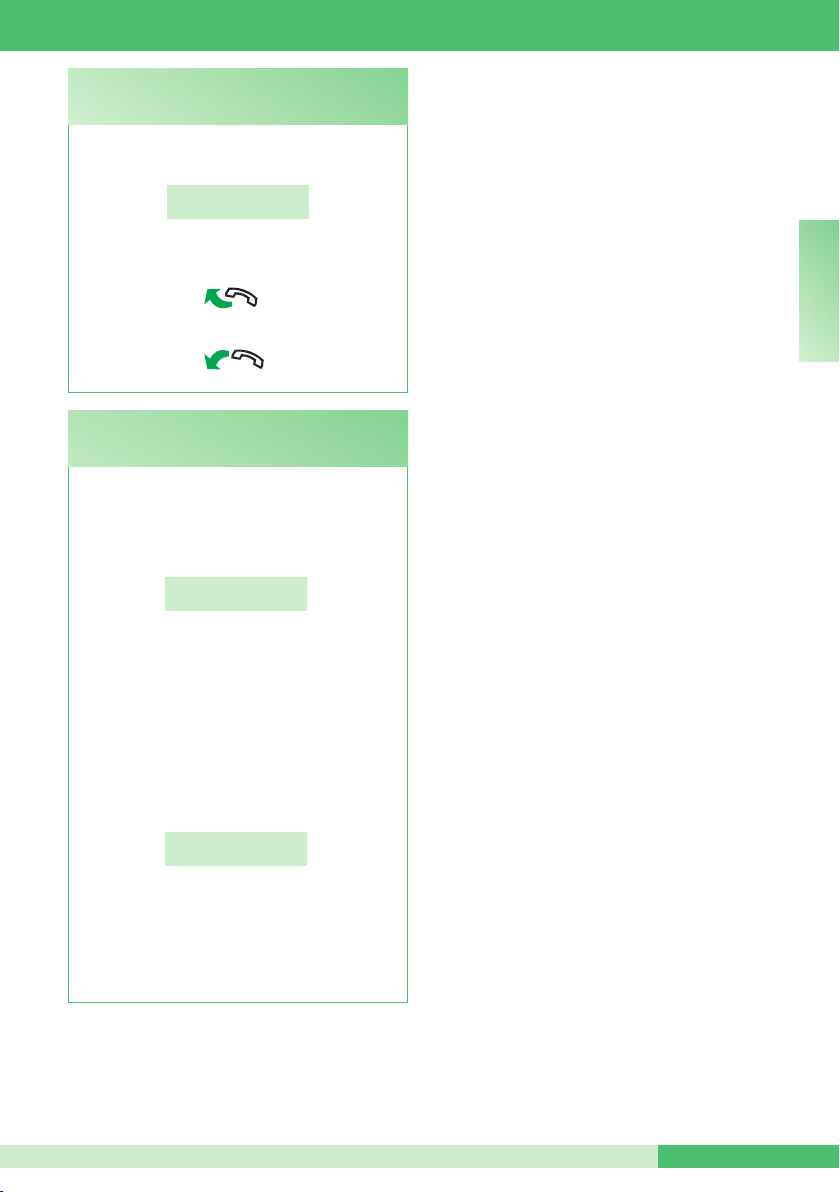
U20 How to answer a call from the main
switchboard to the secondary switchboard
(available from R.I.006)
When the secondary switchboard receives a call from
the main switchboard:
CALL FOR
SWITCHBOARD
- to answer the call coming from the main
switchboard, lift the handset;
- to end the conversation, hang up the handset.
U21 How to activate (MASTER) or deactivate
(SLAVE) the main switchboards
(available from R.I.006)
When using 2 main switchboards congured in series
(see page 86), use one of the following methods:
• press the A/V key on the active switchboard
(MASTER), the following screen will appear:
*
1- MASTER
2 - SLAVE
MT SB 01
E N
- press 2 to deactivate it (SLAVE).
The switchboard will switch off, while the other
switchboard will switch on automatically to become
the MASTER.
or
• press ON/OFF on the deactivated switchboard
(SLAVE) to switch it on.
- press the A/V key and the following screen will
appear:
*
1- MASTER
2 - SLAVE
- press 1 to conrm that you wish to activate the
switchboard (MASTER).
- press ESC repeatedly to return to the main
screen.
The other switchboard will be deactivated
automatically, to become the SLAVE.
MT SB 0133
Page 34
GROUP S.p.A.
Menu 1-7 screens tree diagram
1- CHANGE TIME SET TIME
2- CHANGE DATE SET DATE
E N
3- DAY/NIGHT
AUTOMATIC
SETTINGS
00:00
00/00/00
1- ON/OFF
SERVICE
ACTIVE
SERVICE
NON ACTIVE
4- RECORDING
SPEED NUMBER
5 - CHANGE
LANGUAGE
6- DOWNLOAD
NAMES FROM PC
2- SET TIMES
3- WEEK
PROGRAM
SPEED NUMBER XX
CODE: XXX
*1 - ITALIAN
2 - ENGLISH
3 - FRENCH
4 - GERMAN
5 - PORTUGUESE
6 - DANISH
7 - FINNISH
8 - DUTCH
9 - SPANISH
SERVICE
ACTIVE
TIME 01:
00:00
TIME 02:
00:00
TIME 03:
00:00
TIME 04:
00:00
MONDAY
MODE: DAY
7- ALL
NAMES DELETED
MT SB 01 34
DELETE NAMES
IN DIRECTORY?
ENTER PASSWORD:
_ _ _ _
Page 35
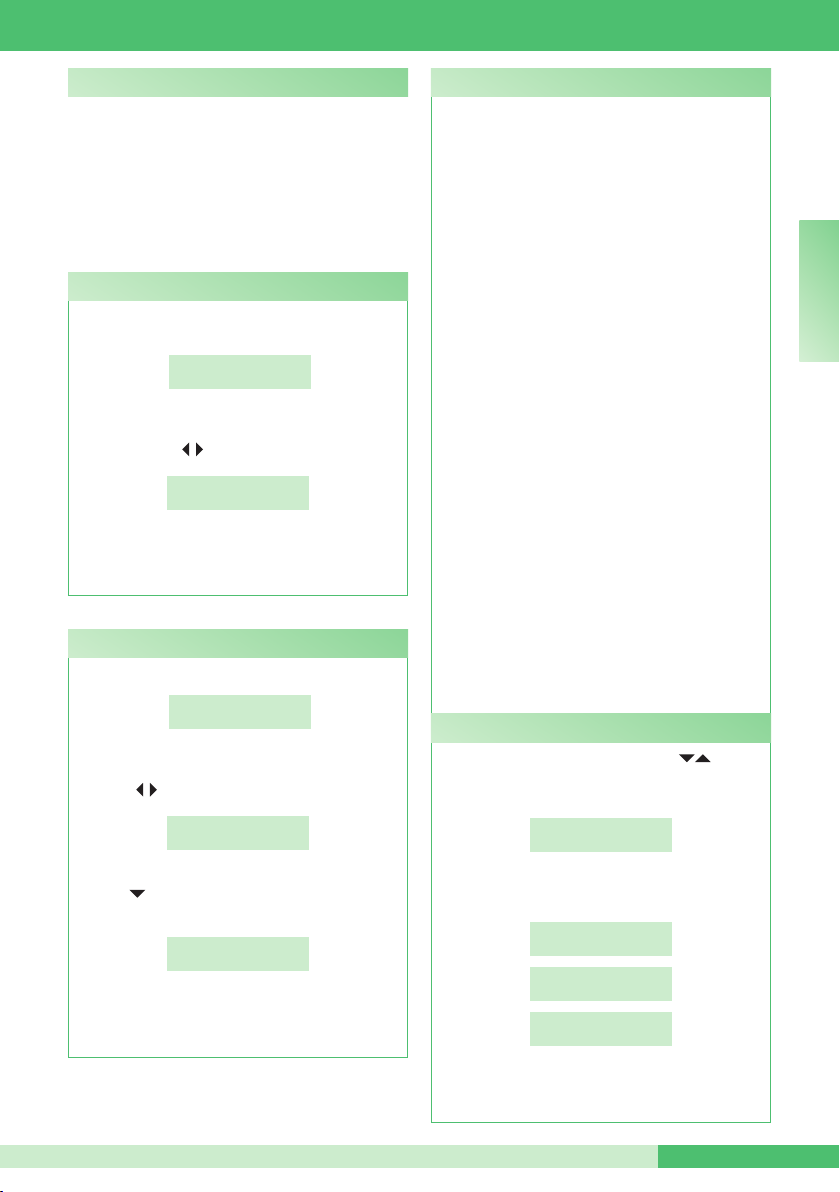
MT SB 01
Settings
This section is aimed at qualied technicians who,
after installing the product, will program the porter
switchboard using guided menus, which can be
viewed on the display by navigating the main menu.
The user can apply these functions to change some
of the switchboard settings (e.g.: language, date/
time, delete all names in the directory, etc.).
I1 - Change time
- press the MENU key and the 1-CHANGE TIME
key:
1-CHANGE TIME
2-CHANGE DATE
- the cursor will be positioned on the rst digit. Enter
the time using the alphanumeric keypad, moving the
cursor using the keys;
- press OK to conrm;
- press ESC to return to the main screen.
I2 - Change date
- press the MENU key and the 2-CHANGE DATE key;
- the cursor will be positioned on the rst digit. Enter the
date using the alphanumeric keypad, moving the cursor
using the keys;
SET TIME
00:00
1-CHANGE TIME
2-CHANGE DATE
SET DATE
00/00/00
I3 - Day/night automatic mode
You can decide to organise the week by selecting
one of these three operating modes for each day:
• AUTO: the system passes from DAY mode to
NIGHT mode at the programmed times.
It is not possible to decide on different time bands for
days during which the system operates in AUTO mode.
• NIGHT: the system is in this mode for the whole
day.
• DAY: the system is in this mode for the whole day.
The system can be set to allow automatic passage
from DAY mode to NIGHT mode at specic times
which can be programmed by the user. A MAXIMUM
of 4 TIMES can be set.
It is extremely important to set the times for switching
from one mode to another correctly.
TIME 1: determines the rst mode switch: from
NIGHT mode to DAY mode
TIME 2: determines the second mode switch: from
DAY mode to NIGHT mode
TIME 3: determines the third mode switch: from
NIGHT mode to DAY mode
TIME 4: determines the fourth mode switch: from
DAY mode to NIGHT mode.
All 4 TIMES must always be set.
Example:
You want to congure the switchboard with the
following parameters:
07:00 - 12:00 Day mode operation
13:00 - 22:00 Day mode operation
TIME 1: 07:00 » NIGHT / DAY
TIME 2: 12:00 » DAY / NIGHT
TIME 3: 13:00 » NIGHT / DAY
TIME 4: 22:00 » DAY / NIGHT
I3.1 - Activation/deactivation
- press the MENU key and use the keys to
view the 3-DAY/NIGHT AUTOMATIC menu, then
press 3;
3-DAY/NIGHT
AUTOMATIC
E N
- press OK to conrm;
- press until the desired day appears on the
display;
ENTER DAY:
MON
- press OK to conrm;
- press ESC to return to the main screen.
- press the 1-ON/OFF key to activate or deactivate
the function;
1-ON/OFF
2-SET TIMES
SERVICE
ACTIVE
SERVICE
NON ACTIVE
- press ESC to return to the main screen.
MT SB 0135
Page 36
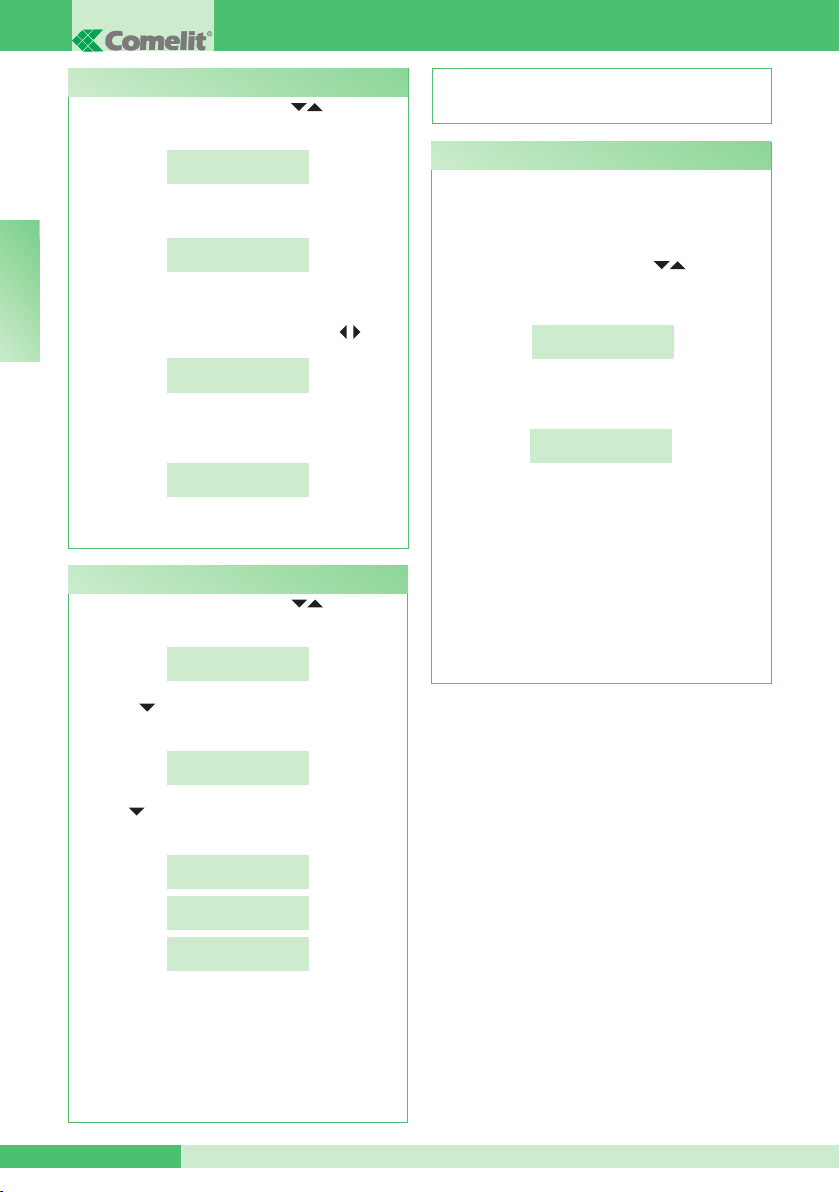
GROUP S.p.A.
I3.2 - Set times in auto mode
- press the MENU key and use the keys to view
the 3-DAY/NIGHT AUTOMATIC menu, then press 3;
3-DAY/NIGHT
AUTOMATIC
- press the 2-SET TIME key;
1-ON/OFF
2-SET TIMES
E N
- 00:00 is the default time, the cursor will be positioned
on the rst digit. Enter the time using the alphanumeric
keypad, moving the cursor using the keys ;
TIME 1:
00:00
- to conrm and move on to the next time, press OK
and repeat the procedure for all 4 times;
TIME 2:
00:00
- press ESC repeatedly to return to the main screen.
I3.3 - Weekly programming
- press the MENU key and use the keys to view
the 3-DAY/NIGHT AUTOMATIC menu, then press 3;
3-DAY/NIGHT
AUTOMATIC
set as listed in the section “I3.2 SET TIMES IN
AUTO MODE”, page 36.
I4 - Recording speed number
Speed numbers can be used to call an internal
extension directly by pressing the key associated
with the user address.
To store a speed number in the memory:
- press the MENU key and use the keys to view
the 4-RECORDING SPEED NUMBER menu, then
press 4;
4-RECORDING
SPEED NUMBER
- enter the code using the alphanumeric keypad
(default code 000):
SPEED NUMBER 01
CODE: 000
NOTE: the CODE arrangement will be as follows:
- CODE (max. 3 digits): 000 for the Simplebus system
- CODE (max. 3+3 digits): --- --- for the Simplebus
TOP system
- CODE (max. 6 digits): ------ for the Simplebus and
Simplebus TOP system with INDIRECT CODE
- To move on to the next speed number, press OK
and repeat the procedure;
- press ESC to return to the main screen.
- use the key to view the 3-WEEK PROGRAM
menu, then press 3;
3-WEEK
PROGRAM
- press to select one of the 3 operating modes
(MODES: AUTO- DAY- NIGHT)
MONDAY
MODE: AUTO
MONDAY
MODE: DAY
MONDAY
MODE: NIGHT
- to conrm and move on to the next day, press OK
and repeat the procedure for all days of the week;
- press OK to conrm;
- press ESC repeatedly to return to the main screen.
CAUTION! The days programmed to operate in
AUTO mode will all have the same time bands
MT SB 01 36
Page 37
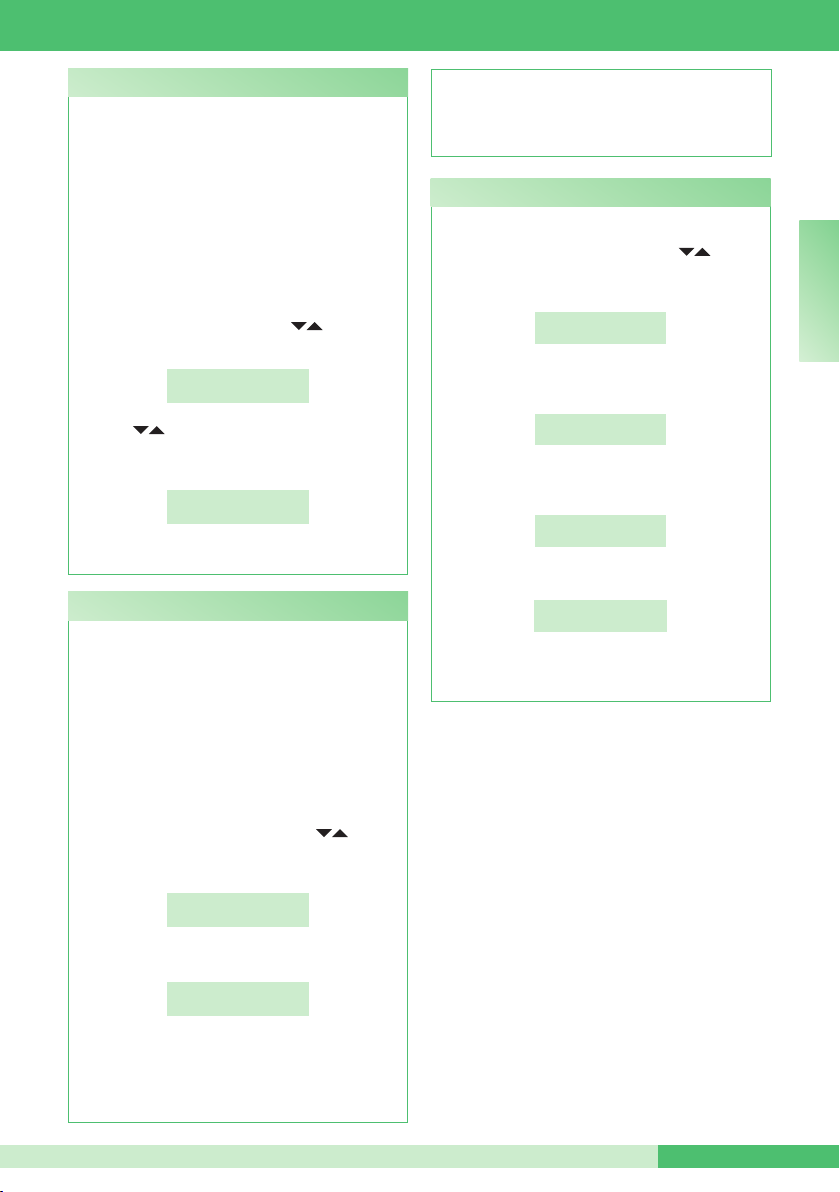
MT SB 01
I5 - Change language
The switchboard language can be selected from the
following list:
*1- Italian (default)
2- English
3- French
4- German
5- Portuguese
6- Danish
7- Finnish
8- Dutch
9- Spanish
- press the MENU key and use the keys to view
the 5-CHANGE LANGUAGE menu, then press 5;
5-CHANGE
LANGUAGE
- use the keys to display the selected language
and press the corresponding button (e.g. 2 for
English);
1-ITALIAN
*2-ENGLISH
- press ESC repeatedly to return to the main screen.
I6 - Downloard names from pc
You can enter names in the memory by downloading
them from a PC using Art. 1249/A. To perform this
operation, activate the download function from the
menu, connect the switchboard to the PC via the
relevant serial cable, and start running the download
software.
CAUTION! ONLY ACTIVATE THE FUNCTION
WHEN YOU WANT TO DOWNLOAD NAMES
FROM A PC. THE FUNCTION REMAINS ACTIVE
FOR 1 MINUTE.
- press the MENU key and use the keys to
display the 6-DOWNLOAD NAMES FROM PC
menu;
6-DOWNLOAD
NAMES FROM PC
may now start downloading names using Art. 1249/A,
during this process the switchboard cannot make or
receive calls; the service is automatically deactivated
on completion of the download.
I7 - All names delete
To delete names in the directory:
- press the MENU key and use the keys to
display the 7-ALL NAMES DELETED menu, then
press 7;
7-ALL NAMES
DELETED
- you will be asked if you want to delete the names
in the directory;
DELETE NAMES
IN DIRECTORY ?
- to conrm, press OK and enter the conrmation
password (1998);
ENTER PASSWORD:
****
- press OK to conrm;
DELETING
...
- once the information has been deleted, the main
screen will be displayed.
E N
- press 6 to activate the function:
SERVICE
ACTIVE
From R.I. 006, downloading of names can ONLY take
place when the DIRECTORY is EMPTY.
- press ESC to return to the main screen, on which
the text “!PC” will be displayed (for 1 minute); you
MT SB 0137
Page 38
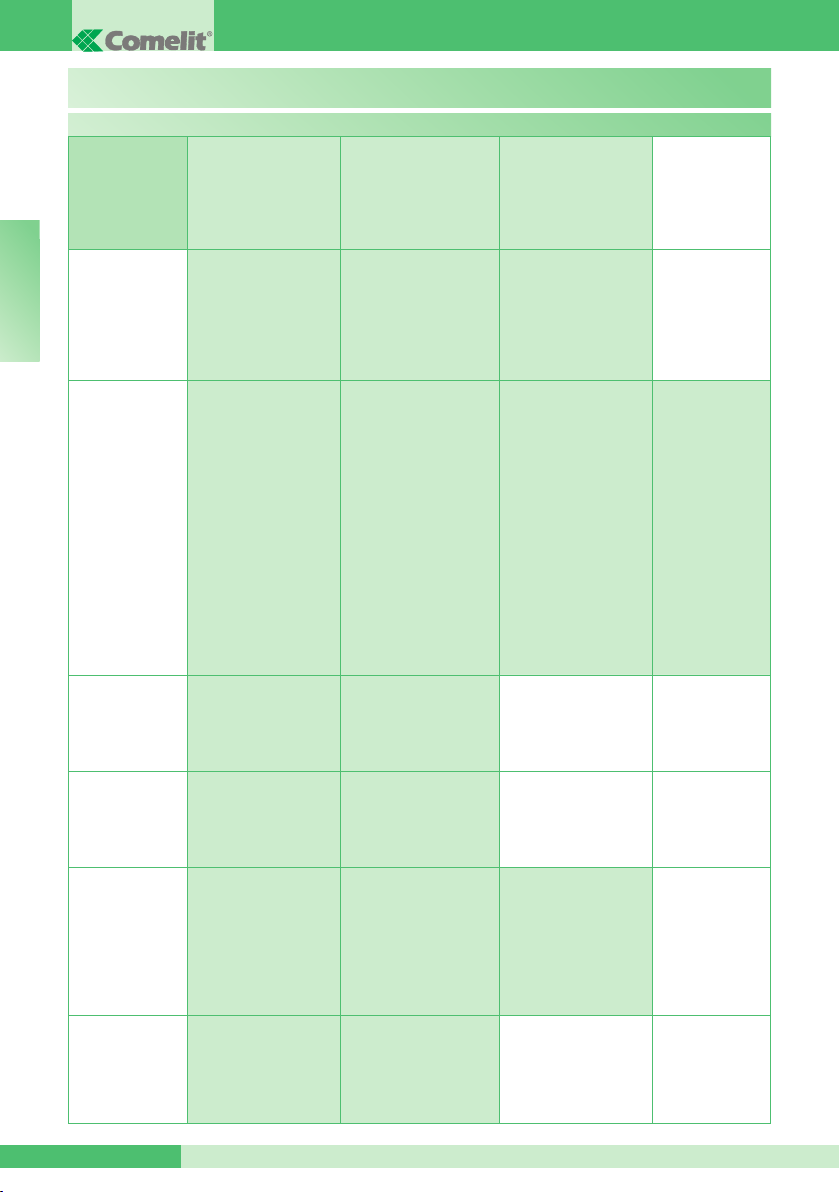
GROUP S.p.A.
Menu 8 screens tree diagram
8 - ADVANCED
OPTIONS
1 - VIDEO MODE
CONFIGURATION
CONFIGURATIONS
SERVICE
ACTIVE
SERVICE
NON ACTIVE (default)
1 - NORMAL MODE
*
2 - DIRECT MODE
2- CALLING
E N
MODE
3- TYPE OF
SWITCHBOARD
4- SELF-IGNITION
ON/OFF
5- TRIPLE
CALL ON/OFF
6- FUNCTION
CH-CH CONTACT
*1 - SB CODE
2 - INDIRECT CODE
3 - INDIRECT CODE
WITHOUT NAME
*1 - SECONDARY
2 - MAIN
(SIMPLEBUS TOP
mode)
SERVICE
ACTIVE
SERVICE NON
ACTIVE (default)
SERVICE
ACTIVE
SERVICE NON
ACTIVE (default)
*1- CALL REPLY
2- EXT. MONITOR
*1 - FILTER OFF
2 - FILTER ON
*1 - SINGLE CPS
2 - PARALLEL CPS
3 - SERIES CPS
*1 - SINGLE CPS
2 - PARALLEL CPS
3 - SERIES CPS
*CONTACT TIME:
1 SEC
CONTACT TIME:
3 SEC
CONTACT TIME:
5 SEC
(function not
available)
1 - MASTER
*2 - SLAVE
1 - LS-IN
*2 - LP-IN
1 - MASTER
*2 - SLAVE
7- FUNCTION
MAIN CPS+SEC
MT SB 01 38
SERVICE
ACTIVE
SERVICE NON
ACTIVE (default)
Page 39
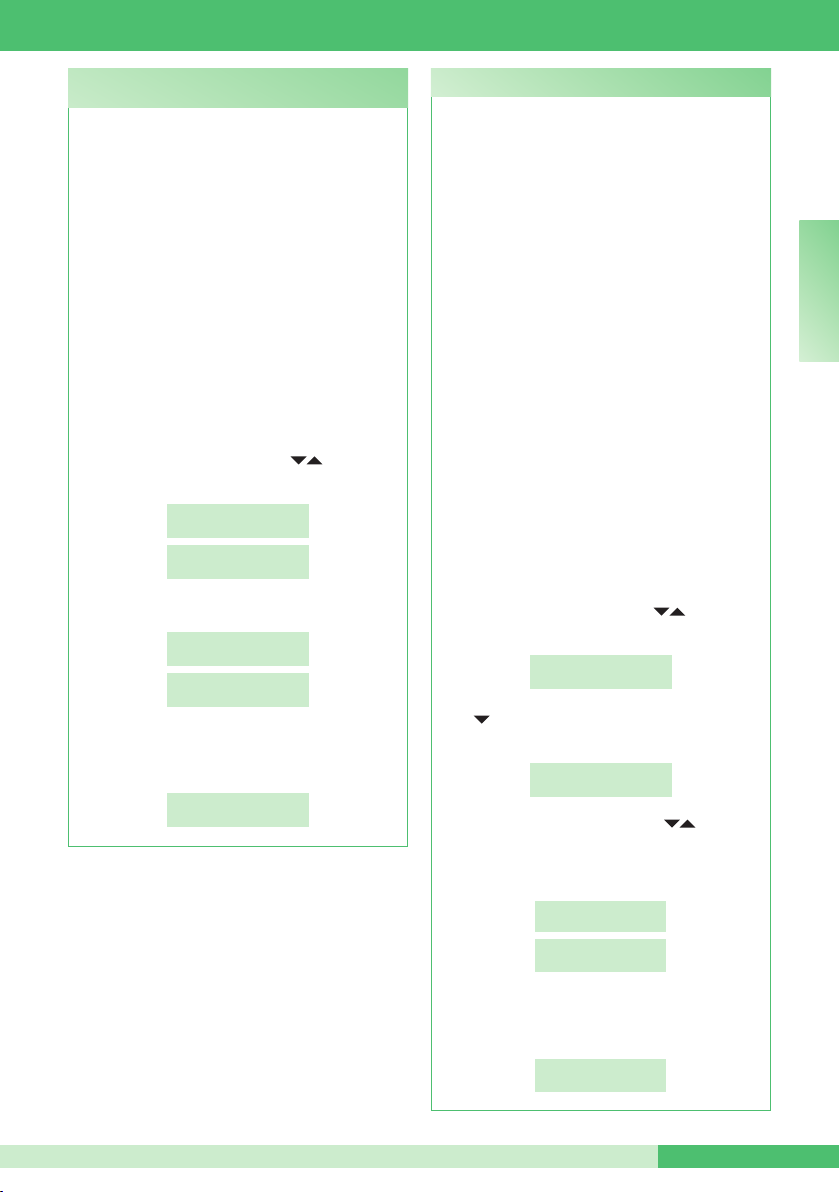
C8.1 - Video mode configuration
(available from R.I.006)
This is disabled by default.
Activating this function will allow you to make a video
call to an internal unit. The monitor called by the
switchboard will switch on, making it possible to view,
for example, the images from the remote cameras
connected to Art. 1259/A or Art. 1259C (see FT/
SB/13 or FT/SBC/05).
VIDEO mode can be NORMAL or DIRECT.
In NORMAL mode, the internal unit video feed
begins when the handset is lifted, or when the
audio line is activated in receipt of a call from the
switchboard; in DIRECT mode, on the other hand, it
begins automatically on receipt of a call.
CAUTION! For DIRECT mode to operate correctly,
the system must be tted with TOP brackets,
door-entry phones, switching devices and mixers
(see “TABLE OF SIMPLEBUS TOP PRODUCTS”,
page 42).
To activate the function:
- press the MENU key and use the keys to view
the 8-ADVANCED OPTIONS menu, then press 8;
- press 1 to activate or deactivate the function;
- if the service has been activated, you will be asked
to select one of the 2 modes.
Press 1 for NORMAL MODE or 2 for DIRECT MODE;
8-ADVANCED
OPTIONS
1-VIDEO MODE
CONFIGURATION
SERVICE
ACTIVE
SERVICE
NON ACTIVE
*
1- NORMAL MODE
2- DIRECT MODE
MT SB 01
C8.2 - Calling mode (available from R.I.006)
This function can be used to select the manual
switchboard calling mode, from the 3 options
available:
1- SIMPLEBUS CODE (default), the call is made by
entering the code corresponding to each user.
• If the system is a SIMPLEBUS type, the door-entry
phone user is identied by a User Name eld
(optional) and a Code eld no longer than 3 digits
(between 1 and 240).
EXAMPLE: User name = Smith; Code = 015.
• If the system is a SIMPLEBUS TOP type, the doorentry phone user is identied by the User Name
eld (optional) and a Code eld consisting of two
parts: zone eld with no more than 3 digits (between
1 and 500) and a user eld which must have 3
digits (between 1 and 249).
EXAMPLE: User name = Smith; Code = 25 015.
2- INDIRECT CODE (the call takes place by entering
the indirect code with 6 digits. This code must be
stored in the memory and associated with the user
who has been given a name (compulsory) and
Simplebus or Simplebus TOP code).
3- INDIRECT CODE WITHOUT NAME, see previous
mode; the difference is that in this case the name
eld is not compulsory. In this mode, FILTER OFF
or FILTER ON will be requested; if activated only
named users will appear on the display; however, if
the lter is deactivated, all users will be displayed.
To activate the function:
- press the MENU key and use the keys to view
the 8-ADVANCED OPTIONS menu, then press 8;
- use to view the 2-CALLING MODE menu, then
press 2;
- view the selected mode using the keys, then
press 1 for the SIMPLEBUS CODE, press 2 for
the INDIRECT CODE or 3 for the INDIRECT CODE
WITHOUT NAME;
8-ADVANCED
OPTIONS
2-CALLING
MODE
*1-SB CODE
2-INDIRECT CODE
3-INDIRECT CODE
WITHOUT NAME
E N
- if the 3-DIRECT CODE WITHOUT NAME is selected,
lter activation is requested; press 1 to disable it, or 2
to activate it;
*1-FILTER OFF
2-FILTER ON
MT SB 0139
Page 40
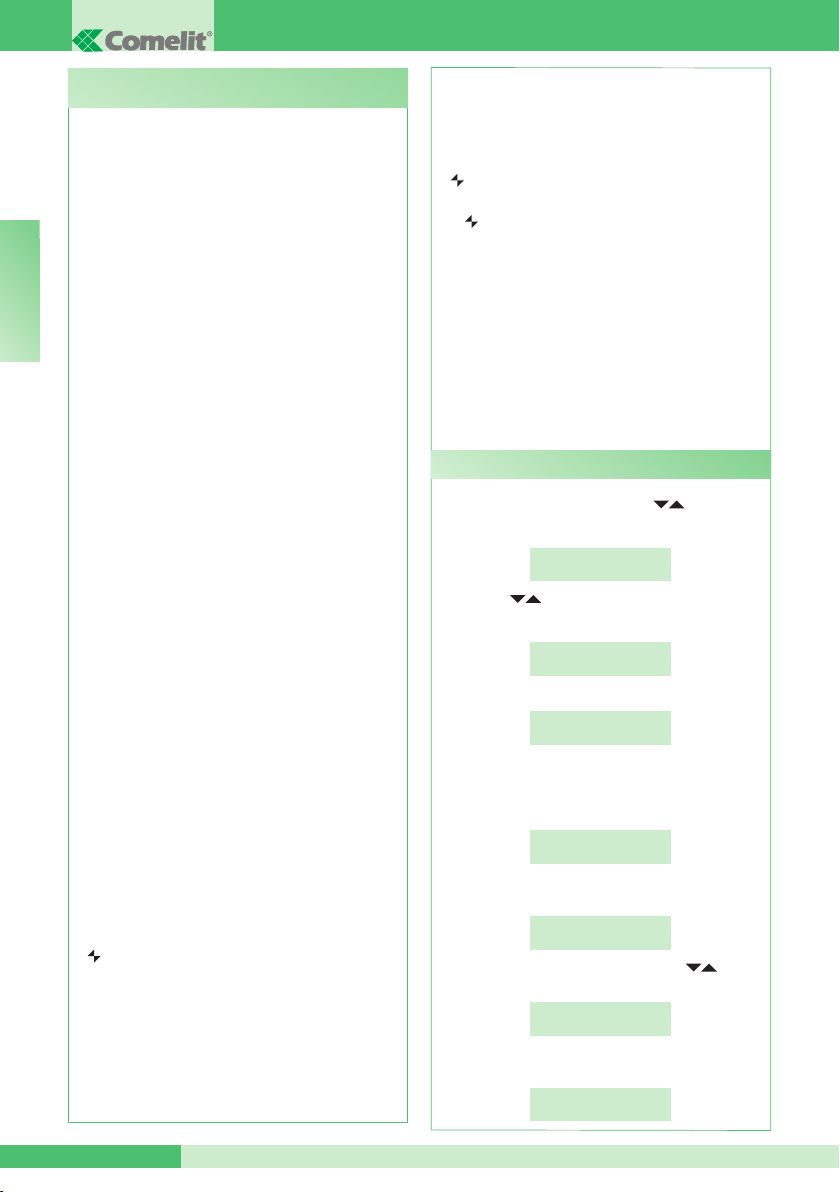
GROUP S.p.A.
C8.3 -Type of switchboard (Simplebus Top mode)
(available from R.I.006)
The switchboard may be SECONDARY or MAIN.
• Set SECONDARY when the switchboard is used as
SECONDARY, on the outgoing line from the LM-LM
terminals of switching device Art. 1424 (Simplebus
TOP system; see diagram SBTOP/001PX, page
80); or when the switchboard is used as MAIN,
in Simplebus systems with switching devices Art.
1224A or in a system with a single riser and no
switching devices.
CAUTION! the SECONDARY switchboard cannot
be congured as a switchboard in PARALLEL.
E N
• Set MAIN when the switchboard is used as MAIN
in SIMPLEBUS TOP systems, then positioned in
the rst section before the switching devices Art.
1424 which mark out the zones/risers (see diagram
SBTOP/002PX, page 82).
The SECONDARY or MAIN switchboard must then
be congured as:
1- SINGLE
2- PARALLEL
3- SERIES.
1- Select SINGLE when the switchboard is the only
one in the system, or the only one serving a specic
riser.
2- If there are 2 main or secondary control
units serving the same riser, the PARALLEL
conguration implies that both switchboards will
be operative with the same functions (see diagram
SBTOP/005PX, page 88).
The rst of the two to answer a call will preclude
the possibility of the other one performing the same
procedure.
If one of the 2 devices is switched on or off, the
other will automatically follow suit.
Congure both switchboards as PARALLEL and
set the switchboard connected underneath the
LS-LS line of the switching device Art. 1424 as
LS-IN; set the device positioned underneath the
LPin-LPin line of switching device Art. 1424 as
LP-IN.
For the PARALLEL switchboard, switching to
NIGHT and the DAY/NIGHT AUTOMATIC function
is not possible (see “I3- DAY/NIGHT AUTOMATIC”,
page 35).
A P should appear on the standby screen of the
two switchboards, indicating that the switchboard
is congured in parallel, in addition to the xed icon
.
3- If there are 2 main or secondary switchboards
serving the same riser, the SERIES conguration
implies that only 1 of the 2 can be operative
(MASTER switchboard), while the other is
deactivated (SLAVE switchboard; see diagram
SBTOP/004PX, page 86).
Congure both switchboards as SERIES and the
active switchboard will, from time to time, be the
one set as MASTER. To change a switchboard
from MASTER to SLAVE and vice-versa, see “U21
HOW TO ACTIVATE (MASTER) OR DEACTIVATE
(SLAVE) THE MAIN SWITCHBOARDS”, page 33.
An S should appear on the standby screen of the
two switchboards, indicating that the switchboard
is congured in series, in addition to the xed icon
.
CAUTION!
- if ashes, it is indicating that the 2 switchboards
are not communicating correctly.
- if the icon ! appears, there is a conguration
problem with the 2 switchboards (e.g. both set
as MASTER or SLAVE, LP-IN or LS-IN, or one is
SERIES and the other PARALLEL).
- If, in a Simplebus TOP system (with switching
devices Art. 1424), both main and secondary
switchboards are installed (see diagram
SBTOP/003PX, page 84); for correct system
operation, it will be necessary to activate - on all
switchboards - the setting “C8.7- FUNCTION MAIN
CPS+SEC”, page 42.
How to configure a main switchboard
- press the MENU key and use the keys to view
the 8-ADVANCED OPTIONS menu, then press 8;
8-ADVANCED
OPTIONS
- use the keys to display the 3-TYPE OF
SWITCHBOARD menu, then press 3;
3- TYPE OF
SWITCHBOARD
- press 2;
1-SECONDARY
*2-MAIN
The switchboard is congured as SINGLE CPS
by default. It is now possible to congure it as
PARALLEL CPS or SERIES CPS.
- to congure it as 2-PARALLEL CPS, press 2;
1-SINGLE CPS
*2-PARALLEL CPS
- to congure it as LS-LN, press 1;
to congure it as LP-LN, press 2;
1- LS-IN
2- LP-IN
- to congure it as SERIES CPS, use the keys to
display the 3-SERIES CPS menu, then press 3;
*3-SERIES CPS
- to congure it as MASTER, press 1;
to congure it as SLAVE, press 2;
1- MASTER
2- SLAVE
MT SB 01 40
Page 41
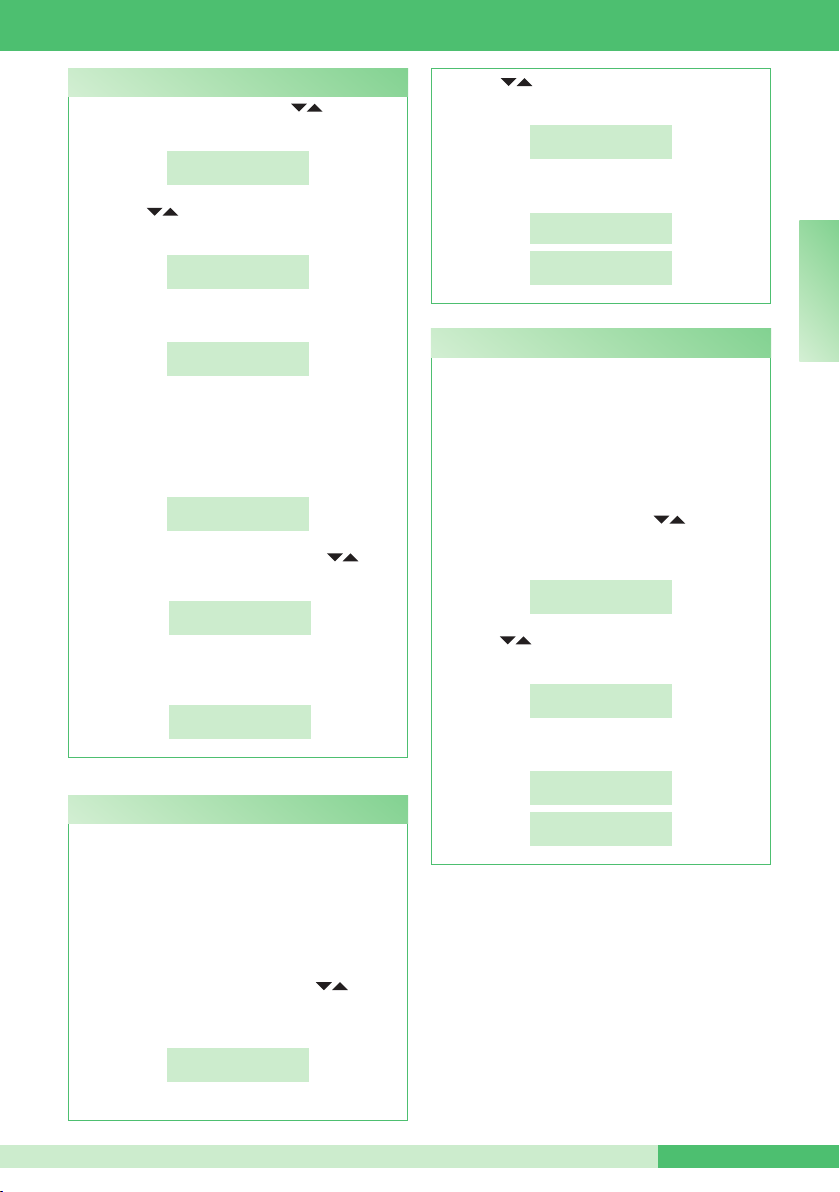
MT SB 01
How to configure a secondarya switchboard
- press the MENU key and use the keys to view
the 8-ADVANCED OPTIONS menu, then press 8:
- use the keys to display the 3-TYPE OF
SWITCHBOARD menu, then press 3;
- Press key 1;
The switchboard is congured as SINGLE CPS by
default.
It is now possible to congure it as SERIES CPS,
in fact the function 2-PARALLEL CPS IS NOT
AVAILABLE;
- to congure it as SERIES CPS, use the keys to
display the 3-SERIES CPS menu, then press 3;
- to congure it as MASTER, press 1; to congure it
as SLAVE, press 2;
C8.4 - Self-ignition on/off (available from R.I.006)
This is disabled by default.
This function is only available for non-TOP Simplebus
systems and requires Art. 1259 for the cyclic
displaying of images from remote cameras.
This function can be used to activate or deactivate
the self-ignition transmitted by the internal units with
the switchboard in DAY mode.
To activate the function:
- press the MENU key and use the keys to
view the 8-ADVANCED OPTIONS menu, then
press 8;
8-ADVANCED
OPTIONS
3- TYPE OF
SWITCHBOARD
*
1-SECONDARY
2-MAIN
*1-SINGLE CPS
2-PARALLEL CPS
*3-SERIES CPS
1- MASTER
2- SLAVE
8-ADVANCED
OPTIONS
- use the keys to view the 4 SELF-IGNITION
ON/OFF menu;
4-SELF-IGNITION
ON/OFF
- press 4 to activate or deactivate the function;
SERVICE
ACTIVE
SERVICE
NON ACTIVE
C8.5 -Triple call on/off (available from R.I.006)
This is disabled by default.
This function can be used to activate or deactivate
the triple call made by the switchboard to the internal
units.
The call will therefore take place on 3 consecutive
occasions (in the case of video calls: the rst 2 will be
audio calls and the third will be a video call).
To activate the function:
- press the MENU key and use the keys to view
the 8-ADVANCED OPTIONS menu, then press 8;
8-ADVANCED
OPTIONS
- use the keys to display the 5-TRIPLE CALL
ON/OFF menu;
- press 5 to activate or deactivate the function;
5-TRIPLE CALL
ON/OFF
SERVICE
ACTIVE
SERVICE
NON ACTIVE
E N
MT SB 0141
Page 42
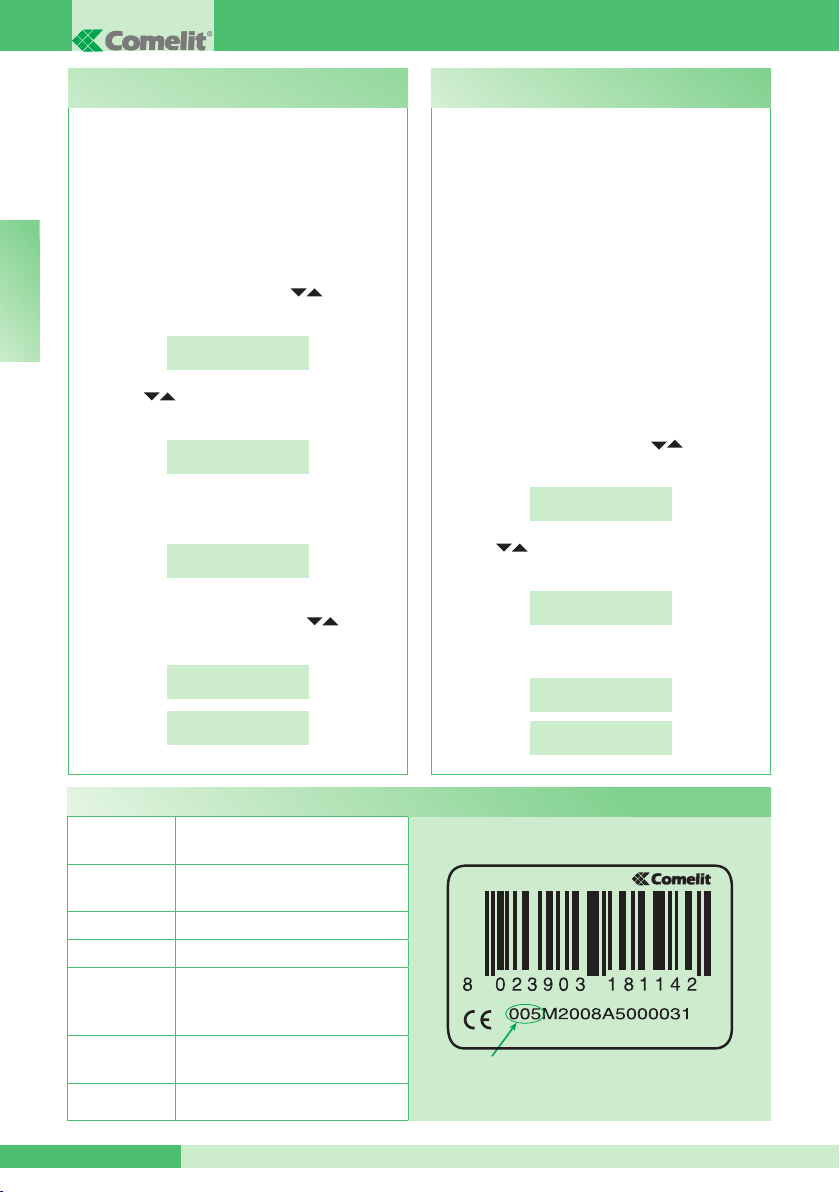
GROUP S.p.A.
C8.6 - Function CH-CH contact
(available from R.I.006)
This function can be used to assign a function to the
CH-CH contact; by default the active function is call
repetition and it is possible to select a contact time
(closure) of either 1, 3 or 5 seconds.
Alternatively, the parallel or external monitor
function can be activated; the contact will close for
the entire duration of a VIDEO call from the external
unit.
To activate the function:
- press the MENU key and use the keys to view
E N
the 8-ADVANCED OPTIONS menu, then press 8;
8-ADVANCED
OPTIONS
- use the keys to display the 6-FUNCTION
CH-CH CONTACT menu, then press 6;
6-FUNCTION
CH-CH CONTACT
- press 1 for the CALL REPLY function or 2 for the
EXTERNAL MONITOR function;
1-CALL REPLY
2-EXT. MONITOR
- if key 1 has been selected, the CONTACT TIME
(closure) will be requested; use keys to display
the selected time (1, 3 or 5 sec.);
CONTACT TIME:
1 SEC
CONTACT TIME:
3 SEC
C8.7 - Function main cps+sec
(available from R.I.006)
This is disabled by default.
CAUTION!
1 This function must remain disabled to prevent
malfunctioning when using switchboards, brackets,
door-entry phones, switching devices and mixers
with R.I. lower than the values indicated in the table
below.
2 This function must be activated on all switchboards
for the correct operation of Simplebus TOP systems
(with switching devices Art. 1424) which use both
main and secondary switchboards.
For the correct operation of systems with main
and secondary switchboards, the system must be
tted with TOP switchboards, brackets, door-entry
phones, switching devices and mixers, with R.I.
equal to or greater than the values listed in the table
on page 42.
To activate the function:
- press the MENU key and use the keys to view
the 8-ADVANCED OPTIONS menu, then press 8;
8-ADVANCED
OPTIONS
- use the keys to view the 7- FUNCTION MAIN
CPS+SEC menu;
7- FUNCTION
MAIN CPS + SEC
- press 7 to activate or deactivate the function;
SERVICE
ACTIVE
SERVICE
NON ACTIVE
Table of Simplebus TOP products
BRACKETS
DOOR-ENTRY
PHONES
SWITCHING
DEVICES
MIXERS
EXTERNAL
UNITS
SWITCHBOARDS
SOFTWARE
Art. 5714C R.I. 007 - Art. 5814C R.I. 002
Art. 6114C R.I. 015
Art. 2608 R.I. 006 - Art. 2610 R.I. 008
Art. 2619 R.I. 000 - Art. 2628 R.I. 005
Art. 2638 R.I. 006
Art. 1424 R.I. 002
Art. 4888C R.I. 013
Art. 1602 R.I. 027 - Art. 1602VCF R.I. 002
Art. 3340 R.I. 021 - Art. 3342 R.I. 021
Art. 3070/A R.I. 010 Art. 3072/A R.I. 010
Art. 4660C R.I. 013
Art. 1998A R.I. 006 - Art. 1998V R.I. 001
Art. 1998VC R.I. 001
Art. 1249/A R.I. 002
MT SB 01 42
R.I.
Page 43

SOMMAIRE
• INTRODUCTION
- Vue générale 44
- Description bornier 44
- Touches de programmation et afcheur 45
- Clavier alphanumérique 45
- Description générale 45
• UTILISATION
U1 Comment répondre à un appel depuis un poste
intérieur
U2 Comment répondre à un appel depuis un poste
extérieur
U3 Comment appeler un poste intérieur 47
U4 Comment envoyer un appel d'un poste extérieur à un
poste intérieur
U5 Comment mettre en communication 2 postes intérieurs
(fonction intercommunicante)
U6 Comment appeler un poste intérieur présent dans la
liste des appels
U7 Comment utiliser le répertoire 49
U8 Comment insérer un nom en répertoire 49
U9 Comment chercher un nom en répertoire 49
U10 Comment effacer un nom du répertoire 49
U11 Comment modier un nom en répertoire 50
U12 Comment utiliser l'ouvre-porte 50
U13 Modalité de fonctionnement jour/nuit 50
U14 Comment activer la fonction “Suivi” (Follow me) 51
U15 Signalisation alarmes 51
U16 Comment activer un relais supplémentaire 51
U17 Comment appeler un standard secondaire depuis le
standard principal
U18 Comment appeler le standard principal depuis un
standard secondaire
U19 Comment répondre à un appel du standard secondaire
au standard principal
U20 Comment répondre à un appel du standard principal
au standard secondaire
U21 Comment activer (MASTER) ou désactiver (SLAVE)
les standards principaux
• RÉGLAGES
- Liste pages menu 1-7 54
- I1- Modier heure 55
- I2- Modier date 55
- I3- Jour / Nuit automatique 55
- I4- Enregistrement numéros brefs 56
- I5- Modier langue 57
- I6- Téléchargement noms du PC 57
- I7- Effacement total des noms 57
• CONFIGURATIONS
- Liste pages menu 8 58
- C8.1- Programmation modalité vidéo 59
- C8.2- Modalité d'appel 59
- C8.3- Type de standard (modalité Simplebus Top) 60
MT SB 01
- C8.4- Auto-allumage interne ON/OFF
- C8.5- Appel triple ON/OFF
- C8.6- Fonction contact CH-CH
- C8.7- Fonctionnement standard principal
+ Standard secondaire
- Tableau articles Simplebus TOP
• SCHÉMAS DE BRANCHEMENT
- SBC/06S Installation parlophonique avec une entrée
principale et standard de conciergerie.
46
- SB2V/EN/103G Installation parlophonique et
visiophonique Simplebus n/b avec 1 principale et
46
standard de conciergerie.
- SB2V/EN/103PX Installation parlophonique et
visiophonique Simplebus Color avec 1 entrée principale et
47
standard de conciergerie.
- SB2V/EN/105G Installation parlophonique et
48
visiophonique Simplebus n/b avec 2 entrées principales et
standard de conciergerie.
48
- SB2V/EN/105PX Installation parlophonique et
visiophonique Simplebus Color avec 2 entrées principales
et standard de conciergerie.
- SBC/08S Installation parlophonique avec une entrée
principale, “n” secondaires audio et standard de conciergerie.
- SB2V/018APX Installation Simplebus Color avec
module caméra déportée Art. 1259C en modalité
actionneur générique et standard de conciergerie.
- SB2V/026PX Installation parlophonique et visiophonique
avec 1 entrée principale et standard de conciergerie associé
au standard téléphonique Art. 2906 pour follow-me.
- SB2V/027PX Installation parlophonique avec standard
de conciergerie associé au standard téléphonique Art.
2906 pour follow-me.
51
- SB2V/EN/101G Installation parlophonique et
52
visiophonique Simplebus n/b avec 1 entrée principale, 3
secondaires vidéo et standard de conciergerie.
52
- SB2V/EN/101PX Installation parlophonique et
visiophonique Simplebus Color avec 1 entrée principale, 3
secondaires vidéo et standard de conciergerie.
53
- SB2V/EN/121G Installation parlophonique et
53
visiophonique Simplebus n/b avec 2 entrées principales, 3
secondaires audio et standard de conciergerie.
- SB2V/EN/121PX Installation parlophonique et
visiophonique Simplebus Color avec 2 entrées principales,
3 secondaires audio et standard de conciergerie.
- SBTOP/001PX Installation parlophonique et visiophonique
Simplebus TOP avec 1 entrée principale, 4 secondaires et
standards de conciergerie secondaires correspondants.
- SBTOP/002PX Installation parlophonique et
visiophonique Simplebus TOP avec 2 entrées principales,
4 secondaires et standard de conciergerie principal.
- SBTOP/003PX Installation parlophonique et
visiophonique Simplebus TOP avec 2 entrées principales,
1 standard de conciergerie principal, 2 secondaires et
standards de conciergerie secondaires correspondants.
- SBTOP/004PX Installation parlophonique et visiophonique
Simplebus TOP avec 1 entrée principale, 4 secondaires et 2
standards de conciergerie principaux en conguration SÉRIE.
- SBTOP/005PX Installation parlophonique et
visiophonique Simplebus TOP avec 1 entrée principale, 3
secondaires et 2 standards de conciergerie principaux en
conguration PARALLÈLE.
61
62
62
61
62
63
64
65
66
67
F R
68
69
70
71
72
74
76
78
80
82
84
86
88
MT SB 0143
Page 44
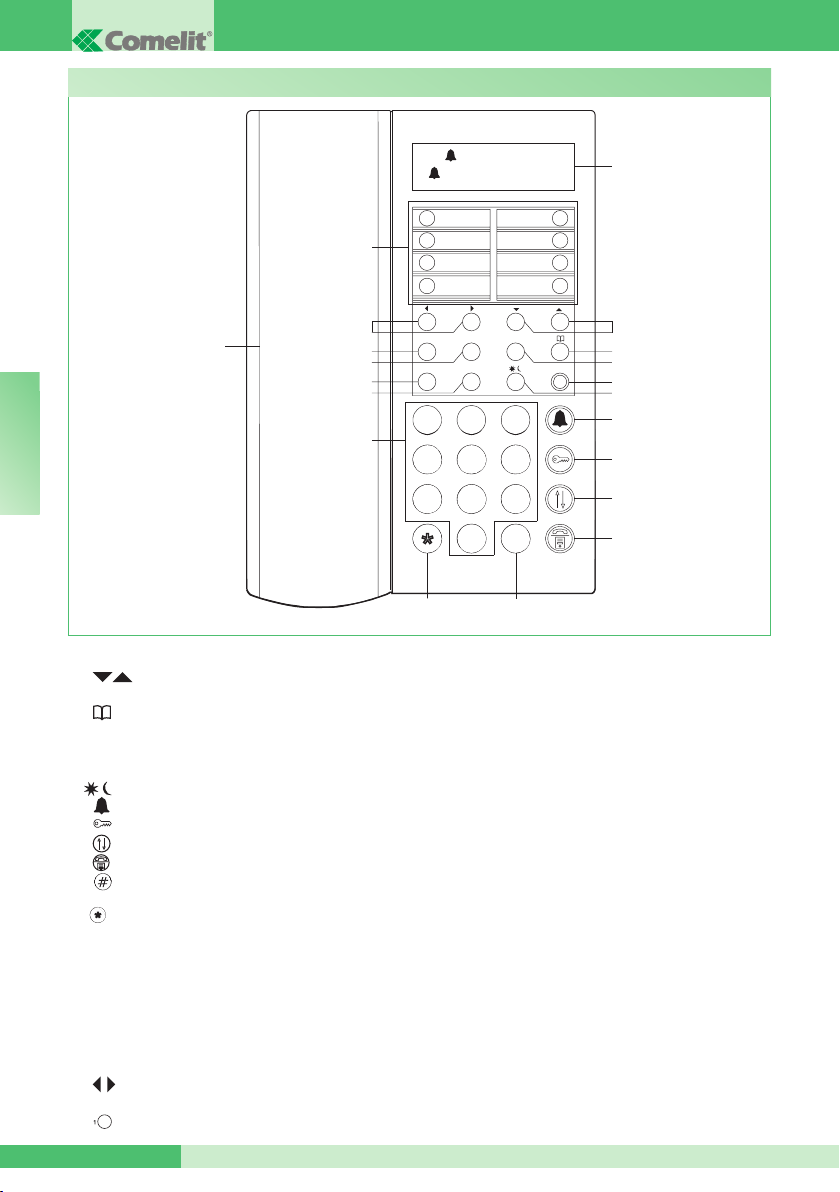
GROUP S.p.A.
Vue générale
18
F R
1 Afcheur signalisation messages
2
Touches pour déroulement répertoire et
menu
3 Touche répertoire
4 Touche MENU
5 ON/OFF Allumage/extinction (maintenir appuyée
pendant 2 secondes)
6 Touche jour/nuit
7 Touche pour envoi appel
8 Touche pour ouvre-porte
9 Touche pour transfert d’appel
10 Touche pour mettre un appel en attente
11 Touche pour appeler le standard principal
depuis le standard secondaire
12 Touche pour activer un relais supplémentaire
13 Clavier alphanumérique
14 A/V Touche gestion “MASTER” “SLAVE” pour
standards en série principaux et secondaires
15 EFF Touche d’effacement appel ou effacement
données introduites
16 OK Touche conrmation
17 ESC Touche de sortie des menus
18 Combiné
19 Touches pour dérouler les appels restés sans
réponse
20 Numéros brefs
A (---) AUTO 14:40
MER 12/03/10
1
2
20
3
4
19
17
16
15
14
13
ESC OK MENU
A/V
1 2 3
ABC DEF
4 5 6
4 5 6
7 8 9
7 8 9
12
0 #
0 #
MNOJKLGHI
WXYZTUVPQRS
11
ON/OFFCANC
1
5
6
7
8
2
3
4
5
6
7
8
9
10
Description bornier :
24 ~ Alimentation 24V CA
0 ~ Alimentation 0V CA
LP1 LP2 Ligne données provenant du poste extérieur
LM LM Ligne données vers les montants
CH CH Contact libre pour “RÉPÉTITION D'APPEL” ou
“VALIDATION MONITEUR EXTÉRIEUR”
OUT OUT Contact normalement ouvert qui se
ferme en envoyant un appel vidéo du standard vers
un poste intérieur
C NO Contact normalement ouvert pour fonction
“SUIVI” (Follow me)
TX RX GND Ligne série RS232 à connecter au PC
pour pouvoir télécharger les noms du répertoire au
moyen de l'Art. 1249/A ou au standard à distance
dans les installations à plusieurs standards en série
ou en parallèle.
MT SB 01 44
Page 45
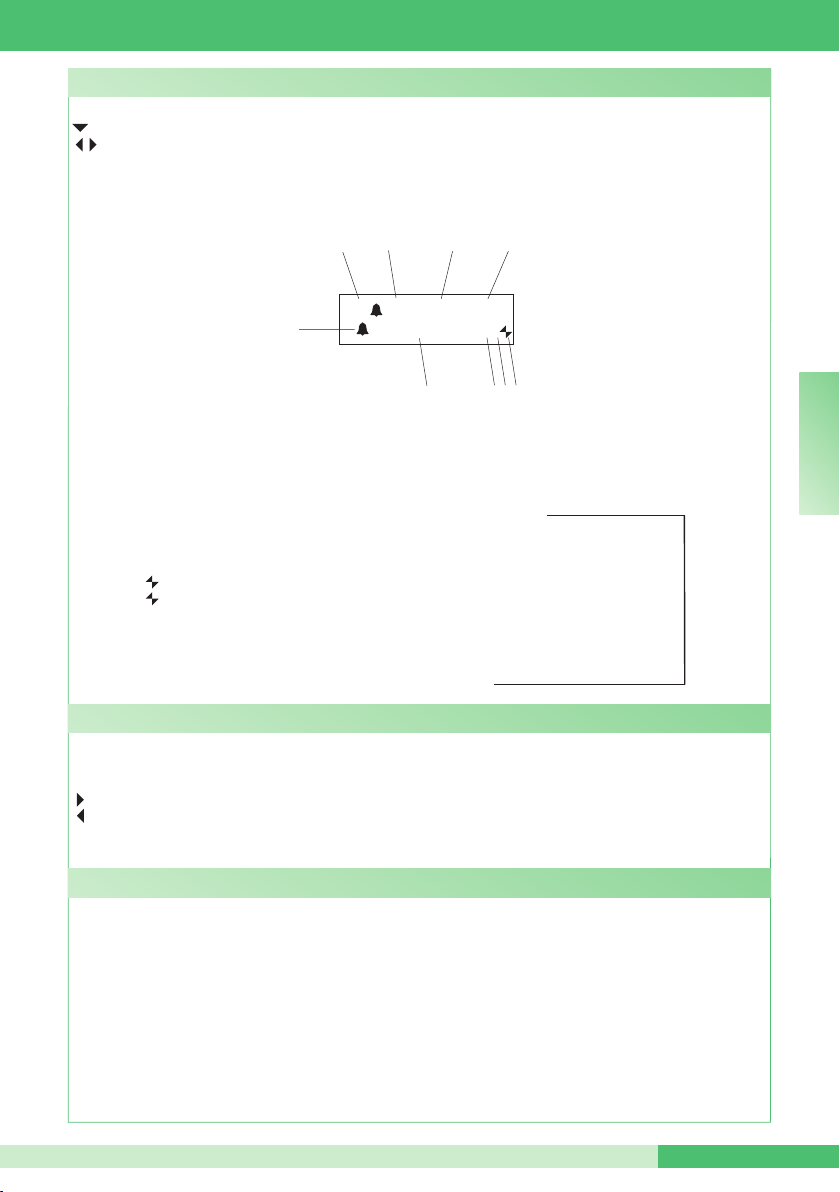
1
2 3 4
Touches de programmation et afficheur
MENUS Pour entrer dans les menus de programmation
Permettent de sélectionner les différentes options des menus
Permettent de déplacer le curseur pour modier les données introduites
OK Conrmation de la sélection visualisée ou de l'introduction données
EFF Effacement des données introduites
ESC Annulation de la sélection et sortie des menus de programmation
Visualisations par afficheur du standard :
MT SB 01
5
A (--) A
1 A modalité AUDIO
V modalité VIDÉO
2 (- -) indique le nombre d'appels sans réponse en modalité JOUR
si l'indication NUIT apparaît, elle indique le fonctionnement dans cette modalité
3 fonctionnement en modalité AUTO afché uniquement durant le fonctionnement JOUR
4 heure (heures: minutes)
5 présence d'appels sans réponse en modalité NUIT
6 nom du jour (Lun, Mar, etc.) et de la date (jour/mois/année)
7 ! on a une conguration entre les 2 standards NON compatibles
? le standard n'a pas encore relevé la présence du standard à distance
8 P indique le standard conguré en parallèle
S indique le standard conguré en série
9 fixe indique le fonctionnement correct de la ligne série
clignotant indique le dysfonctionnement de la ligne série
LM KO indique un court-circuit sur la ligne montant, l'inscription est accompagnée par la répétition
d'une tonalité acoustique. Le standard refuse tout essai d'appel ou de transfert de l'appel vers les
postes intérieurs ; au contraire, tous les appels arrivant du poste extérieur sont gérés normalement.
!PC au moment de l'activation depuis menu du point 6- TÉLÉCHARGEMENT NOMS DU PC,
indique que la ligne série est prête et en attente des données du PC.
Clavier alphanumérique
Pour certaines fonctions, le clavier permet de saisir des chiffres et des lettres ; cela a lieu en appuyant plusieurs
fois sur la même touche, par exemple en appuyant sur la touche 2, on aura en succession sur l'afcheur A - B C - 2 ; en appuyant sur une touche différente, le curseur de l'afcheur se placera sur la lettre suivante.
Déplace le curseur sur la lettre suivante
Déplace le curseur sur la lettre précédente
OK Conrmation des données introduites
EFF Effacement des données introduites
Description générale
Les fonctions principales du standard sont les suivantes :
• appeler un poste intérieur
• recevoir des appels des postes extérieurs et les transmettre éventuellement aux postes intérieurs
• recevoir des appels ordinaires ou d'alarme des postes intérieurs
• commander la gâche électrique des postes extérieurs
• activer un relais
Le standard de conciergerie prévoit également :
• une gestion JOUR/NUIT qui permet de valider les fonctions du standard uniquement dans des tranches
horaires déterminées programmables par l'usager ;
• une LISTE D'ATTENTE APPELS dans laquelle sont mémorisés les appels provenant des postes intérieurs
auxquels il n'a pas été possible de répondre ;
• un RÉPERTOIRE dont la programmation permet d'identier facilement l'usager appelant.
UTO 14:40
MER 12/03/10 ?P
6
7 8 9
disponible
depuis IR.006
F R
MT SB 0145
Page 46
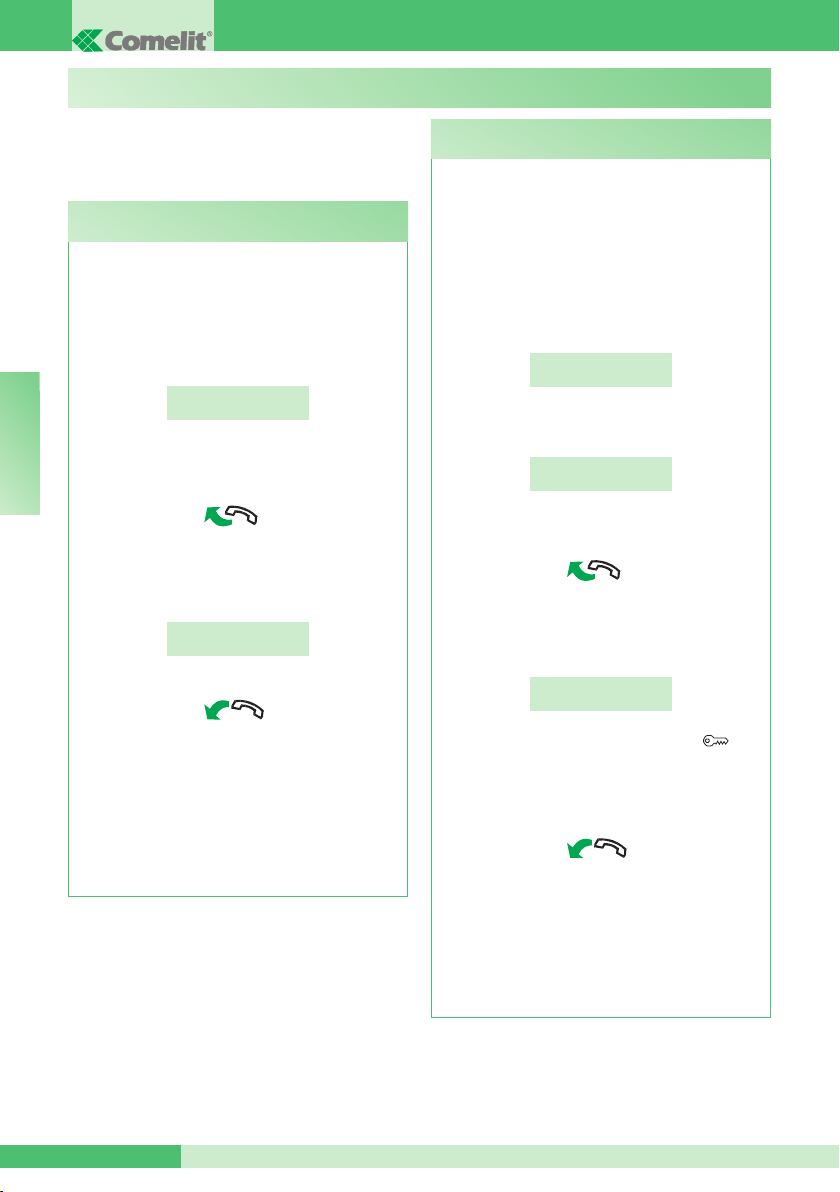
GROUP S.p.A.
Les fonctions suivantes sont celles qui caractérisent
le standard et son mode d'opérer ; elles sont toutes
accessibles en mode direct sans avoir besoin de
recourir aux menus.
U1 Comment répondre à un appel d'un poste
intérieur
Lorsque le standard reçoit un appel d'un poste
intérieur :
- le NOM du poste intérieur d'où provient l'appel
est visualisé (si inséré dans le répertoire, voir “U8
COMMENT INSÉRER UN NOM EN RÉPERTOIRE”
page 49) ou l'adresse de l'appelant (ex. 002).
APPEL DE
USAGER 002
• pour répondre à l'appel provenant du poste intérieur,
F R
soulever le combiné dans les 30 secondes ;
- le standard entre en communication avec le poste
intérieur, la durée maximum de la conversation est
de 2,5 minutes ;
EN COMMUNICATION
AVEC USAGER 002
- raccrocher pour terminer la conversation.
UTILISATION
U2 Comment répondre à un appel d'un poste
extérieur
Le standard doit être en modalité JOUR, en modalité
NUIT il ne pourra répondre qu’aux appels adressés
au standard.
Le standard peut recevoir un appel d'un poste
extérieur :
- adressé directement à un poste intérieur et dans
ce cas, le NOM de l'appelé est visualisé (s'il existe en
répertoire un nom associé au code appelé, voir “U8
COMMENT INSÉRER UN NOM EN RÉPERTOIRE”
page 49) ou l'adresse dudit appelé (ex. 002).
APPEL POUR
USAGER 002
- ou adressé directement au standard
(adresse=240)
APPEL POUR
STANDARD
• pour répondre à l’appel provenant du poste intérieur,
soulever le combiné dans les 30 secondes ;
- le standard entre en communication avec le poste
extérieur, la durée maximum de la conversation est
de 2,5 minutes ;
EN COMMUNICATION
AVEC L’EXTERIEUR
• pour refuser l'appel, appuyer sur CANC.
ATTENTION !
Si le standard est occupé ou le standardiste est
momentanément absent et il ne peut répondre
dans les 30 secondes, l'appel est inséré dans
la liste appels en attente (voir “U6 COMMENT
APPELER UN POSTE INTÉRIEUR PRÉSENT DANS
LA LISTE D'ATTENTE DES APPELS” page 48).
MT SB 01 46
- appuyer éventuellement sur la touche pour
activer la gâche électrique du poste extérieur ; si
l'ouvre-porte est activé on entendra des tonalités de
conrmation ;
- raccrocher pour terminer la conversation.
• pour refuser l’appel, appuyer sur CANC.
ATTENTION !
En modalité NUIT (voir “U13 MODALITÉ DE
FONCTIONNEMENT JOUR/NUIT” page 50) les
appels du poste extérieur adressés à un poste
intérieur sont visualisés sur l'afficheur mais ils ne
peuvent être interceptés par le standard.
Page 47

COMPILARE E CONSERVARE
NELL’IMPIANTO
COMPLETE AND
KEEP WITH UNIT
REMPLIR ET CONSERVER
DANS L’INSTALLATION
IT
Tabella di programmazione dei dip switch.
EN
Dip switch programming table.
Codice/
Dip switch ON Nome/Name
Code
1
2
3
4
5
6
7
8
9
10
11
12
13
14
15
16
17
18
19
20
21
22
23
24
25
26
27
28
29
30
1
2
1,2
3
1,3
2,3
1,2,3
4
1,4
2,4
1,2,4
3,4
1,3,4
2,3,4
1,2,3,4
5
1,5
2,5
1,2,5
3,5
1,3,5
2,3,5
1,2,3,5
4,5
1,4,5
2,4,5
1,2,4,5
3,4,5
1,3,4,5
2,3,4,5
FR
Tableau de programmation des DIP switches.
Codice/
Dip switch ON Nome/Name
Code
31
1,2,3,4,5
32
33
34
35
36
37
38
39
40
41
42
43
44
45
46
47
48
49
50
51
52
53
54
55
56
57
58
59
60
6
1,6
2,6
1,2,6
3,6
1,3,6
2,3,6
1,2,3,6
4,6
1,4,6
2,4,6
1,2,4,6
3,4,6
1,3,4,6
2,3,4,6
1,2,3,4,6
5,6
1,5,6
2,5,6
1,2,5,6
3,5,6
1,3,5,6
2,3,5,6
1,2,3,5,6
4,5,6
1,4,5,6
2,4,5,6
1,2,4,5,6
3,4,5,6
MT SB 0146A
Page 48

COMPILARE E CONSERVARE
NELL’IMPIANTO
COMPLETE AND
KEEP WITH UNIT
REMPLIR ET CONSERVER
DANS L’INSTALLATION
Codice/
Dip switch ON Nome/Name
Code
61
1,3,4,5,6
62
2,3,4,5,6
63
1,2,3,4,5,6
64
65
66
67
68
69
70
71
72
73
74
75
76
77
78
79
80
81
82
83
84
85
86
87
88
89
90
7
1,7
2,7
1,2,7
3,7
1,3,7
2,3,7
1,2,3,7
4,7
1,4,7
2,4,7
1,2,4,7
3,4,7
1,3,4,7
2,3,4,7
1,2,3,4,7
5,7
1,5,7
2,5,7
1,2,5,7
3,5,7
1,3,5,7
2,3,5,7
1,2,3,5,7
4,5,7
1,4,5,7
2,4,5,7
Codice/
Dip switch ON Nome/Name
Code
91
1,2,4,5,7
92
3,4,5,7
93
1,3,4,5,7
94
2,3,4,5,7
95
1,2,3,4,5,7
96
97
98
99
100
101
102
103
104
105
106
107
108
109
110
111
112
113
114
115
116
117
118
119
120
6,7
1,6,7
2,6,7
1,2,6,7
3,6,7
1,3,6,7
2,3,6,7
1,2,3,6,7
4,6,7
1,4,6,7
2,4,6,7
1,2,4,6,7
3,4,6,7
1,3,4,6,7
2,3,4,6,7
1,2,3,4,6,7
5,6,7
1,5,6,7
2,5,6,7
1,2,5,6,7
3,5,6,7
1,3,5,6,7
2,3,5,6,7
1,2,3,5,6,7
4,5,6,7
MT SB 01 46B
Page 49

COMPILARE E CONSERVARE
NELL’IMPIANTO
COMPLETE AND
KEEP WITH UNIT
REMPLIR ET CONSERVER
DANS L’INSTALLATION
Codice/
Dip switch ON Nome/Name
Code
121
1,4,5,6,7
122
2,4,5,6,7
123
1,2,4,5,6,7
124
3,4,5,6,7
125
1,3,4,5,6,7
126
2,3,4,5,6,7
127
1,2,3,4,5,6,7
128
129
130
131
132
133
134
135
136
137
138
139
140
141
142
143
144
145
146
147
148
149
150
8
1,8
2,8
1,2,8
3,8
1,3,8
2,3,8
1,2,3,8
4,8
1,4,8
2,4,8
1,2,4,8
3,4,8
1,3,4,8
2,3,4,8
1,2,3,4,8
5,8
1,5,8
2,5,8
1,2,5,8
3,5,8
1,3,5,8
2,3,5,8
Codice/
Dip switch ON Nome/Name
Code
151
1,2,3,5,8
152
153
154
155
156
157
158
159
160
161
162
163
164
165
166
167
168
169
170
171
172
173
174
175
176
177
178
179
180
4,5,8
1,4,5,8
2,4,5,8
1,2,4,5,8
3,4,5,8
1,3,4,5,8
2,3,4,5,8
1,2,3,4,5,8
6,8
1,6,8
2,6,8
1,2,6,8
3,6,8
1,3,6,8
2,3,6,8
1,2,3,6,8
4,6,8
1,4,6,8
2,4,6,8
1,2,4,6,8
3,4,6,8
1,3,4,6,8
2,3,4,6,8
1,2,3,4,6,8
5,6,8
1,5,6,8
2,5,6,8
1,2,5,6,8
3,5,6,8
46C MT SB 01
Page 50

COMPILARE E CONSERVARE
NELL’IMPIANTO
COMPLETE AND
KEEP WITH UNIT
REMPLIR ET CONSERVER
DANS L’INSTALLATION
Codice/
Dip switch ON Nome/Name
Code
181
1,3,5,6,8
182
2,3,5,6,8
183
1,2,3,5,6,8
184
185
186
187
188
189
190
191
192
193
194
195
196
197
198
199
200
201
202
203
204
205
206
207
208
209
210
4,5,6,8
1,4,5,6,8
2,4,5,6,8
1,2,4,5,6,8
3,4,5,6,8
1,3,4,5,6,8
2,3,4,5,6,8
1,2,3,4,5,6,8
7,8
1,7,8
2,7,8
1,2,7,8
3,7,8
1,3,7,8
2,3,7,8
1,2,3,7,8
4,7,8
1,4,7,8
2,4,7,8
1,2,4,7,8
3,4,7,8
1,3,4,7,8
2,3,4,7,8
1,2,3,4,7,8
5,7,8
1,5,7,8¸¸¸¸
2,5,78
Codice/
Dip switch ON Nome/Name
Code
211
1,2,5,7,8
212
213
214
215
216
217
218
219
220
221
222
223
224
225
226
227
228
229
230
231
232
233
234
235
236
237
238
239
*240
3,5,7,8
1,3,5,7,8
2,3,5,7,8
1,2,3,5,7,8
4,5,7,8
1,4,5,7,8
2,4,5,7,8
1,2,4,5,7,8
3,4,5,7,8
1,3,4,5,7,8
2,3,4,5,7,8
1,2,3,4,5,7,8
6,7,8
1,6,7,8
2,6,7,8
1,2,6,7,8
3,6,7,8
1,3,6,7,8
2,3,6,7,8
1,2,3,6,7,8
4,6,7,8
1,4,6,7,8
2,4,6,7,8
1,2,4,6,7,8
3,4,6,7,8
1,3,4,6,7,8
2,3,4,6,7,8
1,2,3,4,6,7,8
5,6,7,8 *1998/A
MT SB 01 46D
Page 51
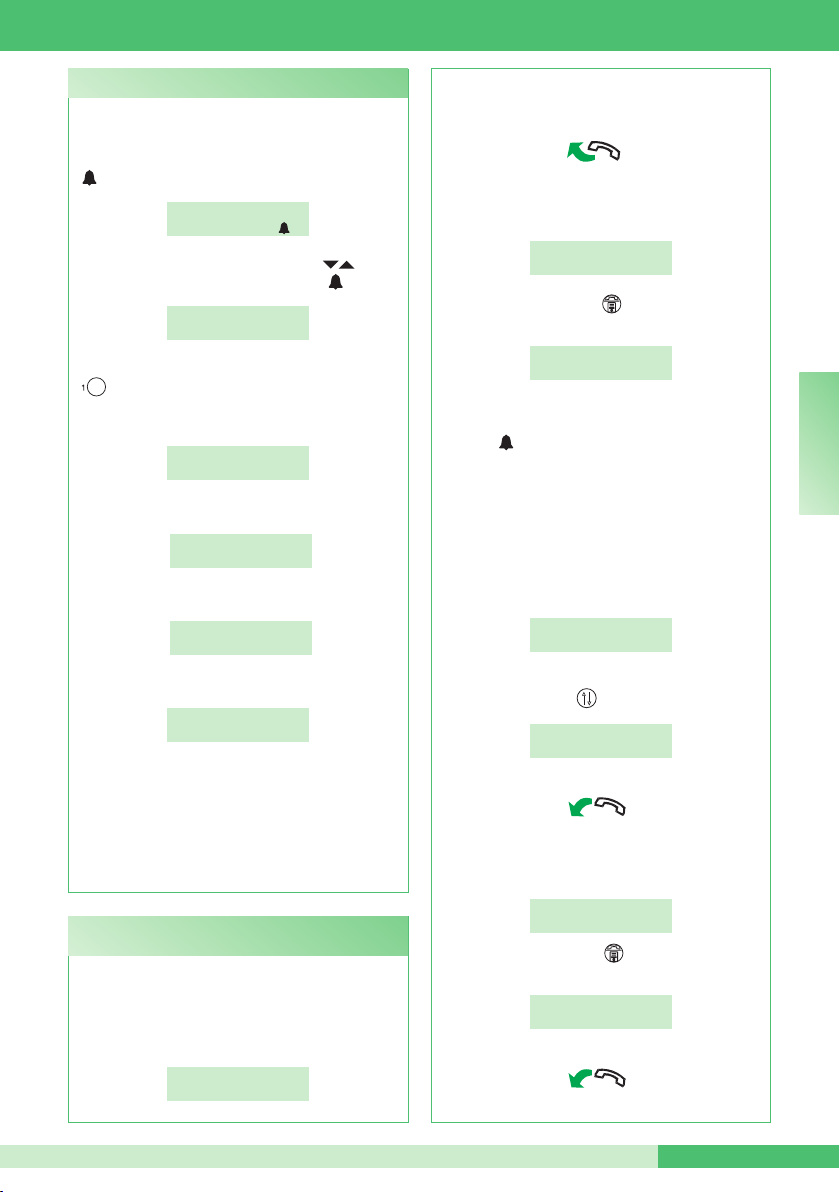
MT SB 01
U3 Comment appeler un poste intérieur
Pour appeler un poste intérieur, le standard peut
utiliser 3 modalités différentes :
• saisir le numéro du poste intérieur* et appuyer sur
.
USAGER: 002
POUR APPELER
• dérouler le répertoire avec les touches jusqu'à
visualiser le nom désiré et appuyer sur .
JENNIFER
CODE: 002
• appuyer sur le numéro bref correspondant (ex.
numéro bref 1= code mémorisé “002”, voir
“I4- ENREGISTREMENT NUMÉROS BREFS” page
56).
APPEL POUR
JENNIFER
- si l'appel a eu lieu correctement :
APPELE
USAGER 002
- si l'appel n'a pas eu lieu correctement :
USAGER 002
NON DISPONIBLE
- si le poste intérieur est occupé :
DERIVE
OCCUPE
Lorsque le poste intérieur appelé entre en phonie,
il se met en communication avec le standard, la
durée maximum de la communication est de 2,5
minutes.
*Le numéro à saisir dépend de la conguration du
standard voir “C.8.2 - MODALITÉ D’APPEL” page
59 ; contacter l’installateur de conance.
U4 Comment passer un appel du poste extérieur
au poste intérieur
Lorsque le standard reçoit un appel d'un poste
extérieur adressé à un poste intérieur :
- le NOM de l'appelé apparaît (s'il existe en répertoire
un nom associé au code appelé, voir “U8 COMMENT
INSÉRER UN NOM EN RÉPERTOIRE” page 49).
DERIVE
OCCUPE
- pour répondre à l'appel provenant du poste
extérieur, soulever le combiné dans les 30 secondes ;
- le standard entre en communication avec le poste
extérieur, la durée maximum de la conversation est
de 2,5 minutes ;
DERIVE
OCCUPE
- appuyer sur la touche pour mettre le poste
extérieur en attente ;
APPEL POUR
USAGER 002
- il est maintenant possible, pour le standard,
d'appeler le poste intérieur désiré en appuyant sur
la touche .
Pour envoyer l'appel à un autre poste intérieur, il
est nécessaire de l'appeler (voir “U3 COMMENT
APPELER UN POSTE INTÉRIEUR” page 47).
Lorsque le poste intérieur appelé entre en phonie,
il entre en communication avec le standard ; si le
poste extérieur est vidéo, le moniteur de l'usager
appelé s'allume et l'image de l'extérieur apparaît.
EN COMMUNICATION
AVEC USAGER 002
Pour passer la conversation vers le poste extérieur,
appuyer sur la touche ;
APPEL EXTERIEUR
TRANSFERE
- raccrocher pour terminer la conversation.
Si l'appel n'a pas eu lieu correctement ou si
la ligne est occupée, le poste extérieur reste en
attente ;
APPEL POUR
USAGER 002
- appuyer sur la touche pour se remettre en
communication avec le poste extérieur ;
EN COMMUNICATION
AVEC L’EXTERIEUR
- raccrocher pour terminer la conversation.
F R
MT SB 0147
Page 52
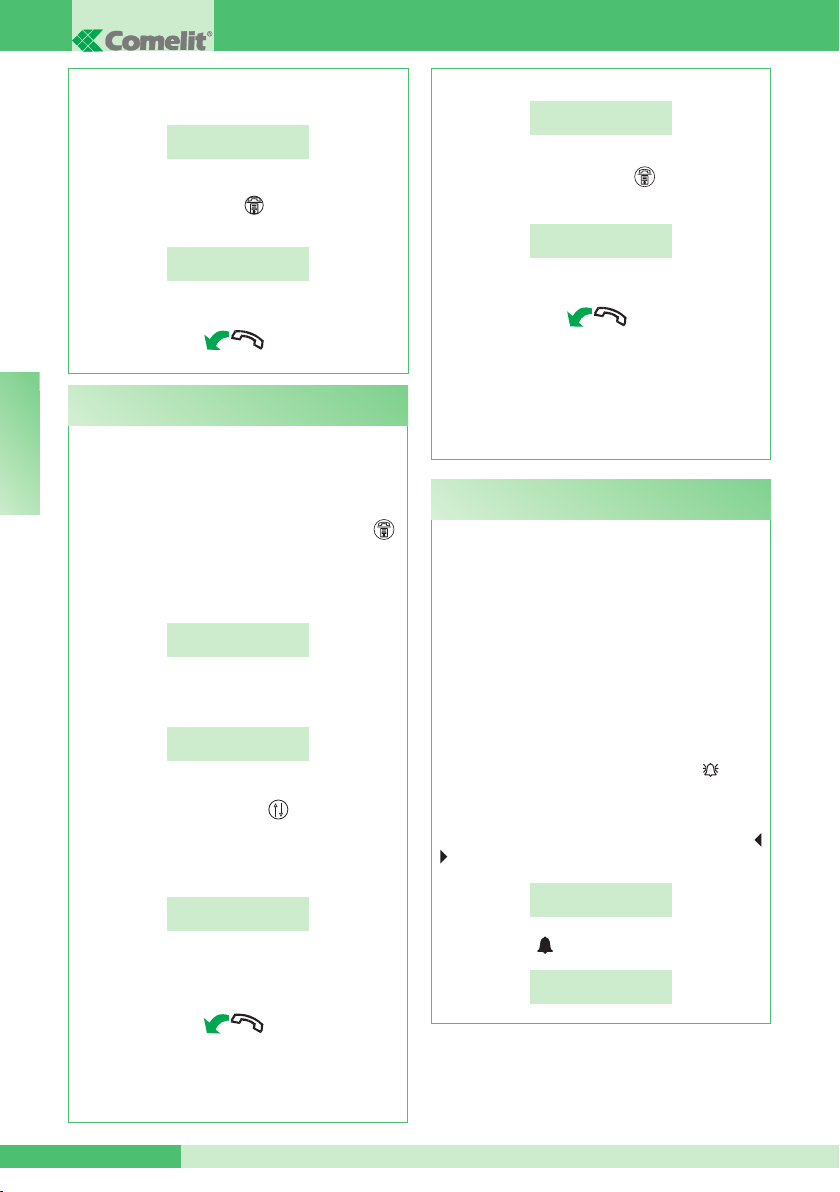
GROUP S.p.A.
Si le poste intérieur n’accepte pas l’envoi de la
conversation, le poste extérieur reste en attente ;
APPEL POUR
USAGER 002
- terminer la conversation avec le poste intérieur
et appuyer sur la touche pour se remettre en
communication avec le poste extérieur ;
EN COMMUNICATION
AVEC L’EXTERIEUR
- raccrocher pour terminer la conversation.
U5 Comment mettre en communication 2 postes
intérieurs (fonction intercommunicante)
Lorsque le standard est en communication avec un
F R
poste intérieur (ex. 002) qui désire parler avec un
autre poste intérieur (ex. 003) :
- mettre en attente le poste intérieur avec lequel on
est en ligne (ex. 002), en appuyant sur la touche ;
- appeler le poste intérieur désiré (ex. 003, voir “U3
COMMENT APPELER UN POSTE INTÉRIEUR”
page 47) ;
APPELE
USAGER 003
Lorsque le poste intérieur appelé entre en phonie,
il se met en communication avec le standard ;
EN COMMUNICATION
AVEC USAGER 003
Pour envoyer la conversation vers l'autre poste
intérieur, appuyer sur la touche ; le poste intérieur
(003) entre en communication avec le poste intérieur
(002) ; la durée maximum de la communication est
de 2,5 minutes ;
INTERCOMMUNICANT
EN COURS
- raccrocher.
Appuyer sur CANC pour remettre à zéro un appel
intercommunicant actif depuis plus d'une minute.
DERIVE
EN ATTENTE
- terminer la communication avec le poste intérieur
(003) et appuyer sur la touche pour se remettre
en communication avec le poste intérieur (002) ;
EN COMMUNICATION
AVEC USAGER 002
- raccrocher pour terminer la conversation.
ATTENTION !
Si le poste extérieur appelle le standard durant un
appel intercommunicant entre postes intérieurs
en cours depuis plus d'une minute, ledit appel
est automatiquement interrompu pour permettre
au standard de gérer l'appel entrant.
U6 Comment appeler un poste intérieur présent
dans la liste d'attente des appels
Lorsque le standard reçoit un appel du poste intérieur
qui n'est pas géré dans les 30 sec. (opérateur
momentanément absent ou occupé dans une autre
conversation), ledit appel est automatiquement
mémorisé dans la liste d'attente des appels.
Si un poste intérieur est appelé plusieurs fois, seul le
premier appel est mémorisé.
Le standard peut mémoriser un nombre maximum
de 10 appels sans réponse. Le onzième appel se
substitue au premier.
Si le standard de conciergerie est en modalité
JOUR, le nombre des appels perdus est indiqué sur
l'afcheur.
Si le standard est en modalité NUIT, on a .
Pour appeler les postes intérieurs présents dans la
liste d'attente appels, il faut :
- visualiser le poste à appeler au moyen des touches
;
RAPPELLE
USAGER 002
- et appuyer sur ;
APPELE
USAGER 002
Si le poste intérieur n'accepte pas l'envoi de la
conversation ou lorsque la ligne est occupée ou
si l'appel n'a pas eu lieu correctement, le poste
intérieur (002) reste en attente ;
MT SB 01 48
Page 53
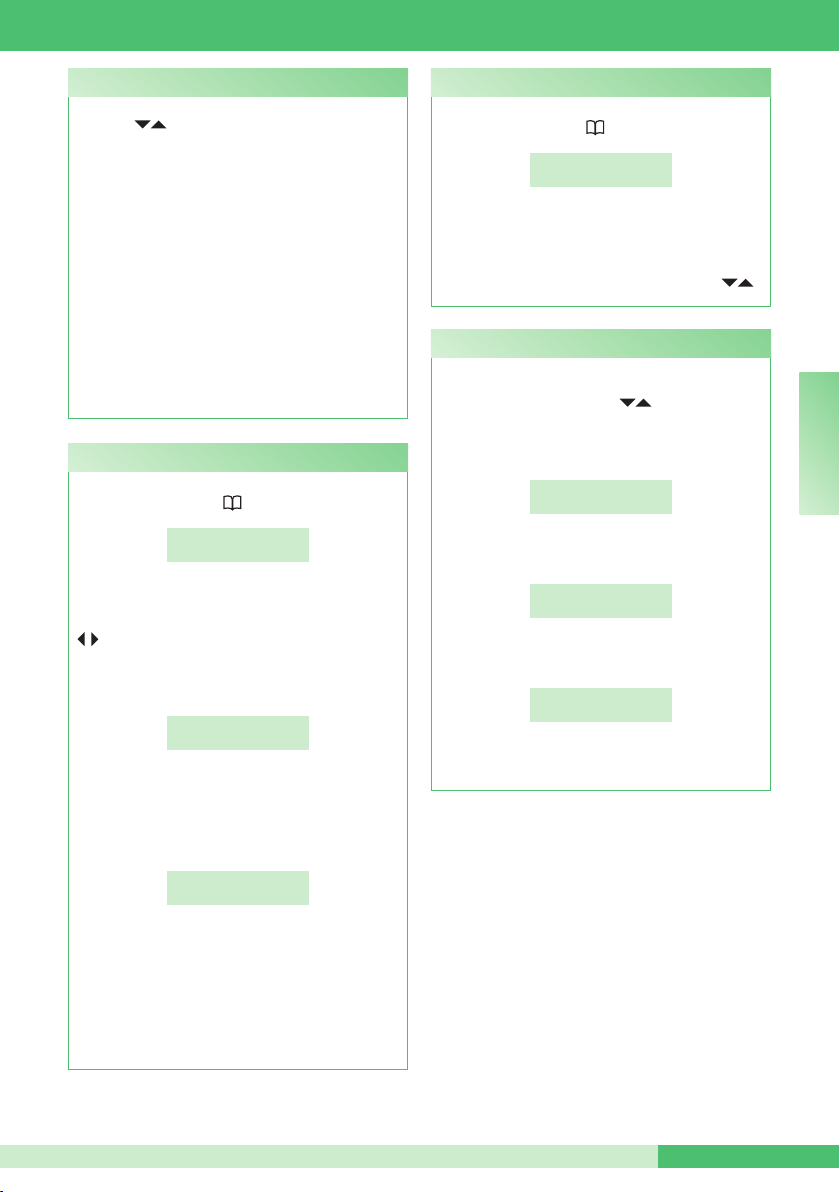
MT SB 01
U7 Comment utiliser le répertoire
On peut dérouler la liste des usagers avec les
touches ; pour augmenter la vitesse de
déroulement, maintenant la touche enfoncée. Le
NOM et le CODE associé à chaque usager sont
afchés.
On peut insérer au maximum 1500 noms (en
standards avec IR. égal ou supérieur à 006) ayant au
maximum 16 caractères alphanumériques, à chaque
nom il faut associer un code qui correspond à celui
du poste intérieur désiré.
Il est possible d'utiliser les caractères spéciaux
suivants : Ä, Å, Æ, Ö, Ü, Ø, ß en appuyant plusieurs
fois que la touche 1.
ATTENTION ! Pour entrer les noms, on peut
procéder en téléchargeant une base de données
du PC au moyen de l'Art. 1249/A (voir “I6-
TÉLÉCHARGEMENT NOMS DU PC” page 57).
Ci-dessous la procédure manuelle.
U8 Comment insérer un nom en répertoire
Si l'on désire insérer un nom en répertoire :
- appuyer sur la touche ;
INSERER LE NOM:
_
- le curseur se place sur la première lettre.
Insérer le nom au moyen du clavier alphanumérique
en se déplaçant entre les curseurs avec les touches
, pour effacer un caractère appuyer sur CANC ;
- pour conrmer l'entrée du nom, appuyer sur la
touche OK :
INSERER
CODE SB
- taper le code au moyen du clavier alphanumérique
(voir tableau des correspondances nom-usager et
adresse page 46A) ;
- pour conrmer l'insertion du code, appuyer sur OK ;
INSERER CODE
INDIRECT
U9 Comment chercher un nom en répertoire
Si l'on veut trouver un nom en répertoire :
- appuyer sur la touche deux fois de suite ;
_
- saisir le nom également avec une partie de
l'extension ;
- pour conrmer le choix appuyer sur la touche OK.
S'il existe plusieurs usagers avec l'initiale saisie, il est
possible de dérouler la liste avec les touches .
U10 Comment effacer un nom en répertoire
Si l'on veut effacer un nom en répertoire :
- visualiser le nom à modier en déroulant le
répertoire avec les touches ou bien voir “U9
COMMENT CHERCHER UN NOM EN
RÉPERTOIRE” page 49.
- appuyer sur la touche CANC ;
- appuyer sur la touche OK, il faut saisir le mot de
passe (1998, ce mot de passe ne peut être changé) ;
- pour conrmer l'effacement, appuyer sur la touche
OK;
ATTENTION ! Pour effacer tout le répertoire voir
“I7-EFFACEMENT TOTAL DES NOMS” page 57.
TROUVE LE NOM:
TU VEUX EFFACER
LE NOM?
SAISIR M.d.P.:
_ _ _ _
EFFACEMENT
EN COURS...
F R
- saisir le code indirect via le clavier alphanumérique
uniquement si le mode d’appel code indirect est
actif (voir “C8.2 - MODALITÉ D’APPEL ” page 59).
- pour conrmer l’insertion du code, appuyer sur OK ;
- il est alors possible d'insérer un nouveau nom ou
bien appuyer sur ESC pour quitter.
MT SB 0149
Page 54
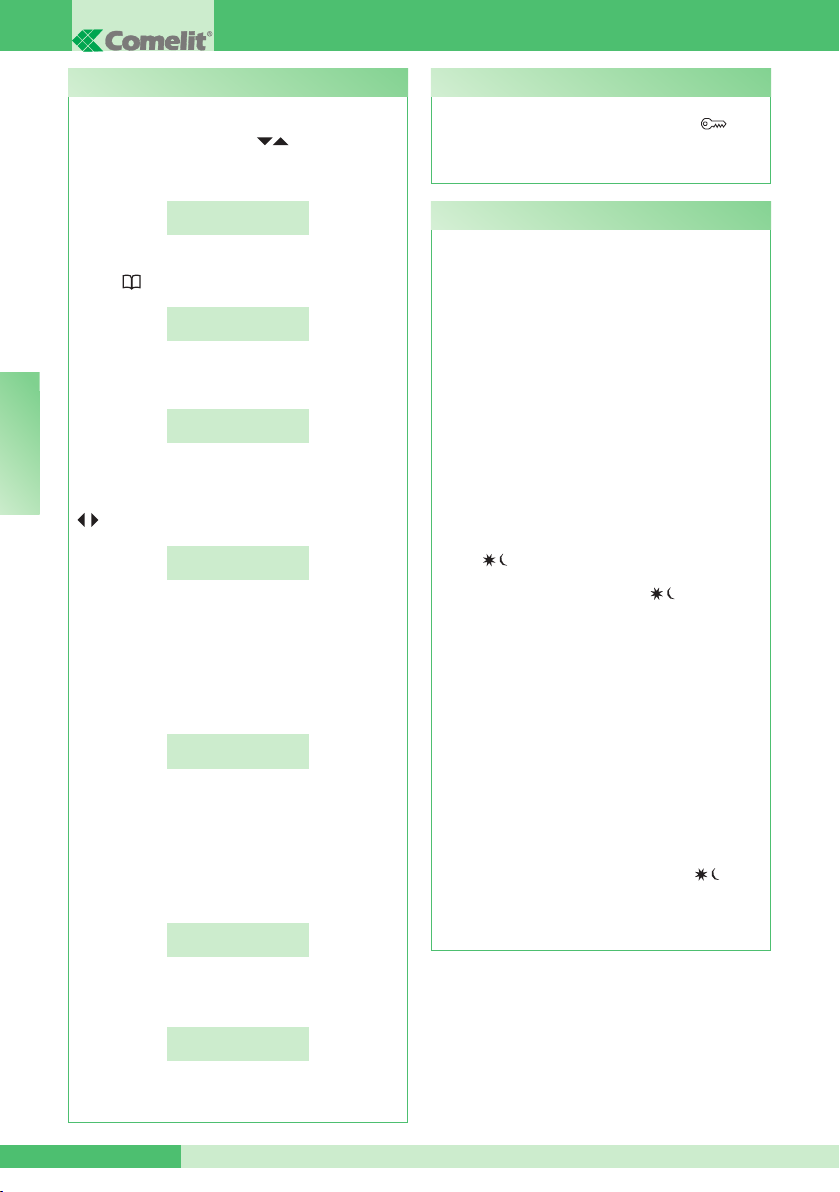
GROUP S.p.A.
U11 Comment modifier un nom en répertoire
Si l'on désire modier un nom en répertoire :
- visualiser le nom à modier en déroulant le
répertoire avec les touches ou bien voir “U9
COMMENT CHERCHER UN NOM EN
RÉPERTOIRE” page 49.
JENNIFER
CODE SB 001
- pour conrmer le choix du nom, appuyer sur la
touche :
TU VEUX MODIFIER
LE NOM?
- appuyer sur la touche OK ;
MODIFICATION NOM
F R
JENNIFER
- le curseur se place sur la première lettre.
Modier le nom au moyen du clavier alphanumérique
en se déplaçant entre les curseurs avec les touches
, pour effacer un caractère appuyer sur CANC ;
MODIFICATION NOM
NOEMI
- pour conrmer la modication du nom, appuyer sur
la touche OK ;
appuyer sur ESC pour quitter.
- le code Simplebus de l'usager en objet sera
afché, pour modier le code, appuyer sur CANC
et saisir le nouveau numéro au moyen du clavier
alphanumérique :
MODIFICATION
CODE SB 001
- pour conrmer la modication du code Simplebus,
appuyer sur OK ;
appuyer sur ESC pour quitter.
- si présent, le code Simplebus indirect de l'usager
en question sera visualisé, pour modier appuyer
sur CANC et saisir le nouveau numéro au moyen du
clavier alphanumérique :
CHANGER CODE
INDIRECT 000001
U12 Comment utiliser l'ouvre-porte
Il est possible de commander la gâche électrique du
poste extérieur en appuyant sur la touche ; si la
commande est effectuée, on entendra des tonalités
de conrmation.
U13 Modalité de fonctionnement jour/nuit
Le standard de conciergerie peut fonctionner en deux
modalités opérationnelles :
- modalité JOUR
- modalité NUIT
En modalité JOUR, tous les appels provenant du
poste extérieur sont reçus par le standard qui peut
éventuellement les transférer aux postes intérieurs.
En modalité NUIT, le standard intercepte les appels
du poste extérieur uniquement s'ils sont adressés
au standard (code 240). Les appels adressés aux
postes intérieurs sont afchés sur l'écran mais non
interceptés par le standard.
La modalité de fonctionnement peut être activée en 2
modalités différentes :
• en mode manuel en agissant sur la touche JOUR/
NUIT .
En appuyant sur la touche , on change
immédiatement la modalité de fonctionnement.
La modalité opérationnelle de fonctionnement est
indiquée sur l'afcheur :
- JOUR avec symbole : (_ _)
- NUIT est indiquée avec l'inscription NUIT.
ATTENTION ! La modalité NUIT n'est disponible
que s'il existe un poste extérieur principal.
• en mode automatique (programmation
effectuée par l'installateur, voir “I3- JOUR/NUIT
AUTOMATIQUE” page 55).
L'indication AUTO n'apparaîtra que durant le
fonctionnement en JOUR. Durant le fonctionnement
en mode automatique, il est possible d'effectuer la
commutation JOUR/NUIT manuellement ( ) ; dans
ce cas, le mode automatique est exclu et s'active
de nouveau à la commutation horaire programmée
successive.
- pour conrmer la modication du code indirect,
appuyer sur OK ;
MEMORISATION
EN COURS...
- appuyer sur ESC pour quitter.
MT SB 01 50
Page 55
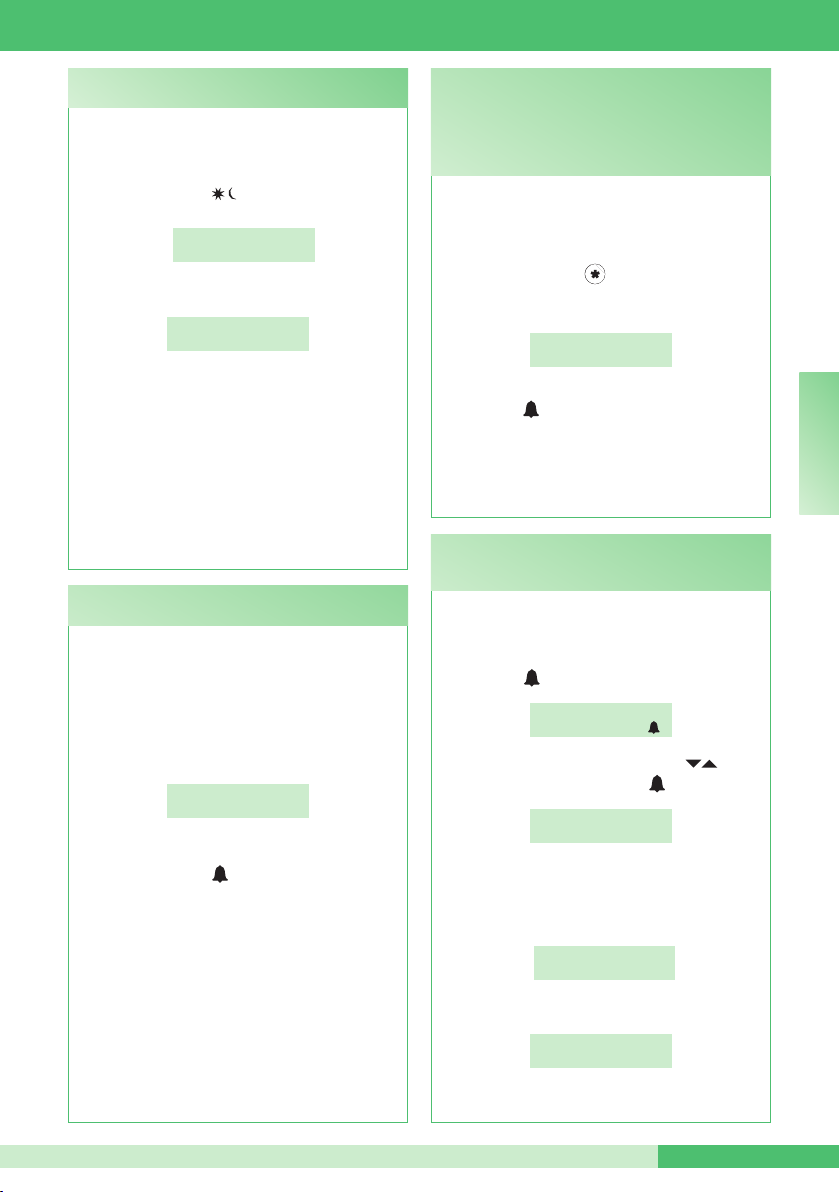
U14 Comment activer la fonction “Suivi”
(Follow me) (disponible depuis IR.006)
Cette fonction permet de dévier les appels destinés
au standard vers les appareils téléphoniques locaux
ou à distance.
Pour activer cette fonction, maintenir la touche
JOUR/NUIT appuyée pendant au moins 3 sec. ;
l'afcheur visualise :
SUIVIS-MOI
Pour invalider, répéter l'opération jusqu'à l'apparition
sur l'écran de la page initiale :
À la suite d'un appel, le standard sonnera de toute
manière et tant que l'appareil à distance n'entrera pas
en communication, il sera possible de répondre à l'appel
depuis le standard en annulant la fonction ”Suivi”.
ATTENTION !
Pour utiliser cette fonction, la centrale Art.
2906 avec interface Art. 2912 doit être présente.
S'adresser à l'installateur de confiance.
Cette fonction n'est activable que sur le Standard
programmé comme secondaire (voir “C8.3 TYPE
DE STANDARD” page 60).
U15 Signalisation alarmes
(disponible depuis IR.006)
Le standard peut recevoir des signalisations d'alarme
provenant des postes intérieurs dans n'importe quel
état de fonctionnement (appel ou conversation).
Lorsque le standard reçoit une alarme :
- il émet un signal sonore. Le signal peut être arrêté
en appuyant sur une touche quelconque du standard.
- la signalisation d'alarme du premier usager qui a
envoyé l'alarme est afchée sur l'écran :
la signalisation disparaît lorsque le poste intérieur
répond à l'appel du standard (pour effectuer l'appel
appuyer sur la touche ), ou lorsque le standardiste
procède à l'effacement forcé au moyen de la touche
CANC.
En cas de plusieurs situations d'alarme simultanées,
une liste d'attente des alarmes est créée avec
les mêmes modalités que celles décrites dans le
paragraphe “U6 COMMENT APPELER UN POSTE
INTÉRIEUR PRÉSENT DANS LA LISTE D'ATTENTE
APPELS” page 48 et l'afcheur visualise uniquement
le numéro des alarmes enregistrées (10 maximum).
À la réception d'un appel depuis le poste extérieur
ou le poste intérieur, le standard quitte l'état d'alarme
pour permettre la gestion de l'appel en entrée. À la
n de la gestion de l'appel, l'état d'alarme est rétabli.
ACTIF
A D (_ _) 14:40
MER 12/03/10
ALARME (04)
USAGER 002
MT SB 01
U16 Comment activer un relais supplémentaire
(ex. pour activer en mode indépendant et avec une
commande dédiée : éclairage, contacts d'alarme TV à
circuit fermé, portails passage véhicules, entrées sans
poste extérieur ou autres dispositifs)
depuis IR.006)
Les actionneurs peuvent être activés tant en modalité
de repos qu'en modalité de conversation vers le
poste extérieur.
Pour activer l'actionneur :
- appuyer sur la touche , il faut saisir le code pour
activer un actionneur spécique ; en cas de code
manquant, un actionneur générique sera activé ;
ACTIONNEUR
CODE :
- pour conrmer l'activation de l'actionneur, appuyer
sur la touche .
ATTENTION !
Pour utiliser cette fonction, il est nécessaire d'avoir
un poste extérieur principal et des actionneurs
Art. 1256. S'adresser à l'installateur de confiance.
U17 Comment appeler un standard secondaire
depuis un standard principal
(disponible depuis IR.006)
Pour appeler un standard secondaire, le standard
principal peut utiliser l'une des 3 modalités suivantes :
• saisir le numéro du standard (ex. 005 240) et
appuyer sur :
USAGER : 005 240
POUR APPELER
• dérouler le répertoire avec les touches jusqu'à
visualiser le nom et appuyer sur :
STANDARD 005
CODE: 005 240
• appuyer sur le numéro bref correspondant (voir
“I4- ENREGISTREMENT NUMÉROS BREFS” page
56).
- Si l'appel a eu lieu correctement :
APPELE
USAGER 005 240
- si l'appel n'a pas eu lieu correctement :
USAGER 005 240
NOT AVAILABLE
(disponible
F R
MT SB 0151
Page 56
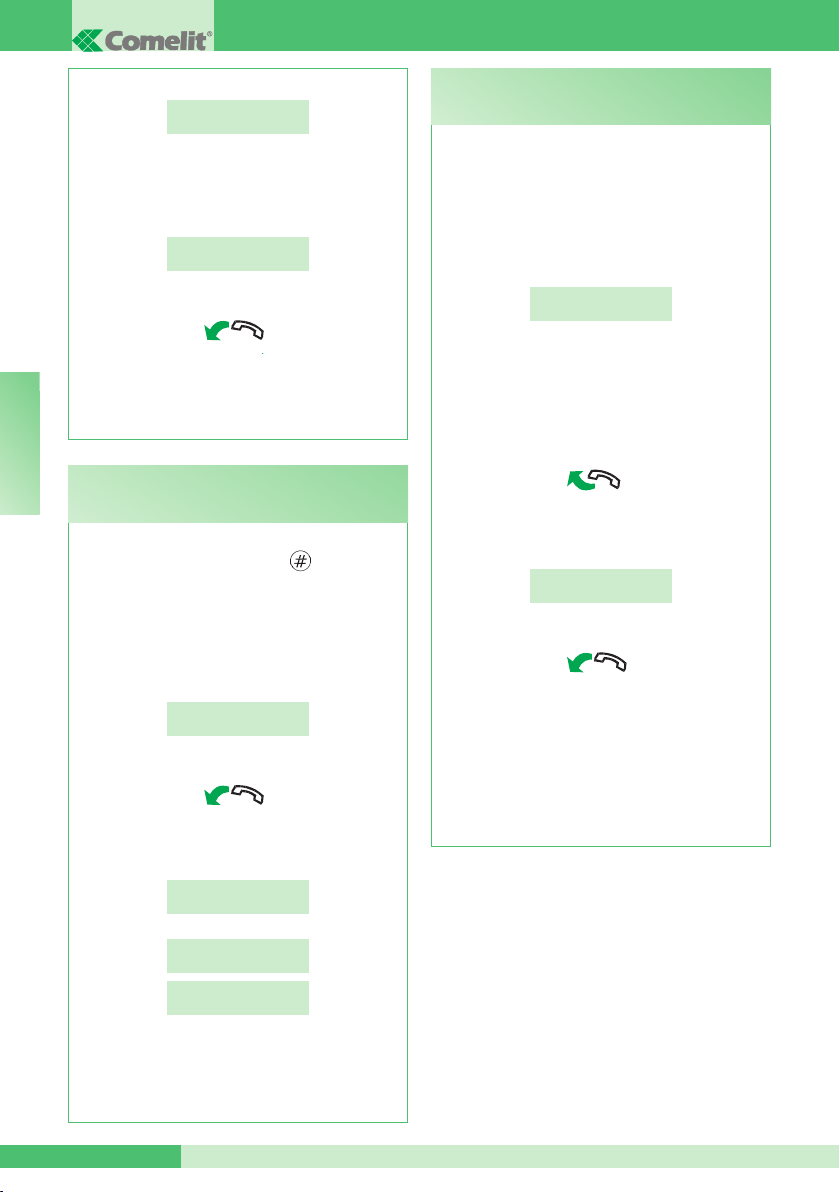
GROUP S.p.A.
- si la ligne est occupée :
DERIVE
OCCUPE
Lorsque l' on soulève le combiné depuis le
standard appelé, on entre en communication avec
le standard principal ; la durée maximum de la
conversation est de 2,5 minutes ;
EN COMMUNICATION
AVEC USAGER 005 240
- raccrocher pour terminer la conversation.
ATTENTION !
Le standard secondaire et le standard principal
en communication entre eux ne peuvent envoyer
les appels ni les mettre en attente.
F R
U18 Comment appeler un standard principal
depuis un standard secondaire
(disponible depuis IR.006)
Pour appeler un standard principal depuis un
standard secondaire, appuyer sur .
- Si l'appel a lieu correctement, on entend 3 tonalités
de conrmation ;
Lorsque l' on soulève le combiné depuis le standard
principal appelé, on entre en communication avec
le standard secondaire ; la durée maximum de la
conversation est de 2,5 minutes ;
APPEL POUR
STANDARD
- raccrocher pour terminer la conversation.
- Si l'appel n'a pas lieu correctement, si la ligne est
occupée ou si le standard principal est inexistant ;
l'afcheur visualise :
FONCTION
PAS DISPONIBLE
et
ESSAI LIGNE
HP MICRO OK
ESSAI LIGNE
HP MICRO KO
ATTENTION !
Le standard secondaire et le standard principal
en communication entre eux ne peuvent envoyer
les appels ni les mettre en attente.
U19 Comment répondre à un appel du standard
secondaire au standard principal
(disponible depuis IR.006)
Lorsque le standard principal reçoit un appel du
standard secondaire :
- le NOM du standard secondaire d'où provient
l'appel est visualisé (si inséré dans le répertoire,
voir “U8 COMMENT INSÉRER UN NOM EN
RÉPERTOIRE” page 49) ou l'adresse du standard
qui appelle (ex. 005 240).
APPEL DE
USAGER 005 240
005= indique la “zone”
240= indique l’ID générique du standard
• pour refuser l’appel, appuyer sur CANC.
• pour répondre à l'appel provenant du standard
secondaire, soulever le combiné ;
- le standard principal entre en communication avec
le standard secondaire, la durée maximum de la
conversation est de 2,5 minutes ;
EN COMMUNICATION
AVEC USAGER 005 240
- raccrocher pour terminer la conversation.
ATTENTION !
Si le standard est occupé ou le standardiste est
momentanément absent et il ne peut répondre
dans les 30 secondes, l'appel est inséré dans
la liste appels en attente (voir “U6 COMMENT
APPELER UN POSTE INTÉRIEUR PRÉSENT
DANS LA LISTE D'ATTENTE DES APPELS” page
48).
MT SB 01 52
Page 57
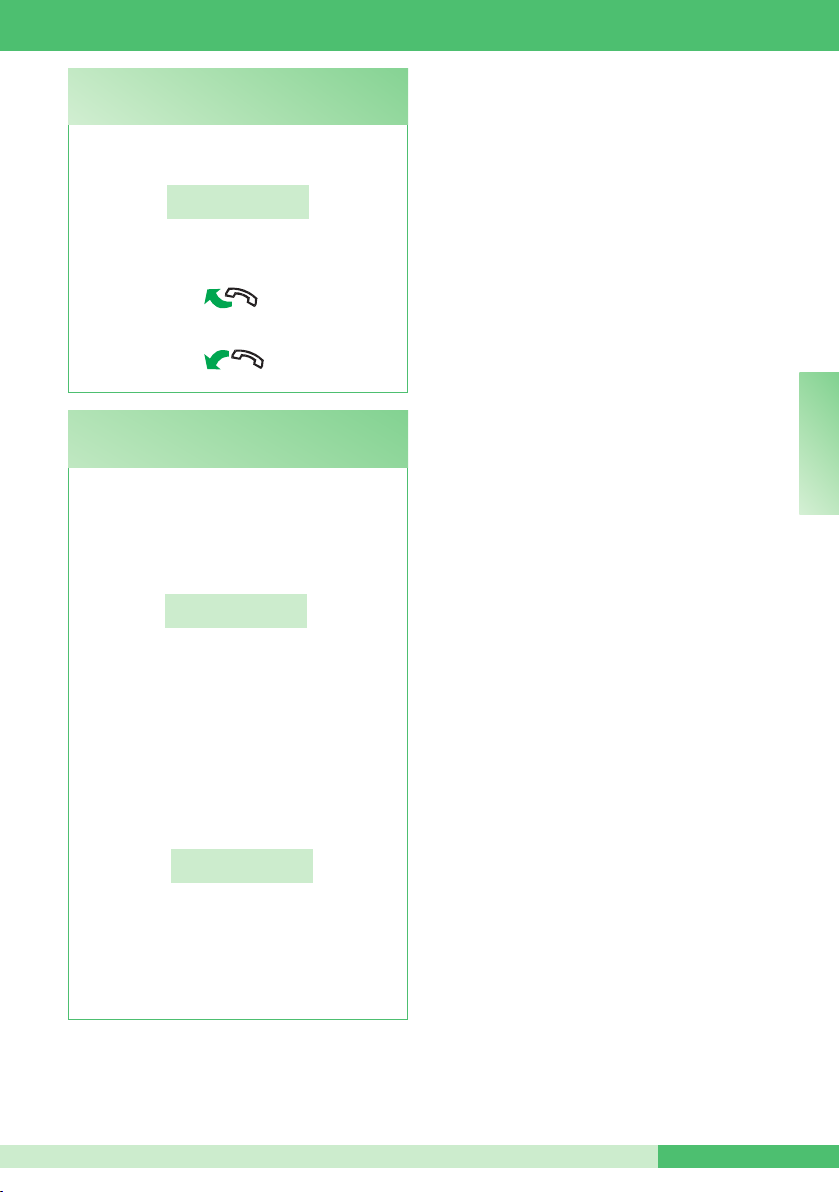
U20 Comment répondre à un appel du standard
principal au standard secondaire
(disponible depuis IR.006)
Lorsque le standard secondaire reçoit un appel du
standard principal :
APPEL POUR
STANDARD
- pour répondre à l'appel provenant du standard
principal, soulever le combiné ;
- raccrocher pour terminer la conversation.
U21 Comment activer (MASTER) ou désactiver
(SLAVE) les standards principaux
(disponible depuis IR.006)
En cas de 2 standards principaux en conguration
série (voir page 86), agir de l'une des manières
suivantes :
• appuyer sur la touche A/V du standard actif
(MASTER) ; la page suivante apparaît :
*
1- MASTER
2 - SLAVE
MT SB 01
F R
- appuyer sur la touche 2 pour le rendre inactif
(SLAVE).
Le standard s'éteint alors que l'autre standard
s'allume en automatique et devient MASTER.
ou
• appuyer sur ON/OFF du standard inactif (SLAVE)
pour l'allumer.
- appuyer sur la touche A/V et la page suivante
apparaît :
*
1- MASTER
2 - SLAVE
- appuyer sur la touche 1 pour conrmer que le
standard doit être actif (MASTER).
- appuyer sur ESC jusqu'au retour à la page
principale.
L'autre standard se désactive en automatique et
devient SLAVE.
MT SB 0153
Page 58

GROUP S.p.A.
RÉGLAGES
Liste pages menu 1-7
1- MODIFIER HEURE INSÉRER HORAIRE
00:00
2- MODIFIER DATE INSÉRER DATE
00/00/00
3- JOUR NUIT
AUTOMATIQUE
F R
4- ENREGISTREMENT
NUMÉROS BREFS
5 - MODIFIER
LANGUE
1- ON/OFF
2- RÉGLER HORAIRES
3- PROGRAMME
SEMAINE
NUMÉRO BREF XX
CODE : XXX
*1 - ITALIEN
2 - ANGLAIS
3 - FRANÇAIS
4 - ALLEMAND
5 - PORTUGAIS
6 - DANOIS
7 - FINLANDAIS
8 - HOLLANDAIS
9 - ESPAGNOL
SERVICE
ACTIF
SERVICE
PAS ACTIF
HORAIRE 01:
00:00
HORAIRE 02 :
00:00
HORAIRE 03 :
00:00
HORAIRE 04 :
00:00
LUNDI
MODALITÉ : JOUR
6- TÉLÉCHARGEMENT
NOMS DU PC
7- EFFACEMENT
TOTAL DES NOMS
MT SB 01 54
SERVICE
ACTIF
VOUS DÉSIREZ EFFACER
LE RÉPERTOIRE ?
SAISIR MOT DE PASSE :
_ _ _ _
Page 59
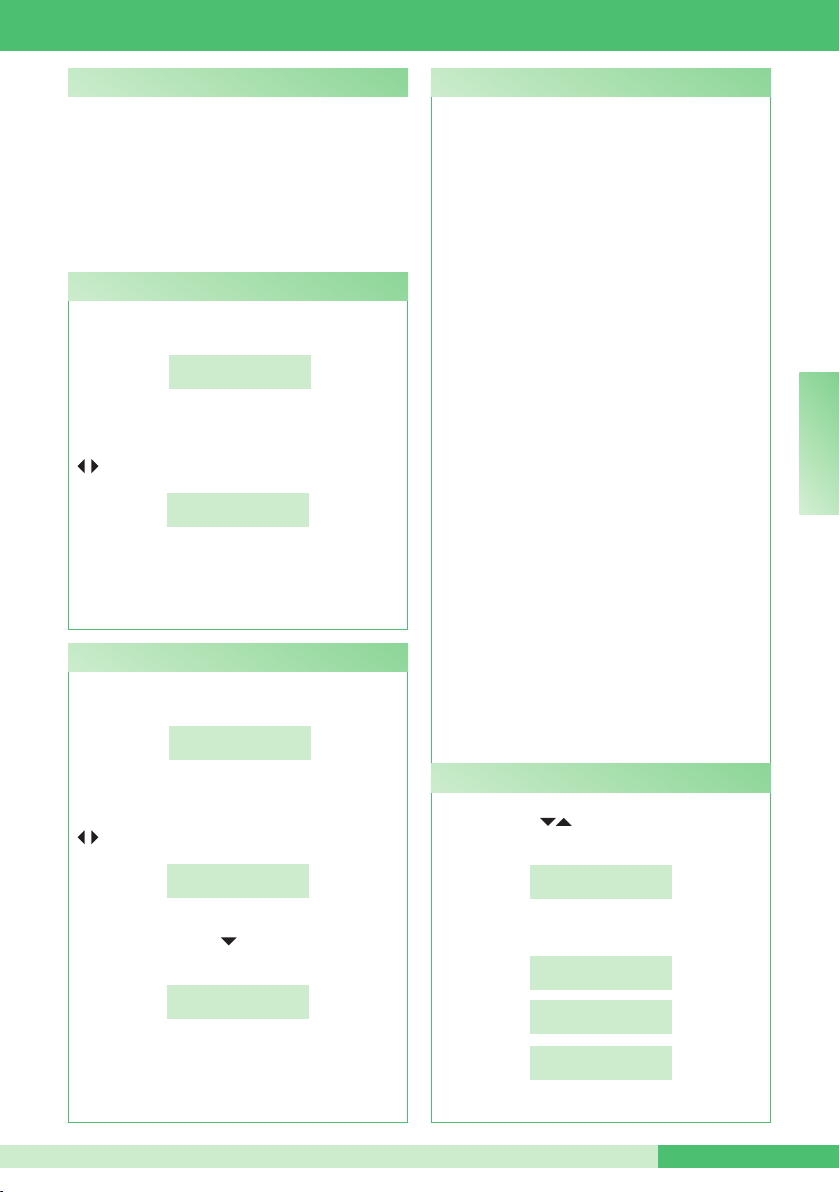
MT SB 01
Réglages
Ce chapitre s'adresse au personnel qualié qui,
après l'installation, procèdera à la programmation
du standard de conciergerie au moyen de menus
guidés et afchés sur l'écran, pouvant être atteints
depuis le menu principal. L'utilisateur peut utiliser
ces fonctions pour changer certains réglages du
standard (par ex. : la langue, l'heure/la date, effacer
totalement le répertoire etc.).
I1 - Modifier heure
- appuyer sur la touche MENU et sur la touche
1-MODIFIER HEURE :
1-MODIFIER HEURE
2-MODIFIER DATE
- le curseur se positionne sur le premier chiffre,
insérer l'horaire au moyen du clavier alphanumérique
en se déplaçant entre les curseurs avec les touches
;
- pour conrmer appuyer sur OK ;
- appuyer sur la touche ESC pour retourner à la page
principale.
I2 - Modifier date
- appuyer sur la touche MENU et sur la touche
2-MODIFIER DATE ;
- le curseur se positionne sur le premier chiffre,
insérer la date au moyen du clavier alphanumérique
en se déplaçant entre les curseurs avec les touches
;
- pour conrmer appuyer sur OK;
- appuyer sur la touche jusqu'à l'apparition du jour
désiré ;
- pour conrmer appuyer sur OK;
- appuyer sur la touche ESC pour retourner à la page
principale.
INSERER HORAIRE
00:00
1-MODIFIER HEURE
2-MODIFIER DATE
INSERER DATE
00/00/00
INSERER JOUR
LUN
I3 - Jour/nuit automatique
On peut décider d'organiser la semaine en choisissant,
pour chaque jour, l'une des trois modalités suivantes
de fonctionnement :
• AUTO : le système passe de la modalité JOUR à la
modalité NUIT aux heures programmées.
On ne peut pas choisir différentes tranches horaires
dans les différents jours lorsque le système
fonctionne en modalité AUTO.
• NUIT : le système est dans cette modalité pendant
toute la journée.
• JOUR : le système est dans cette modalité pendant
toute la journée.
Possibilité de programmer le passage automatique
de la modalité JOUR à la modalité NUIT à des
horaires déterminés programmables par l’usager. Les
HORAIRES programmables sont au MAXIMUM 4.
Il est très important de programmer les horaires de
commutation d'une modalité à l'autre d'une manière
correcte.
HORAIRE 1 : détermine la première commutation :
de la modalité NUIT à la modalité JOUR
HORAIRE 2 : détermine la seconde commutation : de
la modalité JOUR à la modalité NUIT
HORAIRE 3 : détermine la troisième commutation :
de la modalité NUIT à la modalité JOUR
HORAIRE 4 : détermine la quatrième commutation :
de la modalité JOUR à la modalité NUIT.
Dans tous les cas, il faut toujours introduire les 4
HORAIRES.
Exemple :
On désire programmer le standard avec ces paramètres :
07:00 – 12:00 Fonctionnement Jour
13:00 – 22:00 Fonctionnement Jour
HORAIRE 1: 07:00 » NUIT / JOUR
HORAIRE 2: 12:00 » JOUR / NUIT
HORAIRE3: 13:00 » NUIT / JOUR
HORAIRE 4: 22:00 » JOUR / NUIT
I3.1 - Activation/désactivation
- appuyer sur la touche MENU et visualiser au moyen
des touches le menu 3-JOUR NUIT
AUTOMATIQUE, appuyer sur la touche 3 ;
3 - JOUR NUIT
AUTOMATIQUE
- appuyer sur la touche 1-ON/OFF, pour activer ou
désactiver la fonction ;
1 - ON/OFF
2 - RÉGLER HORAIRES
SERVICE
ACTIF
SERVICE
PAS ACTIF
- appuyer sur la touche ESC pour retourner à la page
principale.
F R
MT SB 0155
Page 60
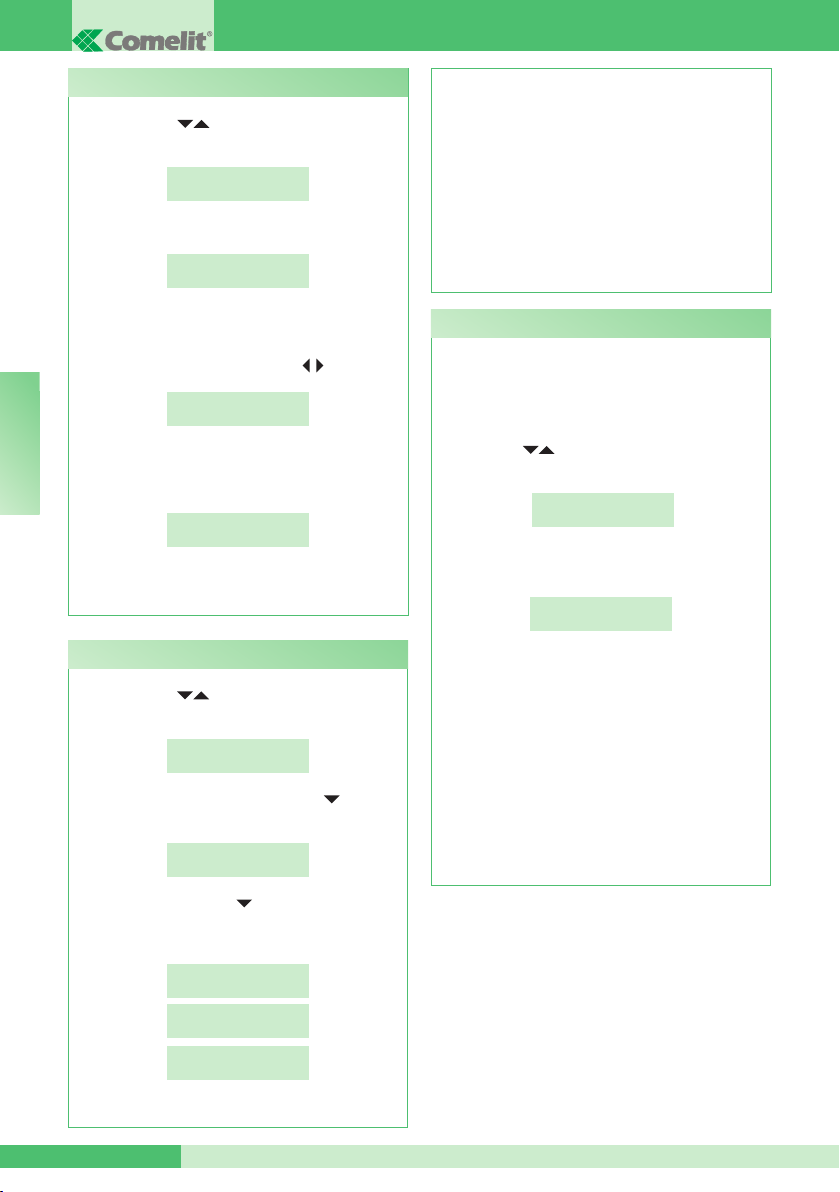
GROUP S.p.A.
I3.2 - Programmation des horaires en modalité auto
- appuyer sur la touche MENU et visualiser au moyen
des touches le menu 3-JOUR NUIT
AUTOMATIQUE, appuyer sur la touche 3 ;
3-JOUR NUIT
AUTOMATIQUE
- appuyer sur la touche 2-RÉGLER HORAIRE;
1-ON/OFF
2-REGLER HORAIRE
pour tous les jours de la semaine ;
- pour conrmer appuyer sur OK ;
- appuyer plusieurs fois sur la touche ESC pour
retourner à la page principale.
ATTENTION ! Les jours programmés pour le
fonctionnement en modalité AUTO posséderont
tous les mêmes tranches horaires programmées
au paragraphe “I3.2 PROGRAMMATION
HORAIRES EN MODALITÉ AUTO” page 56.
- 00:00 est l'horaire par défaut, le curseur se
positionne sur le premier chiffre, insérer l'horaire au
moyen du clavier alphanumérique en se déplaçant
entre les curseurs avec les touches ;
HORAIRE 1 :
00:00
F R
- pour conrmer et passer à l'horaire suivant, appuyer
sur la touche OK et répéter les mêmes opérations
pour les 4 horaires ;
HORAIRE 2 :
00:00
- appuyer plusieurs fois sur la touche ESC pour
retourner à la page principale.
I3.3 - Programmation de la semaine
- appuyer sur la touche MENU et visualiser au moyen
des touches le menu 3-JOUR NUIT
AUTOMATIQUE, appuyer sur la touche 3 ;
3-JOUR NUIT
AUTOMATIQUE
- visualiser au moyen de la touche le menu
3-PROGRAMME SEMAINE, appuyer sur la touche 3 ;
3-PROGRAMME
SEMAINE
I4 - Enregistrement numéros brefs
Le numéro bref permet d'appeler un poste intérieur
en appuyant directement sur la touche à laquelle est
associée l'adresse de l'usager.
Pour mémoriser le numéro bref :
- appuyer sur la touche MENU et visualiser au moyen
des touches le menu 4-ENREGISTREMENT
NUMÉROS BREFS, appuyer sur la touche 4 :
4-ENREGISTREMENT
NUMEROS ABREGES
- saisir le code au moyen du clavier alphanumérique
(code 000 par défaut) :
NUMERO ABREGE 01
CODE : 000
REMARQUE la description CODE sera :
- CODE (de 3 chiffres maximum) : 000 pour système
Simplebus
- CODE (de 3+3 chiffres maximum) : --- --- pour
système Simplebus TOP
- CODE (de 6 chiffres maximum) : ------ pour système
Simplebus et Simplebus TOP avec CODE INDIRECT
- pour passer au numéro bref suivant, appuyer sur la
touche OK et suivre les mêmes opérations ;
- appuyer sur la touche ESC pour retourner à la
page principale.
- appuyer sur la touche pour sélectionner une
des 3 modalités de fonctionnement (MODALITÉ :
AUTO- JOUR- NUIT)
LUNDI
MODALITE : AUTO
LUNDI
MODALITE : JOUR
LUNDI
MODALITE : NUIT
- pour conrmer et passer au jour suivant, appuyer
sur la touche OK et répéter les mêmes opérations
MT SB 01 56
Page 61
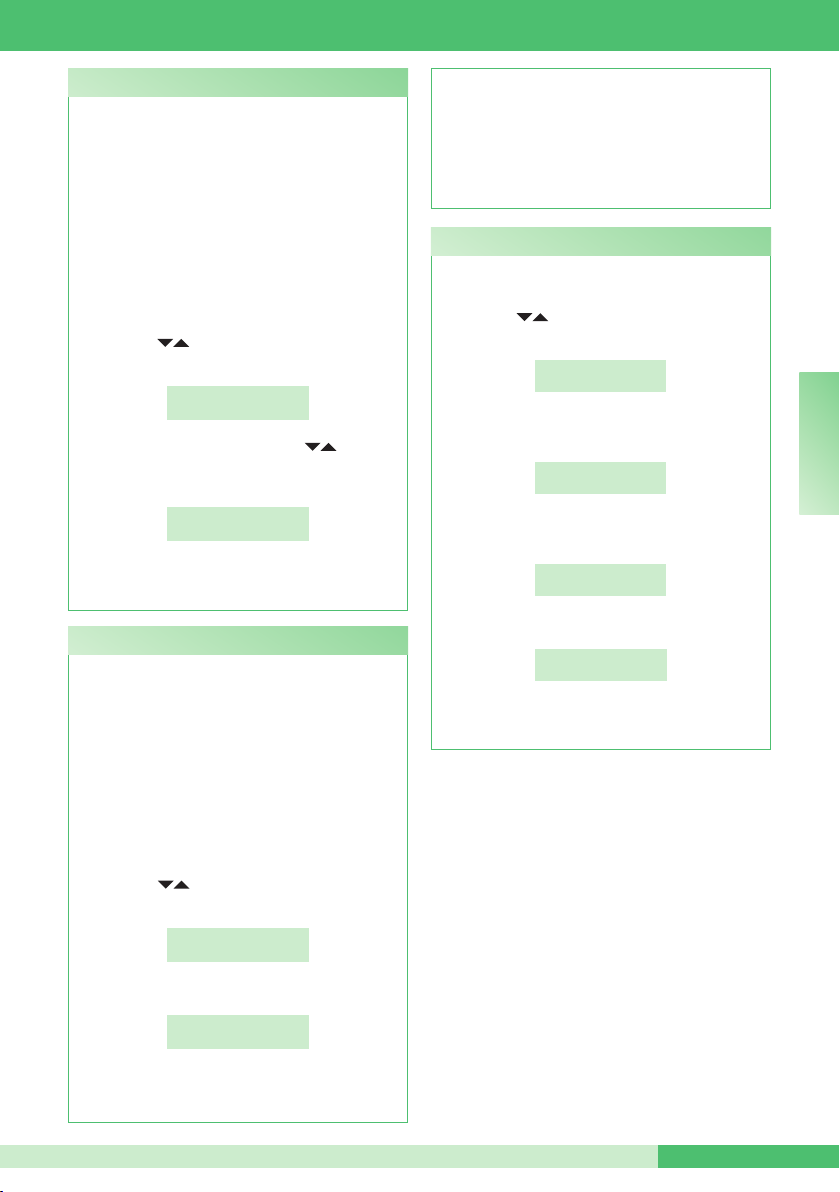
MT SB 01
I5 - Modifier langue
Il est possible de programmer la langue en la
sélectionnant parmi les suivantes :
*1- Italien (par défaut)
2- Anglais
3- Français
4- Allemand
5- Portugais
6- Danois
7- Finlandais
8- Hollandais
9- Espagnol
- appuyer sur la touche MENU et visualiser au moyen
des touches le menu 5-MODIFIER LANGUE,
appuyer sur la touche 5 ;
5-MODIFIER
LANGUE
- visualiser au moyen des touches la langue
choisie et appuyer sur la touche correspondante (ex.
2 pour l'anglais) ;
1-ITALIEN
*2-ANGLAIS
- appuyer plusieurs fois sur la touche ESC pour
retourner à la page principale.
I6 - Téléchargement noms du pc
Possibilité d'entrer les noms dans le répertoire
personnel en les téléchargeant du PC grâce à l'Art.
1249/A. Pour effectuer cette opération il faut activer
la fonction en intervenant sur le menu, brancher le
standard au PC au moyen du câble spécial et lancer
le logiciel de téléchargement.
ATTENTION ! ACTIVER LA FONCTION
UNIQUEMENT POUR TÉLÉCHARGER LES NOMS
DU PC. LA FONCTION RESTE ACTIVE PENDANT
1 MINUTE.
- appuyer sur la touche MENU et visualiser au moyen
des touches le menu 6-TÉLÉCHARGEMENT
NOMS DU PC;
6-DECHARGEMENT
NOMS DU PC
- appuyer sur la touche ESC pour retourner à la
page principale sur laquelle sera afchée “!PC”
(pendant 1 minute) ; on peut maintenant procéder
au téléchargement des noms en utilisant l’Art.
1249/A, durant le téléchargement, le standard ne
peut effectuer ni recevoir des appels ; le service est
désactivé automatiquement après le téléchargement.
I7 - Effacemet total des noms
Pour effacer le répertoire :
- appuyer sur la touche MENU et visualiser au moyen
des touches le menu 7-EFFACEMENT TOTAL
DES NOMS, appuyer sur la touche 7 ;
7-EFFACEMENT
TOTALS DES NOMS
- vous devrez indiquer si vous voulez effacer le
répertoire ;
TU VEUX EFFACER
LE REPERTOIRE?
- pour conrmer appuyer sur la touche OK et insérer
le mot de passe de conrmation (1998) ;
SAISIR M.d.P.:
****
- pour conrmer appuyer sur la touche OK ;
EFFACEMENT
EN COURS...
- à la n de l'effacement, la page principale sera
visualisée.
F R
- appuyer sur la touche 6 pour activer la fonction :
SERVICE
ACTIF
À partir de la IR. 006 le téléchargement des noms
N’est activable QU’avec RÉPERTOIRE VIDE.
MT SB 0157
Page 62
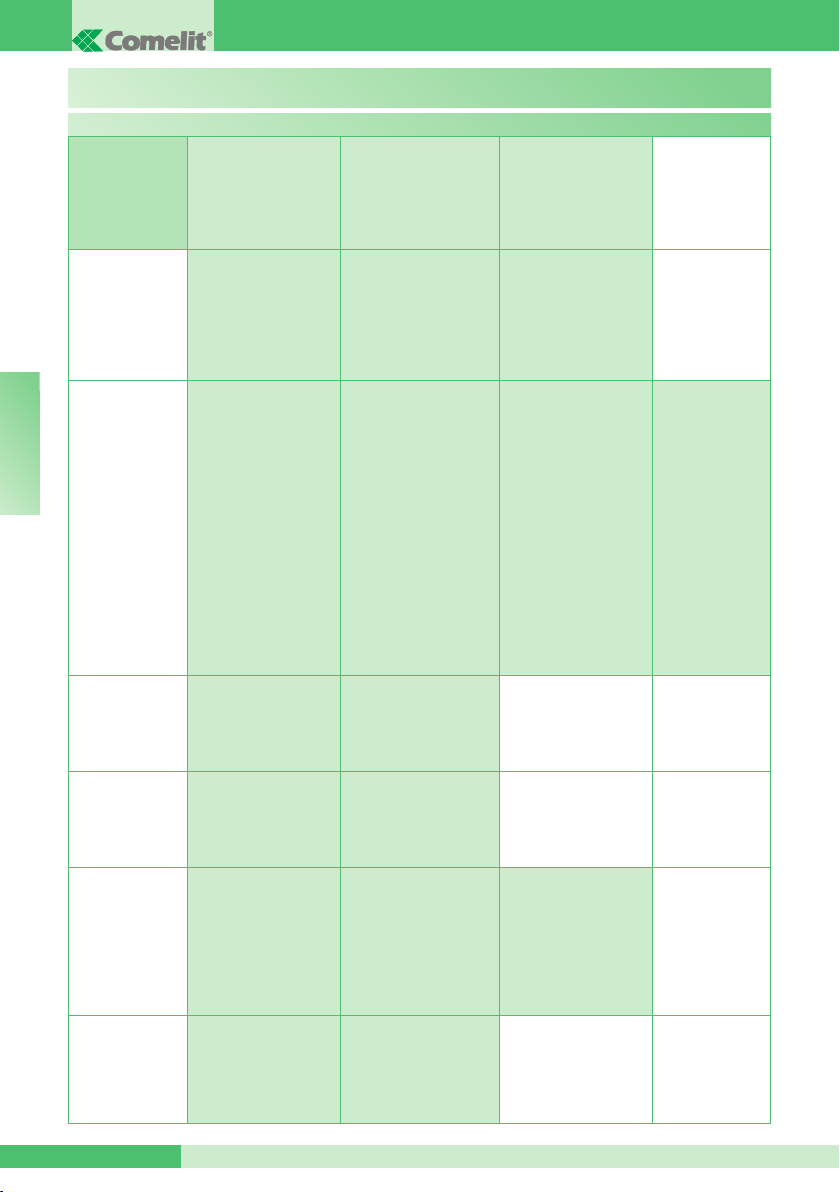
GROUP S.p.A.
Liste pages menu 8
8 - OPTIONS
AVANCÉES
CONFIGURATIONS
1 - RÉGLAGES
MODALITÉ VIDÉO
SERVICE
ACTIF
SERVICE PAS ACTIF
(default)
1 - MOD. NORMALE
*
2 - MOD. DIRECTE
2- MODALITÉ
D’APPEL
3- TYPE DE
STANDARD
F R
4- AUTO-ALL.
INTERNE ON/OFF
5- APPEL
TRIPLE ON/OFF
6- FONCTION
CONTACT CH-CH
*1 - CODE SIMPLEBUS
2 - CODE INDIRECT
3 - CODE INDIRECT
SANS NOM
*1 - SECONDAIRE
2 - PRINCIPAL
(modalité
SIMPLEBUS TOP)
SERVICE
ACTIF
SERVICE PAS ACTIF
(default)
SERVICE
ACTIF
SERVICE PAS ACTIF
(default)
*1 - RÉP. APPEL
2 - MONITEUR EXT.
*1 - FILTRE OFF
2 - FILTRE ON
*1 - STAND. SEC.
SIMPLE
2 - STAND. SEC.
PARALLÈLE
3 - STAND. SEC.
SÉRIE
*1 - STAND. SEC.
SIMPLE
2 - STAND. SEC.
PARALLÈLE
3 - STAND. SEC.
SÉRIE
*DURÉE CONTACT :
1 SEC
DURÉE CONTACT :
3 SEC
DURÉE CONTACT :
5 SEC
(fonction non
disponible)
1- MASTER
*2- SLAVE
1 - LS-IN
*2 - LP-IN
1 - MASTER
*2 - SLAVE
7- FONCTIONNEMENT
STAND. PRINC+SEC
MT SB 01 58
SERVICE
ACTIF
SERVICE PAS ACTIF
(default)
Page 63
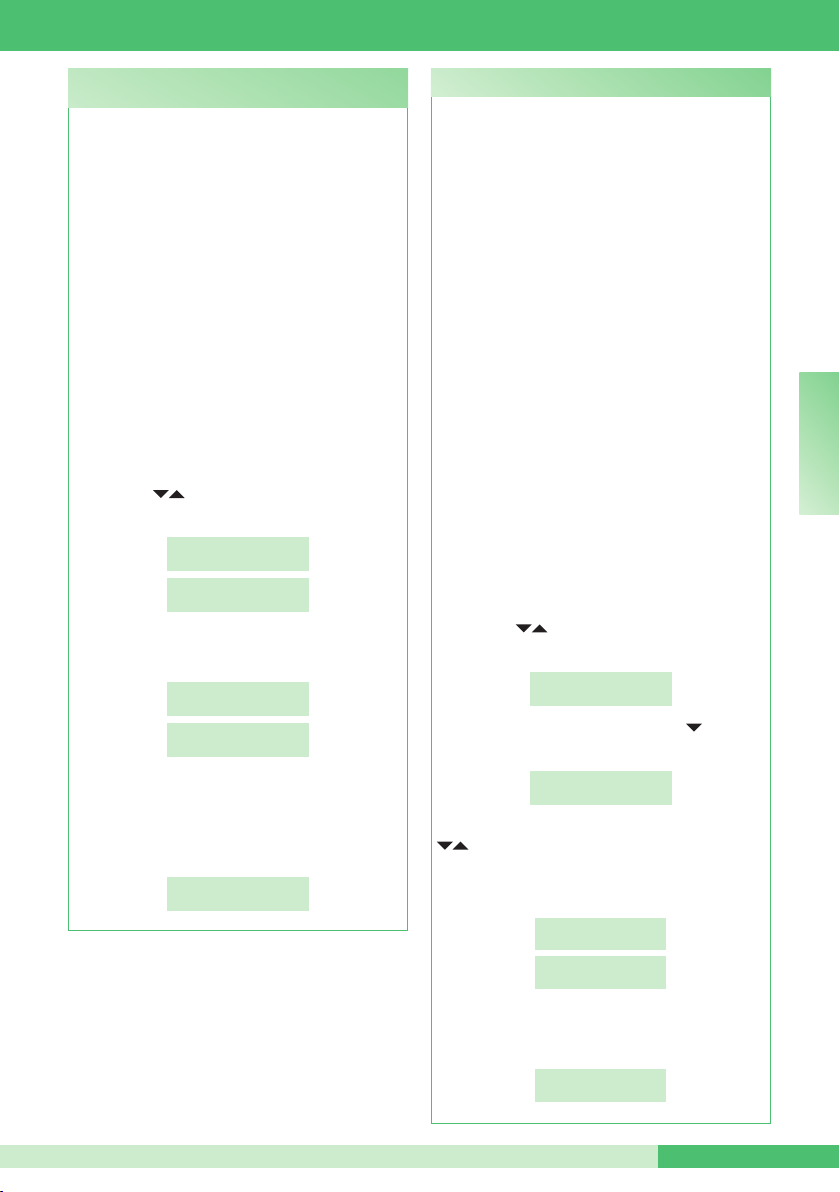
C8.1 - Réglage modalité vidéo
(disponible depuis IR.006)
Elle est désactivée par défaut.
En activant cette fonction, il sera possible d'effectuer
un appel vidéo vers un poste intérieur. Le moniteur
appelé par le Standard s'allumera en permettant par
exemple de voir les caméras déportées associées à
l’Art. 1259/A ou à l'Art. 1259C (voir FT/SB/13 ou FT/
SBC/05).
La modalité VIDÉO peut être NORMALE ou
DIRECTE.
En modalité NORMALE, l'allumage du vidéo du
poste intérieur s'effectue en soulevant le combiné
ou en activant la phonie à la réception de l'appel du
standard ; alors qu'en modalité DIRECTE, il a lieu
automatiquement à la réception de l'appel.
ATTENTION ! Pour le fonctionnement correct de la
modalité DIRECTE, il est nécessaire que l'installation
soit équipée d'étriers, combinés parlophoniques,
commutateurs et mélangeurs en version TOP (voir
“TABLEAU ARTICLES SIMPLEBUS TOP” page 62).
Pour activer la fonction :
- appuyer sur la touche MENU et visualiser au moyen
des touches le menu 8-OPTIONS AVANCÉES,
appuyer sur la touche 8 ;
- appuyer sur la touche 1 pour activer ou désactiver
la fonction ;
- si le service a été activé, il faudra choisir entre les 2
modalités différentes.
appuyer sur la touche 1 pour la MODALITÉ
NORMALE ou sur la touche 2 pour la MODALITÉ
DIRECTE ;
8-OPTIONS
AVANCEES
1-PROGRAMMATION
MODALITE VIDEO
SERVICE
ACTIF
SERVICE
PAS ACTIF
*
1-MOD. NORMALE
2-MOD. DIRECTE
MT SB 01
C8.2 - Modalité d'appel (disponible depuis IR.006)
Cette fonction permet de choisir la modalité manuelle
d'appel du Standard, entre 3 modalités différentes :
1- CODE SIMPLEBUS (par défaut), l’appel a lieu en
saisissant le code associé à chaque usager.
• Si le type d’installation est SIMPLEBUS, l’usager
est identié par un champ Nom Usager (optionnel)
et par un champ Code à 3 chiffres maximum
(compris entre 1 et 240).
EXEMPLE : Nom usager = Rossi ; Code = 015.
• En cas d’installation SIMPLEBUS TOP l’usager
est identié par un champ Nom Usager (optionnel)
et par un champ Code comprenant deux parties :
champ zone de 3 chiffres maximum (compris entre
1 et 500) et champ usager obligatoirement de 3
chiffres (compris entre 1 et 249).
EXEMPLE : Nom usager = Rossi ; Code = 25 015.
2- CODE INDIRECT (l'appel a lieu en saisissant le
code indirect à 6 chiffres. Ce code doit être présent
en répertoire et associé à l'usager possédant un nom
(obligatoire) et un code Simplebus ou Simplebus
TOP).
3- CODE INDIRECT SANS NOM, voir modalité
précédente, à la différence qu'ici le champ "nom"
n'est pas obligatoire. Dans cette modalité, il faudra
indiquer FILTRE OFF ou FILTRE ON ; s'il est activé
il permet la visualisation sur afcheur uniquement
des usagers avec champ nom inséré ; alors qu'avec
le ltre désactivé, tous les usagers seront visualisés.
Pour activer la fonction :
- appuyer sur la touche MENU et visualiser au moyen
des touches le menu 8-OPTIONS AVANCÉES,
appuyer sur la touche 8 ;
- visualiser au moyen de la touche le menu
2-MODALITÉ D'APPEL, appuyer sur la touche 2 ;
- visualiser la modalité choisie au moyen des touches
, appuyer sur la touche 1 pour le CODE
SIMPLEBUS, appuyer sur la touche 2 pour le CODE
INDIRECT ou la touche 3 pour le CODE INDIRECT
SANS NOM;
- si l'on choisit le 3- CODE DIRECT SANS NOM,
on aura la demande d'activation du ltre ; appuyer
sur la touche 1 pour son invalidation ou 2 pour son
activation ;
8-OPTIONS
AVANCEES
2-MODALITE
D’APPEL
*
1-CODE SB
2-CODE INDIRECT
3-CODE INDIRECT
SANS NOM
*1- FILTRE OFF
2- FILTRE ON
F R
MT SB 0159
Page 64
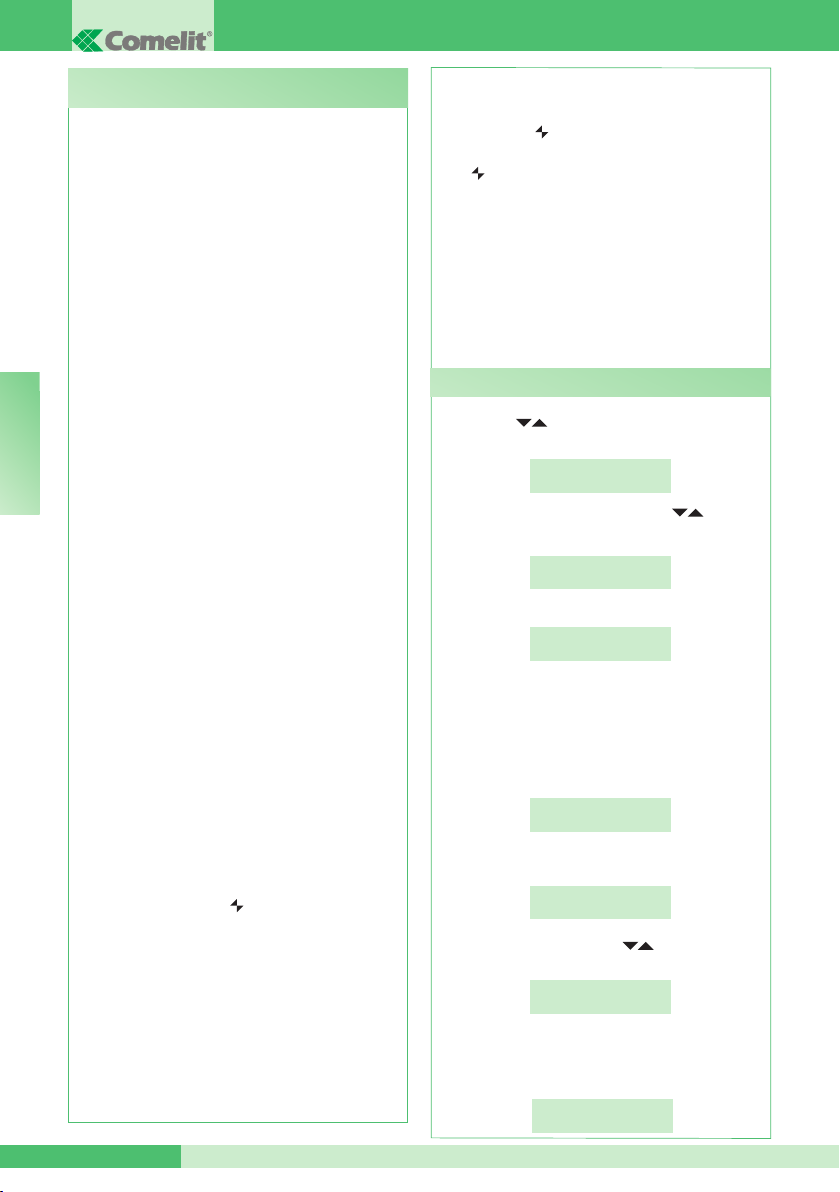
GROUP S.p.A.
C8.3 - Type de standard (modalité Simplebus Top)
(disponible depuis IR.006)
Le Standard peut être SECONDAIRE ou PRINCIPAL.
• Programmer SECONDAIRE lorsque le Standard est
utilisé comme SECONDAIRE, en sortie des bornes
LM-LM des commutateurs Art. 1424 (installation
Simplebus TOP) (voir schéma SBTOP/001PX page
80) ; ou bien lorsque le Standard est utilisé comme
PRINCIPAL, dans des installations Simplebus avec
commutateurs Art. 1224A ou dans une installation
avec un seul montant et en absence de commutateurs.
ATTENTION ! le standard SECONDAIRE ne peut être
conguré comme standard en PARALLÈLE.
• Programmer PRINCIPAL lorsque le standard est utilisé
comme PRINCIPAL dans une installation SIMPLEBUS
TOP, et donc positionné dans le segment avant les
commutateurs Art. 1424 qui dénissent les zones/
montants (voir schéma SBTOP/002PX page 82).
Le standard SECONDAIRE ou PRINCIPAL doit être
ensuite conguré comme :
1- SIMPLE
F R
2- PARALLÈLE
3- SÉRIE.
1-
Sélectionner SIMPLE lorsque le standard est le seul
présent dans l’installation ou bien le seul qui sert un
montant déterminé.
2- En présence de 2 standards
principaux ou
secondaires qui servent le même montant,
conguration PARALLÈLE implique que les deux
standards seront opérationnels avec les mêmes
fonctions (voir schéma SBTOP/005PX page 88).
Le premier des deux qui répond à un appel empêche
l'autre d'effectuer la même opération.
L'allumage ou l'extinction de l'un des 2 provoquera
automatiquement l'allumage ou l'extinction de l'autre.
Congurer les deux standards comme PARALLÈLE
et régler comme LS-IN le standard relié à la ligne
LS-LS du commutateur Art. 1424 ; programmer
comme LP-IN celui placé sous la ligne LPin-LPin
du commutateur Art. 1424.
Pour le standard PARALLÈLE, la commutation en
NUIT et la fonction JOUR/NUIT AUTOMATIQUE
ne sont pas possibles (voir “I3- JOUR NUIT
AUTOMATIQUE” page 55).
Dans la page de repos des deux standards, on
devra avoir P, qui indique le standard conguré en
parallèle et l'icône xe .
3-
En présence de 2 standards
principaux ou
secondaires qui servent le même montant,
conguration SÉRIE implique que seulement 1
des 2 peut être opérationnel (Standard MASTER),
alors que l’autre est désactivé (Standard SLAVE)
(voir schéma SBTOP/004PX page 86).
Congurer les deux standards comme SÉRIE et le
standard actif sera chaque fois celui programmé
comme MASTER. Pour commuter un standard de
MASTER à SLAVE et vice versa, voir “U21 COMMENT
ACTIVER (MASTER) OU DÉSACTIVER (SLAVE) LES
MT SB 01 60
STANDARDS PRINCIPAUX” page 53.
Dans la page de repos des deux standards, il devra
y avoir S, qui indique le standard conguré en série
et l'icône xe .
ATTENTION !
- si clignote, cela indique que les 2 standards ne
communiquent pas correctement.
- si l'icône ! apparaît cela signie qu'il y a un problème
de conguration des 2 standards (ex. les deux MASTER
ou SLAVE, LP-IN ou LS-IN ou un SÉRIE et l'autre
PARALLÈLE).
- si dans une installation Simplebus TOP (avec commutateurs
Art. 1424), sont présents tant des Standards principaux que
secondaires (voir schéma SBTOP/003PX page 84); pour
le fonctionnement correct de l'installation, il est nécessaire
d'activer sur tous les standards la programmation “C8.7FONCTIONNEMENT STAND. PRINC+SEC” page 62.
Comment configurer un standard principal
- appuyer sur la touche MENU et visualiser au moyen
des touches le menu 8-OPTIONS AVANCÉES,
appuyer sur la touche 8;
8-OPTIONS
AVANCEES
- visualiser au moyen des touches le menu
3-TYPE DE STANDARD, appuyer sur la touche 3 ;
3- TYPE DE
la
- appuyer sur la touche 2 ;
STANDARD
1-SECONDAIRE
*2-PRINCIPAL
Le standard est conguré par défaut comme
STANDARD SEC. SIMPLE.
Il est maintenant possible de le congurer comme
STANDARD SEC. PARALLÈLE ou STANDARD
SEC. SÉRIE.
- pour le congurer comme 2-STAND. SEC. PARAL.,
appuyer sur la touche 2;
1-STAND. SINGLE
*2-STAND. PARAL.
- pour le congurer comme LS-IN appuyer sur la touche 1,
pour le congurer comme LP-IN appuyer sur la touche 2;
1- LS-IN
- pour le congurer comme STAND. SEC. SÉRIE,
visualiser au moyen des touches le menu 3-STAND.
la
SEC. SÉRIE, appuyer sur la touche 3;
2- LP-IN
*
3-STANDARD
SERIE
- pour le congurer comme MASTER appuyer sur
pour le congurer comme SLAVE appuyer sur
la touche 1,
la touche 2;
1- MASTER
2- SLAVE
Page 65
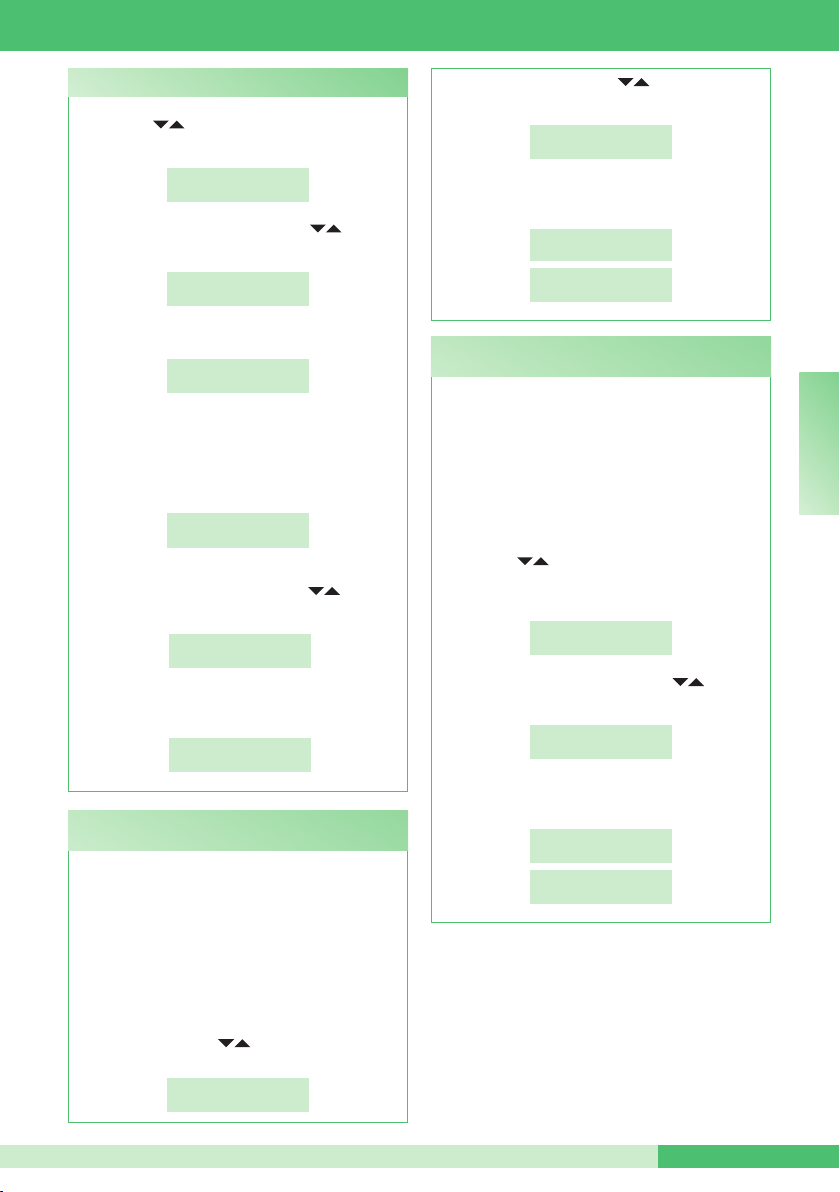
MT SB 01
Comment configure un standard secondaire
- appuyer sur la touche MENU et visualiser au moyen
des touches le menu 8-OPTIONS AVANCÉES,
appuyer sur la touche 8:
- visualiser au moyen des touches le menu
3-TYPE DE STANDARD, appuyer sur la touche 3 ;
- appuyer sur la touche 1 ;
Le standard est conguré par défaut comme
STANDARD SEC. SIMPLE.
Il est possible de le congurer comme STANDARD
SÉRIE, en effet la fonction 2-STANDARD SEC.
PARALL. N'EST PAS DISPONIBLE ;
- pour le congurer comme STANDARD SÉRIE,
visualiser au moyen des touches le menu
3-STANDARD SÉRIE, appuyer sur la touche 3 ;
- pour le congurer comme MASTER appuyer sur la touche
1, pour le congurer comme SLAVE appuyer sur la touche 2 ;
C8.4 - Auto-all. interne on/off
(disponible depuis IR.006)
Désactivée par défaut.
Cette fonction n'est disponible que pour les
installations Simplebus non TOP et la présence de
l'Art. 1259 est nécessaire pour la vision cyclique des
caméras déportées.
Cette fonction permet d'activer ou de désactiver
l'auto-allumage envoyé par les postes intérieurs avec
standard en modalité JOUR.
Pour activer la fonction :
- appuyer sur la touche MENU et visualiser au
moyen des touches le menu 8-OPTIONS
AVANCÉES, appuyer sur la touche 8;
8-OPTIONS
AVANCEES
3- TYPE DE
STANDARD
*
1-SECONDAIRE
2-PRINCIPAL
*
1-STAND. SINGLE
2-STAND. PARAL.
*
3-STANDARD
SERIE
1- MASTER
2- SLAVE
8-OPTIONS
AVANCEES
- visualiser avec les touches le menu 4-AUTO-
ALL. INTERNE ON/OFF ;
4-AUTO-ALLUMAGE
ON/OFF
- appuyer sur la touche 4 pour activer ou désactiver
la fonction ;
SERVICE
ACTIF
SERVICE
PAS ACTIF
C8.5 - Appel triple on/off (disponible depuis
IR.006)
Elle est désactivée par défaut.
Avec cette fonction, il est possible d'activer ou de
désactiver l'appel triple du standard vers les postes
intérieurs.
L'appel sera ainsi effectué 3 fois de suite (dans le cas
d'appel vidéo : les 2 premiers sont audio, le troisième
est vidéo).
Pour activer la fonction :
- appuyer sur la touche MENU et visualiser au moyen
des touches le menu 8-OPTIONS AVANCÉES
et appuyer sur la touche 8 ;
8-OPTIONS
AVANCEES
- visualiser au moyen des touches le menu
5-APPEL TRIPLE ON/OFF ;
5-APPEL TRIPLE
ON/OFF
- appuyer sur la touche 5 pour activer ou désactiver
la fonction ;
SERVICE
ACTIF
SERVICE
PAS ACTIF
F R
MT SB 0161
Page 66
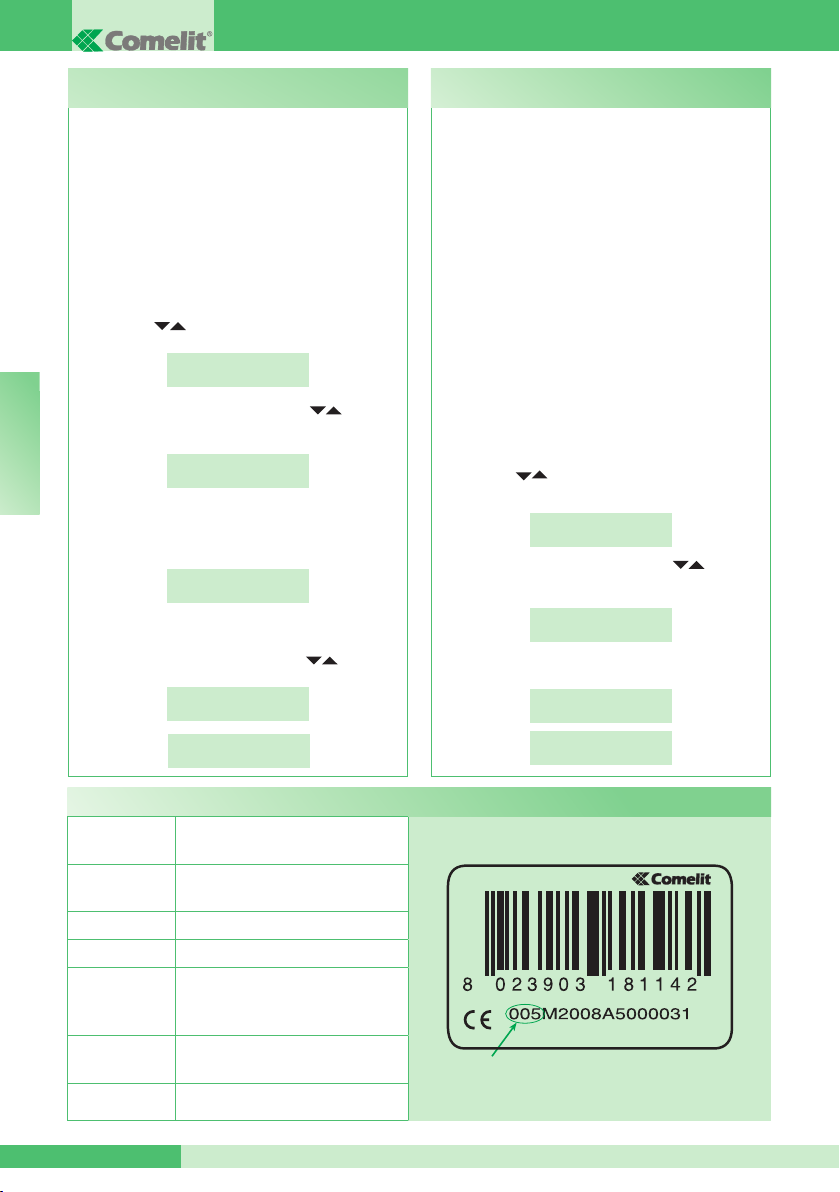
GROUP S.p.A.
C8.6 - Fonction contact CH-CH
(disponible depuis IR.006)
Avec cette fonction, il est possible d'attribuer la
fonction au contact CH-CH, par défaut la fonction
activée est la répétition d'appel et l'on pourra choisir
la temporisation de la fermeture du contact entre 1,3
et 5 secondes.
En alternative, il est possible d'activer la fonction
de moniteur parallèle ou extérieur ; le contact se
fermera pendant toute la durée d'un appel VIDÉO
depuis le poste extérieur.
Pour activer la fonction :
- appuyer sur la touche MENU et visualiser au moyen
des touches le menu 8-OPTIONS AVANCÉES
et appuyer sur la touche 8;
8-OPTIONS
AVANCEES
- visualiser au moyen des touches le menu
6-FONCTION CONTACT CH-CH, appuyer sur la
touche 6;
F R
6-FONCTION
CONTACT CH-CH
- appuyer sur la touche 1 pour la fonction
RÉPÉTITION D'APPEL ou sur la touche 2 pour la
fonction MONITEUR EXTÉRIEUR ;
1-REPET. APPEL
2-EXT. MONITOR
- si l'on a appuyé sur la touche 1, la DURÉE DE
FERMETURE DU CONTACT sera demandée ;
visualiser au moyen des touches la durée
choisie (1,3 ou 5 sec.) ;
DUREE CONTACT :
1 SEC
DUREE CONTACT :
3 SEC
C8.7 - Fonctionnement standard princ+sec
(disponible depuis IR.006)
Désactivé par défaut.
ATTENTION !
1 Cette fonction doit rester désactivée pour éviter
les dysfonctionnements en présence de standards,
étriers, combinés parlophoniques, commutateurs et
mélangeurs avec IR. inférieur à ceux indiqués dans
le tableau ci-dessous.
2 Cette fonction doit être activée sur tous les
standards pour le fonctionnement correct
d'installations Simplebus TOP (avec commutateurs
Art. 1424) qui utilisent des standards principaux et
secondaires.
Pour le fonctionnement correct d'installations avec
standards principaux et secondaires, il est nécessaire
que l'installation soit équipée de standards,
étriers, combinés parlophoniques, commutateurs
et mélangeurs en version TOP avec IR. égal ou
supérieur à ceux indiqués dans le tableau page 62.
Pour activer la fonction :
- appuyer sur la touche MENU et afcher au moyen
des touches le menu 8-OPTIONS AVANCÉES,
appuyer sur la touche 8 ;
8-OPTIONS
AVANCEES
- visualiser au moyen des touches le menu
7-FONCTIONNEMENT STAND. PRINC+SEC;
7- FONCTION
STAND. PRINC+SEC
- appuyer sur la touche 7 pour activer ou désactiver
la fonction ;
SERVICE
ACTIF
SERVICE
PAS ACTIF
Tableau articles Simplebus TOP
ÉTRIERS
COMBINÉS
PARLOPHONIQUES
COMMUTATEURS
MÉLANGEURS
POSTES
EXTÉRIEURS
STANDARDS
LOGICIEL
Art. 5714C IR. 007 - Art. 5814C IR. 002
Art. 6114C IR. 015
Art. 2608 IR. 006 - Art. 2610 IR. 008
Art. 2619 IR. 000 - Art. 2628 IR. 005
Art. 2638 IR. 006
Art. 1424 IR. 002
Art. 4888C IR. 013
Art. 1602 IR. 027 - Art. 1602VCF IR. 002
Art. 3340 IR. 021 - Art. 3342 IR. 021
Art. 3070/A IR. 010 - Art. 3072/A IR. 010
Art. 4660C IR. 013
Art. 1998A IR. 006 - Art. 1998V IR. 001
Art. 1998VC IR. 001
Art. 1249/A IR. 002
MT SB 01 62
IR.
Page 67
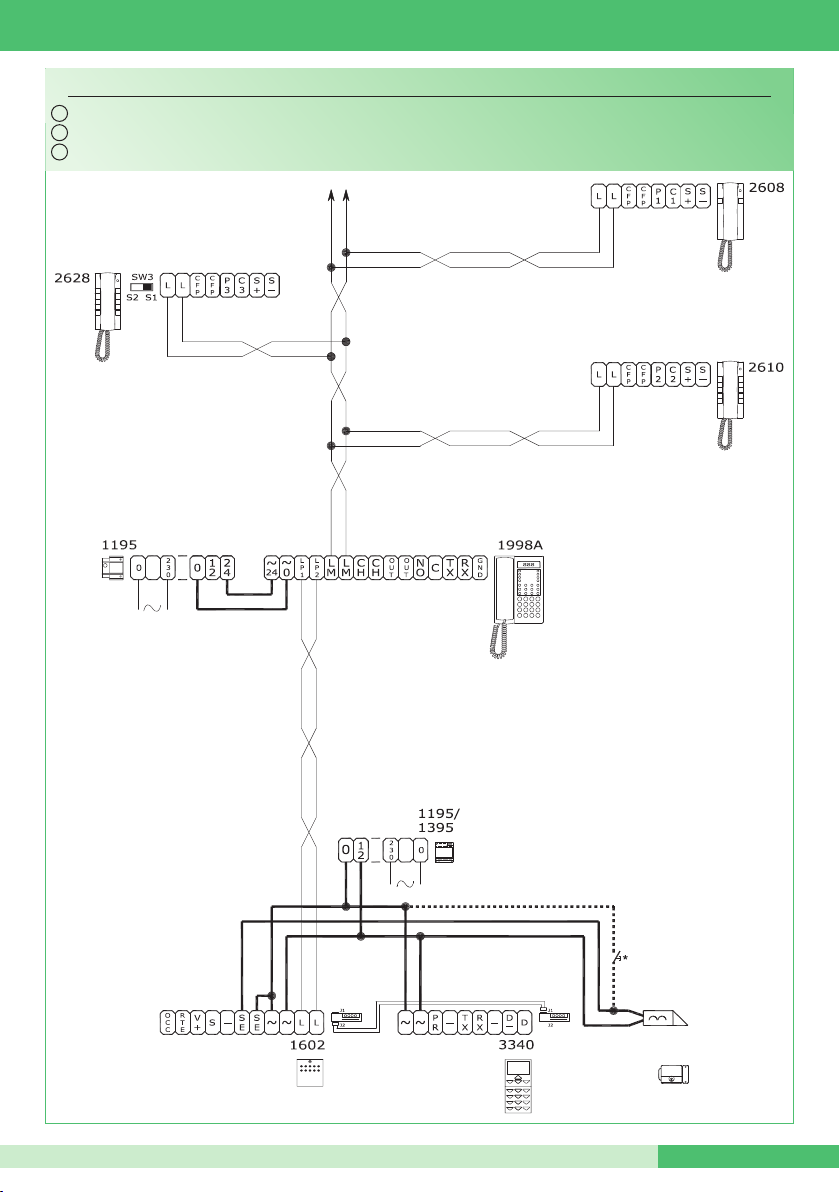
SBC/06S
IT
Impianto citofonico con 1 ingresso principale e centralino di portineria.
EN
Door-entry phone system with 1 main input and porter switchboard.
FR
Installation parlophonique avec 1 entrée principale et standard de conciergerie.
MT SB 01
* Pulsante comando apriporta locale
* Local lock-release button
* Bouton commande ouvre-porte local
MT SB 0163
Page 68
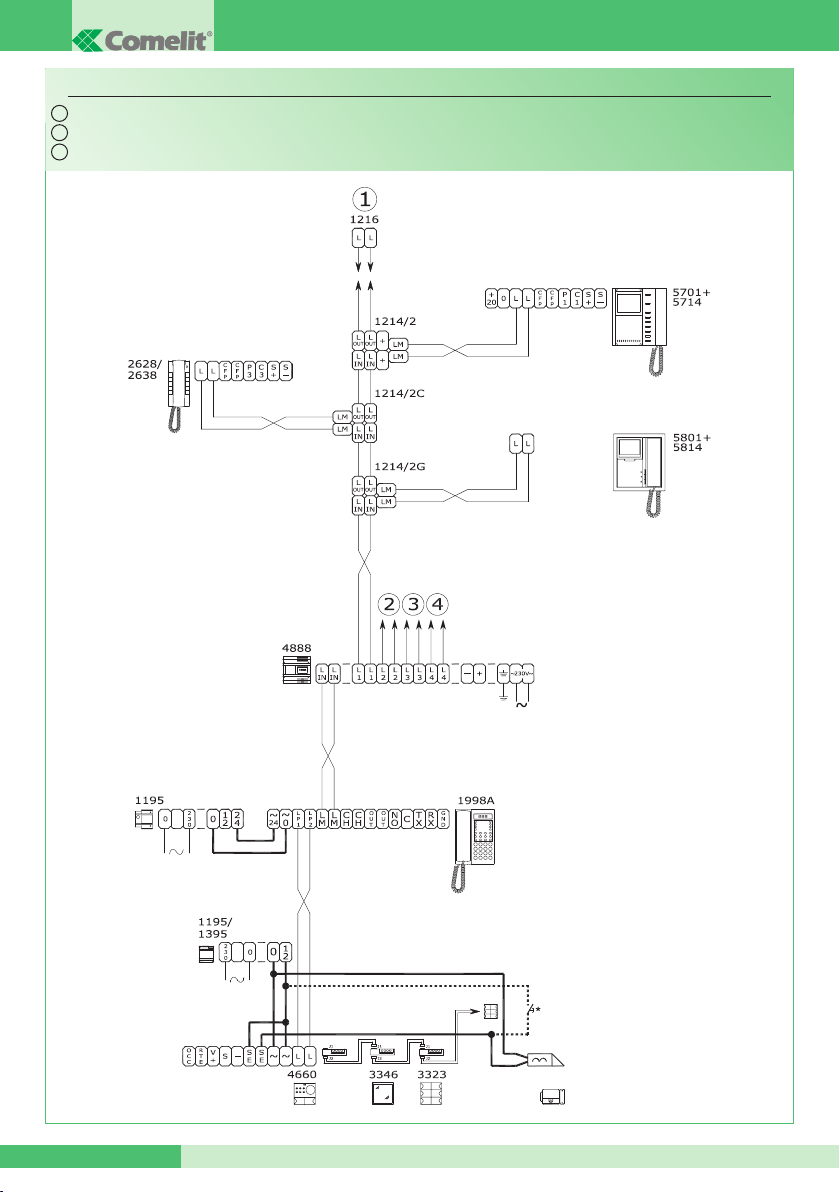
GROUP S.p.A.
SB2V/EN/103G
IT
Impianto videocitofonico Simplebus b/n con 1 ingresso principale e centralino di portineria.
EN
Simplebus B/W video entry phone system with 1 main input and porter switchboard.
FR
Installation parlophonique et visiophonique Simplebus n/b avec 1 entrée principale e standard de conciergerie.
MT SB 01 64
* Pulsante comando apriporta locale
* Local lock-release button
* Bouton commande ouvre-porte local
Page 69
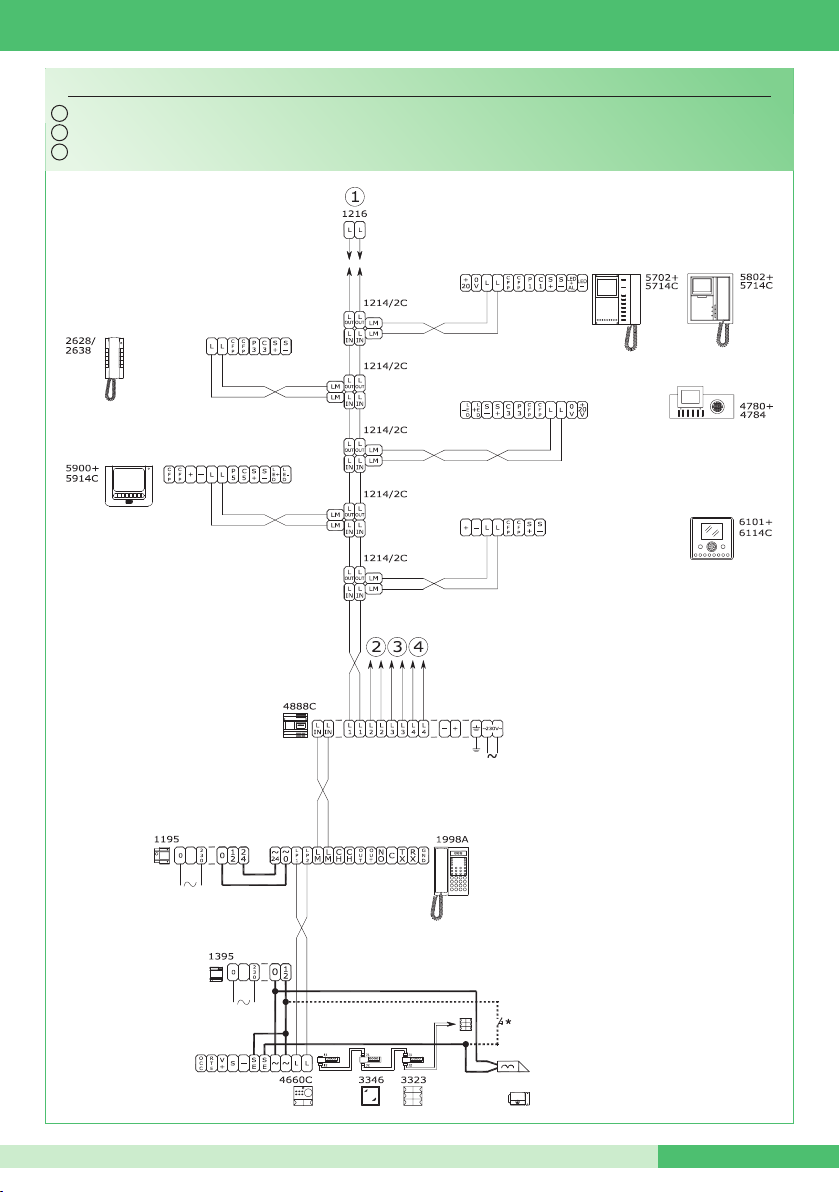
MT SB 01
SB2V/EN/103PX
IT
Impianto videocitofonico Simplebus Color con 1 ingresso principale e centralino di portineria.
EN
Simplebus Color video entry phone system with 1 main input and porter switchboard.
FR
Installation parlophonique et visiophonique Simplebus Color avec 1 entrée principale e standard de conciergerie.
* Pulsante comando apriporta locale
* Local lock-release button
* Bouton commande ouvre-porte local
MT SB 0165
Page 70
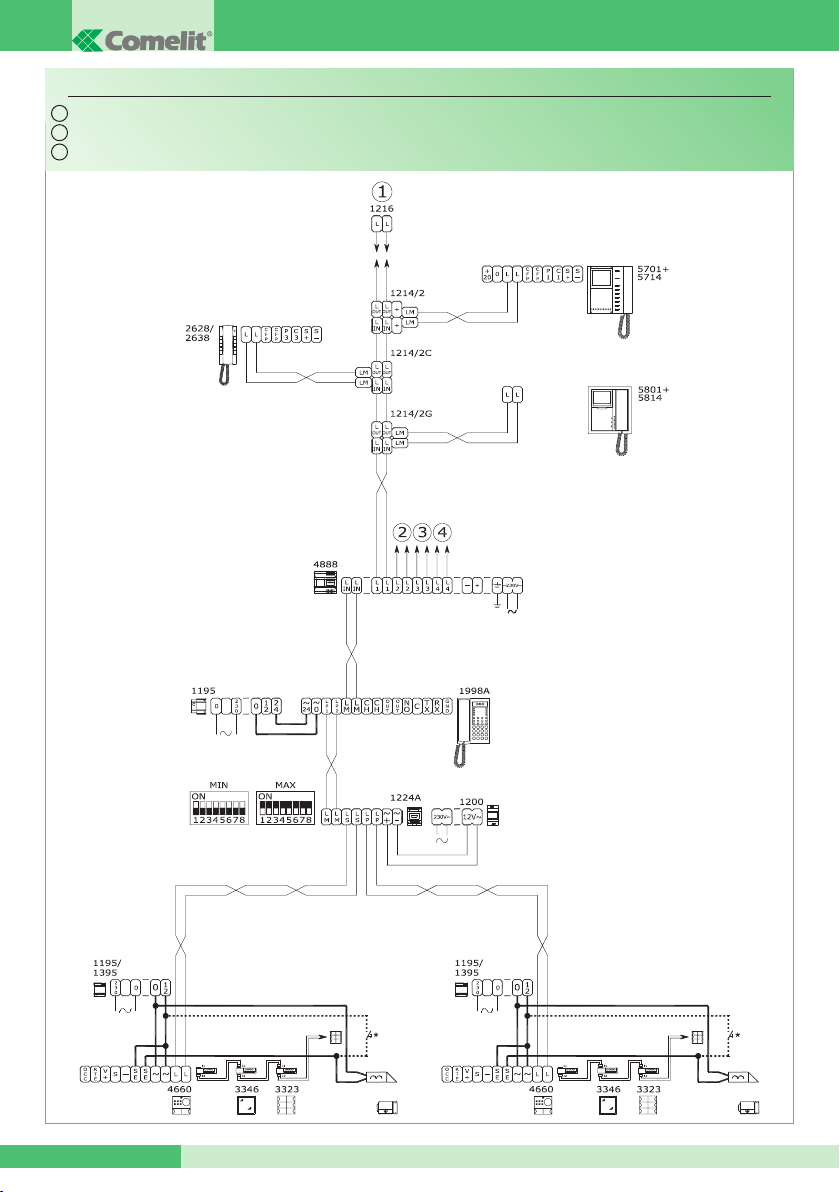
GROUP S.p.A.
SB2V/EN/105G
IT
Impianto videocitofonico Simplebus b/n con 2 ingressi principali e centralino di portineria.
EN
Simplebus B/W video entry phone system with 2 main inputs and porter switchboard.
FR
Installation parlophonique et visiophonique Simplebus n/b avec 2 entrées principales e standard de conciergerie.
MT SB 01 66
* Pulsante comando apriporta locale
* Local lock-release button
* Bouton commande ouvre-porte local
Page 71
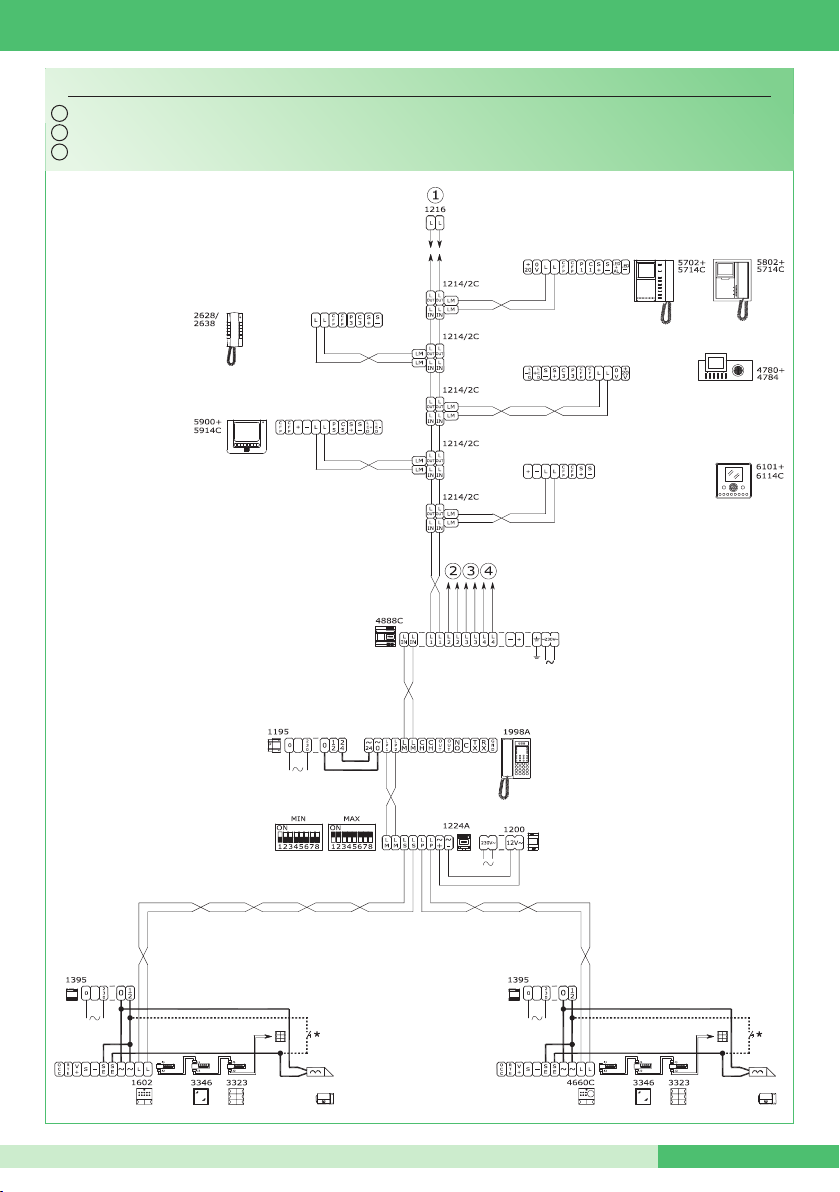
MT SB 01
SB2V/EN/105PX
IT
Impianto videocitofonico Simplebus Color con 2 ingressi principali e centralino di portineria.
EN
Simplebus Color video entry phone system with 2 main inputs and porter switchboard.
FR
Installation parlophonique et visiophonique Simplebus Color avec 2 entrées principales et standard de conciergerie.
* Pulsante comando apriporta locale
* Local lock-release button
* Bouton commande ouvre-porte local
MT SB 0167
Page 72
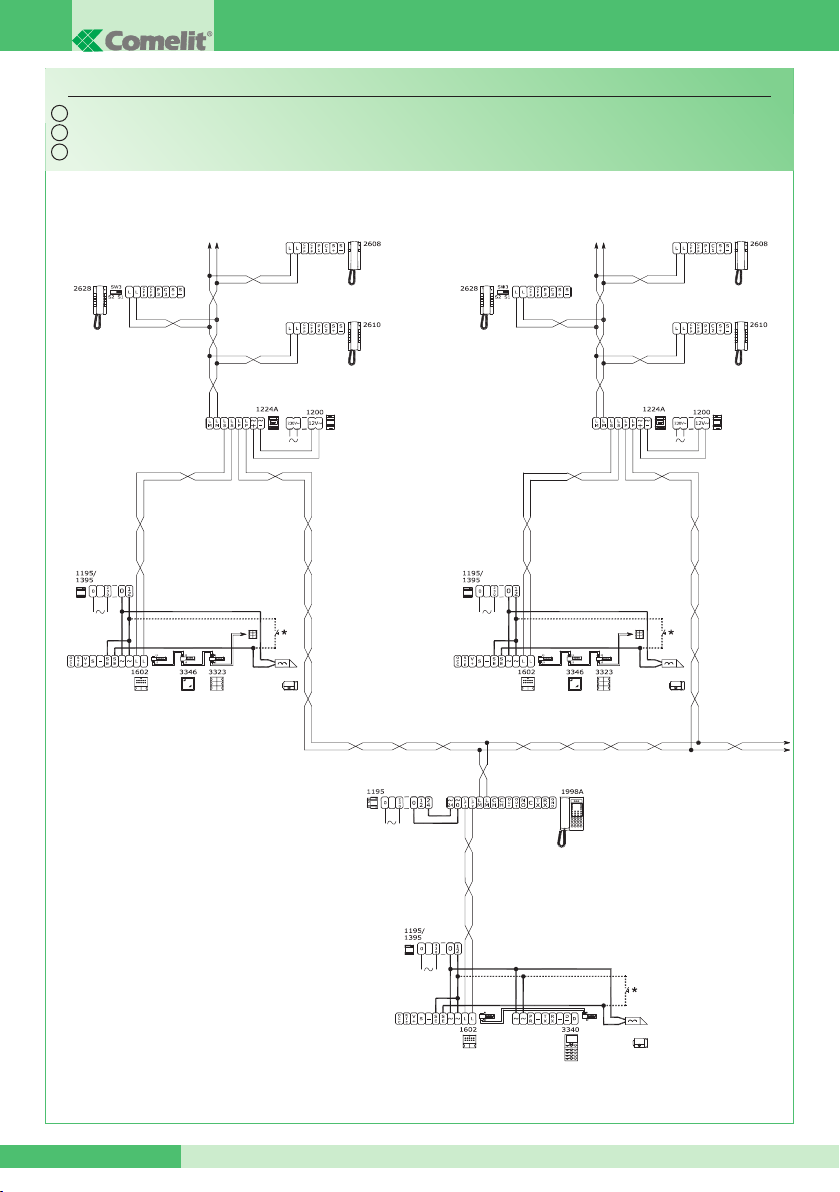
GROUP S.p.A.
SBC/08S
IT
Impianto citofonico con 1 ingresso principale, n. secondari audio e centralino di portineria.
EN
Door-entry phone system with 1 main input, n. secondary audio inputs and porter switchboard.
FR
Installation parlophonique avec 1 entrée principale, “n” secondaires audio et standard de conciergerie.
MT SB 01 68
* Pulsante comando apriporta locale
* Local lock-release button
* Bouton commande ouvre-porte local
Page 73
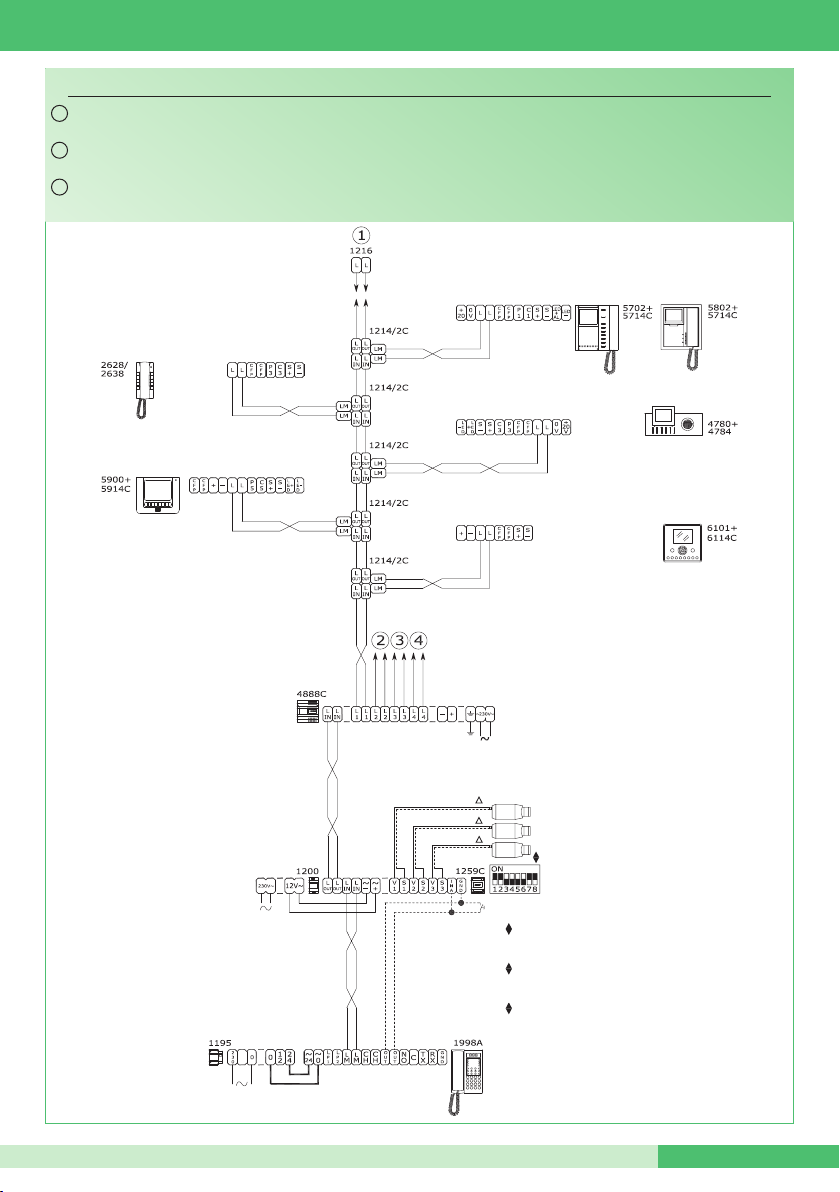
MT SB 01
SB2V/018APX
IT
Impianto Simplebus Color con modulo telecamera scorporata Art. 1259C in modalità attuatore generico e
centralino di portineria.
EN
Simplebus Color system with remote camera module Art. 1259C in generic actuator mode and porter
switchboard.
FR
Installation Simplebus Color avec module caméra déportée Art. 1259C en mode actionneur générique et
standard de conciergerie.
H Da alimentare separatamente
H To be powered separately
H À alimenter séparément
Per settaggio e funzionamento Art. 1259C
vedi FT/SBC/05, MT/SBC/01
For setting and operation of Art. 1259C,
see FT/SBC/05, MT/SBC/01
Pour programmation et fonctionnement
Art. 1259C voir FT/SBC/05, MT/SBC/01
MT SB 0169
Page 74
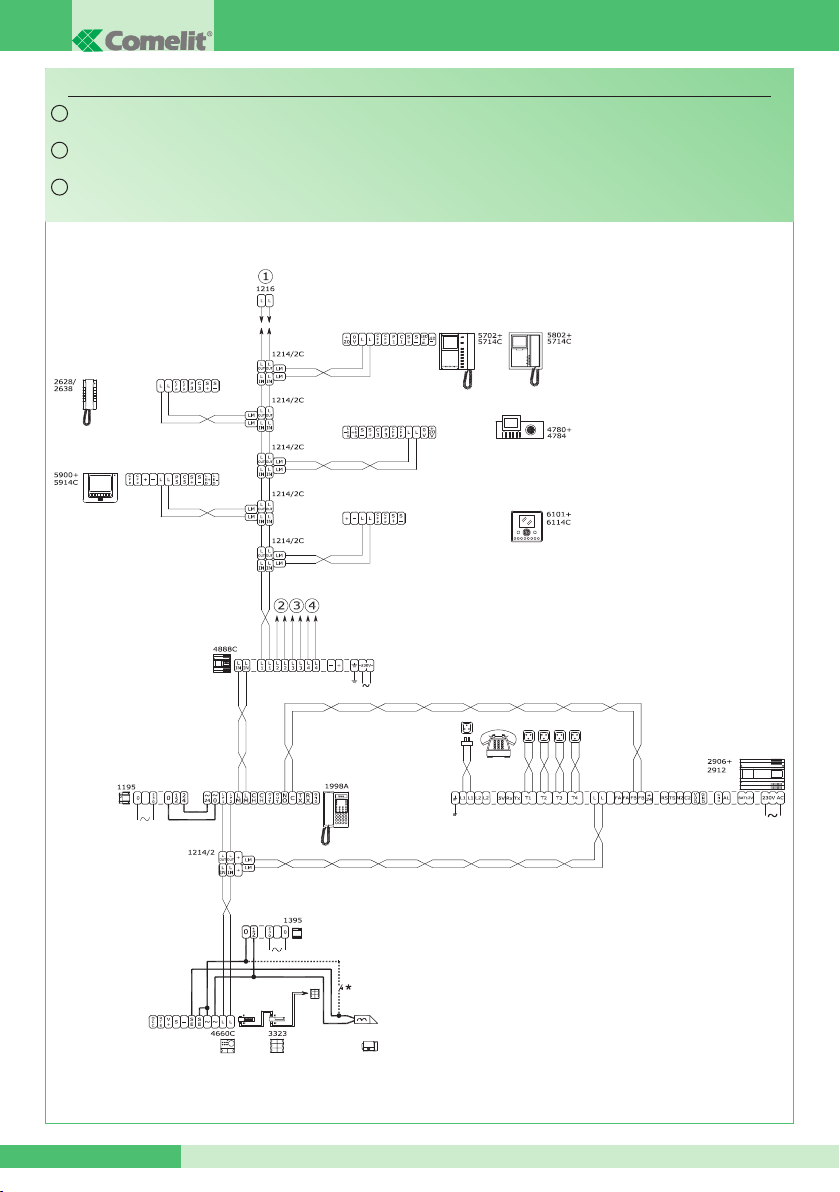
GROUP S.p.A.
SB2V/026PX
IT
Impianto videocitofonico con 1 ingresso principale e centralino di portineria abbinato al centralino
telefonico Art. 2906 per follow-me.
EN
Video entry phone system with 1 main input and porter switchboard used in conjunction with telephone
switchboard Art. 2906 for Follow me mode.
FR
Installation parlophonique et visiophonique avec 1 entrée principale et standard de conciergerie associé
au standard téléphonique Art. 2906 pour follow-me.
MT SB 01 70
* Pulsante comando apriporta locale
* Local lock-release button
* Bouton commande ouvre-porte local
Page 75
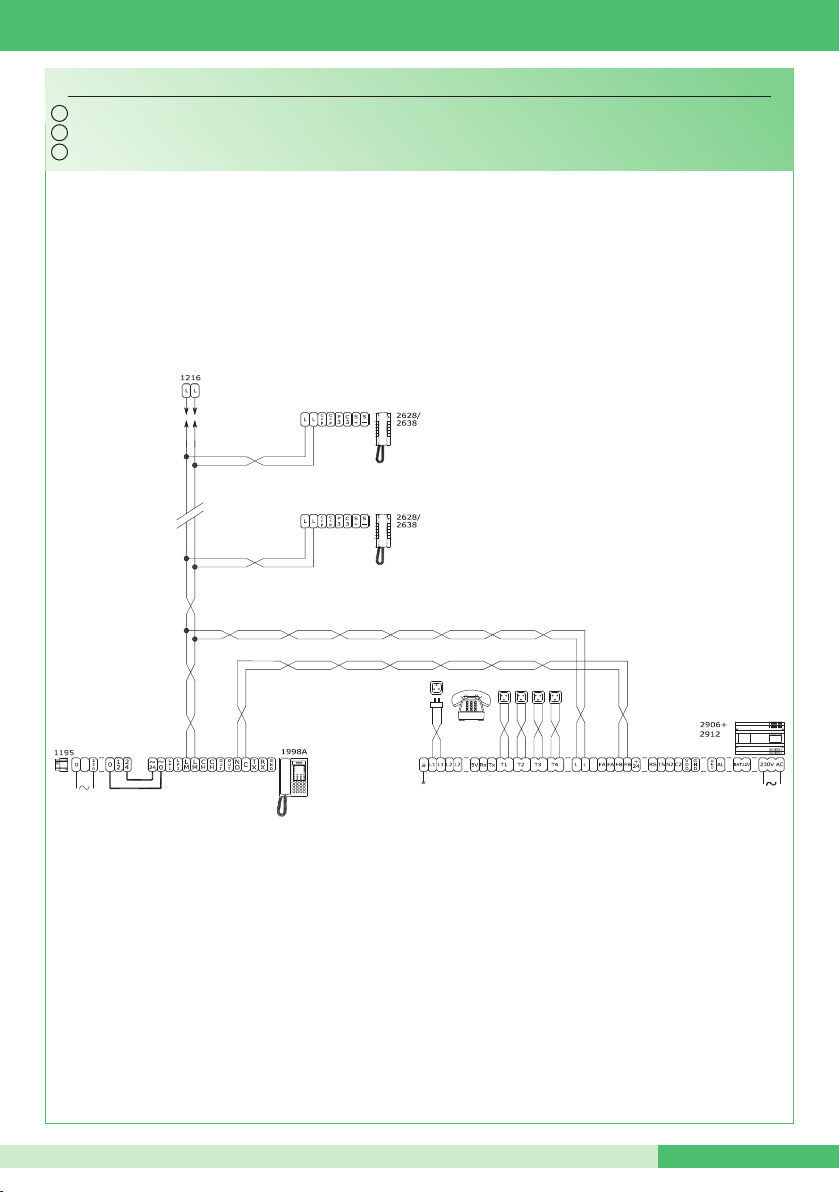
MT SB 01
SB2V/027PX
IT
Impianto citofonico con centralino di portineria abbinato al centralino telefonico Art. 2906 per follow-me.
EN
Door-entry phone system with porter switchboard used in conjunction with telephone switchboard Art. 2906 for follow-me mode.
FR
Installation parlophonique avec standard de conciergerie associé au standard téléphonique Art. 2906 pour follow-me.
MT SB 0171
Page 76
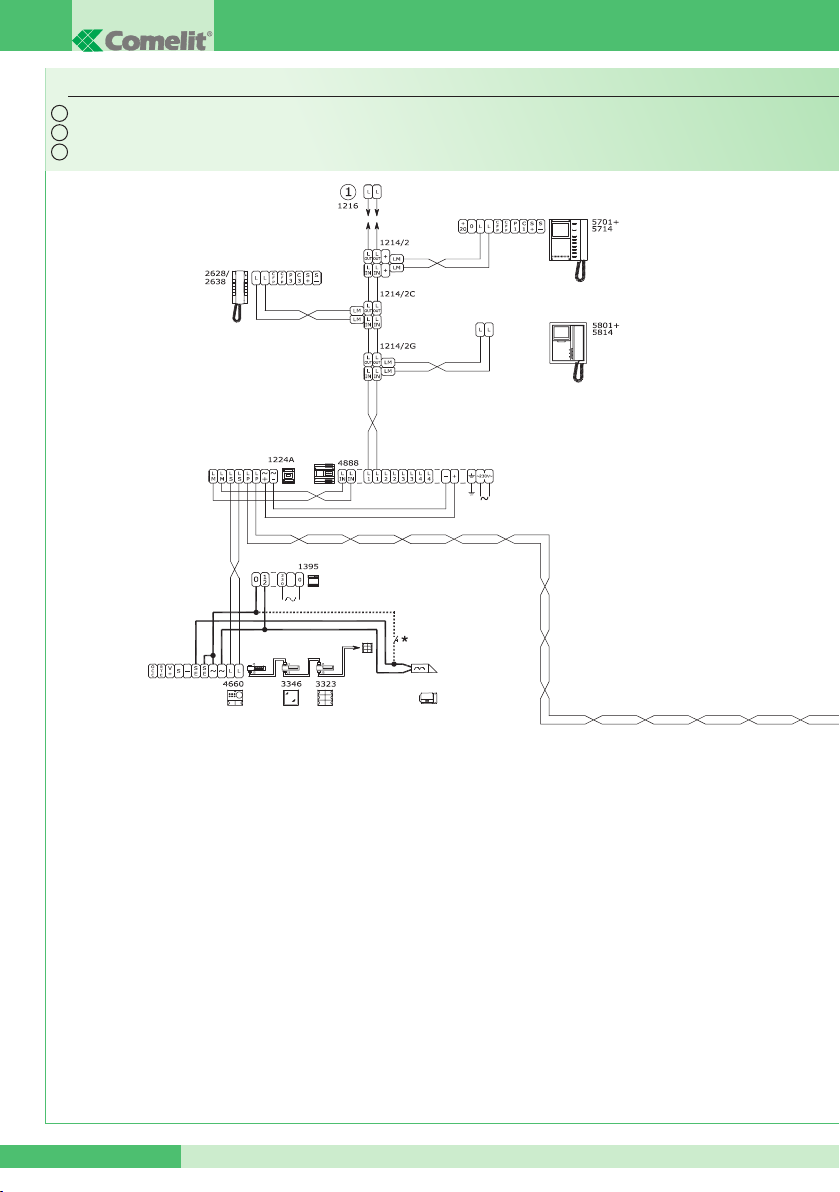
GROUP S.p.A.
SB2V/EN/101G
IT
Impianto videocitofonico Simplebus b/n con 1 ingresso principale, 3 secondari video e centralino di portineria.
EN
Simplebus B/W video entry phone system with 1 main input, 3 secondary video inputs and porter switchboard.
FR
Installation parlophonique et visiophonique Simplebus n/b avec 1 entrée principale, 3 secondaires vidéo et standard de conciergerie.
MT SB 01 72
Page 77
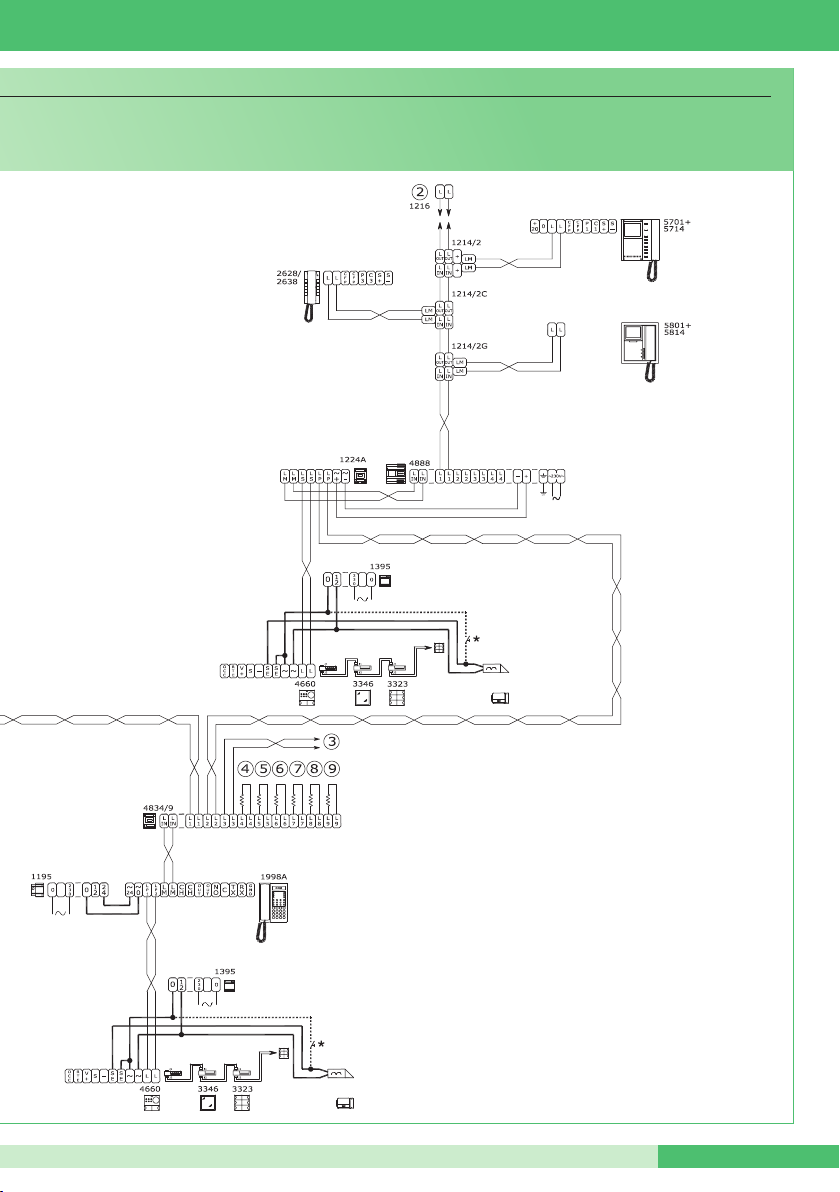
MT SB 01
* Pulsante comando apriporta locale
* Local lock-release button
* Bouton commande ouvre-porte local
MT SB 0173
Page 78
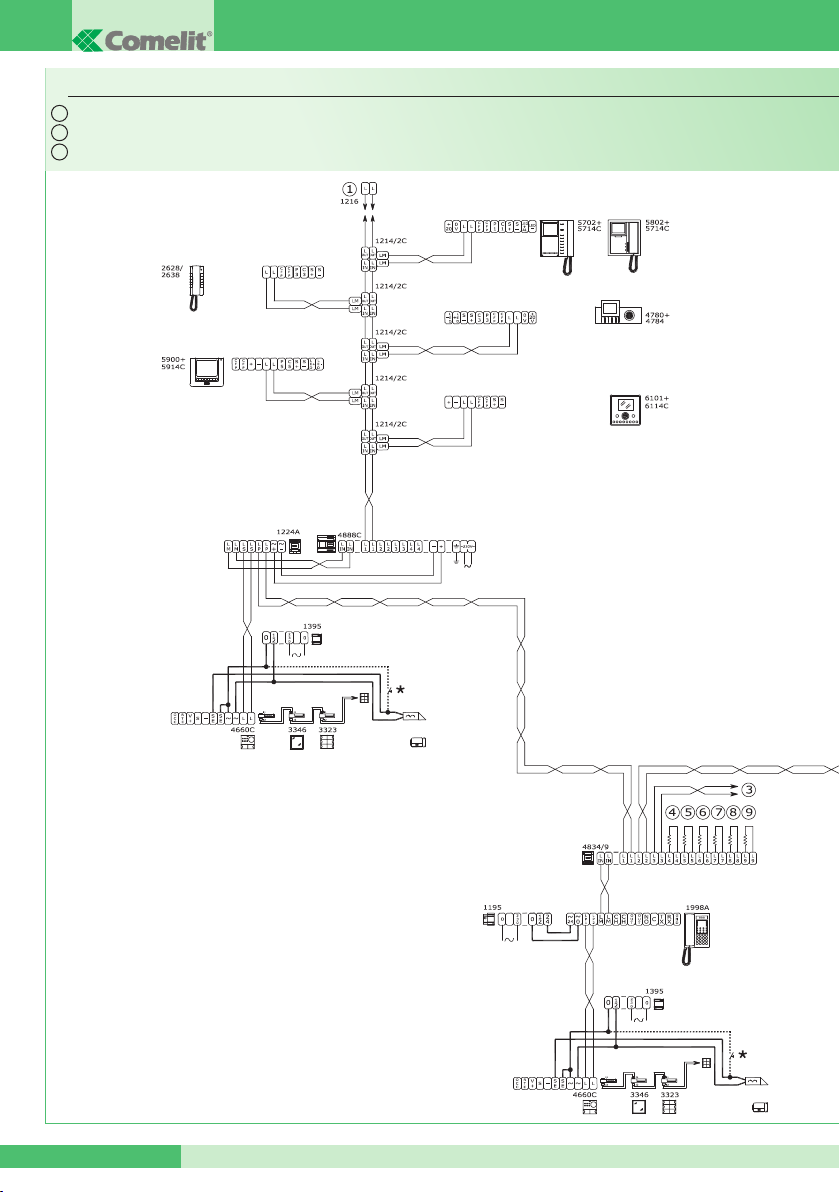
GROUP S.p.A.
SB2V/EN/101PX
IT
Impianto videocitofonico Simplebus Color con 1 ingresso principale, 3 secondari video e centralino di portineria.
EN
Simplebus Color video entry phone system with 1 main input, 3 secondary video inputs and porter switchboard.
FR
Installation parlophonique et visiophonique Simplebus Color avec 1 entrée principale, 3 secondaires vidéo et standard de conciergerie.
MT SB 01 74
Page 79
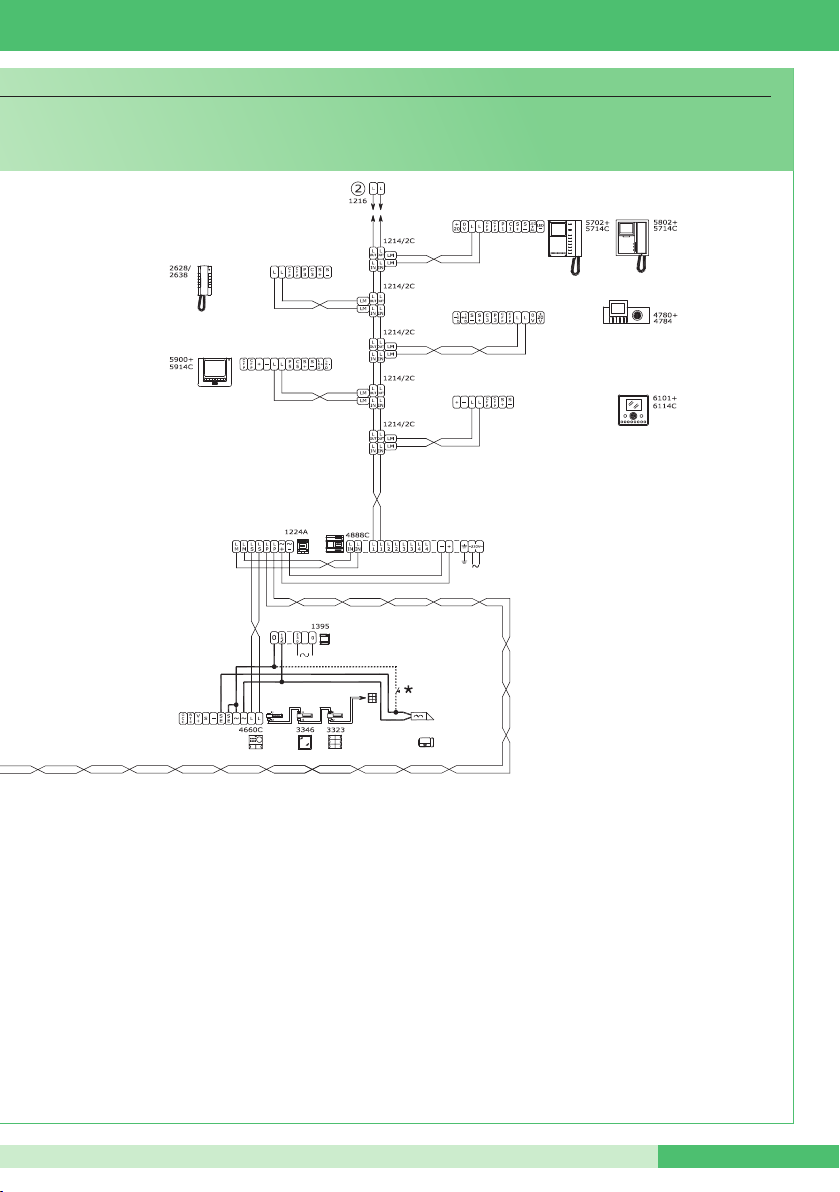
MT SB 01
* Pulsante comando apriporta locale
* Local lock-release button
* Bouton commande ouvre-porte local
MT SB 0175
Page 80
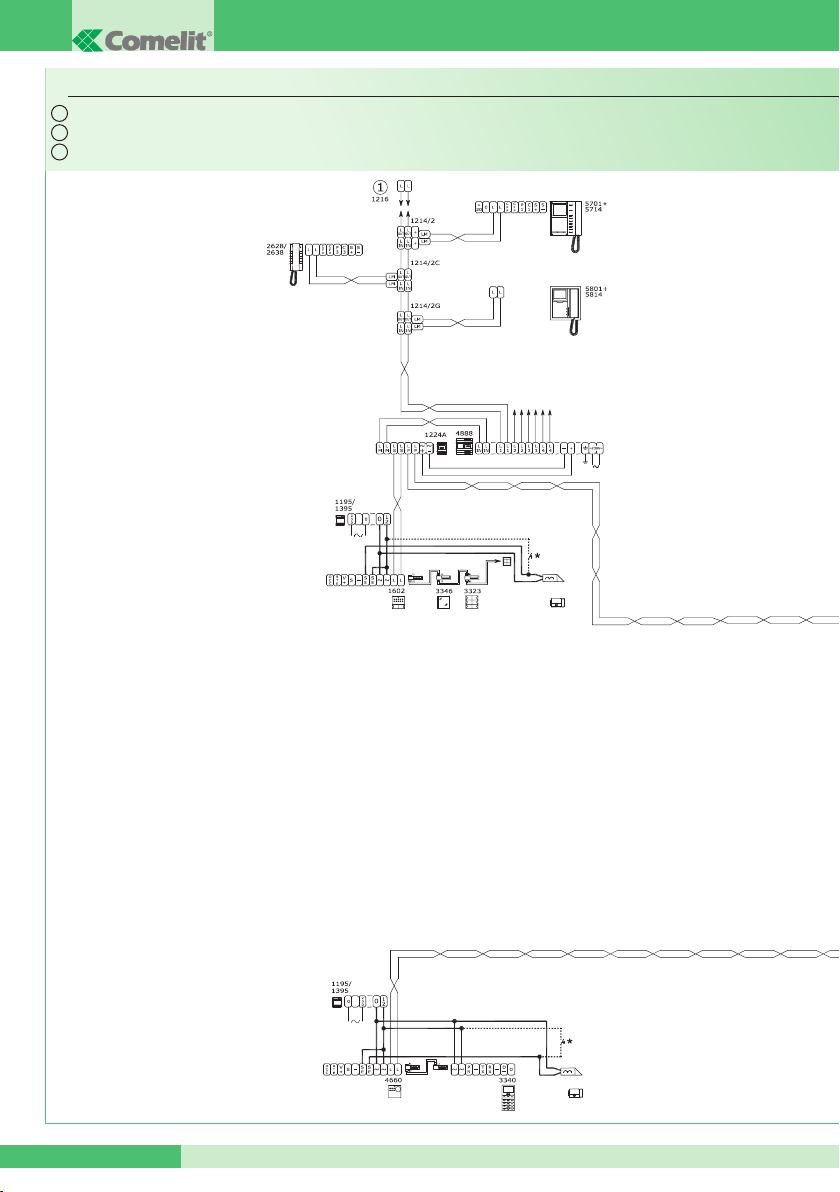
GROUP S.p.A.
SB2V/EN/121G
IT
Impianto videocitofonico Simplebus b/n con 2 ingressi principali, 3 secondari audio e centralino di portineria.
EN
Simplebus B/W video entry phone system with 2 main inputs, 3 secondary audio inputs and porter switchboard.
FR
Installation parlophonique et visiophonique Simplebus Color avec 2 entrées principales, 3 secondaires audio et standard de conciergerie.
MT SB 01 76
Page 81
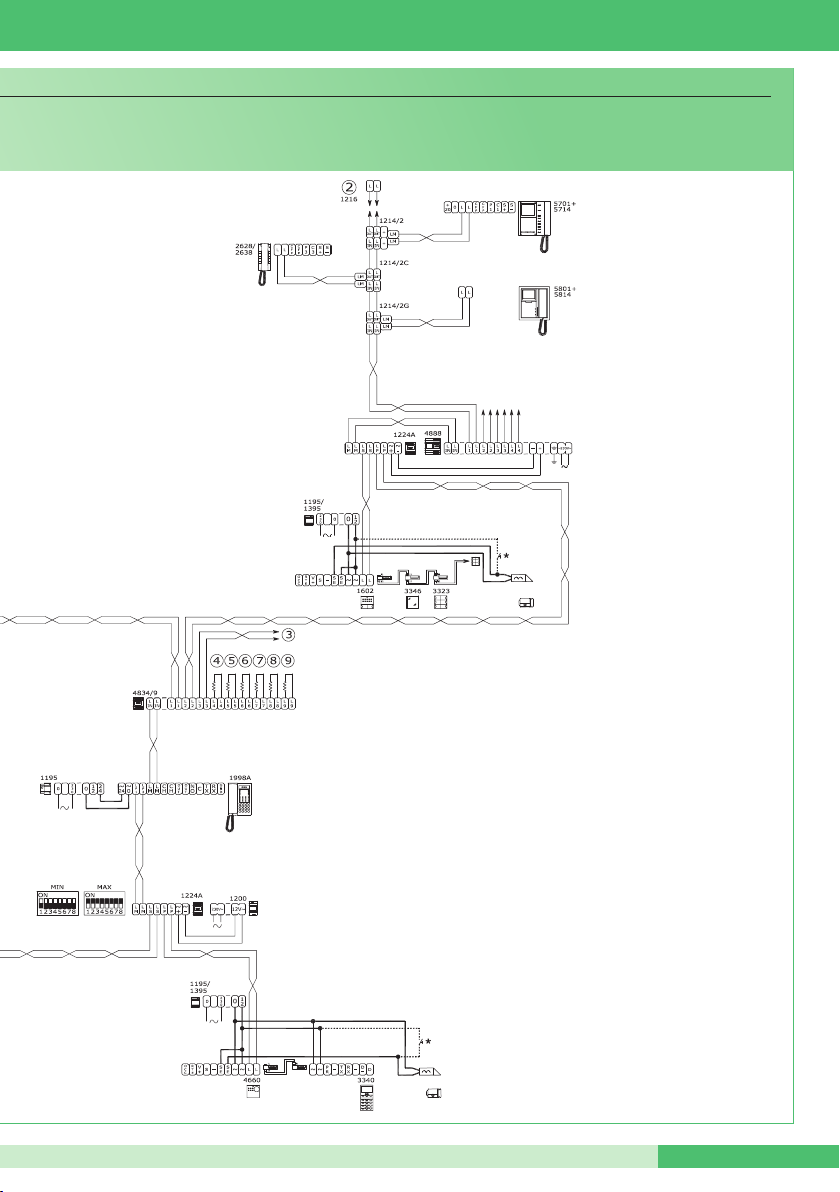
MT SB 01
* Pulsante comando apriporta locale
* Local lock-release button
* Bouton commande ouvre-porte local
MT SB 0177
Page 82
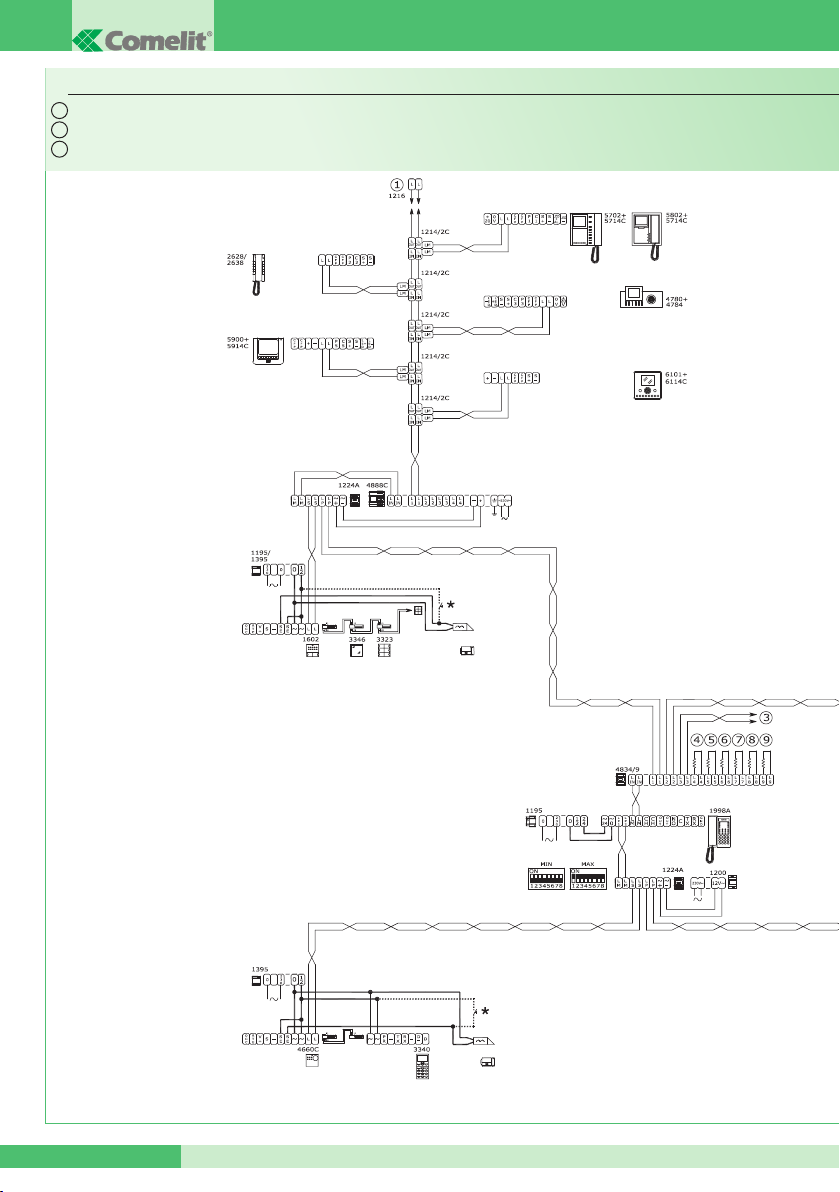
GROUP S.p.A.
SB2V/EN/121PX
IT
Impianto videocitofonico Simplebus Color con 2 ingressi principali, 3 secondari audio e centralino di portineria.
EN
Simplebus Color video entry phone system with 2 main inputs, 3 secondary audio inputs and porter switchboard.
FR
Installation parlophonique et visiophonique Simplebus Color avec 2 entrées principales, 3 secondaires audio et standard de conciergerie.
MT SB 01 78
Page 83
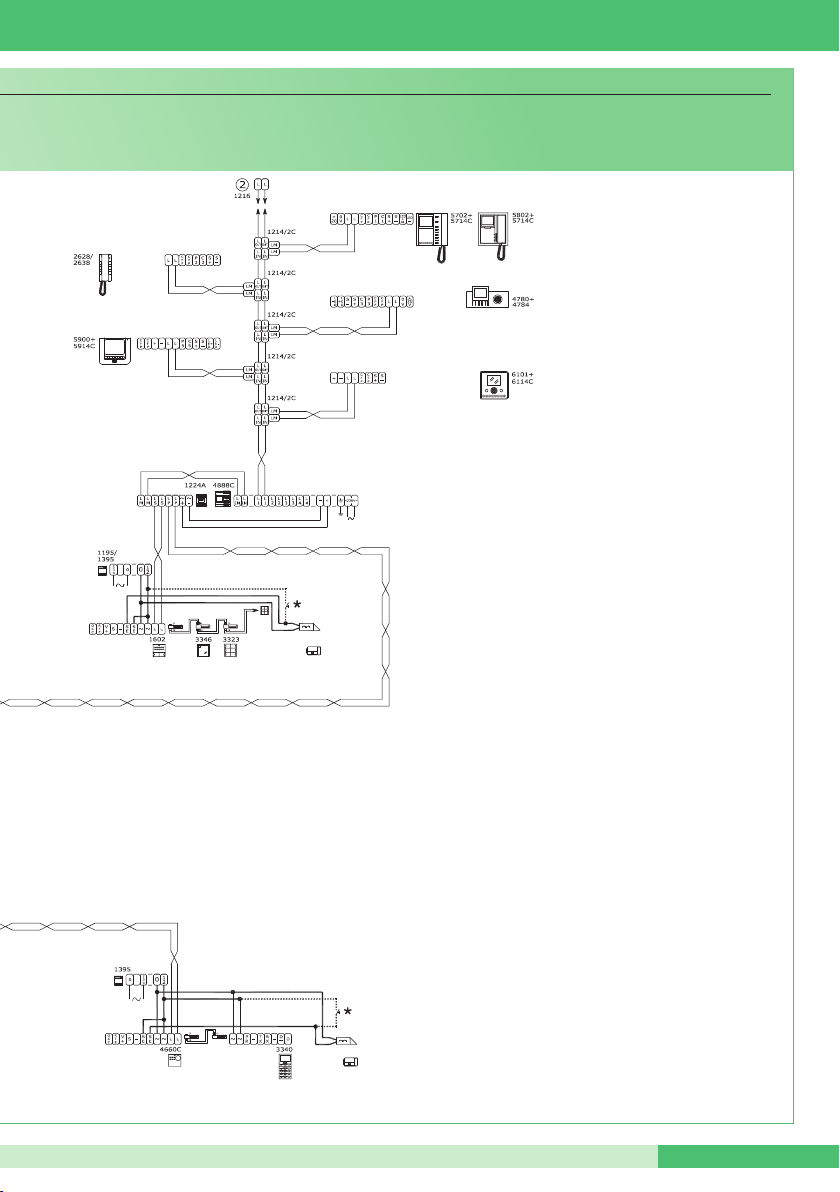
MT SB 01
* Pulsante comando apriporta locale
* Local lock-release button
* Bouton commande ouvre-porte local
MT SB 0179
Page 84
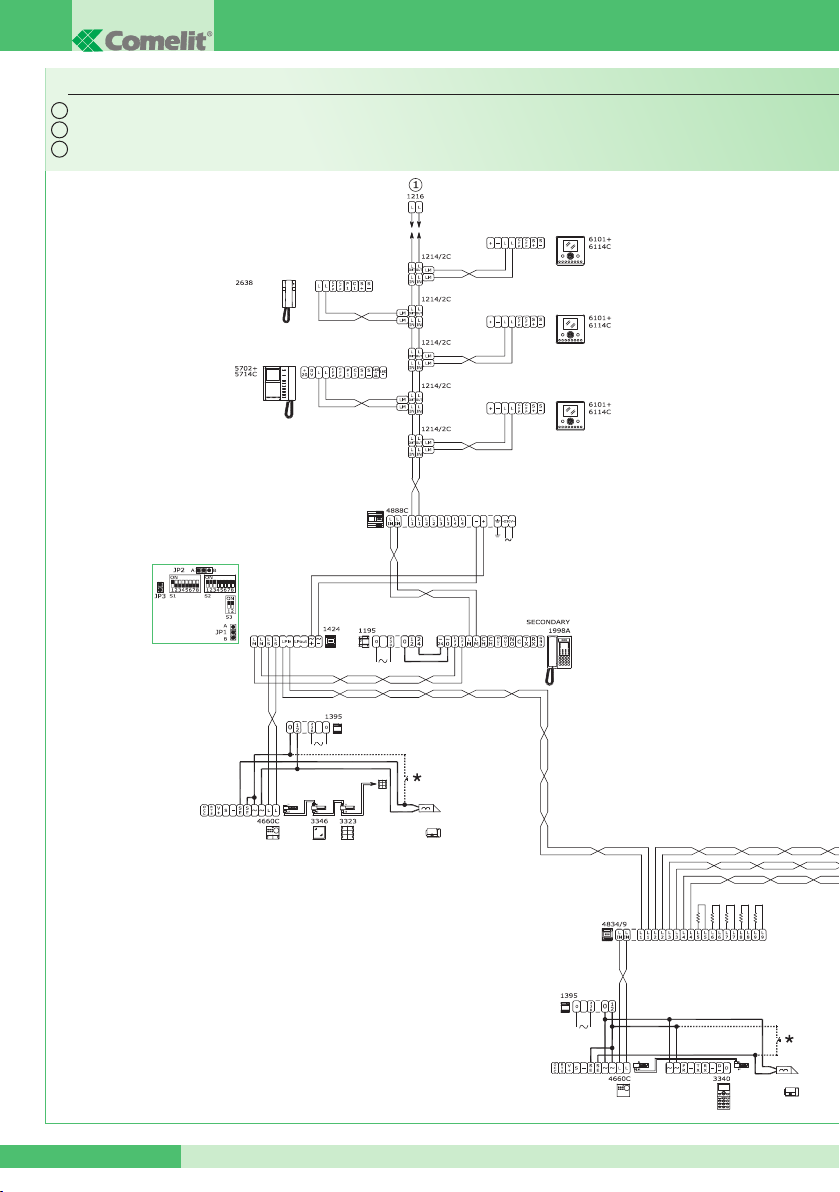
GROUP S.p.A.
SBTOP/001PX
IT
Impianto videocitofonico Simplebus TOP con 1 ingresso principale, 4 secondari e relativi centralini di portineria secondari.
EN
Simplebus TOP video entry phone system with 1 main input, 4 secondary inputs and corresponding secondary porter switchboards.
FR
Installation parlophonique et visiophonique Simplebus TOP avec 1 entrée principale, 4 secondaires et standards de conciergerie secondaires correspondants.
1÷100
TOP 2
MT SB 01 80
Page 85
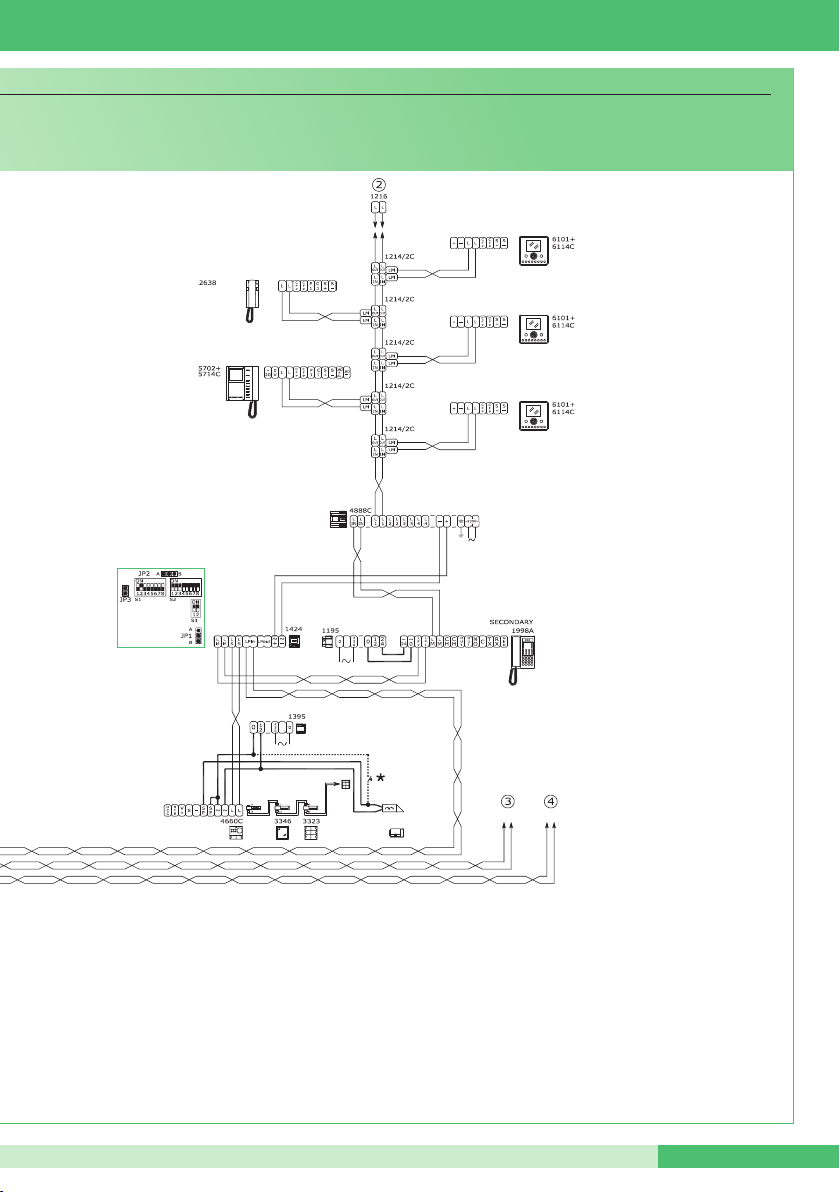
1÷100
MT SB 01
TOP 2
* Pulsante comando apriporta locale
* Local lock-release button
* Bouton commande ouvre-porte local
MT SB 0181
Page 86
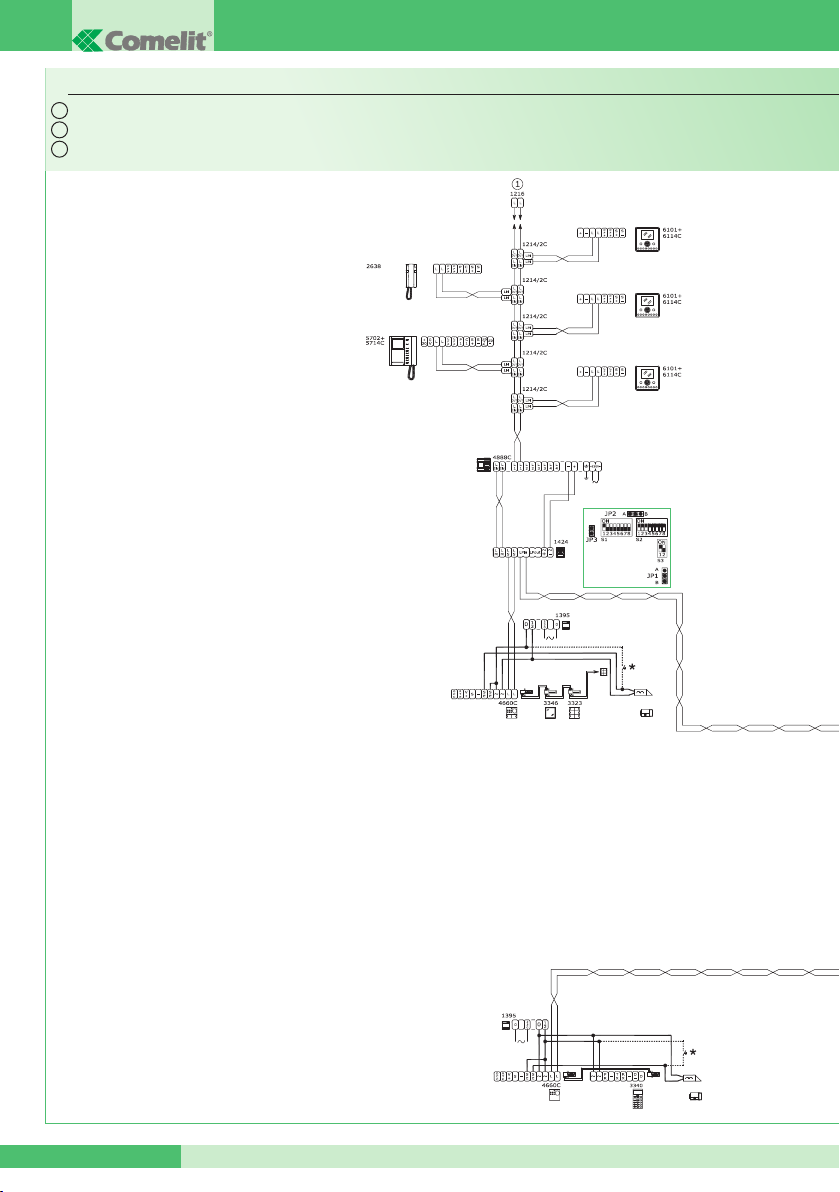
GROUP S.p.A.
SBTOP/002PX
IT
Impianto videocitofonico Simplebus TOP con 2 ingressi principali, 4 secondari e centralino di portineria principale.
EN
Simplebus TOP video entry phone system with 2 main inputs, 4 secondary inputs and main porter switchboard.
FR
Installation parlophonique et visiophonique Simplebus TOP avec 2 entrées principales, 4 secondaires et standard de conciergerie principal.
1÷100
TOP 1
MT SB 01 82
Page 87
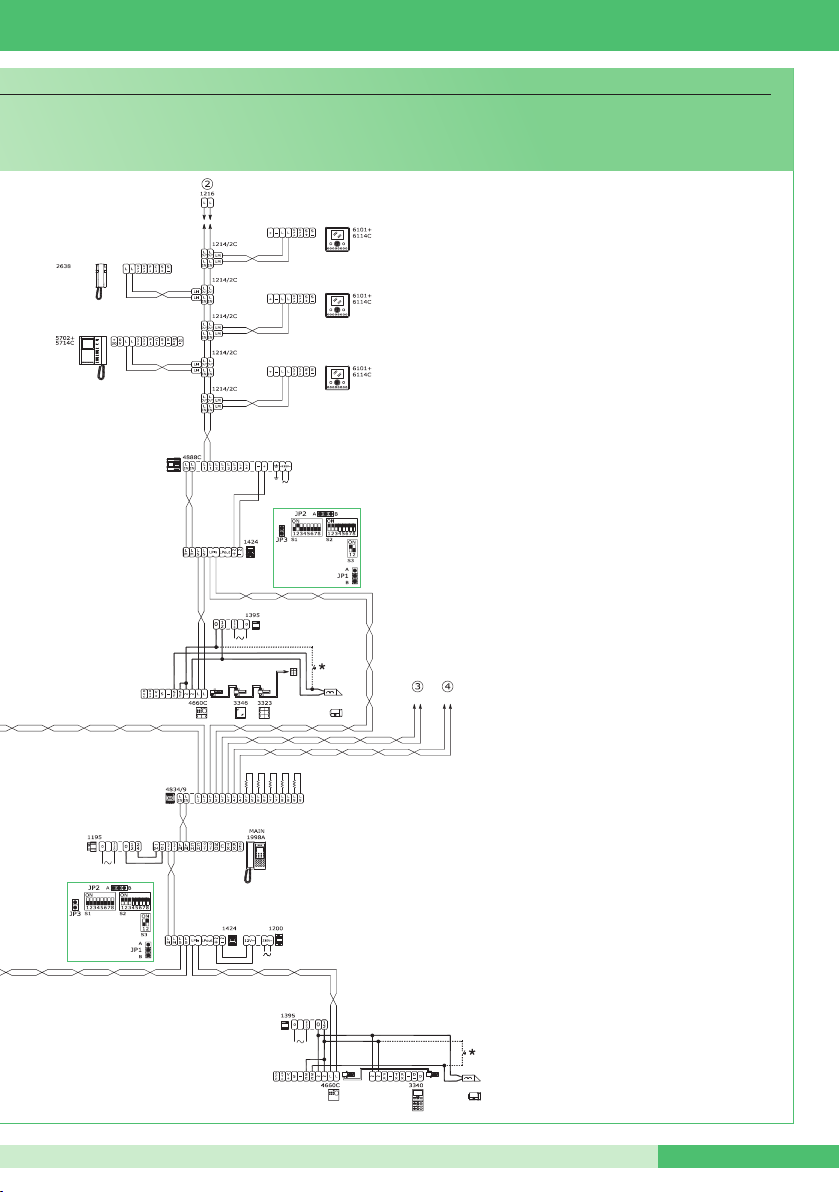
1÷100
TOP 1
MT SB 01
TOP 3
* Pulsante comando apriporta locale
* Local lock-release button
* Bouton commande ouvre-porte local
MT SB 0183
Page 88
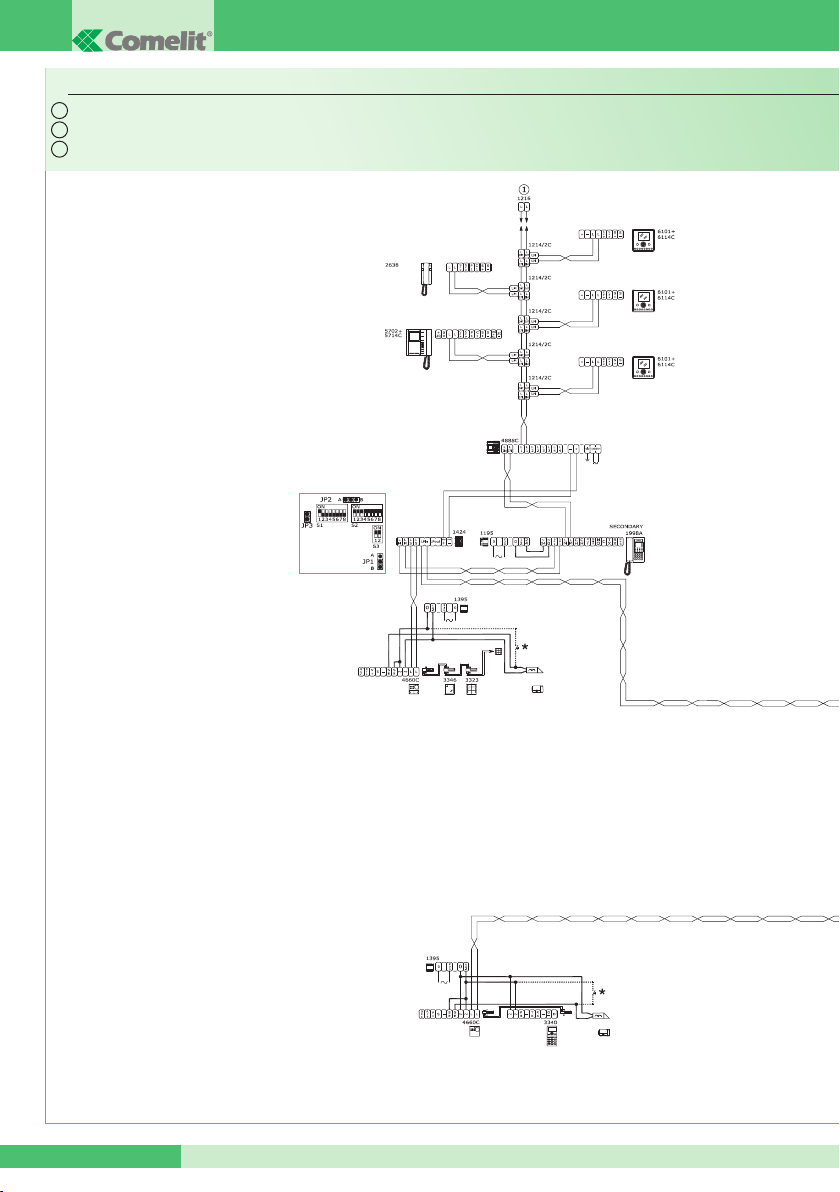
GROUP S.p.A.
IT
Impianto videocitofonico Simplebus TOP con 2 ingressi principali, 1 centralino di portineria principale, 2 secondari e relativi centralini di portineria secondari.
EN
Simplebus TOP video entry phone system with 2 main inputs, 1 main porter switchboard, 2 secondary inputs and corresponding secondary porter switchboards.
FR
Installation parlophonique et visiophonique Simplebus TOP avec 2 entrées principales, 1 standard de conciergerie principal, 2 secondaires et standards de conciergerie secondaires correspondants.
SBTOP/003PX
1÷100
TOP 2
MT SB 01 84
Page 89
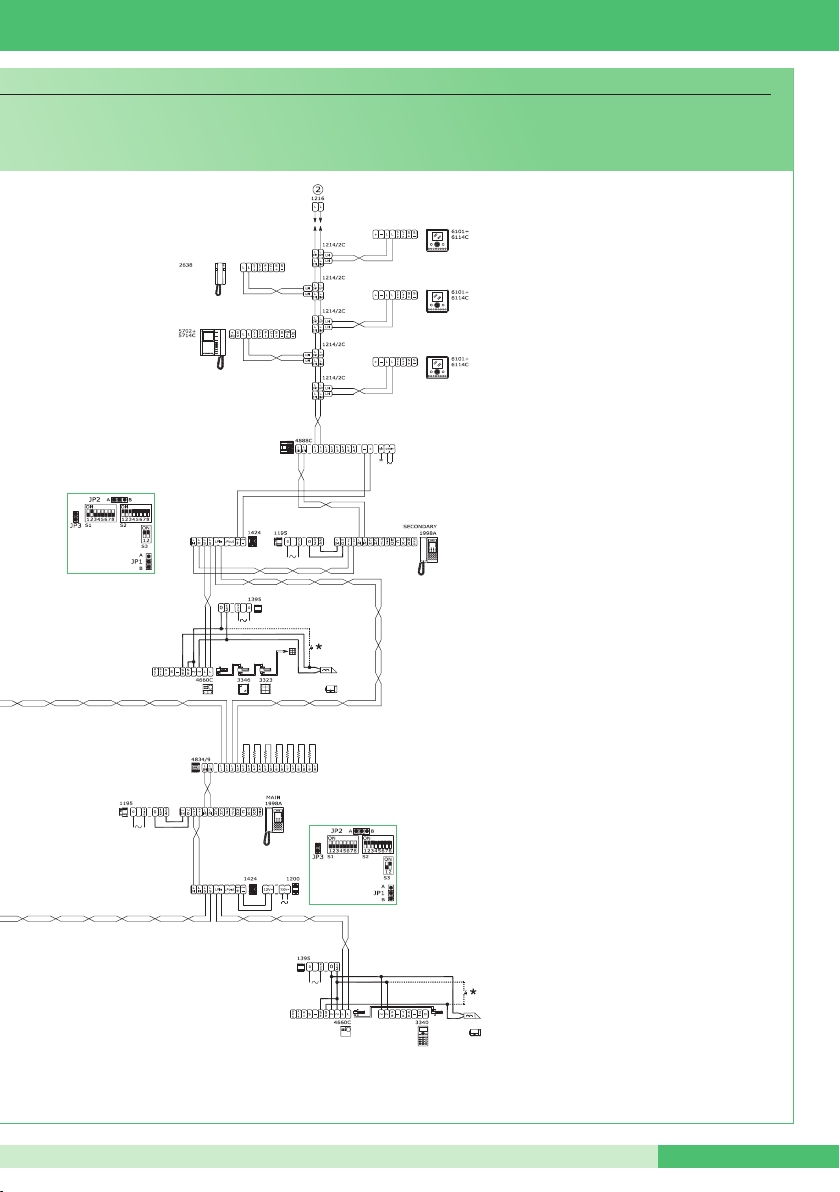
TOP 2
MT SB 01
1÷100
TOP 3
* Pulsante comando apriporta locale
* Local lock-release button
* Bouton commande ouvre-porte local
MT SB 0185
Page 90
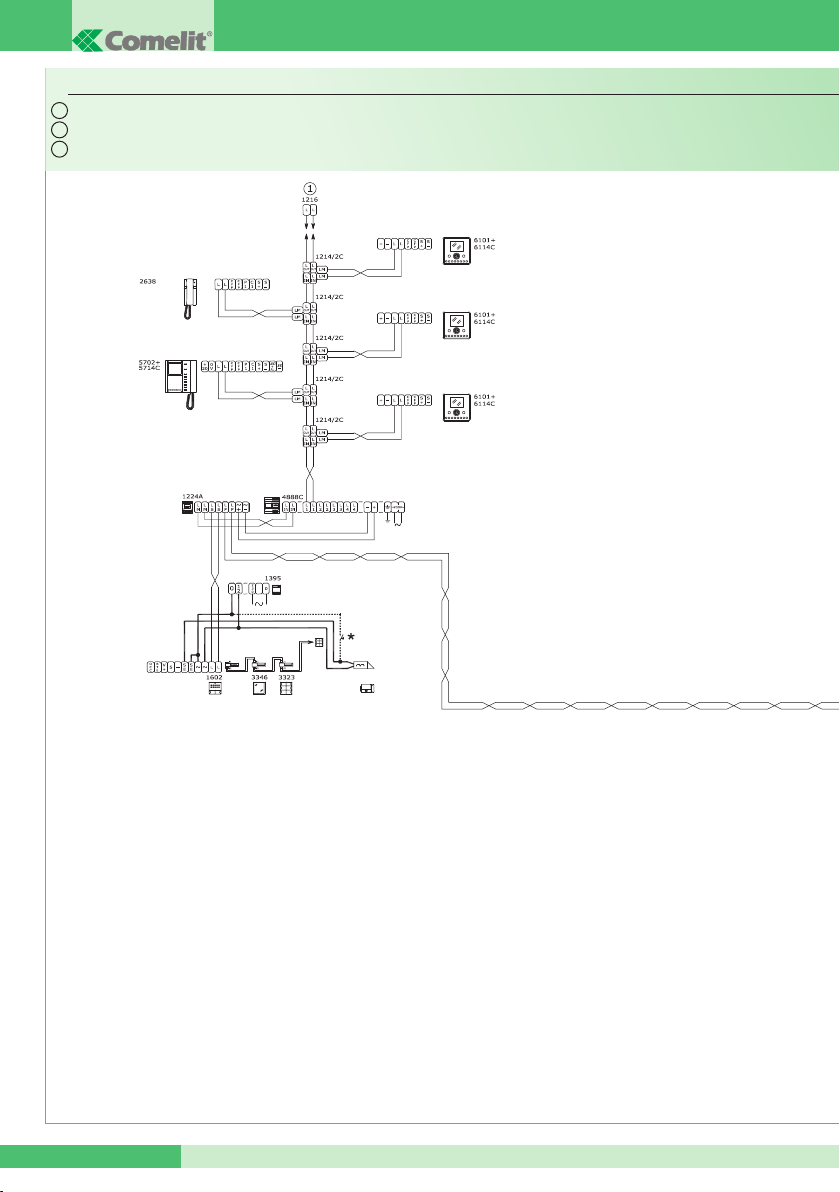
GROUP S.p.A.
SBTOP/004PX
IT
Impianto videocitofonico Simplebus TOP con 1 ingresso principale, 4 secondari e 2 centralini di portineria principali in configurazione SERIE.
EN
Simplebus TOP video entry phone system with 1 main input, 4 secondary inputs and 2 main porter switchboards configured in SERIES.
FR
Installation parlophonique et visiophonique Simplebus TOP avec 1 entrée principale, 4 secondaires et 2 standards de conciergerie principaux en configuration SÉRIE.
MT SB 01 86
Page 91
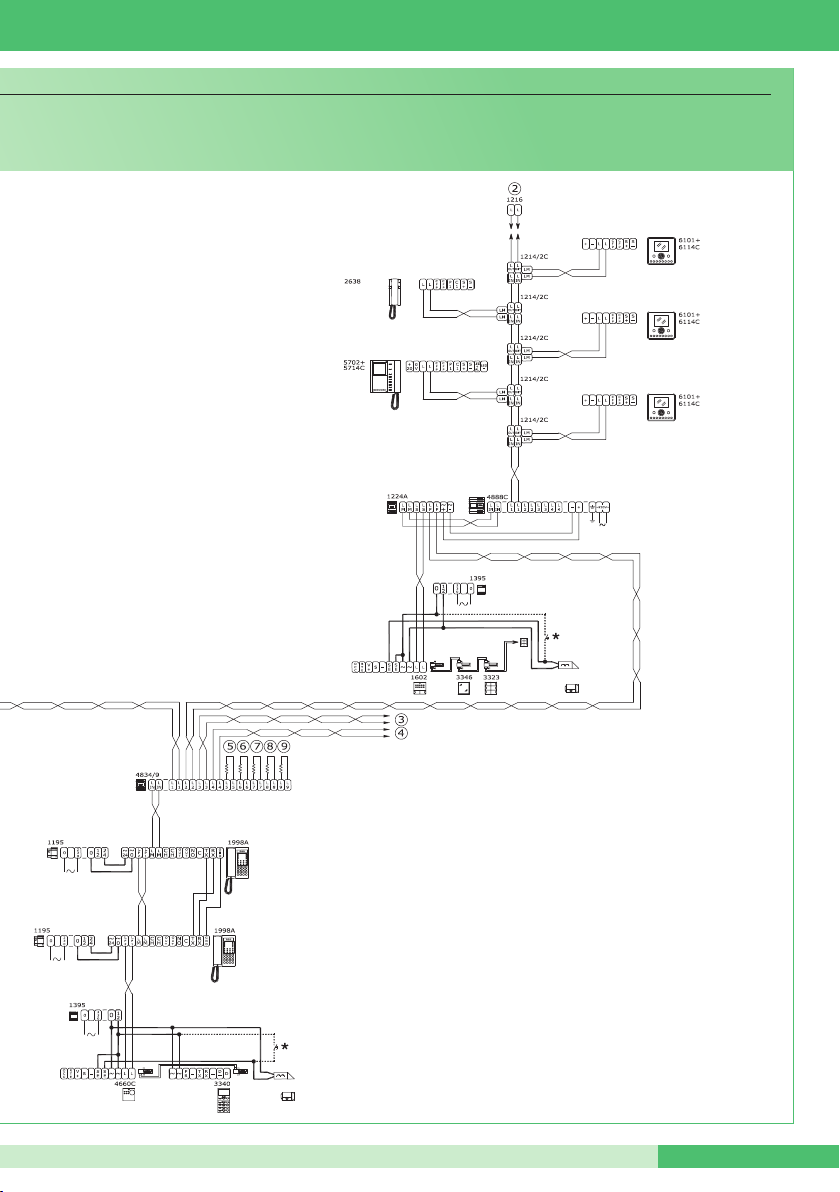
MT SB 01
* Pulsante comando apriporta locale
* Local lock-release button
* Bouton commande ouvre-porte local
MT SB 0187
Page 92
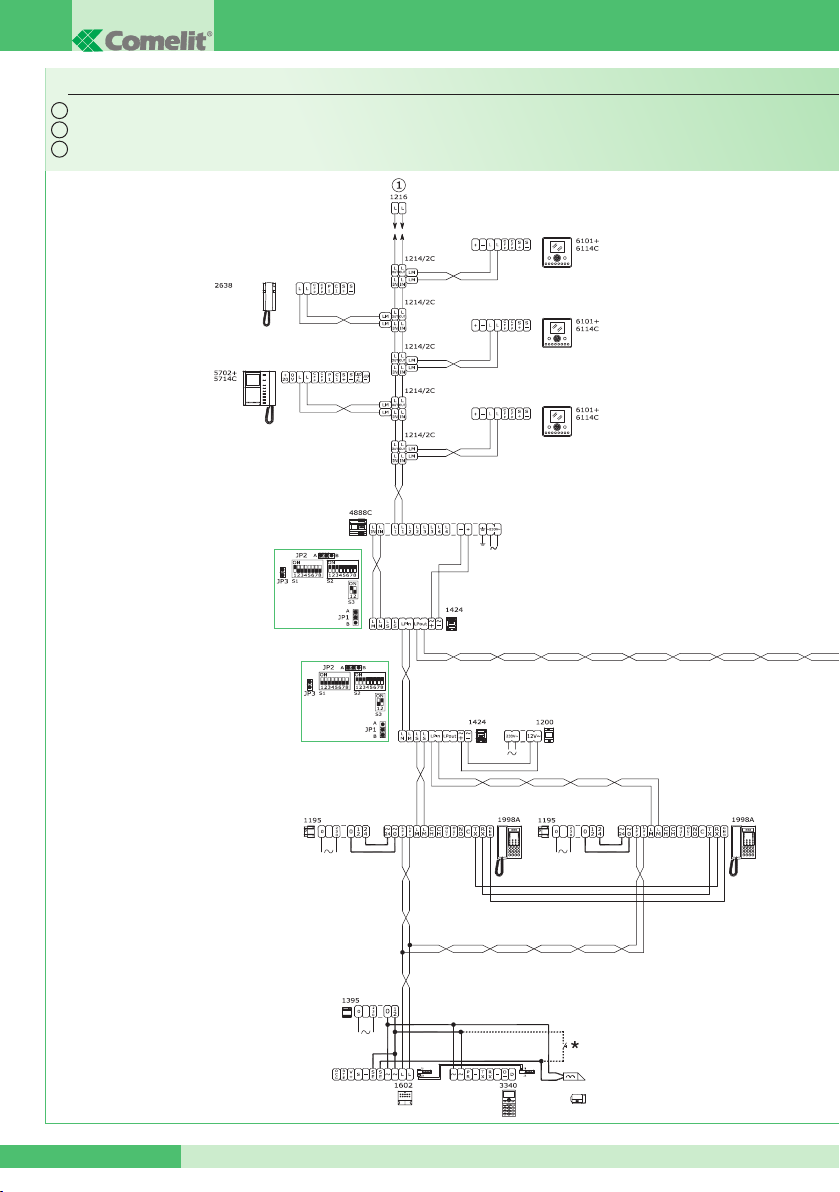
GROUP S.p.A.
IT
Impianto videocitofonico Simplebus TOP con 1 ingresso principale, 3 secondari e 2 centralini di portineria principali in configurazione PARALLELO.
EN
Simplebus TOP video entry phone system with 1 main input, 3 secondary inputs and 2 main porter switchboards configured in PARALLEL.
FR
Installation parlophonique et visiophonique Simplebus TOP avec 1 entrée principale, 3 secondaires et 2 standards de conciergerie principaux en configuration PARALLÈLE.
SBTOP/005PX
1÷100
TOP 1
MT SB 01 88
TOP 3
LS-IN
LP-IN
Page 93
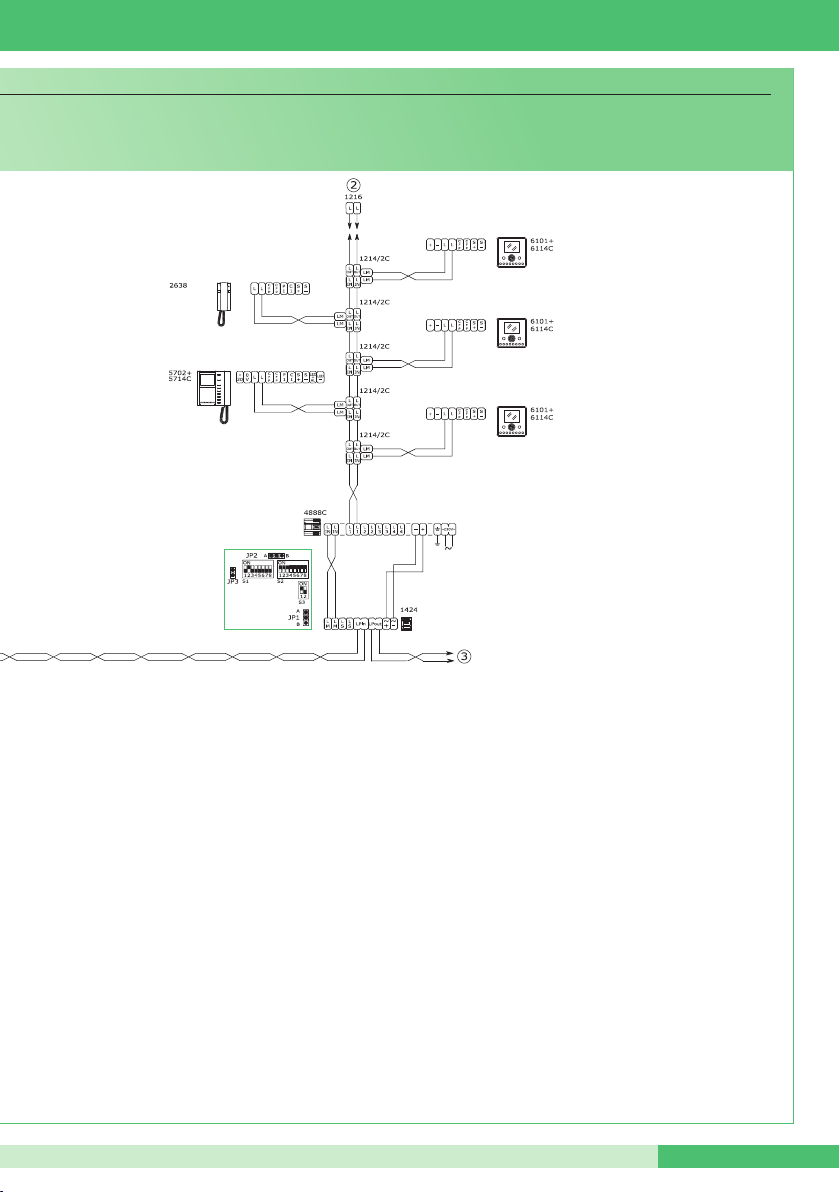
TOP 1
MT SB 01
1÷100
* Pulsante comando apriporta locale
* Local lock-release button
* Bouton commande ouvre-porte local
MT SB 0189
Page 94

GROUP S.p.A.
MT SB 01 90
Page 95

MT SB 01
MT SB 0191
Page 96

Comelit Russia
[ RU ]
Partiyniy per., n.1, korp.58, stroenie 1,
6 floor, off. 21, 115093, Moscow
+7(495)644-20-97
www.comelit.ru - [email protected]
Comelit Hellas
[ GR ]
9 Epiru str.
16452 Argyroupolis - Athens Greece
Tel. +30 210 9968605-6 Fax : +30 210 9945560
www.comelit.gr
[email protected]
Comelit (Shanghai) Electronics Co.,Ltd
[ RC ]
5 Floor No. 4 Building No.30 Hongcao
Road
Hi-Tech Park Caohejing, Shanghai, China
Tel. +86-21-64519192/9737/3527
Fax. +86-21-64517710
www.comelit.com.cn
[email protected]
Comelit Group Belgium
[ B ]
Z.3 Doornveld 170
1731 Zellik ( Asse)
Tel. +32 (0) 24115099 Fax +32 (0) 24115097
www.comelit.be - [email protected]
Assistenza tecnica Italia 0346/750090
Commerciale Italia 0346/750091
Comelit Piemonte
[ I ]
Str. Del Pascolo 6/E - 10156 Torino
Tel. e Fax +39 011 2979330
www.comelit.eu
[email protected]
Comelit Group
[ SG ]
Singapore Representative Office
54 Genting Lane, Ruby Land Complex
Blk 2, #06-01 - Singapore 349562
Tel. +65-6748 8563 - Fax +65-6748 8584
offi[email protected]
Comelit Group Germany GmbH
[ D ]
Brusseler Allee 23- 41812 Erkelenz
Tel. +49 (0) 243190151-23
+49 (0) 243190151-24
Fax +49 (0) 24319015125
www.comelit.de - [email protected]
Comelit Sud S.r.l.
[ I ]
Via Napoli, 159
Centro Meridiana - Torre Antares
80013 Castelnuovo di Napoli (Na)
Tel. +39 081 516 2021
Fax +39 081 953 5951
www.comelit.eu- [email protected]
Technical service abroad (+39)0346750092
Export department (+39) 0346750093
Comelit Group U.A.E.
[ UAE ]
Middle East Office
P.O. Box 54433 - Dubai U.A.E.
Tel. +971 4 299 7533 - Fax +971 4 299 7534
www.comelit.ae
[email protected]
Comelit Espana S.L.
[ E ]
Josef Estivill 67/69 - 08027 Barcelona
Tel. +34 932 430 376 - Fax +34 934 084 683
www.comelit.es
[email protected]
Comelit Ireland
[ IRL ]
Suite 3 Herbert Hall
16 Herbert Street - Dublin 2
Tel. +353 (0) 1 619 0204
Fax. +353 (0) 1 619 0298
www.comelit.ie
[email protected]
[ UK ]
Comelit Group UK Ltd
Unit 4 Mallow Park - Watchmead Welwyn
Garden City Herts - AL7 1GX
Tel: +44 (0)1707377203
Fax: +44 (0)1707377204
www.comelitgroup.co.uk
[email protected]
Comelit Immotec
[ F ]
15, Rue Jean Zay - 69800 SAINT PRIEST
Tél. +33 (0) 4 72 28 06 56 - Fax +33 (0) 4 72 28 83 29
www.comelit.fr - [email protected]
Comelit Nederland BV
[ NL ]
Aventurijn 220-3316 LB Dordrecht
Tel. +31 (0) 786511201 - Fax +31 (0) 786170955
www.comelit.nl - [email protected]
Comelit Usa (Formerly Cyrex)
[ USA ]
250 W. Duarte Rd. Suite B
Monrovia, CA 91016
Tel. +1 626 930 0388 - Fax +1 626 930 0488
www.comelitusa.com
[email protected]
MT/SB/013°edizione06/2010cod.2G40000284
 Loading...