

Page 1

N8004 and N8006
OPERATOR MANUAL
Page 2

CONTENTS
GENERAL INFORMATION. . . . . . . . . . . . . . . . . . . . . . . . . . . . 6
CALIBRATION, CERTIFICATION AND SERVICE ..........8
1. DESCRIPTION. . . . . . . . . . . . . . . . . . . . . . . . . . . . . . 10
1.1 Accessories Available. .....................10
2. OVERVIEW OF DISPLAY SYMBOLS ............11
3. OPERATING INSTRUCTIONS. . . . . . . . . . . . . . . . . . 12
3.1 Switch On. . . . . . . . . . . . . . . . . . . . . . . . . . . . . . 12
3.2 %RH/DP ...............................13
3.3 °C/°F ..................................13
3.4 Hold . . . . . . . . . . . . . . . . . . . . . . . . . . . . . . . . . . 13
3.5 Max/Min . . . . . . . . . . . . . . . . . . . . . . . . . . . . . . . 14
3.6 Reset . . . . . . . . . . . . . . . . . . . . . . . . . . . . . . . . . 14
3.7 Auto-Switch Off ..........................14
4. MEASUREMENT. ............................14
5. PRECAUTIONS IN USE. . . . . . . . . . . . . . . . . . . . . . . 15
6. MAINTENANCE. . . . . . . . . . . . . . . . . . . . . . . . . . . . . 15
6.1 Sensor Cleaning .........................15
7. CALIBRATION. . . . . . . . . . . . . . . . . . . . . . . . . . . . . . 15
8. PRECAUTIONS IN MEASUREMENT . . . . . . . . . . . . 16
9. DEFINITION OF TERMS . . . . . . . . . . . . . . . . . . . . . . 17
10. CHANGING THE BATTERIES ..................17
SPECIFICATION ...................................67
1
Page 3

TABLE DES METIÈRES
GENERALITES ....................................18
ETALONNAGE, CERTIFICATION ET
ENTRETIEN . . . . . . . . . . . . . . . . . . . . . . . . . . . . . . . . . . . . . . 20
1. DESCRIPTION ..............................22
1.1 Accessoires disponibles ....................22
2. VUE D’ENSEMBLE DES SYMBOLES
D’AFFICHAGE . . . . . . . . . . . . . . . . . . . . . . . . . . . . . 23
3. MODE D’EMPLOI ............................24
3.1 Mise en marche ..........................24
3.2 %RH/DP . . . . . . . . . . . . . . . . . . . . . . . . . . . . . . . 25
3.3 °C/°F . . . . . . . . . . . . . . . . . . . . . . . . . . . . . . . . . . 25
3.4 Maintien (HOLD) . . . . . . . . . . . . . . . . . . . . . . . . . 25
3.5 Maxi/Mini . . . . . . . . . . . . . . . . . . . . . . . . . . . . . . . 26
3.6 Remise à zero (RESET) . . . . . . . . . . . . . . . . . . . 26
3.7 Arret Automatique . . . . . . . . . . . . . . . . . . . . . . . . 26
4. MESURAGE ................................26
5. PRECAUTIONS D’EMPLOI ....................27
6. MAINTENANCE .............................27
6.1 Nettoyage du capteur . . . . . . . . . . . . . . . . . . . . . 27
7. ETALONNAGE ..............................27
8. PRECAUTIONS DE MESURAGE HR . . . . . . . . . . . . 28
9. DEFINITIONS ...............................29
10. REMPLACEMENT DES PILES . . . . . . . . . . . . . . . . . 29
SPECIFICATIONS ..................................67
2
Page 4

INHALT
INFORMATIONEN . . . . . . . . . . . . . . . . . . . . . . . . . . . . . . . . . 30
KALIBRIERUNG, ZERTIFIZIERUNG UND
SERVICE .........................................32
1 BESCHREIBUNG ............................34
1.1 Erhältliches Zubehör .......................34
2 ÜBERSICHT DER DISPLAYSYMBOLE . . . . . . . . . . 35
3 BETRIEBSANLEITUNG .......................36
3.1 Einschalten ..............................36
3.2 %RH/DP ................................37
3.3 °C/°F ...................................37
3.4 Halten (HOLD) . . . . . . . . . . . . . . . . . . . . . . . . . . . 37
3.5 Max/Min . . . . . . . . . . . . . . . . . . . . . . . . . . . . . . . . 38
3.6 Zurücksetzen (RESET) .....................38
3.7 Automatikabschaltung ......................38
4 MESSEN ...................................39
5 VORSICHTSMASSNAHMEN BEIM
GEBRAUCH ................................39
6 WARTUNG .................................39
6.1 Sensorreinigung . . . . . . . . . . . . . . . . . . . . . . . . . . 39
7 KALIBRIERUNG . . . . . . . . . . . . . . . . . . . . . . . . . . . . 40
8 WAS BEI DER LUFTFEUCHTIGKEITSMESSUNG
ZU BERÜCKSICHTIGEN IST . . . . . . . . . . . . . . . . . . 40
9 BEGRIFFSDEFINITIONEN . . . . . . . . . . . . . . . . . . . . 41
10 BATTERIEWECHSEL . . . . . . . . . . . . . . . . . . . . . . . . 42
SPEZIFIKATION ...................................67
3
Page 5

INDICE
INFORMAZIONE GENERALE . . . . . . . . . . . . . . . . . . . . . . . . 43
CALIBRAZIONE, CERTIFAZIONE ED
ASSISTENZA . . . . . . . . . . . . . . . . . . . . . . . . . . . . . . . . . . . . . 45
1. DESCRIZIONE ..............................47
1.1 Accessori disponibili . . . . . . . . . . . . . . . . . . . . . . . 47
2. SPIEGAZIONE DEI SIMBOLI SUL DISPLAY . . . . . . 48
3. ISTRUZIONI DI FUNZIONAMENTO . . . . . . . . . . . . . 49
3.1 Accensione ..............................49
3.2 % U.R./DP . . . . . . . . . . . . . . . . . . . . . . . . . . . . . . 50
3.3 °C /°F . . . . . . . . . . . . . . . . . . . . . . . . . . . . . . . . . . 50
3.4 Hold . . . . . . . . . . . . . . . . . . . . . . . . . . . . . . . . . . . 50
3.5 Max/Min . . . . . . . . . . . . . . . . . . . . . . . . . . . . . . . . 51
3.6 Reset . . . . . . . . . . . . . . . . . . . . . . . . . . . . . . . . . . 51
3.7 Auto-Spegnimento . . . . . . . . . . . . . . . . . . . . . . . . 51
4. MISURAZIONE ..............................51
5. PRECAUZIONI D’USO ........................52
6. MANUTENZIONE ............................52
6.1 Pulizia del sensore . . . . . . . . . . . . . . . . . . . . . . . . 52
7. CALIBRAZIONE .............................52
8. PRECAUZIONE DI MISURA . . . . . . . . . . . . . . . . . . . 53
9. DEFINIZIONE DEI TERMINI . . . . . . . . . . . . . . . . . . . 54
10. SOSTITUZIONE DELLE BATTERIE .............54
CARATTERISTICHE ................................67
4
Page 6

CONTIENDOS
INFORMACION ....................................55
GENERALCALIBRACION,CERTIFICACION Y
SERVICIO ........................................57
1. DESCRIPCION ..............................59
1.1 Accesorios Disponibles . . . . . . . . . . . . . . . . . . . . 59
2. VISION GENERAL DE LOS SIMBOLOS EN LA
PANTALLA DE VISUALIZACION . . . . . . . . . . . . . . . 60
3. INSTRUCCIONES DE OPERACION .............61
3.1 Encendido . . . . . . . . . . . . . . . . . . . . . . . . . . . . . . 61
3.2 % Humedad/Punto de rocio .................62
3.3 °C/°F . . . . . . . . . . . . . . . . . . . . . . . . . . . . . . . . . . 62
3.4 Boton de parada (HOLD) ...................63
3.5 Max/Min ................................63
3.6 Reinicializar (RESET) . . . . . . . . . . . . . . . . . . . . . 63
3.7 Apagado Automatico . . . . . . . . . . . . . . . . . . . . . . 63
4. MEDICION . . . . . . . . . . . . . . . . . . . . . . . . . . . . . . . . . 64
5. PRECAUCIONES EN EL USO . . . . . . . . . . . . . . . . . 64
6. MANTENIMIENTO ...........................64
6.1 Limpiado del Sensor . . . . . . . . . . . . . . . . . . . . . . 64
7. CALIBRACION ..............................65
8. PRECAUCIONES EN LA MEDICION . . . . . . . . . . . . 65
9. DEFINICION DE LOS TERMINOS ...............66
10. CAMBIAR DE LAS PILAS .....................66
ESPECIFICACION . . . . . . . . . . . . . . . . . . . . . . . . . . . . . . . . . 67
5
Page 7

ENGLISH
COMARK N8004/N8006
OPERATING INSTRUCTIONS
1. GENERAL INFORMATION
It is recommended that you read the safety and operating instructions
before using this instrument.
Notes:
N8006 is a RH/temperature handheld instrument using an integral sensor; N8004 uses a separate RH/temperature probe (N81).
WARNING
TO AVOID ELECTRIC SHOCK DO NOT ALLOW ANY PROBE OR
SENSOR TO COME INTO CONTACT WITH LIVE ELECTRICAL
POWER CONDUCTORS WITH VOLTAGES IN EXCESS OF 30V AC
RMS OR 60V DC.
TO AVOID DAMAGE OR BURNS, DO NOT MAKE TEMPERATURE
MEASUREMENTS IN MICROWAVE OVENS.
DO NOT PLACE THE THERMOMETER IN A DISHWASHER AS IT IS
NOT DISHWASHER SAFE.
THE SYMBOL ON THE INSTRUMENT INDICATES THAT THE OPERATOR MUST REFER TO THE WARNINGS GIVEN HERE.
CAUTION
Temperature Measurement Probes
This precision instrument has been designed for use with the
extensive range of Comark temperature probes. The use of
other probes may impair the performance and accuracy of the
instrument. Full details of Comark probes and sensors can be
obtained from Comark Customer Support department or your local
distributor. Repeated sharp exing can break thermocouple probe
leads. To prolong lead life, avoid sharp bends or kinks in the leads,
especially near the connector.
6
Page 8

This instrument is manufactured in accordance with the
Company’s ISO 9001 Quality Approved System.
ISO 9001
FM 29700
This instrument complies with the Electromagnetic
Compatibility Directive EN61326-1
Declarations of Conformity available. Contact Comark
Customer Support or your local Distributor.
In line with its policy of continuous development, Comark Instruments
reserves the right to alter the instrument specication without prior
notice. Further information is available from Comark Instruments or
your distributor.
7
Page 9

CALIBRATION, CERTIFICATION AND SERVICE
Certication
No. 0451
Comark can provide certicates of calibration for its whole product
range, to suit ISO 9000 and other quality assurance procedures, food
hygiene regulations, HACCPs and environmental regulations. Comark
certicates are produced by independent quality controlled processes
which compare product performance against agreed National Standards. For peace of mind and best practice Comark recommend annual
certication/recalibration.
Two levels of certication are available for infra-red temperature and
non temperature instruments, excluding humidity:- UKAS certicates via
an external accredited laboratory and NPL traceable certicates from
the Comark calibration laboratory.
Three levels of certication are available for contact temperature and
humidity products and these are detailed here:
a) UKAS Temperature Certication
The Comark UKAS (United Kingdom Accreditation Service)
accredited temperature calibration laboratory is one of the nest in the UK. Comark UKAS certicates can offer the lowest
uncertainty of 0.01°C and provide independent proof of correct
calibration using equipment and procedures audited by UKAS
inspectors. The equipment used is fully traceable to the National Physical Laboratory.
b) UKAS Humidity Certication
In addition to the Comark temperature laboratory, the humidity
laboratory continues the tradition of high accuracy certication
and a wide range (25% to 90%RH) with uncertainties of 2.8% of
reading. This range also includes Dew point measurements.
c) NPL Traceable Certication
Comark NPL certicates are traceable to the National Physical
Laboratory and can offer uncertainty as low as 0.3°C.
Conformance
Certicates of conformance can be supplied for new, serviced and
recalibrated instruments. These conrm that instruments are within their
original manufactured specication.
8
Page 10

Service/Repairs
Regular servicing and any required repairs, under warranty or after, are
available from the Comark Service Department.
For more information on all Comark certication, calibration and service
facilities please call Comark Customer Support or contact your local
distributor.
9
Page 11

1. DESCRIPTION
The N8000 range of handheld hygrometers incorporates high level accuracy (both temperature and humidity) with class leading features.
The N8006 has an integral sensor head, while the N8004 has the RH
sensor and its associated electronics, contained in a hand held probe
(N81) connected to the instrument by a cable. This probe is also tted
with a thermistor for high accuracy air temperature measurement. The
N8004 is also capable of independent temperature measurement via
a special adaptor enabling the use of wide range of Comark thermistor
probes.
Both units use a large LCD allowing both humidity and temperature to
be displayed simultaneously.
There are two basic operation modes for these instruments:
1. Measurement of Relative Humidity.
2. Calculation of Dew point.
1.1 ACCESSORIES AVAILABLE
Each hygrometer can be supplied with a rubber boot for those
demanding applications requiring additional protection for the
instrument. Each rubber boot comes complete with a built in
wrist strap for added security. (Part No: CRS/4)
N8004
The N8004 can measure temperature independently of the
N81 using an adaptor (KX7538) that allows the use of any of
Comark’s standard 6-way Lumberg thermistor probes.
10
Page 12
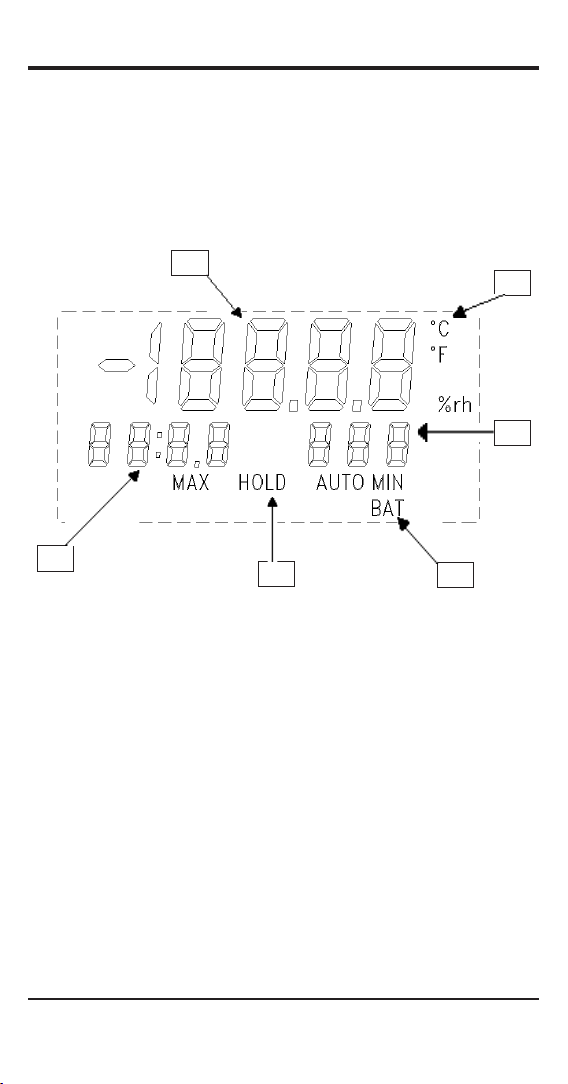
2. OVERVIEW OF DISPLAY SYMBOLS
The Display is split into three main areas. The rst line displays either
Relative Humidity or Dew Point. The second line is split into two areas;
the area to the left is used to display ambient temperature, whereas the
area to the right is used to indicate the temperature scale in use and
Dew point mode.
A
B
C
F
A. Main RH/Dewpoint display.
B. Used to indicate temperature scale in use when in
Dewpoint mode. %rh indicates that the instrument is in
Relative Humidity mode.
C. Displays the current temperature scale in use in RH mode or
indicates Dewpoint mode.
D. Indicates AUTO power off enabled/MINimum and Low BATtery.
E. Indicates MAXimum and HOLD mode.
F. Used to indicate ambient temperature.
E
FIG. 1
D
11
Page 13
3. OPERATING INSTRUCTIONS
A full description of the operation of the modes of the Hygrometers
is given below. Please read it carefully and if you have any further
queries contact the Comark Sales Ofce.
3.1 SWITCH ON
ON
OFF
Press to turn ON.
NOTE: The instrument performs a self-test for up to 1
second when switched on.
Press this button again to turn the instrument OFF.
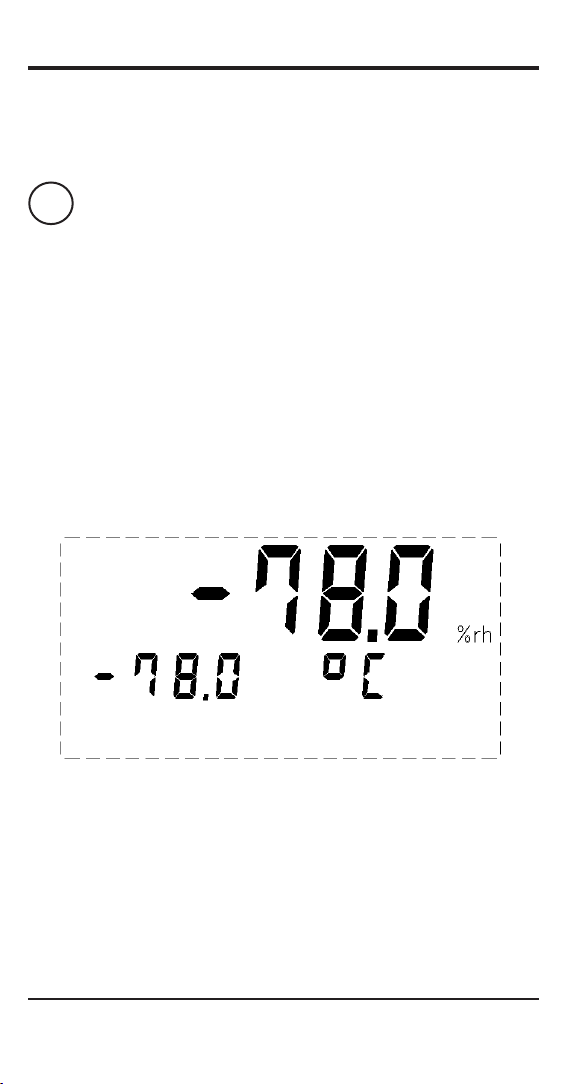
N8004
A probe must be inserted before the instrument can be operated. If a probe is not inserted the display appears as follows:
FIG.2
This is the normal indication for an open circuit, broken probe or
out of range indication.
N8006
If your N8006 displays the above diagram it is faulty and should
be returned to Comark Service Department.
12
Page 14

3.2 %RH/DP
%RH
DP
Selects direct relative humidity measurement or dewpoint
calculation mode and will be displayed in the main numeric area
of the display.
Relative Humidity Mode:
Dewpoint Mode:
FIG.3
FIG.4
3.3 °C/°F
°C
/°F
This selects the temperature scale used. This applies to both
ambient temperature and dewpoint temperature depending on
the mode of operation.
3.4 HOLD
HOLD
Freezes the display with the last measured value. ‘HOLD’ is
shown on the display. Press the button again to release this
function.
NOTE: Having selected HOLD, it is still possible to scroll the
held values of MAX, MIN and CURRENT temperatures and
to redisplay the temperature scale for any of these. It is also
possible to change to dewpoint mode or RH. Note that the
scale indicated by A in Fig. 4, either °C/°F, has now become
the scale indicator for both the dewpoint temperature and the
ambient air temperature.
A
13
Page 15

3.5 MAX/MIN
MAX
MIN
This button scrolls through the display of the Maximum, Minimum and current humidity and temperature. It also cycles
through the Maximum and Minimum values in dewpoint and
hold modes.
3.6 RESET
RESET
Resets Maximum and Minimum to Current value. This function
occurs automatically at switch-on.
The reset button copies the current value into the Maximum and
Minimum stores, but it does not alter the selection for display.
3.7 AUTO-SWITCH OFF
The N8000 series can be congured either to switch off
automatically ve minutes after the last button operation or to
remain permanently on until manually switched off.
This mode is indicated on the display by the AUTO symbol.
When this is visible the instrument will auto power down.
To change from one mode option to the other, switch the instrument OFF, then with the °C/°F button depressed switch the
instrument ON again.
4. MEASUREMENT
Although the humidity sensor is virtually insensitive to temperature over
the normal operating range, temperature itself affects Relative Humidity.
This and other factors are discussed at a later point. This dependence
(typically 0.5%RH for 0.1°C (0.2°F) temperature change) means that
when taking a cold probe into a warmer atmosphere, RH readings will
initially be high and conversely when a warm probe is taken into a cold
atmosphere, readings will initially be low.
To ensure accurate readings the user should wait until the display is
stable.
14
Page 16

5. PRECAUTIONS IN USE
Care should be taken where organic solvents are being used. Occasional exposure to hazardous environments is to be expected for a portable instrument but for more prolonged use (e.g. monitoring), Comark
should be contacted for advice.
Care must also be taken to protect all sensors against physical damage.
6. MAINTENANCE
6.1 SENSOR CLEANING
In the event of accidental pollution, the following steps may be
taken, though success cannot be guaranteed.
NOTE: On no account touch the humidity sensor (glass) with
even the softest material.
DUST – use a gentle air stream, e.g. from squeeze-bulb used
for cleaning camera lenses. If not successful, use a stream of
distilled water from a wash bottle, holding the probe downwards, so that water drips clear from the sensor. Dry in a
dust-free environment, using a hair-dryer to speed the drying
process, if required.
OILY POLLUTION – use a stream of perchlorethylene to remove contamination.
7. CALIBRATION
This can only be performed by Comark Ltd.
15
Page 17

8. PRECAUTIONS IN RH MEASUREMENT
Apart from the need to take reasonable care when using the N8004/6
as described already, there are precautions to be taken in measuring
humidity, regardless of the instrument being used.
AIR CIRCULATION
Without air circulation there will be humidity differentials across the
room or chamber.
TEMPERATURE
The temperature differences that exist across a room or chamber,
though small, will have a large effect on Relative Humidity. In a typical
case 0.5%RH for a temperature difference of 0.1°C (0.2°F).
AIR VELOCITY
Some air velocity is necessary to ensure accurate results and fast
response time.
ATMOSPHERIC PRESSURE EFFECTS
These are often neglected, but can be signicant. As an example, for
the same temperature, air measured at 1050mB (millibars) may give an
RH of 70%RH, whereas the same air at 950mB will read 77%RH.
CONDENSATION
This can occur at high RH when the probe is below the ambient dewpoint. Though the N8004/6 humidity sensor will recover from this, it
should be avoided if possible.
16
Page 18

9. DEFINITION OF TERMS
RELATIVE HUMIDITY – is a measure of the amount of water vapour
in the air as a percentage of the maximum water vapour the same air
could carry. In scientic terms, it is the partial pressure of water vapour
divided by the saturation pressure of water vapour at that temperature.
DEWPOINT – is the temperature at which dew would form if the air
were to be cooled. As the air cools, so it can carry less water vapour;
the point at which dew forms is the saturation temperature at that pressure.
SPECIFIC HUMIDITY – is the weight of water per weight of dry air and
is usually expressed in PPM (parts per million) which is milligrams per
kilogram
10. CHANGING THE BATTERIES
When the BAT symbol appears the batteries should be changed immediately. If this is not done the instrument will continue to work, but the
calibration of the unit can not be guaranteed.
To replace the batteries: Make sure the instrument is off, unscrew the
screw retaining the battery cover on the rear of the instrument using the
correct size at-blade screwdriver. Remove the two cells and replace
with new alkaline cells to ensure long life. Be careful to observe the cor-
rect polarity. Take care not to over-tighten the screw when re-tting the
cover, and not to lose the rubber sealing washer.
Note: NiCd or NiMh cells can be used but will result in reduced operating time. Do not attempt to recharge the cells in the instrument.
17
Page 19

FRANÇAIS
COMARK N8004/N8006
INSTRUCTIONS D’EMPLOI
1. GENERALITES
On lui recommande que vous lisiez le saftey et les consignes
d'utilisation avant d'utiliser cet instrument.
Notes :
N8006 est un instrument tenu dans la main de RH/temperature à
l'aide d'un capteur intégral ; N8004 utilise une sonde séparée de RH/
temperature (N81).
ATTENTION
OUR EVITER LES CHOCS ELECTRIQUES VOUS NE DEVEZ PAS
METTRE EN CONTACT LES CAPTEURS OU LES SONDES AVEC DES
CONDUCTEURS ELECTRIQUES DENUDES SOUMIS A UNE TENSION
SUPERIEURE A 30V CA RMS A 60V DC.
NE PRENEZ PAS LA TEMPERATURE DANS LES FOURS A MICROONDES POUR NE PAS CAUSER D’ACCIDENTS OU DE BRULURES.
NE PAS PLACER L’INSTRUMENT DANS UN LAVE-VAISELLE UN
POUR AINSI DIRE PAS LAVE-VAISSELLE SÛR.
LE SYMBOLE SUR L’INSTRUMENT INDIQUE QUE L’OPÉRATEUR
DOIT SE RÉFÉRER AUX EXPLICATIONS CI-DESSUS.
ATTENTION !
Sondes de mesure de la température
Cet appareil de précision a été conçu pour être utilisé avec les sondes de
température Comark dont un choix étendu vous est proposé. L’utilisation
d’autres sondes risque de nuire à la performance et à la précision de
l’appareil. Pour toutes informations sur les capteurs et les sondes Comark,
contactez le service client Comark ou votre distributeur local.
18
Page 20

Cet appareil est fabriqué conformément au
système d’homologation de la qualité ISO 9001
de la société.
Cet appareil est en conformité avec la Directive
sur la Compatibilité Electro-magnétique,
EN61326-1.
La Déclaration de Conformité est disponible
auprès du service commercial de Comark ou bien
auprès du distributeur local.
Conformément à sa politique de développement permanent,
Comark Instruments se réserve le droit de modier sa spécication
sans avis préalable. Pour toutes autres informations, contactez
Comark Instruments ou votre distributeur.
19
Page 21

ETALONNAGE, HOMOLOGATION, ET ENTRETIEN
Homologation
No. 0451
Le laboratoire Comark fournit des certicats d'étalonnage pour
l'ensemble de sa gamme de produits, en vue de satisfaire à la
norme ISO 9000, à d'autres procédures d'assurance qualité, aux
réglementations en matière d'hygiène alimentaire et d'environnement
ainsi qu'aux HACCP. Les certicats Comark sont délivrés à l'issue de
contrôles de la qualité indépendants qui comparent la performance d'un
produit envers celle d'une norme nationale convenue. Pour avoir l'esprit
tranquille et être dans les règles, Comark conseille de demander une
homologation / réétalonnage annuel(le).
Deux niveaux de certication sont disponsibles pour les thermomètres
à infra-rouge et les intraments ne mesurant pas la température (mesure
d’humidite exclue): certicat UKAS via un laboratoire accrédité
exterieur et certicate NPL du laboratoire d’étalonnage Comark.
Trois types d'homologation sont proposés pour les appareils de mesure
de la température et d'humidité par contact:
(a) Homologation UKAS
Le laboratoire Comark de calibration en température accrédité
UKAS (United Kingdom Accreditation Service) est un des meilleur
du Royaume-Uni. Les certicats UKAS de Comark peuvent offrir
une incertitude allant jusqu’à 0,01°C et fournissent les preuves
indépendantes d’une calibration correcte de part l’utilisation
d’équipements et de procédures audités par les inspecteurs UKAS.
La traçabilité de l’équipement est assurée par le Laboratoire
National de Physique anglais (NPL).
b) Certication UKAS pour l’humidite
En plus de la température, le laboratoire Comark est à present
accrédité pour delivrer des certicats UKAS pour l’humidite. Dans
une tradition de précision, ces certicats sont établis dans une
gamme allant de 25% à 90% RH avec une incertitude 2,8% de
la lecture. Bien entendu, le point de rosee peut également être
mesure.
c) Homologation identiable par rapport au NPL
Les certicats NPL de Comark offrent une incertitude de 0,3°C et
la traçabilité est assurée par le Laboratoire National de Physique
anglais (NPL).
20
Page 22

Conformité
Les certicats de conformité peuvent être fournis pour les instruments
neufs et ceux ayant subi une révision et un réétalonnage. Ils conrment
que l'instrument est conforme à sa spécication d'origine au moment de
sa fabrication.
Entretien/Réparations
Le Service d'entretien de Comark peut assurer des révisions régulières
et les réparations nécessaires des instruments sous garantie ou non.
Pour plus d'informations sur les homologations Comark, les services
d'étalonnage et de révision, appelez le service d'assistance Comark en
Grande-Bretagne ou votre distributeur local.
21
Page 23

1. DESCRIPTION
La gamme d’hygromètres portatifs N8000 allie un haut niveau de
précision (pour les relevés de température et d’humidité relative) à des
caractéristiques de référence.
Le modèle N8006 est muni d’une tête de capteur intégrée. Le capteur
d’humidité relative et les composants électroniques annexes du modèle
N8004 sont intégrés à une sonde portative (N81) relié à l’instrument par
un câble. Cette sonde est également munie d’une thermistance conçue
pour mesurer, avec précision, la température de l’air. Un adaptateur
de conception spéciale compatible avec les diverses sondes à
thermistance de la vaste gamme Comark permet également au modèle
N8004 de mesurer la température indépendamment.
Ces deux appareils ont été dotés d’un grand écran LCD capable
d’afcher simultanément le taux d’humidité relative et la température.
Ces instruments présentent deux modes d’utilisation de base :
1. Mesurage de l’Humidité Relative
2. Calcul du Point de rosée.
1.1 ACCESSOIRES DISPONIBLES
Chaque hygromètre peut être livré muni d’un soufet en
caoutchouc pour les cas où des applications particulièrement
éprouvantes obligent à prévoir une protection supplémentaire
de l’instrument. Chaque soufet en caoutchouc est livré comme
un ensemble complet muni d’une dragonne intégrée pour un
surcroît de sécurité (Réf . pièce No : CRS/4)
N8004
Un adaptateur (KX7538) permet au modèle N8004 de mesurer
la température indépendamment de l’hygromètre N81. Cet
adaptateur est compatible avec n’importe quelle sonde à
thermistance standard à six voies de type Lumberg proposée
par Comark.
22
Page 24

2. VUE D’ENSEMBLE DES SYMBOLES
D’AFFICHAGE
L’afchage est divisé en trois zones d’information principales. La
première ligne indique soit l’Humidité Relative, soit le Point de rosée. La
seconde ligne comporte deux zones. La température ambiante s’afche
à gauche et la zone de droite renseigne sur l’échelle de température
congurée et le mode Point de rosée.
A
B
C
F
E
D
FIG.1
A. Afchage principal de l’Humidité Relative et du Point de
rosée.
B. Indique l’échelle de température congurée en mode Point
de rosée. %rh indique que l’instrument est en mode Humidité
Relative.
C. Indique l’échelle de température actuellement congurée
(en mode RH) ou indique le mode Point de rosée.
D. Témoin de mode d’arrêt AUTO actif/MINimum et d’épuisement de la
pile (BAT).
E. Témoin de mode MAXimum et de maintien (HOLD).
F. Indique la température ambiante.
23
Page 25

3. MODE D’EMPLOI
Les pages suivantes vous expliquent, en détail, le fonctionnement des
Hygromètres. Nous vous invitons à les lire attentivement et à contacter
le Bureau des ventes Comark pour de plus amples informations.
3.1 MISE EN MARCHE
ON
OFF
Appuyer sur ce bouton pour mettre l’instrument sous tension
(ON).
NOTA : A la mise sous tension, l’instrument procède à une
vérication automatique d’une durée maximum de 1 seconde.
Appuyer de nouveau sur ce bouton pour le mettre hors tension
(OFF).
N8004
L’instrument ne fonctionne pas tant qu’une sonde n’a pas été
insérée. Si la sonde n’a pas été insérée, l’afchage renvoie
l’information suivante :
FIG.2
Cet afchage correspond à un circuit ouvert, à une sonde
cassée ou à une indication hors la plage.
N8006
Si le modèle N8006 afche le schéma ci-dessus, il est en panne
et doit être renvoyé au S.A.V. Comark.
l’air ambiant.
24
Page 26

3.2 %RH/DP
%RH
DP
Sélectionne le mesurage direct d’humidité relative ou le mode
de calcul du point de rosée et s’afche dans la zone numérique
principale de l’afchage.
Mode Humidité Relative :
FIG. 3
Mode Point de rosée :
FIG. 4
3.3 °C/°F
°C
/°F
Sélectionne l’échelle de température utilisée. Ceci est valable
pour la température ambiante comme pour la température du
point de rosée, selon le mode de fonctionnement sélectionné.
3.4 MAINTIEN (HOLD)
HOLD
Fige l’afchage sur le dernier relevé. Le mot 'HOLD' s’afche
sur l’écran. Appuyer de nouveau sur ce bouton pour désactiver
cette fonction.
NOTA : La sélection de la fonction de MAINTIEN n’empêche pas de
faire dérouler les valeurs maintenues des températures MAX, MIN
et ACTUELLE (CURRENT) et de réafcher l’échelle de température
de l’une ou de l’autre de ces valeurs. Il est également possible
de passer au mode Point de rosée ou HR. Noter que l’échelle de
température indiquée par un A dans la Fig. 4, soit °C ou °F,
devient l’indicateur d’échelle de température commun au point de
rosée et à l'air ambient.
25
Page 27

3.5 MAX/MIN
MAX
MIN
Ce bouton permet de parcourir les relevés Maximum, Minimum,
d’humidité actuelle et de température qui s’afchent à l’écran.
Il permet également de parcourir les valeurs Maximum et
Minimum des modes point de rosée (DP) et maintien (HOLD).
3.6 REMISE A ZERO (RESET)
RESET
Réinitialise la valeur actuelle des relevés Maximum et Minimum.
Cette fonction se déclenche automatiquement à la mise en
marche de l’appareil.
Le bouton de RESET copie la valeur actuelle dans les
mémoires Maximum et Minimum mais ne modie pas la
sélection à afcher.
3.7 ARRET AUTOMATIQUE
Les modèles de la série N8000 peuvent être congurés pour
s’arrêter automatiquement cinq minutes après la dernière
intervention de l’utilisateur sur les commandes ou pour rester
en marche en permanence, jusqu’à la mise à l’arrêt manuelle
par l’utilisateur.
Le symbole AUTO afché à l’écran se rapporte à ce mode. S’il
est visible, l’instrument s’arrête automatiquement.
Pour passer d’une option de mode à une autre, éteindre
l’instrument (OFF) et, tout en appuyant sur le bouton °C/°F,
remettre l’instrument en marche (ON).
4. MESURAGE
Bien que le capteur d’humidité soit pratiquement insensible à la
température dans les limites de la plage d’utilisation normale, la
température elle-même a une incidence sur l’Humidité Relative. Cet
aspect et d’autres facteurs feront l’objet d’une rubrique séparée. A
cause de cette dépendance (typiquement un taux HR de 0,5% HR pour
une différence de température de 0,1°C (0,2°F)), le relevé d’Humidité
Relative initial est élevé lorsqu’un détecteur froid est introduit dans un
milieu plus chaud. En revanche, le relevé d’Humidité Relative initial est
faible lorsqu’un détecteur chaud est introduit dans un milieu plus froid.
L’utilisateur devra attendre que l’afchage se stabilise pour pouvoir être
sûr de l’exactitude des relevés.
26
Page 28

5. PRECAUTIONS D’EMPLOI
L’utilisation de certains solvants organiques oblige à prendre certaines
précautions. Une exposition occasionnelle aux milieux dangereux est
inévitable avec ce type d’instrument portable. Ceci dit, on recommande
à l’utilisateur de se renseigner auprès de Comark avant une exposition
prolongée de l’instrument dans ces conditions (dans le cadre d’une
application de contrôle, par exemple).
Des précautions doivent également être prises pour protéger les
capteurs du risque de détérioration physique.
6. MAINTENANCE
6.1 NETTOYAGE DU CAPTEUR
Les mesures suivantes peuvent être prises en cas de pollution
accidentelle, mais sans garantie de résultat.
NOTA : Ne jamais toucher la surface du capteur d’humidité
(verre), même avec un tissu des plus doux.
POUSSIERES – utiliser de petits jets d’air, provenant d’une
buse caoutchouc utilisée pour dépoussiérer les lentilles
d’appareils photographiques, par exemple. Si cela ne fait pas
l’affaire, passer sous l’eau distillée d’un acon laveur en tenant
le capteur tête en bas pour permettre à l’eau de s’en écouler.
Sécher dans un milieu dépourvu de poussières à l’aide d’un
sèche-cheveux pour accélérer le séchage, si nécessaire.
POLLUTION HUILEUSE – Passer sous le perchloréthylène
pour éliminer le contaminant.
7. ETALONNAGE
Seule Comark Ltd. est habilitée à effectuer ce réglage.
27
Page 29

8. PRECAUTIONS DE MESURAGE HR
En plus des précautions d’utilisation des modèles N8004/6 déjà
décrites, certaines précautions sont à observer relativement au
mesurage de l’humidité, quel que soit l’instrument utilisé.
CIRCULATION D’AIR
Sans circulation d’air, des différences d’humidité sont relevées à
différents endroits de la salle ou de la chambre.
TEMPERATURE
Bien que peu importantes, les différences de température existant à
différents endroits d’une salle ou d’une chambre ont une incidence
manifeste sur l’Humidité Relative. On tiendra compte typiquement d’un
taux HR de 0,5 % pour une différence de température de 0,1°C (0,2°F).
VITESSE DE L’AIR
Des résultats exacts et un temps de réaction court dépendent d’une
certaine vitesse de l’air.
EFFETS DES PRESSIONS ATMOSPHERIQUES
Souvent négligés, ces effets peuvent jouer un rôle important. Par
exemple, compte tenu de la même température, l’air mesuré à 1050 mB
peut renvoyer une HR de 70% alors que, dans les mêmes conditions,
l’air mesuré à 950 mB renverra une HR de 77%.
CONDENSATION
Ce phénomène intervient en cas de taux HR élevé, si la sonde est audessous du point de rosée ambiant. Même si l’effet de ce phénomène
sur le capteur d’humidité des modèles N8004/6 n’est que passager, il
est préférable de l’éviter.
28
Page 30

9. DEFINITIONS
HUMIDITE RELATIVE – mesure correspondant à la quantité de vapeur
d’eau dans l’air indiquée par le pourcentage du maximum de vapeur
d’eau pouvant être présent dans le même air. En termes scientiques, il
s’agit de la pression partielle exercée par la vapeur d’eau, divisée par la
pression de saturation de la vapeur d’eau à la température de mesure.
POINT DE ROSEE – température à laquelle la rosée se forme si l’air
est refroidi. A mesure que l’air se refroidit, ses capacités de contenance
de vapeur d’eau diminuent. Le moment de la formation de rosée
correspond à la température de saturation à la pression de mesure.
HUMIDITE SPECIFIQUE – correspond au poids de l’eau par quantité
d’air sec normalement exprimé en p.p.m.(partie par million), soit
milligrammes par kilogramme.
10. REMPLACEMENT DES PILES
Remplacer les piles dès que le symbole BAT s’afche ou l’instrument
continue de fonctionner mais l’étalonnage correct de l’appareil n’est
plus garanti.
Pour remplacer les piles : vérier que l’instrument est bien hors
tension, dévisser la vis de retenue du cache de compartiment à piles
situé à l’arrière de l’instrument, à l’aide d’un tournevis plat de la taille
qui convient. Retirer les deux piles et les remplacer par de nouvelles
piles alcalines pour assurer une longue durée de fonctionnement de
l’instrument. Veiller à bien respecter la polarité, à ne pas trop resserrer
la vis en remettant le cache et à ne pas perdre la rondelle d’étanchéité
en caoutchouc.
Nota : Les piles rechargeables de type NiCd ou NiMH peuvent être
utilisées mais ne durent pas aussi longtemps. Ne pas essayer de
recharger les piles à l’intérieur de l’instrument.
29
Page 31

DEUTSCH
COMARK N8004/N8006
BEDIENUNGSANLEITUNGEN
1. INFORMATIONEN
Es wird empfohlen, daß Sie die Sicherheit und Bedienungsanleitung
lesen, bevor Sie dieses Instrument verwenden.
Anmerkungen:
N8006 ist ein RH/temperature Handinstrument mit einem integralen
Sensor; N8004 benutzt eine unterschiedliche RH/temperature
Prüfspitze (N81).
WARNUNG
BEI BERÜHRUNG EINES FÜHLERS MIT SPANNUNGSFÜHRENDEN
TEILEN ÜBER 30V WS BESTEHT FÜR DEN ANWENDER DIE GEFAHR
EINES ELEKTRISCHEN SCHLAGS.
U M B E S C H Ä D IG U N G O D E R VE R B R E N N U NG Z U
V E R H I N D E RN , KEINE T E M P E R ATUR - M E S S U NG EN I N
MIKROWELLENHERDEN DURCHFÜHREN.
DA ES NICHT SPÜLMASCHINENFEST IST, DARF DAS INSTRUMENT NICHT IN EINER GESCHIRRSPÜL-MASCHINE VERWENDET
WERDEN.
DAS SYMBOL LÄßT ERKENNEN, DAß DER BEDIENER SICH AUF
DIE O.A. ERKLÄRUNGEN BEZIEHEN MUß.
Temperaturfühler
Dieses Präzisionsgerät wurde für die Verwendung mit der ausgedehnten Reihe von Comark-Temperaturfühlern konstruiert.
Die Verwendung von anderen Fühlern könnte die Leistung und
Genauigkeit des Geräts beeinträchtigen. Sämtliche Einzelheiten
über Comark-Fühler und -Sensoren sind erhältlich von der ComarkKundendienstabteilung oder Ihren lokalen Händler.
30
VORSICHT
Page 32

Die Fertigung des Geräts erfolgt
in Übereinstimmung mit den
Qualitätssicherungsnachweisforderungen von
ISO 9001.
Das Gerät entspricht den Richtlinien für
elektromagnetische Verträglichkeit
EN61326-1.
EC Konformitätsbescheinigungen sind erhältlich
und anzufordern vom Comark Kundenservice
oder vom lokalen Vertriebspartner.
Entsprechend dem Geschäftsgrundsatz einer dauernden Weiterentwicklung
behält sich Comark Instruments das Recht vor, die technischen Daten des
Geräts ohne vorherige Notiz zu ändern. Weitere Informationen stehen von
Comark Instruments oder Ihrem Händler zur Verfügung.
31
Page 33

KALIBRIERUNG, ZERTIFIZIERUNG UND
SERVICE
Zertizierung
No.0451
Comark kann Kalibrierzertikate für die gesamte Produktpalette
bereitstellen, die für ISO 9000 und andere Qualitätssicherungsverfahren
sowie für Lebensmittelhygieneverordnungen, HACCPs und
Umweltverordnungen gültig sind. Zertikate von Comark werden
in unabhängigen, qualitätskontrollierten Verfahren erstellt, die
die Produkteigenschaften mit den jeweiligen nationalen Normen
vergleichen. Um den sorgenfreien Betrieb sicherzustellen und die
Vorschriften zu beachten, empehlt Comark eine jährliche Zertizierung
und Neukalibrierung.
Zwei Zertikat-Klassen sind für Infrarot-Temperaturmessgeräte und
Nicht-Temperaturmessgeräte sowie Feuchtemeggeräte lieferbar:
UKAS-Zertikate über ein externes akkreditiertes Labor und NPL
rückführbare Zertikate durch das Comark Kalibrierlabor.
Für Kontakttemperaturmessprodukte und Feuchtigkeit Produkte gibt es
die drei folgenden Zertizierungsniveaus:
a) UKAS-Zertizierung
Das von UKAS (United Kingdom Accreditation Service) akkreditierte
Comark-Temperaturkalibrierungslabor gehört zu den besten
in Großbritannien. Comark können UKAS Bescheinigungen
die niedrigste Ungewißheit von 0.01°C anbieten und können
unabhängigem Beweis Gebrauch Geräte richtiger Kalibrierung und
Verfahren versorgen, die von UKAS Inspektoren revidiert werden.
b) UKAS Zertikate für rel. Feuchte
Zusätzlich zur Comark-Temperatur ist unser Labor für Feuchtigkeit
jetzt in der Lage Kalibrierzerticake für rel. Feuchte zu erstellen.
Die Tradition für Zertikate mit hoher Genauigkeit und einen weiten
Messbereich wird fotgesetzt. Wir kalibrieren Feuchte von 25% bis
90% rF mit einer Abweichung von 2,8% des gelesenen Wertes.
c) Zertizierung nach NPL-Standards
Comark sind NPL Bescheinigungen auffundbar zum Nationalen
Physischen Labor und können Ungewißheit so niedrig wie 0.3°C
anbieten.
32
Page 34

Konformität
Konformitätszertikate können für neue, gewartete und neu kalibrierte
Instrumente vorgelegt werden. Diese Zertikate bestätigen, dass die
Geräte ihren ursprünglichen Herstellerspezikationen entsprechen.
Service/Reparaturen
Die Kundendienstabteilung von Comark bietet regelmäßige Wartung
und alle erforderlichen Reparaturen, auch nach Ablauf der Garantiezeit.
Weitere Informationen über alle Comark-Zertizierungen, Kalibrierungen
und Kundendiensteinrichtungen erhalten Sie entweder bei Comark
direkt oder bei Ihrem Händler.
33
Page 35

1. BESCHREIBUNG
Die Baureihe tragbarer Hygrometer N8000 zeichnet sich durch höchste
Genauigkeit (für Lufttemperatur und Luftfeuchtigkeit) aus und weist
Funktionsmerkmale auf, die in ihrer Klasse führend sind.
Das N8006 besitzt einen integrierten Sensorkopf, während beim
N8004 der RH-Sensor und die zugehörige Elektronik in einem
Handmessfühler (N81) untergebracht sind, der mittels Kabel an
das Instrument angeschlossen wird. Dieser Messfühler ist weiterhin
mit einem Thermistor für akkurate Lufttemperaturmessungen
ausgestattet. Das N8004 eignet sich außerdem für unabhängige
Temperaturmessungen mittels eines speziellen Adapters, der die
Anwendung des breiten Sortiments von Comark Thermistorfühlern
ermöglicht.
Beide Geräte besitzen ein großes LCD-Display, das die gleichzeitige
Anzeige von Luftfeuchtigkeit und Lufttemperatur gewährleistet.
Es gibt zwei Grundbetriebsmodi für diese Instrumente:
1. Messen der relativen Luftfeuchtigkeit
2. Taupunktberechnung.
1.1 ERHÄLTLICHES ZUBEHÖR
Für anspruchsvolle Anwendungen kann jedes Hygrometer
mit einer Gummischutzmanschette geliefert werden, um den
zusätzlichen Schutz des Instrumentes zu gewährleisten.
Für Extrasicherheit ist jede Gummischutzmanschette mit
Handgelenkband ausgestattet. (Artikel-Nr. CRS/4)
N8004
Mit einem Adapter (KX7538) kann das N8004 unabhängig vom
N81 Temperaturen messen, indem ein beliebiger 6-poliger
Lumberg-Thermistorfühler der Comark Standardbaureihe
angeschlossen wird.
34
Page 36

2. ÜBERSICHT DER DISPLAYSYMBOLE
Das Display ist in drei Hauptbereiche unterteilt. In der ersten Zeile
wird die relative Luftfeuchtigkeit oder der Taupunkt angezeigt. Die
zweite Zeile ist in zwei Bereiche unterteilt; der linke Bereich dient zur
Anzeige der Umgebungstemperatur, wogegen im rechten Bereich
die verwendete Temperaturskala und der Taupunktmodus angezeigt
werden.
A
B
C
F
E
D
ABB. 1
A. Hauptanzeige Luftfeuchtigkeit/Taupunkt
B. Im Taupunktmodus zur Anzeige der verwendeten
Temperaturskala genutzt. %rh weist darauf hin, dass sich
das Instrument im Modus Relative Luftfeuchtigkeit bendet.
C. Anzeige der aktuelle verwendeten Temperaturskala im
RH-Modus an oder zeigt Taupunktmodus an.
D. Anzeige von AUTO-Abschaltung Freigabe/MINimum und
niedrige BATterieladung.
E. Anzeige von MAXimum und HOLD-Modus (HALTEN).
F. Wird zur Anzeige der Umgebungstemperatur verwendet.
35
Page 37

3. BETRIEBSANLEITUNG
In diesem Abschnitt werden die Modusfunktionen der Hygrometer
umfassend beschrieben. Lesen Sie den Abschnitt bitte sorgfältig durch. Bei
etwaigen Fragen wenden Sie sich bitte an das Comark Vertriebsbüro.
3.1 EINSCHALTEN
ON
OFF
Drücken, um das Instrument EIN-zuschalten (ON).
HINWEIS: Nach dem Einschalten führt das Instrument 1
Sekunde langeinen Selbsttest durch.
Zum AUS-Schalten (OFF) des Instruments diese Taste erneut
drücken.
N8004
Bevor das Instrument genutzt werden kann, muss ein Messfühler
angeschlossen werden. Wenn kein Messfühler eingesteckt ist, sieht
die Displayanzeige wie folgt aus:
ABB. 2
Das ist die normale Anzeige für einen offenen Kreis, einen defekten
Messfühler oder eine Messbereichsüberschreitung.
N8006
Wenn die oben stehende Anzeige an Ihrem N8006 erscheint, ist das
Gerät defekt und muss an die Comark Serviceabteilung geschickt.
36
Page 38

3.2 %RH/DP
%RH
DP
Direktwahl von Messung der relativen Luftfeuchtigkeit oder
des Taupunktberechnungsmodus und wird im numerischen
Hauptbereich am Display angezeigt.
Modus Relative Luftfeuchtigkeit:
ABB. 3
Taupunktmodus:
ABB. 4
3.3 °C/°F
°C
/°F
Wahl der zu verwendenden Temperaturskala. Das gilt je
nach Betriebsmodus für die Umgebungstemperatur oder die
Taupunkttemperatur.
3.4 HALTEN (HOLD)
HOLD
Displayanzeige bleibt beim letzten Messwert stehen. „HOLD“
wird am Display angezeigt. Die Taste erneut drücken, um die
Funktion zu deaktivieren.
HINWEIS: Bei aktiver HOLD-Funktion ist es immer noch
möglich, zwischen den MAX-, MIN- und AKTUELLEN
Temperaturwerten zu scrollen und die Temperaturskala für
diese Werte neu anzuzeigen. Außerdem kann der Taupunktoder RH-Modus gewechselt werden. Bitte beachten, dass die
37
Page 39

unter A angezeigte Skala in Abb. 4, entweder °C oder °F,
jetzt die Skalenanzeige für die Taupunkttemperatur und die
Umgebungslufttemperatur geworden ist.
3.5 MAX/MIN
MAX
MIN
Mit dieser Taste kann man zwischen den maximalen, minimalen
und aktuellen Feuchtigkeits- und Temperaturwerten scrollen.
Außerdem kann man die Maximum- und Minimumwerte im
Taupunktmodus (DP) und im Haltemodus (HOLD) zyklisch
durchlaufen.
3.6 ZURÜCKSETZEN (RESET)
RESET
Setzt die Maximum- und Minimumwerte auf den aktuellen
Wert. Diese Funktion wird beim Einschalten automatisch
durchgeführt.
Mit der Taste RESET wird der aktuelle Messwert in die
Maximum- und Minimumspeicher übernommen, und die Wahl
der Displayanzeige bleibt unverändert.
3.7 AUTOMATIKABSCHALTUNG
Geräte der N8000 Baureihe können so konguriert werden,
dass sie sich fünf Minuten nach dem letzten Tastendruck von
selber ausschalten oder so lange eingeschaltet bleiben, bis sie
manuell ausgeschaltet werden.
Dieser Modus wird am Display vom Symbol AUTO
repräsentiert. Wenn das Symbol zu sehen ist, wird das
Instrument automatisch ausgeschaltet.
Um von einer Modusoption zur anderen zu wechseln, ist das
Instrument AUS-zuschalten (OFF) und dann mit gedrückt
gehaltener Taste °C/°F wieder EIN-zuschalten (ON).
38
Page 40

4. MESSEN
Obwohl der Feuchtigkeitssensor gegenüber Temperaturen über dem
normalen Betriebsbereich nahezu unempndlich ist, hat die Temperatur
selbst Einuss auf die relative Luftfeuchtigkeit. Dieser und andere
Faktoren werden später behandelt. Diese Abhängigkeit (typischerweise
0,5 % rF bei 0,1 °C Temperaturunterschied) bedeutet, dass beim
Überführen eines kalten Messfühlers in eine wärmere Atmosphäre die
rF-Messwerte anfänglich hoch und beim Überführen eines warmen
Messfühlers in eine kalte Atmosphäre dementsprechend anfänglich
niedrig sind.
Um akkurate Messwerte sicherzustellen, sollte der Benutzer warten, bis
sich die Displayanzeige stabilisiert hat.
5. VORSICHTSMASSNAHMEN BEIM GEBRAUCH
Wenn organische Lösungsmittel verwendet werden, ist
Vorsicht angeraten. Ein tragbares Instrument kann gelegentlich
Gefahrenbereichen ausgesetzt werden, für länger dauernde
Einsatzzwecke (z. B. Überwachung) wenden Sie sich aber bitte an
Comark.
Darauf achten, dass alle Sensoren vor mechanischen Beschädigungen
geschützt werden.
6. WARTUNG
6.1 SENSORREINIGUNG
Im Falle einer versehentlichen Verunreinigung können folgende
Schritte ausgeführt werden, deren Erfolg aber nicht garantiert
ist.
HINWEIS: Der Feuchtigkeitssensor (Glas) darf auf keinen Fall
berührt werden, auch nicht mit dem weichsten Material.
STAUB – einen sanften Luftstrom verwenden, z. B. von einem
Quetschballon zur Kameraobjektivreinigung. Wenn nicht
zufriedenstellend, ist ein Strahl destillierten Wassers aus
39
Page 41

einer Waschasche zu verwenden, wobei der Messfühler nach
unten gehalten wird, damit dass Wasser vom Sensor ablaufen
kann. In einer staubfreien Umgebung trocknen, ggf. einen
Haartrockner benutzen, um die Trocknungszeit zu verkürzen.
ÖLVERUNREINIGUNGEN - einen Strahl Perchlorethylen
verwenden, um die Verunreinigung zu beseitigen.
7. KALIBRIERUNG
Die Kalibrierung kann nur von Comark Ltd. vorgenommen werden.
8. WAS BEI DER
LUFTFEUCHTIGKEITSMESSUNG ZU
BERÜCKSICHTIGEN IST
Abgesehen von der bereits beschriebenen allgemeinen Sorgfalt beim
Einsatz des N8004/6 sind unabhängig vom verwendeten Instrument
einige Einussfaktoren zu berücksichtigen.
LUFTZIRKULATION
Ohne Luftzirkulation treten Luftfeuchtigkeitsunterschiede in einem
Raum oder in einer Kammer auf.
TEMPERATUR
Die Temperaturunterschiede in einem Raum oder in einer Kammer
haben einen starken Einuss auf die relative Luftfeuchtigkeit, auch
wenn sie nur gering sind – in einem typischen Fall 0,5 % rF bei einem
Temperaturunterschied von 0,1 °C.
LUFTGESCHWINDIGKEIT
Eine gewisse Luftgeschwindigkeit ist erforderlich, um akkurate
Messergebnisse und schnelle Reaktionszeiten sicherzustellen.
AUSWIRKUNGEN DES ATMOSPHÄRISCHEN DRUCKS
40
Page 42

Die Auswirkungen werden oft außer Acht gelassen, können aber
signikant sein. Bei gleicher Temperatur wird zum Beispiel bei
1050 mbar eine Luftfeuchtigkeit von 70 % rF gemessen, wohingegen
bei 950 mbar 77 % rF gemessen werden.
KONDENSATION
Kondensation kann bei hoher Luftfeuchtigkeit auftreten, wenn die
Temperatur des Messfühlers unterhalb des Umgebungstaupunktes liegt.
Auch wenn sich der N8004/6 Feuchtigkeitssensor davon erholt, sollte
dies vermieden werden.
9. BEGRIFFSDEFINITIONEN
RELATIVE LUFTFEUCHTIGKEIT - ist ein Maß der Wasserdampfmenge
in der Luft als Prozentualwert des maximalen Wasserdampfgehalts, den
die Luft aufnehmen kann. Als wissenschaftlicher Begriff ist die relative
Luftfeuchtigkeit das Verhältnis des Wasserdampfpartialdrucks zum
Sättigungsdampfdruck
bei dieser Temperatur.
TAUPUNKT - ist die Temperatur bei der sich Tau bildete, wenn die Luft
gekühlt würde. Wenn Luft abkühlt, kann sie weniger Wasserdampf
tragen; der Punkt, an dem sich Tau bildet, ist die Sättigungstemperatur
bei diesem Druck.
SPEZIFISCHE LUFTFEUCHTIGKEIT - ist das Verhältnis des
Wassergewichts zum Trockenluftgewicht und wird normalerweise in
ppm (parts per million) angegeben, was gleichbedeutend mit mg/kg ist.
10. BATTERIEWECHSEL
Wenn das Symbol BAT am Display erscheint, sollten die Batterien sofort
ausgewechselt werden. Wenn das nicht geschieht, ist das Instrument
immer noch arbeitsfähig, aber die Kalibrierung des Geräts kann nicht
garantiert werden.
Auswechseln der Batterien: Sicherstellen, dass das Gerät ausgeschaltet
ist und mit einem passenden Flachschraubendreher die Schraube
41
Page 43

vom Batteriedeckel an der Rückseite des Instruments entfernen. Die
beiden Zellen herausnehmen und, um eine lange Batterielebensdauer
zu gewährleisten, durch neue Alkalizellen ersetzen. Beim Einlegen auf
die richtige Polarität achten. Wenn der Deckel wieder befestigt wird,
darauf achten, dass die Schraube nicht überdreht wird und dass die
Gummidichtscheibe nicht verloren geht.
Hinweis: NiCd- oder NiMh-Zellen können verwendet werden, führen
aber zu kürzeren Betriebszeiten. Nicht versuchen, die Zellen im
Instrument aufzuladen.
42
Page 44

ITALIANO
COMARK N8004/N8006
ISTRUZIONI PER L'USO
1. INFORMAZIONI GENERALI
È suggerito che leggete le istruzioni di funzionamento e di sicurezza
prima di per mezzo di questo strumento.
Note:
N8006 è uno strumento tenuto in mano di RH/temperature per mezzo
di un sensore integrale; N8004 usa una sonda separata di RH/temperature (N81).
ATTENZIONE
PER EVITARE SHOCK ELETTRICI, NON PERMETTERE AD ALCUNA
SONDA O SENSORE DI ENTRARE IN CONTATTO CON CONDUTTORI
DI POTENZA ELETTRICA A VOLTAGGI SUPERIORI DI 30V CA VQM
O 60V CC.
PER EVITARE DANNI O BRUCIATURE SI CONSIGLIA DI NON USARE
IL TERMOMETRO PER MISURARE LA TEMPERATURA ALL’INTERNO
DEI FORNI A MICROONDE.
NON METTERE LO STRUMENTO NELLE LAVAPIATTI SE NON IN
SICUREZZA.
IL SIMBOLO CHE APPARE SULLO STRUMENTO INDICA CHE
L’OPERATORE PUÒ CONSULTARE LE SPIEGAZIONI DI CUI SOPRA.
ATTENZIONE
Sonde di temperatura
Questo strumento di precisione è stato realizzato appositamente per
essere usato con le numerosissime sonde di temperatura della linea
Comark. L’impiego di altre sonde potrebbe ridurre sia la prestazione
che la precisione dello strumento. Per informazioni complete sulle sonde e
sui sensori Comark, rivolgersi all’ufcio di assistenza al cliente della Comark
o al distributore di zona.
43
Page 45

La fabbricazione di questo strumento è soggetta al
sistema di controllo qualità della Comark, certicato ai
sensi della norma ISO 9001.
Questo strumento è conforme alle Direttive di
Compatibilità Elettromagnetica EN 61326-1.
È possibile ottenere attraverso la Comark la
Dichiarazione di Conformità.
In applicazione della sua politica di sviluppo continuo dei prodotti, la
Comark Instruments si riserva il diritto di modicare la specica del
prodotto senza preavviso. Per maggiori informazioni, rivolgersi alla Comark
Instruments o al distributore di zona.
44
Page 46

TARATURA, CERTIFICAZIONE E MANUTENZIONE
Certicazione
No. 0451
La Comark può fornire, per tutta la sua gamma di prodotti, i certicati
di taratura conformi alle procedure di controllo della qualità ISO 9000
e altri, per le norme d'igiene alimentare, per sistemi HACCP e per le
norme ambientali. I certicati della Comark vengono rilasciati in base ai
risultati di controlli di massima qualità, che confrontano le prestazioni
del prodotto alle norme nazionali. Per garantire l'afdabilità dei prodotti
e il rispetto delle migliori procedure la Comark consiglia di far certicare/
ritarare i prodotti una volta all'anno.
Sono disponibili due livellidi certicazione per gli strumenti che rilevano
la temperatura a raggi infrarossi e non, escludendo l’umidità: UKAS
Certicazione effettuata da laboratorio esterno accreditato. NPL certicato riferibile da laboratorio di calibrazione Comark.
Per gli strumenti di misurazione a contatto della temperatura ed umidità
sono disponibili, inoltre, tre livelli di certicazione:
a) Certicazione di temperatura UKAS (equivalente SIT)
L’UKAS è il più alto livello di certicazione riconosciuto nel
Regno Unito.Questo offre la più bassa incertezza di misura
esistente (0,01°C) e fornisce un riscontro della corretta taratura,
usando strumenti e procedure approvate dagli ispettori UKAS.
Gli strumenti usati sono in piena rintracciabilità al Laboratorio di
Fisica Nazionale (NPL).
b) Certicazione UKAS (equivalent SIT) per umidità
Il laboratorio Comark, oltre alla temperatura, si avvale ora
anche dell’accreditamento per il parametro umidità, ad alta
precisione ed ampio campo di misura (25% - 90% U.R.) con
incertezza di 2,8% della lettura. La certicazione può includere
inoltre la misurazione del punto di rugiada (dew points).
c) Certicazione conforme alle norme NPL
Le Certicazioni NPL sono utilizzate dal Laboratorio di Fisica
Nazionale epossono offrire un’incertezza pari a 0,3°C.
45
Page 47

Conformità
La Comark rilascia certicati di conformità per strumenti nuovi, riparati
e ritarati. Questi certicati confermano che gli strumenti sono conformi
alle speciche originali del fabbricante
Manutenzione/Riparazione
Il reparto manutenzione della Comark offre un servizio di manutenzione
ed effettua tutte le riparazioni necessarie, anche tramite il proprio
distributore locale.Per maggiori informazioni sui servizi di certicazione,
taratura e manutenzione della Comark basta rivolgersi all'ufcio di
assistenza al cliente o al distributore di zona.
46
Page 48

1. DESCRIZIONE
La gamma di termo – igrometri della serie N8000 combina
un’elevata precisione con caratteristiche di assoluta qualita’.
Il modello N8006 è fornito con un sensore integrato, mentre
il N8004 possiede una sonda elettronica (N81) esterna che
include il sensore di umidita’ ed è connesso allo strumento
tramite un cavo, la sonda include inoltre un termistore per la
misura della temperatura ad alta precisione. Il N8004 è inoltre
in grado di rilevare la temperatura con altre sonde a termistore
della gamma COMARK tramite uno speciale adattatore.
Entrambi gli strumenti possiedono un ampio LCD che visualizza
simultaneamente sia umidità che temperatura.
I due strumenti forniscono due modi operativi di base:
1. Misura di umidita’ relativa (U.R).
2. Calcolo del punto di rugiada (D.P)
1.1 ACCESSORI DISPONIBILI
Ogni termoigrometro puo’ essere fornito di un guscio
in gomma per avere una maggiore protezione. Ogni
guscio in gomma è completo di un velcro per migliore
sicurezza (CRS/4).
N8004
Il N8004 può misurare indipendentemente la
temperatura usando un adattatore (KX 7538) che
permette di utilizzare qualsiasi sonda a termistore
LUMBERG a 6 vie della gamma COMARK.
47
Page 49

2. SPIEGAZIONE DEI SIMBOLI SUL DISPLY
Il display è suddiviso in tre principali aree. La prima linea mostra
l’umidità relativa ad il punto di rugiada. La seconda linea è
suddivisa in due zone.
La zona a sinistra è usata per mostrare la temperatura e la
modalità DP.
A
B
C
F
E
FIG. 1
A. Visualizzatore principale U.R./DP.
B. Usata per indicare la scala di temperatura in uso
nella modalità DP. % rh indica che lo strumento è
nella modalità UR.
C. Mostra la scala di temperatura corrente in modalità
RH o indica la modalità DP.
D. Indica auto–spegnimento attivato / il minimo e
batteria in scarica.
E. Indica maxima e modalità Hold di blocco misura.
F. Usata per indicare la temperatura ambiente.
48
D
Page 50

3. ISTRUZIONI DI FUNZIONAMENTO
Una completa descrizione delle operazioni di tutte le modalità dei
termoigrometri è sotto elencata. Leggere attentamente e se c’è
necessità di ulteriori chiarimenti contattare gli ufci ISOIL INDUSTRIA
SPA rappresentanti della COMARK in Italia.
3.1 Accensione
ON
OFF
Premere ON.
Nota: Lo strumento esegue un test automatico per 1
secondo durante l’accensione.
Premere nuovamente il tasto per spegnere lo strumento, OFF.
N8004
E’ necessario inserire una sonda per far funzionare lo
strumento. Se non è inserita alcuna sonda il display appare
come segue:
FIG. 2
Questa è l’indicazione del circuito aperto, della sonda rotta
oppure l’eccesso del campo di misura.
N8006
Se il N8006 mostra l’indicazione suddetta, lo strumento non è
funzionante e dovrebbe essere reso al servizio assistenza.
49
Page 51

3.2 %RH/DP
%RH
DP
Seleziona direttamente la misura dell’umidità relativa o la
modalità di calcolo del punto di rugiada mostrandoli nella parte
principale del display.
Modalità Umidità Relativa (RH):
FIG. 3
Modalità Punto di Rugiada (DP):
FIG. 4
A
3.3 °C/F
Seleziona la scala di temperatura utilizzata. Essa è applicata ad
entrambe le temperature sia ambiente che del punto di rugiada
in funzione della modalità operativa.
3.4 Hold
Blocca il display all’ultimo valore misurato. HOLD è mostrato sul
display. Premere il tasto nuovamente per abbandonare questa
funzione.
Nota: Avendo selezionato HOLD è ancora possibile
far scorrere i valori mantenuti di Max, Min e istantanei
delle temperature e visualizzare nuovamente la scala di
temperatura per ognuno di loro. E’ inoltre possibile passare
50
Page 52

dalla modalità DP a UR. Notare che la scala indicata da A in
g. 4, sia °C/°F, è ora diventata l’indicatore di scala sia per la
temperatura del punto di rugiada che ambiente.
3.5 Max/Min
MAX
MIN
Il tasto fa scorrere il display dal valore massimo, minimo ed
istantaneo dell’umidità e temperatura. Inoltre fa passare dai
valori massimi e minimi nelle modalità DP e HOLD.
3.6 Reset
RESET
Azzera il massimo ed il minimo al valore istantaneo. Questa
funzione si attiva automaticamente all’accensione.
Il tasto di reset copia il valore istantaneo nelle registrazioni di
massimo e minimo, ma non altera la selezione del display.
3.7 Auto-spegnimento
La serie N8000 può essere congurata per essere spenta
automaticamente cinque minuti dopo l’ultima operazione
effettuata, oppure rimanere permanentemente accesa sino allo
spegnimento manuale.
La funzione è indicata tramite simbolo Auto sul display. Quando
esso è visibile lo strumento si spegnerà automaticamente.
Per passare da una funzione all’altra, spegnere lo strumento
OFF, poi con il tasto °C/°F premuto, accenderelo strumento
nuovamente, ON.
4. MISURAZIONE
Sebbene il sensore di umidità è insensibile alla temperatura alle
normali condizioni di lavoro, la temperatura stessa inuisce l’umidità
relativa. Ciò ed altri punti saranno discussi piu’ avanti. Si intende che
questa inuenza (tipicamente) 0.5% UR per 0.1°C/0.2°F di variazione
termica) dipende dalle condizioni di sonda fredda in atmosfera piu’
calda, determinando nell’iniziale lettura di UR un innalzamento e
vicendevolmente una sonda calda in atmosfera piu’ fredda determina
inizialmente una lettura piu’ bassa.
Per assicurarsi letture corrette si consiglia di attendere che il display sia
stabile.
51
Page 53

5. PRECAUZIONI D’USO
Particolare attenzione deve essere fatta quando sono utilizzati solventi
organici. Occasionali esposizioni in ambienti pericolosi sono consentiti
per uno strumento portatile, ma per prolungati utilizzi (es. monitoraggio)
è consigliabile contattarci per ulteriori suggerimenti.
Massima attenzione deve essere fatta per proteggere tutti i sensori da
eventuali danneggiamenti sici.
6. MANUTENZIONE
6.1 Pulizia del sensore
Nell’eventualità di inquinamento accidentale, del sensore
devono essere intraprese le seguenti operazioni, assicurando
diversamente la buona riuscita della misura.
Note: Non intervenire sul sensore di umidità (vetro), neanche
con il materiale piu’ sofce.
POLVERE: usare l’aria con delicatezza come ad esempio
quella utilizzata per pulire le lenti di una fotocamera. Se non si
sono ottenuti risultati, utilizzare una minima quantità di acqua
distillata tenendo la sonda capovolta, in modo che scorra
naturalmente sul sensore. Lasciare asciugare in ambiente libero
da polvere, usando un asciugacapelli al minimo, se richiesto.
INQUINAMENTO OLFOSO: usare una quantità minima di
etilene perclorato.
7. CALIBRAZIONE
Questa puo’ unicamente essere effettuata dal nostro laboratorio
approvato.
52
Page 54

8. PRECAUZIONI DI MISURA
Oltre che le ragionevoli attenzioni che devono essere prestate all’uso
del N8004/6 già descritte, ci sono precauzioni che devono essere prese
nella misura dell’umidità, in funzione dello strumento che sarà utilizzato.
CIRCOLAZIONE D’ARIA
Senza circolazione d’aria ci saranno differenze di umidità all’interno
della stanza o camera.
TEMPERATURA
Le differenze di temperatura che esistono in una stanza o camera,
sebbene piccola, avranno un signicativo effetto sull’umidità relativa.
Tipicamente 0.5% UR per una differenza di temperatura di 0.1°C
(0.2°F).
VELOCITA’ DELL’ARIA
La velocità dell’aria è necessaria per assicurare risultati precisi e tempi
di risposta rapidi.
EFFETTI DELLA PRESSIONE ATMOSFERICA
Questi sono spesso trascurati, ma possono essere signicativi. Per
esempio, ad una stessa temperatura, con aria misurata a 1050 mbar si
può raggiungere il 70% UR, nei confronti della stessa aria a 950 mbar
che rileverà 77% UR.
CONDENSA
Ciò può incorrere ad alti valori di UR quando la sonda è sotto il punto
di rugiada ambiente. Sebbene il sensore dell’umidità del N8004/6 si
proteggerà da questo, si suggerisce di evitarlo, se possibile.
53
Page 55

9. DEFINIZIONE DEI TERMINI
UMIDITA’ RELATIVA - E’una misura della quantità del vapore acqueo
nell’aria, come percentuale del massimo vapore acqueo che la stessa
aria potrebbe portare. In termini specici, è la pressione parziale del
vapore acqueo diviso pressione di saturazione del vapore acqueo, a
quella temperatura.
PUNTO DI RUGIADA - E’ la temperatura alla quale la rugiada si
formerebbe se l’aria si raffreddasse. Con il raffreddamento dell’aria, che
così potrebbe portare meno vapore acqueo; il punto al quale la rugiada
si forma è la temperatura di saturazione a quella pressione.
UMIDITA’ ASSOLUTA O SPECIFICA - E’ il peso dell’acqua per peso
all’aria secca ed è solitamente espressa in PPM (parti per milione) che
corrisponde a milligrammi per Kg.
10. SOSTITUZIONE DELLE BATTERIE
Quando il simbolo BAT appare le batterie dovrebbero essere subito
sostituite. Se ciò non avviene lo strumento continuerà a rilevare, ma la
sua calibrazione non può essere garantita.
Per sostituire le batterie : assicurarsi che lo strumento sia spento,
svitare le viti di ssaggio nel retro del coperchio di chiusura dello
strumento utilizzando il cacciavite adatto. Togliere le due batterie e
sostituirle con nuove alcaline a lunga durata. Osservare la corretta
polarità. Prestare attenzione a non serrare eccessivamente le viti e di
non perdere le guarnizioni in gomma.
Notare: batterie al Nicd o Nimh possono essere utilizzate, ma risulterà
ridotto il tempo di lavoro. Non eseguire la ricarica delle batterie nello
strumento.
54
Page 56

ESPAÑOL
COMARK N8004/N8006
MANUAL DE OPERACION
1. INFORMACION GENERAL
Se recomienda que usted lea las instrucciones de seguridad y de
funcionamiento antes de usar este instrumento.
Notas:
N8006 es un instrumento portátilde RH/temperatura utilizando un
sensor integral; N8004 utiliza una punta de prueba separada de RH/
temperatura (N81).
ADVERTENCIA
PARA EVITAR UNA POSIBLE DESCARGA ELECTRICA NO PONER LA
SONDA EN CONTACTO CON CABLES ELECTRICOS CON TENSIONES
SUPERIORES A 30V CA RED RMS O 60V CC.
PARA EVITAR HERIR O QUEMARSE, NUNCA MEDIR LA TEMPERATURA
EN UN HORNO MICROONDAS.
NO COLOQUE IL INSTRUMENTO EN UN LAVAPLATOS PUES NO
ES CAJA FUERTE DEL LAVAPLATOS.
EL SÍMBOLO EN EL INSTRUMENTO INDICA QUE EL OPERADOR
DEBE REFERIR A LAS EXPLICACIÓNES ARRIBA.
ADVERTENCIA
Sondas para la medición de temperatura
Este instrumento de precisión ha sido diseñado para uso con la
gama extensa de sondas de temperatura Comark. El uso de otras
sondas puede perjudicar las prestaciones y exactitud del instrumento.
Se pueden obtener detalles completos de las sondas y sensores
Comark del departamento de Soporte de los Clientes Comark, o de su
distribuidor local.
55
Page 57

Este instrumento ha sido fabricado de acuerdo
con el Sistema de Calidad Aprobada ISO 9001.
Este instrumento cumple con la Directiva
EN61326-1 de Compatibilidad Electro-magnética.
Disponemos de las declaraciones de conformidad. Consultar con el Distribuidor de Comark.
De acuerdo con su política de desarrollo continuo, Comark Instruments
se reserva el derecho de modicar la especicación del instrumento sin
aviso previo. Se puede obtener información adicional de Comark Instru-
ments o de su distribuidor.
56
Page 58

CALIBRACION, CERTIFICACION Y SERVICIO
Certicación
No. 0451
Comark puede facilitar certicados de calibración para toda su gama
de productos, para adaptarse a la ISO 9000 y a otros procedimientos
de aseguramiento de la calidad, reglamentos de higiene alimentaria,
HACCPs y reglamentos medioambientales. Los certicados Comark
son creados por procesos sometidos a un control de calidad
independiente que comparan el rendimiento del producto frente a las
Normas Nacionales establecidas. Para una mayor tranquilidad y como
buena práctica, Comark recomienda una certicación / recalibración
anual.
Son disponsibles dos niveles de certicación para instrumentos que
miden la temperatura de forma infra roja y para los que no, exluyendo
humedad - Certicados UKAS efectuada por un laboratorio externo que
está acreditado para ello y certicados trazados a NPL del laboratorio
Comark.
Existen tres niveles de certicación para los productos de temperatura
por contacto y productos de humedad, son los que se detallan a
continuación:
a) Certicación UKAS
UKAS es el nivel más alto de certicatión reconocido en el
Reino Unido. Los certicados UKAS de Comark peuden
ofrecer una incertidumbre tan baja como de 0.01°C y puden
ofrecer preuba de correcta calibración utilizando instrumentos
y procedimientos auditados por los inspectores de UKAS.
Los instrumentos utilazados está completamente trazable al
Laboratorio de Fisica Nacional.
b) Certicación UKAS en Humedad
El laboratorio de Comark, además de temperatura, ahora
tambien de humedad continúa la tradición de una certicación
con gran precisión y un gran campo de medición (25% a 90%
RH) con incertidumbres del 2.8% de la lectura. Esta certicaión
tambien incluye la medida del punto de rocío.
c) Certicación de Trazabilidad NPL
Los certicados Comark NPL están trazables al Laboratorio
de Física Nacional y puden ofrecer una incertidumbre tan baja
como de 0,3 ºC.
57
Page 59

Conformidad
Pueden suministrarse Certicados de Conformidad para los
instrumentos nuevos, recalibrados y para los que se les ha efectuado
una puesta en servicio. Dichos certicados conrman que los
instrumentos se encuentran dentro de la especicación original que
corresponde a su fabricación.
Servicio / Reparaciones
Bajo el periodo de garantía o con posterioridad, el Departamento
de Servicio Comark llevará a cabo el servicio regular y cualquier
reparación necesaria.Para más información acerca de cualquier
certicación, calibración y servicios por parte de Comark, sírvanse
contactar con nuestro Servicio al Cliente o contacten con su distribuidor
local.
58
Page 60

1. DESCRIPCION
La gama de medidores portátiles de humedad relativa N8000 vienen
diseñados con un gran nivel de exactitud (para ambas mediciones de
temperatura y humedad) y se presentan con un diseño sensacional.
El N8006 tiene un sensor cabezal integrado, mientras que el N8004
tiene el sensor RH y sus asociados electrónicos contenidos en una
sonda portátil (N81) conectada al instrumento por medio de un cable.
Esta sonda también viene equipada con un termistor para una mayor
exactitud en la medición de temperatura ambiente. El N8004 también
es capaz de medir la temperatura independientemente por medio de un
adaptador que le permite el uso de una gran gama de sondas termistor
de Comark.
Ambos instrumentos tienen una gran pantalla de visualización LCD
la cual permite visualizar la temperatura y la humedad de forma
simultánea.
Para estos dos instrumentos hay dos modos de operación:
1. Medida de la Humedad Relativa
2. Cálculo del Punto de Rocío
1.1 ACCESORIOS DISPONIBLES
Cada medidor de humedad relativa se puede suministrar con
una funda protectora de goma para aquellas aplicaciones
donde el instrumento requiera una protección adicional.
Cada funda protectora viene completa con una correa para la
muñeca para una mayor seguridad (CRS/4)
N8004
El N8004 puede medir temperatura independientemente
del N81 por medio del uso de un adaptador (KX7538) que
le permite el uso de cualquiera de las sondas termistor con
Lumberg conector estándard de Comark.
59
Page 61

2 VISION GENERAL DE LOS SIMBOLOS DE
VISUALIZACION
La pantalla de visualización tiene tres zonas. La primera línea muestra la humedad relativa o el punto de rocío. La segunda línea está
dividida en dos zonas; la zona de la izquierda se utiliza para visualizar
la temperatura ambiente, y la zona de la derecha visualiza la escala de
temperatura que se esté usando bien sea °C o °F y el modo de Punto
de Rocío.
A
B
C
F
E
D
FIG. 1
A. Visualización RH/Punto de Rocío.
B. Indica la escala de temperatura que se está utilizando
cuando está en modo de Punto de Rocío. %RH indica que el
instrumento está en modo de humedad relativa.
C. Visualiza la escala de temperatura que se está utilizando
en modo RH o indica modo de Punto de Rocío.
D. Indica que el apagado automático está activado/Mínimo y
bajo de pilas.
E. Indica máximo y modo de parada.
F. Utilizado para indicar la temperatura ambiente.
60
Page 62

3 INSTRUCCIONES DE OPERACION
A continuación le damos una descripción general del modo de
operación para los medidores de humedad relativa. Por favor lea
estas instrucciones detenidamente y si tiene alguna duda póngase en
contacto con su distribuidor local o con el Departamento de Ventas
Internacionales de Comark.
3.1 ENCENDIDO
ON
OFF
Pulse éste botón para encender el aparato.
NOTA: Cuando el instrumento se pone en funcionamiento éste
realizará una autocomprobación que dura un segundo.
Pulse éste botón otra vez para apagar el instrumento .
N8004
Se debe de insertar una sonda antes de que el instrumento
pueda funcionar. Si no se inserta una sonda la pantalla de
visualización mostrará lo siguiente.
N8006
N8006
FIG. 2
Esta indicación es normal cuando existe un circuito abierto, la
sonda está rota o está fuera de especicaciones.
61
Page 63

Si su N8006 muestra el diagrama indicado arriba, su
instrumento no se encuentra en buen funcionamiento y se debe
enviar al Departamento de Reparación de Comark.
3.2 %RH/DP
%RH
Este botón selecciona la medida directa de humedad relativa o
DP
el cálculo de punto de rocío y éstos valores serán visualizados
en la zona principal de la pantalla de visualización.
Modo de Humedad Relativa:
Modo de Punto de Rocío
3.3 °C/°F
°C
/°F
Este botón selecciona la escala de temperatura a usar. Es
válido para temperatura ambiente o para temperatura de punto
de rocío dependiendo del modo de operación.
62
A
Page 64

3.4 BOTON DE PARADA
HOLD
Congela la visualización del último valor medido. En la pantalla
se verá HOLD. Pulse el botón otra vez para inutilizar esta
función.
NOTA: Cuando haya seleccionado HOLD, es posible visualizar
los valores de temperatura que han sido recogidos MAX, MIN
y ACTUAL y volver ha visualizar la escala de temperatura para
cualquiera de estos valores. También es posible cambiar el
modo de punto de rocío o RH. Por favor tome nota de que la
escala indicada por medio de A en la gura 4, bien sea °C/°F
ha llegado ha ser la escala indicadora para la temperatura de
punto de rocío y para la temperatura ambiente.
3.5 MAX/MIN
MAX
MIN
Este botón le permite desplazarse entre el Máximo, mínimo y
actual humedad y temperatura. También le permite hacerlo con
los valores máximos y mínimos para el punto de rocío y en los
modos de parada.
3.6 REINICIALIZAR
Reinicializa los valores Máximo y Mínimo a valores Actuales.
Esta función ocurre automáticamente cuando se enciende el
aparato.
El botón de reinicialización copia los valores actuales en
la almacenamiento de Máximo y Mínimo pero no altera la
selección de la pantalla de visualización.
3.7 APAGADO AUTOMATICO
Las series N8000 pueden ser congurados bien que se
apagen automáticamente cinco minutos depués de que se
haya pulsado un botón por última vez o que permanezcan
permanentemente encendidos hasta que se apagen
manualmente.
Este modo es indicado en la pantalla de visualización por
medio del símbolo AUTO. Cuando esto es visible el instrumento
se apagará automáticamente.
Para cambiar de un modo a otro, apague el aparato, sin pulsar
el teclado °C/°F encienda el instrumento otra vez.
63
Page 65

4. MEDICION
Aunque el sensor de humedad es practicamente insensible a la
temperatura que sea más alta de la del rango de operación, la
temperatura afecta a la Humedad Relativa. Este resultado (típicamente
0.5%RH para 0.1°C (0.2°F) cambio de temperatura) quiere decir que
cuando se toma una sonda que esté fría dentro de una atmósfera más
templada, las lecturas RH serán inicialmente altas y a la inversa cuando
una sonda con temperatura templada se pone en un ambiente frío, las
lecturas iniciales serán bajas.
Para asegurarse de obtener lecturas exactas el usuario debe esperar
hasta que la visualización de la pantalla se estabilize.
5. PRECAUCIONES DE USO
Se debe de tener cuidado donde se utilizan productos
solventes. Se espera que el aparato tenga una exposición en
medios ambientales peligrosos durante un corto periodo de
tiempo, cuando éste periodo sobrepase lo que se considere
periodo corto, contacte Comark para consejo.
6. MANTENIMIENTO
6.1 LIMPIADO DEL SENSOR
Si por alguna razón se tiene un accidente de polución, se
deben de seguir los siguientes pasos, aunque no se garantiza
que ésto le dé buen resultado.
NOTA: No se debe de tocar el sensor de humedad en ninguna
circumstancia (vidrio) ni siquiera con el material más delicado.
POLVO – utilize una corriente de aire delicada como por
ejemplo la bombilla de presión que se utiliza para limpiar las
lentes de las cámaras fotográcas. Si esto no le da un buen
resultado, utilize agua destilada posicionando la sonda hacia
abajo para que el agua esté fuera de contacto de la sonda.
Secar en un lugar donde no haya polvo y utilize un secador de
mano para agilizar el proceso si así se requiere.
POLUCION GRASIENTA – utilize un chorro de perchlorethylee
para remover la suciedad.
64
Page 66

7. CALIBRACION
Sólamente puede ser realizada por Comark Ltd.
8. PRECAUCIONES EN LA MEDICION DE RH
Aparte de la necesidad de tomar una razonable seguridad cuando se
utilize el N8004/6 como se ha descrito anteriormente hay precauciones
que se deben de tomar cuando se mide humedad sin reparar en el
instrumento que se utilize.
CIRCULACION DE AIRE
Si en el lugar donde se esté utilizando el instrumento no hay circulación
de aire, ésto hará que haya una diferencia en la humedad.
TEMPERATURA
La diferencia de temperatura que existe en la habitacion por pequeña
que sea, tendrá bastante efecto en la humedad relativa. Normalmente
será 0.5RH para una diferencia de temperatura de 0.1°C (0.2F)
VELOCIDAD DE AIRE
Un poco de velocidad de aire es necesaria para obtener exactos
resultados y un tiempo de respuesta rápida
EFECTOS ATMOSFERICOS DE PRESION
Estos efectos normalmente son ignorados pero pueden ser de
gran signicado. Como ejemplo podemos decir, para una misma
temperatura, aire medido a 1050 mB (milibares) puede dar una
humedad de 70%RH, y sin embargo el mismo aire medido a 950mB
dará un resultado de 77%RH.
CONDENSACION
Esto puede ocurrir a una alta RH cuando la sonda está por debajo del
punto de rocío ambiente. Aunque el sensor de humedad del N8004/6
se recobrará, esto se debe de evitar si es posible.
65
Page 67

9. DEFINICION DE LOS TERMINOS USADOS
HUMEDAD RELATIVA – es el peso del agua por el peso de aire seco
y normalmente está expresado en PPM (partes por millón) el cual es
miligramos por kilo.
PUNTO DE ROCIO - es la temperatura en la cual se formaría rocío si
se enfraise el aire. Mientras que el aire se enfria puede llevar menos
vapor de agua; el momento en el cual se forma rocío es en la sat-
vración de temperatura a esa preción.
HUMEDAD ESPECÍFICA - es el peso de agua por peso de aire seco y
se expresa generalmente en PPM (partes por millón) que es miligramos
por kilogramo.
10. CAMBIAR LAS PILAS
Cuando el símbolo de BAT aparezca quiere decir que se deben de
cambiar las pilas inmediatamente. Si las pilas no son cambiadas, el
instrumento continuará funcionando, pero la calibración no será garantizada.
Para cambiar las pilas: Asegúresè de que el instrumento se encuentra
apagado, destornille el tornillo que mantiene la tapa de las pilas en la
parte de atrás del aparato con el correcto destornillador. Reemplaze las
dos pilas con unas nuevas, asegúrese de que sean alkalinas si quiere
que duren durante más tiempo. Asegúrese de la correcta polaridad en
las pilas. No apriete demasiado los tornillos cuando atornille la tapa y
no pierda la goma de sellado.
Nota: Se pueden usar pilas NiCd o NiMh, la diferencia está en el
tiempo de duracción. No intente recargar las pilas en el instrumento.
66
Page 68

SPECIFICATION
N8004 & N8006
RANGE:
Humidity 0%RH to 100%RH
Temperature -20 to 60°C (-4 to 140°F)
RESOLUTION: 0.1°C/F %RH
ACCURACY:
Humidity ±2%RH 0 to 90%RH
±3%RH 90 to 100%RH
Temperature ±0.5°C, ±0.9F°
Temperature Coefcient of Negligible
RH Sensor
Ambient Operating
Temperature Range -20 to 60°C (-4 to 140°F)
BATTERY TYPE: Two Type I.E.C. LR6 Size AA
Battery Life Continuous N8004 250hrs
N8006 300hrs
DIMENSIONS:
Instrument Approx L183, W 68/79, D31mm
Probe N81 Approx L 200, Dia 23mm
WEIGHT
Instrument 272g
Probe N81 126g
EMC Tested to EN61326-1
Criteria B performance
67
Page 69

68
Page 70

Comark Instruments
52 Hurricane Way,
Norwich, Norfolk, NR6 6JB England
Tel: 01603 (+44 1603) 256647
Fax: 01603 (+44 1603) 256744
Email: service@comarkltd.com
Website: www.comarkltd.com
Comark Instruments
PO Box 9090, Everett,
WA 98206, USA
Tel: (503) 643 5204
Fax: (503) 644 5859
Email: sales@comarkUSA.com
Website: www.comarkUSA.com
© Comark Instruments Stock No. 17679 Issue 5
 Loading...