


BLUETOOTH THERMOMETER
BT42
BT42C
BT48
BT48C
For BT42C Model only:
Meets the requirements of
DIN EN 13485:2002
“Thermometers for measuring the air and product temperature for the transport, storage and distribution of chilled, frozen, deep-frozen/quick frozen food and ice-cream”
O F
E |
Y |
F |
OR |
T |
T |
|
|
H |
|
|
|
|
|
|
Use with
COMARK
Kitchen
CHECKS
APP  IoT
IoT 
t |
f |
|
your |
R
E

Introduction EN
Comark BT40 series Bluetooth thermometers have either a Lumberg or sub-miniature connector and are designed for use with interchangeable probes. They have a high strength, polycarbonate case with rubber over moulding. This offers a high level of strength and durability. All models incorporate a clock, countdown timer, MAX/MIN and data hold feature.
Comark’s Bluetooth thermometers are designed for use with the Comark Kitchen Checks App to automate your
HACCP records and reporting. Download the Comark Kitchen Checks App from Google Play or Apple Store. For larger organizations the Comark API can be used to integrate Bluetooth thermometers into existing HACCP programs.
When connected via Bluetooth, temperature updates are sent to the tablet or phone and displayed by the App.
For more information visit: www.comarkinstruments.com/kitchen- checks-pro.

Safety Information
 Prevent Electric Shock
•To avoid electric shock do not allow the probe to come into contact with live electrical parts.
 Maintaining Product Safety &
Preserving Comark Warranty
•Only use the instrument for its intended purpose.
•Do not use in a microwave oven.
•Do not use the instrument beyond its operating temperature range.
Waste Electrical & Electronic


 Equipment Directive (WEEE)
•This instrument must not be disposed of in general waste. Instead take it to your local authority’s recycling centre for small electrical goods. Within the European Union, Comark operates a Take Back scheme for our end-of-life products. Contact us for details.
•Dispose of waste batteries in local recycling facilities.
 FCC Safety Warning
This device complies with Part 15 of the FCC Rules. Operation
is subject to the following two conditions:
(1)This device may not cause harmful interference, and
(2)This device must accept any interference received, including interference that may cause undesired operation.

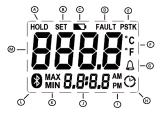
Overview of display symbols
AIndicates the HOLD has been selected
BSetting menu item to ON/OFF
CIndicates low battery
DIndicates a fault with the Bluetooth - Contact Comark for support if fault indicated
EIndicates probe type
FIndicates the temperature scale in use
GAlarm indication
HIndicates countdown active
IIndicates AM or PM for clock
JClock, countdown and timer display
KIndicates MAX or MIN has been selected
LIndicates Bluetooth connection status
MMain display for temperature
Operation
Connecting Probes to the Thermometers
BT40 series thermometers have either sub-miniature or Lumberg sockets for probe connection and offer a class leading choice between Comark thermistor, type T thermocouple or type K thermocouple probes.
The polarity of the connector must always be checked before connecting thermocouple probes to BT40 series thermometers. A probe of the correct thermocouple type must also be selected to match the specific thermometer. BT40 series thermometers with Lumberg sockets will automatically detect the sensor type of the probe connected. The LCD will then indicate thermistor probes as “PST”, and type T thermocouple probes as “T”. Models with Sub-Min connector are of fixed thermocouple type, see specifications for details
Switching On and Off
Press and hold the “HOLD” button on the keypad to switch the thermometer on. After a short pause, the display will show the current model of the instrument and will then revert to normal temperature display. The current time is also permanently displayed on the LCD. To switch off is a long press on the “HOLD” button.
Data Hold
All BT40 series thermometers have a data hold facility. If the “HOLD” button is pressed at any time during normal temperature mode, the current
temperature will be held on the display. To release press “HOLD”.

MAX/MIN
All BT40 series thermometers have a MAX/MIN function. Press “MAX/MIN” for MAX temperature reading and again for MIN temperature reading. Press “MAX/ MIN“ to resume normal temperature readings. To clear MAX/MIN, press and hold “MAX/MIN” until the display returns to normal measurement.
Countdown Timer
All BT40 series thermometers have a countdown timer. This function is
activated from the Set-Up Menu – see section below, and can be calibrated in seconds or minutes. Pressing the countdown timer button will start this function. Pressing the button again
during the countdown period will stop the count. The instrument will beep for 30 seconds at the end of a countdown period to indicate to the user that it has been completed.
Auto Switch Off/Power Saving Mode
BT40 series thermometers have a selectable auto-switch off feature. This is set to 3 minutes from the factory. Autoswitch off timer starts on the last button press. Please refer to Set-Up Menu for instructions on changing this setting.
Set-Up Menu
BT40 series thermometers have a hidden menu structure that is used to set up a number of parameters within the instrument.
To enter the set-up menu first ensure the instrument is off, then press the Count
Down button and keep this held down while pressing the “HOLD” (ON/OFF) button to switch the instrument on. After the thermometer has completed its self-
checks, it will enter the menu.
N.B. After each menu item use the Bluetooth button to save and move to the next menu item.
Clock selection is the first item in the menu:
Clock – the display will show ‘CLOC’
Use the UP and DOWN buttons to adjust the clock time up or down.
Countdown Timer – the display will show ‘Cd’
Use the UP and DOWN button to select timer on or off. Use the UP and DOWN buttons to scroll up and down in seconds up to 5 minutes then in 1 minute intervals up to 60 Minutes.
Auto Power OFF – the display will show ‘AOFF’
Use the UP and DOWN Buttons to scroll between the available options of None, 3, 10, and 30 minutes.
Scale – the display will show ‘SCAL’
After entering the SCALE menu, use the UP and DOWN Buttons to scroll between the available scales.
High Alarm – the display will show ‘HIAL’
Use the UP and DOWN Buttons to select or de-select high alarms, then select the required high alarm value.
Low Alarm – the display will show ‘LOAL’
Use the UP and DOWN Buttons to select or de-select low alarm, then select the required low alarm value.
On Alarm the speaker will bleep, press any key to stop.
Bluetooth MAC Address
The Bluetooth MAC address will be indicated next, in blocks of 4 numbers on alternate seconds. Simply press the Bluetooth button to exit setup and return to normal operation.
Bluetooth Operation
To switch on the Bluetooth, press the Bluetooth button. Bluetooth radio will advertise for 60 seconds (Bluetooth
Symbol will flash during this time). If after this time a successful connection is not made, the Bluetooth radio will shut down, leaving only the thermometer active. To re-attempt making a Bluetooth connection, simply press the Bluetooth button again.
Note: The advertising text for searching is BTXX 12345678, where XX is the model number, e.g. 42 or 48 and 12345678 is the serial number.
Taking Measurements
Having successfully connected the Bluetooth Thermometer to Comark Kitchen Checks app, check that the Bluetooth symbol in the LCD is solid. To record the displayed reading press the Bluetooth button on the keypad.
The temperature display will flash. The app will guide you through storing the temperature record.
Note: The app will display the reading as indicated on the LCD, e.g. including MAX/ MIN or Data Hold values.

Maintenance
Cleaning
BT40 series thermometers are dust and splash proof and will withstand harsh environments. Use a damp cloth or warm soapy water to remove deposits and prevent them from hardening or becoming sticky.
Use only domestic kitchen cleaners or mild detergents to clean this instrument. Do not use aggressive cleaning chemicals or solvents, these will attack plastics and cause damage.
Caution: Do not place any BT40 series thermometers in a dishwasher.
Battery Replacement
The low battery symbol appears on the display when the battery voltage has reduced. Battery replacement is recommended at this time.
To replace the battery, remove the battery cover retaining screw on the rear of
the instrument, using the correct size *screwdriver. Remove the two cells, wait for a minimum of 30 seconds and replace with Alkaline or Lithium (L91) cells. Be careful to observe the correct polarity. Take care not to over-tighten the screw when refitting the cover.
Note: The BT40 series thermometers will not work if the battery compartment is incorrectly fitted or missing. In this instance, the display will show ‘OPEn’. Please note the small pip on the inside of the battery cover, which must fit into the hole provided in the back of the case.
* Philips No 1 or 5mm flat blade screwdriver.
Technical Support
Please see: www.comarkinstruments.com or www.comarkUSA.com for details.
Warranty
Each Comark product is warranted to be free from defects in material and workmanship under normal use and service. The warranty period is one
(1) year, unless otherwise stated, and the warranty period begins on the date of shipment. Temperature probes are warranted for six (6) months.
The warranty extends only to the original buyer or end-user of a Comark authorized reseller. This warranty does not cover damage resulting from normal wear
and tear, abuse, misuse, accidental breakage, negligence, defects caused by modifications, repair and servicing not made or authorised by Comark
Instruments, damage caused by handling, operating, storing, or using the product outside the intended uses described
by our product literature. Disposable batteries are also exempt from warranty.
Warranties on dishwasher safe models apply only where the product has been used in a commercial dishwasher.
Comark Instruments products are not suitable for use or cleaning in domestic dishwashers.
Comark’s warranty obligation is limited, at Comark’s option, to refund of the purchase price, free of charge repair, or replacement of a defective product returned within the warranty period. Products must be returned to Comark
or one of Comark’s authorized service agents.
This warranty is the buyer’s sole and exclusive remedy and is in lieu of all other warranties, express or implied, including but not limited to any implied warranty of fitness for a particular purpose. Comark shall not be liable for any special, indirect, incidental or consequential damages or losses, including loss of data, whether arising from breach of warranty or based on contract, tort, reliance or any other theory. Since some countries or states do not allow limitation of the term of an implied warranty, or exclusion or limitation of incidental or consequential damages, the limitations and exclusions of this warrant may not apply to every buyer.
To obtain service during the warranty period, visit the Service and Repair page on our website - www.comarkinstruments.com or www. comarkUSA.com for instructions on obtaining a Return Material Authorization (RMA) then send the product to our Service Centre with a description of the problem.

Specification
General Specification
Measurement
Measurement Range
Thermistor
Type T Thermocouple
Type K Thermocouple
Scales
Displayed Resolution
0.1°
1°
Instrument Accuracy
Thermocouple
System Accuracy
Thermistor
Type T Thermocouple*
Temperature Coefficient
Thermistor
Thermocouple
Ambient Temperature Range
Display
Power
Battery Life (continuous)
Enclosure Ingress Protection

Thermistor 10 K Ohms unicurve Thermocouple type T and K
6-pin Lumberg and Sub-Min Connectors
-40°C to +125°C / -40°F to +257°F -200°C to +400°C / -328°F to +752°F -200°C to 1372°C / -328°F to +2502°F
°C / °F
> -100° <1000°
≤ -100° ≥ 1000°
0.1% ±0.2°C / ±0.4°F full range @ +23°C / +73°F Ambient
±0.3°C 0°C to +70°C / ±0.6°F +32°F to +158°F ±0.5°C -20°C to +100°C / ±0.9°F -4°F to +212°F
±0.5°C 0°C to +70°C / ±0.9°F +32°F to +158°F *Typical accuracy with a Comark probe
<0.005 degree/degree
<± 0.01 % of reading ±0.02 °C/°C change from +23°C / ±0.02°F/°F change from +73°F
-20°C (-4°F) to +50°C (122°F) operating
4 digit, 12.5 mm LCD
Two Type I.E.C. LR6 Size AA – Alkaline or *Lithium recommended.
*Lithium is recommended for Low Temperature environments, constantly below 10°C/50°F and will give approximately 50% increased battery life when used in lieu of Alkaline.
Up to 1000 hours with Bluetooth enabled Up to 5000 hours with Bluetooth disabled
IP65
Weight & Measures
Dimensions
Case Size
Weight
Case Materials
Case
152 x 58 x 22/27 mm / 6” x 2.3” x 1.1” 178g / 6.3 ozs
Mixed: ABS & PC with BioCote® anti-microbial protection moulded in.

Compliance
EMC Directive
EMC Standard
Radiated RF emissions 30MHz-6GHz
Electrostatic discharge Radiated RF immunity *
Power frequency magnetic field immunity
Broadband Data Transmission Systems -
Essential Requirements
Radio Equipment-Common Requirements
Broadband Data Transmission Systems
Product Safety
RoHS Directive
* Readings may be temporarily affected in the prese

EC Directive 2014/30/EU
EN 61326-1:2013, EN 61326-2-1:2013 (Portable Equipment Environment) EN 55011:2009+A1:2010
EN 55022:2010 CFR 47 Part 15.109 EN 61000-4-2:2009
EN 61000-4-3:2006+A1:2008+A2:2010 EN 61000-4-8:2010
EN 300 328 1.8.1 (2012-06)
EN 301 489-1 1.9.2 (2011-09)
EN 301 489-17 2.2.1 (2012-09)
EN 61010-1:2010 Safety requirements for electrical equipment for measurement,
control and laboratory use. Part-1: General requirements
EN 60950-1:2006+A11:2009 +A1:2010+A12:2011 ITE Safety
EC Directive 2011/65/EU RoHS
nce of radio frequency interference.
Appendix 1
BT40 Series Model Range Options
Models |
BT42 |
BT42 |
BT48 |
|
|
T Type |
K Type |
|
|
|
|
Part No. |
BT42C |
BT42 |
BT48 |
|
|
|
BT48C |
Options |
|
|
|
|
|
|
|
Bluetooth |
|
|
|
|
|
|
|
Countdown |
|
|
|
Timer |
|
|
|
|
|
|
|
Data Hold |
|
|
|
|
|
|
|
Real Time |
|
|
|
Clock |
|
|
|
|
|
|
|
MAX/MIN |
|
|
|
|
|
|
|
Scale |
|
|
|
Selection |
|
|
|
|
|
|
|
High Alarm |
|
|
|
|
|
|
|
Low Alarm |
|
|
|
|
|
|
|
Type T |
|
|
- |
|
|
|
|
Type K |
- |
- |
|
|
|
|
|
Thermistor |
|
|
- |
|
|
|
|
Connector* |
L |
L |
S |
|
|
|
|
Auto Off |
|
|
|
|
|
|
|
Splashproof |
|
|
|
|
|
|
|
*L – Lumberg
S – Sub-Miniature
Introduction FR
Les thermomètres Bluetooth Comark série BT40 ont un connecteur subminiature ou Lumberg et sont conçus pour l’utilisation de sondes interchangeables. Ils présentent une enveloppe polycarbonate haute résistance avec caoutchouc sur le moulage. Cela lui confère un haut degré de résistance et de durabilité. Tous les modèles intègrent des fonctionnalités réveil, minuteur, MAX/MIN et conservation de données.
Les thermomètres Bluetooth Comark sont conçus pour l’utilisation avec l’application Comark Kitchen Checks, pour automatiser vos enregistrements et rapports HACCP. Téléchargez l’application de Comark Kitchen Checks depuis Google Play ou Apple
Store. Pour les plus grandes organisations, l’API Comark peut être utilisé pour intégrer les thermomètres Bluetooth dans les programmes HACCP existants.
Lorsqu’il est connecté par Bluetooth, les mises à jours de température sont envoyées
à la tablette ou au téléphone et affichée par l’application.
Pour plus d’informations, rendez-vous à l’adresse : www.comarkinstruments.com/kitchen- checks-pro.

Informations sur la sécurité
 Eviter les chocs électriques
•Pour éviter tout risque de choc électrique, ne laissez pas la sonde entrer en contact avec des composants électriques.
 Maintien de la sécurité du produit et préservation de la garantie Comark
•N’utilisez l’instrument que pour son usage prévu.
•Ne l’utilisez pas dans un four micro-ondes.
•N’utilisez pas l’instrument au-delà de sa plage de températures de fonctionnement.
Déchets d’équipements électriques et électroniques (Directive DEEE)
•Cet instrument ne doit pas être jeté dans les déchets généraux. Apportezle plutôt au centre de recyclage de votre autorité locale pour les petits appareils électriques. Au sein de l’Union européenne, Comark exploite un système de reprise pour nos produits en fin de vie. Contactez-nous pour plus de détails.
•Élimination des piles usagées dans les installations de recyclage locales.
 Mise en garde sur la sécurité FCC
Cet appareil est conforme à la Partie 15 des règles FCC. Le fonctionnement
est tributaire des deux conditions suivantes :
(1)Cet appareil ne doit pas provoquer d’interférences nocives, et
(2)Il doit accepter les interférences reçues, y compris les interférences susceptibles d’entraîner un fonctionnement indésirable.
Sommaire des symboles d’affichage
AIndique que HOLD a été sélectionnée
BRéglage élément de menu sur ON/ OFF
CIndique une batterie faible
DIndique un problème avec le Bluetooth — Contactez Comark pour une assistance si un défaut est signalé
EIndique le type de sonde
FIndique l’échelle de température en utilisation
GIndication d’alarme
HIndique un compte à rebours actif
IIndique AM ou PM pour l’horloge
JAffichage du réveil, du compte à rebours et du chronomètre
KIndique que MAX ou MIN a été sélectionné
LIndique l’état de la connexion Bluetooth
MAffichage principal pour la température
Fonctionnement
Connexion des sondes aux thermomètres
Les thermomètres série BT40 disposent de connecteurs subminiature ou Lumberg pour la connexion de la sonde et offrent un
choix inégalé entre les sondes thermistance Comark, thermocouple type T ou thermocouple type K.
La polarité du connecteur doit toujours
être vérifiée avant de connecter les sondes à thermocouple aux thermomètres série BT40. Une sonde du bon type de thermocouple doit également être choisie pour correspondre au thermomètre. Les thermomètres série BT40 avec connecteurs Lumberg détectent automatiquement le type de capteur de la sonde connectée. L’écran LCD indiquera ensuite les sondes à thermistance comme « PST », et les sondes à thermocouple de type T comme « T ». Les modèles avec connecteur Sub-Min sont de type thermocouple fixe ; consultez les spécifications pour plus de détails
Marche et arrêt
Appuyez et maintenez enfoncé le bouton « HOLD » sur le clavier pour allumer le thermomètre. Après une courte pause, l’écran affichera le modèle actuel de l’instrument, puis reviendra à l’affichage température normale. L’heure actuelle est
également affichée en permanence sur l’écran LCD. Pour éteindre, effectuez un appui prolongé sur le bouton « HOLD ».
Maintien des données
L’ensemble des thermomètres de la série BT40 disposent d’une fonction de maintien des données. Si le bouton « HOLD » est enfoncé à tout moment du mode température normal, la température actuelle sera maintenue à l’écran. Pour relâcher, appuyez sur « HOLD ».

MAX/MIN
Tous les thermomètres de la série BT40 ont une fonction MAX/MIN. Appuyez sur « MAX/MIN » pour un relevé MAX de la température et à nouveau pour un relevé
MIN de la température. Appuyez sur « MAX/ MIN » pour reprendre le relevé de la température normale. Pour effacer MAX/
MIN, pressez et maintenez la touche « MIN/
MAX » jusqu’à ce que l’afficheur revienne à la mesure normale.
Compte à rebours
Tous les thermomètres de la série BT40 ont une fonction compte à rebours. Cette fonction est activée à partir du menu de configuration — voir section ci-dessous — et peut être calibrée en secondes ou en minutes. Appuyer sur le bouton compte à rebours démarrera cette fonction. Appuyez
ànouveau sur le bouton pendant le compte
àrebours interrompt ce dernier. L’instrument émettra un bip pendant 30 secondes à la fin d’un compte à rebours pour indiquer à l’utilisateur qu’il est achevé.
Mode extinction/économie d'énergie automatique
Les thermomètres série BT40 ont une fonction extinction automatique sélectionnable. Celle-ci est réglée à 3 minutes par défaut. La minuterie de l’extinction automatique démarre lors de la dernière pression d'un bouton. Consultez le menu de configuration pour savoir comment modifier ce paramètre.
Menu de configuration
Les thermomètres série BT40 disposent d’une structure de menu cachée, utilisée pour définir un certain nombre de paramètres dans l'instrument.
Pour accéder au menu de configuration, vérifiez tout d’abord que l’instrument est éteint, puis appuyez sur le bouton Compte à rebours et maintenez-le tout en appuyant sur le bouton
« HOLD » (MARCHE/ARRÊT) pour allumer l’appareil. Après que le thermomètre a terminé ses auto-contrôles, il ouvrira le menu.
N.B. Après utilisation de chaque élément de menu, utilisez le bouton Bluetooth pour enregistrer et passer à l’élément de menu suivant.
La sélection de l’horloge est le premier élément du menu :
Horloge — l'écran affichera « CLOC »
Utilisez les boutons HAUT et BAS pour ajuster l’heure de l’horloge.
Compte à rebours — l'écran affichera « CD »
Utilisez les boutons HAUT et BAS pour sélectionner la marche ou l’arrêt du minuteur. Utilisez les touches Haut et Bas pour faire défiler vers le haut et vers le bas, en secondes, jusqu'à 5 minutes, puis par intervalle de 1 minutes, jusqu'à 60 minutes.
Extinction automatique — l’écran affichera « AOFF »
Utilisez les touches Haut et Bas pour faire défiler les options disponibles : aucun, 3,
10 et 30 minutes.
Échelle — l'écran affichera « SCAL »
Après avoir ouvert le menu ECHELLE, utilisez les boutons HAUT et BAS pour faire défiler les échelles disponibles.
Alarme haute — l’écran affichera « HIAL »
Utilisez les touches HAUT et BAS pour sélectionner ou désélectionner les alarmes hautes, puis sélectionnez la valeur d'alarme haute requise.
Alarme basse — l’écran affichera « LOAL »
Utilisez les touches HAUT et BAS pour sélectionner ou désélectionner l’alarme basse, puis sélectionnez la valeur d’alarme basse requise.
En cas d'alarme, le haut-parleur émettra un signal sonore, appuyez sur une touche pour l’arrêter.
Adresse MAC Bluetooth
L’adresse MAC Bluetooth sera indiquée à côté, en blocs de 4 chiffres sur les secondes alternées. Appuyez simplement sur le bouton
Bluetooth pour quitter la configuration et revenir au fonctionnement normal.
Fonctionnement Bluetooth
Pour activer le Bluetooth, appuyez sur le bouton Bluetooth. La radio Bluetooth s’affichera pendant 60 secondes (le
symbole Bluetooth clignotera pendant cette période). Si aucune connexion réussie n’est établie après ce temps, la radio Bluetooth s’interrompra, ne laissant que le thermomètre actif. Pour réessayer d’établir une connexion Bluetooth, appuyez simplement sur le bouton Bluetooth à nouveau.
Remarque : Le texte affiché pour la recherche est BTXX 12345678, où XX est le numéro de modèle, par exemple 42 ou 48 et 12345678 le numéro de série.
Prise de mesure
Après avoir réussi à connecter le thermomètre Bluetooth à l’application
Comark Kitchen Checks, vérifiez que le symbole Bluetooth est stabilisé sur l’écran
LCD. Pour enregistrer la valeur affichée, appuyez sur le bouton Bluetooth du clavier.
L’affichage de la température clignotera.
L’application vous guidera dans le stockage de l’enregistrement des températures.
Remarque : L’application permet d’afficher le relevé comme indiqué sur l’écran LCD, par exemple en intégrant MAX/MIN ou les valeurs de maintien des données.

Entretien
Nettoyage
Les thermomètres série BT40 sont résistants à la poussière et aux projections d'eau et résiste à des environnements difficiles. Utilisez un chiffon humide ou de l'eau chaude savonneuse pour éliminer les dépôts et les empêcher de durcir ou de coller.
N’utilisez que des nettoyants pour cuisine ou détergents doux pour nettoyer cet instrument. N'utilisez pas de produits chimiques ou solvants nettoyants agressifs, car ils attaquent le plastique et causent des dommages.
Attention : Ne pas placer les thermomètres série BT40 dans le lave-vaisselle.
Remplacement des piles
Le symbole de batterie faible apparaît à l'écran lorsque la tension de la pile est réduite. Le remplacement de la pile est alors recommandée.
Pour remplacer la pile, retirez la vis de fixation maintenant le couvercle de pile
à l'arrière de l'instrument, en utilisant le tournevis de format correct*. Retirez les deux piles, attendez au moins 30 secondes et les remplacer par des piles alcalines ou au lithium (L91). Assurez-vous de respecter les bonnes polarités. Assurez-vous de ne pas trop serrer la vis lorsque vous replacez le couvercle.
Remarque : Les thermomètres série BT40 ne fonctionneront pas si le compartiment de la pile est mal monté ou manquant. Dans ce cas, l'écran affichera « OUVERT ».
Remarquez la petite languette sur l'intérieur du couvercle de pile, qui doit rentrer dans le trou prévu à l'arrière du boîtier.
* Tournevis plat 5 mm ou Philips No 1.
 Loading...