

Page 1
Description
C series thermometers have a high strength, polycarbonate
case with rubber over moulding to provide durability and
protection against dust and water ingress
The Catercheck 3 is based on the C20 but has a fixed probe.
C12 HACCP Thermometer
The C12 Thermometer comes complete with colour coded
labels so that you can change the colour from blue to red,
green, yellow or orange.
Instructions
Should you wish to change the blue label on your C12
thermometer from the blue label supplied, remove the plastic
protective cover from the C12 Label at the front of the
instrument (if fitted). It is not necessary to remove the label
itself. Select the new coloured label and carefully remove the
backing cover to reveal the glued area. Carefully align the
label over the old one and affix into place.
The air and penetration probes provided do not have colour
coding.
1
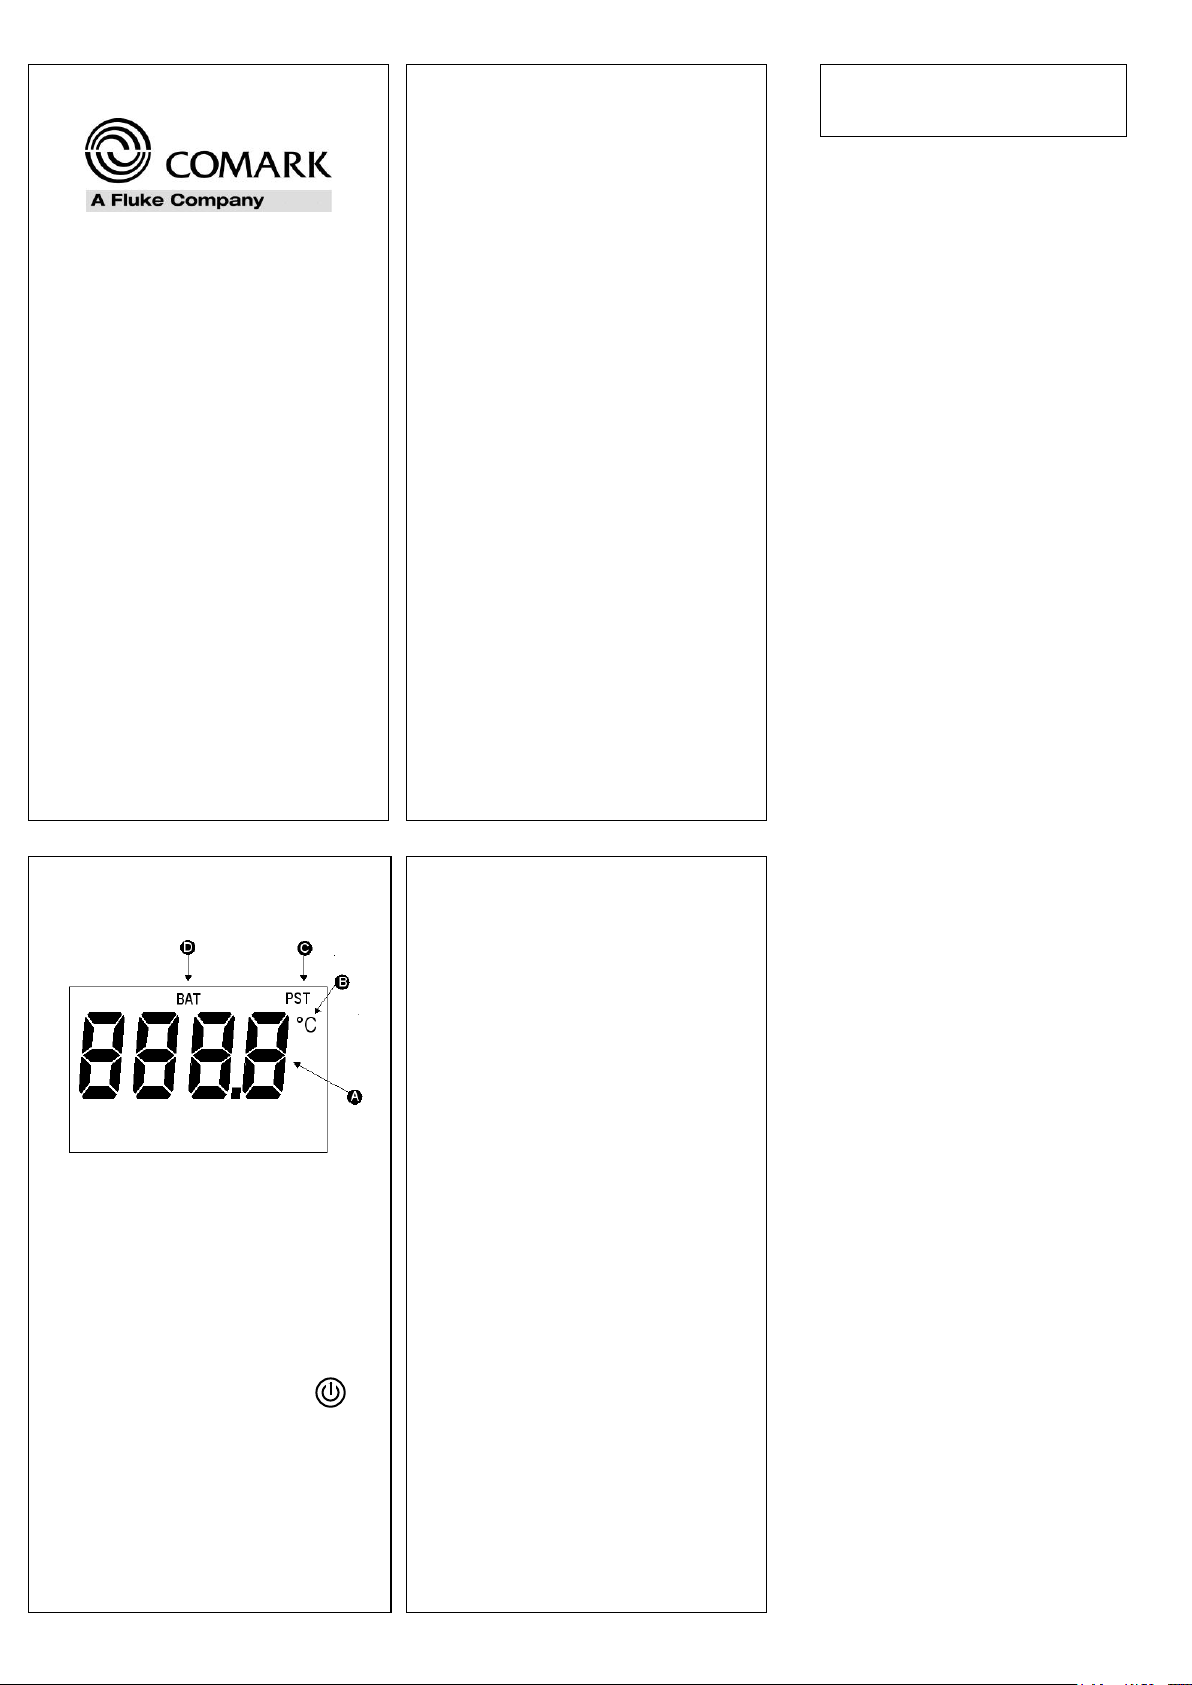
Overview of Display Symbols
A – Main Display for Temperature
B – °C Indicator
C – Sensor Type – PST (Thermistor)
D – Low Battery Indicator
Connecting Probes to the Thermometers
The C12 and C20 thermometer have sockets for probe
connection of Thermistor probes.
Switching On and Off
The single ‘ON/OFF’ button on the keypad is used to switch
on the thermometer. After a short pause the display will show
the model of the instrument and will then revert to normal
temperature display.
2
Comark Handheld Thermometers
C12 HACCP,
C20 and Catercheck 3
Operator Manual
Auto Switch Off/Power Saving Mode
C12 and C20 series thermometers have auto-switch off
feature. This is set to 3 minutes.
Care of the Thermometer
C12 and C20 series thermometers are dust and waterproof as
stated in the specifications and will withstand harsh
environments. Use a damp cloth or warm soapy water to
remove deposits and prevent them from hardening or
becoming sticky. Do not use solvent-based cleaners or
methylated spirit, etc.
C20
In particularly harsh environments care should be taken to
clean the Lumberg probe connector regularly. This should
ensure it does not become difficult to remove the probe from
the thermometer. The probe should be removed from the
instrument as frequently as necessary, the thread then
cleaned and lubricated with food safe oil.
Caution: Do not place any C12 or C20 series thermometers in
a dishwasher.
Changing the Batteries
The symbol BAT appears on the display when the battery
voltage has reduced. Battery replacement is recommended at
this time.
To replace the battery, remove the battery cover retaining
screw on the rear of the instrument, using the correct size
screwdriver. Remove the two cells, and replace with alkaline
cells only. Be careful to observe the correct polarity. Take
care not to over-tighten the screw when refitting the cover.
Note: The C12 and C20 series thermometers will not work if
the battery compartment is incorrectly fitted or missing. In this
instance the display will show ‘OPEn’. Please note the small
pip on the inside of the battery cover, which must fit into the
hole provided in the back of the case.
3
Trim folded width to
63mm
Page 2

Specifications for C12, C20 and Catercheck 3
Sensor Thermistor 10 K Ohms uni-curve
Connector C12: 3.5mm Jack
C20: 6-pin Lumberg
Measurement Range -40°C to +125°C
Scale °C
Displayed Resolution 0.1°
System Accuracy at 23°C ±0.5°C -20°C to +70°C
Ambient Temperature Range -20°C to +50°C operating
Display 4 digit 12.5 mm LCD
Battery Two of type I.E.C. LR6 Size AA
Battery Life (continuous) up to 14000 Hours
Environmental Protection
C20 Certified IP67, BS 60529, IEC 529
Catercheck 3 Not Certified
C12 Not Certified
EMC Emission Tested to EN61326-1
Criteria B Performance
Dimensions (Excluding Probe)
Length 152mm/6 inches
Width 58mm/2.3 inches
Depth 22/27mm/0.9/1.1 inches
Weight 178g/6.3 ozs
4
Description
Les thermomètres série C ont un boîtier en polycarbonate
haute résistance avec surmoulage, pour garantir la durabilité
et offrir une protection contre la pénétration de poussière et
d'eau
Le Catercheck 3 est articulé sur le C20, mais a une sonde
fixe.
C12 HACCP Thermomètre
Le thermomètre C12 est livré avec étiquettes couleur codées
de sorte que vous pouvez changer la couleur du bleu au
rouge, vert, jaune ou orange.
Instructions
Si vous souhaitez modifier l'étiquette bleue sur votre
thermomètre C12 à partir de l'étiquette bleue fournie, retirez
le couvercle de protection en plastique de l'étiquette C12 à
l'avant de l'appareil (le cas échéant). Il n'est pas nécessaire
d'enlever l'étiquette elle-même. Sélectionnez la nouvelle
étiquette de couleur et retirez avec précaution le couvercle du
support de révéler la zone collée. Alignez soigneusement
l'étiquette sur l'ancienne et fixez en place.
Les sondes d'air et la pénétration prévus n'ont pas un code
de couleur.
6
Thermomètres portables Comark
Gamme HACCP C12,
C20 et Catercheck 3
Manuel de l'utilisateur
5
Présentation des symboles de l'afficheur
A – Affichage principal de la température
B – Indicateur en °C
C – Type de capteur – PST (Thermistor)
D – Indicateur de faible autonomie
Raccordement des sondes aux thermomètres
Les thermomètres C12 et C20 ont des prises réservées au
raccordement des sondes à thermistor.
Mise sous tension et hors tension
Le bouton « ON/OFF » (marche/arrêt) unique du clavier
permet d'allumer le thermomètre. Après une brève pause,
l'afficheur indique le modèle de l'instrument, puis revient à
l'affichage normal de la température.
7
Page 3

Caractéristiques des C12, C20 et Catercheck 3
Capteur Thermistor 10 KOhms uni-curve
Connecteur C12: Jack 3,5 mm
C20 : Lumberg 6 broches
Gamme de mesure -40°C à +125°C
Echelle °C
Résolution affichée 0,1°
Précision du système à 23°C ±0,5°C -20°C à +70°C
Gamme de température ambiante -20°C à +50°C en fonctionnement
Afficheur LCD 4 chiffres, 12,5 mm
Piles Deux de type I.E.C. LR6 Size AA
Autonomie des piles
(utilisation continue) jusqu'à 14 000 heures
Protection environnementale
C20 Certifié IP67, BS 60529, IEC 529
Catercheck 3 Non certifié
C12 Non certifié
Emissions EMC Testé selon EN61326-1
Performances critère B
Dimensions (hors sonde)
Longueur 152 mm / 6 pouces
Longueur 58 mm / 2,3 pouces
Profondeur 22/27 mm / 0,9/1,1 pouce
Poids 178 g / 6,3 onces
9
Mode Arrêt automatique/Economie d'énergie
Les thermomètres série C12 et C20 comportent une fonction
d'arrêt automatique programmable. Elle est réglée sur 3
minutes.
Entretien du thermomètre
Les thermomètres série C12 et C20 résistent à l'eau et à la
poussière comme indiqué dans les caractéristiques et sont
adaptés aux environnements difficiles. Utilisez un chiffon
humide ou une solution d'eau savonneuse chaude pour
enlever les dépôts et les empêcher de durcir ou devenir
collants. N'utilisez pas de nettoyants à base de solvants ou
d'alcool méthylique, etc.
C20
Dans les environnements particulièrement difficiles, il faut
veiller à nettoyer régulièrement le connecteur de sonde
Lumberg. Cela permet d'éviter que le retrait de la sonde du
thermomètre ne devienne difficile. Il faut retirer la sonde de
l'instrument aussi fréquemment que nécessaire, puis nettoyer
le filetage et le lubrifier avec de l'huile adaptée au contact
alimentaire.
Attention : ne placez jamais un thermomètre série C12 ou
C20 au lave-vaisselle.
Remplacement des piles
Le symbole BAT s'affiche lorsque la tension des piles faiblit.
Un remplacement est alors conseillé.
Pour remplacer les piles, retirez la vis de fixation du couvercle
du compartiment située à l'arrière de l'instrument, avec un
tournevis de taille correcte. Retirez les deux piles et
remplacez-les par des piles alcaline uniquement. Veillez à
respecter la polarité. Prenez soin de ne pas trop serrer la vis
en remettant le couvercle en place.
Remarque : les thermomètres série C12 et C20 ne
fonctionnent pas si le compartiment des piles est mal fixé ou
absent. L'afficheur indique alors « OPEn ». Veuillez noter la
petite pointe sur l'intérieur du couvercle du compartiment, qui
doit entrer dans l'encoche prévue à l'arrière du boîtier.
8
Beschreibung
Die Thermometer der Reihen C haben ein äußerst robustes
Gehäuse aus Polykarbonat mit Gummierung, das eine lange
Haltbarkeit bietet und vor dem Eindringen von Staub und
Wasser schützt.
Der Catercheck 3 basiert auf dem C20, verfügt jedoch über
einen festen Messfühler.
C11 HACCP-Thermometer
Der C12 Thermometer wird komplett mit farbigen Etiketten, so
dass Sie die Farbe von blau zu rot, grün, gelb oder orange
ändern können.
Anleitung
Sollten Sie das blaue Etikett auf Ihrem C12 Thermometer
ändern aus dem blauen Label geliefert, entfernen Sie die
Kunststoff-Schutzkappe von der C12 Label auf der
Vorderseite des Gerätes (falls vorhanden). Es ist nicht
notwendig, um das Etikett selbst zu entfernen. Wählen Sie
den neuen farbigen Aufkleber und entfernen Sie vorsichtig die
Schutzfolie Abdeckung, um die Klebefläche zu offenbaren.
Richten Sie das Etikett über die alte und kleben an seinen
Platz.
Die Luft-und Einstechfühler vorgesehen habe keine
Farbcodierung..
11
Handthermometer von Comark
C12 HACCP-Bereich,
C20 und Catercheck 3
Bedienerhandbuch
10
Page 4
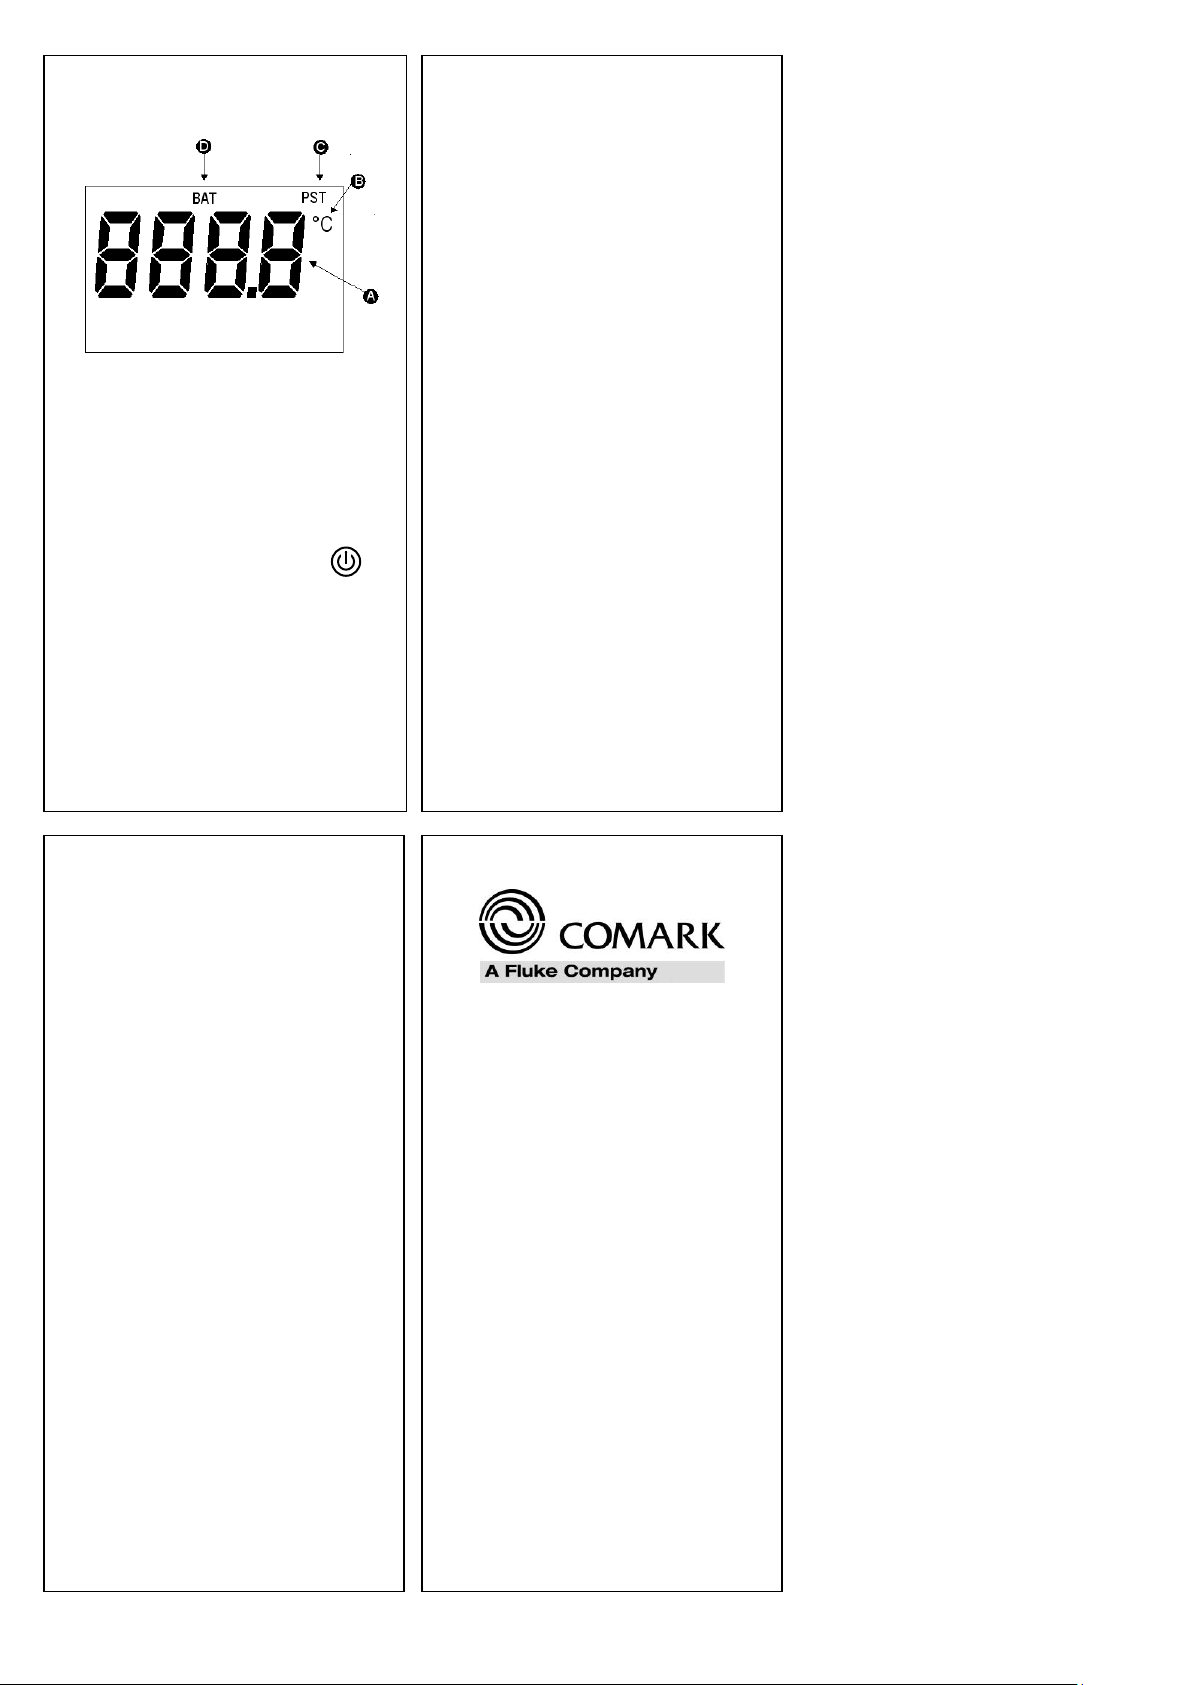
Übersicht der Anzeigesymbole
A – Temperatur-Hauptanzeige
B – °C-Anzeige
C – Sensortyp – PST (Thermistor)
D – Anzeige für einen niedrigen Batteriestand
Anschließen der Messfühler an die Thermometer
Die Thermometer der Reihen C12 und C20 verfügen über
Buchsen für den Anschluss der Thermistorfühler.
Ein- und Ausschalten
Mit der Taste „ON/OFF“ (EIN/AUS) auf dem Tastenfeld wird
das Thermometer eingeschaltet. Nach einer kurzen Pause
zeigt das Display das Modell des Messinstruments an.
Anschließend kehrt es zurück zur normalen
Temperaturanzeige.
12
Abschaltautomatik/Energiesparmodus
Die Thermometer der Reihen C12 und C20 verfügen über
eine Abschaltautomatik. Diese ist auf 3 Minuten
voreingestellt.
Pflege des Thermometers
Die Thermometer der Reihen C12 und C20 sind gemäß den
technischen Daten staubgeschützt und wasserdicht und
widerstehen selbst härtesten Beanspruchungen. Entfernen
Sie Ablagerungen mit einem feuchten Tuch oder warmem
Seifenwasser, und vermeiden Sie, dass die Ablagerungen
aushärten oder klebrig werden. Verwenden Sie keine
Reinigungsmittel auf Lösungsmittelbasis und keinen
Brennspiritus usw.
C20
Insbesondere bei einem Einsatz in rauen Umgebungen sollte
darauf geachtet werden, den Lumberg-Messfühleranschluss
regelmäßig zu reinigen. Dadurch soll sichergestellt werden,
dass es im Laufe der Zeit nicht schwieriger wird, den
Messfühler vom Thermometer zu entfernen. Der Messfühler
sollte so häufig vom Messinstrument abgenommen werden,
wie dies erforderlich ist. In diesem Fall kann das Gewinde
dann mit lebensmittelechtem Öl gereinigt und geschmiert
werden.
Achtung: Geben Sie die Thermometer der Reihen C12 und
C20 nicht in die Spülmaschine.
Wechseln der Batterien
Wenn sich die Batteriespannung verringert, wird das Symbol
BAT im Display eingeblendet. Zu diesem Zeitpunkt wird ein
Batteriewechsel empfohlen.
Zum Wechseln der Batterie entfernen Sie die
Befestigungsschraube der Batterieabdeckung hinten am
Gerät mit einem Schraubendreher der richtigen Größe.
Entfernen Sie die beiden Batteriezellen. Tauschen Sie sie nur
gegen Alkalizellen aus. Achten Sie auf die richtige Polarität.
Ziehen Sie die Schraube beim Wiederanbringen der
Abdeckung nicht zu stark an.
Hinweis: Die Thermometer der Reihen C12 und C20
funktionieren nicht, wenn die Abdeckung des Batteriefachs
falsch angebracht ist oder fehlt. In diesem Fall wird „OPEN“
(GEÖFFNET) im Display angezeigt. Bitte beachten Sie den
kleinen Nippel auf der Innenseite der Batterieabdeckung, der
in die Öffnung auf der Gehäuserückseite fassen muss.
13
Technische Daten für C12, C20 und Catercheck 3
Sensor Thermistor, 10 kOhm, Unicurve
Anschluss C12: 3,5-mm-Buchse
C20: 6-pol. Lumberg
Messbereich -40 °C bis +125 °C
Skala °C
Angezeigte Auflösung 0,1 °
Systemgenauigkeit bei 23 °C ±0,5 °C -20 °C bis +70 °C
Umgebungstemperaturbereich -20 °C bis +50 °C (Betrieb)
Anzeige 4-stelliges 12,5-mm-LCD
Batterie 2 x vom Typ I.E.C. LR6 Größe AA
Batterielebensdauer
(Dauerbetrieb) bis zu 14000 Stunden
Umweltschutz
C20 Zertifiziert nach IP67, BS 60529, IEC 529
Catercheck 3 Nicht zertifiziert
C12 Nicht zertifiziert
EMV-Emission Geprüft gem. EN61326-1
Leistungskriterien B
Maße (ohne Messfühler)
Länge 152 mm/6 Zoll
Breite 58 mm/2,3 Zoll
Tiefe 22/27 mm/0,9/1,1 Zoll
Gewicht 178 g/6,3 ozs
14
Termómetros portátiles Comark
Gama HACCP C12,
C20 y Catercheck 3
Manual para operarios
15
Page 5

Descripción
Los termómetros de la serie C tienen una carcasa de
policarbonato de gran resistencia con una moldura de goma
para mayor durabilidad y protección contra el polvo y la
entrada de agua.
El modelo Catercheck 3 se basa en el modelo C20 pero tiene
una sonda fija.
Gama HACCP C12
El termómetro C12 viene con colores codificados etiquetas de
modo que usted puede cambiar el color de azul a rojo, verde,
amarillo o naranja.
Instrucciones
Si desea cambiar la etiqueta azul en el termómetro de C12 de
la etiqueta azul suministrada, retire la cubierta protectora de
plástico de la etiqueta de C12 en la parte frontal del
instrumento (si está instalado). No es necesario quitar la
etiqueta en sí. Seleccione la etiqueta de color nuevo y quite
con cuidado la tapa del soporte para revelar el área de
pegado. Alinee cuidadosamente la etiqueta con el antiguo, y
colocar en su lugar.
Las sondas de aire y la penetración previstas no tienen
código de colores.
16
Descripción de los símbolos de la pantalla
A – Pantalla principal de temperatura
B – Indicador de °C
C – Tipo de sensor – PST (Termistor)
D – Indicador de carga de pila baja
Conexión de las sondas a los termómetros
El termómetro C12 y C20 tiene tomas para la conexión de
sondas termistor.
Encendido y apagado
El botón ‘ON/OFF’ del teclado se utiliza para encender el
termómetro. Tras una pausa, la pantalla mostrará el modelo
del instrumento y volverá a la pantalla de temperatura.
17
Apagado automático / Modo de ahorro de energía
Los termómetros de la serie C12 y C20 tienen la función de
apagado automático. Viene ajustado en 3 minutos.
Cuidado del termómetro
Los termómetros de las series C12 y C20 son impermeables
y tienen una protección antipolvo como se indica en las
especificaciones, y soporta entornos exigentes. Utilice un
paño húmedo o agua jabonosa caliente para eliminar los
residuos y evitar que se endurezca o tenga un tacto
pegajoso. No utilice limpiadores con disolventes, alcoholes
desnaturalizados, etc.
C20
En entornos especialmente exigentes, se debe tener mucho
cuidado y limpiar con regularidad el conector de la sonda
Lumberg. Esto debe garantizar que no resulte difícil quitar la
sonda del termómetro. Esta sonda debe retirarse del
instrumento con la frecuencia que sea necesario, y debe
limpiarse y lubricarse con aceite alimentario seguro.
Precaución: no coloque los termómetros de las series C12 o
C20 en el lavavajillas.
Cambio de pilas
El símbolo BAT aparece en pantalla cuando la carga de la
pila es reducida. Se recomienda cambiar la pila en este
momento.
Para cambiar la pila, quite el tornillo de sujeción de la tapa en
la parte trasera del instrumento utilizando un destornillador
del tamaño correcto. Retire las dos pilas de botón y
sustitúyalas sólo por pilas de botón alcalinas. Tenga cuidado
y respete la polaridad. No apriete en exceso el tornillo al
volver a colocar la tapa.
Nota: los termómetros de las series C12 y C20 no
funcionarán si el compartimento de la batería está mal
colocado o no está colocado. En este caso, la pantalla
mostrará ‘OPEn’ (Abierto). Fíjese en el pequeño punto que
existe dentro de la tapa de la pila que debe coincidir con el
orificio que existe en la parte trasera de la carcasa.
18
Especificaciones para C12, C20 y Catercheck 3
Sensor Termistor de 10 Kohmios Uni-curve
Conector C12: Clavija de 3,5 mm
C20: Lumberg de 6 patillas
Rango de medición De -40 °C a +125 °C
Escala °C
Resolución de pantalla 0,1°
Precisión del sistema a 23 °C ±0,5 °C -20 °C a +70 °C
Rango de temperatura ambiente De -20 °C a +50 °C en funcionamiento
Pantalla LCD de 4 dígitos de 12,5 mm
Pila Dos de tipo I.E.C. LR6 tamaño AA
Duración de la pila (continuo) hasta 14.000 horas
Protección del medio ambiente
C20 Certificación IP67, BS 60529, IEC 529
Catercheck 3 Sin certificación
C12 Sin certificación
Emisión de EMC Probado para EN61326-1
Criterios de rendimiento B
Dimensiones (excepto sonda)
Longitud 152 mm / 6 pulg.
Anchura 58 mm / 2,3 pulg.
Profundidad 22 / 27 mm / 0,9 / 1,1 pulg.
Peso 178 g / 6,3 oz
19
Page 6

Comark Instruments
52 Hurricane Way,
Norwich, Norfolk, NR6 6JB
Tel: +44 844 815 6599 Fax: +44 844 815 6598
www.comarkinstruments.com
Comark Instruments
PO Box 9090
Everett, WA 98206
Tel (503) 643 5204 Fax (503) 644 5859
www.comarkUSA.com
Copyright Comark Instruments Part No. 18453/8
(11/12)
 Loading...