

Page 1

Wireless Meat
Thermometer
Trådlös stektermometer
Trådløst steketermometer
Langaton paistolämpömittari
Kabelloses Ofenthermometer
English 2
Svenska 11
Art. No.: Model. No:
44-2239 TPR307+TPX307
Norsk 20
Suomi 29
Deutsch 38
ENGLISHSVENSKANORSKSUOMI
Ver. 20170904
DEUTSCH
Page 2

Wireless Meat Thermometer
Art.no 44-2239 Model TPR307+TPX307
ENGLISH
Please read theentire instruction manual before using theproduct and then
save it for future reference. We reserve theright for any errors in text or
images and any necessary changes made to technical data. In theevent of
technical problems or other queries, please contact our Customer Services.
Safety
• Theproduct is only intended for normal domestic use and only in
themanner described in this instruction manual.
• Do not expose theproduct to rain or moisture.
• Theproduct’s temperature probe is only designed for measuring
theinternal temperature of foodstuffs. Never attempt to use theproduct
for other types of temperature measurement.
• Never mix old and new batteries. Never mix rechargeable and
non-rechargeable batteries.
• Do not subject theproduct to impacts or shocks.
• Theproduct should never be used if it is in any way damaged or
malfunctioning.
• Never immerse theproduct into water or other liquids. Wipe
theproduct dry immediately if it has become wet or damp.
• Never let children play with theproduct.
2
Page 3
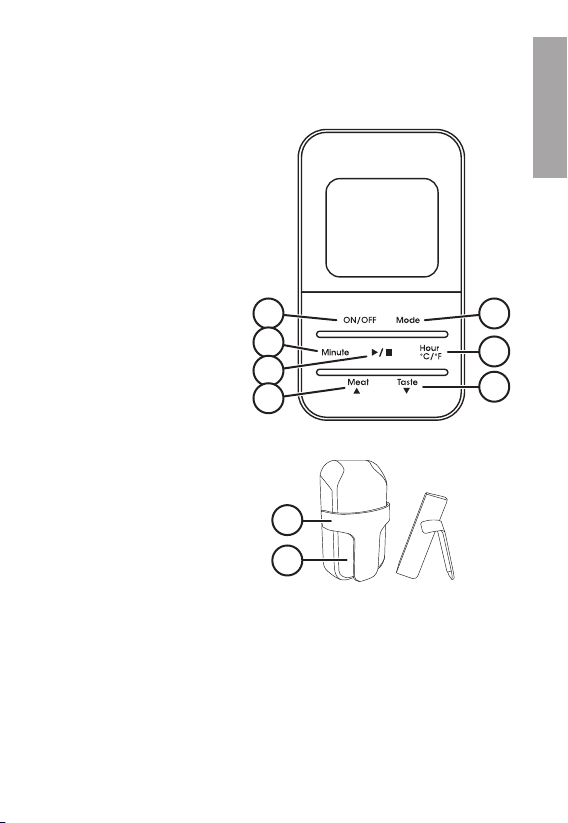
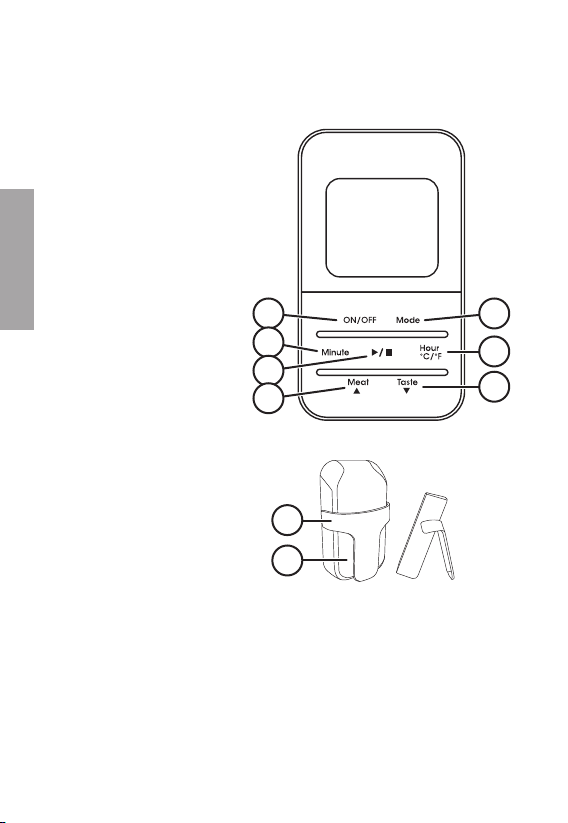
Product description
Receiver
1. [ ON/OFF ] Power button
2. [ Minute ] Minutes setting
3. [ ►/■ ] Start/stop and
resetting thetimer
4. [ Meat ▲ ] Meat settings or
selectable cooking
temperature
5. [ Mode ] Thermometer or
timer settings
6. [ Hour °C/°F ] Setting hours
and temperature units
7. [ Taste ▼ ] Doneness levels
(Well Done, Medium etc.)
and selectable cooking
temperature
8. Belt clip/stand
9. Battery cover
ENGLISH
51
2
3
4
8
9
6
7
Page 4
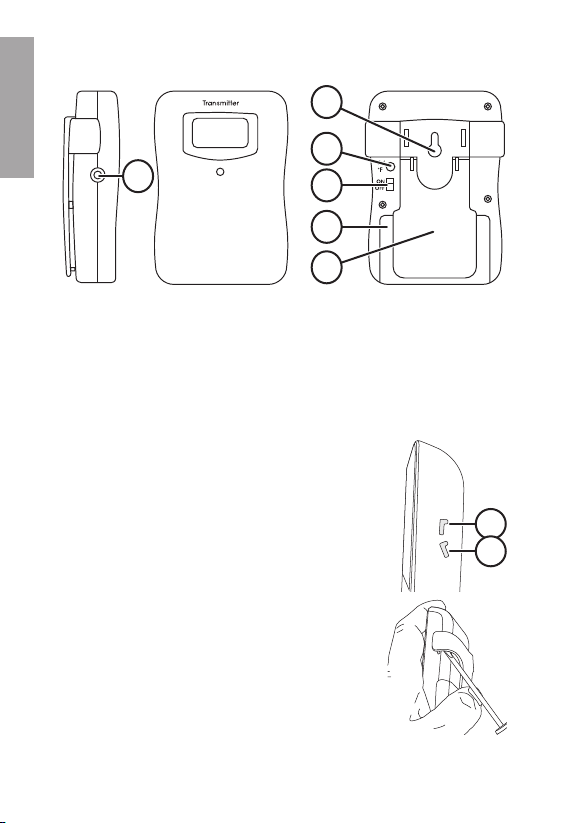
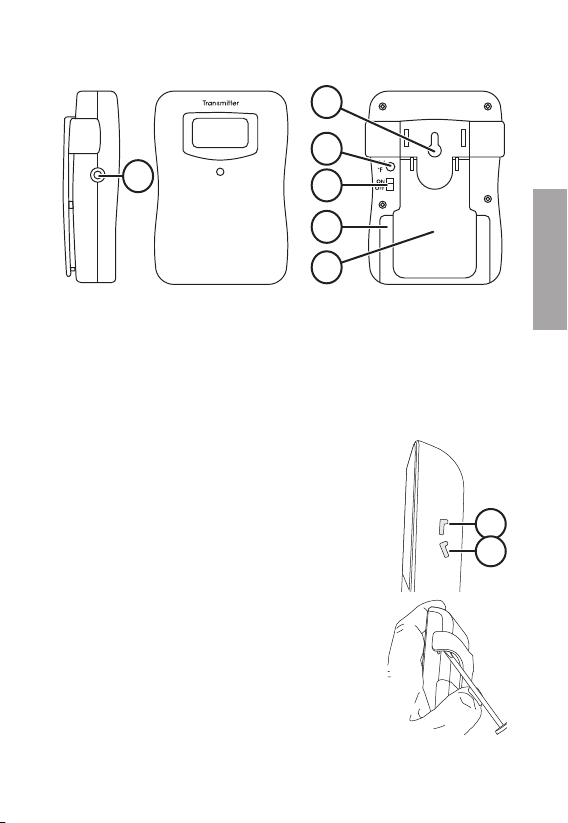
Transmitter
11
ENGLISH
10
10. Probe socket
11. Wall mount
12. [ °C/°F ] Connects thereceiver to thetransmitter
and selects temperature units
13. [ ON/OFF ] Switch
14. Battery cover
15. Stand
Before initial use
Receiver
Belt clip/stand
1. Belt clip and stand with multiple
fastening options.
A) Used as abelt clip
B) Used as astand
2. Theclip is fastened onto thethermometer
securely. To remove or adjust its position,
bend it slightly using anappropriate tool
until it becomes loose and can be removed
or repositioned.
12
13
14
15
A
B
4
Page 5

Batteries
1. Open thereceiver’s battery compartment on theback and insert
2×AAA/LR03 batteries. Note themarkings on thebottom of
thebattery holder to ensure correct polarity.
2. Refit thebattery cover.
Transmitter
Table stand
Fold out thestand on theback of
thetransmitter. 2-position stand.
Note: If thestand is over-extended it will release its grip from its mount to
prevent damage. Refit thestand back into its mount and it will function
normally again.
Batteries
1. Open thereceiver’s battery compartment on theback and insert
2×AAA/LR03 batteries. Note themarkings on thebottom of
thebattery holder to ensure correct polarity.
2. Refit thebattery cover.
Connecting the transmitter to
the receiver
Things to consider:
• Other wireless equipment using thesame frequency can reduce
thetransmission range.
• Therange of all wireless equipment depends on thetype of obstacles
located between thetransmitter and thereceiver (e.g. aconcrete wall
will interfere with thesignal more than aplasterboard wall).
ENGLISH
If you experience problems, try thefollowing:
• Turn off any other existing wireless equipment to check whether this
is thecause of theproblem.
• Reposition thewireless equipment, shorten thedistance between
thetransmitter and thereceiver or reduce thenumber of obstacles
(walls, furniture, etc.) between them.
Page 6
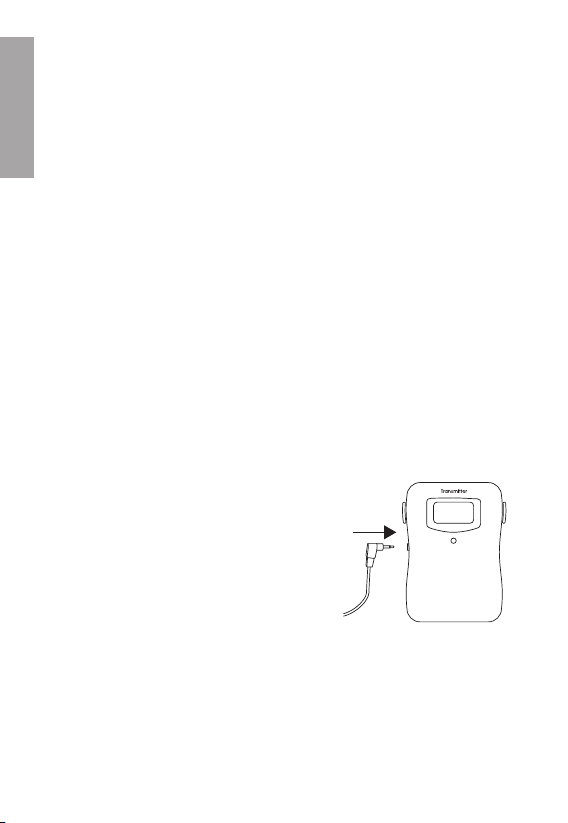
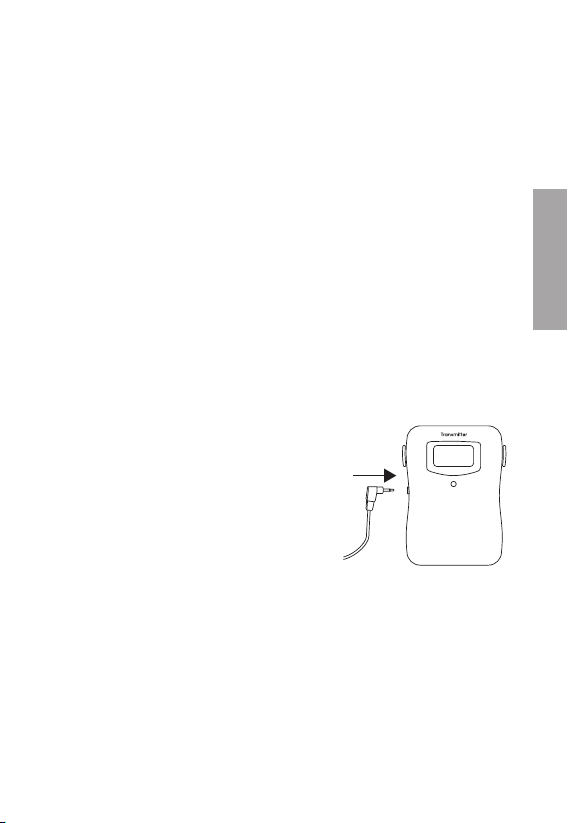
1. Plug theprobe into thetransmitter’s socket (10).
2. Turn thetransmitter on by setting its [ OFF/ON ] switch (13),
on theback, to theON position.
3. Turn thereceiver on by holding in its [ ON/OFF ] button until thedisplay
comes on.
ENGLISH
Note: Thereceiver must be turned on within 2 min of thetransmitter
being turned on for asuccessful connection to be established.
4. Hold in the [ °C/°F ] button on theback of transmitter until anaudible
signal is heard from thereceiver and thecurrent temperature is
displayed on thereceiver’s display. Thedevices are now paired.
Note:
• Themax range between thedevices is 30 m in optimal unobstructed
conditions. Indoor environments present multiple signal obstructions
such as walls, furniture, other objects, transmissions from other
wireless equipment, etc.
• If thedevices lose contact with each other, thereceiver will emit
anaudible signal every 4 sec and display “---”. When thedevices
come back into range they will automatically be paired again.
If theconnection is not re-established, place thedevices close to
each other and repeat thepairing procedure. Start by turning off
both devices and then follow thesteps listed in theConnecting
thetransmitter to thereceiver section above.
Operating instructions
Plug thetemperature probe into thethermometer.
Note: Stick thetip of theprobe into
thecentre of thethickest part of themeat.
Do not stick it in so far that it comes out
theother end. Avoid sticking it into any
fatty areas.
Warning:
• Use heat-resistant gloves/mitts if you need to handle
theprobe or its cable during thecooking process.
• Keep theprobe and its cable out of thereach of children.
• Clean theprobe thoroughly both before and after use.
• Don’t subject thedevices to rain and never immerse them
in water or other liquids.
6
Page 7

• Don’t subject thedevices to excessive heat or hot surfaces.
• Don’t expose theprobe or its cable to live flames.
• Never use thethermometer in microwave ovens.
Using the thermometer’s pre-set
temperature settings
Note:
You can still set thetemperature even if you have selected one of thepre-set
temperature settings by following theinstructions in theSelecting cooking
temperature section.
1. Hold in [ MODE ] until “Well done”, “Medium”, “Medium rare” or “Rare”
appears on screen.
2. Press [ Meat ▲ ] to select thetype of meat:
3. Press [ Taste ▼ ] to select thecooking temperature
4. Once theset temperature is reached anaudible signal will be
emitted and thetemperature light will flash.
5. Press any button to turn thealarm off.
6. Hold in [ MODE ] to reset thedisplay.
Thetable below shows pre-set temperatures for different types of meat:
Meat type Displays Well done Medium Medium rare Rare
Beef BEEF
Veal VEAL
Lamb LAMB
Pork PORK
Chicken CHICK
Turkey TURKY
Fish FISH
Hamburger HAMBG
75 °C/167 °F 70 °C/158 °F 60 °C/140 °F 55 °C/
75 °C/167 °F 70 °C/158 °F
75 °C/167 °F 70 °C/158 °F
77 °C/171 °F 71 °C/160 °F
80 °C/176 °F
80 °C/176 °F
60 °C/140 °F
75 °C/167 °F
- - -
- - -
- - -
- - -
- -
- -
- -
131 °F
Selecting cooking temperature
1. Make sure that “Well done”, “Medium”, “Medium rare” or “Rare” do not
appear on screen.
2. If any one of these doneness levels appear on screen, hold in [ MODE ]
until theselection disappears.
3. Press or hold in [ Meat ▲ ] or [ Taste ▼ ] to set thedesired temperature.
ENGLISH
Page 8

Timer function
Press [ MODE ] until thetimer appears on screen. Thetimer has two modes,
timer and stopwatch.
Note: You can start thetimer and then select any of thepre-set cooking
temperatures mentioned above. Thetimer will then run in thebackground
ENGLISH
without showing up on screen. You can interrupt thetimer at any time by
pressing the [ Mode ] button.
Timer
1. Press [ Minute ] to set theminutes and [ Hour ] to set thehours.
2. Press [ ►/■ ] to start thetimer.
3. When theset time is reached anaudible signal will be emitted.
Press any button to turn thealarm off.
4. Thetimer will continue counting down even after thealarm has
been turned off. To turn thetimer off press [ ►/■ ].
5. Hold in [ ►/■ ] to reset.
Stopwatch
1. Press [ ►/■ ] to start thestopwatch.
2. Press [ ►/■ ] to stop thestopwatch.
3. Hold in [ ►/■ ] to reset.
Care and maintenance
• Clean theexterior of thethermometer by wiping it with adamp cloth.
Use only mild cleaning agents, never solvents or corrosive chemicals.
• Whenever thethermometer is not to be used for anextended period,
thebatteries should be removed and stored in adry, dust-free
environment, out of children’s reach.
Note:
Theprobe must never be put into adishwasher or washed in running water.
It must only be cleaned by wiping it with adamp cloth. Be careful not to get any
water inside thecable connection of theprobe. If water gets inside theprobe it
might damage it and cause inaccurate temperature readings.
8
Page 9
Troubleshooting guide
Thethermometer won’t turn
on/thedisplay is unclear.
Thedisplayed temperature
is incorrect.
Thedisplay shows “LLL”
or “HHH”.
No temperature shows on
thedisplay.
Check that thebatteries are not flat and
that they are inserted correctly.
Change if necessary.
• Check that thetemperature probe is
properly plugged into thetransmitter.
• Check thebatteries in both devices
and change if necessary.
• Make sure that theprobe is properly
positioned into themeat.
Thetemperature range (0–300 °C/32–572 °F)
has been exceeded or is below range.
Allow theprobe to return to room temperature before attempting to use it again.
Thedevices may have lost contact with
each other. Place thedevices closer
to each other or repeat thepairing
process according to theConnecting
thetransmitter to thereceiver section.
Responsible disposal
This symbol indicates that this product should not be disposed
of with general household waste. This applies throughout
theentire EU. In order to prevent any harm to theenvironment
or health hazards caused by incorrect waste disposal,
theproduct must be handed in for recycling so that thematerial
can be disposed of in aresponsible manner. When recycling
your product, take it to your local collection facility or contact
theplace of purchase. They will ensure that theproduct is
disposed of in anenvironmentally sound manner.
ENGLISH
Page 10

Specifications
Transmitter
Batteries 2×AAA/LR03
Max display temperature 300 °C/572 °F
ENGLISH
Temperature probe
Max probe temperature range 300 °C/572 °F
Cable length 105 cm
Operating probe
cable temperature range 380 °C
Receiver
Batteries 2×AAA/LR03
Max display temperature 300 °C/572 °F
Alarm temperature range 0–300 °C
Max timer range 0–23 h 59 min
10
10
Page 11

Trådlös stektermometer
Art.nr 44-2239 Modell TPR307+TPX307
Läs igenom hela bruksanvisningen före användning och spara den
sedan för framtida bruk. Vi reserverar oss för ev. text- och bildfel samt
ändringar av tekniska data. Vid tekniska problem eller andra frågor,
kontakta vår kundtjänst.
Säkerhet
• Produkten är endast avsedd för normalt bruk ihemmet på det sätt
som beskrivs iden här bruksanvisningen.
• Produkten får inte utsättas för regn och fukt.
• Produktens mätsond är endast avsedd för att mäta temperatur
inuti råvaror. Försök aldrig använda produkten till andra typer av
temperaturmätningar.
• Blanda inte gamla och nya batterier. Blanda inte heller laddbara med
icke laddbara batterier.
• Utsätt inte produkten för slag, stötar.
• Använd aldrig produkten om den på något sätt är skadad eller inte
fungerar normalt.
• Sänka aldrig ner produkten ivatten eller andra vätskor.
Torka av den omedelbart om den blivit våt eller fuktig.
• Låt aldrig barn leka med produkten.
SVENSKA
Page 12
Produktbeskrivning
Mottagare
1. [ ON/OFF ] På/av
2. [ Minute ] Inställning av minuter
3. [ ►/■ ] Start/stopp och
nollställning av timerfunktion
4. [ Meat ▲ ] Inställning av
råvara och eget val av
tillagningstemperatur
5. [ Mode ] Val av temperatureller timerfunktion
SVENSKA
6. [ Hour °C/°F ] Inställning
av timmar och val av
temperaturenhet
7. [ Taste ▼ ] Val av förinställd
tillagningstemperatur
(Well Done, Medium
etc.) och eget val av
tillagningstemperatur
8. Bältesclips/bordsstöd
9. Lucka över batterihållare
51
2
3
4
6
7
8
9
12
Page 13
Sändare
11
12
10
13
14
15
10. Anslutning för mätsond
11. Väggfäste
12. [ °C/°F ] Sammankoppling av sändare/mottagare
och val av temperaturenhet
13. [ ON/OFF ]
14. Lucka över batterihållare
15. Bordsstöd
Före första användning
Mottagare
Bältesclips/bordsstöd
1. Bältesclipset och bordsstödet har olika fästpunkter
beroende på hur det ska användas.
A) Som bältesclips
B) Som bordsstöd
2. Bältesclipset och bordsstativet sitter stadigt,
bänd loss det försiktigt med lämpligt verktyg
om du behöver ta bort det eller ändra position.
SVENSKA
A
B
Page 14

Batterier
1. Öppna batteriluckan på mottagarens baksida och sätt
i2×AAA/LR03-batterier. Se märkningen ibotten på
batterihållaren så att polariteten blir rätt.
2. Sätt tillbaka batteriluckan.
Sändare
Bordsstöd
Vik ut bordsstödet på sändaren
baksida. Stödet kan ställas i2 lägen.
Obs! Om bordsstödet av misstag viks ut för långt släpper det från fästet
SVENSKA
för att inte skadas. Tryck tillbaka fästet igen så fungerar det normalt igen.
Batterier
1. Öppna batteriluckan på mottagarens baksida och sätt
i2×AAA/LR03-batterier. Se märkningen ibotten på
batterihållaren så att polariteten blir rätt.
2. Sätt tillbaka batteriluckan.
Sammankoppling av sändare
och mottagare
Tänk på att:
• Annan befintlig trådlös utrustning på samma frekvens kan påverka
räckvidden negativt.
• Räckvidden på all trådlös utrustning påverkas av vilka hinder som finns
mellan sändaren och mottagaren (t.ex. dämpar enbetongvägg signalen
avsevärt mer än engipsvägg).
Vid funktionsproblem, prova följande lösningar:
• Stäng av övriga befintliga trådlösa utrustningar för att kontrollera om de
kan vara orsaken till problemet.
• Flytta den trådlösa utrustningen, förkorta avståndet, eller minska antalet
hinder (väggar, möbler etc.) mellan sändaren och mottagaren.
14
Page 15
1. Anslut mätsonden till anslutningen (10) på sändaren.
2. Slå på sändaren genom att ställa [ ON/OFF ] på sändarens baksida
iläge ON.
3. Slå på mottagaren genom att hålla in [ ON/OFF ] tills displayen tänds.
Obs! Mottagaren måste slås på inom 2 min från det att sändaren slås
på för att sammankopplingen ska kunna genomföras.
4. Håll in [ °C/°F ] på sändarens baksida tills mottagaren avger enljudsignal
och aktuell temperatur visas imottagarens display. Enheterna är nu
sammankopplade.
Obs!
• Max räckvidd för enheterna är 30 m vid optimala förhållanden utan
hinder. Iinomhusmiljö finns enmängd hinder för signalen att ta hänsyn
till som väggar, möbler och annan inredning, signaler från annan trådlös
utrustning etc.
• Om enheterna tappar kontakten avger mottagaren enljudsignal var 4 sek
och displayen visar ”---”. När enheterna kommer närmare varandra
återupptas kontakten automatiskt. Om inte kontakten återupptas,
placera enheterna närmare varandra och gör om anslutningen.
Börja med att slå av båda enheterna och följ sedan stegen iavsnittet
Sammankoppling av sändare och mottagare ovan.
Användning
Anslut mätsonden till sändaren.
Obs! Tänk på att placera mätsondens
spets iråvarans tjockaste del. Skjut inte in
den så långt att den nästan sticker ut på
andra sidan. Undvik partier som innehåller
mycket fett.
Varning!
• Använd skyddshandskar om du behöver hantera mätsonden eller
kabeln när tillagning pågår!
• Håll mätsonden och kabeln utom räckhåll för barn.
• Rengör mätsonden noga före och efter varje användning.
• Utsätt inte enheterna för regn, sänka aldrig ner dem ivatten eller
annan vätska.
• Utsätt inte enheterna för stark värme eller heta ytor.
• Utsätt inte mätsonden eller kabeln för öppen eld.
• Använd aldrig termometern imikrovågsugn.
SVENSKA
Page 16

Användning med termometerns
förinställda temperaturer
Obs!
Om du valt enförinställd temperatur kan du ändå välja att ändra temperaturen
genom att följa stegen iavsnittet Välj egen tillagningstemperatur.
1. Håll in [ MODE ] tills något av begreppen ”Well done”, ”Medium”,
”Medium rare” eller ”Rare” visas idisplayen.
2. Tryck [ Meat ▲ ] för att välja råvara.
3. Tryck [ Taste ▼ ] för att välja tillagningstemperatur
4. När inställd temperatur uppnåtts avger termometern enljudsignal och
temperaturen blinkar imottagaren.
5. Tryck valfri knapp för att stänga av ljudsignalen.
6. Håll in [ MODE ] för att återställa displayen till normalvisning.
SVENSKA
Tabellen nedan visar termometerns förinställda temperaturer för
olika råvaror:
Råvara Displayen
Biff BEEF 75 °C/167 °F 70 °C/158 °F 60 °C/140 °F 55 °C/131 °F
Kalv VEAL 75 °C/167 °F 70 °C/158 °F - Lamm LAMB 75 °C/167 °F 70 °C/158 °F - Fläsk PORK 77 °C/171 °F 71 °C/160 °F - Kyckling CHICK 80 °C/176 °F - - Kalkon TURKY 80 °C/176 °F - - Fisk FISH 60 °C/140 °F - - Hamburgare HAMBG 75 °C/167 °F - - -
visar
Well done Medium Medium rare Rare
Välj egen tillagningstemperatur
1. Se till att inget av begreppen ”Well done”, ”Medium”, ”Medium rare”
eller ”Rare” visas idisplayen.
2. Om något av begreppen visas håll in [ MODE ] tills det släcks.
3. Tryck eller håll in [ Meat ▲ ] eller [ Taste ▼ ] för att ställa in önskad
temperatur.
16
Page 17

Timerfunktion
Tryck [ MODE ] tills timern visas idisplayen. Timern har två funktioner,
timer och tidtagning.
Obs! Du kan starta timern och sedan välja någon av de förinställda
tillagningstemperaturerna ovan. Timern går då ibakgrunden utan att visas
idisplayen. Du kan när som helst visa timern genom att trycka [ Mode ].
Timer
1. Tryck [ Minute ] för att ställa in minuter och [ Hour ] för att ställa in timmarna.
2. Tryck [ ►/■ ] för att starta timern.
3. När inställd tid passerat avger termometern enljudsignal.
Tryck valfri knapp för att stänga av ljudsignalen.
4. Timern börjar räkna upp tiden efter att ljudsignalen stängts av,
tryck [ ►/■ ] för att stoppa tiden.
5. Håll in [ ►/■ ] för att nollställa.
Tidtagning
1. Tryck [ ►/■ ] för att starta timern.
2. Tryck [ ►/■ ] för att stoppa.
3. Håll in [ ►/■ ] för att nollställa.
Skötsel och underhåll
• Rengör termometern med enlätt fuktad trasa. Använd ettmilt
rengöringsmedel, aldrig lösningsmedel eller frätande kemikalier.
• Ta ut batterierna och förvara termometern torrt och dammfritt utom
räckhåll för barn om den inte ska användas under enlängre period.
Obs!
Mätsonden får aldrig maskindiskas eller diskas under rinnande vatten.
Gör endast ren produkten genom att torka av den med en lätt fuktad
trasa. Var noga med att inte få in vatten i mätsondens kabelanslutning.
Om vatten kommer in i mätsonden kan den skadas och termometern
visa fel temperatur.
SVENSKA
Page 18

Felsökningsschema
Termometern går inte
att slå på/displayen är
otydlig.
Temperaturen visas inte
eller visas felaktigt.
Displayen visar ”LLL”
eller ”HHH”.
SVENSKA
Ingen temperatur visas
idisplayen
Kontrollera att batterierna inte är förbrukade
och att de är rätt monterade, byt vid behov.
• Kontrollera att mätsonden är ordentligt
ansluten till sändaren.
• Kontrollera alla batterier, byt vid behov.
• Är mätsonden rätt placerad iråvaran?
Mätområdet (0–300 °C/32–572 °F) har övereller underskridits. Låt mätsonden återfå
normal rumstemperatur innan mätningarna
återupptas.
Enheterna kan ha förlorat kontakten med
varandra. Placera enheterna närmare
varandra eller gör om anslutningen enligt
avsnittet Sammankoppling av sändare och
mottagare.
Avfallshantering
Denna symbol innebär att produkten inte får kastas
tillsammans med annat hushållsavfall. Detta gäller inom hela
EU. För att förebygga eventuell skada på miljö och hälsa,
orsakad av felaktig avfallshantering,ska produkten lämnas till
återvinning så att materialet kan tas omhand på ettansvarsfullt
sätt. När du lämnar produkten till återvinning, använd dig av
de returhanteringssystem som finns där du befinner dig eller
kontakta inköpsstället. De kan se till att produkten tas om hand
på ettför miljön tillfredställande sätt.
18
Page 19

Specifikationer
Sändare
Batterier 2×AAA/LR03
Max visningstemperatur 300 °C/572 °F
Mätsond
Maxtemperatur 300 °C/572 °F
Kabellängd 105 cm
Maxtemperatur kabel 380 °C
Mottagare
Batterier 2×AAA/LR03
Max visningstemperatur 300 °C/572 °F
Temperaturinställning för larm 0–300 °C
Tidsinställning timer 0–23 h 59 min
SVENSKA
Page 20

Trådløst steketermometer
Art.nr. 44-2239 Modell TPR307+TPX307
Les brukerveiledningen grundig før produktet tas ibruk, og ta vare på den
for framtidig bruk. Vi reserverer oss mot eventuelle feil itekst og bilder,
samt endringer av tekniske data. Ved tekniske problemer eller spørsmål,
ta kontakt med vårt kundesenter.
Sikkerhet
• Produktet er kun beregnet til vanlig bruk ihjemmet, slik det er beskrevet
idenne bruksanvisningen.
• Produktet må ikke utsettes for regn eller fuktighet.
• Produktets målesensor/føler er kun beregnet til åmåle temperaturer
inni råvarer. Termometeret må ikke brukes til annen temperaturmåling.
• Bland aldri nye og gamle batterier. Bland heller ikke ladbare og ikke
ladbare batterier.
• Utsett aldri produktet for slag og støt.
• Produktet må ikke brukes hvis det har skader eller ikke fungerer som
det skal.
NORSK
• Senk aldri produktet ned ivann eller andre væsker. Tørk termometer
umiddelbart dersom det er blitt utsatt for fuktighet eller væsker.
• La aldri barn leke med produktet.
20
Page 21

Produktbeskrivelse
Mottaker
1. [ ON/OFF ] På/av
2. [ Minute ] Innstilling av minutter
3. [ ►/■ ] Start/stopp og
nullstilling av timerfunksjon
4. [ Meat ▲ ] Innstilling av
råvare og eget valg av
tillagningstemperatur
5. [ Mode ] Valg av temperatureller timerfunksjon
6. [ Hour °C/°F ] Innstilling
av timer og valg av
temperaturenhet
7. [ Taste ▼ ] Valg av
forhåndsinnstilt
tilberedelses temperatur
(Well Done, Medium
etc.) og eget valg av
tilberedelsestemperatur
8. Belteklips/bordstøtte
9. Lokk over batteriholder
51
2
3
4
6
7
NORSK
8
9
Page 22

Sender
10
10. Uttak for målesonde
11. Veggfeste
12. [ °C/°F ] Sammenkobling av sender/mottaker
og valg av temperaturenhet
13. [ ON/OFF ]
14. Lokk over batteriholder
15. Bordstøtte
NORSK
Før første gangs bruk
Mottaker
Belteklips/bordstøtte
1. Belteklipset/bordstativet har forskjellige
festepunkter avhengig av hvordan det skal
brukes.
A) Som belteklips
B) Som bordstøtte
2. Belteklipset og bordstativet sitter godt
festet. Bend det forsiktig løs med et
passende verktøy hvis du skal fjerne det
eller endre posisjonen.
11
12
13
14
15
A
B
22
Page 23

Batterier
1. Batterilokket åpnes på termometerets bakside og plasser
2×AAA/LR03-batterier iholderen. Følg merkingen for
polaritet ibunnen av batteriholderen.
2. Sett batterilokket på plass igjen.
Sender
Bordstøtte
Fell ut bordstøtten på senderens
bakside. Støtten kan stilles inn
i2 forskjellige posisjoner.
Obs! Hvis bordstøtten ved enfeiltagelse felles ut for langt vil den løsne
fra festet for ikke åskades. Trykk den tilbake på plass igjen.
Batterier
1. Batterilokket åpnes på termometerets bakside og plasser
2×AAA/LR03-batterier iholderen. Følg merkingen for
polaritet ibunnen av batteriholderen.
2. Sett batterilokket på plass igjen.
Sammenkobling av sender og mottaker
Husk:
• Annet trådløst utstyr som er innstilt på samme frekvens, kan på kan
påvirke rekkevidden negativt.
• Hindringer mellom sender og mottaker kan påvirke kontakten (rekkevidden)
mellom disse. Enbetongvegg kan f.eks. dempe signalene dramatisk
iforhold til hva engipsvegg gjør.
Ved problemer, prøv følgende:
• Skru av øvrig trådløst utstyr for åkontrollere hvor årsak til problemene er.
• Flytt det trådløse utstyret og reduser avstanden mellom sender og
mottaker. Forsøk også åredusere antall hindringer mellom sender og
mottaker (vegger, møbler etc.).
NORSK
Page 24

1. Målesonden kobles til uttaket (10) på senderen.
2. Senderen skrus på ved åstille [ ON/OFF ] (13) på ON. Bryteren er på
senderens bakside.
3. Mottakeren skrus av ved åholde [ ON/OFF ] inne til displayet tennes.
Obs! Mottakeren må skrus på innen 2 minutter fra da senderen ble
skrudd på for at sammenkoblingen skal kunne skje.
4. Hold [ °C/°F ] på senderens bakside inne til mottakeren avgir et lydsignal
og aktuell temperatur vises imottakerens display. Enhetene er nå koblet
sammen.
Obs!
• Maks rekkevidde for enhetene er 30 meter ved optimale forhold.
Innendørs kan det være mange ting som hindrer signalene iånå fram,
som vegger, møbler eller annen innredning, eller signaler fra andre
trådløse innretninger etc.
• Hvis enhetene mister kontakt med hverandre vil mottakeren avgi et
lydsignal hvert 4. sekund og displayet viser «---». Når enhetene kommer
nærmere hverandre vil kontakten gjenopprettes automatisk. Hvis ikke
kontakten gjenopprettes må enhetene plasseres nærmere hverandre og
koblingen endres. Start med åslå av begge enhetene og følg deretter
trinnene iavsnittet Sammenkobling av sender og mottaker ovenfor.
NORSK
Bruk
Fest føleren til senderen.
Obs! Husk at spissen på måleføleren skal
festes der råvaren er tykkest. Skyv den inn
til midten av kjøttstykket. Unngå partier
med mye fett.
Advarsel!
• Bruk hansker som beskytter deg hvis du må ordne med måleføleren
eller ledningen under tilberedelsene!
• Hold måleføler og ledning utenfor barns rekkevidde.
• Rengjør føleren grundig før og etter bruk.
• Enhetene må ikke utsettes for regn, eller senkes ned ivann eller annen væske.
• Utsett aldri enhetene for sterk varme eller varme flater.
• Målesonden og ledningen må ikke utsettes for åpen ild.
• Ikke bruk termometeret imikrobølgeovn.
24
Page 25

Bruk med forhåndsinnstilte temperaturer
Obs!
Hvis du har valgt en forhåndsinnstilt temperatur kan du endre denne ved å
følge trinnene i avsnittet Velg egen tilberedelsestemperatur.
1. Hold [ MODE ] inne til enav følgende tekster: «Well done», «Medium»,
«Medium rare» eller «Rare» vises idisplayet.
2. Trykk [ Meat ▲ ] for åvelge råvare.
3. Trykk [ Taste ▼ ] for åvelge tilberedelsestemperatur
4. Når den innstilte temperaturen er oppnådd vil termometeret avgi et
lydsignal og temperaturen blinker imottakeren.
5. Trykk på valgfri knapp for åskru av lydsignalet.
6. Hold [ MODE ] inne for åstille displayet tilbake til normalvisning.
Tabellen nedenfor viser de forhåndsinnstilte temperaturene til de
forskjellige råvarene:
Råvare Displayet
Biff BEEF 75 °C/167 °F 70 °C/158 °F 60 °C/140 °F 55 °C/
Kalv VEAL 75 °C/167 °F 70 °C/158 °F - Lam LAMB 75 °C/167 °F 70 °C/158 °F - Svin PORK 77 °C/171 °F 71 °C/160 °F - Kylling CHICK 80 °C/176 °F - - Kalkun TURKY 80 °C/176 °F - - Fisk FISH 60 °C/140 °F - - Hamburger HAMBG 75 °C/167 °F - - -
viser
Well done Medium Medium rare Rare
131 °F
Velg egen temperatur
1. Ingen av følgende tekster: «Well done», «Medium», «Medium rare» eller
«Rare» skal vises idisplayet.
2. Hvis noen av begrepene vises må [ MODE ] holdes inne til det slukkes.
3. Trykk deretter [ Meat ▲ ] eller [ Taste ▼ ] inn for åstille inn ønsket temperatur.
NORSK
Page 26

Timerfunksjon
Trykk på [ MODE ] til timeren vises på skjermen. Timeren har to funksjoner,
timer og tidtaking.
Obs! Du kan starte timeren og senere velge enav de forhåndsinnstilte
temperaturene ovenfor. Timeren vil da gå ibakgrunnen uten åvises
idisplayet. Du kan når som helst vise timeren ved åtrykke på [ Mode ].
Timer
1. Trykk på [ Minute ] for åstille inn minutter, og [ Hour ] for åstille inn timene.
2. Trykk [ ►/■ ] for åstarte timeren.
3. Når innstilt tid er talt vil termometeret avgi et lydsignal.
Trykk på valgfri knapp for åskru av lydsignalet.
4. Timeren vil starte åtelle tiden når lydsignalet stenges.
Trykk [ ►/■ ] for åstoppe tiden.
5. Hold [ ►/■ ] inne for ånullstille.
Tidtaking
1. Trykk [ ►/■ ] for åstarte timeren.
2. Trykk [ ►/■ ] for åstoppe timeren.
3. Hold [ ►/■ ] inne for ånullstille.
NORSK
Stell og vedlikehold
• Rengjør produktet med enlett fuktet klut. Bruk et mildt rengjøringsmiddel,
aldri løsningsmidler eller etsende kjemikalier.
• Når termometeret ikke er ibruk skal den lagres tørt og støvfritt, og
utilgjengelig for barn. Ta også ut batteriene når den ikke er ibruk.
Obs!
Målesonden må ikke vaskes imaskin eller under rennende vann.
Produktet rengjøres med enlett fuktet klut. Sørg for at det ikke kommer vann
ikabeltilkoblingen på målesonden. Hvis det kommer vann inn idenne kan
den bli ødelagt og termometeret vil begynne åvise feil temperatur.
26
Page 27

Feilsøking
Det går ikke åskru
på termometeret.
Temperaturen vises
ikke eller vises feil.
Displayet viser
”LLL” eller ”HHH”.
Displayet viser
ingen temperatur.
Kontroller at batteriene ikke er utbrukt og at de
sitter vendt riktig vei iholderen. Skift ved behov.
• Kontroller at kabelen til sensoren er riktig koblet
til senderen.
• Kontroller batteriene og skift ved behov.
• Er målesonden riktig plassert iråvarene?
Måleområdet (0–300 °C/32–572 °F) over- eller
underskrids. La målesonden gå tilbake til normal
romtemperatur før målingene gjenopptas.
Enhetene kan ha mistet kontakten med hverandre.
Plasser enhetene nærmere hverandre eller
endre koblingen som beskrevet iavsnittet
Sammenkobling av sender og mottaker.
Avfallshåndtering
Symbolet viser til at produktet ikke skal kastes sammen med
husholdning s avfallet. Dette gjelder ihele EØS-området.
For åforebygge eventuelle skader på helse og miljø, som
følge av feil håndtering av avfall, skal produktet leveres
til gjenvinning, slik at materialet blir tatt hånd om på
enansvarsfull måte. Benytt miljøstasjonene som er der du
befinner deg eller ta kontakt med forhandler. De kan se til
at produktet blir behandlet på entilfredsstillende måte som
gagner miljøet.
NORSK
Page 28

Spesifikasjoner
Sender
Batterier 2×AAA/LR03
Maks temperatur som kan vises 300 °C/572 °F
Målesonde
Makstemperatur 300 °C/572 °F
Lengde på ledning 105 cm
Makstemperatur kabel 380 °C
Mottaker
Batterier 2×AAA/LR03
Maks temperatur som kan vises 300 °C/572 °F
Temperaturinnstilling for alarm 0–300 °C
Tidsintervall timer 0–23 h 59 min
NORSK
28
28
Page 29

Langaton paistolämpömittari
Tuotenro 44-2239 Malli TPR307+TPX307
Lue käyttöohje ennen tuotteen käyttöönottoa ja säilytä se tulevaa tarvetta varten.
Pidätämme oikeuden teknisten tietojen muutoksiin. Emme vastaa
mahdollisista teksti- tai kuvavirheistä. Jos tuotteeseen tulee teknisiä
ongelmia, ota yhteys myymälään tai asiakaspalveluun.
Turvallisuus
• Laite on tarkoitettu normaaliin käyttöön kotona käyttöohjeen
ohjeiden mukaisesti.
• Laitetta ei saa altistaa kosteudelle.
• Laitteen mitta-anturi on tarkoitettu ainoastaan raaka-aineiden lämpötilan
mittaamiseen. Älä koskaan käytä laitetta muunlaiseen lämpötilanmittaukseen.
• Älä käytä vanhoja ja uusia paristoja yhdessä. Älä käytä ladattavia akkuja
ja tavallisia paristoja yhdessä.
• Älä altista laitetta iskuille tai kolhuille.
• Älä käytä laitetta, jos se on vaurioitunut tai jos se ei toimi oikealla tavalla.
• Älä upota laitetta veteen tai muuhun nesteeseen. Pyyhi laite välittömästi,
jos se kastuu.
• Älä anna lasten leikkiä laitteella.
SUOMI
Page 30

Tuotteen kuvaus
Vastaanotin
1. [ ON/OFF ] Virtakytkin
2. [ Minute ] Minuuttien
asettaminen
3. [ ►/■ ] Käynnistys/pysäytys
ja ajastintoiminnon
nollaaminen
4. [ Meat ▲ ] Raaka-aineen
asetus ja valmistuslämpötilan
valinta
5. [ Mode ] Lämpötila- ja
ajastintoiminnon valinta
6. [ Hour °C/°F ] Ajan asetus ja
lämpötilayksikön valinta
7. [ Taste ▼ ] Esiasetetun
valmistuslämpötilan (Well
Done, Medium jne) ja oman
valmistuslämpötilan valinta
8. Vyökiinnike/pöytätuki
9. Paristolokeron kansi
SUOMI
51
2
3
4
6
7
8
9
30
Page 31

Lähetin
11
12
10
13
14
15
10. Mitta-anturin liitäntä
11. Seinäkiinnike
12. [ °C/°F ] Lähettimen/vastaanottimen yhdistäminen ja
lämpötilayksikön valinta
13. [ ON/OFF ]
14. Paristolokeron kansi
15. Pöytätuki
Ennen ensimmäistä
käyttökertaa
Vastaanotin
Vyökiinnike/pöytätuki
1. Vyökiinnikkeessä/pöytätuessa on useita
kiinnityspisteitä käyttötavasta riippuen.
A) Käyttö vyökiinnikkeenä
B) Käyttö pöytätukena
2. Vyökiinnike ja pöytäteline ovat tiukasti kiinni.
Taivuta ne irti varovasti sopivalla työkalulla,
jos ne pitää irrottaa tai jos niiden asentoa
pitää muuttaa.
A
B
SUOMI
Page 32

Paristot
1. Avaa vastaanottimen takana oleva paristolokero ja aseta lokeroon kaksi AAA/
LR03-paristoa. Noudata paristolokeron pohjassa olevia napaisuusmerkintöjä.
2. Laita paristolokeron luukku takaisin paikalleen.
Lähetin
Pöytätuki
Taita auki lähettimen takana oleva
pöytätuki. Pöytätuessa on kaksi
eri asentoa.
Huom.! Jos pöytätuki käännetään vahingossa liian pitkälle, se irtoaa
kiinnikkeestä vahingoittumisen estämiseksi. Paina pöytätuki takaisin
kiinnikkeeseen, niin se toimii taas normaalisti.
Paristot
1. Avaa vastaanottimen takana oleva paristolokero ja aseta lokeroon
kaksi AAA/LR03-paristoa. Noudata paristolokeron pohjassa olevia
napaisuusmerkintöjä.
2. Laita paristolokeron luukku takaisin paikalleen.
Lähettimen ja vastaanottimen
yhteyden muodostaminen
Ota huomioon seuraavat seikat:
• Muut samalla taajuudella toimivat langattomat laitteet voivat
heikentää kantamaa.
• Lähettimen ja vastaanottimen väliset esteet vaikuttavat kaikkien
SUOMI
langattomien laitteiden kantamaan (esim. betoniseinä heikentää
signaalia huomattavasti kipsiseinää enemmän).
Kokeile ongelmatilanteessa seuraavia keinoja:
• Selvitä, aiheuttavatko muut langattomat laitteet ongelmia sammuttamalla ne.
• Siirrä langattomia laitteita, lyhennä laitteiden välistä etäisyyttä ja poista
lähettimen ja vastaanottimen väliset esteet, kuten huonekalut.
32
Page 33

1. Liitä mitta-anturi lähettimen liitäntään (10).
2. Käynnistä lähetin asettamalla lähettimen takana oleva kytkin [ ON/OFF ]
asentoon ON.
3. Käynnistä vastaanotin painamalla [ ON/OFF ] kunnes näyttö syttyy.
Huom.! Vastaanotin pitää käynnistää 2 minuutin kuluessa lähettimen
käynnistämisestä, jotta yhteenliittäminen onnistuu.
4. Paina lähettimen takana olevaa painiketta [ °C/°F ] kunnes lähettimestä
kuuluu äänimerkki ja senhetkinen lämpötila näkyy vastaanottimen
näytöllä. Laitteet on nyt liitetty yhteen.
Huom.!
• Laitteiden välinen kantama optimaalisissa olosuhteissa ilman esteitä
on 30 metriä. Sisätiloissa on paljon kantamaan vaikuttavia esteitä,
kuten seiniä ja huonekaluja.
• Jos laitteet menettävät yhteyden, vastaanottimesta kuuluu äänimerkki
4 sekunnin välein ja näytöllä näkyy ---. Laitteet muodostavat yhteyden
toisiinsa automaattisesti, kun ne ovat kantaman sisäpuolella. Jos
laitteet eivät muodosta yhteyttä toisiinsa, siirrä ne lähemmäs toisiaan
ja muodosta yhteys uudelleen. Sammuta ensin molemmat laitteet ja
muodosta yhteys kappaleen Lähettimen ja vastaanottimen yhteyden
muodostaminen mukaisesti.
Käyttö
Liitä mitta-anturi lähettimeen.
Huom.! Paina mitta-anturin kärki raaka-
aineen paksuimpaan osaan. Älä työnnä
kärkeä liian pitkälle. Vältä kohtia, joissa on
paljon rasvaa.
Varoitus!
• Käytä suojakäsineitä, jos käsittelet mitta-anturia tai johtoa ruoan
valmistuksen aikana.
• Säilytä mitta-anturia ja johtoa lasten ulottumattomissa.
• Puhdista mitta-anturi huolellisesti ennen käyttöä ja käytön jälkeen.
• Älä altista yksiköitä sateelle äläkä upota niitä veteen tai muuhun nesteeseen.
• Älä altista laitteita kuumuudelle äläkä aseta niitä kuumille pinnoille.
• Älä altista mitta-anturia tai johtoa avotulelle.
• Älä käytä lämpömittaria mikroaaltouunissa.
SUOMI
Page 34

Lämpömittarin esiasetettujen lämpötilojen käyttö
Huom.!
Jos olet valinnut esiasetetun lämpötilan, voit muuttaa lämpötilaa kappaleen
Oman valmistuslämpötilan asettaminen mukaisesti.
1. Paina [ MODE ], kunnes näytöllä lukee ”Well done”, ”Medium”,
”Medium rare” tai ”Rare”.
2. Valitse raaka-aine painamalla [ Meat ▲ ].
3. Valitse valmistuslämpötila painamalla [ Taste ▼ ]
4. Kun valittu lämpötila on saavutettu, lämpömittarista kuuluu äänimerkki
ja lämpötila vilkkuu vastaanottimessa.
5. Sammuta äänimerkki millä tahansa painikkeella.
6. Palauta näytön normaaliasetukset painamalla [ MODE ].
Taulukossa on eri raaka-aineiden esiasetetut lämpötilat.
Raaka-aine Näytön
Nauta BEEF 75 °C/167 °F 70 °C/158 °F 60 °C/140 °F 55 °C/131 °F
Vasikka VEAL 75 °C/167 °F 70 °C/158 °F - Karitsa LAMB 75 °C/167 °F 70 °C/158 °F - Porsas PORK 77 °C/171 °F 71 °C/160 °F - Kana CHICK 80 °C/176 °F - - Kalkkuna TURKY 80 °C/176 °F - - Kala FISH 60 °C/140 °F - - Hampurilaispihvi HAMBG 75 °C/167 °F - - -
Well done Medium Medium rare Rare
merkintä
Oman valmistuslämpötilan asettaminen
1. Varmista ettei näytöllä lue ”Well done”, ”Medium”, ”Medium rare”
tai ”Rare”.
2. Jos jokin yllä olevista asetuksista näkyy näytöllä, paina [ MODE ],
kunnes asetus katoaa näytöltä.
3. Aseta sopiva lämpötila painamalla [ Meat ▲ ] tai [ Taste ▼ ].
SUOMI
34
Page 35

Ajastintoiminto
Paina [ MODE ] kunnes ajastin näkyy näytöllä. Ajastimessa on kaksi toimintoa,
ajastin ja ajanotto.
Huom.! Voit käynnistää ajastimen ja sen jälkeen valita jonkin esiasetetuista
valmistuslämpötiloista. Ajastin käy taustalla, mutta se ei näy näytöllä.
Voit katsoa ajastinta painamalla [ Mode ].
Ajastin
1. Aseta minuutit painamalla [ Minute ] ja aseta tunnit painamalla [ Hour ].
2. Käynnistä ajastin painamalla [ ►/■ ].
3. Kun asetettu aika on päättynyt, lämpömittarista kuuluu äänimerkki.
Sammuta äänimerkki millä tahansa painikkeella.
4. Ajastin alkaa laskea aikaa äänimerkin sammuttamisen jälkeen, pysäytä
aika painamalla [ ►/■ ].
5. Nollaa aika painamalla [ ►/■ ].
Ajanotto
1. Käynnistä ajastin painamalla [ ►/■ ].
2. Pysäytä ajastin painamalla [ ►/■ ].
3. Nollaa aika painamalla [ ►/■ ].
Huolto ja ylläpito
• Puhdista lämpömittari kevyesti kostutetulla liinalla. Käytä mietoa
puhdistusainetta. Älä käytä liuottimia tai syövyttäviä kemikaaleja.
• Jos laitetta ei käytetä pitkään aikaan, irrota paristot ja säilytä laitetta
kuivassa ja pölyttömässä paikassa lasten ulottumattomissa.
Huom.!
Mitta-anturia ei saa pestä pesukoneessa eikä juoksevan veden alla. Tuotteen
saa puhdistaa vain pyyhkimällä kevyesti kostutetulla liinalla. Varmista, että
mitta-anturin johtoliitäntään ei pääse vettä. Jos mitta-anturiin pääsee vettä,
se voi vahingoittua ja mittari voi näyttää väärää lämpötilaa.
SUOMI
Page 36

Vianhakutaulukko
Lämpömittari ei käynnisty/
näyttö on epäselvä.
Lämpötila ei näy tai se
näkyy väärin.
Näytöllä lukee LLL tai HHH Mitta-alue (0–300 °C/32–572 °F) on ylittynyt
Lämpötila ei näy näytöllä Laitteet ovat saattaneet menettää yhteyden
Tarkista paristojen kunto ja vaihda
ne tarvittaessa.
• Tarkista että mitta-anturi on liitetty
kunnolla lämpömittariin.
• Tarkasta paristot ja vaihda ne tarvittaessa.
• Onko mitta-anturi painettu kunnolla
raaka-aineeseen?
tai alittunut. Anna mitta-anturin sopeutua
huonelämpötilaan ennen mittaamista.
toisiinsa. Sijoita laitteet lähemmäs tai tee
liitäntä uudelleen kappaleen Lähettimen ja
vastaanottimen yhteyden muodostaminen.
Kierrättäminen
Tämä kuvake tarkoittaa, että tuotetta ei saa hävittää
kotitalousjätteen seassa. Tämä koskee koko EU-aluetta.
Virheellisestä hävittämisestä johtuvien mahdollisten
ympäristö- ja terveyshaittojen ehkäisemiseksi tuote
tulee viedä kierrätettäväksi, jotta materiaali voidaan
käsitellä vastuullisella tavalla. Kierrätä tuote käyttämällä
paikallisia kierrätysjärjestelmiä tai ota yhteys ostopaikkaan.
Ostopaikassa tuote kierrätetään vastuullisella tavalla.
SUOMI
36
Page 37

Tekniset tiedot
Lähetin
Paristot 2 kpl AAA/LR03
Suurin näyttölämpötila 300 °C/572 °F
Mitta-anturi
Suurin lämpötila 300 °C/572 °F
Johdon pituus 105 cm
Johdon suurin lämpötila 380 °C
Vastaanotin
Paristot 2 kpl AAA/LR03
Suurin näyttölämpötila 300 °C/572 °F
Hälytyksen lämpötilasäätö 0–300 °C
Ajastimen asetus 0–23 h 59 min
SUOMI
Page 38

Kabelloses Ofenthermometer
Art.Nr. 44-2239 Modell TPR307+TPX307
Vor Inbetriebnahme diekomplette Bedienungsanleitung durchlesen und
aufbewahren. Irrtümer, Abweichungen und Änderungen behalten wir uns
vor. Bei technischen Problemen oder anderen Fragen freut sich unser
Kundenservice über eine Kontaktaufnahme.
Sicherheitshinweise
• DasProdukt ist nur für den Hausgebrauch und für diein dieser
Bedienungsanleitung beschriebene Benutzung vorgesehen.
• DasProdukt niemals Regen oder Feuchtigkeit aussetzen.
• DieMesssonde des Produktes ist ausschließlich zum Messen der
Temperatur in Lebensmitteln geeignet. DasProdukt nicht für andere
Temperaturmessungen zweckentfremden.
• Niemals benutzte mit unbenutzten Batterien kombinieren. Niemals
wiederaufl adbare mit nicht wiederaufladbaren Batterien kombinieren.
• DasProdukt keinen Stößen und Schlägen aussetzen.
• DasProdukt niemals betreiben, wenn es auf irgendeine Weise
beschädigt ist oder nicht fehlerfrei funktioniert.
• DasProdukt niemals in Wasser oder andere Flüssigkeiten tauchen.
Sofort abtrocknen, falls es feucht oder nass wird.
• Kein Kinderspielzeug.
DEUTSCH
38
Page 39

Produktbeschreibung
Empfänger
1. [ ON/OFF ] Ein/Aus
2. [ Minute ] Einstellung der
Minuten
3. [ ►/■ ] Start/Stopp
und Zurücksetzen der
Timerfunktion
4. [ Meat ▲ ] Einstellung der
Rohware und eigene Wahl
der Zubereitungstemperatur
5. [ Mode ] Wahl der
Temperatur- oder
Timerfunktion
6. [ Hour °C/°F ] Einstellung
der Stunden und Wahl
der Temperatureinheit
7. [ Taste ▼ ] Wahl der
voreingestellten
Zubereitungstemperatur
(Well Done, Medium etc.)
und eigene Wahl der
Zubereitungstemperatur
8. Gürtelclip/Tischstütze
9. Abdeckung über der
Batteriehalterung
2
3
4
8
9
51
6
7
DEUTSCH
Page 40

Sender
11
12
10
13
14
15
10. Anschluss für dieMesssonde
11. Wandhalterung
12. [ °C/°F ] Verbindungsherstellung von Sender/Empfänger
und Wahl der Temperatureinheit
13. [ ON/OFF ]
14. Abdeckung über der Batteriehalterung
15. Tischständer
Vor dem ersten Gebrauch
Empfänger
Gürtelclip/Tischstütze
1. Der Gürtelclip und dieTischstütze haben
verschiedene Befestigungs punkte je
nach Art der Benutzung.
A) Als Gürtelclip
B) Als Tischstütze
2. Der Gürtelclip und dieTischstütze sitzen
stabil. Vorsichtig mit einem geeigneten
Werkzeug lösen, falls sie entfernt werden
oder umgesetzt werden sollen.
A
B
DEUTSCH
40
Page 41

Batterien
1. DasBatteriefach auf der Rückseite des Empfängers öffnen und
2×AAA/LR03-Batterien einsetzen. DieAbbildung unten im
Batteriefach zeigt diekorrekte Ausrichtung der Batterien an.
2. DieBatterieabdeckung wieder anbringen.
Sender
Tischständer
DieTischstütze ander Rückseite
des Senders ausklappen.
DieStütze hat zwei Positionen.
Hinweis: Wird dieTischstütze aus Versehen zu weit ausgeklappt, löst sie
sich von der Halterung, um nicht kaputt zu gehen. DieHalterung wieder
andrücken, dann funktioniert alles wie gehabt.
Batterien
1. DasBatteriefach auf der Rückseite des Empfängers öffnen und
2. 2×AAA/LR03-Batterien einsetzen. DieAbbildung unten im Batteriefach
zeigt diekorrekte Ausrichtung der Batterien an.
3. DieBatterieabdeckung wieder anbringen.
Verbindung von Sender und Empfänger
Bitte beachten:
• Andere Funkausrüstung, dieauf der gleichen Frequenz sendet, kann
dieReichweite beeinträchtigen.
• DieReichweite jeder Funkausrüstung wird durch Hindernisse zwischen
Sender und Empfänger beeinträchtigt (beispielsweise wird dasSignal
durch eine Betonwand deutlich stärker gedämpft als durch eine Gipswand).
Bei Funktionsproblemen bitte folgende Lösungen testen:
• Sonstige Funkausrüstung abschalten, um zu prüfen, ob sie
dieProblemursache ist.
• DieFunkausrüstung versetzen und/oder den Abstand verringern.
Außerdem dieZahl der Hindernisse (Wände, Möbel) zwischen Sender
und Empfänger verringern.
DEUTSCH
Page 42

1. DieMesssonde anden Eingang (10) am Sender anschließen.
2. Um den Sender einzuschalten, [ ON/OFF ] ander Rückseite des
Senders auf ON setzen.
3. [ ON/OFF ] gedrückt gehalten bis dasDisplay aufleuchtet, um den
Empfänger einzuschalten. Hinweis: Der Empfänger muss innerhalb von
2 min nachdem der Sender eingeschaltet wurde ebenfalls eingeschaltet
werden, damit dieVerbindung hergestellt werden kann.
4. [ °C/°F ] auf der Senderrückseite gedrückt halten bis der Empfänger ein
Tonsignal abgibt und dieaktuelle Temperatur auf dem Display erscheint.
DieGeräte sind jetzt miteinander verbunden.
Hinweis:
• Die max. Reichweite für dieGeräte bei optimalen Verhältnissen
ohne Hindernisse beträgt 30 m. Im Innenbereich gibt es zahlreiche
Hindernisse für dasSignal, diebeachtet werden müssen, z. B. Wände,
Möbel und andere Einrichtungsgegenstände, Signale von anderer
Funkausrüstung usw.
• Verlieren dieGeräte due Verbindung zueinander, erklingt alle 4
Sekunden ein Tonsignal und dasDisplay zeigt „---“ an. Verringert
sich der Abstand zwischen den beiden Geräten wird dieVerbindung
automatisch wiederhergestellt. Kann dieVerbindung nicht automatisch
wiederhergestellt werden, dieGeräte nahe einander aufstellen und
dieVerbindung manuell herstellen. Zunächst beide Geräte ausschalten
und dann dieSchritte, dieim Abschnitt Verbindung von Sender und
Empfänger oben beschrieben wurden, durchführen.
Benutzung
DieMesssonde anden Sender anschließen.
Hinweis: DieMesssone immer in den dicksten
Teil der Rohware stecken. Nicht so weit
hineinschieben, dass sie auf der anderen Seite
wieder herausschaut. Partien mit viel Fett
vermeiden.
Warnung:
• Schutzhandschuhe benutzen, wenn dieMesssonde oder dasKabel
während der Zubereitung gehandhabt werden müssen.
• DieMesssonde und dasKabel von Kindern fernhalten.
• DieMesssonde vor und nach jedem Einsatz gründlich reinigen.
DEUTSCH
42
Page 43

• DieGeräte niemals in Kontakt mit Regen kommen lassen bzw. nie in
Wasser oder andere Flüssigkeiten tauchen.
• DieGeräte von starker Hitze und heißen Flächen fernhalten.
• DieMesssonde und dasKabel von offenem Feuer fernhalten.
• DasThermometer niemals in der Mikrowelle verwenden.
Benutzung mit den voreingestellten
Temperaturen des Thermometers
Hinweis:
Wurde eine voreingestellte Temperatur gewählt, kann die Temperatur
dennoch manuell geändert werden, indem die im Abschnitt Wahl einer
eigenen Zubereitungs temperatur beschriebenen Schritte durchgeführt
werden.
1. [ MODE ] gedrückt halten, bis einer der Begriffe „Well done“, „Medium“,
„Medium rare“ oder „Rare“ auf dem Display erscheint.
2. Auf [ Meat ▲ ] drücken, um dieRohware zu wählen.
3. Auf [ Taste ▼ ] drücken, umdie Zubereitungstemperatur auszuwählen.
4. Wenn dievoreingestellte Temperatur erreicht wurde, piepst
dasThermometer und dieTemperatur blinkt auf dem Empfänger.
5. DasTonsignal kann mit einer beliebigen Taste ausgeschaltet werden.
6. [ MODE ] gedrückt halten, um dasDisplay auf dienormale Anzeige
zurückzusetzen.
DieTabelle unten zieht dievoreingestellten Temperaturen
für verschiedene Rohwaren an:
Roware Auf dem
Rindfleisch BEEF 75 °C/167 °F 70 °C/158 °F 60 °C/140 °F 55 °C/
Kalb VEAL 75 °C/167 °F 70 °C/158 °F - Lamm LAMB 75 °C/167 °F 70 °C/158 °F - Schweinefleisch
Hühnchen CHICK 80 °C/176 °F - - Pute TURKY 80 °C/176 °F - - Fisch FISH 60 °C/140 °F - - Hamburger HAMBG 75 °C/167 °F - - -
Display
erscheint
PORK 77 °C/171 °F 71 °C/160 °F - -
Well done Medium Medium rare Rare
131 °F
DEUTSCH
Page 44

Wahl einer eigenen Zubereitungstemperatur
1. Sicherstellen, dass keiner der Begriffe „Well done“, „Medium“,
„Medium rare“ oder „Rare“ auf dem Display erscheint.
2. Wird einer der Begriffe angezeigt, [ MODE ] gedrückt halten, bis er erlischt.
3. [ Meat ▲ ] oder [ Taste ▼ ] drücken oder gedrückt halten, um
diegewünschte Temperatur einzustellen.
Timerfunktion
Auf [ MODE ] drücken, bis der Timer auf dem Display angezeigt wird.
Der Timer hat zwei Funktionen, Timer und Stoppuhr.
Hinweis: Der Timer kann zuerst gestartet werden, um dann eine der
voreingestellten Zubereitungstemperaturen zu wählen. Der Timer läuft in
dem Fall im Hintergrund und wird nicht auf dem Display angezeigt.
Durch Drücken von [ MODE ] kann der Timer jederzeit angezeigt werden.
Timer
1. Auf [ Minute ] drücken, um dieMinuten einzustellen und [ Hour ],
um dieStunden einzustellen.
2. Auf [ ►/■ ] drücken, um den Timer zu starten.
3. Wenn dieeingestellte Zeitdauer abgelaufen ist, gibt dasThermometer
ein Tonsignal von sich. DasTonsignal kann mit einer beliebigen Taste
ausgeschaltet werden.
4. Der Timer fängt andieZeit zu rechen, nachdem dasTonsignal aus geschaltet
wurde, auf [ ►/■ ] drücken, um dieZeitrechnung zu stoppen.
5. [ ►/■ ] gedrückt halten, um zurückzusetzen.
Zeitmessung
1. Auf [ ►/■ ] drücken, um den Timer zu starten.
2. Auf[ ►/■ ] drücken, um zu stoppen.
3. [ ►/■ ] gedrückt halten, um zurückzusetzen.
DEUTSCH
44
Page 45

Pflege und Wartung
• DasGerät mit einem leicht befeuchteten Tuch reinigen. Ein sanftes
Reinigungsmittel verwenden, keine scharfen Chemikalien oder
Reinigungslösungen.
• Bei längerer Nichtbenutzung dieBatterien herausnehmen und
dasGerät trocken und staubfrei außer Reichweite von Kindern
aufbewahren.
Hinweis:
DieMesssonde niemals in der Spülmaschine oder unter laufendem Wasser
reinigen. DasProdukt nur mit einem leicht befeuchteten Tuch abwischen.
Darauf achten, dass kein Wasser in den Kabelanschluss der Messsonde
gelangen kann. Dringt Wasser ein, kann dasProdukt Schaden nehmen,
sodass dasThermometer diefalsche Temperatur anzeigt.
Fehlersuche
DasProdukt lässt sich
nicht einschalten/
dasDisplay ist unleserlich.
DieTemperatur wird
fehlerhaft oder gar nicht
angezeigt.
DasDisplay zeit „LLL“
oder „HHH“.
Auf dem Display wird
keine Temperatur
angezeigt
Sicherstellen, dass dieBatterien nicht leer sind
und dass sie korrekt in der Batteriehalterung
sitzen, bei Bedarf wechseln.
• Sicherstellen, dass dieMesssonde korrekt
anden Sender angeschlossen ist.
• Alle Batterien überprüfen und bei Bedarf
auswechseln.
• Sicherstellen, dass dieMesssonde korrekt
in der Rohware sitzt.
Der Messbereich (0–300 °C/32–572 °F)
wurde über- oder unterschritten.
DieMesssonde auf Zimmertemperatur
abkühlen lassen, bevor eine erneute
Messung durchgeführt wird.
DieGeräte haben womöglich den Kontakt
zueinander verloren. DieGeräte näher
zueinander aufstellen oder dieVerbindung
wie im Abschnitt Verbindung von Sender und
Empfänger beschrieben herstellen.
DEUTSCH
Page 46

Hinweise zur Entsorgung
Dieses Symbol zeigt an, dass dasProdukt nicht gemeinsam
mit dem Haushaltsabfall entsorgt werden darf. Dies gilt in
der gesamten EU. Um möglichen Schäden für dieUmwelt
und Gesundheit vorzubeugen, diedurch fehlerhafte
Abfallentsorgung verursacht werden, dieses Produkt zum
verantwortlichen Recycling geben, um dienachhaltige
Wiederverwertung von stofflichen Ressourcen zu fördern.
Bei der Abgabe des Produktes bitte dievorhandenen
Recycling- und Sammelstationen benutzen oder den
Händler kontaktieren. Dieser kann dasProdukt auf eine
umweltfreundliche Weise recyceln.
Technische Daten
Sender
Batterien 2×AAA/LR03
Max. Anzeigetemperatur 300 °C/572 °F
Messsonde
Höchsttemperatur 300 °C/572 °F
Kabellänge 105 cm
Höchsttemperatur Kabel 380 °C
Empfänger
Batterien 2×AAA/LR03
Max. Anzeigetemperatur 300 °C/572 °F
Temperatureinstellung
für den Alarm 0–300 °C
Zeiteinstellung Timer 0–23 Std. 59 min
DEUTSCH
46
Page 47

Declaration of Conformity
Hereby, Clas Ohlson AB declares that following product(s):
Wireless Meat Thermometer
44-2239
TPR307+TPX307
is in compliance with the essential requirements and other
relevant provisions of Directive 2014/53/EC and 2014/35/EC.
Article 3.1a (Health): EN 62479:2010
Article 3.1a (Safety): EN 60950:2006
+A11:2009+A1:2010
+A12:2011+A2:2013
Article 3.1b (EMC): EN 301 489-1 V1.9.2
EN 301 489-3 V1.6.1
Article 3.2 (Radio): EN 300 220-1 V2.4.1
EN 300 220-2 V2.4.1
Insjön, Sweden, March 2017
Henrik Alfredsson
Technical Manager
Insjön, Sweden, August ,2017
CLAS OHLSON AB, SE-793 85 INSJÖN, SWEDEN
Page 48

SVERIGE
KUNDTJÄNST Tel: 0247/445 00
Fax: 0247/445 09
E-post: kundservice@clasohlson.se
INTERNET www.clasohlson.se
BREV Clas Ohlson AB, 793 85 INSJÖN
NORGE
KUNDESENTER Tlf.: 23 21 40 00
Faks: 23 21 40 80
E-post: kundesenter@clasohlson.no
INTERNETT www.clasohlson.no
POST Clas Ohlson AS, Postboks 485 Sentrum,
0105 OSLO
SUOMI
ASIAKASPALVELU Puh: 020 111 2222
Sähköposti: asiakaspalvelu@clasohlson.fi
INTERNET www.clasohlson.fi
OSOITE Clas Ohlson Oy, Kaivokatu 10 B,
00100 HELSINKI
GREAT BRITAIN
CUSTOMER SERVICE Contact number: 020 8247 9300
E-mail: customerservice@clasohlson.co.uk
INTERNET www.clasohlson.co.uk
POSTAL 10 – 13 Market Place
Kingston Upon Thames
Surrey
KT 1 1JZ
DEUTSCHLAND
KUNDENSERVICE Hotline: 040 2999 78111
E-Mail: kundenservice@clasohlson.de
HOMEPAGE www.clasohlson.de
POSTANSCHRIFT Clas Ohlson GmbH, Jungfernstieg 38,
20354 Hamburg
 Loading...