

Page 1
CW1542
PREMIUM KITCHENWARE
LONGER
FRESHNESS
MORE
JUICE
EASY TO
CLEAN
Page 2

Page 3

Page 4

Slow Juicer
Art.no 18-4655 Model JE5621G-GS
44-1542 JE5621G-GS
ENGLISH
Please read theentire instruction manual before using theproduct and then save
it for future reference. We reserve theright for any errors in text or images and any
necessary changes made to technical data. In theevent of technical problems or other
queries, please contact our Customer Services (see address details on theback).
Safety
• Never use theproduct for longer than 15 minutes at atime.
Switch theproduct off and let themotor cool down for at least
30 minutes before using it again.
• Incorrect handling of this product could result in personal injury.
• Theproduct should always be disconnected from
themains when it is not in use, when it is to be assembled/
disassembled and when it is to be cleaned.
• Switch theproduct off and disconnect it from themains before
changing any accessories or handling any of themoving parts.
• This appliance may not be used by children.
• Keep the appliance and its mains lead out of children’s reach.
• Theproduct may be used by persons with reduced physical,
sensory or mental capability, lack of experience or knowledge
which could jeopardise their safety, provided they have been
given supervision or instruction concerning thesafe use of
theproduct and understand thehazards involved.
• Never let children play with theproduct.
• Ensure that theproduct is used with thecorrect voltage.
Refer to therating plate on theproduct.
• To prevent electric shocks, theproduct and its mains lead
should be kept dry.
• Never lay themains lead over hot surfaces, sharp edges or corners.
• Always disconnect theproduct from thepower supply by
holding and pulling theplug. Do not pull themains lead.
• Make sure that all parts are correctly assembled and that theproduct
is switched off before it is connected to thepower supply.
4
Page 5
• Never operate theproduct without food in thecontainer.
• Never use theproduct close to heat sources.
• Only use theincluded accessories.
• Never use theproduct for anything other than its intended use.
• Do not use theproduct if thefilter is damaged.
• Do not use theappliance without thepulp bin attached.
• Avoid contact with moving parts.
• Ensure that theappliance is placed on aneven and steady surface.
• Themains lead should be checked regularly. Never use
appliances with faulty or damaged power leads. Thepower
lead should only be replaced by aqualified tradesman.
• Make sure that all parts are correctly attached and that
theappliance is switched off when it is connected to
thepower supply.
ENGLISH
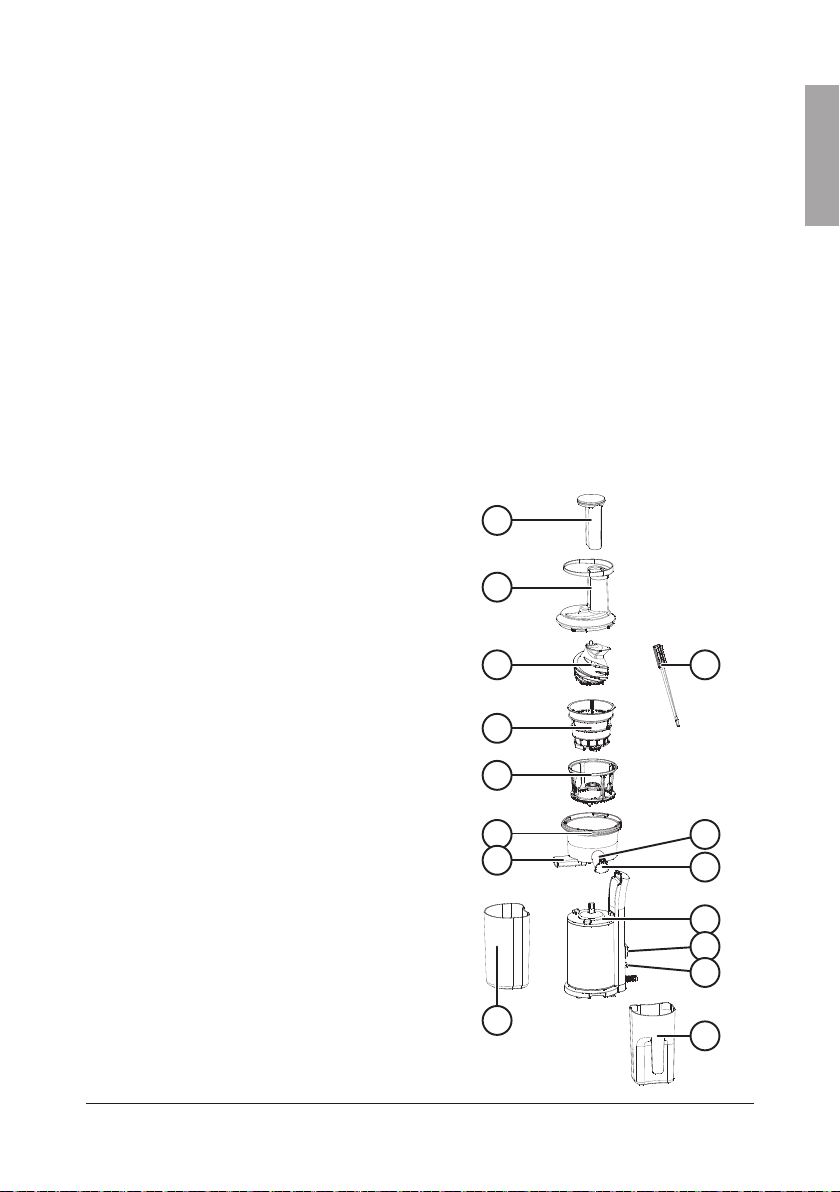
Parts
1. Food pusher
2. Hopper
3. Squeezing screw
4. Small cleaning brush
5. Strainer
6. Spinning brush
7. Juice bowl
8. Pulp spout
9. Juice spout
10. Lid
11. Motor unit
12. Power switch
13. Reset switch
14. Juice container
15. Pulp container
1
2
3
5
6
7
8
15
4
9
10
11
12
13
14
5
Page 6

Before initial use
1. Carefully unpack theparts and place them on aflat surface.
2. Wash all thedetachable parts in warm soapy water. Never immerse themotor unit
ENGLISH
into any type of liquid.
3. Allow all theparts to air-dry before reassembling them. Make sure that themains
lead is not plugged into alive electrical socket.
Note: Thestrainer can be cleaned using theincluded small brush.
Preparing the fruit and vegetables
1. Hard, fibrous foods should be cut into small pieces, 3–5cm in length and
1.5–2cm in width.
2. Tough skin, peel, stalks and seeds, pips should be removed before juicing.
3. Never juice frozen foods or ice.
4. Never juice sugar cane, coconut or cereals without first soaking them in water to
soften them.
5. Do not try to juice too much food at atime.
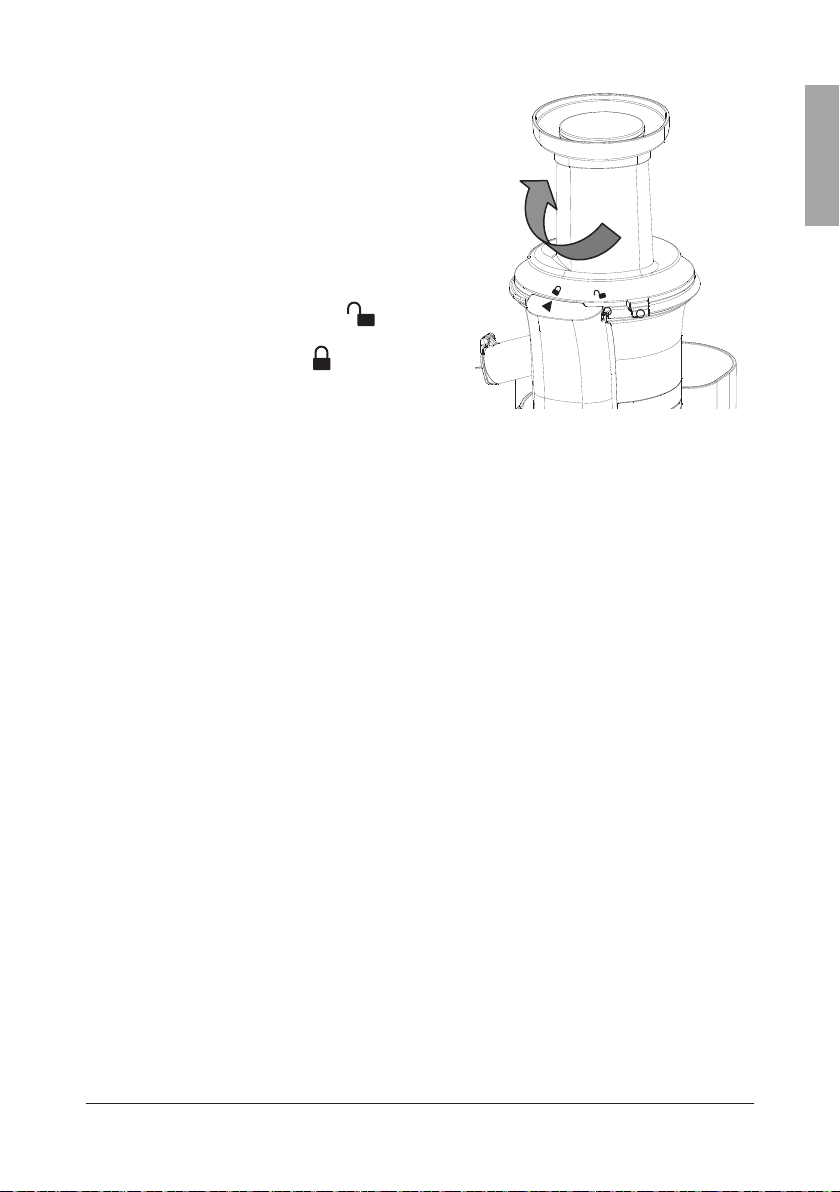
Assembly
1. Place thejuice bowl (7)
onto themotor unit
(11) so that the ▼ and
▲ symbols line up
with each other. Push
thebowl down and twist
it clockwise until it locks
and the
thebottom arrowhead.
2. Make sure that it is tight.
Thejuicer will not start if
thebowl is not locked in
position.
lines up with
3. Make sure that thesluice
flap is fitted correctly in
thepulp spout (8).
6
Page 7
4. Place thestrainer (5) into thespinning brush (6),
line up the ▼ on thestrainer with the ▲
on themotor unit (11) and then push
thestrainer downwards. Make sure that
thestrainer (5) is securely attached to
thejuice bowl (7).
5. Fit thesqueezing screw (3) into thejuice
bowl (7). Thesqueezing screw might need to
be turned alittle until it fits properly.
6. Attach thehopper (2) to thejuice bowl by first
lining the ▲ symbol up with the
and then twisting thehopper clockwise until
thetab locks into theslot
7. Place thejuice container (14) under thejuice
spout (9) and thepulp container (15) under
thepulp spout (8).
Note: Pull back thesluice flap to facilitate thecleaning of thepulp spout (8).
Refit thesluice flap before using thejuicer again.
symbol
.
Operating instructions
1. Before plugging themains lead into awall socket, make sure that thepower
switch (12) is set to the0 position (OFF). Thepower switch has 3 positions: “1”
symbolises ON, “0” symbolises OFF and “R” symbolises REVERSE (can be used
for freeing clogged food).
2. Make sure that thejuice container (14) and pulp container (15) are placed under thespouts.
3. Cut fruits and vegetables into small pieces. For example, carrots can be in pieces
sized 1.5×1.5cm before they are fed into thejuicer.
4. Place thefood into thehopper (2) and if necessary push it down carefully using
thefood pusher (1).
5. Set thepower switch to position 1 (ON). After afew seconds juice will begin to
flow out of thespout.
6. If any food becomes stuck during operation, first set the power switch to 0
and then press the reset button (13). Set the power switch (12) to R for a few
seconds and then try again. If that does not free the clogged food, you will need to
dismantle the juicer to remove the blockage.
7. When thejuice container (14) is full (approx 600ml) or there is no more food to be
juiced, thejuicer should be switched off.
ENGLISH
Note:
• Remove any seeds, pits, pips or stones before processing.
• Never process hard foods.
• Remove thepeel of oranges, lemons, grapefruits and melons before juicing.
• Never operate thejuicer without any food in it.
• Never push food into thehopper using your fingers when thejuicer is switched on.
7
Page 8

• Never use thejuicer for longer than 15 minutes at atime. Thejuicer must rest for at
least 30 minutes between operating cycles.
• Themotor will stop if theinterlock switch between thehopper and themotor unit is
disconnected during operation.
ENGLISH
Care and maintenance
1. Unplug themains lead and let thejuicer cool before cleaning it.
2. Unlock thehopper (2) by twisting it anticlockwise and then remove it.
3. Detach thesqueezing screw (3), strainer (5) and thespinning brush (6).
4. Rotate thejuice bowl (7) to
5. Empty the pulp container (15) and wash all the parts except the motor unit (11) in
running water. The detachable parts (except the motor unit) are also dishwasher safe.
6. Themotor unit can be cleaned using asoft, damp cloth. Never immerse themotor
unit in water.
7. Make sure that all theparts are dry before reassembling thejuicer.
Note: Pull back thesluice flap to facilitate thecleaning of thepulp spout (8).
Refit thesluice flap before using thejuicer again.
and then remove it.
Disposal
This product should be disposed of in accordance with local regulations.
If you are unsure how to proceed, contact your local council.
Specifications
Voltage 220–240 V, 50/60 Hz
Power 150W
8
Page 9

Slow juicer
Art.nr 18-4655 Modell JE5621G-GS
44-1542 JE5621G-GS
Läs igenom hela bruksanvisningen före användning och spara den sedan för framtida bruk.
Vi reserverar oss för ev. text- och bildfel samt ändringar av tekniska data. Vid tekniska
problem eller andra frågor, kontakta vår kundtjänst (se adressuppgifter på baksidan).
Säkerhet
• Använd aldrig produkten längre än 15 minuter åt gången.
Stäng av motorn och låt den kylas ner minst 30 minuter innan
du använder den igen.
• Felaktig användning av produkten kan medföra personskada.
• Koppla alltid bort produkten från elnätet när den inte används,
när du monterar ihop/isär delarna och när den ska rengöras.
• Slå av produkten och koppla bort den från elnätet innan du
byter tillbehör eller handskas med de rörliga delarna.
• Apparaten får inte användas av barn.
• Håll apparaten och dess sladd utom räckhåll för barn.
• Produkten får användas av personer med någon form av
funktionsnedsättning, brist på erfarenhet eller kunskap som
skulle kunna äventyra säkerheten, om de har fått instruktioner
om hur den på ett säkert sätt ska användas och förstår faror
och risker som kan uppkomma.
• Låt aldrig barn leka med produkten.
• Kontrollera att rätt nätspänning används. Se produktens märkskylt.
• För att undvika elektrisk stöt, skydda produkten och dess
nätsladd från fukt och väta.
• Placera aldrig nätsladden över heta ytor, skarpa kanter eller hörn.
• Koppla aldrig bort produkten från elnätet genom att dra
i nätsladden, dra alltid i stickproppen.
• Se till att produktens delar är korrekt monterade och att
produkten är avstängd före anslutning till elnätet.
• Använd aldrig produkten utan innehåll i behållaren.
• Använd aldrig produkten i närheten av värmekällor.
SVENSKA
9
Page 10
• Använd endast medföljande tillbehör.
• Använd endast produkten till det den är avsedd för.
• Produkten får inte användas om silen är skadad.
• Använd inte produkten utan fruktköttsbehållaren inkopplad.
• Undvik kontakt med delar som rör sig.
• Se till att produkten står på ett plant och stabilt underlag.
• Nätsladden bör regelbundet kontrolleras. Använd aldrig
apparaten om dess nätsladd eller stickpropp är skadad.
Nätsladden får endast bytas ut av försäljningsstället eller
SVENSKA
kvalificerad yrkesman.
• Se till att produktens delar är korrekt monterade och att den
är avstängd före anslutning till elnätet.
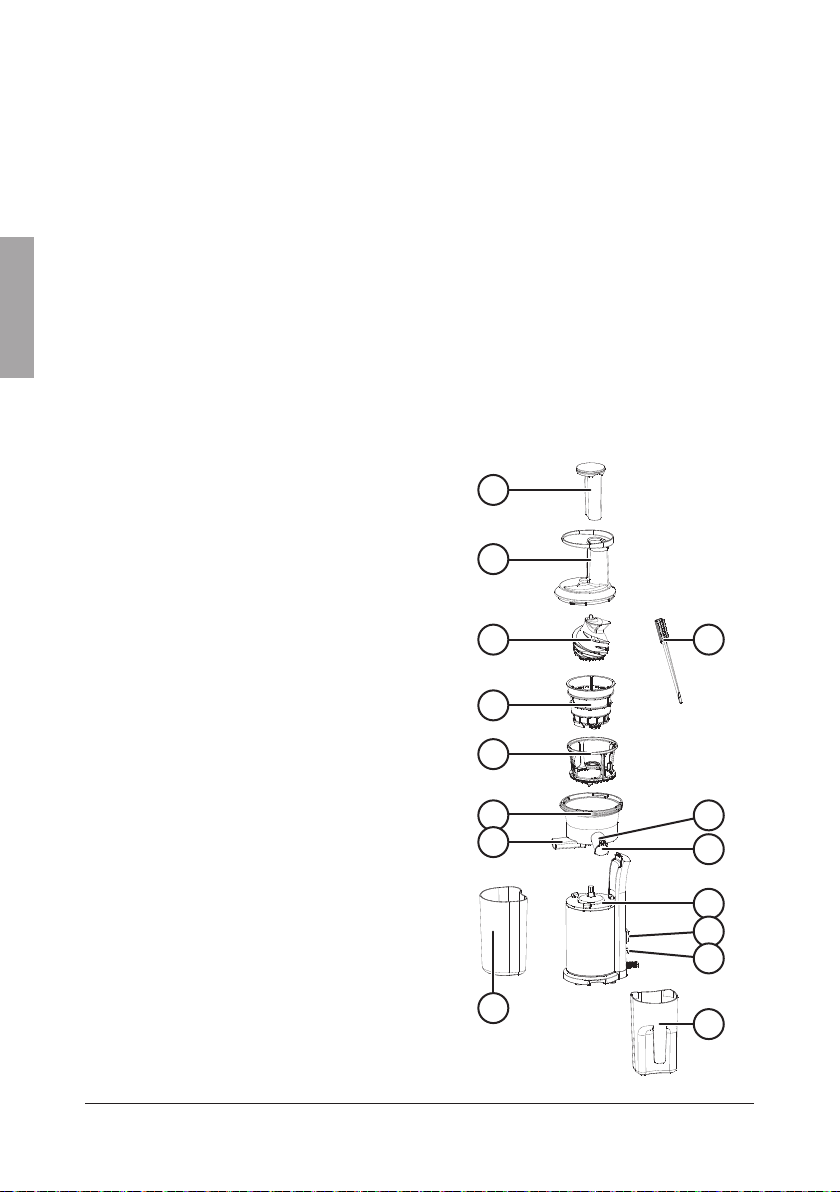
Delar
1. Påmatare
2. Påfyllningsrör
3. Skärhuvud
4. Liten borste
5. Sil
6. Roterande rengöringsborste
7. Juicetratt
8. Fruktköttspip
9. Juicepip
10. Lock
11. Motordel
12. Strömbrytare
13. Återställning
14. Juicebehållare
15. Fruktköttsbehållare
1
2
3
5
6
7
8
15
4
9
10
11
12
13
14
10
Page 11

Före första användning
1. Packa upp alla delarna och lägg dem på ett plant underlag.
2. Lägg alla löstagbara delar i varmt vatten med lite diskmedel och rengör.
Sänk aldrig ned motordelen i vätska.
3. Torka alla delar ordentligt innan du sätter ihop dem igen. Kontrollera att
nätsladden inte är ansluten till ett vägguttag.
Obs! Silen kan rengöras med den lilla borsten som medföljer.
Förbered ingredienserna
1. Ingredienser som är hårda ska skäras i mindre bitar, ca 3–5 cm långa och
1,5–2 cm breda.
2. Ta bort eventuellt skal, stjälk och kärnor innan tillagning.
3. Använd aldrig frysta ingredienser eller is.
4. Använd aldrig sockerrör, kokosnöt eller flingor etc. utan att de blivit uppmjukade
i vatten innan.
5. Överfyll inte maskinen med ingredienser.
Montering
1. Placera juicetratten (7)
ovanför motordelen (11)
så att ▼ och ▲ matchar
varandra. Sänk sedan ned
juicetratten (7) och vrid
den medsols för att låsa
fast vid
2. Se till att den sitter fast
ordentligt. Det går inte att
starta slow juicern om den
inte är korrekt monterad.
.
SVENSKA
3. Se till att gummipluggen
är monterad korrekt med
fruktköttspipen (8).
11
Page 12

4. Placera silen (5) i den roterande
rengöringsborsten (6) och se till att matcha
▼ på silen med ▲ på motordelen (11) och
tryck sedan nedåt. Kontrollera att silen (5)
sitter fast ordentligt i juicetratten (7).
5. Montera skärhuvudet (3) i juicetratten (7).
Vid behov, skruva lite på skärhuvudet (3)
för att få det att sitta ordentligt.
6. Montera påfyllningsröret (2) genom att matcha
▲ med
det låses fast
7. Sätt juicebehållaren (14) under pipen (8)
SVENSKA
och fruktköttsbehållaren (15) vid
fruktköttspipen (8).
Obs! Lossa gummipluggen för att förenkla rengöringen av fruktköttspipen (8). Sätt tillbaka den
igen innan användning.
och vrid sedan medsols tills
.
Användning
1. Innan du ansluter stickproppen till ett vägguttag, se till att strömbrytaren (12) är
i läge 0. Strömbrytaren har 3 lägen: ”1” symboliserar på, ”0” symboliserar av och
”R” symboliserar bakåt (används när något har fastnat).
2. Se till att juicebehållaren (14) och fruktköttsbehållaren (15) är korrekt placerade.
3. Skär fruktbitarna i mindre delar. Exempelvis morötter ska vara i storleken ca 1,5×1,5 cm
innan de stoppas ned i slow juicern.
4. Lägg i ingredienser i påfyllningsröret (2) och om det behövs tryck försiktigt med
påmataren (1).
5. Tryck på strömbrytaren så den hamnar i läge 1 (på). Efter några sekunder rinner
juicen ut.
6. Om något fastnar under användning, ställ strömbrytaren i läge 0 och tryck sedan på
återställningsknappen (13). Ställ strömbrytaren (12) i läge R i några sekunder och prova
igen. Om inte det fungerar måste du ta isär slow juicern och ta bort det som fastnat.
7. När juicebehållaren (14) är full (ca 600 ml) eller ingredienserna är slut, stäng av
slow juicern.
Obs!
• Ta bort alla kärnor innan tillredning.
• Tillred aldrig hårda ingredienser.
• Ta bort allt skal från ingredienserna innan tillredning.
• Använd aldrig slow juicern utan ingredienser.
• Stoppa aldrig ned händer eller fingrar under användning.
• Använd aldrig längre än 15 min. Slow juicern måste svalna minst 30 min efter
användning innan den får användas igen.
• Motorn stannar automatiskt om inte monteringen är korrekt utförd eller om någon
del hoppar ur sitt läge.
12
Page 13

Skötsel och underhåll
1. Dra ut nätsladden ur vägguttaget och låt slow juicern svalna innan rengöring.
2. Lås upp påfyllningsröret (2) genom att vrida det motsols och ta bort det.
3. Ta bort skärhuvudet (3), silen (5) och den roterande rengöringsborsten (6).
4. Rotera juicetratten (7) till
5. Töm fruktköttsbehållaren (15) och rengör alla delar utom motordelen (11) under
rinnande vatten. De löstagbara delarna (ej motordelen) tål även maskindisk.
6. Torka av motordelen med en mjuk och lätt fuktad trasa. Sänk aldrig ned
motordelen i vatten.
7. Kontrollera att alla delar är ordentligt torra innan slow juicern monteras ihop igen.
Obs! Lossa gummipluggen för att förenkla rengöringen av fruktköttspipen (8). Sätt
tillbaka den innan användning sker igen.
och ta sedan bort den.
Avfallshantering
När du ska göra dig av med produkten ska detta ske enligt lokala föreskrifter.
Är du osäker på hur du ska gå tillväga, kontakta din kommun.
Specifikationer
Nätspänning 220–240 V, 50/60 Hz
Effekt 150 W
SVENSKA
13
Page 14

Slow juicer
Art.nr. 18-4655 Modell JE5621G-GS
44-1542 JE5621G-GS
Les brukerveiledningen grundig før produktet tas i bruk og ta vare på den for framtidig bruk.
Vi reserverer oss mot ev. feil i tekst og bilde, samt forandringer av tekniske data.
Ved tekniske problemer eller spørsmål, ta kontakt med vårt kundesenter.
(Se opplysninger om kundesenteret i denne bruksanvisningen).
Sikkerhet
• Bruk ikke produktet mer enn 15 minutter i strekk. Skru av
motoren og la den avkjøles i 30 minutter før den startes igjen.
• Feil bruk av produktet kan føre til personskader.
• Når produktet ikke er i bruk skal det kobles fra strømnettet.
NORSK
Det skal også kobles fra nettet ved rengjøring og når delene
monteres/demonteres.
• Før skifte av tilbehør og ved behandling av de bevegelige delene
skal produktet slås av og strømledningen kobles fra strømnettet.
• Produktet må ikke brukes av barn.
• Hold produktet og dets ledning utenfor barns rekkevidde.
• Produktet kan benyttes av personer med funksjonshemming
og manglende erfaring og kunnskap om produktet, dersom
noen har lært dem opp i bruken av produktet og forståelse for
faren ved bruk av det.
• La aldri barn leke med produktet.
• Kontroller at spenningen på strømnettet er riktig. Se merkingen
på produktet.
• For å unngå elektrisk støt, må strømledningen og apparatet
holdes unna fuktighet og vann.
• Sørg for at strømledningen aldri kommer i kontakt med varme
flater, eller skarpe kanter og hjørner.
• Apparatet skal aldri kobles fra strømnettet ved å trekke i strømkabelen. Dra alltid i støpselet.
• Påse at produktets deler er riktig montert og at det er avslått,
før det kobles til strømnettet.
14
Page 15

• Bruk aldri produktet uten innhold i beholderen.
• Bruk aldri produktet nær varmekilder.
• Bruk kun det tilbehøret som følger med.
• Bruk produktet kun til det det er beregnet for.
• Apparatet må ikke benyttes hvis silen er skadet.
• Bruk ikke apparatet hvis ikke fruktkjøttbeholderen er innkoblet.
• Unngå kontakt med bevegelige deler.
• Påse at apparatet står på et stabilt og plant underlag.
• Strømledningen bør kontrolleres regelmessig. Bruk aldri apparatet
hvis strømledningen eller kontakten er skadet. Strømledningen
må bare byttes av salgsstedet eller kvalifisert servicetekniker.
• Påse at apparatets deler er riktig montert og at apparatet er
avslått, før det kobles til strømnettet.
Deler
1. Mater
2. Påfyllingsrør
3. Skjærehode
4. Liten børste
5. Sil
6. Roterende rengjøringsbørste
7. Juicetrakt
8. Fruktkjøtt-tut
9. Juice-tut
10. Lokk
11. Motordel
12. Strømbryter, utenpåliggende
13. Tilbakestille (Reset)
14. Juicebeholder
15. Fruktkjøttbeholder
1
2
3
5
6
7
8
15
NORSK
4
9
10
11
12
13
14
15
Page 16

Før første gangs bruk
1. Pakk forsiktig ut delene og legg dem på et mykt underlag.
2. Legg alle avtakbare deler i varmt såpevann og vask dem. Senk aldri motordelen
ned i væske.
3. La alle deler lufttørke før du setter dem sammen igjen. Kontroller at ledningen ikke
er koblet til et strømuttak.
Obs! Silen kan rengjøres med den lille børsten som følger med.
Preparering av ingrediensene
1. Harde ingredienser må skjæres opp i mindre biter på ca. 3–5 cm lengde og
1,5–2 cm bredde.
2. Fjern eventuelt skall, stilker og kjerner før tilberedningen.
3. Bruk aldri frosne ingrediensene eller is.
4. Bruk aldri sukkerrør, kokosnøtter, korn etc. uten at de har blitt oppmyket i vann.
5. Maskinen må ikke overfylles med ingredienser.
NORSK
Montering
1. Plasser juicetrakten (7)
oppå motordelen (11)
sånn at symbolene ▼
og ▲ står rett ovenfor
hverandre. Senk deretter
juicetrakten (7) ned og drei
den medsols så den låses
fast ved
2. Sjekk at den sitter
ordentlig festet. Slow
juiceren kan ikke startes
hvis den ikke er montert.
.
3. Påse at gummipluggen er
montert riktig.
16
Page 17

4. Plasser silen (5) i den roterende rengjøringsbørsten (6) og se til at ▼ på silen passer
til ▲ på motordelen (11) og trykk deretter
nedover. Kontroller at silen (5) sitter godt
festet til juicetrakten (7).
5. Monter skjærhodet (3) i juicetrakten (7).
Skru litt på skjærhodet ved behov for å få
det til å sitte ordentlig.
6. Monter påfyllingsrøret (2) Ved at ▲ stemmer
overens med
den låses
7. Sett juicebeholderen (14) under tuten (9) og
fruktkjøttbeholderen (15) ved fruktkjøtt-tuten (8).
Obs! Løsne på gummipluggen slik at det blir
enklere å rengjøre fruktkjøtt-tuten (8). Sett den
tilbake igjen før bruk.
og drei deretter medsols til
.
Bruk
1. Før støpselet kobles til et strømuttak må du passe på at strømbryteren (12) er
innstilt på 0. Strømbryteren har 3 innstillingsposisjoner: «1» symboliserer på,
«0» symboliserer av og «R» symboliserer bakover (benyttes når noe har satt seg fast).
2. Pass på at juicebeholderen (14) og fruktkjøttbeholderen (15) er riktig plassert.
3. Kapp fruktbitene opp i mindre deler. Gulrøtter skal for eksempel deles opp i biter
på ca. 1,5×1,5 cm før de puttes oppi slow juiceren.
4. Legg ingrediensene i påfyllingsrøret (2) og trykk forsiktig ned med påmateren (1).
5. Trykk på strømbryteren så den står på 1 (på). Etter noen få sekunder renner juicen ut.
6. Hvis noe skulle sette seg fast ved bruk, still strømbryteren på 0 og trykk inn
resetknappen (13). Still strømbryteren (12) på R i noen sekunder, og prøv igjen.
Hvis det ikke fungerer må du demontere slow juiceren og fjerne det som sitter fast.
7. Når juicebeholderen (14) er full (ca. 600 ml), eller det ikke er mer å presse,
skal slow juiceren skrus av.
Obs!
• Fjern alle kjerner og steiner før tilberedning.
• Bruk aldri harde ingredienser i maskinen.
• Skrell ingrediensene før tilberedning.
• Kjør aldri maskinen uten ingredienser i.
• Putt aldri hender eller fingre ned i maskinen.
• Bruk ikke produktet mer enn 15 minutter i strekk. La den avkjøles i minst 30 minutter
etter hver kjøre-økt, så den rekker å bli kald igjen.
• Motoren stopper automatisk hvis maskinen ikke er satt sammen riktig eller hvis
noe hopper ut av stilling.
NORSK
17
Page 18

Stell og vedlikehold
1. Før rengjøring må støpselet trekkes ut og produktet avkjøles.
2. Lås opp påfyllingsrøret (2) ved å dreie det mot solen og ta det av.
3. Ta bort skjærhodet (3), silen (5) og den roterende rengjøringsbørsten (6).
4. Drei juicetrakten (7) til
5. Tøm fruktkjøttbeholderen (15) og rengjør alle delene, bortsett fra motordelen
(11), under rennende vann. De avtakbare delene (ikke motordelen) tåler også
maskinvask.
6. Rengjør motordelen (11) med en myk og lett fuktet klut. Senk aldri motordelen
ned i vann.
7. Kontroller at alle deler er ordentlig tørre før slow juiceren monteres sammen igjen.
Obs! Løsne på gummipluggen slik at det blir enklere å rengjøre fruktkjøtt-tuten (8).
Sett den tilbake igjen før bruk.
og ta den av.
Avfallshåndtering
Når produktet skal kasseres, må det skje i henhold til lokale forskrifter.
NORSK
Hvis du er usikker, ta kontakt med lokale myndigheter.
Spesifikasjoner
Nettspenning 220–240 V, 50/60 Hz
Effekt 150 W
18
Page 19

Slow juicer
Tuotenro 18-4655 Malli JE5621G-GS
44-1542 JE5621G-GS
Lue käyttöohje ennen tuotteen käyttöönottoa ja säilytä se tulevaa tarvetta varten.
Pidätämme oikeuden teknisten tietojen muutoksiin. Emme vastaa mahdollisista teksti-
tai kuvavirheistä. Jos tuotteeseen tulee teknisiä ongelmia, ota yhteys myymälään tai
asiakaspalveluun (yhteystiedot käyttöohjeen lopussa).
Turvallisuus
• Älä käytä laitetta yhtäjaksoisesti yli 15 minuuttia kauempaa.
Sammuta moottori ja anna laitteen jäähtyä vähintään 30 minuuttia,
ennen kuin käytät sitä uudelleen.
• Laitteen virheellinen käyttö saattaa johtaa käyttäjän
loukkaantumiseen.
• Irrota laite aina pois sähköverkosta, kun sitä ei käytetä, kun
irrotat tai liität laitteen osia tai kun puhdistat laitetta.
• Sammuta laite ja irrota se sähköverkosta ennen kuin vaihdat
tarvikkeita tai käsittelet teräviä osia.
• Lapset eivät saa käyttää laitetta.
• Pidä laite ja sen johto lasten ulottumattomissa.
• Henkilöt, joilla on fyysisiä tai psyykkisiä rajoitteita, tai henkilöt,
joilla ei ole riittävästi turvallisuuteen vaikuttavia taitoja tai
kokemusta, saavat käyttää laitetta, jos heitä on ohjeistettu sen
turvallisesta käytöstä ja käytön mahdollisista vaaroista.
• Älä anna lasten leikkiä laitteella.
• Varmista, että verkkovirta on oikea. Tarkista verkkovirta
laitteen merkkikilvestä.
• Älä altista laitetta tai sen virtajohtoa kosteudelle sähköiskujen
välttämiseksi.
• Älä sijoita virtajohtoa kuumien pintojen, terävien reunojen tai
kulmien päälle.
• Älä vedä johdosta, kun irrotat pistokkeen pistorasiasta, vaan
vedä aina pistokkeesta.
• Varmista ennen sähköverkkoon liittämistä, että kaikki osat on
asennettu oikein ja että laite on sammutettu.
SUOMI
19
Page 20

• Älä käytä laitetta, jos säiliö on tyhjä.
• Älä käytä laitetta lämmönlähteiden läheisyydessä.
• Käytä ainoastaan mukana tulevia tarvikkeita.
• Älä käytä laitetta muihin kuin sille tarkoitettuihin tehtäviin.
• Laitetta ei saa käyttää, jos sihti on vahingoittunut.
• Älä käytä laitetta, jos siihen ei ole liitetty hedelmälihasäiliötä.
• Vältä liikkuvien osien koskemista.
• Varmista, että laite on tasaisella ja vakaalla alustalla.
• Tarkista virtajohdon kunto säännöllisesti. Älä käytä laitetta,
mikäli laite tai sen virtajohto on vioittunut. Virtajohdon saa
vaihtaa ainoastaan valtuutettu sähkömies.
• Varmista ennen sähköverkkoon liittämistä, että kaikki osat on
asennettu oikein ja että laite on sammutettu.
Osat
1. Työnnin
2. Täyttöputki
3. Teräosa
4. Pieni harja
SUOMI
5. Sihti
6. Pyörivä puhdistusharja
7. Mehusuppilo
8. Hedelmälihanokka
9. Mehunokka
10. Kansi
11. Moottoriosa
12. Virtakytkin
13. Asetusten palauttaminen
14. Mehusäiliö
15. Hedelmälihasäiliö
1
2
3
5
6
7
8
15
4
9
10
11
12
13
14
20
Page 21

Ennen ensimmäistä käyttökertaa
1. Ota kaikki osat pakkauksesta ja laita ne tasaiselle alustalle.
2. Puhdista kaikki irrotettavat osat lämpimällä vedellä ja astianpesuaineella.
Älä upota moottoriosaa nesteeseen.
3. Kuivaa kaikki osat huolella, ennen kuin laitat ne paikoilleen. Varmista, että
virtajohdon pistoke ei ole pistorasiassa.
Huom.! Puhdista sihti mukana tulevalla pienellä harjalla.
Ainesten valmisteleminen
1. Leikkaa kovat ainekset 3–5 cm:n pituisiksi ja 1,5–2 cm:n levyisiksi paloiksi.
2. Poista kuoret, kannat ja siemenet ennen valmistamista.
3. Älä käytä pakastettuja aineksia tai jäätä.
4. Jos käytät sokeriruokoa, kookospähkinää, hiutaleita ym., liota niitä ensin vedessä,
jotta ne pehmenevät.
5. Älä laita liikaa aineksia.
Asennus
1. Aseta mehusuppilo (7)
moottoriosan (11) päälle
niin, että symbolit ▼ ja ▲
ovat kohdakkain.
Laske mehusuppilo
(7) sen jälkeen alas ja
lukitse se kiertämällä sitä
myötäpäivään
2. Varmista, että mehusuppilo
on kunnolla kiinni. Laitetta
ei voi käynnistää, jos sen
osat eivät ole kunnolla
paikallaan.
.
SUOMI
3. Varmista, että kumitulppa
on asennettu kunnolla
hedelmälihanokkaan (8).
21
Page 22

4. Laita sihti (5) pyörivään puhdistusharjaan (6)
ja varmista, että sihdin ja moottoriosan (11)
symbolit ▼ ja ▲ ovat kohdakkain, ja paina
sen jälkeen sihtiä alaspäin. Varmista, että
sihti (5) on kunnolla kiinni mehusuppilossa (7).
5. Asenna teräosa (3) mehusuppiloon (7).
Kierrä teräosaa (3) tarvittaessa hieman,
jotta se menee kunnolla kiinni.
6. Asenna täyttöputki (2) niin, että ▲ ja
ovat kohdakkain, ja kierrä myötäpäivään,
kunnes se lukittu kiinni
7. Aseta mehusäiliö (14) mehunokan (9) alle ja
hedelmälihasäiliö (15) hedelmälihanokan (8)
alle.
Huom.! Irrota kumitulppa, kun puhdistat hedelmälihanokan (8). Laita tulppa takaisin,
ennen kuin käytät laitetta seuraavan kerran.
.
Käyttö
1. Varmista, että virtakytkin (12) on asennossa 0, ennen kuin liität pistokkeen
pistorasiaan. Virtakytkimessä on kolme asentoa: ”1” = päällä, ”0” = pois päältä ja
”R” = peruutus (käytetään, jos koneeseen on juuttunut ruoka-aineksia).
2. Varmista, että mehusäiliö (14) ja hedelmälihasäiliö (15) on asennettu kunnolla.
3. Leikkaa hedelmät pieniksi paloiksi. Leikkaa esim. porkkanat 1,5×1,5 cm:n paloiksi
SUOMI
ennen kuin laitat ne laitteeseen.
4. Laita ainekset täyttöputkeen (2) ja paina tarvittaessa varoen työntimellä (1).
5. Paina virtakytkin asentoon 1 (päällä). Laitteesta tulee mehua muutaman sekunnin
kuluttua.
6. Jos laitteeseen juuttuu aineksia käytön aikana, aseta virtakytkin asentoon 0 ja paina
sen jälkeen palautuspainiketta (13). Aseta virtakytkin (12) asentoon R muutaman
sekunnin ajaksi, ja kokeile uudelleen. Jos tämä ei auta, sammuta laite, irrota osat ja
poista juuttuneet ainekset.
7. Sammuta laite, kun mehusäiliö (14) on täynnä (noin 600 ml) tai ainekset ovat loppu.
Huom.!
• Poista kaikki siemenet ennen mehustamista.
• Älä mehusta kovia aineksia.
• Poista kaikki kuoret ennen valmistamista.
• Älä käytä laitetta tyhjänä.
• Älä laita laitteeseen käsiä tai sormia käytön aikana.
• Älä käytä laitetta yli 15 minuuttia pidempään. Laitteen tulee jäähtyä vähintään
30 minuuttia ennen seuraavaa käyttökertaa.
• Moottori pysähtyy automaattisesti, jos laitetta ei ole asennettu kunnolla tai jos sen
osat joutuvat pois paikoiltaan.
22
Page 23

Huolto ja puhdistaminen
1. Irrota pistoke pistorasiasta ja anna laitteen jäähtyä ennen puhdistusta.
2. Avaa täyttöputken (2) lukitus kiertämällä putkea vastapäivään ja irrota putki.
3. Irrota teräosa (3), sihti (5) ja pyörivä puhdistusharja (6).
4. Kierrä mehusuppiloa (7) kohtaan
5. Tyhjennä hedelmälihasäiliö (15) ja puhdista moottoriosaa (11) lukuun ottamatta kaikki
osat juoksevan veden alla. Irrotettavat osat (ei moottoriosa) voidaan pestä koneessa.
6. Pyyhi moottoriosa pehmeällä ja kevyesti kostutetulla liinalla. Älä upota moottoriosaa
veteen.
7. Varmista, että kaikki osat ovat kuivia, ennen kuin laitat ne takaisin paikalleen.
Huom.! Irrota kumitulppa, kun puhdistat hedelmälihanokan (8). Laita tulppa takaisin,
ennen kuin käytät laitetta seuraavan kerran.
ja irrota suppilo.
Kierrätys
Kierrätä tuote asianmukaisesti, kun poistat sen käytöstä.
Tarkempia kierrätysohjeita saat kuntasi jäteneuvonnasta.
Tekniset tiedot
Verkkojännite 220–240 V, 50/60 Hz
Teho 150 W
SUOMI
23
Page 24

Slow Juicer
Art.Nr. 18-4655 Modell JE5621G-GS
44-1542 JE5621G-GS
Vor Inbetriebnahme diekomplette Bedienungsanleitung durchlesen und aufbewahren.
Irrtümer, Abweichungen und Änderungen behalten wir uns vor. Bei technischen Problemen
oder anderen Fragen freut sich unser Kundenservice über eine Kontaktaufnahme
(Kontakt siehe Rückseite).
Sicherheitshinweise
• DasProdukt nie länger als 15 Minuten am Stück betreiben.
Vor dem erneuten Einsatz den Motor abschalten und
mindestens 30 Minuten abkühlen lassen.
• Falsche Anwendung des Produkts kann zu Verletzungen führen.
• Wenn dasProdukt nicht verwendet wird, immer
dieStromversorgung unterbrechen. Ebenso beim Einbau/
Ausbau von Teilen und beim Reinigen.
• Vor dem Auswechseln von Zubehör und dem Hantieren mit
den beweglichen Teilen dasProdukt abschalten und von der
Stromversorgung trennen.
• DasGerät ist nicht für Kinder geeignet.
• DasGerät und dessen Kabel außer Reichweite von
Kindern halten.
• DasGerät ist für Personen mit eingeschränkten physischen,
sensorischen oder geistigen Fähigkeiten bzw. mangelnder
DEUTSCH
Erfahrung/mangelndem Wissen nur dann geeignet, wenn
diese in diesichere Handhabung eingeführt worden sind und
dieRisiken und Gefahren der Benutzung verstehen.
• Kein Kinderspielzeug.
• Sicherstellen, dass dieNetzspannung mit der Betriebsspannung
des Ladegerätes übereinstimmt. Siehe Typenschild des Produkts.
• Zur Vermeidung von Stromschlägen dasProdukt und
dasNetzkabel vor Feuchtigkeit und Nässe schützen.
• DasNetzkabel niemals über heiße Flächen oder scharfe
Kanten führen.
24
Page 25

• Um dasGerät vom Netz zu trennen immer am Stecker und
nicht am Kabel ziehen.
• Sicherstellen, dass alle Teile des Gerätes korrekt montiert
sind und dass dasGerät vom dem Anschluss ans Stromnetz
ausgeschaltet ist.
• DasGerät nie ohne Inhalt im Behälter benutzen.
• Nie dasGerät in der Nähe von Hitzequellen benutzen.
• Nur dasmitgelieferte Zubehör benutzen.
• DasGerät nur für den dafür vorgesehenen Zweck benutzen.
• DasGerät nicht betreiben, wenn dasSieb beschädigt ist.
• DasGerät nicht ohne Fruchtfleischbehälter verwenden.
• Kontakt mit sich bewegenden Teilen vermeiden.
• Darauf achten, dass dasGerät auf einer ebenen und stabilen
Unterlage steht.
• DasNetzkabel regelmäßig auf Fehler überprüfen. DasGerät
nie verwenden, wenn Stromkabel oder Stecker beschädigt
sind. DasNetzkabel darf nur von der Verkaufsstelle oder
qualifiziertem Fachpersonal ausgewechselt werden.
• Sicherstellen, dass alle Teile des Gerätes korrekt montiert
sind und dass dasGerät vom dem Anschluss ans Stromnetz
ausgeschaltet ist.
25
DEUTSCH
Page 26

Teile
1. Stopfer
2. Einfüllrohr
3. Scherkopf
4. Kleine Bürste
5. Sieb
6. Rotierende Reinigungsbürste
7. Safttrichter
8. Fruchtfleischausguss
9. Saftausguss
10. Deckel
11. Motoreinheit
12. Schalter
13. Zurücksetzen auf Werkseinstellung
14. Saftbehälter
15. Fruchtfleischbehälter
1
2
3
4
5
6
7
8
9
10
11
12
13
15
Vor dem ersten Gebrauch
1. Alle Teile auspacken und auf eine ebene Unterlage legen.
2. Alle abnehmbaren Teile mit warmem Wasser und etwas Spülmittel reinigen.
DEUTSCH
Nie die Motoreinheit in Flüssigkeit tauchen.
3. Alle Teile ordentlich abtrocknen, bevor sie wieder zusammengesetzt werden.
Sicherstellen, dass dasNetzkabel nicht aneine Steckdose angeschlossen ist.
Hinweis: DasSieb kann mit der kleinen mitgelieferten Bürste gereinigt werden.
Die Zutaten vorbereiten
1. Harte Zutaten in kleinere Teile schneiden, ca. 3–5 cm lang und 1,5–2 cm breit.
2. Schale, Stängel und Kerne, falls vorhanden, vor der Zubereitung entfernen.
3. Niemals gefrorene Zutaten oder Eis verwenden.
4. Niemals Zuckerrohr, Kokosnuss, Haferflocken etc. verwenden, ohne diese zuvor in
Wasser aufzuweichen.
5. Nicht zu viele Zutaten in dasGerät geben.
26
14
Page 27

Montage
1. Den Safttrichter (7) so über
der Motoreinheit (11) halten,
dass dieSymbole ▼ und
▲ sich gegenüber liegen.
Dann den Safttrichter
(7) aufsetzen und im
Uhrzeigersinn drehen um
ihn an
2. Auf festen Sitz
kontrollieren. Es ist nicht
möglich, den Slow Juicer
zu starten, wenn dies
nicht korrekt montiert
wurde.
3. Sicherstellen, dass der
Gummistöpsel korrekt am
Fruchtfleischausguss [ 8 ]
montiert ist.
4. DasSieb (5) in der rotierenden
Reinigungsbürste (6) platzieren und
sicherstellen, dass ▼ am Sieb mit ▲ ander
Motoreinheit (11) übereinstimmt und dann
nach unten drücken. Sicherstellen, dass
dasSieb (5) ordentlich im Safttrichter (7) fest
sitzt.
5. Den Schneidkopf (3) im Safttrichter (7)
montieren. Bei Bedarf den Schneidknopf (3)
etwas drehen, damit er ordentlich fest sitzt.
6. DasNachfüllrohr (2) anbringen und dabei
▲ mit
drehen, bis es einrastet
7. Den Saftbehälter (14) unter den Ausguss (9)
und den Fruchtfleischbehälter (15) unterden
Fruchtfleischausguss (8) stellen.
zu verriegeln.
abstimmen, dann im Uhrzeigersinn
.
DEUTSCH
Hinweis: Den Gummistöpsel lösen, um dieReinigung des Fruchtfleischausgusses (8)
zu vereinfachen. Vor dem nächsten Gebrauch wieder anbringen.
27
Page 28

Bedienung
1. Bevor der Stecker aneine Steckdose angeschlossen wird, sicherstellen, dass
der Schalter (12) in Position 0 ist. Der Schalter hat 3 Positionen: „1“ bedeutet
eingeschaltet, „0“ ausgeschaltet und „R“ bedeutet rückwärts (wird benutzt wenn
etwas feststeckt).
2. Sicherstellen, dass der Saftbehälter (14) und der Fruchtfleischbehälter (15) korrekt
angebracht wurden.
3. DieFrüchte in kleinere Teile zerschneiden. Karotten sollen z. B. eine Größe von
ca. 1,5×1,5 cm haben, bevor sie in den Slow Juicer gegeben werden.
4. DieZutaten in dasNachfüllrohr (2) legen und bei Bedarf vorsichtig mit dem Stopfer
(1) herunterdrücken.
5. Den Schalter auf Position 1 (ein) versetzen. Nach einigen Sekunden rinnt der Saft
heraus.
6. Bleibt während des Gebrauchs etwas stecken, den Schalter erst auf Position 0 setzen
und dann die Wiederherstellungstaste (13) drücken. Den Schalter (12) ein paar
Sekunden lang auf Position R setzen und dann erneut testen. Funktioniert dies
nicht, den Slow Juicer auseinander nehmen und das feststeckende Teil entfernen.
7. Ist der Saftbehälter (14) voll (ca. 600 ml) oder dieZutaten zu Ende, dasGerät
ausschalten.
Hinweis:
• Vor der Zubereitung alle Kerne entfernen.
• Niemals harte Zutaten zubereiten.
• Vor der Zubereitung immer dieSchale entfernen.
• DasGerät nie ohne Zutaten laufen lassen.
• Niemals dieHand oder Finger während der Benutzung in dasGerät stecken.
• Nie länger als 15 Minuten am Stück betreiben. DasGerät nach dem Gebrauch
min. 30 min abkühlen lassen, bevor es erneut verwendet wird.
• Der Motor bleibt automatisch stehen, wenn dieMontage nicht korrekt ausgeführt
wurde, oder ein ein Teil aus seiner Position rutscht.
DEUTSCH
28
Page 29

Pflege und Wartung
1. Vor der Reinigung stets dasGerät abschalten, den Netzstecker ziehen und
dasGerät abkühlen lassen.
2. DasNachfüllrohr (2) entsperren, indem es gegen den Uhrzeigersinn gedreht wird,
dann abnehmen.
3. Den Schneidkopf (3), dasSieb (5) und dierotierende Reinigungsbürste (6) entfernen.
4. Den Safttrichter (7) auf
5. Den Fruchtfleischbehälter (15) entleeren und alle Teile außer der Motoreinheit (11)
unter fließendem Wasser reinigen. Die abnehmbaren Bestandteile (außer die Motoreinheit) sind spülmaschinenfest.
6. DieMotoreinheit mit einem weichen, leicht befeuchteten Tuch abwischen.
DieMotoreinheit niemals in Wasser tauchen.
7. Sicherstellen dass alle Teile gut getrocknet sind, bevor dasGerät erneut
zusammengebaut wird.
Hinweis: Den Gummistöpsel lösen, um dieReinigung des Fruchtfleischausgusses (8)
zu vereinfachen. Vor dem nächsten Gebrauch wieder anbringen.
drehen und dann abnehmen.
Hinweise zur Entsorgung
Bitte dasProdukt entsprechend den lokalen Bestimmungen entsorgen.
Weitere Informationen sind von der Gemeinde oder den kommunalen
Entsorgungsbetrieben erhältlich.
Technische Daten
Netzspannung 220–240 V AC, 50/60 Hz
Leistungsaufnahme 150 W
29
DEUTSCH
Page 30

Page 31

Page 32

SVERIGE
KUNDTJÄNST Tel: 0247/445 00
Fax: 0247/445 09
E-post: kundservice@clasohlson.se
INTERNET www.clasohlson.se
BREV Clas Ohlson AB, 793 85 INSJÖN
NORGE
KUNDESENTER Tlf.: 23 21 40 00
Faks: 23 21 40 80
E-post: kundesenter@clasohlson.no
INTERNETT www.clasohlson.no
POST Clas Ohlson AS, Postboks 485 Sentrum, 0105 OSLO
SUOMI
ASIAKASPALVELU Puh: 020 111 2222
Sähköposti: asiakaspalvelu@clasohlson.fi
INTERNET www.clasohlson.fi
OSOITE Clas Ohlson Oy, Maistraatinportti 4 A, 00240 HELSINKI
GREAT BRITAIN
CUSTOMER SERVICE Contact number: 020 8247 9300
E-mail: customerservice@clasohlson.co.uk
INTERNET www.clasohlson.co.uk
POSTAL 10 – 13 Market Place
Kingston Upon Thames
Surrey
KT1 1JZ
DEUTSCHLAND
KUNDENSERVICE Unsere Homepage www.clasohlson.de
besuchen und auf Kundenservice klicken.
 Loading...