

IA4100
Speakerphone
Installation, Configuration, Operation & Troubleshooting
Administrator Guide
800.205.7186 • www.codeblue.com

Administrator Guide
Table of Contents
Section Page
2 Introduction................................................................................. 3
3 Getting Started............................................................................ 4
4 Circuit Board Connector List..................................................... 6
5 Installation................................................................................... 7
6 Optional Flush Mount Enclosure Installation Instructions.... 8
7 Connecting Power Sources....................................................... 9
8 Connecting PSTN/PBX Services.............................................. 10
9 Connecting Auxiliary Devices.................................................. 11
10 Installation Into Code Blue Units............................................. 12
IA4100
11 Basic Programming................................................................... 13
12 Advanced Programming............................................................ 14
12.1 Initial Call-In Commands................................................ 15
12.2 Commands During a Call............................................... 16
12.3 Programming Commands.............................................. 17
13 Troubleshooting....................................................................... .. 25
14 Warranty & Regulatory............................................................... 29
Notice
Every effort was made to ensure that the information in this document was complete and accurate at
the time of printing. However, information is subject to change.
IA4100 Full Duplex Disclaimer
This mode of operation is dependent on the systems/services that the IA4100 is connected to. Various systems, including VoIP systems, Analog Terminal Adapters, etc. may cause adverse functional-
ity due to multiple acoustic echo cancelling points throughout the system conguration.
TCP/IP
Customers may experience differences in product performance, reliability and security depending
upon network congurations/design and topologies, even when the product performs as warranted.
Code Blue • 259 Hedcor Street • Holland, MI 49423 USA • 800.205.7186 • www.codeblue.com
GU-139-Jpage 2 of 29
IA4100
Administrator Guide
2 Introduction
Thank you for choosing the Code Blue IA4100 half/full duplex analog speakerphone(s), intercom(s)
and paging device(s) for indoor and outdoor applications. These speakerphones are part of our
Emergency Signaling group of products that are built to meet the latest regulations, withstand the
harshest elements and be proactive solutions for when you need them most. This guide provides
basic and advanced programming information for obtaining the best performance with the IA4100
speakerphone(s).
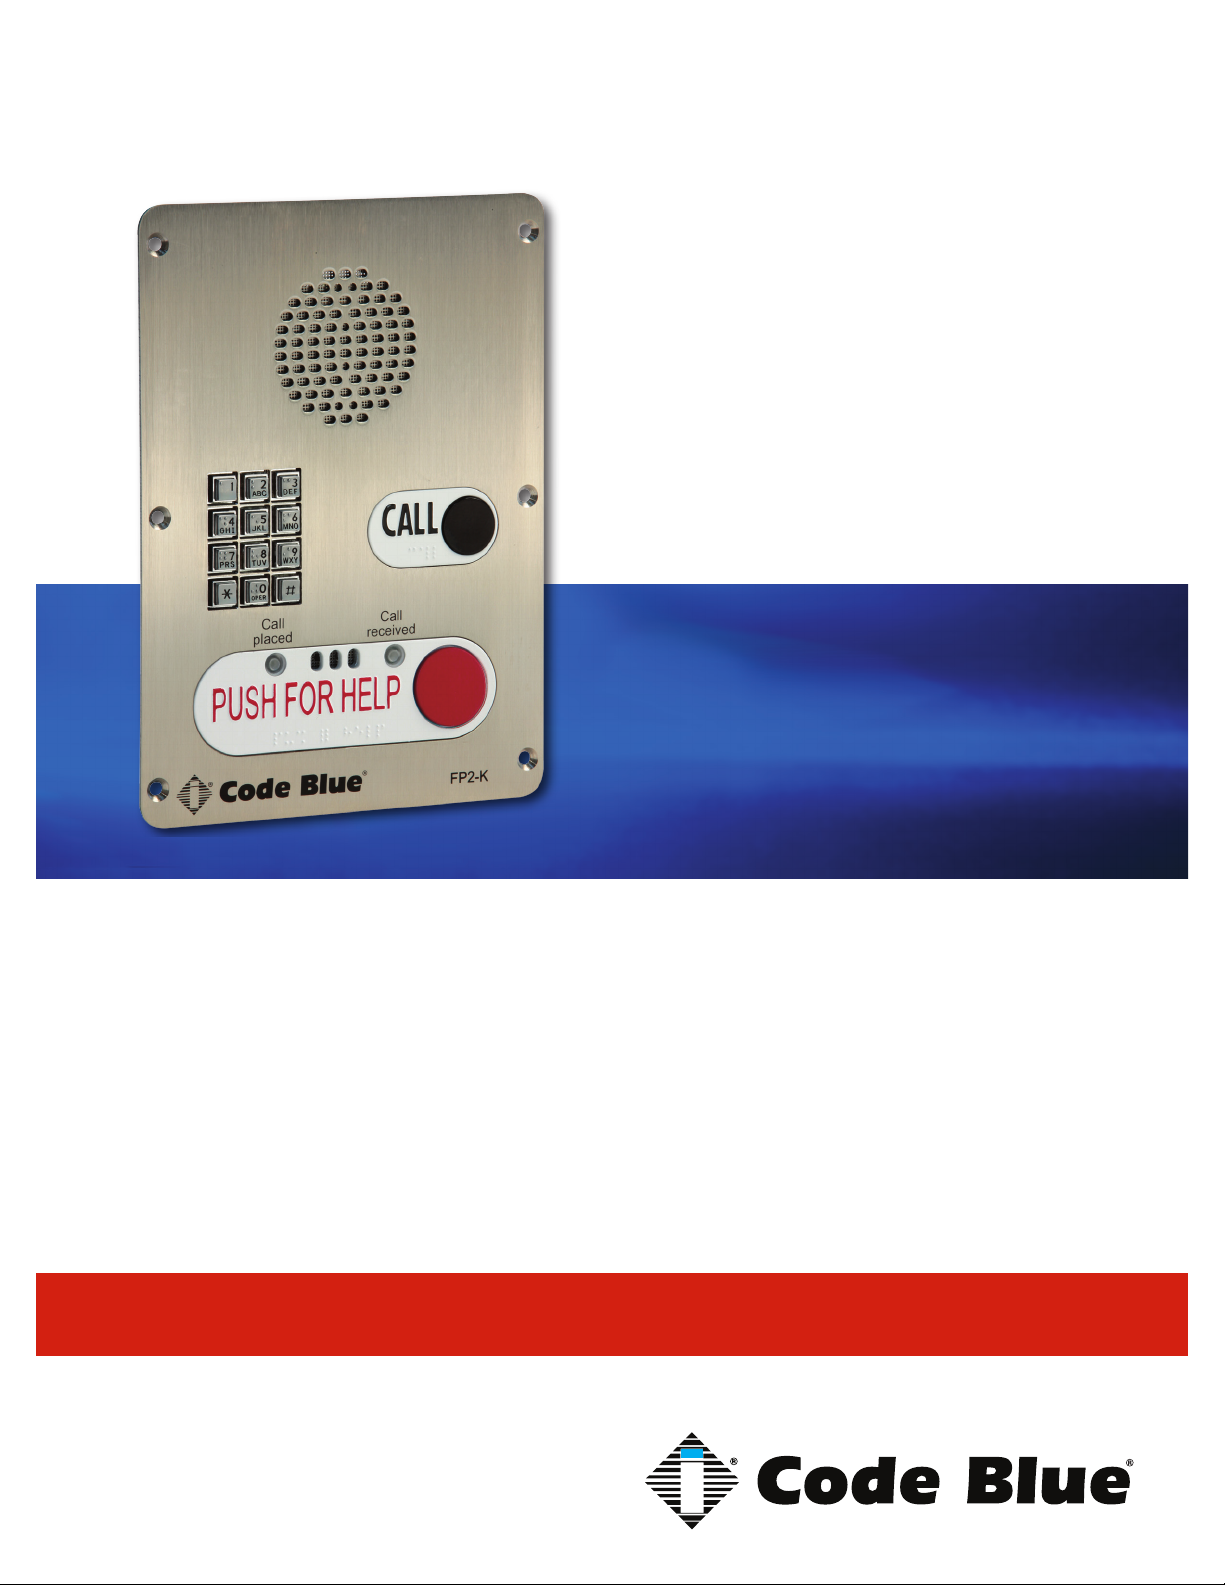
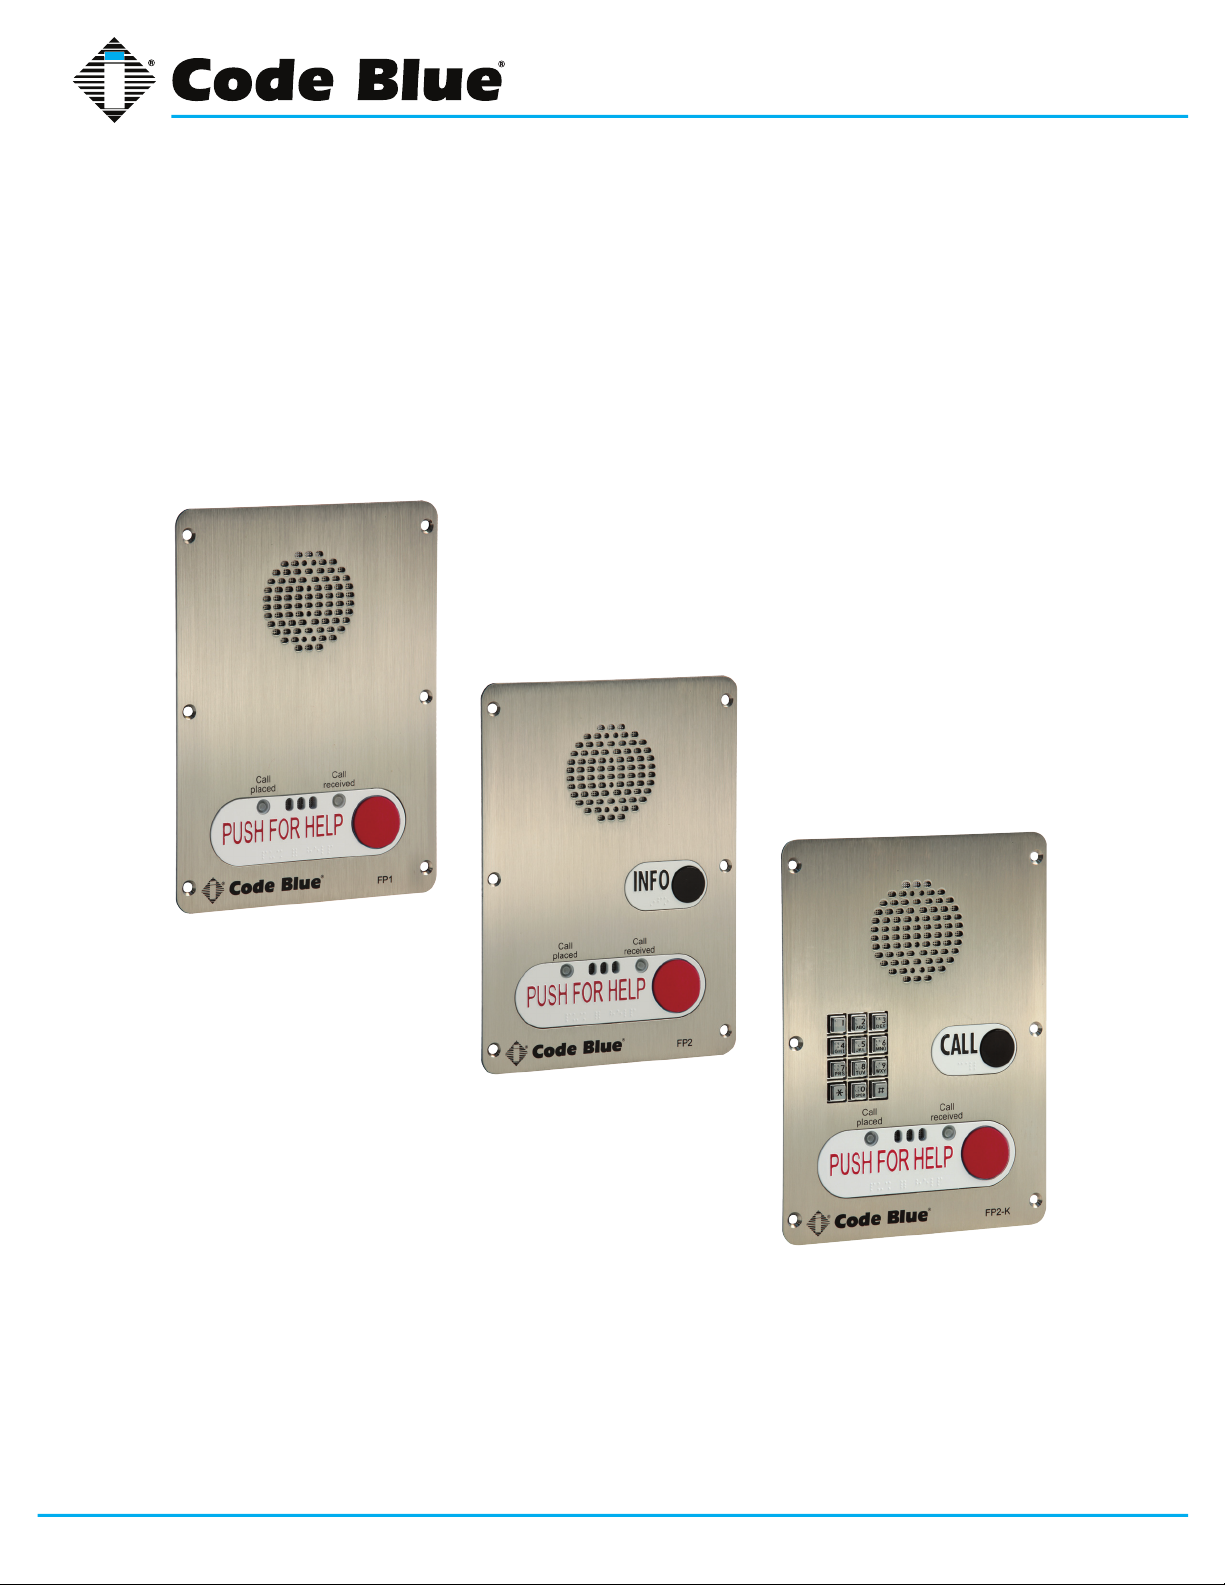
IA4100 Single Button
IA4100 Double Button
IA4100 Double Button + Keypad
Code Blue • 259 Hedcor Street • Holland, MI 49423 USA • 800.205.7186 • www.codeblue.com
GU-139-Jpage 3 of 29
IA4100
Administrator Guide
3 Getting Started
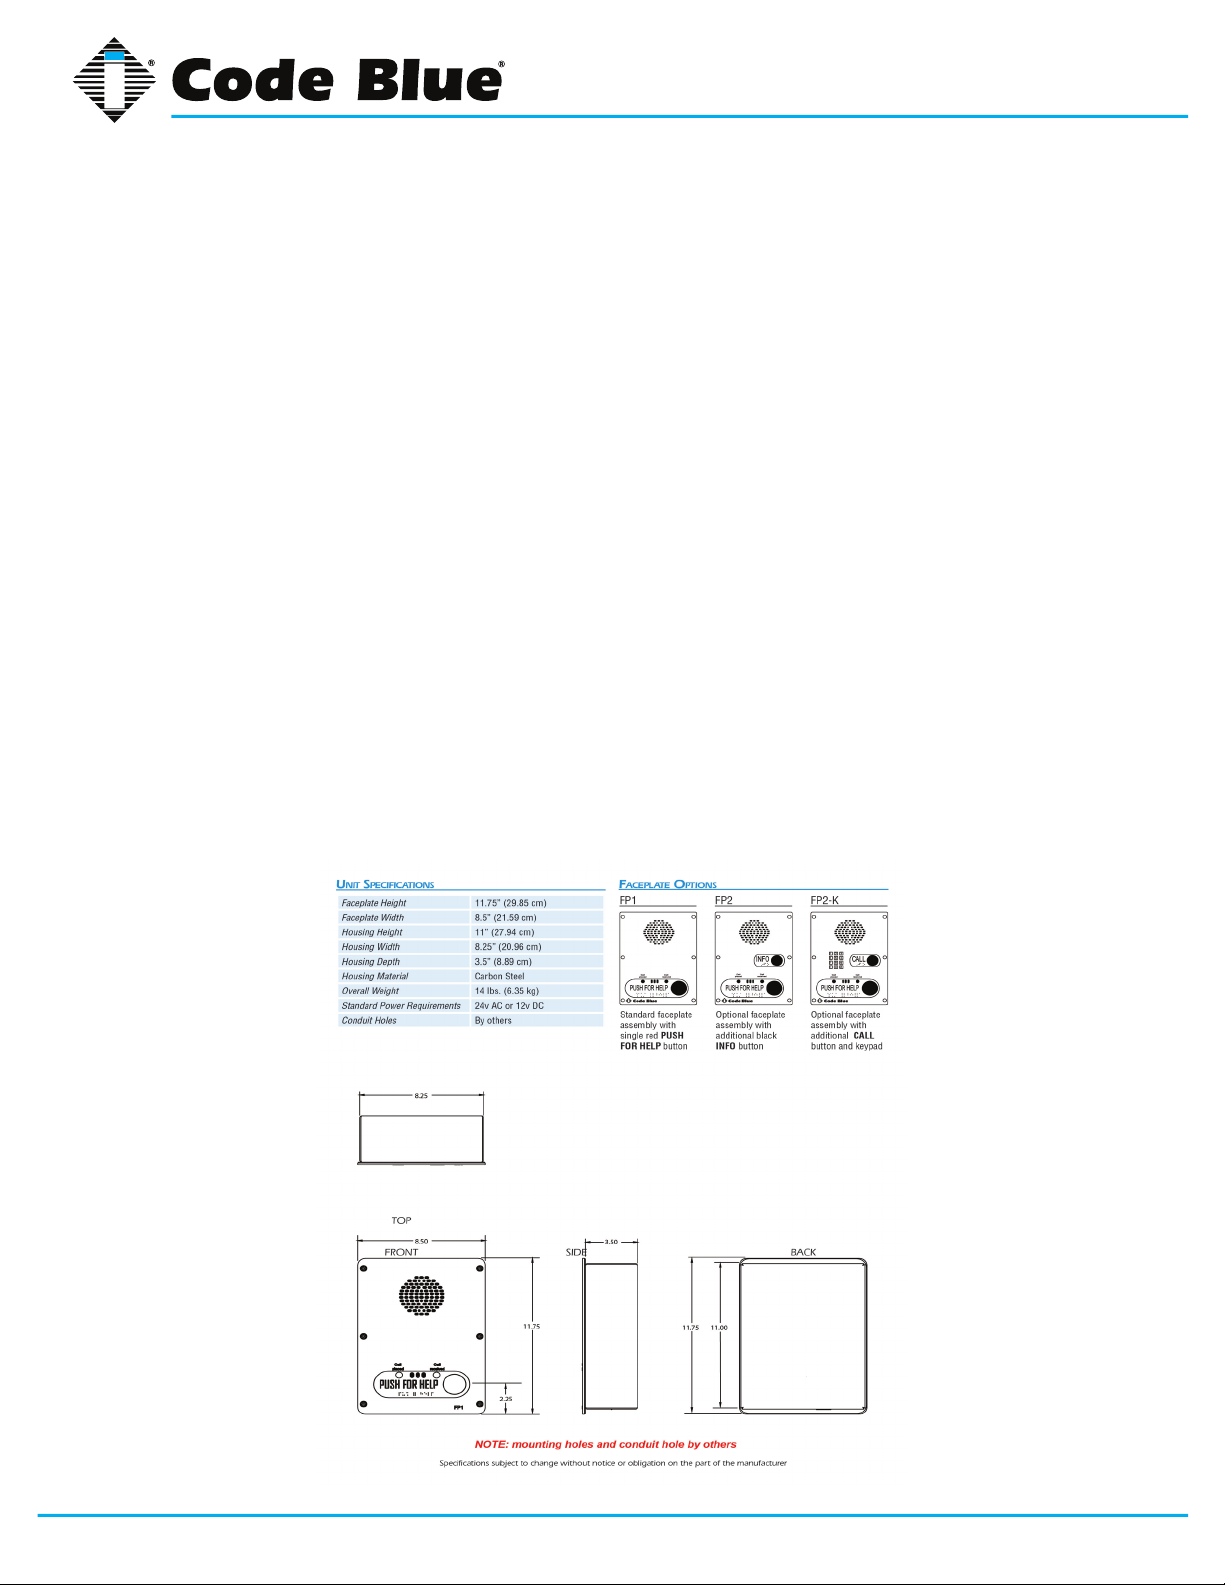
The IA4100 speakerphone is a hands-free, ADA-compliant emergency speakerphone designed for
outdoor or indoor use. Code Blue’s latest generation of speakerphones establishes a new industry
benchmark for both features and reliability. It is a highly vandal resistant unit incorporating a .125”
stainless steel faceplate, a self-healing, aluminum 1.5” piezoelectric push button, self-monitoring
ability and fault reporting for loss of power and low battery voltage.
The IA4100 is designed to automatically dial any one of the pre-programmed numbers (determined
by priority programming) or initiate a PBX Private Line Automatic Ringdown (PLAR) circuit and illuminate a .375” diameter vivid red LED indicating “Call placed.” Upon receipt of the call, the IA4100
identies itself with a digital recorded voice message and illuminates a separate .375” diameter
green LED indicating “Call received.” The IA4100 is also capable of activating peripheral devices
such as CCTV or strobe lights via one of its three normally open or three normally closed auxiliary
outputs. All functions of the IA4100 speakerphone are remotely programmable via any touch-tone
phone or Code Blue’s Unit Programming and Diagnostic (UPD) software package, and are protect-
ed by a user dened security code.
NOTE: Programming via a cell phone is subject to the quality of the call’s DTMF tone transmission.
Throughout this guide you will see the following two references:
Caller: This is the person activating the IA4100 speakerphone by pressing a button or activating the
auxiliary input.
Callee: This is the person receiving the call from the IA4100; typically a guard, 911 operators, dis-
patch ofcer, etc.
Code Blue • 259 Hedcor Street • Holland, MI 49423 USA • 800.205.7186 • www.codeblue.com
GU-139-Jpage 4 of 29
Administrator Guide
Note: If the IA4100 is purchased separate from an enclosure, the following parts are included:
Quantity Part # Description
1 50001 PUSH FOR HELP single button Included
1 42” Power Harness Included
1 10’ Phone Cord w/RJ11 Included
6 Faceplate Security Screws Included
1 Security Bit Included
Note: The following are optional parts available for the IA4100
Part # Description
50002 PUSH FOR HELP Double Button Optional
50003 PUSH FOR HELP Double Button w/Keypad Optional
41471 Analog Modular Phone Line Surge Suppressor Optional
40064 4 Ohm Speaker - 3 Pack Optional
40354 Microphone Assembly Optional
IA4100
Code Blue • 259 Hedcor Street • Holland, MI 49423 USA • 800.205.7186 • www.codeblue.com
GU-139-Jpage 5 of 29
IA4100
Administrator Guide
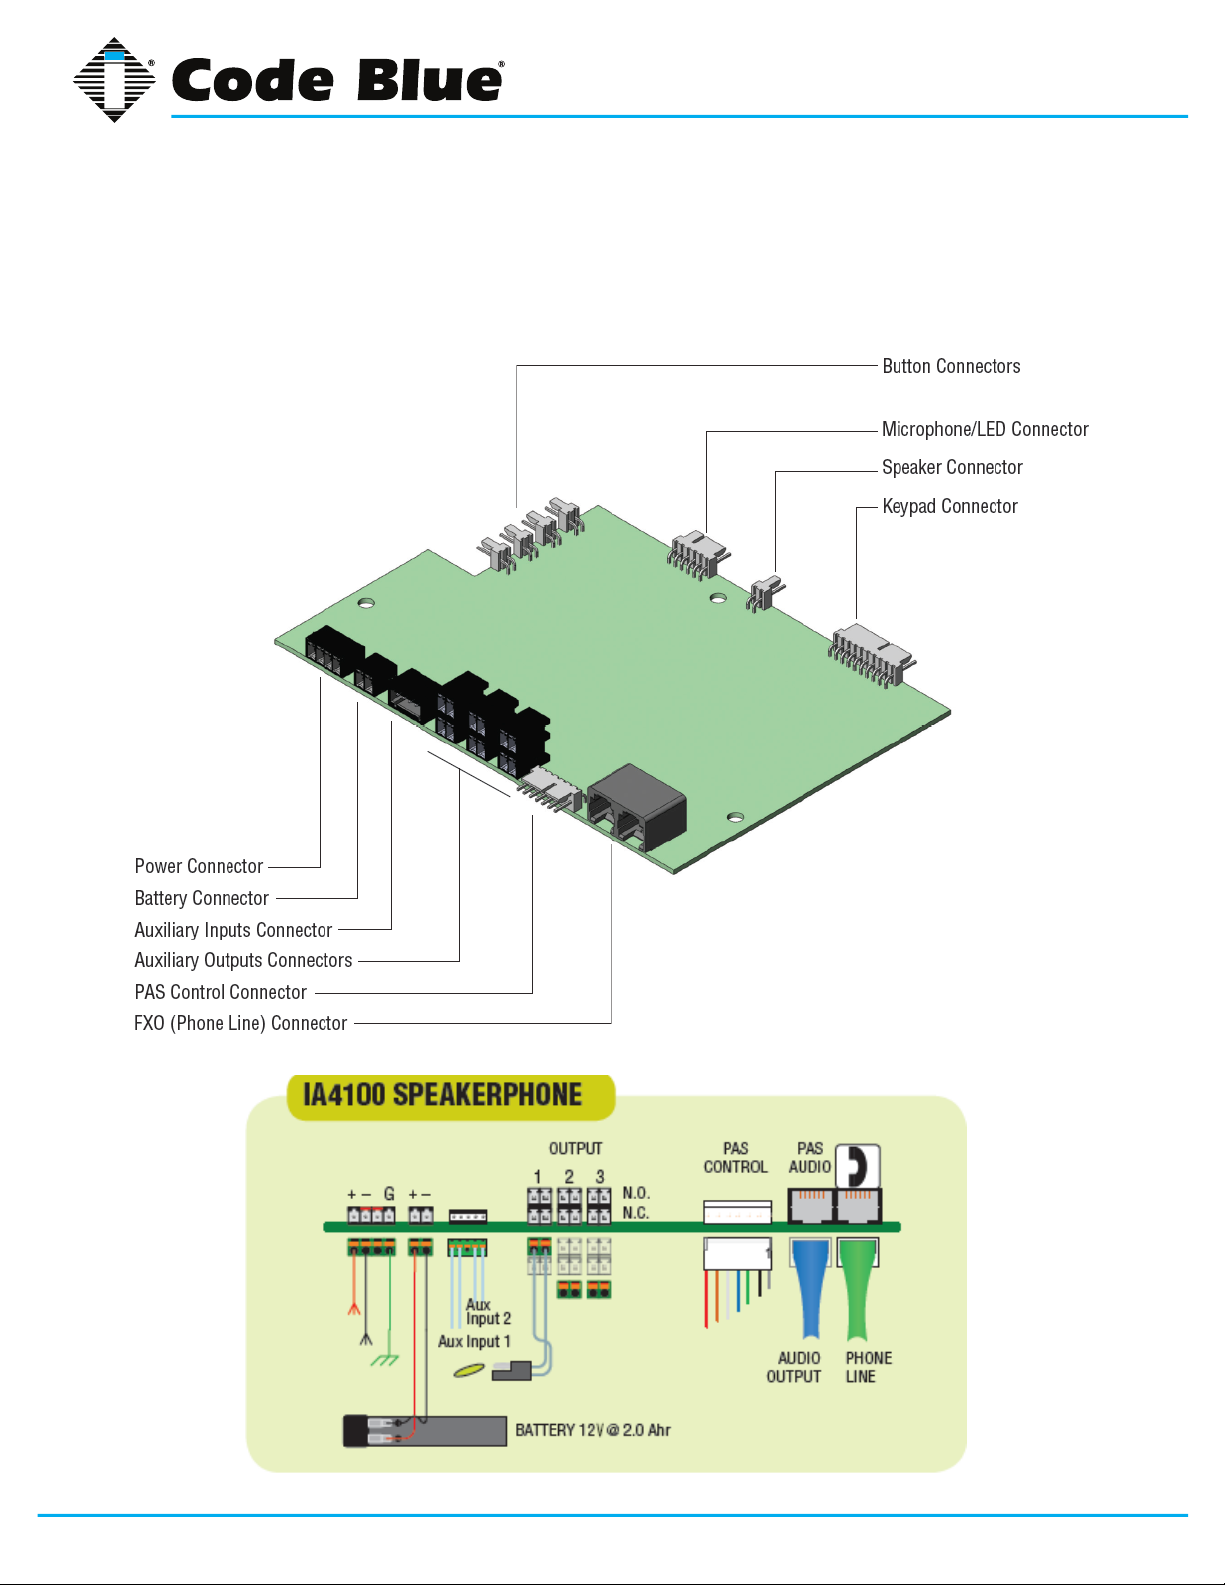
4 Circuit Board Connector List
The IA4100 speakerphone comes with your choice of single button, double button or double button
with keypad faceplate. The internal components consist of a speaker, microphone, PCB and
mounting hardware.
Code Blue • 259 Hedcor Street • Holland, MI 49423 USA • 800.205.7186 • www.codeblue.com
GU-139-Jpage 6 of 29

IA4100
Administrator Guide
5 Installation
The IA4100 speakerphone is capable of being connected to 12-24 Volts DC or 12-24 Volts AC
power sources. Additionally, the IA4100 may also be congured with a 12 Volts DC battery backup
system that monitors and reports on the battery voltage for ensured up time.
The IA4100 has one FXO port for connectivity to POTS/1MB/Station Ports from a Local Exchange
Carrier, PBX system, etc.
The IA4100 has three normally open and three normally closed auxiliary output contacts for connecting devices, such as the LED beacon/strobe, camera preset activation inputs, third party
controllers, etc. There are also two normally open auxiliary input contact closures for connecting
devices, such as door contacts, relays, etc. which can be programmed to perform various functions
of the phone.
The IA4100 speakerphone has been designed to be mounted in any Code Blue enclosure. Custom
faceplates are available for mounting in other product enclosures. Contact your local dealer for additional information and availability of custom options.
Code Blue • 259 Hedcor Street • Holland, MI 49423 USA • 800.205.7186 • www.codeblue.com
GU-139-Jpage 7 of 29
IA4100
Administrator Guide
6 Optional Flush Mount Enclosure Installation Instructions
PRE-INSTALLATION
1.0 Electrical preparation – The unit may have supply wires run from either (a) behind the unit
through the wall, or (b) below the unit by using an external conduit through the bottom of the unit’s
back plate. Mounting holes in the back, bottom or side of unit to be administered by the installer.
IMPORTANT: If wiring is coming in from the bottom or back, insure that the conduit is
aligned at this time. Connect electrical and communications wiring (see wiring instructions). Follow
all national and local codes that apply.
1.1 Prepare Wall – FME enclosure mounting hole in wall should except the housing dimensions
below and must be smaller than the faceplate dimensions to ensure clean ush mount look.
INSTALLATION PROCEDURES
1.2 Mark the ush mount mounting hole – In order to comply with the Americans with Disabilities Act (ADA) of 1990, the speakerphone button(s) should be positioned between 34 and 48 inches
from grade level. (Consult an ADA specialist in your area to verify local and federal guidelines.)
1.3 Secure the housing to the wall – The Flush mount enclosure can be mounted from the
back, bottom or side by drilling the mounting holes where needed per the installers application while
still keeping the unit within ADA compliance height. (1.2) Mounting hardware to be supplied by installer.
Code Blue • 259 Hedcor Street • Holland, MI 49423 USA • 800.205.7186 • www.codeblue.com
GU-139-Jpage 8 of 29
IA4100
Administrator Guide
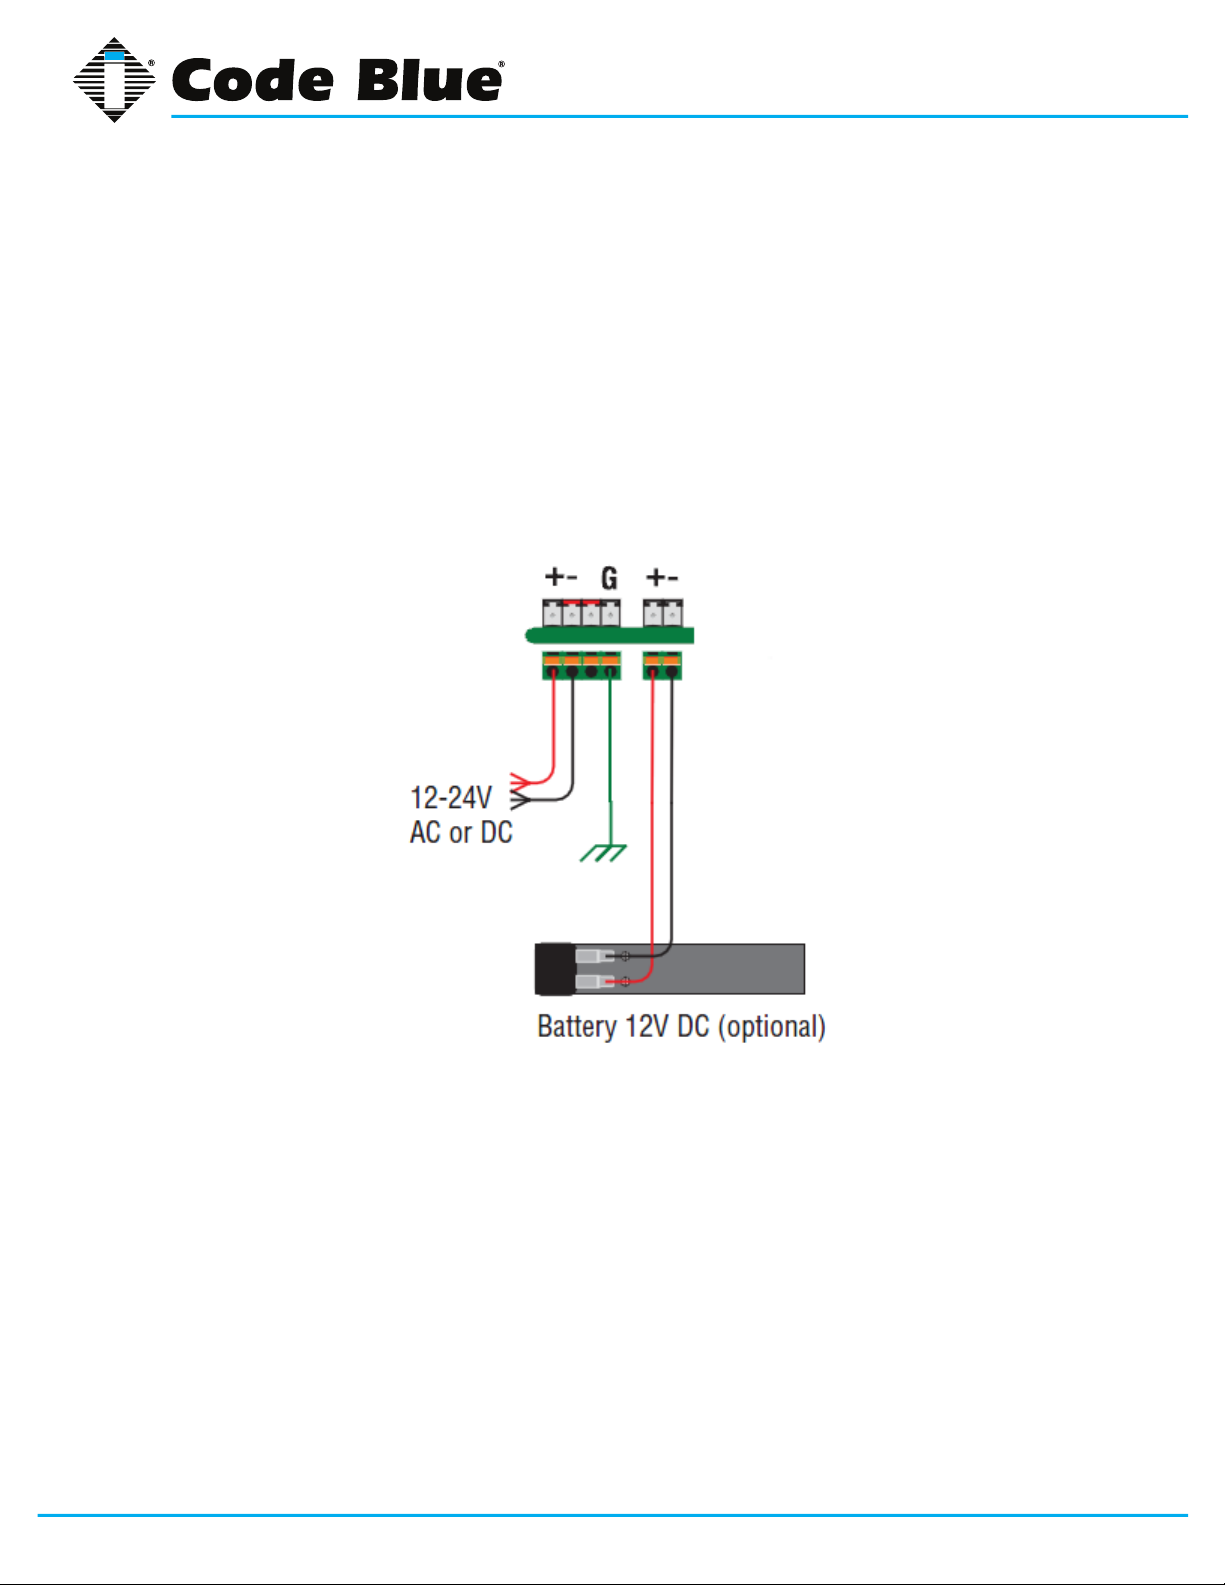
7 Connecting Power Sources
The IA4100 speakerphone is capable of being connected to any power source that provides 12-24
Volts AC or DC with a minimum of 400 mA current rating. Optionally, a battery can be connected to
the secondary power input and the IA4100 speakerphone will monitor the battery for low voltage
conditions, typically utilized in solar or NightCharge® applications. It is strongly recommended that
you disconnect any power to the unit prior to installation. Consult your local electrician for proper
power connectivity to your Code Blue equipment.
NOTE: When powered by solar or NightCharge option, the IA4100 battery circuit becomes the main
power input.
Code Blue • 259 Hedcor Street • Holland, MI 49423 USA • 800.205.7186 • www.codeblue.com
GU-139-Jpage 9 of 29

IA4100
Administrator Guide
8 Connecting PSTN/PBX Services
The IA4100 speakerphone has one FXO port for connectivity to POTS/1MB/Station Ports from a
Local Exchange Carrier, PBX system, etc. Each Code Blue phone requires its own line or PBX
extension of one pair of shielded twisted pair for the telco line (telco wire size varies depending on
the distance required; 22 gauge is standard).
Code Blue • 259 Hedcor Street • Holland, MI 49423 USA • 800.205.7186 • www.codeblue.com
GU-139-Jpage 10 of 29

IA4100
Administrator Guide
9 Connecting Auxiliary Devices
The IA4100 speakerphone analog auxiliary connections are three normally open or three normally
closed outputs and two normally open inputs. Typically, any Code Blue unit with a LED beacon/
strobe will have the trigger connected to Auxiliary Output 1. The Auxiliary Outputs can be pro-
grammed to be active during a call or by entering a specic time period. The Auxiliary Inputs can be
programmed to perform any script entered into the phone. See the complete IA4100 Administrator
Guide at www.codeblue.com/support for further information on programming the Auxiliary Inputs and
Outputs. Auxiliary inputs require power utilizing any voltage between 9 and 32 volts AC or DC.
Code Blue • 259 Hedcor Street • Holland, MI 49423 USA • 800.205.7186 • www.codeblue.com
GU-139-Jpage 11 of 29

IA4100
Administrator Guide
10 Installation Into Code Blue Units
The IA4100 speakerphone is designed to t into any existing or new Code Blue unit enclosure. It is
a direct replacement for the InterAct analog legacy series: IA2000, IA3000 and IA3100. Additionally, Code Blue offers custom faceplate designs, allowing the IA4100 to be placed in many different
enclosure types. Code Blue provides six custom security screws and a security bit with each Code
Blue unit for attaching the IA4100 speakerphone. Consult your unit installation instructions for further information.
Code Blue • 259 Hedcor Street • Holland, MI 49423 USA • 800.205.7186 • www.codeblue.com
GU-139-Jpage 12 of 29

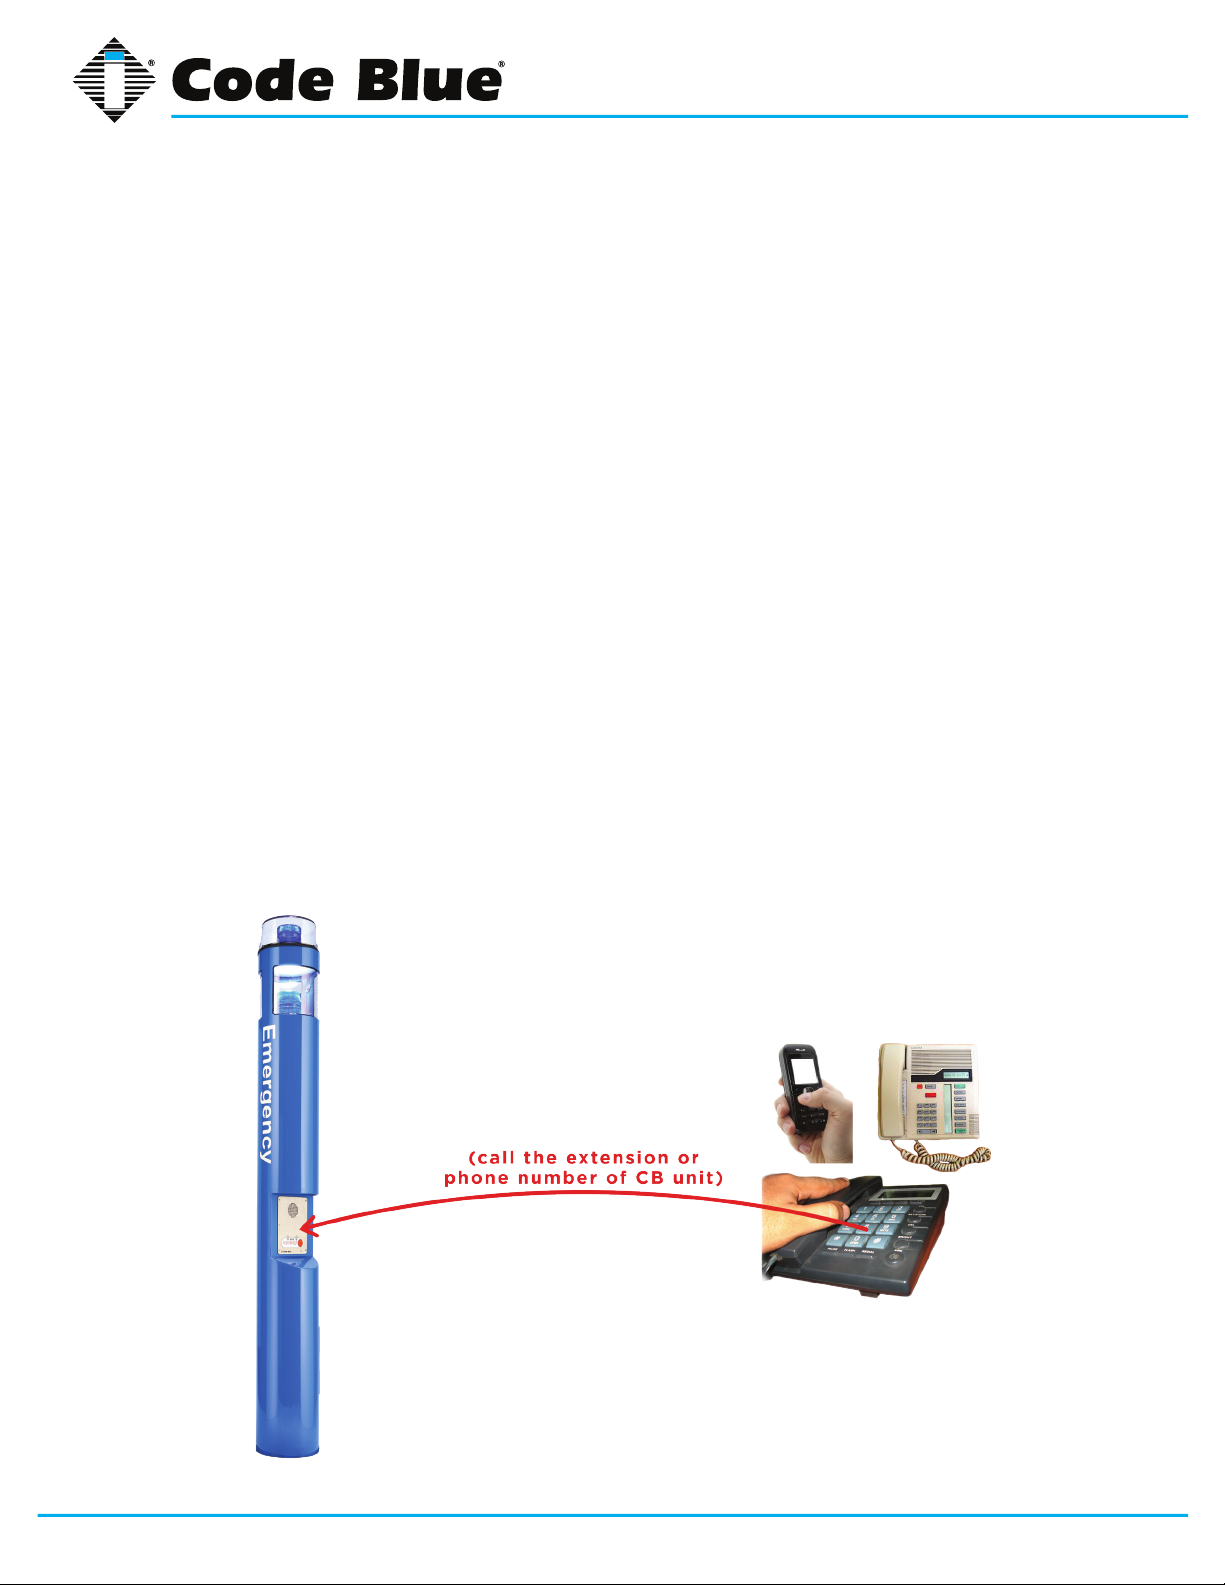
11 Basic Programming
IA4100
Administrator Guide
PROGRAMMING
1. NORMAL PROGRAMMING
Call the extension or phone number of CB unit, after the RFA tone:
12583# programming mode
99Ý99#
57# trains the phone on the local loop
4108# revert to dial tone hangup
4308# repeating (reorder) tone hangup
01 <phone number> # 1st phone number, button #1 dials
02 <phone number> # 2nd phone number, button #1 dials
04 <phone number> # 1st phone number, button #2 dials
05 <phone number> # 2nd phone number, button #2 dials
Ý#
Failure to program in any number will result in a failure to
operate.
2. GSM CELLULAR PROGRAMMING
Call the extension or phone number of CB Unit, after the RFA tone:
12583# programming mode
99Ý99#
57# trains the phone on the local loop
4108# revert to dial tone hangup
4308# repeating (reorder) tone hangup
5145# unique GSM programming command
5245# unique GSM programming command
01 <phone number> # 1st phone number, button #1 dials
04 <phone number> # 1st phone number, button #2 dials
Ý#
defaults the phone
hang up and exit programming
defaults phone
hang up and exit programming
COMMANDS DURING A CALL
The following commands can be used by the called party
after the IA4100 places a call. These commands cannot
be used in Programming Mode.
20 increase microphone gain
21 decrease microphone gain
22 speaker volume up
23 speaker volume down
24 microphone mute
25 speaker mute
01 play message #1
02 play message #2
11 turn on auxiliary output 1
13 turn on auxiliary output 3
14 turn off auxiliary output 1
16 turn off auxiliary output 3
AUXILIARY OUTPUTS (default settings)
Auxiliary Output #1 closed until the end of the call
Auxiliary Output #3
closed for one second momentary
contact closure
IA4100 DIAGRAM
3. PROGRAMMING FOR HOT LINE (RING-DOWN)
Call the extension or phone number of CB Unit, after the RFA tone:
12583# programming mode
99Ý99#
defaults phone
57# trains the phone on the local loop
5000# give up waiting for dial tone
4108# revert to dial tone hangup
4308# repeating (reorder) tone hangup
Ý#
hang up and exit programming
If messages are required see section 3.
Power
Acc
Grd
–
–
+
Battery
+ –
Aux
Inputs
2
1
to strobe unit
4. RECORDING MESSAGES
Call the extension or phone number of CB Unit, after the RFA tone:
12583# programming mode
21# <your message> #
22# <your message> #
Ý#
Code Blue • 259 Hedcor Street • Holland, MI 49423 USA • 800.205.7186 • www.codeblue.com
plays to end user at CB unit when
HELP activated
plays to end user at CB unit AND called
party when call is answered
hang up and exit programming
Aux Outputs
1
1
3
Battery 12v @ 2.0AhrBattery 12V @ 2.0Ahr
2 3
2
N.O.
4
N.C.
PAS Control
Control cable and PAS audio cable,
PAS Audio
Audio
Output
supplied with PAS amp
Phone
Line
GU-139-Jpage 13 of 29

IA4100
Administrator Guide
12 Advanced Programming
Information programmed into the phone is represented by <numbers, symbols and/or recording>.
When the instructions call for entering 1<programming password>#, simply press 1 and the default
password, followed by the # (pound) symbol on your telephone keypad. For example, the default
password on the IA4100 is 2583. To put the IA4100 into Program Mode, dial 12583#.
When you enter a command (CMD) correctly, the unit will respond with a single beep (DTMF “B”).
If a command has been entered incorrectly, the unit will respond with a rejection triple beep (DTMF
“BBB”). When commands are met with a triple beep, the command has not been accepted and will
not affect the programming of the unit.
All necessary commands can be entered during one programming session. Any time the unit responds (with either a single beep or a rejection triple beep), it is capable of accepting another command.
When you rst dial into the IA4100 speakerphone you will hear a Request For Acknowledgment
(RFA) tone. If a response from you is not received within seven (7) seconds the IA4100 will remain
in two-way audio mode and accept In Call Commands (section 5.2). Because the unit has not yet
been programmed, you should dial 12583# on your touch-tone keypad to enter Program Mode.
The unit can be forced to hang up by depressing the Ý (star) followed by the # (pound) symbols on
the telephone keypad. If the Ý# sequence is not used to hang up the IA4100, the phone is programmed to recognize a Disconnect Supervision such as a WINK or reverse polarity signal from the
PBX or PSTN. Also available is a Silent Time Out (CMD 42), reorder tones or revert to dial tone. The
speakerphone will hang up once it has received any of these standard end of call signals. If none of
those Supervised Disconnects occur, the speakerphone will stay active (i.e., Call received LED light
stays on) after the called party has hung up or until the Call Timer expires.
NOTE: You MUST program the speakerphone after installing the Code Blue unit.
Code Blue • 259 Hedcor Street • Holland, MI 49423 USA • 800.205.7186 • www.codeblue.com
GU-139-Jpage 14 of 29

IA4100
Administrator Guide
12.1 Initial In-Call Commands
The following commands are used after the RFA (Request For Acknowledgement) tone upon initial
call in. When calling the extension or phone number of the IA4100 you will hear the RFA tone
(DTMF “B”). If a new command mode is not selected within seven seconds, the IA4100 will default
to two-way call mode (full monitoring) and will start accepting “Commands During A Call” (see
page 8).
Initial Call-In Modes
Command Explanation Format Default
1 Programming Mode 1<programming password> # 1 2583#
3 Full Monitoring, two-way
(microphone and speaker)
4 Silent Monitoring, one-way call
(speaker is off)
5 Monitoring, one-way call
(microphone is off)
8 UPD Fault Reporting Mode
9 Paging Mode
Ý# Forced Hang Up Ý#
2
3<call pass code> # 3#
4<call pass code> # 4#
5<call pass code> # 5#
1
8#
9#
NOTES: 1 UPD Fault Reporting Mode allows the UPD software to check the system for faults.
2
System (PAS) amplier/speaker array.
Paging Mode is utilized to send the incoming call output to the attached Public Address
Code Blue • 259 Hedcor Street • Holland, MI 49423 USA • 800.205.7186 • www.codeblue.com
GU-139-Jpage 15 of 29

12.2 Commands During a Call
The following commands may be used by the called party after the IA4100 places a call, or by
calling into the IA4100 and entering audio modes 3, 4 or 5. The commands below cannot be used
while in programming mode. When issuing a two-digit command, the second digit must follow the
rst by no more than 0.7 seconds. Failure to complete the command will result in a DTMF “BB” NAK
(double beep or rejected tones).
These commands cannot be used in Programming Mode.
Play Recordings
Command Explanation Format
01 Play message number 1 01
02 Play message number 2 02
03 Play message number 3 03
04 Play message number 4 04
05 Play message number 5 05
06 Play message number 6 06
07 Play message number 7 07
08 Play message number 8 08
09 Play message number 9 09
NOTE: To stop message playback, press # pound) during the
message playback. When the message is nished, the user will
hear a single tone (DTMF “#”) to signal the end of message.
Audio Adjustments
Command Explanation Format
20 Increase microphone gain by
3 dB
21 Decrease microphone gain
by 3 dB
22 Speaker volume up 22
23 Speaker volume down 23
24 Microphone mute toggle 24
25 Speaker mute toggle 25
28 PAS output volume increase 28
29 PAS output volume decrease 29
NOTES: If the audio level being changed has reached its maximum or minimum, you will hear two tones (DTMF “BB”).
Microphone/Speaker/PAS audio level changes will be retained
until changed or the audio gains are reset (See Programming
Commands: Pass Codes and Reset Programming, Commands 95
and 99; page 16).
Microphone or speaker can be toggled between their current level
and mute by issuing Commands 24 or 25.
When a mute command is entered, you will either hear a single
tone (DTMF “B”) to indicate NOT muted or a double tone (DTMF
“BB”) to indicate a muted condition.
20
21
IA4100
Administrator Guide
Turn On/Off Outputs
Command Explanation Format
11 Turn on auxiliary output 1 11
12 Turn on auxiliary output 2 12
13 Turn on auxiliary output 3 13
14 Turn off auxiliary output 1 14
15 Turn off auxiliary output 2 15
16 Turn off auxiliary output 3 16
NOTES: When an auxiliary output is initiated, it will remain on
for the duration of the timed programming or until turned off
using Commands 14, 15 or 16 (See Commands 11, 12 and 13).
Normally Closed (N.C.) and Normally Open (N.O.) state changes
are separated by 10 milliseconds on each output; they do not
happen simultaneously. This is to ensure both the N.C. and
N.O. contacts are never closed at the same time.
Miscellaneous
Command Explanation Format Default
31 Extend Call Timer 31 10
minutes
33 Terminate message
playback
ÝÝ
Change from
Monitor (3-5) or
Paging (9) Mode to
Programming Mode
ÝÝ#
Change from
Programming Mode
to Monitor (3-5) or
Paging (9) Mode
NOTE: The Call Timer is extended by Call Time Out minutes.
(Programming command 44). After this command is entered,
the user will hear a single tone (DTMF “B”) acceptance.
End Call
Command Explanation Format
Ý#
NOTES: After entering ÝÝ or ÝÝ# you will have seven sec-
onds to enter a new initial call in command and password if
applicable.
After seven seconds with no entry, the IA4100 will hang up.
Hang up IA4100
33
ÝÝ
ÝÝ#
Ý#
Code Blue • 259 Hedcor Street • Holland, MI 49423 USA • 800.205.7186 • www.codeblue.com
GU-139-Jpage 16 of 29

12.3 Programming Commands
Programming a Phone Number to Dial
Command Explanation Format
01 Phone #1 RED button 01<phone number>#
02 Phone #2 RED button 02<phone number>#
03 Phone #3 RED button 03<phone number>#
04 Phone #1 BLACK button 04<phone number>#
05 Phone #2 BLACK button 05<phone number>#
06 Phone #3 BLACK button 06<phone number>#
07 Loss of power phone number 07<phone number>#
08 Loss of battery phone number 08<phone number>#
09 PAS Fault phone number 09<phone number>#
Programming for Hot Line (Ring-Down)
IA4100
Administrator Guide
NOTES: HOT LINE (aka ring-down) – If the IA4100 is connected to a private line, automatic ring-down or “hotline,” all
phone number locations 01 through 09 must be cleared, with 99Ý99# so no phone number will be dialed.
Call the extension or phone number of CB Unit, after the RFA tone:
12583# programming mode
99Ý99#
57# trains the phone on the local loop
5000# programs the phone for ringdown
Ý#
defaults phone / full reset
hang up and exit programming
If messages are required see section 3.
The maximum number of digits including Ý and # is 45.
A one-second pause when entering phone num bers is the Ý (star) symbol.
Continued on next page)
Code Blue • 259 Hedcor Street • Holland, MI 49423 USA • 800.205.7186 • www.codeblue.com
GU-139-Jpage 17 of 29

Administrator Guide
Programming Commands (continued)
Programming Outputs
Command Explanation Format Default
11 Auxiliary output 1 11<active time># 91
12 Auxiliary output 2 12<active time># 01
13 Auxiliary output 3 13<active time># 01
NOTES: Active Time Values
00 = disabled
01 - 60 = 1 to 60 seconds
61 - 90 = 1 minute to 30 minutes
91 = until the end of the call
92 = until trigger on input 2
Recording Messages
Call the extension or phone number of CB Unit, after the RFA tone:
IA4100
Programming Recordings
Command Explanation Format
12583# programming mode
21 Message recording #1 21<record message>#
22 Message recording #2 22<record message>#
23 Message recording #3 23<record message>#
24 Message recording #4 24<record message>#
25 Message recording #5 25<record message>#
26 Message recording #6 26<record message>#
27 Message recording #7 27<record message>#
28 Message recording #8 28<record message>#
29 Message recording #9 29<record message>#
Ý#
NOTES:
RECORDING STEPS
1. Enter Command 21-29 followed by the # key
2. Wait for the beep
3. Recite your message
4. Enter # to conrm completion
5. The message will be played back for approval
6. Repeat steps 1-4 if your message is not ac
ceptable
7. Enter the # key to terminate playback (21-29
Programming Mode only).
hang up and exit programming
Maximum message length is 30 seconds.
To listen to a recorded message, dial ÝÝ <Command 21-29>#
For example: To listen to recording number 4 (Command 24): ÝÝ 24#
Message volume level can be changed with programming Command 67.
(Continued on next page)
Code Blue • 259 Hedcor Street • Holland, MI 49423 USA • 800.205.7186 • www.codeblue.com
GU-139-Jpage 18 of 29

IA4100
Administrator Guide
Programming Commands (continued)
Programming Buttons and Inputs
Command Explanation Format Default
31 Button 1 (RED) 31<phone number>Ý<output(s)>Ý<recording(s)># 123Ý13Ý1#
32 Button 2 (BLACK) 32<phone number>Ý<output(s)>Ý<recording(s)># 0456Ý2Ý#
33 Button 3 33<phone number>Ý<output(s)>Ý<recording(s)># ÝÝ#
34 Button 4 34<phone number>Ý<output(s)>Ý<recording(s)># ÝÝ#
35 Input 1 35<button># 0#
36 Input 2 36<button># 0#
37 Loss of AC power 37<phone number>Ý<output(s)>Ý<recording(s)># 7ÝÝ7#
38 Low battery 38<phone number>Ý<output(s)>Ý<recording(s)># 8ÝÝ8#
39 PAS Fault 39<phone number>Ý<output(s)>Ý<recording(s)># 9ÝÝ9#
NOTES: For Programming Phone Numbers, see Commands 01 to 09 (page 5).
If the rst phone number slot entered is zero and a keypad (i.e., FP2-K faceplate) is
connected, then this button (other than RED) will activate as manual call mode. Or if
entering a number slot (e.g., 31123ÝÝ# or 32456ÝÝ#) has a phone number pro grammed and a keypad is present, the number will be auto dialed. Upon the call being
detected and answered by voice message (auto attendant), the user is allowed keypad
access to dial a number allowed by system.
For setting outputs 1 through 3 on, see Programming Outputs, Commands 11 to 13 (page 5).
For recorded messages, see Programming Recordings 1 through 9, see Commands 21 to 29
(page 5).
A message will play over the speaker immediately after a button press in the order in
which they were programmed.
For Input Commands 35 and 36, the input associated with the button is as follows:
0 = disabled
1 to 4 = button 1 to 4
Voltage controlled relays = 9-32 volts AC or DC
(Continued on next page)
Code Blue • 259 Hedcor Street • Holland, MI 49423 USA • 800.205.7186 • www.codeblue.com
GU-139-Jpage 19 of 29

IA4100
Administrator Guide
Programming Commands (continued)
Command Explanation Format Default
71 Upon answer of Button 1 calls 71<output(s)>Ý<recording(s)># Ý2#
72 Upon answer of Button 2 calls 71<output(s)>Ý<recording(s)># Ý#
73 Upon answer of Button 3 calls 71<output(s)>Ý<recording(s)># Ý#
74 Upon answer of Button 4 calls 71<output(s)>Ý<recording(s)># Ý#
NOTES: For turning outputs 1 through 3 on, see Programming Outputs, Commands 11 to 13 (page 5).
For recorded messages, see Programming Recordings, 1 through 9, see Commands 21 to 29
(page 5).
Example:
7123Ý3# = when a Button 1 call is answered the phone will activate outputs 2 and 3,
and play recording 3
Use CMD 72 for Button 2 to play a message to the called party.
Record message in 24.
(Continued on next page)
Code Blue • 259 Hedcor Street • Holland, MI 49423 USA • 800.205.7186 • www.codeblue.com
GU-139-Jpage 20 of 29

Administrator Guide
Programming Commands (continued)
Programming Hang Up Methods
Command Explanation Format Default
40 Polarity Reversal/WINK 40<Polarity Reversal/WINK time># 2#
41 Revert back to dial tone 41<length of dial tone># 00#
42 Silent time out 42<silence time># 0#
43 Repeating (reorder) tone 43<number of reorder tones># 00#
44 Call time out 44<call time># (30-second notier) 10#
45 WINK Voltage Minimum 45<Voltage># 0#
46 Minimum Ring Voltage
Detection
47 Maximum Ring
Frequency
NOTES: FORMAT VALUE PARAMETERS
Command 40 = WINK time: 0 - 9
0 = disabled
1 - 9 = 100 - 900 milliseconds
46<0, 1 or 2># 0#
47<0, 1 or 2># 0#
IA4100
Command 41 = Length of dial tone: 00 - 99
00 = disabled
01 - 99 = 1 - 99 seconds
Continuous sound for this period will initiate hang up
Command 42 = Silent time out: 0 - 9
0 = disabled
1 to 9 (10 to 90 in 10-second increments)
Command 43 = Number of repeating tones: 00 - 99
00 = disabled
01 - 99 = 1 - 99 cycles
Command 44 = Call time out timer: 00 - 99
00 = disabled
01 - 99 = minutes
A DTMF “BBBBB” notier plays to both parties 30 seconds prior to expiration
Command 45 = Minimum “voltage change” to interpret as a “WINK”
0 = 5V thru 9 = 14V
Command 46 = Minimum Ring Voltage Detection Threshold measured in Vrms
0 = 13, 1 = 19
2 = 40
Command 47 = Maximum Ring Frequency measured in Hz
0 = 75, 1 = 50, 2 = 35
(Continued on next page)
Code Blue • 259 Hedcor Street • Holland, MI 49423 USA • 800.205.7186 • www.codeblue.com
GU-139-Jpage 21 of 29

Administrator Guide
Programming Commands (continued)
Programming Call Properties
Command Explanation Format Default
50 Give up waiting for dial tone 50<time># 5#
51 Call progress detection delay
(give up time waiting after dial)
52 Give up time waiting for answer 52<time># 30#
53 Call connected detection 53<mode># 0#
54 Call loop cycles 54<cycles># 2#
55 Force half duplex operation 55<full/half duplex># 0#
56 Full duplex noise cancellation setting 56<noise setting># 0#
57 Local loop training 57# #
58 Answer message repeat playing 58<message repeat># 0#
59 Request for Acknowledgement beep delay 59<delay># 15#
NOTES: FORMAT VALUE PARAMETERS
Command 50 = Give up wait for dial tone: 00 -99
00 = ring down
01 - 99 = 1 - 99 seconds
If dial tone is not detected in this time, the phone will hang up (default is 5 seconds).
Command 51 = Call progress detection delay: 1 - 99
1 - 99 = 1 - 99 seconds
Call progress tone detection. Time that the phone will wait monitoring progress tones.
Command 52 = Wait for answer: 00 - 99
00 - 99 = 0 - 99 seconds
Time that the phone will wait from initiation for a call to be answered before dialing the
next number
Command 53 = Call connected detection: 0 or 1
0 = When voice or DTMF is detected by the IA4100
1 = After call is placed (non-ADA; forces call to connect)
Command 54 = Call Loop Cycle: 1- 9
1 - 9 = 1 - 9 loops
The number of dialing attempts the phone will perform on all programmed phone numbers, in
order, before resetting to standby
51<time># 20#
IA4100
Command 55 = Force half duplex operation: 0 or 1
0 = full duplex
1 = half duplex
Command 56 = Full duplex noise cancellation: 0 - 3
0 - 3 = low to high
Command 57 = Local loop training
Train and tune to the local loop length
Command 58 = Answer message repeat playing: 0 or 1
0 = message is played once upon call answered
1 = message is played continuously until DTMF 33 is pressed by guard
See Programming Buttons and Inputs, Commands 71 - 74 (page 12)
Command 59 = RFA tone delay: 00 - 99
00 - 99 = 0 - 1980 milliseconds
The amount of delay when the IA4100 answers and plays the RFA tone
The delay “value” is multiplied by 20 milliseconds. For example, the default value “15”
equals 300 milliseconds (15 x 20 = 300) or a “value” of 99 equals 1,980 milliseconds (99 x 20 = 1980).
Code Blue • 259 Hedcor Street • Holland, MI 49423 USA • 800.205.7186 • www.codeblue.com
GU-139-Jpage 22 of 29

Administrator Guide
Programming Commands (continued)
Miscellaneous Programming
Command Explanation Format Default
61 RFA Tone Delay from Answer 61<Delay> 5#
62 Preliminary Audio Delay 62<Delay> 9#
63 DTMF timing on 63<DTMF on># 7#
64 Pause time 64<Pause time># 7#
65 DTMF dialing volume 65<DTMF volume># 5#
67 Recording playback level 67<playback level># 5#
68 Ring count answer 68<ring>#
69 Disable Backup Battery Check 69<0 or 1># 0#
NOTES: FORMAT VALUE PARAMETERS
Command 61 = RFA Tone Delay from Answer
3 - 9 = 3/10 to 9/10 second
Command 62 = Preliminary Audio Delay
0 - 9 = 0/10 to 9/10 second from RFA beep to initial 2-way audio
1Ý0#
IA4100
Command 63 = DTMF on time: 1 - 9
1 - 3 = 100 - 300 milliseconds
4 - 9 = 40 - 90 milliseconds
Command 64 = Pause time: 1 - 9
1 - 3 = 100 - 300 milliseconds
4 - 9 = 40 - 90 milliseconds
Command 65 = DTMF volume: 1 - 9
1 - 9 = -8dB - +8dB
Command 67 = Playback level: 1 - 9
1 - 9 = -8dB - +8dB
Command 68 = Ring count answer
First digit, ring count = 1 - 9
Second digit, ringing sound: if the First Digit is greater than 1, then after H (asterisk
key) choose.
0 = NO ringing sound
1 = YES ringing sound
Command 69 = Disable Backup Battery Check
0 = NO
1 = YES
(Continued on next page)
Code Blue • 259 Hedcor Street • Holland, MI 49423 USA • 800.205.7186 • www.codeblue.com
GU-139-Jpage 23 of 29

Administrator Guide
Programming Commands (continued)
Command Explanation Format Default
76 Upon call in answer mode 76<answer mode># 0#
NOTES: FORMAT VALUE PARAMETERS
Command 76 = Answer mode: 0 or 1
0 = automatically enters two-way audio mode without password
1 = requires audio call password or phone will disconnect
Command Explanation Format Default
77 PAS enable
78 Enable UPD on call answer 78<upd># 0#
NOTES: FORMAT VALUE PARAMETERS
Command 77 = Public Address System
First Value Set, enabling PAS: 0 or 1
0 = disabled
1 = enabled
77<pas>Ý<output(s)>Ý<recordings(s)># 0ÝÝ#
IA4100
Second Value Set (outputs)
See Programming Outputs (page 10)
Third Value Set (recordings)
See Programming Messages (page 11)
Command 78 = Enable Unit Programming & Diagnostics (UPD): 0 or 1
0 = don’t send bit fault on answer menu instead of RFA
1 = send bit fault on answer menu instead of RFA
Pass Codes and Reset Programming
Command Explanation Format Default
90 Programming password
92 Audio call password
95 Reset audio settings
96 Reset phone numbers only
97 Reset recordings only
98 Default all settings EXCEPT
audio, phone and recordings
99 Full reset (default ALL settings)
NOTES: FORMAT VALUE PARAMETERS
Command 95 = Reset audio settings
Resets the audio gain for microphone, speaker, PAS and message volume back to
default
90<new pass code>Ý<new pass code>#
92<new pass code>Ý<new pass code>#
95Ý95#
96Ý96#
97Ý97#
98Ý98#
99Ý99#
2583#
#
Code Blue • 259 Hedcor Street • Holland, MI 49423 USA • 800.205.7186 • www.codeblue.com
GU-139-Jpage 24 of 29

IA4100
Administrator Guide
13 Troubleshooting
Phone Line – Ensure that the phone line is free of static and the electrical characteristics are satisfactory:
Loop Current: 23 mA to 35 mA (required)
Talk Battery: -48V DC to -52V DC (typical)
Ring Voltage: 90 Vrms (typical)
Electrical – Ensure that the unit is powered with 12 to 24V DC or AC power. If the unit is Solar or
NightCharge® ensure the battery voltage is above 11.5V DC.
EMI – Some sources of EMI (Electromagnetic Interference) will interfere with the operation and audio quality of the unit. An example would be a bad ballast on a high pressure sodium or metal halide
area light, or communication cable run by a transformer or orescent light ballast.
GSM/Cellular – GSM and/or cellular interfaces cause distortion of DTMF tones. You may need to
program your IA4100 speakerphone with a line simulator or on a standard analog POTS/PBX station prior to connecting to GSM/Cellular gateway.
Disconnect Supervision – Ensure that supervised disconnect is enabled on any PBX system the
IA4100 may be connected to. This will ensure the unit hangs up properly upon call completion.
Some systems will provide a momentary Polarity Reversal which will also hang up the speakerphone.
Answer Supervision – If your system provides answer supervision, then it is possible that when the
call is connected the IA4100 will disconnect the call. This is due to the IA4100 considering the WINK
signal sent for answer supervision to be a disconnect signal.
Default Settings – Ensure your phone is programmed accordingly when connecting to auxiliary
outputs. By default the phone may be set to activate or not activate as required by your application.
Refer to the programming commands for more information and default settings.
If IA4100 Phone does not answer an incoming call...
1. Verify the phone you’re dialing is actually ringing on the correct phone line.
2. To verify if the problem is at the location or the IA4100 phone, swap it with one from a work
ing location. If the problem is at the location, the Ring Voltage and Frequency Hertz can be
measured. If the problem follows the phone, call Code Blue TSS. Note the serial number to
verify warranty coverage.
3. Ring Voltage - Put your meter on the two wires (Tip & Ring) of the phone line. It does not
need to be connected to the phone (no load needed; 0 REN phone). Call the phone line
and you should measure an AC Ring Voltage between 50-130 Vrms during the ringing
phase of the ring cycle. FCC standard is at least 90 VAC.
4. Frequency Hertz - Change your meter to measure AC or DC, but set for Hz. Put your probes
on Tip & Ring again and call the phone number associated to that line and the frequency
during the ring cycle. You should see a Hz range somewhere between 17-33 Hz. Not all
meters can do this if your phone line is out of spec and does not fall into these ranges. We
offer an IA4100 phone with a rmware that opens to greater variances. For more informa
tion, please contact Code Blue Technical Services & Support at tss@codeblue.com.
Code Blue • 259 Hedcor Street • Holland, MI 49423 USA • 800.205.7186 • www.codeblue.com
GU-139-Jpage 25 of 29

IA4100
Administrator Guide
General Programming
How do I program an analog emergency speakerphone or “call box”?
To program an IA4100, IA3100 and IA500 series phone, you need to use an analog phone or an IP
phone that pushes DTMF tones and call the extension or phone number of the Emergency phone.
When you dial the phone number to the Code Blue speakerphone you’re trying to reach, you will
hear an acknowledgement tone or RFA tone to let you know that the phone has picked up and is
ready to be programmed. Then press the programming password for that particular model phone to
enter programming mode and congure the phone.
For example, to program an IA4100:
Call into the speakerphone or “call box”, press 12583# and wait for acknowledgement tone,
01 <phone number> #, wait for acknowledgement tone, then press * # to hang up.
Where can I nd speakerphone programming manuals?
http://codeblue.com/Support/TechnicalSupport/downloads or Email tss@codeblue.com)
IA4100 Speakerphone
How do I program the IA4100 to work on a ring-down line?
5. Call Code Blue speakerphone’s phone number and enter program mode (1<password>#).
6. Enter 5000 #. This will set the IA4100 to operate in ring-down mode.
7. Enter * # to save and exit programming.
How do I get the IA4100 phone to hang up after the called party hangs up?
By default, the IA4100 is looking for a 200-millisecond WINK to hang up the call. If your phone
system is not issuing a 200-millisecond WINK there are additional hang-up methods available, such
as monitoring for dial tone, reorder tones or silence. If you know the type of disconnect or hang-up
method your phone system uses, then just enable the one you need via programming. If not, you
can turn them all on.
The alternate hang-up methods available are:
Revert to dial tone: CMD 41 (Default=00)
Continuous sound for this period will initiate hang-up
Recommended 4108#
Silent Time Out: CMD 42 (Default=0#)
1 to 9 (10 to 90 in 10-second increments)
Recommended 422#
Reorder tones “busy tones”: CMD 43 (Default= 00#)
Number of reorder tones (01 – 99 = 1 -99 cycles)
Recommended 4308#
Code Blue • 259 Hedcor Street • Holland, MI 49423 USA • 800.205.7186 • www.codeblue.com
GU-139-Jpage 26 of 29

IA4100
Administrator Guide
For example, to enable an alternate hang-up method:
Call the speakerphone. After you hear the acknowledgement or RFA tone, press 12583#. Wait for
acknowledgement tone, then press 4108# (monitor 8 seconds of reorder tones). Wait for acknowledgement tone, then press * # to save and hang up.
How do I record a message in the IA4100 speakerphone to play to the caller at the unit and
called party?
Call the speakerphone to enter programming mode. After acknowledgement tone, press 1 <password> #, then wait beep, then press 22# <record message> #. Press* # to hang up.
How do I record a message in the IA4100 speakerphone to play to the caller at the unit when
HELP button is activated?
If you record a message in 21# <your message>#, it will play to the caller only while the call is in
progress or before the called received light comes on.
IA4100 phone will not recognize call as Answered
If an IA4100 delays or never switches to call answered after the called party answers, take the following steps:
1. Until the light on the phone switches from red to green, the person at the Code Blue phone
will not be heard. The phone listens on the line for audio from the called party. The IA4100
is not hearing enough audio to mark the call as answered.
a. The person answering the call needs to speak up and say something longer then
“hello”.
b. The person answering can enter any DTMF digit from their keypad, which will mark
the call as answered. This works immediately and extremely well. (Just don’t press
*# since it may hang up the phone.)
c. The customer can increase the transmit gain on their PBX as well.
d. If all else fails, program 531# (this is not ADA compliant). This marks the call as
answered when it dials out, whether the call is answered or not. Two-way audio
will occur immediately. It will not roll to a secondary number or redial the rst
number programmed. This is a good option if the IA4100 is calling one number and
that party always answers.
Code Blue • 259 Hedcor Street • Holland, MI 49423 USA • 800.205.7186 • www.codeblue.com
GU-139-Jpage 27 of 29

IA4100
Administrator Guide
If the IA4100 doesn’t seem to be functioning properly, follow the steps below to test line loop current,
ring voltage and talk battery. These line levels are important to the proper function of the IA4100.
Code Blue Technical Support: 800.205.7186, opt 3
Technical Support Hours: 8am - 6pm Monday - Thursday, 8am - 5pm Friday. ET
Code Blue • 259 Hedcor Street • Holland, MI 49423 USA • 800.205.7186 • www.codeblue.com
GU-139-Jpage 28 of 29

Administrator Guide
14 Warranty & Regulatory
Regulatory
The IA4100 Emergency Phone conforms to the following list of directives and product safety
standards as applicable:
USA:
Class A digital device pursuant to part 15 of the FCC Rules
FCC part 68 compliant
Registration #51STE00B410
CANADA:
IC #2889A-IA4100
IA4100
FCC & IC Ren #0.01
Warranty
Code Blue Corporation provides a limited warranty on this product. Refer to your sales agreement
to establish the terms. In addition, Code Blue’s standard warranty language, as well as information
regarding support for this product while under warranty, is available at
www.codeblue.com/support/downloads.
Notice: Every effort was made to ensure that the information in this document was complete and
accurate at the time of printing. Information is subject to change.
Code Blue • 259 Hedcor Street • Holland, MI 49423 USA • 800.205.7186 • www.codeblue.com
GU-139-Jpage 29 of 29
 Loading...