

Page 1
For Dispatchers and Administrative Users
User Guide
800.205.7186 • www.codeblue.com
Page 2
Blue Alert® Mobile
Table of Contents
Section Page
2 Signing into Blue Alert Mobile.....................................................3
3 Blue Alert Mobile Home Screen...................................................4
3.1 Home Screen....................................................................4
3.2 Active Alerts Management Screen....................................6
3.3 Past Alerts Management Screen....................................10
4 Reports........................................................................................13
4.1 Incidents.........................................................................13
4.2 Users..............................................................................17
5 Tools.............................................................................................20
User Guide
5.1 Administrative Users.......................................................20
5.2 Geofence Manager Screen............................................22
5.3 Help & Support...............................................................27
6 Connected...................................................................................28
7 User Tab.......................................................................................29
8 Contacts.......................................................................................30
Code Blue • 259 Hedcor Street • Holland, MI 49423 USA • 800.205.7186 • www.codeblue.com
GU-151-Apage 2 of 30
Page 3
2 Signing into Blue Alert Mobile
Blue Alert Mobile Powered by Guardly
Blue Alert® Mobile
User Guide
To sign into the Blue Alert Mobile Powered by Guardly system, please go to https://command.
guardly.com or the URL designated for your company.
In order to gain access to Blue Alert Mobile Powered by Guardly, your account will need to have administrative access. Either a Code Blue Representative or an administrative user within your organization who already has access to Blue Alert Mobile can designate an account to have administrative
access.
Login Screen
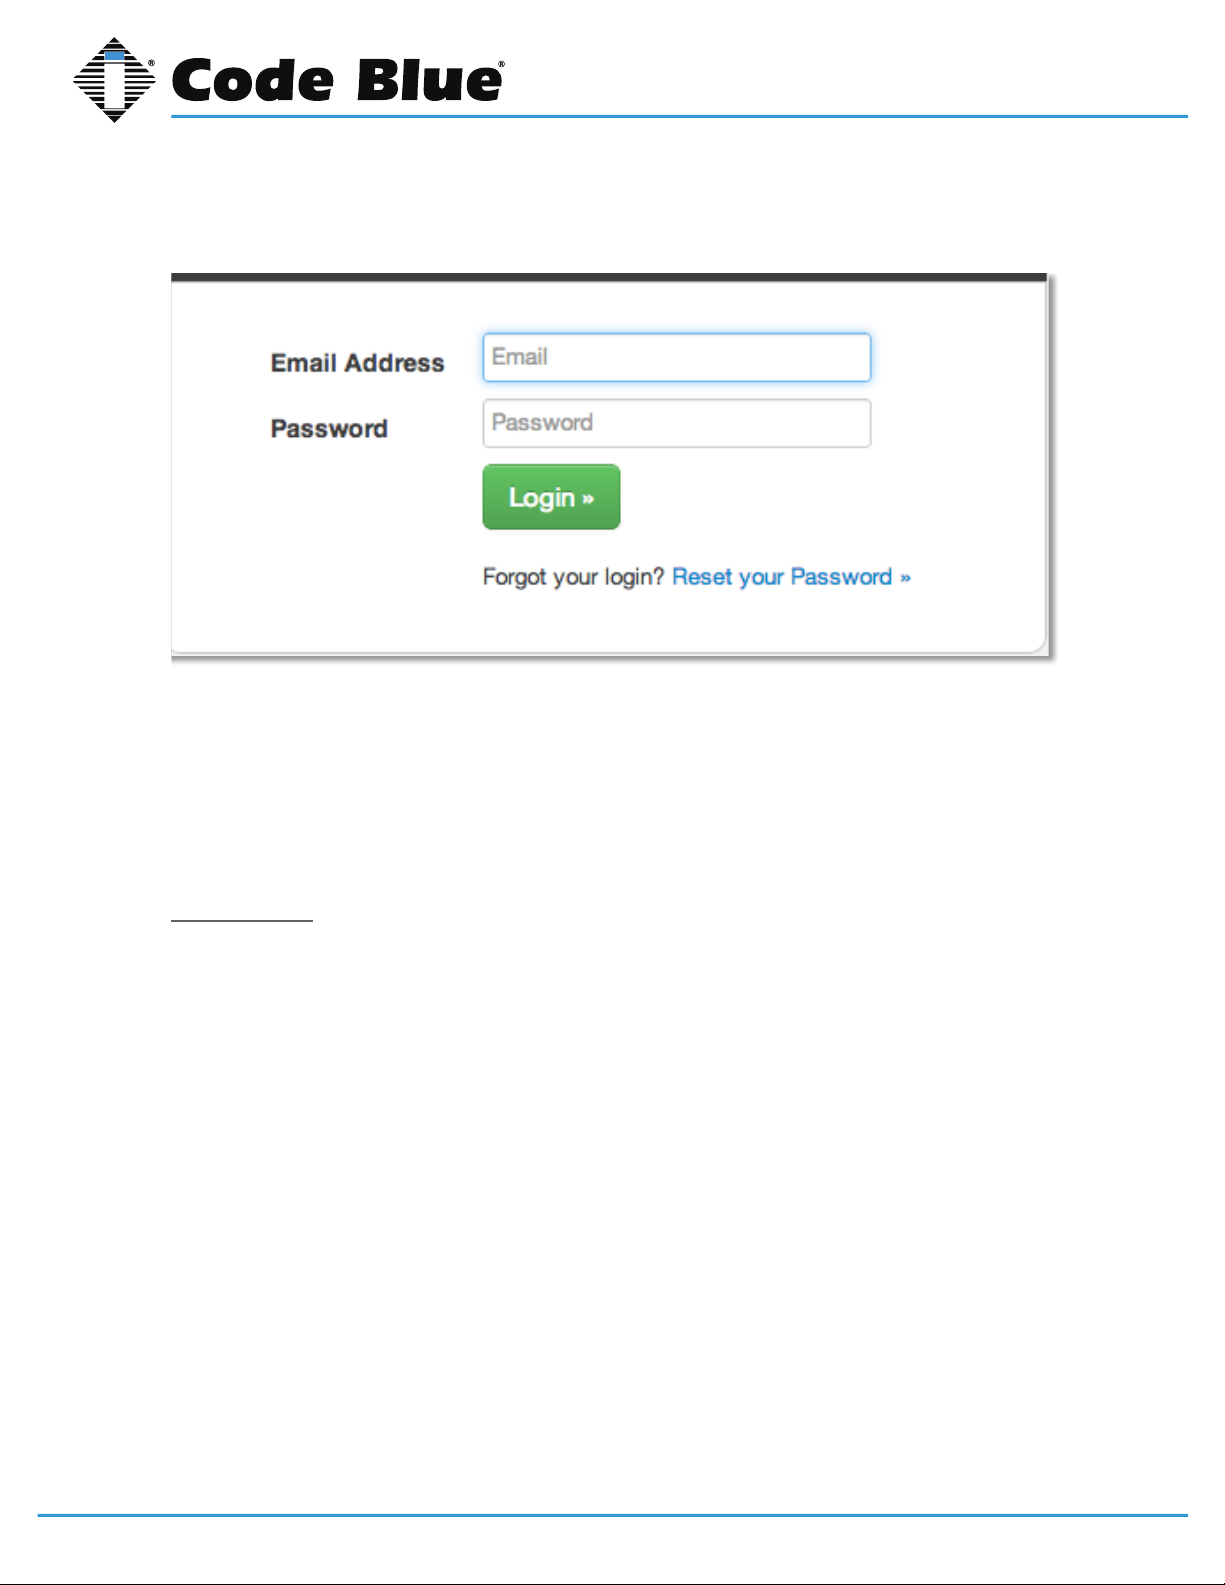
Type in your account email address and password. Click the login button. A successful login will
bring you to the home screen. A failed login will return you to the login screen, with an error message displayed.
If you have forgotten your password, click the Reset your Password link. This will bring you to the
Reset Password screen.
• Type in the email address of your Blue Alert Mobile Powered by Guardly account.
• Click the Submit button and an email will be sent with instructions on how to reset your password.
Code Blue • 259 Hedcor Street • Holland, MI 49423 USA • 800.205.7186 • www.codeblue.com
GU-151-Apage 3 of 30
Page 4
3 Blue Alert Mobile Home Screen
Blue Alert Mobile Powered by Guardly
Blue Alert Mobile Home Screen
Home Screen
3.1 Home Screen
Blue Alert® Mobile
User Guide
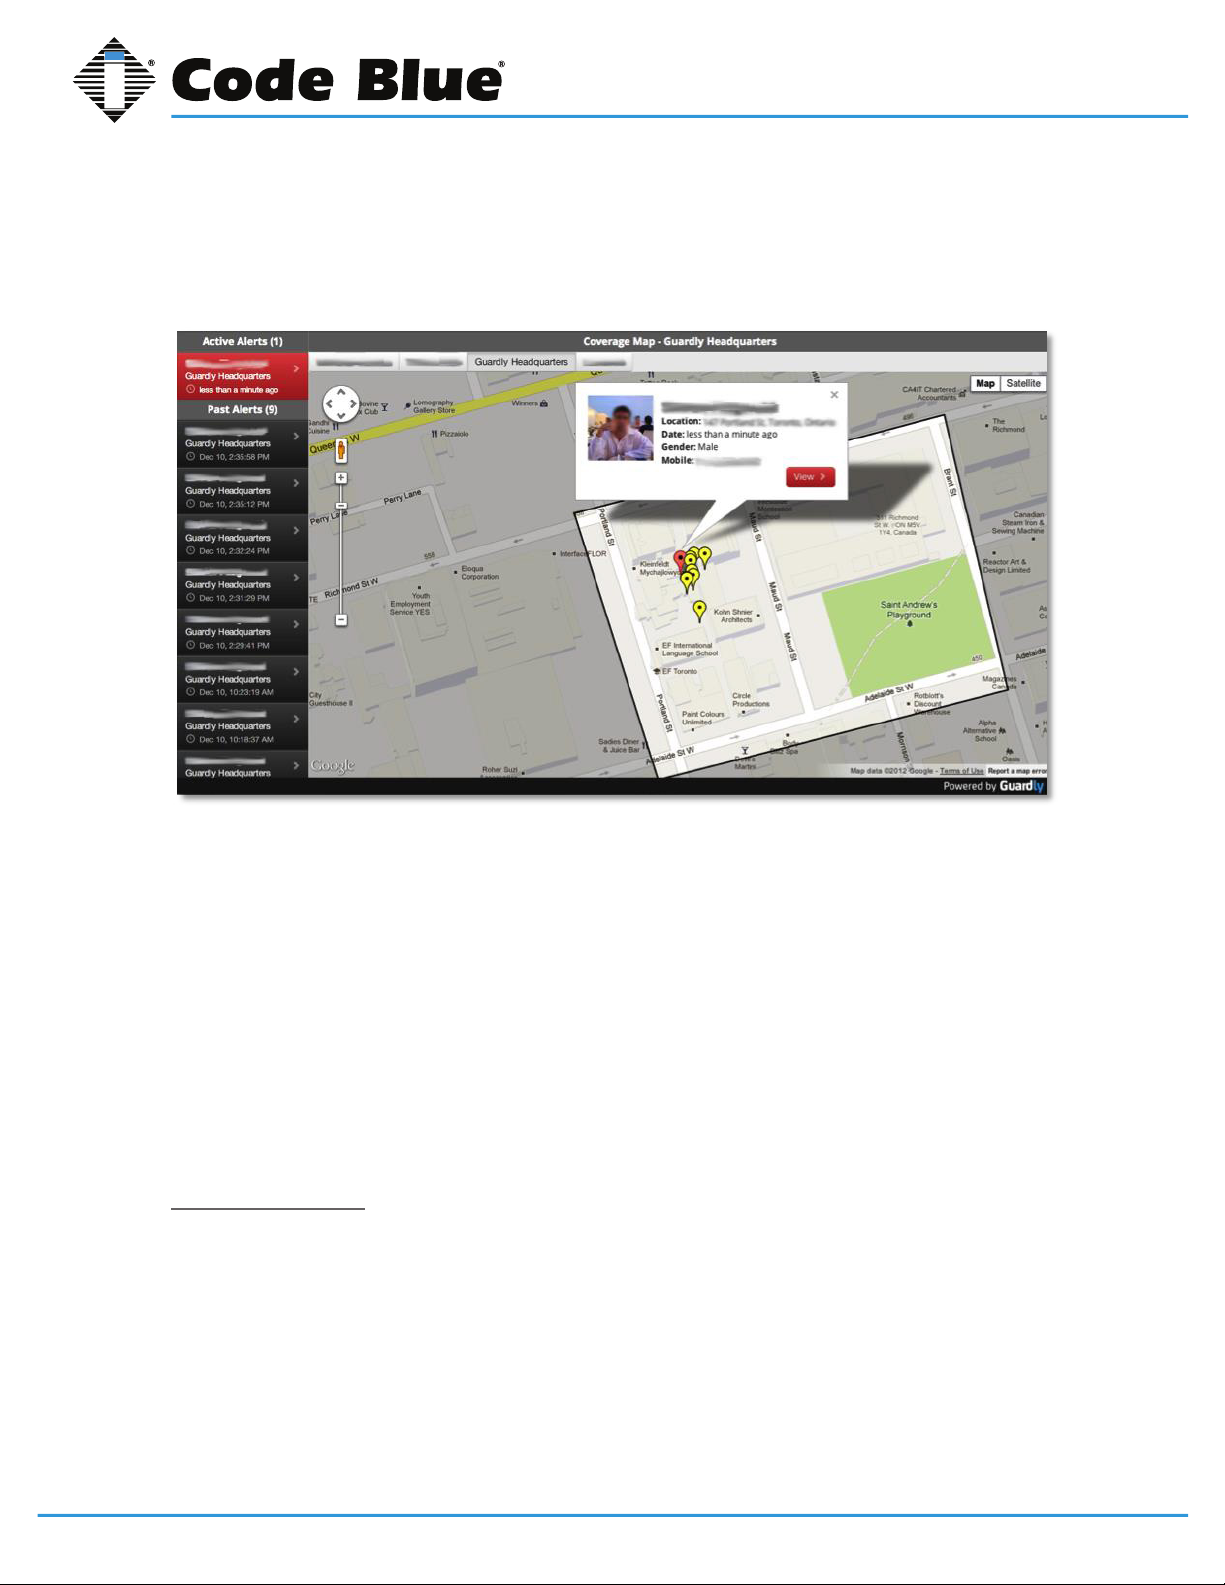
The Home Screen allows you to manage alerts within your campus boundaries. The Home Screen
is broken down into three main areas. The top of the screen is the menu bar for navigating various
tools. The left side of the screen displays the Active and Past Alert feeds, and the right side displays
the Coverage Map.
When an alert is initiated, a red location marker will appear on the Coverage Map, giving you the
real-time GPS location of the user, and an audible alert sound will be played through the browser. In
order to hear the audible alert, your computer will need the internal or external speakers connected
and the volume turned up.
An information bubble will appear above the red location marker with the user’s name, location, date
(time since the emergency was initiated), gender and mobile phone number.
By clicking the red View button, you will be brought instantly to the Active Alerts Management
screen.
Active Alerts Feed
On the left side of the screen, there will be an Active Alerts tab.
Selecting one of the Active Alerts will bring you to the Active Alerts Management screen.
Active Alerts that have not been selected will be highlighted in red.
Once an active alert is selected, it will be highlighted in green in the Active Alerts feed and you will
be brought to the Active Alerts Management screen.
Code Blue • 259 Hedcor Street • Holland, MI 49423 USA • 800.205.7186 • www.codeblue.com
GU-151-Apage 4 of 30
Page 5
Blue Alert® Mobile
User Guide
Each item in the Active Alerts feed will list the user’s name, the Geofence region that the alert was
sent from and the time of the incident.
The number of active alerts that are still in progress will be listed next to Active Alerts.
Past Alerts Feed
The Past Alerts feed is located on the left side of the screen, under the Active Alerts feed. The Past
Alerts feed shows alerts that have taken place within the last 24 hours.
Selecting one of the Past Alerts will bring you to the Past Alerts Management screen.
Each item will list the user’s name, the Geofence region that the alert was sent from and the time of
the incident.
The number of past alerts that have taken place within the last 24 hours is listed next to the Past
Alerts title.
Coverage Map
Under the Coverage Map, there will be a tab for each Geofence region within your organization’s
jurisdiction.
Clicking the button of each Geofence will center the map to the respective default center point and
zoom level. The default center point and zoom level can be adjusted within the Geofence Manager.
The Coverage Map will show all active alerts with red location markers and all past alerts with yellow
markers.
Code Blue • 259 Hedcor Street • Holland, MI 49423 USA • 800.205.7186 • www.codeblue.com
GU-151-Apage 5 of 30
Page 6
3.2 Active Alerts Management Screen
Blue Alert Mobile Powered by Guardly
The Coverage Map will show all Active Alerts with red location markers and all Past Alerts with yellow
location markers.
Active Alerts Management Screen
Blue Alert® Mobile
User Guide
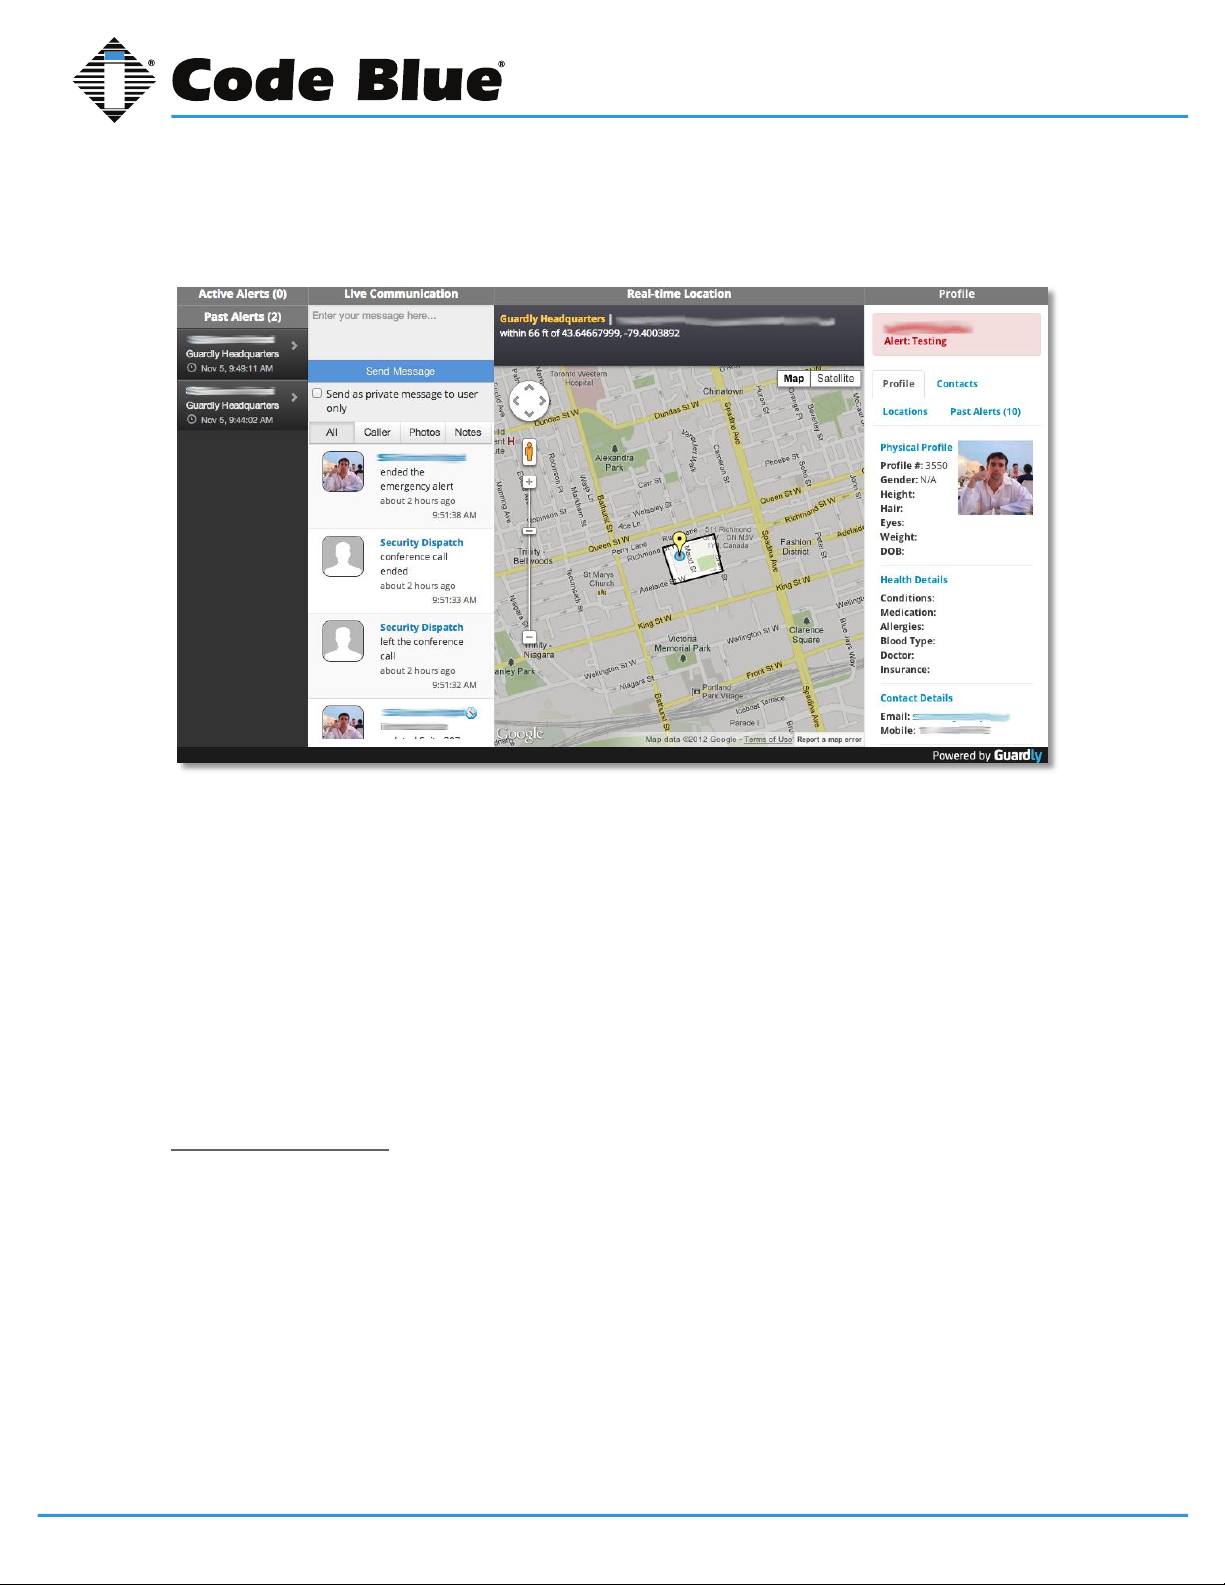
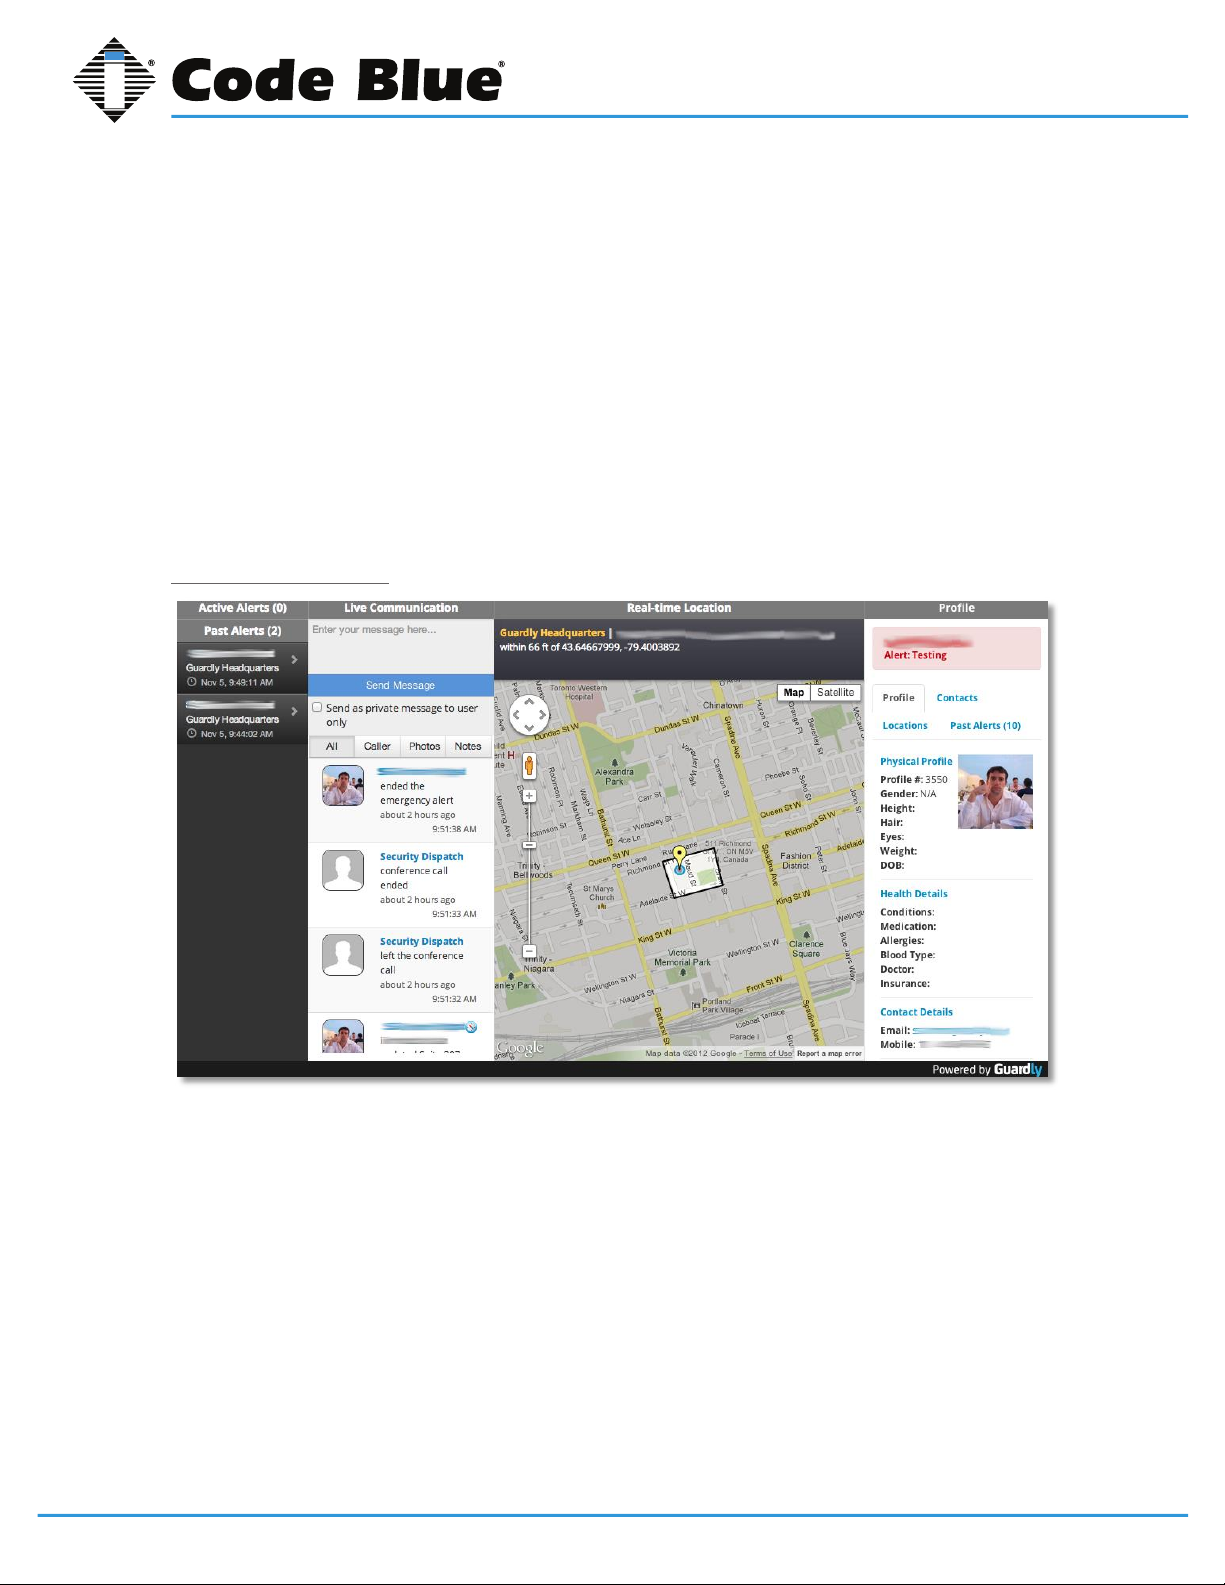
The Active Alerts Management screen allows the dispatcher to manage individual alerts. It is divided into three main areas. The left section is the Live Communication feed. The center displays
the user’s real-time location, which updates continually throughout the duration of an alert. The right
section displays the user’s physical and medical prole, photograph, list of emergency contacts, precongured locations and history of past alerts. Contrary to traditional emergency response through
telephone only, this screen provides the dispatcher a rich and relevant dataset, which ultimately
helps reduce the response time since key information is readily available.
In addition, the dispatcher will continue to have access to the Active Alerts and Past Alerts feeds
while using the Active Alerts Management screen. The feeds will update as new alerts begin and
end.
More information on the Active Alerts Feed and Past Alerts Feed can be found in Section 3.1.
Live Communication
Live Communication Feed
To send a message to the user from the Active Alerts Management screen, type in the message box
under Live Communication.
Click the Send Message button. The message will appear in the Live Emergency feed below the
message box, and will be sent to the mobile app of the user who initiated the alert. The user may
also have other emergency contacts that have joined the live feed. Their text communications will
appear within the live chat.
To send a private message that only the user can see, toggle the checkbox under the Send Message button.
Code Blue • 259 Hedcor Street • Holland, MI 49423 USA • 800.205.7186 • www.codeblue.com
GU-151-Apage 6 of 30
Page 7
Blue Alert® Mobile
User Guide
• If the Send a Private Message checkbox is checked, only the user who sent the alert will be
able to view it.
• If the Send a Private Message checkbox is empty, the user and emergency contacts participating in the alert will be able to view the message.
Live Emergency Feed
During an emergency, all communication and update notications will appear in the Live Emergency
feed located on the left side of the screen.
Updates on location will be frequently reported and appear in the feed with the user’s real-time location and time stamp.
In location update messages, clicking the compass icon in the top right corner of the message will
center the map on the location marker.
Photos
If the user sends photos, the emergency dispatch personnel can access them by clicking the “click
to view photo” link in the photo update.
A modal dialog will appear in the middle on the screen, displaying the photo that was sent by the
user.
To exit the photo modal dialog and return to the Active Alert Management screen, click the “X” in the
top right corner or the “Close” button in the bottom right corner of the modal dialog.
Sorting Tabs
The Sorting Tabs allow the dispatcher to lter messages in the Live Emergency feed.
The lters:
• All: Displays all messages and updates that have occurred during the incident in the emergency
feed.
• Caller: Displays only the messages and updates that are sent from the user and their device.
• Photos: Displays only the photos sent by the user.
• Notes: Allows emergency dispatch personnel to add notes during or after an incident for refer-
ence. The notes are shown only to the administrative personnel and are not received by the
user who sent the alert or their emergency contacts.
Code Blue • 259 Hedcor Street • Holland, MI 49423 USA • 800.205.7186 • www.codeblue.com
GU-151-Apage 7 of 30
Page 8
Blue Alert® Mobile
User Guide
Real-time Location
Real-time Location feed
Below the Real-time Location heading is the Real-time Location feed.
The Real-time Location feed gives location updates of the user during an emergency.
• The text highlighted in yellow is the Coverage Map and respective Geofence region that the
user is currently in.
• The address is an approximation of the last known physical location of the user, and is continually updated as the location coordinates become more accurate or the user moves. Doing a
reverse geocode lookup of the user’s latitude and longitude against the Google Geocode API
derives the resulting address.
• The feed will also show the accuracy of the GPS coordinates, as well as the GPS coordinates.
Incident Map
The Incident Map shows the user with a red location marker.
By clicking the red location marker, an information bubble appears with the user’s prole photo,
name and mobile phone number.
The map will also show the specic Geofence region that the user is currently in.
Emergency dispatch personnel can toggle between Map View and Satellite View.
• Map View is the default setting and will show you a map of the area, including labels of the
region.
• Satellite View will display the satellite image of the region, including labels. The emergency dispatch personnel can toggle the labels off in this view to have a clearer image of the region.
Prole Tab
Under the Prole tab, the user’s name will appear in red and the type of alert they are running.
Emergency Communication Icons
911 Notied
Emergency dispatch personnel can click the 911 Notied button to let the user and their emergency
contacts know that they have notied 911. Note: This feature does not interact with 911 services. It
is simply a mechanism to indicate that the dispatcher has taken secondary action to escalate the
alert to emergency services.
Only select this icon if you have notied 911.
Join Call
Clicking the Join Call icon will allow the emergency dispatch personnel to join a one-to-one call with
the user.
Code Blue • 259 Hedcor Street • Holland, MI 49423 USA • 800.205.7186 • www.codeblue.com
GU-151-Apage 8 of 30
Page 9
Blue Alert® Mobile
User Guide
End Alert
Clicking the End Alert icon will end the alert and store it as a Past Alert. Note: This feature should be
used with caution as it allows the dispatcher to force close an active alert. This feature should only
be used if you are condent that the alert is over and/or the user did not or is not able to end the
alert from their mobile device.
Ending the alert will create a record in Incident Reports, noting that the alert was ended by the dispatcher.
User Index Tabs
Prole Index Tab
The Prole Index tab gives a full prole overview and description of the user.
Physical Prole
• Photo
• Prole #
• Gender
• Height
• Hair
• Eyes
• Weight
• DOB
Health Details
• Conditions: Displays any pre-existing medical conditions the user has updated.
• Medication: Displays any medication that the user takes.
• Allergies: Displays any signicant allergies that the user may have.
• Blood Type: Displays the user’s blood type.
• Doctor: Displays the name of the user’s doctor.
• Insurance: Displays the reference number of the user’s insurance.
Contact Details
• Email
• Mobile
Contacts Index Tab
The Contacts Index tab will list the emergency contacts that have been notied of the user’s emergency.
It will list the contact’s name, email and mobile number.
Locations Index Tab
The Location Index tab shows a list of frequently visited locations by the user. The locations list is
managed by the user within the mobile app.
The rst location to appear is the current location of the user, which will correlate to the red location
marker on the map.
Code Blue • 259 Hedcor Street • Holland, MI 49423 USA • 800.205.7186 • www.codeblue.com
GU-151-Apage 9 of 30
Page 10
Blue Alert® Mobile
Blue Alert Mobile Powered by Guardly
The Coverage Map will show all Active Alerts with red location markers and all Past Alerts with yellow
location markers.
Active Alerts Management Screen
User Guide
The remaining locations listed will be ones that the user has pre-dened and input as frequently
visited locations.
The location name will appear in blue text with the address of the location.
Past Alerts Index Tab
The Past Alerts Index tab provides a list of previous emergency alerts that the user has initiated.
Each individual incident will list the Alert Type, as well as the date and time of the incident.
By clicking the Alert Type Name, the emergency dispatch personnel will be given a detailed incident
report in a new tab on their web browser. (Clicking the date on the specic past alert will also provide a link to that respective incident report.)
3.3 Past Alerts Management Screen
Live Communication
Live Communication Feed
In the Past Alert Management screen, the messaging feature is disabled and you will not be able to
input additional messages to the incident.
The Notes tab will be enabled and additional notes can be added to the incident report.
Live Emergency Feed
All Live Emergency feed messages and location updates that occur during an emergency will appear in the Live Emergency feed. Since the alert is no longer active, no new messages or location
updates will be displayed.
In location update messages, clicking the compass icon in the top right corner will center the map on
Code Blue • 259 Hedcor Street • Holland, MI 49423 USA • 800.205.7186 • www.codeblue.com
GU-151-Apage 10 of 30
Page 11

Blue Alert® Mobile
User Guide
the user’s location at the respective time during the incident.
Photos
If the user sends photos, the emergency dispatch personnel can access them with the “click to view
photo” link in the photo update.
A modal dialog will appear in the middle on the screen, displaying the photo that was sent by the
user.
To exit the photo and return to the Past Alert Management screen, click either the “x” in the top right
corner or the “Close” Icon in the bottom right corner of modal dialog.
Sorting Tabs
The Sorting tabs allow the dispatcher to lter messages in the Live Emergency feed.
The lters:
• All: Displays all messages and updates that have occurred during the incident in the emergency
feed.
• Caller: Displays only the messages and updates that are sent from the user and their device.
• Photos: Displays only the photos sent by the user.
• Notes: Allows emergency dispatch personnel to add notes during or after an incident for refer-
ence. The notes are shown only to the emergency personnel and are not received by the user
experiencing an emergency.
Real-time Location Tab
Real-time Location feed
Under the Real-time Location tab is the Real-time Location feed.
The Real-time Location feed will give you the last location update of the user.
• The text highlighted in yellow is the coverage map and respective Geofence region that the user
was last in.
• The address is the most relevant address to describe the location of the user. The feed will also
show the accuracy of the GPS coordinates, as well as the GPS coordinates.
Incident Map
The Incident Map shows the location of the user with a yellow marker.
By clicking the yellow location marker, an information bubble will appear with the user’s picture,
name and mobile phone number.
The map will also show the specic Geofence region that the user is currently in.
Emergency dispatch personnel can toggle between Map View and Satellite View.
Code Blue • 259 Hedcor Street • Holland, MI 49423 USA • 800.205.7186 • www.codeblue.com
GU-151-Apage 11 of 30
Page 12
Blue Alert® Mobile
User Guide
• Map View is the default setting and will show you a map of the area, including labels of the
region.
• Satellite View will display the satellite image of the region, including labels of the region. Emergency dispatch personnel can toggle the labels off in this view to have a clearer image of the
region.
Prole Tab
The user’s name will appear in red and the type of alert they are running will be listed under the
Prole tab.
User Index Tabs
The User Index tabs give a full overview of the user and prole information.
Code Blue • 259 Hedcor Street • Holland, MI 49423 USA • 800.205.7186 • www.codeblue.com
GU-151-Apage 12 of 30
Page 13
4 Reports
Blue Alert Mobile Powered by Guardly
4.1 Incidents
Incidents Report Screen
Blue Alert® Mobile
User Guide
Clicking the Reports Tab and selecting Incidents will bring you to the Incidents Report screen.
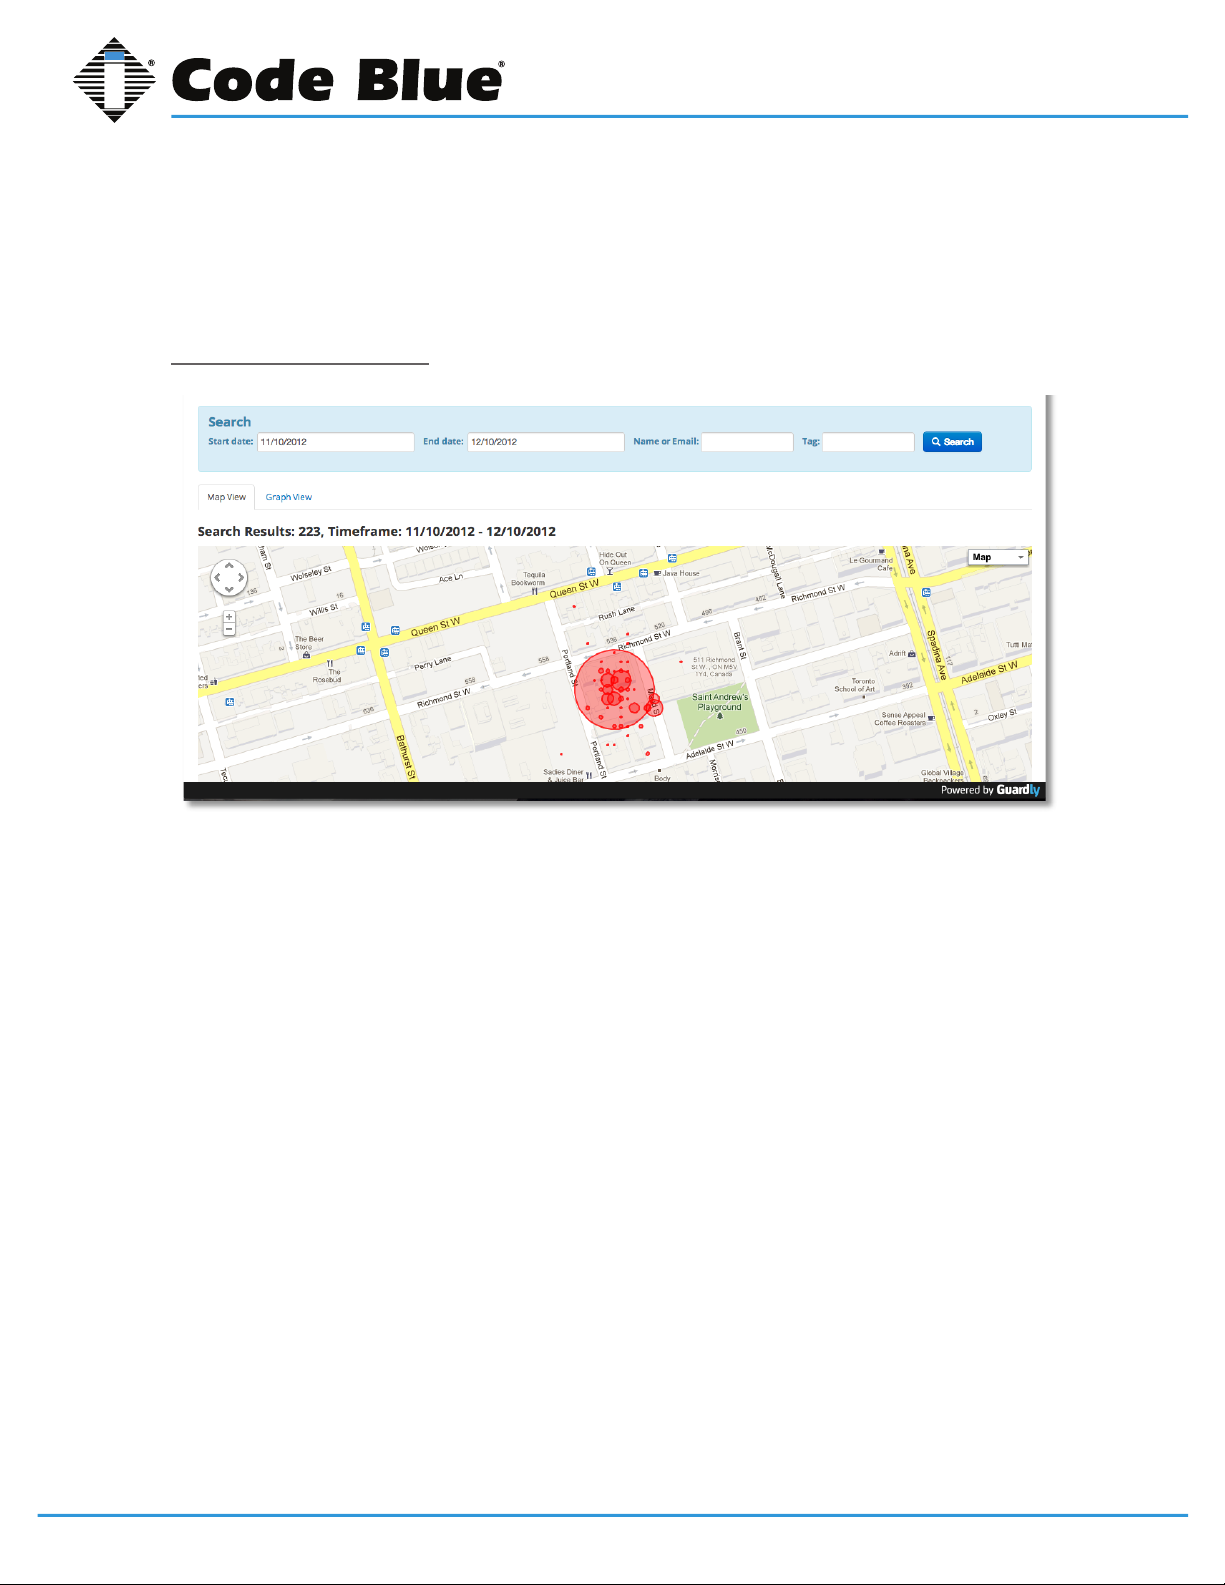
The Incidents Report screen will show you a map of incident density in the respective coverage
region by default.
Incident density is a measurement of the incidents that have occurred in a specic area. It is shown
on the map as a red circle. The larger the red circle, the more incidents that have occurred.
The time frame over the reported incidents is defaulted to the last 30 days.
Incident Search
In the Incident Search bar, you can search for incidents during a specic period by selecting dates
with the Start Date Calendar and the End Date Calendar.
Search for specic incidents by typing in either the name or email of the user.
Search for incidents by typing in the tag for the respective emergency.
By clicking the Search Icon, the incident reports that t your respective search criteria will be listed
below the Incident Density Map.
The number of incidents within the predened time frame will appear just below the Map View and
Graph View tab.
Code Blue • 259 Hedcor Street • Holland, MI 49423 USA • 800.205.7186 • www.codeblue.com
GU-151-Apage 13 of 30
Page 14
Blue Alert® Mobile
Blue Alert Mobile Powered by Guardly
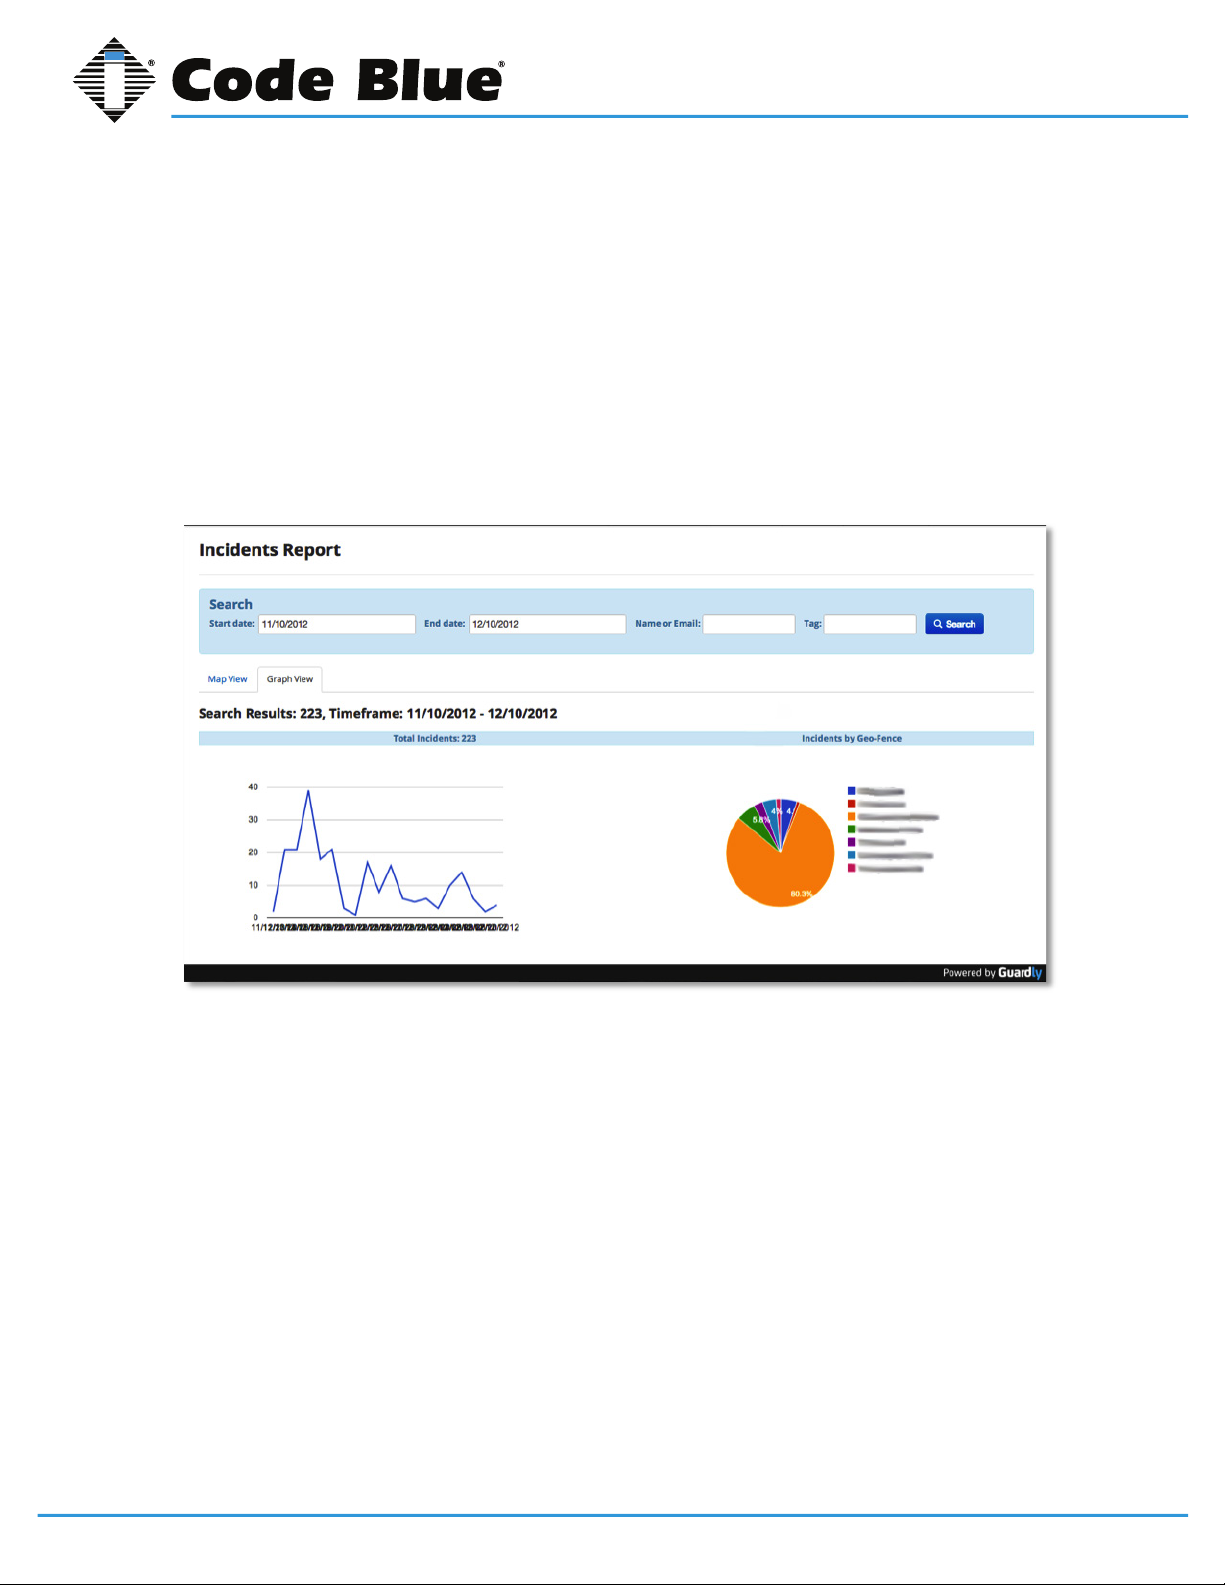
The number of incidents within the predefined Timeframe will appear just below the Map View and
Graph View Tab.
Incident Density Map
In the Map View tab you will see the Incident Density Map.
This map gives information of the regions that experience the highest number of incidents.
Incident Density is shown with red circles. The larger the red circle, the higher the number of incidents
that were reported in those regions.
Areas without any red circles have not experienced an incident.
Incident Graph View
Incident Density Map
In the Map View tab, you will see the Incident Density Map.
This map gives information on the regions that experience the highest number of incidents.
Incident density is shown with red circles. The larger the red circle, the higher the number of incidents that were reported in those regions.
Areas without any red circles have not experienced an incident.
Incident Graph View
User Guide
You will be able to access a line graph showing the total number of incidents by date, as well as a
pie chart detailing the percentage of incidents by Geofence in the Incident Graph View tab.
Total Incidents Graph
The Total Incidents graph will calculate the total number of incidents in the predened time frame.
On the Y-axis of the graph, you will have the number of incidents per date. On the X-axis, you will
have the date.
To see the number of incidents that occurred on a specic day, move your mouse over a specic
point. A text box showing the specic date and number of the incidents will appear.
Incidents by Geofence
The Incidents by Geofence graph is a pie chart that shows the percentage of incidents that occurred
during the predened timeframe.
Code Blue • 259 Hedcor Street • Holland, MI 49423 USA • 800.205.7186 • www.codeblue.com
GU-151-Apage 14 of 30
Page 15
Blue Alert® Mobile
Blue Alert Mobile Powered by Guardly
On the y-axis of the graph you will have the number of incidents per date. On the x-axis of the graph you
will have the date.
To see the number of incidents that occurred on a specific day, simply move your mouse cursor over a
specific point on the line graph. A text box showing the specific date and the number of the incidents for
that specific date will appear.
Incidents by Geofence
The Incidents by Geofence graph is a pie chart that shows the percentage of incidents that occurred in
each specific Geofence during the predefined timeframe.
Each Geofence will be listed on the right hand side of the chart with a color designating its
representation on the chart.
To see the percentage of incidents for a specific Geofence, move your mouse cursor over the respective
Geofence color on the chart. A text box will appear showing the name of the Geofence you have
highlighted, the number of incidents in that specific Geofence, and the percentage on incidents
occurring in that Geofence out of the total number of incidents during the Timeframe.
Incident Details
Each Geofence will be listed on the right side of the chart with a color designating its representation.
To see the percentage of incidents for a specic Geofence, move your mouse cursor over the respective Geofence color on the chart. A text box will appear showing the name of the Geofence you
have highlighted, the number of incidents and the percentage of incidents occurring in that Geofence out of the total number of incidents during the time frame.
Incident Details
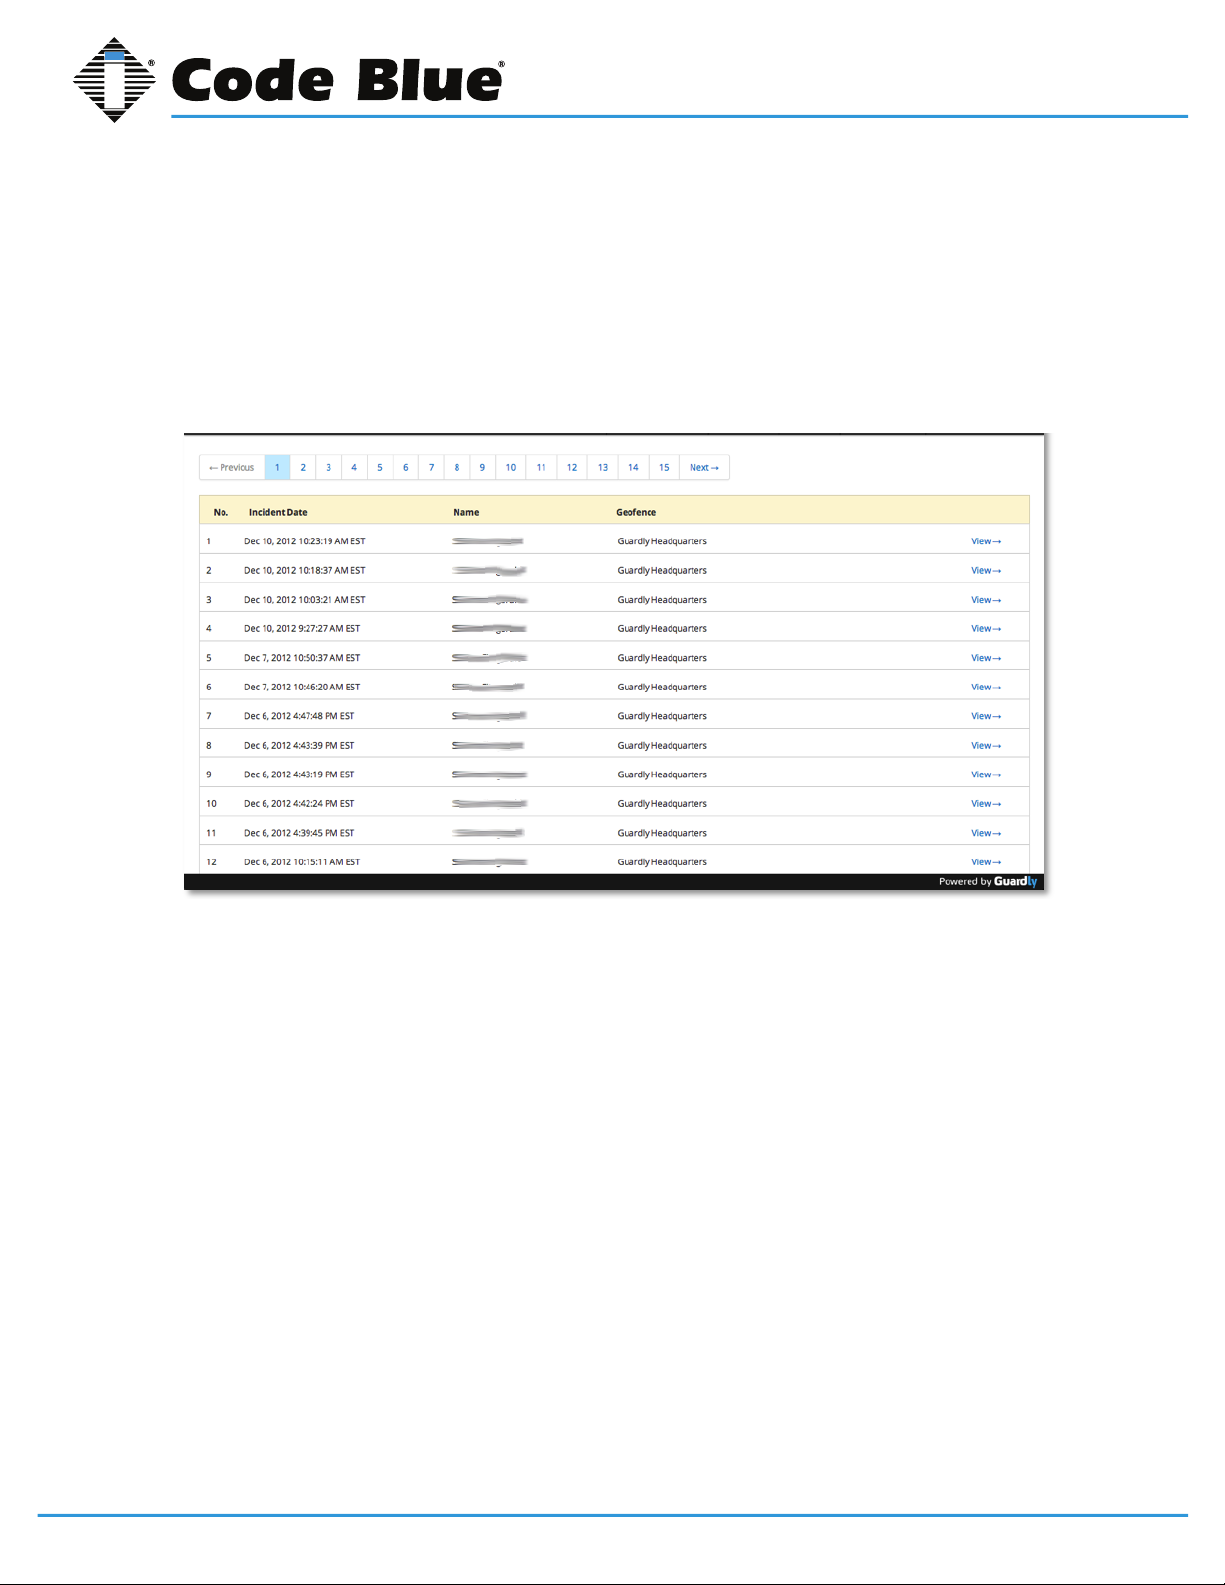
Under the Incident Map View and Incident Graph View there is a list of all individual incidents that
occurred during the predened time frame you have searched.
The incidents are listed from the most recent to the most dated.
To nd older incidents, click Next, Previous or the page number.
Each incident will have:
• The number of incidents in the predened time frame in order of the most recent to most dated.
• The incident date.
• The name of the person triggering the incident.
• The Geofence in which the incident occurred.
User Guide
To get details of an individual incident, click the View Link to the right of the individual incident.
Code Blue • 259 Hedcor Street • Holland, MI 49423 USA • 800.205.7186 • www.codeblue.com
GU-151-Apage 15 of 30
Page 16
Incident Detail Screen
Blue Alert Mobile Powered by Guardly
most dated incident.
Blue Alert® Mobile
User Guide
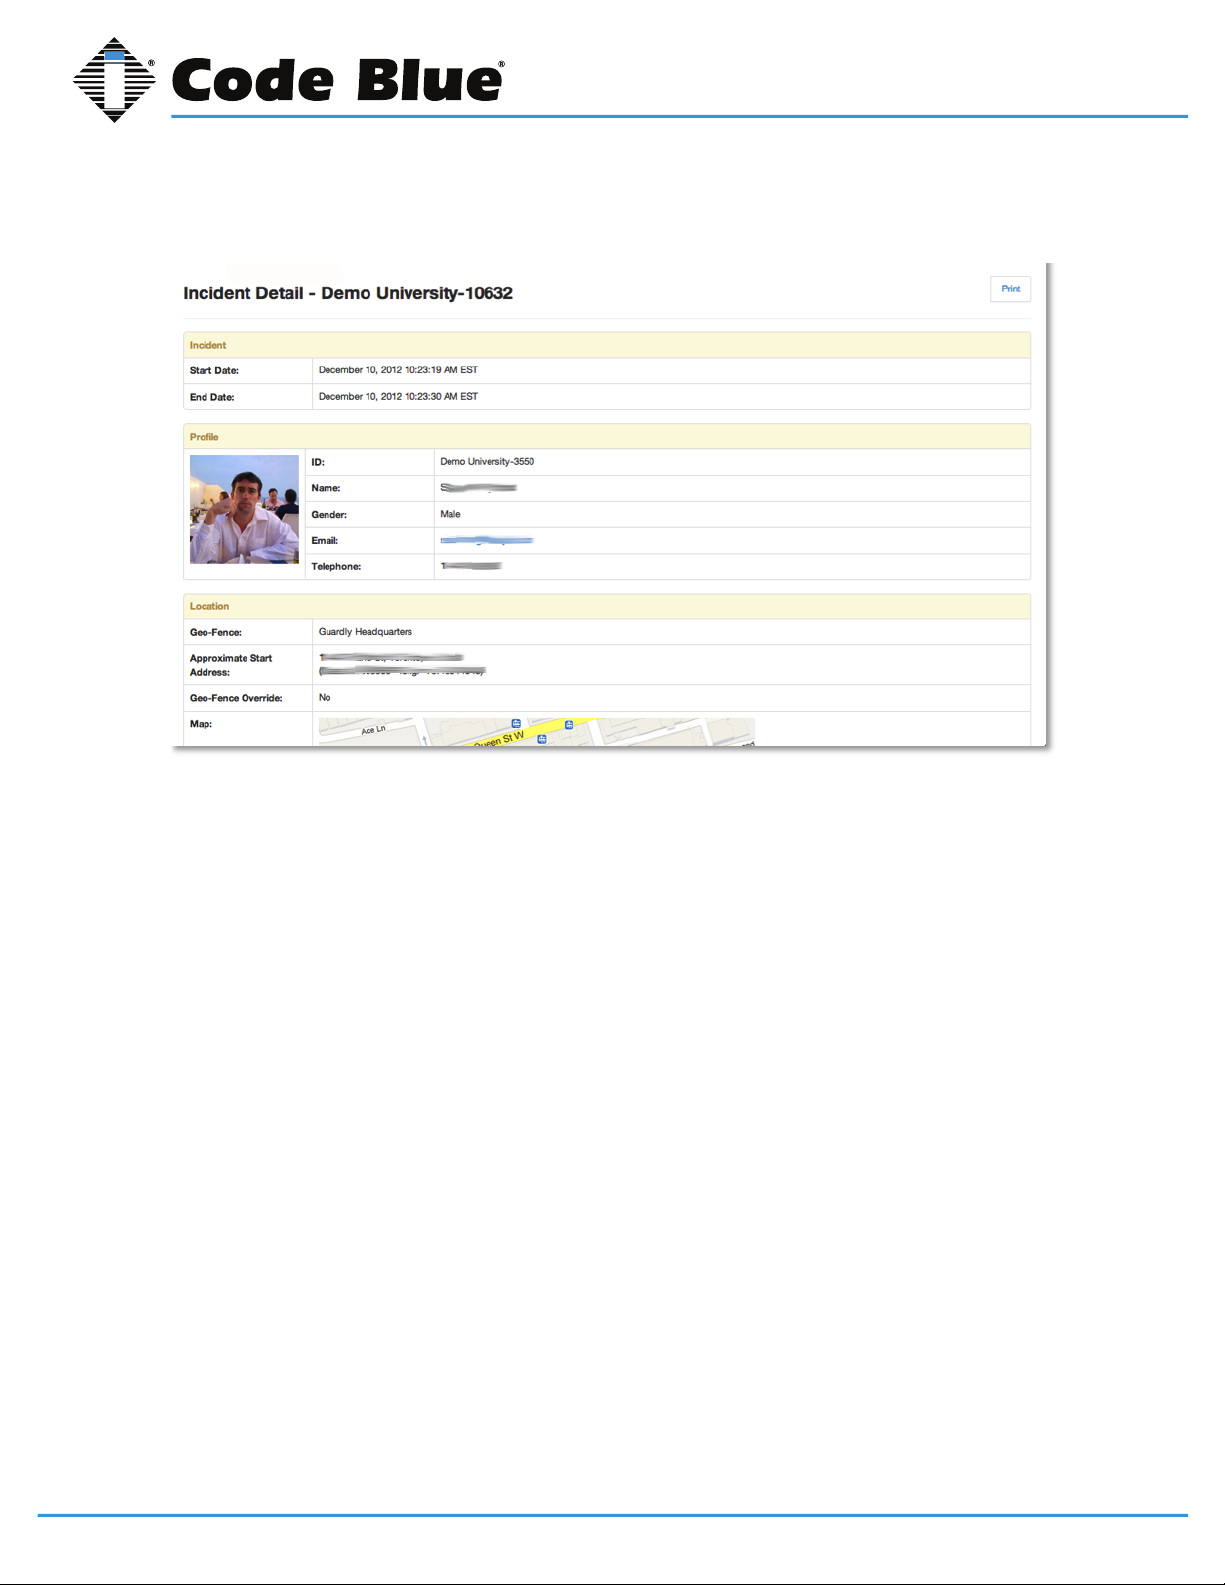
The Incident Detail screen shows the specics of an individual incident for the purpose of keeping
records and learning more.
At the top of the screen, the title of the incident will read: Incident Detail – Name of the Customer
– Incident ID Number.
The Incident Detail information is categorized into: Incident, Prole, Location, Safety Group and
Incident Timeline.
Incident
• Start Time: Displays the date and time the incident was initiated by the user.
• End Time: Displays the date and time the incident was ended by the user.
Prole
• ID
• Name
• Gender
• Email
• Telephone
Location
• Geofence: Displays the name of the Geofence in which the incident occurred.
• Approximate Start Address: Displays the approximate street address where the incident be-
gan, as well as the approximate latitude and longitude coordinates.
• Geofence Override: Displays whether or not the Geofence was manually overwritten. This only
occurs from alerts that were sent from BlackBerry devices.
• Map: Displays a map where the incident occurred with a red marker representing the location.
• Street View: Displays a Google Street View image of the location where the incident occurred.
Code Blue • 259 Hedcor Street • Holland, MI 49423 USA • 800.205.7186 • www.codeblue.com
GU-151-Apage 16 of 30
Page 17
Blue Alert® Mobile
Blue Alert Mobile Powered by Guardly
User Guide
Safety Group
• Group Name: Displays the name of the safety group contacted.
• Contacts: Displays the contacts in the safety group.
Incident Timeline
Shows a timeline of all information sent during the incident, from beginning to end.
The information will include location updates, messages sent and all other information sent throughout the incident.
Print
To print the information from the incident, click the Print Link that appears in the top right corner of
the Incident Details screen.
4.2 Users
User Report Screen
The User Report screen allows the client to view the number of users that have signed up to use the
Blue Alert Mobile Powered by Guardly program.
To access the User Report screen, select Users under the Reports tab.
User Search
In the User Search bar, search for incidents during a specic period by selecting dates with the Start
Date Calendar and the End Date Calendar.
Code Blue • 259 Hedcor Street • Holland, MI 49423 USA • 800.205.7186 • www.codeblue.com
GU-151-Apage 17 of 30
Page 18
Blue Alert® Mobile
User Guide
Search for users by typing in either the name or email.
Search for incidents by typing in the tag for the respective emergency.
Click the Search Icon and the User Reports that t your respective criteria will be listed below the
User Graph View.
The number of incidents within the predened timeframe will appear just below the User Graph
View.
User Graph View
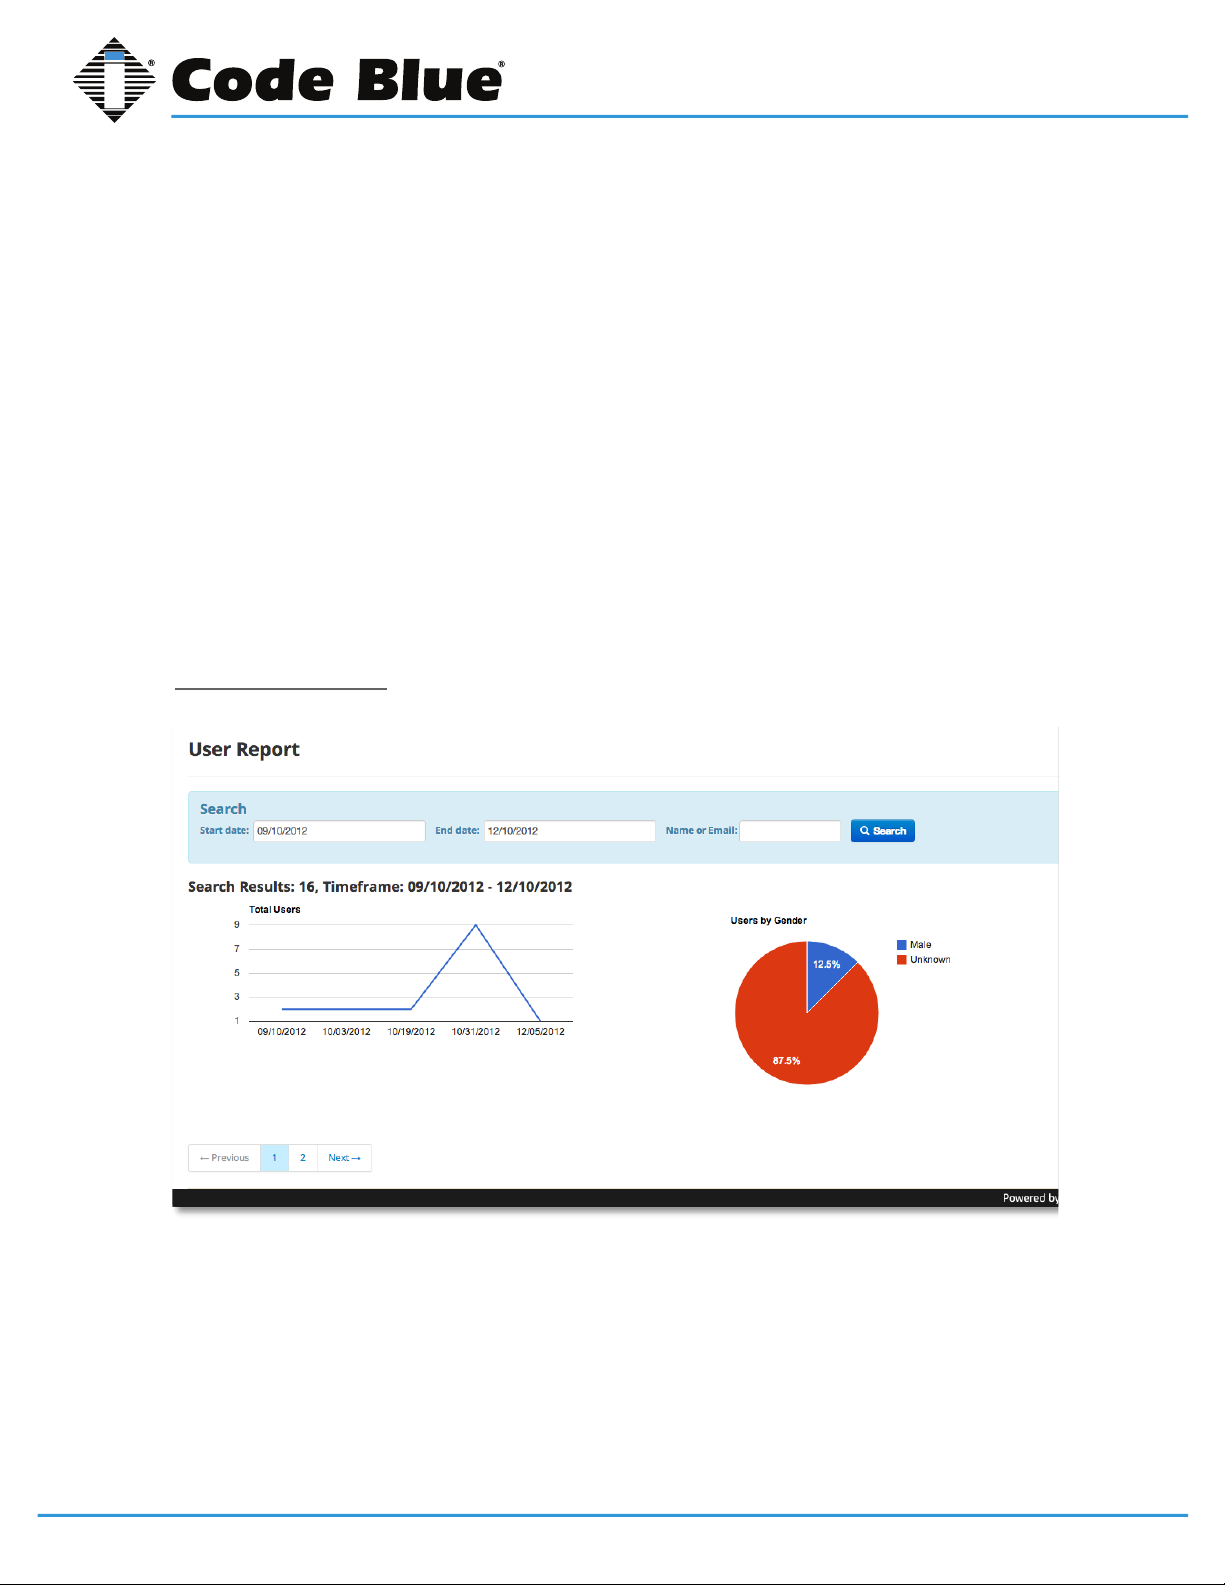
In the User Graph View you will be able to access a line graph showing the total number of user
signups by date, as well as a pie chart detailing the percentage of user signups by gender.
Total Users Graph
The Total Users graph will calculate the total number of user signups that occurred during the pre-
dened timeframe.
On the Y-axis of the graph, you will have the number of user signups per date. On the X-axis of the
graph, you will have the date.
To see the number of user signups that occurred on a specic day, move your mouse cursor over a
specic point on the line graph. A text box showing the date and number of user signups will appear.
User Signups by Gender
The User Signups by Gender graph is a pie chart that shows the percentage of user signups by
gender during the predened time frame.
Each gender will be listed on the right side of the chart with a color designating its representation.
To see the percentage of user signups for a specic gender, move your mouse cursor over the respective gender color on the chart. A text box will appear showing the gender you have highlighted,
the number of signups and the percentage of signups by that gender during that time frame.
User Sign-up Details
Under the User Graph View there is a list of all individual user signups that occurred during the pre-
dened time frame you have searched.
User signups occur from most recent to most dated.
To nd older signups, click next, previous or the page number to nd the specic user signup.
Each signup will have these details:
Code Blue • 259 Hedcor Street • Holland, MI 49423 USA • 800.205.7186 • www.codeblue.com
GU-151-Apage 18 of 30
Page 19
Blue Alert® Mobile
User Guide
• No.: Displays the number of signups in the predened time frame from most recent to most
dated.
• Signup Date
• First Name
• Last Name
• Email
• View: Will bring you to the User Detail screen.
To get details of an individual incident, click the View Link to the right of the individual user signup.
User Detail Screen
The User Detail screen shows if a user has updated their Blue Alert Mobile account. It provides contact, subscription, medical and device information.
This screen allows administrative users to get a detailed description of individual users and user
signups.
At the top of the screen the title will read User Detail: User’s Name.
User Prole
The User Prole provides specic information on the user:
Contact Information
• Name
• Email
• Mobile Telephone
• Home Telephone
• Work Telephone
Subscription
• Account Type
• Date Created
• Registrar
• Date Onboarding Completed
• Subscription End Date
• Recurring Plan
• Email Subscription: Displays if the user is opted in or out of receiving generic email communi-
cations not related to critical system updates or alerts.
• Test Count: Displays the number of test alerts or simulations the user has done.
Medical Information
• Birth Date
• Hair Color
• Eye Color
• Blood Type
• Height
• Weight
To print the User Detail screen, click the print link in the top right corner of the screen.
To return to the User Report screen, click the back link in the top right corner of the screen.
Code Blue • 259 Hedcor Street • Holland, MI 49423 USA • 800.205.7186 • www.codeblue.com
GU-151-Apage 19 of 30
Page 20
Blue Alert® Mobile
User Guide
5 Tools
5.1 Administrative Users
Administrative User Screen
The Administrative User screen allows the client to designate users of the Blue Alert Mobile Powered by Guardly system.
To access the Administrative Users screen, select Administrative Users under the Tools tab.
In the top left corner of the screen the client’s name will be listed.
Under the client’s name will be a list of the administrative users designated for the system.
The Administrative Users list includes the following information:
• ID: The ID number of the user.
• Name
• Email
• Mobile Telephone
• Geofences: The Geofences that the user has been assigned to.
• Role: The role of the user.
• Onboarded: Determines whether the user has successfully completed their prole and the
onboarding process.
○ Green check marks represent the user has successfully onboarded.
○ Red Xs represent the user has unsuccessfully onboarded.
• Active: Determines whether the user account is one of the following:
○ Green checkmarks represent the user has an active account.
○ Red Xs represent the user has an inactive account.
• Edit: Brings you to the Edit Administrative User screen.
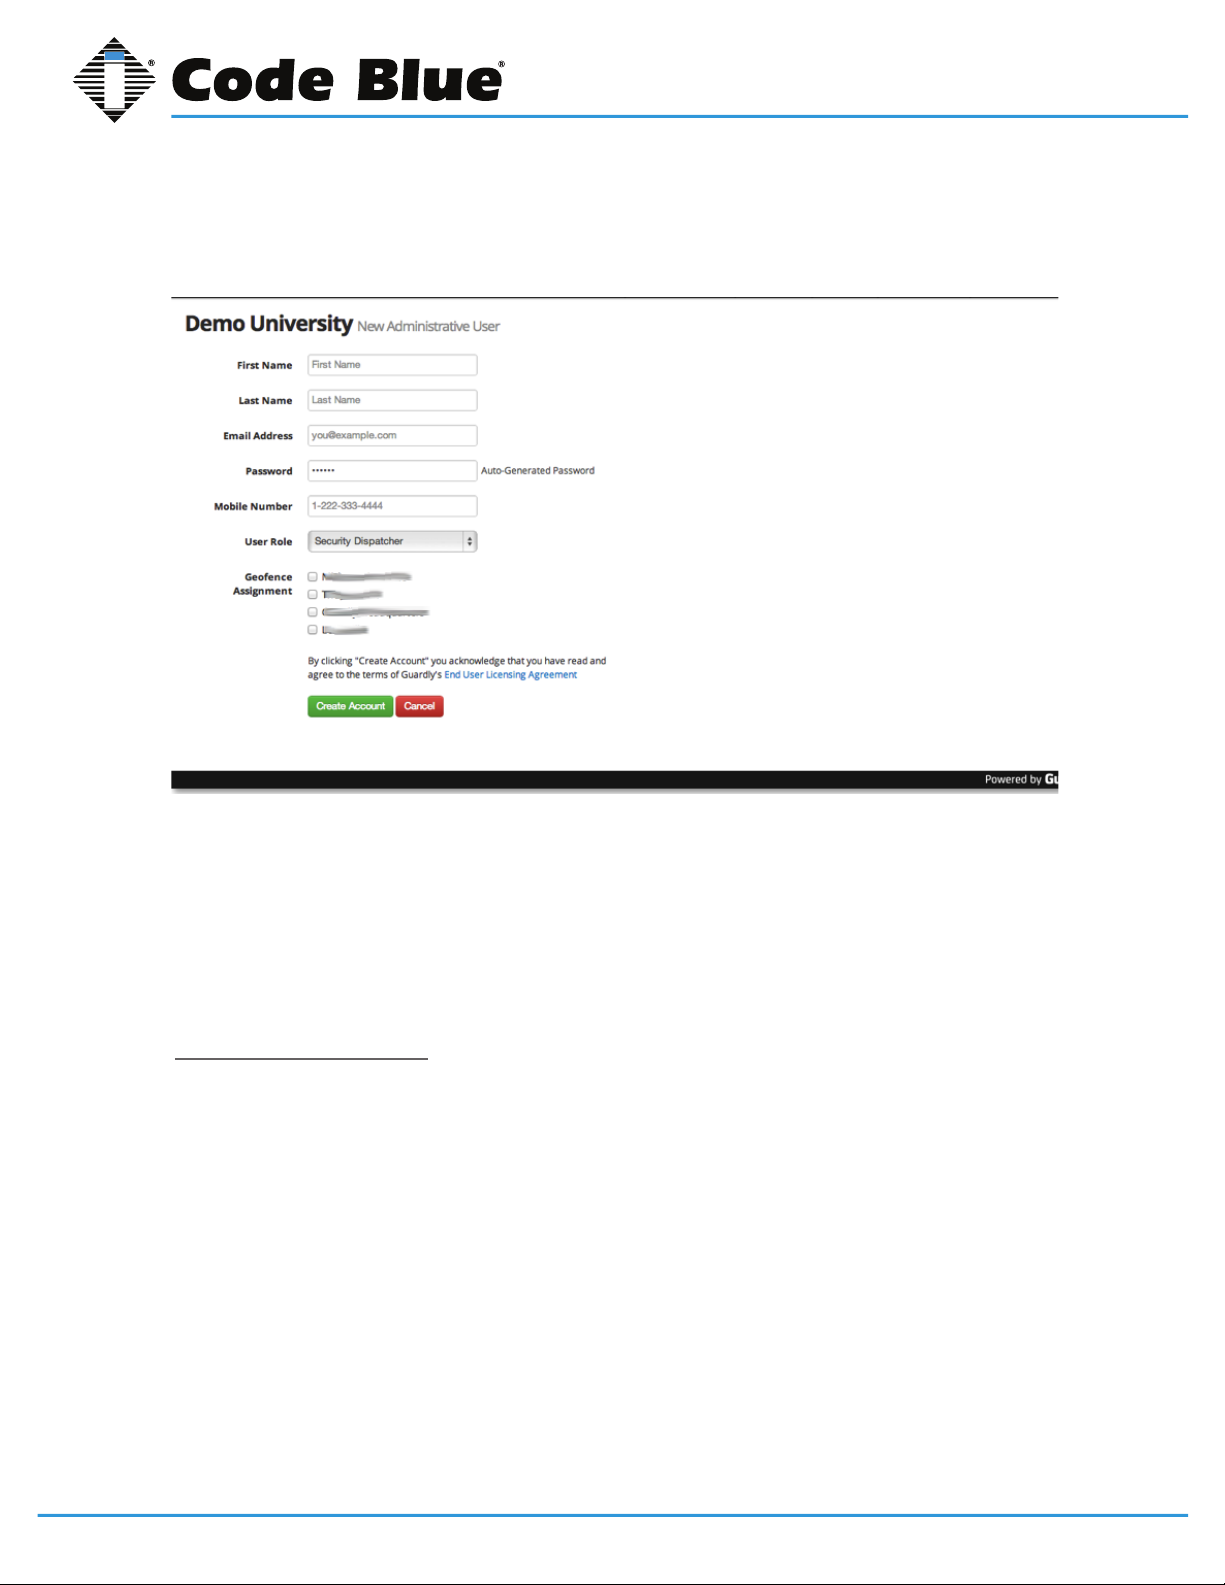
Create a New User
To create a new user, select the New User icon in the top right corner of the Administrative User
screen. This will bring you to the Create New User screen.
Create New User Screen
The Create New User screen allows you to create new administrative users.
To create a new user you must provide information in the following elds:
• First Name
• Last Name
• Email Address
• Password: Create a password for the user to log in to the Blue Alert Mobile Powered by
Guardly system.
• Mobile Number
• User Role: Select the appropriate role.
○ Security Dispatch: The user will be granted access to security dispatch features
in the system.
○ Partner Admin: The user will be granted access to the Partner Administrative
Code Blue • 259 Hedcor Street • Holland, MI 49423 USA • 800.205.7186 • www.codeblue.com
GU-151-Apage 20 of 30
Page 21
Blue Alert® Mobile
User Guide
features in the system.
• Geofence Assignment: Select the appropriate boxes next to the Geofence Assignments to
give the new user access.
Once you have provided information for all the elds, click the Create Account icon at the bottom of
the screen.
If you decide not to create a new user, simply select the Cancel icon at the bottom of the screen and
you will be automatically redirected to the Administrative User screen.
Edit Administrative User Screen
To edit an existing user, click the Edit link on the right side of the user’s name on the Administrative
User screen.
This will bring you to the Edit Administrative User screen.
Before making any edits to the user information, verify that the correct name of the user appears
after Edit Administrative User.
To edit the user’s information, select one or more of the following elds and update it with the appropriate information.
• First Name
• Last Name
• Email Address
• Mobile Phone
• User Role: Select the appropriate role for the user.
○ Security Dispatch: The user will be granted access to security dispatch
features.
○ Partner Admin: The user will be granted access to the Partner Administrative
features.
• Geofence Assignment: Select the appropriate boxes next to the Geofence Assignments to
give the new user access.
Once you are done editing all elds, select the Update User icon at the bottom of the screen and the
user’s information will be updated.
Code Blue • 259 Hedcor Street • Holland, MI 49423 USA • 800.205.7186 • www.codeblue.com
GU-151-Apage 21 of 30
Page 22
To completely remove a user from the system, click the Remove from Admin icon at the bottom
Blue Alert Mobile Powered by Guardly
o Green checkmarks represent the user has successfully onboarded.
o Red X’s represent the user has unsuccessfully onboarded.
Active: Determines whether the user account is.
o Green checkmarks represent the user has an active account.
o Red X’s represent the user has an inactive account.
Edit: The Edit link brings you to the Edit Administrative User Screen.
of the screen. This will remove the user and revoke access to the Blue Alert Mobile Powered by
Guardly system.
Blue Alert® Mobile
User Guide
If you do not wish to edit the user’s information or remove them from the system, click the Back link
in the top right hand corner of the screen.
5.2 Geofence Manager Screen
The Geofence Manager screen allows you to create, manage and disable Geofences around the
respective perimeters you monitor.
To access the Geofence Manager screen, select Geofence Manager under the Tools tab.
Create a new Geofence
Once you have selected the Geofence Manager tab, you will be brought to the default Geofence
Manager screen to create a new Geofence.
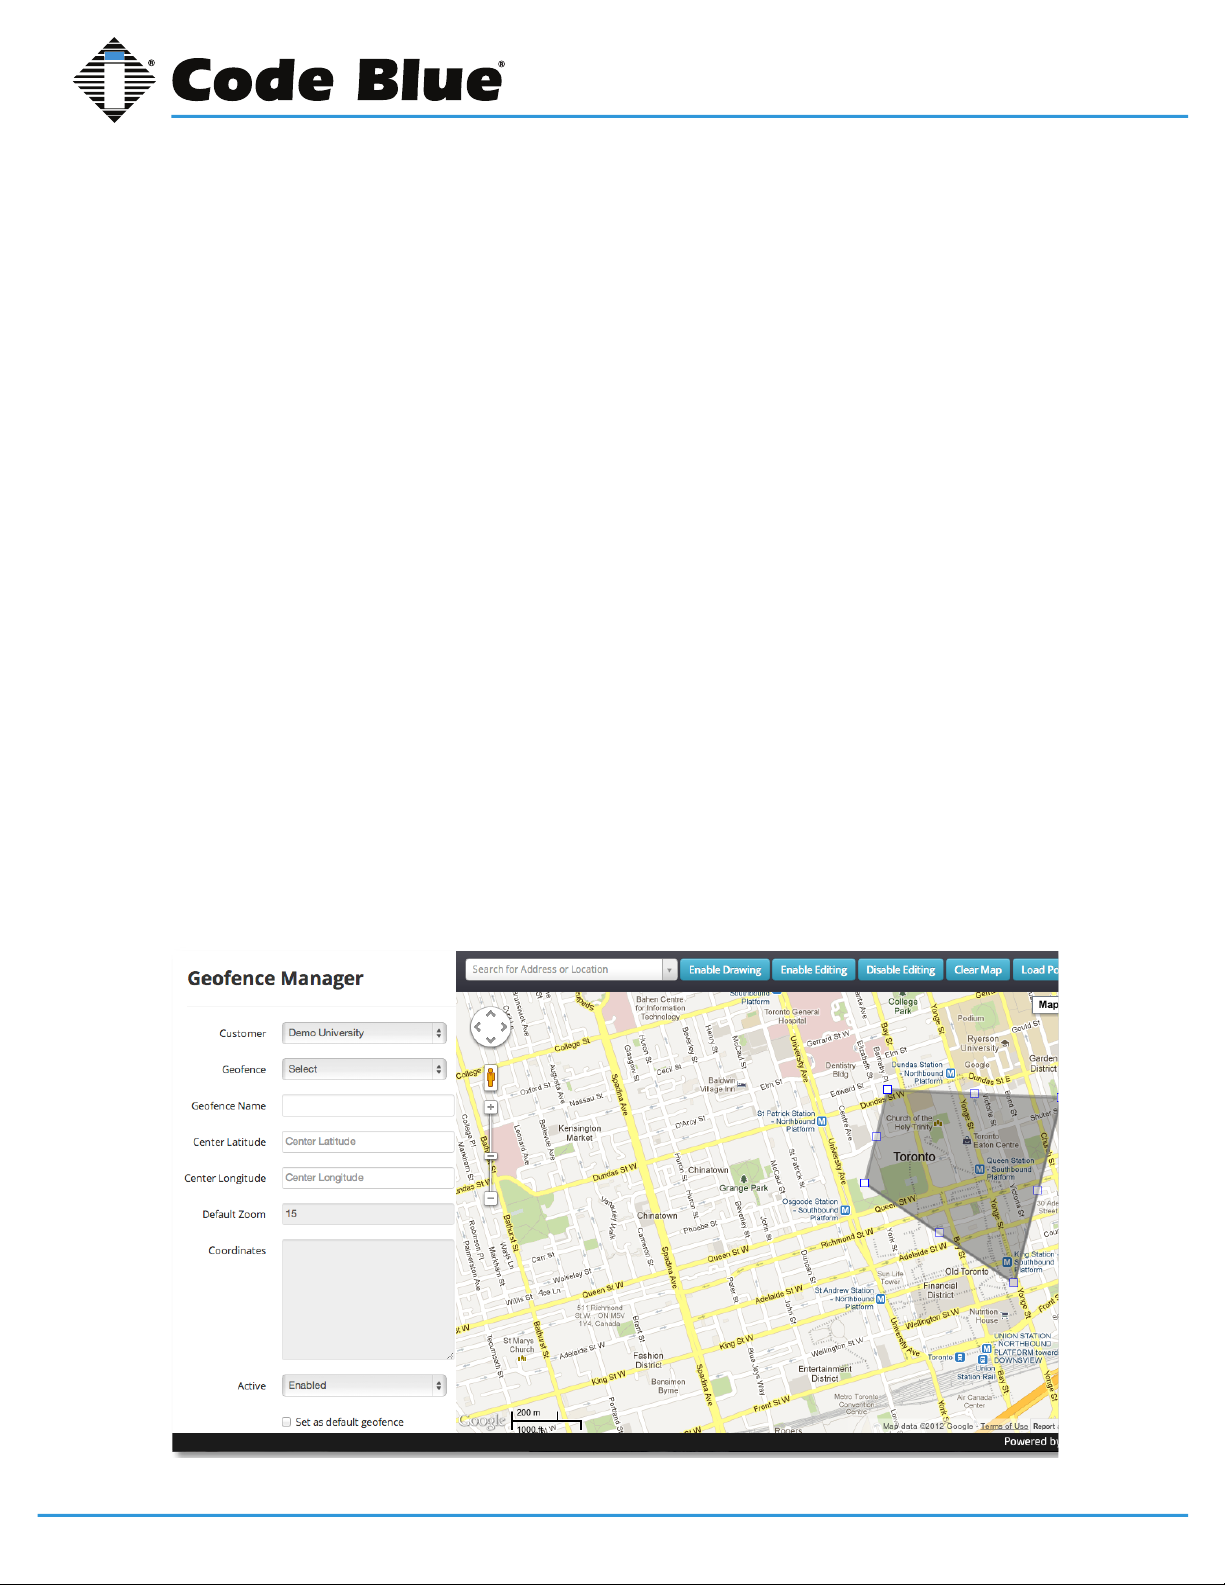
Geofence Manager Toolkit
On the left side of the screen you will have the Geofence Manager Toolkit that allows you to create,
edit and disable specic Geofences.
Use the following elds to select the appropriate customers and Geofences you wish to create, edit
or disable:
Customer
List the customers which you have oversight.
Code Blue • 259 Hedcor Street • Holland, MI 49423 USA • 800.205.7186 • www.codeblue.com
GU-151-Apage 22 of 30
Page 23
Blue Alert® Mobile
Blue Alert Mobile Powered by Guardly
Geofence Assignment: Select the appropriate boxes next to the Geofence Assignments
to give the new user access to the selected Geofences.
User Guide
To manage the Geofences for a specic customer, select that customer in the list.
Geofence
List the Geofences that have been created for the customer, including both active and disabled Geofences.
If you would like to create a new Geofence, choose the Select option and proceed with the request-
ed elds.
If you wish to edit an existing Geofence, select the respective Geofence you would like to edit.
If you are managing an existing Geofence but would like to create a new Geofence, select the Create New Geofence option. This will refresh the page and allows you to create a new Geofence.
Geofence Specics
To add the specic details of the Geofence, ll in and edit the following elds:
• Geofence Name
• Center Latitude: Add the latitude coordinate of where you would like the Geofence to be cen-
tered.
• Center Longitude: Add the longitude coordinate of where you would like the Geofence to be
centered.
• Default Zoom: To adjust the Default Zoom, zoom in or zoom out on the map to the right of the
Geofence Manager Toolkit.
• Coordinates: The coordinates will show each focal point that is added when drawing the Geo-
fence. As more focal points are added, the Coordinates box will update.
• Active: List the options Enabled and Disabled.
○ Enabled: This activates the selected Geofence and adds it to the Coverage Map
tab on the home screen.
»
Code Blue • 259 Hedcor Street • Holland, MI 49423 USA • 800.205.7186 • www.codeblue.com
GU-151-Apage 23 of 30
Page 24
Blue Alert® Mobile
User Guide
○ Disabled: This disables the selected Geofence and removes it from the Coverage Map
tab on the home screen.
• Set as Default Geofence: Toggle the Set as Default Geofence option to set the selected Geo-
fence as the Default Geofence when logging in.
Before saving the Geofence, you must rst use the Geofence Drawing Tools and create the Geofence or it will not properly save.
To learn more about drawing Geofences, refer to the Geofence Drawing Toolkit below.
Geofence Drawing Toolkit
The Geofence Drawing Toolkit is located to the right of the Geofence Manager and above the map.
The Geofence Drawing Toolkit options are:
Search Location
Type in the address or name of a location to help center the map on the area you would like to Geofence.
Hit return or the Search icon to center the map.
Enable Drawing
To draw the boundaries of the Geofence, click the Enable Drawing icon.
The Geofence must be created using clockwise coordinates. The best practice in drawing a
Geofence is to start by selecting the top left coordinate of the perimeter.
To select the starting coordinate, right click the mouse on the location. A focal point will appear on
the map.
Select the focal point and bring the cursor to next focal point on the boundary. Click the coordinate
of the next focal point.
Continue the process until you have created the appropriate Geofence for your boundary.
To complete the Geofence, right click anywhere outside of the boundary. You will see a red marker
icon appear on the rst focal point. Drag the red marker icon to the center of the Geofence. This
will set the center latitude and longitude in the form on the left. These coordinates determine where
the map/Geofence centers when viewing the home screen.
Adjusting the zoom level will also be reected in the form on the left. This value dictates the zoom
level that will be applied to the Geofence when viewing the home screen.
Enable Editing
To edit boundaries for the selected Geofence, click the Enable Editing icon.
To edit the Geofence, select the focal point you would like to adjust and move it to the appropriate
position.
Code Blue • 259 Hedcor Street • Holland, MI 49423 USA • 800.205.7186 • www.codeblue.com
GU-151-Apage 24 of 30
Page 25
Blue Alert® Mobile
User Guide
To create new focal points, select the focal point you would like to connect and drag the cursor to
the proper location.
Disable Editing
To disable editing to the selected Geofence, click the Disable Editing icon.
Clear Map
To clear the map of all Geofence coordinates you have drawn, click the Clear Map icon.
Load Polygon
To create a Geofence with predetermined coordinates, click the Load Polygon icon.
Enter the exact coordinates of each focal point of the Geofence.
A Geofence will be created matching the specic coordinates you have entered.
Save Geofence
Once you have nished drawing the Geofence and lled in all appropriate elds in the Geofence
Manager Toolkit, click the Save Geofence icon at the bottom of the Geofence Manager Toolkit.
This will create the new Geofence and add it to Geofences under the Coverage Map in the home
screen.
If you do not click Save Geofence, your edits or Geofence drawings will not be saved.
Cancel Geofence
To cancel any work editing or creating a Geofence, click the Cancel icon at the bottom of the Geofence Manager Toolkit.
Edit an Existing Geofence
To edit an existing Geofence, go to the Geofence Manager screen by selecting Geofence Manager
under the Tools tab.
To edit a specic Geofence, go to the Geofence Manager Toolkit located on the left side of the
screen and select the appropriate Geofence.
Customer
Select the customer you would like to edit.
Geofence
Code Blue • 259 Hedcor Street • Holland, MI 49423 USA • 800.205.7186 • www.codeblue.com
GU-151-Apage 25 of 30
Page 26
Blue Alert® Mobile
User Guide
Select the specic Geofence you would like to edit.
The screen will refresh with the Geofence.
All current information will be automatically updated in the Geofence Manager Toolkit.
Edit the Geofence.
Once the appropriate Geofence has been uploaded to the screen, use the instructions in the Geofence Manager Toolkit and Geofence Drawing Toolkit to make the desired edits.
More information on these tools can be found above under Create New Geofence.
To save all updates, click the Save Geofence icon at the bottom of the Geofence Manager Toolkit.
If you do not click the Save Geofence icon, the Geofence will not be updated and it will remain the
same as before.
Disabling an Existing Geofence
To disable an active Geofence, go to the Geofence Manager screen by selecting Geofence Manager
under the Tools Tab.
Customer
Select the customer you would like to disable.
Geofence
Select the specic Geofence that you would like to disable.
The screen will refresh with the Geofence you have selected.
All current information will be automatically updated in the Geofence Manager Toolkit.
Disable the Geofence.
Select the Disabled option next to the Active eld in order to disable the Geofence.
Once you have selected Disabled, click the Save Geofence button at the bottom of the Geofence
Manager Toolkit.
After saving, the Geofence will no longer be active and will be removed from the Coverage Map on
the home screen. Alerts that occur within the disabled Geofence boundaries will not result in alert
notications reaching dispatch.
5.3 Help & Support
The Help & Support screen provides customer service information and other troubleshooting options.
Guardly Contacts also will be provided to help with troubleshooting.
Code Blue • 259 Hedcor Street • Holland, MI 49423 USA • 800.205.7186 • www.codeblue.com
GU-151-Apage 26 of 30
Page 27
Blue Alert® Mobile
To access the Help & Support screen, select Help & Support under the Tools tab.
User Guide
Code Blue • 259 Hedcor Street • Holland, MI 49423 USA • 800.205.7186 • www.codeblue.com
GU-151-Apage 27 of 30
Page 28
Blue Alert® Mobile
User Guide
6 Connected
The Connected tab at the top of the Blue Alert Mobile Powered by Guardly system provides information on whether or not you are connected to the system.
If the tab has a Green dot and reads “Connected”, then you will have full functionality.
If the tab had a Red dot and reads “Connecting…”, then you may have limited functionality.
Code Blue • 259 Hedcor Street • Holland, MI 49423 USA • 800.205.7186 • www.codeblue.com
GU-151-Apage 28 of 30
Page 29
Blue Alert® Mobile
User Guide
7 User Tab
The User tab at the top right corner of the Blue Alert Mobile Powered by Guardly system displays
the name of the active user and allows them to log out.
To log out, select Logout under the User Tab. You will be brought to the sign-in page.
Code Blue • 259 Hedcor Street • Holland, MI 49423 USA • 800.205.7186 • www.codeblue.com
GU-151-Apage 29 of 30
Page 30
Blue Alert® Mobile
User Guide
8 Contacts
Code Blue is always focused on improving emergency management and meeting our customers’
needs. If you have any questions about the Blue Alert Mobile Powered by Guardly system, please
contact us and let us know how we can help.
For information regarding technical queries:
Floyd (Chip) Wheeler – Director of Customer Service
Code Blue • 259 Hedcor Street • Holland, MI 49423 USA • 800.205.7186 • www.codeblue.com
GU-151-Apage 30 of 30
 Loading...