

Page 1
Installation
Manual
C3100 Speaker
Universal Mounting Bracket Kit
Sirens produce loud sounds that may damage hearing
• Wear hearing protection when testing
• Use siren only for emergency response
• Roll up windows when siren is operating
• Avoid exposure to the siren sound outside of vehicle
IMPORTANT:
WARNING
Read all instructions and warnings before
installing and using this equipment.
INSTALLER This manual must be
delivered to the end user of this equipment.
Page 2

!
WARNING!
SIREN PRODUCTS:
Sirens are an integral part of an effective audio/visual
emergency warning system. However, sirens are only short
range secondary warning devices. The use of a siren does
not insure that all drivers can or will observe or react to an
emergency warning signal, particularly at long distances or
when either vehicle is traveling at a high rate of speed. Sirens
should only be used in a combination with effective warning
lights and never relied upon as a sole warning signal. Never
take the right of way for granted. It is your responsibility to be
sure you can proceed safely before entering an intersection,
driving against traffic, or responding at a high rate of speed.
The effectiveness of this warning device is highly dependent
upon correct mounting and wiring. Read and follow the
manufacturer’s instructions before installing or using this
device. The vehicle operator should check the equipment
daily to insure that all features of the device operate correctly.
To be effective, sirens must produce high sound levels that
potentially can inflict hearing damage. Installers should be
warned to wear hearing protection, clear bystanders from the
area and not to operate the siren indoors during testing.
Vehicle operators and occupants should assess their
exposure to siren noise and determine what steps, such as
consultation with professionals or use of hearing protection
should be implemented to protect their hearing.
This equipment is intended for use by authorized personnel
only. It is the user’s responsibility to understand and obey all
laws regarding emergency warning devices. The user should
check all applicable city, state and federal laws and regulations.
Code 3, Inc., assumes no liability for any loss resulting from
the use of this warning device.
Proper installation is vital to the performance of the siren and
the safe operation of the emergency vehicle. It is important to
recognize that the operator of the emergency vehicle is under
psychological and physiological stress caused by the
emergency situation. The siren system should be installed in
such a manner as to: A) Not reduce the acoustical performance of the system, B) Limit as much as practical the noise
level in the passenger compartment of the vehicle, C) Place
the controls within convenient reach of the operator so that he
can operate the system without losing eye contact with the
roadway.
Emergency warning devices often require high electrical
voltages and/or currents. Properly protect and use caution
around live electrical connections. Grounding or shorting of
electrical connections can cause high current arcing, which
can cause personal injury and/or severe vehicle damage,
including fire.
PROPER INSTALLATION COMBINED WITH OPERATOR
TRAINING IN THE PROPER USE OF EMERGENCY
WARNING DEVICES IS ESSENTIAL TO INSURE THE
SAFETY OF EMERGENCY PERSONNEL AND THE PUBLIC.
Page 3
Selecting a Mounting
Location: The mounting
location should not only be
as flat as possible but also,
allow the siren to project its
tone parallel to the road.
For detailed information on
mounting locations for
certain specific vehicles,
see the following pages.
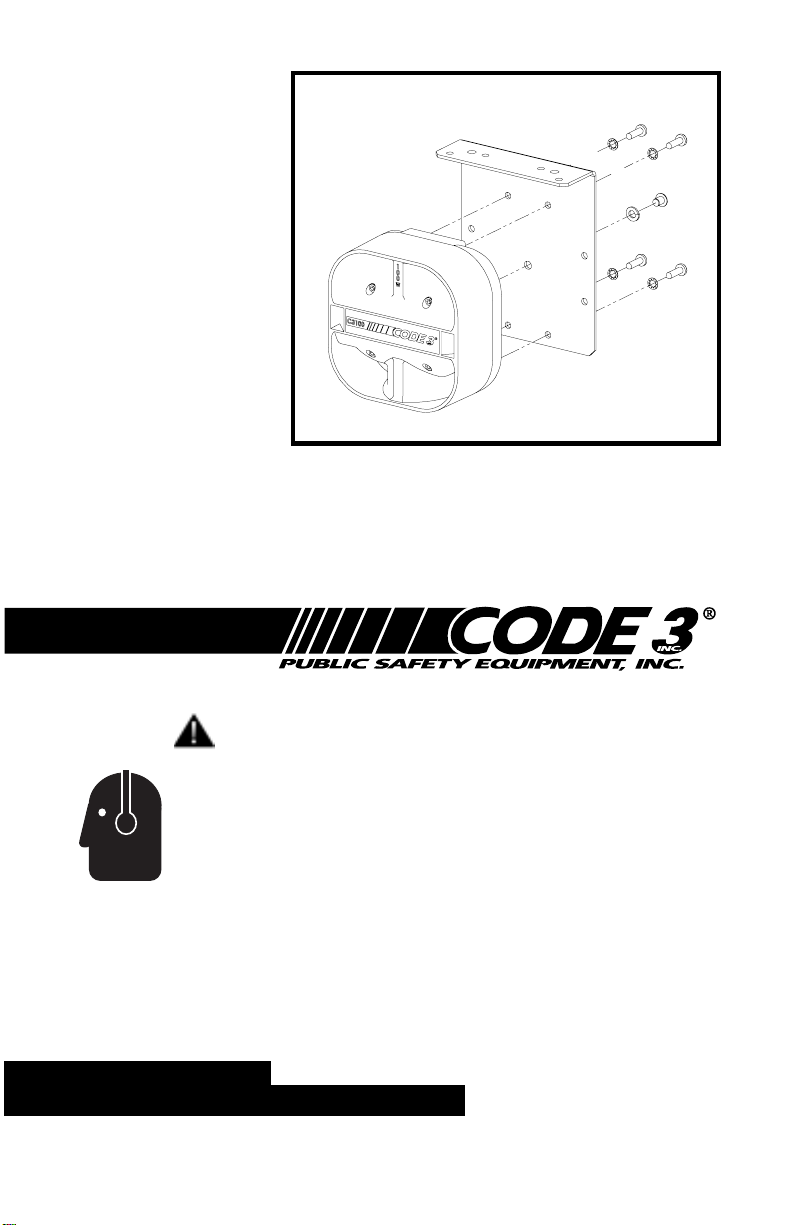
Installation: Position the
bracket onto the desired
mounting area and mark
the centers of the 4
mounting holes using the bracket as a template.
Now in the center of each of the 4 holes you marked, drill a 1/8-inch pilot
hole into the mounting surface for each of the 4 screws then enlarge the
pilot holes with a 9/32-inch drill. If you can get access to the other side of
the mounting area, and it is not too thick, you may want to substitute the 4
mounting screws with nuts, bolts and washers (customer supplied) of
comparable strength and size.
Fig 1
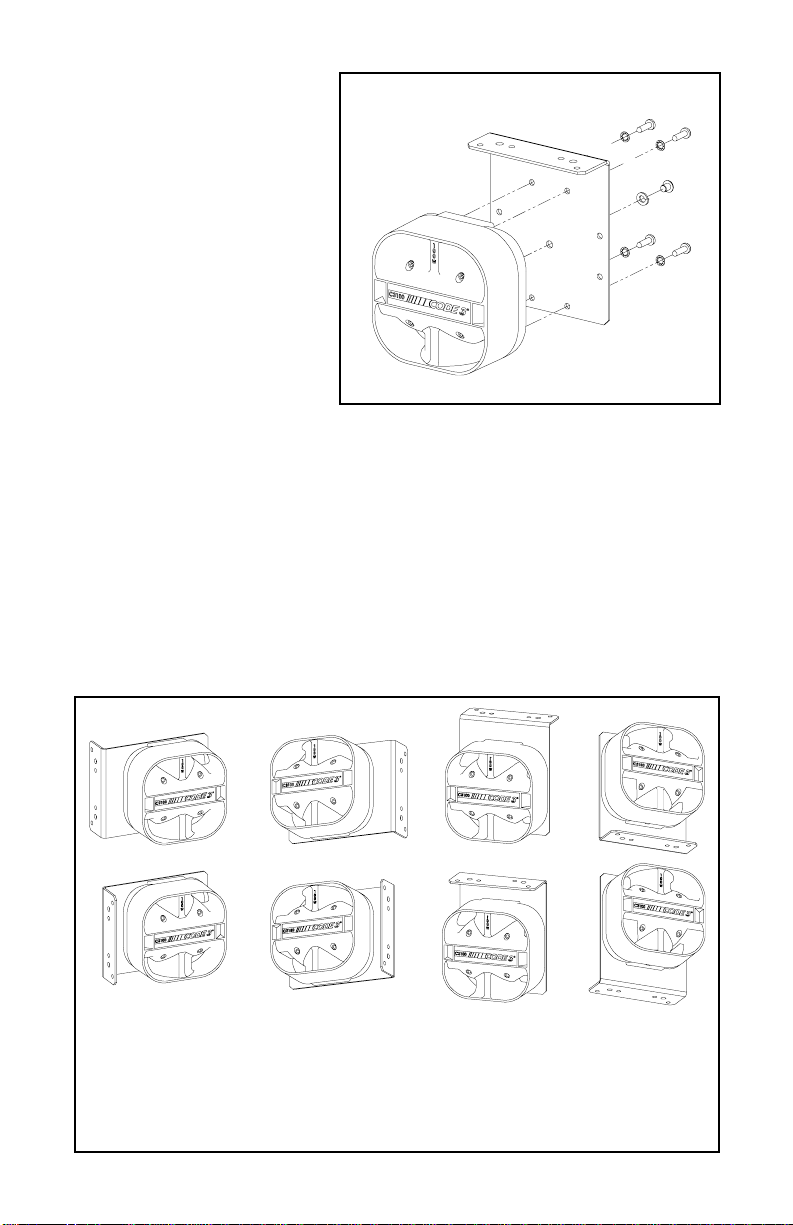
Fig 2, 8 possible mounting positions for the Universal bracket. It is
absolutely essential that the speaker be mounted so that the wires
exit at the the bottom (toward the ground). Improper mounting will
cause damage to your C3100 Speaker and void the warranty
Page 4

Secure the bracket to the mounting surface with the 4 supplied hex head
screws or the customer supplied fasteners of comparable strength and
size.
Note: Some kits are supplied with self-tapping screws. When
installing this type of screw you may need a socket and
electric drill to drive the screws.
Attach the siren to the bracket using the supplied screws and washers as
shown in Fig. 1. Note the center screw is a button head cap screw and
lock washer.
Extend the BLUE (Positive) and WHITE (Negative) speaker wires to your
siren amplifier and connect as shown in the amplifiers instructions.
Test the siren for proper operation.
Mounting The Speaker
Installation / 2002-2003 Ford Explorer:
The speaker will be mounted in front of the driver side front tire,
behind the bumper. You will use two existing nuts and their bolts
that are already on the vehicle. Always be sure that the sirens
wires exit the bottom of the siren after mounting for proper
drainage of the siren.
Attach the mounting bracket to the speaker as shown in figure 3.
Looking in through the drivers side wheel well, find the 2 existing bolts on
the vehicle that match up to the mounting holes on the bracket (Fig 4).
Fig 3,Attaching Mounting
Bracket
Fig 4
Fig 6, Use these holes for the 02-03
Ford Explorer
Fig 5
Page 5

Remove the 2 nuts from their bolts and mount the bracket ( with speaker
attached) securing it with the 2 nuts you removed (Figs. 2 & 3).
Extend the BLUE (Positive) and WHITE (Negative) speaker wires to your
siren amplifier and connect as shown in the amplifiers instructions.
Test the siren for proper operation.
Installation / 2001 Ford Taurus:
The speaker will mount in the area usually occupied by the Antilock Brake
System (ABS). If your vehicle is equipped with ABS you cannot mount the
speaker in this location.
Otherwise, the C3100 speaker will mount under the battery tray. First, you
will need to remove the battery tray, and the air filter and housing (Fig. 5).
The siren bracket will mount to the drivers side of the engine
compartment, on the side wall.
Disconnect the
ground terminal from
the negative post of
the battery, remove
the battery and tray
and then remove the
filter and housing.
Attach the bracket to
speaker as shown in
Fig. 6.
Position the bracket
and speaker onto the
mounting area. Try
not to position it too
far forward so the
siren is muffled. Be
sure the bracket
doesnt interfere with
any existing vehicle
components. Be sure
the bracket is not too
near any existing
holes on the mounting
Fig 5
Fig 6
Page 6

Fig 7
bracket and mount the bracket to the vehicle in the previously determined
location, using the self-tapping screws and washers supplied. You will
need to install these screws using a socket driver and electric drill.
Remount the speaker to the bracket making sure that the siren wires exit
the bottom of the speaker for proper drainage.
Extend the BLUE (Positive) and WHITE (Negative) speaker wires to your
siren amplifier and connect as shown in the amplifiers instructions.
Test the siren for proper operation.
Mark location of
the top edge of
the bracket
area, then
mark the
mounting
surface to
show the
location of
the top of
the bracket
(Fig. 7).
Now
remove the
speaker
from the
Page 7

NOTES
Page 8

WARRANTY
Code 3, Inc.'s emergency devices are tested and found to be
operational at the time of manufacture. Provided they are installed and
operated in accordance with manufacturer's recommendations, Code
3, Inc. guarantees all parts and components except the lamps to a
period of 1 year (unless otherwise expressed) from the date of
purchase or delivery, whichever is later. Units demonstrated to be
defective within the warranty period will be repaired or replaced at the
factory service center at no cost.
Use of lamp or other electrical load of a wattage higher than
installed or recommended by the factory, or use of inappropriate or
inadequate wiring or circuit protection causes this warranty to become
void. Failure or destruction of the product resulting from abuse or
unusual use and/or accidents is not covered by this warranty. Code
3, Inc. shall in no way be liable for other damages including consequential,
indirect or special damages whether loss is due to negligence or breach
of warranty.
CODE 3, INC. MAKES NO OTHER EXPRESS OR IMPLIED
WARRANTY INCLUDING, WITHOUT LIMITATION, WARRANTIES
OF FITNESS OR MERCHANTABILITY, WITH RESPECT TO THIS
PRODUCT.
PRODUCT RETURNS
If a product must be returned for repair or replacement*, please
contact our factory to obtain a Return Goods Authorization Number
(RGA number) before you ship the product to Code 3, Inc. Write the
RGA number clearly on the package near the mailing label. Be sure
you use sufficient packing materials to avoid damage to the product
being returned while in transit.
*Code 3, Inc. reserves the right to repair or replace at its discretion. Code 3, Inc. assumes no responsibility
or liability for expenses incurred for the removal and /or reinstallation of products requiring service and/or repair.; nor
for the packaging, handling, and shipping: nor for the handling of products return to sender after the service has been
rendered.
10986 N. Warson Road
©2005, CODE 3, Inc. Printed in USA
Code 3 is a registered trademark
of Public Safety Equipment, Inc.
St. Louis, Missouri 63114-2029—USA
Ph. (314) 426-2700 Fax (314) 426-1337
Revision 0, 02/05 - Instruction Book Part No. T11271
CODE 3, Inc.Ò
 Loading...