


 Loading...
EN
ES
FR
KCD150
Under-the-Cabinet CD Player & Radio
Instruction Manual........................................... |
Page 2 |
Reproductor de CD con Radio para |
|
Debajo del Mostrador |
|
Manual de Instrucciones............................. |
Página 26 |
Lecteur CD Sous-Meuble avec Radio |
|
Mode d’emploi................................................ |
Page 52 |
Pleasereadcarefullybeforeuse•Léaelmanualantesdeusar•
Veuillezlirecelivretavantutilisation

Table of Contents
English
Thank You........................................................................ |
4 |
Mounting the Unit........................................................ |
5 |
Controls at a Glance.................................................. |
7 |
Getting Started............................................................. |
8 |
Power ....................................................................................................... |
8 |
Clock Backup............................................................................... |
8 |
Using AC Power.......................................................................... |
8 |
Changing the Function Mode......................................................... |
9 |
Adjusting the Volume......................................................................... |
9 |
CD Mode........................................................................... |
10 |
Loading a CD....................................................................................... |
10 |
Playing a CD......................................................................................... |
10 |
Repeat and Random Playback............................................ |
11 |
Programmed CD Playback.............................................................. |
11 |
Radio Mode.................................................................... |
13 |
Clock Mode.................................................................... |
14 |
Setting the Clock Time.................................................................... |
14 |
Using the Alarm Clock..................................................................... |
15 |
Setting the Alarm Timers..................................................... |
15 |
Setting the Alarm Mode (Wake to Radio, CD, or |
|
Buzzer)........................................................................................ |
15 |
Turning the Alarm Off / Snooze........................................ |
16 |
Setting a Sleep Timer (Sleep to Music)....................................... |
17 |
Page 2 |
Coby Electronics Corporation |
|
|

Table of Contents
CD Care & Maintenance |
..............................................18 |
Handling CDs...................................................................................... |
18 |
Cleaning CDs....................................................................................... |
18 |
Cleaning the CD Player Lens......................................................... |
19 |
Specifications............................................................. |
20 |
Troubleshooting........................................................ |
21 |
Safety Notices............................................................. |
22 |
English
www.cobyusa.com |
Page 3 |
|
|

Thank You
English
Thank you for purchasing the Coby KCD150 Under-the- Cabinet CD Player/Radio. Please read this manual carefully before operation.
Visit the Coby website at www.cobyusa.com to find the most current version of this manual as well as other helpful guides.
Your KCD150 features:
CD player with programmable track memoryAM/FM radio
Clock with dual alarm, snooze, and sleep functionsBuilt-in full-range speaker system
Convenient front panel displayMounting kit included
Page 4 |
Coby Electronics Corporation |
|
|

Mounting the Unit
When choosing an installation site, make sure that:
an electrical outlet is available and within reach of the unit
the unit will not be exposed to water
the unit will not be exposed to heat or open flames.
Do not mount the unit near a sink. Do not mount the unit above a stove.
English
What you will need:
Screwdriver (cross-head)Drill with 0.6mm bit
Pencil
Installation template (included)4 mount adapters (included)4 mount screws (included)
To mount the unit:
1.Place the mount adapters into the four, notched sockets of the unit. Make sure that the adapters match the notches of the socket upon insertion.
2.Use the installation template to mark the mounting positions, then use a 0.6mm drill bit to drill 4 holes where marked.
www.cobyusa.com |
Page 5 |
|
|

Mounting the Unit
English
3.Screw the mount screws in through the top of the cabinet and into the mount adapters. Tighten the screws by hand.
The screws used to mount this unit must match the construction material of the installation site (e.g., wood, composite wood, drywall, etc.) If in doubt, contact a qualified installation professional.
Page 6 |
Coby Electronics Corporation |
|
|
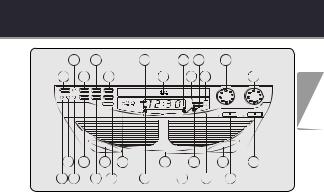
Controls at a Glance
12 |
|
10 |
|
|
8 |
6 |
4 |
2 |
|
13 |
11 |
|
9 |
|
7 |
5 |
3 |
|
1 |
|
|
|
|
|
|
|
|
|
English |
15 |
17 |
|
19 |
21 |
23 |
25 |
19 |
28 |
|
14 16 |
|
18 |
20 |
|
22 |
24 |
26 |
27 |
|
1. |
TuningKnob |
15. |
CDTrackDisplayButton |
2. |
VolumeDial |
17. |
CD:ProgramButton |
3. |
EjectButton |
16. |
Alarm2Button |
4. |
PowerOnIndicator |
18. |
CD:Stop/ClockAdjustButton |
5. |
CD:RepeatIndicator |
19. |
Speakers |
7. |
CDDoor |
20. |
SnoozeButton |
6. |
Alarm2Indicator |
21. |
CD:Play/PauseButton |
8. |
Time:PMIndicator |
22. |
Alarm1Indicator |
9. |
CDSkipUp/HourButton |
23. |
BatteryCompartment |
10. |
CDSkipDown/MinuteButton |
24. |
CD:ProgramIndicator |
11. |
PlayModeButton(Repeat1/ |
25. |
RandomIndicator |
|
RepeatAll/Random/Normal) |
26. |
FMStereoIndicator |
12. |
Alarm1Button |
27. |
FunctionSwitch |
13. |
Power/AlarmOffButton |
|
(AM/FM/CD/Buzzer) |
14. |
SleepButton |
28. |
FMMono/Stereo |
www.cobyusa.com |
Page 7 |
|
|
Getting Started
Power
English
Clock Backup
Open the BATTERY COMPARTMENT [23] and connect one 9-volt battery (not included) to the appropriate terminals. This backup battery will allow your clock to maintain the correct time during a power outage or other interruption of the AC connection.
If the AC connection is interrupted, the clock will continue to mark the correct time internally. The time will not be displayed until AC power is reconnected.
Using AC Power
Make sure that the voltage of your electrical power supply corresponds to the voltage indicated by the manufacturer. If the voltage is incorrect, consult your dealer or service center.
This unit should be used with AC 120V wall outlets, only.
Connect the electrical cord by plugging it into the wall outlet. Keep objects clear of the cord where it connects to the device and to the wall. Do not stretch the cord.
To turn on the unit, press POWER/ALARM OFF [13]. The POWER ON INDICATOR [4] will light up.
To turn off the unit, press POWER/ALARM OFF [13] again. The POWER ON INDICATOR [4] will darken.
Page 8 |
Coby Electronics Corporation |
|
|

Getting Started
Changing the Function Mode
Set the FUNCTION SWITCH [27] to one of the following positions to change the function mode of the unit.
AM: Listen to AM radio broadcasts.FM: Listen to FM radio broadcasts.CD: Listen to a CD.
Buzzer: Set the alarm mode to buzzer.
Adjusting the Volume
To increase the volume, turn the VOLUME KNOB [2] clockwise to the right.
To decrease the volume, turn the VOLUME KNOB [2] counter-clockwise to the left.
English
www.cobyusa.com |
Page 9 |
|
|

CD Mode
To place the unit in CD mode, set the FUNCTION SWITCH [27] to “CD”.
English
Loading a CD
1.Press EJECT [3] to open the disc tray compartment.
2.Place the CD into the disc tray. Make sure that the label of the CD is facing up.
3.Press EJECT [3] again to close the disc tray compartment.
Playing a CD
After you have loaded a CD:
Press PLAY/PAUSE [21] to start playing the CD. The display will indicate the track number of the current song.
Press PLAY/PAUSE [21] while a CD is playing to pause playback. Press PLAY/PAUSE [21] again to resume playback.
Press UP/HOUR [9] to advance to the next track. Hold this button down to scan forward through the track.
Press DOWN/MINUTE [10] to return to the previous track. Hold this button down to scan backwards through the track.
Press STOP/CLOCK ADJ [18] to stop CD playback.
You can press the CD DISPLAY button to view the number of CD track, then it will return to the clock time after few seconds.
Page 10 |
Coby Electronics Corporation |
|
|
CD Mode
Repeat and Random Playback
While a CD is playing:
Press PLAY MODE [11] once to repeat the current track. The REPEAT INDICATOR [5] will flash.
Press PLAY MODE [11] again to repeat all tracks. The REPEAT INDICATOR [5] will light a steady red.
Press PLAY MODE [11] again to play all tracks in random order. The RANDOM INDICATOR [25] will light a steady red.
Press PLAY MODE [11] again to resume normal playback. The REPEAT and RANDOM indicators will turn off.
English
Programmed CD Playback
Create and enjoy a customized CD track list. After you have loaded a CD:
1.Press PROGRAM [17] to enter start creating your program list. The display will flash “P 01”.
2.Press UP/HOUR [9] or DOWN/MINUTE [10] to select a track number and then press PROGRAM [17] to save it to the program list. The display will now flash “P 02”.
3.Repeat Step 2 until you have completed your program list, or until you have saved the maximum of 20 tracks.
4.To cycle through and review the saved program list, press PROGRAM [17].
www.cobyusa.com |
Page 11 |
|
|

CD Mode
5. |
When you are satisfied with the program list, press |
|
PLAY/PAUSE [21] to start playback. |
6. |
To clear all programmed tracks, press PROGRAM [17] |
English |
and then press STOP/CLOCK ADJ [18]. |
|
Page 12 |
Coby Electronics Corporation |
|
|

Radio Mode
To place the unit in Radio mode, set the FUNCTION SWITCH [27] to either “AM” or “FM”.
Set the switch to AM to listen to AM radio broadcasts.Set the switch to FM to listen to FM radio broadcasts.
To tune to a higher station frequency, turn the TUNING KNOB [1] clockwise to the right.
To tune to a lower station frequency, turn the TUNING KNOB [1] counter-clockwise to the left.
English
There is an FM wire antenna on the rear of the unit. Extend and adjust the wire’s position to obtain the best FM reception.
If an FM stereo signal is within range, the FM STEREO INDICATOR [26] will light.
www.cobyusa.com |
Page 13 |
|
|

Clock Mode
English
Setting the Clock Time
Make sure the unit has been turned off before setting the time.
To toggle the clock display between 12-hour mode and 24-hour mode:
Press and hold STOP/CLOCK ADJ [18] for 3 seconds. The screen will display “12H” for 12-hour mode, or “24H” for 24-hour mode.
To change modes again, wait until the normal clock display returns, then press and hold STOP/CLOCK ADJ [18] again.
The PM indicator will light up in 12-hour mode to indicate PM hours.
To set the clock time:
Press STOP/CLOCK ADJ [18] once. The screen will begin to flash.
While the screen is flashing:
Press SKIP UP/HOUR [9] to adjust the hour.
Press SKIP DOWN/MINUTE [10] to adjust the minutes.
Press STOP/CLOCK ADJ [18] to finish setting the time.
Page 14 |
Coby Electronics Corporation |
|
|

Clock Mode
Using the Alarm Clock
Setting the Alarm Timers
Set one or two independent alarms to wake at different times.
To set the Alarm 1 timer:
1.Make sure the unit has been turned off (the POWER ON INDICATOR [4] should be dark).
2.Press AL 1 [12]. The AL1 INDICATOR [22] will light and the display will flash the Alarm 1 time.
3.Press SKIP UP/HOUR [9] to adjust the hour; press SKIP DOWN/MINUTE [10] to adjust the minutes.
4.Press AL 1 [12] again to save the Alarm 1 time. The AL1 INDICATOR [22] will remain on; the unit will now sound at the set time.
To set the Alarm 2 timer, follow all of the steps above, but press AL 2 [16] instead of AL 1. When the Alarm 2 timer has been set and is active, the AL2 INDICATOR [6] will light.
English
Setting the Alarm Mode (Wake to Radio, CD, or Buzzer)
Set the FUNCTION SWITCH [27] to the “AM” or “FM” position to wake to the radio. Turn the VOLUME KNOB [2] to adjust the volume to the desired level.
Set the FUNCTION SWITCH [27] to the “CD” position to wake to a CD. Turn the VOLUME KNOB [2] to adjust the volume to the desired level.
www.cobyusa.com |
Page 15 |
|
|

Clock Mode
English
Set the FUNCTION SWITCH [27] to the “BUZZER” position to wake to the alarm buzzer.
When waking to the radio, ensure that you have tuned to a radio station within frequency range before setting the alarm. See the section “Radio Mode” to learn how to tune to a radio station.
When waking to a CD, ensure that you have loaded a compatible disc into the compartment tray before setting the alarm. If no disc has been loaded, the unit will default to a buzzer when the alarm sounds.
Turning the Alarm Off / Snooze
When the alarm sounds, press SNOOZE [20] to reset the alarm to sound again 5 minutes later.
To turn off the alarm completely, press AL 1 [12] or AL 2 [16].
Page 16 |
Coby Electronics Corporation |
|
|

Clock Mode
Setting a Sleep Timer (Sleep to Music)
The sleep timer allows you to go to sleep to music. The unit will turn itself off automatically at the end of the timer. To set the sleep timer:
While the radio or CD is playing, press SLEEP [14]. The screen will display the default sleep timer duration of
90 (minutes).
Decrease the length of the sleep timer by pressing SLEEP [14] again. You can set the sleep timer to 90, 60, 30, or 15 minutes.
To cancel the sleep timer, press SLEEP [14] until the sleep timer is no longer displayed on the screen.
To turn off the music before the sleep timer ends, simply press POWER [13] to turn off the unit.
English
www.cobyusa.com |
Page 17 |
|
|

CD Care & Maintenance
English
Handling CDs
Hold a CD by its edges. Avoid touching the recorded side of the disc. To remove a CD from its storage case, press down on the center retention mechanism of the case and lift the disc out.
Cleaning CDs
Use a dry, soft cloth to wipe off any fingerprints and dusts from the playing surface of the disc. Wipe in a straight line radially from the center to the outside edge of the disc. Small dust particles and light stains will not affect playback quality.
Never use chemicals such as record sprays, anti-static sprays, benzene, or thinners to clean your CDs.
To reduce the risk of scratches, always put CDs back in their case after use.
Do not subject CDs to prolonged exposure to direct sunlight, high humidity, or high temperatures.
Do not place stickers or labels on either side of the CD.
Page 18 |
Coby Electronics Corporation |
|
|

CD Care & Maintenance
Cleaning the CD Player Lens
A dirty lens can cause CD playback to skip. If the lens is very dirty, the CD may not work at all. Unplug the power supply, open the CD door, and clean the lens as follows:
For Dust or Dry Particles - use a camera lens brush/ blower to blow on the lens a few times. Then, wipe the lens gently with the brush, and blow on the lens once more.
For Fingerprints - use a dry cotton swab to wipe the lens in a straight line radially from the center to the outside edge.
English
www.cobyusa.com |
Page 19 |
|
|

Specifications
|
Amplifier |
Output |
1.5W(RMS) |
|
|
|
|
|
|
English |
|
FrequencyResponse |
60–20,000Hz(+/-10dB) |
|
|
|
|
||
CD |
FrequencyResponse |
30–20,000Hz |
||
|
||||
|
|
|
|
|
|
|
DynamicRange |
60dB |
|
|
|
|
|
|
|
|
HarmonicDistortion |
0.5% |
|
|
|
|
|
|
|
|
ChannelSeparation |
35dB |
|
|
|
|
|
|
|
|
SignalNoiseRate |
50dB |
|
|
|
|
|
|
|
Radio |
FrequencyRange |
AM530–1710kHz |
|
|
|
|
|
|
|
|
|
FM87.5–108MHz |
|
|
|
|
|
|
|
Power |
Supply |
AC120V~60Hz |
|
|
|
|
|
|
|
|
|
DC9Vforclockback-up |
|
|
|
|
|
|
|
|
Consumption |
15 W |
|
|
|
|
|
*Specifications and design are subject to change without notice.
Page 20 |
Coby Electronics Corporation |
|
|
Troubleshooting
If you have a problem with this device, please check our website at www.cobyusa.com for Frequently Asked
Questions (FAQs) and firmware updates. If these resources do not resolve the problem, please contact Technical Support.
Address
Coby Electronics Technical Support 56-65 Rust Street
Maspeth, NY 11378
Email techsupport@cobyusa.com
Web www.cobyusa.com
Phone
800-727-3592: Mon–Fri, 8:00AM–11:00PM EST Saturdays, 9:00AM–5:30PM EST
718-416-3197: Mon–Fri, 8:00AM–5:30PM EST
English
www.cobyusa.com |
Page 21 |
|
|

Safety Notices
English
The lightning flash with arrowhead symbol within an equilateral triangle is intended to alert the user to the presence of uninsulated “dangerous voltage” within the product’s enclosure that may be of sufficient magnitude to constitute a risk of electric shock.
The exclamation point within an equilateral triangle is intended to alert the user to the presence of important operation and servicing instructions in the literature accompanying the appliance.
For Customer Use:
Enter below the serial number that is located on the rear of the unit. Retain this information for future reference.
Model No. |
KCD150 |
Serial No.
WARNING: To prevent fire or shock hazard, do not expose this device to rain or moisture. Dangerous high voltage is present inside the enclosure. Do not open the cabinet.
CAUTION: To prevent electric shock, match wide blade of plug to wide slot of outlet and fully insert.
For recycling or disposal information about this product, please contact your local authorities or the Electronics Industries Alliance: www.eiae.org.
Page 22 |
Coby Electronics Corporation |
|
|

Safety Notices
FCC Statement:
This device complies with Part 15 of the FCC Rules. Operation is subject to the following two conditions:
(1) |
This device may not cause harmful interference, and |
English |
(2) |
This device must accept any interference received, including interference that |
|
|
may cause undesired operation. |
|
Note: This equipment has been tested and found to comply with the limits for Class B digital devices, pursuant to Part 15 of the FCC rules. These limits are designed to provide reasonable protection against harmful interference in a residential installation. This equipment generates, uses and can radiate radio frequency energy and, if not installed and used in accordance with the instructions, may cause harmful interference to radio communications. However, there is no guarantee that interference will not occur in a particular installation. If this equipment does cause harmful interference to radio or television reception, which can be determined by turning the equipment off and on, the user is encouraged to try to correct the interference by one or more of the following measures:
•Reorientorrelocatethereceivingantenna.
•Increasetheseparationbetweentheequipmentandreceiver.
•Connecttheequipmentintoanoutletonacircuitdifferentfromthattowhichthereceiveris connected.
•Consultthedealeroranexperiencedradio/TVtechnicianforhelp
Use of shielded cable is required to comply with Class B limits in Subpart B of Part 15 of the FCC rules.
Do not make any changes or modifications to the equipment unless otherwise specified in the manual. If such changes or modifications should be made, you could be required to stop operation of the equipment.
www.cobyusa.com |
Page 23 |
|
|

Safety Notices
Important Safety Instructions
|
1. |
Read Instructions: All the safety and operating instructions should be |
|
|
read before the product is operated. |
English |
2. |
Retain Instructions: The safety and operating instructions should be |
|
retained for future reference. |
|
|
|
|
|
3. |
Heed Warnings: All warnings on the product and in the operating |
|
|
instructions should be adhered to. |
|
4. |
Follow Instructions: All operating and usage instructions should be |
|
|
followed. |
|
5. |
Cleaning: Unplug this product from the wall outlet before cleaning. |
|
|
Do not use liquid cleaners or aerosol cleaners. Use a damp cloth |
|
|
for cleaning. |
|
6. |
Attachments: Use only attachments recommended by the manufac- |
|
|
turer. Use of other attachments may be hazardous. |
|
7. |
Water and Moisture: Do not use this product near water (e.g., near a |
|
|
bath tub, washbowl, kitchen sink, laundry tub, in wet basements, or |
|
|
near a swimming pool and the like). |
|
8. |
Ventilation: Slots and openings in the cabinet are provided for venti- |
|
|
lation to ensure reliable operation of the product and to protect it from |
|
|
overheating. These openings should never be blocked by placing the |
|
|
product on a bed, sofa, rug, or other similar surface. This product |
|
|
should not be placed in a built-in installation such as a bookcase |
|
|
or rack unless proper ventilation is provided or the manufacturer |
|
|
instructions have been adhered to. |
|
9. |
Power Sources: This product should be operated only from the type |
|
|
of power source indicated on the rating label. If you are not sure of |
|
|
the type of power supply to your home, consult your product dealer or |
|
|
local power company. For products intended to operate from battery |
|
|
power or other sources, refer to the operating instructions. |
|
10. |
Power-Cord Protection: Power supply cords should be routed so |
|
|
that they are not likely to be walked on or pinched by items placed |
|
|
upon or against them, paying particular attention to cords at plugs, |
|
|
convenience receptacles, and at the point which they exit from the |
|
|
product. |
|
11. |
Lightning: For added protection for this product, unplug it from the |
|
|
wall outlet and disconnect the antenna or cable system during a light- |
ning storm or when it is left unattended and unused for long periods of time. This will prevent damage to the product due to lightning or power-line surges.
Page 24 |
Coby Electronics Corporation |
|
|
Loading...