

Page 1

CP9125manual(6.12) 10/20/98 11:38 AM Page 1
Cobra Electronics Corporation
6500 West Cortland Street
Chicago, IL60707
IfYou Think You Need Service
For te c h n i cal assistance,please call our Au to m a ted Help Desk which can assist
you by answe ring the most fre q u e n t ly asked questions about Co b ra prod u ct s.
A Consumer Service Representative can be reached through this same number
Technical assistance is also available on-line in the Frequently Asked Questions (FAQ)
section at www.cobraelec.com or by e-mail to productinfo@cobraelec.com
8:00 am - 8:00 pm,Monday through Friday,CST.
If you think you need service call 1.773.889.3087
“If your product should require factory service please call Cobra first before sending your unit in.
This will ensure the fastest turn-around time on your repair.”
You may be asked to send your unit to the Cobra factory.It will be necessary to furnish the following in order to have the product serviced and returned.
1. For Warranty Repair include some form of proof-of-purchase,such as a mechanical reproduction
or carbon or a sales receipt. If you send the original receipt it cannot be returned.
2. Send the entire product.
3. Enclose a description of what is happening with the unit.Include a typed or clearly print name
and address of where the unit is to be returned.
4. Pack unit securely to prevent damage in transit.If possible,use the original packing material.
5. Ship prepaid and insured by way of a traceable carrier such as United Parcel Service (UPS) or First
Class Mail to avoid loss in transit to: Cobra Factory Service,Cobra Electronics Corporation,6500
W.Cortland St.,Chicago,IL 60707.
6. If the unit is in warranty,upon receipt of your unit it will either be repaired or exchanged
depending on the model. Please allow approximately 3 to 4 weeks before contacting us for
status.If the unit is out of warranty a letter will automatically be sent informing you of the
repair charge or replacement charge.If you have any questions,please call 1.773.889.3087 for
assistance.
Cobra Electronics Corp.© 1998
Printed in China
Part No. 480-282-P-001
(773) 889-3087
24 hours a day, 7 days a week.
O pe rating Instru ctions
for your Co b ra CP-9125
Private Call®900
900 MHz
Cordless
Telephone
“Ingenious Prod u cts for Easier Co m m u n i cat i o n .”
CP-9125
FCC Information
FCC Information
Included Accessories
Included Accessories
1
2
3
4
5
6
7
Re g i s te red with The FCC
Please note :This co rdless phone ope r ates under part 15 and part 68 of FCC ru l e s.
O pe ration is subject to two co n d i t i o n s :
1 .It may not inte rfe re with radio co m m u n i cat i o n s ,and 2.It must accept any inte rfe re n c e
re ce i ve d,including that which may cause undesirable ope rat i o n . See the Operational
Features section of this manual for ways to reduce interference.
Changes or mod i f i cations not ex p ressly approved by the party re s ponsible for co m p l i a n ce
could void the user’s authori ty to ope rate this equipment.
N OT E :This equipment has been te s ted and found to comply with the limits for a Class B
digital dev i ce,p u r s u a nt to Pa rt 15 of the FCCRu l e s.The limits are designed to provide re a sonable pro te ction against harmful inte rfe re n ce in a re s i d e ntial installat i o n .This equipm e nt generate s,uses and can ra d i ate radio fre q u e n cy energy and,if not installed and used
in acco rd a n c e with the instru ct i o n s,m ay cause harmful inte rfe re n ce to radio co m m u n i cat i o n s.Howeve r ,t h e re is no guara ntee that inte rfe re n ce will not occur in a particular installat i o n .If this equipment does cause harmful inte rfe re n c e to radio or te l evision re ce p t i o n ,
which can be dete rmined by turning the equipment off and on,the user is enco u raged to
t ry to co r re ct the inte rfe re n ce by one of the fo l l owing measure s :
- Re o ri e nt or re l ocate the re ceiving ante n n a .
- Increase the separation be t ween the equipment and re ce i ve r.
- Co n n e ct the equipment into an outlet on a circuit diffe re nt
f rom that to which the re ce i ver is co n n e cte d .
- Consult the dealer or an ex pe ri e n ced ra d i o / TV technician for help.
Your telephone co m p a ny is re q u i red by the Fe d e ral Co m m u n i c ations Commission to allow
you to co n n e ct FCC re g i s te red telephones to their lines.
The FCC re q u i res you to provide info rm at i o n ,if re q u e s ted by the local telephone co m p a ny,
a bout the co n n e ction of an FCC re g i s te red telephone to their lines. Th ey may ask you fo r
the FCC re g i s t ration number and ringer equiva l e n ce number (REN),both of which are on
the bo t tom of the base.Th ey may also ask for the Un i versal Se rv i c e Order Code (USOC)
n u m ber which is RJ-11C. It is illegal to use this phone on a party line or to
co n n e ct it to a co i n - o pe rated te l e p h o n e.
The REN is used to dete r mine the quant i ty of dev i ces you may co n n e ct to the te l e p h o n e
l i n e.Exce s s i ve RENs on the telephone line may result in the dev i c es not ringing in re s po n s e
to an incoming ca l l .In most areas the sum of RENs should not exceed 5.0.To be sure,co nt a ct the local telephone co m p a ny.
If your equipment causes harm to the telephone netwo rk ,the telephone co m p a ny will
notify you in adva n ce (if possible) of a te m po ra ry disco nt i n u a n ce of serv i ce.Al s o,you will
be advised of your ri g ht to file a co m p l a i nt with the FCC .
The telephone co m p a ny may make changes in it’s facilities,e q u i p m e nt or proce d u res that
could affe ct the ope ration of your equipment.The telephone co m p a ny will prov i d e
a dva n ce notice to help you maintain uninte rru p ted serv i ce.
What’s Included with Your CP-9125
1. Headset
2. AC/DC Power Adapter
3. Memory Label
4. Line Cords (6”and 6’)
5. Belt Clip
8
6. Belt Clip Slot Cover
7. Wall Mount Bracket
8. Handset Battery
A1
Page 2

CP9125manual(6.12) 10/20/98 11:38 AM Page 4
Controls and Indicators
Base:
1. Line Jack
2. Power In Jack
3. Ringer On/Off Switch
4. Tone/Pulse Switch
5. Redial/Pause Button
6. Flash Button
7. Mute Button
8. Memory Button
9. Charge Indicator
10. Intercom Indicator
11. In Use Indicator
12.
Power On/Off Indicator
13.
Hold Button
14.
Intercom Page/Find Button
15.
Speakerphone Button
Handset:
16.
Headset Jack
17.
In Use Indicator
18.
Low Battery/Intercom
Indicator
19.
Volume Up/Down Buttons
20.
Intercom/Page Button
21.
Talk Button
22.
Flash Button
23.
Redial/Pause Button
24.
Channel Button
25.
Memory Button
26.
Hold Button
Our Thanks to You
321 4
5 6 7
8
9
1 0
1 1
1 2
1 5
1 3
1 4
1 6
1 7201 8
1 9
2 1
23 26
22
2524
Thank you for purchasing the Cobra CP-9125
cordless phone. Properly used, this Cobra product will give you many years of reliable service.
Customer Support
Should you encounter any problems with the
product or not understand its many features,
please refer to this owner’s manual. If,after
referring to the manual, you still need help,
call Cobra Customer Service at 773.889.3087.
Cobra Customer Service
Live operators are available
M-F 8:00 am - 8:00 pm CST at:
773.889.3087. Automated
Technical Assistance available
by phone 24 hours a day,seven
days a week.
E-mail questions to:
productinfo@cobraelec.com
Cobra on the World Wide Web:
Frequently Asked Questions
(FAQ) can be found on-line at:
www.cobraelec.com
A2
A3
Page 3

CP9125manual(6.12) 10/20/98 11:38 AM Page 7
How to Use Your Cobra
CP-9125 900 MHz
Cordless Telephone
Contents
Features.......................................................................................1
FCC Information/Included Accesories............................A1
Controls & Indicators.............................................................A2
Our Thanks toYou...................................................................A3
Customer Support
Important Safety Instructions...........................................2
Installation
Quick Set-Up Guide............................................................4
Wall Mounting Instructions.............................................8
Operating Your CP-9125
Answering Calls From The Handset..............................10
Answering Calls From The Base......................................12
Placing Calls From The Handset.....................................14
Placing Calls From The Base.............................................15
Channel Selection................................................................16
Flash..........................................................................................17
Secur-Loc™............................................................................17
4 Level Volume Control.....................................................18
Hearing Aid Compatibility................................................18
Mute..........................................................................................19
Last Number Instant Redial..............................................20
Last Number Delay Redial................................................21
Memory Number Storage.................................................22
Memory Number Dialing..................................................24
To Find The Handset...........................................................25
Intercom Mode From The Handset...............................26
Intercom Mode From The Base.......................................27
Hold Button...........................................................................29
Ringer Switch........................................................................30
Tone/Pulse..............................................................................30
Handset Battery Recharging...........................................31
Private Call®Scrambling...................................................32
Battery Saver.........................................................................33
Replacing Handset Battery ..............................................34
Disposal of The Battery......................................................35
Headset Operation/Belt Clip/Slot Cover.....................36
Cleaning The Charging Contacts...................................37
Troubleshooting......................................................................38
Frequently Asked Questions..............................................39
Limited One-Year Warranty................................................43
Accessories and Order Form..............................................44
IfYou Think You Need Service..........................Back Cover
Features of This Product
• Private Call®Voice Scrambling Base and Handset
• Headset for Hands Free Operation
• 900 MHz Extended Range
• Detachable Belt Clip
• 30 Channel Autoscan
• Clear Call® PLUS Compander
• Ten (10) Number Memory
• Handset Volume Control
• Page/Find
• Mute Button
• Fourteen (14) Day Stand-By
• Wall Mountable
• Last Number Redial
• Hearing Aid Compatible
• Auto Answer
• Auto Stand-By
• Audible Battery Low Indicator
• Replaceable Handset Battery
• Secur-Loc™ 65,000 Security Codes
• Base Speaker Phone
• Base Keypad
• Intercom
• Hold on Base and Handset
1
Page 4

CP9125manual(6.12) 10/20/98 11:38 AM Page 8
Important Safety InstructionsImportant Safety Instructions
When using your telephone equipment, basic safety precautions should
always be followed to reduce the risk of fire, electric shock and injury to persons, including the following:
1 . Read and understand all instru c t i o n s .
2 . Follow all warnings and instructions marked on the pro d u c t .
3 . Unplug this product from the wall outlet before cleaning. Do not use liquid
cleaners or aerosol cleaners. Use a damp cloth for cleaning.
4 . Do not locate base unit near water, for example, near a bath tub, wash
bowl, kitchen sink, or laundry tub, in a wet basement or near a swimming
p o o l .
5 . Do not place this product on an unstable cart, stand or table. The pro d u c t
may fall, causing serious damage to the pro d u c t .
6 . Slots and openings in the cabinet and the bottom or back are provided for
ventilation, to protect it from overheating; these openings must not be
blocked or covered. The openings should never be blocked by placing the
p roduct in the bed, sofa, rug or other similar surface. This product should
never be placed near or over a radiator or heat re g i s t e r . This pro d u c t
should not be placed in a built-in installation unless proper ventilation is
p ro v i d e d .
7 . This product should be operated only from the type of power source indi-
cated on the marking label. If you are not sure of the type of power supply
to your home, consult your dealer or local power company.
8 . Do not allow anything to rest on the power cord. Do not locate this pro d-
uct where the cord will be abused by persons walking on it.
9 . Do not overload outlets and extension cords as this can result in the risk of
f i re or electric shock.
1 0 . Never push objects of any kind into this product through cabinet slots as
they may touch dangerous voltage points or short out parts that could
result in a risk of fire or electric shock. Never spill liquid of any kind on the
p ro d u c t .
11 . To reduce the risk of electric shock, do not disassemble this product, but
take it to qualified servicemen when service or repair work is re q u i re d .
Opening or removing covers may expose you to dangerous voltages or
other risks. Incorrect reassembly can cause electric shock when the appliance is subsequently used.
1 2 . Avoid using telephones (other than a cordless type) during an electrical
storm. There may be a remote risk of electric shock from lightning.
1 3 . Do not use the telephone to report a gas leak in the vicinity of the leak.
1 4 . Unplug this product from the outlet and refer servicing to qualified service
personnel under the following conditions:
A. When the power supply cord or plug is damaged or frayed.
B. If liquid has been spilled into the pro d u c t .
C. If the product has been exposed to rain or water.
D. If the product does not operate normally by following the operating
i n s t ructions. Adjust only those controls that are covered by the operating
i n s t ructions because improper adjustment of other controls may result in
damage and will often re q u i re extensive work by a qualified technician to
re s t o re the product to normal operation.
E. If the product has been dropped or the cabinet has been damaged.
F. If the product exhibits a distinct change in performance.
1 5 . Never install telephone wiring during a lightning storm.
1 6 . Never install telephone jacks in wet locations unless jack is specifically
designed for wet locations.
1 7 . Never touch uninsulated telephone wires or terminals unless the tele-
phone line has been disconnected at the network interface.
C A U T I O N :
To reduce the risk of fire or injury to persons, read and follow these instruc-
t i o n s :
A . Use only the battery pack supplied with the unit or identical re p l a c e-
m e n t .
B . Do not dispose of battery pack in a fire. The cells may explode. Check
with local codes for possible disposal instru c t i o n .
C . Since released electrolyte is corrosive and may cause damage to eyes or
skin and may be toxic if swallowed:
C1. Do not open or mutilate battery pack.
C2. Always replace the entire battery pack rather than reusing one or
m o re cells.
C3. Do not expose batteries to heat or flame.
D . E x e rcise care in handling the battery pack in order not to “short” the bat-
tery contacts with conducting materials such as rings, bracelets, and
keys. The battery or conductor may overheat and cause burns.
E . C h a rge the battery provided with or identified for use with this pro d u c t
only in accordance with the instructions and limitations specified in this
m a n u a l .
F. Observe proper polarity orientation between the battery and battery
c h a rg e r.
Save These Instructions
32
Page 5
CP9125manual(6.12) 10/20/98 11:38 AM Page 10
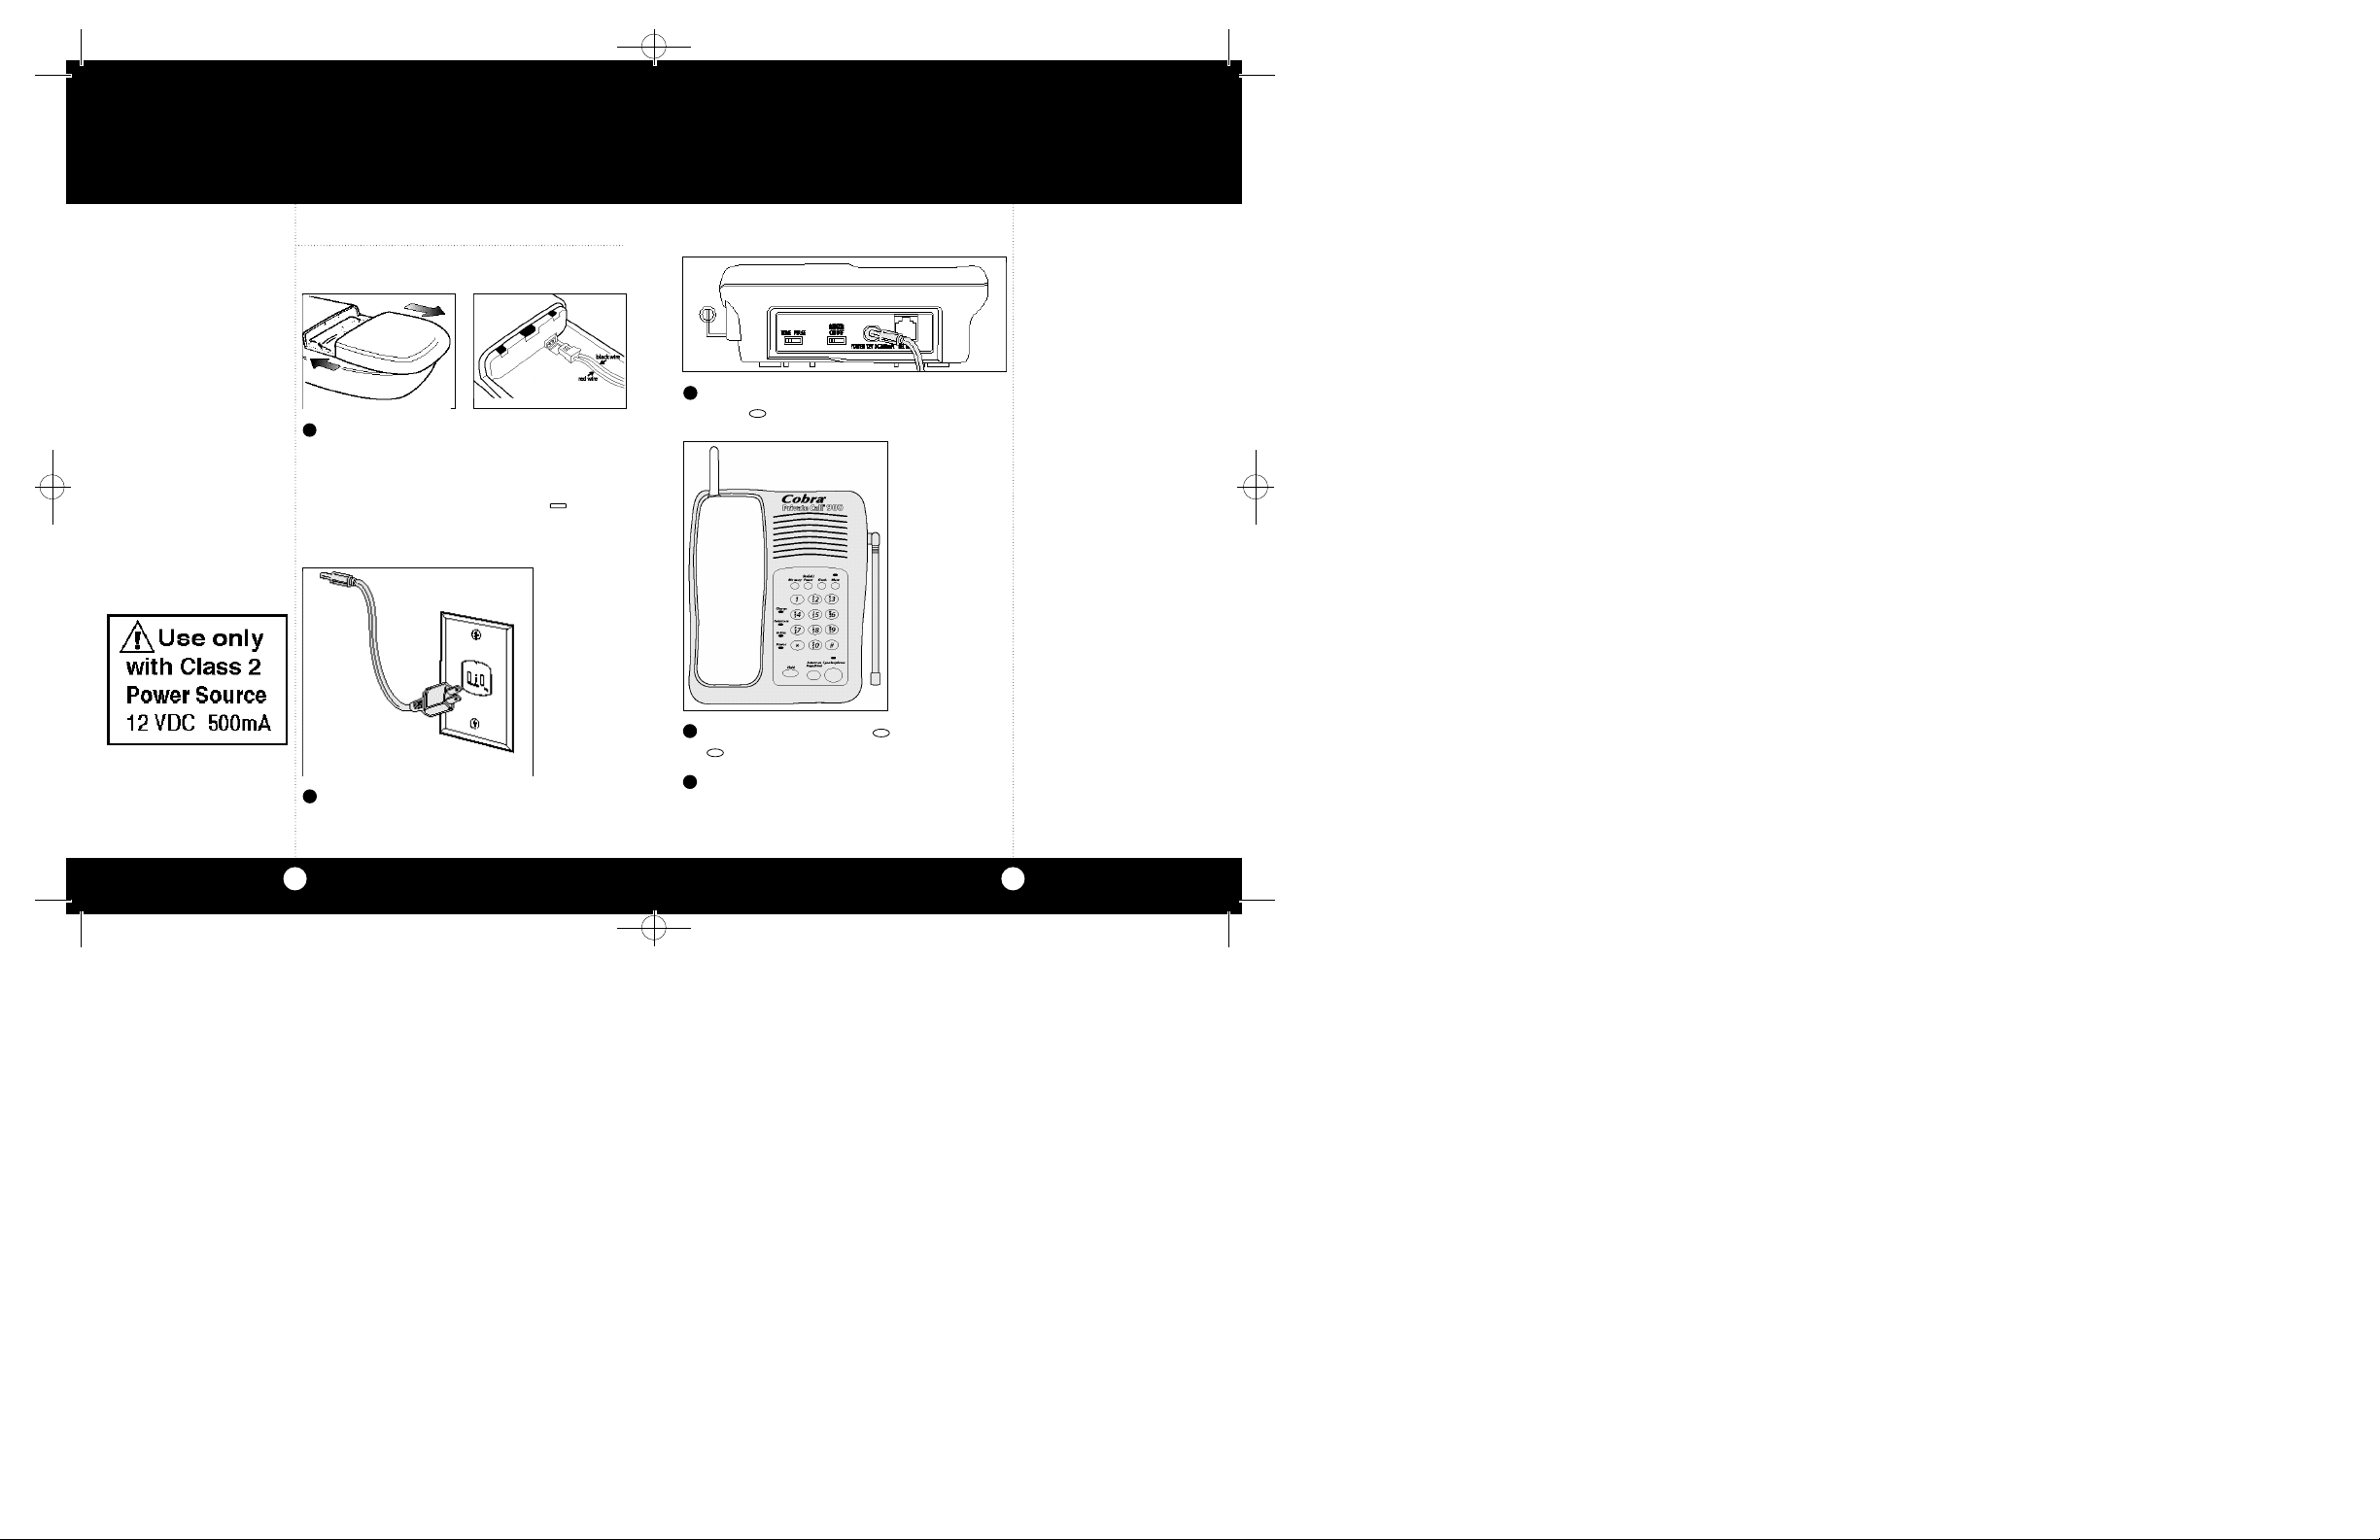
InstallationInstallation
Quick Set-Up
Guide
Note
The battery must be charged at
least 12 hours before use.
Replacement batteries are
available direct from Cobra.
See Accessories section on
page 44.
Quick Set-Up Guide
1
Install Ni-Cad battery in the handset.
To remove the battery door,press and slide
downward.
Observe connection orientation, connect the
battery and replace the door. The indi-
Low Batt
cator will blink until the handset is placed in
the base and power is applied to the base.
2
Connect power adapter in outlet.
3
Connect round connector into power jack on
In Use
base. indicator on base will flash rapidly.
4
Place handset on base so indicator lights.
In Use
indicator will stop flashing.
5
Raise antenna to vertical position.
Charge
continued
4
5
Page 6

CP9125manual(6.12) 10/20/98 11:38 AM Page 12
InstallationInstallation
Quick Set - Up
Guide
Note
Charge batteries for 12 hours
before first use.
Quick Set-Up Guide continued
5
Plug 6 ’phone co rd into wall jack.
6
Plug phone cord into jack on rear of base.
7
Turn on RINGERswitch.
8
SwitchTONE/PULSE on base for proper
operation.
For tone dialing-switch TONE/PULSE on
base to TONE.
For pulse dialing-switch TONE/PULSE on
base to PULSE.
6
7
Page 7

CP9125manual(6.12) 10/20/98 11:38 AM Page 14
InstallationInstallation
Wall Mounting
Instructions
Note
If you do not have a wall
mount,contact your local
phone company for installation
of phone line and wall mount.
Wall Mounting Instructions
1
Plug 6”phone cord into jack on rear of base.
2
Slide wall mount bracket onto base.
3
Th re a d co rd through slot in wall mount bra c ke t.
4
Plug phone cord into wall jack.
5
Slide base down on wall plate.
6
Raise antenna to vertical position.
98
Page 8

CP9125manual(6.12) 10/20/98 11:38 AM Page 16
OperationOperation
Answering Calls
F r o mT heH a n d s e t
Note
When answering a call,the
LED will illuminate. It will be
displayed on both the handset
and the base during the duration of the call.
Answering Calls From The Handset
To answer a call while handset is away from
the base:
1
Push and release button.
2
Talk.
When call is completed:
Talk
Return handset to base
or push and release
Talk
the button.
Phone auto m at i cally
d i s co n n e ct s.
To answer a call while handset is in base:
1
Pick up handset. Phone will automatically
answer incoming call.
2
When call is completed:
Return handset to base
or push and release
Talk
the button.
Phone auto m at i cally
d i s co n n e ct s.
1110
Page 9

CP9125manual(6.12) 10/20/98 11:38 AM Page 18
OperationOperation
Answering Calls
From The Base
Note
When answering a call,the
LED will illuminate. It will be
displayed on both the handset
and the base during the duration of the call.
Answering Calls From The Base
To answer a call on the base,use the
Speakerphone feature:
In Use
In Use
1
LED will flash.
2
Push and release button.
3
Talk.
Speakerphone
When call is completed:
4
Push and release button.
Speakerphone
Note
You can only end the call from
the base by pushing and releasing the button.
Speakerphone
12
Phone will auto m at i cally disco n n e ct.
13
Page 10

CP9125manual(6.12) 10/20/98 11:38 AM Page 20
Operation
Placing Calls
From The
Handset
Note
If you have pulse phone service,
use the button to change
*
from pulse to tone dialing after
dialing the number and receiving
a response.
Placing Calls From The Ha n d s e t
1
Pick up handset:
2
Push and release button.
3
Wait for dial tone and then place your call.
Talk
Placing Calls From The Ba s e
1
Push and release button.
2
Wait for dial tone and place your call from the
base key p a d.
Speakerphone
Operation
Placing Calls From
The Base
14
#
15
Page 11

CP9125manual(6.12) 10/20/98 11:38 AM Page 22
OperationOperation
Channel
Selection
Note
Please also refer to questions 3,5
and 6 in the Frequently Asked
Questions section on page 39
for more information about
interference.
Channel Selection
Should you experience interference:
Push and release button.
The CP-9125 will scan for and advance to a
clearer channel when you push and release the
Channel
button.
• Two double beeps will indicate a successful
channel change.
• If three beeps are heard the channel change
was not successful. Move closer to base and
press and release button again.
Channel
Channel
Flash
handset base
Push and release FLASH button to interrupt the
phone line to access features such as:
• Call Waiting
• Three Way Calling
that might be offered by your phone company.
Secur - Loc
An exclusive security measure to protect your
phone from being accessed by another cordless
phone. Secur-LocTMactivates automatically every
time your handset is placed in the base.
or
TM
Flash
Secur-Loc
™
16
17
Page 12

CP9125manual(6.12) 10/20/98 11:38 AM Page 24
OperationOperation
4 Level Volume
Control
Hearing Aid
Compatibility
4 Level Volume Control Mute
Your CP-9125 fe at u res a MUTE button on the base.
While in a conversation:
Your CP-9125 has a four level volume control on
the side of the handset.
To raise or lower the volume,push the UP
arrow for higher volume;push the DOWN
arrow for lower volume.
Hearing Aid Compatibility
The CP-9125 handset is compatible with inductively coupled hearing aids (HAC).
1
Push and release the MUTE button,which shuts
off the base microphone.The will illuminate on the base.You will still be able to hear
your caller but they will not be able to hear
you or a conversation you might be having.
2
Push and release the MUTE button again to
rejoin the conversation.The will go off on
the base.
Mute
Mute
Mute
18
19
Page 13

CP9125manual(6.12) 10/20/98 11:38 AM Page 26
OperationOperation
Last Number
Instant Redial
Last Number Instant Redial
Each time you dial a number,that number is
stored in the REDIAL memory.Up to 32 digits can
be stored. To redial the number after receiving a
busy signal:
handset base
1
Push and release FLASH button.
2
Listen for dial tone.
3
Push and release REDIAL/PAUSE button.
4
The number will be redialed.
or
Last Number Delayed Redial
If steps 1,2 and 3 from the “Last Number Instant
Redial”still result in a busy signal,hang up.If you
would like to try again in a few minutes,push and
releaseTALK button for dial tone,then:
handset base
3
Push and release REDIAL/PAUSE button.
4
The number will be redialed.
or
Last Number
Delayed Redial
2120
Page 14

CP9125manual(6.12) 10/20/98 11:38 AM Page 28
Operation Operation
Memory Number
Storage
Memory Number Storage
The CP-9125 will store up to 10 frequently called
numbers.
1
Push and release button once.
2
Enter digits of n u m ber to be sto re d (up to 16).
Memory
3
Push and release button again.
Memory
There will be 2 double beeps.
4
Assign memory position by entering keypad
number from 0 to 9.
There will be two quick double beeps to
confirm number storage.
Repeat for additional numbers to be stored
in memory.
Note
To store numbers from the base
follow the same proceedure used
for the handset.
Note
1.You may also use the
button in memory to temporarily
change from pulse to tone dialing.
2.The REDIAL/PAUSE button in
memory enters a 3 second delay.
Note
Enter name beside MEMORY
number on the memory label
provided with the unit.
*
2322
Page 15

CP9125manual(6.12) 10/20/98 11:38 AM Page 30
Operation Operation
Memory Number
Dialing
Note
Memory dialing from base uses
same procedure as handset.
Memory Number Dialing
1
Access the line.
2
Push and release button once.
3
Pushand release keypad number,(0-9),you
assigned for that phone number.The phone
will dial that number automatically.
Memory
To Find The Handset
The handset can be located when it’s away from
the base.To locate the handset:
Intercom
1
Push and release button.
The handset will beep for 30 seconds,
allowing time to locate the handset.
2
If you wish to stop beep tones push and
release or buttons,wait 2 seconds,
push and release again or,push and release
button on base.
Page/Find
Int/Page
Talk
To Find The
Handset
Intercom
Page/Find
2524
Page 16

CP9125manual(6.12) 10/20/98 11:38 AM Page 32
OperationOperation
Intercom Mode
From The
Handset
Note
Intercom may be initiated from
either the handset or the base.
Intercom Mode From The Handset
Your CP-9125 can serve as an intercom between
the base and the handset. To utilize this feature:
1
Push and release button.The LED
Int/Page
will illuminate.
Intercom
In Use
2
The and LED will light on the base.
Four beeps will emit from the base.
3
Begin talking.
Low Batt
Intercom
Intercom Mode The From Base
Intercom
1
Push and release button.The LED
will flash on the base.
Low Batt
2
The LED will flash and the handset
Intercom
will beep.
Page/Find
In Use
Intercom Mode
From The Base
Note
To initiate INTERCOM while on
a call,push and release
button.Then push and release
Intercom
Page/Find
button.
Proceed following INTERCOM
instructions.
Note
Only the handset can end
INTERCOM mode.Push and
Int/Page
release button to end.
Hold
26
27
Page 17

CP9125manual(6.12) 10/20/98 11:38 AM Page 34
OperationOperation
Intercom Mode From The Base continued
3
The person using the handset should push
and release the button.
4
Begin talking.
28
Int/Page
Hold Button On The Base
1
Push and release button to put a party on
hold or to prevent them from hearing you.
The LED on base will blink.
Speakerphone
2
To release HOLD push and release the
button or pick up a branch phone,
which will automatically disconnect
the CP-9125.
Hold
Hold Button On The Handset
1
Push and release button to put a party
on hold or to prevent them from hearing you.
In Use
The LED on the handset will blink.
2
To release HOLD push and release button
or pick up a branch phone, which will automatically disconnect the CP-9125.
Hold
Talk
Speakerphone
Hold Button
On The Base
Note
When party is on hold, the
LED will be illuminated on the
base.
Hold Button
On The Handset
29
In Use
Page 18

CP9125manual(6.12) 10/20/98 11:38 AM Page 36
OperationOperation
Ringer Switch
Note
When ringer switch is off you
can detect an incoming call by
the flashing IN USE LED on the
handset or on the base.
Tone/Pulse
Ringer Switch
OFF/ON switch (on base) controls the handset
ringer.
When set on OFF,no ring will sound.
Tone/Pulse
The CP-9125 can be used either as tone or pulse,
depending upon your phone service.
Handset Battery Recharging
When the handset battery needs recharging:
Low Bat
on handset will flash and 2 beeps will be
heard every 30 seconds for 2 minutes.Return to
base for recharging.Handset will shut off at the
end of the 2 minute period,terminating a conversation if the handset is in TALK mode.
Handset Battery
Recharging
Note
Replacement batteries are
available from Cobra.
See Accessories section on
page 44.
30
31
Page 19

CP9125manual(6.12) 10/20/98 11:38 AM Page 38
OperationOperation
®
Voice Scrambling
Private Call®Voice Scrambling
Private Call®prevents other cordless phones or
scanners from understanding your conversations.
Battery Saver
Handset may,in OFF position, remain away from
base for up to 14 days.
Duration of battery charge depends upon actual
use of phone.
Battery SaverPrivate Call
3332
Page 20

CP9125manual(6.12) 10/20/98 11:38 AM Page 40
OperationOperation
Replacing
Handset
Batteries
Note
Replacement batteries are
available direct from Cobra.
See Accessories section on
page 44.
Replacing Handset Batteries
The rechargeable NiCad battery in your cordless
phone may need to be replaced if the handset
will not function when the TALK button is
pressed after recharging for 12 hours.
1
To remove the battery door,press and slide
downward.
2
Carefully disconnect the battery pack and
dispose of it properly.See Battery Disposal
below.
3
To replace,observe connection orientation and
connect the new battery and replace the door.
Return the handset to the base and charge the
battery overnight (at least 12 hours).
Handset Battery Disposal
The rechargeable nickel cadmium (NiCad)
battery in this product must be recycled or
disposed of properly in compliance with all
applicable laws.It may not be thrown in the
trash.Certain states or municipalities require
recycling and have established collection programs.Please contact your local waste removal
authority for instructions,or return to Cobra for
recycling.Wrap batteries carefully and mail
postage prepaid to:Cobra Electronics Corpor-
ation,6500 W.Cortland Street, Chicago,Illinois
60707,Attn: Battery Recycling.
Or contact the Rechargeable Battery Recycling
Corporation(RBRC) at 1-800-8BATTERY for a
local recycling center near you.For more information about battery recycling,the RBRC has a web
site at:http://www.RBRC.com
DO NOT PUT BATTERIES INTO FIRE OR
EXPOSE TO HIGH HEAT.THEY MAY
EXPLODE.
Handset Battery
Disposal
34
35
Page 21

CP9125manual(6.12) 10/20/98 11:39 AM Page 42
Operation
Headset
Operation
To RemoveThe Belt Clip And
Install The Slot Cover
1.Push the belt
clip lock tab
as shown.
3. Put the slot cover in
the slot and press
down.
2. Pull the belt
clip up and
out of the
handset.
Headset Operation
1
The headset jack allows use of a headset with
an earspeaker and boom microphone.
1
Position the
headset comfortably on your
head and adjust
the microphone
so it is located
near,but not
touching,your
mouth.
2
Plug the headset
into the CP-9125
handset.
3
Use the belt clip for
convenience.
Spread Right PageSpread Left Page
Cleaning The Charging Contacts
Clean the two metal charging contacts on both
base and handset with a soft dry cloth on a
regular basis.
1
Clean base contacts.
2
Clean handset contacts.
Operation
Cleaning The
C h a r g i n gC o n t a c t s
Cobra Customer Service
773.889.3087
24 hours a day,
seven days a week
Note
Isopropyl alcohol may be used
for more thorough cleaning.
36
37
Page 22

CP9125manual(6.12) 10/20/98 11:39 AM Page 44
Troubleshooting
Phone is dead
Are power adapter and phone cord connected?
Handset beeps during call or away from base
Batteries need recharging; return handset to base.
Handset disconnects,loses performance and
beeps three times when in use away from base
Out of range or batteries need recharging.
Move closer to base or recharge batteries.
Unable to make call because of interference
Move closer to the base, access the line,select a
new channel,and try moving back to your previous location.
Handset won’t work after power outage or
disconnecting from AC power & reconnecting
Return handset to base for thirty seconds to
automatically match security coding.
Handset seems “dead”
Battery power has run out; return handset to base
and charge for at least 12 hours. If handset still
seems dead,unplug handset battery for 15 seconds and plug back in. Then place handset back
on base for at least 5 minutes.
Memory dialing not working
Batteries need recharging; return handset to base.
Re-enter memory numbers.
Frequently Asked Questions
1.How long should the handset battery be
charged?
Typically leaving the handset on the base
overnight will charge the battery sufficiently.
2.How long can a battery last after a twelve
hour charge?
After a twelve hour charge,the handset has typically 8 hours of continuous talk time,or 14 days in
standby mode (when the phone is out of the
base but not in use).
3.What is the range of my cordless phone?
There is no way to easily answer this question as
many factors affect the range of a cordless
phone. In an open field,under ideal conditions,a
900 MHz cordless phone can have an effective
range of about 1200 feet.
Unfortunately,most cordless phones are used
under conditions that are anything but ideal. The
effective range of a cordless phone varies
because of environmental and other conditions.
Cordless phones and other 900 MHz devices may
cause interference which may limit the effective
range of your cordless phone.Changing the
channel may help.
Aluminum siding can also have a dramatic effect
on range.Try using your cordless phone in many
locations in and around your home.Each situation presents different conditions under which
the phone must work.
Cobra Customer Service
Live operators are available
M-F 8:00 am - 8:00 pm CST at:
773.889.3087. Automated
Technical Assistance available
by phone 24 hours a day,seven
days a week.
E-mail questions to:
productinfo@cobraelec.com
Cobra on the World Wide Web:
Frequently Asked Questions
(FAQ) can be found on-line at:
www.cobraelec.com
38
39
Page 23

CP9125manual(6.12) 10/20/98 11:39 AM Page 46
Frequently Asked Questions
4.Why do I sometimes have difficulty making a
connection even though I’m close to the base?
There are several possible causes for this condition.Please try the following solutions to see
where your problem lies.
First,make sure the base unit power adapter is
connected to a working AC outlet. Make sure
that you are within range of the base unit when
pressing the TALK button.If this works,then you
were trying to access the base from too great a
distance.Other cordless phones in your house
could be causing interference.Two or more
cordless phones may interfere with each other’s
security codes.If you have two or more cordless
phones in your house please disconnect all but
the phone which is giving you the Out of Range
signal.You can then reset the security codes by
using the following procedure.
To reset the security code,remove the handset
from the base.Remove the power cord from the
base for 30 seconds.Replace the power cord to
the base and replace the handset,making sure
the charge light comes on.Wait another 30 seconds and the security code should be reset.Try
the phone after resetting the security code–it
should work fine.Your other cordless phones can
still be used but they should be moved further
apart or you may experience this problem again.
Frequently Asked Questions
5.Why do I have static on my cordless phone?
Your cordless phone works as a miniature radio
transmitter and receiver.As such,it will pick up
stray signals caused by other nearby appliances
which emit radio signals and thus become a
source of interference.
Some sources in a home that may cause noise
and interference on a cordless phone are:
• other cordless phones
• fluorescent fixtures
• home appliances such as televisions,
refrigerators,microwave ovens,
home computers and baby monitors
In order to eliminate some of this interference
it may be necessary to relocate the base unit of
the cordless phone to a different location in your
house.This solves two problems.First,you are further from the source of interference and secondly
the power adapter for the cordless phone will be
plugged into an outlet, which most likely is on a
different line than the appliance which is causing
the interference.
If the noise persists after relocating the base,
move closer to the base unit when talking on the
phone.If the noise disappears,then it is most likely local interference being generated by a source
outside your home,or a source inside your home
strong enough to blanket your entire house such
as a baby monitor.If you find that the noise and
interference are equally strong throughout your
house,your cordless phone may require service.
Cobra Customer Service
Live operators are available
M-F 8:00 am - 8:00 pm CST at:
773.889.3087
Automated Technical Assistance
available 24 hours a day,seven
days a week.E-mail questions to:
productinfo@cobraelec.com
Cobra on the World Wide Web:
Frequently Asked Questions (FAQ)
can be found on-line at:
www.cobraelec.com
40
41
Page 24

CP9125manual(6.12) 10/20/98 11:39 AM Page 48
Frequently Asked Questions
6.Will more than one cordless phone work in
the house?
Whether or not you are able to use two or more
cordless phones in your house varies, depending
on how many cordless phones you have in your
house and how close the cordless phones are to
each other.Problems you could experience
include:
• intermittent ringing
• cross talk
• interference
• inability of the handset to access the base
Changing the channel on one phone may help.
Relocating one of the bases may also help.
7.How can I find a replacement battery?
Batteries are typically available locally at Radio
Shack,Walmart,K-Mart or anywhere cordless
phone accessories are sold.You must match the
voltage,milliamp hours (mAH) and the connector
of your current battery exactly to the new one to
ensure proper operation of your cordless phone.
You should take the original battery with you to
the store to match these features.Or order the
battery from Cobra.
Limited One Year Warranty
Cobra warrants that its cordless telephone products, and
the component parts thereof,will be free from defects in
workmanship and materials for a period of one (1) year
from the date of first consumer purchase. This warranty
may be enforced by the first consumer purchaser,provided that the product is utilized within the U.S.A.
Cobra,without charge,will repair,or replace,at its option,
defective cordless telephone products or component
parts upon delivery to Cobra factory Service Department,
accompanied by proof of the date of first consumer purchase,such as a duplicated copy of a sales receipt.
You must pay any initial shipping charges required to ship
the product for warranty service, The return charges will
be at Cobra’s expense if the product is repaired or
replaced under warranty.
Exclusions: This limited warranty does not apply 1) to any
product damaged by accident,improper line voltage or
weather related circumstances;2) in the event of misuse
or abuse of the product or as a result of unauthorized
alterations or repairs;3) to non-defective original equipment Nickel Cadmium rechargeable batteries;4) if the
serial number has been altered, defaced or removed;
or 5) if the owner of the prod u ct resides outside of the U.S.A.
All implied warranties,including warranties of
merchantability and fitness for a particular purpose,
are limited in duration to the length of this warranty.
Cobra shall not be liable for any incidental, consequential or other damages, including,without limitation,
damages resulting from loss of use or cost of installat i o n .
Some states do not allow limitations on how long an
implied warranty lasts and/or do not allow the exclusion
or limitation of incidental or consequential damages, so
the above limitations may not apply to you.
This limited warranty gives you specific legal rights, and
you may also have other rights which vary from state to
state.
Cobra Electronics
Corporation
6500 West Cortland Street
Chicago,Illinois 60707
42
43
Page 25

CP9125manual(6.12) 10/20/98 11:39 AM Page 50
Accessory Order Form
Accessories
N i c ke l - Cadmium Ba t te ry Pa c k
As s e m b ly with Co n n e cto r
For use with model CP- 9 1 2 5
213-021-N-001 $15.00
AC Power Adapter
For use with model CP-9 1 2 5
768-032-N-001 $15.00
Ch a rge Cra d l e
For use with model CP- 9 1 2 5
C R-900 $10.00
Headset
For use with model CP-9 1 2 5
H-900 $25.00
Part # Description Cost Ea. Qty. Amount
2 1 3 - 0 2 1 - N - 0 0 1 N i c ke l - Cadmium Bat te ry Pack w/Co n n e cto r $15.00
76 8 - 032 - N - 0 0 1 AC Power Ad a p te r $15.00
C R - 9 0 0 Ch a rge Cra d l e $10.00
H-900 Headset $25.00
Prices subject to change without notice.
Tax Table
Illinois residents add 7%
Cook Co.residents add .75% (7.75% total)
Chicago residents add 1% (8.75% total)
Indiana residents add 5%
Michigan residents add 4 %
Minnesota residents add 6%
Ohio residents add 6%
Wisconsin residents add 5%
For credit card orders fill out order
form and fax to:1.773.622.2269
or call 1.773.889.3087
(Press 1 from the main menu)
8:00 am - 8:00 pm,M-F,CST.
Amount
(Tax if applicable)
Shipping/handling
Total
Ma ke check or money order (no stamps)
payable to:
Cobra Accessories Dept.
6500 West Co rtland St.Ch i ca g o,IL 60707
Please print clearly
Name
Address (No P.O.Box)
City State
Zip
Telephone ( )
Credit Card No. Exp.Date
Customer Signature
Circle One: Visa MasterCard Discover
Allow 4 to 6 weeks for delivery.Offer valid in Continental U.S.only.
$4.00
44
 Loading...