

Page 1
Introduction
Our Thanks to You and
Customer Assistance
ersion B Patent Pending
MARINE
BBLLUUEETTOOOOTTH
®
H
HANDSET
Owner’s Manual
Our Thanks to You
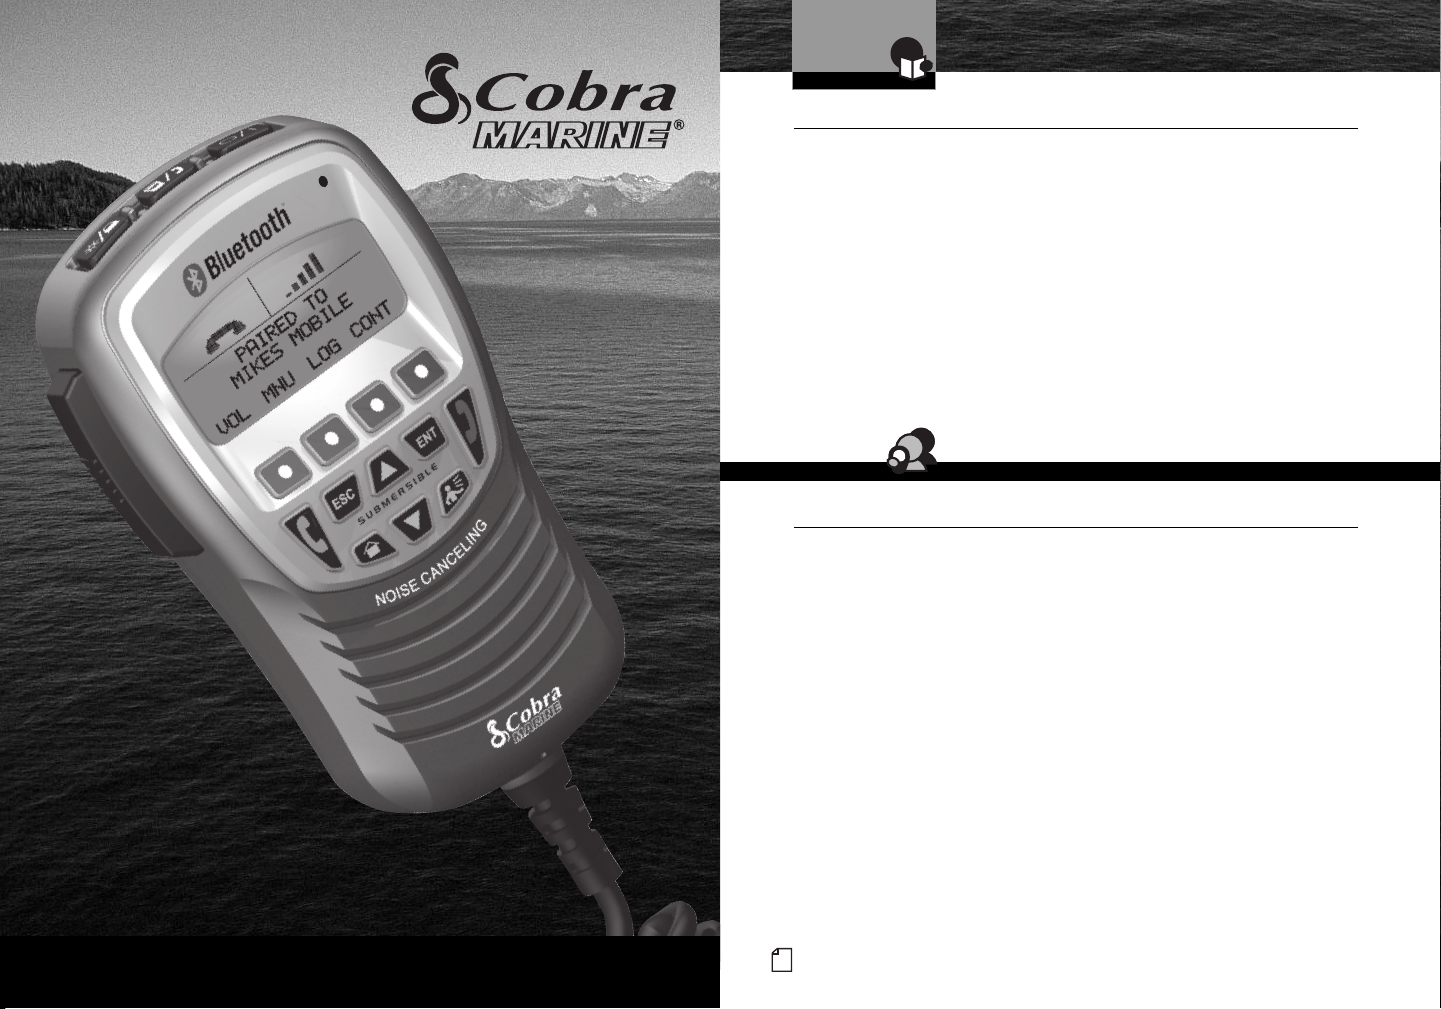
Thank you for purchasing a CobraMarine Bluetooth Handset.
Properly used, this Cobra product will give you many years
of reliable service.
How Your CobraMarine Bluetooth Handset Works
This handset allows use of mobile telephones (cell phones) afloat while protecting
them from potential damage in the marine environment.
Bluetooth wireless technology allows voice and data transmission over short
distances by means of a radio link. Using that technology, the Bluetooth handset
allows your cell phone to be turned on and stowed in a waterproof and protected
location on the vessel. Calls are then made and received using the
Bluetooth
handset on deck or in the cabin of your boat.
Customer Assistance
Customer Assistance
Should you encounter any problems with this product, or not understand its
many features, please refer to this owner’s manual. If you require further
assistance after reading this manual, Cobra Electronics offers the following
customer assistance services:
For Assistance in the U.S.A.
Automated Help Desk English only.
24 hours a day, 7 days a week 773-889-3087 (phone).
Customer Assistance Operators English and Spanish.
8:00 a.m. to 6:00 p.m. Central Time Mon. through Fri. (except holidays)
773-889-3087 (phone).
Questions English and Spanish.
Faxes can be received at 773-622-2269 (fax).
Technical Assistance English only.
www.cobra.com (on-line: Frequently Asked Questions).
English and Spanish. productinfo
@cobra.com (e-mail).
•
•
MR F300 BT
Printed in China Part No. 480-463-P V
Nothing Comes Close to a Cobra
®
English
For Assistance Outside the U.S.A.
Contact Your Local Dealer or Visit www.cobra.com.
English
A1
2008 Cobra Electr
©
6500 W
Chicago, Illinois 60707 USA
onics Corporation
est Cortland Str
.cobra.com
www
eet
Page 2
Introduction
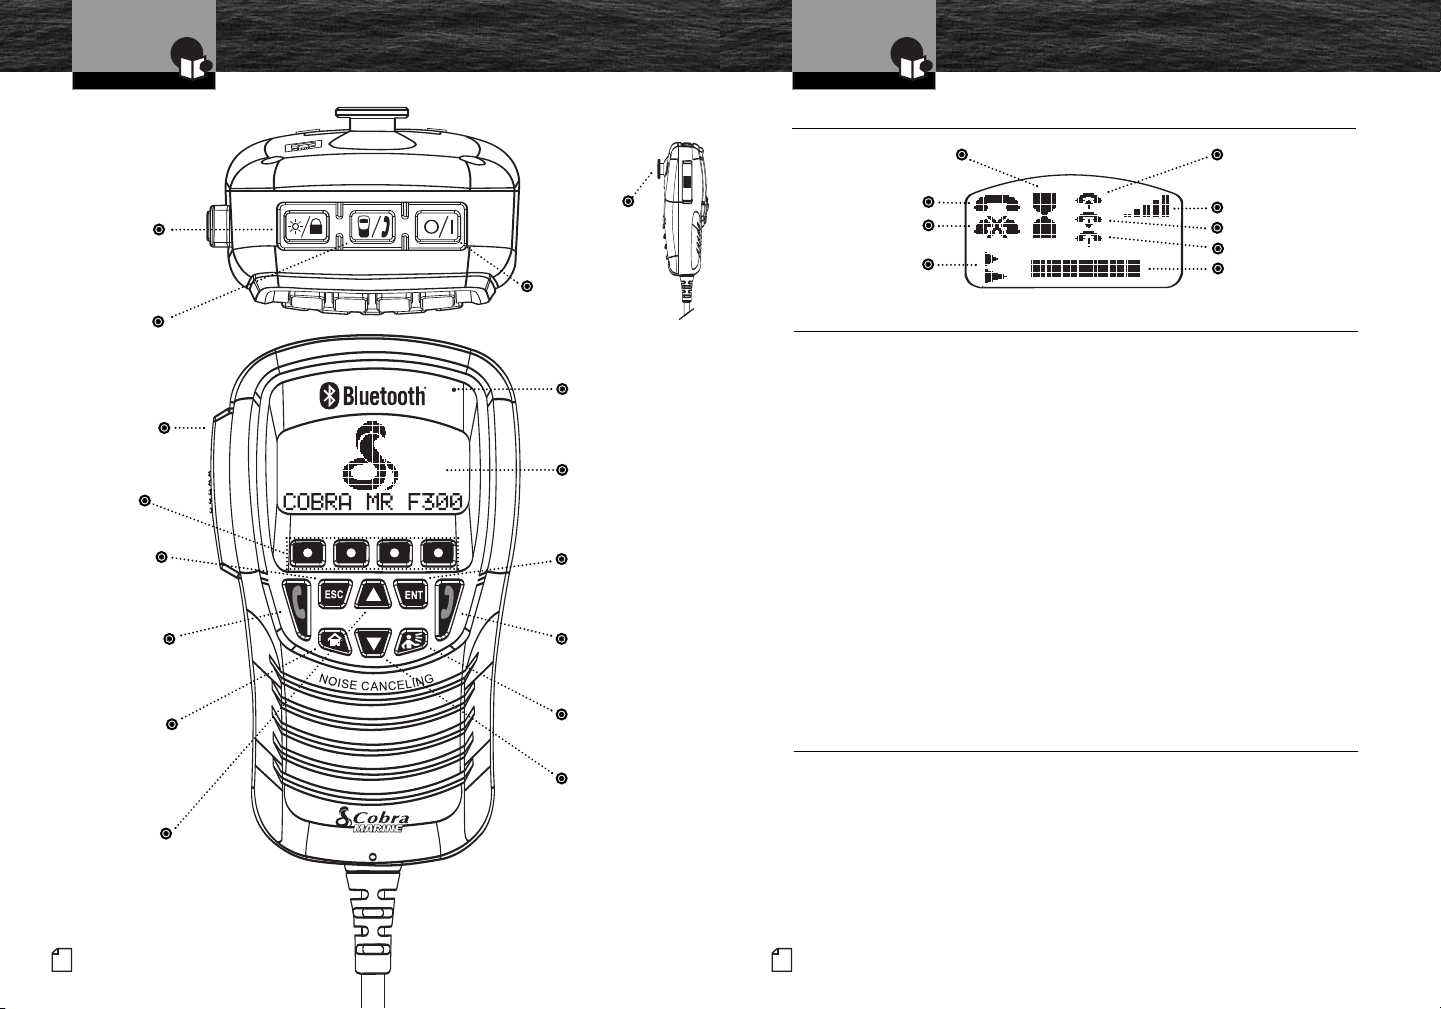
Handset Controls
and Indicators
Introduction
Backlit LCD Screen,
Product Features and Trademarks
Back Light/
Lock Button
Mode Button
Push to Talk
(PTT)
Function
Buttons
Escape
Button
Green Phone
Button
Button
Up Arrow
Button
English
A2
*
Home
Hanger
Peg
Power
Button
Microphone
Backlit LCD
Screen
Enter
Button
Red Phone
Button
Voice Dialing /
Last Number
Redial Button
Down Arrow
Button
Function button effects vary with
*
the mode in which the handset is
operating. Button functions are
shown directly above them on
the LCD screen.
Backlit LCD (Liquid Crystal Display) Screen
Waiting
Connected
Disconnected
Pointers
Incoming Call
Cell Phone Signal
Outgoing Call
Missed Call
Level
Product Features
Widely Compatible
Links with most Bluetooth enabled
cell phones.
Intuitive Operation
Handset is similar to CobraMarine
radio microphones for easy operation.
Submersible
Meets JIS7 submersible standards.
Noise Cancelling Microphone
Reduces effect of environmental
noise when speaking.
External Audio Output
Allows connection of the F300 to
your stereo’s AUX input.
Key Lock
Prevents accidental operation or setting
changes when key lock is set.
Backlit LCD Screen
Allows adjustment of brightness and
contrast for legibility in all light conditions.
Illuminated Buttons
Allows high visibility of all function
buttons.
Phonebook
Allows storage of name and number
entries.
Call Log
Displays data on the most recent calls
including sent, received and missed.
Trademark Acknowledgement
Cobra®, CobraMarine®, Nothing Comes Close to a Cobra®and the snake design
are registered trademarks of Cobra Electronics Corporation, U.S.A.
Cobra Electronics CorporationTMand MicroBlueTMare trademarks of Cobra Electronics
Corporation, U.S.A.
The Bluetooth®word mark and logo are registered trademarks owned by Bluetooth SIG, Inc.,
and any use of such marks by Cobra Electronics Corporation, U.S.A. is under license.
Other trademarks and trade names are the property of their respective owners.
English
A3
•
•
•
Page 3

Introduction
1
Nothing Comes Close to a Cobra
®
Table of Contents
Introduction
Our Thanks to You . . . . . . . . . . . . . . . . . . . . . . . . . . . . . . . . . . . . . . . . . . A1
Customer Assistance . . . . . . . . . . . . . . . . . . . . . . . . . . . . . . . . . . . . . . . . A1
Handset Controls and Indicators . . . . . . . . . . . . . . . . . . . . . . . . . . . . . . . A2
Backlit LCD (Liquid Crystal Display) Screen . . . . . . . . . . . . . . . . . . . . . . . A3
Product Features . . . . . . . . . . . . . . . . . . . . . . . . . . . . . . . . . . . . . . . . . . . A3
Trademark Acknowledgement . . . . . . . . . . . . . . . . . . . . . . . . . . . . . . . . . . A3
Important Safety Information . . . . . . . . . . . . . . . . . . . . . . . . . . . . . . . . . . . . 2
FCC Notice . . . . . . . . . . . . . . . . . . . . . . . . . . . . . . . . . . . . . . . . . . . . . . . . . . 2
Installation
Included in this Package . . . . . . . . . . . . . . . . . . . . . . . . . . . . . . . . . . . . . . . 3
Installation . . . . . . . . . . . . . . . . . . . . . . . . . . . . . . . . . . . . . . . . . . . . . . . . . . 4
Operating Your Handset
Getting Started . . . . . . . . . . . . . . . . . . . . . . . . . . . . . . . . . . . . . . . . . . . . . . . 6
Common MR F300 Functions . . . . . . . . . . . . . . . . . . . . . . . . . . . . . . . . . . . 7
Operation . . . . . . . . . . . . . . . . . . . . . . . . . . . . . . . . . . . . . . . . . . . . . . . . . . 11
Customizing the MR F300 . . . . . . . . . . . . . . . . . . . . . . . . . . . . . . . . . . . . . 16
Warranty
Warranty . . . . . . . . . . . . . . . . . . . . . . . . . . . . . . . . . . . . . . . . . . . . . . . . . . 23
Product Service
Maintenance . . . . . . . . . . . . . . . . . . . . . . . . . . . . . . . . . . . . . . . . . . . . . . . . 24
Product Service . . . . . . . . . . . . . . . . . . . . . . . . . . . . . . . . . . . . . . . . . . . . . 24
ain Icons
Assistance
Warranty
Page 4
A
ssistance
W
arranty
Assistance
Warranty
Customer
Assistance
Introduction
Assistance
Warranty
Customer
Assistance
Warranty
Assistance
Warranty
Customer
Assistance
Introduction
Important Safety Information
Installation
Marine Communication and
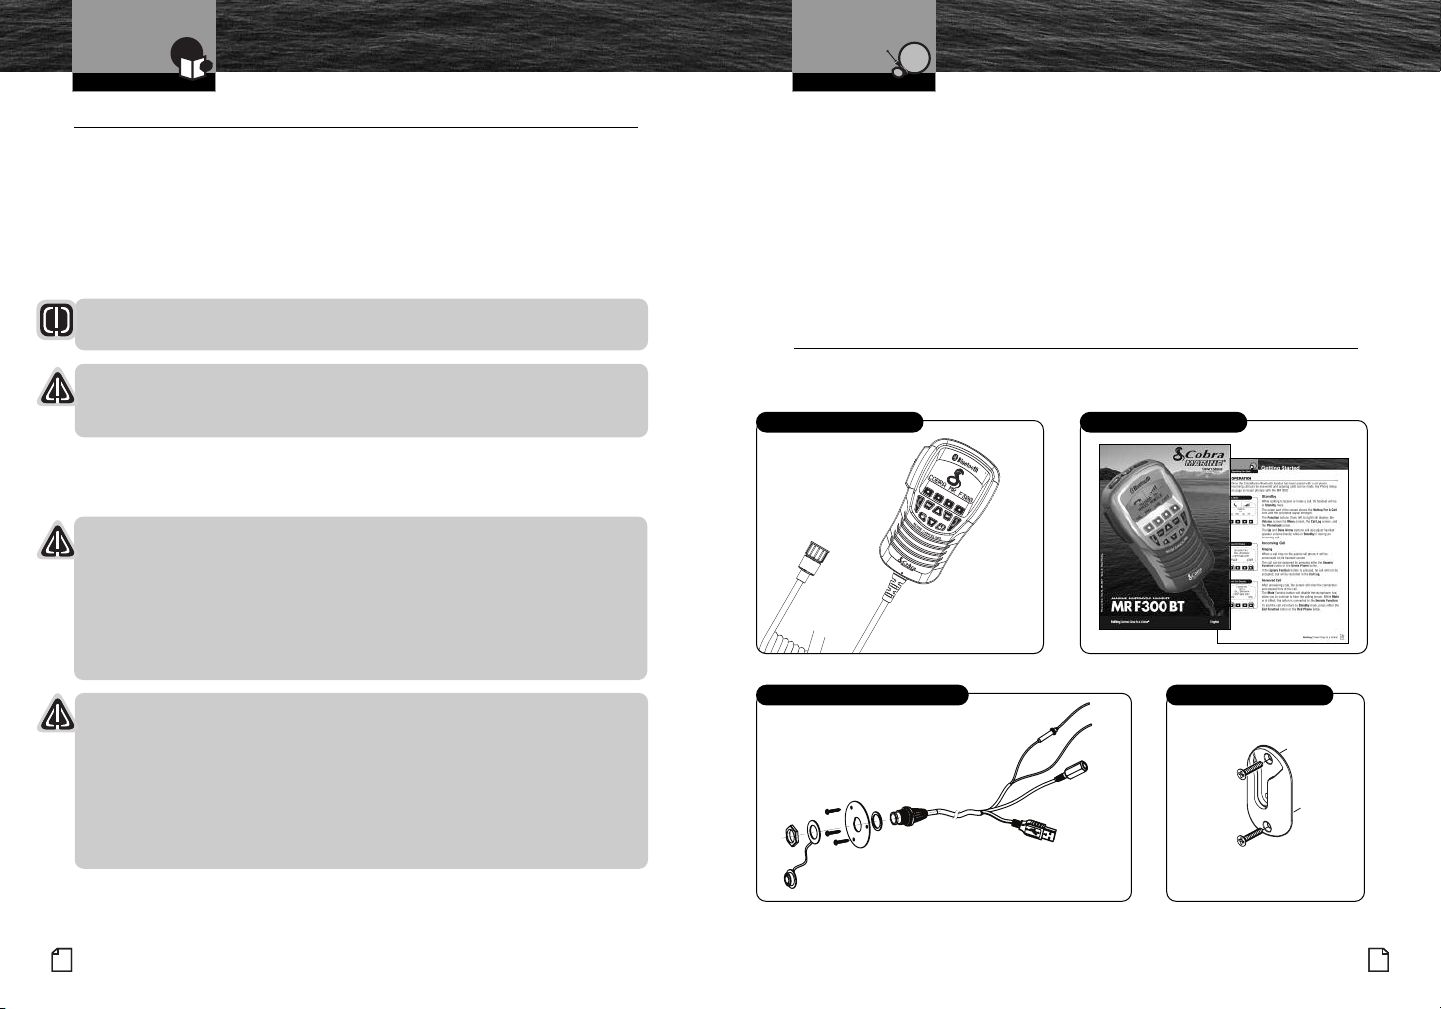
Included in this Package
Important Safety Information
Before installing and using your Bluetooth handset, please read these general
precautions and warnings.
Warning and Notice Statements
To make the most of this Bluetooth handset, it must be installed and used properly.
Please read the installation and operating instructions carefully before installing and
using the handset. Special attention must be paid to the
WARNING and NOTICE
statements in this manual.
WARNING
Statements identify conditions that could result in personal injury or loss of life.
NOTICE
Statements identify conditions that could cause damage to the handset,
other equipment or stored data.
General Precautions
The following NOTICES information is important to your operation of the handset.
FCC NOTICES
This device complies with part 15 of the FCC Rules. Operation is subject to
the following two (2) conditions:
1. This device may not cause harmful interference, and
2. This device must accept any interference received, including interference
that may cause undesired operation.
NOTICES
AVOID
using your Bluetooth handset at temperatures below -4°F (-20°C) or
above 131°F (55°C).
AVOID storing your Bluetooth handset at temperatures below -4°F (-20°C)
or above 158°F (70°C).
DO NOT attempt to service any internal parts yourself. Have any necessary
service performed by a qualified technician.
•
Recommendations for Marine Communication
The U.S. Coast Guard does not endorse cellular telephones as substitutes for marine
radios. They generally cannot communicate with rescue vessels and, if you make a
distress call on a cellular telephone, only the party you call will be able to hear you.
Additionally, cellular telephones may have limited coverage over water and can be
hard to locate. If you do not know where you are, the Coast Guard will have difficulty
finding you if you are using a cellular telephone.
However, cellular telephones can have a place onboard where cellular coverage is
available – to allow social conversations and keep the marine frequencies uncluttered
and available for their intended use.
Included in this Package
You should find all of the following items in the package with your CobraMarine
•
Bluetooth handset.
Handset
Bulkhead Connector Cord and Hardware
Operating Instruction Manual
Hanger Bracket
The manufacturer is not responsible for any radio or TV interference caused
by unauthorized modifications to this equipment. Such modifications could
void the user's authority to operate the equipment.
English
2
2
Nothing Comes Close to a Cobra
®
3
Page 5
A
ssistance
W
arranty
Installation
A
ssistance
W
arranty
Installation
Installation
Installation
Installation
Before using your Bluetooth handset, the bulkhead connector cord must be
installed on your vessel and connected to a 12 volt DC power source.
Installing the Bulkhead Connector Cord
Choose a convenient location for the connector near where the Bluetooth handset
will be used. Keep in mind that the nine foot long coiled cord on the handset must
be attached to the connector when the handset is to be used.
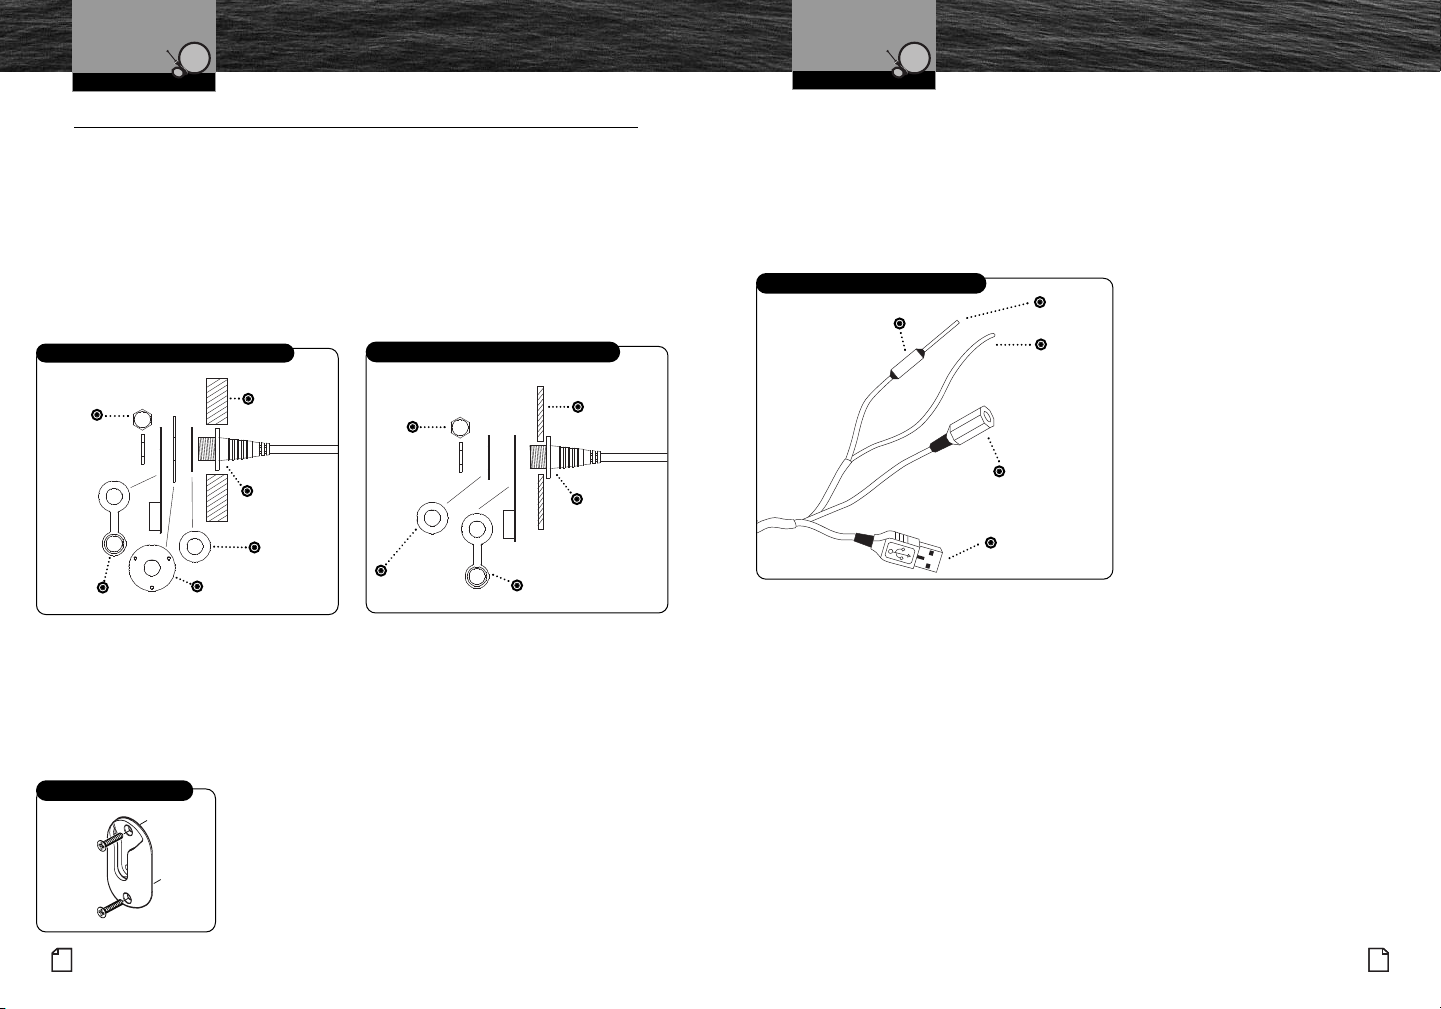
1. Drill a hole through the bulkhead or dash in the chosen location 7/8 inches for a
thick dash or 5/8 inches for a thin dash.
2. Install the components as shown in the diagram.
Installing Bulkhead Connector Cord in a Thick Dash
Bulkhead
Nut
Dust
Cap
or Dash
Male
Bulkhead
Connector
Gasket
Mounting Plate
and Screws
Installing Bulkhead Connector Cord in a Thin Dash
Nut
Gasket
Dust
Cap
If the dash is thin enough, the flange can be at the back surface of the dash and the
threads project out the front. If the dash is thick, the threaded part of the Male
Bulkhead Connector will project through the Mounting Plate and the hole in the dash
will be big enough for the flange at the base of the threads to be right up behind the
Mounting Plate.
Installing the Hanger Bracket
Hanger Bracket
1. Install the hanger bracket on a vertical surface
near the bulkhead connector using the supplied
stainless steel screws.
•
Bulkhead
or Dash
Male
Bulkhead
Connector
Connecting Power to the Bulkhead Connector Cord
Your Bluetooth handset is powered from your vessel’s 13.8 volt DC system
(12 volt nominal). A fused power connection lead is provided at the opposite
end from the bulkhead connector fitting.
1. Attach the black wire to a negative ground.
2. Attach the fused red power wire to the positive side of the vessel’s
12 volt DC power system.
Connecting to the Bulkhead Connector Cord
1 Ampere Fuse
Red
Black
3.5 mm
Female Jack
USB
Male Type “A”
Connecting (Optional) to a Stereo System AUX Input
Telephone conversations can be switched from the internal speaker in the
Bluetooth handset to the speakers that are part of the boat’s stereo system.
1. Connect the external stereo system to the handset connector cord
with a 3.5 mm male stereo jack. This cable is not supplied but can be
found at your local audio/visual store.
USB Connector
The USB connector shown next to the external stereo jack is used to
connect to a personal computer (PC) to reprogram or update the software
in the
Bluetooth handset. The latest software and update instructions can
be found at www.cobra.com.
4
4
English
Nothing Comes Close to a Cobra
®
5
Page 6

Operating Your Handset
Assistance
Warranty
Customer
Assistance
Getting Started Common MR F300 Functions
Operating Your Handset
Getting Started
Refer to the foldout at the front of this manual to identify the various controls and
indicators on your
Bluetooth handset.
Most button functions are activated by a momentary press, then release. In those
cases that call for “press and hold,” hold the button down for at least two seconds
after it is pressed. The
PTT button is held down as long as you are speaking into
the microphone.
When using the handset, tones will sound to:
■
Indicate an error – three beeps.
■
Confirm an action – two beeps.
■
Confirm a single button press (except the PTT button) – one beep.
You can turn the
Key Tones Off if you want (see page 22).
Try It Out
Using the Bluetooth handset is the most effective way to learn about it. Don’t
hesitate to explore functions and add entries to see how they work. Do not be
concerned if you make mistakes. They can all be undone in
Edit mode. Or you
can reset the unit to the original factory default condition. Push and hold the
Green Phone and Home function keys, then push the Power key until the
unit turns On.
NOTICE
Resetting the unit will clear ALL Bluetooth device pairings as well as the
Call Log, Phonebook and
Bluetooth device list.
•
Common MR F300 Functions
The following procedures define common operating functions of the handset.
•
Power On/Off
Press the Power button at the top of the handset for two seconds to turn it On
or Off.
The first time you turn On the CobraMarine
Bluetooth handset you will see a
message that the unit is ready for pairing with a cell phone. The message also
provides a password. If you do not want to pair a device right away, press the
Escape button to go to Standby mode.
When the unit is subsequently turned On, it will search for the currently selected
Bluetooth device and go to Standby mode.
Mode
This button serves two functions:
■
To change the mode of operation between the Bluetooth handset and
your cell phone itself.
■
To switch voice activation of the microphone between On and Off. Turn VOX On
if you want to operate in a hands-free mode similar to a
Bluetooth handset.
Mode
Normal operation of the CobraMarine Bluetooth handset uses its internal
microphone and speaker to conduct conversations during a call. However,
there may be times you want to suspend the
Bluetooth pairing and continue
part or all of the call on your cell phone itself.
To Change Between Handset and Cell Phone Modes:
Press the Mode button to switch the call to your cell phone.
1.
2. Talk and listen to your cell phone in the usual way. The handset will be inactive.
3. Press the Mode button to restore operation to the handset.
4. Talk and listen to the call on the Bluetooth handset.
6
6
English
Nothing Comes Close to a Cobra
®
7
Page 7

Operating Your Handset
Assistance
Warranty
Customer
Assistance
Assistance
Warranty
Customer
Assistance
Common MR F300 Functions
Operating Your Handset
Common MR F300 Functions
VOX
The VOX function converts the handset microphone’s pickup of your voice from
being controlled by the
PTT button to being activated by your voice. When VOX
is On, the PTT button does not need to be pushed to transmit your voice and
you can just speak into the microphone.
When
VOX is Off, you need to push the PTT button while speaking.
To Change Between VOX On and Off:
Press and hold the Mode button for two seconds while a call is in progress.
1.
NOTE
When the VOX function is On in noisy environments, the caller connected
to the F300 might hear some of your background noise.
Back Light/Lock
This button serves two functions:
■
To turn the display back light On and Off.
■
To lock and unlock most of the buttons on the handset.
Back Light
A light is provided behind the LCD screen to improve visibility of the information
provided there. However, you can turn the light On or Off at will.
To Turn the Back Light On or Off:
Press the Back Light/Lock button.
1.
Lock
The Lock function disables the operation of all buttons except PTT, Back Light/Lock
and Power buttons. When Lock is On, accidental presses of any of the other buttons
are ignored by the unit. A call can be continued if it was started before
turned On, but new calls cannot be made or answered when
Lock is On.
To Turn Lock On or Off:
Press and hold the Back Light/Lock button for two seconds.
1.
Lock was
Push to Talk (PTT)
This button serves two functions:
■
To activate the handset microphone during a call when VOX is Off. This is similar
to the action of such a button on a CobraMarine VHF or a CB radio.
■
To activate the handset microphone for a PA announcement, the unit must be in
Standby and be connected to the stereo’s AUX input with the stereo in AUX mode.
To Activate the Handset Microphone During a Call:
After placing or accepting a call, press the PTT button and talk into the handset
1.
microphone.
To Make a PA Announcement:
When the unit is in Standby mode, press the PTT button and talk into the
1.
microphone.
NOTE
Before a PA announcement can be made:
■
The PA function must be turned ON from the settings menu.
■
The F300 must be connected to the stereo system AUX input.
■
The stereo must be in AUX mode with the stereo’s volume adjusted.
Green Phone Button
This button acts just like the green phone button on a cell phone. Pressing the
button answers an incoming call and initiates dialing an outbound call after the
number has been entered or selected.
In
Standby mode, this button is a shortcut to the Call Log where a number can be
selected to call.
Red Phone Button
This button acts just like the red phone button on a cell phone. Pressing the button
ends an active call.
In modes other than an active call, it backs up to the
Standby mode.
English
8
8
Nothing Comes Close to a Cobra
®
9
Page 8

Operating Your Handset
VOL
MENU
LOG
CONT
PAIRED TO
XXX
CONNECTED
+1 555 5661234
MUTE
END
INCOMING CALL
+1 555 566 1234
ANSWER
IGNORE
VOL
MENU
LOG
CONT
PAIRED TO
XXX
A
ssistance
Warranty
Customer
A
ssistance
Common MR F300 Functions
Operating Your Handset
Operation
Home Button
Pressing this button enables you to return the handset to Standby mode from
any other mode.
Voice Dialing / Last Number Redial
This button serves two functions:
■
To enable voice dialing.
■
To redial the last number dialed from the handset.
Voice Dialing
You can activate your cell phone's voice dialing feature from Standby mode.
To Voice Dial A Number:
Press and release the Voice Dialing / Last Number Redial button.
1.
2. Say the name or phone number command following the audio prompt.
The display screen will show the progress of dialing and connecting the call.
NOTE
Your cell phone must have voice dialing enabled and voice commands
recorded to use this feature with the F300.
To Redial The Last Number Dialed:
Press and hold the Voice Dialing / Last Number Redial button for two seconds.
1.
The display screen will show the progress of dialing and connecting the call.
Function Buttons
The Function buttons provide different utilities to different modes of handset
operation. In any mode, the active functions are shown directly above the buttons
on the display screen as shown in this
Functions
In this example, pressing the second button from the
left will display the
Function Names
Standby display.
Menu.
Operation
Once the CobraMarine Bluetooth handset has been paired with a cell phone,
incoming calls can be answered and outgoing calls can be made.
Standby
While waiting to receive or make a call, the handset will be in Standby mode.
Standby Mode
The upper part of the screen shows the
Waiting For A Call
icon and the cell phone signal strength.
Function buttons (from left to right) will activate display
The
of the
Volume screen, the Menu screen, the Call Log screen
and the
Phonebook screen.
Up and Down Arrow buttons will also adjust handset
The
speaker volume directly while in
Standby or during a call.
Incoming Call
When the active paired cell phone receives a call, the ring tone will sound and it will
be announced on the handset screen.
Incoming Call Display
Answered Call Display
Ringing
The call can be answered by pressing either the Answer
Function
If the
be accepted, but will be recorded in the
button or the Green Phone button.
Ignore Function button is pressed, the call will not
Call Log.
Answered Call
The Mute Function button will disable the microphone,
but allow you to continue to hear the calling person.
To end the call and return to
the
End Function button or the Red Phone button.
Standby mode, press either
Caller information like name and number of the incoming
caller will only be shown if it is available on your network
and/or device.
•
10
English
Function Buttons
Nothing Comes Close to a Cobra
®
11
Page 9

Operating Your Handset
BILL
ANDERSON
1 555 588 2300
JANE DOE
VIEW
PG
1
3
PG
1
2
1 555 600 4300
4
5
6
M
ARY WILLIAMS
1 555 250 4343
BILL
CELL
NATALIE
NAT CELL
EDIT
PG
PG
1
2
3
BILL DESK
4
ADD NEW
EXIT
NEW
Assistance
Warranty
Customer
Assistance
INCOMING CALL
+1 555 566 1234
ANSWER
IGNORE
ENTER NUMBER
1 2 3
4 5 6
7 8 9
0+ *#
Assistance
Warranty
Customer
Assistance
Operation
Operating Your Handset
Operation
Call Waiting
When a second call rings during an active call, it will be announced on the
handset screen.
Call Waiting Display
To Answer the Waiting Call:
Press the Answer Function button. The waiting call
1.
will become active, the first call will be put on hold.
Outgoing Call
Outgoing calls can be initiated in three ways:
■
By selecting a Phonebook entry.
■
By selecting a Call Log entry.
■
By dialing the number using handset Function buttons.
Phonebook
After adding a number to your Phonebook, you can go to the Phonebook and select
it from the available numbers to be dialed.
To access a number in the
mode, then select the Phonebook mode to arrive at the screen shown.
Phonebook
Select and Dial a Number
Phonebook, press the Menu Function button in Standby
To Select and Dial a Number:
Use the Page Up and Page Down buttons to shift up and
1.
down the list of entries.
2. Use the Up and Down Arrow buttons to scroll the pointer
at the left of the screen to the desired entry.
3. Press the Green Phone button to call the number.
Call Log
The most recent incoming and outgoing calls are recorded in the handset Call Log.
These can be used to select and dial a number.
To access a number in the
Call Log, press the Menu Function button in Standby
mode, then select the Call Log mode to arrive at the screen shown.
Call Log
Select and Dial a Number
To Select and Dial a Number:
Use the Page Up and Page Down buttons to shift up
1.
and down the list of entries.
2. Use the Up and Down Arrow buttons to scroll the pointer
at the left of the screen to the desired entry.
3. Press the Green Phone button to call the number.
NOTE
While in Call Log mode, you can see details of the
selected entry by pressing the
or
Enter button.
View Function button
Dial Number
To enter a number you want to dial, press the Menu Function button in Standby
mode, then select the Dial By Number mode to arrive at the screen shown.
Dialing a Number
To Enter a Number to be Dialed:
Press and release the Function button under the first digit
1.
of the phone number until the correct number appears
above the flashing cursor.
2. Wait for the cursor to shift to the right or press the Enter
button to shift the cursor.
3. Enter the second digit of the phone number as in step 1.
4. Repeat steps 1 and 2 until the complete number has
been entered.
5. Press the Green Phone button to call the number.
12
English
NOTE
The number will appear on the screen without
dashes or other separators.
Nothing Comes Close to a Cobra
®
13
Page 10

Introduction
NEW
DELETE
DISABLE
S
WITCH
READY FOR PAIRING
TO YOUR PHONE
PASSWORD IS 0000
2:59 MNTS REMAINING
BILL
ANDERSON
JANE DOE
WIFES
PHONE
DEL
EXIT
PG
PG
BILL
ANDERSON
X
JANE
DOE
WIFES
PHONE X
X
EXIT
PG
P
G
BILL
ANDERSON
X
JANE DOE
WIFES
PHONE X
DEL
EXIT
PG PG
Operating Your Handset
Operation
Product Features
Introduction
Operating Your Handset
Operation
Product Features
Bluetooth Phone Setup and Switching
The CobraMarine Bluetooth handset can be paired with only one device at a time.
However, it can store pairing information on up to eight different devices.
Setup
New
New can be used to add a device to those already paired or to pair a device
if you did not do so at the initial Power On of the F300.
Add a New Cell Phone
Delete
Delete is used to remove the pairing information for a device from the
handset memory.
Delete a Cell Phone
14
English
To Begin Phone Setup or To Switch To Pair With
a Different Device:
1.
Press the Menu button in Standby mode, then select the
Bluetooth Phone Setup mode to arrive at the screen shown.
2. At this screen, use the Up and Down Arrow buttons
to move the pointer to the desired function. Then press the
Enter button to select the function and advance to its screen.
To Add a New Cell Phone:
Select New on the Phone Setup screen to advance
1.
to the screen shown.
2. Follow the cell phone’s instructions to search for available
pairing with another
Bluetooth device. This can often be
found in the Tools or Settings menu of your mobile phone.
3. Wait for the pairing process to complete.
You will then see a confirmation of successful pairing
or a notice to try again if pairing did not occur.
The newly paired cell phone will become the active one
that is used for calls until you Switch to another.
To Delete a Cell Phone:
Select Delete on the Phone Setup screen to advance
1.
to the screen shown.
2. Use the Page Up and Page Down buttons to shift up
and down the list of entries three items at a time.
3. Use the Up and Down Arrow buttons to scroll the
pointer at the left to the screen to the desired entry.
4. Press the Delete Function button to remove the
device from the list.
Disable
Disable prevents pairing with a device, but does not remove it from the list
or its pairing data from the handset memory.
Disable a Cell Phone
To Disable a Cell Phone:
Select Disable on the Phone Setup screen to advance
1.
to the screen shown.
2. Use the Page Up and Page Down buttons to shift up
and down the list of entries three items at a time.
3. Use the Up and Down Arrow buttons to scroll the
pointer at the left to the screen to the desired entry.
4. Press the X Function button to disable an available
device or to enable a disabled device.
An
X at the right of an entry indicates that it is in
disabled status.
Switch
The Switch function allows you to select which device will be used for calls from
the list of those available.
Switch From One Active
Cell Phone to Another
To Switch From One Active Cell Phone to Another:
Select Switch on the Phone Setup screen to advance
1.
to the screen shown.
2. Use the Page Up and Page Down buttons to shift up
and down the list of entries three items at a time.
3. Use the Up and Down Arrow buttons to scroll the pointer
at the left of the screen to the cell phone which you want
to make active.
4. Press the Enter button to begin the process of re-pairing
to the selected device.
Nothing Comes Close to a Cobra
®
15
Page 11

Introduction
Assistance
Warranty
Customer
Assistance
Assistance
Warranty
Customer
Assistance
NAME :
NMB:
SAVE
DEL
+1 555588 2300
JANE DOE
ADD NEW
EXIT
EDIT
49
5
0
NEW
PHONEBOOK
C
ALL LOG
DIAL BY NUMBER
PA OUTPUT
BLUETOOTH PHONE STUP
SETTINGS
EXIT
MORE
Operating Your Handset
Customizing the MR F300
Introduction
Operating Your Handset
Customizing the MR F300
Customizing the MR F300
Your CobraMarine Bluetooth handset allows you to customize its operation to match
your preferences. Features you can adjust have the following defaults when the unit
is new or after a reset:
■
VOX: Off
■
PA Output: Off
■
Display Brightness: high
■
Ring Tone: #1
■
Call Log: cleared
■
BT Device List: cleared
■
Display Contrast: 8
■
Button Tones: On
■
Phonebook: cleared
■
Volume: 75%
■
Auto Dim: Off
■
BT Region: USA and EUROPE
Menu
The customizable features on your handset are reached from the Menu mode.
Menu
To begin customizing your handset, press the
button in Standby mode to arrive at the screen shown.
Menu options list appears on the screen.
The
The complete list is:
■
Phonebook
■
Dial By Number
■
Bluetooth Phone Setup
■
Exit
■
Call Log
■
PA Output
■
Settings
You can scroll through the list one entry at a time by
use of the
Up and Down Arrow buttons.
Once the pointer at the left of the screen is positioned at the
option you want, press the
Enter button to select it and
advance to its screen.
Menu Function
•
The Operation section described using a Phonebook entry to dial an outgoing call.
Both names and numbers can be stored in the
Add New
To Enter a New Name and Phone Number
Select Phonebook from the Menu function and scroll
1.
the pointer down to
Phonebook.
Add New at the bottom of the list
to arrive at the screen shown.
2. Press the Enter or New Function button to advance
to the
Phonebook Edit mode.
3. Press the Up or Down Arrow button to scroll the
Enter a New Name
and Phone Number
alphanumeric list to the first character of the
NOTE
The list consists of the letters A to Z followed by the
numbers 0 to 9 followed by +, “space,” *, and # and
it will wrap around from # to A.
NOTE
If only a number (without a name) is to be entered,
at step 3, press the
Right Arrow Function button until
the cursor moves to the first character of the number
and jump to step 7.
4. When the first character appears above the cursor, press
the
Enter or PTT button to save the character and move
the blinking cursor to the right.
5. Repeat step 4 until the entire name has been entered.
6. Continually press or press and hold the Right Arrow
Function
button until the cursor moves to the first
character of the Number.
7. Enter the phone number in the same fashion as the name.
8. Press the Save Function button to save the entry and go
back to the
Phonebook function.
Name.
Phonebook Entries
English
16
Nothing Comes Close to a Cobra
®
17
Page 12

Introduction
ON OFF
PA OFF
Customer
Assistance
Assistance
W
arranty
C
ustomer
Assistance
NAME : BILL ANDERSON
NUMBER: +1 555566 1234
SAVE
DEL
V
OLUME
DISPLAY
VOX
R
ING TONES
KEY TONE
BT REGION SET
DOWN
UP
SAVE
VOLUME ADJUST
Operating Your Handset
Customizing the MR F300
Introduction
Operating Your Handset
Customizing the MR F300
NOTE
If corrections are needed before saving the entry, press the Left or Right
Arrow Function
changed and press the
button to move the cursor to the character that is to be
Delete Function button to remove that character.
Then scroll the list to select the correct character.
NOTE
A “double click” on the Delete Function button will remove the entire entry
Phonebook Edit
and return the cursor to the initial position after
To Edit an Existing Name or Phone Number:
Select Phonebook from the Menu function, scroll down to
1.
Name.
name or number to be edited and press the
button to arrive at the screen shown.
2. Use the Right and Left Arrow Function buttons to move
the cursor to the character(s) to be changed and proceed
as described for making corrections when entering a new
name or number.
3. Press the Save Function button to save the changes or
deletion and go back to the
Phonebook function.
PA Output
If, during installation, you have connected the CobraMarine Bluetooth handset
connection cable to your vessel’s stereo AUX input, you can allow the handset
to be used as a public address microphone.
Enable Use of
Auxiliary Speakers
To Enable Use of Auxiliary Speakers:
Select PA Output from the Menu function to arrive at
1.
the screen shown.
2. Press the On or Off Function button to toggle between
On and Off condition.
Edit Function
Settings
The Settings option on the Menu provides access to the remaining functions needed
to customize your handset.
Settings Menu
To access these functions, select the
the
Menu to arrive at the screen shown.
Settings options list appears on the screen.
The
Settings option from
The complete list is:
■
Volume
■
VOX
■
Key Tones
■
Exit
■
Display
■
Ring Tones
■
BT Region
Once the pointer at the left of the screen is positioned at the
option you want, press the
Enter button to select it and
advance to its screen.
Volume
This volume adjustment can be performed on the internal speaker in the handset
either from
Adjust Handset Volume
Standby mode or during a call.
To Adjust the Handset Volume:
Select Volume from the Settings function to arrive at the
1.
screen shown.
2. Press the Up or Down Arrow buttons or the Up or Down
Function
buttons to adjust the speaker volume. The bar
graph will show the level you have set.
3. Press the Enter or Save Function button to save the
volume setting and return to
Settings function.
18
English
Nothing Comes Close to a Cobra
®
19
Page 13

Introduction
SAVE
BRIGHTNESS ADJUST
HIGH
DOWN
UP
B
RIGHTNESS
C
ONTRAST
A
UTO DIM
Assistance
Warranty
Customer
Assistance
SAVE
CONTRAST ADJUST
8
DOWN
UP
AUTO DIM
ONOFF
OFF
VOX
ON
OFF
OFF
Assistance
W
arranty
Customer
Assistance
Operating Your Handset
Customizing the MR F300
Introduction
Operating Your Handset
Customizing the MR F300
Display
The Display function adjusts the lighting of the LCD screen and includes three
separate adjustments: Brightness, Contrast and Auto Dim.
Display Settings
Adjust Screen Brightness
Adjust Screen Contrast
To access these functions, select the
Settings mode to arrive at the screen shown.
You can scroll the list using the
buttons.
Once the pointer at the left of the screen is positioned at
the option you want, press the
advance to its screen.
To Adjust the Screen Brightness:
Select Brightness from the Display mode to advance to
1.
the screen shown.
2. Press the Up or Down Arrow or Up or Down Function
button to step through the available settings of High,
Medium, Low and Off.
3. At the desired setting, press the Enter or Save Function
button to save the setting and return to Display function.
To Adjust the Screen Contrast:
Select Contrast from the Display mode to advance to the
1.
screen shown.
2. Press the Up or Down Arrow or Up or Down Function
button to step through the available settings. The range is
from a minimum at 0 to a maximum at 16.
3. At the desired setting, press the Enter or Save Function
button to save the setting and return to Display function.
Display option from
Up and Down Arrow
Enter button to select it and
Adjust Auto Dim
To Set Auto Dim On or Off:
Select Auto Dim from the Display mode to advance to
1.
the screen shown.
2. Press the Off or On Function button to select the
desired condition.
3. Press the Enter button to save the setting and return
to
Display mode.
NOTE
When Auto Dim is set to On, the LCD screen backlight
will be turned Off after 15 seconds if no button is
pressed. It will be turned On for 15 seconds following
any button press except
PTT.
VOX
The VOX function can be turned On or Off directly with the Mode button as
described on page 8 or from the
VOX Setting
To Set VOX On or Off from the Menu:
1.
2. Press the Off or On Function button to select the desired
3. Press the Enter button to save the setting and return
Menu.
Select VOX from Settings mode to advance to the
screen shown.
condition.
to
Settings mode.
NOTE
The VOX On or Off setting will be retained when the
unit is turned
Off.
20
English
Nothing Comes Close to a Cobra
®
21
Page 14

Introduction
RING TONE SELECT
R 01
PLAY
SAVE
KEY TONES
ON
OFF
ON
USE - EUROPE
FRANCE
SPAIN
SAVE
*
BT REGION SET
Operating Your Handset
Customizing the MR F300
Introduction
Warranty
Warranty
Ring Tones
Ten different ring tones are available from which to choose.
Select a Ring Tone
To Select a Ring Tone:
Select Ring Tones from Settings mode to advance
1.
to the screen shown.
2. Press the Up Arrow or Down Arrow button to scroll
through the tones from 01 to 10.
3. Press the Play Function button to hear the selected tone.
4. Press the Enter or Save Function button to save the
tone and return to
Settings mode.
Key Tones
Key tones confirm button presses for all but the PTT button.
Set Key Tones
To Set Key Tones On or Off:
Select Key Tones from Settings mode to advance
1.
to the screen shown.
2. Press the Off or On Function button to select the
desired condition.
3. Press the Enter or PTT button to save the setting
and return to
Settings mode.
Bluetooth Region
Different parts of the world use different sets of radio frequencies for Bluetooth
pairing. You can select from four regions for handset operation: (1) USA - Europe,
(2) France, (3) Spain and (4) Japan. Most users will not need to change these settings.
Setting BT Region
To Select A Bluetooth Region:
Select BT Region from the Settings function to arrive
1.
at the screen shown.
2. Press the Up or Down Arrow buttons or the Up or Down
Function
buttons to scroll through the list.
3. Once the pointer at the left of the screen is positioned
at the region you want, press the
Function
button to save the setting.
Enter, PTT or Save
Limited 3-Year Warranty
For Products Purchased In The U.S.A.
Cobra Electronics Corporation warrants that its CobraMarine Bluetooth handset, and the
component parts thereof, will be free of defects in workmanship and materials for a period
of three years from the date of first consumer purchase. This warranty may be enforced by
the first consumer purchaser, provided that the product is used within the U.S.A.
Cobra will, without charge, repair or replace, at its option, defective handsets, products or
component parts upon delivery to the Cobra Factory Service department, accompanied by
proof of the date of first consumer purchase, such as a duplicated copy of a sales receipt.
You must pay any initial shipping charges required to ship the product for warranty
service, but the return charges will be at Cobra’s expense, if the product is repaired or
replaced under warranty. This warranty gives you specific legal rights, and you may also
have other rights which may vary from state to state.
Exclusions.This limited warranty does not apply:
1. To any product damaged by accident.
2. In the event of misuse or abuse of the product, or as a result
of unauthorized alterations or repairs.
3. If the serial number has been altered, defaced or removed.
4. If the owner of the product resides outside the U.S.A.
All implied warranties, including warranties of merchantability and fitness for a particular
purpose are limited in duration to the length of this warranty. Cobra shall not be liable for
any incidental, consequential or other damages; including, without limitation, damages
resulting from loss of use or cost of installation.
Some states do not allow limitations on how long an implied warranty lasts and/or do not
allow the exclusion or limitation of incidental or consequential damages, so the above
limitations may not apply to you.
For Products Purchased Outside The U.S.A.
Please contact your local dealer for warranty information or visit www.cobra.com.
•
English
22
Nothing Comes Close to a Cobra
®
23
Page 15

English
Introduction
24
Product Service
Maintenance and
Product Service
Maintenance
•
Very little maintenance is required to keep your CobraMarine Bluetooth handset in good
operating condition:
■
Keep the handset clean by wiping with a soft cloth and mild detergent. Do not use solvents
or harsh or abrasive cleaners, which could damage the case or scratch the LCD screen.
■
If the handset is exposed to salt water, wipe with a soft, moist cloth at least once a day to
prevent buildup of salt deposits, which could interfere with button operation.
■
To determine the software version in your handset, press and hold the PTT button
while turning On the power. The version number will show on the LCD screen for
five seconds, then proceed to normal startup.
■
The USB connector on the bulkhead connector cord can be used to update the
software for your handset using a personal computer. Go to Cobra’s website
www.cobra.com to find the latest software version and follow the instructions there.
Product Service
•
For any questions about operating or installing this new Cobra product, or if parts are
missing…PLEASE CALL COBRA FIRST…do not return this product to the store.
If this product should require factory service, please call Cobra first before sending the product.
This will ensure the fastest turnaround time on any repair. If Cobra asks that the product be sent
to its factory, the following must be furnished to have the product serviced and returned:
1. For Warranty Repair include some form of proof-of-purchase, such as a mechanical
reproduction or carbon of a sales receipt. Make sure the date of purchase and product
model number are clearly readable. If the originals are sent, they cannot be returned.
2. Send the entire product.
3. Enclose a description of what is happening with the product. Include a typed or clearly
printed name and address of where the product is to be returned, with phone number
(required for shipment).
4. Pack the product securely to prevent damage in transit. If possible, use the original
packing material.
5. Ship prepaid and insured by way of a traceable carrier such as United Parcel Service
(UPS) or Priority Mail to avoid loss in transit to:
Cobra Factory Service, Cobra Electronics Corporation
6500 West Cortland Street, Chicago, Illinois 60707 U.S.A.
6. If the product is in warranty, upon receipt of the product, it will either be repaired or
exchanged depending on the model. Please allow approximately 3 – 4 weeks before
contacting Cobra for status. If the product is out of warranty, a letter will automatically
be sent with information as to the repair charge or replacement charge.
For any questions, please call 773-889-3087 for assistance.
 Loading...