

Page 1
1
* Cobra recommends you always wear a hel
met while riding. Please never operate your motorcycle while under
1 – FRONT EXHAUST HEADPIPE W/ HEATSHIELD
PRIOR TO INSTALLATION, MAKE SURE YOUR STOCK HEAD
PIPE GASKETS ARE IN GOOD
frame rail, retain 2 flange bolts from stock upper bracket for later reinstallation. The two stock exhaust
Remove the exhaust bracket from the box and mount it to the motorcycle frame using the stock bolts
61MSC clamps onto the muffler
Slide the muffler onto the head pipes by
tapping it onto the head pipes with your hand as you push the mufflers forward making sure the muffler
ad pipe flanges to the
motor (slowly tighten opposing acorn nut) and muffler clamps. (NOTE: If the muffler clamps are slid to
uffler assembly
4718
–
4818
–
4918
Page
1
of 2
Items Supplied >
23801 E. La Palma Ave., Yorba Linda, Ca 92887 Ph. 714.692.8180 Fax. 714.692.5016
www.cobrausa.com
Application(s) >
1 – REAR EXHAUST HEADPIPE W/ HEATSHIELD
1 – EXHAUST BRACKET
1 – EXHAUST MUFFLER
4 – CLAMPS, HS-24
2 – CLAMPS, HS-28
2 – CLAMPS, 27-61 MSC
2 – BOLT, HEX 5/16-18 x 5/8”
2 – SCREW, BUTTON ¼-20 x 3/8”
2 – BILLET MUFFLER TIPS
KAWASAKI VN900 06-09
Instruction Manual >
SHAPE. IF YOU HAVE ANY DOUBTS AS TO THEIR CONDITION, REPLACE THEM.
Read all instructions carefully and completely before installing your new exhaust system
1. Remove stock exhaust system and remove stock upper and lower exhaust mount s on the right side
brackets will not be used in combination with the Cobra Exhaust System.
2. Loosen and move the right side floorboard assembly out of the way to ease installation of the exhaust.
3.
retained in Step 1, but DO NOT TIGHTEN at this time, see Figure 1.
4. Install the front and rear head pipes onto the motorcycle using the supplied Cobra flanges and stock
acorn nuts. Make sure the pipes are parallel to each other. DO NOT TIGHTEN.
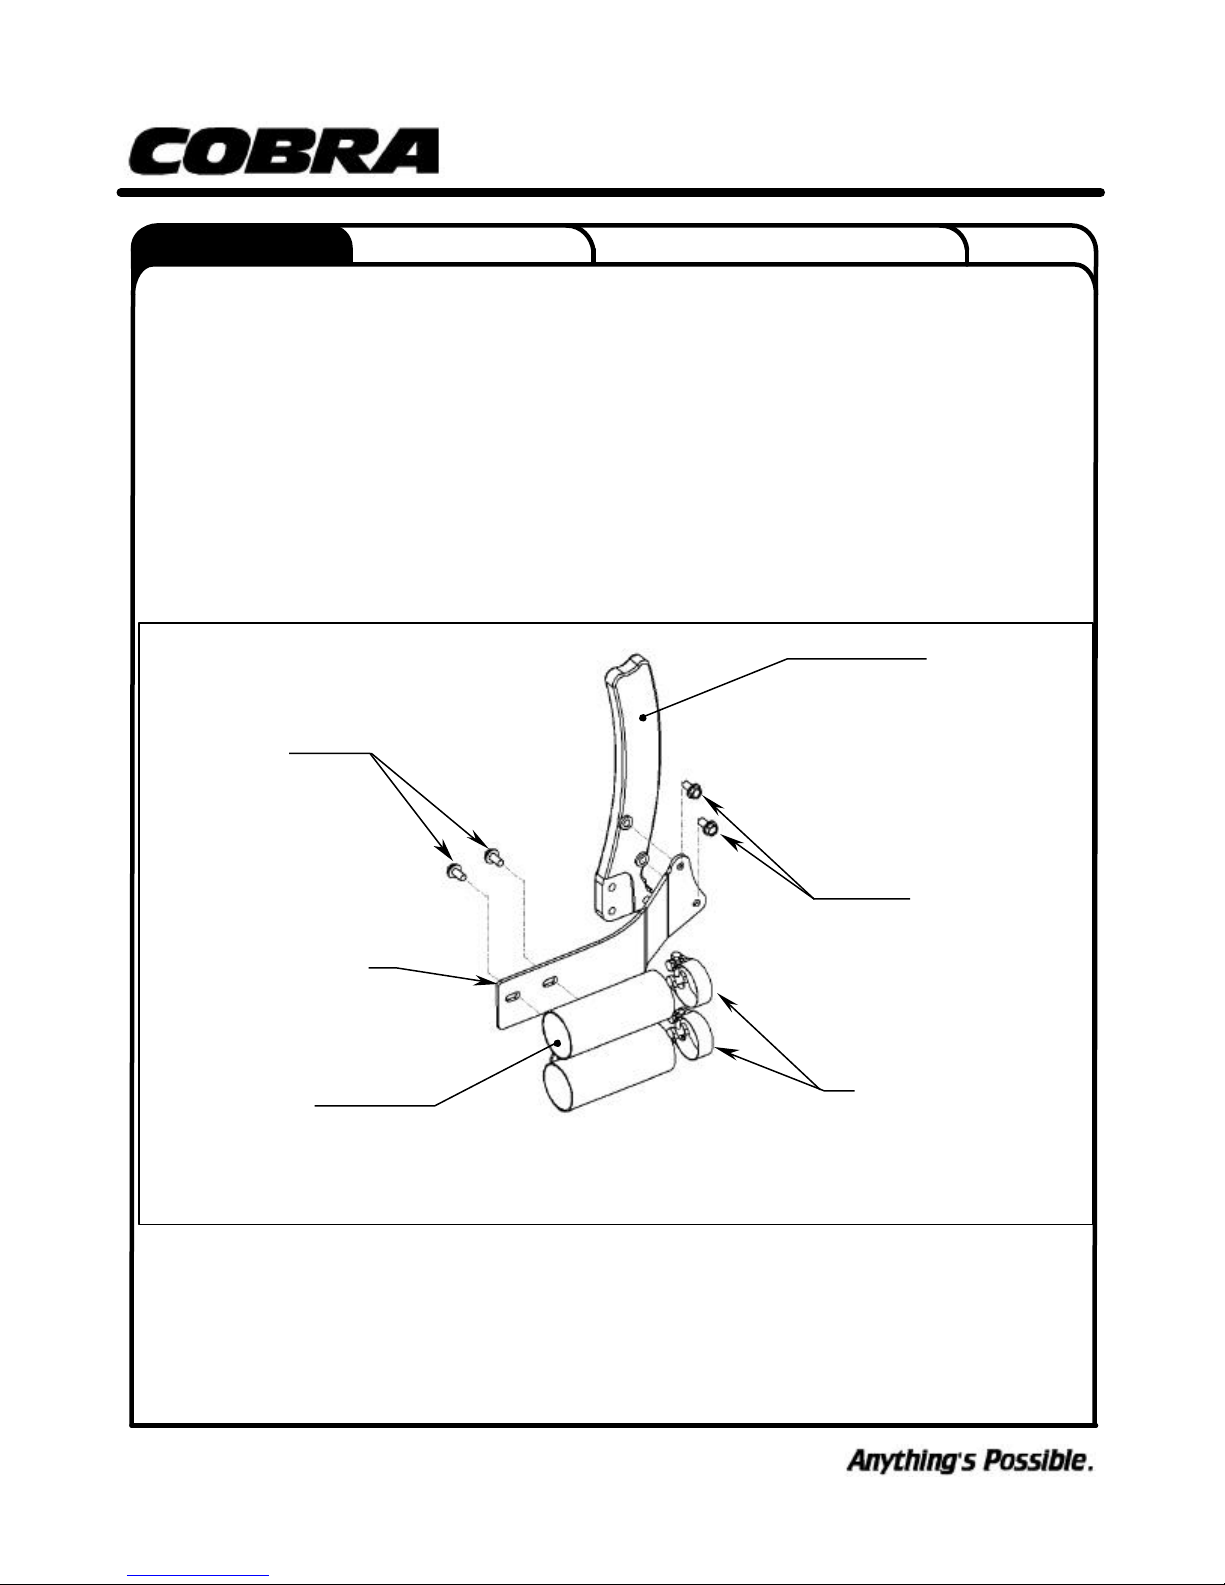
5. Remove the muffler assembly from the box and slide two supplied 27 tubes. The clamps should be orientated as shown in Figure 1.
slides as far forward as possible. Secure the muffler to the exhaust-mounting bracket using the
supplied 5/16-18 bolts but DO NOT TIGHTEN.
6. Make sure the muffler assembly is parallel to the ground (this is critical) then tighten the following in
order: exhaust bracket to the frame, muffler assembly to the exhaust bracket, he
far up the muffler or past the three slots, the clamps will not tighten.)
7. On the front and rear heatshields unscrew the remaining hose clamps and feed the tail end of the
clamp through the clips on the inside. The screw end of the hose clamps should be accessible for
tightening but not visible when the heatshields are mounted to the pipes.
8. To install the front heatshield, first slide the rear portion of the heatshield over the muffler, continue to
slowly slide it forward pushing the front of the shield gently into place between the frame and motor
(Hint: Spread the hose clamps apart slightly to make it easier to slide them over the m
and head pipes). Snug the heatshield clamps but DO NOT TIGHTEN.
9. Install the rear heatshield the same way as the front heatshield.
CONTINUE TO NEXT PAGE!
the influence of alcohol and/or drugs. Enjoy the new look of your motorcycle and please ride safely.
DOCUMENT NO. 0017 REV. B
07/09
Page 2
2
4718
–
4818
–
4918
10. Install one billet ti
p on each heatshield making sure the ends of the tips are parallel with each other.
Fasten the
If it is difficult to slide the tips into
the heatshields loosen the clamps on the heatshield and adjust until aligned, avoiding this may
Make sure all the hardware (brackets, headpipes, heatshields, and baffles) have been tightened and
DOCUMENT NO
. 0018 REV. B
ORIENTATION OF
CLAMPS
SUPPLIED MUFFLER
EXHAUST
FOR CLARITY
RIGHT SIDE
SUPPLIED
STOCK M8
BOLTS
23801 E. La Palma Ave., Yorba Linda, Ca 92887 Ph. 714.692.8180 Fax. 714.692.5016
Instruction Manual >
On Slashdown models, make sure the angled ends of the tips are parallel with each other.
tips with the supplied ¼” x 20 buttonhead screws making sure they snug up against the heatshield
leaving no gap between the tip and heatshield when tightened.
cause damage to the chrome tips.
11. Tighten the clamps on the heatshields.
12. Reinstall the right side floorboard assembly; tighten the bolts to factory specifications.
13.
cleaned before starting the motorcycle.
www.cobrausa.com
Page 2 of 2
FRAME
MEMBER
FLANGE
BOLTS
FLANGE
BRACKET
EXHAUST
MUFFLER
SHORTENED
FIGURE 1
IMPORTANT: Cobra highly recommends using a Fi2000 Fuel Management System to help
eliminate lean conditions and popping sounds. Cobra Part# 92-1968.
Before starting your engine remove all fingerprints from chrome with a quality wax or chrome polish.
Failure to do so can cause discoloration. Due to fluctuations in fuel injection/carburetion settings,
timing, etc., Cobra Engineering does not warrant against chrome discoloration.
07/09
 Loading...