

Page 1
For servicing single piece automotive and
most light truck tire/wheel assemblies.
Safety Instructions
Set-up Instructions
Operation Instructions
Maintenance Instructions
READ these instructions before placing unit in
service. KEEP these and other materials delivered
with the unit in a binder near the machine for ease
of reference by supervisors and operators.
1601 J. P. Hennessy Drive, LaVergne, TN USA 37086-3565 615/641-7533 800/688/6359 www.ammcoats.com Manual Part No.: 85606719 02
HENNESSY INDUSTRIES INC. Manufacturer of AMMCO
®
, COATS® and BADA® Automotive Service Equipment and Tools. Revision: 11/13
Page 2

Operation Manual - COATS PRO GUARD PLUS - 2
Page 3

INDEX
INTRODUCTION.....................................................................................................................................................5
DETAILS OF THE TIRE CHANGER.......................................................................................................................5
1 .0_General information.......................................................................................................................................6
2.0_General safety instructions............................................................................................................................6
2.1_Safety instructions................................................................................................................................7
3.0_Safety devices.................................................................................................................................................8
4.0_Safety notices and decals..............................................................................................................................8
4.1_Safety decals (p/n 82031373)..............................................................................................................9
5.0_Remember R.I.M............................................................................................................................................10
6.0_Principle operating parts.............................................................................................................................11
7.0_Description of the machine’s controls........................................................................................................12
7.1_Control overview.................................................................................................................................13
8.0_Transport.......................................................................................................................................................15
9.0_Unpacking......................................................................................................................................................15
10.0_Installation...................................................................................................................................................16
10.1_Space required to position the machine..........................................................................................16
10.2_Positioning.......................................................................................................................................16
10.3_Commissioning................................................................................................................................17
11.0_Operational test...........................................................................................................................................18
12.0_Identifying and checking the rim and tire.................................................................................................19
13.0_Positioning the valve..................................................................................................................................20
14.0_Tire classifi cation.......................................................................................................................................20
15.0_Tire lift.........................................................................................................................................................21
16.0_Wheel clamping..........................................................................................................................................22
16.1_Wheel locking..................................................................................................................................22
16.2_Pneumatic locking system (optional)...............................................................................................22
17.0_Bead loosening...........................................................................................................................................23
17.1_Upper bead loosening......................................................................................................................23
17.2_Lower bead loosening......................................................................................................................24
17.3_Lower bead loosening on special wheels........................................................................................25
18.0_Demounting tire..........................................................................................................................................26
18.1_Upper bead demounting..................................................................................................................26
18.2_Lower bead demounting..................................................................................................................27
19.0_Mounting tire...............................................................................................................................................28
19.1_Lower bead mounting......................................................................................................................28
19.2_Upper bead mounting......................................................................................................................28
19.3_UHP (low profi le) and RUN-FLAT (self-supporting) tires mounting..................................................30
Operation Manual - COATS PRO GUARD PLUS - 3
Page 4

20.0_Infl ation........................................................................................................................................................31
21.0_Standard accessories................................................................................................................................32
21.1_Optional accessories.......................................................................................................................32
22.0_Repositioning..............................................................................................................................................37
23.0_Storage........................................................................................................................................................37
24.0_Scrapping....................................................................................................................................................37
25 .0_Maintenance...............................................................................................................................................37
25 .1_General warnings............................................................................................................................37
25 .2_Routine maintenance......................................................................................................................38
26.0_Oil treatment................................................................................................................................................39
26.1_General precautions.........................................................................................................................39
26.2_First Aid instructions.........................................................................................................................39
26.3_Disposing of old oil...........................................................................................................................39
26.4_Oil spillages or leakages..................................................................................................................39
27.0_Technical specifi cations............................................................................................................................40
Operation Manual - COATS PRO GUARD PLUS - 4
Page 5

INTRODUCTION
We thank you for purchasing one of our tire changers, which are particularly suitable for mounting/demounting convetional, low profi led and RUN-FLAT tires.
The machine is manufactured using the best of quality principles.
To ensure correct operation and long life of the machine, read and follow these instructions.
DETAILS OF THE TIRE CHANGER
When contacting our Service Department or when requesting spare parts, please provide a complete description of the
tire changer model and its Serial Number.
For the sake of convenience, the details of your tire changer are written in the name plate placed on the back of it.
If the details given in this manual do not match those written in the nameplate of your tire changer, those written on the
nameplate are the ones to be considered as valid.
NOTE: some of the illustrations shown in this manual have been taken from pictures of prototypes.
As a consequence, some parts or components of standard production machines may differ from what is illustrated.
Operation Manual - COATS PRO GUARD PLUS - 5
Page 6
1.0_GENERAL INFORMATION
The tire changer is designed to demount and mount tires of passengers cars and light commercial vehicles with rims
from 10” to 34” (254 - 863 mm) and maximum tire diameter of 47” (1200 mm).
The tire changer is designed to demount and mount conventional tires, as well as new generation types, such as “selfsupporting” RUN-FLAT and low profi led tires (UHP) with steel and/or light alloy rims, even of considerable dimensions.
The tire changer is NOT suitable for demounting infl ated or dirty tires, to straighten rims or to remove wheel bead wires.
As a consequence, all these procedures are FORBIDDEN.
.
2.0_GENERAL SAFETY INSTRUCTIONS
The tire changer is to be used exclusively by qualifi ed and authorised personnel.
A qualifi ed operator is someone who has fully understood the instructions described in the use and maintenance manual
supplied by the manufacturer, who has been specifi cally trained and who is aware of safety standards at the workplace.
Those in charge of using the machine shall not be under the infl uence of drugs, alcohol or other substances, which
could compromise their physical and mental work capabilities.
For greater safety , operators shall wear health & safety footwear, gloves, protection goggles and shall NOT wear any
form of clothing that could get caught up or restrict the operator’s movements.
The operator must be able to:
- read and understand the danger warnings.
- understand the characteristics of the machine.
- keep unauthorised people away from the work area.
- make sure the machine is started in full observance of all the applicable safety standards and regulations.
- make sure all operators are familiar with the machine and how to use it safely and correctly.
- avoid touching moving parts or pressurised parts without fi rst disconnecting the machine from the electrical and
air power supply.
- read and ensure full comprehension of the use and maintenance manual to be able to use the machine correctly and
safely.
- keep the use and maintenance manual with care in an easily accessible place, so that it can be consulted whenever
needed.
The tire changer may only and exclusively be used by expert, specifi cally trained and
authorised personnel.
- T ampering or modifi cations to the equipment that are not authorised in advance by the manufacturer, relieve the latter
from all forms of liability as regards to damages deriving from or referable to such actions.
- Removal or tampering with the safety devices provides grounds to immediately cancel the warranty and involves
violation of State and Federal OSHA regulations and codes.
- The tire changer is equipped with informative and warning decals, which are designed and produced to last in time.
If they should deteriorate, user may request replacement decals.
Operation Manual - COATS PRO GUARD PLUS - 6
Page 7
2.1_Safety Instructions
Owner’s Responsibility
To maintain machine and user safety, the responsibility of the owner is to read and follow these instructions:
•Follow all installation instructions.
•Make sure installation conforms to all applicable Local, State, and Federal Codes, Rules, and Regulations; such as
State and Federal OSHA Regulations and Electrical Codes.
•Carefully check the unit for correct initial function.
•Read and follow the safety instructions. Keep them readily available for machine operators.
•Make certain all operators are properly trained,know how to safely and correctly operate the unit,and are properly supervised.
•Allow unit operation only with all parts in place and operating safely.
•Carefully inspect the unit on a regular basis and perform all maintenance as required.
•Service and maintain the unit only with authorizedor approved replacement parts.
•Keep all instructions permanently with the unit and all decals/labels/notices on the unit clean and visible.
•Do not override safety features.
Operator Protective Equipment
Personal protective equipment helps make tire servicing safer. However , equipment does not take the place of safe operating practices. Always wear durablework clothing during tire service activity. Loose fi tting clothing should be avoided.
Tight fi tting leather glove are recommended to protect operator’s hands when handling worn tires and wheels. Sturdy
leather workshoes with steel toes and oil resistant soles should be used by tire service personnel to help prevent injury in
typical shop activities. Eye protection is essential during tire service activity . Safety glasses with sideshields, goggles, or
face shields are acceptable. Backbelts provide support during lifting activities and are also helpful in providing operator
protection.Consideration should also be given to the use of hearing protection if tire service activity is performed in an
enclosed area, or if noise levels are high.
Defi nitions of Hazard Levels
Identify the hazard levels used in this manual with thefollowing defi nitions and signal words:
DANGER
Watch for this symbol:
DANGER
It Means: Immediate hazards, which will result in severe personal injury or death.
WARNING
Watch for this symbol:
WARNING
It Means: Hazards or unsafe practices, which could result in severe personal injury or death.
CAUTION
Watch for this symbol:
CAUTION
It Means: Hazards or unsafe practices, which may result in minor personal injury or product or property damage.
Watch for this symbol! It means BE ALERT! Your safety, or the safety of others, is involved!
Operation Manual - COATS PRO GUARD PLUS - 7
Page 8
3.0_SAFETY DEVICES
The tire changer is equipped with safety devices that are designed to guarantee the safety of the machine operator:
- Pneumatic safety valve, arranged inside the machine that prevents the pressure from exceeding 58 PSI (4 bar) during
infl ation.
- Pressure regulator and gauge that limits the maximum pressure of the circuit to 145 PSI (10 bar).
- Maximum tank pressure valve, fi tted on the tank, to prevent the maximum pneumatic pressure from exceeding 160
PSI (11 bar) (optional auxiliary bead seater)
- Removal or tampering with the safety devices provides grounds to immediately cancel the warranty and
represents a breach of State and Federal OSHA regulations and codes.
4.0_SAFETY NOTICES AND DECALS
WARNING
Failure to follow danger, warning, and caution instructions may lead to serious personal injury or death to operator orbystander or damage to property. Do not operate this machine until you read and understand all the dangers, warnings
and cautions in this manual. For additional copies of either, or further information, contact:
Hennessy Industries, Inc.
1601 J.P. Hennessy Drive
LaVergne, TN 37086-3565
(615) 641-7533 or (800) 688-6359
www.ammcoats.com
For additional information contact:
Rubber Manufacturers Association
1400 K Street N. W.
Washington, DC 20005
(202) 682-4800
Tire Guides, Inc.
The Tire Information Center
1101-6 South Rogers Circle
Boca Raton, FL 33487-2795
(561) 997-9229
www.tireguides.com
Operation Manual - COATS PRO GUARD PLUS - 8
Page 9
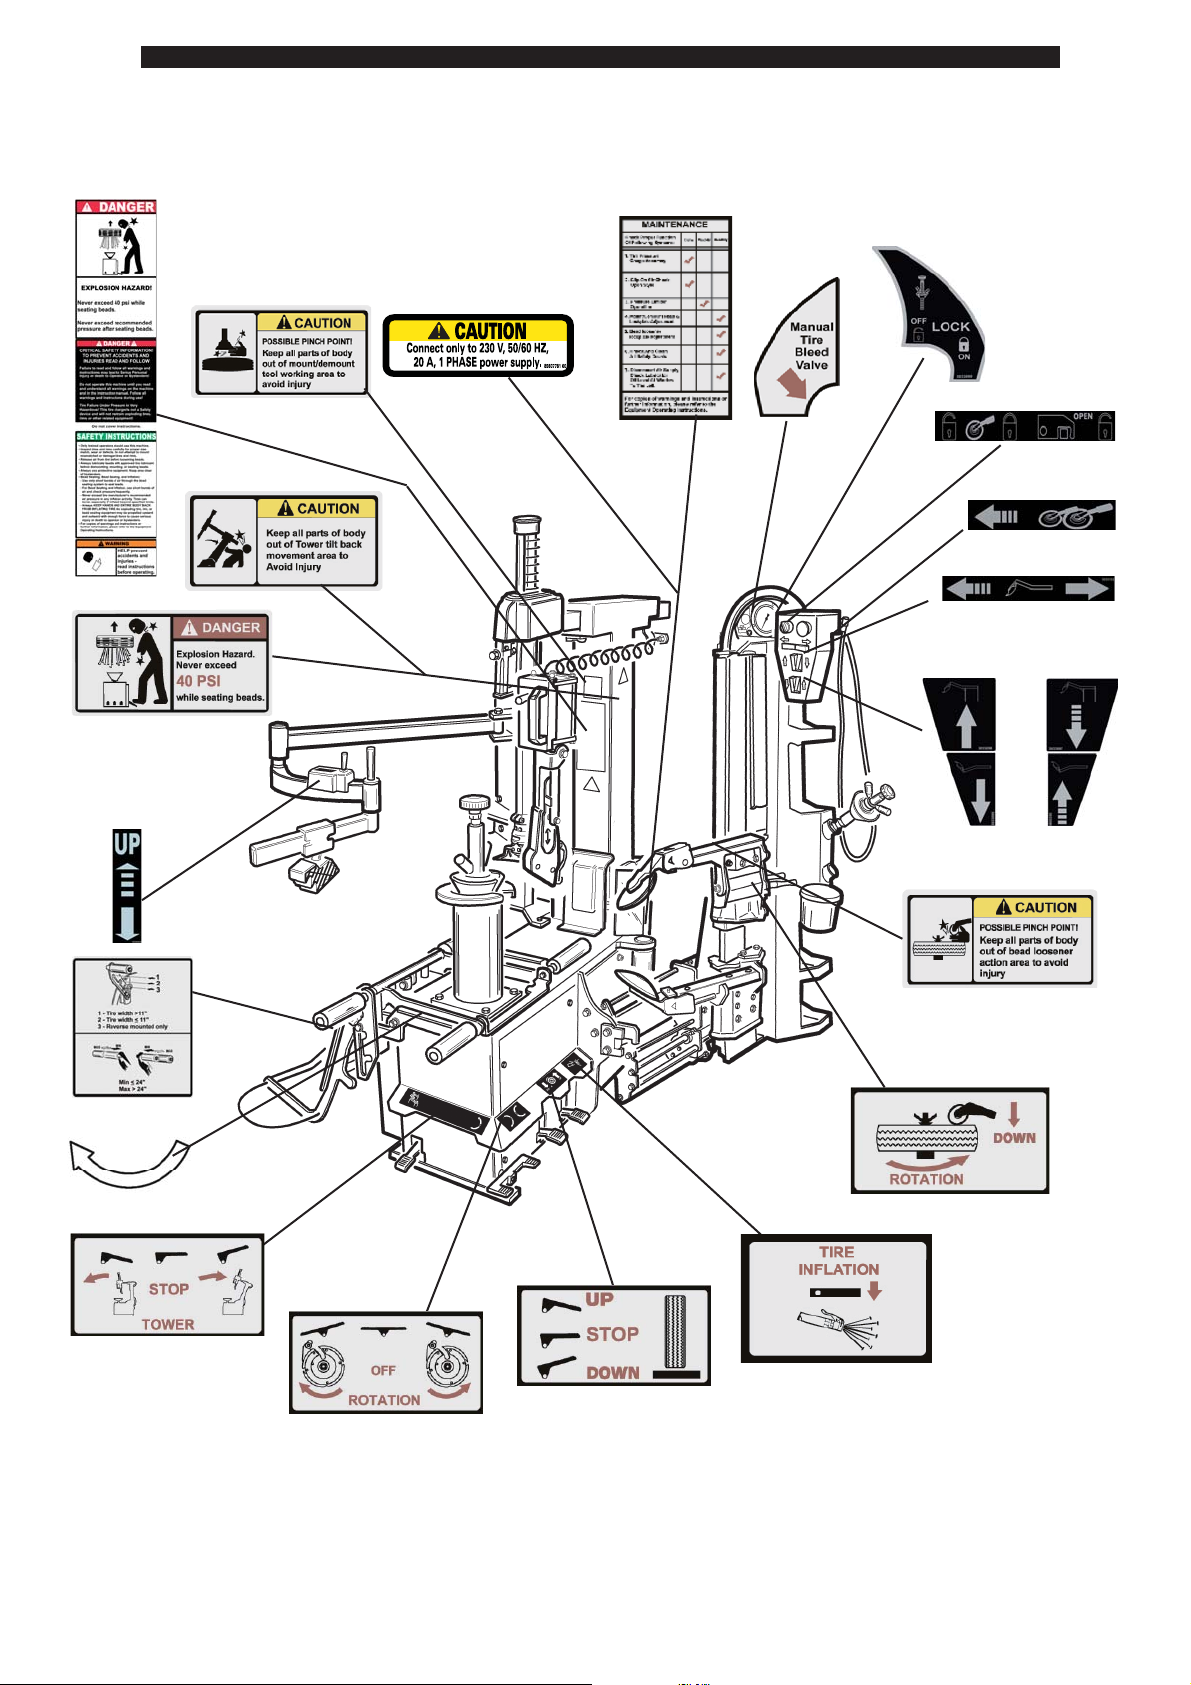
4.1_Safety Decals (p/n 82031373)
Operation Manual - COATS PRO GUARD PLUS - 9
Page 10
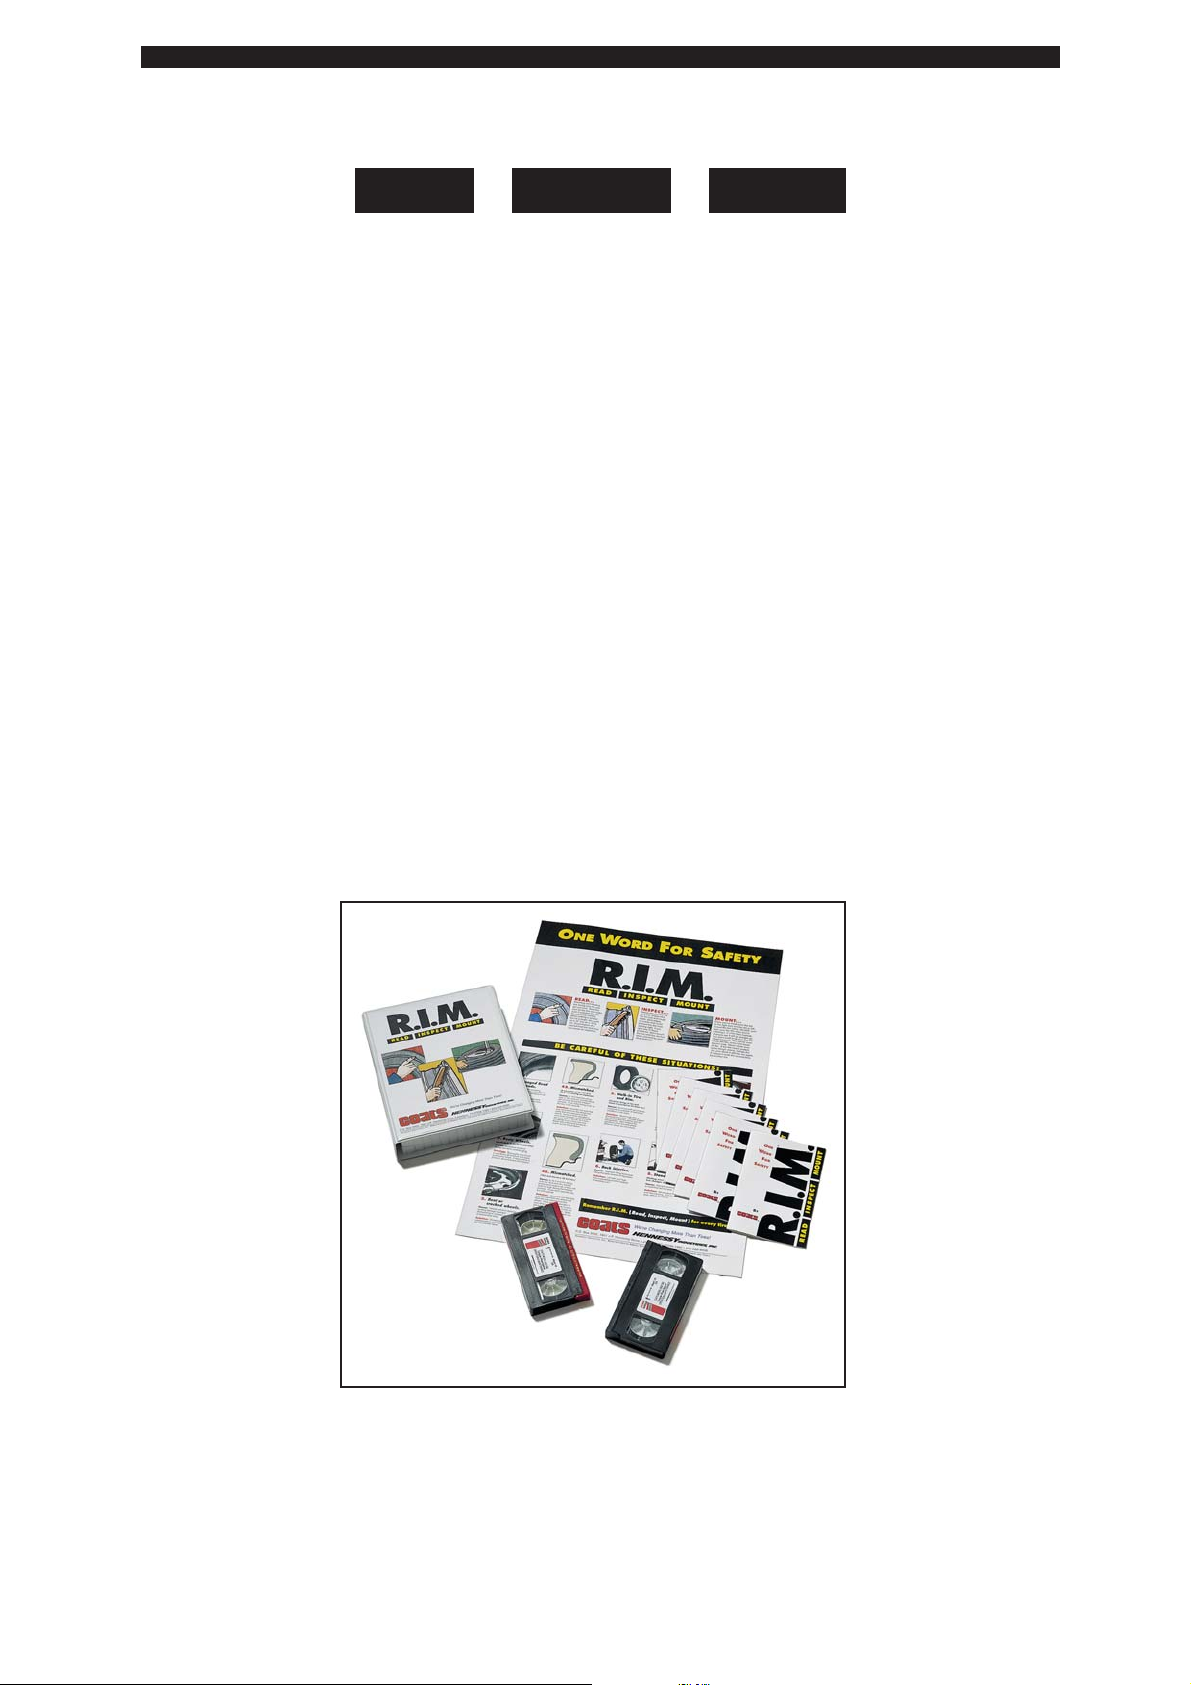
5.0_REMEMBER R.I.M.
Three Simple Steps To Help Keep Shops Safe
READ INSPECT MOUNT
R.I.M. is a training program developed by HennessyIndustries to help keep tire technicians safe. By
following the basic principles of R.I.M., technicians can avoid situations that can cause catastrophic
accidents like tire explosions.
R.I.M.stands for read, inspect, and mount:
Read the tire size on a new tire before mounting to make sure it is the proper size for the wheel.
Inspect the wheel for cracks, rust, and or other damage that could cause an unsafe situation.
Mount the tire safely, making sure not to put any part of your body over the tire during infl ation.
The most serious of possible accidents is a tire explosion. This is often caused by a tire/rim
mismatch.
If a tire explodes on a tire changer, pressure causes it to fl y straight up at tremendous speed. If a
technician is standing over the tire, he can be seriously injured or killed.
Hennessy’s R.I.M. program allows the technician to avoid situations that can cause tire explosions
and other accidents. The full program, including training videos, brochures, posters, and other materials, is available from Coats distributors nationwide.
For more details, contact your Coats distributor or e-mail us.
Operation Manual - COATS PRO GUARD PLUS - 10
Page 11
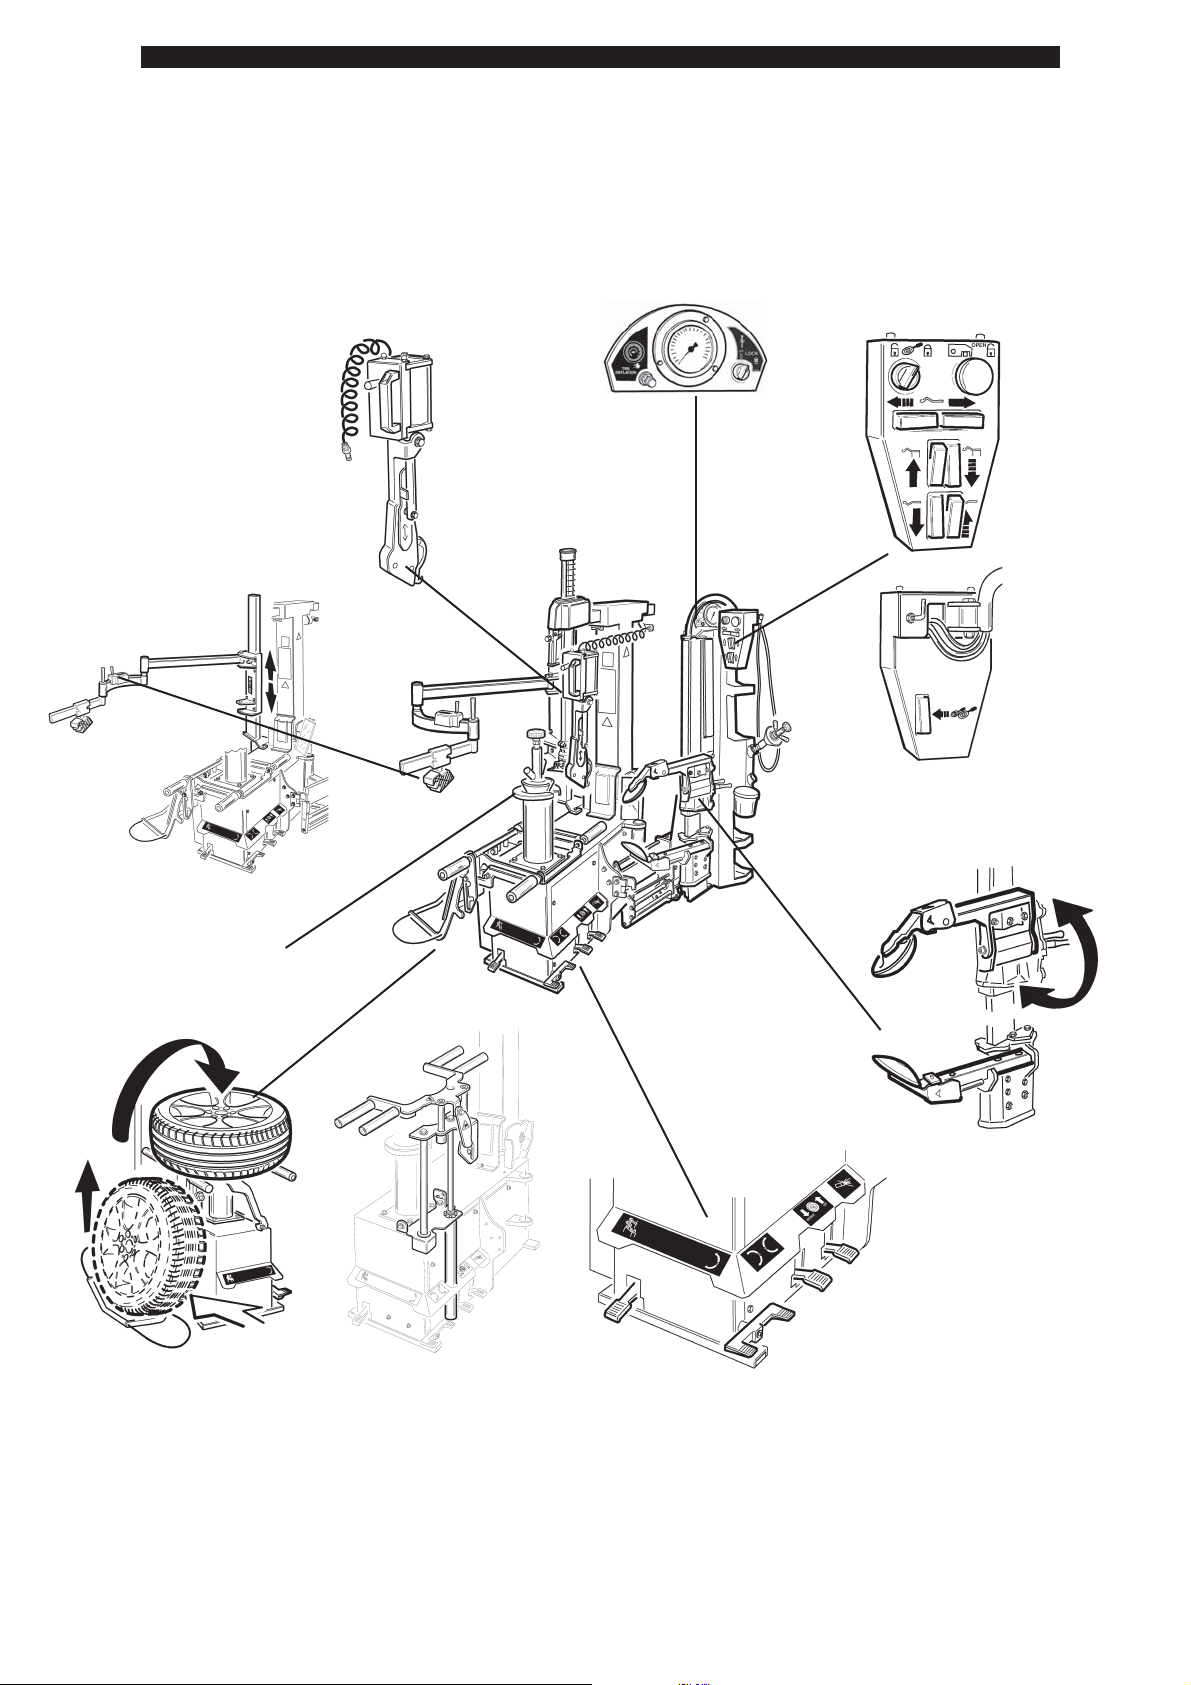
6.0_PRINCIPLE OPERATING PARTS
Leverless Bead Lifter
Helper Arm
Infl ation
Control panel
Spindle fl ange
Bead loosening disc
Pedal controlsLift
Operation Manual - COATS PRO GUARD PLUS - 11
Page 12
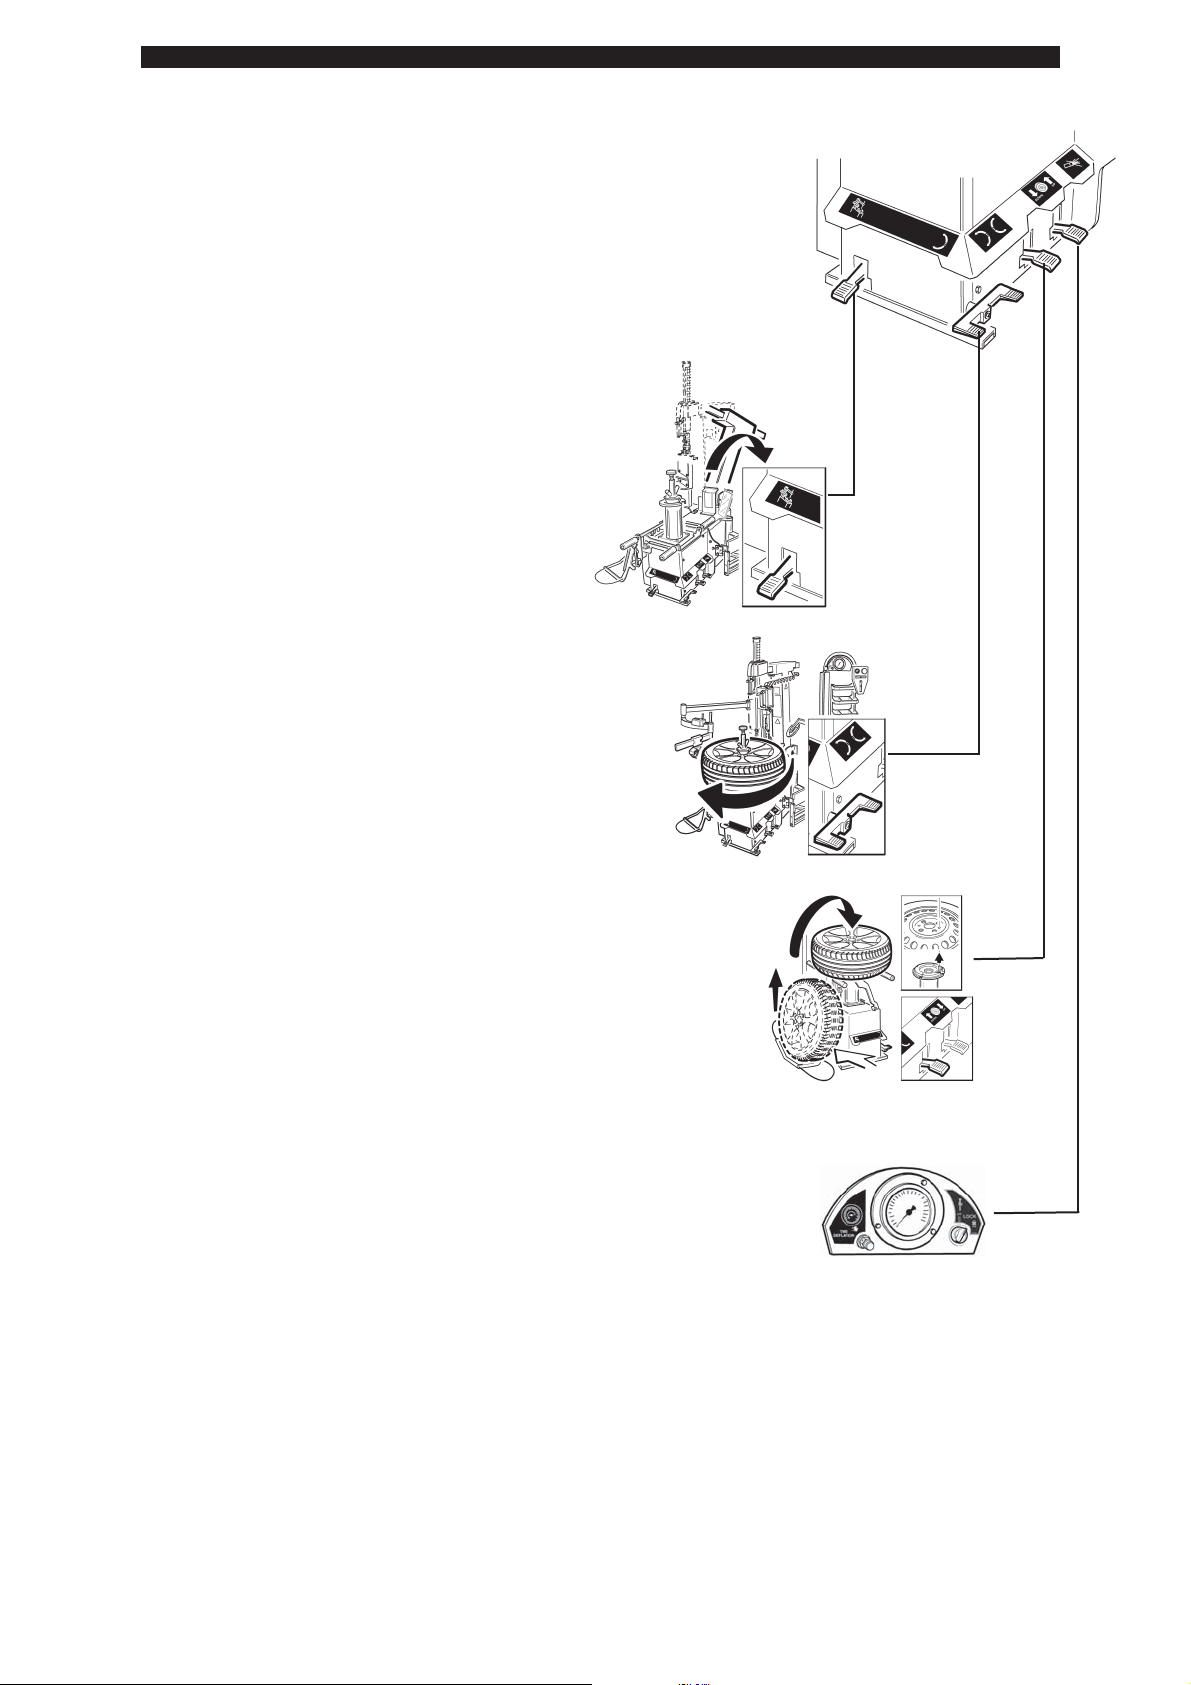
7.0_DESCRIPTION OF THE MACHINE’S CONTROLS
O
The pedal control (L) is used to move the vertical arm
out of the working position, once the tire has been demounted, or in the working position while mounting and
demounting the tire.
The pedal control (M) is used to turn the spindle fl ange
clockwise, (low and rotation mode) and counter-clockwise
(low rotation mode).
L
N
M
The pedal control (N) is used to lift the tire off the ground to clamp it on the
fl ange and vice versa to lower it back down to the ground after mounting
it. Press the pedal to raise the lift, push the pedal upwards to lower the lift.
The pedal control (O) is used to infl ate the tire. Connect the infl ation hose to the
pneumatic valve and press the pedal to infl ate; to reduce the tire’s pressure, press
the button at the side of the gauge. Before infl ating, read the instruction ma-
nual of the vehicle fi rst to fi nd out the recommended pressure of the tires.
Operation Manual - COATS PRO GUARD PLUS - 12
Page 13
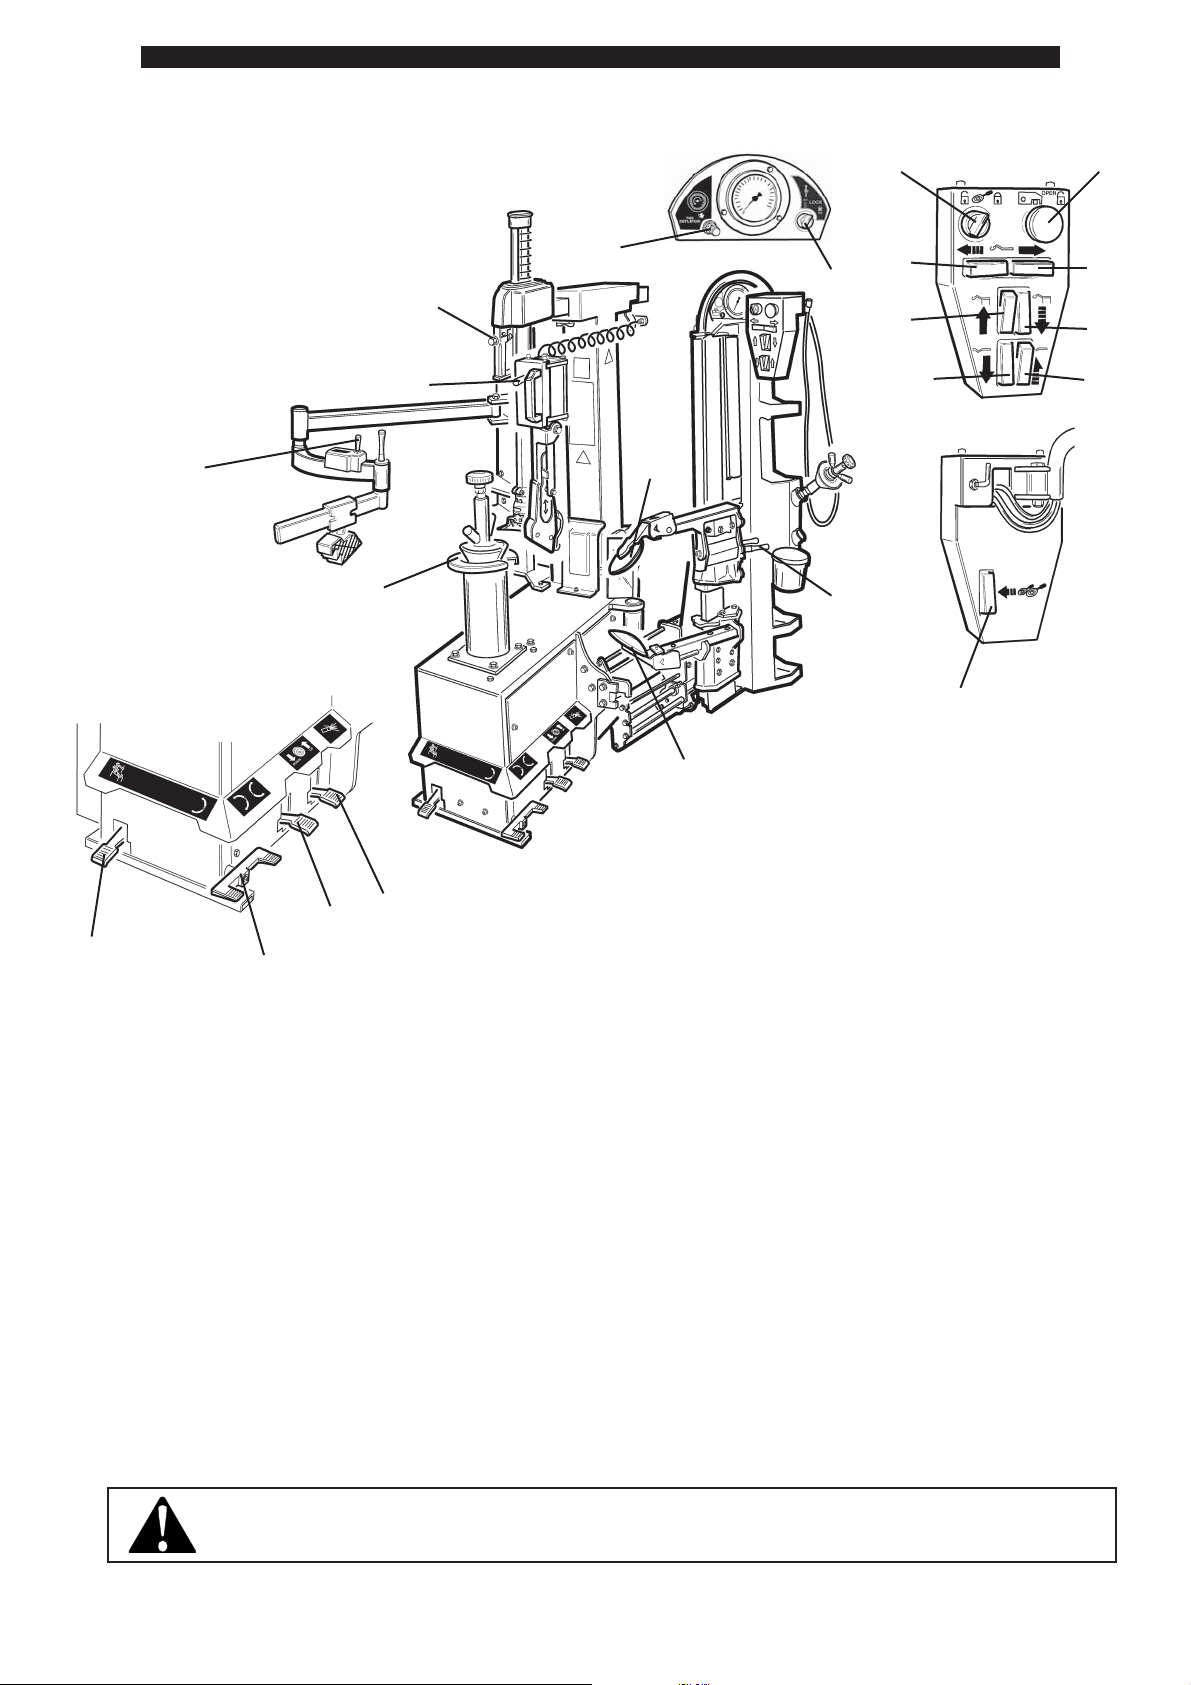
7.1_Control Overview
67
17
15
20
19
14
16
18
22
21
8
10
12
9
11
13
5
4
3
1
2
1-Tower tilt pedal control
2- Clockwise and counterclockwise center plate (ref. 15)
rotation pedal control
3-Wheel positioning device control pedal (optional)
4-Infl ation pedal control
5-Bead loosening rollers override engaging button
6-Bead loosener locking and override (ref. 5) activation
switch.
7-Bead loosener releasing button.
8-Bead loosener “forward” movement button
9-Bead loosener “back” movement button
10-Upper bead loosening roller lifting button
11-Upper bead loosening roller lowering button
12-Lower bead loosening roller lowering button
13-Lower bead loosening roller lifting button
14-Defl ation button (infl ating: by pedal 4)
15-Center plate
16-Upper bead loosener roller
17-Press arm control switch
18-Lower bead loosener roller
19-Operating arm control button
20-Leverless system control switch
21-Upper bead loosener tilting control
22-Center plate pneumatic locking switch
Any test must be operated without a tire on the machine.
Be mindful of any component that could interfere with machine testing operations.
Operation Manual - COATS PRO GUARD PLUS - 13
Page 14

23
Leverless Bead Lifter
Push the lever (23) down to be able to take the tool out of its
seat and push it up to put it back in position.
The bead helper arm is used to facilitate the mounting and
demounting phases. It is optional on standard tires but required on Run-Flat and UHP tires (low profi le).
Gauge
Defl ation button
Infl ation control panel consists of the gauge and the tire defl ation button. T o
infl ate the tire, press the pedal at the side of the machine (see illustration
below)
Infl ation pedal
Operation Manual - COATS PRO GUARD PLUS - 14
Page 15

8.0_TRANSPORT
- The tire changer is to be transported in its original packaging and kept in the position indicated on the actual
packaging.
- The packed machine is to be moved using a forklift truck of suitable load-bearing capacity, inserting the forks in
the points indicated in the drawing below (fi g. 1).
9.0_UNPACKING
Remove the cardboard and the securing screws, then take the machine off the original pallet.
Check the integrity of the equipment, making sure no parts are visibly damaged or missing, referring to the illustration on page 11.
In the case of doubt, do not use the machine but contact your dealer.
Packaging elements must not be left at children’s reach because they could be dangerous. Put the packaging
material in dedicated waste collection areas if they are pollutant or non-biodegradable.
NOTE: Exposed parts are covered with special rust inhibiting oil, possible traces of dirt are not due to negligence
but are just leftovers of this oil. Clean if necessary.
Net weight 937 lbs
(425 Kg).
Gross weight 1003
lbs(455 Kg).
fi g. 1 fi g. 2
Operation Manual - COATS PRO GUARD PLUS - 15
Page 16

10.0_INSTALLATION
10.1_Space required to position the machine
When choosing the place of installation, remember to observe current standards on safety at the workplace.
- The tire changer needs to be connected to the electrical mains and to the compressed air supply. The machine should
therefore be installed near such sources.
- Furthermore, the chosen place of installation must have the spaces indicated in drawings 4 - 4/A at least, so that all
of its parts are able to work without any restrictions.
DANGER
It is forbidden to use the tire changer in an explosive environment unless it is a version
specifi cally designed for such purpose.
Lifting point
27,6“
(700 mm)
27,6“
(700 mm)
27,6“
(700 mm)
27,6“
(700 mm)
Fig. 4
Fig. 4a
10.2_Positioning
Position the tire changer on fl at, smooth and non-slippery ground of suitable load-bearing capacity.
It is recommended to secure the tire changer to the garage fl oor using a bolt on each corner.
Use lifting equipment of suitable load-bearing capacity that is able to take the weight of the tire changer (at least 992
lbs -450 Kg.); to lift the machine, use a transport strap with minimum load-bearing capacity of at least 1 102 lbs (500 kg).
The machine must not necessarily be anchored to the ground, but if you prefer to do so, drill 4” (100 mm) deep holes
in the ground by the 4 holes of the machine bed using a 0,40” (10 mm) bit for concrete of suitable length.
Insert suitable metal anchor dowels in the holes drilled and secure fi rmly.
The place where the tire changer is installed must be equipped with an electrical safety system with effi cient grounding
and also supplied with appropriate differential 20A circuit breaker.
The place of installation must have a pneumatic connection with minimum working pressure of 116 PSI (8 bar).
Once you have fi nished positioning the machine, slide the safety pin out that prevents the arm from tipping accidentally
(fi g. 4b). Put the pin away safely with the accessories supplied so that it can be used again if the machine is moved
somewhere else.
Operation Manual - COATS PRO GUARD PLUS - 16
Page 17

10.3_Commissioning
WARNING
Before you connect the machine electrically, check the nameplate fi tted on it to make sure the elec-
trical power supply to which it will be connected matches the electrical arrangement of the manufacturer.
DANGER
Work on the electrical system, must be carried out by professionally qualifi ed personnel.
CAUTION
The manufacturer is not liable for machine damages caused by the incorrect electrical connection.
WARNING
When moving the machine around to position it initially, or if it is moved in the future to a different
location, it must be disconnected from the electrical and pneumatic power sources.
- Connect the machine to the electrical mains, which must have line fuses and an effi cient grounding system, pur-
suant to current standards. It must also be connected to an automatic differential circuit breaker calibrated at 20 A.
NOTE: If the machine is supplied without an electrical plug, the user shall fi t one (at least 20A) that is suitable for
the voltage of the machine and that complies with current standards.
- Connect the machine to the compressed air system using the fi tting on the lubricator at the back of the machine.
- Loosen the control panel bracket locking cap screw and pivot cap screw, adjust it to a convenient position for tha
operation, then tighten the cap screw.
Operation Manual - COATS PRO GUARD PLUS - 17
Page 18

11.0_OPERATIONAL TEST
B
A
H
V
S
S
R
Q
P
- Press pedal M and the lift P should raise; to lower the lift, lift the same
pedal upwards.
- Press pedal L on L2 and the spindle fl ange R should turn clockwise.
Press the pedal L on L1 and the spindle fl ange R should turn anti-clockwise.
C
E
F
I
L2
D
G
L1
T
U
N
M
L
NOTE: If the fl ange should turn in the opposite direction to that indicated, you need to invert two wires on the plug, if
it is three-phase.
- Turn selector A to the right to lock the movement of the bead loosening carriage; in this situation, the carriage will
only move in work mode (over stroke) by pressing button G, at the back of the control panel.
If the selector is turned to the left (unlocked), it will be possible to only move bead loosening carriage right - left, using
buttons C and D.
- Press button E and the bead loosenig carriage will move upwards; press button F and the carriage will lower.
- Press button B and turn the bead loosening carriage Q, the latter will move out from the work position. Release the
button and the hook will lock again. To move the carriage to the work position, turn the latter towards the machine and
make sure the hook locks it.
- To turn the bead loosening disc, move handle U towards handle T and simultaneously accompany the disc support
by hand downwards or upwards.
- With the pedal I right down, the vertical arm V moves to the work position; with pedal I raised, the arm V tilts backwards out of the work position.
- Press pedal N to start infl ating the tire; if you wish to defl ate the tire, use button H at the side of the gauge.
CAUTION
All the procedures are to be performed without using a tire, making sure that no
other parts of the machine interfere with the movements when performing them.
Operation Manual - COATS PRO GUARD PLUS - 18
Page 19

12.0_IDENTIFYING AND CHECKING THE RIM AND TIRE
Before you start to demount the tire, it is of CRUCIAL IMPORTANCE to identify the measurements of the rim and of the
tire. Also make sure neither is damaged.
ATTENTION: These procedures are very important and are to be performed to reduce risks of the tire bursting when
re-mounting the tire on the rim and infl ating it.
All rims bear an indication of their diameter, width, number of humps etc. If we take the picture below as an example,
you can see that:
A= 8 Nominal width of the rim in inches (1 inch =25,4 mm)
B = J Size of the fl ange
C = 15 Nominal diameter of the rim
D = H2 It indicates if there is a double hump (anti bead removing edge)
The tire bears a considerable amount of details, among which are the dimensions, type and maximum speed.
For example: 205/65 R 15 91H TL
A = 205 indicates the width of the tire, in other words the distance between the
sides, expressed in millimetres.
B = 65 is the ratio expressed in percentage between the height of the section
and its width.
C = R Type of tire (R = radial)
A
BC
8Jx15H2
B
A
C
D
E
D
F
G
D = 15 indicates the keying diameter in inches (diameter of wheel), which must
be the same as the rim.
E = 91 is the index of the maximum load born for each wheel.
F = H is the maximum rated speed of the tire. (H= 130,5 Mph -210Km/h)
G = TL means that the tire is Tubeless
WARNING
ATTENTION: It is strictly forbidden to mount tires on rims that have different parameters
(diameter and width). It is also forbidden to mount tires with different dimensions compared
to those stated.
Operation Manual - COATS PRO GUARD PLUS - 19
Page 20

13.0_POSITIONING THE VALVE
Fig. 6 shows a rim in the form of a clock, so that, following the various
processing phases described hereafter, (chapter entitled Mounting and
Demounting), you can position the valve and its sensor correctly so as
not to damage them.
CAUTION
To avoid damaging the valve and the pressure sensor, if
the latter is installed, you must always arrange the valve
in the position indicated, following the instructions when
mounting and demounting the tire. fi g.6
14.0_TIRE CLASSIFICATION
LOW PROFILE tires (UHP) are those in which the height (H) and the width (C) have a ratio lower than 0.5 (i.e. low
profi le series 45 stands for a ratio of H/C = 0.45).
For tires to be considered as LOW PROFILE (UHP), they must also have a maximum speed code of equal to and/or
higher than V.
fi g.6
RUN-FLA T tires are those which, even when they have no internal pressure, allow you to continue to drive the vehicle
for a preset number of miles and at a preset speed. These parameters change from one manufacturer to another.
The market currently offers 2 different types of RUN-FLAT tires:
- Those with REINFORCED SIDE (SELF-SUPPORTING) where, thanks to a different mix and a reinforced structure,
the shoulder of the tire is able to bear the weight of the vehicle even when the pressure in the tire is zero.
- Those with INTERNAL SUPPOR T have a ring inside the rim that bears the side of the tire when there is no pressure
inside it. The internal support may be made of plastic (Pax-System) or of metal (Support-Ring).
The tire changer is able to handle all types of LOW PROFILE (UHP) and all types of RUN-FLAT tires with REINFORCED SIDE; for other types, refer to the specifi c instructions of the dedicated accessories, if available.
The mounting and demounting procedure is the same, be it a RUN-FLAT tire with REINFORCED SIDE (SELF-SUPPORTING) or a LOW PROFILE tire (UHP).
CAUTION
It is of crucial importance to follow the instructions very carefully in order to avoid irreparable
damages to the tire, which could compromise the vehicle’s safety.
Operation Manual - COATS PRO GUARD PLUS - 20
Page 21

15.0_TIRE LIFT
A conventional rim is a wheel of a vehicle with rim made of steel or light aluminium, with a center hole and a drop center
near the edge of the rim.
A reverse mount rim is a wheel of a vehicle with rim made of steel or light aluminium, with a center hole and a drop
center near the bottom patch of the rim.
- Using a special tool, remove any wheel weights on the rim, being particularly careful not to damage the rim.
- Make sure none of the tools are in the work zone of the LIFT so that it is free to position the wheel correctly.
- Position the wheel on the spindle using the LIFT, as follows:
- Move the wheel on the lift platform of the machine, in vertical position with the outside face of the tire facing left.
- Using the lifting pedal, raise the platform and the wheel up to the fl at position and align the center hole of the
wheel with the spindle fl ange.
- Lower the LIFT and center the anti-rotation device.
For wheels bigger than 24-inches or when clamping reverse mount rims wheels, you may need to
widen the plastic rollers of the lift and/or change the angle of the rollers bracket before lifting.
LIFT
Anti rotation device
Spindle center post
LIFT pedal
1 - Tire width > 11”
2 - Tire width _ 11”
3 - Reverse mounted only
<
Min _ 24”
<
Max > 24”
Operation Manual - COATS PRO GUARD PLUS - 21
Page 22

16.0_WHEEL CLAMPING
16.1_Wheel locking
1. Insert the ring nut hub correctly (the cone plastic cover preserving the alloy rims from damages)
2. Turn the ring nut hub clockwise by hand until you fi nd the exact coupling position, then press the hub and
turn it clockwise by 90° to its full-stroke
3. Release the ring nut and make sure it raises by 0,40° (10 mm) approximately, otherwise turn it slightly
clockwise or counter-clockwise lifting up the hub.
4. Make sure the plastic cone is in contact with the rim, perfectly centerd with the drop-center hole, the split of
the nose matching up with the driving pin.
Tighten the ring nut so that it moves up to the cones and continue tightening so that the wheel is pushed
fi rmly on the fl ange of the spindle.
16.2_Pneumatic locking system (optional)
If the tire changer is provided with the optional pneumatic locking system:
1. Insert the ring nut hub correctly (the cone plastic cover preserving the alloy rims from damages).
2. Turn the ring nut clockwise by hand until the exact coupling position, press the ring nut until its end-stroke
and rotate the ring nut hub 90° by hand.
3. Release the ring nut and make sure thet it raises by 0,40° (10 mm) approximately.
4. Rotate the pneumatic locking switch onto the manometer panel to the locking position.
4
Before you start any work on the wheel, make sure it is
mounted securely on the spindle
Operation Manual - COATS PRO GUARD PLUS - 22
Page 23

17.0_BEAD LOOSENING
Do NOT start any work on the wheel before the tire is completely defl ated.
DEFLATE the tire completely by removing the valve core before starting any work.
-Remove all weights from the rim by a proper tool, paying attention not to damage the rim.
-Before starting any operation, please check the eventual presence of a pressure sensor. In positive case, it is prefe
rable to check its effi ciency by a dedicated diagnostic tool.
-The bead loosening rollers are mounted on special tilting supports to ease bead loosening on wheels with high profi le
or soft tires. This procedure is “Over Run”
“OVER RUN” PROCEDURE SHOULD NOT BE USED ON UHP AND RUN FLAT TIRES
Push down the hook
lever to release the
upper roller
Lift up the hook lever
to release the lower
roller.
17.1_Upper bead loosening
Check the correct centering and locking of the wheel onto the center-plate.
Check that the upper disk arm is in the right position (step 1)
-to move the upper disk in its right position: unlock it from rest position by pressing the right lever
to the left (A), then lift the disk arm support by hand and lock it by pressing the right lever to the right (B)
Turn the switch 6 clockwise to free the bead-breaking unit and position it by handling the console, in order to let the
upper roller keep to 5 mm distance from the rim border, then lock the bead-breaking until by turning again te switch 6
clockwise.
Move the bead breaking arm onto the tire by pressing buttons 8-9 an 10-11
Step 1
4
A
B
6
8
10
12
Operation Manual - COATS PRO GUARD PLUS - 23
7
9
11
13
1
3
2
5
Page 24

Pay attention to the valve sensor position during bead loosening steps.
Wrong movements of the upper roller could damage the sensor.
Avoid contact between the lubricating paste and the valve sensor, if any.
- Spin the center-plate until the valve reaches position
at “3 o’clock” position.
- Lower the bead loosening roller until it touches the tire
using controls 10 for lifting and 11 for lowering.
- Start spinning anticlockwise pressing pedal 2.
Note: the center-plate can spin at 2 different speeds, according to
operator’s preferences
- While spinning the wheel, push the bead loosening upper roller down
under the edge of the rim, then press and hold down the “over-stroke”
function button 5 going on lowering the roller until the bead detaches
from the rim.
- As soon as enough space is available, grease both inner surface
of the rim and tire bead carefully with a proper tire lubricating paste.
Avoid contact between the lubricating paste and the valve sensor, if any.
Fase 2
- Once the bead gets loosened, raise and move away the upper roller by acting on button 10.
17.2_Lower bead loosening
Keep the bead-loosening unit set up as for upper bead release: the lower roller is always aligned with the upper one,
at 5 mm distance from rim lower border already.
Lift the lower roller until it touches the lower bead using controls 13
for lifting and 12 for lowering.
Start spinning the wheel anticlockwise by pressing pedal 2.
- While spinning the wheel, push the lower roller up over the edge of
the rim, then press and hold down the “over-stroke” function button 5
going on lifting the roller until the bead detaches from the rim.
- As soon as enough space is available, grease both inner surface of
the rim and tire bead carefully with a proper tire lubricating paste.
Fase 3
Note: for a better control of the lower bead loosening
please refer to the dedicated mirror fi tted onto
the tire changer main frame.
Press on the bead – never on the sidewall of the tire while loosening the bead.
Operation Manual - COATS PRO GUARD PLUS - 24
Page 25

17.3_Lower bead loosening on special wheels
The lower bead of reverse drop center rims with signifi cant width may be hard to break with the lower disk.
In this case it is possible to use the upper bead-loosening disk to break the lower bead of the tire:
-tilt down the upper disk arm support to its lower position (step 1) to get both upper-and lower-bead loosening disks at
the same tilt-angle (step 2);
-follow instructions as per section “17.1_Upper bead loosening and 17.2_Lower bead loosening”.
Step 1
A
B
Step 2
Upper bead loosening arm
Lower bead loosening arm
Operation Manual - COATS PRO GUARD PLUS - 25
Page 26

18.0_DEMOUNTING TIRE
Once the bead loosening process is completed, and the wheel is already positioned onto the center-plate, check and
ensure its locking and centering.
18.1 Upper bead demounting
Mounting tool
- Turn the wheel until the valve is in the “1 o’clock” position
(roughly 10 cm - 4-inch distance from the mounting tool) in order
to avoid possible damages to the valve or the pressure
sensor.
in working
position
10 cm
4
3
1
-Press the pedal ref. 1 to position the mounting arm close to the wheel while driving.
The mounting arm by handling (fi g. 5), lock it in position 1 by ref. 19 (fi g. 5B) to lock the operating arm and the hori-
zontal arm at the same time.
Automatically the mounting tool is moved up and away from the rim border to have a
clearance of approx. 2 mm when locked
- Lower the lever ref. 20 to insert the mounting tool between the bead and the rim edge. The mounting tool should
penetrate enough to hook the tire bead to let the operator complete the tire demounting: spin slowly the wheel until the
mounting tool is positioned correctly.
A gentle pressure on the tire sidewall by the upper roller could help the mounting tool positioning.
2
Valve
Fig. 5
Fig. 5B
19 19 19
Pos. 1 Pos. 2 Pos. 3
- As soon as the bead is perfectly hooked, lift the mounting tool by raising lever ref. 20 to pull out the bead.
To make the lifting easier set the tire pressing unit at “6 o’clock” position and press the tire side (fi g. 6).
Get a further help by contemporarily lifting the lower tire side by the lower bead-loosening roller (fi g. 7).
20
Fig. 7
Fig. 6
- Press down on pedal ref. 2 to rotate the wheel clockwise until the entire bead is lifted from the rim
NOTE: rim and tire must spin together as one.
Operation Manual - COATS PRO GUARD PLUS - 26
Page 27

- In order to help the bead coming out and reduce the stress to the tire:
insert the plastic lever (as shown by picture aside) and spin the wheel
clockwise while lifting the tire by the lower bead-loosening roller.
NOTE: The above mentioned action is compulsory for UHP and RUN-FLAT
tires according to tire regulations.
To avoid damaging the valve and/or the pressure sensor, move it to the “1 o’clock” position before
inserting the tool in the drop center, operating the control lever 20.
18.2_Lower bead demounting
- Before pulling out the lower bead, spin the wheel to let the valve
reach “1” or “2” o’clock position in order to avoid possible
damages to the valve and the sensor - if any.
- Lower the lever ref. 20 to insert the demounting tool under the
lower bead. Raise the lever ref. 20 to lift the demounting tool and
the bead.
- Raise the lower bead loosening roller to lift the tire until the lower
bead is 1 cm over the upper rim edge.
- In order to help the above mentioned operation, lift the tire
manually at “2” or “3” o’clock position and insert the plastic lever
as per tire regulations for UHP and RUN-FLAT tires.
- Spin the wheel clockwise until the tire comes off the rim.
- Press the pedal ref. 1 to move the mounting arm away, push the
rollers bead breaking unit away and pull out the tire.
- Check the status of the pressure sensor - if any - and replace it if
necessary.
4
3
1
2
Operation Manual - COATS PRO GUARD PLUS - 27
Page 28

19.0_MOUNTING TIRE
- Check the rim and the tire carefully, as per instructions at page 19 of this manual.
- If the rim has been moved, lock it again onto the center-plate as per instructions
at page 22 of this manual.
- Lube 3 cm thickness along the whole internal surface of the rim and internal and
external surface of tire beads.
If there is a sensor, do not let it come into contact with the lubricant
19.1 Lower bead mounting
- Put the tire onto the center-plate tilting the tire at “12 o’clock” position in order
to make both upper and lower beads go under the upper rim edge.
- Press pedal ref. 1 to approach the mounting arm and position the mount/demount
head
onto rim edge.
- Incline the tire to the bottom at “3 o’clock” position, driving the lower bead to
the mounting head in order to put the lower bead over the mounting lip on the left side of
the head and under the demounting claw on the right side of the head.
- Rotate the wheel by pressing the pedal ref. 2, contemporarily press the tire at “5
o’clock” position until the bead reaches the drop center level. Keep the tire pressed until
“8 o’clock” position while rotating
to complete the lower bead mounting.
19.2 Upper bead mounting
- Keep the mounting arm and the mount/demount head at working position, then put the tire bead on the rim slightly
tilted down to “3 o’clock” position..
Bead correctly positioned
over the mounting lip.
OK
Bead correctly positioned
under the demounting claw
OK
Bead incorrectly positioned
causing bead damages
between the head lip
and the rim edge
Bead incorrectly positioned
Operation Manual - COATS PRO GUARD PLUS - 28
Page 29

- Press the button ref. 11 to lower the upper bead loosening roller until the upper bead reaches 3 cm level under the
rim edge.
- Make sure that the upper bead of the tire rests on the left lip of the head and under the demountig claw on the
right side of the head.
- Press the pedal ref. 2 to rotate the wheel clockwise, contemporarily press the tire
manually from “5 o’clock” position to force the bead at drop-center position.
Keep it pressed while rotating up to “8 o’clock” position to complete
the upper bead mounting.
17
Make sure that rim and tire always spin together.
- To make the upper bead mounting easier, use the tire pressing unit by setting it at “5
o’clock” position and pressing lever ref. 17 to keep the bead at drop-center level while
rotating up to “8 o’clock” position until the tire complete mounting.
Operation Manual - COATS PRO GUARD PLUS - 29
Page 30

19.3 UHP (low profi le) and RUN-FLAT (self-supporting) tires mounting
- Some precise and careful operations are necessary to mount UHP and RUNFLA T tires. It is compulsory to follow tire regulations to avoid permanent damages
to these tires.
-Lower bead mounting can be performed as per standard instruction
at page 27 of this manual..
-Once the lower bead is mounted, keep the mounting arm and tool at working position and start WDK upper bead mounting procedure putting the tire slightly tilted
down to “3 o’clock” position.
-Use the bead pressing clamp together with the proper rubber protection
( steel rim, alloy rim, convex alloy rim) locking the clamp onto rim edge
• •• •••
with the valve at “3 o’clock” position.
If necessary, press the tire side by the upper bead loosening roller to
help the correct positioning and locking of the clamp (fi g. 1).
-Keep the upper bead loosening roller at drop-center level, spin slightly
to insert the pressing tool between the roller and the clamp and pressing
onto the tire side until the upper bead reaches drop-center level (fi g. 2).
-Make sure that the upper bead of the tire rests on the left lip of the mount head
and under the demounting claw on the right side of the head.
Fig. 1
-Start spinning the wheel paying attention to the bead not going between
the rim edge and the bead loosening roller.
While spinning, when clamp is roughly at “6 o’clock” position make sure
that the whole bead within this section is right inside the drop-center.
-If this necessary condition for a correct mounting is not accomplished,
use the bead pressing unit pushing its tool onto the tire side to insert
the bead into the drop-center (fi g. 3).
Act gently onto tire sidewall during the above mentioned
process
- Go on spinning the wheel until the upper bead is completely mounted.
- Remove the clamp and the rubber protection by the help of the pressing unit.
Pull the pressing tool away and lift the roller away
from the working position by acting on button 10.
Press button 7 to move the bead loosener from working position.
- Press the pedal ref. 1 to push the mounting arm up and move the roller bead
breaking unit away from working position.
Fig. 2
Fig. 3
- Keep the wheel locked onto the center-plate during the infl ating operations.
Read the infl ating instructions at page 23 carefully.
- Once the tire infl ation is completed, unlock the wheel and bring it down
onto the fl oor, taking advantage of the optional wheel positioning unit.
Operation Manual - COATS PRO GUARD PLUS - 30
Page 31

20.0_INFLATION
DANGER
Tires are to be infl ated with utmost caution. Strictly follow the instructions here after as the tire changer
is NOT designed and manufactured to safeguard the user (nor anybody else standing near the machine)
if the tire should accidentally burst.
CAUTION
ATTENTION! If the tire bead fails to fi t in place during infl ation at the maximum pressure of 40 PSI (3.3
bar), you need to repeat the bead loosening and lubricating procedure of the tire itself and then try infl ating again.
DANGER
If the tire should burst or the rim should break under pressure, operators could be seriously injured or even killed.
Make sure the rim and the tire are the same size.
Also check the state of wear of the tire and the rim to make sure there are no defects
before starting to infl ate.
Infl ate the tire with short blasts of air and check the pressure frequently while infl ating.
All our tire changers are automatically limited to an infl ation pressure of 61 PSI (4.2 bar).
NEVER EXCEED THE PRESSURE RECOMMENDED BY THE MANUFACTURER WHATEVER THE CASE.
Keep hands and body as far away as possible from the tire during infl ation.
• Connect the infl ation hose to the valve of the tire.
• Make sure the rim and the tire have the same diameter again.
• Make sure the rim and tire are suffi ciently lubricated; lubricate if necessary.
• Press and release the infl ation pedal continuously, checking the pressure on the gauge frequently until the tire
bead fi ts completely on the rim.
• Continue infl ating to reach the pressure recommended by the manufacturer. Always infl ate in short blasts and
always checking the pressure while doing so.
• Press the defl ation button to defl ate the tire if, during infl ation, the pressure exceeds the value recommended by
the manufacturer.
Operation Manual - COATS PRO GUARD PLUS - 31
Page 32

21.0_STANDARD ACCESSORIES
Supplied in the box
21.1_Optional Accessories
NOTE: before using the following optional accessories (P/N#89231514, 89231512 and 89231513) remove the
wide, rubber coated table top as follow:
-Loosen anti-rotation pin pivot arm locking screw
-Move anti-rotation pin pivot arm aside, to access retaining screw for rubber coated table top.
-Loosen all rubber coated table top retaining screws and remove the table top
-Assemble the horse shoe bracket (always provided in each of the below mentioned accessory kits) on the smaller
table top, by tightening the 3 retaining screws.
4
5
2
3
1
Clamping adaptor for rims without center hole (P/N# 89231514)
This clamping adaptor can be used on all wheels with any number of lug holes.
Remove the rubber coated wide fl ange plate, then position the horse shoe
bracket on the spindle chuck, and secure it by tightening the screws.
4
Fit the fl ange plate on the spindle chuck making
sure to match the assembling holes, securing it
with the 2 knobs supplied. Unscrew the securing
nuts.
Position the pins based on the number of lug holes
in the rim, inserting the anti-rotation pin in the slot
and the securing screw in the threaded hole with
the number desired.
Note: The pin with the yellow screw must never
be removed.
Take the gauge supplied with the kit and measure the center distance of 2 holes, then lock this
measurement on the gauge.
Operation Manual - COATS PRO GUARD PLUS - 32
Page 33

Turn the pins of the fl ange so that the center di-
stance matches the measurement made earlier
on the rim.
Tighten the securing screws of the pins.
Insert the wheel, matching up the clamping holes
with the threaded pins, position and tighten the
wheel securing nuts.
LT TRUCK CONE KIT (P/N# 89231512)
for clamping rims with center hole larger than Ø 4,8”-7,5” (120-190 mm).
Remove the rubber coated wide fl ange plate, then position the horse shoe
bracket on the spindle chuck, and secure it by tightening the screws.
Position the fl ange plate to the spindle chuck, making sure to match the
assembling holes, and secure it with the 2 knobs supplied.
Insert the wheel, matching-up the anti-rotation pin with a lug hole, position
and secure by tightening the clamping shaft over the cone.
Operation Manual - COATS PRO GUARD PLUS - 33
Page 34

LT TRUCK CONE KIT (P/N# 89231513)
for clamping rims with center hole larger than Ø 7,5”-9.0” (190 -220 mm).
Read installation and operations as per
P/N # 89231512
MATCH MOUNTING TIRE HOLDER KIT (P/N# 89231511)
-Install tire holder in bracket on left assist arm and secure with pin.
-Position tire holder on top bead and press by lowering whole left assist arm carriage. Also, position bead loosener
roller on bottom bead and push bead up.
-Once you have both tire beads hold by the two rollers, rotate the spindle chuck to turn the wheel and proceed
match mounting
BEAD LOCK TOOL (P/N # 83018892)
After lifting the top bead by powerduckhead
“Hook”, insert tool between wheel surface
and tire bead, to help removing top bead on
stiff side wall tires. Plastic-made, it never gives chance to damage wheel.
Operation Manual - COATS PRO GUARD PLUS - 34
Page 35

DROP CENTER TOOL (P/N # 89218904)
Provides additional pressing point
and extra help to assist arm, in keeping tire bead into drop center
DROP CENTER BEAD LOCKS (P/N # 89216929)
Provides additional protection against direct
contact between wheel surface and drop
center tool.
POWER DUCKHEAD BOOTIES KIT (P/N # 89231515)
Protects wheel surface against
“metal to metal” contact with power duckhead.
Operation Manual - COATS PRO GUARD PLUS - 35
Page 36

CLAMPING CONE BOOTIES KIT (P/N # 89231516)
TABLE TOP PADS KIT (P/N # 89231517)
ANTI-ROTATION PIN BOOTIES KIT (P/N # 89231518)
Protects center hole of alu wheels
against “metal to metal” contact
with clamping cone.
Protects outside surface of reverse mount alu wheels against direct
contact with table top.
Protects wheel lug holes against
“metal to metal” contact with antirotation pin.
Operation Manual - COATS PRO GUARD PLUS - 36
Page 37

22.0_RE-POSITIONING
To re-position the tire changer in a new workplace, you need to secure the moving parts (i.e. bead pressering
arm etc.) disconnect all the power sources and install it again following all the instructions given in chapter
10.0 “INSTALLATION” of this manual.
Connections to power sources and connections and inspections of the safety systems must be
carried out by trained personnel.
23.0_STORAGE
If the tire changer is to be stored away for extended periods of time, you need to:
- Disconnect the power sources
- Empty the tanks containing operational fl uids
- Protect parts that could be damaged if dust should settle on them
- Grease parts that could damage if they should dry up
When re-commissioning the tire changer:
- Follow the instructions given in chapter 10.0 of this manual
- Replace any damaged parts, referring to the spare parts list. This is to be done by factory authorized service
partners
24.0_SCRAPPING
If you should decide that the tire changer can no longer be used, you are recommended to make it unusable
by removing the power supply connections, emptying the tanks and disposing of the fl uids pursuant to current
state and federal regulation.
The tire changer is considered as heterogeneous waste and must consequently be split-up into parts made of
similar material (electrical parts, plastic parts and ferrous parts), which must be disposed of properly , according
to current State and Federal regulation.
25.0 MAINTENANCE
25.1_General warnings
Non routine maintenance must be carried out by factory authorized service partners
• Routine maintenance, following the relevant instructions, is of crucial importance to ensure the correct operation and
lasting life of the tire changer.
• If routine maintenance is not carried out regularly, the effi cient operation and reliability of the machine could be com-
promised.
WARNING
Before you start any maintenance job, disconnect the electrical power supply by unplugging the machine
from the mains and disconnect it also from the pneumatic supply by shutting off the valve.
Furthermore, to release the compressed air from the circuit, press the infl ation pedal down for a few secon-
ds.
Defective parts should be exclusively replaced with genuine spare parts by factory authorized service partners.
Removal or tampering with the safety devices (max.pressure valve – pressure regulator) represents a breach
of State and federal OSHA regulations and workplace codes.
Operation Manual - COATS PRO GUARD PLUS - 37
Page 38

In particular, Hennssy Industries, Inc. is not liable for claims deriving from the use of non-original spare
parts or for damages caused through removal or tampering with safety systems.
25.2_Routine Maintenance
Before making any inpection, adjustement, or repair, disconnect the power source and block out all moving
parts to prevent injury.
Observe the instructions that follow to ensure the perfect operation and lasting life of your tire changer:
- On a weekly basis, after cleaning thoroughly with vaporizing solvent, lubricate the guides of the bead loosening
carriage (1) and the guide of the Press Arm with chassis grease (2) (fi g. 40).
Keep all machine parts, in contact with the tire and/or wheel, clean.
- Make sure the transmission belt is tensioned correctly.
- On a periodic basis, check the oil level of the lubricator. Top-up if necessary by unscrewing the cup. Use just oil for
pneumatic systems in class ISO HG with viscosity ISO VG 32 such as the following types, for example: ESSO Febis
K32; MOBIL Vacouline Oil 1405; KLUBER Airpress 32
2
1
fi g. 40
Operation Manual - COATS PRO GUARD PLUS - 38
Page 39

26.0_OIL TREATMENT
WARNING
OIL IS HIGHLY POLLUTANT! Do not throw away outdoors or pour on the ground
26.1_General precautions
- Avoid direct and prolonged contact with skin.
- Avoid the formation of oil mists in the air.
- Avoid splashing.
- Wear appropriate clothing, gloves and goggles to protect against oil splashes.
- Do not use greasy rags.
- Do not eat or smoke if your hands are soiled with oil.
26.2_First Aid instructions
- If oil is swallowed, do NOT induce vomiting but go immediately to the nearest medical center with information
on the type of oil swallowed.
- If oil gets in eyes, rinse abundantly with water until irritation ceases, then go to the nearest medical center.
- If oil comes into contact with skin, rinse abundantly with neutral soap and water. Do not use solvents or irritant
products.
26.3_Disposing of used oil
Do not throw used oil away outdoors or pour it on the ground. Drain into a suitable container and forward to
specialised oil disposal centers, or hand it over to authorised collection companies.
26.4_Oil spillages or leakages
Eliminate the cause of the leakage and stop the oil spillage from spreading using absorbent material. Clean
the area where the oil has spilled using degreasing detergents to prevent slipping and dispose of the waste
according to current State and Federal regulations.
Clean up the oil and send to special disposal centers according to current State and Federal
regulations
Operation Manual - COATS PRO GUARD PLUS - 39
Page 40

27.0_TECHNICAL SPECIFICATIONS
SPECIFICATIONS
Electrical Requirements
Power Supply Requirements 230V, 50/60 Hz, 20A, 1Ph
NEMA L6-20P
Air Source Requirement
Service Inlet Air Pressure 110-175 PSI 7.5-12 Bar
14-15SCFM @ 150 PSI
Rim/Tire Specifi cations
Rim Diameter 10” - 34” 254-863 mm
Max Tire Diameter 47” 1200 mm
Max Tire Width 16” 410 mm
Max Wheel Lift Capacity 176 lbs 80 kg
Dimensions
Width 47” 1200 mm
Depth 77” 1960 mm
Height 84” 2120 mm
Net Weight 937 lbs 425 kg
Drive System
Clockwise Spindle Speed 7 or 14 rpm
Counter-clockwise Spindle Speed 7 rpm
Spindle Drive Motor 1 HP 0.75 kW
Operation Manual - COATS PRO GUARD PLUS - 40
Page 41

NOTE
Page 42

ONE WORD FOR SAFETY
R.I.M.
READ INSPECT MOUNT
READ…
Mounting and infl ating the
wrong size tire can get
you hurt. Read the size on
the tire and make sure it
matches the rim. Be especially careful about putting a
smaller tire on a larger rim,
such as a 16-inch tire on a
16.5-inch rim.
Infl ation of a mismatched
tire and rim can cause an
explosion.
BE CAREFUL OF THESE SITUATIONS:
1. Damaged Bead or
Beads.
2. Rusty Wheels.
(particularly in the
bead seat area)
3. Bent or Cracked
Wheels.
4 A. Mismatched.
(A mis-match of a
16-inch tire to a 16.5inch rim causing an
explosion)
4 B. Mismatched.
(16.5-inch tire on a
16-inch rim)
INSPECT…
Before you put any tire on a
rim, inspect the rim for rust,
tough spots, bent edges, or
cracks that could prevent
the tire from seating right.
If you spot any of these
problems, don’t mount the
tire until the rim has been
checked by your shop foreman.
Inspect the tire for bead
damage.
5. Walk-In Tire and
Rim.
6. Back Injuries.
7. Hand or Finger
Injuries.
(Hands or fi ngers too
close to infl ating tire
or bead seats which
may cause injury.)
MOUNT…
Once you’ve made sure the tire is OK
and the right size and the rim is OK,
mount the tire safely . NEVER, ever lean
over the tire when you’re infl ating it. If a
tire does explode, it will go straight up.
You don’t want to be over the tire if that
happens. Also, never over-infl ate the
tire, even if the bead doesn’t seat. Never
infl ate over 40 PSI. If the tire hasn’t
seated, something is wrong. Deflate
the tire and check it and the rim again.
If it doesn’t work the second time, try
another tire.
8. Standing Clear.
(Never put any part
of your body over the
tire changer during
infl ation.)
9. Beads will not
Seat at 40 PSI.
10. Improper
Infl ation.
Remember R.I.M. (Read, Inspect, Mount) for every tire.
TIRE FAILURE UNDER PRESSURE IS HAZ-
FAILURE T O READ AND FOLLOW ALL WARNINGS AND INSTRUCTIONS IN THIS MANUAL
CAN LEAD TO SERIOUS PERSONAL INJUR Y
OR DEA TH TO OPERATOR OR BYST ANDER.
THE OWNER IS RESPONSIBLE FOR MAINTAINING THE OPERATION INSTRUCTIONS
AND DECALS FOR OPERA TOR REFERENCE.
FOR ADDITIONAL COPIES, CONTACT THE
COATS® COMPANY, 1601 J.P. HENNESSY
DRIVE, LAVERGNE, TENNESSEE, 37086 (800) 688-6359.
85606719 02 11/2013 © Copyright 1998 Hennessy Industries and COATS® All Rights Reserved.
DANGER
ARDOUS! This tire changer Will Not Restrain
Exploding Tires, rims or other related equipment.
TIRES CAN EXPLODE, ESPECIALLY IF INFLATED BEYOND SPECIFIED LIMITS. DO
NOT EXCEED TIRE MANUFACTURERS RECOMMENDED AIR PRESSURE.
AN EXPLODING TIRE, RIM, OR BEAD SEATING EQUIPMENT MAY PROPEL UPWARD
AND OUTWARD WITH SUFFICIENT ENERGY
TO CAUSE SERIOUS INJURY OR DEATH TO
OPERA TOR AND/OR BYST ANDERS.
 Loading...