

Page 1
Matrix K
User's Manual
Version 1.0
Page 2

Page 3

FCC INFORMATION (U.S.A)
1. IMPORTANT NOTICE: DO NOT MODIFY THIS UNIT!
This product, when installed as indicated in the instructions contained in this manual, meets
FCC requirements. Modications not expressly approved by CME may void your authority,
granted by the FCC, to use the product.
2. IMPORTANT:
high quality shielded cables. Cable(s) supplied with this product MUST be used. Follow all
installation instructions. Failure to follow instructions could void your FCC authorization to
use this product in the USA.
3. NOTE:
Digital device, pursuant to Part 15 of the FCC Rules. These limits are designed to provide
reasonable protection against harmful interference in a residential environment. This
equipment generates, uses and can radiate radio frequency energy and, if not installed and
used according to the instructions found in the users manual, may cause interference harmful
to the operation of other electronic devices. Compliance with FCC regulations does not
guarantee that interference will not occur in all installations. If this product is found to be the
source of interference, which can be determined by turning the unit “OFF” and “ON”, please
try to eliminate the problems by using one of the following measures:
Relocate either this product or the device that is being affected by the interference.
Utilize power outlets that are on different branch (circuit breaker or fuse) circuits or install
AC line lter(s).
In the case of radio or TV interference, relocate/reorient the antenna. If the antenna lead-in is
300 ohm ribbon lead, change the lead-in to co-axial type cable.
If these corrective measures do not produce satisfactory results, please contact the local
retailer authorized to distribute this type of product. If you cannot locate the appropriate retailer,
please contact CME.
When connecting this product to accessories and/or another product use only
This product has been tested and found to comply with the limits for a Class B
The above statements apply ONLY to those products distributed in the USA.
Matrix K User's Manual
1
Page 4

Matrix K User's Manual
PRECAUTIONS
IMPORTANT
Always follow the basic precautions listed below to avoid the possibility of serious injury or
even death from electrical shock, damages, re or other hazards. These precautions include, but
are not limited to, the follows:
1. Read and understand all the instructions.
2. Always follow the instructions on the device.
3. Before cleaning the instrument, always remove the electric plug from the outlet as well as
the USB or IEEE 1394 cable. When cleaning, use a soft and dry cloth. Do not use gasoline,
alcohol, acetone, turps or any other organic solutions; do not use liquid cleaner, spray cleaner
or too wet cloth.
4. Do not use the device near water or moisture, such as bathtub, washbasin, washing pool in the
kitchen or similar places.
5. Do not place the device in an unstable position where it might accidentally fall over.
6. Do not jam sinks or holes of the device; those sinks of holes are used for air circulation to
prevent the device from overheating. Do not place the device near heat sink or any places
with poor air circulation.
7. Do not place anything on the power cord. Make sure the power cord is set on a safe place, so
nobody will step on it and no body will trip over it.
8. Do not overload the outlet and the AC cable to avoid re or electrical shock.
9. Do not insert anything in the device, which may cause re or electrical shock. Do not splash
any kind of liquid to the device.
10. Do not disassemble the device in case of accidental electrical shock.
11. Always take the device to a qualied service center in need of repair. You will cause yourself
in danger if you open or remove the cover, and improper assembly may cause electrical shock
in the future use.
12. Unplug all the connectors and take the device to a qualied service center if anything in the
below listed happens:
A. The power cord or connector get hurt or worn out.
B. Any liquid get in the device.
C. The device gets rain or water splash.
D. The device dose not work properly after following all the instructions regarding to the
trouble-shootings.
E. The device falls down or gets broken.
F. The device functions poorly.
13. Do not use the device when thundering; otherwise the thundering may cause long-distance
electrical shock.
14. Do not use the device when there is a gas leak nearby.
Keep this manual in safe place
2
Page 5

CAUTION:
Setting up
Do not connect the device when thundering.
Do not set up the cord or outlet to a moist place, except for that the outlet is specially
designed for moist places.
When the power cord is connected to the AC outlet, do not touch the naked part of the cord
or the connector.
Always follow the instructions carefully when setting up the device.
WARNING:
Do not expose the device to rain or moisture, to avoid re or electrical shock.
Other precautions:
Keep the device away from electrical interface sources, such as uorescent light and electrical
motors.
Keep the device away from dust, heat and vibration.
Do not expose the device to sunlight.
Do not place heavy objects on the device, do not place containers with liquid on the device.
Do not touch the connectors with wet hands.
Central Music Co. is not responsible for any damage or data loss caused by improper
operation to the device.
All the pictures and the LED display in the manual are used for demonstration; they may be
different from the real device.
Trademarks:
CME and Matrix K are the registered trademarks of Central Music Co. All the other
trademarks belong to their respective owners.
Matrix K User's Manual 3
Page 6

Matrix K User's Manual
4
Page 7

Contents
FCC INFORMATION (U.S.A) ................................................................ 1
Precautions .......................................................................................... 2
Introduction ......................................................................................... 6
Conguration ....................................................................................... 7
Front Panel ................................................................................................................ 7
Rear Panel of Matrix K FW ........................................................................................ 8
Rear Panel of Matrix K USB ...................................................................................... 9
Connection examples ....................................................................... 10
Connection examples of front panel ........................................................................ 10
Connection examples of rear panel ......................................................................... 10
Signal ow chart (block diagram) .................................................... 11
Driver Installation and Removal ....................................................... 12
Driver Installation ..................................................................................................... 12
Driver Removal ........................................................................................................ 12
Control and Setting ........................................................................... 14
Control Panel of Matrix K FW ........................................................... 17
Synchronisation tag ................................................................................................. 17
Settings tag .............................................................................................................. 17
Examples of Matrix-X usage ............................................................. 18
Stand-alone Mode .................................................................................................. 18
Connecting to a synthesizer or electric piano for live performance ................ 18
Listen to music ................................................................................................ 18
Practice or play Electrical Guitar / Bass along with music .............................. 18
Vocal Practice and Karaoke ............................................................................ 19
Working together with computer ......................................................................... 20
Recording from the Line In ............................................................................. 20
Recording from a microphone ........................................................................ 20
Recording an Electric guitar (or bass) ............................................................ 20
Matrix-X setting chart ....................................................................... 21
Specications ................................................................................... 22
System requirements ....................................................................... 22
Matrix K FW technical information .................................................. 24
Matrix K USB technical information ................................................ 25
Matrix K User's Manual 5
Page 8

Matrix K User's Manual
Introduction
The Matrix K is a small, multi-function, professional audio system, which integrates a
microphone pre-amplier with +48V phantom power, a Direct Box for connecting a guitar or
bass, a 3-channel dual bus stereo mixer and dual headphone amplifiers. The unique dual bus
design makes Matrix K the best choice for use with a computer based hard-disk recording system
or when you want to add a microphone to a digital instrument with line in and line outs. For
example, use the Matrix K with a synthesizer with a sampling function or to add vocals to a
digital piano with line inputs and outputs.
After connecting Matrix K to your computer, your new music-making system will include
many practical and convenient functions. Matrix K features not only inputs and outputs for
transmitting signal to/from computer but also two headphone outputs with volume control
knob for different monitoring needs. Matrix K also features different connectors such as Line
In, Monitor Output, gain adjustable Mic In and Guitar In to satisfy all of your music-making
needs. In addition, the Line In of Matrix K can receive un-balanced signals and convert into
balanced signals. Furthermore, Matrix K provides +48V phantom power to support professional
microphones.
Matrix K is bus powered when it connects with computer via IEEE 1394 port (Matrix K FW)
or USB port (Matrix K USB). It works with full functions without any other extra power adaptor
is needed.
Hardware Direct Monitor is another advantage for Matrix K users. Signals from the Line
In, Mic In or Guitar In can be sent to the headphone outputs or monitor speakers directly by
pressing the Direct Monitor button. Un-pressing the button will route those signals to the
computer and then out through Matrix K back to the headphone output or monitor speakers. This
is a convenient function to compare the sound before and after processing and recording on the
computer.
Besides working with computer, Matrix K can be used as a stand-alone device to add a
microphone or guitar to a keyboard that has a line in and out. Simply connect the audio matrix
and you can easily add a microphone or guitar to a digital piano with speakers or increase in the
number of headphone outputs.
Matrix K is a unique utility mixer that ts many different audio applications because of its
exible and powerful design. It’s especially useful in a small computer recording environment.
You’ll nd that Matrix K will come in handy for many different situations and that it’s quality
and cost performance is outstanding.
6
Page 9
Congurations
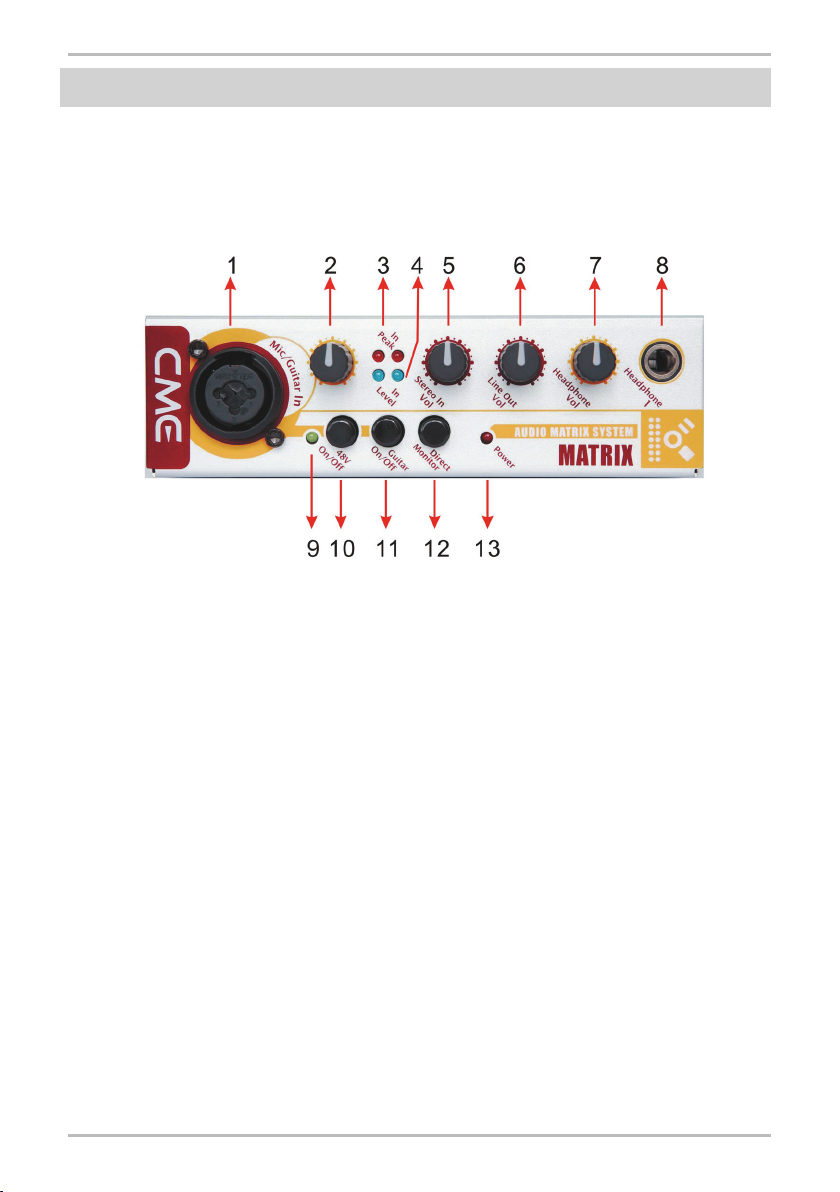
Front Panel
Matrix K front panel has all of the input gain and output volume control knobs, and the
switches for direct monitor, phantom power and guitar signal. Below is the detail of Matrix K
front panel.
1. XLR / TS combo connector
You can connect a microphone or electrical guitar here. The XLR input is balanced and
provides 48V phantom power (by pressing the “48V On / Off” button). It is suitable for
professional condenser microphones. The ¼” connector is un-balanced and is suitable for
dynamic coiled microphone and electric guitar or bass.
2. Mic / Guitar In
Adjusts the gain of the signal from the combo connector.
3. In Peak
After activating “Direct Monitor” function. A red LED ashes when the input signal level is
near distortion indicating it would be better to lower the input gain.
4. In Level
After activating “Direct Monitor” function. A blue LED will light up and ash if signal is
available at the input channel.
5. Stereo In Vol.
Adjusts the volume level of the Stereo In.
6. Line Out vol.
Adjusts the volume level of Line Out.
7. Head Phone Vol.
Adjusts the volume level of Head Phone 1 and Head Phone 2.
8. Head Phone 1
The rst headphone output connector (stereo).
Matrix K User's Manual 7
Page 10

Matrix K User's Manual
9. Phantom power LED
This LED will light up when phantom power supply is turned on and is providing power to
XLR input.
10. 48V On / Off
Switches the phantom power on or off. Turn phantom power on by pressing the button.
11. Guitar On / Off
Pressing this button will activate the TS connector of the combo connector to receive external
signals.
12. Direct Monitor
Switches the direct monitor function On or Off. Pressing this button down, all of the input
signals will be sent to Head Phone 1 / 2 and Line Out directly. If you are using recording software
to record, you should un-press this button to avoid latency while monitoring.
13. Power LED
This LED will light up when it is turned on.
Rear Panel of Matrix K FW
The main input and output connectors are in rear panel of Matrix-X.
14. Power Input
Plug the bundled power adapter here for supplying power to the Matrix K. To avoid voiding
your warranty, only use the power adapter supplied for use with Matrix K.
15. Power On
Power switch. It just switches the power while using power adaptor. The power from IEEE
1394 or USB bus is not been controlled.
16. Line Out
Signal monitor output connectors, the left channel is on the top, the right channel is on the
bottom. Both of the two connectors are balanced 1/4” TRS jacks.
17. Head Phone 2
The second headphone output connector (1/8”, stereo).
8
Page 11

18. Stereo In
This is stereo input to Matrix K. Please connect the Line Out of an external device to here.
This connector is un-balanced 1/8” TRS jacks.
19. IEEE 1394
IEEE 1394 connector of Matrix K FW. Please connect with computer via IEEE1394 cable
here.
20. Lock
Lock hole. Lock Matrix K with laptop lock to prevent missing.
Rear Panel of Matrix K USB
The only difference of rear panel between Matrix K FW and Matrix K USB is USB
connector.
21. USB
USB connector of Matrix K USB. Connect Matrix K USB with computer via USB cable
here.
Matrix K User's Manual
9
Page 12

Matrix K User's Manual
Connection examples
The Matrix K is a very exible device that features many input and output connectors for
different usage and applications. You can connect various external equipment to meet your audio
needs.
Connection examples of front panel
Note: You can only connect ONE device to the XLR / TS combo connector at the same
time, either an XLR microphone or TS E.guitar/bass. The g. Shows that the XLR / TS combo
connector can be used to connect XLR microphones, as well as TS E.guitar/bass, but you cannot
connect XLR device and TS device at the same time.
Connection examples of rear panel
10
Page 13

Signal ow chart (block diagram)
The ow chart below shows how signals are routed through the Matrix K, which may help
you better understand how to use the Maxtrix-X.
Matrix K User's Manual
11
Page 14

Matrix K User's Manual
Driver Installation and Removal
Matrix K is an external digital audio device. You can start your music making just by an
IEEE 1394 cable (Matrix K FW) or USB cable (Matrix K USB) to connect with computer. After
installing driver, Matrix K FW can be used immediately.
Matrix K USB can work properly without any extra driver in Windows XP.
Both Matrix K FW and Matrix K USB will work properly without extra drivers in MAC OS X.
Driver Installation
The following is brief of Matrix K FW’s driver installation step in Windows XP.
Please note, do not connect Matrix K FW with computer before the installer ask you to do so.
Please insert the driver CD which is within the pack of Matrix K FW into CD-ROM drive.
The installation will start automatically later. Please select “Install Matrix K FW” in main menu
to start the driver and control panel installation.
Select “Next” to go on.
Please use the default path to install driver and control panel. Select “Next” to continue.
12
Page 15

Select “Next” and go next step.
Select “Continue Anyway” to install.
Please connect Matrix K FW with computer by IEEE 1394 cable when this dialog shows up,
and select “Next” to continue.
Matrix K User's Manual 13
Page 16

Matrix K User's Manual
Please ignore this dialog and select “Continue Anyway” to continue.
Please wait for the installation to be nished. The installation is completed when this screen
disappear.
After installing, there is a small Matrix K icon on the task bar. Open Matrix K FW’s control
panel by double clicking this small icon.
Driver Removal
To remove Matrix K FW, please go to “Control Panel \ Add or Remove programs” and
remove it.
Control and Settings
On Windows XP, besides the hardware controllers, most of the controls and settings of Matrix
K are set by its control panel. Matrix K FW has its own control panel. We will discuss about it
later.
Matrix K USB uses the volume control of Windows XP. It does not have its own control
panel, neither the ASIO driver supporting.
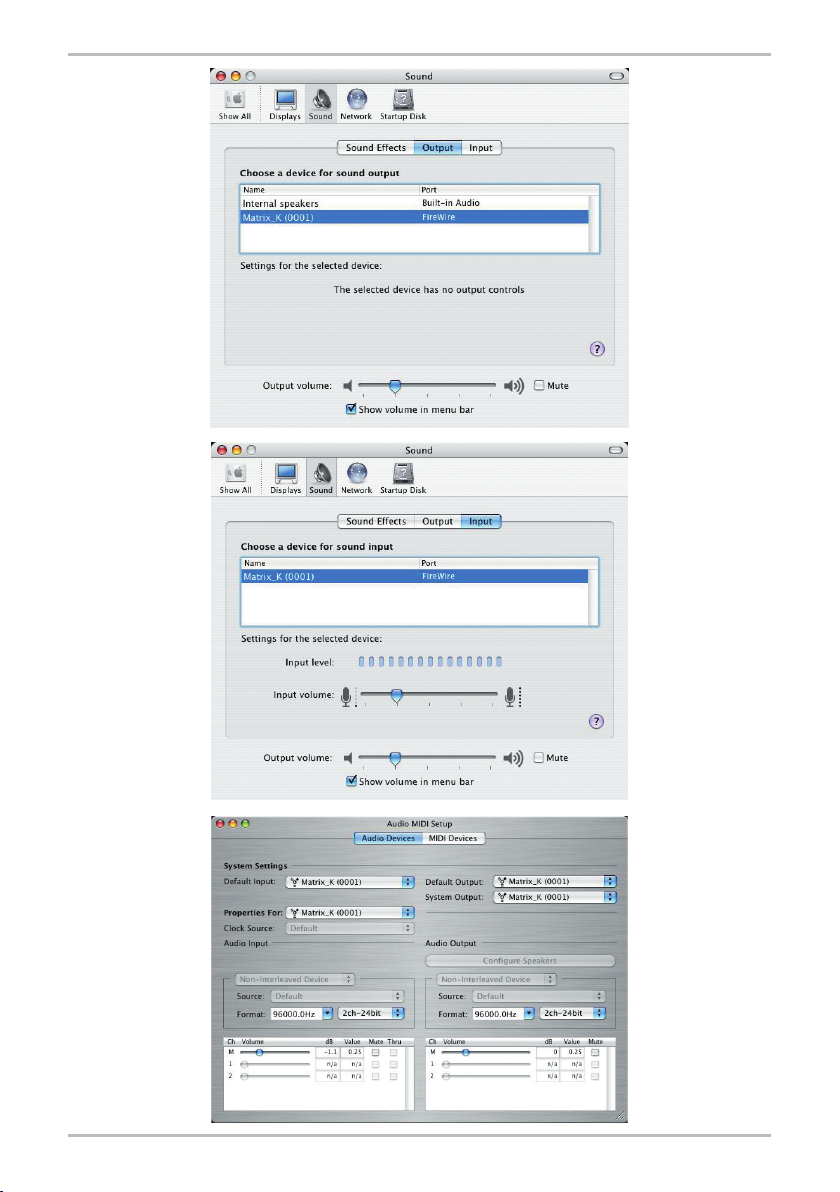
On MAC OS X, both of Matrix K FW and Matrix K USB use system control to adjust the
settings.
The following is some screen shots of Matrix K settings on MAC OS X. (The device name is
just for reference.)
14
Page 17
Matrix K User's Manual 15
Page 18

Matrix K User's Manual
16
Page 19

Control Panel of Matrix K FW
There are 6 pages in Matrix K FW control panel. But there are only 2 pages, “Synchronisation”
and “ Settings”, related to setting and control. Other pages are providing device information to
users.
Synchronisation tag
Users set the sampling rate of WDM driver mode of Matrix K FW in this page. The supported
sampling rates are 44.1, 48, 88.2, 96, 176.4 and 192KHz. It is not necessary to set sampling
rate in ASIO driver mode. The sampling rate of Matrix K FW will sync to ASIO driver setting
automatically.
Settings tag
Users set the buffer size of ASIO or WDM driver here. Adjust those buffer size settings once
any pops happen while playback or recording, and eliminate pop noise.
Matrix K User's Manual 17
Page 20

Matrix K User's Manual
Examples of Matrix K usage
Matrix K features various input and output connectors to use either in stand-alone mode or
used with computer or external device. It will meet most of your music making, practicing and
listening needs. There are some examples of Matrix K usage below to explain how to set up and
connect Matrix K to your system. Please refer to them as a quick start guide.
1. Stand-alone Mode
You should connect “Line Out” to a set of active speakers to monitor output sound. You can
use the Head Phone 1 in the front panel or Head Phone 2 in the rear panel to monitor, and adjust
the output volume via the corresponding control knobs.
In Stand-alone mode, you should plug the bundled power adaptor into Matrix K to get
electric power.
A. Conn e c t i ng to a synthes i z er or e l e c t r ic piano f or live
performance
You can skip step 2 if your synthesizer without sampling function.
1. Connect the Line Out of synthesizer to the “Stereo In” on the rear panel of Matrix K.
2. Connect the “Line Out” on the rear panel of the Matrix K to the Audio In of the
synthesizer.
3. Plug a microphone or electric guitar into the “Mic / Guitar In” on the front panel of the
Matrix K. This signal could be sampled by a synthesizer with a sampling function or it
could simply add a vocal signal to the output of the synth or digital piano.
4. Please press down “Direct Monitor” button for the synthesizer without sampling function.
5. Please adjust the output volume from the sound source or the active speakers. You also can
do the same thing by adjusting the “Line Out Vol.” knob.
B. Listening to music
1. Connect the Line Out of an external sound source (e.g. DVD player) to the “Stereo In” on
the rear panel of the Matrix K.
2. Press the “Direct Monitor” button down.
3. Please adjust the output volume from the sound source or active speakers. You can do the
same thing by adjusting the “Line Out Vol.” knob.
C. Practicing or playing Electrical Guitar / Bass along with music
If you don’t need any music to accompany with you while practicing or playing, please skip
those steps which relate to external sound source.
1. Connect the Line Out of a sound source (e.g. DVD player) to the “Stereo In” on the rear
panel of the Matrix K.
2. Connect the electrical guitar (bass) signal to the TS jack of the combo connector on the
front panel of the Matrix K. To adjust the gain, turn the “Mic / Guitar In” knob.
3. Press the “Guitar On / Off” button down.
18
Page 21

4. Press the “Direct Monitor” button down.
5. Start playing the external sound source and play electrical guitar (bass) along with music.
6. Please adjust music volume on external sound source. The gain of the electric guitar (bass)
could be adjusted not only on guitar (bass) but also via the “Mic / Guitar In” knob. Use the
“Line Out Vol.” knob to adjust the main output volume.
D. Vocal Practice and Karaoke
If you don’t need any music to accompany with you while vocal practice, please skip those
steps which relate to external sound source.
(a) Microphone with self-powered and XLR connector
1. Connect the Line Out of a sound source (e.g. DVD player) to the “Stereo In” on the
rear panel of the Matrix K.
2. Connect the microphone to the XLR jack of the combo connector on the front panel of
the Matrix K. To adjust the gain, turn the “Mic / Guitar In” knob.
3. Press the “Direct Monitor” button down.
4. Start playing music and enjoying Karaoke.
5. Please adjust the music volume on the external sound source. The gain of microphone
can be adjusted via the “Mic / Guitar In” knob. Use the “Line Out Vol.” knob to adjust
the main output volume.
(b) Phantom Powered Microphone with XLR connector
1. Connect the Line Out of sound source (e.g. DVD player) to the “Stereo In” on the rear
panel of the Matrix K.
2. Connect the microphone to the XLR jack of the combo connector on the front panel of
the Matrix K. Adjust the gain by turning the “Mic / Guitar In” knob.
3. Press the “48V On / Off” button down.
4. Press the “Direct Monitor” button down.
5. Start playing music and enjoying Karaoke.
6. Please adjust music volume on the external sound source. The gain of microphone can
be adjusted via the “Mic / Guitar In” knob. Use the “Line Out Vol.” knob to adjust the
main output volume.
(c) Microphone with TS connector
1. Connect the Line Out of the sound source (e.g. DVD player) to the “Stereo In” on the
rear panel of the Matrix K.
2. Connect the microphone to the TS jack of the combo connector on the front panel of
the Matrix K. Adjust the gain by turning the “Mic / Guitar In” knob.
3. Press the “Guitar On / Off” button down.
4. Press the “Direct Monitor” button down..
5. Start playing music and enjoying Karaoke.
6. Please adjust music volume on the external sound source. The gain of microphone can
be adjusted via the “Mic / Guitar In” knob. Use the “Line Out Vol.” knob to adjust the
Matrix K User's Manual 19
Page 22

Matrix K User's Manual
main output volume.
2. Working together with computer
In Hard-disk Recording mode, you have to connect Matrix K with computer by IEEE1394
cable (Matrix K FW) or USB cable (Matrix K USB), and according to this manual to install
driver and control panel correctly.
In this mode, Matrix K is bus powered via IEEE 1394 (Matrix K FW) or USB (Matrix K
USB) interface and all functions will work properly. It is not necessary to plug power adaptor
into Matrix K.
In this mode, we recommend not using “Direct Monitor” to avoid latency problems while
using ASIO driver (Matrix K FW and Windows only) or software monitoring.
A. Recording from the Line In
1. Connect the Line Out of the sound source (e.g. DVD player) to the “Stereo In” on the rear
panel of Matrix K.
2. Set the recording device driver in the recording software.
3. Playback music and record using the software.
4. Use the “Stereo In Vol.” knob in the front panel of Matrix K to set the input signal gain.
B. Recording from a microphone
(a) Self-powered Microphone with XLR connector
1. Connect the microphone to the XLR jack of the combo connector on the front panel of
the Matrix K. Adjust the gain by turning the “Mic / Guitar In” knob.
2. Set the recording device driver in the recording software.
3. Pick-up the audio signal from the microphone and start recording in the software.
(b) Phantom power Microphone with XLR connector
1. Connect the microphone to the XLR jack of the combo connector on the front panel of
the Matrix K. Adjust the gain by turning “Mic / Guitar In” knob.
2. Press the “48V On / Off” button down.
3. Set the recording device driver in the recording software.
4. Pick-up the audio signal from the microphone and start recording in the software.
(c) Microphone with TS connector
1. Connect the microphone to the TS jack of the combo connector on the front panel of
the Matrix K. Adjust the gain by turning the “Mic / Guitar In” knob.
2. Press “Guitar On / Off” button down.
3. Set the recording device driver in the recording software.
4. Pick-up the audio signal from the microphone and start recording in the software.
C. Recording an Electric guitar (or bass)
1. Connect the electric guitar (or bass) to the TS jack of the combo connector on the front
20
Page 23

panel of the Matrix K. Adjust the gain by turning the “Mic / Guitar In” knob.
2. Press the “Guitar On / Off” button down.
3. Play the electric guitar (bass) and start recording in the software.
4. The gain of the electric guitar (bass) can be adjusted not only on the guitar (bass) but also
via the “Mic / Guitar In” knob.
Matrix-X setting chart
Mode Usage
Listen to music
Practice or play Electrical Guitar / Bass
along with music
Microphone with self-powered
Stand-
alone
Karaoke
Record from Line In
With
sound
card
◎
: Button pressed down ╳ :Button released
Record
from
Microphone
Record from Electrical guitar (bass)
and XLR connector
Microphone with XLR
connector but without selfpowered
Microphone with TS
connector
Microphone with self-powered
and XLR connector
Microphone with XLR
connector but without selfpowered
Microphone with TS
connector
48V On /
Off
╳ ╳ ◎
╳ ◎ ◎
╳ ╳ ◎
◎ ╳ ◎
╳ ◎ ◎
╳ ╳ ╳
╳ ╳ ╳
◎ ╳ ╳
╳ ◎ ╳
╳ ◎ ╳
Guitar
On / Off
Direct
Monitor
Matrix K User's Manual 21
Page 24

Matrix K User's Manual
Specications
◎
External IEEE1394 (Matrix K FW) or USB (Matrix K USB) audio system
◎
1 IEEE1394 jack (for Matrix K FW) or USB jack (for Matrix K USB)
◎
Digital signal accessing up to 24-bit/192KHz (Matrix K FW) or 24-bit/48KHz (Matrix K
USB)
◎
ASIO 2 support for Windows (only for Matrix K FW)
◎
WDM and MME driver support for Windows
◎
CoreAudio support for MAC OS X
◎
1 “Stereo In” to receive external line level signal (un-balanced, 1/8” TRS)
◎
Stereo “Line Out” with volume control for connecting active speakers (2 balanced, 1/4”
TRS)
◎
2 Stereo headphone outputs with volume control (1/4” and 1/8" stereo TRS for each)
◎
1 “Mic / Guitar In”, with a XLR and TS combo connector that microphone and electric
guitar/bass share and a gain control knob
◎
XLR of combo connector is balanced, TS is un-balanced
◎
2 input signal LEDs (blue, one for each channel), indicate if there is any signal available
at the input channel
◎
2 input peak LEDs (red, one for each channel), indicate if an input signal is near
distortion
◎
48V phantom power with switch (press button), provides power to XLR only
◎
1 phantom power LED (green) indicates the status of phantom power supply
◎
1 “Direct Monitor” button toggles the input signal between direct monitoring of the input
or the sound card output
◎
1 “Guitar On / Off” button turns on “Mic / Guitar In” function in front panel
PC system requirement
PC system requirement
◎
Intel Pentium III 800 or same performance CPU of AMD
◎
256MB RAM
◎
IEEE1394 and USB connector
◎
Windows XP with ServicePack 1
Recommendation PC system
◎
Intel Pentium 4 2GHz or AMD Athlon XP2000+
◎
512MB RAM
◎
IEEE1394 and USB connector
◎
Windows XP with ServicePack 2
22
Page 25

MAC system requirement
◎
G4 800MHz
◎
512MB RAM
◎
IEEE1394 and USB connector
◎
OS X Panther 10.3.4 or higher
Recommendation MAC system
◎
G5 1.8GHz
◎
512MB RAM
◎
IEEE1394 and USB connector
◎
OS X Panther 10.3.4 or higher
Matrix K User's Manual 23
Page 26

Matrix K User's Manual
Matrix K FW Technical information
Number of Input Channels 3
Number of Output Channels 2
Number of Headphone Outputs 2
Performance
THD + Noise (%) 0.0062 (digital board)
Noise Floor (dB) (A-weighted) -98.4 (digital board)
Dynamic Range (dB) (A-weighted) 97.7 (digital board)
Input
C o n n e c t o r s ( g u i t a r a n d
microphone)
Connectors (line input) 3.5mm
Input Impedance, XLR 10Kohm
Input Impedance, High Z (1/4”) 2.2Mohm
Input Impedance, Line level TRS
Output
Connectors (line output) 1/4” TRS
Connectors (headphone) 1/4” and 1/8” TRS
Output Impedance (line level) 33ohm
Output Impedance (headphone) 33ohm
XLR/TS combo
10Kohm
Front Panel Controls
Guitar In Gain +10dB
MIC In Gain +30dB
Headphone volume control +8dB
Pad (48V On / Off) Switch on / off
Pad (Guitar On / Off) Switch on / off
Pad (Direct Monitor) Switch on / off
Power Supply
Type Linear supply
Input 15 VAC / 1000mA
Power 15 Watts
Physical
Dimensions 14.5cm x 15.5cm x 4.3cm
24
Page 27

Matrix K USB Technical information
Number of Input Channels 3
Number of Output Channels 2
Number of Headphone Outputs 2
Performance
THD + Noise (%) 0.0125 (digital board)
Noise Floor (dB) (A-weighted) -95.5 (digital board)
Dynamic Range (dB) (A-weighted) 95.4 (digital board)
Input
C o n n e c t o r s ( g u i t a r a n d
microphone)
Connectors (line input) 3.5mm
Input Impedance, XLR 10Kohm
Input Impedance, High Z (1/4”) 2.2Mohm
Input Impedance, Line level TRS
Output
Connectors (line output) 1/4” TRS
Connectors (headphone) 1/4” and 1/8” TRS
Output Impedance (line level) 33ohm
Output Impedance (headphone) 33ohm
XLR/TS combo
10Kohm
Front Panel Controls
Guitar In Gain +10dB
MIC In Gain +30dB
Headphone volume control +8dB
Pad (48V On / Off) Switch on / off
Pad (Guitar On / Off) Switch on / off
Pad (Direct Monitor) Switch on / off
Power Supply
Type Linear supply
Input 15 VAC / 1000mA
Power 15 Watts
Physical
Dimensions 14.5cm x 15.5cm x 4.3cm
Matrix K User's Manual
25
Page 28

 Loading...