

Page 1
ESPRESSO COFFEE MACHINE
USE AND MAINTENANCE MANUAL
Instructions for the user
C.M.A. S.p.a.
Via dei Colli, 66 - 31058 SUSEGANA (TV) - ITALY
Tel. 0438/6615 - Fax 0438/60657
INTERNET: www.cmaspa.com - E-MAIL: cma@cmaspa.com
Cod. 02000093 - Rev. 00 - 10/00
Page 2

2
ENGLISH
1
ENGLISH
Index
1. general guide .................................................... 2
2. general presentation .......................................... 3
3. description of the coffee maker ........................... 4
4. unpacking ......................................................... 5
5. getting the coffee maker ready ............................ 5
6. connecting to the electricity mains ............. 7
7. starting the coffee maker for the first time ............. 7
8. making a cup of coffee ...................................... 8
9. water finishes when coffee is being dispensed ....... 10
10. dispensing steam ............................................... 10
11. tips to make a good cup of coffee ....................... 11
12. cleaning and maintenance ....................... 11
13. risks when using the machine .............................. 12
14. what to do if ................................................. 12
Read carefully
all parts of this manual before using the coffee maker and keep it in a safe place for
future reference.
The coffee maker you have purchased has been designed and made using innovative
methods and technologies that guarantee quality and reliability over time.
You will find all the instructions needed in this manual to use, clean and maintenance
the coffee maker properly.
The manufacturer reserves the right to make improvements to the product. It is herewith
guaranteed that this manual reflects the state-of-the-art at the moment of sale.
If this manual is lost we can send you another copy and answer any queries or
clarifications you may need.
We wish to thank you for having chosen us and hope you enjoy
a great cup of coffee
1. general guide
This appliance is for making hot drinks like coffee, tea, cappuccino, etc. Any other
use is to be considered improper and as such dangerous.
After removing the packaging material check that all the components are sound.
Do not leave the packaging material within reach of children as it is a hazard
source. Keep the packaging material until the guarantee has expired.
Before using the coffee maker make sure the electricity mains voltage is 230 V (or
120V as the case may be).
We advise against using leads or adapters for multiple plugs. If it is essential to use
them, use only those that conform to standards and that have a sufficient power
capacity.
If the socket and the appliances plug are incompatible, have a qualified technician
replace the plug with a suitable one.
Do not leave the appliance with water in it in a room where the temperature is 0°C
or under.
Page 3
3
ENGLISH
4
ENGLISH
Do not use the appliance if the power lead is damaged.
The user must not change this appliances power lead. If it is damaged call in an
authorised assistance centre.
Do not let children or incapable people use the coffee maker.
Do not touch the coffee maker with wet hands or if you have bare feet.
Do not pull on the power lead to disconnect the appliance.
Do not put the coffee maker in water or leave it exposed to the elements (rain, sun,
etc.).
Before installing and cleaning the coffee maker, take the plug out of the mains.
In the case of a breakdown, malfunction or if any part of the appliance is damaged,
unplug it from the electricity mains and call your dealer or a qualified assistance
centre.
If you decide you are not going to use the coffee maker any more, take the plug out
of the electricity mains.
Avoid direct contact with the hot parts of the appliance and steam.
Any tampering with any part of the appliance invalidates the guarantee.
2. general presentation
This coffee maker is to make single-dose espresso coffee with a pod of ground
coffee pressed in single-dose packs.
With the filter holder and adapter, available as optionals, a cup of espresso can
also be made with loose ground coffee.
With this machine you can also make other hot drinks like tea and milk, using
steam.
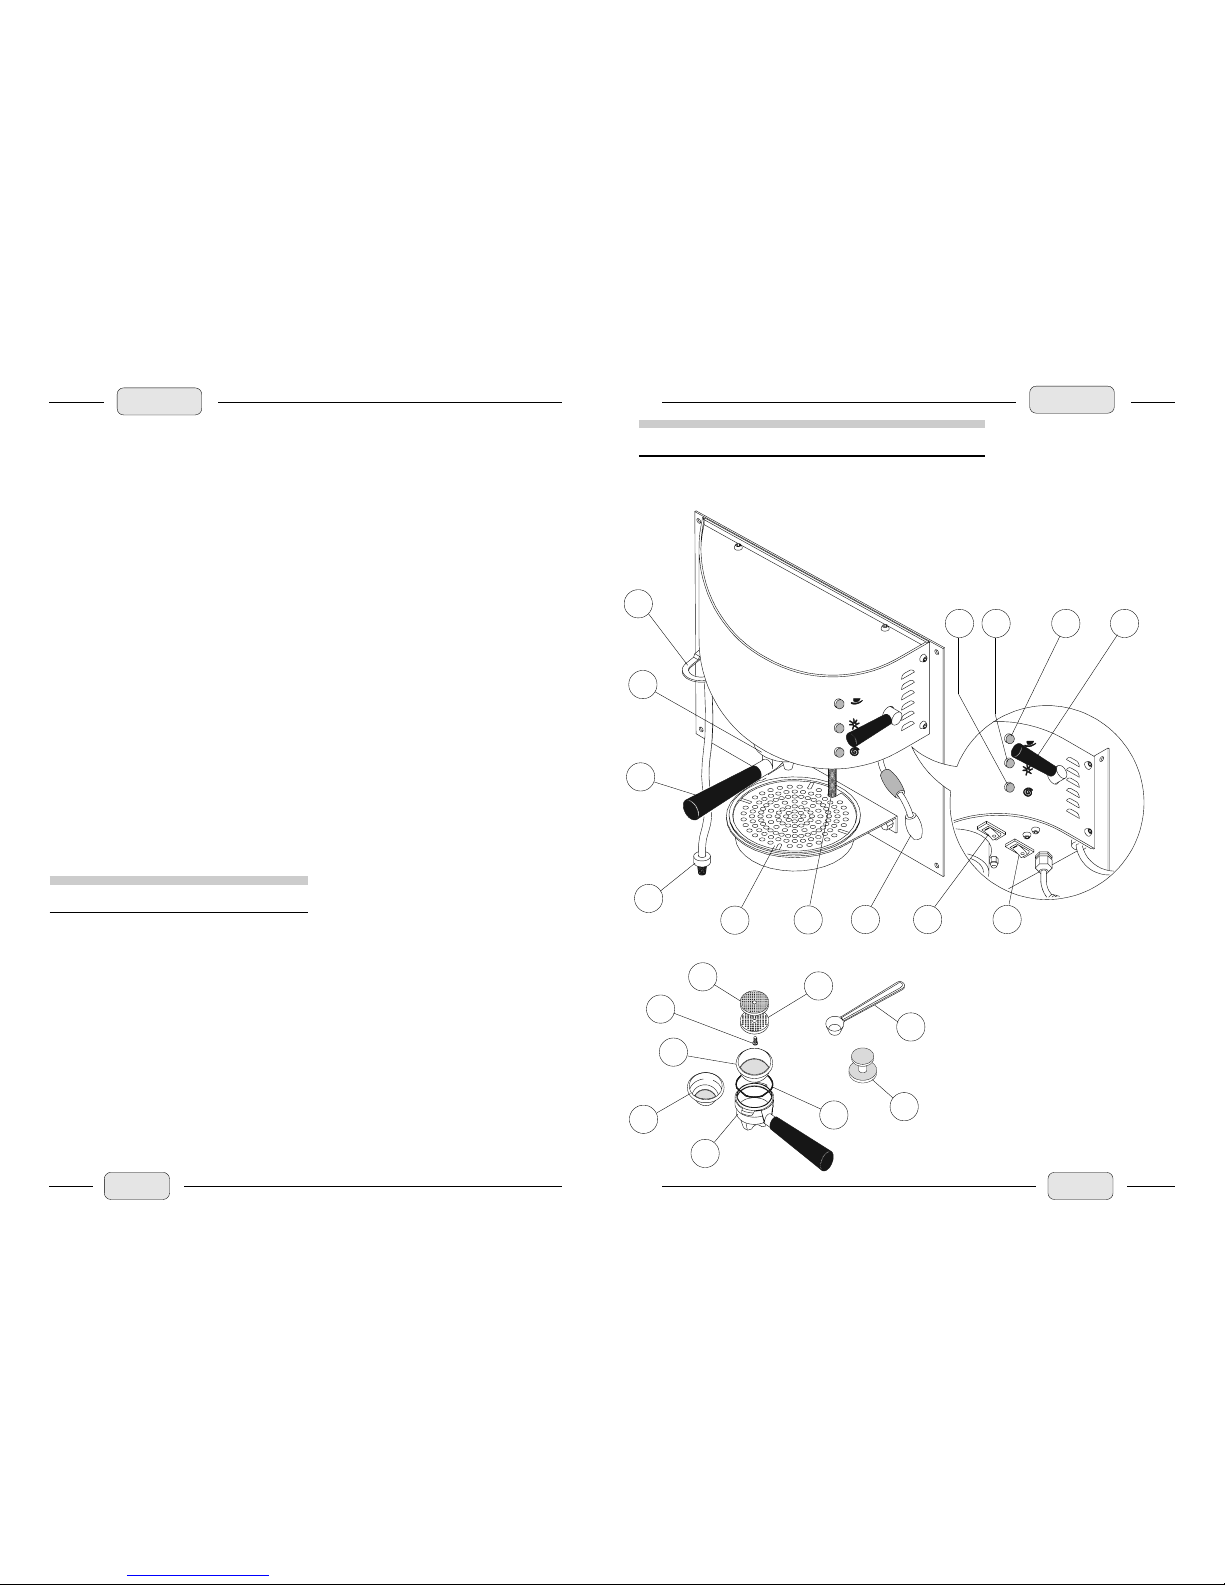
3. description of the coffee maker
1. Dispensing unit
2. Filter holder
3. Water suction tube
4. Drainage tray
5. Water drainpipe
6. Steam nozzle
14. Filter holder
15. 1-cup filter
16. 2-cup filter
17. Screw
18. Adapter
19. Water filter
20. Measuring spoon
21.21.
21.21.
21. Press
22. Filter hook
Accessories for ground coffee
7. Main switch
8. Steam boiler switch
9. Function selection lever
10. Coffee dispensing pilot light
11. Coffee maker ready pilot light
12. Steam dispensing pilot light
13. Bottle support
fig.A
2
4
3
6
1
7
5
8
910
1112
14
15
17
19
18
22
21
16
20
fig.B
13
Page 4

6
ENGLISH
5
ENGLISH
4. unpacking
open the box;
remove the inside protection wrappings;
remove the coffee maker from the top.
Only a few simple jobs are needed to
assemble your coffee maker:
using the holed template supplied with the
appliance, drill 4 holes in the wall and
insert the Rawlplugs (1), also supplied;
fix the rear support with the 4 screws (2)
supplied;
position the drainage tray (4) on the
support (3);
fig.C
place the drainpipe (5) in the
drainage tray;
position the grid (6) on the
drainage tray;
screw on the function selection
lever (7);
fig.D
1
2
4
7
6
3
5. getting the coffee maker ready
fig.E
5
Iput the water suction tube (1) in the bottle filled with
water;
hook the bottle of water to its support, putting it in from
the bottom and pulling it towards you until the neck of
the bottle is in place as shown in Fig. F.
In some cases, to guarantee the bottle is hooked properly,
it is advisable to put one of the seals (2) provided on the
bottle neck.
Use only drinking water or natural mineral water.
Do not use other liquids like milk, coffee, etc..
Do not use the coffee maker without water.
The water suction tube must always be kept
open
The coffee maker can be assembled without using the rear support. In such a case
proceed as follows:
using the template provided (3) drill holes
in the wall, observing the drawings and
insert the Rawlplugs (4) and the two screws
(5);
1
fig.F
2
unhook the coffee maker from the
rear support (6) unscrewing the
check nut (7) and lifting the coffee
maker as shown in Fig. H;
fig.H
7
6
6
fig.G
4
3
5
Page 5

7
ENGLISH
8
ENGLISH
7. starting the coffee maker for
the first time
When using the coffee maker for the first time or after a
long time of non-use, proceed as follows:
make sure there is water in the bottle;
hook the filter holder to the dispensing unit;
put the main switch (1) and the boiler switch (2) in
the I position: the three pilot lights on the front should
turn on;
place a cup under the coffee dispensing spout;
lift the selection lever up to the coffee dispensing
position ;
let water come out for at least 5 seconds;
put the lever back into the rest position to stop water
coming out ;
fig.M
fix the coffee maker to the wall, hooking it first to the two upper
supports (1) and then locking it with the check nut (2);
6. connecting the electricity mains
check that the voltage of the electricity mains is 230
V (or 120 V as the case may be);
Avoid using leads or adapters for multiple plugs. If it is essential
to use them, use only those that conform to standards and that
have a sufficient power capacity.
fix the tray support (3) and the bottle support (4)
to the wall with the screws;
lastly position the grids and bottles drainpipe.
make sure that all the coffee makers switches are in the 0 position;
put the coffee makers plug in the mains socket.
1
2
fig.L
fig.I
1
2
3
4
8. making a cup of coffee
make sure there is water in the bottle;
wait until the coffee dispensing pilot light has gone out;
put a pod of coffee in the filter holder;
Visually check that the filter holder is firmly in position on the
dispensing unit. Always remember to check and empty the water
drainage tray regularly.
Avoid direct contact with hot parts of the coffee maker to avoid
scalding yourself
Use only single-dose coffee pods.
The coffee pod must be removed as soon as it has been used.
It is advisable to keep the filter holder warm, leaving it hooked to the
dispensing unit.
fig.N
fig.O
fig.P
twist the filter holder up and into the dispensing
unit;
put a coffee cup under the spout;
lift the coffee dispensing selection lever ;
when you have enough coffee in your cup put the
lever back in the rest position ;
take the cup of coffee away;
remove the filter holder from the dispensing unit;
remove the used coffee pod;
the coffee maker is now ready to make more
coffee.
wait for the steam pilot light to go out;
put a cup under the steam dispensing nozzle;
lower the selection lever into the steam dispensing
position ;
let steam come out for at least 5 seconds;
put the lever back into the rest position to stop steam
coming out ;
Page 6

10
ENGLISH
9
ENGLISH
The machine is designed for espresso coffee cups (1).
If you wish to use tall cups, a simple alteration to the coffee
maker will suffice.
after removing the grid and drainage tray, unscrew the
two nuts (2) and detach the tray support;
turn the tray support 180° and put it back with the two
check nuts (2);
put the drainage tray back and the top grid.
The coffee maker is now ready for tall cups or mugs (3).
Using different sized cups or mugs
Using ground coffee (only with the optional filter holder)
The coffee maker can be used with ordinary ground coffee
but with its own filter holder that is available as an optional for
the appliance.
hook the filter holder to the dispensing unit;
put the coffee cup under the spout;
lift the coffee dispensing selection lever ;
Proceed as follows:
Prepare the filter holder according to
the cups of coffee you are making;
Fill the filter with the dose of ground
coffee and press it with the press (7);
clean the edges of the filter;
7
fig.T
1
2
3
fig.Q
fig.R
fig.S
when you have enough coffee in your cup put the lever back in the rest position ;
4
5
6
fig.U
take the cup of coffee away;
remove the filter holder from the dispensing unit;
remove the used coffee grouts;
the coffee maker is now ready to make more coffee.
To improve the quality of your coffee you can install an adapter.
Proceed in the following way:
switch the coffee machine off and wait until it is completely cold;
unscrew the screw (4), remove the spring and water filter for
the pods (DO NOT lose the spring!);
hook the adapter (5) and the new water filter (6) to the
dispensing unit, locking them together with the screw (4);
If, when coffee is being dispensed, the water in the bottle finishes (you will hear a
loud noise from the pump in this case) proceed as follows:
immediately stop dispensing coffee;
fill the bottle up with water;
put the bottle back in place making sure the water suction tube is positioned correctly;
remove the pod or coffee from the filter and put the filter holder back on the dispensing
unit;
lift the coffee dispensing lever to start the circuit ;
when water starts coming through the spout put the lever back in the rest position
.
9. water finishes when coffee is being dispensed
10. dispensing steam
make sure there is water in the bottle;
Put the steam switch in position 0 to turn the steam
boiler off.
put the steam boiler switch (1) in
position I and wait until the steam pilot
light goes out;
place the container with the liquid in to heat under the
steam dispensing spout;
move the selection lever down into the steam dispensing
position ;
to stop steam, put the selection lever back in the rest
position .
To avoid scalding, wait a few seconds until there is no more steam
coming through the spout before removing the container.
Avoid direct contact with the steam and steam nozzle scalding risk.
Do not use the coffee maker without water.
fig.Z
1
fig.V
Page 7

11
ENGLISH
12
ENGLISH
14. what to do if
1) When you select the coffee dispensing position neither coffee nor water comes out,
or with the lever in the steam dispensing position steam does not come out:
check the level of water in the bottle;
make sure the water suction tube is positioned correctly.
2) While coffee is being dispensed water comes out at the sides:
make sure the filter holder has been put correctly in position;
if, although the filter holder has been put correctly in position, water still comes
out, contact your nearest assistance centre.
The manufacturer declines all and every responsibility for any
damages caused by the failure to comply with the instructions
given in this manual or by the failure to comply with the current
safety rules and regulations.
13. risks when using the machine
Here is a list of the possible risks for the user if the safety standards described in this
manual are not complied with:
the electricity mains must have an effective earthing system to avoid any discharges;
never open the dispensing unit while it is dispensing coffee because very hot water
and steam can come out;
the attempt to repair the appliance can lead to malfunctions and hazards for the
user: if any maintenance is required call in authorised personnel only;
do not wash the outside of the coffee maker with water and do not spray jets of
water inside it as damage could be caused and hazards result;
pay attention to the dispensing unit, coffee spouts and steam nozzle as they are all
hot parts;
never carry out any installation, maintenance or cleaning on the coffee maker until
the plug has been taken out of the mains socket and it is completely cold;
do not use the coffee maker for purposes other than those specified.
12. cleaning and maintenance
To keep your coffee maker working properly we suggest cleaning it regularly.
Clean the outside with a soft cloth moistened with warm water (do not use abrasive
detergents).
Clean the filter holder regularly, working it for a few seconds without the coffee pod
in it.
Check and empty the water drainage tray.
Clean the end of the steam spout with a soft cloth moistened with hot water.
In the case of a breakdown, malfunction or if the coffee maker needs overhauling,
do not attempt it yourself but contact your dealer or an authorised assistance centre.
11. tips to make a good cup of coffee
To make a good quality cup of coffee we suggest following these few but essential
rules:
always use fresh soft drinking water or natural mineral water;
open the coffee pod just before youre going to use it;
if youre using freshly ground coffee do not keep large quantities for long periods of
time. Its always preferable to have fresh coffee;
keep the filter holder warm by leaving it hooked to the dispensing unit;
warm the ceramic coffee cups before using them;
wait for the relative pilot lights to go out before dispensing coffee and steam to get
the best quality.
 Loading...