


 Loading...
HDML-Cloner Box Pro User Manual
Version: 2.1
HDML-Cloner Box Pro User Manual
This documentation describes how to use HDML-Cloner Box Pro (Model: CA-998P) device.
Copyright Notice
Copyright © ClonerAlliance® Inc. All rights reserved.
Documentation Version 2.0
No part of this publication may be reproduced, transmitted, transcribed, stored in a retrieval system, or translated into any language or computer language, in any form or by any means, electronic, mechanical, magnetic, optical, chemical, manual, or otherwise, without the prior written permission of ClonerAlliance™ Inc.
Trademarks
HDML® is a registered trademark of ClonerAlliance® Inc.
Safety Notices
Before using HDML-Cloner Box Pro, please ensure that you read and understand the safety precautions bleow:
1.Do not attempt to open the case of HDML-Cloner Box Pro or modify it in any way, as this will void the warranty.
2.Keep HDML-Cloner Box Pro away from water and other liquids, as this may cause the unit to malfunction.
3.HDML-Cloner Box Pro may become warm during use. This does not indicate malfunction.
4.Do not place heavy objects on HDML-Cloner Box Pro, as this may cause the unit to overheat and malfunction.
5.If the exterior of HDML-Cloner Box Pro requires cleaning, wipe it with a soft dry cloth.
6.Do not dispose of the unit via conventional domestic waste.

|
|
|
CONTENTS |
1 |
|
Getting Started |
1 |
1.1 |
Box Contents . . . . . . . . . . . . . . . . . . . . . . . . . . . . . . . . . . . . . . . . . . . . . . . . . . . . . . . . . |
. . . . . . . . . . . . . . . . . . . . . .1 |
|
1.2 |
Product Diagram . . . . . . . . . . . . . . . . . . . . . . . . . . . . . . . . . . . . . . . . . . . . . . . . . . . . . . . |
. . . . . . . . . . . . . . . . . . . . . .1 |
|
2 |
How to record videos to the USB storage device |
5 |
|
2.1 |
Connect . . . . . . . . . . . . . . . . . . . . . . . . . . . . . . . . . . . . . . . . . . . . . . . . . . . . . . . . . . . . . . |
. . . . . . . . . . . . . . . . . . . . . .5 |
|
2.2 |
Record/Capture . . . . . . . . . . . . . . . . . . . . . . . . . . . . . . . . . . . . . . . . . . . . . . . . . . . . . . . . |
. . . . . . . . . . . . . . . . . . . . . .6 |
|
2.3 |
Schedule Recording . . . . . . . . . . . . . . . . . . . . . . . . . . . . . . . . . . . . . . . . . . . . . . . . . . . . |
. . . . . . . . . . . . . . . . . . . . . .7 |
|
2.4 |
Playback . . . . . . . . . . . . . . . . . . . . . . . . . . . . . . . . . . . . . . . . . . . . . . . . . . . . . . . . . . . . . |
. . . . . . . . . . . . . . . . . . . . . .9 |
|
2.5 |
Menu Navigation . . . . . . . . . . . . . . . . . . . . . . . . . . . . . . . . . . . . . . . . . . . . . . . . . . . . . . |
. . . . . . . . . . . . . . . . . . . . . .14 |
|
3 |
How to record videos to PC |
19 |
|
3.1 Obtain HDML-Cloner Pro Helper . . . . . . . . . . . . . . . . . . . . . . . . . . . . . . . . . . . . . . . . . . . . . . . . . . . . . . . . . . . . . . .19
3.2 Install & Connect . . . . . . . . . . . . . . . . . . . . . . . . . . . . . . . . . . . . . . . . . . . . . . . . . . . . . . . . . . . . . . . . . . . . . . . . . . . .20
3.3 Register . . . . . . . . . . . . . . . . . . . . . . . . . . . . . . . . . . . . . . . . . . . . . . . . . . . . . . . . . . . . . . . . . . . . . . . . . . . . . . . . . . . .25
3.4 Record/Capture . . . . . . . . . . . . . . . . . . . . . . . . . . . . . . . . . . . . . . . . . . . . . . . . . . . . . . . . . . . . . . . . . . . . . . . . . . . . . .28
3.5 Setup . . . . . . . . . . . . . . . . . . . . . . . . . . . . . . . . . . . . . . . . . . . . . . . . . . . . . . . . . . . . . . . . . . . . . . . . . . . . . . . . . . . . . .34
4 |
Frequently Asked Questions |
36 |
5 |
Supported Resolutions |
37 |
6 |
Product Specifications |
38 |
7 |
Contact Us |
39 |
8 |
Disclaimer |
40 |
i

GETTING STARTED
1.1 Box Contents
• |
a. Power Adapter |
• |
f. Remote Control |
• b. MMI Cable (VGA/AV/YPbPr to HDMI Cable) |
• g. User Manual |
||
• |
c. Installation |
• |
h. HDMI Cable |
• d. Micro-USB to USB Cable |
• i. USB Flash drive |
||
• e. HDML-Cloner Box Pro |
|
|
|
1
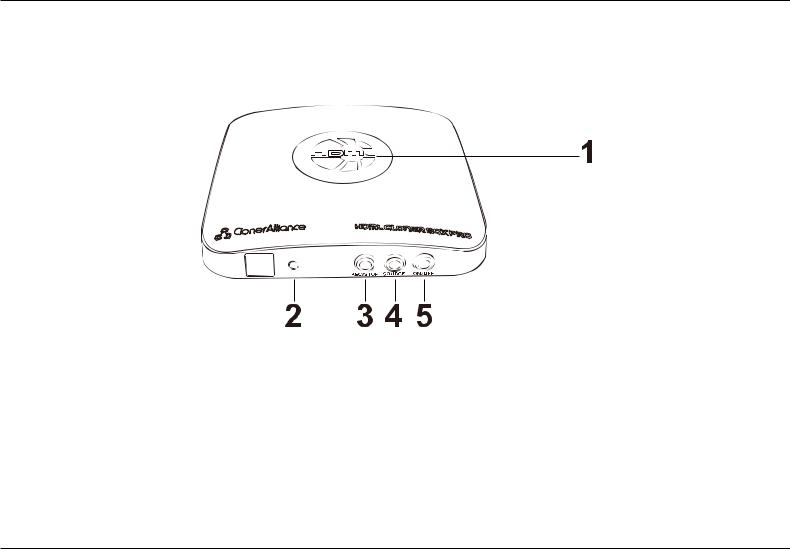
1.2. Product Diagram
1.2 Product Diagram
1.LED indicator light for recording. Blue means HDML-Cloner Box Pro is recording videos in 1080p, whie Green means it is recording videos in 720p or others.
2.When this light is on, it means HDML-Cloner Box Pro is turned on.
3.REC/STOP: Press this button to start/stop recording.
4.SOURCE: Press this button to switch the input signal. HDMI, VGA, YPbPr and AV are available.
5.ON/OFF: Press and hold this button for a few seconds to power on/power off.
2
1. Getting Started
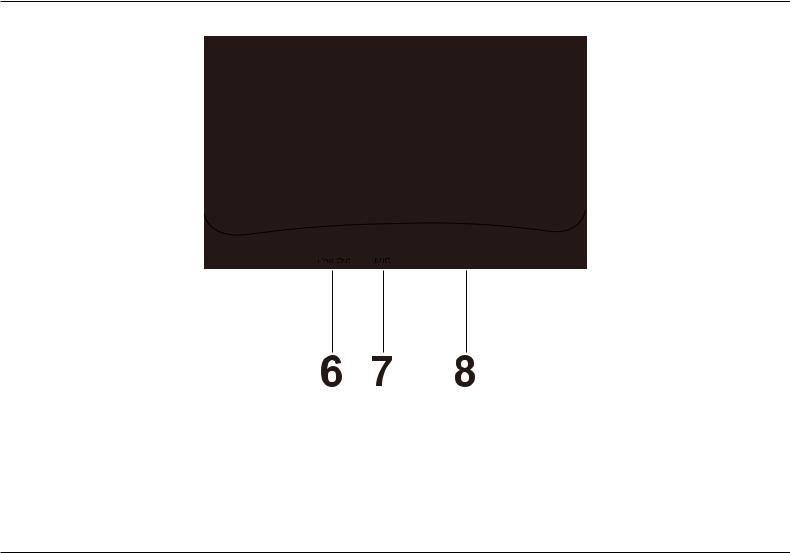
6.Line Out: Insert the headphone plug into this jack to output the video sound.
7.MIC: Insert the microphone plug into this jack to input voice
8.Storage: Insert the USB flash drive or mobile hard disk and record videos to this storage medium.
3
1.2. Product Diagram
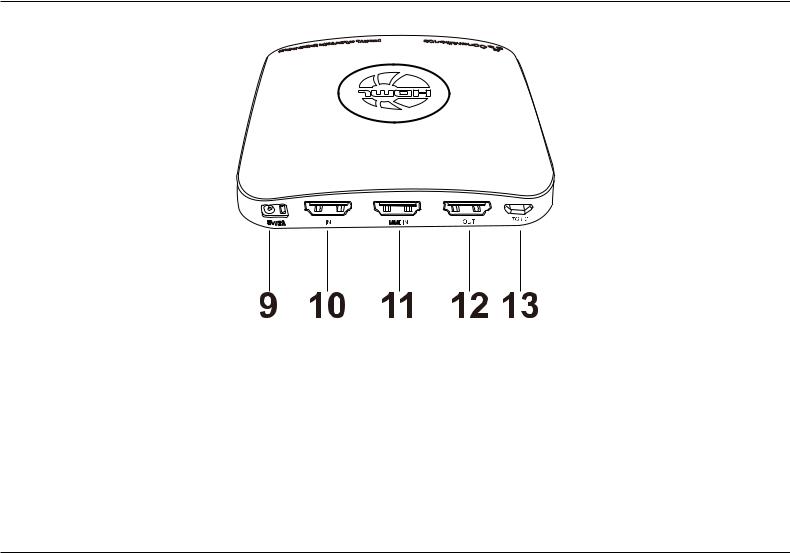
9.5V/2A: Plug the power adapter into this port and power on HDML-Cloner Box Pro.
10.IN: Connect an HDMI cable between the video player and HDML-Cloner Box Pro.
11.MMI IN: Connect the included VGA/AV/YPbPr to HDMI cable between the video player and HDML-Cloner Box Pro.
12.OUT: Connect an HDMI cable between HDML-Cloner Box Pro and TV.
13.TO PC: Connect the Micro-USB to USB cable between PC and HDML-Cloner Box Pro for recording videos to PC. This function must be realized together with HDML-Cloner Pro Helper.
4
1. Getting Started
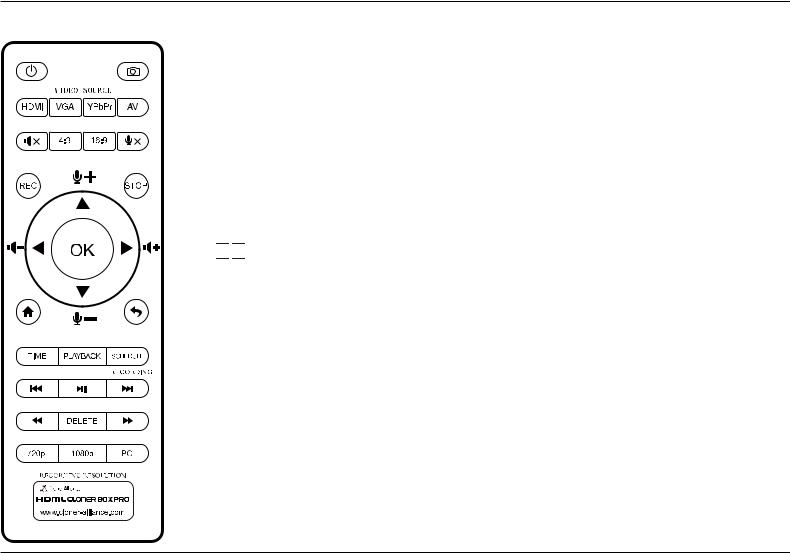
 Power on/Power off.
 Capture an image.
 Select HDMI as the input signal.
 Select VGA as the input signal.
 Select YPbPr as the input signal.
 Select AV the input signal.
 Mute.
Mute.
 Switch to the aspect ratio 4:3.
 Switch to the aspect ratio of 16:9.
 Microphone mute.
 Start recording.

 Stop recording.
 OK button.


 Adjust the vdume of the source Video.


 Adjust the volume of MIC input.
 Show the main menu.
 Back to the previous interface.
 Set the system time by year/month/day/hour/minute/second.


 Play back the contents in the USB storage device.
 Set the recording frequency. Starting time and recording time. Then videos will be recorded automatically according to your settings.
 Back to the previous page.


 Play or stop playing.
 Go to the next page.
 Fast backward.
 Delete the recorded Video.
 Fast forward.
 Set the output resolution to 720p.
 Set the output resolution to 1080p.
 Select the recording resolution for PC, including 1920x1080, 1280x720 and 720x480.
Tips: The remote contro is powered by 2 AAA batteries which are not included in the packing box and need to be purchased independently
5

HOW TO RECORD VIDEOS TO THE USB STORAGE DEVICE 2.1 Connect
1.Plug the power adapter into the power socket and plug the other end into the 5V/2A port of HDML-Cloner Box Pro.
2.Connect the video player to IN port on HDML-Cloner Box Pro via an HDMI cable.
3.Connect HDML-Cloner Box Pro from OUT port to TV via an HDMI cable.
4.Plug the USB storage device into the “Storage”port of HDML-Cloner Box Pro
6
2. How to record videos to the USB storage device
Tips:
1.If you want to connect devices via the VGA/AV/YPbPr to HDMI cable, please connect the video player to MMI IN port on HDML-Cloner BOX Pro.
2.Please use a premium USB flash d rive or mobile hard disk with high speed to avoid unexpected problems such as file loss.
2.2 Record/Capture
1.After all devices are connected properly, please press and hold the “ON/OFF”button for a few seconds to switch on the power of HDML-Cloner Box Pro and turn on other devices.
2.Insert a video disc into the drive of the video player and play the video
3.Press the REC/STOP button on the capture box or press the REC button on the remote control to Start recording
4.After recording for a period Of time, press the REC/STOP button again on the capture box or press the STOP button on the remote control to stop recording.
7

2.3. Schedule Recording
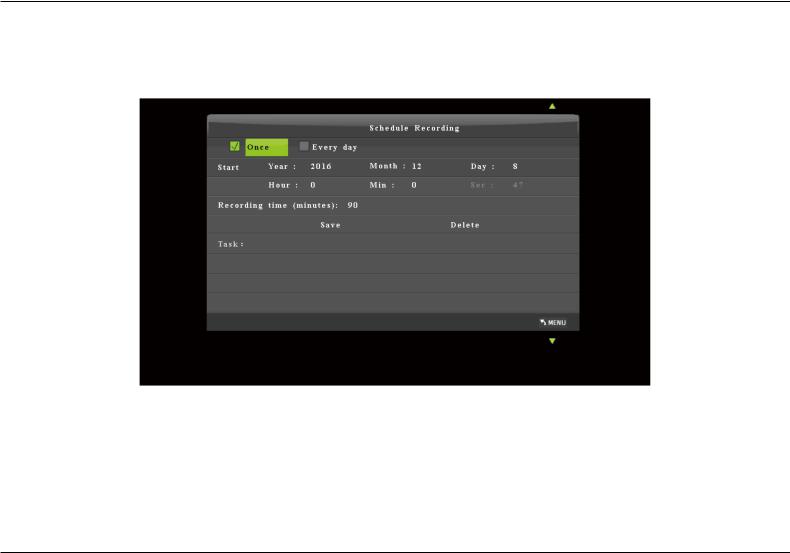
2.3 Schedule Recording
1.Press the TIME button on the remote control. Set the system time by using the four buttons of volume control on the remote control. Then select Save to finish the setting.
8
2.How to record videos to the USB storage device
2.Press the SCHEDULE button on the remote control. Set the recording frequency, start time and recording time by using the four buttons of volume control on the remote control. Then select Save to finish the setting.
3.After finishing the setup, press  on the remote control and return to the video playback interface. Then HDML-Cloner Box Pro will start to record videos automatically at the scheduled time.
9
2.4. Playback
2.4 Playback
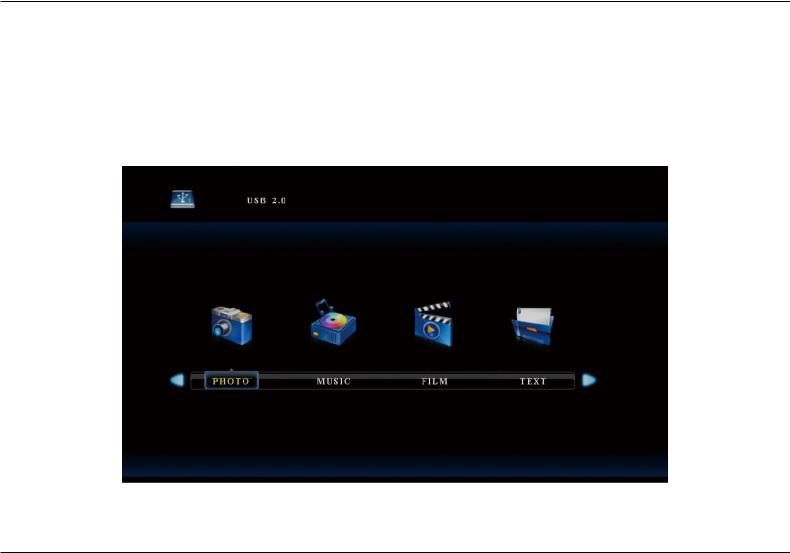
1.After all devices are connected propery, plug the USB storage device into HDML-Cloner Box Pro and press the PLAYBACK button on the remote control to enter the playback menu interface.
There are four categories, which are PHOTO, MUSIC, FILM and TEXT.
10
Loading...