

Page 1
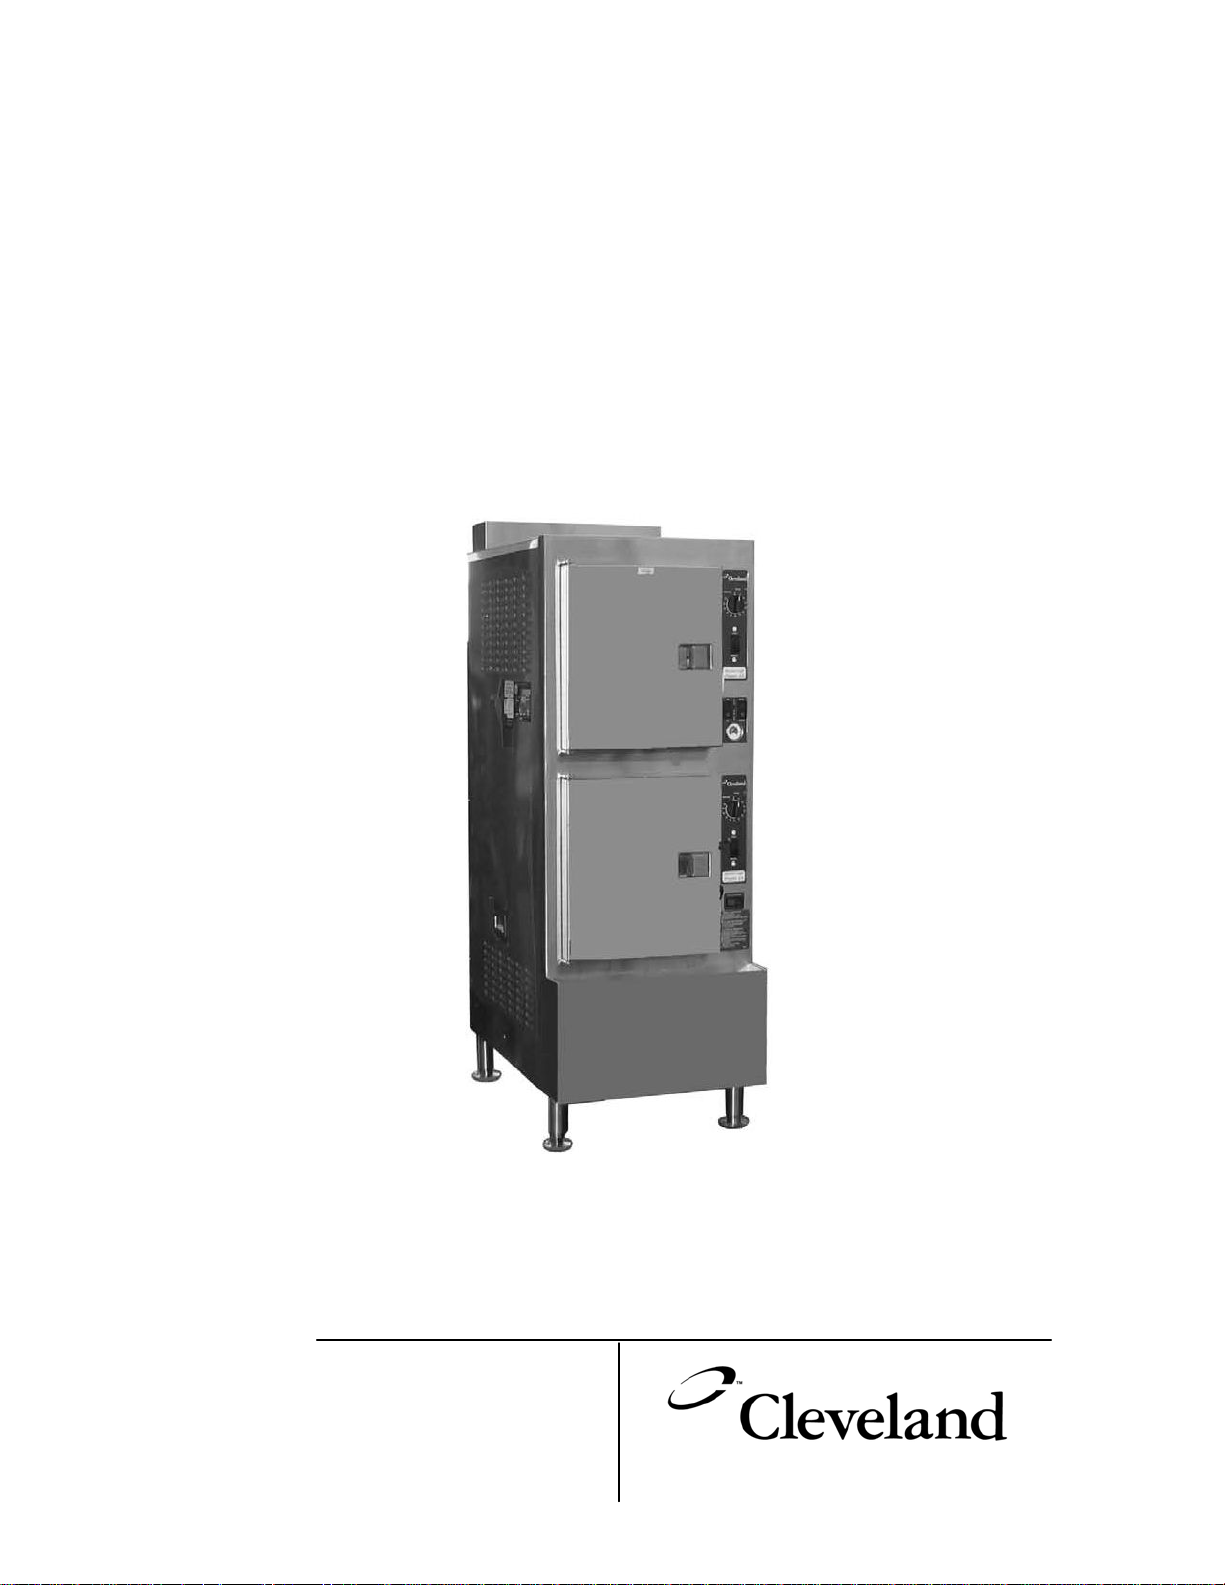
Parts Manual
Floor Type Gas Convection Steamer
Series: SteamCraft Model 24CGP10
1333 East 179
Cleveland, Ohio 44110
Phone: (216) 481-4900
1-800-338-2204
Fax: (216) 481-3782
www.clevelandrange.com
th
Street
Page 2

Page 3
Page 4
Page 5

Page 6
Page 7
Page 8
Page 9
Page 10
Page 11
Page 12
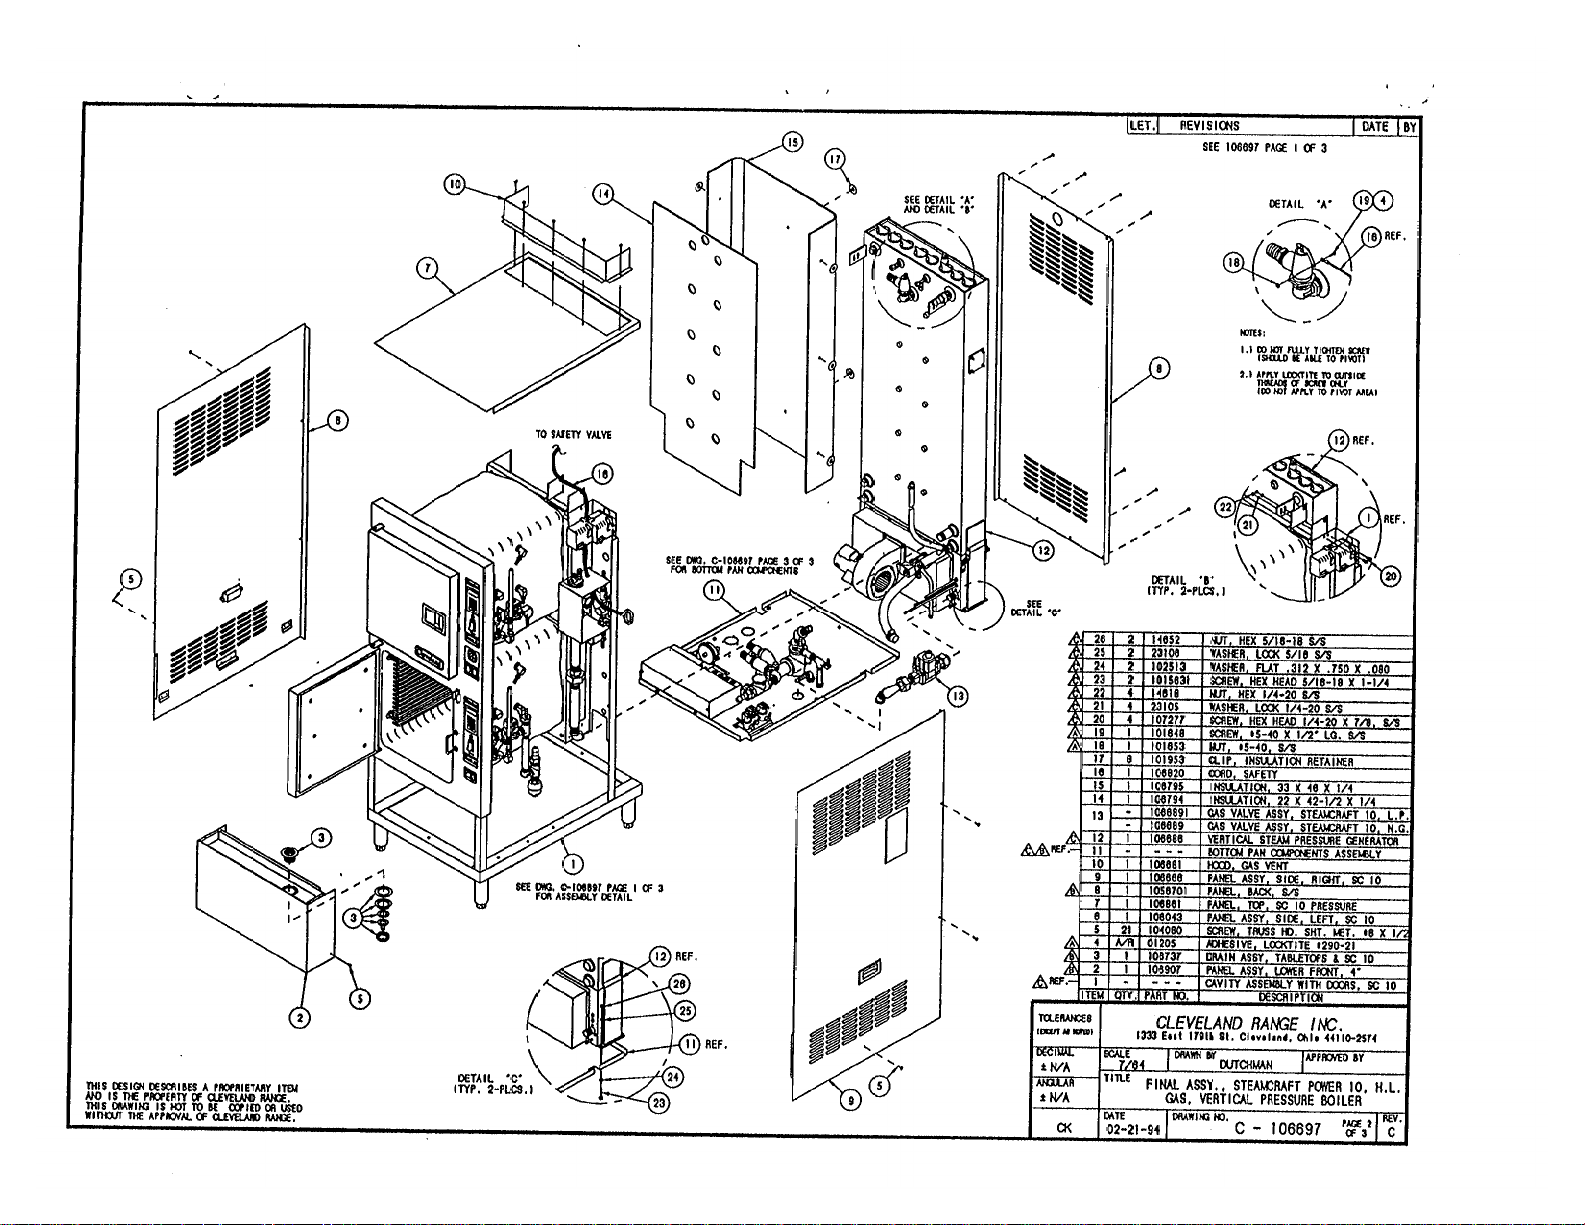
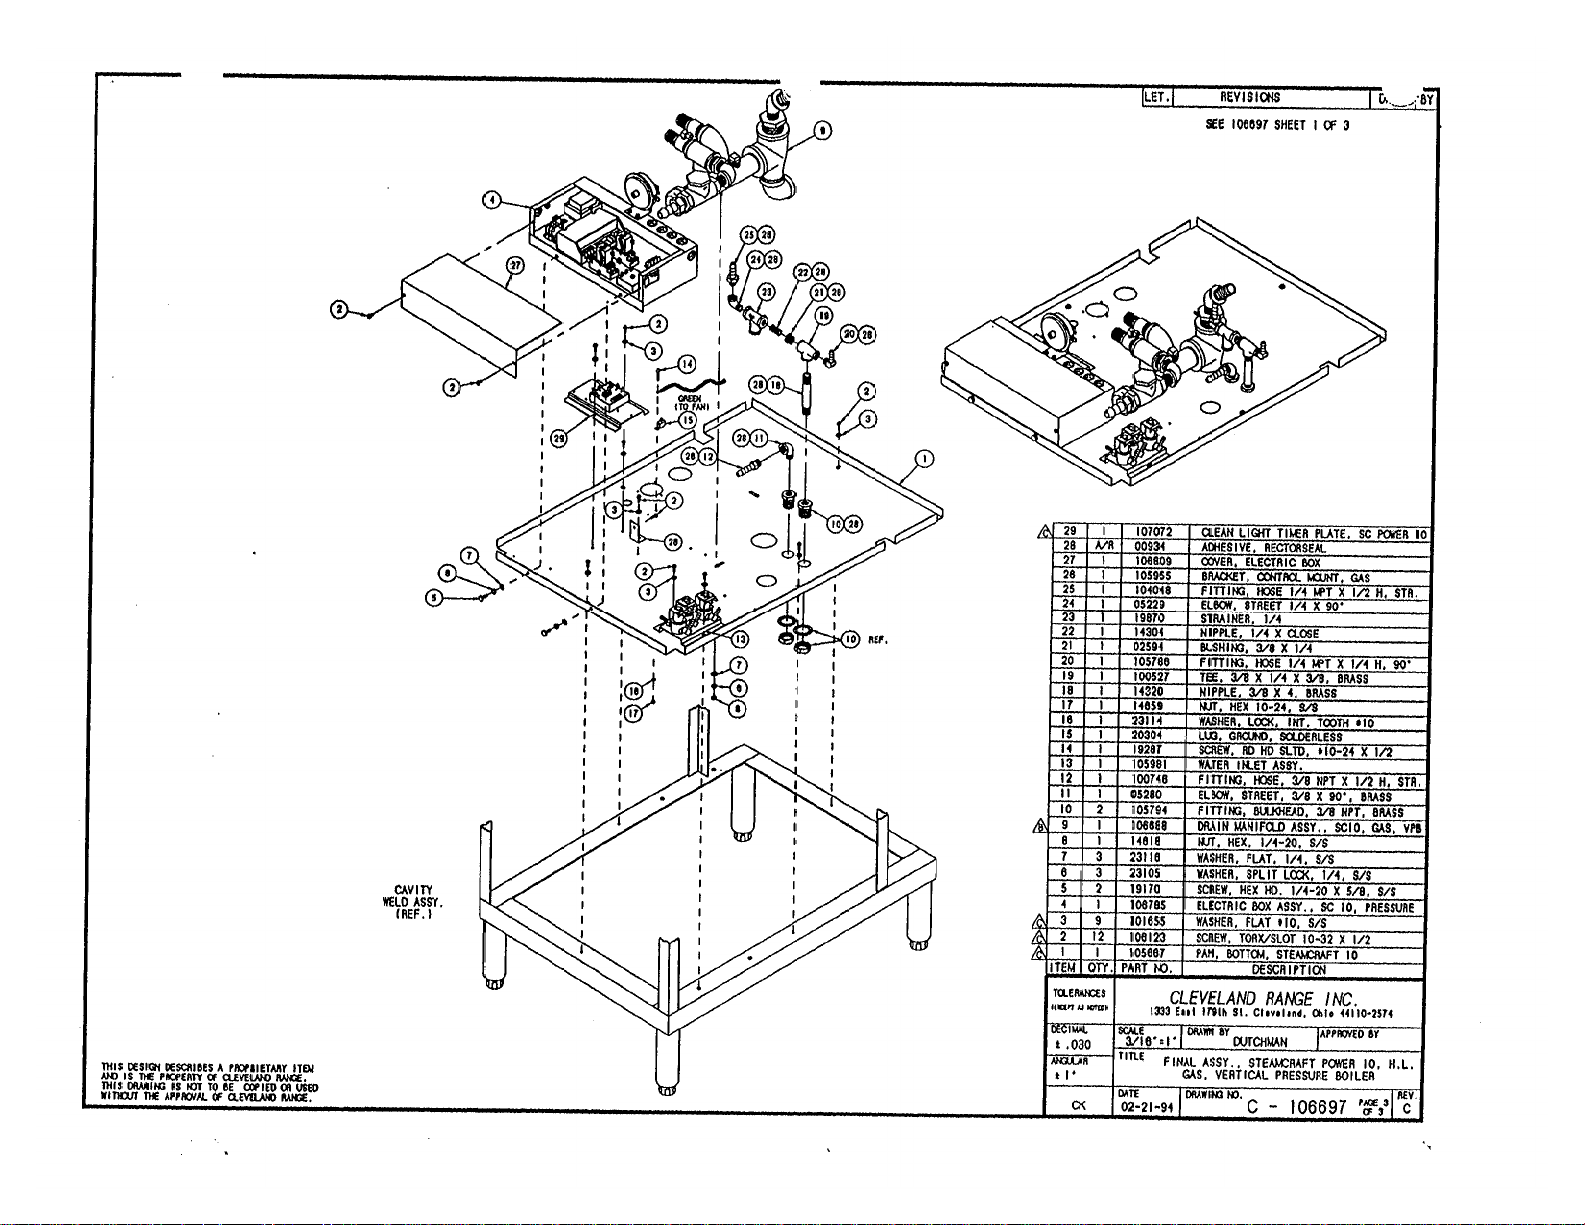
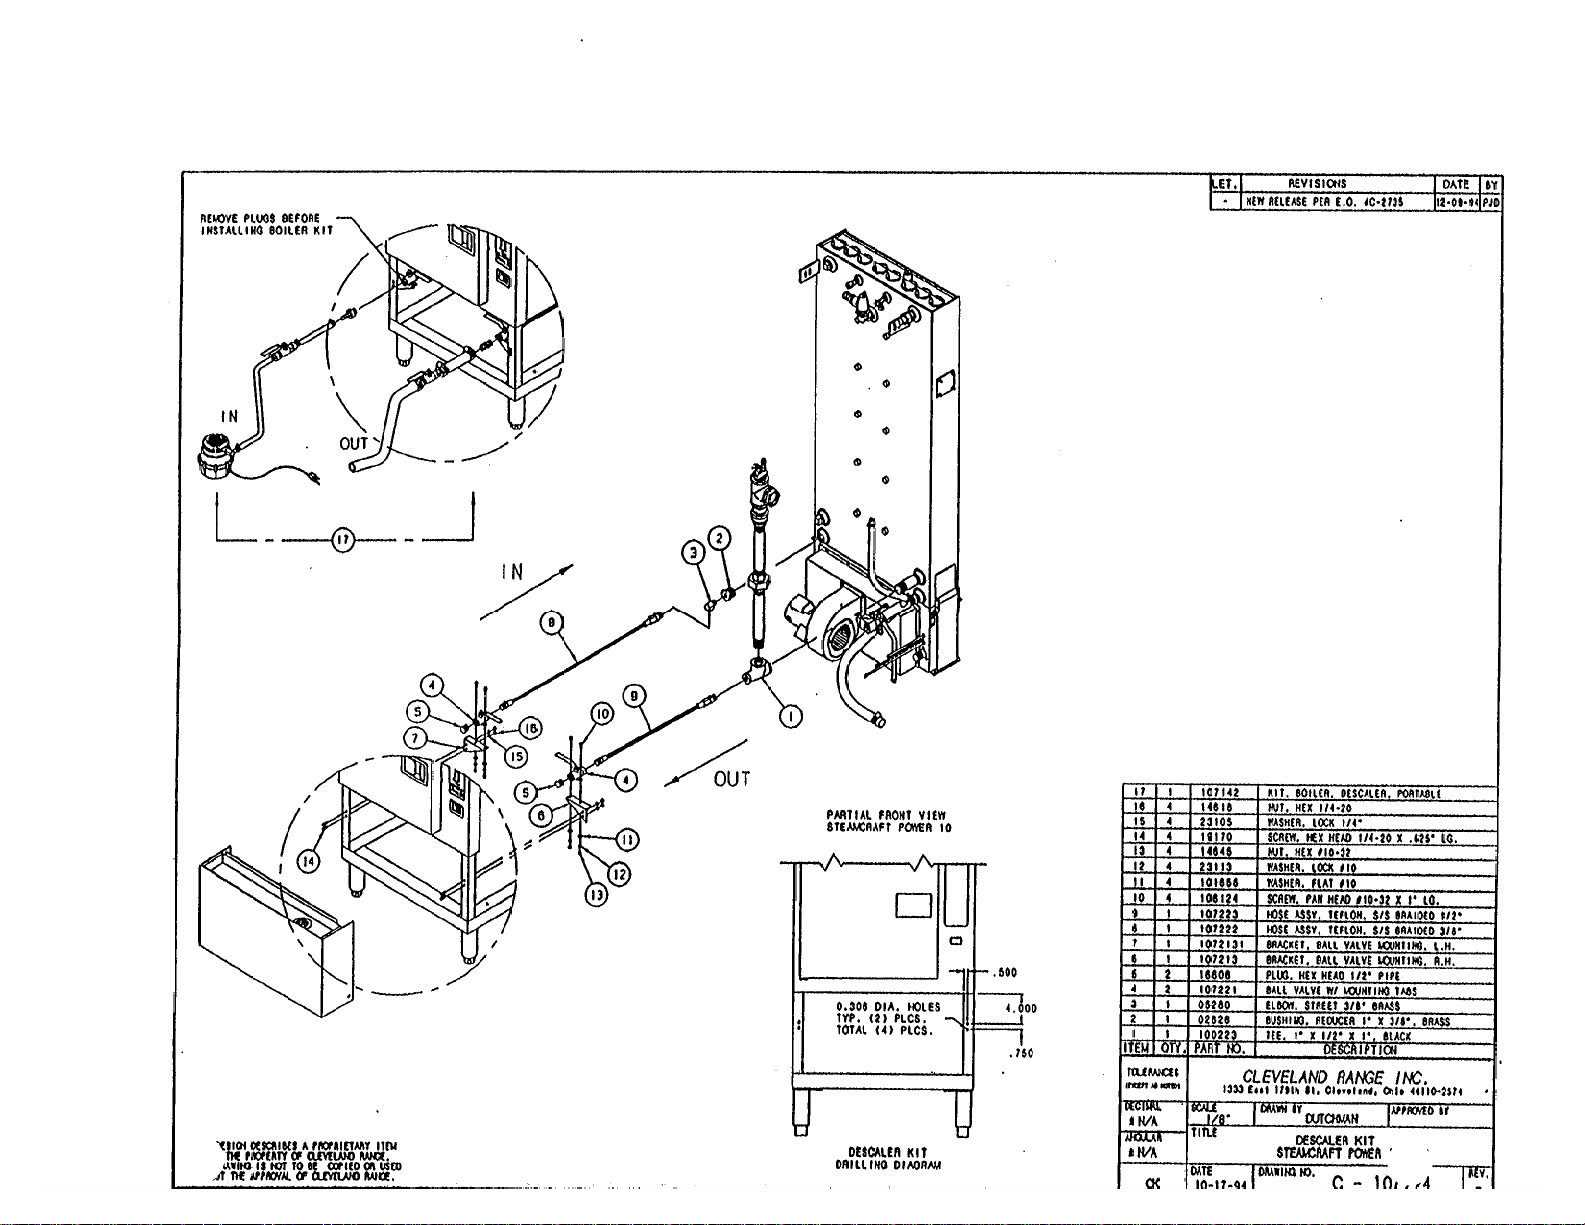
109967
Page 13
Page 14
Page 15
Page 16
Page 17
Page 18
Page 19

Page 20

Page 21

Page 22

Page 23

Page 24

Page 25

Page 26

Page 27

Page 28

Page 29

Page 30

Page 31

Page 32

Page 33

Page 34

Page 35

Page 36

Page 37

CLEVELAND RANGE
SEQUENCE OF OPERATIONS
24CGP10
Mechanical Timer
1. To turn the unit on, depress the red on/off rocker switch.
• 115 VAC is sent to normally open blowdown valve closing it.
• 115 VAC is sent to the Timed/Manual switches for the cabinets.
• 115 VAC is sent to L1 and L2 of the water level board.
2. With the water level board energized and no water in the boiler
• 115 VAC is sent from the IND terminal to the low water indicator light on the console.
• 115 VAC is sent from the WF terminal to the fill solenoid after a 5-second delay.
• The fill solenoid opens and the boiler fills.
• The water fills to the secondary low water cutoff probe in the boiler, shorting it to
ground
• 115 VAC is removed from the IND terminal and the low water indicator light is
de-energized.
• 115 VAC is sent from the HTR terminal through the normally closed contact of
the high-pressure switch to the amber reset switch,
• 115 VAC is sent through the normally closed R1 contacts to energize the amber
light.
• If the low water cut off probe is not grounded for 20 seconds, 115 VAC is
removed from HTR and sent back to IND energizing the low water light.
3. When the momentary amber switch is depressed 115 VAC is sent to the R1 relay closing it.
• The normally closed R1 contacts open de-energizing the amber light.
• The relay latches through the normally closed contacts of R1
• If either the high-pressure switch (set at 15 PSI) or the low probe circuit on the
water level board opens, then the latch circuit opens.
• When the water level or pressure returns to a safe condition the amber light will
energize and the process may begin again.
4. The R1 relay contacts close sending 115 VAC through the normally closed operating
pressure switch to the 24 VAC transformer.
• 24VAC is sent through the low water cutoff float switch to the R2 relay coil.
• The normally open R2 contacts close and send 115 VAC to the fan.
• The fan turns and the air prover switch is closed.
• 24 VAC is sent through the air prover switch to the ignition module.
• With 24 VAC to the ignition module 24VAC is sent to the pilot coil on the gas
valve.
• A spark is generated at the igniter.
• The pilot valve is energized and opens.
• Gas is sent to the pilot burner.
• The gas is ignited and the flame rectifies the AC current.
Page 38

• When the ignition module reads 1.0 micro amps DC current through the
ground wire the coil to the main gas valve is energized
• The pilot flame lights the main burner.
• If the module does not read 1.0 micro amps DC in 90 seconds it will shut
down the main burner and make one more try before locking out.
5. The water in the boiler is heated to steam.
• As steam is generated and pressure builds the air is pushed out through the steamtrap
on the lower steam manifold.
• Steam goes through the steam trap heating it to 192 degrees closing the steam trap.
6. Pressure builds in the boiler to the set point of 8-10 PSI.
• The operating pressure switch opens and the heat circuit is de-energized.
7. With the timed/manual switch in the timed position and time on the timer.
• 115 VAC is sent to the steam solenoid and steam is sent to the cooking cabinet. There
the steam is directed around the product.
• 115 VAC is sent to the “Pause” or “Sure Cook” light.
• 115 VAC is sent to the normally open contacts of the compartment thermostat.
• The normally open contacts of the compartment thermostat close when the
compartment temperature reaches 193 degrees
• 115 VAC is sent to the timer motor and the timer begins to count down.
• 115 VAC is sent to the condensate solenoid and cold water is sent to the condensate
spray nozzle pulling the steam down the drain.
• When the steam pressure drops below the operating set point the heat circuit is
energized and the heat process begins again.
8. Water continues to fill the boiler until the operational water float is lifted and closes, shorting
the HI terminal on the water level board to the C terminal. .
• When the HI terminal is shorted to the C terminal the WF terminal on the water level
board is de-energized.
• If the water level drops below the operational water float switch for more than 5
seconds the WF terminal is energized and the water fill circuit begins again.
9. When the mechanical timer counts down:
• 115 VAC is removed from the condensate circuit.
• 115 VAC is removed from the steam solenoid.
• 115 VAC is sent to the 3-second timer
• 115 VAC is sent from the 3-second timer to the buzzer for 3 seconds.
10. With the timed/manual switch in the Manual position
• 115 VAC is sent to the steam solenoid and steam is sent to the cooking cabinet. There
the steam is directed around the product.
• 115 VAC is sent to the “Pause” or “Sure Cook” light.
• 115 VAC is sent to the normally open contacts of the compartment thermostat.
• The normally open contacts of the compartment thermostat close when the
compartment temperature reaches 193 degrees
Page 39

• 115 VAC is sent to the condensate solenoid and cold water is sent to the condensate
spray nozzle pulling the steam down the drain.
• When the steam pressure drops below the operating set point the heat circuit is energized
and the heat process begins again.
11. The unit is turned off by depressing the red rocker switch.
• 115 VAC is removed from the timing and heat circuits.
• 115 VAC is removed from the normally open blowdown valve allowing the unit to
drain.
• 115 VAC is sent to the 3-minute timer.
• The three-minute timer will energize the fill and rinse solenoids for 3 minutes while
the steamer drains assisting and cooling the blowdown. .
Page 40

Page 41

Page 42

CLEVELAND RANGE
SEQUENCE OF OPERATIONS
24 CGP 10
Electronic Timer
1. To turn the unit on, depress the red on/off rocker switch.
• 115 VAC is sent to normally open blowdown valve closing it.
• 115 VAC is sent to the 24 VAC transformer to the timer.
• 24 VAC is sent to the timer.
• 115 VAC is sent to the Timed/Manual switches for the cabinets.
• 115 VAC is sent to L1 and L2 of the water level board.
2. With the water level board energized and no water in the boiler
• 115 VAC is sent from the IND terminal to the low water indicator light on the console.
• 115 VAC is sent from the WF terminal to the fill solenoid after a 5-second delay.
• The fill solenoid opens and the boiler fills.
• The water fills to the secondary low water cutoff probe in the boiler, shorting it to
ground
• 115 VAC is removed from the IND terminal and the low water indicator light is
de-energized.
• 115 VAC is sent from the HTR terminal through the normally closed contact of
the high-pressure switch to the amber reset switch,
• 115 VAC is sent through the normally closed R1 contacts to energize the amber
light.
• If the low water cut off probe is not grounded for 20 seconds, 115 VAC is
removed from HTR and sent back to IND energizing the low water light.
3. When the momentary amber switch is depressed 115 VAC is sent to the R1 relay closing it.
• The normally closed R1 contacts open de-energizing the amber light.
• The relay latches through the normally closed contacts of R1
• If either the high-pressure switch (set at 15 PSI) or the low probe circuit on the
water level board opens, then the latch circuit opens.
• When the water level or pressure returns to a safe condition the amber light will
energize and the process may begin again.
4. The R1 relay contacts close sending 115 VAC through the normally closed operating
pressure switch to the 24 VAC transformer.
• 24VAC is sent through the low water cutoff float switch to the R2 relay coil.
• The normally open R2 contacts close and send 115 VAC to the fan.
• The fan turns and the air prover switch is closed.
• 24 VAC is sent through the air prover switch to the ignition module.
• With 24 VAC to the ignition module 24VAC is sent to the pilot coil on the gas
valve.
• A spark is generated at the igniter.
• The pilot valve is energized and opens.
Page 43

• Gas is sent to the pilot burner.
• The gas is ignited and the flame rectifies the AC current.
• When the ignition module reads 1.0 micro amps DC current through the
ground wire the coil to the main gas valve is energized
• The pilot flame lights the main burner.
• If the module does not read 1.0 micro amps DC in 90 seconds it will shut
down the main burner and make one more try before locking out.
5. The water in the boiler is heated to steam.
• As steam is generated and pressure builds the air is pushed out through the steamtrap
on the lower steam manifold.
• Steam goes through the steam trap heating it to 192 degrees closing the steam trap.
6. Pressure builds in the boiler to the set point of 8-10 PSI.
• The operating pressure switch opens and the heat circuit is de-energized.
7. With the timed/manual switch in the timed position (with time on the timer) or in the manual
position:
• The timer display alternates between “PAUS” and the time set.
• 115 VAC is sent to the steam solenoid and steam is sent to the cooking cabinet.
There the steam is directed around the product and pulled down the drain by the
condensate spray.
• When the cooking compartment reaches 193 degrees internally the thermal switch
closes and the timer begins to count down.
• 115 VAC is sent to the condensate solenoid. The condensate solenoid sends cold
water to the condensate spray nozzle pulling the steam down the drain.
• When the pressure drops below the set point the heat circuit is energized and the heat
process begins again.
8. Water continues to fill until the operational water float is lifted and closes, shorting the HI
terminal on the water level board to the C terminal. .
• When the HI terminal is shorted to the C terminal the WF terminal on the water level
board is de-energized.
• If the water level drops below the operational water float switch for more than 5
seconds the WF terminal is energized and the water fill circuit begins again.
9. When the electronic timer counts down:
• 115 VAC is removed from the condensate circuit.
• 115 VAC is removed from the steam solenoid
10. With the timed/manual switch in the manual position
• 115 VAC is sent to the steam solenoid and steam is sent to the cooking cabinet and
around the product.
• 115 VAC is sent to the normally open contacts of the compartment thermostat.
Page 44

• The normally open contacts of the compartment thermostat close when the
compartment reaches 193 degrees.
• 115 VAC is sent to the condensate solenoid and cold water is sent to the condensate
spray nozzle pulling the steam down the drain.
11. The unit is turned off by depressing the red rocker switch.
• 115 VAC is removed from the timing and heat circuits.
• 115 VAC is removed from the normally open blowdown valve allowing the unit to
drain.
• 115 VAC is sent to the 3-minute timer.
• The three-minute timer will energize the fill and rinse solenoids for 3 minutes
while the steamer drains assisting and cooling the blowdown. .
Page 45

Page 46

Page 47

PROBLEM:
24CGP10 Boiler
won't build
pressure
Replac e the
water boar d .
Replac e the
water boar d
Repair
or Replace th e
probe circuit.
Replace R2
relay
Yes
No
Yes
See
Steamer won' t
fill.
Is the red "Low
Water" light on
with a j u mp er from
terminal s LO W
and C on the wat er
board?
No
Repair
or Replace th e
probe circuit.
Is there 120 VAC
between ter m i nals
L2 and HTR on t h e
water boar d wi t h a
jumper b etween
LOW and C?
Replace the R1
relay
Boiler won't build
Is the r ed l i g ht on
in the on/off
Is there water in
No
the sight glass?
Is the red "Low
Yes
Water" light on ?
Is the Amber ligh t
on in t h e r es et
Is there 120 VAC
terminals L2 and
No
HTR on the water
Is there 120 VAC
No
to the Reset
Replac e the
Reset switch
pressure
switch?
Yes
Yes
No
switch?
No
between
board?
Yes
switch?
Yes
Is there 115 VAC
No
to the s t eamer?
After depressing
the reset switch,
Yes
does th e A m ber
light go off?
Is there 120 VAC
to the pri m ary of
the 24 VAC
transformer?
Is there 2 4 V A C at
the secon dar y of
the transformer?
Yes
Replac e the
on/off rocker
switch
Yes
ignition
Yes
No
No
Is there 120 VAC
to the pri m ary of
transformer wit h
No
pressure switch
No
Connect 115
VAC to
steamer.
Replace
the high limit
pressure
switch
Yes
With the High
Limit pressu r e
switch
temporarily
bypassed , does
the Am b er li g h t g o
off when the reset
switch is
depressed?
the ignition
the operatin g
temporarily
bypass ed?
Yes
Replac e the
ignition
transformer
No
Replace the R1
No
the operating
Replace the R1
relay.
relay
Replace
pressure
switch
Yes
Is there 2 4 V A C to
coil of R2?
No
Replace float
switch
Is there 120 VAC
No
Replac e the
to blower ?
Yes
blower
No
Is the blower
turning?
Yes
Replace t he air
prover s w it ch
Is there 2 4 V A C at
No
ignit ion module?
Is there fl am e at
the burner?
Is there allot of
steam comi n g ou t
the drain?
Replac e the
steam t rap
Yes
Yes
Yes
Yes
No
No
See Boiler
won't ignite.
With
flame and water the
Boiler is makin g
steam. Chec k for
leaks.
Page 48

PROBLEM:
24CGP10
Gas boiler
won't fill
Boiler won't fill.
Yes
Is there 115 VAC
to the s t eamer?
Yes
No
Supply 115
VAC to the
steamer.
Replac e the
wiring to th e fill
solenoid.
Is there w at er to
Is there 120 VAC
between the L1
120 VAC between
L2 and WF on the
120 VAC across
No
the coil of t h e fill
the s t eam er?
Yes
and L2 on the
water board ?
Yes
Is there
water board ?
Yes
Is there
solenoid?
No
No
No
Supply cold
water to the
steamer.
Replac e the
on/off rocker
switch .
Remove
the wire f r om t h e H I
terminal on the water
board. I s t h er e 12 0
VAC between L2 and
Replace float
switch
WF?
Yes
No
Replac e the
water boar d
Replace wiri n g
to drain
solenoid.
Replac e the
wiring to the
intermittent
blowdown
timer .
No
the s t eam er have
blowdown timer?
No
there 120 VAC
between ter m i nals
2&3 on the timer?
Replace t h e fill
solenoid
Does
the opt i onal
intermittent
Yes
Is
Yes
Replac e the
intermittent
blowdown
timer.
No
No
Yes
Is
water leaving the
fill solenoid?
Yes
Is there
120 VAC across
the coil of the
drain valve?
Yes
Is water draining
from the
generator?
Yes
Replac e the
drain valve.
No
If water
is leaving the fill
solenoid and not
draining from th e
generator wh er e is it
going? check for
leaks..
Page 49

Replac e the
gas valve.
PROBLEM:
24CGP10
Gas boiler
won't ignite
Replace pilot
assy and ignition
wire
Boiler won't heat.
start
Is there 2 4 V A C to
the ignition
module?
Yes
Is there s p ark t o
the igni t er and 2 4
VAC to the pilot
coil of th e gas
val ve f or 9 0
seconds ?
No
No
See Boiler
won't build
pressure.
Replac e the
ignit ion module
Supply gas to
the Steamer .
Is there gas to th e
No
Yes
unit?
Is there gas to th e
No
pilot assy?
Replac e the
gas valve
Yes
Is there fl am e at
No
the pilot assy?
Is there at least
1.0 micro amp DC
ground terminal at
Is there 2 4 V A C to
the main valve coil
Yes
on gas valve?
Yes
Yes
to the burner
the ignition
module?
Yes
After replacing the
ground wire to the
burner ground
terminal , is th er e
No
1.0 micro amp DC
to the ignition
No
Replac e the
ignit ion module
module?
Yes
No
Replac e the
pilot as sy and
ignition wire
PROBLEM: 24CGP10 Gas Boiler Overfills
Boiler over fills
With a jumper
across termin als
HI and C on the
water boar d , is
there 120 VAC
between L2 and
WF?
No
Replace the float
switch.
Replace t h e fill
solenoid
With water in th e
sight glas s is t h er e
120 VAC between
No
terminals L2 and
WF on the water
Yes
board.?
Yes
Replac e ;th e
water boar d
Page 50

PROBLEM:
24CGP10
Gas Boiler Over
Pressurizes
(15# Safet y
valve opens)
Boiler over
pressurizes
Replace
operating
pressure
switch
Does operatin g
pressure switch
open at pr oper
No
setting (chec k
service manual f or
that st eam er)?
Replac e the
safety valve.
Yes
No
Does the burner
continue to burn
with operating
pressure switch
open?
No
Does the pressure
in the gauge
continue to ris e
with no burners
on?
PROBLEM: 24CGP10 Stops Producing Steam
Yes
Replac e g as
valve.
Descale boilerYes
Replac e the
operating p r es sur e
switch
Yes
Does th e s t eamer start t o
steam when the operatin g
pressure switch is
temporarily by-pass ed?
No
The
ignit ion module
has gone into
lockout. See
Boiler won't
ignite
Steamer stops
steaming
Does the Boiler
build pressure?
Does th e am ber
No
light in the reset
switch come on?
Is the temperature
sensitive dot
(surrounded by a
yellow ci r cle) on
the water board
white?
No
Yes
No
With the cabinet in
the ti m ed p os i t i on and
Yes
Yes
time on the timer is
the 120 VAC t o th e
steam s olenoid?
Is the low water
indicator on (120
terminals on the
Replace S t eam
Solenoid
Yes
VAC bewtween
the IND and L 2
waterboard )?
Replac e the
With the cabinet in
the manual
postion is ther e
No
120 VAC to the
steam s olenoid?
Replac e the
water boar d
Does th e low
water in d i cator
light go off with a
jumper btween the
Yes
LOW and C
terminals on the
waterboard?
timer
Yes
No
No
Yes
Replac e the
door swit c h
Yes
With the optional
door switch by
passed, is th er e
120 VAC to the
steam s olenoid?
No
Replac e the
timed/manual
switch
Clean or
replace the low
water probe
Replace
the water board. I t h as
reached a temperatur e of
over 180
degrees.
No
Is high pressure
switch opening
prematurely?
No
Delime the
boiler
Yes
Replace high
pressure switch
Page 51

PROBLEM:
24CGP10
Timer displays "PAUS" ("Sure Cook" light is on) and won't count down
START
Is steam heati ng
Replac e the
thermo-switch
cabinetabove 192
degrees (the set
thermo-switch)?
count down when
Yes
the thermo-switch
the cook i n g
No
temp of the
Yes
Does the timer
No
is bypassed?
See
24CGP10 Stop s
Producing
Steam
Replac e the
timer
Steam Leaks
Around Door
Is COLD water
supplied to th e
steamer?
Yes
Is the door gas k et
phys ic ally
damaged?
Yes
Turn over the
gasket or
replace it.
No
No
Supply
cold water (35-
60 PSI) to the
steamer.
Is the door ou t of
alignment ?
Yes
Replac e the
door bearings
and pins.
PROBLEM:
24CGP10
Steam leaks around the door.
Is there 120 VAC
No
Is the drain
obstructed?
Yes
Remove the
obstruction
across the coil of
No
the condensate
Is the solenoid
solenoid?
Yes
opening?
No
No
Replac e the
compartment
thermostat
Replac e the
condensate
solenoid.
Yes
Replac e the
condensate spray
nozzle
Page 52

1333 East 179th Street
Cleveland, Ohio 44110
Phone: (216) 481- 4900
Fax: (216) 481- 3782
Page 53

Page 54

Page 55

Page 56

Page 57

 Loading...