

ClearSounds CST25 User Manual
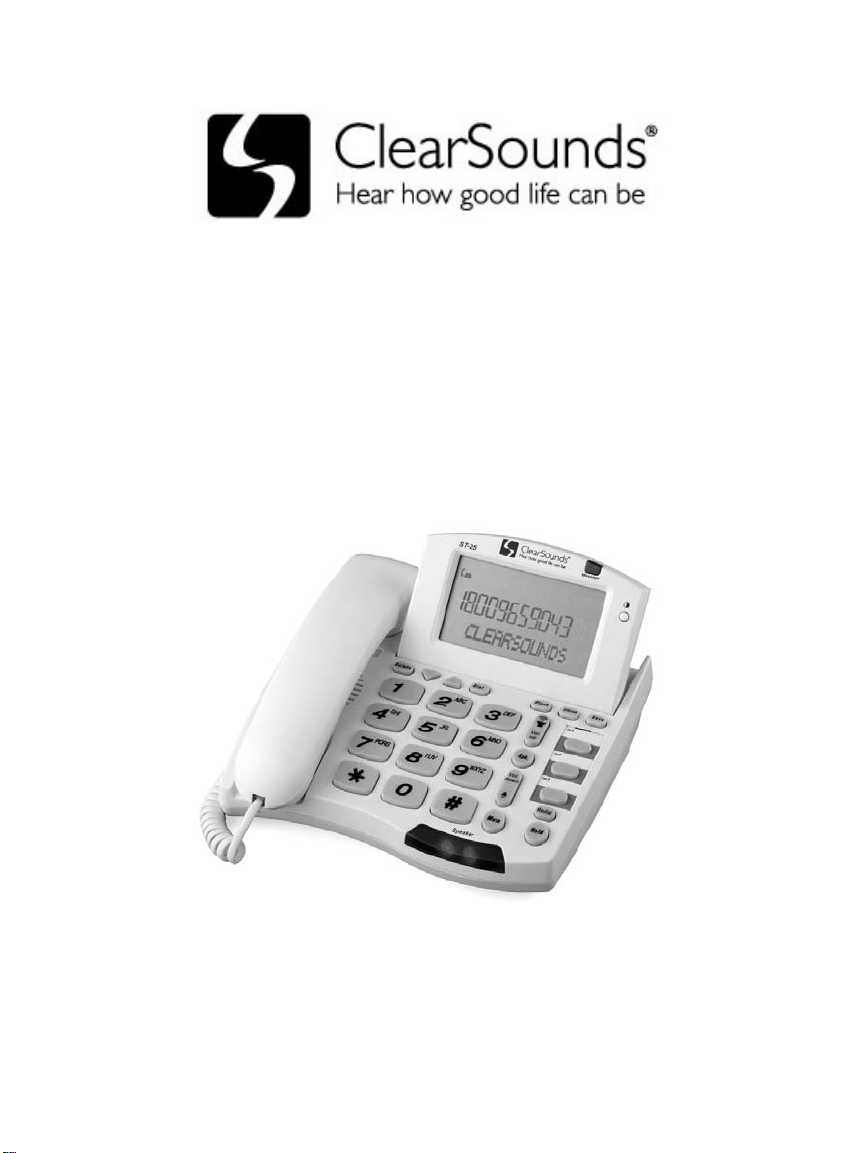
CST25
Sound-enhanced
Speakerphone with CALLER ID
Installation Guide & User Manual
©2006 ClearSounds Communications. All right reserved.

Table of Contents
SETTING UP AND INSTALLING YOUR PHONE ................................................. 1
Introduction ......................................................................................................... 1
Important Safety Instructions .............................................................................. 1
Parts Checklist .................................................................................................... 2
Installation .......................................................................................................... 4
Wall Mounting ..................................................................................................... 6
Adjusting the Display Angle ................................................................................ 6
Adjusting the Display Contrast ........................................................................... 6
Adjusting Handset Receiver Volume .................................................................. 6
Adjusting Speakerphone Receiver Volume ........................................................ 7
USING THE TELEPHONE ..................................................................................... 8
Making a Call ...................................................................................................... 8
Editing Telephone Number before Dialing ......................................................... 8
Receiving a Call .................................................................................................. 8
Receiving a Call Waiting Call ............................................................................. 8
Switching Between the Handset and the Speakerphone ................................... 9
Redialing ............................................................................................................. 9
Putting a Call on Hold ......................................................................................... 9
Muting a Call ....................................................................................................... 9
Storing a New Number and Name in the Memory Buttons .............................. 10
Copying the Caller’s Number and Name to a Memory Button ......................... 10
CALLER ID .......................................................................................................... 11
CALLER ID Service and Call Waiting CALLER ID Service .............................. 11
CALLER ID Display .......................................................................................... 11
New Calls and Total Calls ................................................................................ 11
Viewing the CALLER ID List ............................................................................. 12
Calling Back a Number From the CALLER ID List ........................................... 12
Deleting a Call From the CALLER ID List ........................................................ 12
Deleting All Calls from the CALLER ID List ...................................................... 13
Using Call Waiting CALLER ID ........................................................................ 13
Message Indication ........................................................................................... 13
Accessing Voice Mailbox .................................................................................. 13
Clearing the Message Waiting Indicator .......................................................... 13
UNAVAILABLE, PRIVATE CALL and ERROR Messages ............................... 14
IN CASE OF DIFFICULTY ................................................................................... 15
Resetting Your Telephone's Programming ...................................................... 15
Maintenance Information .................................................................................. 15

Troubleshooting ................................................................................................ 16
LIMITED WARRANTY ......................................................................................... 16
Warranty Limitation ........................................................................................... 17
What This Warranty Does Not Cover ............................................................... 17
State Law Rights .............................................................................................. 17
FCC REGISTRATION AND REPAIR INFORMATION ....................................... 18
Connection and Use with the Nationwide Telephone Network ........................ 18
Notification to the Telephone Company ........................................................... 18
Repair Instructions ............................................................................................ 18
Rights of the Telephone Company ................................................................... 18
Interference Information: Part 15 of FCC Rules .............................................. 18

Setting Up and Installing Your Phone
Introduction
Congratulations on the purchase of your new telephone. It has been manufactured to very
high quality standards for convenient and reliable service. This telephone can be used
with "Call Identification (CALLER ID) Service" and/or "Call Waiting CALLER ID Service"
that is provided by your local telephone company. There is a fee for these services by
your local telephone company, and they may not be available in all areas. When used
with these services, your telephone displays the telephone number or the telephone
number and name of each caller before you answer the call allowing you to screen your
calls.
In addition to CALLER ID services, if you subscribe to voice mail services from your local
telephone company, voice mail waiting indicators will inform you there is a message
waiting in your voice mailbox.
Important Safety Instructions
Before using your telephone equipment, basic safety precautions should always be
followed to reduce the risk of fire, electric shock and injury to persons, including the
following:
1.
Read and understand all instructions.
2. Follow all warnings and instructions marked on the product.
3. Unplug this product from the telephone jack and the power outlet before cleaning.
Do not use liquid or aerosol cleaners. Use a damp cloth for cleaning.
4.
Do not use this product near water, such as near a bathtub, sink, laundry tub, in a
wet basement, or near a swimming pool.
5. Do not place this product on an unstable cart, stand, or table. Serious damage may
result if the product falls.
6. Slots or openings in the cabinet and the back and bottom are provided for ventilation
to protect the phone from overheating. These openings must not be blocked or
covered. The product should never be placed near or over a radiator or heat register.
7. This product should be operated only from the type of power source indicated on the
marking label.
8. Do not allow anything to rest on the power cord. Do not locate this product where
the cord will be abused by persons walking on it. Do not attach the power cord to
building surfaces.
9. Do not overload wall outlets and extension cords as this can result in the risk of fire
or electric shock.
10. Never push any objects into this product through cabinet slots as they may touch
dangerous voltage points or short out parts that could result in a fire or electric
shock. Never spill liquid of any kind on the product.
11. If this product does not operate normally, see the “In Case of Difficulty” section in
this owner's manual. If you cannot resolve the problem, or if the product is
damaged, refer to the "Limited Warranty" section of this owner's manual. Opening
the product or reassembling it incorrectly may expose you to dangerous voltages or
other risks, and will void the warranty.
Page 1

12. Unplug this product from the wall outlet and refer servicing to qualified service
personnel under the following conditions: (a) When the power supply cord or plug is
damaged or frayed. (b) If liquid has been spilled into the product. (c) If the product
has been exposed to rain or water. (d) If the product does not operate normally by
following the operating instructions. Adjust only those controls that are covered by
the operating instructions. (e) If the product has been dropped or the cabinet has
been damaged. (f) If the product exhibits a distinct change in performance.
13. Avoid using a telephone during an electrical storm. There may be a remote risk of
electric shock and/or hearing damage from lightning.
Do not use the telephone near a gas leak even to report the leak.
14.
Parts Checklist
Remember to save your sales receipt in case you ever need warranty service.
Check to make sure your package includes the items described below:
1. Telephone Base 4. AC/DC Adapter
2. Telephone Handset 5. Handset Cord
3. Telephone Line Cord
Make sure you have a modular wall jack near the place you have chosen to install the
telephone. If you have an older phone jack, you will need to buy a modular jack adapter.
Page 2
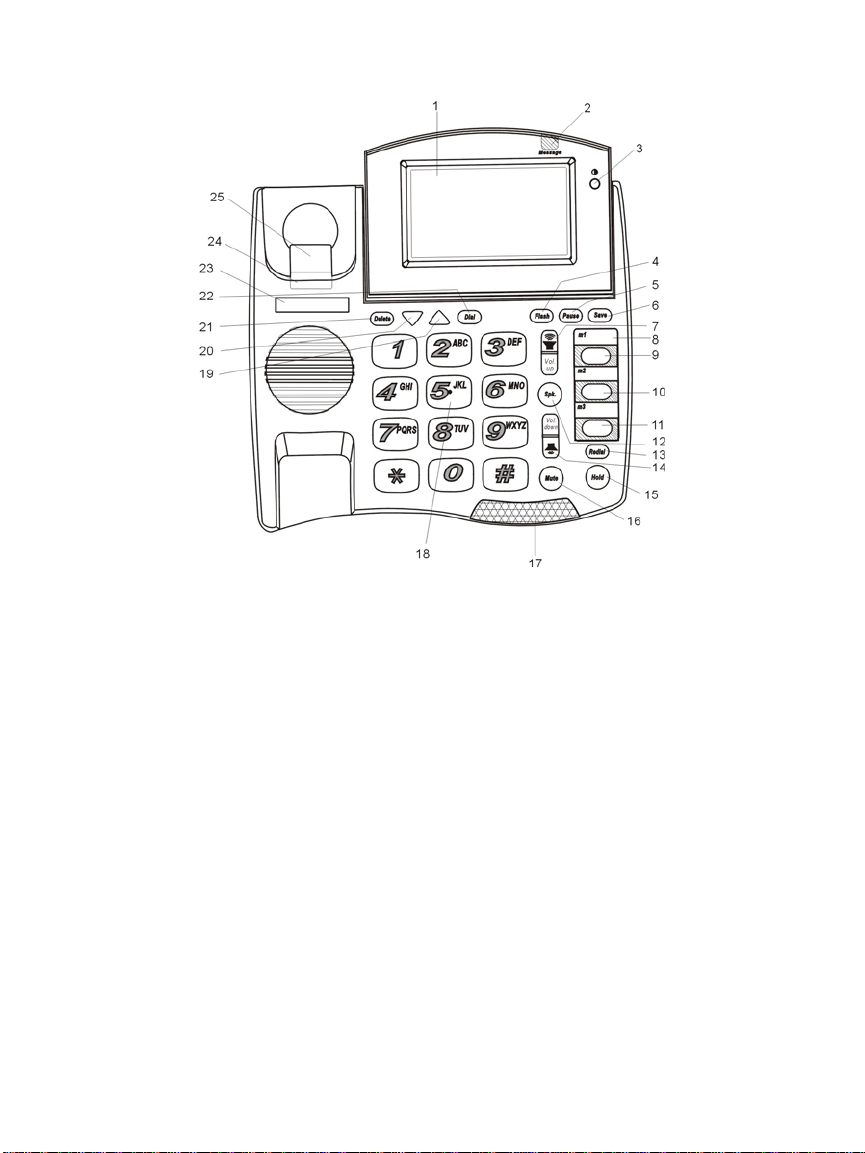
Controls and Functions
1. LCD display
2. Message light - Visual message waiting indicator.
3. ◑ button – to adjust LCD contrast.
4. Flash button – during a call, to access telco’s calling features.
5. Pause button – to insert 3 seconds delay during memory button programming.
6. Save – to begin programming of memory buttons.
7. Vol. up button – to increase receiver volume for handset and speakerphone.
8. Overlay paper
9. M1 – programmable memory button
10. M2 – programmable memory button
11. M3 – programmable memory button
12. Spk. Button with indicator – to activate or to deactivate speakerphone.
13. Redial button – to redial last number.
14. Vol. down Button – to reduce receiver volume for handset and speakerphone.
Page 3
15. Hold with indicator – to put a call on hold, LCD will display “Hold”
16. Mute with indicator – to mute transmitter, LCD will display “Mic Muted”
17. Visual ringer and speakerphone indicators
18. Telephone keypad
19. - to review upward from the oldest CALLER ID record.
20. - to review downward from the newest CALLER ID record.
21. Delete button – to delete one or all CALLER ID records, or Message light.
22. Dial button – to dial number displayed or to accept entry
23. Index card
24. Handset tab
25. Hook switch
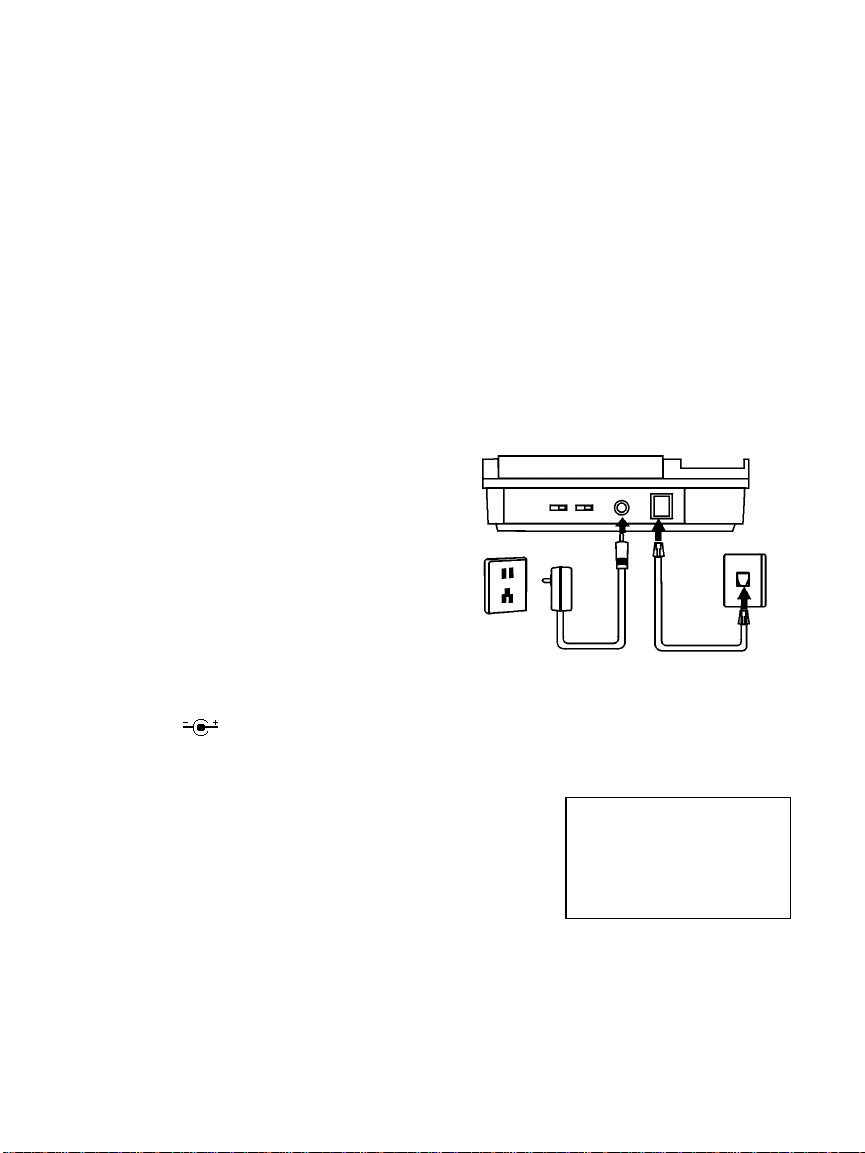
Installation
1. Plug one end of the flat telephone line
cord into the line jack on the back of the
phone where it is labeled "TEL.LINE"
and plug the other end into your modular
telephone wall jack.
2. Connect one end of the coiled Handset
Cord to the jack on the left side of the
phone and connect the other end of the
coiled Handset Cord to the jack on the
handset
3. Connect the AC adapter to an electrical wall outlet and then connect the AC adapter
plug to the “DC 9V” jack on the back of the phone. Use only with a Class 2 power
source, plug polarity, 9V DC, AC adapter.
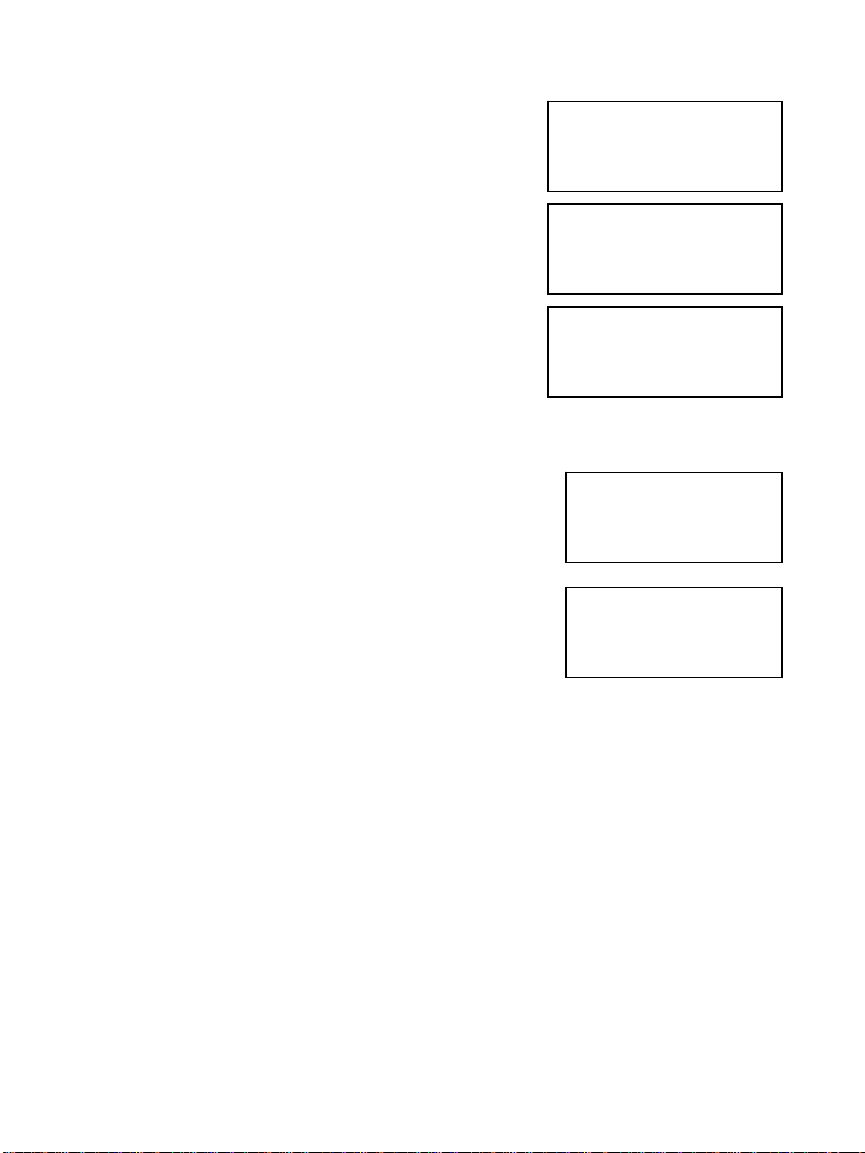
4. Selecting a language
When the phone is powered up for the first time, the
display flashes “SELECT LANUGAGE” and “>ENG
ESP FRA”.
To select English, press the “1” button.
To select Spanish, press the “2”
To select France, press the “3”
Then, press the Dial button to confirm the selection.
Page 4
button.
button.
#00
SELECT LANGUAGE
1 2 3
>ENG ESP FRA

5. Program your area code
(A) After selecting the language, the display flashes "ENTER AREA CODE" and “7
DIGITS DIAL”.
(B) If you dial your local calls using 7 digits (e.g., 555-
1212), then enter your local area code, press the
Dial button, and go to Step C.
If you dial your local calls using 10 digits (e.g., 303-
#00
_ _ _
ENTER AREA CODE
7 DIGITS DIAL
555-1212), then enter “000” as the area code for 7
digits dial, and press the Dial button to go to Step C.
(C) The display flashes “ENTER AREA CODE” and “10
DIGITS DIAL”.
#00
3 0 3
ENTER AREA CODE
7 DIGITS DIAL
Enter the area code(s) for numbers that you dial
using ten digits (e.g., 720-555-1234). You can store
up to three area codes for ten-digit dialing. Press
Dial when you are done. If there is no number you
dial using ten digits, then press Dial.
#00
_ _ _ - _ _ _ - _ _ _
ENTER AREA CODE
10 DIGITS DIAL
6. Press the Save button to save these operating settings.
After installation, lift the telephone's Handset and listen for
the dial tone. If there is no dial tone, check to make sure all
cords are firmly plugged into their jacks.
#00
7 2 0
ENTER AREA CODE
10 DIGITS DIAL
Note: Programming your area code will allow you to easily
dial numbers that are in your CALLER ID list. See the Section “Calling Back a Number
from the CALLER ID List” for more information on dialing calls from your CALLER ID list.
Page 5
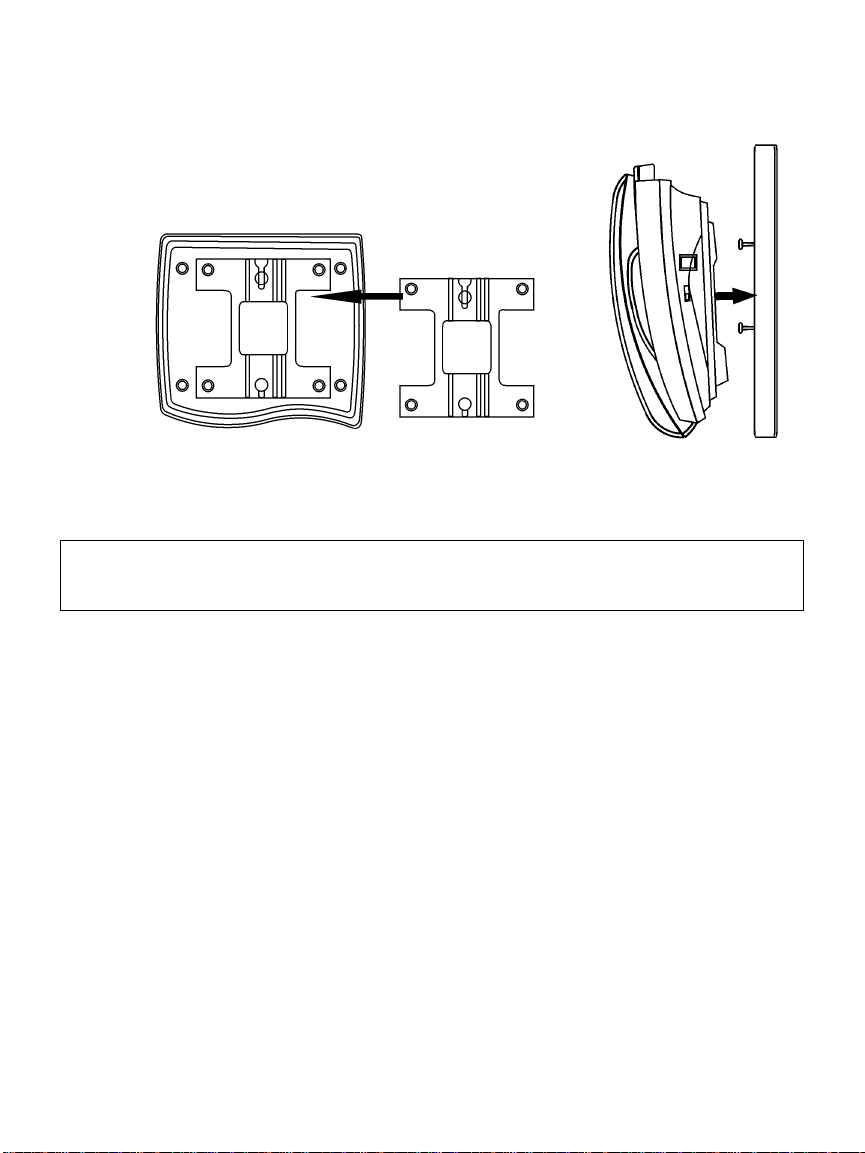
Wall Mounting
1. Turn the phone over so that you are looking at the bottom of the phone. Insert tabs at
the thin end of the wall mount bracket into the holes at the
rear of the phone bottom. Press and latch the tabs at the
thicker end of the wall bracket into holes at the front end of
phone. The back of the phone should then have two round
plastic holes that can be used to hang your phone on the
wall.
2. Use the two round holes to hang the phone on the wall plate on your wall.
Important Note: If you do not wish to mount your phone on the wall, the Wall Mount
Bracket can be reversed to raise the angle of the phone's display when sitting on a table
or desk.
Adjusting the Display Angle
You can optimize the LCD display by adjusting the viewing angle. To adjust the LCD
viewing angle, move the rear edge of the LCD module up or down.
Adjusting the Display Contrast
The display can be adjusted to suit the light level of your room and your viewing
preference. To make the contrast of the display lighter or darker, press the ◑ button to
the right of the screen until the desired contrast is reached.
Adjusting Handset Receiver Volume
To adjust the handset receiver volume:
1. Lift the handset and listen to the dial tone.
2. Press the Volume up button to increase the receiver volume.
3. Press the Volume down button to decrease the receiver volume.
4. Replace the handset when the desired receiver volume is reached.
Page 6

Adjusting Speakerphone Receiver Volume
To adjust the speakerphone receiver volume:
1. Press the Speaker button and listen to the dial tone.
2. Press the Volume up button to increase the receiver volume.
3. Press the Volume down button to decrease the receiver volume.
4. Press the Speaker button when the desired receiver volume is reached.
Page 7

Using the Telephone
Making a Call
1. Pick up the Handset or press the Speaker button, and listen for a dial tone.
2. Using the Keypad, dial the desired telephone number. The number you are dialing
will appear on the display as you dial. When making a call or talking on the phone,
the "In Use" light will turn on indicating the phone is in use. This light will also be on
whenever another phone on the same phone line is in use.
Editing Telephone Number before Dialing
You can enter the telephone number you wish to dial before lifting handset or pressing the
Speaker button.
1. Use the keypad to enter the telephone number. The number is displayed on the
screen.
2. If you enter one or more wrong digits, press the delete button one or more times till
incorrect digits are erased.
When all digits of a telephone number are entered correctly, press the Dial button. The
speakerphone is activated and the telephone number is dialed automatically. If you desire
to use the handset instead of the speakerphone simply pickup the handset after pressing
the Dial button.
Receiving a Call
1. When you hear the phone ring, simply pick up the handset from the handset cradle.
You may also press the Speaker button to answer the call using the speakerphone.
2. When you are finished talking, replace the handset in the handset cradle to end the
call. If you have been talking using the speakerphone, press the Speaker button to
hang up.
Receiving a Call Waiting Call
If you subscribe to call waiting services and are on a call when another caller calls your
phone number, you will hear a "beep" indicating there is another call coming in. If you
subscribe to Call Waiting ID services, the caller’s name and number can be displayed on
the screen. To answer the waiting call and/or switch between calls:
1. Press and release the Flash button to put the current call on "hold" and to answer the
incoming call. To switch back and forth between the two calls, press and release the
Flash button.
2. When a Call Waiting call comes in, you may also hang up the current call in order to
pick up the waiting call. When you are on a call you want to end and another call
comes in, hang up the telephone. The current call will be disconnected and after a
temporary delay, the phone will ring, allowing you to answer the waiting call.
Page 8

Switching Between the Handset and the Speakerphone
To switch a call between the Handset and the Speakerphone during a conversation:
1. While talking on the handset, press the Speaker button to activate the speakerphone.
The call can now be heard from the speakerphone.
2. While talking on the speakerphone, simply lift up the handset and the call will be
transferred to the handset and will no longer be heard on the speakerphone.
3. Hang up the handset. Hanging up the handset will not
Speakerphone is activated. You have to press the Speaker button to disconnect the
call.
4. If the speakerphone is not activated, simply hang up the handset and the call will be
disconnected.
disconnect the call when the
Redialing
You can redial the last number you called with just one touch of the Redial button. This
lets you easily redial the same number again if the line was busy.
1. Pick up the handset or press the Speaker button and listen for a dial tone.
2. Press the Redial button and the last number you dialed will be shown on the display
and will be automatically dialed.
Putting a Call on Hold
The Hold button allows you to place a call on "HOLD" without disconnecting the call.
When a call is on hold, you may hang up the handset without disconnecting the call.
1. Press the Hold button and the current call will be placed on hold. If you were talking
with the handset, you can then place the handset back in the handset cradle without
disconnecting the call. If you were talking with the speakerphone, the call is placed on
hold.
2. To continue the conversation, pick up the handset or press the Speaker button.
Muting a Call
In addition to putting a call on hold, muting a call is a good way to mute the phone so that
the person on the other end of the line will not hear what you are saying. You can
continue to hear the person on the other end.
1. Press the Mute button to mute the call.
2. To release the mute, press the Mute button again and you will be able to continue the
conversation. Do not hang up the phone while a call is muted or the call will be
disconnected.
Page 9
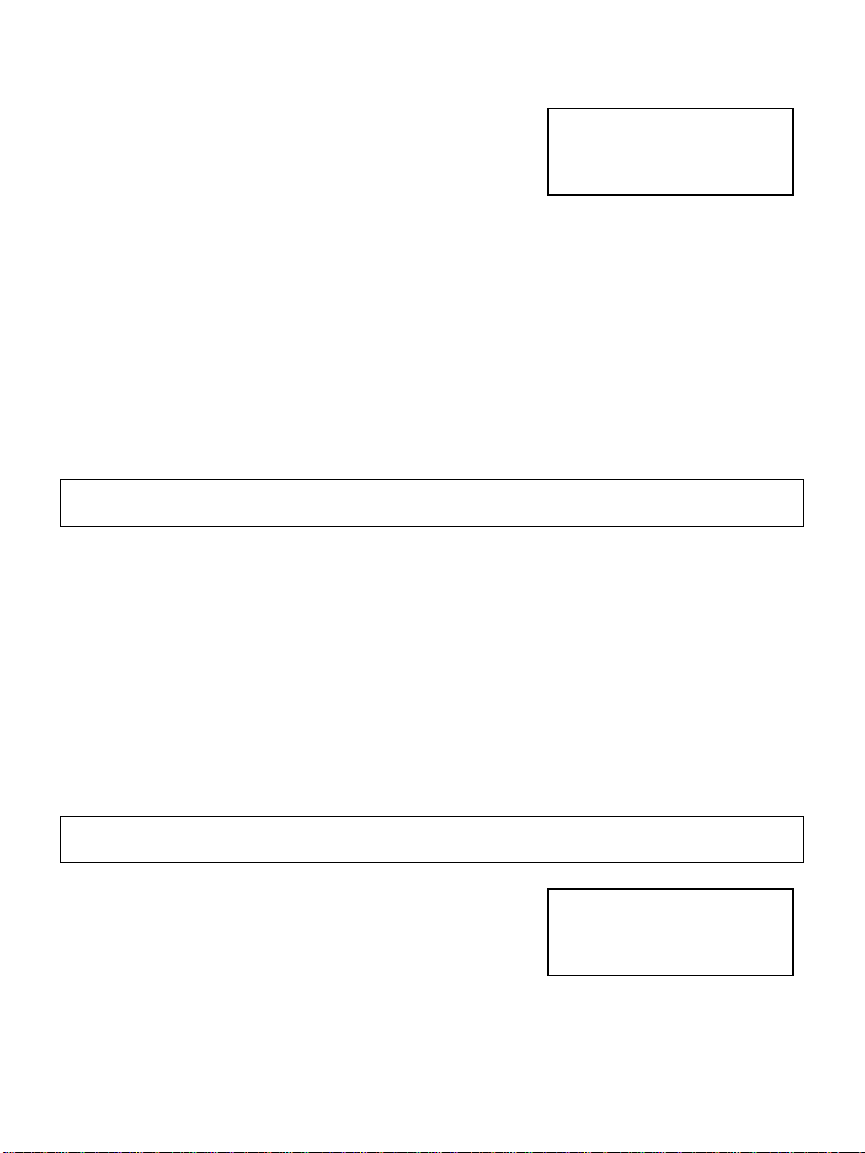
Storing a New Number and Name in the Memory Buttons
To store a new number and name in the memory
buttons:
1. Press the Save button when the display shows no
caller’s number or name. The “SAVE TO?” prompt
appears on the display.
2. Press the memory button where you wish to store
this telephone number (e.g., M1). The “ENTER
NUMBER>“ prompt appears on the display.
3. Use the keypad to enter the telephone number,
including the long distance prefix that you need to
dial this number. Insert a pause or multiple pauses
where required by using the Pause button. Then
press the Save button.
4. The display will read “PROGRAMMING OK!”.
Copying the Caller’s Number and Name to a Memory Button
When the caller’s number and name you wish to store in a
memory button is displayed during CALLER ID review,
press the Save button. The 3
“SAVE TO?”.
You can save this caller’s number and name into a memory
button by pressing the desired memory button (e.g., M1).
The display will read “PROGRAMMING OK!”.
rd
line of the display indicates
SAVE TO?
#00
ENTER NUMBER>
#00
8009659043
USE SAVE TO END
#25
800-965-9043
ClearSounds
SAVE TO?
Page 10

CALLER ID
CALLER ID Service and Call Waiting CALLER ID Service
The "CALLER Identification" service (CALLER ID) allows the caller’s phone number and/or
name to be shown on the display as the call comes in before you pick up the phone. In
order to use this feature, YOU MUST FIRST SUBSCRIBE TO THE CALLER ID SERVICE
provided by your local telephone company. The name of this service may vary depending
on your telephone company. Before using this feature, please make sure you have
properly entered your area code as explained in the “Programming Your Area Code” step
of the Introduction section of this manual.
Important Note: When a new call comes in, you must let your phone ring at least 2 full
times in order for the CALLER ID information to be displayed.
The Call Waiting CALLER ID service allows the phone number and/or name of a waiting
caller to be shown during a telephone conversation. To use this feature, YOU MUST
FIRST SUBSCRIBE TO CALL WAITING CALLER ID SERVICE with your local telephone
company. The name of this service may vary depending on your telephone company.
CALLER ID Display
When you receive a call, the phone number appears on
the display with the day and time the call was received
and is then stored in the Call Memory as shown.
If your CALLER ID service includes the caller's name,
then the caller’s name also appears on the display (up to
15 letters) as shown.
The date and time information is received from your
telephone company. If the call came from a different
time zone, it will still show the time in your area.
The total number of calls that are saved in the Call Memory is displayed after the “#”
symbol when a call is received. Each call is assigned a call number. The most recent call
has the highest number (e.g. “#99”) and the oldest call has the smallest number (e.g. “
#1”). The phone number of a waiting caller is also registered into the Call Memory as
another call.
New Calls and Total Calls
When the phone is not in use, the display indicates the
number of new calls that have been received since the
last review of the Call Memory as well as the total
number of calls in memory.
10:30am 8/11 #20
800.965.9043
10:30am 8/16 #60
800.965.9043
ClearSounds
25
NEW CALLERS
Page 11
Viewing the CALLER ID List
This CALLER ID telephone automatically stores in the
Call Memory the CALLER ID information of the last 99
calls received. It keeps track of all calls received,
whether they were answered or not. The oldest call in
the Call Memory is always call #1. The highest
numbered call (or call #99 if the Call Memory is full) is always the most recent call. If the
Call Memory is full with 99 calls and a new call comes in, the oldest call, call #1, is
automatically deleted to make room in the memory for the new call.
1. Press the ▼ button to display the most recent call and to move backward through the
call records.
2. Press the ▲ button to display the oldest call and to move forward through the call
records.
3. When you get to the last call stored in the Call Memory, then the “END OF
RECORD” message will appear on the display. If the screen indicates "END OF
RECORD", press the ▲ button and the screen will display the first record in the Call
Memory. If you press the ▼ button, the screen will display the last record in the Call
Memory.
Important Note: The telephone's buttons will not work while the phone is ringing, or for a
few seconds afterward.
#80
END OF RECORD
Calling Back a Number From the CALLER ID List
To easily call back a number from the CALLER ID list:
1. Press the ▼ button or the ▲ button until the number you want to call is displayed.
2. Press the Dial button. The number is dialed automatically.
The area code is not dialed when it matches the area code stored for 7 DIGITS DIAL. The
area code is dialed for all other numbers. When the area code matches any area code
stored for 10 DIGITS DIAL, then the number is dialed as a ten-digit call (e.g., 303-555-
1212). When the area code does not match an area code for 10 DIGITS DIAL, the number
is dialed as a long distance call (e.g., 1-520-555-1234).
Deleting a Call From the CALLER ID List
Important Note: Be sure to write down on a piece of paper any important phone numbers
or information before deleting them from the Call Memory.
1. Press the ▼ button or the ▲ button until the call
information you want to erase is displayed on the
screen.
2. Press the Delete button once and the selected call is
erased from the Call Memory. The display shows
"DELETED".
Page 12
#61
DELETED
Deleting All Calls from the CALLER ID List
To delete all the calls stored in Call Memory at once,
press and hold the Delete button for 5 seconds. The
entire list of calls will be completely cleared and the
display shows "DEL ALL!”. .
#00
DEL ALL!
Using Call Waiting CALLER ID
If another call comes in during a conversation, your phone will display the "WAITING"
message in the upper right hand corner and the incoming caller's information will be
displayed on the screen. To pick up the waiting call:
1. Press and release the Flash button to put the
current call on "hold" and to answer the incoming
call. To switch back and forth between the two calls,
press and release the Flash button.
2. When a Call Waiting call comes in, you may also hang up the current call in order to
pick up the waiting call. The current call will be disconnected and after a temporary
delay, the phone will ring, allowing you to answer the waiting call.
10:30am 8/16 #61WAITING
800.965.9043
ClearSounds
Message Indication
The Message indicator flashes to indicate a message(s) is in your local telephone
company’s voice mailbox, if you subscribe to voice mailbox
services and your local telephone company delivers a
"Visual Voice Message Waiting Indication Signal".
When you have messages waiting in your voice mailbox,
the screen will display “MESSAGES” and “NEW
CALLERS” alternatively, and an envelope-shaped Voice
Mail Waiting icon " " will flash.
#61
48
NEW CALLERS
MESSAGES
Accessing Voice Mailbox
Please follow instructions from your voice mail service provider to access your voice
mailbox.
Clearing the Message Waiting Indicator
If you have Voice Messaging service (Voice Mail), whenever you have a new message the
display will show “MESSAGES” and the red light labeled Message will flash. After you
Page 13

listen to your new message, the message waiting indicators will turn off automatically after
a short delay. If these indicators remain on even after you have listened to all your
messages, you can manually clear the indicators by pressing the Delete button when
“MESSAGES” and “NEW CALLERS” are displayed on LCD, alternatively.
UNAVAILABLE, PRIVATE CALL and ERROR Messages
Certain messages may appear instead of a caller's name and/or number:
1. The screen will display "UNAVAILABLE" if a call is
made through a telephone company which does not
offer the CALLER ID service. This can include long
distance, international, and sometimes even local
phone calls.
2. The screen will display "PRIVATE CALL" if a caller's
information is blocked from being transmitted. For
privacy reasons, many states allow callers the ability
to block his or her telephone information from being
displayed on another person's CALLER ID display.
3. The screen will display “ERROR” if the caller’s
information being transmitted to your telephone is
corrupt or contains some errors from the
transmission process.
2:00pm 8/15 #42
_ _ _ _ _ _ _ _ _ _ _ _
UNAVAILABLE
2:05pm 8/15 #43
_ _ _ _ _ _ _ _ _ _ _ _
PRIVATE CALL
#44
_ _ _ _ _ _ _ _ _ _ _ _
ERROR
Page 14

In Case of Difficulty
Resetting Your Telephone's Programming
Electrostatic or power surge (e.g., from lightning) may cause the phone to lock up. There
are two ways to reset this phone.
1. Basic reset
• Disconnect the telephone line cord from the phone.
• Disconnect the AC adapter from the phone.
• Press the ▼ button or the ▲ button two times. Wait for 10 seconds;
• Reconnect the telephone line cord and the AC adapter to the phone.
• Follow the installation procedures to select the language and to enter the
area codes.
2. Full reset
If the basic reset cannot return to the phone to the normal operating condition, you
must do a full reset. All information stored in memory will be erased during a full
reset.
• Disconnect the telephone line cord from the phone.
• Disconnect the AC adapter from the phone.
• Press the ▼ button or the ▲ button two times. Wait for 10 seconds.
• Press and hold the Delete button and the ▲ buttons when reconnecting the
AC adapter to the phone.
• Reconnect the telephone line cord.
• Follow the Installation procedures to select the language and to enter the
area codes.
Maintenance Information
Although your unit is designed to be maintenance free, it contains sensitive electronic
parts. Treat it with care to assure the best performance.
Avoid Rough Treatment: Avoid dropping the unit. The original packaging should be used
for protection if you must ship the unit. Dropping or damaging the unit will void the
warranty.
Cleaning: The hard plastic casing on your unit has a durable finish that should retain its
original luster for many years. Clean exposed parts with a soft, slightly damp cloth. To
remove stains, use a mild soap. Never use detergents, excess water, treated cloths,
harsh cleaning agents, or sprays.
Page 15

Troubleshooting
If your product does not work properly, try the following suggestions before seeking repair
assistance:
• Check all line cord connections at the wall jack and at the telephone.
• "CALLER Identification" is a subscription service. Non-subscribers of this
service cannot receive CALLER Identification information. Make sure that
the telephone company has activated your service.
• The telephone receives call information between the first and second ring. If
the caller hangs up or you answer before the second ring, the telephone may
not receive the call Identification information.
• If you have Call Forwarding Service and your calls are forwarded, the
telephone will not receive the caller's information. Calls forwarded using a
call forwarding service are typically forwarded before completing the second
ring. To receive a caller's information, turn off the Call Forwarding feature.
Important Note: Make sure you have followed all the instructions in this booklet. If you
continue to have problems, call (USA) ClearSounds Customer Service at (800) 965.9043,
(Canada) ClearSounds Canada at (604) 980-6686.
Limited Warranty
This warranty applies only to products purchased and used in the United States.
What Is Covered? Any defect in materials or workmanship.
For How Long? For one year from the date of purchase
What We Will Do: If we repair your product, we may use new or reconditioned
replacement parts. If we choose to replace your product, we may replace it with a new or
reconditioned one of the same or similar design. The repair or replacement product will be
warranted for either (a) 90 days or (b) the remainder of the original one year warranty
period, whichever is longer.
Page 16

What We Ask You To Do: You must prepay all shipping and handling costs. We
suggest you retain your original packing material in the event you need to ship your
product. When sending your product for repair service, include your name, address,
telephone number with area code, proof of date of purchase, prepaid shipping and
handling costs, and a description of the problem. Send all of this to:
ClearSounds USA
Attn: Repair Center
8160 S. Madison St 110-1861 Welch Street
Burr Ridge, IL 60527
.
ClearSounds Canada
Attn: Repair Center
North Vancouver, BC V7P 1B7
Warranty Limitation
Implied warranties, including those of fitness for a particular purpose and merchantability
(an unwritten warranty that the product is fit for ordinary use), are limited to one year from
date of purchase. We will not pay for loss of time, inconvenience, loss of use of your
product, or property damage caused by your product or its failure to work, or any other
incidental or consequential damages. Some states do not allow limitations on how long an
implied warranty lasts or the exclusion or limitation of incidental or consequential
damages, so the above exclusions or limitations may not apply to you.
What This Warranty Does Not Cover
This warranty does not cover defects resulting from accidents, damage while in-transit to
or from our Product Service Center, alterations, unauthorized repair, failure to follow
instructions, misuse, use outside the United States and Canada, fire, flood, and acts of
God. We do not warrant your product to be compatible with any particular telephone
equipment or party line, key telephone systems or more sophisticated customer premises
switching systems. If your product is not covered by our warranty, call us for advice as to
whether we will repair your product and other warranty repair information, including
required shipping and handling charges. We, at our option, may replace rather than repair
your product with a new or reconditioned product of the same or similar design. The repair
or replacement product will be warranted for either (a) 90 days or (b) the remainder of the
original one year warranty period, whichever is longer.
State Law Rights
This warranty gives you specific legal rights, and you may also have other rights that vary
from state to state.
Page 17

FCC Registration and Repair Information
Your new product has been registered with the Federal Communication Commission
(FCC). This product complies with standards in Part 68 of the FCC Rules. The FCC
requires us to provide you with the following information:
Connection and Use with the Nationwide Telephone Network
The FCC requires that you connect your product to the nationwide telephone network
through a modular telephone outlet or jack. The modular telephone outlet or jack to which
the telephone must be connected is a USOC RJ-11C or RJ-11W. This equipment may not
be used with Party Line Service or with Coin Telephone Lines.
Notification to the Telephone Company
The FCC requires that upon request of your local telephone company, you provide the
following information: a) The “line” to which you will connect the telephone equipment
(that is, your phone number), and b) The telephone equipment’s FCC registration number
and ringer equivalence number (REN). These numbers are on the back or bottom of your
telephone equipment. The REN is used to determine how many devices you may connect
to your telephone line and still have them ring when your telephone line is called. In most,
but not all areas, the sum of all REN’s should be 5 or less. You may want to contact your
local telephone company.
Repair Instructions
If it is determined that your telephone equipment is malfunctioning, the FCC requires that it
not be used and that it be unplugged from the modular outlet until the problem has been
corrected. Repairs to the telephone equipment can only be made by the manufacturer or
its authorized agents or by others who may be authorized by the FCC. For repair
procedures, follow instruction outlined under the "Limited Warranty".
Rights of the Telephone Company
If your product is causing harm to the telephone network, the telephone company may
temporarily discontinue your telephone service. If possible, they’ll notify you before they
interrupt service. If advance notice isn’t practical, you’ll be given the opportunity to correct
the problem, and you will be informed of your right to file a complaint with the FCC notified
as soon as possible.
Your telephone company may make changes in its facilities, equipment, operations, or
procedures that could affect the proper functioning of your product. If such changes are
planned, you will be notified.
Interference Information: Part 15 of FCC Rules
Some telephone equipment generates, uses, and can radiate radio-frequency energy and,
if not installed and used properly, may cause interference to radio and television reception.
Page 18
 Loading...