

Page 1

RoomRoster 5.7 Installation and Setup Guide
I. Getting Started
Before proceeding with the installation of the RoomRoster room sign, please check to make sure everything was
received:
o RoomRoster Panel Display
o Control Keypad
o Power over Ethernet (POE) Splitter
o 12” Ethernet Cable
o EZ-Stream CD-ROM
o EZ-Stream User Manual
o 4 mounting screws
o Power Supply
II. Setup
Use the power supply for the initial setup of the unit before the final installation. Attach the MagicBox keypad
to one of the USB ports on the side and power the unit on.
Network: To configure the network settings, you will need the following:
A Static IP Address from your IT department for this unit
Network Information including the Subnet, Gateway, and Domain (DNS address).
Once the unit is running the demo project, do the following:
1. Press the Menu key on the keypad.
2. Use the Arrow keys to navigate to “Network” and press Enter.
3. In this submenu are selections for each of the pieces of information required to configure the network
settings (TCP/IP, Subnet, Domain, and Gateway). Arrow down and Press “Enter” on the first item in the list
(TCP/IP) and enter in the Static IP address. Use the up and down arrow keys to enter in each digit of the IP
Address, leaving a blank space where there is no number. When finished, arrow over to SET and press ‘Enter’.
Repeat this process for each item in the list (Subnet, Domain, and Gateway). When finished with all 4 items,
press ‘Enter’ on EXIT MENU. The RoomRoster will then automatically reboot. After 30 seconds, the Demo
content will begin playing and the network settings will be configured.
4. To verify that the network settings are correct, either PING the unit, or use the EZ-Stream software that came
with the unit and “Check Site.” Instructions on setting up the RoomRoster unit in EZ-Stream can be found in the
EZ-Stream User Guide, Section 2.1: Site Setup.
1 | P a g e 800-000-000-11 Rev 2.0
Page 2
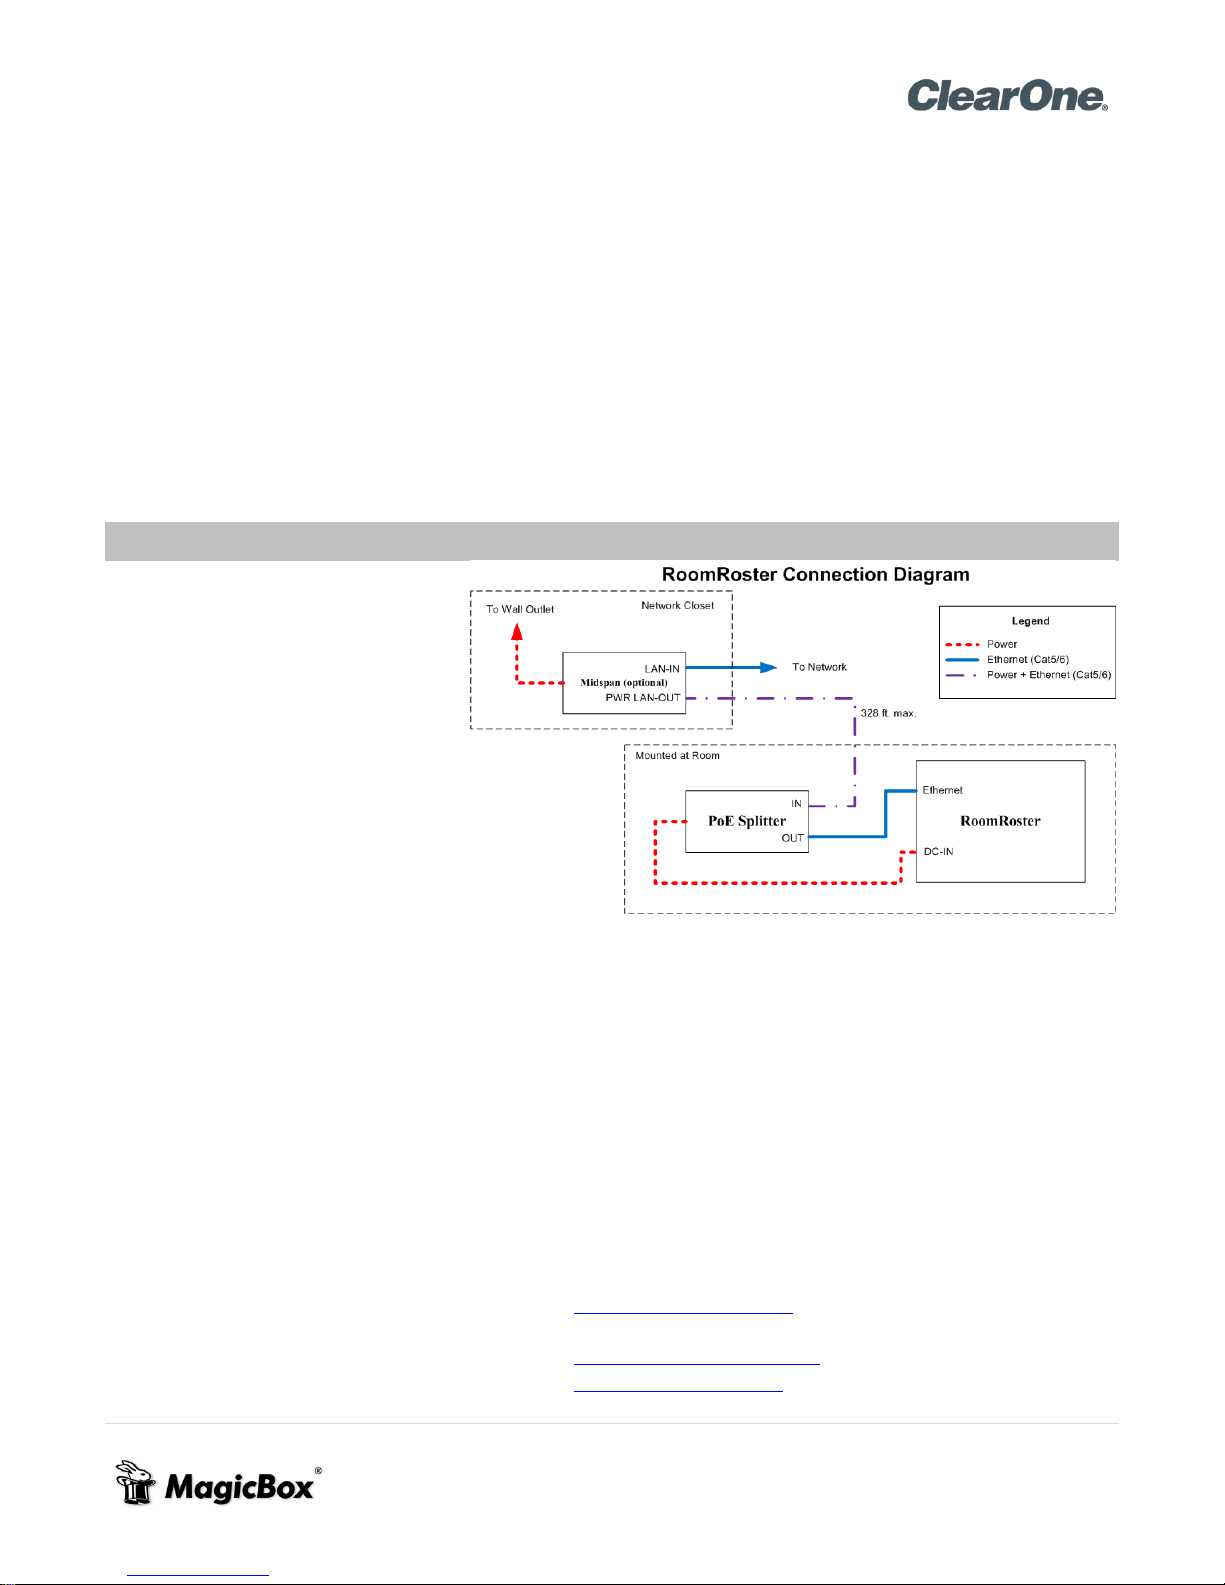
The RoomRoster uses Power over
Ethernet, meaning that you only have
to run one Cat5/Cat6 cable to the unit.
This is accomplished using a PoE
Splitter that needs to be mounted
behind the RoomRoster unit. To
connect the PoE Splitter, do the
following:
1. Connect the 3 pin power connector from the POE Splitter to the Power Input on the RoomRoster and set the
power switch to the on position.
2. Connect the included ethernet cable from the “OUT” on the PoE Splitter to the Ethernet jack on the
RoomRoster.
3. Connect the Ethernet cable coming from your Endspan or Midspan to the “IN” on the PoE Splitter. This cable
will be carrying Power and Ethernet combined.
Note: If you received a Midspan from MagicBox, then the cable carrying combined Power and Ethernet will come
from the “PWR LAN-OUT” on the Midspan, and go to the “IN” on the PoE Splitter. The connection to your
network is plugged into the “LAN-IN” on the Midspan.
Contact Info
MagicBox
1600 SW Western, Suite #130
Corvallis, OR 97333
Sales: 541-752-5654
sales@magicboxinc.com
Support: 541-752-5542
support@magicboxinc.com
Web: www.magicboxinc.com
Date and Time: It is important to set up your RoomRoster with the correct date and time for your location so
that the content from EZ-Stream will display as scheduled:
1. Press the ‘Menu’ key on the keypad.
2. Use the Arrow keys to navigate to TIME/DATE and press ‘Enter’.
3. Arrow down to SET TIME and press ‘Enter’.
4. Use the up and down arrow keys to set each digit of the time. Note that the time is in 24 hour time. When
finished arrow over to SET and press ‘Enter’.
5. Navigate to TIME/DATE again and go into the SET DATE menu. Again, use the up and down arrow keys to set
each digit in the date, starting with the month, then the day, and then the year.
The RoomRoster is now configured and ready to go.
III. Connecting the RoomRoster Player
2 | P a g e 800-000-000-11 Rev 2.0
 Loading...