

Page 1
Musica™ - NS-MNE Musica Network Interface
NS-MNE a N d iMu S i c a iN S t a l l a t i o N a N d
op E r a t i o N Ma N u a l
Page 2

Table of Contents
Chapter 1: Introduction .........................................................................................................................................................1
PRODUCT OVERVIEW
Browser Operation ......................................................................................................................................................1
iMusica Operation ......................................................................................................................................................1
PACKAGE CONTENTS
HARDWARE REQUIREMENTS
SOFTWARE REQUIREMENTS
INSTALLER REQUIREMENTS
INSTALLATION AND OPERATION OVERVIEW
Chapter 2: Installing and Configuring the NS-MNE .............................................................................................................3
Configuring Methods .......................................................................................................................................................3
IN-NETWORK METHOD
Information Required ..................................................................................................................................................4
Discovering and Configuring the NS-MNE Units .......................................................................................................5
Running MNE_Finder ................................................................................................................................................5
Configuring with MNE_Finder .....................................................................................................................................5
Other Finder Controls .................................................................................................................................................6
STANDALONE METHOD
Information Required ..................................................................................................................................................7
Configuration Process ................................................................................................................................................7
Chapter 3: Using the Browser NS-MNE Musica Interface .................................................................................................12
MUSICA BROWSER CONTROL SCREENS
Startup Screen ........................................................................................................................................................13
Room Selection .......................................................................................................................................................13
Standby Screen.......................................................................................................................................................14
Control Screen ........................................................................................................................................................14
Player Controls ........................................................................................................................................................15
Settings Screen .......................................................................................................................................................15
Transfer ...................................................................................................................................................................16
Page 3

Chapter 4: Downloading, Configuring, and Using the iMusica Software...........................................................................17
CONFIGURING iMUSICA
OPERATING THE MUSICA ADC WITH iMUSICA
Startup Screen ........................................................................................................................................................20
Room Selection .......................................................................................................................................................20
Standby Screen and Source Selection Screen.......................................................................................................21
Player Control Screens ...........................................................................................................................................21
Amp Settings Screen ..............................................................................................................................................22
Room Settings Screen ............................................................................................................................................ 22
Tuner Screens .........................................................................................................................................................23
Chapter 5: Using iTunes with iMusica .................................................................................................................................24
PAIRING WITH A DIFFERENT ITUNES LIBRARY
NS-MNE Technical Specifications ......................................................................................................................................28
In s t a l l a t I o n a n d op e r a t I o n Ma n u a l 3
Page 4
Chapter 1: Introduction
PRODUCT OVERVIEW
The ClearOne NS-MNE Musica Network Interface adapter connects the MusicaTM MU5066ADC RS232 connector to an RJ-45 Ethernet connection allowing IP-control of the Musica system through
an Adobe® Flash®-enabled browser or using the iMusica application with an Apple® iPhone®, iPad®
or iPod touch®.
The NS-MNE is compact in size and the software is built in so it requires no programming. Simple
configuration is all that is required to take IP-control of the Musica system.
In addition, up to 3 MU5066ADC units can be connected using 3 NS-MNEs to make an 18-zone
system.
Note: Installing one or more NS-MNE units is essentially the same, however, this »
guide assumes multiple NS-MNEs are being installed and configured.
Br o w s e r op e r a t I o n
PC’s, tablets and smartphones with Flash enabled browsers access and control the NS-MNE over
its Ethernet connection from a GUI generated within the unit.
IMu s I c a op e r a t I o n
iMusica is an application written for use with the Apple iPhone, iPod touch and iPad products that
provides the same functionality using an optimized interface. It additionally provides access to an
iTunes Library running on a networked computer.
PACKAGE CONTENTS
The following illustration shows the parts that ship in the box with the NS-MNE.
NS-MNE Unit (RS-232
Connector Showing.
The Opposite End Has
RJ-45 Ethernet and
Power Connectors.)
Null- Modem RS-232 Cable for IP
Addressing and Connection with
the ADC
Note: ClearOne is not responsible for product damage incurred during shipment. You »
must make claims directly with the carrier. Inspect your shipment carefully for obvious
signs of damage. If the shipment appears damaged, retain the original boxes and
packing material for inspection by the carrier. Contact your carrier immediately.
9-30 VDC @ 370mA
Power Supply
1 te c h n I c a l su p p o r t : 800.283.5936
Page 5

HARDWARE REQUIREMENTS
To complete an installation for one or more NS-MNE’s, you will need:
NS-MNE (one for each MU5066 Audio Distribution Center•
NetStreams Musica MU5066 Audio Distribution Center (ADC)•
An Ethernet Switch/Wireless Router•
A computer running MS-Windows •
Ethernet cable•
RS-232 cable •
All units require power cables
®
)
SOFTWARE REQUIREMENTS
The software required to install and configure the NS-MNE includes:
Computer running Windows XP, SP2 or higher (for configuring the IP Address of the NS-MNE)•
For PC’s, tablets and smartphones
Adobe Flash running on the web browser•
Windows XP, SP2 or higher (for configuring the IP Address of the NS-MNE)•
A Flash-compatible web browser•
MNE_Finder.exe for discovering and configuring the NS-MNE (Download from the Musica Tools •
area in the Resource Library of the NetStreams website.)
For iPads, iPhones, or iPod touch devices
iMusica (Downloadable from the Apple Apps Store)•
INSTALLER REQUIREMENTS
This manual assumes the installer:
Knows how to install a Musica MU5066ADC system•
Knows how to use basic installation tools such as an RJ-45 crimper to terminate CAT5e wire•
Has pulled the required wires to the locations where the keypads and speakers are installed•
Understands basic MS-Windows commands; such as how to browse, create and save files and •
folders, etc.
INSTALLATION AND OPERATION OVERVIEW
This Installation Manual will guide you in all the tasks to configure the NS-MNE Musica Network
Interface adapter, install the NS-MNE, and how to access the Flash GUI and iMusica software used
in it’s operation. These include:
Installing and Configuring the NS-MNE•
+ In-Network Method
+ Standalone Method
Using the Browser NS-MNE Interface•
Downloading, Configuring, and Using the iMusica Software•
Using iTunes with iMusica•
In s t a l l a t I o n a n d op e r a t I o n Ma n u a l 2
Page 6
Chapter 2: Installing and Configuring the NS-MNE
Each NS-MNE must be installed and configured with the information needed to uniquely identify it
and for it to communicate with both the Ethernet network and its Musica MU5066ADC.
co n f I g u r I n g Me t h o d s
There are two methods which can be used to do this depending on your situation and
preferences:
In-Network Method - Configuration can be accomplished after connecting the devices to the
Ethernet network using the MNE_Finder application to identify and configure the devices. This the
recommended and easiest method.
Standalone Method - Allows configuring the information into the NS-MNE devices before
connecting them into the network, such as before installing at the customer site.
Note: Configuration must be performed for each NS-MNE that is to be installed in »
the system. Up to 3 NS-MNE’s (and the accompanying Musica ADC’s) are allowed
creating up to 18 zones.
IN-NETWORK METHOD
To configure the NS-MNE devices in-network, complete the following steps by referring to the
diagrams below:
Verify the DIP switches on the bottom of the NS-MNE unit are in the proper positions as shown: 1.
DIP Switch Positions
Connect each NS-MNE to the Musica MU5066ADC it will control using its null modem cable.2.
Connect the Ethernet port of each NS-MNE to the home Ethernet network switch.3.
Connect the PC to the home Ethernet network; wired or wirelessly.4.
Ensure all power cables are plugged in.5.
Start the computer.6.
An 18-zone connected setup including 3 Musica ADC’s and 3 NS-MNE interfaces would appear
like this:
3 te c h n I c a l su p p o r t : 800.283.5936
Page 7
Home Network with 3 Musica ADC’s and 3 NS-MNE’s Comprising an 18-Zone System
Power and other connections for all devices not shown
MU5066ADC
NS-MNE to Ethernet
MU5066ADC
MU5066ADC
NS-MNE RS-232 to ADC Connection
(One for each NS-MNE)
PC to Ethernet Switch/
Wireless Router Connection.
Can be wired or wireless.
Switch/Wireless Router
Connection
(One for each NS-MNE)
Personal Computer
Ethernet Switch/Wireless Router
NS-MNE Connectors
NS-MNE RS-232
Connector End
RS-232 DB-9M Connector
Power Connector
NS-MNE Ethernet and
Power Connector End
RJ-45 Ethernet Connector
In f o r M a t I o n re q u I r e d
You will need to provide the following information for each NS-MNE as you configure:
Static IP Address•
Note: In systems where more than one NS-MNE is configured, the IP addresses that are »
assigned must be sequential. For example, the first NS-MNE could be 10.15.100.150,
then the second would be 10.15.100.151, and the third 10.15.100.152.
Subnet Mask•
Gateway Address•
In s t a l l a t I o n a n d op e r a t I o n Ma n u a l 4
Page 8
You will also need the MAC Address of each NS-MNE device (printed on bottom of the unit)
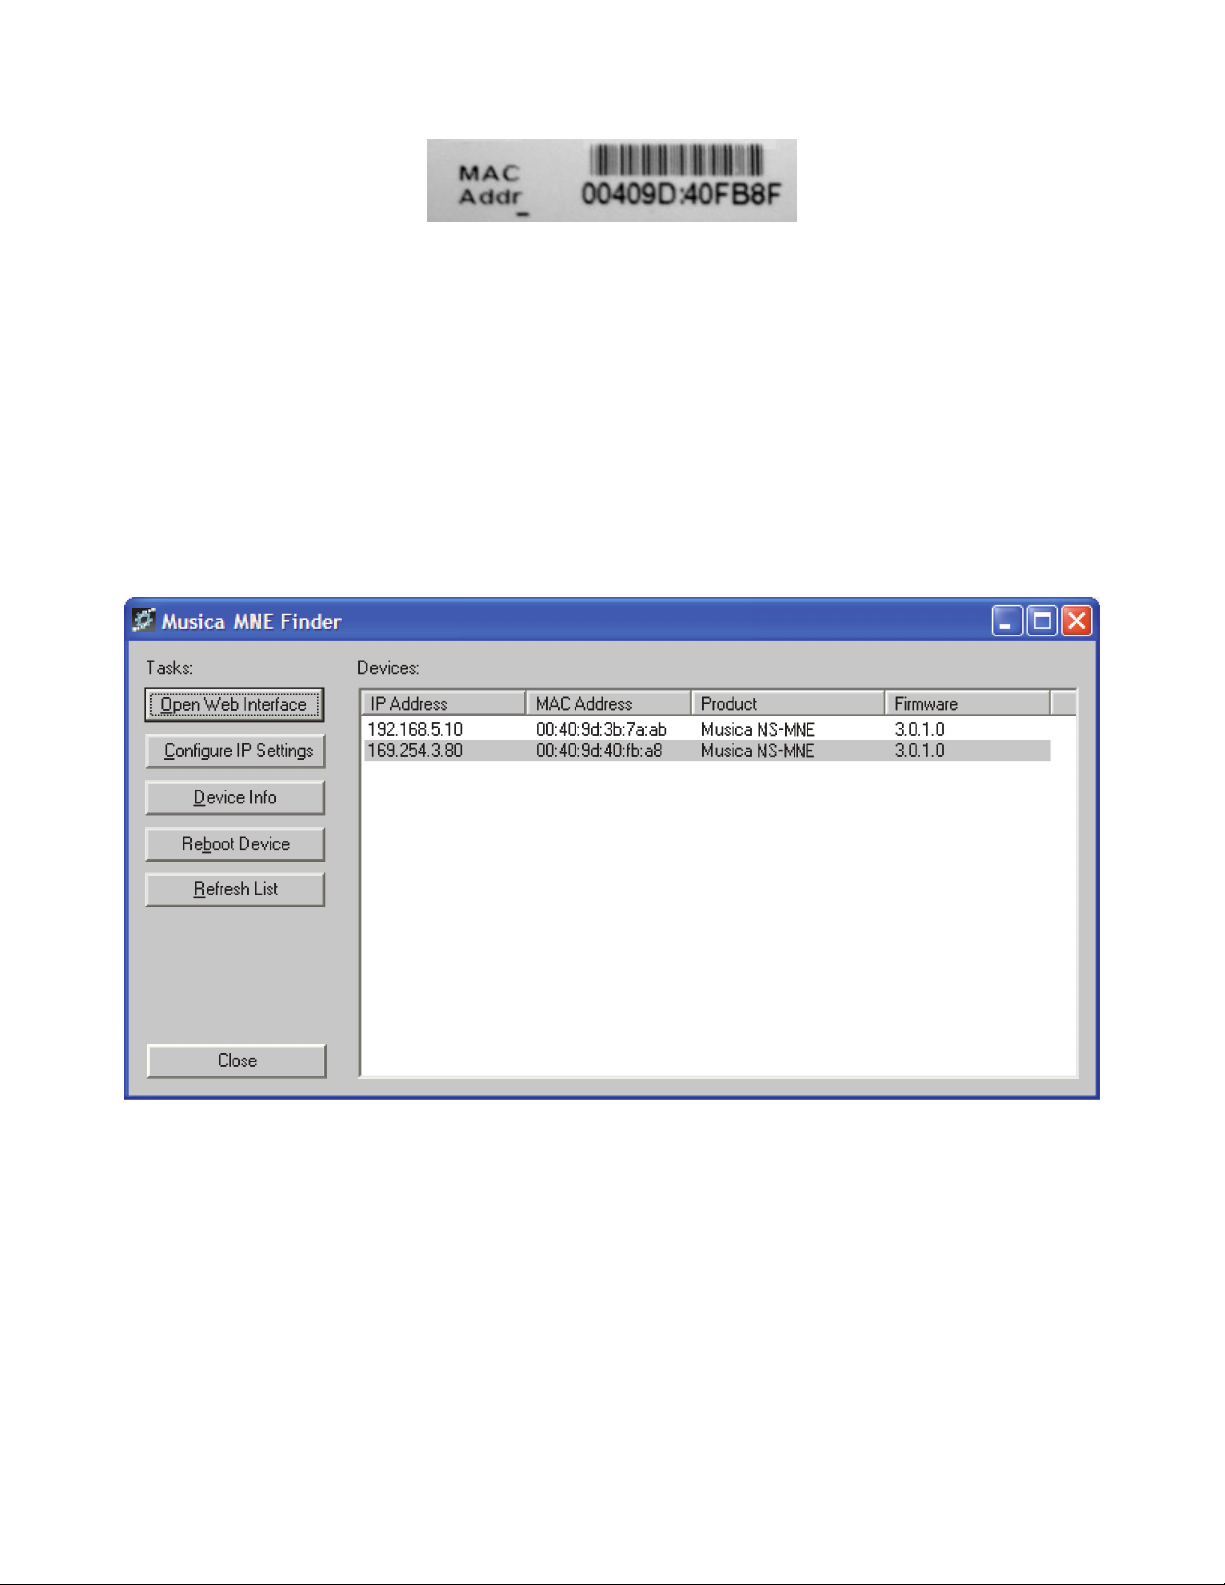
dI s c ov e r I n g a n d co n f I g u r I n g t h e ns-Mne un I t s
The MNE_Finder application running on a PC connected to the network discovers any NS-MNE units
that are connected via the local Ethernet even if their current IP address settings are incompatible
with those of the PC running the program.
ru n n I n g Mne_fI n d e r
Make sure each NS-MNE unit is powered on and connected to the Ethernet network via its Ethernet
port.
On a PC running Windows connected to the same Ethernet network, run the MNE_Finder.exe
program. The program automatically discovers and shows a list of all connected NS-MNE units
along with their current IP address, MAC address, and firmware revision.
If you need to repeat the discovery, press the “Refresh List” button.
CONFIGURING WITH MNE_FINDER
To configure, perform the following:
Identify the NS-MNE unit you will configure by the MAC address that is listed by the MNE_1.
Finder.
Select it then click the 2. Configure IP Settings button.
5 te c h n I c a l su p p o r t : 800.283.5936
Page 9
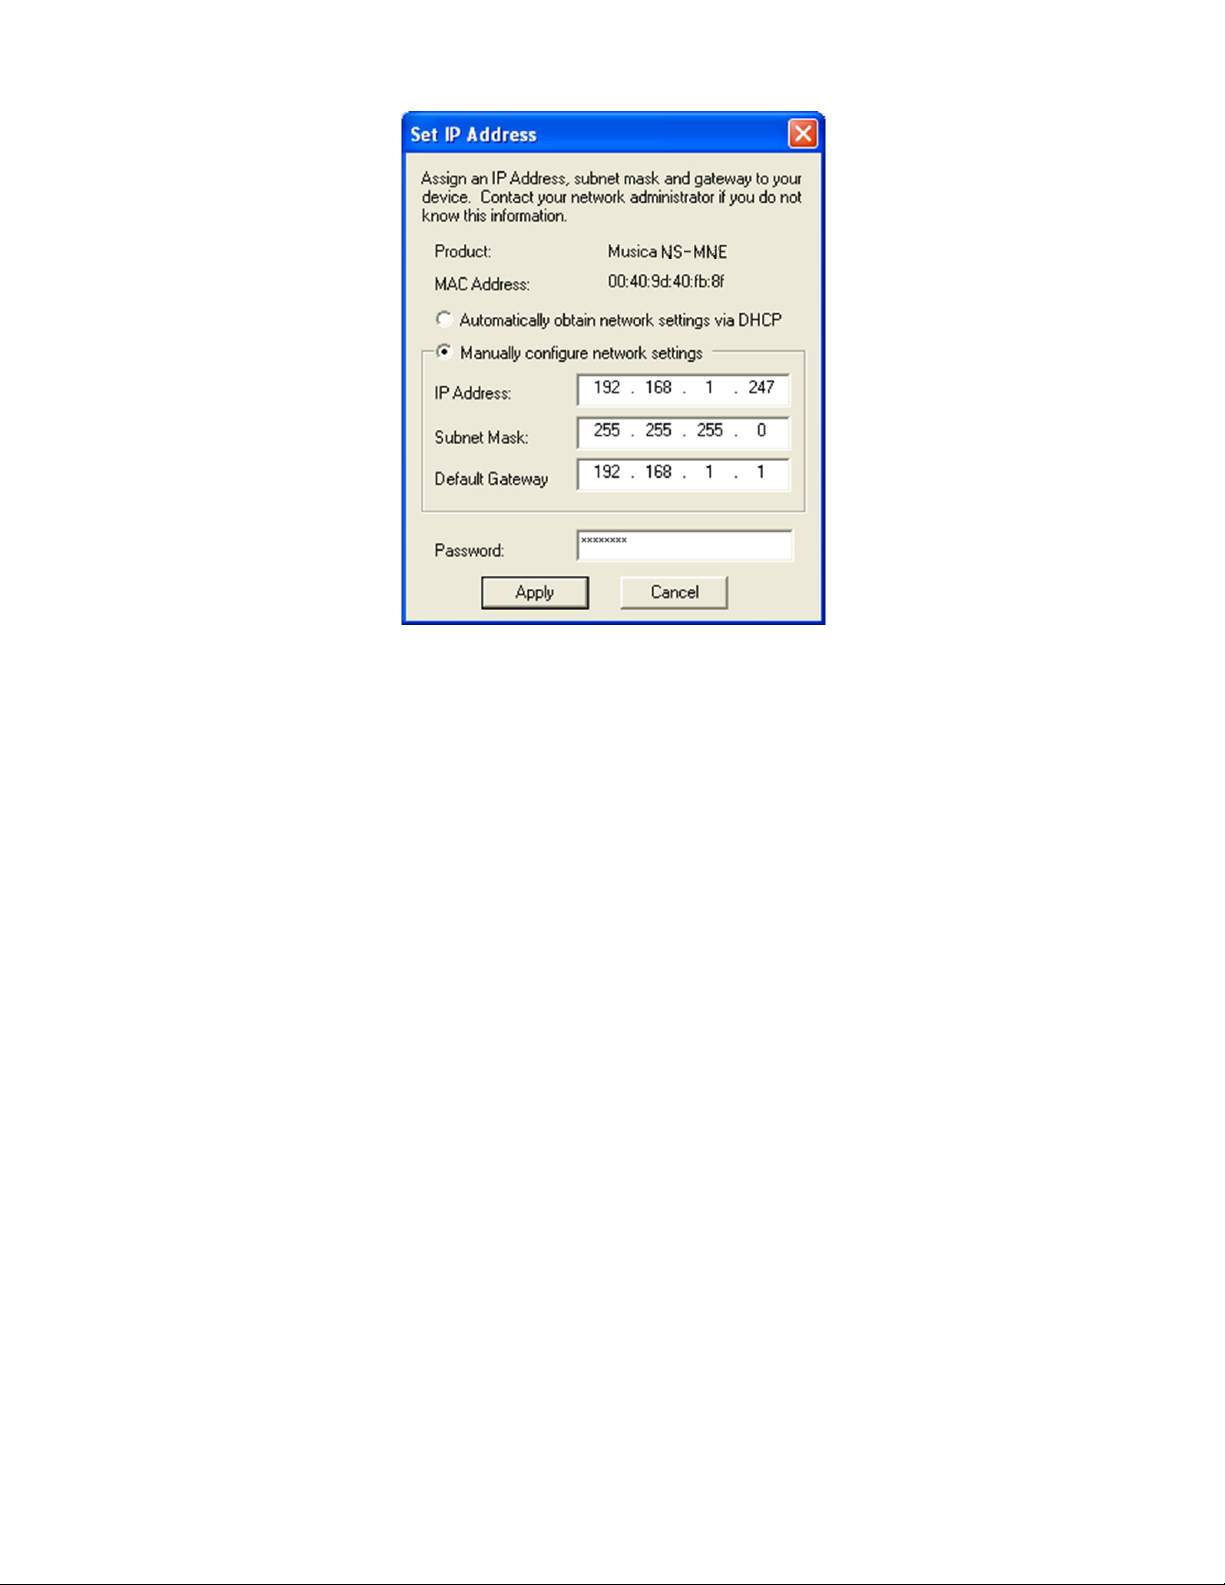
Enter the IP Address, Subnet Mask, and Default Gateway for the device.3.
Enter the password, which is “4. sysadm” (the field is case sensitive).
Click on 5. Apply which pushes the address into the device over the network. After the information has been sent to the device the MNE_Finder main screen will be displayed (about 30 seconds).
Reboot the NS-MNE by either unplugging and restoring the power to the device, or by select-6.
ing the device and clicking on the Reboot Device button on the side panel of the MNE_Finder
program. (Using the Reboot Device button requires that the password be entered.)
After the device is rebooted verify the IP Address, Subnet Mask and Default Gateway are as 7.
intended.
Repeat the process for each NS-MNE in the system.8.
Subsequent possible operations are available via buttons on the left hand side of the interface,
which are described below. Wherever a password is needed, it will be the root password for the
unit, which is “sysadm” by default.
OTHER FINDER CONTROLS
The MNE_Finder application has other controls running along the side of the screen whose functions
are described below:
Device Info - Shows a summary of the information available on the NS-MNE unit.
Reboot Device - Reboots the device. Requires a password.
Refresh List - Performs a new discovery of NS-MNE devices.
Close - Closes the MNE_Finder application.
In s t a l l a t I o n a n d op e r a t I o n Ma n u a l 6
Page 10
STANDALONE METHOD
In f o r M a t I o n re q u I r e d
You will need to provide the following information for each NS-MNE as you configure:
Static IP Address •
Note: In systems where more than one NS-MNE is configured, the IP addresses that are »
assigned must be sequential. For example, the first NS-MNE could be 10.15.100.150,
then the second would be 10.15.100.151, and the third 10.15.100.152.
Subnet Mask•
Gateway Address•
co n f I g u r a t I o n pr o c e s s
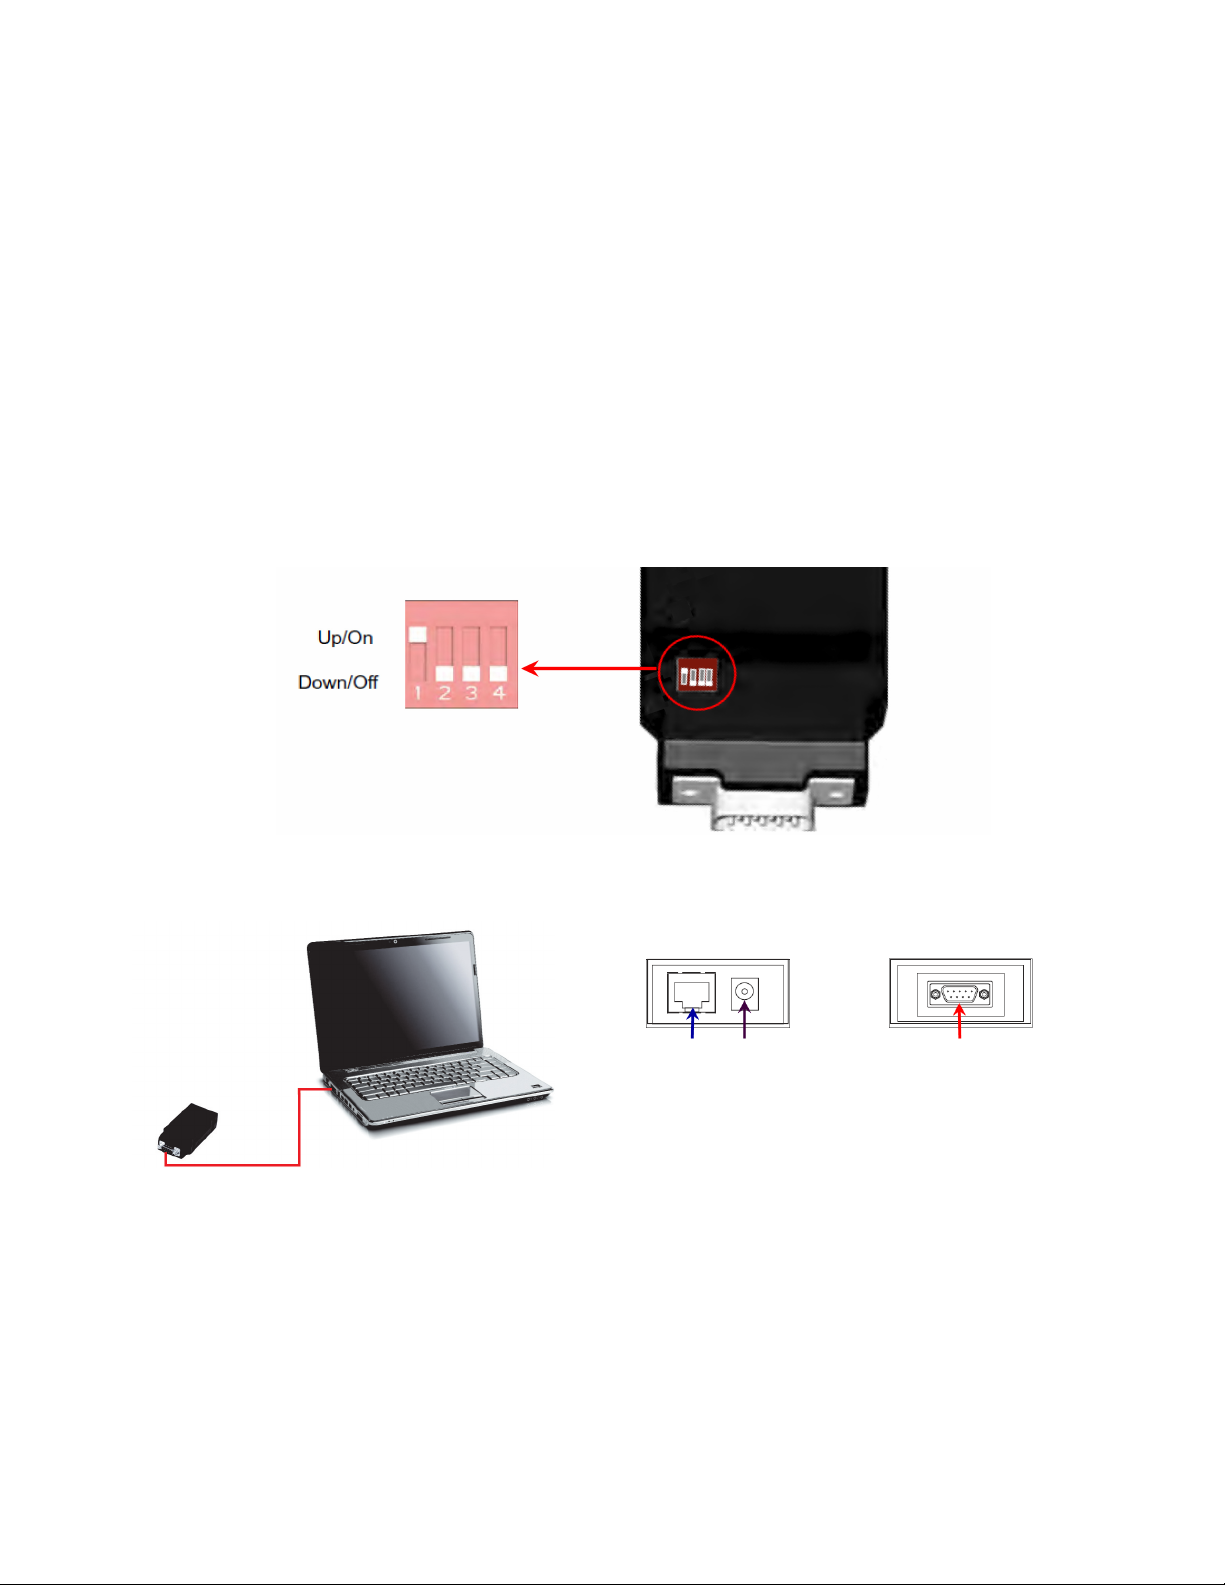
To configure the NS-MNE, connect the hardware, then use the Windows HyperTerminal or similar
application to perform the configuration. (HyperTerminal can be downloaded for Windows 7.)
Verify the DIP switches on the bottom of the NS-MNE unit are in the proper positions as shown: 1.
DIP Switch Positions
Connect the NS-MNE to the computer serial port using the null modem cable provided. 2.
DO NOT CONNECT POWER TO NS-MNE.
Ethernet Connector
of NS-MNE not used
for Standalone
Configuration
Power
Connector
of NS-MNE
RS-232 Connector on End of NS-MNE
Connects by Null Modem Cable to PC
NOTE: If your computer does not have a serial port, you need to use an adapter that »
converts from USB to serial. Note the COM port number.
Start the computer.3.
Establish a COM Port connection to the NS-MNE device using the MS-Windows HyperTerminal 4.
program. Select Start>All Programs>Accessories>Communications>HyperTerminal.
The HyperTerminal Screen Displays
7 te c h n I c a l su p p o r t : 800.283.5936
Page 11

In the Connection Description dialog box, enter NS-MNE in the Name field.5.
Select 6. OK.
The Connect To dialog box appears
In the Connect Using field, select the COM port you want to use (this will normally be COM1).7.
Select 8. OK.
The COM Properties window displays
In s t a l l a t I o n a n d op e r a t I o n Ma n u a l 8
Page 12

Select the following settings:9.
Bits Per Second: 9600•
Data Bits: 8•
Parity: None•
Stop Bits: 1•
Flow Control: None•
Select 10. OK.
A blank HyperTerminal screen displays. The HyperTerminal application will now recognize the
NS-MNE.
Connect the power using the Power Cable to the NS-MNE11.
Wait 30-60 seconds while HyperTerminal connects to the NS-MNE. Shortly, the screen displays
information for the NS-MNE and informs that you can make changes if you press any key within
five seconds of the information displaying.
Press any key12.
You are prompted to Accept or Modify the settings.
9 te c h n I c a l su p p o r t : 800.283.5936
Page 13

Enter 13. M to Modify.
You are prompted for the root password for the NS-MNE device.
Enter 14. “sysadm” (the field is case sensitive).
You are prompted to enter your IP settings.15.
Enter the Static IP Address and press 16. Enter.
Note: If you have more than one NS-MNE to configure the IP addresses must be »
sequential. For instance, the first NS-MNE might be 10.15.100.150, and the next two
would be 10.15.100.151 and 10.15.100.152.
You are prompted to enter the Subnet mask.
Enter the Subnet Mask and press 17. Enter.
You are prompted to enter the Gateway Address.18.
Enter the Gateway address and press 19. Enter.
You are prompted to change or accept other settings. Accept the defaults. 20.
Accept the changes and the values are saved in NV (Non-Volatile) memory completing the 21.
configuration.
The unit reboots. When it has rebooted you will see the new IP, Subnet Mask, and Gateway 22.
settings displayed on the HyperTerminal.
Note: Do not make any changes to your computer or any hardware connected to the »
system until the NS-MNE completely reboots.
In s t a l l a t I o n a n d op e r a t I o n Ma n u a l 10
Page 14

This procedure must be repeated for each NS-MNE unit to be placed in the customer network.
The following diagram shows how the NS-MNE units must be installed at the customer network.
Since they have already been configured, they can then be controlled by either a connected Flashenabled browser or configured Apple iPhone, iPad, or iPod touch device. (This diagram is also
available in the NS-MNE datasheet.)
Home Network with 3 Musica ADC’s and 3 NS-MNE’s Comprising an 18-Zone System
Power and other connections for all devices not shown
MU5066ADC
NS-MNE to Ethernet
MU5066ADC
MU5066ADC
NS-MNE RS-232 to ADC Connection
(One for each NS-MNE)
Switch/Wireless Router
Connection
(One for each NS-MNE)
Personal Computer
RS-232 DB-9M Connector
NS-MNE Connectors
NS-MNE RS-232
Connector End
PC to Ethernet Switch/
Wireless Router Connection.
Can be wired or wireless.
NS-MNE Ethernet and
Power Connector End
Power Connector
Ethernet Switch/Wireless Router
RJ-45 Ethernet Connector
11 te c h n I c a l su p p o r t : 800.283.5936
Page 15

Chapter 3: Using the Browser NS-MNE Musica Interface
The browser interface of the NS-MNE can be entered by any Flash-enabled browser running on a
computer, smartphone or tablet attached to the same Ethernet network as the NS-MNE. This can
be a wired or wireless connection. Access the interface by entering into the browser the IP Address
of the NS-MNE unit connected to the Musica ADC.
In systems where more than one NS-MNE was configured using sequential IP addresses, browsing
to the NS-MNE with the lowest IP address automatically establishes control over all of them. Up
to 18 zones will be controlled through the browser. For example, if the first NS-MNE configured is
10.15.100.150, the second (10.15.100.151) and the third (10.15.100.152) would also be controlled
through the browser.
The address, when entered, may include a parameter to display the control panel in either Portrait
or Landscape mode:
http://<NS-MNE IP Address>/Portrait.html
http://<NS-MNE IP Address>/Landscape.html
When no parameter is specified both screens will display and the user selects the one to use by
clicking on the control screen desired.
The IP Address with parameter can be saved to a browser Favorite or Bookmark for ease of use.
MUSICA BROWSER CONTROL SCREENS
The following screens are used to access the various Musica functions through the browser interface.
Some of the screens are shown in Landscape mode, some in Portrait mode; either orientation
contains the same controls
In s t a l l a t I o n a n d op e r a t I o n Ma n u a l 12
Page 16

st a r t u p sc r e e n
This screen is first displayed after launching the browser.
No controls are functional at this point.
ro o M se l e c t I o n
After startup, clicking on the Room List button displays a list of rooms within the system. In the
case of systems with up to 3 sequentially addressed NM-MNE’s, all the rooms served by all the
ADC’s will be listed.
This screen is used to select which room you wish to control, select a room.
Click on a room, the click on Select.
13 te c h n I c a l su p p o r t : 800.283.5936
Page 17

st a n d B y sc r e e n
This screen shows the room has been selected, but that an audio source has not been selected.
The audio sources available for a room using the Musica system are listed on the right hand of the
screen. Select a source by clicking on its button.
co n t r o l sc r e e n
The audio player controls for the room and source selected appear. Note that the example shows
that the CD source is selected.
In s t a l l a t I o n a n d op e r a t I o n Ma n u a l 14
Page 18

PLAYER CONTROLS
The player has controls as show below:
Previous
Beginning
Stop
Shuffle
se t t I n g s sc r e e n
The Settings screen is selected by clicking on the Settings button on any screen.
Next
Play
End
Pause
Continuous
Mute
Volume DOWN
Volume UP
Go to
Graphic
Equalizer
Loudness Control On/Off
3D Audio Mode On/Off
Sleep - Set Sleep Timer
Backlight Color
Blue/Amber
AMP - Selects
Internal/External
Amplifier Setting
Balance Left/Right
15 te c h n I c a l su p p o r t : 800.283.5936
Page 19

tr a n s f e r
The Transfer Audio button is used to send the same Source selection and Volume settings to
another room or to multiple rooms. When clicked, a confirmation screen appears.
In s t a l l a t I o n a n d op e r a t I o n Ma n u a l 16
Page 20

Chapter 4: Downloading, Configuring, and Using the iMusica Software
CONFIGURING iMUSICA
The iMusica software application is designed to allow an Apple iPhone, iPad, or iPod touch device
to control the Musica devices connected to the home network using an NS-MNE interface.
Download the iMusica application from the Apple iTunes Store. 1.
Once the application is downloaded, configure it using the iPhone/iPad/iPod touch 2. Settings
tool - Typically found on the device’s Home Page.
Scroll down the Settings Page until you come to the Applications Section. Select the 3. iMusica
icon to enter the iMusica setup.
17 te c h n I c a l su p p o r t : 800.283.5936
Page 21

The first time you enter iMusica Settings you see the screen for Host and Port configuration.
Touch the 4. Host field and the pop-up keyboard appears.
Switch from Alpha to Numbers mode, and enter the IP Address you have assigned to your NS-5.
MNE.
Note: If you have two or three NS-MNE’s/ADC’s (allowing 12 or 18 Speaker Zones), »
the IP addresses of the NS-MNE’s must be sequential. For instance, the first NS-MNE
might be 192.168.1.150, and the next two would be 192.168.1.151 and 192.168.1.152.
The lowest IP address number is the proper address to type into this field.
The default Port Number of 10001 should be left as it is.6.
Set the 7. Number of ADCs to the number of Musica ADCs you have in the network.
Select the 8. iTunes Source. (Optional)
iMusica has a feature similar to Apple’s Remote App which lets you control iTunes from your
iPhone/iPod Touch. This feature will allow you to pick one of the ADC’s four Source inputs as
an iTunes Source.
When this Source is selected from iMusica, you will be able to Browse and Control iTunes on a
PC/Mac you will pair with. If you wish to use this feature then tap the iTunes Source and select
which Source you plan to have your PC/Mac with iTunes connected to.
The 9. Library ID should be left blank.
The 10. Version number updates after you first run iMusica .
Verify the NS-MNE’s are connected to a Wireless Router or Access Point which you will need to 11.
In s t a l l a t I o n a n d op e r a t I o n Ma n u a l 18
Page 22

connect to wirelessly with your iPhone/iPad/iPod Touch. (See below)
MU5066ADC
MU5066ADC
MU5066ADC
Apple iPhone, iPad,
or iPod touch using
iMusica Application to
manage Musica system
through NS-MNE
RS-232 DB-9M
connection
between ADC
and NS-MNE
NS-MNE
(One each for up
to 3 systems. Each
NS-MNE must be
configured before it can
be used to manage its
Musica system.)
Ethernet Switch/Wireless Router
Note: iTunes from a PC »
If you plan to use the iTunes feature, then the computer which will have the iTunes
Library will also need to be physically or wirelessly connected to the same Ethernet
device the NS-MNE’s are plugged in to. (See the Operating iMusica with iTunes
section of this manual for more instruction on configuring for iTunes.)
19 te c h n I c a l su p p o r t : 800.283.5936
Page 23

OPERATING THE MUSICA ADC WITH iMUSICA
The following screens are used to access the various Musica ADC functions through the iMusica
interface. The iMusica interface contains the same controls as the Flash-enabled browser interface.
The interface is designed to be intuitive so not all controls are described.
st a r t u p sc r e e n
This screen is first displayed after launching. No controls are functional at this point.
ro o M se l e c t I o n
After startup, clicking on the Room List button displays a list of rooms within the system. In the
case of systems with up to 3 sequentially addressed NM-MNE’s, then all the rooms served by all
the ADC’s will be listed. Select which room you wish to control. Selected rooms are checked. Use
the Done button to exit the Room screen.
In s t a l l a t I o n a n d op e r a t I o n Ma n u a l 20
Page 24

st a n d B y sc r e e n a n d so u r c e se l e c t I o n sc r e e n
The first screen below identifies the room that has been selected, but that an audio source has
not been selected. Access the audio sources available for a room using the Source button. The
second screen shows a list of sources. Select a source and use the Done button to exit the Source
selection screen.
pl a y e r co n t r o l sc r e e n s
There are two Control Screens: One for the player, the other for the amplifier controls. The audio
player control screen shows the standard controls usually found in an audio player.
End
Beginning
Play
Pause
Previous
Shuffle
Stop
Next
Continuous
Go to Amp
Settings
Screen
21 te c h n I c a l su p p o r t : 800.283.5936
Mute (icon changes
when muted)
Volume
Page 25

aM p se t t I n g s sc r e e n
The Amp Settings screens provides additional audio control of the Musica ADC including 5-Band
Graphic Equalizer, Loudness, Balance, and 3D Audio Mode control. Use the Done button to exit
the Amp Settings screen.
Loudness Control On/Off
Balance Left/Right
3D Audio Mode On/Off
5-Band Graphic
Equalizer
AMP - Selects
Internal/External
Amplifier Setting
Volume
ro o M se t t I n g s sc r e e n
The Room Settings screens provides backlight color control of the panel, sleep time control, and
the ability turn off/on all rooms in the system. Use the Done button to exit the Room Settings
screen.
Backlight Color
Blue/Amber/Off
Goes to Room
Settings Screen
Mute (icon changes
when muted)
Sleep - Set Sleep Timer
Go to Amp
Settings
Screen
Mute (icon changes
when muted)
Volume
In s t a l l a t I o n a n d op e r a t I o n Ma n u a l 22
Page 26

tu n e r sc r e e n s
There are two tuner screens, one that accesses preset stations on the tuner, and a manual-mode
keypad screen that allows entry of the station frequency.
Note: A Musica FM Tuner card must be installed into the room Keypad for any room »
requiring an FM Tuner. and it must be selected as Source.
23 te c h n I c a l su p p o r t : 800.283.5936
Page 27

Chapter 5: Using iTunes with iMusica
With the iMusica interface controlling the Musica ADC through the NS-MNE, iTunes can become
an audio source for your Musica system. To do this, iMusica will need to pair with iTunes on the
computer you are planning to use as the Source.
Perform the following:
Select iTunes as the source from any room. iMusica will display the following as it is 1.
connecting:
When connected, in iTunes you will see the name of your device running iMusica.2.
In s t a l l a t I o n a n d op e r a t I o n Ma n u a l 24
Page 28

Click on the device name and iTunes will display the following Pairing Screen:3.
Enter the 4. passcode (0000, four zeroes). This will complete the Pairing process and iTunes will
display a confirmation.
25 te c h n I c a l su p p o r t : 800.283.5936
Page 29

Click 5. OK. The iMusica application will index the computer’s iTunes Library and display a screen
similar to the following:
iMusica goes to the Player Screen once a song begins:6.
The Transport Control will now control iTunes on the Paired Computer.7.
In s t a l l a t I o n a n d op e r a t I o n Ma n u a l 26
Page 30

PAIRING WITH A DIFFERENT iTUNES LIBRARY
If you later want to Pair to a different iTunes Library on another Computer, you need to go back into
the Settings Tool as when iMusica was first configured. You will see a screen similar to this:
Touch the Library ID field and erase its contents to delete the Pairing. The Pairing process will start
again the next time iMusica is run and a Room selects iTunes as a Source.
27 te c h n I c a l su p p o r t : 800.283.5936
Page 31

NS-MNE Technical Specifications
SPECIFICATIONS
Hardware•
32-bit NET+ARM high-performance
RISC processor (NS7520 55 MHz)
4 MB Flash and 16 MB RAM
RS-232 or switch-selectable RS232/422/485 serial interface (DB-9M
connector)
Throughput up to 230,400 bps•
7/8 data bits•
1/1.5/2 stop bits•
None/even/odd parity•
Software/hardware flow control•
Auto-sensing 10/100 Mbit Ethernet
interface and network link
Wired LAN Interface•
10BASE-T
100BASE-TX (Automatic Recognition)
Musica ADC Interface•
RS-232 Female
Power•
9-30 VDC @ 370 mA power supply
included
Dimensions•
Length: 3.876 in (9.846 cm)
Width: 1.680 in (4.267 cm)
Depth: 0.999 in (2.537 cm)
Weight: 2.29 oz (6.50 g)
Weight•
2.29 oz (6.50 g)
Environmental•
Storage temperature:
-40º C to 90º C (-40º F to 194º F)
Operating temperature:
0º C to 60º C (32º F to 140º F)
Relative Humidity:
5% to 90% (non-condensing)
Altitude:
12,000 Feet (3658 Meters)
Indicators•
Network link
Ethernet activity
Power (red)
Regulatory Approvals•
FCC Part 15, Class A
EN 55022
EN5J024
VCCI
AS 3548
UL60950
CSA 22.2 NO. 60950
EN 60950
> ClearOne LOCATIONS
Headquarters:
Salt Lake City, UT USA
5225 Wiley Post Way
Suite 500
Salt Lake City, UT 84116
Tel: 801-975-7200
Toll Free: 800-945-7730
Fax: 801-977-0087
sales@clearone.com
© 2011 ClearOne. All rights reserved. Apple® iPhone®, iPad®, iPod touch®, Adobe®, Flash®, the Flash logo, and other products are trademarks of their respective owners.
Latin America
Tel: 801-974-3621
global@clearone.com
Information in this document subject to change without notice. 800-000-106 Rev 1.0 August 2011.
EMEA
Tel: 44 (0) 1189 036 053
global@clearone.com
APAC
Tel: 801-303-3388
global@clearone.com
TechSales
Tel: 800.705.2103
E-mail: techsales@clearone.com
Technical Support
Tel: 800.283.5936
E-mail:
tech.support@clearone.com
In s t a l l a t I o n a n d op e r a t I o n Ma n u a l 28
 Loading...