

Page 1

NetStreams™ Quartet
User’ s Guide
™
Page 2

Title: Quartet User’s Guide
Document Number: 020026
Original Publication Date: December 18, 2007
All rights reserved.
Copyright © 2007 by NetStreams.
All brand names, product names, and trademarks are properties of their
respective owners.
Copyright
3600 W. Parmer Lane, Suite 100
Austin, TX 78727
USA
Phone: +1 512.977.9393
Fax: +1 512.977.9398
Toll Free Technical Support 1-866-353-3496
Page 3

Contents
Chapter 1: Overview .....................................................................................................................1-1
Introduction ............................................................................................................................... 1-1
Package Contents ...................................................................................................................... 1-1
Required Tools ..........................................................................................................................1-2
NetStreams Documentation ...................................................................................................... 1-2
Contacting NetStreams ............................................................................................................. 1-2
Safety Requirements ................................................................................................................. 1-2
Hardware Labels ...................................................................................................................1-3
Safety Instructions ................................................................................................................ 1-3
Qualified Service Personnel .................................................................................................. 1-4
Chapter 2: Key Features, Components, and Specifications .....................................................2-1
Key Features of the Quartet System ....................................................................................... 2-1
4-Sources + FM Tuner/4 Rooms .......................................................................................... 2-1
Intercom and Room Monitoring ........................................................................................... 2-1
Sleep Timer and Rest and Rise® ..........................................................................................2-1
Super Zone ............................................................................................................................ 2-1
Adding Sources with an Audio Port ..................................................................................... 2-2
5-Band Graphic Equalizer .................................................................................................... 2-2
3D Sound Stage Mode .......................................................................................................... 2-2
Simplified Programming - No Laptops Required ................................................................. 2-2
Multi-Room Processor (MRP) Components and Specifications .......................................... 2-2
MRP Components .................................................................................................................2-2
MRP Specifications .............................................................................................................. 2-4
Remote Control .........................................................................................................................2-4
Specifications for the Remote Control .................................................................................. 2-5
In-Wall Keypad Layout and Specifications ............................................................................ 2-6
In-Wall Keypad Front Layout ............................................................................................... 2-6
In-Wall Keypad Rear Layout ................................................................................................ 2-7
Quartet Keypad Specifications ............................................................................................. 2-7
Optional Add-On Audio Port (AP500) ................................................................................... 2-8
Chapter 3: Getting Started ...........................................................................................................3-1
Pre-Wiring for Quartet ............................................................................................................ 3-1
Pre-Wiring for Audio Ports .....................................................................................................3-1
Terminating a CAT5 Cable ..................................................................................................... 3-2
Installation ................................................................................................................................. 3-2
iii
Page 4

Contents
Connecting an Audio Port (sold separately) ........................................................................... 3-3
Powering the System ON .......................................................................................................... 3-3
Chapter 4: Using the Setup Menus .............................................................................................4-1
Using the Remote to Navigate the Menu ................................................................................ 4-1
Using the ROOM Menu ........................................................................................................... 4-2
Naming a Room ....................................................................................................................4-4
Adjusting Sound Settings in the Room ................................................................................. 4-5
Using the 5-Band Equalizer........................................................................................... 4-5
Adjusting the Left/Right Balance .................................................................................. 4-6
3D Sound Mode............................................................................................................. 4-7
Turning Loudness ON or OFF....................................................................................... 4-8
Adjusting the Default Volume....................................................................................... 4-9
VOLUME ............................................................................................................................. 4-9
Speaker Impedance Adjustments ........................................................................................ 4-10
Audio Port Sensitivity Adjustments (AUX GAIN) ............................................................ 4-11
Setting Up a Super Zone .....................................................................................................4-12
Intercom Room/Monitoring Settings ..................................................................................4-13
Do Not Disturb Setting (DND).................................................................................... 4-13
Privacy Settings ............................................................................................................ 4-14
Monitoring a Room ....................................................................................................... 4-15
Setting the Sleep Timer ....................................................................................................... 4-16
Setting the Rest and Rise Mode (RNR) ..............................................................................4-16
Quartet Keypad Settings ........................................................................................................4-18
Adjusting the Keypad Pilot Light Setting ........................................................................... 4-18
Adjusting the Keypad Back Light Setting .......................................................................... 4-18
Locking a Quartet Keypad .................................................................................................. 4-19
Adjusting the Paging Chime Bell Setting ...........................................................................4-20
Changing the AUX MODE ................................................................................................. 4-21
Using the SOURCE Menus .................................................................................................... 4-22
Naming a Source ................................................................................................................. 4-23
Source Input Adjustments (IN GAIN) ................................................................................ 4-24
FM Tuner Settings ..................................................................................................................4-24
Adjusting the FM Tuner Sensitivity ................................................................................... 4-24
Adjusting the FM Tuner Spacing ........................................................................................ 4-25
Adjusting the FM Tuner Pre-Emphasis .............................................................................. 4-26
Setting FM Tuner Presets ................................................................................................... 4-27
Auto Pre-Set Tuning.................................................................................................... 4-27
Setting System Settings ........................................................................................................... 4-28
Adjusting the LCD Backlight Setting ................................................................................. 4-29
Setting a Password for Quartet ........................................................................................... 4-30
Locking and Unlocking the MRP Menu ............................................................................. 4-31
Saving the Quartet’s Current Settings ................................................................................ 4-31
Chapter 5: Learning IR .........................................................................................................
Adjusting the IR Type .............................................................................................................. 5-1
........5-1
iv
Page 5

Contents
Learning IR for Control of Sources ........................................................................................ 5-2
Creating Macros .......................................................................................................................5-3
2’S Repeat ............................................................................................................................. 5-4
Macro Time ........................................................................................................................... 5-4
Key Macro ............................................................................................................................ 5-5
Chapter 6: Using the Quartet Keypads to Listen to Audio .......................................................6-1
In-Wall Keypad ......................................................................................................................... 6-1
Turn Keypad ON/OFF .............................................................................................................6-1
Turn Volume Up/Down ............................................................................................................6-1
Mute Audio ................................................................................................................................ 6-2
Select a Global Source .............................................................................................................. 6-2
Select a Source for All Rooms ..................................................................................................6-2
Control a Source ....................................................................................................................... 6-2
Select a Local Source (Audio Port) ......................................................................................... 6-2
Select a Source Local Source in Another Room ..................................................................... 6-2
Select the FM Tuner .................................................................................................................6-2
Change Stations .................................................................................................................... 6-2
Select Tuner Presets .............................................................................................................. 6-2
Special Functions ...................................................................................................................... 6-3
Sleep ...................................................................................................................................... 6-3
RNR ...................................................................................................................................... 6-3
Using the Remote to Navigate the Menu ................................................................................ 6-3
Chapter 7: Whole House and Room-to-Room Paging ...............................................................7-1
In-Wall Keypad ......................................................................................................................... 7-1
Paging all Rooms (Whole House Paging) ............................................................................... 7-1
Answering a Page ................................................................................................................. 7-1
Hanging Up on a Page .......................................................................................................... 7-2
Paging One Room ..................................................................................................................... 7-2
Monitoring a Room ................................................................................................................... 7-2
Chapter 8: Troubleshooting .........................................................................................................8-1
Appendix A:Quartet Keypad Quick Reference............................................................................. A-1
v
Page 6

Introduction
Chapter
1
Overview
If the last time you experienced really great audio quality was at a live venue, we have
good news. Now, with NetStreams Quartet Q4000, you can have that same memorable
experience and enjoyment - everyday - in every room of your home. Imagine being
able to listen to your favorite music in any room without having to deal with the
complexity and clutter of equipment in each room. NetStreams Quartet Q4000 makes
it all possible by delivering incredible sound quality and so much more in one
affordable package.
This easy to use Multi-Room Audio system is packed with high-end features,
including a built-in intercom system. Every member of your family can enjoy their
favorite music - wherever and whenever they want, at the touch of a button.
The Q4000 enables homeowners to enjoy exceptional audio quality from as many as
nine (9) different global audio sources, such as an FM tuner, DVD player, satellite
radio, etc., in up to four (4) different zones or areas of your home at the same time.
Package Contents
The Quartet Q4000 is shipped with the following equipment and cables. Verify that
that the contents of your shipment include:
Multi-Room Processor (MRP) - labeled Quartet
Four keypads (not sold separately)
One power cord
Five IR emitters
One remote control
One FM antenna.
All specifications subject to change without notification. All rights reserved. Copyright © 2007 NetStreams
Main +1 512.977-9393 / fax +1 512.977.9398 / Toll Free Technical Support +1 866-353-3496
3600 W. Parmer Lane, Suite 100; Austin, TX 78727 / www.netstreams.com.
1-1
Page 7

Quartet User’s Guide
Required Tools
NetStreams Documentation
Tools required for installation of a Quartet Q4000 include:
small flathead screwdriver
CAT5 tester
volt meter
RJ45 crimping tool
RJ45 connectors
wire cutters
wire strippers.
To view or print NetStreams documentation:
1. From a web browser, go to www.netstreams.com.
2. Click the Dealer Login button.
3. Log in with your dealer user name and password.
4. Select Dealer Documents.
Contacting NetStreams
If you have questions about the Quartet that are not covered in this manual:
visit the dealer section of the NetStreams website (www.netstreams.com) for
application notes
email support@netstreams.com
call 1-866-353-3496 or 1-512-977-9393.
Safety Requirements
Safe installation and use of NetStreams products requires a thorough knowledge of the
products and proper installation practices. Therefore, please read this manual before
beginning and heed all warnings. Follow all instructions provided and retain them.
Adhere to all warnings on the product and in the instructions.
1-2
All specifications subject to change without notification. All rights reserved. Copyright © 2007 NetStreams
Main +1 512.977-9393 / fax +1 512.977.9398 / Toll Free Technical Support +1 866-353-3496
3600 W. Parmer Lane, Suite 100; Austin, TX 78727 / www.netstreams.com.
Page 8

Overview
CAUTION!
CAUTION!
WARNING
Hardware Labels
T o reduce the risk of fire
or electrical shock, do
not expose this
appliance to rain or
moisture. To reduce the
risk of electric shock, do
not remove cover. No
user-serviceable parts
inside. Refer servicing
to qualified personnel.
The lightning flash with ar rowhead symbol, with in an equilateral The exclamation point within an equilateral triangle is intended to alert the user to the
presence of important operating and maintenance (servicing) instructions in the
literature accompanying the appliance.
Safety Instructions
To reduce the risk of
possible fire or
electrical shock, make
all connections and
finish all terminations
before turning on power
to the unit.
Before turning the
power on for the first
time, read this section
carefully. All models
are designed for use
only with the power
supply voltage of the
region where they are
sold.
Do not block any ventilation openings. For example; do not place on a rug, bed,
sofa, or similar surface which impedes airflow across the chassis. Airflow through
the ventilation openings should be unobstructed. Provide ventilation on all sides of
the appliance, especially if placed in a rack. If ventilation is blocked, the appliance
may overheat and malfunction.
Do not install near heat sources such as radiators, heat registers, stoves, or other
appliances (including amplifiers) that produce heat. Do not expose the appliance to
direct sun light as the appliance’s internal components temperature may rise and
shorten the life of the components. Avoid damp and dusty places.
Unplug this apparatus during lightning storms or when unused for long periods of
time.
Only connect the appliance to a power supply described in the operating
instructions or as marked on the appliance.
Do not defeat the safety purpose of the polarized or grounding-type plug. A
polarized plug has two blades with one wider than the other . A grounding type plug
has two blades and a third grounding prong. The wide blade or the third prong is
1-3
All specifications subject to change without notification. All rights reserved. Copyright © 2007 NetStreams
Main +1 512.977-9393 / fax +1 512.977.9398 / Toll Free Technical Support +1 866-353-3496
3600 W. Parmer Lane, Suite 100; Austin, TX 78727 / www.netstreams.com.
Page 9

Quartet User’s Guide
NOTE
provided for your safety. If the provided plug does not fit into your outlet, consult
an electrician for replacement of the obsolete outlet.
NetStreams provides a
VSPW 12v DC power
supply. Review whether
this is the appropriate
voltage and power
supply for your country
and call NetStreams
Technical Services at
(866) 353-3496 if you
have any questions.
A label located at the rear panel power connection indicates the DC power input for
the unit. The label will read 100-240V DC 12V/1.5A Adapter.
Route power cord and other cables so that they are not likely to be walked on,
tripped over, pinched, or stressed. Pay particular attention to condition of cords and
cables at plugs, and the point where they exit from the apparatus. T o prevent risk of
fire or injury, damaged cords and cables should be replaced immediately.
Only use attachments/accessories specified by the manufacturer.
The apparatus should be serviced by qualified service personnel when:
the power supply cord or the plug has been damaged
objects have fallen or liquid has spilled into the unit
the apparatus has been exposed to rain or other moisture
the apparatus does not appear to operate normally
the apparatus has been dropped, or the enclosure damaged.
Do not attempt to service the appliance beyond that described in the operating
instructions. All other servicing should be referred to qualified service personnel.
Clean only with a dry cloth. Do not use rough material, thinners, alcohol or other
chemical solvents or cloths since this may damage the finish or remove the panel
lettering. Never pour any liquid on or in the device.
Do not use near water, for example, near a bathtub, washbowl, kitchen sink,
laundry tub, in a wet basement, near a swimming pool, etc.
Do not expose the appliance to dripping or splashing and do not place objects filled
with liquids, such as vases, on the appliance.
Do not touch the appliance with wet hands. Do not handle the appliance or the
power cord when your hands are wet or damp. If water or any other liquid enters
the appliance chassis, take the appliance to qualified service personnel for
inspection.
Only use the appliance with a cart or stand recommended by the manufacturer. An
appliance and cart combination should be moved with care. Quick stops, excessive
force and uneven surfaces may cause the appliance and cart combination to
overturn.
Only mount the appliance to a wall or ceiling as recommended by the
manufacturer.
Qualified Service Personnel
Only NetStreams employees are qualified to inspect or repair internal damage to
NetStreams equipment. If your NetStreams device is damaged, contact NetStreams
Technical Support for a Return Merchandise Authorization.
1-4
All specifications subject to change without notification. All rights reserved. Copyright © 2007 NetStreams
Main +1 512.977-9393 / fax +1 512.977.9398 / Toll Free Technical Support +1 866-353-3496
3600 W. Parmer Lane, Suite 100; Austin, TX 78727 / www.netstreams.com.
Page 10

Key Features, Components, and Specifications
Key Features of the Quartet System
The following subsections discuss the key features of the Quartet system.
4-Sources + FM Tuner/4 Rooms
Quartet is a 4-room system capable of distributing 4 global sources, a centralized FM
tuner, and up to 4 remotely located sources (see Adding Sources using an Audio Port).
A keypad is capable of selecting any of these sources allowing each room to listen to a
separate source or they can all be listening to the same source. In addition to
distributing sources, they can be named and the input level can be balanced.
Chapter
2
Intercom and Room Monitoring
The Quartet keypads include a built-in microphone for Intercom “Push to Talk”
communications, room-to-room paging, as well as room monitoring, a feature not
commonly found with entry-level Multi-Room Audio systems. Now you can have
great audio quality and the convenience of a built-in intercom without the hassle or
expense of installing a separate intercom system.
Sleep Timer and Rest and Rise®
The Rest and Rise feature allows you to set a count down timer once it is reached to
start playing that source for a specified length of time. For example, a user wants to
wake up to music so they would set an eight hour countdown, then the source would
play for the designated hour. With NetStreams Rest and Rise feature, select between 1
to 12 hours in 30-minute intervals.
Super Zone
Quartet features a super zone which allow you to link two or more rooms together to
function as a single room.
All specifications subject to change without notification. All rights reserved. Copyright © 2007 NetStreams
Main +1 512.977-9393 / fax +1 512.977.9398 / Toll Free Technical Support +1 866-353-3496
3600 W. Parmer Lane, Suite 100; Austin, TX 78727 / www.netstreams.com.
2-1
Page 11

Quartet User’s Guide
Adding Sources with an Audio Port
5-Band Graphic Equalizer
3D Sound Stage Mode
Using the optional Audio Port, a local source can be connected to the keypad and
played in that room. This is convenient for sources that are typically installed in the
room like gaming systems, computers, cable boxes, and iPods. The Audio Port
provides line level audio output making it ideal for driving powered subwoofers in the
game room or external amplifiers for the poolside speakers. With certain caveats (see
Chapter 5), a locally connected source can be distributed globally.
All Quartet keypad/amplifiers feature a 5-band graphic equalizer which allows for
further customization of the sound quality to suit your tastes. Adjust the sound output
in each room at 100Hz, 300Hz, 1KHz, 3KHz, and 10KHz.
The Quartet features a proprietary 3D sound stage to expand the spacious quality of the
sound. Particularly beneficial for installations where speakers have been placed very
close together, or for small rooms, the 3D sound mode improves the sound stage for
the listening area.
Simplified Programming - No Laptops Required
Quartet is designed to work “out of the box” and does not require a laptop. All features
can be set at the MRP using its LCD display and the included remote control, including
a source’s IR. You only need to learn the IR commands for a source once and those
commands are effective for all keypads. This is makes it easy to configure an MRP at
the office and deliver it to the home “ready to go.”
Multi-Room Processor (MRP) Components and Specifications
This section describes the MRP components and lists specifications.
MRP Components
Figure 2-1 shows the front panel of the MRP. Figure 2-2 shows the rear panel of the
MRP. The MRP is a 1/2 rack wide component that features a built-in 400 watt
amplifier, FM tuner, four source global inputs, and an IR emitter for source control.
2-2
All specifications subject to change without notification. All rights reserved. Copyright © 2007 NetStreams
Main +1 512.977-9393 / fax +1 512.977.9398 / Toll Free Technical Support +1 866-353-3496
3600 W. Parmer Lane, Suite 100; Austin, TX 78727 / www.netstreams.com.
Page 12
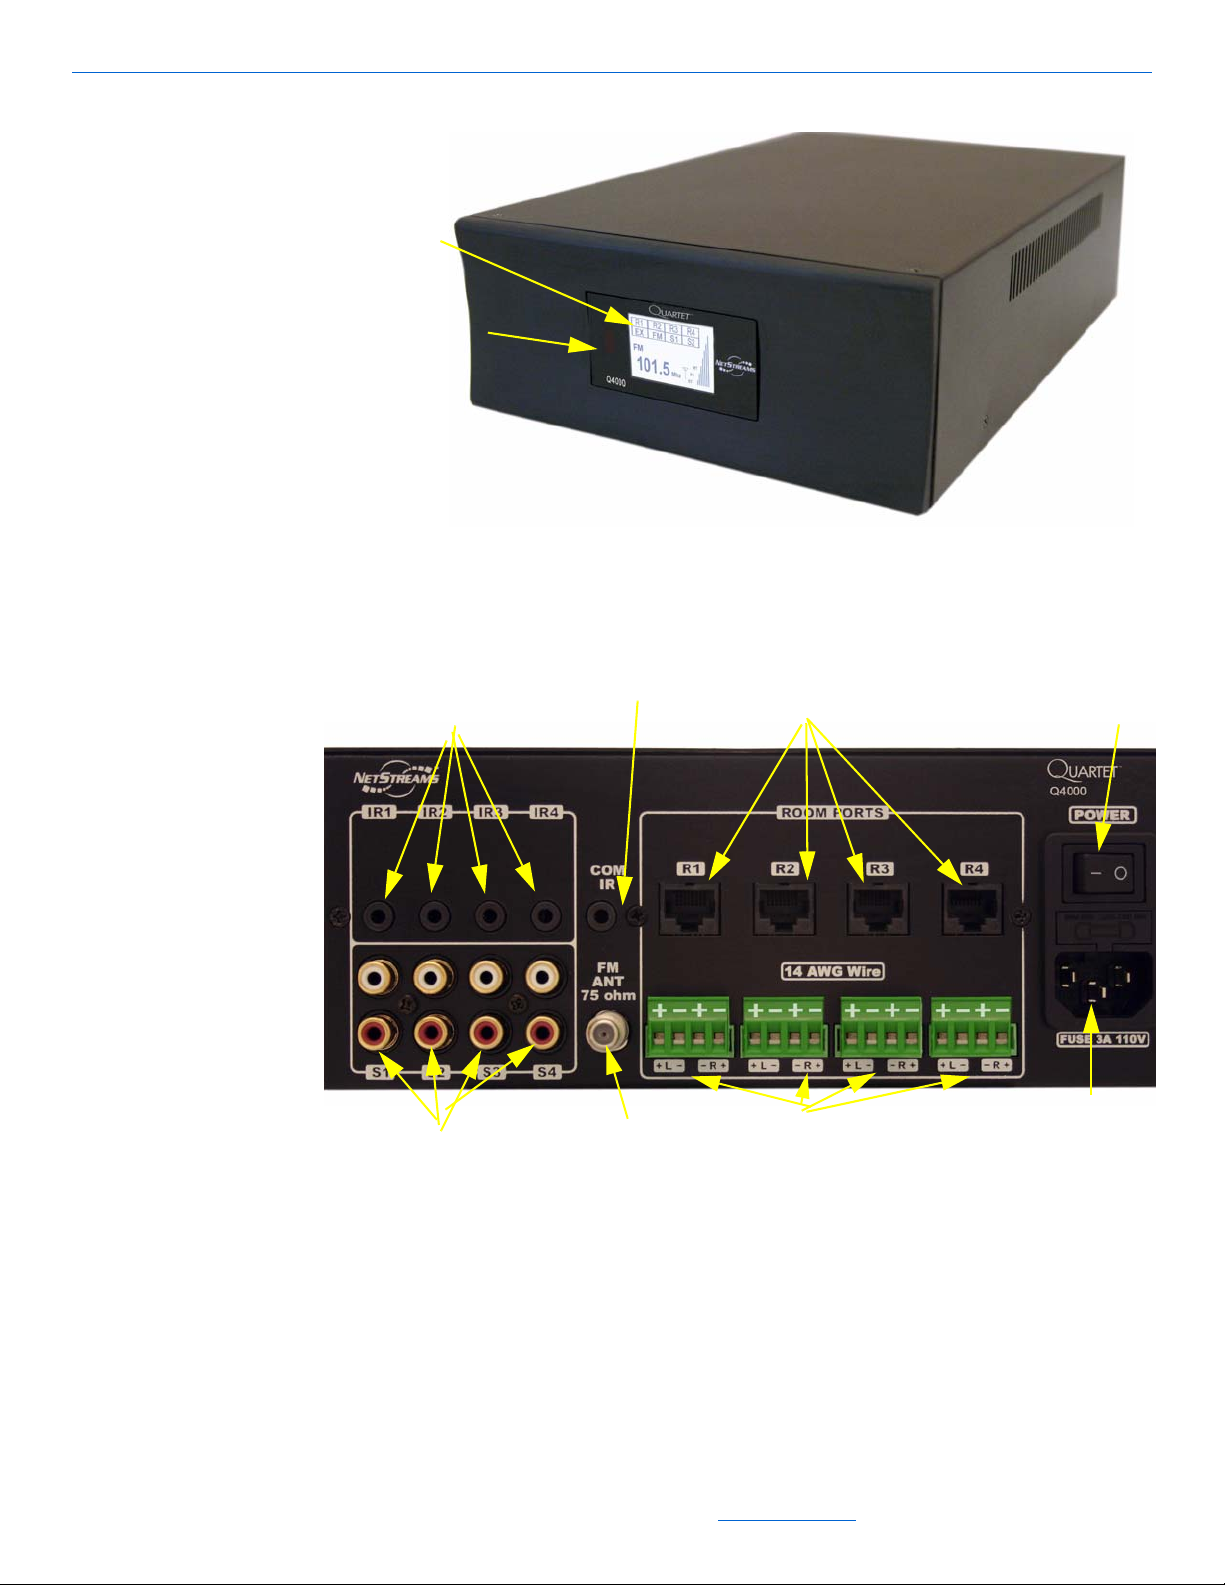
Figure 2-1 Quartet Front Panel
1.IR Receiver
2. Display
3. IR Emitter Output Connectors for 4 Sources
4. 4 RCA Connectors for
5. Common IR Emitter/Output Connector
6. FM Antenna Connector
7. 4 Quartet Keypad Connectors
8.4-pin Phoenix
9. AC Power
Connector
10. MRP Power
Switch
Connectors for Speakers
sources
Key Features, Components, and Specifications
Figure 2-2 Quartet Rear Panel
1.
IR receiver - receives IR signals from the Quartet remote or a universal remote
(sold separately) (front panel)
2. Display - shows the four sources and what is playing on them, displays the FM
channel selected and antenna strength, and provides access to the Quartet main
menu (front panel)
3. IR Emitter/Output connectors for four sources (rear panel)
All specifications subject to change without notification. All rights reserved. Copyright © 2007 NetStreams
Main +1 512.977-9393 / fax +1 512.977.9398 / Toll Free Technical Support +1 866-353-3496
3600 W. Parmer Lane, Suite 100; Austin, TX 78727 / www.netstreams.com.
2-3
Page 13

Quartet User’s Guide
MRP Specifications
4. Four Source Connectors - provides the inputs from the 4 home-wide sources (rear
panel)
5. Common IR Emitter/Output Connector- for IR source input. Used to mirror IR
output from all source ports, and provides partial IR control of a second MRP. (rear
panel)
6. FM Antenna Connector (rear panel)
7. Quartet Keypad Connectors - for the four keypads (rear panel)
8. Four-pin Phoenix Connectors for Speakers - phoenix type connectors for four pairs
of speakers (left and right). (rear panel)
9. AC Power Connector (rear panel)
10. MRP Power switch - powers the MRP ON (-)/OFF(0). (rear panel)
Power 50 WPC x 8 channels @ 6 Ohms
Amp Signal to noise ratio > 96dB
Distortion 0.04% (6 Ohms, 1KHz, 1W)
# Sources Up to nine (9) Global
Source inputs 4 stereo pairs, (up to 4 local inputs) + 1 FM tuner
Connector Stereo RCA jack
# Zones Four (4) simultaneous
Dimensions: 13"x 3.5" x 8.7" (W x H x D)
(330.2mm x 88.90mm x 220.98mm)
Weight 7 lbs. 5 oz. (3.32 Kg)
2-4
Certifications RoHS, UL
Remote Control
One Quartet Remote (MU4601RC) is included with each MRP Audio Distribution
Center. The ergonomically designed, simple to use Quartet remote control duplicates
functions of the wall-mounted keypad. The remote control also features a mute button,
and discrete power ON/OFF buttons. Additional remotes may also be purchased.
Figure 2-3 shows the Quartet remote control.
Figure 2-3 Quartet Remote MU4601RC
All specifications subject to change without notification. All rights reserved. Copyright © 2007 NetStreams
Main +1 512.977-9393 / fax +1 512.977.9398 / Toll Free Technical Support +1 866-353-3496
3600 W. Parmer Lane, Suite 100; Austin, TX 78727 / www.netstreams.com.
Page 14
Specifications for the Remote Control
MRP BACKLIGHT BRIGHTNESS
Figure 2-4 shows how the Quartet remote control duplicates the functions of the
keypad. Figure 1-5 shows the functions of the Quartet remote control.
Dimensions 5.52" x 1.72" x 1.22" (L x W x D)
Buttons: Room System Buttons and SRC Buttons
Power: 3VDC (Off 2 x 1.5V AAA Batteries)
Key Features, Components, and Specifications
Figure 2-4 MU4601RC Remote duplicates functions of the keypad
All specifications subject to change without notification. All rights reserved. Copyright © 2007 NetStreams
Main +1 512.977-9393 / fax +1 512.977.9398 / Toll Free Technical Support +1 866-353-3496
3600 W. Parmer Lane, Suite 100; Austin, TX 78727 / www.netstreams.com.
2-5
Page 15
Quartet User’s Guide
1. Source Selection Buttons
2.FM Tuner
3. Selects the Source Connected to the Audio Port
4. FM Scanning
5. Volume Up
7. Volume
Down
8. Pause
9. Play
10. Shuffle
11. Repeat
12. Skip Track
13. Skip Track
14. Rewind
15. Fast Forward
16. Stop
17. Mode
6. Talk/Mute
Back
Forward
In-Wall Keypad Layout and Specifications
In-Wall Keypad Front Layout
2-6
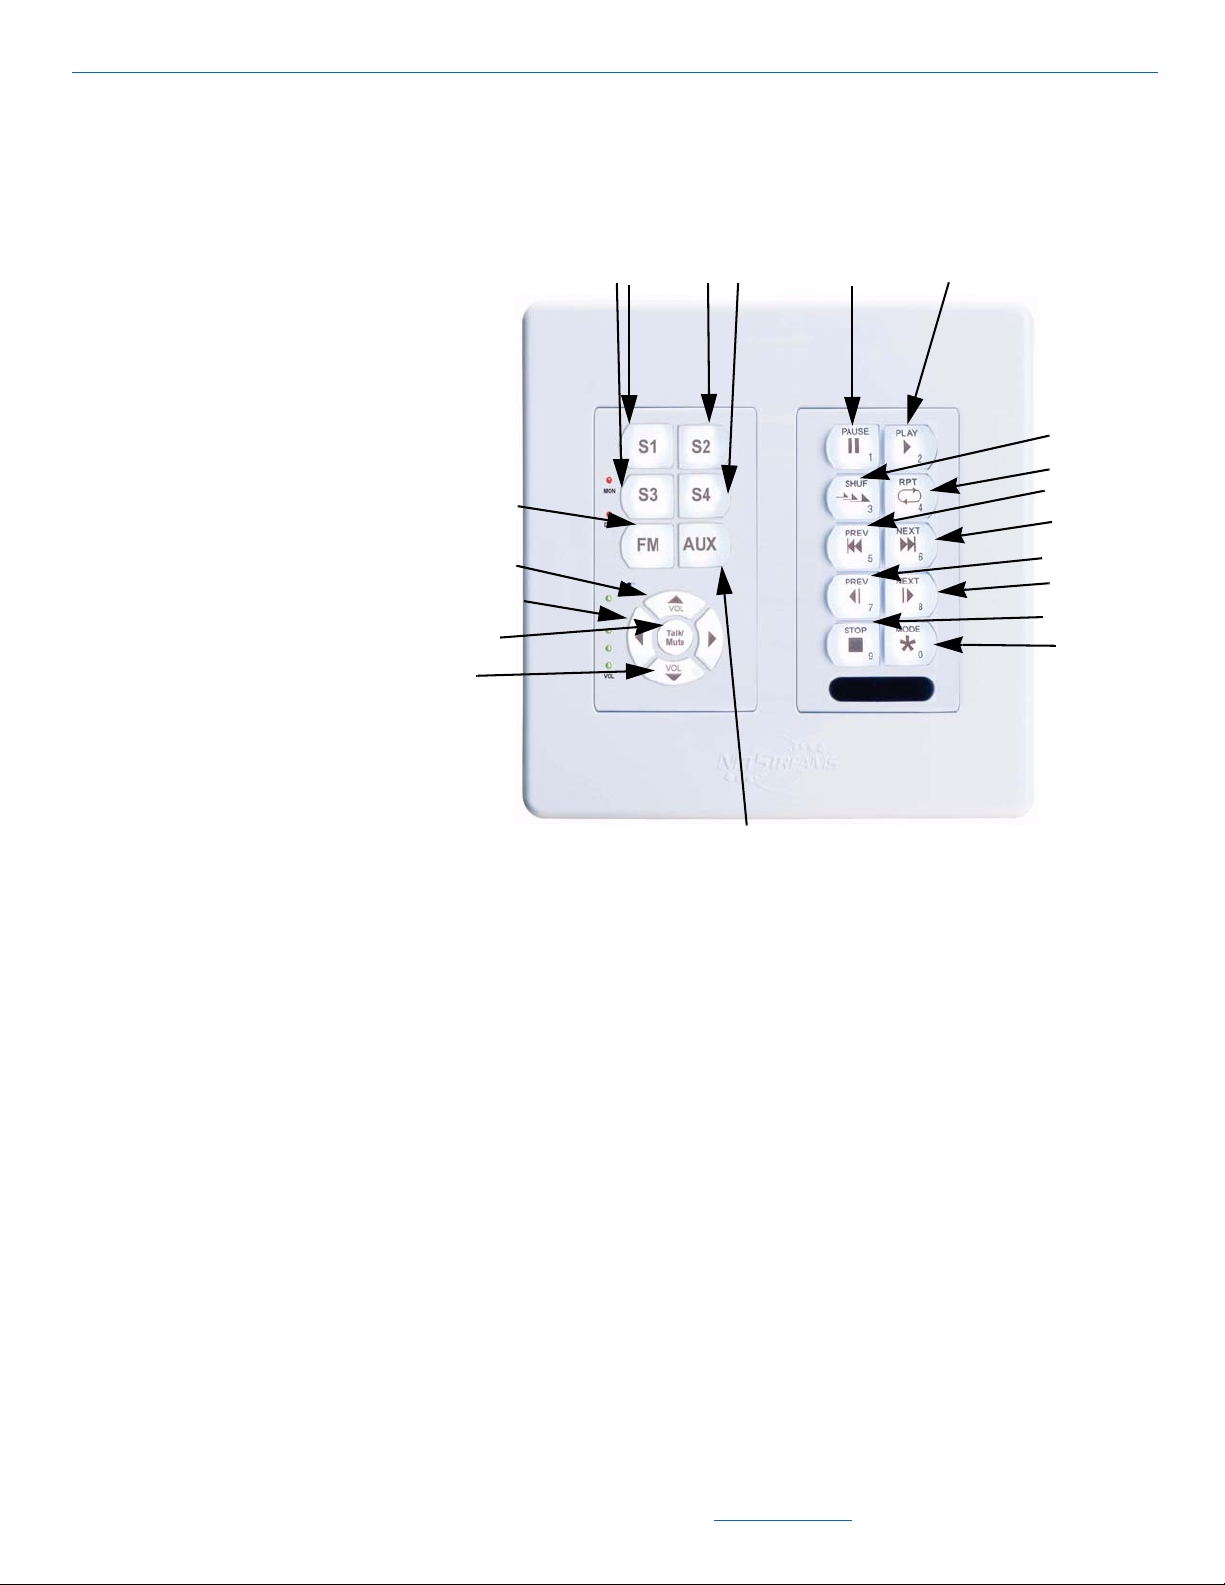
Figure 2-5 Quartet Keypad
Source Selection Buttons - used to select a specific global source connected to the MRP.
1.
Turns off the source when pressed a second time.
2. FM Tuner - to select the FM tuner. Press and hold to scan. Pressing a second time after
initial selection will turn off the room.
3. AUX - selects source connected to local or global Audio Ports (in the room or in another
room).
4. Right and left arrow - for FM tuning.
5. Up arrow - volume up.
6. Talk/Mute - press once to mute. Press and hold for 1 second (button will blink), then
release to intercom with a specific room. S1 through S4 will light to allow selection of
rooms 1 - 4. Press and hold Talk/Mute for 4 seconds for an all rooms page.
7. Down arrow - volume down.
8. Pause - pauses the music.
9. Play - plays the currently selected source.
10. Shuffle - Turns the source’s Shuffle setting ON or OFF.
All specifications subject to change without notification. All rights reserved. Copyright © 2007 NetStreams
Main +1 512.977-9393 / fax +1 512.977.9398 / Toll Free Technical Support +1 866-353-3496
3600 W. Parmer Lane, Suite 100; Austin, TX 78727 / www.netstreams.com.
Page 16
11. Repeat - repeats the currently selected song.
12. Skip Track Back - goes to next track
13. Skip Track Forward - goes to previous track
14. Rewind - rewinds the current song.
15. Fast forward - fast forwards the current song.
16. Stop - stops the currently selected song.
17. Mode - Toggles the mode setting for the currently selected source.
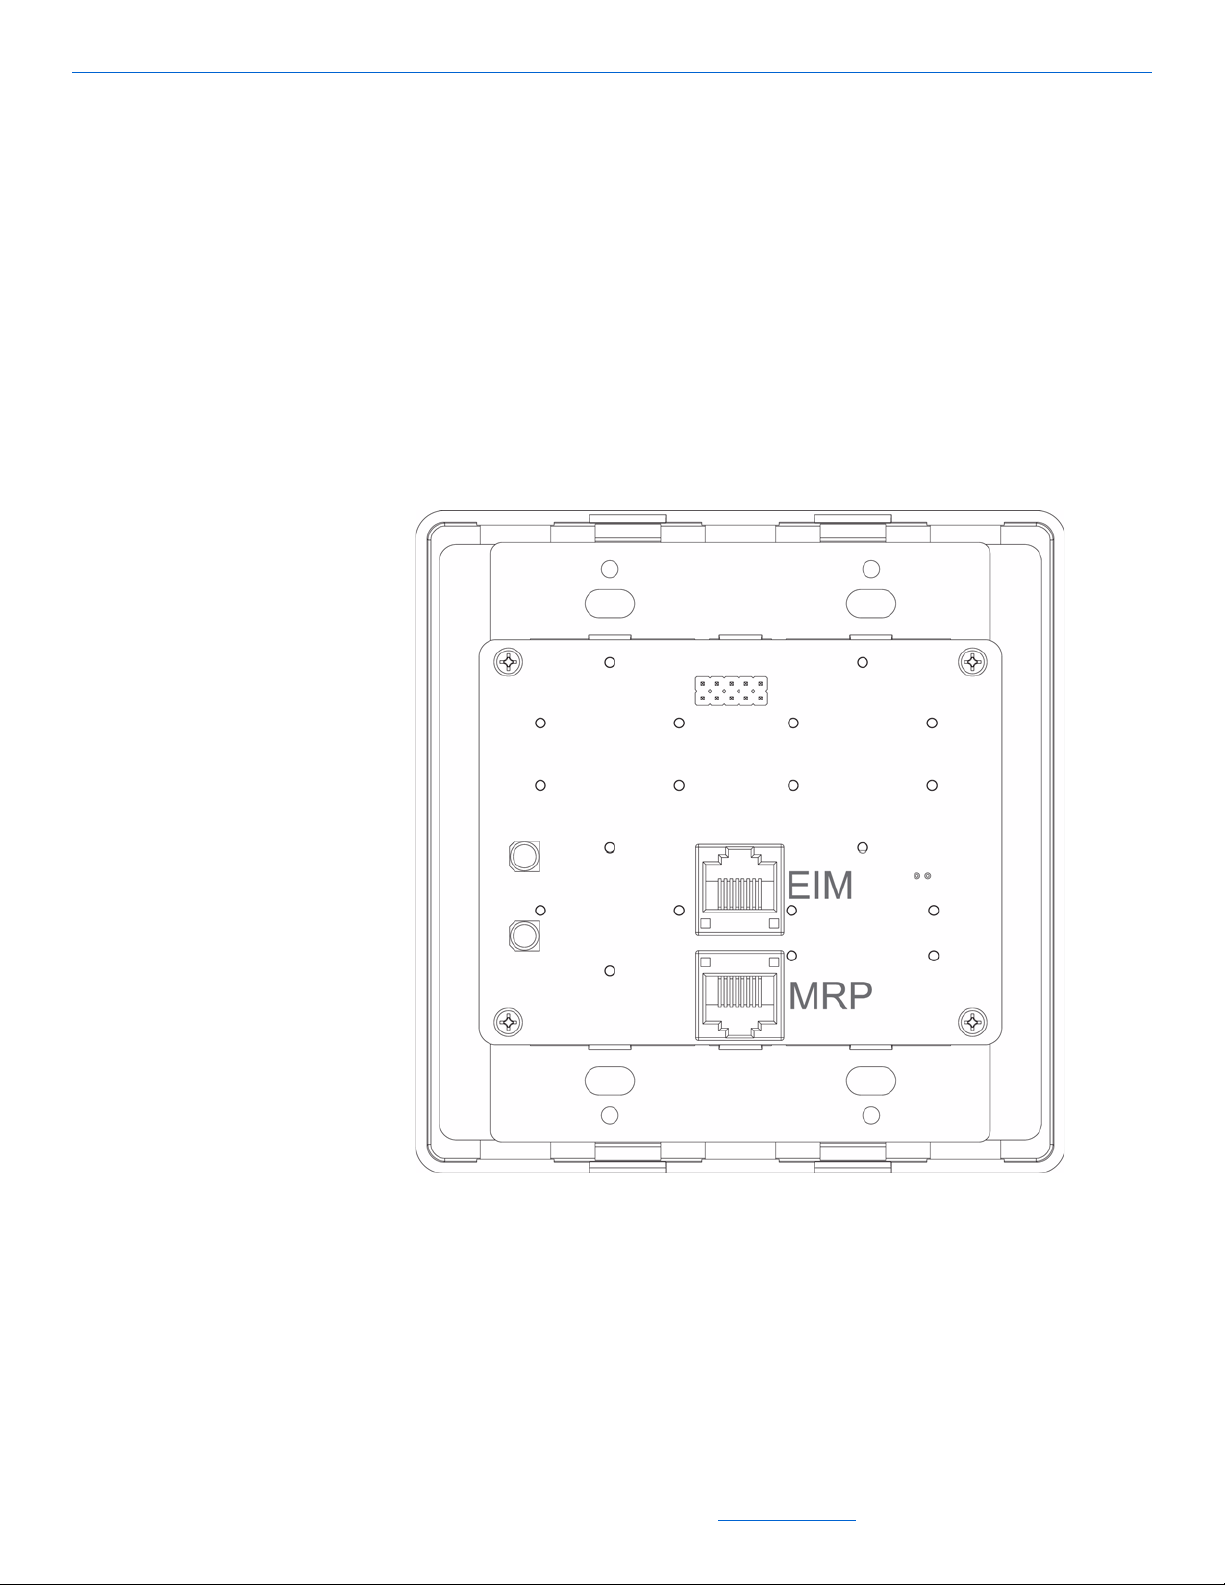
In-Wall Keypad Rear Layout
See Figure 2-6 for a diagram of the in-wall keypad rear layout.
Key Features, Components, and Specifications
Figure 2-6 In-Wall Keypad Rear Layout
Quartet Keypad Specifications
FM Tuner
Channel Separation 50KHz, 100KHz, 200KHz
Keypad 2-Gang, Decora-compatible
Keypad connector-data 8-pin RJ45 data jack
2-7
All specifications subject to change without notification. All rights reserved. Copyright © 2007 NetStreams
Main +1 512.977-9393 / fax +1 512.977.9398 / Toll Free Technical Support +1 866-353-3496
3600 W. Parmer Lane, Suite 100; Austin, TX 78727 / www.netstreams.com.
Page 17
Quartet User’s Guide
(EIA / TIA 568a termination required)
Keypad connector-power Caged Euro Style
Phoenix connector
IR Source control output Infrared LED flashed; 38 and 56KHz supported
Input level 2 Vrms
Input Impedance 10k Ohms
Output Level 2.0 Vrms
Power 100-240 V AC, 50-60 Hz
Power Consumption 150W
In-wall dimensions 4 1/5” x 3 7/10” x 1 24/25”
(backbox) (W x H x D) (106mm x 94mm x 50mm)
Fits standard 2 gang box
Outside dimensions 4 3/10” x 5 1/10” x 2/5”
(faceplate) (W x H x D) (110mm x 130mm x 10mm)
Weight 0.74 lbs (0.33 kg)
(back box with electronics)
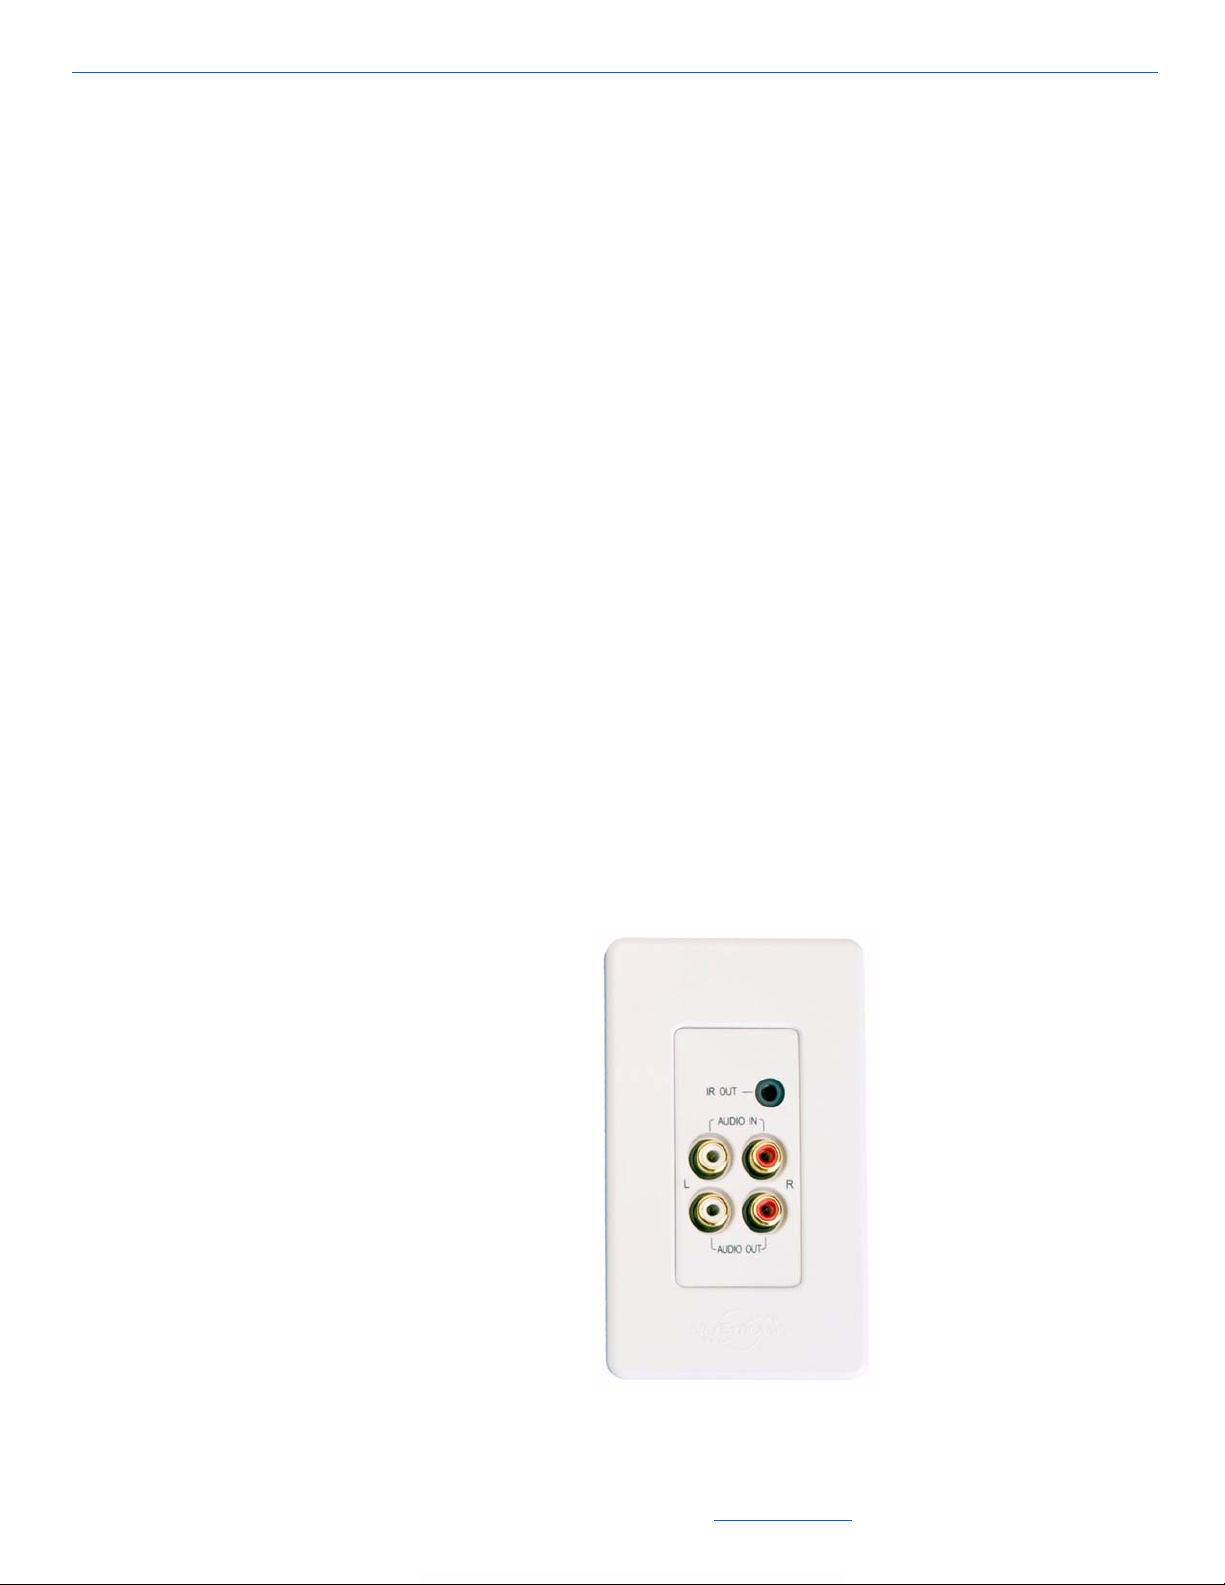
Optional Add-On Audio Port (AP500)
A dealer can purchase an optional add-on Audio Port (AP500) for each keypad to add
an additional audio source. The AP500 is sold separately. See Figure 2-7 for the front
panel of the Audio Port. See Figure 2-8 for the rear panel of the Audio Port.
2-8
Figure 2-7 Audio Port (front panel)
All specifications subject to change without notification. All rights reserved. Copyright © 2007 NetStreams
Main +1 512.977-9393 / fax +1 512.977.9398 / Toll Free Technical Support +1 866-353-3496
3600 W. Parmer Lane, Suite 100; Austin, TX 78727 / www.netstreams.com.
Page 18

Key Features, Components, and Specifications
Figure 2-8 Audio Port (rear panel)
2-9
All specifications subject to change without notification. All rights reserved. Copyright © 2007 NetStreams
Main +1 512.977-9393 / fax +1 512.977.9398 / Toll Free Technical Support +1 866-353-3496
3600 W. Parmer Lane, Suite 100; Austin, TX 78727 / www.netstreams.com.
Page 19
NOTE
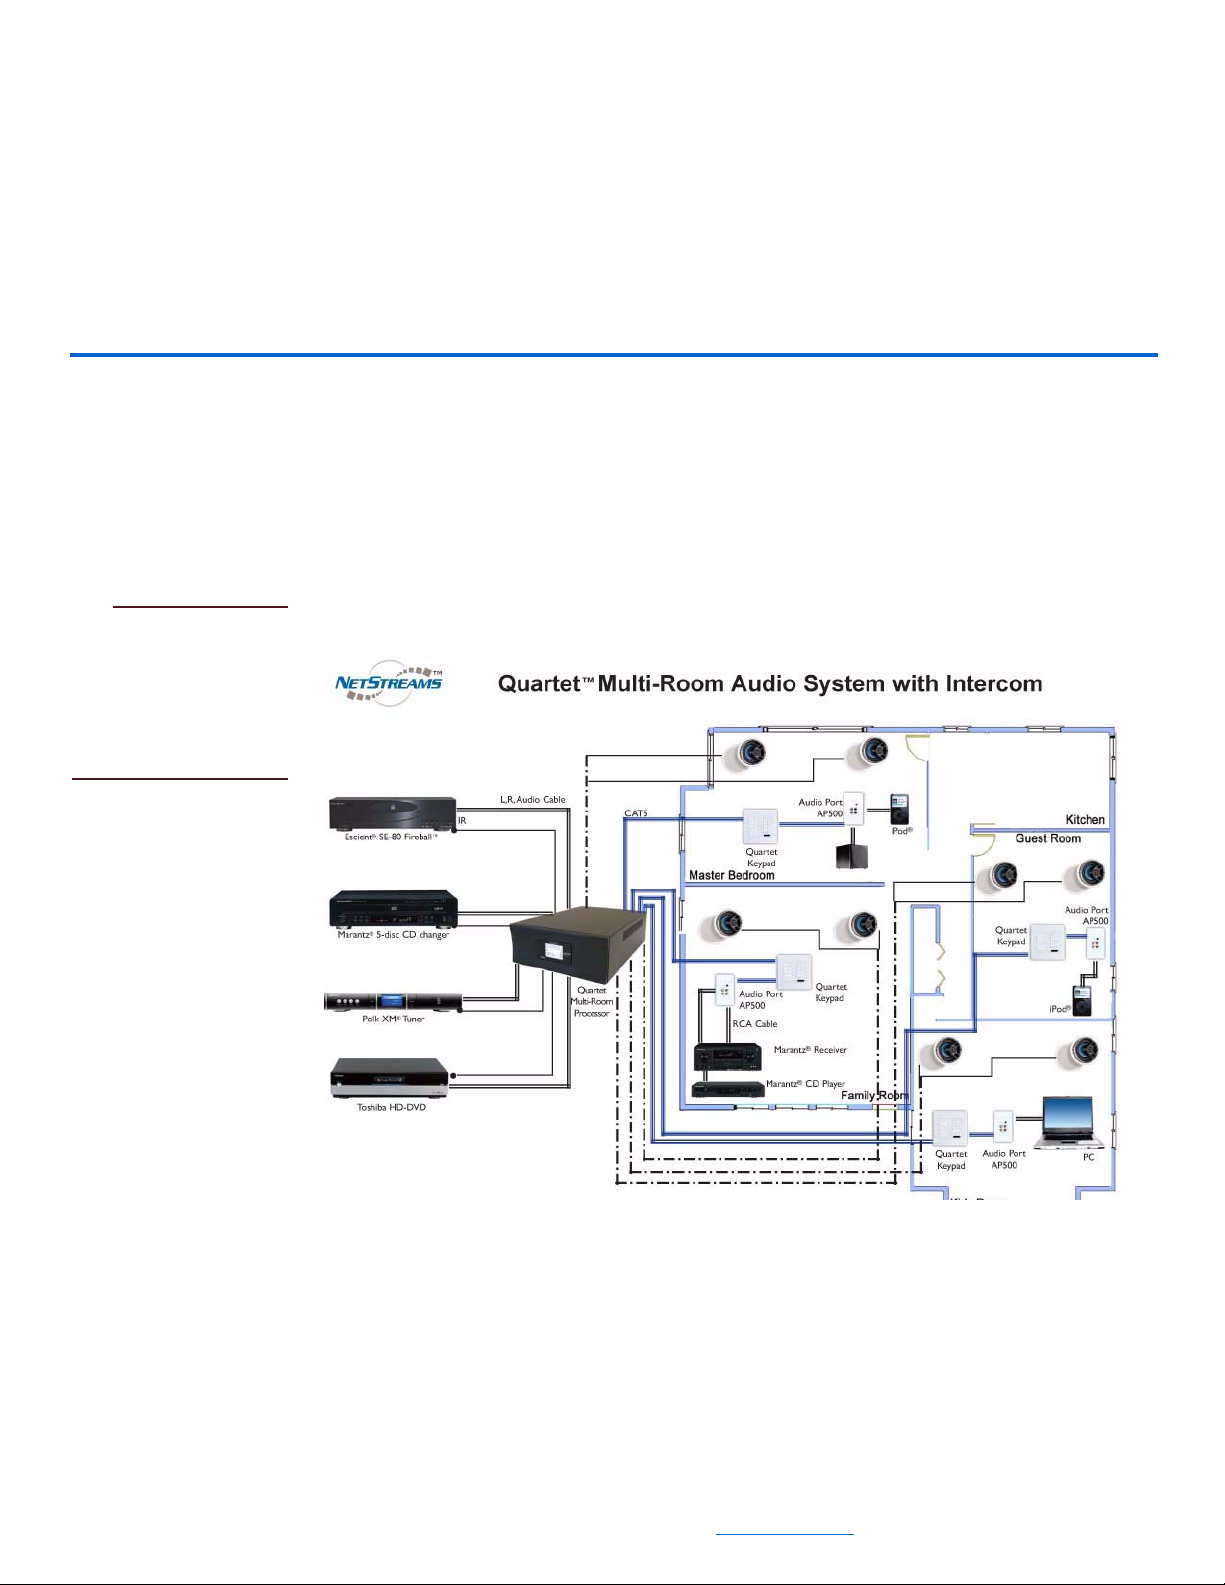
Pre-Wiring for Quartet
NetStreams
recommends pre-wiring
according to Figure 3-1
to allow for a future
upgrade path to Musica
and DigiLinX.
Chapter
3
Getting Started
NetStreams recommends dealers wire the CEA 2030 standard for Multi-Room Audio
(1 CAT5 + 1 14AWG/4-conductor speaker wire). The speaker wire should run from
the MRP directly to the speakers. The CAT5 cable should run from the MRP to the
Quartet in-wall keypads. See Figure 3-1 for a pre-wiring diagram for Quartet.
Figure 3-1 Pre-Wiring Diagram
Pre-Wiring for Audio Ports
Additionally, run 1 CAT5 cable from each Quartet keypad up to 65 feet to the Audio
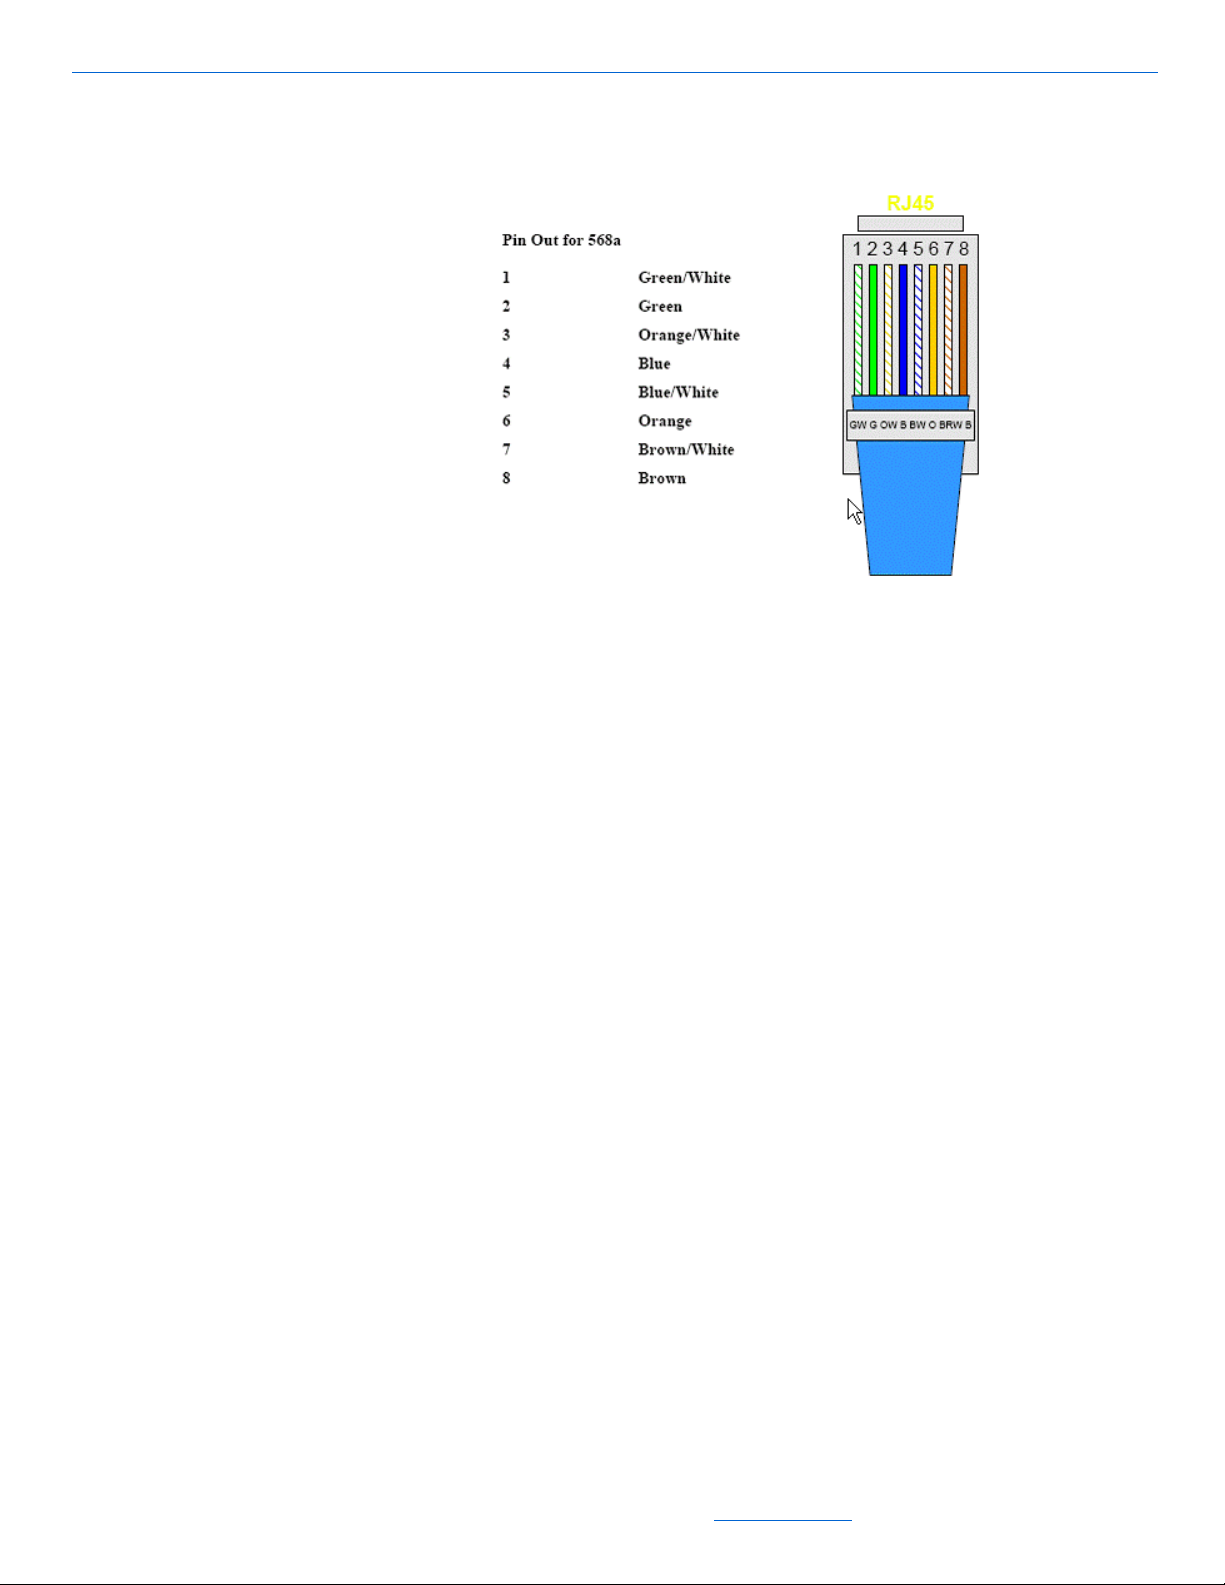
Port location. All CAT5/CAT5e cables should be terminated to the EIA/TIA 568a
standard.
3-1
All specifications subject to change without notification. All rights reserved. Copyright © 2007 NetStreams
Main +1 512.977-9393 / fax +1 512.977.9398 / Toll Free Technical Support +1 866-353-3496
3600 W. Parmer Lane, Suite 100; Austin, TX 78727 / www.netstreams.com.
Page 20
Quartet User’s Guide
Terminating a CAT5 Cable
See Figure 3-2 for a diagram on how to terminate a CAT5 cable
Figure 3-2 Terminating a CAT5 cable
Installation
To get started with your new system, you must first connect the cables as follows:
1. Connect the CAT5 cables from the back of the keypad (use connector labeled MRP
connector) then connect the other end to the back of the unit labeled R1, R2, R3,
and R4.
2. Connect the RCA cables from the audio sources to the RCA connectors on the back
of the unit labeled S1, S2, S3, and S4.
3. Plug the IR emitters into the connectors on the back of the unit IR1, IR2, IR3, and
IR4 and position the emitter over the IR receiver on the appropriate source.
4. Use 14 AWG to wire 4 pairs of speakers to the 4 included phoenix connectors and
plug the connectors into the MRP under R1, R2, R3, and R4.
5. Connect the power cable to the back of the unit.
3-2
All specifications subject to change without notification. All rights reserved. Copyright © 2007 NetStreams
Main +1 512.977-9393 / fax +1 512.977.9398 / Toll Free Technical Support +1 866-353-3496
3600 W. Parmer Lane, Suite 100; Austin, TX 78727 / www.netstreams.com.
Page 21

NOTE
Connecting an Audio Port (sold separately)
EIM runs should be less
than 60 feet.
Powering the System ON
Getting Started
To connect an Audio Port AP500, run a CAT5 (terminated 568a) from the Audio Port
to the connector on the back of the keypad labeled EIM.
1. Press the Power switch on the rear of the MRP to the ON position (-).
2. To start the system and get to the home screen, press the ON button on the Quartet
remote and the following screen appears.
Figure 3-3 Home screen
The home screen shows you the FM channel selected and lists the rooms across the
top. Just below the room names are the sources that are playing within each room
3-3
All specifications subject to change without notification. All rights reserved. Copyright © 2007 NetStreams
Main +1 512.977-9393 / fax +1 512.977.9398 / Toll Free Technical Support +1 866-353-3496
3600 W. Parmer Lane, Suite 100; Austin, TX 78727 / www.netstreams.com.
Page 22

Chapter
4
Using the Setup Menus
The Quartet MRP features an LCD screen on the front panel to guide you though a
variety of system setup options. Using the remote, press the MENU key to access the
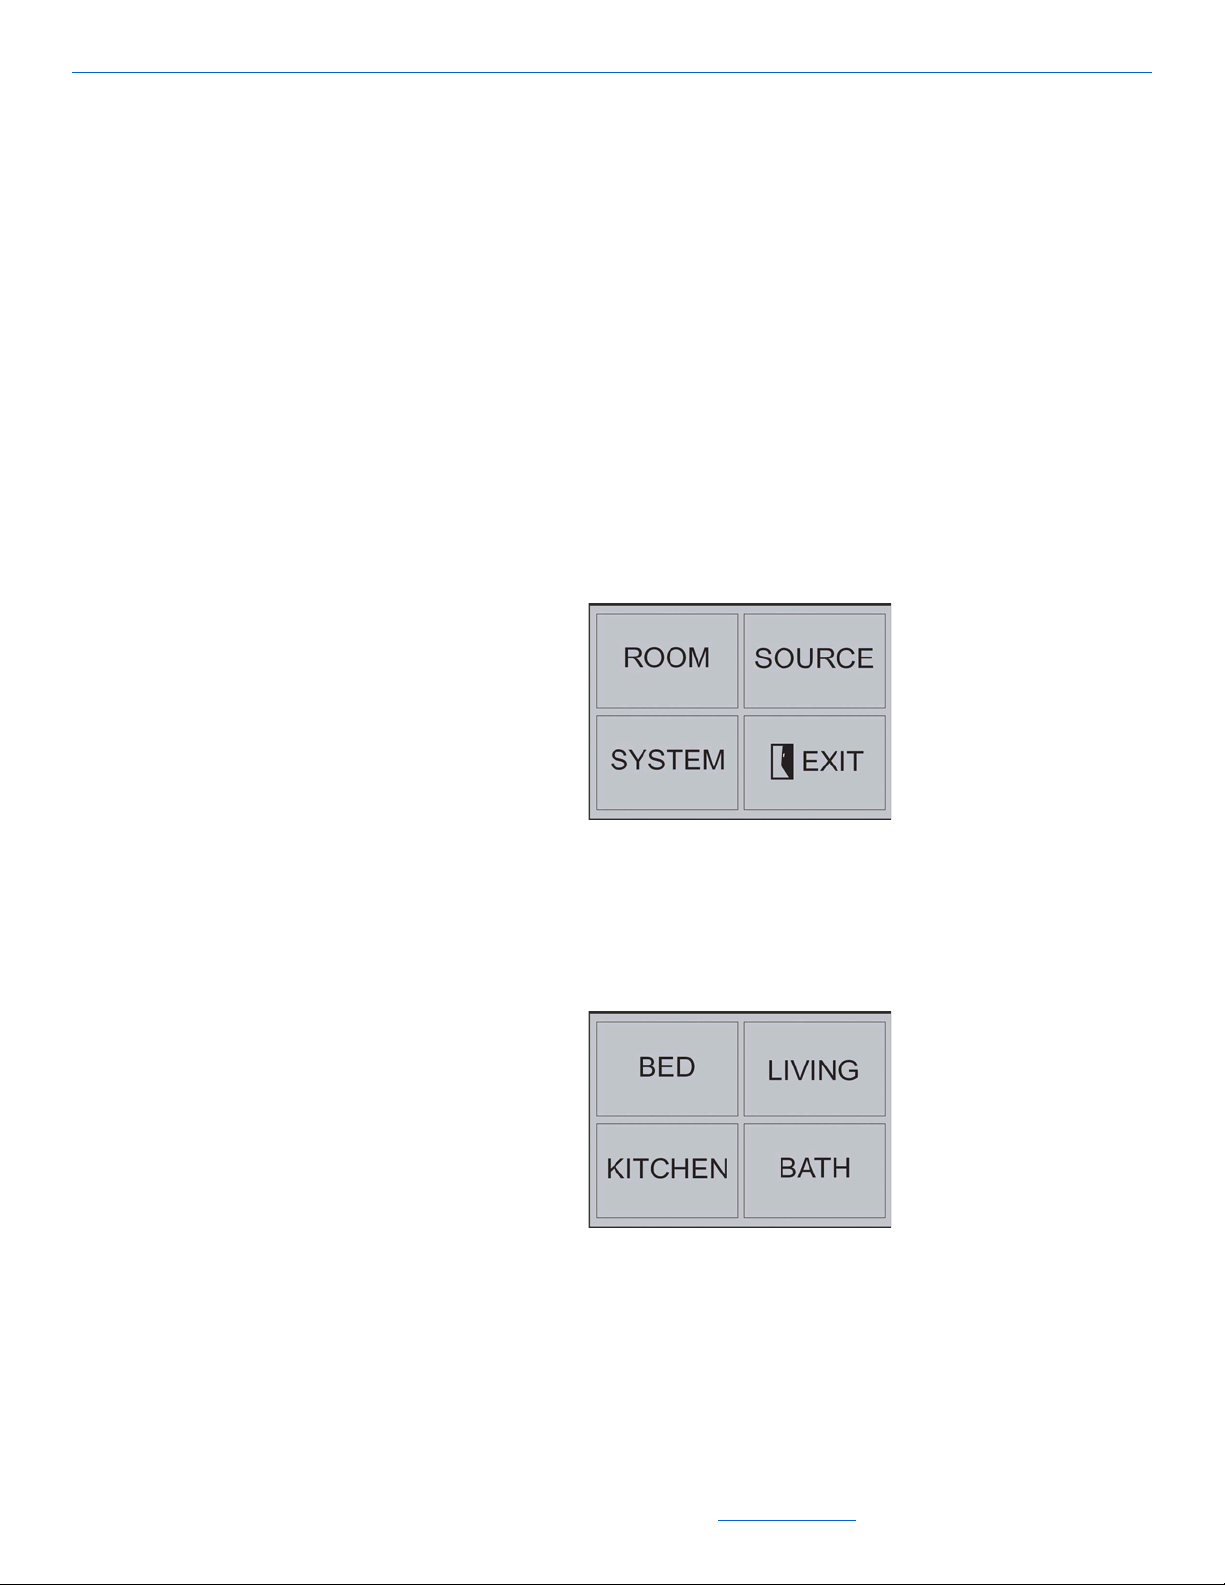
menus. There are four menu items on the Main menu:
ROOM - adjusts settings for the individual rooms.
SOURCE - adjusts settings for each source.
SYSTEM - adjusts settings for the system.
EXIT - exits the menu system.
Using the Remote to Navigate the Menu
You can control the menu by pointing the remote at the IR window on the front panel
of the MRP or on any of the keypads and pressing MENU. If the MRP is visible, you
will see the following screen appear:
Figure 4-1 Menu screen
The keys on the bottom of the remote are key to navigating through the menus. Their
functions are as follows:
MUTE Moves back to the previous screen.
MENU Displays the Quartet menu and is used to select an item.
Up Arrow Moves up a selection in a list.
Down Arrow Moves down a selection in a list.
All specifications subject to change without notification. All rights reserved. Copyright © 2007 NetStreams
Main +1 512.977-9393 / fax +1 512.977.9398 / Toll Free Technical Support +1 866-353-3496
3600 W. Parmer Lane, Suite 100; Austin, TX 78727 / www.netstreams.com.
4-1
Page 23

Quartet User’s Guide
Using the ROOM Menu
Right Arrow Moves to the next or previous column in the menu list; also used to
increase a value.
Left Arrow Moves to the next or previous column in the menu list; also used to
decrease a value.
The ROOM menu allows you to adjust settings for each individual room. Select
ROOM from the main menu, then select a room, and the following screen appears.
The settings on the ROOM menu include:
NAME Name a room to be displayed on the front MRP screen.
EQUALIZER A 5-band equalizer to allow for further customization of the
sound quality in each room to your tastes.
BALANCE Modifies the balance from left to right for the selected room.
3D SOUND Features a proprietary 3D sound stage to expand the spacious
quality of sound. 3D sound is particularly useful for those rooms
where the speakers are placed close together.
LOUD Increases the amount of bass in the room.
DEF VOL Sets the default volume between 0 and 15 when the room is first
turned ON.
VOLUME Sets the volume of the selected room.
SPEAKER Adjusts the Quartet’s amplifier to match the impedance of the
room. You can select from 4 ohm, 6 ohm or 8 ohm, and it lets
you choose Quartet’s internal amplifier or an external amplifier
(if you have an optional audio port connected).
AUX GAIN Adjusts the input sensitivity from 6db to -6db of the Audio Port
when you have an external source selected.
4-2
SP ZONE Used to group rooms into a super zone.
All specifications subject to change without notification. All rights reserved. Copyright © 2007 NetStreams
Main +1 512.977-9393 / fax +1 512.977.9398 / Toll Free Technical Support +1 866-353-3496
3600 W. Parmer Lane, Suite 100; Austin, TX 78727 / www.netstreams.com.
Page 24
Using the Setup Menus
DND Tells the system that the room is not to be disturbed, by a page
an intercom.
PRIVACY When set to ON, the room cannot be monitored. When set to
OFF, the room can be monitored.
MONITOR Allows you to monitor another room from the current room’s
keypad.
SLEEP Used to set the system to ramp the volume down for a specified
period of time and then turn it OFF.
RNR Sets a specified period of time for the system to idle or wait
before it begins to play music.
To use the ROOM menu, follow these steps:
1. Press the MENU key to access the Main menu as shown in Figure 4-2.
.
Figure 4-2 Main menu
Press the MENU key again to select the ROOM menu.
2.
3. Use the arrow keys to select a specific room as shown in Figure 4-3.
Figure 4-3 Selecting a specific room
When you have selected a room, press the MENU key again and the following
4.
menu is displayed:
4-3
All specifications subject to change without notification. All rights reserved. Copyright © 2007 NetStreams
Main +1 512.977-9393 / fax +1 512.977.9398 / Toll Free Technical Support +1 866-353-3496
3600 W. Parmer Lane, Suite 100; Austin, TX 78727 / www.netstreams.com.
Page 25

Quartet User’s Guide
Naming a Room
Figure 4-4 Specific ROOM menu
The menu items available are discussed in the following subsections.
The NAME menu allows the room name that appears on the front MRP screen to be
customized. To customize a room name, follow these steps.
1. Press the MENU key to select NAME.
2. Use the down arrow key to highlight MODIFY and press the MENU key. The
following screen appears:
Figure 4-5 Modifying a room name
Use the up and down arrows to scroll through the alphabet. The > button shifts the
3.
alphabet to lower case and numerical characters.
4. After you have displayed the first letter of the new name, use the right arrow key to
move to the next letter.
5. Use the up and down arrow keys and the right arrow key to select additional letters.
4-4
6. When you are done entering letters, press the MENU key again. The new name
will appear under the text [Current] as shown in Figure 4-6.
All specifications subject to change without notification. All rights reserved. Copyright © 2007 NetStreams
Main +1 512.977-9393 / fax +1 512.977.9398 / Toll Free Technical Support +1 866-353-3496
3600 W. Parmer Lane, Suite 100; Austin, TX 78727 / www.netstreams.com.
Page 26

Using the Setup Menus
Figure 4-6 New name appears under [Current]
From the NAME menu, you can also select:
NEXT - to move to the next menu item.
PREV - to move to the previous menu item.
SP ZONE - to change rooms included in super zone (not recommended for this
setting).
SET ALL - sets all the rooms to this name.
Adjusting Sound Settings in the Room
Using the 5-Band Equalizer
The Quartet features a 5-band equalizer to allow for further customization of the sound
quality in each room to your tastes. Adjust the sound in each room by 100Hz, 300Hz,
1KHz, 3KHz, and 10KHz.
1. Use the down arrow key to highlight EQUALIZER.
2. Press the MENU key to select EQUALIZER.
3. Use the down arrow key to highlight MODIFY and press the MENU key. The
following screen appears:
Figure 4-7 Modifying the Equalizer
Use the right and left arrow keys to select a tonal band from low to high
4.
frequencies.
4-5
All specifications subject to change without notification. All rights reserved. Copyright © 2007 NetStreams
Main +1 512.977-9393 / fax +1 512.977.9398 / Toll Free Technical Support +1 866-353-3496
3600 W. Parmer Lane, Suite 100; Austin, TX 78727 / www.netstreams.com.
Page 27

Quartet User’s Guide
5. Use the up or down arrow keys to adjust the tonal band from low to high.
6. When you are done adjusting the tonal bands, press the MENU button.
From the EQUALIZER menu, you can also select:
NEXT - to move to the next menu item.
PREV - to move to the previous menu item.
SP ZONE - inactive.
SET ALL - sets all the rooms to this equalizer setting.
Adjusting the Left/Right Balance
The BALANCE setting modifies the balance from left to right for the selected room.
To modify the balance, follow these steps:
1. Use the down arrow key to highlight BALANCE.
2. Press the MENU key to select BALANCE.
3. Use the down arrow key to highlight MODIFY and press the MENU key. The
following screen appears:
4-6
Figure 4-8 Modifying the Balance
Use the right and left arrow keys to adjust the volume to the right or left.
4.
5. When you are done selecting the balance, press the MENU key.
From the BALANCE menu, you can also select:
NEXT - to move to the next menu item.
PREV - to move to the previous menu item.
SP ZONE - to change the balance of a super zone you have set up.
All specifications subject to change without notification. All rights reserved. Copyright © 2007 NetStreams
Main +1 512.977-9393 / fax +1 512.977.9398 / Toll Free Technical Support +1 866-353-3496
3600 W. Parmer Lane, Suite 100; Austin, TX 78727 / www.netstreams.com.
Page 28

Using the Setup Menus
NOTE
Because super zone
ties multiple rooms
together, the balanced
setting acts on all
rooms. For example,
if R1, R2, and R3 are
in a super zone, the
balanced setting will
address each room’s
speaker pair. Super
zone does not have
any way to know if 3
rooms are being used
to power 1 very large
room and no way to
know right from left
across multiple
speaker pairs. The
balance setting works
only on individual
speaker pairs.
SET ALL - sets all the rooms to this balance.
3D Sound Mode
The Quartet features a proprietary 3D sound stage to expand the spacious quality of
sound. 3D sound is particularly useful for those rooms where the speakers are placed
close together. 3D sound expands the sound stage in the listening area. The 3D
SOUND feature turns ON or OFF three dimensional sound.
To turn ON or OFF 3D sound, follow these steps:
1. Use the down arrow key to highlight 3D SOUND.
2. Press the MENU key to select 3D SOUND.
3. Use the down arrow key to highlight MODIFY and press the MENU key. The
following screen appears:
Figure 4-9 Turning 3D Sound ON or OFF
4-7
All specifications subject to change without notification. All rights reserved. Copyright © 2007 NetStreams
Main +1 512.977-9393 / fax +1 512.977.9398 / Toll Free Technical Support +1 866-353-3496
3600 W. Parmer Lane, Suite 100; Austin, TX 78727 / www.netstreams.com.
Page 29

Quartet User’s Guide
4. Use the up or down arrow key to turn 3D Sound ON or OFF.
5. When you are done selecting the 3D sound feature, press the MENU key.
From the 3D SOUND menu, you can also select:
NEXT - to move to the next menu item.
PREV - to move to the previous menu item.
SP ZONE - to turn 3D sound ON or OFF in a super zone you have set up.
SET ALL - sets all the rooms to this setting.
Turning Loudness ON or OFF
The LOUD setting increases the amount of bass in the room.
To turn loudness ON, follow these steps:
1. Use the down arrow key to highlight LOUD.
2. Press the MENU key to select LOUD.
3. Use the down arrow key to highlight MODIFY and press the MENU key. The
following screen appears:
4-8
Figure 4-10 Turning LOUD ON or OFF
Use the up or down arrow key to turn LOUD ON or OFF.
4.
5. When you are done turning LOUD ON or OFF, press the MENU key.
From the LOUD menu, you can also select:
NEXT - to move to the next menu item.
PREV - to move to the previous menu item.
SP ZONE - to increase the amount of bass in a super zone you have set up.
SET ALL - sets all the rooms to this setting.
All specifications subject to change without notification. All rights reserved. Copyright © 2007 NetStreams
Main +1 512.977-9393 / fax +1 512.977.9398 / Toll Free Technical Support +1 866-353-3496
3600 W. Parmer Lane, Suite 100; Austin, TX 78727 / www.netstreams.com.
Page 30

Using the Setup Menus
NOTE
CAUTION!
Adjusting the Default Volume
The DEF VOL setting sets the default volume between 0 and 15 when the room is first
turned ON.
The keypad’s volume
will use the default
volume or the keypad’s
volume if the keypad
volume is lower than the
default or after the MRP
has been powered
OFF/ON.
To change the default volume, follow these steps:
1. Use the down arrow key to highlight DEF VOL.
2. Press the MENU key to select DEF VOL.
3. Use the down arrow key to highlight MODIFY and press the MENU key. The
following screen appears:
Figure 4-11 Setting the default volume
Use the up or down arrow key to set the default volume.
4.
5. When you are done setting the default volume, press the MENU key.
Setting the default
volume too high could
be startling to a user
who was not
expecting a loud
system.
VOLUME
From the DEF VOL menu, you can also select:
NEXT - to move to the next menu item.
PREV - to move to the previous menu item.
FACTORY - returns this setting back to the default setting.
SET ALL - sets all the rooms to this setting.
The VOLUME setting adjusts the volume of the sound in the selected room. You can
select from 0 to 15db.
1. Use the down arrow key to highlight VOLUME.
2. Press the MENU key to select VOLUME and the following screen appears.
4-9
All specifications subject to change without notification. All rights reserved. Copyright © 2007 NetStreams
Main +1 512.977-9393 / fax +1 512.977.9398 / Toll Free Technical Support +1 866-353-3496
3600 W. Parmer Lane, Suite 100; Austin, TX 78727 / www.netstreams.com.
Page 31

Quartet User’s Guide
Figure 4-12 Setting the volume
Use the down arrow key to highlight MODIFY and press the MENU key.
3.
4. Use the up or down arrow to select the volume.
5. Press the MENU key when you are done selecting the volume for the room.
From the VOLUME menu, you can also select:
NEXT - to move to the previous menu item.
PREV - to move to the next menu item.
FACTORY - to return this setting back to the factory settings.
SET ALL - sets all the rooms to this volume.
Speaker Impedance Adjustments
The SPEAKER setting adjusts the Quartet’s amplifier to match the impedance of the
speakers in each room. You can select from 4 ohm, 6 ohm or 8 ohm. In addition, it lets
you choose Quartet’s internal amplifier or an external amplifier (if you have an
optional audio port connected).
To change the speaker settings, follow these steps:
1. Use the down arrow key to highlight SPEAKER.
2. Press the MENU key to select SPEAKER.
3. Use the down arrow key to highlight MODIFY and press the MENU key. The
following screen appears:
4-10
Figure 4-13 Adjusting the speaker settings
All specifications subject to change without notification. All rights reserved. Copyright © 2007 NetStreams
Main +1 512.977-9393 / fax +1 512.977.9398 / Toll Free Technical Support +1 866-353-3496
3600 W. Parmer Lane, Suite 100; Austin, TX 78727 / www.netstreams.com.
Page 32

Using the Setup Menus
NOTE
4. Use the right or left arrow key to set the to set the speaker to 4 ohm, 6 ohm, or
8ohm.
5. If you have an Audio Port connected and want to use an external amplifier
connected to the RCA outputs of that Audio Port, press the down arrow key to
select INT and use the right or left arrow key to change it to AUX. The INT + AUX
setting allows an external amplifier to be used and at the same time drives the
speakers using Quartet’s internal amplifier.
If the SPEAKER
setting is set to AUX
or INT + AUX, the
audio port’s input
cannot be global.
Other rooms cannot
listen to this room’s
audio port input when
Quartet is sending a
signal to the Audio
Port’s output.
Audio Port Sensitivity Adjustments (AUX GAIN)
6. When you are done setting the speaker, press the MENU key.
From the SPEAKER menu, you can also select:
NEXT - to move to the next menu item.
PREV - to move to the previous menu item.
SP-ZONE - to set the speaker on a super zone you have set up.
SET ALL - sets all the rooms to this setting.
The AUX GAIN setting adjusts the input sensitivity from 6db to -6db of the Audio
Port when you have an external source selected.
To adjust the input sensitivity of the Audio Port, follow these steps:
1. Use the down arrow key to highlight AUX GAIN.
2. Press the MENU key to select AUX GAIN.
3. Use the down arrow key to highlight MODIFY and press the MENU key. The
following screen appears:
Figure 4-14 Adjusting the sensitivity of the Audio Port
Use the up or down arrow key to adjust the sensitivity of the Audio Port.
4.
5. When you are done adjusting the sensitivity, press the MENU key.
4-11
All specifications subject to change without notification. All rights reserved. Copyright © 2007 NetStreams
Main +1 512.977-9393 / fax +1 512.977.9398 / Toll Free Technical Support +1 866-353-3496
3600 W. Parmer Lane, Suite 100; Austin, TX 78727 / www.netstreams.com.
Page 33

Quartet User’s Guide
NOTE
Setting Up a Super Zone
From the E-N ADJ menu, you can also select:
NEXT - to move to the next menu item.
PREV - to move to the previous menu item.
FACTORY - returns this setting back to the factory setting.
SET ALL - sets all the rooms to this setting.
The SP ZONE setting is used to group rooms into a super zone. Rooms in a super zone
act as one.
There can be only one super zone per system. To group rooms in a super zone, follow
these steps:
1. Select the ROOM menu.
2. Select a room.
3. Use the down arrow key to highlight SP ZONE.
4. Press the MENU key to select SP ZONE.
The currently selected
room is assumed to be
in the super zone. To
tell other rooms to
join the super zone,
change their setting to
INCLUDE. If all
rooms are set to
EXCLUDE, no super
zone is active.
5. Use the down arrow key to highlight MODIFY and press the MENU key.
The following screen appears:
Figure 4-15 Grouping rooms into a super zone
Use the left and right arrow keys to either include a zone or exclude the zone.
6.
7. When you are done grouping rooms, press the MENU key.
From the SP ZONE menu, you can also select:
NEXT - to move to the previous menu item.
PREV - to move to the next menu item.
FACTORY - to return this setting back to the factory settings.
SET ALL - not active.
4-12
All specifications subject to change without notification. All rights reserved. Copyright © 2007 NetStreams
Main +1 512.977-9393 / fax +1 512.977.9398 / Toll Free Technical Support +1 866-353-3496
3600 W. Parmer Lane, Suite 100; Austin, TX 78727 / www.netstreams.com.
Page 34

NOTE
Intercom Room/Monitoring Settings
Do Not Disturb Setting (DND)
The DND setting can be enabled or disabled. If the DND feature is enabled, that
room’s keypad can be set to DND, however if the setting is disabled that room’s
keypad will not have DND available. If a room’s DND feature is enabled, the installer
can set the keypad’s default to ON or OFF. This is useful during a power outage when
the Quartet powers back ON, the room will come up with DND ON. Rooms with DND
turned ON will ignore party mode and all OFF commands, and will not receive pages
or room-to-room intercom requests. The DND menu contains two settings. The first
allows the ability to turn DND ON or OFF from the keypad.
To allow a user to change the DND setting at the keypad, follow these steps:
1. Use the down arrow key to highlight DND.
2. Press the MENU key to select DND.
3. Use the down arrow key to highlight MODIFY and press the MENU key. The
following screen appears:
Using the Setup Menus
If DND is disabled, it
cannot be set to ON.
All specifications subject to change without notification. All rights reserved. Copyright © 2007 NetStreams
Figure 4-16 Giving the room the ability to toggle ON and OFF Do Not Disturb mode
Use the left and right arrow keys change the setting to ENABLE or DISABLE to
4.
give a user the ability to toggle ON or OFF Do Not Disturb mode from the room’s
keypad.
5. Next, you can press the down arrow key to toggle the current DND setting for the
room to room ON or OFF.
6. When you are done changing the DND mode settings, press the MENU key.
From the DND menu, you can also select:
NEXT - to move to the next menu item.
PREV - to move to the previous menu item.
FACTORY - to return this setting to the default setting.
SET ALL - sets all the rooms to this setting.
4-13
Main +1 512.977-9393 / fax +1 512.977.9398 / Toll Free Technical Support +1 866-353-3496
3600 W. Parmer Lane, Suite 100; Austin, TX 78727 / www.netstreams.com.
Page 35

Quartet User’s Guide
NOTE
NOTE
If allowed by the
ENABLE setting,
DND can be turned
ON at the keypad
using the shift key (
+ *) followed by the
PLAY button.
Privacy Settings
PRIVACY allows a key pad to block being monitored. Privacy can be enabled or
disabled for the user to select their privacy setting from the keypad in the room. If it is
enabled, the room can select PRIVACY ON/OFF from the keypad. Disabled prevents
the ROOM from having the feature. The second option tells the system if the room
should have privacy turned ON or OFF when the system is turned ON. This is useful
during a power outage when the Quartet powers back ON, the room will come up in
Privacy mode.
To allow a user to change the privacy setting at the keypad, follow these steps:
1. Use the down arrow key to highlight PRIVACY.
2. Press the MENU key to select PRIVACY.
3. Use the down arrow key to highlight MODIFY and press the MENU key. The
following screen appears:
Figure 4-17 Enabling the room to be monitored by another room
Use the left and right arrow keys to either ENABLE or DISABLE the ability of a
4.
user to change the privacy setting from the room’s keypad.
When a room is being
monitored, the MON
light on the keypad
illuminates.
4-14
All specifications subject to change without notification. All rights reserved. Copyright © 2007 NetStreams
5. Next, you can press the down arrow key to change the PRIVACY setting to ON or
OFF. ON means other rooms cannot monitor this room. OFF means other rooms
can monitor this room.
6. When you are done giving the room the ability to be monitored, press the MENU
key again.
Main +1 512.977-9393 / fax +1 512.977.9398 / Toll Free Technical Support +1 866-353-3496
3600 W. Parmer Lane, Suite 100; Austin, TX 78727 / www.netstreams.com.
Page 36

Using the Setup Menus
NOTE
If allowed by the
ENABLE setting,
privacy can be turned
on at the keypad using
the shift key, followed
by the SHUF key.
Regardless of the
PRIVACY setting, the
room cannot monitor,
be monitored, page, or
intercom if that
room’s audio port is
set to global and is
being listened by
another room.
From the PRIVACY menu, you can also select:
NEXT - to move to the next menu item.
PREV - to move to previous menu item.
FACTORY - to return this setting back to the factory default. The factory default
setting is ENABLED/ON.
SET ALL - sets all the rooms to this setting.
Monitoring a Room
The MONITOR setting allows the installer to activate a room’s ability to monitor
another room. If the room is enabled, then that room can monitor any other room (as
long as the room does not have Privacy enabled).
1. Use the down arrow key to highlight MONITOR.
2. Press the MENU key to select MONITOR.
3. Use the down arrow key to highlight MODIFY and press the MENU key. The
following screen appears:
Figure 4-18 Monitoring a room
Press the up or down arrow key to either disable or enable monitoring from this
4.
room’s keypad
5. When you are done setting up monitoring, press MENU again.
From the MONITOR menu, you can also select:
NEXT - to move to the next menu item.
PREV - to move to the previous menu item.
4-15
All specifications subject to change without notification. All rights reserved. Copyright © 2007 NetStreams
Main +1 512.977-9393 / fax +1 512.977.9398 / Toll Free Technical Support +1 866-353-3496
3600 W. Parmer Lane, Suite 100; Austin, TX 78727 / www.netstreams.com.
Page 37

Quartet User’s Guide
Setting the Sleep Timer
SP-ZONE - to set up MONITOR for a super zone.
SET ALL - sets all the rooms to this setting.
The SLEEP setting is used to set the system to ramp the volume down for a specified
period of time and then turn it OFF. The SLEEP timer can be selected to run from 5 to
60 minutes, in 5 minute intervals.
1. Use the down arrow key to highlight SLEEP.
2. Press the MENU key to select SLEEP.
3. Use the down arrow key to highlight MODIFY and press the MENU key. The
following screen appears:
Figure 4-19 Setting up SLEEP
Use the right or left arrow key to turn SLEEP ON or OFF.
4.
5. Use the up or down arrow key to select the time.
6. Enter a time by using the right or left arrow key.
7. When you are done setting the time, press the MENU key again.
From the SLEEP menu, you can also select:
NEXT - to move to the next menu item.
PREV - to move to the previous menu item.
FACTORY - to return this setting back to the factory default.
SET ALL - sets all the rooms to this setting.
Sleep can also be turned off at the keypad using the shift key ( + *) followed by the
RP T key. To start a SLEEP mode at the keypad, press the shift key ( + *) followed by
the 7 key.
Setting the Rest and Rise Mode (RNR)
The Rest and Rise setting sets a specified period of time for the system to idle or wait
before it begins to play music. From the MRP, you can turn RNR ON or OFF (this can
also be done from the keypad), specify how long you want the music to continue
4-16
All specifications subject to change without notification. All rights reserved. Copyright © 2007 NetStreams
Main +1 512.977-9393 / fax +1 512.977.9398 / Toll Free Technical Support +1 866-353-3496
3600 W. Parmer Lane, Suite 100; Austin, TX 78727 / www.netstreams.com.
Page 38

Using the Setup Menus
playing before it turns OFF, and a length of time before the designated source comes
back ON.
For example, before going to bed a user could enable RNR, 10 minutes later the
currently playing source will turn itself OFF, the keypad will wait 7 hours then switch
to the DVD player, and initiate a macro.
1. Use the down arrow key to highlight RNR.
2. Press the MENU key to select RNR.
3. Use the down arrow key to highlight MODIFY and press the MENU key. The
following screen appears:
Figure 4-20 Setting up RNR
Use the right or left arrow key to turn RNR ON or OFF.
4.
5. Next, press the down arrow key to adjust the OFF-TIME setting. This specifies the
length of time the keypad plays audio before turning itself OFF. You can select
from 1 to 12 hours in 30 minute increments.
6. Press the down arrow key to adjust the ON-TIME setting. This specifies the length
of time the keypad waits before turning itself back ON.
7. Press the down arrow key again to adjust the SOURCE setting and select a source
that comes back ON.
8. When you are done setting up RNR, press the MENU key.
From the RNR menu, you can also select:
NEXT - to move to the next menu item.
PREV - to move to the previous menu item.
SP-ZONE - to set up RNR for a super zone.
SET ALL - sets all the rooms to this setting.
RNR can also be turned ON or OFF at the keypad using the shift key ( + *) followed
by the NEXT key. The keypad will visually indicate that RNR mode is active by
lighting the up, right, down, and left arrows in sequence.
4-17
All specifications subject to change without notification. All rights reserved. Copyright © 2007 NetStreams
Main +1 512.977-9393 / fax +1 512.977.9398 / Toll Free Technical Support +1 866-353-3496
3600 W. Parmer Lane, Suite 100; Austin, TX 78727 / www.netstreams.com.
Page 39

Quartet User’s Guide
Quartet Keypad Settings
Adjusting the Keypad Pilot Light Setting
The PL LIGHT setting adjusts the pilot light on the keypad. The pilot light illuminates
the top six keys above the arrow keys when the keypad is OFF.
To adjust the pilot light setting, follow these steps:
1. Use the down arrow key to highlight PL LIGHT.
2. Press the MENU key to select PL LIGHT.
3. Use the down arrow key to highlight MODIFY and press the MENU key. The
following screen appears:
Figure 4-21 Adjusting the pilot light setting
Use the up or down arrow key to turn lights ON or OFF.
4.
5. When you are done changing the lights on the keypad, press the MENU key again.
From the PL LIGHT menu, you can also select:
NEXT - to move to the next menu item.
PREV - to move to the previous menu item.
SP-ZONE - to set the pilot light for a super zone.
SET ALL - sets all the rooms to this setting.
Adjusting the Keypad Back Light Setting
The BK LIGHT setting adjusts the level of the backlight on the keypad keys and
specifies how long after last being touched before the backlight times out. The
backlight is the overall light illuminating the keypad.
To adjust the backlight, follow these steps:
1. Use the down arrow key to highlight BK LIGHT.
2. Press the MENU key to select BK LIGHT.
3. Use the down arrow key to highlight MODIFY and press the MENU key. The
following screen appears:
4-18
All specifications subject to change without notification. All rights reserved. Copyright © 2007 NetStreams
Main +1 512.977-9393 / fax +1 512.977.9398 / Toll Free Technical Support +1 866-353-3496
3600 W. Parmer Lane, Suite 100; Austin, TX 78727 / www.netstreams.com.
Page 40

Using the Setup Menus
Figure 4-22 Adjusting the backlight
Use the right or left arrow key to set the backlight from 0 to 9.
4.
5. Press the down arrow key to select how long before the backlight times out. You
can select from Always ON up to 15 minutes.
6. When you are done changing the backlight, press the MENU key again.
From the BK LIGHT menu, you can also select:
NEXT - to move to the next menu item.
PREV - to move to the previous menu item.
SP-ZONE - to set the backlight for a super zone.
SET ALL - sets all the rooms to this setting.
Locking a Quartet Keypad
The KEY LOCK setting is used to lock and unlock the keypad. When the keypad is
locked, the only allowed functions are to turn the room off (push currently selected
source key), responding to intercoms or pages.
To lock or unlock the keypad, follow these steps:
To adjust the KEY LOCK setting, follow these steps:
1. Use the down arrow key to highlight KEY LOCK.
2. Press the MENU key to select KEY LOCK.
3. Use the down arrow key to highlight MODIFY and press the MENU key. The
following screen appears:
4-19
All specifications subject to change without notification. All rights reserved. Copyright © 2007 NetStreams
Main +1 512.977-9393 / fax +1 512.977.9398 / Toll Free Technical Support +1 866-353-3496
3600 W. Parmer Lane, Suite 100; Austin, TX 78727 / www.netstreams.com.
Page 41

Quartet User’s Guide
Figure 4-23 Locking or unlocking the keypad
Press the up or down arrow key to lock and unlock the keypad.
4.
5. When you are done locking or unlocking the keypad, press the MENU key again.
From the KEY LOCK menu, you can also select:
NEXT - to move to the next menu item.
PREV - to move to the previous menu item.
SP-ZONE - to lock or unlock the keypad for a super zone.
SET ALL - sets all the rooms to this setting.
To unlock a locked keypad, enter the unlock code defined in the SYSTEM menu
(factory default: 0000). To relock an unlocked keypad at the keypad, press the shift key
( + *) followed by the key.
Adjusting the Paging Chime Bell Setting
The CHIME BELL setting changes the sound used to indicate that the room is being
paged or that an intercom session has started when a user starts to page to all rooms.
To adjust the sound, follow these steps:
1. Use the down arrow key to highlight CHIME BELL.
2. Press the MENU key to select CHIME BELL.
3. Use the down arrow key to highlight MODIFY and press the MENU key. The
following screen appears:
4-20
Figure 4-24 Setting the sound when you page all rooms
Use the up or down arrow to select between 1 and 4.
4.
All specifications subject to change without notification. All rights reserved. Copyright © 2007 NetStreams
Main +1 512.977-9393 / fax +1 512.977.9398 / Toll Free Technical Support +1 866-353-3496
3600 W. Parmer Lane, Suite 100; Austin, TX 78727 / www.netstreams.com.
Page 42
5. When you are done adjusting the sound, press MENU again.
From the CHIME BELL menu, you can also select:
NEXT - to move to the next menu item.
PREV - to move to the previous menu item.
FACTORY - returns this setting back to the factory setting.
SET ALL - sets all the rooms to this setting.
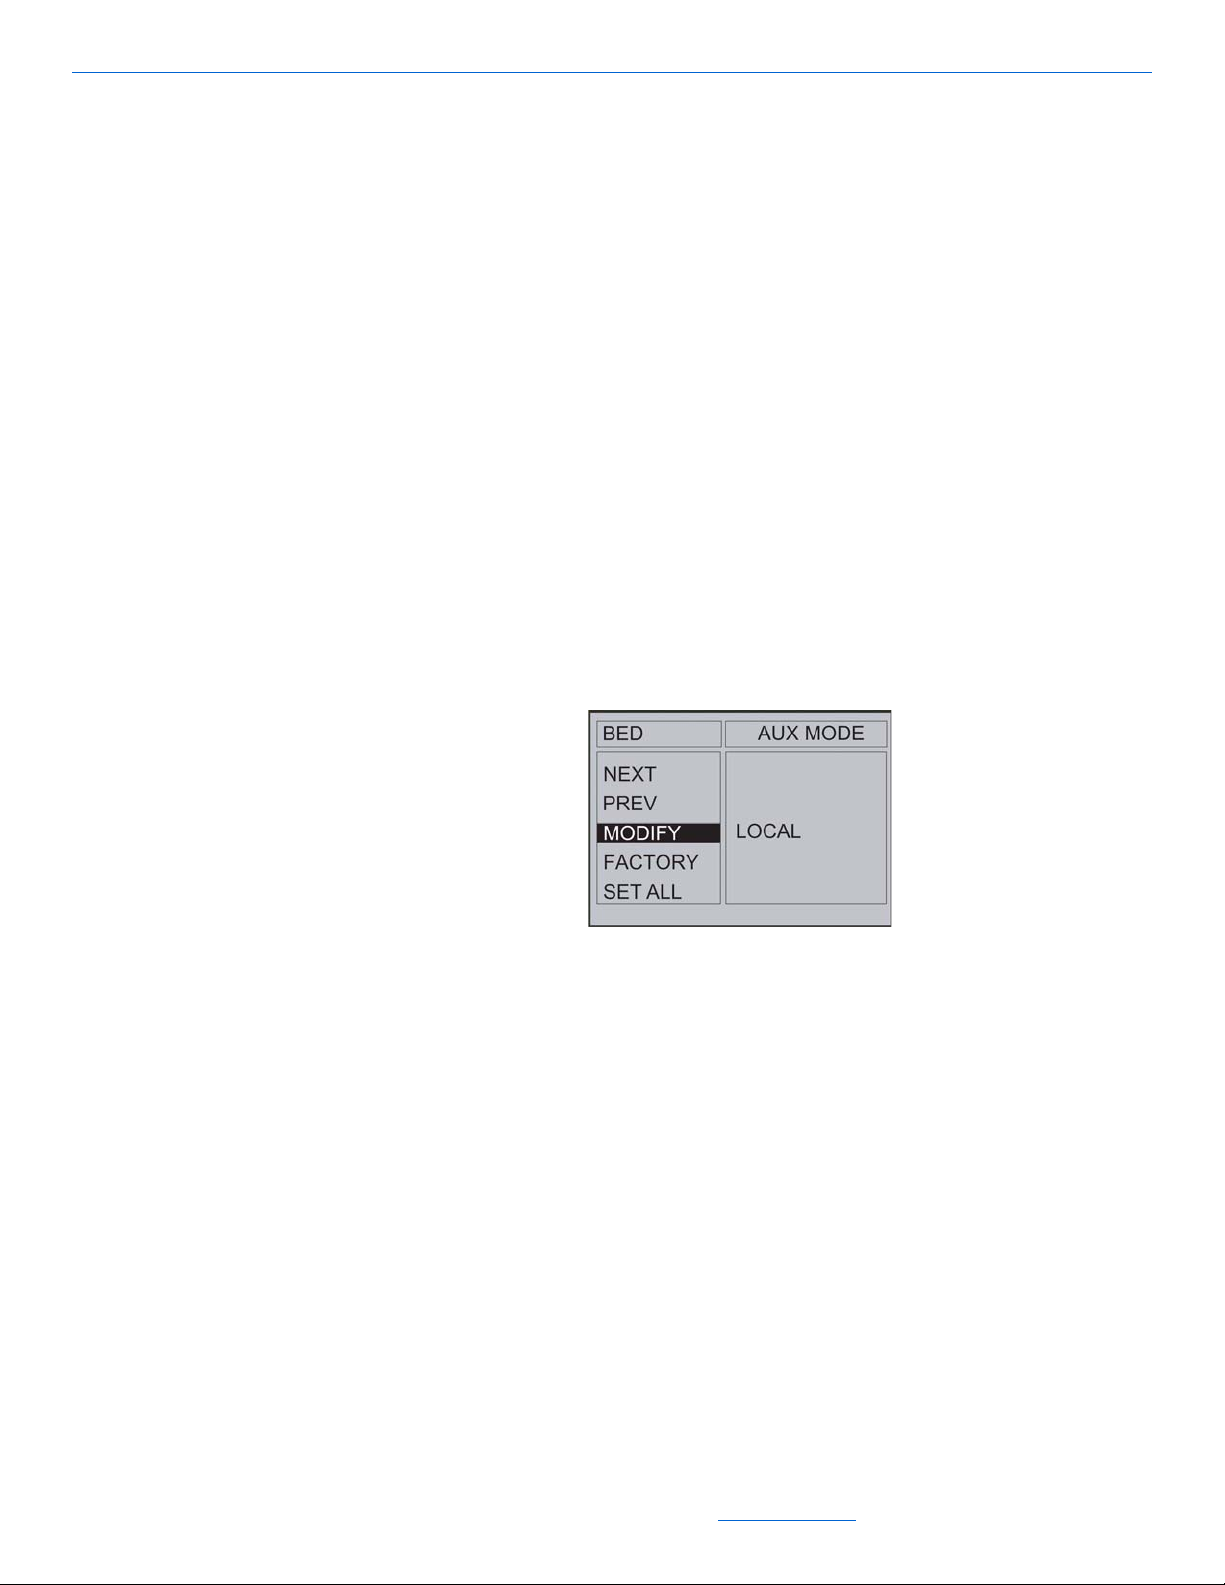
Changing the AUX MODE
The AUX MODE setting determines if the Audio Port output in the room is restricted
to that room or if other rooms can listen to the Audio Port as well. If the Audio Port is
being accessed from another room, the room with the Audio Port will not be able to be
paged or intercomed.
1. Use the down arrow key to highlight AUX MODE.
2. Press the MENU key to select AUX MODE.
3. Use the down arrow key to highlight MODIFY and press the MENU key. The
following screen appears:
Using the Setup Menus
Figure 4-25 Changing the AUX MODE setting
Use the up or down arrow to change the LOCAL setting to ALL ROOMS if you
4.
want this Audio Port to be accessible from other rooms.
5. When you have finished selecting AUX MODE, press the MENU key.
From the AUX MODE menu, you can also select:
NEXT - to move to the next menu item.
PREV - to move to the previous menu item.
FACTORY - returns this setting back to the factory setting.
SET ALL - sets all the rooms to this setting.
4-21
All specifications subject to change without notification. All rights reserved. Copyright © 2007 NetStreams
Main +1 512.977-9393 / fax +1 512.977.9398 / Toll Free Technical Support +1 866-353-3496
3600 W. Parmer Lane, Suite 100; Austin, TX 78727 / www.netstreams.com.
Page 43

Quartet User’s Guide
Using the SOURCE Menus
The SOURCE menu lets you adjust settings for each individual source. Select
SOURCE from the Main menu. Select a source to change settings for an individual
source as shown in the following figure.
Figure 4-26 SOURCE menu
After you select a source, the following screen appears:
Figure 4-27
The menu items available from the SOURCE menu include:
NAME Allows you to name a specific room.
IN GAIN Changes the amount of adjustment for source input sensitivity.
IR FREQ Sets the IR frequency to 38 or 56 KHz. Discussed in Chapter 5.
IR LEARN Learns source’s remote control IR commands to the Quartet
remote. Discussed in Chapter 5.
2’S REPEAT Is the delay time between the first IR command sent and all
consecutive IR commands sent from the 2nd function on each
button (Button Hold). Discussed in Chapter 5.
MACRO TIME Adjusts the delay time between each IR command sent in a
macro and in an RnR macro. Discussed in Chapter 5.
KEY MACRO Selects up to two macros based on a combination of up to four
remote keys. Discussed in Chapter 5.
4-22
All specifications subject to change without notification. All rights reserved. Copyright © 2007 NetStreams
Main +1 512.977-9393 / fax +1 512.977.9398 / Toll Free Technical Support +1 866-353-3496
3600 W. Parmer Lane, Suite 100; Austin, TX 78727 / www.netstreams.com.
Page 44

Naming a Source
The NAME setting changes the name of the source. To change a source name, follow
these steps:
1. Use the MENU key to select NAME.
2. Use the down arrow key to highlight MODIFY.
3. Press the MENU key to select MODIFY and the following screen appears:
Figure 4-28 Modifying a Source Name
Using the Setup Menus
Use the up and down arrow to scroll through the alphabet. The > button to shift the
4.
alphabet to lowercase and numerical characters.
5. After you have displayed the first letter of the new name, use the right arrow key to
move to the next letter.
6. Use the up and down arrow keys and the right arrow key to select additional letters
as shown in Figure 4-29.
.
Figure 4-29 Entering new name
When you are done entering letters, press the MENU key again. The new name
7.
will appear under the text [Current].
From the NAME menu, you can also select:
NEXT - to move to the next menu item.
PREV - to move to the previous menu item.
FACTORY - returns the name to the factory default.
SET ALL - sets all the sources to this name.
4-23
All specifications subject to change without notification. All rights reserved. Copyright © 2007 NetStreams
Main +1 512.977-9393 / fax +1 512.977.9398 / Toll Free Technical Support +1 866-353-3496
3600 W. Parmer Lane, Suite 100; Austin, TX 78727 / www.netstreams.com.
Page 45

Quartet User’s Guide
NOTE
Source Input Adjustments (IN GAIN)
The IN GAIN setting changes the amount of adjustment for source input sensitivity
(+/- 6db).To change the input sensitivity, follow these steps:
1. Use the down arrow key to highlight IN GAIN.
2. Press the MENU key to select IN GAIN.
3. Use the down arrow key to highlight MODIFY and press the MENU key. The
following screen appears:
For IR learning, see
Chapter 5.
FM Tuner Settings
Adjusting the FM Tuner Sensitivity
Figure 4-30 Setting the input adjustment
Press the up or down arrow key to move the sensitivity higher or lower.
4.
5. When you are done setting the input sensitivity, press the MENU key.
From the IN GAIN menu, you can also select:
NEXT - to move to the next menu item.
PREV - to move to the previous menu item.
FACTORY - returns the name to the factory default.
SET ALL - sets all the sources to this name.
Select FM TUNER from the SOURCE menu->FM TUNER selected menu.
The SENSITIVITY setting defines how much signal the tuner recognizes when it does
a seek. It can be set to low, mid, or high.
To define how much signal you want the turner to recognize when it scans or seeks,
follow these steps:
1. Use the down arrow key to highlight SENSITIVITY.
4-24
All specifications subject to change without notification. All rights reserved. Copyright © 2007 NetStreams
Main +1 512.977-9393 / fax +1 512.977.9398 / Toll Free Technical Support +1 866-353-3496
3600 W. Parmer Lane, Suite 100; Austin, TX 78727 / www.netstreams.com.
Page 46

Using the Setup Menus
2. Press the MENU key to select SENSITIVITY.
3. Use the down arrow key to highlight MODIFY and press the MENU key. The
following screen appears:
Figure 4-31 Defining the tuner’s sensitivity
Use the up or down arrow key to set the sensitivity to low, mid, or high.
4.
5. When you are done setting the sensitivity, press the MENU key.
From the SENSITIVITY menu, you can also select:
NEXT - to move to the next menu item.
PREV - to move to the previous menu item.
FACTORY - to return to the factory default.
SET ALL - to set all rooms to this setting.
Adjusting the FM Tuner Spacing
The SPACING setting defines how much spacing is between tuning intervals on a seek
or a manual tune up or down. You can set it from 50 to 200KHz.
To define the amount of spacing between tuning intervals, follow these steps.
1. Use the down arrow key to highlight SPACING.
2. Press the MENU key to select SPACING.
3. Use the down arrow key to highlight MODIFY and press the MENU key. The
following screen appears:
Figure 4-32 Defining tuning interval
4-25
All specifications subject to change without notification. All rights reserved. Copyright © 2007 NetStreams
Main +1 512.977-9393 / fax +1 512.977.9398 / Toll Free Technical Support +1 866-353-3496
3600 W. Parmer Lane, Suite 100; Austin, TX 78727 / www.netstreams.com.
Page 47

Quartet User’s Guide
Adjusting the FM Tuner Pre-Emphasis
4. Use the up or down arrow key to set the tuning level from 50 to 200KHz.
5. When you are done defining the tuning level, press the MENU key again.
From the SPACING menu, you can also select:
NEXT - to move to the next menu item.
PREV - to move to the previous menu item.
FACTORY - to set return to the factory default.
SET ALL - to set all rooms to this setting.
The EMPHASIS setting adjusts the process that is used to decrease the magnitude of
the tuner’s frequency response from 1KHz to 16KHz. This allows a reduction in high
frequency noise and other random noise. In the U.S. the setting should be 75 μs
(factory default). Outside the U.S. this should be set to 50 μs.
To set the emphasis, follow these steps:
1. Press the down arrow key to highlight EMPHASIS.
2. Press the MENU key to select EMPHASIS.
3. Press the down arrow key to highlight MODIFY and press the MENU key. The
following screen appears:
Figure 4-33 Setting EMPHASIS
Change the response time to either 50 μs or 75 μs.
4.
5. When you are done selecting the response time, select the MENU key again.
From the EMPHASIS menu, you can also select:
NEXT - to move to the next menu item.
4-26
PREV - to move to the previous menu item.
FACTORY - to return to the factory default.
SET ALL - to set all rooms to this setting.
All specifications subject to change without notification. All rights reserved. Copyright © 2007 NetStreams
Main +1 512.977-9393 / fax +1 512.977.9398 / Toll Free Technical Support +1 866-353-3496
3600 W. Parmer Lane, Suite 100; Austin, TX 78727 / www.netstreams.com.
Page 48

NOTE
Setting FM Tuner Presets
The PRESET setting defines up to 20 tuner presets. The PRESET menu has three
options: MODIFY, AUTO, and SHOW. MODIFY enables presets to be set and
changed manually. To modify a preset, follow these steps:
1. Press the down arrow key to highlight PRESET.
2. Press the MENU key to select PRESET.
3. Press the down arrow key to highlight MODIFY and press the MENU key. The
following screen appears:
Using the Setup Menus
Preset 0-9 are the
numeric keys on the
keypad. Presets 10-19
are the press and hold
function. Preset 0 is the
0 key, not the top key.
Figure 4-34 Modifying presets
4. Use the left and right arrow keys to change from 0 to 19.
5. Press MENU to edit the preset.
6. Use the number (#) keys on the remote for the station. For example, 98.7 FM
would be key sequence 9-8-7.
7. Press MENU to confirm and set the preset.
Auto Pre-Set Tuning
Quartet can also set presets automatically based. To set presets automatically, follow
these steps:
1. Press the down arrow key to highlight PRESET.
2. Press the MENU key to select PRESET.
3. Press the down arrow key to highlight AUTO.
4. Press the MENU key to select AUTO and the following screen appears:
4-27
All specifications subject to change without notification. All rights reserved. Copyright © 2007 NetStreams
Main +1 512.977-9393 / fax +1 512.977.9398 / Toll Free Technical Support +1 866-353-3496
3600 W. Parmer Lane, Suite 100; Austin, TX 78727 / www.netstreams.com.
Page 49

Quartet User’s Guide
Figure 4-35 Setting presets automatically
Quartet will immediately begin to scan available stations and set presets when it
has good reception, until the presets are full or there is no more frequency to scan.
Quartet will return to the PRESET menu after the AUTO scan is complete.
The final menu item in the PRESET menu is SHOW. SHOW is used to show all FM
presets at once for easy review. To view the presets, follow these steps:
1. Press the down arrow key to highlight PRESET.
2. Press the MENU key to select PRESET.
3. Press the down arrow key to select SHOW. Press the MENU key and presets 0-9
will show on the following screen:
Figure 4-36 Showing presets
Use the right arrow to view presets 10 - 19.
4.
5. Press the MUTE key to return to the PRESET menu.
Setting System Settings
4-28
You set MRP Settings from the SYSTEM menu as shown in the following screen.
All specifications subject to change without notification. All rights reserved. Copyright © 2007 NetStreams
Main +1 512.977-9393 / fax +1 512.977.9398 / Toll Free Technical Support +1 866-353-3496
3600 W. Parmer Lane, Suite 100; Austin, TX 78727 / www.netstreams.com.
Page 50

Using the Setup Menus
Figure 4-37 System Main Menu
The settings available from this menu are as follows:
LCD BACKLIGHT - adjusts the level of the backlight on the Quartet display and
how long it stays ON.
MENU LOCK - locks the menu on the Quartet display.
SETTING - this menu is used to save Quartet’s current settings to internal memory.
PASSWORD - lock/unlock users out of accessing the MRP SETTINGS menu,
with a password protected screen.
Adjusting the LCD Backlight Setting
The LCD B-LIGHT setting adjusts the level of the backlight on the Quartet display and
how long it stays ON.
To adjust the level of the backlight and how long it stays on, follow these steps:
1. Press the down arrow key to highlight LCD B-LIGHT .
2. Press the MENU key to select LCD B-LIGHT.
3. Press the down arrow key to highlight MODIFY and press the MENU key. The
following screen appears:
Figure 4-38 Setting the LCD backlight
Adjust the level of the backlight by pressing the right or left arrow keys. You can
4.
select levels 1 through 5.
4-29
All specifications subject to change without notification. All rights reserved. Copyright © 2007 NetStreams
Main +1 512.977-9393 / fax +1 512.977.9398 / Toll Free Technical Support +1 866-353-3496
3600 W. Parmer Lane, Suite 100; Austin, TX 78727 / www.netstreams.com.
Page 51

Quartet User’s Guide
Setting a Password for Quartet
5. Press the down arrow key to select how long the backlight stays on. You can select
from ALWAYS ON, from 10 to 50 seconds, and from 1 minute to 15 minutes.
6. When you are done selecting how long the backlight stays on, press the MENU
key again.
From the LCD B-LIGHT menu, you can also select:
NEXT - to move to the next menu item.
PREV - to move to the previous menu item.
FACTORY - to return to the factory default.
SET ALL - inactive.
The Quartet system also features the ability to lock/unlock users out of accessing the
MRP SETTINGS menu, with a password protected screen. PASSWORD allows you to
set up a new password for the system. To change the password, you are asked for the
current password, the new password, and to confirm the new password.
To set up a new password, follow these steps:
1. Press the down arrow to highlight PASSWORD.
2. Press the MENU key to select PASSWORD.
3. Press the down arrow key to highlight MODIFY and press the MENU key. The
following screen appears:
Figure 4-39 Modifying the password (factory default: 0000)
In response to the prompt Enter Current, enter the current 4-digit password.
4.
5. In response to the prompt Enter New, enter a new 4-digit password.
6. In response to the prompt Confirm New, enter the new 4-digit password again.
From the PASSWORD menu, you can also select:
4-30
NEXT - to move to the next menu item.
PREV - to move to the previous menu item.
FACTORY - to return to the factory default.
SET ALL - inactive.
All specifications subject to change without notification. All rights reserved. Copyright © 2007 NetStreams
Main +1 512.977-9393 / fax +1 512.977.9398 / Toll Free Technical Support +1 866-353-3496
3600 W. Parmer Lane, Suite 100; Austin, TX 78727 / www.netstreams.com.
Page 52

Locking and Unlocking the MRP Menu
The MENU LOCK setting locks the menus on the Quartet MRP display. You use a
password (set under SYSTEM->PASSWORD) to unlock the display.
To lock the display, follow these steps:
1. Press the down arrow key to highlight MENU LOCK.
2. Press the MENU key to select MENU LOCK.
3. Press the down arrow key to highlight MODIFY and press the MENU key. The
following screen appears:
Using the Setup Menus
Figure 4-40 Locking or unlocking the menu
Use the up or down arrow key to lock the menu.
4.
5. When you are done locking or unlocking the menu, press the MENU key again.
From the MENU LOCK menu, you can also select:
NEXT - to move to the next menu item.
PREV - to move to the previous menu item.
FACTORY - to return to the factory default.
SET ALL - inactive.
Saving the Quartet’s Current Settings
The SETTING menu is used to save Quartet’s current settings to internal memory.
This is useful if during installation settings are changed in different configurations. The
saved settings can be recalled from memory to quickly restore the system.
To save or load system settings to or from memory, follow these steps:
1. Press the down arrow key to highlight SETTING.
2. Press the MENU key to select SETTING.
3. Press the down arrow key to highlight LOAD or SAVE and press the MENU key.
The following screen appears:
4-31
All specifications subject to change without notification. All rights reserved. Copyright © 2007 NetStreams
Main +1 512.977-9393 / fax +1 512.977.9398 / Toll Free Technical Support +1 866-353-3496
3600 W. Parmer Lane, Suite 100; Austin, TX 78727 / www.netstreams.com.
Page 53

Quartet User’s Guide
Figure 4-41 Adjusting Setting
From this menu, you can also select from the following options:
NEXT - to move to the next menu item.
PREV - to move to the previous menu item.
FACTORY - to return to the factory default.
4-32
All specifications subject to change without notification. All rights reserved. Copyright © 2007 NetStreams
Main +1 512.977-9393 / fax +1 512.977.9398 / Toll Free Technical Support +1 866-353-3496
3600 W. Parmer Lane, Suite 100; Austin, TX 78727 / www.netstreams.com.
Page 54

Learning IR
This chapter discusses the following:
Adjusting the IR Frequency
Learning IR for Control of Sources
Creating Macros
You learn IR from the SOURCES menu ->S1, S2, S3, or S4 selected.
Chapter
5
Adjusting the IR Type
The IR TYPE setting sets the IR frequency to 38 or 56 KHz and if the source uses
alternating codes.
To set the IR frequency, follow these steps:
1. Use the down arrow key to highlight IR TYPE.
2. Press the MENU key to select IR TYPE.
3. Use the down arrow key to highlight MODIFY and press the MENU key. The
following screen appears:
Figure 5-1 Setting the IR frequency
Press the right or left arrow key to switch between 38 and 56 KHz.
4.
5. Select the down arrow to select 1-CODE.
6. Use the right or left arrow key to select 1-CODE or 2-CODE for alternating IR
code.
All specifications subject to change without notification. All rights reserved. Copyright © 2006 NetStreams
Main +1 512.977-9393 / fax +1 512.977.9398 / Toll Free Technical Support +1 866-353-3496
3600 W. Parmer Lane, Suite 100; Austin, TX 78727 / www.netstreams.com.
5-1
Page 55

Quartet User’s Guide
NOTE
Learning IR for Control of Sources
7. When you are done setting the IR frequency and code, press the MENU key again.
From the IR TYPE menu, you can also select:
NEXT - to move to the next menu item.
PREV - to move to the previous menu item.
FACTORY - to return this setting to the factory default.
SET ALL - sets all the rooms to this setting.
The IR LEARN menu learns source’s remote control IR commands to the Quartet
remote.
To learn a source’s remote commands to the Quartet remote, follow these steps:
1. Make sure you have selected the source that you want to learn the IR code for.
2. Use the down arrow key to highlight IR LEARN.
3. Press the MENU key to select IR LEARN.
4. Use the down arrow key to highlight LEARN and press the MENU key. The
following screen appears:
You can select either the
press function (one
press) or the press and
hold function (one press
and hold it down).
5-2
All specifications subject to change without notification. All rights reserved. Copyright © 2006 NetStreams
Figure 5-2 Setting the source’s remote commands to the Quartet remote
Select the key on the Quartet remote you want to learn it to. In our example screen
5.
that follows, we’ve selected the Pause key.
Figure 5-3 Selecting the key on the Quartet to learn a command
Main +1 512.977-9393 / fax +1 512.977.9398 / Toll Free Technical Support +1 866-353-3496
3600 W. Parmer Lane, Suite 100; Austin, TX 78727 / www.netstreams.com.
Page 56

Learning IR
6. Select the key on the sources’s remote you want to learn. Quartet displays the
following:
Figure 5-4 Selecting the key on the source’s remote
Repeat the key again to confirm. The Quartet displays the following if the key has
7.
been learned.
Figure 5-5 Successful IR learn
If you want to create a Macro, press the right arrow key.
8.
9. Enter the Quartet’s remote key you want to learn it to and then the source’s remote
key you want to learn. You can create up to a 4-step macro.
10. When you are done setting source remote commands or macros, press the MENU
key again.
From the IR LEARN menu, you can also select:
NEXT - to move to the next menu item.
PREV - to move to the previous menu item.
TEST - to test the Quartet remote key you have learned.
CLEAR - to clear all IR commands learned.
Creating Macros
You can create macros using the 2’s REPEAT, MACRO TIME, and KEY MACRO
menus. Macros can have a maximum of 4 steps.
All specifications subject to change without notification. All rights reserved. Copyright © 2006 NetStreams
Main +1 512.977-9393 / fax +1 512.977.9398 / Toll Free Technical Support +1 866-353-3496
3600 W. Parmer Lane, Suite 100; Austin, TX 78727 / www.netstreams.com.
5-3
Page 57

Quartet User’s Guide
NOTE
2’S Repeat
2’s Repeat is the delay time between the first IR command sent and all consecutive IR
commands sent from the 2nd function on each button (Button Hold). If the Disable
option is selected, then there are no repetitive IR commands sent.
This setting can be
useful if a source needs
“processing time”
between IR commands.
If IR commands are sent
too quickly, they can
queue and create
unexpected results.
To set the 2’s Repeat time, follow these steps:
1. Use the down arrow key to highlight 2’S REPEAT.
2. Press the MENU key to select 2’S REPEAT.
3. Use the down arrow key to highlight MODIFY and the following screen appears:
Figure 5-6 Setting the 2’s REPEAT delay time.
Use the right or left arrow key to toggle between DISABLE and ENABLE.
4.
5. To set the 2’s Repeat time, use the down arrow key to select the delay time. You
can choose from .5 seconds to 1 second.
6. When you are done setting the 2’s Repeat time, select the MENU key again.
5-4
From the 2’S REPEAT menu, you can also select:
NEXT - to move to the next menu item.
PREV - to move to the previous menu item.
FACTORY - to return to the factory default.
SET ALL - sets all the rooms to this setting.
Macro Time
The MACRO TIME setting adjusts the delay time between each IR command sent in a
macro and in an RnR macro.
To set the macro time, follow these steps:
1. Use the down arrow key to highlight MACRO TIME.
2. Press the MENU key to select MACRO TIME.
3. Use the down arrow key to highlight MODIFY and press the MENU key. The
following screen appears.
All specifications subject to change without notification. All rights reserved. Copyright © 2006 NetStreams
Main +1 512.977-9393 / fax +1 512.977.9398 / Toll Free Technical Support +1 866-353-3496
3600 W. Parmer Lane, Suite 100; Austin, TX 78727 / www.netstreams.com.
Page 58

Learning IR
Figure 5-7 Setting the macro time
In response to the KEY prompt, select the delay time between each IR command
4.
sent in a macro by pressing the right or left arrow keys. You can select from 0 to 5
seconds.
5. Press the down arrow key to select the delay time between each IR command sent
in an RnR macro. You can select from 0 to 5 seconds. Use the right or left arrow
key to select the time.
6. When you are done setting the RnR macro time, press the MENU key.
From the MACRO TIME menu, you can also select:
NEXT - to move to the next menu item.
PREV - to move to the previous menu item.
FACTORY - to return to the factory default.
SET ALL - sets all the rooms to this setting.
Key Macro
The KEY MACRO setting allows you to create a 4-step macro from the control
buttons. For example, if you learned the IR for power on to the Mode button (button 1)
and you learned the play IR code to the play button, a key macro could be created that
simulates pushing the Mode button to play.
To set up to two macros, follow these steps:
1. Use the down arrow key to highlight KEY MACRO.
2. Press the MENU key to select KEY MACRO.
3. Use the down arrow key to highlight MODIFY and press the MENU key. The
following screen appears:
All specifications subject to change without notification. All rights reserved. Copyright © 2006 NetStreams
Main +1 512.977-9393 / fax +1 512.977.9398 / Toll Free Technical Support +1 866-353-3496
3600 W. Parmer Lane, Suite 100; Austin, TX 78727 / www.netstreams.com.
5-5
Page 59

Quartet User’s Guide
Figure 5-8 Entering macros
Select up to four buttons on the remote that you want to include in the first macro.
4.
5. Press the up or down arrow key to select the second macro.
6. Select up to four buttons on the remote that you want to include in the second
macro. An example screen follows.
Figure 5-9 Setting up to two macros
When you are done setting up the two macros, press the MENU key again.
7.
To trigger key macro 13, press the left arrow key on the keypad. To trigger key macro
14, press the right arrow on the keypad.
From the KEY MACRO menu, you can also select:
NEXT - to move to the next menu item.
PREV - to move to the previous menu item.
FACTORY - to return to the factory default.
SET ALL - sets all the rooms to this setting.
5-6
All specifications subject to change without notification. All rights reserved. Copyright © 2006 NetStreams
Main +1 512.977-9393 / fax +1 512.977.9398 / Toll Free Technical Support +1 866-353-3496
3600 W. Parmer Lane, Suite 100; Austin, TX 78727 / www.netstreams.com.
Page 60

In-Wall Keypad
Chapter
6
Using the Quartet Keypads to Listen to Audio
Figure 6-1 Quartet Keypad
Turn Keypad ON/OFF
To turn the keypad ON for a room, press the source key once. To turn the keypad OFF
for a room, press the source button again.
Turn Volume Up/Down
Use the up or down arrow keys on the keypad to control the volume.
All specifications subject to change without notification. All rights reserved. Copyright © 2007 NetStreams
Main +1 512.977-9393 / fax +1 512.977.9398 / Toll Free Technical Support +1 866-353-3496
3600 W. Parmer Lane, Suite 100; Austin, TX 78727 / www.netstreams.com.
6-1
Page 61

Quartet User’s Guide
Mute Audio
Select a Global Source
Select a Source for All Rooms
Control a Source
To mute the audio for a room, press the TALK/MUTE button once. To unmute the
audio for a room, press the TALK/MUTE button again.
Select S1, S2, S3, or S4 to select a global source.
Press and hold S1, S2, S3, or S4 to select a source for all rooms.
Press the 0 to 9 keys to control a source. Press and hold the 0 to 9 keys to select presets
10 through 19.
Select a Local Source (Audio Port)
Press the AUX button to select a local source connected to an Audio Port.
Select a Source Local Source in Another Room
Press the AUX button and then select one of the blinking S1, S2, S3, or S4 keys to
indicate which room to use.
Select the FM Tuner
To select the FM tuner, press the FM button on the keypad.
Change Stations
Use the left and right arrow buttons to tune up or down a selection. Hold down the left
or right arrow keys to seek.
Select Tuner Presets
6-2
Select keys 0 to 9 on the keypad to select tuner presets 0 to 9. Press and hold the 0 to 9
keys to select tuner presets 10 to 19.
All specifications subject to change without notification. All rights reserved. Copyright © 2007 NetStreams
Main +1 512.977-9393 / fax +1 512.977.9398 / Toll Free Technical Support +1 866-353-3496
3600 W. Parmer Lane, Suite 100; Austin, TX 78727 / www.netstreams.com.
Page 62

Trigger Key Macros
Press the left arrow key to trigger key macro 13. Press the right arrow key to trigger
key macro 14.
Special Functions
Sleep
Press STOP and MODE, then key 7 to turn sleep ON. Press STOP and MODE, then
key 7 again to turn sleep OFF.
RNR
Press STOP and MODE, then key 8 to turn RNR ON. Press STOP and MODE, then
key 8 again to turn RNR OFF.
Using the Quartet Keypads to Listen to Audio
Using the Remote to Navigate the Menu
You can control the menu by pointing the remote at the IR window on the front panel
of the MRP or on any of the keypads and pressing MENU. If the MRP is visible, you
will see the following screen appear:
Figure 6-2 Menu screen
The keys on the bottom of the remote are key to navigating through the menus. Their
functions are as follows:
MUTE Moves back to the previous screen.
MENU Displays the Quartet menu and is used to select an item.
Up Arrow Moves up a selection in a list.
Down Arrow Moves down a selection in a list.
Right Arrow Moves to the next or previous column in the menu list; also used to
increase a value.
All specifications subject to change without notification. All rights reserved. Copyright © 2007 NetStreams
Main +1 512.977-9393 / fax +1 512.977.9398 / Toll Free Technical Support +1 866-353-3496
3600 W. Parmer Lane, Suite 100; Austin, TX 78727 / www.netstreams.com.
6-3
Page 63

Quartet User’s Guide
Left Arrow Moves to the next or previous column in the menu list; also used to
decrease a value.
6-4
All specifications subject to change without notification. All rights reserved. Copyright © 2007 NetStreams
Main +1 512.977-9393 / fax +1 512.977.9398 / Toll Free Technical Support +1 866-353-3496
3600 W. Parmer Lane, Suite 100; Austin, TX 78727 / www.netstreams.com.
Page 64

In-Wall Keypad
Chapter
7
Whole House and Room-to-Room Paging
Figure 7-1 Quartet Keypad
Paging all Rooms (Whole House Paging)
Press and hold the Talk/Mute button down for 4 seconds to page all the rooms.
Answering a Page
Press the TALK/MUTE button once. Speak into the the speaker. The person who
wishes to talk must press and release the TALK/MUTE button to take control of the
intercom session.
All specifications subject to change without notification. All rights reserved. Copyright © 2007 NetStreams
Main +1 512.977-9393 / fax +1 512.977.9398 / Toll Free Technical Support +1 866-353-3496
3600 W. Parmer Lane, Suite 100; Austin, TX 78727 / www.netstreams.com.
7-1
Page 65

Quartet User’s Guide
NOTE
NOTE
NOTE
NOTE
Hanging Up on a Page
Rooms in DND (Do Not
Disturb) mode will not
hear the page.
Paging One Room
Paging and room
monitoring functions
must be performed at
the keypad location.
Press any source button once.
Press and hold the TALK/MUTE button for one second (until it blinks), then select
S1, S2, S3, or S4 to select a specific room.
Rooms in DND (Do Not
Disturb) mode will not
hear the page.
Monitoring a Room
Rooms with PRIVACY
enabled cannot be
monitored.
Press the STOP and MODE keys at the same time, then select key 6. The source
selection buttons will light letting you select the room you want to monitor.
7-2
All specifications subject to change without notification. All rights reserved. Copyright © 2007 NetStreams
Main +1 512.977-9393 / fax +1 512.977.9398 / Toll Free Technical Support +1 866-353-3496
3600 W. Parmer Lane, Suite 100; Austin, TX 78727 / www.netstreams.com.
Page 66

Chapter
8
Troubleshooting
The following sections discuss symptoms, explanations, and actions required for
troubleshooting Quartet.
Symptom
System does not power ON.
Explanation
Power cable is not fully connected or fuse is blown.
Action
1. Turn OFF the power on the MRP.
2. Ensure proper power cable connection.
3. Check fuse and replace with a 3A, 110V fuse.
4. Turn system back ON.
Symptom
There are problems when trying to learn the IR keys on the Quartet keypad.
Explanation
There could be several things to check for.
Action
1. Check to make sure that the IR emitter output connection is using the port with the
same number as the source connected to the MRP. For example, a source connected by RCA analog to Audio Input 1 on the MRP should have the IR emitter
running from IR Out 1 on the MRP.
2. If number 1 is OK, then consult the owner’s manual for the source equipment to
double check that the IR codes are transmitting at the same frequency. The default
IR setting for the Quartet system is 38KHz; however, if the source connected to the
input takes IR codes that are transmitting at 56KHz, you will need to change the IR
All specifications subject to change without notification. All rights reserved. Copyright © 2007 NetStreams
Main +1 512.977-9393 / fax +1 512.977.9398 / Toll Free Technical Support +1 866-353-3496
3600 W. Parmer Lane, Suite 100; Austin, TX 78727 / www.netstreams.com.
8-1
Page 67

NetStreams Panorama System Installation Guide
FREQ setting for that source input from the menu on the Quartet keypad (using the
IR section of the menu).
3. Some source manufacturer’s remote controls transmit IR codes in reverse polarity.
Try learning the IR codes to the keypad by pointing the remote control at the
keypad once to lean the code, then point it away, and press the same button again,
and finally point it back at the keypad to verify the IR code learned.
8-2
All specifications subject to change without notification. All rights reserved. Copyright © 2007 NetStreams
Main +1 512.977-9393 / fax +1 512.977.9398 / Toll Free Technical Support +1 866-353-3496
3600 W. Parmer Lane, Suite 100; Austin, TX 78727 / www.netstreams.com.
Page 68

j Appendix A
Pause
Play
Shuffle
Repeat
Previous 2X
Next 2X
Rewind
Fast Forward
Stop
Mode
Source Keys
FM
Volume Up
FM Scanning
Selects the source connected to the Audio Port
Quartet Keypad Quick Reference
How the Keypad Works
Press Means to press the key once.
Press and Hold Means to press the key and hold it down.
Shift Means to press STOP and MOD E at th e same time, fol lowed by another key indicating the function.
Table 1: Source and Room Names
Key Source Name Room Name
S1
S2
S3
S4
Dealer Information:
DN: 020028 1
All specifications subject to change without notification. All rights reserved. Copyright © 2007 NetStreams
Main +1 512.977-9393 / fax +1 512.977.9398 / Toll Free Technical Support +1 866-353-3496
3600 W. Parmer Lane, Suite 100; Austin, TX 78727 / www.netstreams.com.
Page 69

j Appendix A
Quartet Keypad Quick Reference
Table 2. Function Quick Reference
Function Description Press Button
Select a source. Selects a source for that room. Press S1, S2, S3, S4 or FM, depending
on desired source.
Select a source for all rooms. Selects a source for all rooms (Party mode). Press and hold S1, S2, S3, S4 or FM.
Select a local source in the room. Selects a local source located in the room. Press AUX.
Select a local source in another
room.
Select FM tuner. Selects the FM tuner. Press the FM button.
Manually tune radio. Manually tunes the FM radio. Press the left or right arrow buttons.
Seek up or down. Automatically goes to the next or previous radio
Turn DND ON or OFF. Turns room DND mode ON or OFF. Press STOP and MODE key, then press
Turn room privacy ON or OFF. Turns room privacy mode ON or OFF. Press STOP and MODE key, then press
Turn room monitoring ON. Triggers room monitoring mode. Press STOP key and MODE key, then
Turn room monitoring OFF. Turns room monitoring OFF. Select the source you are monitoring.
Turn sleep ON or OFF Turns sleep mode ON or OFF. Press STOP key and MODE key, then
Select preset 0-9. Selects FM tuner preset 0-9. Press 0 - 9 key.
Select preset 10-19. Selects FM tuner preset 10-19. Press and hold 0-9 key.
Mute or unmute room. Mutes or unmutes room. Press TALK/MUTE once to mute; press
Selects a local source located in another room. Press AUX (the options will be blinking).
Press and hold the left or right arrow but-
station.
tons.
4
5.
press 6.
press 7.
again to unmute.
Turn all rooms OFF. Turns all rooms OFF. Press and hold MODE key for two sec-
onds with the STOP key to enter key shift
mode. After entering key shift mode,
press the MODE key again to turn all
rooms OFF.
Set room to INT amplifier. Sets room to INT amplifier. Press STOP key and MODE key, then
press 1.
Set room to AUX output for local
amplifier.
Set room to INT+AUX output. Sets room to INT+AUX output. Press STOP and MODE, then press 3.
Sets room to AUX output for local amplifier. Press STOP and MODE, then press 2.
DN: 020028 2
All specifications subject to change without notification. All rights reserved. Copyright © 2007 NetStreams
Main +1 512.977-9393 / fax +1 512.977.9398 / Toll Free Technical Support +1 866-353-3496
3600 W. Parmer Lane, Suite 100; Austin, TX 78727 / www.netstreams.com.
 Loading...