

Page 1

V5120 Dual Host Card Upgrade Kit for R1350 Blades
Quick Start Guide
The V5120 Dual Host Card Upgrade Kit for R1350 blades
contains the following items:
V5120 Dual Host card—Provides
dual–monitor support.
Mounting bracket—Connects to motherboard
and to V5120 video card to support the card.
Mounting hardware—Two 6–32 pan–head
screws and two male–female standoffs.
5120
Video V5120 configuration label—Provides
part number, serial number, and card MAC
address. MAC address is critical for card and
blade configuration.
Note: The upgrade kit is for R1350 blades only.
Installing the V5120 Dual Host Card
Perform the following steps to install the V5120 upgrade kit. Use a
#2 Phillips head screwdriver and a ¼–inch hex–head wrench.
CAUTION: Handle components and cards carefully. Hold cards
1.
Remove the R1350 blade from the chassis. If the blade is not in
a chassis, ensure that you disconnect power from the blade.
2. Remove memory modules and cables to ease access to the
PCI Express
a. Place the blade on a stable surface. Carefully remove
b. Remove the SATA data cable and the hard disk power
3. If the R1350 blade does not contain a video card, skip this
step and continue to step 4.
If an NVIDIA
remove the video card.
a. Remove the screw from the center of the video card and
and memory modules by their edges and do not
touch their components or contacts. Use a personal
grounding device to prevent electrostatic discharge
before and while installing this upgrade kit.
®
(PCIe®) video card socket.
both memory modules by pressing out on the retaining
latches. Place the memory modules on a dissipative
surface, such as the anti-static bag that the V5120 card is
shipped in.
cable from the hard disk drive and motherboard.
®
Quadro®4 video card is installed in the blade,
save the screw for later use.
b. Grasp the video card by the edges. Carefully remove the
card by pulling it out of the PCIe socket. Store the card in
an anti-static bag.
c. Remove the standoff and the hex–head screw shown in
the following figure (do not use this standoff in the
following step).
Remove
4. Remove screws and insert standoffs.
a. Remove the two hex–head screws shown in the
following figure (if you removed a video card in the
previous step, continue to step b).
Remove
b. Insert the two standoffs (included in the kit) in the same
holes. Use a hex–head wrench to gently tighten the
standoffs.
Insert
ClearCube Technology 8834 Capital of Texas Hwy N Austin, Texas 78759 voice 512 652 3500 www.clearcube.com
Page 2
5. Using the screws you removed in the previous step, secure
the mounting bracket to the standoffs.
6. If there is a plastic dust cover in the PCIe socket, remove the
dust cover.
7. Grasp the V5120 card by the edges, ensuring that the RJ-45
port is facing up. Carefully lower the V5120 card into the
blade and insert the card’s gold fingers into PCIe socket.
Press in firmly to seat the card. Ensure that the holes in the
card are aligned with the standoffs.
8. Secure the V5120 card to the mounting bracket using the
two 6–32 pan–head screws included in kit.
9. Replace the memory modules and reconnect the SATA data
cable and the hard disk power cable that you removed in step 2.
10. Remove the backing from the V5120 configuration label
included in the kit and place it on the outside of the R1350
blade frame.
Note: If a video card configuration label is already on the
blade in the indicated location (for example, if you are
replacing or upgrading an existing V5120 or V5140
card), ensure that you remove the old label before
applying the label in the upgrade kit. If you cannot
remove the old label, place the new label on top of the
existing label.
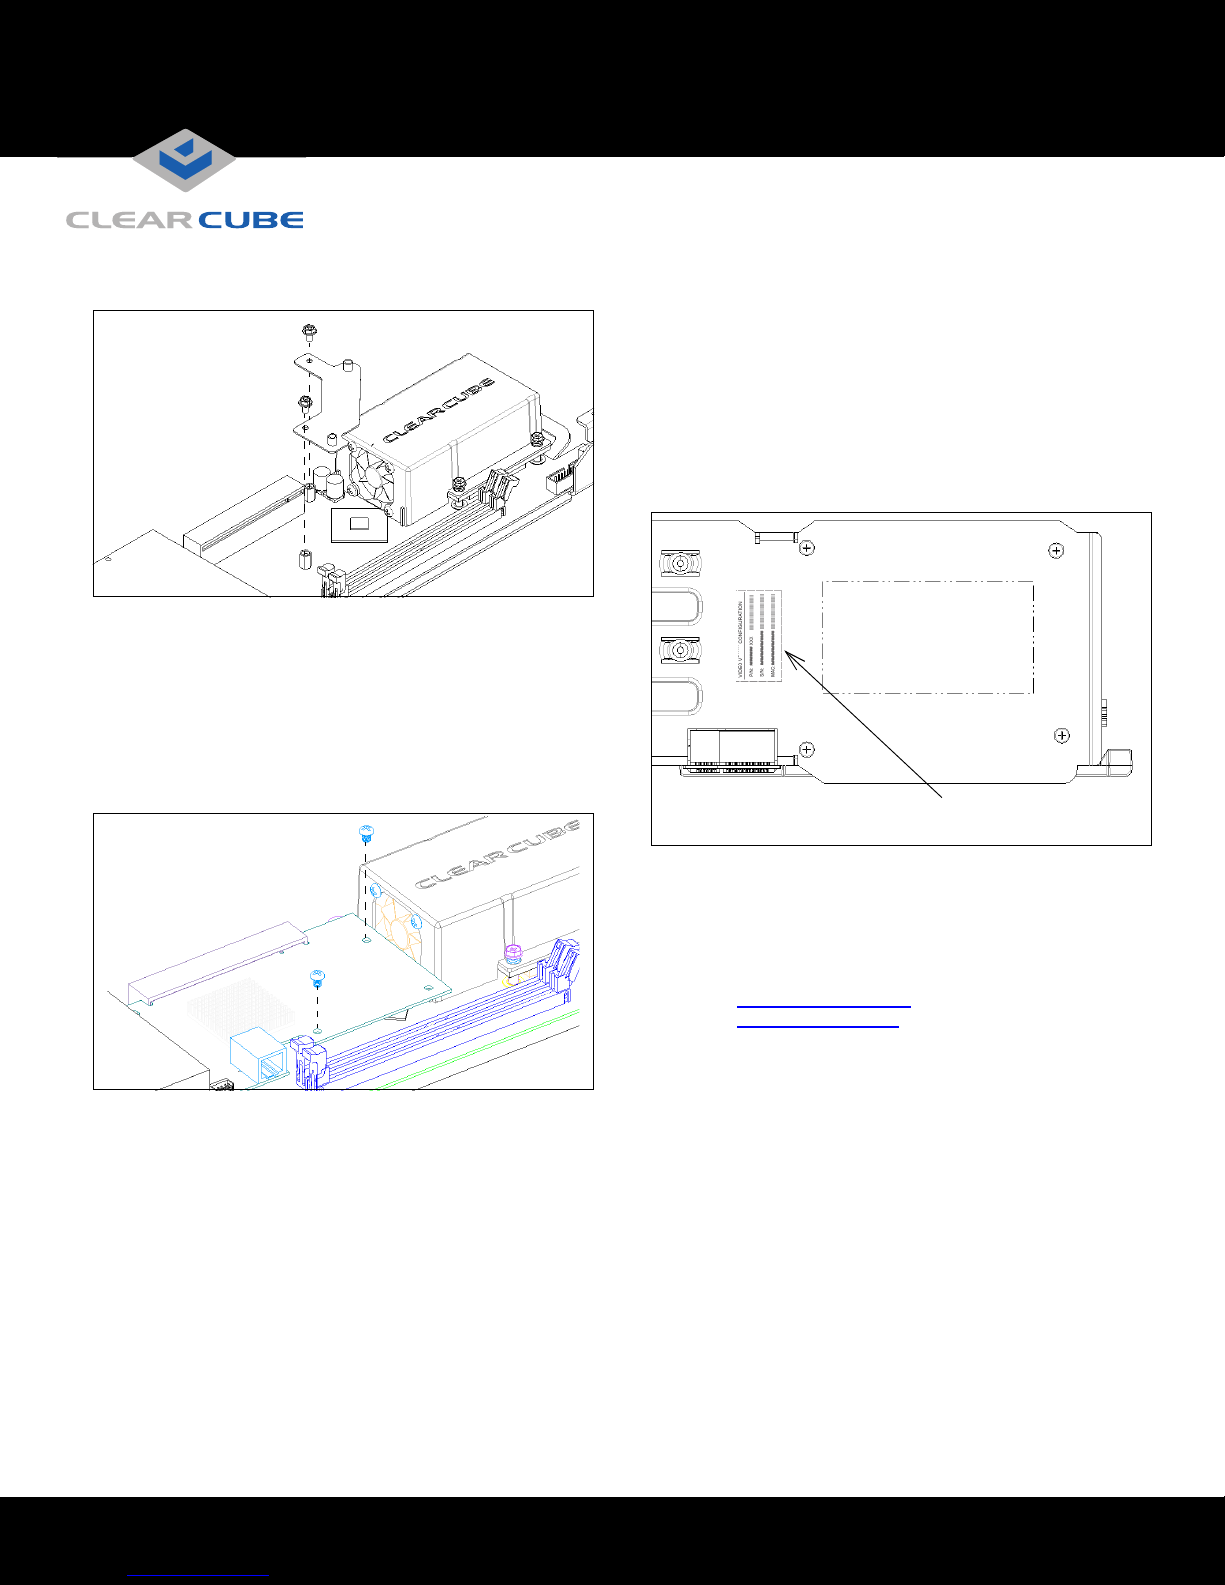
51
Place configuration label on outside of
blade frame in this location
After installing the V5120 card kit and reassembling the blade,
replace the blade in a cage. If the blade is a standalone blade,
reconnect power to the blade.
See R–Series Data Center Products Reference Guide for more
information about the R1350 blade and V5120 Dual Host card.
Email:
support@clearcube.com
Web site: support.clearcube.com
Toll-free: (866) 652-3400
Phone: (512) 652-3400
ClearCube Technology 8834 Capital of Texas Hwy N Austin, Texas 78759 voice 512 652 3500 www.clearcube.com
G0200107 Rev A
 Loading...