

Page 1

Sentral 6.9.3
Quick Start Guide
Revision F 2.2.08.06.2014
Page 2

Technical Support
See the support Web site for technical updates, additional warranty information and documentation, and software revisions:
Web http://www.clearcube.com/support/
Email: support@clearcube.com
Phone: (512) 652-3400
(866) 652-3400
ClearCube Technology, Inc.
The ClearCube Building
3700 W Parmer Lane
Austin, Texas 78727
E-mail info@clearcube.com
Phone: (512) 652-3500 or call toll free (866) 652-3500
Or contact your local ClearCube Reseller or Authorized Service Provider
Copyrights
© 2014 ClearCube Technology, Inc. All rights reserved. Under copyright laws, this publication may not be reproduced or
transmitted in any form, electronic or mechanical, including photocopying, recording, storing in an information retrieval
system, or translating, in whole or in part, without the prior written consent of ClearCube Technology, Inc.
This information is subject to change without notice and ClearCube shall not be liable for any direct, indirect, special, incidental
or consequential damages in connection with the use of this material.
Trademarks
ClearCube®, Sentral®, Blade Switching BackPack™, PC Blade™, C/Port™, and I/Port™ are trademarks or registered trademarks of
ClearCube Technology, Inc.
Adobe PDF is a registered trademark of Adobe Systems Incorporated in the United States and/or other countries.
PC-over-IP and PCoIP are registered trademarks of Teradici Corporation in the United States and/or other countries. Microsoft,
Windows and Windows Vista are registered trademarks of Microsoft Corporation in the United States and/or other countries.
Intel, Intel Core, Pentium, and Xeon are trademarks of Intel Corporation in the U.S. and/or other countries. VMware and
VMware View are trademarks or registered trademarks of VMware, Inc. in the United States and/or other jurisdictions.
Kensington is a registered trademark of ACCO Brands. PCIE® and PCIe® are registered trademarks and/or service marks of PCISIG. Catalyst, Cisco, and Cisco Nexus are registered trademarks or of Cisco Systems, Inc. and/or its affiliates in the United States
and certain other countries. Linux® is the registered trademark of Linus Torvalds in the U.S. and other countries. Red Hat, Red
Hat Enterprise Linux, the Shadowman logo and JBoss are registered trademarks of Red Hat, Inc. in the U.S. and other
countries.Raspberry Pi is a trademark of the Raspberry Pi Foundation. S3 Graphics is a registered trademark of S3 Graphics Co.,
Ltd. Realtek is a trademark of Realtek Semiconductor Corporation. Other product and company names mentioned herein are
trademarks or trade names of their respective companies.
Patents
The ClearCube Architecture and its components described in this user manual are protected by numerous granted and pending
U.S. and international patents. Granted patents include: US05926172, US05966056, US05994952, US06012101, US06020839,
US06037884, US06038616, US06119146, US06148182, US06167241, US06385666, US06421393, US06426970, US06633934,
US06708247, US06735658, and US06886055.
Patents pending include: US S/N 09/755378, US S/N 10/279475, US S/N 10/198719, US S/N 10/198650, US S/N 10/409219, US S/N
09/728667, US S/N 09/728669, US S/N 10/411804, US S/N 10/411908, US S/N 10/458853, US S/N 10/364584, US S/N 10/301536, US
S/N 60/411066, US S/N 10/662933, US S/N 10/662889, US S/N 10/662932, US S/N 10/662968, US S/N 10/301563, US S/N 10/662936,
US S/N 10/301518, US S/N 10/662955 and US S/N 10/662954.
Inquiries regarding patented technology should be directed to ClearCube Corporate Headquarters.
Page 3

Contents
1 Introduction .................................................................................................................................... 1
2 New in ClearCube Sentral 6.9.3 ....................................................................................................... 1
3 Requesting a Sentral License Key .................................................................................................... 1
4 Minimum Requirements and Support ............................................................................................. 2
5 Before You Begin: Installation Prerequisites and Recommendations.............................................. 3
5.1 Installing Microsoft IIS ............................................................................................................. 3
5.2 Installing Database Server ........................................................................................................ 3
5.2.1 Important Settings for MySQL Server ................................................................................. 4
5.2.2 Important Settings for MS SQL Server ................................................................................ 5
5.3 Virtual Machine Snapshots (Optional) ...................................................................................... 5
6 Installing Sentral FTP Server and Sentral Server.............................................................................. 6
7 Installing Sentral Console .............................................................................................................. 12
8 Start Sentral Console as Administrator ......................................................................................... 12
9 Logging in to Sentral for the First Time ......................................................................................... 13
10 Important Configuration Settings for Sentral Server ..................................................................... 13
10.1 SNMP Configuration .............................................................................................................. 15
10.2 Email Notifications ................................................................................................................. 17
10.3 Alert Frequency ..................................................................................................................... 17
10.4 Server Type and Addresses .................................................................................................... 17
10.5 Device Polling and Timeout .................................................................................................... 17
10.6 FTP Server ............................................................................................................................. 18
10.7 Database Server..................................................................................................................... 18
10.8 Dashboard Refresh ................................................................................................................ 18
10.9 User Discovery ....................................................................................................................... 19
10.10 Mapping User Type ................................................................................................................ 19
10.11 Offline Node Notification ....................................................................................................... 19
10.12 I9400 Logoff and Session State............................................................................................... 19
10.13 Label Display in Chassis View ................................................................................................. 20
10.14 VMware View Connection Server Settings ............................................................................. 20
10.15 IPMI-Enabled Server Discovery .............................................................................................. 21
10.16 Search Options ...................................................................................................................... 21
10.17 Common Configurations: ServerConfiguration.xml File .......................................................... 21
10.17.1 Location .......................................................................................................................... 21
10.17.2 Displaying Login Screen on Zero Clients ........................................................................... 21
iii
Page 4

11 Apply a Sentral License Key ........................................................................................................... 22
12 Server Log and Settings ................................................................................................................. 22
12.1 Log Location .......................................................................................................................... 23
12.2 Specifying Log Destination: ServerConfiguration.xml ............................................................. 23
12.3 Turning off Logging ................................................................................................................ 23
13 Backups ......................................................................................................................................... 23
13.1 Backing up Sentral Server and Sentral Console ....................................................................... 24
13.2 Backing up Sentral Database Schema ..................................................................................... 24
13.3 Backing up Virtual Machines and Snapshots........................................................................... 24
14 Basic Operations ........................................................................................................................... 24
14.1 Installing Sentral Host Agent .................................................................................................. 25
14.1.1 Windows Embedded Standard 7 ...................................................................................... 25
14.1.2 Red Hat® Enterprise Linux® (RHEL) .................................................................................... 29
14.1.3 CentOS® Linux® ................................................................................................................. 31
14.1.4 Ubuntu ............................................................................................................................ 32
14.2 Installing Sentral Thin Client Agent......................................................................................... 32
14.2.1 Windows Operating Systems ........................................................................................... 33
14.2.2 Linux-Based Operating Systems ....................................................................................... 36
14.3 Device Discovery .................................................................................................................... 37
14.4 Creating Groups and Subgroups (Required for All Management Tasks) .................................. 38
14.5 Renaming I/Ports (Zero Clients) ............................................................................................. 38
14.6 Adding Users to Sentral Database .......................................................................................... 38
14.6.1 Adding a User .................................................................................................................. 38
14.6.2 Adding Large Numbers of Users ....................................................................................... 39
15 Creating Device-Based Allocations ................................................................................................ 41
16 Administrator-Instantiated PCoIP Sessions ................................................................................... 41
17 Creating User-Based Allocations ................................................................................................... 41
18 Orchestrating User Moves ............................................................................................................ 42
19 Updating Sentral Host Agent Software ......................................................................................... 42
20 Firmware Update Process ............................................................................................................. 44
20.1 Uploading Files ...................................................................................................................... 44
20.2 Monitoring Progress and Restarting Devices .......................................................................... 44
21 Right-Click Menu Options from Hierarchical Tree ......................................................................... 45
21.1 Blade with PCoIP Host Card.................................................................................................... 45
21.2 Zero Clients............................................................................................................................ 46
iv
Page 5

22 Creating Custom Views in Sentral ................................................................................................. 47
23 Troubleshooting ............................................................................................................................ 49
23.1 Console Response Issues........................................................................................................ 49
23.2 Server Performance Is Slow or Server Is Not Responding ....................................................... 49
23.3 Sentral Errors and Messages .................................................................................................. 49
23.4 Running Apache Tomcat as an Application ............................................................................. 49
24 Important Account Information .................................................................................................... 51
v
Page 6

Version
Date
Description
1.0.06.20.2012
06/21/2012
First release. Details installation steps and configurations necessary for
initial setup and preliminary configuration.
1.1.08.29.2012
08/29/2012
Updated contact information.
Included content for IIS support.
Additional detail about permissions required during installation.
Added details about Database Server installation.
Added installation troubleshooting information.
1.2.01.23.2013
01/23/2013
Updated for release 6.8.
Noted performance improvements constituting this release.
2.0.07.30.2013
07/30/2013
Updated for release 6.9.
2.1.02.24.2014
02/24/2014
Updated for release 6.9.3.
Added SNMP configuration content.
Added log performance and configuration content.
Added Windows® and Linux® Host Agent, Thin Client Agent content.
2.2.08.06.2014
08/06/2014
Revisions
Updated content about requesting a Sentral License Key.
vi
Page 7

This Page Is Intentionally Blank
vii
Page 8

NOTE:
You must apply a license within 60 days of installing Sentral. Sentral documentation details how
to apply a Sentral license.
1 Introduction
ClearCube® Sentral™ Version 6.9.3 provides a single interface to manage your desktop infrastructure
including virtual machines, physical host (such as blades and computers), thin clients, and zero clients.
ClearCube Sentral builds on six generations of ClearCube management software in a single management
platform with many innovative new features. Sentral offers IT administrators one console to monitor
and control their entire deployment of local and remote computing assets. ClearCube Sentral is a
software package that delivers proven cost reductions through unique features such as dynamic
resource allocation, virtual desktop management, active health monitoring, and host switching and
sparing. Sentral offers these benefits across platforms, with support for other vendors’ host systems
(physical computers, blades, virtual machines, and other computing devices). Designed to scale from
small businesses to large enterprises, ClearCube Sentral offers IT departments total control.
2 New in ClearCube Sentral 6.9.3
SNMP updates
Sentral Server can now send alerts for all SNMP events that the server receives.
Teradici® firmware support
Support for Teradici firmware release 4.1.2 and above.
Log optimization
Internal logging improvements.
Support for new ClearCube hardware
Support for new zero client series CD7500, CD7600, CD7700, CD7800, CD9500, CD9600, CD9700 and
CD9800. Support for new V5430 and V5420 host cards.
New Host Agent and Thin Client Agent operating system support
New Sentral Host Agent and Thin Client Agent for Red Hat® Linux, CentOS® Linux®, and Ubuntu®
distributions
Multiple performance improvements
Exponential server performance improvements to support an appliance model for future releases
3 Requesting a Sentral License Key
Contact ClearCube Support for a Sentral license.
Email: support@clearcube.com
Phone: (866) 652-3400
Next step: Apply the license key after installing Sentral Console. See 11 “Apply a Sentral License Key”
below for instructions.
Rev F 2.2.08.06.2014 1
Page 9

Sentral Quick Start Guide
Component
Minimum Requirements and
Supported Items
Recommended or Comments
Sentral Console
2.4 GHz processor
Intel Core™ i7 or Xeon® 3400 series (4 cores)
1 GB RAM
8 GB RAM or higher
2 GB free space
Windows® 2008 R2 64-bit Server VM
Sentral Server
2.4 GHz processor
Intel Core™ i7 or Xeon® 3400 series (4 cores)
1 GB RAM
8 GB RAM or higher
2 GB free space
Windows® 2008 R2 64-bit Server VM
Sentral
Database
2.4 GHz processor
Intel Core™ i7 or Xeon® 3400 series (4 cores)
1 GB RAM
8 GB RAM or higher
10 GB free space
Windows® 2008 R2 64-bit Server VM
Hosts running
Sentral Host
Agent
1.8 GHz processor
—
1 GB RAM
—
2 GB free space
—
Operating
systems
Windows 7
Supported on Console, Server, Database, and
Host Agent
Windows 2008 Server
Supported on Console, Server, Database, and
Host Agent
Windows 2003 Server R3
Standard Edition
Supported on Console, Server, Database, and
Host Agent
Windows XP Professional, SP3
Supported on Host Agent only
(Optional)
VM host
application
Microsoft Hyper-V®
—
VMware® ESX Server
—
VMware Server
—
Xen® Hypervisor
—
4 Minimum Requirements and Support
The table below shows minimum requirements for Sentral components and supported operating
systems and VM host applications.
Table 1. Minimum requirements for Sentral components and supported software
2 Rev F 2.2.08.06.2014
Page 10

Before You Begin: Installation Prerequisites and Recommendations
NOTE:
Ensure that you install all of the features—including all lower-level features included in the
parent features—that are shown below.
5 Before You Begin: Installation Prerequisites and Recommendations
Before installing Sentral ensure that:
if you are using Microsoft® Internet Information Services (IIS) as your Sentral Web server, install IIS
before installing Sentral FTP Server and Sentral Server. See 5.1 “Installing Microsoft IIS” below for
details.
you have installed a database. 5.2 “Installing Database Server” below identifies Sentral Database
requirements and provides database and VM-related recommendations.
5.1 Installing Microsoft IIS
Perform this procedure only if you are using IIS as the Web server in your Sentral environment.
The steps below show how to install IIS features on a computer running Windows 2008 Server, R2 or
Windows 7 Enterprise operating system.
1. Click Start > Control Panel > Programs > Turn Windows features on or off.
2. Expand Internet Information Services.
3. Expand Web Management Tools and select all lower-level features.
4. Expand World Wide Web Services and select all lower-level features.
5. Select Internet Information Services Hostable Web Core.
6. Click OK. Windows displays a message while it makes changes and then minimizes the dialog box.
You can now continue to install a database server.
5.2 Installing Database Server
ClearCube Sentral supports MS SQL 2005 and MySQL 5.5.24. The database server must be installed and
available before installing Sentral Server. The database server can be installed on a remote computer or
on the same computer as Sentral Server. For large deployments, ClearCube recommends installing the
database server on:
a different computer than the one running Sentral Server, and
a computer with database redundancy or high availability.
Rev F 2.2.08.06.2014 3
Page 11
Sentral Quick Start Guide
5.2.1 Important Settings for MySQL Server
MySQL Server is not included with Sentral. It is assumed that the database installer has at least an
intermediate knowledge about MySQL Server and your environment to perform the installation.
Configure MySQL as appropriate for your environment. If you are unsure about any settings, ClearCube
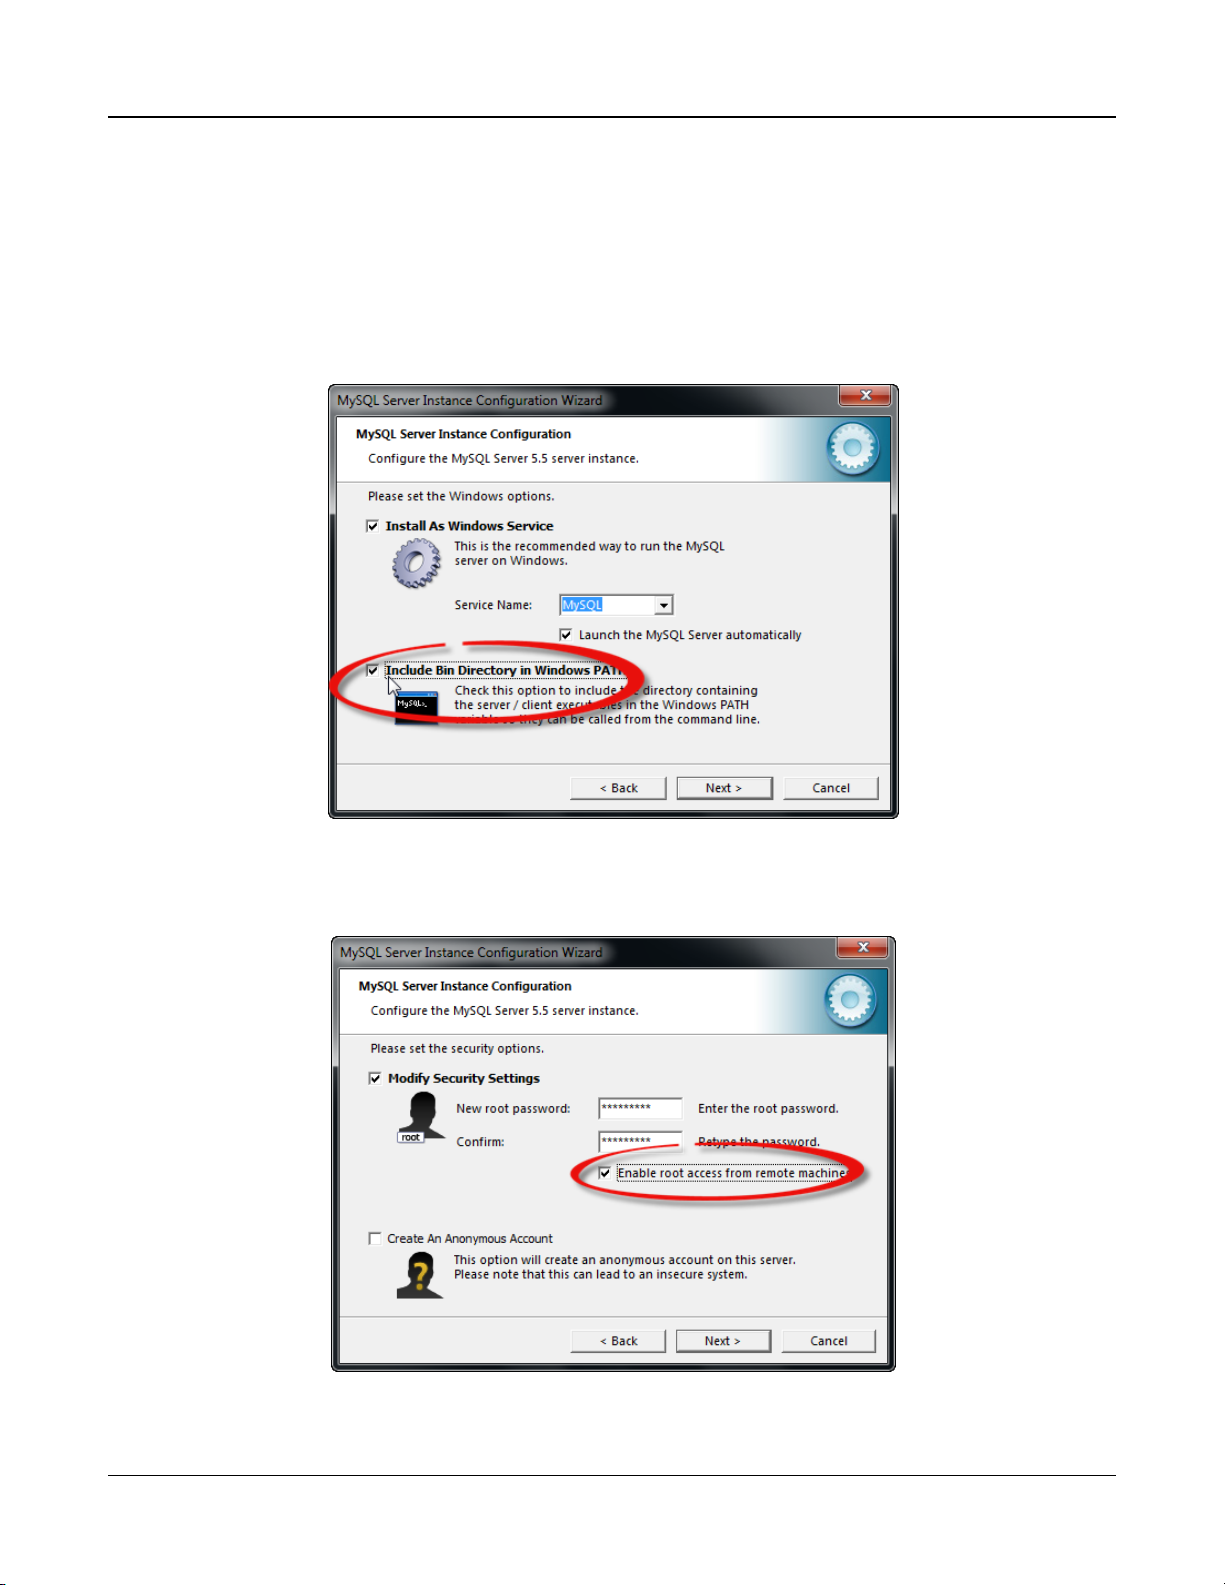
recommends accepting default installation with the following exceptions:
From the MySQL Server Instance Configuration Wizard’s Windows options screen (shown below),
select the Include Bin Directory in Windows PATH option, as shown below.
Figure 1. Setting Windows options from the MySQL Configuration Wizard
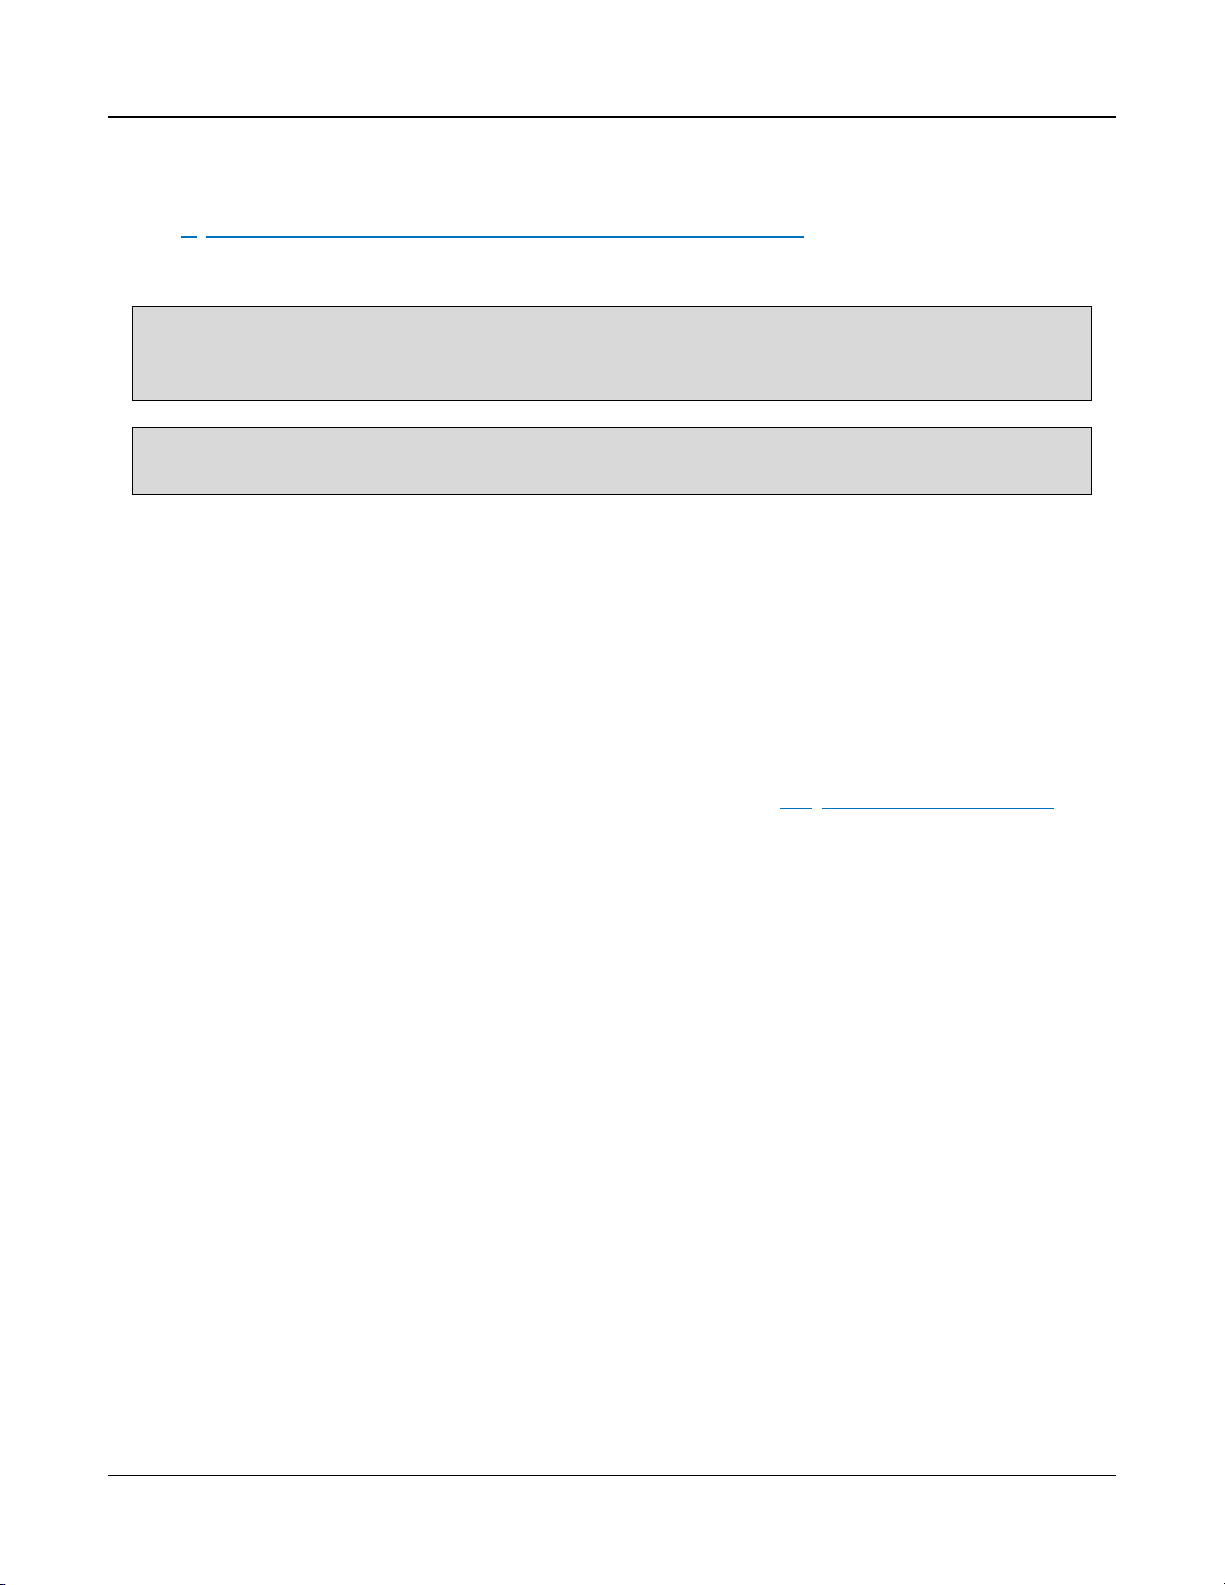
Enable remote execution during installation and configuration of MySQL.
Figure 2. Setting security options from the MySQL Configuration Wizard
4 Rev F 2.2.08.06.2014
Page 12

Before You Begin: Installation Prerequisites and Recommendations
5.2.2 Important Settings for MS SQL Server
MS SQL is not included with Sentral. It is assumed that the database installer has adequate knowledge
about MS SQL and your environment to perform the installation. Configure MS SQL as appropriate for
your environment. If you are unsure about any settings, ClearCube recommends accepting default
installation settings, with the following exception:
When installing MS SQL, enable mixed-mode authentication.
5.3 Virtual Machine Snapshots (Optional)
If you are installing Sentral Server on a virtual machine (VM) a best practice is to create a snapshot of
the VM immediately after installing Sentral Server and applying any patches or updates (if applicable). If
the need arises, this step can help to return the VM to known, pristine state.
Rev F 2.2.08.06.2014 5
Page 13
Sentral Quick Start Guide
NOTE:
If you are using Microsoft IIS as your Sentral Web server, you must install IIS before installing
Sentral FTP Server and Sentral Server. If you are using IIS and have not already installed it, stop
and do so now.
NOTE:
If you are installing Microsoft IIS, Sentral requires the addition of ServletExec. If you do not
already have a ServletExec license, contact ClearCube Sales.
6 Installing Sentral FTP Server and Sentral Server
Before installing Sentral FTP Server and Sentral Server, ensure that you have installed all prerequisites.
See 5 “Before You Begin: Installation Prerequisites and Recommendations” above for details.
The steps below show how to install Sentral FTP Server and Sentral Server.
1. If you are installing Sentral on a Windows 7 operating system, set Sentral installer’s Compatibility
mode and Privilege Level.
a. Right-click the Sentral Console and Server installer (named Setup.exe) and select properties.
b. From the Compatibility tab, click Change settings for all users.
c. Select Run this program in compatibility mode for and select Windows 7.
d. In the Privilege Level area, select Run this program as administrator, and then click OK.
2. Double-click the Sentral installer. The installer contains all components required for Sentral
installation. Ensure that you already have the database server (see 5.2 “Installing Database Server”
above for more information).
3. The installer detects if any components that Sentral requires are already installed on the computer.
If a component is not installed, it is automatically selected in the dialog box shown below. The
pictures below show a Sentral Server and Console installation.
6 Rev F 2.2.08.06.2014
Page 14
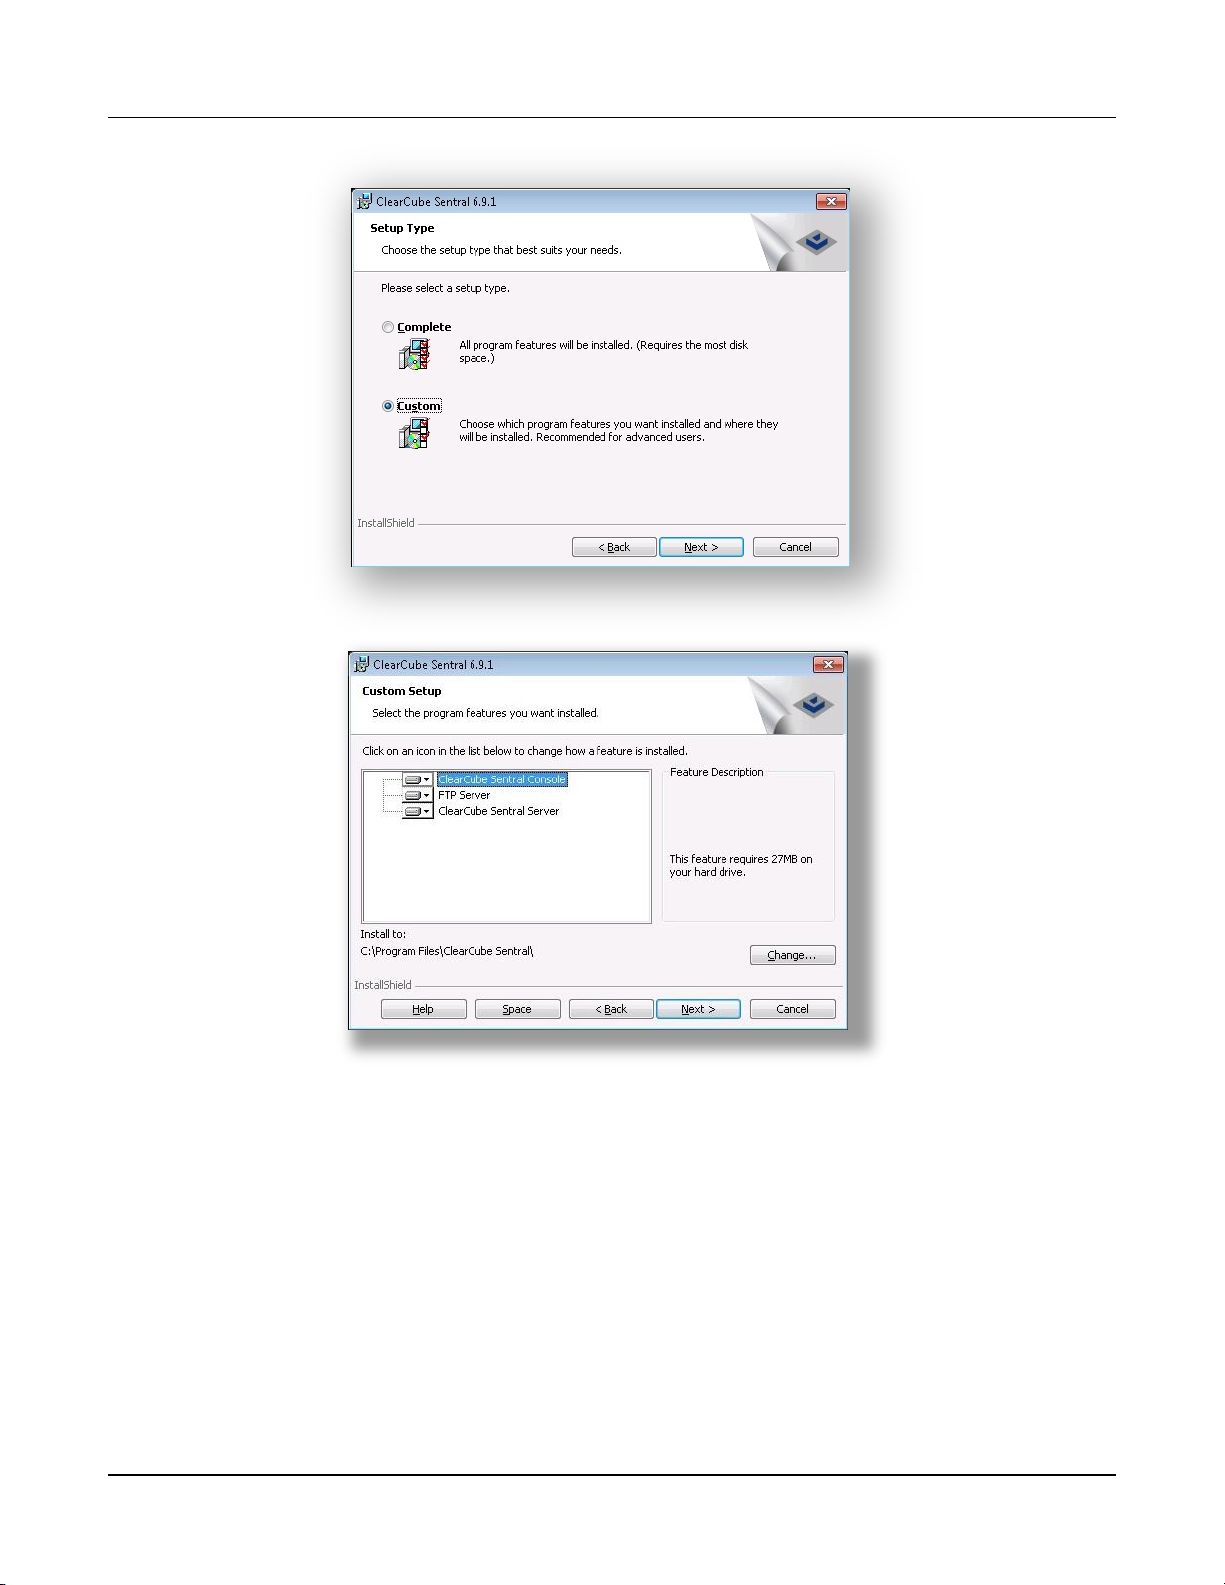
Installing Sentral FTP Server and Sentral Server
Figure 3. The Sentral Installer showing the components selected for installation
4. Read the license agreement and click Yes.
5. Specify the path to install Sentral components and then click Next. ClearCube recommends using
the default path. Sentral then installs the JRE environment.
6. Sentral installs an FTP server. This FTP server is used for firmware and software updates. Click Next
to continue the FTP server installation
7. Provide the information requested in the following screens. The installer uses this information to
register the FTP server components.
8. Click Finish to complete FTP server installation.
Rev F 2.2.08.06.2014 7
Page 15
Sentral Quick Start Guide
NOTE:
For future configuration, you can specify or modify these settings by selecting ClearCube
Tomcat from Services Microsoft Management Console (MMC). Open MMC by entering
services.msc in the Start menu’s Search box.
NOTE:
If you are using IIS it must be installed before you can continue. If you have not already
installed IIS, stop and do so now. See 5.1 “Installing Microsoft IIS” for more information.
NOTE:
Ensure that you enter CMSServer capitalized as shown.
9. Select the Web server you are using in your Sentral deployment from the options provided. The list
below shows the steps to perform for the Web server that you select. Select one of the following:
Apache Tomcat
a. The installer requests Windows operating system and Active Directory credentials for
authenticating Tomcat Server. Provide credentials in these fields. See the text on this screen for
more information.
b. Click Next to display the database credentials screen. Continue to step 10 below.
—OR—
Microsoft IIS
Sentral installs ServletExec®, which enables Java® Servlets in IIS.
a. Sentral displays the ServletExec Application Server Setup dialog box. Click Next.
b. Select Install a ServletExec AS instance and then click Next.
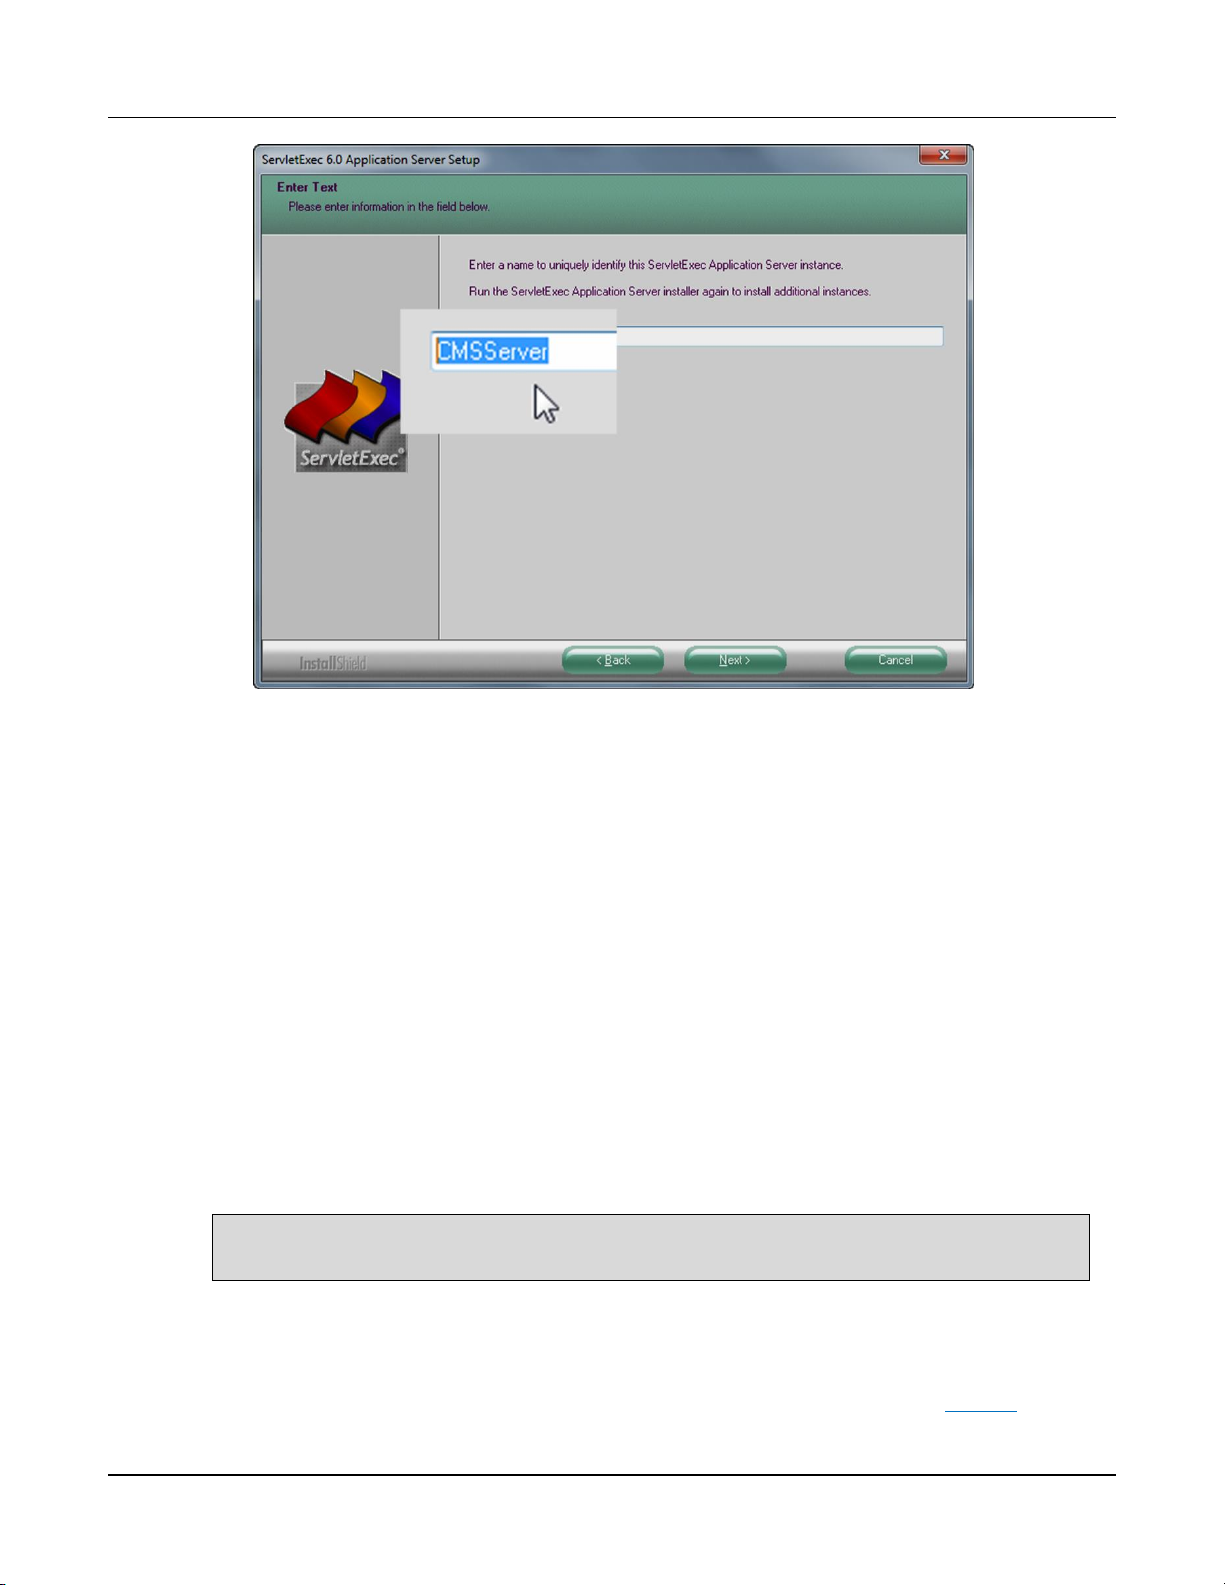
c. Continue by accepting installation defaults. From the Enter Text screen shown below, be
sure to replace the default (the name of the computer on which you are installing Sentral)
with CMSServer (this value is case-sensitive).
8 Rev F 2.2.08.06.2014
Page 16
Installing Sentral FTP Server and Sentral Server
NOTE:
If this message is covered by a Windows Explorer containing a readme file, close the
explorer to see the remaining installation messages.
Figure 4. Specifying the name of the AS instance
d. From the Setup Type screen, select Microsoft IIS, and then click Next.
e. From the Choose Destination Location screen, accept the default location,
C:\InetPub\Scripts, and then click Next (assuming that the installation drive is C:\).
f. Accept the default ServletExec port, 8888, and then click Next.
g. Click Next to install the specified components.
h. Specify values from the ServletExec Admin Username and Password screen. Note that
Sentral does not require these credentials (these are used for a Web-based admin login).
Click Next.
i. The installer displays an Application Server Setup information message about
webadapter.properties. Click OK to continue.
j. Click Finish to complete ServletExec installation. Sentral then displays a message about
starting ServletExec.
Now that you have specified the Sentral Web server, continue to the following step.
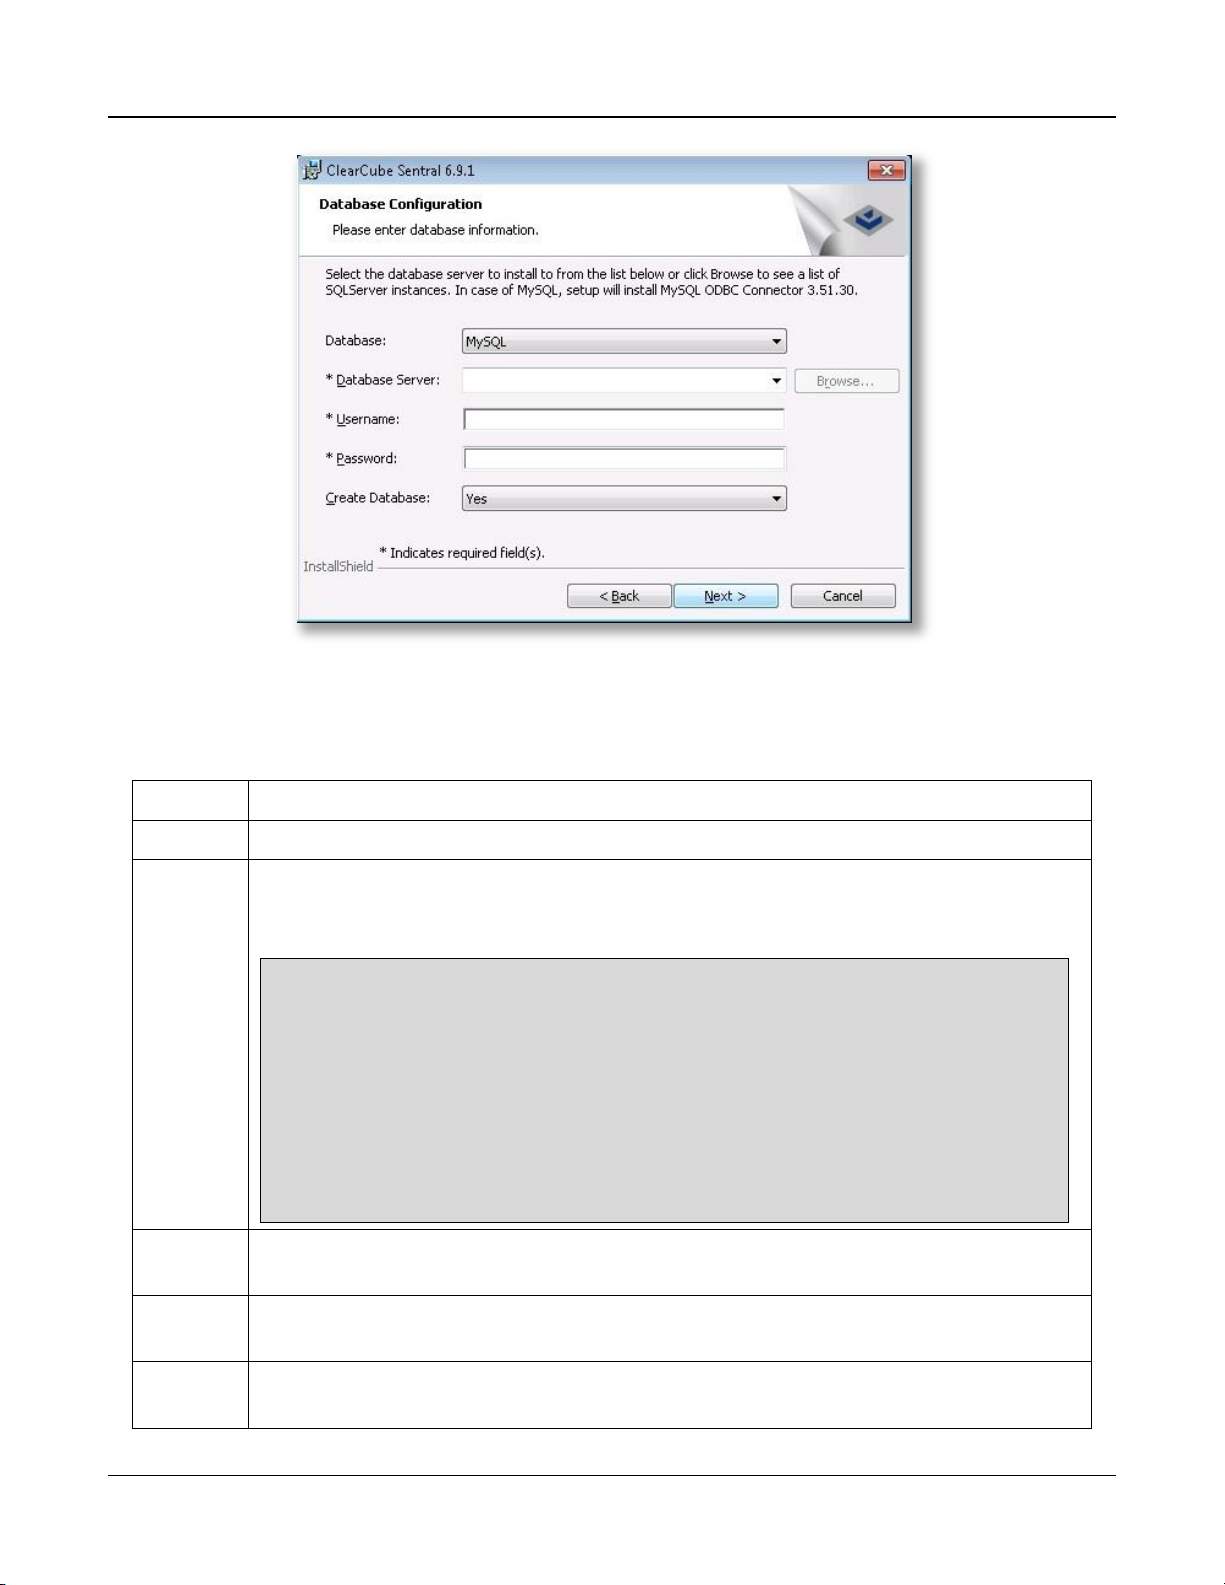
10. Provide the database server credentials so that the installer can insert the schema in the database.
The table below shows each field in the Enter database information screen (shown in Figure 5).
Rev F 2.2.08.06.2014 9
Page 17
Sentral Quick Start Guide
Field
Description
Database
Select MySQL or MS SQL as appropriate for your installation.
Database
Server
Enter the network location of the Sentral Database (the IP address or host name).
ClearCube recommends using a static IP address. Type localhost if you are using the default
MySQL database user name and the password root.
NOTE:
Only if you are using a non-default port for your database server (the default
MySQL port is 3306, and the default SQL Server port is 1433), specify the port
at the end of the IP address with a comma between the IP address and the
port number. For example:
192.168.3.52,nnnn
where 192.168.3.52 is the IP address and nnnn is the port number.
If you are using default database server ports (see above), do not specify any
port at the end of the IP address.
Username
Enter the user name of the Sentral Database administrator you specified during MS SQL or
MySQL installation.
Password
Enter the password for the Sentral Database administrator you specified during MS SQL or
MySQL installation.
Create
Database
Select Yes to automatically load the Sentral schema for the database you selected above.
NOTE: You must select Yes the first time you install Sentral.
Figure 5. The Sentral Database information screen
The table below explains the Database Configuration fields.
Table 2. The Database Configuration screen fields
10 Rev F 2.2.08.06.2014
Page 18
Installing Sentral FTP Server and Sentral Server
NOTE:
If you are using a primary server only, specify the primary server’s address in the
Secondary Sever field.
11. From the Primary and Secondary Server screen, specify the IP address or host name of Sentral
Server (ClearCube recommends using an IP address).
12. Click Next and the installer displays progress messages.
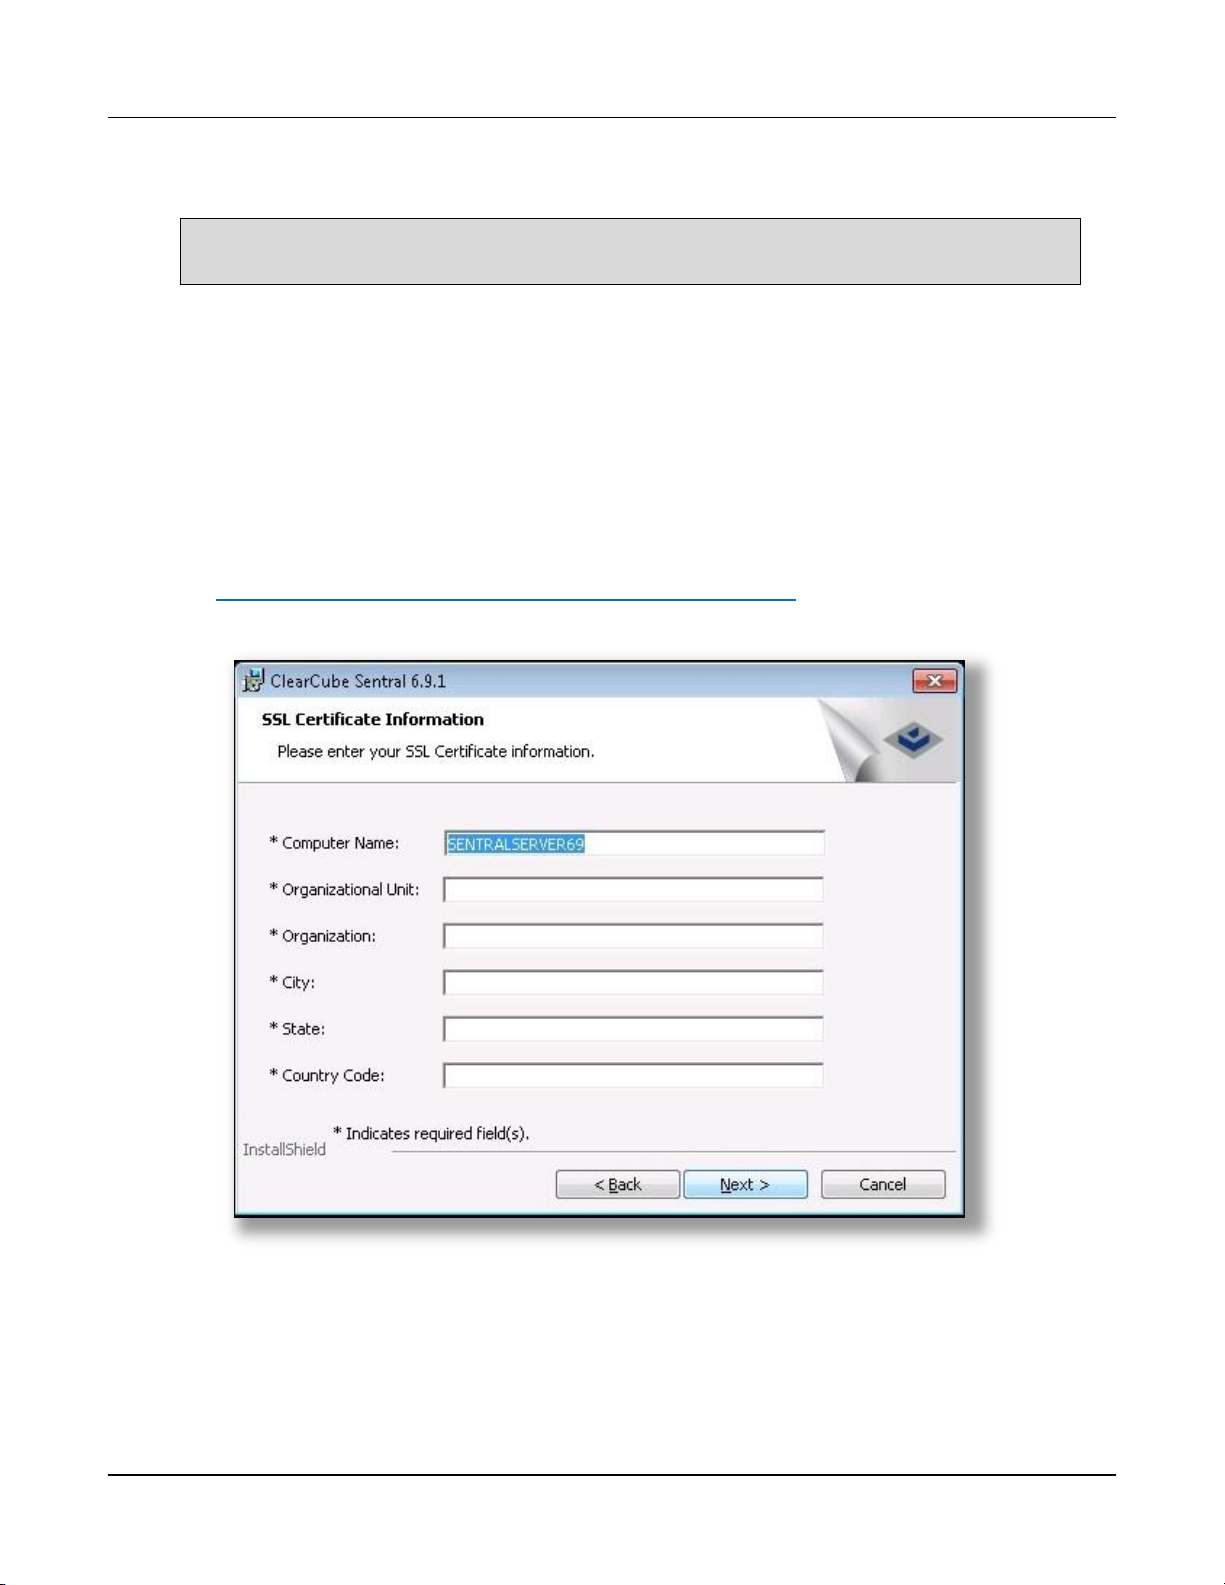
13. Enter the requested information to create an SSL certificate (shown in the figure below). This
information is used for communicating with R-series chassis Remote Management Module (RMM).
(See Sentral Administrator’s Guide and R-Series Data Center Products User’s Guide for more information.)
All fields are mandatory
Country Code field is a two-letter code. You can find a list of two-letter country codes (or code
elements) in the ISO 3166-1 standard, located at:
http://www.iso.org/iso/country_codes/iso_3166_code_lists.htm
Figure 6. Entering SSL certificate information
14. Click Next to continue. A message is displayed about SSL certificate creation.
15. Click Finish to complete Sentral Server installation and to begin Sentral Console installation.
Next step: Sentral Console installation
Rev F 2.2.08.06.2014 11
Page 19
Sentral Quick Start Guide
NOTE:
Do not install Sentral host agent on the computer on which Sentral Console is installed.
NOTE:
See 10.4 “Server Type and Addresses” below for information about important settings when
using PCoIP zero clients.
7 Installing Sentral Console
Sentral Console installation automatically begins after Sentral Server installation is complete.
1. In the Sentral Server Information screen, Sentral automatically populates the Primary and Secondary
Server fields with the hostname of the computer on which you are performing the installation.
ClearCube recommends entering the computer’s IP address here.
If you are installing only one Sentral Server, enter the same value in the primary and secondary
server fields.
Click Next to continue.
2. From the Choose Destination Location screen, accept the default or specify a different installation
path and click Next to continue.
3. From the InstallShield® Wizard Complete screen, click Finish to complete installation.
4. Select Yes, I want to restart my computer now and click Finish to restart the computer.
8 Start Sentral Console as Administrator
Always start Sentral Console as an administrator user. The steps below show how to start Sentral
Console (these steps assume Sentral is installed on Windows 7).
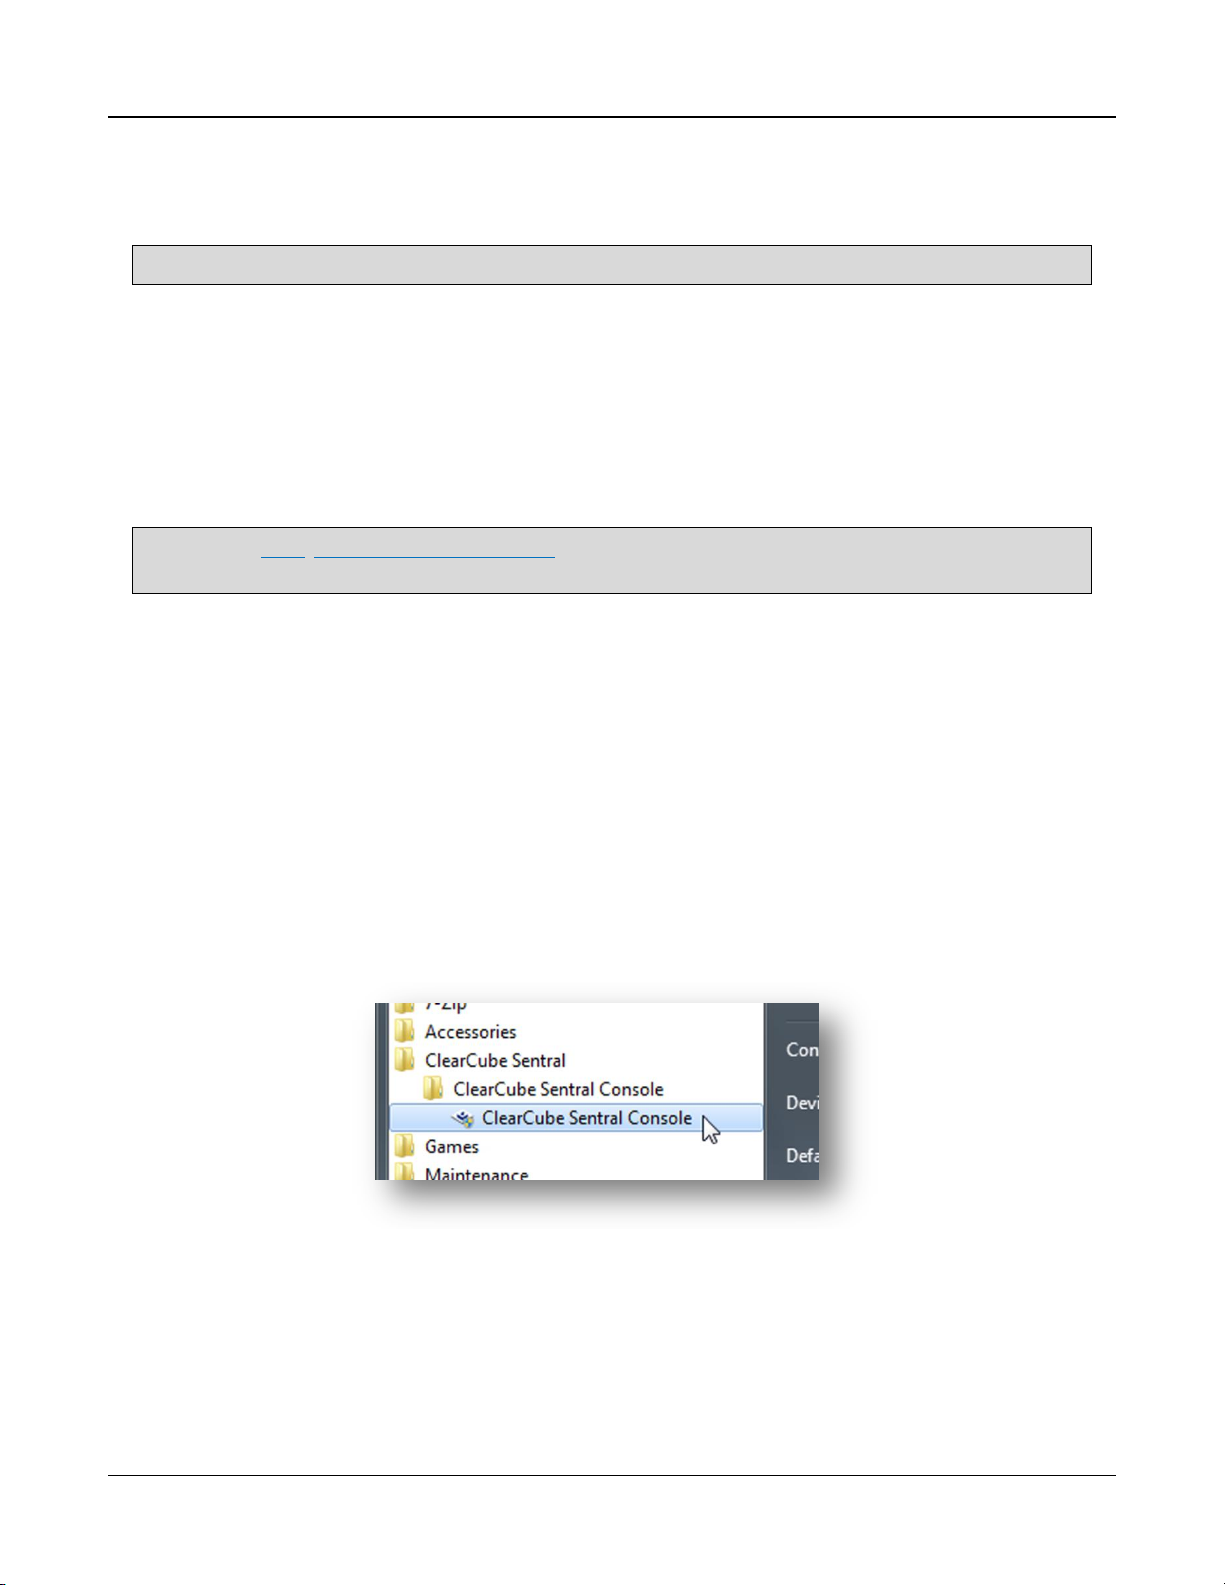
1. Click Start > All Programs > ClearCube Sentral > ClearCube Sentral Console, then right-click the
second ClearCube Sentral Console menu item.
Figure 7. Entering SSL certificate information
2. From the right-click menu, select Run as administrator, and then click Yes.
12 Rev F 2.2.08.06.2014
Page 20

Important Configuration Settings for Sentral Server
Credential
Value
Username
administrator
Password
clearcube
Domain
CCT
9 Logging in to Sentral for the First Time
The default Sentral account enables you log in for the first time and set and configure all settings. After
performing initial configurations and setting security options, you can disable the default account and
use the local administrator account or a configured Domain account. The table below shows the default
Sentral account credentials.
Table 3. The Default Sentral account credentials
10 Important Configuration Settings for Sentral Server
Sentral Server settings are available from the Configuration Wizard (displayed by default when you log in
to Sentral Console), and from the Configuration screen. Settings here apply to:
Sentral Console
Sentral Server
Sentral Database
Sentral FTP server
Sentral logs, and more.
The pictures below shows the Configuration Wizard and the Configuration screen.
Rev F 2.2.08.06.2014 13
Page 21

Sentral Quick Start Guide
Figure 8. The Configuration Wizard displayed at login
14 Rev F 2.2.08.06.2014
Page 22

Important Configuration Settings for Sentral Server
Figure 9. The Configuration screen (Setup > Configuration)
The sections below provide short lists of the Sentral Configuration screen fields.
10.1 SNMP Configuration
Simple Network Management Protocol (SNMP) is a protocol that enables you to manage nodes on an IP
network. SNMP allows sending alerts and other messages across your network, and can help network
administrators manage network performance, find and solve network problems, and plan for network
growth. You can set a global SNMP configuration for hosts in your environment from Sentral console.
1. From the main menu, click Setup > Configuration to display the Configuration screen.
2. From the toolbar, click the Configure SNMP button ( ) to display the SNMP Configuration screen.
3. Edit the following parameters as appropriate for your environment.
Rev F 2.2.08.06.2014 15
Page 23

Sentral Quick Start Guide
Field Name
Description
Port
This field specifies the UDP port to which traps are sent. The default is 162, and should
not be changed unless you open this port across the network to your trap receiver
system, and configure the receiver to accept SNMP traps on this port.
Generic Trap
This field indicates that the trap is enterprise-specific. SNMP vendors and users define
their own traps under the private-enterprise branch of the SMI object tree. The default
value is 6.
Trap Receiver
This field specifies the system that receives the SNMP traps sent. The default value is
localhost, and should be changed to the hostname or the IP address of the trap
receiver system.
Specific Trap
This field specifies the enterprise-specific trap number, and applies only when the
Generic Trap is set to 6. To process this trap properly, the NMS has to decode the
specific trap number that is part of the SNMP message. The default value is 1247.
Community
String
This field specifies the SNMP community name used in traps sent to this destination.
The default value is public.
OID
This field specifies the Object ID (OID). The default value is 1.3.6.1.4.1.2789.1247.1.
Enterprise
This field specifies the object identifier that uniquely identifies the Enterprise ID in the
MIB. The default value is 1.3.6.1.4.1.2789.
Type of Trap
Format
This field specifies the type of trap format. The default value is String.
Trap Sender
This field specifies the system where the SNMP agent that sends trap notifications to
the host and port that you specify. The default value is localhost, and should be
changed to the hostname or the IP address of the trap sender system if it is different
from the Sentral console.
Table 4. Console SNMP Configuration Fields
4. From the toolbar, click the Save button ( ). Click OK, and then click OK again to dismiss the
confirmation dialog boxes.
5. From the toolbar, click the Deploy SNMP Configuration ( ) button. Sentral displays the hosts to
which you can deploy the SNMP configuration.
6. Select the host or hosts to receive SNMP deployment.
7. Right-click a selected host and select Deploy SNMP Configuration. Click OK to dismiss the
confirmation screen. The SNMP configuration is deployed to the selected hosts.
16 Rev F 2.2.08.06.2014
Page 24

Important Configuration Settings for Sentral Server
NOTE:
In deployments using PCoIP devices, only use Sentral Server in Standalone mode. In this case:
the primary and secondary server IP address is the same, and
Server type is Standalone.
10.2 Email Notifications
The list below shows settings for email notifications sent from Sentral Server.
Alert Email Sender
Alert Email Sender Password
SMTP Server
SMTP Port
SSL Password Authentication
Email Group
10.3 Alert Frequency
The list below shows settings controlling how often deployed alerts are evaluated and how often
notifications are sent when they are triggered.
Alert Evaluation Interval (min)
Alert Firing Internal (hrs)
10.4 Server Type and Addresses
The list below shows settings that specify the IP address(es) of Sentral Server and indicate if the
environment contains a backup server.
Primary Server
Secondary Server
Server Type
10.5 Device Polling and Timeout
The following settings control the polling and timeout parameters for thin clients, host cards, and hosts.
The list below shows polling and timeout settings:
Thin Client Update Timeout (min)
Rev F 2.2.08.06.2014 17
Page 25

Sentral Quick Start Guide
Host Update Timeout (min)
Host Card Update Timeout (min)
Thin Client Health Update Interval (min)
Host Card Health Update Interval (min)
Host Card Health Update Interval (min)
The list below shows best practices:
Timeout values are always larger than update intervals.
ClearCube recommends setting polling and timeout values so devices can send two polls within the
timeout period.
10.6 FTP Server
The list below shows FTP server settings. The FTP server is used for updating firmware on PCoIP devices
and for pushing out software updates.
FTP Host
FTP User
FTP Password
10.7 Database Server
The list below shows Database Server settings. All data processed by the server is stored on the
database.
Database Server Name
Database User Name
Database User Password
Database Server Port
Database Type
10.8 Dashboard Refresh
The list below shows settings that control how frequently the Sentral dashboard refreshes and the
history (in number of hours) shown for average polls received by the server.
Dashboard Scale (hrs)
18 Rev F 2.2.08.06.2014
Page 26

Important Configuration Settings for Sentral Server
Figure 10. Time scale in graph specified in Dashboard Scale setting
Dashboard Refresh Time (min)
10.9 User Discovery
Sentral can discover users to map (or allocate) users to devices. The Discovery User Preference setting
determines if the users discovered allocations are part of the local machine (or imported directly into
database) or are part of a Domain. Select
Domain if Sentral user accounts are located in an Active Directory Domain
—OR—
Local if Sentral users are defined in a Sentral Database (see 14.6 “Adding Users to Sentral Database”
below for more information) or are Windows user accounts on the local computer.
10.10 Mapping User Type
This setting determines if users are imported into Sentral for allocation or reside in Active Directory.
10.11 Offline Node Notification
Select this option for Sentral to notify the administrator when a device goes offline.
10.12 I9400 Logoff and Session State
Change this option to True to stop a PCoIP session when a user logs off from a zero client. The default
setting, False, maintains the PCoIP session when a user logs off, which is the most common configuration.
Rev F 2.2.08.06.2014 19
Page 27

Sentral Quick Start Guide
10.13 Label Display in Chassis View
The Staggered Labels option specifies how C/Port, Host, and I/Port labels are displayed in chassis
graphical views (for example, in the C/Ports – Switching screen. Figure 11 below shows staggered C/Port
labels.
Figure 11. Staggered view of C/Port labels in R-Series chassis view
10.14 VMware View Connection Server Settings
Sentral can push out the IP address and settings of a VMware View server (such as port number, SSL
setting, and auto-connect options). From the Discovery Options screen, select View Connection Server
and then click Discover to push this information to zero clients.
Figure 12. Using discovery to push VMware View information to devices
20 Rev F 2.2.08.06.2014
Page 28

Important Configuration Settings for Sentral Server
10.15 IPMI-Enabled Server Discovery
This option discovers all IPMI-enabled servers on the network and populates them in the Sentral
hierarchical tree. Right-click menu options (such as Serial over LAN and power operations) are available
by right-clicking nodes in the hierarchical tree.
Figure 13. Discovering IMPI devices
10.16 Search Options
Sentral 6.9 has the ability to search for networked nodes within the hierarchical tree, the connection
brokering screen, and within the PCoIP Event Log Screen. This helps to find particular nodes faster.
10.17 Common Configurations: ServerConfiguration.xml File
This section describes common configurations made to Sentral Server’s ServerConfiguration.xml
file, which specifies many server settings.
10.17.1 Location
The default location of ServerConfiguration.xml is:
C:\Program Files\ClearCube Sentral\CMSServer\WEB-INF\configuration\properties
This location might be different depending on where you installed Sentral.
10.17.2 Displaying Login Screen on Zero Clients
This entry shows or hides the login screen displayed on zero clients. Credentials requested here are
Windows user account credentials.
<entry key="iport.hide.login.screen">false</entry>
Rev F 2.2.08.06.2014 21
Page 29

Sentral Quick Start Guide
The default value is true, which hides the zero client login screen. Setting the value to false displays the
zero client login screen.
11 Apply a Sentral License Key
Section 3 “Requesting a Sentral License,” above, shows how to request a Sentral license key from
ClearCube Support. After you receive the license key and install all Sentral components, apply the key as
shown in the steps below (these steps assume Sentral is installed on Windows 7).
1. Copy the license key from the email you received from ClearCube.
2. Start Sentral Console by running as administrator. Click Start > All Programs > ClearCube Sentral >
ClearCube Sentral Console, then right-click the second ClearCube Sentral Console menu item.
Figure 14. Starting Sentral Console
3. From the right-click menu, select Run as administrator, and then click Yes.
4. From the Sentral menu, click Setup > License Information.
5. Paste the license key in the dialog box (press CTRL+V), then click Submit.
6. A message is displayed about restarting Sentral Console. Click OK to automatically close Sentral
Console.
7. Start Sentral Console again as described above and log in.
Your Sentral license is now applied.
12 Server Log and Settings
Logging is enabled by default so you can monitor Sentral Server performance after installation. After
configuring server poll times, timeouts, and so on, ClearCube recommends turning logging off as
described below.
Sentral Server logs are either:
written to a SerntralServer.log file (log files are saved daily as a zip file with the name format
Server.log.YYYY-MM-DD, where YYYY is the year, MM is the month, and DD is the day).
—OR—
22 Rev F 2.2.08.06.2014
Page 30

Backups
Value
Description
true
Default value. Server logs are saved in a zip file as described above. See the previous section for
log location.
false
Server logs are displayed in an Apache Tomcat console, available only when starting Tomcat as
an application. This option is useful for troubleshooting. See 23.4 “Running Apache Tomcat as
an Application” below for information about launching Apache Tomcat as an application.
displayed in an Apache Tomcat Console
(The console is available only when starting Tomcat as an application instead of as a service.)
12.1 Log Location
The log file, SentralServer.log, is located in the C:\Program Files\ClearCube
Sentral\CMSServer\WEB-INF\configuration\log directory.
12.2 Specifying Log Destination: ServerConfiguration.xml
The console.system.out.appender entry in ServerConfiguration.xml specifies if log output is
written to SentralServer.log or is output to an Apache Tomcat Console.
Table 5. ServerConfiguration.xml and console.system.out.appender values
12.3 Turning off Logging
The steps below show how to stop logging (where logs are not written to SerntralServer.log or displayed
in Tomcat Console).
1. Set the console.system.out.appender entry in ServerConfiguration.xml to true (see the
previous section for instructions), and
2. Set logging level to OFF:
a. Edit log4j.xml in the following directory:
C:\Program Files\ClearCube Sentral\Tomcat\webapps\CMSServer\WEB-INF\classes
b. Change level value from DEBUG to OFF, as shown below:
<logger name="com">
<level value="OFF" />
<appender-ref ref="CSMSSERVER"/>
</logger>
13 Backups
The sections below discuss recommendations for backing up Sentral components.
Rev F 2.2.08.06.2014 23
Page 31

Sentral Quick Start Guide
echo OFF
TASKKILL /F /IM "javaw.exe"
NET STOP "tomcat7"
"C:\Program Files\MySQL\MySQL Server 5.5\bin\mysqldump" –u<USERNAME>
-p<PASSWORD> --result-file="\\NETWORK-LOCATION\FILE%date:/=%.sql" cms
NET START "tomcat7"
13.1 Backing up Sentral Server and Sentral Console
ClearCube recommends backing up Sentral Server and console after making all configurations.
From the C:\Program Files\ClearCube Sentral\ directory, back up the directories shown below:
ClearCube Sentral Console
Tomcat
13.2 Backing up Sentral Database Schema
ClearCube recommends creating an automated daily or weekly backup of the database schema.
You can create a batch file that gracefully stops the console and server, backs up the database, and then
restarts the Apache Tomcat service.
The example below is a script you can use with Windows Scheduler that backs up a MySQL database.
Example 1. A script to back up MySQL database
Save the script above as a .bat file and schedule it to run using Task Scheduler, included with Windows
operating systems.
You can then use MySQL restore commands to restore the database if needed:
mysql --verbose --user=USERNAME --password=PASSWORD CMS < /PATH/TO/backupfilename.SQL>
13.3 Backing up Virtual Machines and Snapshots
When Sentral is installed on a virtual machine, it is a best practice to create a snapshot after completing all
Sentral configurations. The snapshot enables you to return to a known instance if it is ever necessary.
Additionally, it is a best practice to create backups of the Sentral Server virtual machine on a regular basis.
14 Basic Operations
The sections below provide instructions for basic Sentral tasks and explain how to install the Sentral
Host Agent on hosts (physical and virtual compute devices) that Sentral manages.
24 Rev F 2.2.08.06.2014
Page 32

Basic Operations
NOTE:
Remember that hosts require a host agent; thin clients require a thin client agent. Zero clients
do not require the installation of agent software.
See 14.2 “Installing Sentral Thin Client Agent” on page 32 for information about installing a thin
client agent.
14.1 Installing Sentral Host Agent
The sections below show how to install Sentral Host Agent on compute devices in a Sentral
environment.
The Sentral host agent must be installed on each host (physical computer, blade, virtual machine, or
other computing device) that Sentral manages.
14.1.1 Windows Embedded Standard 7
This section shows how to install Sentral Host Agent on devices using the Windows Embedded Standard
7 operating system.
ClearCube recommends copying the host agent installer to the host or VM and installing it locally.
The Sentral host agent requires administrator privileges for installation. These steps assume you are
installing the host agent on a computer running a Windows 7 operating system. To install the Sentral
host agent on a host, perform the following steps:
1. Ensure that you:
Log in to the physical host or VM as an Administrator with installation privileges.
Open ports that Sentral requires for communication, specified in the table “Configuring network
ports” in Sentral Administrator’s Guide.
For VMs only: Install and configure VM host application and VMs according to product
documentation.
2. From the Sentral download, copy the Setup.exe installer from the Sentral host agent folder to the
host or VM.
3. Right-click Setup.exe and select Run as administrator to launch the host agent installer. User
Account Control displays a message. Click Yes. The installer displays the Host Agent welcome screen,
shown below.
Rev F 2.2.08.06.2014 25
Page 33

Sentral Quick Start Guide
Figure 15. The Host Agent installer welcome screen
4. Click Next to display the license agreement.
5. Accept the agreement and then click Next to display the Customer Information screen.
6. Complete the user name and organization fields, and then select the users for whom to install the
application. Click Next to display the Setup Type screen.
7. From the Setup Type screen, select the features to install. You can enable and disable features by
choosing the Custom Setup option.
ClearCube Sentral Host Agent (Mandatory) – Installs the host agent.
BMC (Mandatory for A-Series Blade PCs only) — A-Series blades contain a BMC, or baseboard
management controller. Be sure to select BMC if you are installing a host agent on an A-Series
blade.
VNC (Optional) – Installs TightVNC software that administrators can use to mirror desktops for
remote support and troubleshooting tasks.
After choosing the features to install, click Next.
26 Rev F 2.2.08.06.2014
Page 34

Basic Operations
NOTE:
You might need to move the host agent dialog box to see the TightVNC installer when it
starts.
Figure 16. Selecting host agent components to install
8. Click Install to begin Host Agent installation.
If you included the BMC feature and you are installing the host agent on a VM or any computer
other than an A-Series blade, a message is displayed indicating that hardware for the BMC driver is
not found. Click OK to proceed. BMC hardware is only found on A-Series blade PCs.
Figure 17. BMC driver message displayed when BMC is selected for installation on a non-A-Series blade
9. The installer displays the TightVNC Setup Wizard.
Click Next to continue installation.
Rev F 2.2.08.06.2014 27
Page 35

Sentral Quick Start Guide
Figure 18. TightVNC Setup Wizard
10. Click I Agree to continue.
11. Accept all default values and click Next until you reach the Select Additional Tasks screen.
12. Be sure to select all options in the Select Additional Task screen, shown below, and then click Next.
Figure 19. TightVNC Select Additional Tasks screen
13. The installer starts the TightVNC service and displays the Service Configuration screen. Specify a
password for service authentication and for the control interface. These passwords apply only to
VNC. Click Install.
14. The TightVNC installer shows that installation is complete. Click Next. The Completing TightVNC
Setup Wizard screen is displayed. Click Finish to close the TightVNC wizard.
28 Rev F 2.2.08.06.2014
Page 36

Basic Operations
NOTE:
PCoIP agent for thin clients does not support 32-bit operating systems.
15. The Sentral Host Agent setup completion screen is displayed. Click Finish to complete host agent
installation.
16. Restart the computer to complete installation. Click Yes to restart immediately or No to restart later.
Now that the host agent is installed on the device, you can perform a device discovery to begin
managing the host from the Sentral Console.
Remember to install thin client agents on any thin clients in your Sentral environment. See 14.2
“Installing Sentral Thin Client Agent” on page 32 for information.
14.1.2 Red Hat
®
Enterprise Linux® (RHEL)
This section shows how to install Sentral Host Agent on devices using Red Hat Enterprise Linux.
Dependencies for PCoIP support on 64-bit operating system
To support PCoIP technology on a thin client, you must install PCoIP Host Software on a thin client
before installing a Sentral Host Agent.
PCoIP Host Software is a collection of driver and applications that enable the operating system to
interact with PCoIP firmware. This software enables features such as local cursor and keyboard, locking
the computer when a session is terminated, and more.
The steps below show how to install PCoIP Host Software on 64-bit RHEL. These steps assume you are
working from a computer on the same network as the computer with the PCoIP host card.
1. From the x86_64 > PCoIP Agent folder in the Sentral download’s Host Agent folder, install the rpm
package using following command:
rpm -ivh pcoip_host-4.0-8.el6.x86_64.rpm
2. From a computer on the same network as the PCoIP host card, open the host card’s Web interface
(type the host card’s IP address in your browser’s address bar) and log in (passwords are blank by
default).
3. From the Configuration menu, select Host Driver Function.
4. Select Enable Host Driver Function, and then click Apply. A prompt appears to indicate that the
PCoIP process must be reset.
5. Click Reset and then click OK to schedule a deferred reset.
6. Restart the PCoIP host by restarting the computer.
Rev F 2.2.08.06.2014 29
Page 37

Sentral Quick Start Guide
You can now follow the steps below to install the Sentral Host Agent. See PCoIP System User’s Guide for
more information about zero client and host card interfaces and options.
Installing Sentral Host Agent
1. From the Sentral download, copy the host agent installer from the Sentral host agent folder to the
host or VM. Be sure the installer is for the appropriate operating system.
2. Change directory to the location of the installation rpm. Type the following command:
sudo rpm -ivh --nodeps BladeAgent-6.9.3-1.x86_64.rpm
3. A success message indicates that the installation is complete. Restart the computer.
Post Installation Dependencies
Run the Following Commands in the Terminal as super user.
1. Get Extra Packages for Enterprise Linux:
For i386 only:
wget http://dl.fedoraproject.org/pub/epel/6/i386/epel-release-6-8.noarch.rpm
For x86_64 only:
wget http://dl.fedoraproject.org/pub/epel/6/x86_64/epel-release-6-8.noarch.rpm
2. Enter the command:
sudo rpm -Uvh epel-release-6*.rpm;rm -rf epel-release-6*;
3. Enter the command:
yum -y install xrdp
4. Change directory:
cd /etc/rc.d/init.d/ && chkconfig --add xrdp
5. Enter the command:
chkconfig --level 2345 xrdp on
6. Restart the computer.
30 Rev F 2.2.08.06.2014
Page 38

Basic Operations
Uninstall
1. Enter the following command:
rpm -e BladeAgent
2. Restart the computer.
14.1.3 CentOS
®
Linux®
This section shows how to install Sentral Host Agent on devices using CentOS Linux.
Dependencies for PCoIP support on 64-bit operating system
To support PCoIP technology on a thin client, you must install PCoIP Host Software on a thin client
before installing a Sentral Host Agent.
See Dependencies for PCoIP support on 64-bit operating system
on page 29 for instructions, then continue to the CentOS installation section below.
Pre-Installation Dependencies
From a terminal, enter the commands below as super user.
1. Get Extra Packages for Enterprise Linux:
For i386 only:
wget http://dl.fedoraproject.org/pub/epel/6/i386/epel-release-6-8.noarch.rpm
For x86_64 only:
wget http://dl.fedoraproject.org/pub/epel/6/x86_64/epel-release-6-8.noarch.rpm
2. Enter the command:
sudo rpm -Uvh epel-release-6*.rpm;rm -rf epel-release-6*;
3. Enter the command:
yum -y install xrdp
4. Change directory:
cd /etc/rc.d/init.d/ && chkconfig --add xrdp
5. Enter the command:
chkconfig --level 2345 xrdp on
Rev F 2.2.08.06.2014 31
Page 39

Sentral Quick Start Guide
Install
1. Enter the command:
rpm -ivh -- BladeAgent-6.9.3-1.x86_64.rpm
2. Restart the computer.
Uninstall
1. Enter the command
rpm -e BladeAgent
2. Restart the computer.
14.1.4 Ubuntu
This section shows how to install Sentral Host Agent on devices using Ubuntu® Linux.
Pre-Installation Dependencies
From a terminal, enter the commands below as super user.
1. sudo apt-get update
2. sudo apt-get install xrdp
Install
From a terminal, enter the commands below as super user.
1. dpkg -i BladeAgent-6.9.3-1.x86_64.rpm
2. Restart the computer.
Uninstall
1. apt-get remove bladeagent
2. Restart the computer.
14.2 Installing Sentral Thin Client Agent
Thin clients require the Sentral thin client agent to enable Sentral to manage them. Install the Sentral
thin client agent on each thin client that Sentral manages. Sentral includes installers for Windows®
Embedded Standard 7 and for Linux®.
32 Rev F 2.2.08.06.2014
Page 40

Basic Operations
NOTE:
Zero clients using PCoIP technology do not require a thin client agent.
NOTE:
If you are using clients that run a Linux operating system, consult the documentation
included in the installation media for Linux thin client agent installation instructions.
If the thin clients in your enterprise have pre-installed Sentral thin client agents, you do not need to
install or re-install the thin client agent.
14.2.1 Windows Operating Systems
The steps below show how to install a thin client agent locally on a single thin client on a Windows
Embedded Standard 7 operating system.
1. Ensure that you:
Log in to the thin client as an Administrator with installation privileges.
Uninstall any Sentral software that is currently installed on the thin client.
Open ports that Sentral requires for communication. These are shown in the table “Configuring
network ports” in Sentral Administrator’s Guide.
Attach any necessary peripherals to the thin client (including a keyboard, mouse, monitor, and
optionally a mass storage device).
2. If applicable, turn off or disable the thin client’s write filter.
Ensure that the thin client has enough space to install the thin client agent. This might require
deleting items or moving items to another location, such as a network share.
3. From the thin client folder in the Sentral download, copy the setup.exe installer to the thin client.
Choose the installer appropriate for your operating system.
4. Right-click setup.exe and select Run as administrator to launch the thin client agent installer.
5. User Account Control displays a message. Click Yes. The installer displays the Thin Client Agent
welcome screen, shown below.
Rev F 2.2.08.06.2014 33
Page 41

Sentral Quick Start Guide
Figure 20. Thin Client Agent welcome screen
6. Click Next to display the license agreement.
7. Accept the agreement and then click Next to display the Customer Information screen.
8. Complete the User Name and Organization fields, and then select the users for whom to install the
application. Click Next to display the Setup Type screen.
9. From the Setup Type screen, select the features to install. You can include and remove features by
choosing the Custom option.
ClearCube Sentral Thin Client Agent (Mandatory) – Installs the thin client agent.
VDIworks VideoOverIP (Optional) — A remote desktop connection protocol.
VNC (Optional) – Installs TightVNC software that administrators can use to mirror desktops for
remote support and troubleshooting tasks.
34 Rev F 2.2.08.06.2014
Page 42

Basic Operations
NOTE:
If you have a Primary Sentral Server only, enter the same values in the Primary and
Secondary fields. The value here must be the same as the value you specified
during Sentral Server installation.
NOTE:
You might need to move the host agent installation dialog box to view the
TightVNC installer.
Figure 21. Selecting Thin Client Agent components to install
After choosing features to install, click Next.
10. Enter the IP address or hostname of the Sentral Primary Server and Secondary Server. The
default value is the hostname of the computer on which you are installing the host agent.
Click Next.
11. Click Install to start installation. The installer displays a progress bar and status information.
12. For TightVNC installations only: Follow the steps below if you chose to install the VNC feature. If
you did not choose to install the VNC feature, skip to step 13.
a. From the TightVNC installation dialog box, click Next.
b. Click I Agree.
c. From the Choose Components dialog box, ensure all options are selected and click Next.
d. Specify and installation directory or accept the default and click Next.
e. Select the Start Menu options and click Next.
f. Be sure to select all options in the Select Additional Task screen, shown below, and then
click Next.
Rev F 2.2.08.06.2014 35
Page 43

Sentral Quick Start Guide
Figure 22. TightVNC Select Additional Tasks screen
g. The installer starts the TightVNC service and displays the Service Configuration screen.
Specify a password for service authentication and for the control interface or clear the
options to remove password requirements. These passwords apply only to VNC. Click Install.
h. The TightVNC installer shows that installation is complete. Click Next. The Completing
TightVNC Setup Wizard screen is displayed. Click Finish to close the TightVNC wizard.
13. The Sentral Thin Client Agent setup completion screen is displayed. Click Finish to complete Thin
Client Agent installation.
14. Restart the thin client to complete installation. Click Yes to restart immediately or No to
restart later.
15. Optionally, if you moved any data to a network share or other location, move the data back to
the thin client.
16. If applicable, turn on or enable the write filter.
Now that the Thin Client Agent is installed on the device, you can perform a device discovery to
begin managing the host from the Sentral Console.
14.2.2 Linux-Based Operating Systems
The sections below show how to install the Sentral Thin Client Agent on thin clients that run Linux-based
operating systems.
14.2.2.1 Ubuntu
®
and Raspbian
The steps below show how to install and uninstall the Thin Client Agent package for Ubuntu and
Raspbian.
36 Rev F 2.2.08.06.2014
Page 44

Basic Operations
NOTE:
If you have a Primary Sentral Server only, enter the same values in the Primary and
Secondary fields. The value here must be the same as the value you specified
during Sentral Server installation.
To install:
1. From the thin client folder in the Sentral download, copy iport_6.9.3.deb to the thin client. Choose
the file appropriate for your operating system.
2. Open a terminal window and change directory to the location of the iport_6.9.3.deb file.
3. Enter the command:
sudo dpkg -i iport_6.9.3.deb
4. From the pop-up dialog box, enter the IP address or hostname of the Sentral Primary Server and
Secondary Server. The default value is the hostname of the computer on which you are installing
the host agent.
5. Reboot the thin client.
To uninstall:
7. Open a terminal window and change directory to the location of the iport_6.9.3.deb file.
8. Enter the command:
sudo apt-get remove iport
9. Reboot the thin client.
14.3 Device Discovery
Before you can perform any Sentral operations, you must discover your devices (zero clients, host
blades, host cards, users, and more).
The steps below show how to perform a discovery from the Sentral menu.
1. Click Setup > Run Discovery.
2. Create a subnet range by right-clicking an empty space and selecting New Subnet.
3. Complete the fields and click the Save icon.
4. Right-click the subnet entry and select Device Discovery.
5. Select one or more device types to discover (such as Sentral Host Machines and PCoIP-enabled
Devices, Managed Mode).
6. The discovery process can be lengthy. Be sure to allow the discovery to complete. Note that the
discovery process additionally configures devices to poll Sentral Server.
Rev F 2.2.08.06.2014 37
Page 45

Sentral Quick Start Guide
NOTE:
From the Management > Configuration screen, ensure that the Discovery User Preference is
set appropriately for your environment. Select Domain when you are using Active Directory in
your environment, otherwise, select Local.
When the discovery process is complete, all discovered devices are displayed in the hierarchical tree.
14.4 Creating Groups and Subgroups (Required for All
Management Tasks)
Devices and users must be in a Sentral group to perform management tasks on them. To create a group:
1. Right-click CCT node in the hierarchical tree on the left portion of the screen.
2. Select Add Group.
3. Complete the group name fields and then click Add Group.
4. Optionally, to create a subgroup, right-click a group and perform the steps above.
14.5 Renaming I/Ports (Zero Clients)
For ease of management, it is a best practice to rename I/Ports (zero clients and thin clients) with an
alias that allows you to quickly identify them. For example, an alias could be the I/Port’s desk or user
location.
To rename I/Ports (zero clients):
1. From the hierarchical view on the left portion of the screen, right-click an I/Port.
2. Select Rename Device.
3. Specify a new name and click OK.
14.6 Adding Users to Sentral Database
The sections below show how to add users to Sentral Database.
14.6.1 Adding a User
1. From the main menu, click Setup > Configuration.
2. Click the Add User icon ( ).
3. In the User Name field, specify the user name to add and select a Security Group to associate it with.
4. Click Save.
5. Click Management > Groups.
38 Rev F 2.2.08.06.2014
Page 46

Basic Operations
NOTE:
If you do not already have a group specified for users, create one from the hierarchical
tree by right-clicking the CCT group, selecting New Group, and specifying a name.
NOTE:
You can use this method to add users through batch scripts.
6. Right-click the group to which you are adding users and select Manage User Group.
7. On the Connection Brokering – User Groups (New) screen, select the group again, right-click, and
select Add User.
8. From the Group Name list, select Users. All users in the group are displayed.
9. Select the user you want to add, and then select the group you want to add the user to.
10. Click the Add User icon ( ).
The user is displayed in the selected group in the hierarchical tree and is now available for allocation to
devices.
14.6.2 Adding Large Numbers of Users
You can add large numbers of users by creating user records directly in the Sentral Database.
The high-level instructions below assume your Sentral Database is a MySQL database.
Figure 23. Adding users directly through Sentral Database
Rev F 2.2.08.06.2014 39
Page 47

Sentral Quick Start Guide
1. From the Sentral Database, open the discovereduser table.
2. Add a new record for each user in the format: Username, SecurityGroups, DomainName, TypeID.
For Sentral Database, use the values shown below, where User Name is the name of each user:
User Name, Users, Local, 5
3. Perform steps 5 to 10 as shown in the previous procedure.
40 Rev F 2.2.08.06.2014
Page 48

Creating User-Based Allocations
NOTE:
To allocate devices they must be in a group as shown in 14.4 “Creating Groups and Subgroups”
above.
NOTE:
The zero client and the blade must be allocated to perform this procedure.
15 Creating Device-Based Allocations
The steps below show how to allocate clients to blades (a zero client to a blade in this example).
1. From the Sentral menu, click Connection Brokering > Allocation.
2. Click the Thin Client tab.
3. From the pane on the left, select the zero client you want to allocate (listed in the Hostname
column). From the pane on the right, select the host (blade) to which to allocate the zero client.
4. Click Allocate, located on the bottom of the screen. The devices are now allocated.
5. Optionally, to delete the allocation, select the zero client or the blade and click Delete Current
Allocation(s) at the bottom of the device selection pane.
Perform the same process to allocate zero clients or thin clients to virtual machines.
16 Administrator-Instantiated PCoIP Sessions
When performing device-based allocations, administrators can remotely create a PCoIP session from
Sentral Console.
1. From the Sentral menu, click Connection Brokering > Allocation.
2. From the Connection Brokering screen, select the zero client and the blade that are allocated.
3. Click the Connect button at the bottom of the screen to create a PCoIP session. (If a session is not
created, ensure that the devices are allocated to each other).
17 Creating User-Based Allocations
The steps below show how to allocate a user to a blade. Perform similar steps to allocated users to
virtual machines.
1. From the Sentral menu, click Connection Brokering > Allocation.
2. Click the Users tab.
3. From the pane on the left, select the user (listed in the Hostname column) you want to allocate.
From the pane on the right, select the blade to which to allocate the user.
4. Click Allocate, located on the bottom of the screen. The user and blade are now allocated.
5. To delete the allocation, select the user or the blade and click Delete Current Allocation(s) at the
bottom of the device selection pane.
Rev F 2.2.08.06.2014 41
Page 49

Sentral Quick Start Guide
NOTE:
Disconnecting devices ensures that the zero clients do not have active PCoIP sessions.
NOTE:
Before you begin, ensure you have
created a group called updates (this is the name used below; however, you can use any name)
placed the host agent update package (Softwareupdate.zip) and answer file in a
directory you can access from Sentral Console.
18 Orchestrating User Moves
The steps below show how to move users from one desk to another using device-based allocation.
Before you begin:
Obtain the MAC addresses of the zero client the user is currently using and of the zero client they will be
moving to. MAC addresses are shown on a label on the zero client.
1. From the Connection Brokering > Allocation screen, right-click the zero client (listed in the
Thinclient column) and select Disconnect device. (Use the MAC address to help identify the device.)
2. Right-click the zero client that the user is moving to and select Disconnect device.
3. From the user’s new zero client, ask them to enter their user name and click Connect. The zero
client display shows the allocated device.
4. Ask the user to click Connect again. The PCoIP session starts.
19 Updating Sentral Host Agent Software
Sentral can update the host agent installed on blades from version 6.5 to version 6.9. From Sentral
Console you can deploy a package (including the host agent and an answer file) to large groups of
devices at the same time.
The steps below show how to update host agent software.
1. From the hierarchical tree, drag the blades you are updating the updates group.
2. From the menu, click Management > Hosts > All Hosts.
3. Right click in an empty space and select Update Host Agent Group.
Figure 24. Selecting the Update Host Agent Group option
42 Rev F 2.2.08.06.2014
Page 50

Updating Sentral Host Agent Software
4. Right-click the group that you want to update (in this example, the update group) and select New
Update.
Figure 25. Selecting the New Update option
5. Select the SoftwareUpdate.zip package and the ans.run file from the applicable directory.
Figure 26. Selecting the Software Update and answer files
6. Click the Schedule Time icon ( ) to display the Time Date Management screen.
7. Specify an update time 15 minutes in advance to ensure that the console has enough time to upload
the package to the FTP server. Click the Save icon.
8. Click the Update icon ( ) to start uploading to the FTP server.
Results and Notes:
A confirmation message is displayed once the files are uploaded.
After uploading is complete, Sentral sends a request to each device in the group to download the
files from the FTP server. Thereafter, the update process is silent.
When the update process is complete, restart each computer to complete the installation.
After each devices polls Sentral, the new host agent version is displayed in Sentral Console.
Rev F 2.2.08.06.2014 43
Page 51

Sentral Quick Start Guide
NOTE:
Before you begin, ensure you have
created a group called updates and dragged the devices you want to update to this group
(“updates” is the group name used below; however, you can use any name)
placed the PCoIP firmware in a directory you can access from Sentral Console.
20 Firmware Update Process
The sections below show how to update PCoIP firmware for PCoIP host cards and PCoIP zero clients.
20.1 Uploading Files
The steps below show how to upload firmware update files to the Sentral FTP Server.
1. From the Sentral menu, access the devices you are updating.
For blades and host cards: click Management > Hosts > PCoIP Hosts.
—OR—
For zero clients: Click Management > Thin Client > PCoIP Thin Clients.
2. Right-click an empty space in the screen and then select PCoIP Firmware Update.
3. Right-click the update group and select New Update. The devices that you dragged to the group are
listed in the text box.
4. Click Browse to navigate to the firmware file.
5. Click Upload ( ). The file is uploaded to the FTP server.
A confirmation message is displayed once the files are uploaded.
Sentral then sends the firmware update command to each device.
20.2 Monitoring Progress and Restarting Devices
The steps below show how to use the PCoIP Event Log to monitor update progress and restart devices to
complete the update process.
1. From the Sentral menu, click Reports > PCoIP Event Log. Monitor progress from this screen.
2. The PCoIP Event Log displays the message FirmwareupdatedSuccessfully when the update
process is complete.
3. Be sure to wait for an additional 10 minutes to ensure that the process completes gracefully.
4. Restart devices.
For blades and host cards: Restart blades by removing them from the chassis and re-inserting
them. Ensure that they power on either automatically or by pressing the power button.
—OR—
For zero clients: Power off and then power on the zero client.
44 Rev F 2.2.08.06.2014
Page 52

Right-Click Menu Options from Hierarchical Tree
Menu Option
Description
Change Mode to Managed
Sets the host card to poll to Sentral Server
Change Mode to Unmanaged
Clears Sentral Server IP address from the host card
Advance PCoIP Configuration
Displays the Web interface for host card configuration
Restart
Performs an OS restart on the blade
Shutdown
Performs an OS shut down on the blade
Rediscover
Rediscovers the blade OS (does not affect the host card)
21 Right-Click Menu Options from Hierarchical Tree
You can right-click hosts and zero clients in the hierarchical tree shown on the left side of Sentral
Console (as shown in Figure 27 and Figure 28). Right-click menus display common management options.
The sections below explain frequently-used right-click menu options.
21.1 Blade with PCoIP Host Card
The table below describes commonly-used right-click menu options for blades with PCoIP host cards.
Table 6. Right-click menu options for blades with host cards
Figure 27. The right-click menu for blades with PCoIP host cards
Rev F 2.2.08.06.2014 45
Page 53

Sentral Quick Start Guide
Menu Option
Description
Change Mode to
Managed
Sets the zero client to poll to Sentral Server and enable connection brokering.
Change Mode to
Unmanaged
Zero client does not poll Sentral Server (for deployments using unmanaged
connections).
Rename Device
Allows you to create an alias for the zero client.
Reset Device
Power cycles the zero client.
Disconnect Device
Disconnect a zero client’s active session (see 18 “Orchestrating User Moves”
above for a usage example).
Set Peer
Enables you to set the IP address of a peer host card (especially for deployments
that do not use connection brokering). If using this option, set the zero client to
unmanaged mode.
Clear Peer
Clears the peer address if it is present on the zero client.
Rediscover
Rediscovers the zero client and sets it to managed mode.
21.2 Zero Clients
The table below describes the zero client right-click menu options that are commonly used.
Table 7. Zero client right-click menu options
Figure 28. The zero client right-click menu options
46 Rev F 2.2.08.06.2014
Page 54

Creating Custom Views in Sentral
22 Creating Custom Views in Sentral
Administrators can create custom views to filter data shown in the console.
Figure 29. The View menu with custom views
The default view in Sentral shows all devices. By creating customized views you can reduce the amount
of information that Sentral Console displays. Custom views can
simplify data management on screen
enable administrators to assess targeted information quickly, and
improve console performance.
The steps below show how to create views.
Before you begin:
You will add one or more groups to a view in the steps below, so be sure to have groups defined before
creating a view. See 14.4 “Creating Groups and Subgroups” above for instructions about creating
groups.
1. From the Sentral menu, click Management > Views.
2. From the Defined Views area in the upper portion of the screen, right-click an empty space and
select Add new View.
Rev F 2.2.08.06.2014 47
Page 55

Sentral Quick Start Guide
Figure 30. Right-click and select Add new View
3. Give the view a name in the View Name field.
4. Select the group(s) that you want to include in the view (you can SHIFT-click and CTRL-click to select
multiple groups).
Figure 31. Selecting groups to include in a custom view
5. Click the right arrow to move the groups you are including in the view the right panel.
6. Click the Save button. Sentral displays the New view has been added message.
7. Click OK. The view is now available from the View drop-down menu in the upper-right portion of the
console (see Figure 29 above).
48 Rev F 2.2.08.06.2014
Page 56

Troubleshooting
NOTE:
ClearCube recommends exiting the console when you have finished using the console rather
than leaving it running.
NOTE:
See ClearCube Sentral training documentation and Sentral Administrator’s Guide for additional
troubleshooting information.
NOTE:
Ensure that you do not run Tomcat as a service and as an application at the same time. This can
cause unsupported behavior.
23 Troubleshooting
The sections below provide troubleshooting steps and suggestions.
23.1 Console Response Issues
If Sentral Console does not respond to mouse clicks, you might need to restart Sentral Console. From the
Windows operating system Task Manager’s Processes tab, find the javaw.exe process and click End
Process.
23.2 Server Performance Is Slow or Server Is Not Responding
Restart Sentral Server (depending on your environment, either ClearCube Tomcat service or IIS Admin
Service). From the Windows Start menu Search bar, type services.msc and press Enter). From the
Services panel, select the service and click Restart.
Depending on your environment, you might find it necessary to occasionally restart the server service. In
addition to restarting the service from Services panel (services.msc), you can automate restarts using
Windows Task Scheduler (for example, restart the service on a daily basis).
23.3 Sentral Errors and Messages
If you encounter Sentral errors, turn on logging (as described in 12 “Server Log and Settings” above) and
send ClearCube server logs.
23.4 Running Apache Tomcat as an Application
For deployments using Apache Tomcat, you can assist troubleshooting steps by running Apache Tomcat
as an application instead of as a service (the default mode).
1. As mentioned above, ensure that Tomcat service is stopped.
2. Navigate to the C:\Program Files\ClearCube Sentral\Tomcat\bin\ directory.
Rev F 2.2.08.06.2014 49
Page 57

Sentral Quick Start Guide
3. Right-click tomcat7.exe and select Run as administrator.
4. From the User Account Control dialog box, click Yes to open the console.
50 Rev F 2.2.08.06.2014
Page 58

Inportant Account Information
Sentral Server
Hostname
Domain
User Account on Computer Running Sentral Server
User Name
Password
Domain
Sentral Account Details
Built-in CCT Account
User Name
Password
Domain
(CCT by Default)
User Account on Computer Running Sentral Console (Local System Account)
User Name
Password
Domain
Sentral Database
Database Type
(MySQL, MS SQL)
Database
Version
— Continued Below —
CCT
MySQL
24 Important Account Information
Use the table below to record important Sentral-related account information.
Rev F 2.2.08.06.2014 51
Page 59

Sentral Quick Start Guide
P/N G0200153
Rev 1.0.06.20.2012
Sentral Database (continued)
User Name
Password
Sentral Server ClearCube Tomcat Service Account
Not applicable if your deployment uses Internet Information Services (IIS)
User Name
Password
Micrsoft Internet Information Services (IIS) Account
Not applicable if your deployment uses Apache Tomcat
User Name
Password
Sentral Email Account
Sender
Receiver
SMTP Server
Port
SSL Password
Sentral FTP Server
FTP Server is typically installed on the same computer as Sentral Server.
FTP Host
FTP User Name
FTP Password
52 Rev F 2.2.08.06.2014
Page 60

This Page is Intentionally Blank
Page 61

Rev F 2.2.08.06.2014
P/N G0200153
www.clearcube.com
 Loading...