

Page 1
I8442 I/Port
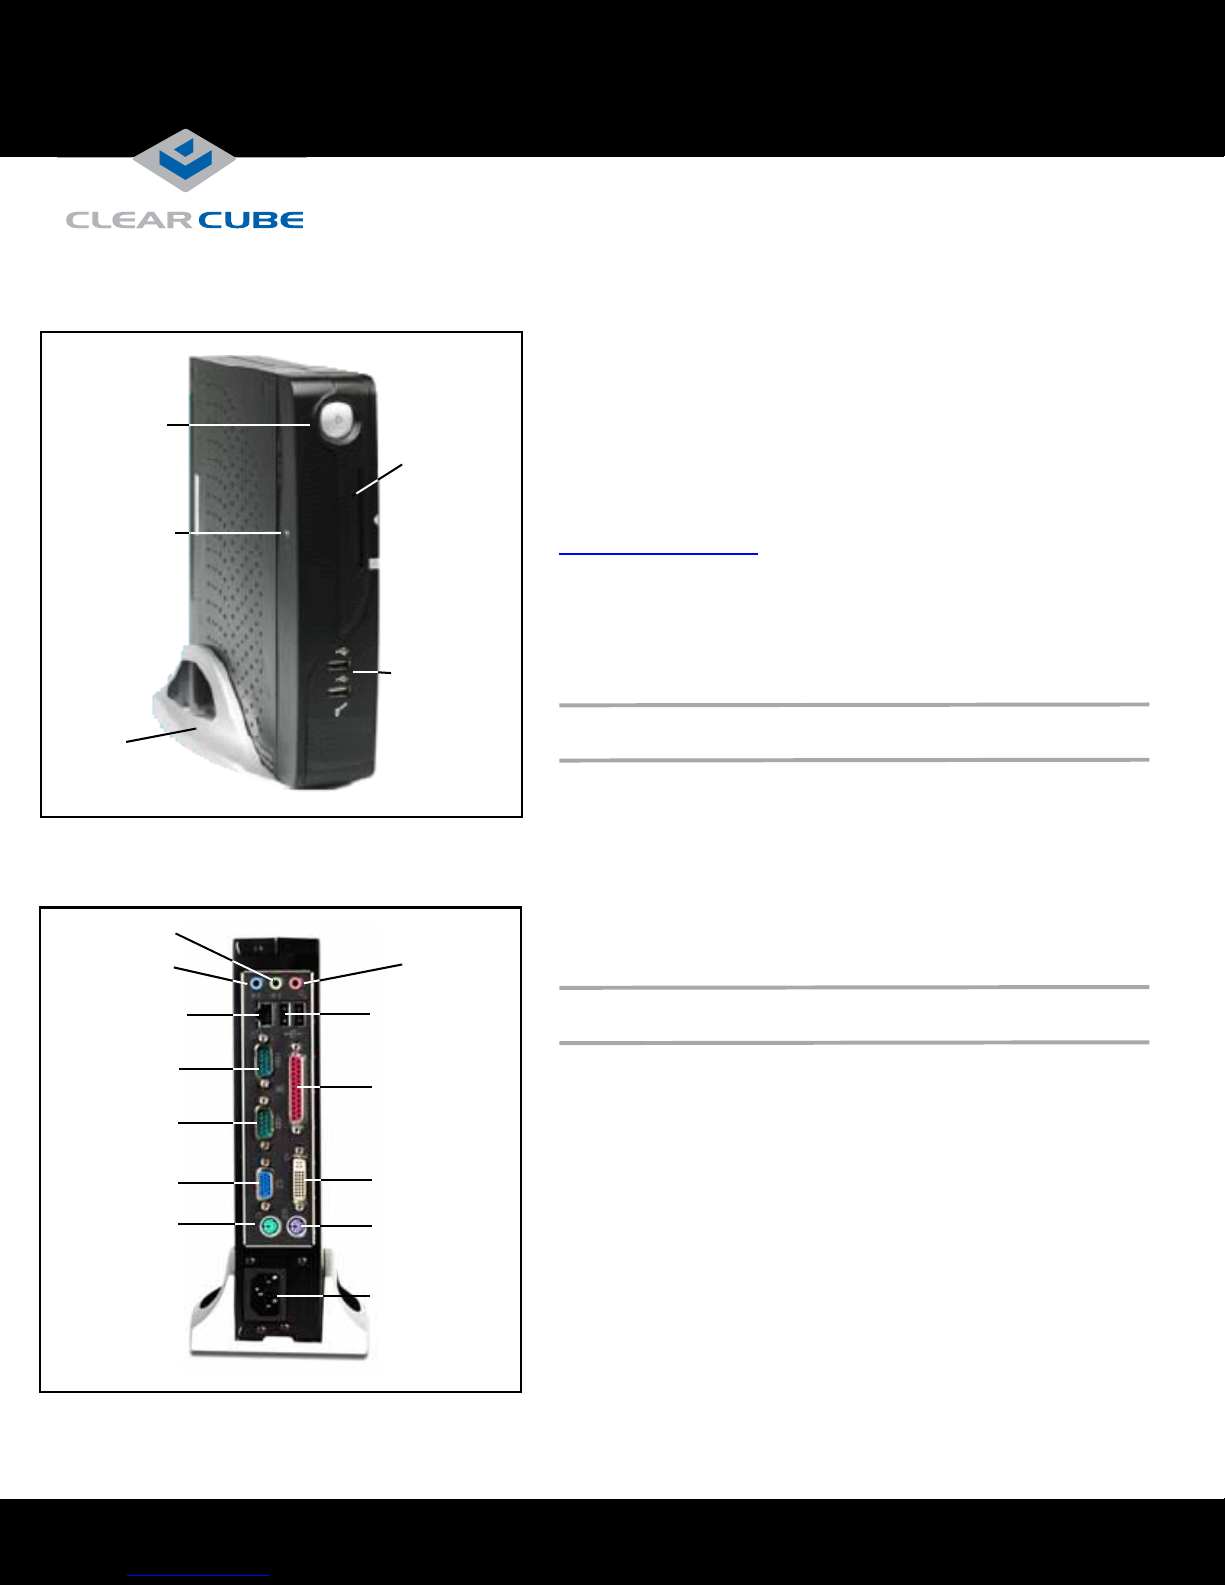
Power Button
Wireless Local
Loop Indicator
(WLL Optional
Feature)
Quick Start Guide
Smartcard
Reader
(Optional Feature)
USB 2.0 Ports
ClearCube® I8442 I/Ports are thin clients that enable users to
access remote computing devices, such as ClearCube blades or
other computing resources.
The I8442 package contains:
• I8442 I/Port thin client
• I8442 pedestal
• This quick start guide
• Mouse (if ordered; consult your shipping invoice)
• Power cord appropriate for your country
This guide describes how to set up the I8442 I/Port thin client. See
support.clearcube.com
for the following additional information:
• Sentral User’s Guide describes how to use ClearCube Sentral
to manage thin client connection brokering.
• XLmanage Installation Guide and XLmanage User’s Guide
describe how to perform basic I8442 configuration and
administration tasks.
Pedestal
Line Out
Line In
10/100/1000
Mbps Ethernet
COM Port 2
COM Port 1
VGA
PS/2 Mouse
Microphone
USB 2.0 Ports
Parallel Port
DVI-I
PS/2 Keyboard
AC Power In
Safety and Precautions
• Do not install the thin client in areas where it can become wet
or be exposed to water.
• Only use the power cord shipped with the thin client.
• Ensure there is four inches of space surrounding the thin client.
Inadequate ventilation can damage the unit.
• Ensure the thin client is always vertical and inserted in the
included pedestal.
Setting up Your I8442 Thin Client
1. Carefully unpack the I8442 and components. Ensure that you have
the following items:
• Power cord included with the thin client
• Mouse to connect to the I8442
• Keyboard to connect to the I8442
• Monitor to connect to the I8442
2. Place the I8442 on a desktop.
3. Connect a keyboard and moue to the thin client. As shown in the
figures, USB ports are located on the front and rear of the I8442
and PS/2 ports are located on the rear.
4. Establish a network connection between the thin client and the
remote computing device by performing one of the following:
– Connect the network cable (RJ-45) to the Ethernet port on
the rear of the thin client.
ClearCube Technology 8834 Capital of Texas Hwy N Austin, Texas 78759 voice 512 652 3500 www.clearcube.com
—OR—
Page 2

– Optionally, establish a Wireless Local Loop LAN
connection (not available on all models).
5. Optionally, connect a printer to the I8442 using a USB port
or the parallel port on the rear of the thin client.
6. The I8442 supports one or two monitors with one VGA
port and one DVI-I port on the rear of the device. Connect
a primary monitor to the VGA port. Optionally , connect a
second monitor to the DVI-I port by performing one of the
following steps:
– Connect a DVI monitor to the DVI-I port using the
cable that came with your DVI monitor.
– Connect a VGA monitor as described in
“Connecting a VGA Monitor to the DVI-I Port.”
7. Connect the power cord (included with the I8442) to the
AC socket on the rear of the thin client, and then plug the
power cord into an AC power outlet.
8. Power on the thin client by gently pressing the power
button on the front of the I8442.
Making OS-Level Changes
I844x-series thin clients provide an Enhanced Write Filter
(EWF) to enable administrators to easily apply and remove
OS-level changes to the thin client. To make OS-level
changes you must:
• Log in as administrator.
• Commit changes from the EWF manager.
Log in as administrator
1.
From the Windows XPe desktop, click
display the Log Off Windows dialog box.
2. Simultaneously press and hold the SHIFT key and click
Log Off to display the Log In screen.
3. Log in as user administrator and use password
Administrator.
Start > Log Off
to
Connecting a VGA Monitor to the DVI-I Port
These steps assume a VGA monitor is connected to the
I8442 VGA port, and you are adding a second VGA monitor
to the DVI port using a VGA monitor cable and a DVI-toVGA adapter.
Ensure the I8442 is powered on.
1.
2. Log in to the I8442 as administrator as described above.
3. Power on the secondary VGA monitor. Connect the VGA
cable to the monitor and connect the DVI-to-VGA adapter
to the I8442 DVI-I port.
4. Right-click the desktop and select Properties. Then select
the Settings tab.
5. Select the secondary monitor (indicated by the number 2),
and then click Advanced on the lower right portion of the
screen.
6. Select the S3Display tab.
7. Select the CRT 2 option, then click OK. Click OK to
confirm your choice, then click Yes to keep the new
settings.
8. On the Settings tab, select the secondary monitor.
9. Select Extend my Windows desktop onto this monitor
and then click Apply.
10. Specify a resolution and color quality for the secondary
monitor and, if necessary , select the appropriate orientatio n
to match the physical placement of the monitors. Click
Apply and then click OK.
See I/Port User’s Guide on support.clearcube.com for more
information.
Email: support@clearcube.com
Web site: support.clearcube.com
Toll-free: (866) 652-3400
Phone: (512) 652-3400
Commit changes from EWF manager
1.
Ensure you are logged in as the administrator user. From the
Windows XPe desktop, click
Administrative Tools > EWF manager
Start > Control Panel >
.
2. Select Commit in the Commit Writes portion of the screen.
3. Click Yes and then follow prompts to restart the thin client.
ClearCube Technology 8834 Capital of Texas Hwy N Austin, Texas 78759 voice 512 652 3500 www.clearcube.com
In the European Union, this
WEEE Disposal Guidelines
electronic product falls under the
European Directive (2002/96/EC)
WEEE. When it reaches the end
of its useful life or is no longer
wanted, dispose of at an
approved designated recycling or
treatment facility.
Check with your local authorities
for proper disposal instructions.
For assistance, contact
ClearCube at
RoHS
G0200114 Rev B
 Loading...