

Page 1

Grid Center 4.11
Administrator’s Guide
ClearCube Technology, Inc.
Page 2

Copyright © 2005, ClearCube Technology, Inc. All rights reserved.
Under copyright laws, this publication may not be reproduced or transmitted in any form, electronic or mechanical,
including photocopying, recording, storing in an information retrieval system, or translating, in whole or in part,
without the prior written consent of ClearCube Technology, Inc.
This information is subject to change without notice and ClearCube shall not be liable for any direct, indirect,
special, incidental or consequential damages in connection with the use of this material.
Trademarks
ClearCube™, C3 Architecture™, Blade Switching BackPack™, PC Blade™, and C/Port™
are trademarks of ClearCube Technology Inc. Product and company names mentioned herein
are trademarks or trade names of their respective companies.
Patents
The ClearCube Architecture and its components described in this user manual
are protected by numerous granted and pending U.S. and international patents.
Granted patents include: US06020839, US06012101, US05994952, US05966056, US05926172, US06167241,US06148182,
US06119146, US06038616, US06385666, and US06037884. Inquiries regarding patented technology should be directed to
Revision Date: 1-31-2005, based on ClearCube Grid Center release 4.1.8
ClearCube Corporate Headquarters.
Page 3

Contents
Contents. . . . . . . . . . . . . . . . . . . . . . . . . . . . . . . . . . . . . . . . . . . . . . . . . . . . . . . . . . . . . . . i
Figures . . . . . . . . . . . . . . . . . . . . . . . . . . . . . . . . . . . . . . . . . . . . . . . . . . . . . . . . . . . . . . . iii
Introduction . . . . . . . . . . . . . . . . . . . . . . . . . . . . . . . . . . . . . . . . . . . . . . . . . . . . . . . . . . . 1
ClearCube Grid Center 4.11. . . . . . . . . . . . . . . . . . . . . . . . . . . . . . . . . . . . . . . . . . . . 1
New Features . . . . . . . . . . . . . . . . . . . . . . . . . . . . . . . . . . . . . . . . . . . . . . . . . . . . . . . 1
Management Capabilities in Grid Center . . . . . . . . . . . . . . . . . . . . . . . . . . . . . . . . . . 2
Packaging. . . . . . . . . . . . . . . . . . . . . . . . . . . . . . . . . . . . . . . . . . . . . . . . . . . . . . . . . . 3
Migrating Grid Center Data . . . . . . . . . . . . . . . . . . . . . . . . . . . . . . . . . . . . . . . . . . . . 4
Grid Center Installation . . . . . . . . . . . . . . . . . . . . . . . . . . . . . . . . . . . . . . . . . . . . . . . . . . 5
Installing Grid Center 4.11 . . . . . . . . . . . . . . . . . . . . . . . . . . . . . . . . . . . . . . . . . . . . . 6
Installing Components Individually. . . . . . . . . . . . . . . . . . . . . . . . . . . . . . . . . . . . . . 12
Migrating Discovery Lists . . . . . . . . . . . . . . . . . . . . . . . . . . . . . . . . . . . . . . . . . . . . . 13
Uninstalling Grid Center . . . . . . . . . . . . . . . . . . . . . . . . . . . . . . . . . . . . . . . . . . . . . . 14
Grid Center Console . . . . . . . . . . . . . . . . . . . . . . . . . . . . . . . . . . . . . . . . . . . . . . . . . . . 17
Launching the Administration Console. . . . . . . . . . . . . . . . . . . . . . . . . . . . . . . . . . . 18
Logging in for the First Time. . . . . . . . . . . . . . . . . . . . . . . . . . . . . . . . . . . . . . . . . . . 18
Take a Tour . . . . . . . . . . . . . . . . . . . . . . . . . . . . . . . . . . . . . . . . . . . . . . . . . . . . . . . 19
Grid Center Clients. . . . . . . . . . . . . . . . . . . . . . . . . . . . . . . . . . . . . . . . . . . . . . . . . . . . . 25
I/Port Client. . . . . . . . . . . . . . . . . . . . . . . . . . . . . . . . . . . . . . . . . . . . . . . . . . . . . . . . 25
Blade Client . . . . . . . . . . . . . . . . . . . . . . . . . . . . . . . . . . . . . . . . . . . . . . . . . . . . . . . 26
Configuring Grid Center . . . . . . . . . . . . . . . . . . . . . . . . . . . . . . . . . . . . . . . . . . . . . . . . . 29
Configuring the Administration Console. . . . . . . . . . . . . . . . . . . . . . . . . . . . . . . . . . 29
Configuring the Authentication Database. . . . . . . . . . . . . . . . . . . . . . . . . . . . . . . . . 30
Configuring Network Nodes . . . . . . . . . . . . . . . . . . . . . . . . . . . . . . . . . . . . . . . . . . . 32
Debugging Blade Discovery. . . . . . . . . . . . . . . . . . . . . . . . . . . . . . . . . . . . . . . . . . . 36
Modifying User Access to the Administration Console. . . . . . . . . . . . . . . . . . . . . . . 38
Allocation . . . . . . . . . . . . . . . . . . . . . . . . . . . . . . . . . . . . . . . . . . . . . . . . . . . . . . . . . . . . 41
Creating Groups . . . . . . . . . . . . . . . . . . . . . . . . . . . . . . . . . . . . . . . . . . . . . . . . . . . . 42
Allocating I/Ports and Blades . . . . . . . . . . . . . . . . . . . . . . . . . . . . . . . . . . . . . . . . . . 47
Switching and Sparing . . . . . . . . . . . . . . . . . . . . . . . . . . . . . . . . . . . . . . . . . . . . . . . . . . 51
When to Switch and When to Spare . . . . . . . . . . . . . . . . . . . . . . . . . . . . . . . . . . . . 52
Switching an I/Port . . . . . . . . . . . . . . . . . . . . . . . . . . . . . . . . . . . . . . . . . . . . . . . . . . 53
Sparing an I/Port . . . . . . . . . . . . . . . . . . . . . . . . . . . . . . . . . . . . . . . . . . . . . . . . . . . 54
Updates . . . . . . . . . . . . . . . . . . . . . . . . . . . . . . . . . . . . . . . . . . . . . . . . . . . . . . . . . . . . . 55
Updating an I/Port . . . . . . . . . . . . . . . . . . . . . . . . . . . . . . . . . . . . . . . . . . . . . . . . . . 55
Inventory and Health . . . . . . . . . . . . . . . . . . . . . . . . . . . . . . . . . . . . . . . . . . . . . . . . . . . 57
Viewing I/Port Health . . . . . . . . . . . . . . . . . . . . . . . . . . . . . . . . . . . . . . . . . . . . . . . . 57
Viewing Blade Health . . . . . . . . . . . . . . . . . . . . . . . . . . . . . . . . . . . . . . . . . . . . . . . . 59
Appendix A: Using Grid Center with e100 and Capio I/Ports. . . . . . . . . . . . . . . . . . . . . 61
Grid Center 4.11 Administrator’s Guide Contents • i
Page 4

Console Software . . . . . . . . . . . . . . . . . . . . . . . . . . . . . . . . . . . . . . . . . . . . . . . . . . . 62
Client Software . . . . . . . . . . . . . . . . . . . . . . . . . . . . . . . . . . . . . . . . . . . . . . . . . . . . . 64
Notes . . . . . . . . . . . . . . . . . . . . . . . . . . . . . . . . . . . . . . . . . . . . . . . . . . . . . . . . . . . . 66
Contacting Support . . . . . . . . . . . . . . . . . . . . . . . . . . . . . . . . . . . . . . . . . . . . . . . . . . . . 67
Grid Center 4.11 Administrator’s Guide Contents • ii
Page 5

Figures
Figure 1 Grid Center All-in-One Installer. . . . . . . . . . . . . . . . . . . . . . . . . . . . . . 7
Figure 2 Setup Type . . . . . . . . . . . . . . . . . . . . . . . . . . . . . . . . . . . . . . . . . . . . . 8
Figure 3 Grid Center Administration Console Login . . . . . . . . . . . . . . . . . . . . 18
Figure 4 Grid Center Administration Console Welcome Screen. . . . . . . . . . . 19
Figure 5 Icons for Blades, I/Ports, and Groups. . . . . . . . . . . . . . . . . . . . . . . . 19
Figure 6 Network Configuration View . . . . . . . . . . . . . . . . . . . . . . . . . . . . . . . 20
Figure 7 Edit Groups View . . . . . . . . . . . . . . . . . . . . . . . . . . . . . . . . . . . . . . . 21
Figure 8 Switching View . . . . . . . . . . . . . . . . . . . . . . . . . . . . . . . . . . . . . . . . . 22
Figure 9 Allocation View . . . . . . . . . . . . . . . . . . . . . . . . . . . . . . . . . . . . . . . . . 22
Figure 10 Update View . . . . . . . . . . . . . . . . . . . . . . . . . . . . . . . . . . . . . . . . . . . 23
Figure 11 Inventory and Health View . . . . . . . . . . . . . . . . . . . . . . . . . . . . . . . . 24
Figure 12 I/Port Client Connection to Blade . . . . . . . . . . . . . . . . . . . . . . . . . . . 25
Figure 13 I/Port Client Login Screen. . . . . . . . . . . . . . . . . . . . . . . . . . . . . . . . . 26
Figure 14 Dedicated I/Port to Blade Mapping. . . . . . . . . . . . . . . . . . . . . . . . . . 27
Figure 15 Shared I/Port to Blade Mapping . . . . . . . . . . . . . . . . . . . . . . . . . . . . 27
Figure 16 Authentication Database. . . . . . . . . . . . . . . . . . . . . . . . . . . . . . . . . . 30
Figure 17 Replicating Authentication Database Entries . . . . . . . . . . . . . . . . . . 32
Figure 18 Blade Configuration Screen . . . . . . . . . . . . . . . . . . . . . . . . . . . . . . . 33
Figure 19 Blade Client Configuration Window . . . . . . . . . . . . . . . . . . . . . . . . . 34
Figure 20 I/Port Configuration Screen . . . . . . . . . . . . . . . . . . . . . . . . . . . . . . . 35
Figure 21 Setting the I/Port Refresh Time . . . . . . . . . . . . . . . . . . . . . . . . . . . . 35
Figure 22 Getting I/Port Information . . . . . . . . . . . . . . . . . . . . . . . . . . . . . . . . . 36
Figure 23 Allocation Strategies . . . . . . . . . . . . . . . . . . . . . . . . . . . . . . . . . . . . . 42
Figure 24 Creating an I/Port Group. . . . . . . . . . . . . . . . . . . . . . . . . . . . . . . . . . 46
Figure 25 Allocation View . . . . . . . . . . . . . . . . . . . . . . . . . . . . . . . . . . . . . . . . . 48
Figure 26 Adding a Shared Resource. . . . . . . . . . . . . . . . . . . . . . . . . . . . . . . . 49
Figure 27 Choosing a Blade for Mapping . . . . . . . . . . . . . . . . . . . . . . . . . . . . . 50
Figure 28 Deleting a User Mapping . . . . . . . . . . . . . . . . . . . . . . . . . . . . . . . . . 50
Figure 29 Switching View with Default Blade Group Selected . . . . . . . . . . . . . 51
Figure 30 Selected I/Port . . . . . . . . . . . . . . . . . . . . . . . . . . . . . . . . . . . . . . . . . 52
Figure 31 Selecting a Blade . . . . . . . . . . . . . . . . . . . . . . . . . . . . . . . . . . . . . . . 53
Figure 32 Confirm Dialog for Switching . . . . . . . . . . . . . . . . . . . . . . . . . . . . . . 53
Figure 33 Selecting an I/Port for Updating . . . . . . . . . . . . . . . . . . . . . . . . . . . . 55
Figure 34 I/Port Inventory and Health View . . . . . . . . . . . . . . . . . . . . . . . . . . . 57
Figure 35 I/Port System Information Description Window . . . . . . . . . . . . . . . . 58
Figure 36 Blade Health Window . . . . . . . . . . . . . . . . . . . . . . . . . . . . . . . . . . . . 59
Figure A-1 ClearCube I/Ports . . . . . . . . . . . . . . . . . . . . . . . . . . . . . . . . . . . . . . 61
Grid Center 4.1 Administrator’s Guide Figures • iii
Page 6

This page intentionally left blank.
iv • Figures Grid Center 4.1 Administrator’s Guide
Page 7

Introduction
ClearCube Grid Center 4.11
ClearCube Grid Center™ 4.11 is a web-based application that provides a complete
management interface for an I/Port environment. Grid Center can be accessed from
any machine that has IP connectivity to the machine where Grid Center is installed,
thus enabling world-wide remote systems management.
New Features
Grid Center 4.11 provides the following new features:
• Support for new XPe-based Eon e100 I/Ports
• Support for new Linux-based Capio One and Eon e100 I/Ports
• Redundant Consoles for higher availability
• Ability to block end user from changing assigned Blade
• Multiple spare groups
• Ability to define Blade and I/Port groups as shared or dedicated
• Improved Blade selection algorithm
• Support for dual NIC Blades
• All-in-One installer that streamlines new Console and Blade client installation
• Improved usability
• Improved manageability with trusted machines list
• Improved input error checking
• DCI service enhancements
Grid Center 4.11 Administrator’s Guide Introduction • 1
Page 8

Management Capabilities in Grid Center
Grid Center provides several unique management capabilities in the following six
View windows:
• Configuration View
• Edit Groups View
• Switching View
• Allocation View
• Updates View
• Inventory and Health View
Each View provides access to specialized tools for configuring and managing an
I/Port environment, along with convenient links to the other Views.
Configuration View
The Configuration View provides the fundamentals for configuring a network built
around an I/Port environment.
Edit Groups View
Grid Center applies the concept of groups to I/Ports and Blades. Quite simply, a group is
a collection of zero or more I/Ports or Blades that has been created by an administrator.
A group can be left empty, to be populated later. A group can contain a single I/Port or
Blade, to allow dedicated mappings between I/Ports and Blades. A group can contain
several I/Ports or Blades, to allow shared mappings between I/Ports or Blades. With
Grid Center, groups can be set up without limitation on size or location. This capability
gives a wide range of options to system administrators for load-balancing and resource
sharing, and can be dynamically adjusted to meet changing resource demands. The Edit
Groups View allows creating and configuring groups.
Switching View
With the Switching View, Grid Center delivers server-level availability to end users by
allowing administrators to easily switch I/Ports to spare Blades if a problem occurs.
This dramatically reduces downtime because the end user does not need to wait for
deskside support. The end user resumes working on a spare Blade while an IT
technician troubleshoots the problem Blade.
Allocation View
Allocation is the assigning of resources to users based on their computing needs. In
any user environment, some people need only a little access or processing power,
and some people are “power users” who need a dedicated processor—or several
2 • Introduction Grid Center 4.11 Administrator’s Guide
Page 9

dedicated processors. Usually, these users are already divided into groups with
similar computing needs.
Allocation defines the allowable connections between the I/Ports and the Blades, with
connections defined by the administrator. For example, the I/Ports in the Sales Group
can be configured to connect only to the Blades dedicated to the Sales Group. When
a user logs in, Grid Center automatically connects the user’s I/Port to the least loaded
Blade in the group, using a built-in algorithm that monitors the processor load and
memory utilization on each Blade. On the other hand, the power users in the software
development group could be set up to have their I/Ports connect to specific Blades,
ensuring they always have ample computing resources.
Updates View
This update feature allows administrators to package and deploy driver updates,
software patches, and new applications to individual or multiple I/Ports. The Grid
Center 4.11 update adds support for ClearCube’s new Eon e100 and Capio One
Linux-based I/Ports.
Inventory and Health View
Grid Center lets administrators monitor I/Port health status and see asset
management information such as installed applications, memory capacity, and OS
settings. In addition, administrators can see real-time CPU loading and memory
utilization for any Blade.
Grid Center provides management for I/Ports. If your network also contains C/Ports,
use ClearCube Switch Manager (sold separately) to manage C/Ports. Grid Center
and Switch Manager can be installed on the same Console system.
Packaging
Grid Center 4.11 is shipped with an All-in-One installer application (see page 9) that
automates the correct installation of certain components (see page 5). Additionally, all
these components are provided on the Grid Center 4.11 installation CD as
independently installable applications. Grid Center requires that these components be
installed in a specific order prior to installing the application.
This manual is the most current version as of the initial release ship date for the Grid
Center 4.11 application. For free updated manual versions, please visit the Tech
Docs section at
If you are updating from Grid Center 4.0, you need to apply updates to your I/Ports to
enable many of the new features in Grid Center 4.11. Please see the README on the
http://support.clearcube.com.
Grid Center 4.11 Administrator’s Guide Introduction • 3
Page 10

installation CD for more information, or contact ClearCube using the resources listed
in Contacting Support on page 67.
Migrating Grid Center Data
Grid Center 4.11 allows for the migration of Discovery lists from a Grid Center 4.0
installation to Grid Center 4.11. Because of the numerous new features in each new
version, not all data can be migrated. Saving Discovery lists significantly speeds
configuring your Grid Center 4.11 installation. For more information, see Migrating
Discovery Lists on page 13.
4 • Introduction Grid Center 4.11 Administrator’s Guide
Page 11

Grid Center Installation
The Grid Center Administration Console can be installed on Windows 2000/2003
Server or Windows XP Professional. The Grid Center Blade client can be installed on
Windows XP Professional. The Grid Center I/Port clients can be installed on I8800,
Eon e100, and Capio One I/Ports. The Grid Center Administration Console and the
Grid Center Blade client should not be installed on the same system. Installation of
either package requires local administrator access privileges.
For Grid Center to function properly, the following components must be installed. All
these components are provided as part of the All-in-One installer.
• Java Runtime Environment (JRE) version 1.4.2—Grid Center 4.11 requires
JRE version 1.4.2_03 or later. The correct JRE version is provided on the Grid
Center 4.11 CD shipped from ClearCube. The version of a previously installed
Java package can be checked in Add or Remove Programs from the Control
Panel, or by running the
returns the installed Java version. Versions previous to 1.4.2_03 should be
removed.
Version 1.4.2 or later of the Java 2 Enterprise Edition 1.4 Software Development
Kit (SDK), which adds support for EJBs, JSPs, XML, and Web Services APIs, can
also be used (not provided on the Grid Center 4.11 installation CD).
Version 1.5 or higher is not supported.
Java -version command at the DOS prompt, which
• ActiveState Perl 5.6.1—Grid Center 4.11 requires ActiveState Perl 5.6.1. The
correct version of ActiveState Perl is provided on the Grid Center 4.11 CD shipped
from ClearCube. The version of a previously installed ActiveState Perl can be
checked in Add or Remove Programs from the Control Panel, or by running the
Perl -version command at the DOS prompt, which returns the installed Perl
version. Versions previous to 5.6.1 should be removed.
Versions higher than 5.6.x are not supported.
The ActiveState Repository has a large collection of modules and extensions in
binary packages that are easy to install and use. To view and install these
packages, use the Perl Package Manager (PPM) which is included with
ActivePerl.
• ClearCube Distributed Computing Infrastructure (DCI)—Grid Center 4.11
requires ClearCube DCI version 2.0.8. The correct version is provided on the Grid
Center 4.11 CD shipped from ClearCube. Before installing Grid Center 4.11,
Grid Center 4.11 Administrator’s Guide Grid Center Installation • 5
Page 12

please make sure that the current DCI is installed. The installed DCI version can
be verified through Add or Remove Programs in the Control Panel. Versions
previous to 2.0.8 should be removed prior to installing Grid Center 4.11.
• ClearCube Perl PlugIn—Grid Center 4.11 requires ClearCube Perl PlugIn
version 1.1. The correct version is provided on the Grid Center 4.11 CD. The
installed Perl PlugIn version can be verified through Add or Remove Programs
in the Control Panel. Version 1.0 should be removed.
Installing Grid Center 4.11
The Grid Center 4.11 Administration Console provides the capability of installing a
secondary, or redundant Console. The main benefit of this feature is that it allows
maintaining control of the managed systems if the Primary Console system fails or is
disconnected. When this happens, information about I/Ports and Blades is stored on
the redundant (Secondary) Console system, and replicated to the Primary Console
system when it is reconnected. Installation of a Secondary Console is not required.
Grid Center 4.11 provides two types of installation:
• Grid Center Administration Console—The Grid Center Administration Console
should be installed on a Primary Console and a Secondary Console system. Only
one Secondary Console can be installed.
• Grid Center Clients—The Grid Center clients are installed on the targeted
Blades and I/Ports once the Grid Center Administration Console is installed.
Note: If you are installing the Grid Center Administration Console on a Blade that
has Blade Manager 4.0 or higher installed, you should already have the
correct versions of Java, ActiveState Perl, and ClearCube DCI installed.
The Grid Center 4.11 All-in-One installer application checks for the necessary
components, and installs all components not detected. In addition, separate installers
for each application are provided on the Grid Center installation CD.
Note: If you already have Grid Center Console 4.1 or Grid Center Blade client 4.1
installed, do not remove or reinstall the Grid Center Console or Blade client.
Before You Install
Before you begin your installation, you need to gather the following information:
• The version number of your Grid Center installation (if installed).
• The name of the system to be designated as the Primary Grid Center
Administration Console, and the name of the system to be designated as the
6 • Grid Center Installation Grid Center 4.11 Administrator’s Guide
Page 13
Secondary Console, if desired.
• Administrator logins and passwords for the Consoles, Blades, and I/Ports.
• IP subnet ranges for the Blades and I/Ports.
You should plan your I/Port and Blade groups before installing Grid Center. You can
always create, edit, and delete groups after you configure your network.
On the Blade and Console systems, you need to stop the CC DCI service before
installing or uninstalling Grid Center or its components.
Back up existing Discovery lists if desired. See Migrating Discovery Lists on page 13.
On the Blade and Console systems, check the versions of the JRE, ActiveState Perl,
ClearCube DCI, and Perl PlugIn (if these products are installed), and remove any
previous versions. Installations of Grid Center 4.0 or earlier should also be removed
(see Migrating Grid Center Data on page 13 before uninstalling Grid Center). The
Grid Center installer contains a dialog box reminding you to remove previous
versions. Installations of Grid Center 4.1 should not be removed.
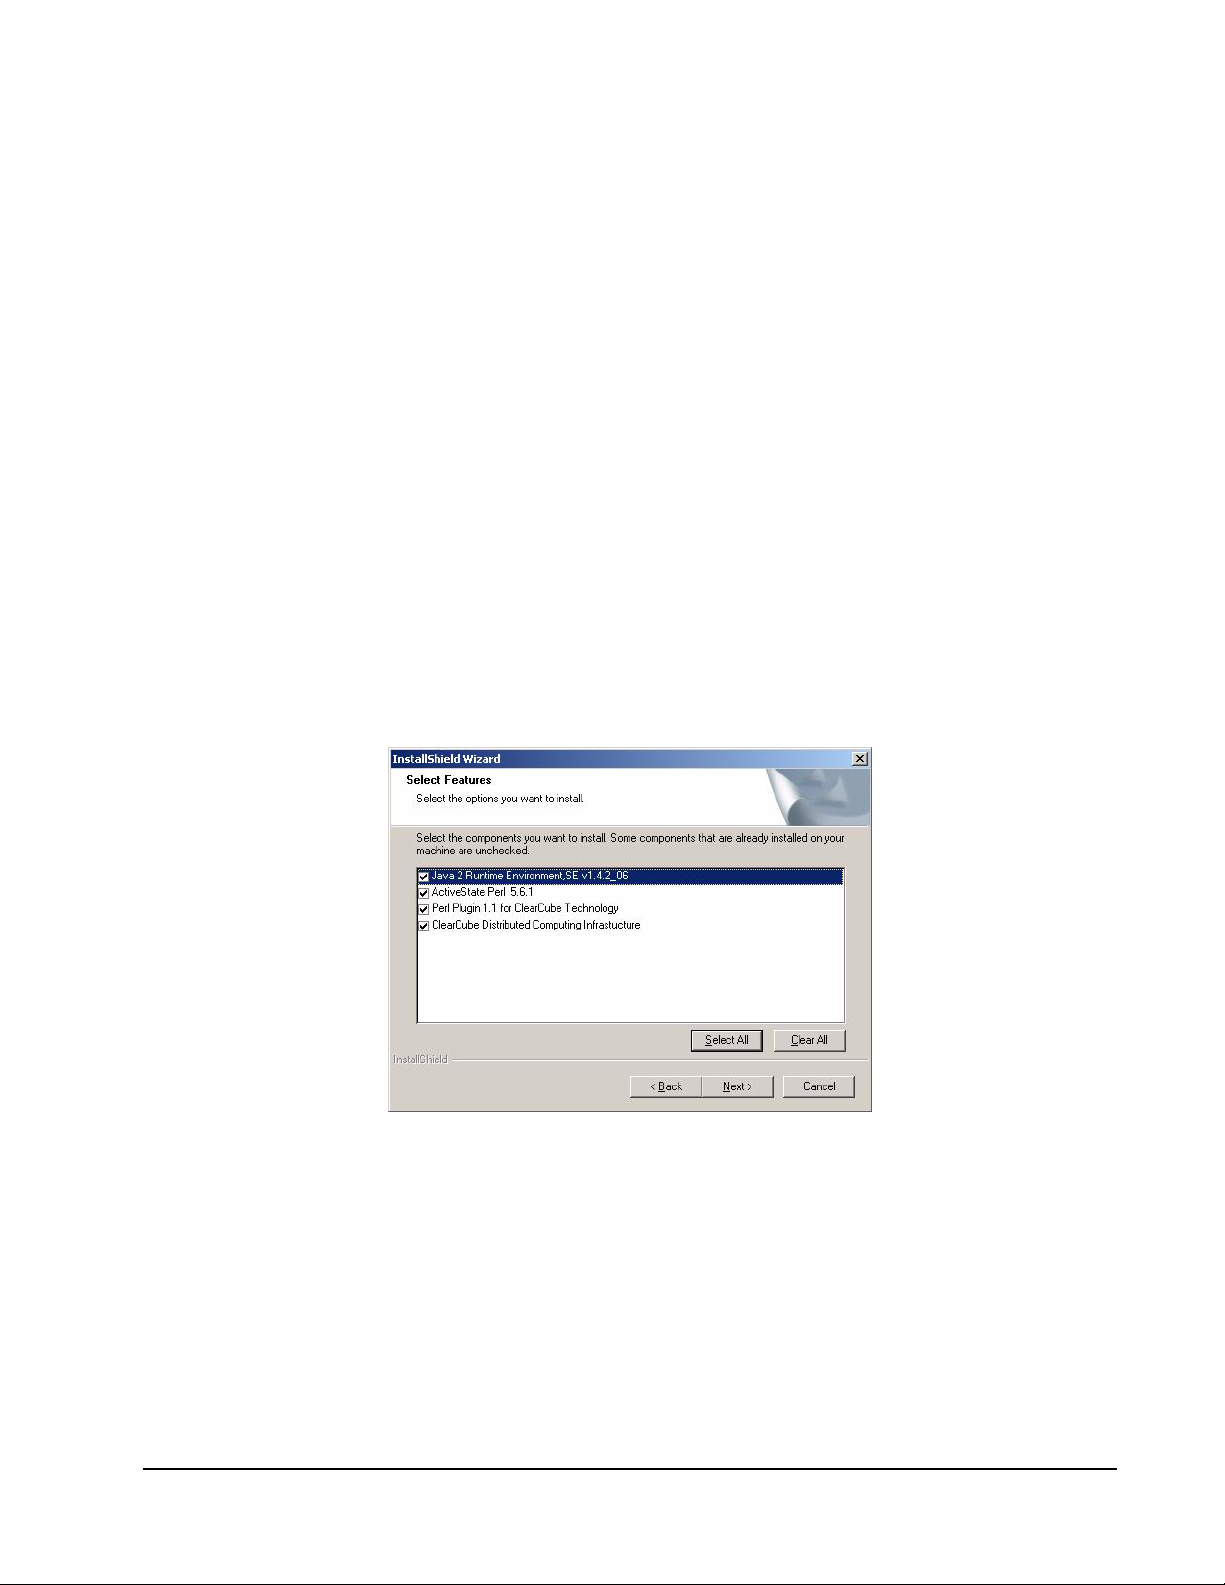
Using Grid Center’s All-in-One Installer
The Grid Center 4.11 installation CD provides an All-in-One installer for the
Administration Console that simplifies the task of installation. See Figure 1.
Figure 1 Grid Center All-in-One Installer
The installer displays all the required components for the Grid Center installation. If a
component needs to be installed, a check box is placed by its name. If it has already
been installed, the box next to its name is empty. The installer then installs each
component selected in the correct order. It is strongly recommended to use the
All-in-One installer to determine the necessary components and their installation
order, and to accept the settings of the installer.
Grid Center 4.11 Administrator’s Guide Grid Center Installation • 7
Page 14
Note: Verify the versions of your installed components, and uninstall outdated
versions before beginning to install Grid Center.
In all cases, allow the installer adequate time to complete its operation. The
ClearCube All-in-One installer appears to pause at several times during its execution,
while showing no obvious activity. The installation resumes within several seconds,
and displays a dialog box with information or more instructions.
Installing the Grid Center Administration Console
If you have a Grid Center 4.0 installation, remove it before installing Grid Center 4.11.
If you have a Grid Center 4.1 installation, do not remove or re-install Grid Center.
Instead, go to the Installing the Linux Console Update procedure on page 9.
Install the Grid Center Administration Console using the All-in-One installer on the
Grid Center CD. Installation requires local administrator access privileges.
1. Double-click the setup.exe icon on the Grid Center 4.11 installation CD.
2. Choose the components to be installed from the Select Features window (see
Figure 1). Press Next.
3. When prompted, choose the users who see the Grid Center installation by
selecting “Anyone who uses this computer (all users)” or “Only for me
(username).” This can be changed later. See
Administration Console on page 38.
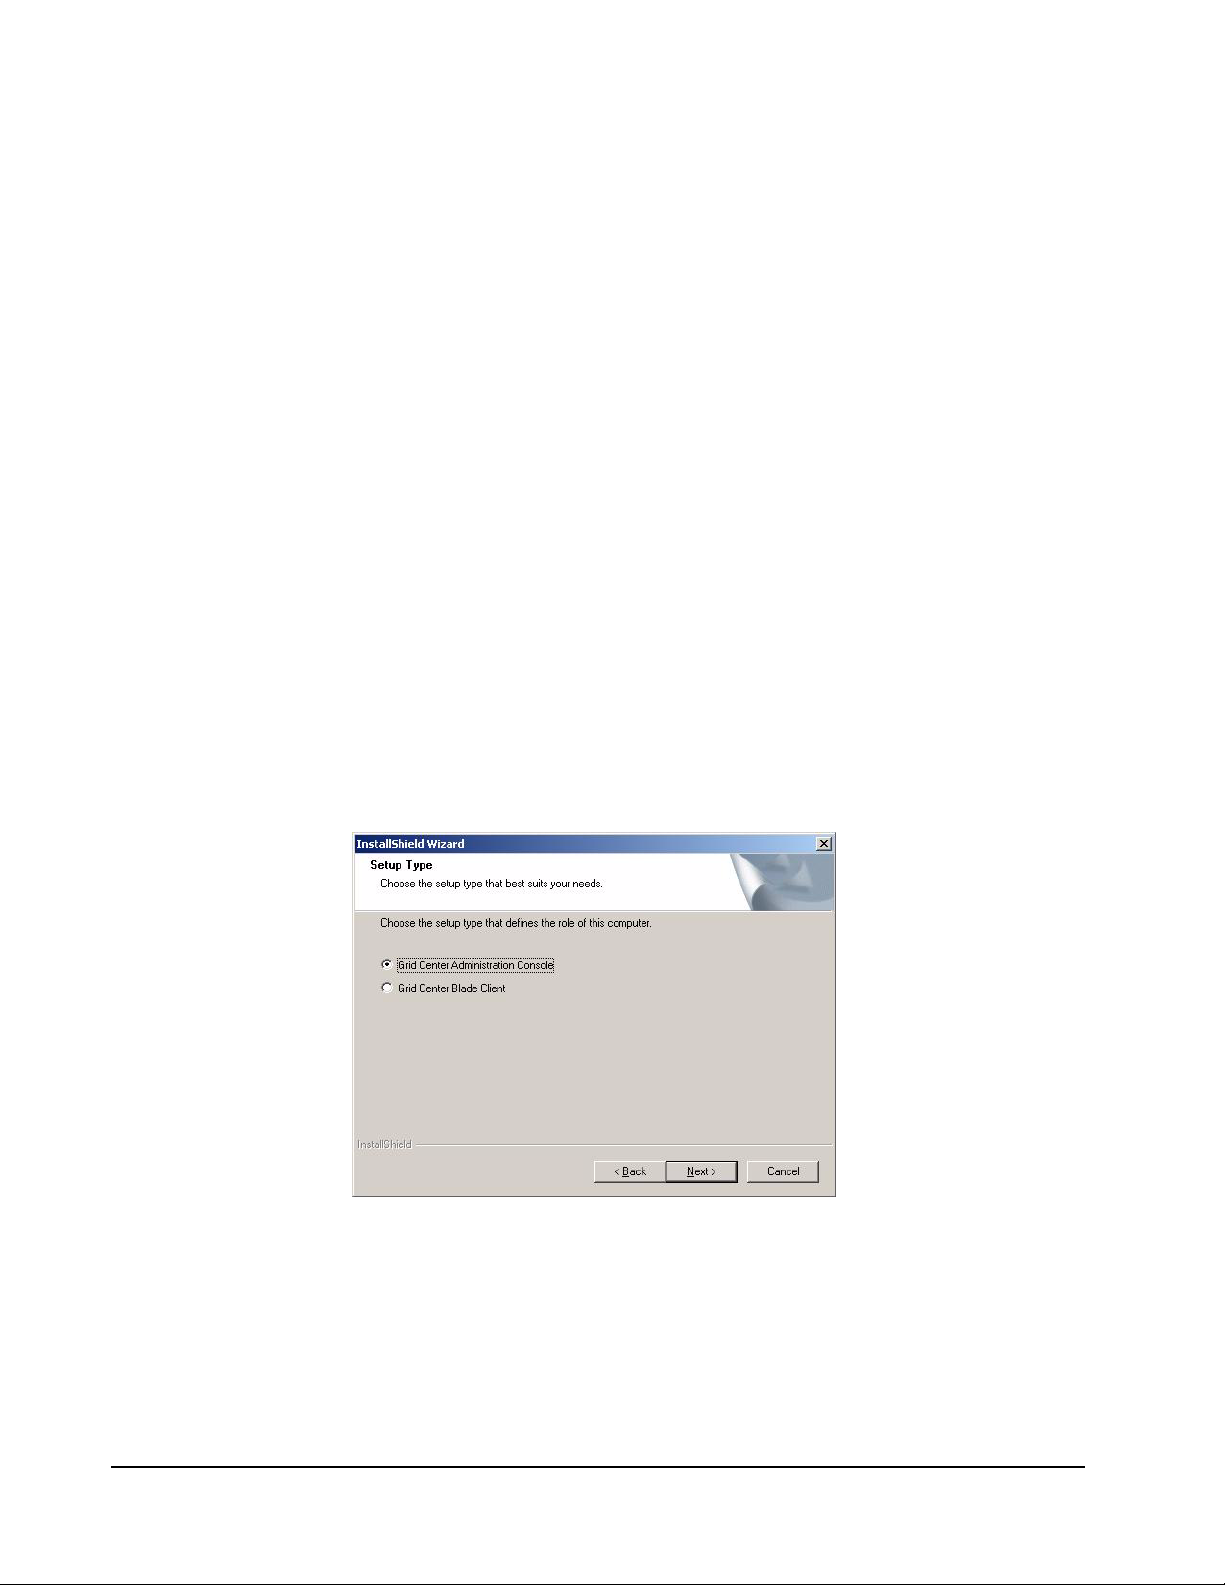
4. Select Grid Center Administration Console from the Setup Type screen
Figure 2). Press Next.
(see
Modifying User Access to the
Figure 2 Setup Type
5. Accept the default settings as the InstallShield Wizard runs. Press Next when
necessary.
6. Follow the prompts as appropriate.
8 • Grid Center Installation Grid Center 4.11 Administrator’s Guide
Page 15

7. Enter the Grid Center Server names when you are prompted for them. The
Primary Server is the first system on which you are installing the
Administration Console now. The Secondary Server is the system that you
plan to designate as the Secondary Console. If you have not yet chosen the
Secondary Server, enter a non-null text string. This can be easily changed
later. Enter the name of the Primary Server as the name of the Secondary
Server if you do not plan to use a Secondary Server. Press Next.
8. When the installation has completed, restart your system.
9. Repeat the installation on the Secondary Console, if one is being configured.
Note: If the installer prompts you to restart your system, do so, and restart the
setup.exe application after restarting.
Installing the Linux Console Update
Install the Linux Console update from the update installer in the Console Updates
directory of the Grid Center 4.11 CD. Installation requires local administrator access
privileges.
1. Double-click the updater icon on the Grid Center 4.11 installation CD.
2. Accept the defaults.
3. Reboot your system after completing the installation.
Installing Grid Center Clients
Once the Grid Center Administration Console is installed on the Primary and
Secondary systems, Grid Center clients need to be installed on each Blade and each
I/Port that Grid Center manages.
Installing the Grid Center Blade Client
Install the Grid Center Blade client from the installation program on the Grid Center
CD. Installation requires administrator access privileges.
1. From the Grid Center 4.11 Blade Client folder on the ClearCube Grid Center
CD, launch the
2. Choose the components to be installed from the Select Features window (see
Figure 1). Press Next.
3. Select Grid Center Blade Client from the Setup Type screen (see Figure 2).
4. Click Next to begin installing the Grid Center Blade client.
5. Follow the prompts as appropriate.
6. Enter the Grid Center Server names when you are prompted for them. Both
fields are auto-populated with the name of the Primary Server. Enter the name
of the Secondary Server in the specified field. To configure for only one Grid
Center server, click Next.
7. When the installation has completed, restart your system.
setup.exe file.
Grid Center 4.11 Administrator’s Guide Grid Center Installation • 9
Page 16

Installing the I8800 I/Port Client
The Grid Center I8800 I/Port client is installed after the Blade clients are installed.
This client can be installed in one of two ways:
• Locally at the I/Port
• Remotely from the Console, using the Grid Center Update function (see Updates
on page 55)
To install the Grid Center client, do the following (for both methods):
1. Change the following configuration files in the IPORT-CLIENT file before
sending it as an update:
a. Edit the iportinfo.xml file to specify valid Primary and Secondary
Administration Console(s).
<dcreason>2</dcreason>
<adminblade>PrimaryServer</adminblade>
<secondaryserver>SecondaryServer</secondaryserver>
<refreshtime>150</refreshtime>
Change to the name
of the Primary Admin Console.
Change to the name
of the Secondary Admin Console.
b. Edit the trustusers.xml file to include the name of the Secondary Admin
Console as a trusted Console.
<?xml version="1.0"
encoding="UTF-8"?>
<trustusers></trustusers>
Insert the name of the Secondary Administration Console
This establishes the Console systems as trusted machines for the I/Ports. A trusted
machine is a system that is assumed to be safe to send data, snapins, and operating
system updates to the I/Ports without requiring authentication or a challenge/
response exchange. By default, the Consoles are the trusted machines for the I/Ports.
More systems can be added as trusted machines in this fashion. Trusted machines
can also be configured through Grid Center after the I/Ports have been discovered.
For a local installation:
1. Copy the update files to a USB mass storage device such as a key drive and
go to the I/Port.
2. Log into the I/Port as an administrator. Press and hold the Shift key and select
Logoff from the Start menu. Keep the Shift key depressed until the
Administrator Login dialog box is displayed. The factory default Administrator
account is
administrator and the default password is clearcube. These
can be changed in the User Accounts control panel.
10 • Grid Center Installation Grid Center 4.11 Administrator’s Guide
Page 17

3. Turn off the Write Filter by double-clicking the Write Filter Disable icon on the
desktop. The Write Filter is a special mechanism that prevents unauthorized
writes to the I/Port’s flash memory. The Write Filter status is always displayed
in the toolbar by a green circle for Write Filter Enabled (flash memory cannot
be written), or by a red circle for Write Filter Disabled (flash memory can be
written).
4. Insert the USB storage device into an available USB port.
5. Copy the update files to C:\. (This is faster than installing through the USB
port.)
6. Launch the update installer. Accept the defaults and click through the installer.
7. Reboot your computer when prompted to do so. This reboots the I/Port.
8. When the I/Port finishes rebooting, log in as Administrator again.
9. Delete the update files from C:\ and double-click the Enable Write Filter icon
to re-enable the Write Filter.
10. When the Write Filter has been re-enabled (a green circle is displayed in the
tool bar), log out from the Administrator account and continue to the next
I/Port.
Note: If you have a number of I/Ports to update, you may want to set up several
terminals (keyboard, monitor and mouse) in the same place, and update
several I/Ports at one time. A KVM switch can also be used to provide this
same capability.
For a remote installation:
1. Compress the IPORT-CLIENT folder to IPORT-CLIENT.zip.
2. Push out the batch file and the IPORT-CLIENT.zip file via the Administration
Console. See
Updates on page 55 for more information.
By default, the installer places the I/Port User account in the Administrators group of
the I/Port. This is required for the client to function correctly. If the User account is
moved from the Administrator group, or is installed in another group, the I/Port client
cannot communicate with Grid Center.
Note: Grid Center I/Port clients are pre-installed on Eon e100 and Capio One
I/Ports. For more information, see
Appendix A: Using Grid Center with e100
and Capio I/Ports on page 61.
Grid Center 4.11 Administrator’s Guide Grid Center Installation • 11
Page 18

Installing Components Individually
Components on the Console and Blade client systems can be installed individually, if
desired. Use the following procedures.
Install JRE
Installation of the JRE requires local administrator access privileges.
1. To begin installation, launch the j2re-1_4_2_06-windows-i586-p .exe file
on the ClearCube Grid Center CD.
2. The Java License Agreement Screen is displayed. Click the I accept the
terms of the license agreement radio button to accept the license
agreement. Click the Next button.
3. Click the Next button to accept the Custom Setup choices.
4. Accept the default selection for Browser Registration. Click the Next button.
5. Click the Finish button to complete the installation of JRE.
Note: The Java SDK 1.4.2 or higher can also be installed. The 1.5 version is not
supported.
Install ActivePerl
Installation of ActivePerl requires local administrator access privileges.
1. To begin installation, launch the ActivePerl installer file
ActivePerl-5.6.1.638-MSWin32-x86.msi on the ClearCube Grid Center
CD. Click the Next button to continue.
2. The Active State End User License Agreement is displayed. Click the I accept
the terms in the License Agreement button to accept the license
agreement. Click the Next button. If you decline the agreement, installation is
halted.
3. Click the Next button to accept the Custom Setup choices.
4. Click the Next button to skip the Programmer’s Package Manager and
continue with installation.
5. Select all the options in the Choose Setup Options screen. Click the Next
button.
6. Click the Finish button to complete the installation.
Install Distributed Computing Infrastructure (DCI)
Installation of ClearCube Distributed Computing Infrastructure (DCI) requires local
administrator access privileges.
1. To begin installation, launch the dci-setup.exe file on the ClearCube Grid
Center CD. Click the Next button to continue.
12 • Grid Center Installation Grid Center 4.11 Administrator’s Guide
Page 19

2. The ClearCube Distributed Computing Infrastructure License Agreement is
displayed. Click Yes to accept the license agreement.
3. Click the Next button to accept the default Destination Location.
4. Click the Finish button to complete the installation.
5. Once the installation is complete, you must restart the computer to finalize the
setup process. Select the Yes radio button and click the Finish button to
restart your computer.
6. Once DCI is installed on the system, the service must be started. Check the
CC DCI service from Start–>Control Panel–>Administrative
Tools–>Services.
7. Double-click the CC DCI service to view the properties. Click the Log On tab.
8. Set up logon parameters as appropriate.
9. Click the OK button to save changes to the logon name. Click through the
following dialog boxes.
10. Stop and then restart the DCI service for all changes to take effect.
Install Grid Center Administration Console and Blade Client
Installation of the Grid Center Administration Console and Blade clients requires local
administrator access privileges.
1. To begin installation, launch the gcAdmin-setup.exe file to launch the
installer for the Administration Console, or the
launch the installer for the Grid Center client.
gcClient-setup.exe file to
Note: Install the Grid Center Consoles before installing Blade clients.
2. The installer verifies whether the necessary components have been installed.
3. If all the necessary components have been installed in the correct order, the
installer proceeds in the same fashion as if it were running as the All-in-One
installer. Accept the default options during installation.
4. When the installation is complete, click the Finish button.
5. If installing on a Console system, run the Grid Center Linux client updater.
Migrating Discovery Lists
If you have a previous Grid Center 4.0 installation, you can migrate your existing
discovery lists to your new Grid Center 4.11 installation. This greatly speeds network
configuration. Your Grid Center 4.1 data is not changed by the Grid Center 4.11 update.
Use these procedures to migrate Discovery lists. Local administrator access is
generally required.
Grid Center 4.11 Administrator’s Guide Grid Center Installation • 13
Page 20

Note: You must begin this process before beginning to uninstall a previous version
of Grid Center.
Backing up the Discovery List Files
To back up the Discovery list files for Grid Center 4.0, do the following before you
begin your Grid Center 4.11 installation process:
1. Go to C:\Program Files\ClearCube Management
Suite\DCI\CGI-BIN\IPORT\ .
2. Copy these two files:
• shosts
• bladehosts
3. Save these files to a directory outside the ClearCube Management Suite
directory.
4. Proceed with your Grid Center 4.11 installation, beginning with un-installing
your previous version of Grid Center.
Removing Grid Center erases these files from the ClearCube Management Suite
directory.
Restoring the Discovery List Files
To restore the Discovery list files, do the following after you complete your Grid
Center 4.11 installation process:
1. Go to C:\Program Files\ClearCube Management
Suite\DCI\CGI-BIN\IPORT\ .
2. Copy the backed-up shosts and bladehosts files into the IPORT directory.
This overwrites the newly installed files with the data from your previous Grid
Center installation.
3. Start Grid Center 4.11.
Uninstalling Grid Center
Use these procedures to uninstall Grid Center. Local administrator access is required
for all uninstallations.
Note: On the Blade and Console systems, you need to stop the CC DCI service
before installing or un-installing Grid Center or its components.
14 • Grid Center Installation Grid Center 4.11 Administrator’s Guide
Page 21

Uninstalling the Administration Console
To uninstall the Grid Center Administration Console, do the following:
1. Go to Add/Remove Programs in the Control Panel.
2. Select ClearCube Grid Center from the list of programs. Click the
Change/Remove button.
3. Select the radio button for Remove. Click the Next button.
4. Once the removal is complete, click the Finish button.
Uninstalling the Clients
To uninstall Grid Center Blade clients, do the following:
1. Go to Add/Remove Programs in the Control Panel.
2. Select ClearCube Grid Center from the list of programs. Click the
Change/Remove button.
3. Select the radio button for Remove. Click the Next button.
4. Once the removal is complete, click the Finish button.
Uninstalling Other Components
The other components necessary for Grid Center (such as Java) can be uninstalled
from Add/Remove Programs in the Control Panel.
Note: Components must be un-installed in the following order, or system errors will
occur.
Administration Console Blade Client Side
1. Grid Center Administration Console 1. Grid Center Blade Client
2. DCI 2. DCI
3. Perl Plugin for ClearCube Technology 3. Perl Plugin for ClearCube Technology
4. ActivePerl 4. ActivePerl
5. Java 5. Java
Grid Center 4.11 Administrator’s Guide Grid Center Installation • 15
Page 22

This page intentionally left blank.
16 • Grid Center Installation Grid Center 4.11 Administrator’s Guide
Page 23

Grid Center Console
ClearCube Grid Center 4.11 is a web-based application that provides a complete
management interface for an I/Port environment consisting of I8800, Eon e100, and
Capio One I/Ports. I8010 I/Ports are not supported. Grid Center can be accessed
from any machine that has IP connectivity to the machine where Grid Center is
installed.
The Administration Console is the first of three Grid Center components. It can be
installed on any Windows 2000 or 2003 server, or Windows XP Pro system. The
Administration Console acts as a traffic director between I/Ports and Blades. When an
I/Port client is launched, the Administration Console directs it to a specific Blade or to
a group of Blades.
When an I/Port is in Dedicated mode, the Administration Console always directs it to a
specific Blade. In this case, the user logs in to the same Blade every time. When an
I/Port is in Shared mode, the Console directs it to a group of Blades. The Console
tracks utilization on the Blades, and always directs the I/Port to the least utilized Blade
in the specified group.
Grid Center uses TCP ports 6500, 9000, and 3389; and UDP ports 6500 and 9000.
These ports must remain open between network nodes that use Grid Center. The first
time the Grid Center Administration Console is run, it does not have any Blades or
I/Ports populated in its database. To populate Blades and I/Ports, you need to specify
the IP address subnet range that contains the Blades and I/Ports to be managed by
this Grid Center installation. See Configuring the Administration Console on page 29
for more information. After specifying the subnet range, you need to do a process
called Discovery, which searches for Blades and I/Ports in the subnet range. See
Configuring the Authentication Database on page 30 for more information.
When Discovery finds a Blade or an I/Port, it stores the identifying information for
each component in the database. When new components are added to the network,
Discovery can be run again to locate them.
Once a Blade or I/Port has been discovered, Grid Center maintains a record of it and
graphically displays whether it is active on the network. Grid Center maintains these
records indefinitely, and periodically re-discovers Blades and I/Ports. When this
happens, the database is updated. Blades and I/Ports can be manually deleted from
the database if they are physically removed from the network, but if they are
reconnected, they will be saved in the database again when Discovery is run.
Grid Center 4.11 Administrator’s Guide Grid Center Console • 17
Page 24
Launching the Administration Console
Launch the primary Grid Center Administration Console by selecting Start
Menu–>All Programs–>ClearCube Management Suite–>Grid Center–>Grid
Center Admin.
Grid Center can also be launched by pointing a browser to:
http://hostname:6500/iport/index.htm
where
Console is installed. Once the Primary Console is installed, its settings are replicated
automatically on the Secondary Console.
hostname is the system on which the Primary Grid Center Administration
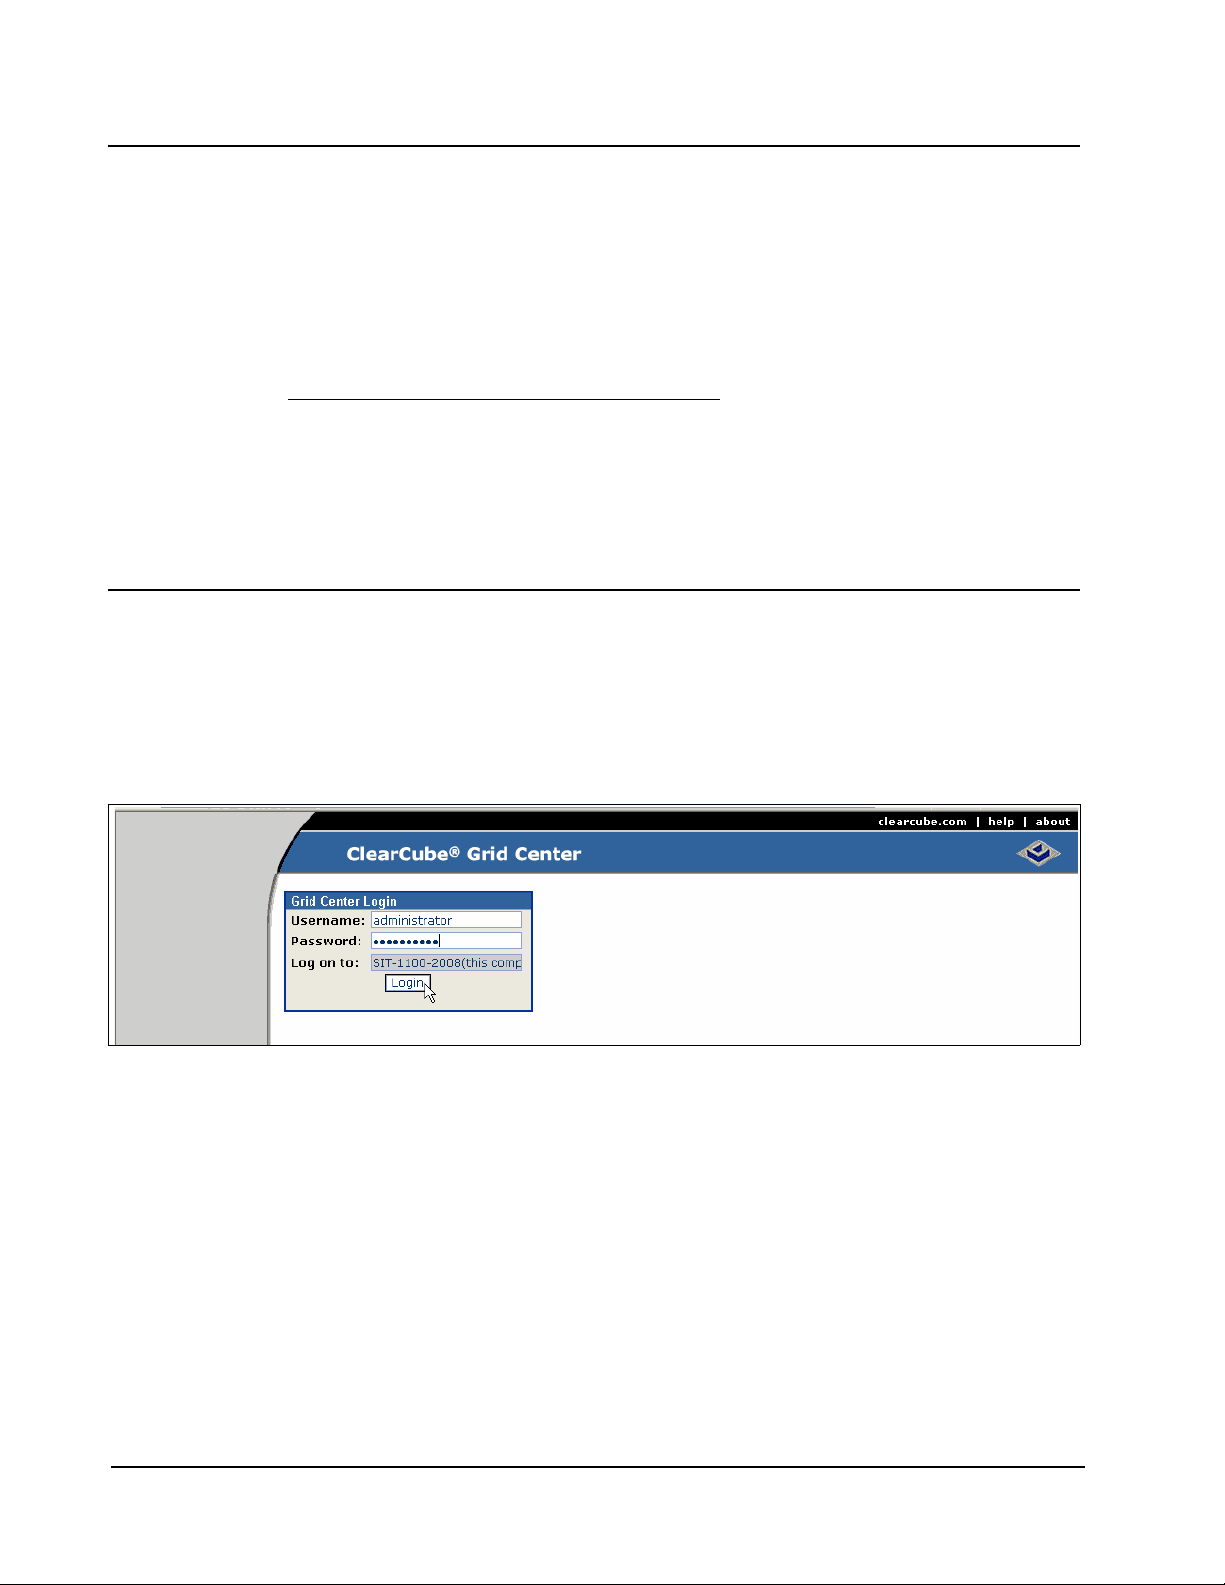
Logging in for the First Time
The first screen in Grid Center is the Login screen. The first time you log in, you must
use the administrator username and password for the local machine. The local
system’s host name is automatically populated in the Domain Name field. Click the
Login button.
Figure 3 Grid Center Administration Console Login
Once you have logged in, use the procedures found in Configuring Grid Center on
page 29 to configure the Console. This process needs to be done only once, and only
on the Primary Console. These settings and subsequent updates are automatically
replicated on the Secondary Console.
18 • Grid Center Console Grid Center 4.11 Administrator’s Guide
Page 25

Take a Tour
The following figures show the six Views in the Administration Console. The next
chapter, Configuring Grid Center, describes how to use the tools in these Views.
When you log in to the Administration Console, the Welcome screen (shown in
Figure 4) is displayed. The main menu on the left side of the screen lists the Views
with their associated sub-menu items. Select any of the main menu or sub-menu
items to navigate to that View.
Figure 4 Grid Center Administration Console Welcome Screen
Figure 5 shows how the groups, Blades, and I/Ports on the network entities are
represented in the Grid Center Console Views. All types of supported I/Ports are
represented by the same I/Port icons.
Network icon
Group icon
I/Port Online icon
I/Port Offline icon
Blade Online icon
Blade Offline icon
Figure 5 Icons for Blades, I/Ports, and Groups
Grid Center 4.11 Administrator’s Guide Grid Center Console • 19
Page 26

The Network Configuration View, shown in Figure 6, allows configuring Grid Center’s
network database and the Blades and I/Ports (also called nodes) in the database.
Figure 6 Network Configuration View
Select I/Ports or Blades under the Configuration menu to configure I/Ports or
Blades, respectively. The Auth. DB menu choice allows configuring and editing the
Authentication database, which allows assigning user names and passwords for
specific Blades and I/Ports. When configured and populated, this database allows the
administrator to log into Blades and I/Ports without entering user names or passwords
each time Blades or I/Ports need to be configured. For security reasons, this
database is encrypted. See Configuring the Authentication Database on page 30 for
more information.
20 • Grid Center Console Grid Center 4.11 Administrator’s Guide
Page 27

The Edit Groups View (shown in Figure 7) allows the administrator to create, modify,
and delete I/Port and Blade groups. This View also allows designating Blade groups
as Dedicated, Shared, or Spare.
Figure 7 Edit Groups View
The Switching View, shown in Figure 8, allows the administrator to switch I/Ports and
I/Port groups from one Blade or Blade group to another, depending on how the I/Ports
and Blades have been allocated.
Grid Center 4.11 Administrator’s Guide Grid Center Console • 21
Page 28

Figure 8 Switching View
The Allocation View in Figure 9 allows creating and managing allocations between
Blades and I/Ports. Allocation reflects the mappings between I/Ports and Blades. The
sections Grid Center Clients on page 25 and Allocation on page 41 provide detailed
information on allocation and how to configure allocations.
Figure 9 Allocation View
22 • Grid Center Console Grid Center 4.11 Administrator’s Guide
Page 29

The Update View (Figure 10) allows sending updates to I/Ports, either individually or by
group. The I8800 I/Port and some Eon e100s use the Windows XP Embedded (XPe)
operating system. The Capio One and some Eon e100s use the NeoLinux operating
system. From time to time, the operating systems and the applications running on it
require updates to enhance functionality or new add features. For more information,
see Appendix A: Using Grid Center with e100 and Capio I/Ports on page 61.
Figure 10 Update View
The Inventory and Health View (Figure 11) allows looking at a variety of
environmental parameters on Blades and I/Ports. For detailed information about an
I/Port, select I/Ports, and then click on an I/Port in the left pane. For user and usage
information on individual or Blade groups, select Blades or Health Reports.
Additionally, clicking on a Blade displays the users logged into that Blade.
Grid Center 4.11 Administrator’s Guide Grid Center Console • 23
Page 30

Figure 11 Inventory and Health View
24 • Grid Center Console Grid Center 4.11 Administrator’s Guide
Page 31

Grid Center Clients
Grid Center 4.11 provides two types of clients:
• I/Port client
• Blade client
This chapter briefly discusses their interaction. Allocation on page 41 details how to
configure this interaction.
I/Port Client
The I/Port client is an application that resides on each I/Port being managed by the
Administration Console. When an I/Port client is launched, it polls the Administration
Console that controls the appropriate Blade to which the I/Port should connect. This
Blade identification is returned to the I/Port client. (See Figure 12.) The I/Port client
then presents a login dialog box in which users enter credentials for the Blade to
which they will connect, as shown in Figure 12.
End User
1
I/Port client launches and
makes request to GC Console
for Blade information.
Grid Center
2
1
Admin Console
2
GC Console populates
appropriate Blade name
to which I/Port will connect.
3
3
Blade
(Data Center)
I/Port connects to Blade
via RDP.
Figure 12 I/Port Client Connection to Blade
Grid Center 4.11 Administrator’s Guide Grid Center Clients • 25
Page 32

Connections are accomplished via Microsoft Remote Desktop Protocol (RDP). When
a user clicks Connect, an RDP session is initiated, and the desktop of the remote
Blade is displayed after the client passes through the login credentials.
Blade Client
Click to refresh
Blade list
Click to select
last-connected Blade
Figure 13 I/Port Client Login Screen
The Blade client is an application that resides on each Blade being managed by the
Grid Center Administration Console. Blade clients are simple agents that run on
ClearCube Blades and maintain communication with the Console, reporting
information such as resource utilization and the I/Ports connected to the Blade.
Blades can run in single-user mode (shown in Figure 14), or multi-user mode if
WinConnect is being used (shown in Figure 15). With Grid Center, a Blade can allow
as many as four I/Ports to connect to it simultaneously.
26 • Grid Center Clients Grid Center 4.11 Administrator’s Guide
Page 33

End User
End User
Grid Center
Admin Console
Using dedicated mappings, as many as
four I/Ports can connect to a specified Blade.
The I/Ports connect to the same Blade
each time the I/Port client is launched.
Figure 14 Dedicated I/Port to Blade Mapping
Grid Center
Admin Console
Blade
(Data Center)
Blade
(Data Center)
Using shared mappings, a group of
I/Ports is mapped to a group of Blades.
In this scenario, an I/Port always
connects to the least utilized Blade
in the Blade group.
Figure 15 Shared I/Port to Blade Mapping
Grid Center 4.11 Administrator’s Guide Grid Center Clients • 27
Page 34

This page intentionally left blank.
28 • Grid Center Clients Grid Center 4.11 Administrator’s Guide
Page 35

Configuring Grid Center
Once you have logged into Grid Center for the first time, you need to configure the
Administration Console, the Blades, and the I/Ports on the network before you can
actually begin managing your network.
Configuring the Administration Console
Figure 6 on page 20 shows the Network Configuration View, which opens by default
to the User Database. To configure or edit this database, click the Configuration link
in the Main menu, then enter the settings for the following:
Table 1: Configuration Database Fields
Field Name Description
Database Server The system on which the database resides. The default value is localhost.
Database Type The type of the database being used by Grid Center 4.1. The default value is MS Access.
Database Name Required only when using a database other than MS Access.
Database Username User name of the administrator logging into the database. Not required for MS Access.
Database Password Password for the database. Enter a password, if desired. Not required for MS Access.
Confirm Password Password for the database. Re-enter the password, if one is to be set.
Operating Mode Workgroup or Domain. The authentication system works in one of two modes. In Domain
mode, group membership and user name/password combinations are authenticated against
a domain controller. In the default Workgroup mode, group membership and user name/
password combinations are authenticated against the local machine.
Security Group Determines the group of users that should be authenticated to log in to the Grid Center
Session Timeout (Min.) Specifies the period of time that causes Grid Center to automatically force the administrator
Subnet Range
I/Port Refresh Time (Min.) If an I/Port does not poll the Console within this interval, it is considered idle and appears in
Console. If the Operating Mode is changed, the Grid Center page should be refreshed in
order to populate the correct Security Groups.
to log in again.
Used for I/Port and Blade auto-discovery. Type the desired subnet range in the format
XXX.XXX.XXX.XXX–XXX. XXX.XXX.XXX
To use a range larger than a Class C, enter multiple subnets by separating them with a
the GUI with a clock on the icon.
. The addresses specified should be of Class C type.
+
.
Grid Center 4.11 Administrator’s Guide Configuring Grid Center • 29
Page 36

Table 1: Configuration Database Fields (Continued)
Field Name Description
Blade Refresh Time (Min.) If a Blade does not poll the Console within this interval, it is considered idle.
Server Type Primary, Secondary, or Stand-Alone. Click Configure to toggle between types.
Primary Server Name Name of the Primary Server.
Secondary Server Name Name of the Secondary Server.
Click the Save button to save the configuration. Grid Center connects to the specified
database and stores the changes.
Note: Enter valid data in the database server, type, name, username, and password
fields. If you configure a database with any settings other than the defaults,
and the data is incorrect, when you save it, an error message is generated
because Grid Center is unable to locate and connect with that database.
Configuring the Authentication Database
The Authentication database allows assigning user names and passwords for specific
Blades and I/Ports, allowing the administrator to log into Blades and I/Ports without
entering user names or passwords each time Blades or I/Ports need to be configured.
Figure 16 Authentication Database
30 • Configuring Grid Center Grid Center 4.11 Administrator’s Guide
Page 37

Discover Network Nodes
Click Use Last Discovery to pick up the machines in the lists of previously
discovered I/Ports and Blades. This option is useful when a pre-populated discovery
list is available, because it avoids a potentially lengthy discovery process. If you
migrated your Discovery lists, click Use Last Discovery to restore these network
nodes to the Authentication database.
Click Add New Blades to discover new Blades on the network and populate the
Authentication database with them. Click Add New I/Ports to discover new I/Ports on
the network and populate the Authentication database with them. These nodes are
added to the existing entries in the Authentication database.
The Blades and I/Ports are listed in the Authentication database in the following order:
• Blades, alphanumerically
• I/Ports, alphanumerically after the list of Blades
On the original discovery, Blades are identified by their Windows host names or by
their IP addresses, and I/Ports by their MAC addresses. You may want to change
these names for easier identifiability.
Configure the Consoles as Trusted Machines
A trusted machine is a system that is assumed to be safe to send data, snapins, and
operating system updates to the I/Ports without requiring authentication or a
challenge/response exchange. By default, the Consoles are the trusted machines for
the I/Ports. More systems can be added as trusted machines in this fashion. Trusted
machines can also be configured through Grid Center after the I/Ports have been
discovered. By default, the Consoles are the trusted machines for the I/Port. More
systems can be added as trusted machines.
The procedure described in Installing the I8800 I/Port Client on page 10 shows one
way to configure trusted machines. They can also be configured through Grid Center
once the I/Ports have been discovered. The procedure in the I/Ports section on page
34 discusses this.
Add Authentication Data
Once the Authentication database is populated, user authentication data can be
added. User/password information can be added one record at a time, or replicated
one page at a time. Since the Grid Center administrator will be the primary user of this
database, it makes sense to methodically set up this data.
Grid Center 4.11 Administrator’s Guide Configuring Grid Center • 31
Page 38

Figure 17 Replicating Authentication Database Entries
Figure 17 shows a populated Authentication database. To add user/password entries,
enter a user name and a password in the top row of the database. Press Save
Record(s) to save the entries. To replicate entries, as has been done in Figure 17,
click the top check box. All the entries on the page are marked. Enter a user name
and a password in the top row of the database. Press Replicate User Credentials to
copy the entries into all the records on the page, and press Save.
Replication copies user/password entries only from the top row, and only to all the
records shown on one page. If more than one page of records is available, a clickable
list of page numbers is displayed near the lower right hand corner of the screen.
Replication can be repeated as desired on other pages. Remember that Blades are
listed first, in alphanumeric order, then I/Ports in alphanumeric order.
Clicking a box in the left column selects an individual record. The Clear All button
de-selects all selected record(s). The Delete Selected Record(s) button deletes all
selected records.
Configuring Network Nodes
Once the database has been configured, the I/Ports and Blades (network nodes) can
be configured and assigned to groups. This task can be simplified if you have a list of
users to be allocated to their respective Blades and I/Ports. Please see Allocation on
page 41 for more information on allocation.
32 • Configuring Grid Center Grid Center 4.11 Administrator’s Guide
Page 39

Blades
The Blade Configuration screen, shown in Figure 18, allows connecting to individual
Blades to configure them. The left-hand tree shows all the discovered Blades. If
Blades are part of a group, then they are displayed in their respective groups. If they
have not yet been assigned to a group, they are displayed in the Last Discovered list.
There are two methods for configuring the Grid Center Blade client:
• Via the Grid Center Administration Console
• Directly from the Blade
From the Grid Center Administration Console, click the Configuration link in the left
menu and click the Configure Network icon at the bottom of the screen. Select
Blade Network and click on the Blade to configure.
or
Launch the Grid Center client locally on the Blade by selecting Start Menu–>All
Programs–>ClearCube Management Suite–>Grid Center–>Grid Center Client.
Figure 18 Blade Configuration Screen
When logging into a Grid Center Blade client, use either the domain credentials of any
valid domain account, or the local credentials of a valid local account. If local is
chosen, enter the local system name instead of the workgroup name.
1. To configure Blade clients on the network, select a Blade from the left-hand
pane and click Blade Config. The Grid Center Blade client Login dialog box is
displayed. If the Authentication database has been populated with the correct
username and password, you are logged in automatically.
Grid Center 4.11 Administrator’s Guide Configuring Grid Center • 33
Page 40

2. Enter the Username, Password, and (if required) the Domain Name for this
Blade. Click Login.
3. Enter the Primary Server, Secondary Server, and Refresh Time in the
Configuration window.
Figure 19 Blade Client Configuration Window
The parameters in the Client Configuration window are:
• Primary Server – the machine running the Administration Console.
• Secondary Server – the machine running the Secondary Console, if one
is configured.
• Refresh Time – the time increment (in seconds) for the client to poll its
Primary Grid Center Console. If the Blade has not polled the Console
within the designated time period, it drops the client from the list. The
default time is 150 seconds.
4. If this Blade needs to be mapped to just one Grid Center Console, click the
link in the Click
5. Click the Save button to save the new configuration.
This procedure should be repeated for each Blade in this subnet.
here to configure to Stand-Alone Server line.
I/Ports
To configure I/Ports on the network, do the following:
1. Click the I/Port Config link in the menu bar near the top of the Configuration
View, or I/Ports in the Configuration menu. The I/Port Configuration screen
Figure 20) is displayed.
(
2. Right-click on the I/Port Network link to re-discover I/Ports in the subnet
range specified in the Network Configuration screen. This ensures your list is
up-to-date.
3. Click on an individual I/Port icon to open its client configuration window. This
window lets you change the Grid Center Console assigned to the I/Port, which
is the Console polled by the I/Port to locate its Blade allocation and refresh
time. An I/Port can be configured or reconfigured only when the Console is
added as a trusted machine in the I/Port trusted machine list. If you have the
I/Port’s user name and password already set in the Authentication database,
an administrator can log in automatically.
34 • Configuring Grid Center Grid Center 4.11 Administrator’s Guide
Page 41

Figure 20 I/Port Configuration Screen
4. Only trusted machines can push software updates to I/Ports. To add a trusted
machine to an I/Port’s list of trusted machines, click the here link on the
screen. A login screen is displayed. Enter the I/Port’s local system user
credentials or domain user credentials to add new trusted machines or delete
previous ones.
5. Click the Configure I/Port link to see the I/Port Client Manager configuration
and make changes.
6. Enter the Primary and Secondary Server names and the I/Port Refresh Time
Figure 21). The refresh time is the frequency with which the I/Port polls
(see
its Grid Center Console. Click the Save button.
Figure 21 Setting the I/Port Refresh Time
This procedure should be repeated for each I/Port in this subnet.
Grid Center 4.11 Administrator’s Guide Configuring Grid Center • 35
Page 42

To see details regarding the I/Port client, click the Get I/Port Client Information link.
The I/Port Client Manager window is displayed (Figure 22) is displayed.
Figure 22 Getting I/Port Information
Debugging Blade Discovery
Occasionally, Blade discovery may not seem to work properly. Use this checklist and
set of debugging procedures to isolate and resolve the most common problems.
Checklist
These items should be check to ensure correct Blade discovery:
• Check the left hand tree to see whether it is in the “collapsed” state. After
performing a discovery, click on the root icon to expand it.
• Verify that the correct subnet range is specified in the GC configuration.
• Verify that all the Blades have Grid Center Blade client installed.
• Verify that the Grid Center installation has not been corrupted by the
ServiceDirectory.xml file being overwritten. This can happen when older
versions of ClearCube software are installed on a blade after Grid Center. If Grid
Center is the most recent ClearCube software installed, this is not the problem. A
36 • Configuring Grid Center Grid Center 4.11 Administrator’s Guide
Page 43

“clean” copy of the ServiceDirectory.xml file is available on the ClearCube
Support website.
Debugging
Take these steps to diagnose Blade client problems:
• Open the %cc_install_dir%\cgi-bin\iport\projects\bladehosts file and
check its contents. Are any discovered hosts present?
• Open a command prompt and run the following command:
cd %cc_install_dir%\iport
set classpath=%classpath%;.
Usage: java MultiThreadUDPGCClient 6500 25 subnet_range
Example:
C:\Program Files\ClearCube Management Suite\DCI\iport>java
MultiThreadUDPGCClient 6500 25 192.168.0.1-192.168.0.254
Return Value: The list of discovered Blades in the network.
If no Blades are returned, it could be because the subnet range is incorrectly
set, Port 6500 has been blocked by some switch or firewall, or that the Grid
Center client is not running on the Blades. Check service status on the Blade
to determine.
Grid Center 4.11 Administrator’s Guide Configuring Grid Center • 37
Page 44

• Check these if the discovery appears to work:
Check to see whether all the Blades that have Grid Center Blade client
installed also have following service directory tag in their
serviceDirectory.xml file:
<Service Name="gcclient">
<Executable>chkgcclient.bat</Executable>
<Arguments/>
If the tag does not exist, then the installation has been corrupted somehow.
Reinstallation should resolve the issue.
• Run the following command line to check the correct functioning of the service
directory:
cd %cc_install_dir%
set classpath=%classpath%;.
Usage: java requestSender gcclient " " BLADE_IP asynch
Example:
C:\Program Files\ClearCube Management Suite\DCI>java
requestSender gcclient " " 192.168.0.12 asynch
Return Value: The names of Blades discovered on the network.
Modifying User Access to the Administration Console
You may find that other users with separate accounts need access to Grid Center on
the Console system. To modify access, and display Grid Center in the Start menu, do
the following:
1. Determine which users need access.
This page intentionally left blank.
2. Navigate to the user profile folder that contains the Start menu files for Grid
Center.
For example: C:\Documents and Settings\All Users\Start
Menu\Programs\ClearCube Management Suite.
3. Copy the ClearCube Management Suite folder and paste it into the
Programs folder for the user(s) requiring access.
4. Edit the program icons appropriately.
5. Restart the system.
Alternatively, the ClearCube Management Suite folder can be moved from the
Programs folder or deleted. If you do this, ensure that you copy the folder before
deleting it.
38 • Configuring Grid Center Grid Center 4.11 Administrator’s Guide
Page 45

Grid Center 4.11 Administrator’s Guide Configuring Grid Center • 39
Page 46

40 • Configuring Grid Center Grid Center 4.11 Administrator’s Guide
Page 47

Allocation
Grid Center utilizes the concepts of I/Port groups and Blade groups for the purpose of
mapping, or allocating, I/Ports to Blades. A group can contain a single I/Port or Blade,
or many. Allocation defines the allowable connections (mappings) between the I/Port
groups and Blade groups.
Allocation allows administrators to allocate dynamic or static mappings between
groups of Blades and I/Ports. Allocation consists of these tasks:
• Create groups
• Add Blades and I/Ports to the groups
• Assign Blades and I/Ports between the groups
• Create shared mappings if desired
After they are created, allocations can be easily modified to allow for changing
network needs and use. Three types of allocations are possible:
• Dedicated – connects the I/Port to the same assigned Blade each time.
• Shared – connects an I/Port to any available Blade in a group, based on the least
load average.
• Spare – allows switching an I/Port to any available spare Blade in the event of a
Blade failure. Typically, Spared Blades do not have any active connections.
These Blades are, as the name suggests, reserved for use only when necessary
as a replacement. More than one Spare Blade group can be created.
When a Blade group is designated as a Dedicated group, I/Ports can connect only to
a specified Blade in that group. This is a static mapping. It does not change between
sessions.
When a Blade group is designated as a Shared group, I/Ports can connect to any
Blade in the group, based on the least-load average algorithm, which monitors
system usage and automatically assigns I/Ports to the Blade in the group that has the
least load when the connection is attempted. This is a dynamic mapping in the sense
that it may be different at the start of any given session.
Grid Center 4.11 Administrator’s Guide Allocation • 41
Page 48

When a Blade group is designated as a Spare group, I/Ports can be re-mapped, or
spared, to any available Blade in that group, regardless of their allocation to a
Dedicated or Shared Blade group.
For example, the I/Ports in an I/Port group named “Sales I/Ports” could be configured
to connect only to the Blades in a Blade group named “Sales Blades.” When an end
user logs in, the Grid Center Console directs that user to a specific Blade, or to any
Blade in a particular group, as allocated.
Figure 23 shows the possible ways in which I/Ports, I/Port groups, Blades, and Blade
groups can be allocated, or mapped.
I/Port Group
I/Port Group
I/Port Group
Spare
Blade Group
Valid
Mapping
I/Port Group
I/Port Group
I/Port Group
Shared
Blade Group
Mapping
Not Allowed
I/Port
I/Port
I/Port
Dedicated
Blade Group
Figure 23 Allocation Strategies
Any number of I/Port groups can be mapped to a Spare Blade group by using the
I/Port group configuration tools. Spare Blade groups are not displayed as selectable
groups in the Allocation View. Only one I/Port group can be mapped to a Shared
Blade group. I/Port groups cannot be mapped to Dedicated Blade groups. However,
individual I/Ports can be mapped to a Dedicated Blade in any quantity and from any
I/Port group.
Note: The Microsoft license restricts RDP connections between Blades and I/Ports
to no more than four simultaneous RDP connections per Blade. If more than
four I/Ports are mapped to a Blade, only the first four RDP connections
initiated will connect successfully.
Creating Groups
Before allocating I/Ports and Blades, you must first create I/Port groups and Blade
groups.
42 • Allocation Grid Center 4.11 Administrator’s Guide
Page 49

Creating a Blade Group
1. From the main menu, click Blade Groups under Edit Groups.
or
In the Group Edit View, click Blade Groups in the menu bar.
2. Enter the Group Name, Description, and Location. Select a Users Class
parameter from the Users Class pull-down menu. These parameters are:
• Name — the name of the group
• Description — a meaningful description of the group
• Location — the group’s location, either physical or virtual
• Users Class— Shared, Dedicated, or Spare, depending on how these
Blades will be allocated.
The first three fields are free text fields and accept alphanumeric characters,
including spaces. Special characters such as . * & % # / \ > < | cannot be used.
If you enter one of these, a dialog box reminds you not to enter special
characters.
Note: If you enter a name longer than 17 characters, only the first 17 characters will
be displayed in the center pane.
3. Press Save or Add Group and confirm this action. The new Blade group is
saved in the database and the group name is added to the Blade Group
pull-down menu at the right end of the menu bar.
The Blade group can be modified at any time by selecting its name from the Blade
Group pull-down menu in the Group Edit View – Blade Groups screen.
To delete a Blade group, select it from the Blade Group pull-down menu and press
the Delete button in the lower right corner of the screen. You will be prompted to
confirm the deletion.
Adding Blades to a Blade Group
To add Blades to a new or existing Blade group, do the following:
1. Select a Blade group from the Blade Group pull-down menu at the right end of
the menu bar.
2. Click on a Blade name or icon in the left pane. A Blade icon with its name is
placed in the right pane.
3. Click Save.
Note: Blades cannot be added to more than one group. Each Blade can belong to
only one group.
To delete a Blade from a Blade group, do the following:
1. Click on the check box next to the Blade to be deleted in the right pane.
2. Click Delete Blades in the center pane.
Grid Center 4.11 Administrator’s Guide Allocation • 43
Page 50

3. You are prompted for confirmation before the Blade is removed from the
group.
4. Click the Save button.
Multiple Blades in a group can be selected for deletion. If you do not click Save, the
changes are discarded and the group remains unchanged.
Note: This process removes the Blade from the group in the Grid Center database.
The Blade itself remains untouched, and is available to be added to a different
group.
You can create a Blade group and populate it in a single step by entering the name
and other parameters for the group, clicking on Blades in the left pane, and clicking
Add or Save.
You can create an essentially unlimited number of Blade groups and leave them
unpopulated if you wish. This is useful for planning future network expansions.
Remember that each Blade can be a member of only one group.
Creating an I/Port Group
Creating and modifying I/Port groups is almost identical to the process for creating
and modifying Blade groups. The major difference is that selecting the Users Class
for Blade groups affects how Blade Spare groups are presented for mapping to I/Port
groups.
1. From the main menu, click I/Port Groups under Edit Groups.
or
In the Group Edit View, click I/Port Groups in the menu bar.
2. Enter the new Group Name, Description, and Location. Select a Blade
group from the Spare Group pull-down menu. See
parameters are:
•Name — the name of the group
• Description — a meaningful description of the group
• Location — the group’s location, either physical or virtual
• Spare Group— a Blade group that has been designated as a spare, or
None.
The first three fields are free text fields and accept alphanumeric characters,
including spaces. Special characters such as . * & % # / \ > < | cannot be used.
If you enter one of these, a dialog box reminds you not to enter special
characters.
Note: If you enter a name longer than 17 characters, only the first 17
The Spare Group menu is populated only with Blade groups that have
already been designated as Spare. If no Spare Blade groups exist, the only
characters will be displayed in the center pane.
Figure 24. These
44 • Allocation Grid Center 4.11 Administrator’s Guide
Page 51

choice is None. However, you can add or modify a Blade group and designate
it as a Spare group, and change the I/Port group spare mapping later.
3. Press Save or Add Group and confirm this action. The new I/Port group is
saved in the database and the group name is added to the I/Port Group
pull-down menu at the right end of the menu bar.
An I/Port group can be modified at any time by selecting its name from the I/Port
Group pull-down menu in the Group Edit View — I/Port Groups screen.
To delete an I/Port group, select it from the I/Port Group pull-down menu and press
the Delete button in the lower right corner of the screen. You will be prompted to
confirm the deletion.
Adding I/Ports to an I/Port Group
Figure 24 shows an unpopulated I/Port group. To add I/Ports to a new or existing
I/Port group, do the following:
1. Select the I/Port Group from the I/Port Group pull-down menu at the right end
of the menu bar.
2. Click on an I/Port name or icon in the left pane. The I/Port is shown in the right
pane, and is added to the database.
3. Click Save.
Grid Center 4.11 Administrator’s Guide Allocation • 45
Page 52

Figure 24 Creating an I/Port Group
Note: I/Ports cannot be added to more that one group. Each I/Port can belong to
only one group.
To delete an I/Port from an I/Port group, do the following:
1. Click on the check box next to the I/Port to be deleted in the right pane.
2. Click Delete I/Ports in the center pane.
3. You are prompted for confirmation before the I/Port is removed from the
group.
4. Click the Save button.
Multiple I/Ports in a group can be selected for deletion. If you do not click Save, the
changes are discarded and the group remains unchanged.
As with Blades in a Blade group, this process removes the I/Port from the group in the
Grid Center database. The I/Port itself remains untouched, and is available to be
added to a different group.
You can create an I/Port group and populate it in a single step by entering the name
and other parameters for the group, clicking on I/Ports in the left pane, and clicking
Add or Save.
46 • Allocation Grid Center 4.11 Administrator’s Guide
Page 53

You can create an essentially unlimited number of I/Port groups and leave them
unpopulated if you wish. This is useful for planning future network expansions.
Remember that each I/Port can be a member of only one group.
Allocating I/Ports and Blades
Allocation allows administrators to allocate dynamic connections between groups of
Blades and I/Ports. After they are created, allocations can be easily modified to allow
for changing network needs and use. Two types of allocations are possible:
• Dedicated – connects the I/Port to the same assigned Blade each time.
• Shared – connects an I/Port to a Blade based on the least-load average.
When a Blade group is designated as a Dedicated group, I/Ports can only connect to
that Blade. When a Blade group is designated as a Shared group, I/Ports can connect
to any Blade in the group, based on the least-load average algorithm, which monitors
system usage and automatically assigns I/Ports to the Blade in the group that has the
least load when the connection is attempted.
In both types of allocation, as many as four I/Ports can connect to a Blade at one time.
With Dedicated allocation, administrators can select as few as one or as many as four
I/Ports to be connected to their dedicated Blade. In this way, administrators can allocate
the right amount of computing power to each user, according to their varied needs.
For example, a power user should be given a Dedicated allocation as a single user on
a Blade. One way to do this is to create a Blade group containing only one Blade, and
an I/Port containing only one I/Port, which is located in the power user’s work area.
For environments where computer usage is light or varied, such as computerized
point-of-sale terminals, an Internet cafe, or a telemarketing group, it would make
sense to create both relatively large I/Port groups and Blade groups, keeping in mind
the limit of four I/Ports per Blade. Since allocations and mappings can be changed at
any time, administrators also gain the ability to perform load-balancing on their
networks.
Setting Allocations
Allocations are added, modified, and deleted from the Allocation View. To manage
allocations, click the Allocation link in the main menu. The Dedicated Resource
Users list is displayed, as shown in Figure 25. This is the default behavior when
Allocation is chosen from the main menu. To see the Shared Resource Users list,
click Shared Allocations.
Grid Center 4.11 Administrator’s Guide Allocation • 47
Page 54

Figure 25 Allocation View
The Resource Users lists show the existing allocations between I/Port groups and
Blade groups. To delete an allocation from one of these lists, click the check box to
the left of the record, and click Delete. You are asked for confirmation. To allow or
disallow the user from being able to change his assigned Blade, click the link under
Blade Selection that corresponds to the group or the I/Port. This toggles between
User Override, which allows changing Blades, and No User Override, which
prevents the user from changing Blades. This is displayed on the user login screen by
making the Blade Name field editable. The user must know the name of the Blade to
enter it. Alternatively, clicking the Last Connected button autopopulates the
last-connected Blade name in the Blade Name field. The user may need to press the
Refresh button if the User Override setting has been changed recently. See Figure 13
on page 26.
To add a record, click Add. The Allocation View – Dedicated Resource Users screen
(Figure 25) is displayed. To add a dedicated group allocation, do the following:
1. Click Refresh Nodes in the middle pane. This ensures that you have the most
recent network information.
2. Click on an I/Port group in the left pane. The group information is placed in the
I/Port Group information table in the bottom pane.
3. Click on a Blade group from the pull-down menu in the right pane. The group
information is placed in the Blade Group information table in the bottom pane.
4. Click Save.
48 • Allocation Grid Center 4.11 Administrator’s Guide
Page 55

Figure 26 Adding a Shared Resource
Creating a Shared User Mapping
Before creating a shared user mapping, each Blade client must be configured as a
Shared resource type (see Creating a Blade Group on page 43). The Blade group
and I/Port groups must also be configured as Shared resource types (see Creating a
Blade Group on page 43 and Creating an I/Port Group on page 44).
1. From the Allocation View, click the Add link.
2. Select Shared Resource Users from the drop-down menu in the upper gray
bar.
3. Click on the I/Port Group name in the left pane.
4. Select the Blade Group to be shared from the drop-down menu in the upper
gray bar.
5. Click on any of the Blades shown in the right pane.
6. Click the Save button to save the shared user mapping.
7. To verify mapping was saved, click the Allocation link in the left menu and
click the link in the right pane to see the Shared Resource Users List.
Creating a Dedicated User Mapping
Before creating a dedicated user mapping, you must configure the Blade clients as a
Dedicated resource type (see Creating a Blade Group on page 43). The Blade group
and I/Port groups must also be configured as Dedicated resource types (see Creating
a Blade Group on page 43 and Creating an I/Port Group on page 44).
Grid Center 4.11 Administrator’s Guide Allocation • 49
Page 56

1. From the Allocation View, click the Add link.
2. Select Dedicated Resource Users from the drop-down menu in the upper
gray bar.
3. Click on the I/Port Group name in the left pane.
4. Select an individual I/Port.
5. Select the Blade Group to be used from the drop-down menu in the upper
gray bar.
6. Click on any of the Blades shown in the right pane.
Figure 27 Choosing a Blade for Mapping
7. Click the Save button to save the shared user mapping.
8. To verify mapping was saved, click the Allocation link in the left menu and
click the link in the right pane to see the Dedicated Resource Users List.
Deleting a User Mapping
1. Click the Allocation link in the left menu, then click a menu choice from the
menu bar in the right pane to see the Dedicated Resource Users or Shared
Resource Users list, as desired.
2. Select the check box next to the mapping to be deleted.
3. Click the Delete link.
Figure 28 Deleting a User Mapping
50 • Allocation Grid Center 4.11 Administrator’s Guide
Page 57

Switching and Sparing
The Switching View lets administrators view and switch any I/Port to any Blade on the
network. To access the Switching View, click the Switching link in the left-hand frame
in the Grid Center Console. The tree in the left pane shows the available I/Port
groups. The drop-down list in the top gray bar shows the Blade group currently
selected. By default, information for the first Blade group is shown, as in Figure 29.
Figure 29 Switching View with Default Blade Group Selected
Double-click the I/Port network link to expand the I/Port network tree. Click the
Expand icon next to each I/Port group to see the I/Ports in that group.
Note: I/Ports with small clocks on them show that they are currently offline or are
otherwise unavailable. An I/Port determined to be offline is one that has not
polled within the configured polling interval, including new I/Ports that have not
yet been added to the Authentication database.
Grid Center 4.11 Administrator’s Guide Switching and Sparing • 51
Page 58

When an I/Port or a Blade is selected, its information is shown at the bottom of the
screen, as shown in Figure 30.
Figure 30 Selected I/Port
When to Switch and When to Spare
When an administrator needs to move a user from one Blade to another, the decision
should be made with both the administrator’s and the user’s needs in mind.
First, why is the user being switched? If the switch is being made to perform a brief
maintenance task such as exchanging a Blade, the administrator typically has ample
time to select a Blade to which the user can be switched. On the other hand, if the user’s
Blade has failed, sparing them over gets them back online in the shortest possible time.
Next, what are the user’s computing demands? If the user is a “power user” who
needs a lot of power and is in a Dedicated allocation, moving the user to a spare
Blade may be the best choice. Since spare Blades typically are unused, this would
provide the largest amount of available computing power for the user. Switching a
“power user” to a shared Blade already occupied by three other users would probably
result in noticeably degraded performance for all four users.
On the other hand, if the user has only modest needs and is in a Shared group,
switching them to another Blade within the same group is the best option, and is
likeliest to be the least visible to the user. If the user ends their RDP session, on
re-establishing a connection they will rejoin their assigned group according to the
least-used selection method. But if network security policies are in place, switching
them to a different Shared Blade group may leave them without access to their
networked files or applications.
52 • Switching and Sparing Grid Center 4.11 Administrator’s Guide
Page 59

Switching an I/Port
Switching an I/Port is possible only when the I/Port user has already connected to a
Blade using the Grid Center I/Port client.
Switching an I/Port to Another Blade
1. Select the I/Port to be switched from the left pane. The I/Port description at the
bottom shows the user name and the Blade to which it is currently connected.
2. Using the Blade Group menu, select the Blade group containing the Blade you
want connected to the selected I/Port. Click on the target Blade in the right
pane. The Blade description at the bottom shows the name of the I/Ports that
are connected to that Blade.
Figure 31 Selecting a Blade
3. Click the Switch button to switch the I/Port to the selected Blade. If other
I/Ports are already connected to the Blade, the following screen is shown:
Figure 32 Confirm Dialog for Switching
Clicking on Disconnect All disconnects all the currently connected I/Ports, and then
connects the selected I/Port to the Blade. Clicking the Connect This button connects
the selected I/Port to the Blade while leaving all other I/Port connections intact.
Grid Center 4.11 Administrator’s Guide Switching and Sparing • 53
Page 60

Sparing an I/Port
The Administration Console also allows switching an I/Port to a spare Blade.
1. Select the I/Port to be spared from the left pane.
2. Using the Blade Group menu, select the Spare Blade group.
3. Click the Spare button to switch the I/Port to the spare Blade. Grid Center then
connects the selected I/Port to an available spare Blade from the Spare group
not currently connected to an I/Port.
54 • Switching and Sparing Grid Center 4.11 Administrator’s Guide
Page 61

Updates
Updating an I/Port
Grid Center lets the administrator update software on I/Ports without having to
physically be at the I/Port location. To update an I/Port or I/Port group, two files are
required – the update file (a
updated files for installation, and the answer file (a
the files contained in the update file to the specified locations.
Updates don’t necessarily have to always deploy files. They can modify the system
environment, reboot a machine, delete files, change the contents of files, or perform
other modifications.
Updates make it simple to refresh the software on an I/Port. For instance, updates
can be used to deploy new peripheral drivers without ever visiting an I/Port. Updates
can also modify and replace vulnerable system files with patched versions, thus
removing security or reliability defects. To update an I/Port, do the following:
.zip or .tar archive file) that contains the new or
.bat or .2do file) file that installs
1. From the Update View, click on the individual I/Port to be updated, as shown
Figure 33, or double-click the I/Port group name to select the entire group.
in
Figure 33 Selecting an I/Port for Updating
Grid Center 4.11 Administrator’s Guide Updates • 55
Page 62

2. Click the first Browse button to locate the update file.
3. Click the second Browse button to locate the answer file.
4. Click the Update button.
Note: The Browse function checks only that a file is specified, and not a directory.
File extensions are checked when the Update button is clicked, and the
extensions for the update and answer files are verified.
Use .zip and .bat files for the I8800 and XPe Eon e100 I/Ports, and .tar and .2do
files for the Capio One and Linux Eon e100 I/Ports. The Linux files are
interchangeable between the Capio One and the Linux Eon e100, but the XPe files
are not interchangeable between the I8800 and the XPe Eon e100. If you send an
I8800 file to an Eon e100, or vice versa, you will corrupt the operating system and will
need to re-image the operating system. The Eon e100 can be re-imaged in the field.
The I8800 needs to be returned to ClearCube for re-imaging.
See Appendix A: Using Grid Center with e100 and Capio I/Ports on page 61 for more
information.
56 • Updates Grid Center 4.11 Administrator’s Guide
Page 63

Inventory and Health
Viewing I/Port Health
Health of individual I/Ports can be seen from the Inventory and Health View.
1. Click the Inventory and Health link in the left menu.
2. Click on an individual I/Port from left tree to see the health categories.
3. Click a category link in the right pane to see the details of the I/Port. If the
I/Port is offline, its health statistics are not shown.
Figure 34 I/Port Inventory and Health View
4. For details within the category, click the icon next to the description.
Grid Center 4.11 Administrator’s Guide Inventory and Health • 57
Page 64

Figure 35 I/Port System Information Description Window
This page intentionally left blank.
58 • Inventory and Health Grid Center 4.11 Administrator’s Guide
Page 65

Viewing Blade Health
Health of individual Blades can be seen from the Inventory and Health View. To see a
Blade’s status, do the following:
1. From the Health and Inventory View, select Blade Health Stats.
2. Click on a Blade in the left pane to see its health stats.
Figure 36 Blade Health Window
3. Click the Expand button next to the Blade name to see additional details.
4. Click a user name link to see currently running tasks for that user.
Grid Center 4.11 Administrator’s Guide Inventory and Health • 59
Page 66

60 • Inventory and Health Grid Center 4.11 Administrator’s Guide
Page 67

Appendix A: Using Grid Center
with e100 and Capio I/Ports
Grid Center 4.11 adds support for ClearCube’s new I/Ports, the Eon e100 and Capio
One. These two new architectures differ from ClearCube’s previous I/Ports, although
Grid Center’s management capabilities are essentially unchanged. The most
significant changes are:
• Updates and snapins for the new I/Ports do not work with the I8800 I/Port, and
vice versa. Loading an update to the wrong kind of I/Port can render the I/Port’s
operating system unusable.
• The new I/Ports use a different application for loading operating system updates
and operating system snapins, Neoware ezRemote Manager.
This appendix describes the new features and configuration requirements for the Eon
e100 and Capio One I/Ports, and touches on significant differences between the new
architectures and ClearCube’s existing I/Port architectures.
Capio One
I8800
Eon e100
Figure A-1 ClearCube I/Ports
Grid Center 4.11 Administrator’s Guide Appendix A: Using Grid Center with e100 and Capio I/Ports • 61
Page 68

Console Software
The new I/Ports use the following console applications:
• Grid Center 4.11
• Neoware ezRemote Manager
Grid Center is used in its traditional fashion to monitor and manage I/Ports. The
ezRemote Manager application is used to push system updates and snapins for the
new I/Ports.
Table A-1 Grid Center and ezRemote Manager Functionality Overview
Action Grid Center ezRemote Manager
Update Grid Center client software
Track and manage I/Ports with auto-discovery
Set up and manage dynamic and dedicated
connections to Blades
Spare users between Blades
View Blade utilization statistics
View client asset information
Install peripheral drivers
Install local applications
Install Microsoft security updates
Re-image I/Ports
Shadow (mirror) a user's RDP session
Best application choice for this task.
√
√
Grid Center can perform these functions, but in order to leverage the snap-ins that
*
have already been completed and validated by Neoware, these update packages will
primarily be made available in the ezRemote Manager format.
√
√
√
√
√
√
√
√
√
*
*
*
√
√
√
√
√
Grid Center
To provide full support for the new I/Ports, you need to run the Grid Center Linux
Update Installer on your Grid Center Console system. This installer places the
required files for the Linux I/Port Client on the Grid Center Console. You must have
Grid Center 4.1 or higher installed to use this update.
62 • Appendix A: Using Grid Center with e100 and Capio I/Ports Grid Center 4.11 Administrator’s Guide
Page 69

With the Grid Center clients installed on the I/Ports and the new Grid Center Linux
Update installed on the Grid Center Console, Grid Center ‘s management
functionality between the old and the new I/Ports is essentially the same. The two
most notable differences are that the Eon e100 I/Ports with XPe report a larger set of
parameters in the Inventory and Health View; and ezRemote Manager must be used
to push operating system updates to the new I/Ports.
Grid Center snapins for XPe-based I/Ports, including the I8800, will be pushed using
Grid Center.
ezRemote Manager
The Eon e100 and Capio I/Ports require Neoware ezRemote Manager to perform
software updates. ezRemote Manager can be downloaded from
http://www.neoware.com/.
Two versions are available: ezRemote Manager Enterprise Edition, and ezRemote
Manager Limited Edition. ezRemote Manager Enterprise Edition requires Windows
2000 Server or Windows 2003 Server to run, requires obtaining a software key from
Neoware, and allows managing an unlimited number of clients. ezRemote Manager
Limited Edition runs on Windows 2000 or Windows XP Professional (installed on the
ClearCube Blades) as well as Windows 2000 Server or Windows 2003 Server and
does not require a software key, but can manage only 5 clients at a time.
You need a serial number from one of your I/Ports to download ezRemote Manager.
When you download the software, get the manual as well. If you plan to use
ezRemote Manager Enterprise Edition, register for a software key as well. The
software key is delivered by email, or can be obtained by phone from Neoware.
Details are provided in the ezRemote Manager User Manual.
If you are using your I/Port as a client managed by Grid Center, do the following from
the Grid Center Console to set up connectivity:
1. Discover the I/Port.
2. Configure the I/Port with the Primary and Secondary Consoles’ names to
establish them as trusted machines.
3. Add the I/Port to the Grid Center authentication database.
By default, the Consoles are trusted machines for the I/Port. More systems can be
addedas trusted machines. More information is provided in other sections of this
manual.
All Neoware snapins will be pushed using ezRemote Manager. All reimages and
image updates except for the I8800 will be pushed using ezRemote Manager. If you
are using your I/Port as a client managed by ezRemote Manager, please see the
ezRemote Manager User Manual for full information.
Grid Center 4.11 Administrator’s Guide Appendix A: Using Grid Center with e100 and Capio I/Ports • 63
Page 70

Client Software
Grid Center 4.11 maintains full compatibility with the I8800 I/Port, and adds client
support for the Eon e100 XPe I/Ports, and Eon e100 and Capio One NeoLinux
I/Ports.
The Eon e100 is available with either XPe or NeoLinux. The Capio One is available
only with NeoLinux. The NeoLinux operating system and client can be installed on an
Eon e100, although this is not recommended.
Eon e100 and Capio One I/Ports from ClearCube are shipped with Grid Center Client
software pre-installed. This section provides information on how to verify that this
software is correctly installed and functions properly. It also provides information on
how to install, reinstall, or update the client software or other software snapins.
Finally, it gives information on updating or re-imaging the operating system.
I/Port System and Client Verification
The Grid Center client is programmed to start automatically on system startup on the
NeoLinux I/Ports. The XPe Eon e100 I/Port requires you to login to the I/Port before
starting the Grid Center client. (This behavior differs from the I8800 I/Port, which
auto-starts the Grid Center client and auto-connects to an allocated Blade via RDP,
and provides the user with a Windows login screen on the Blade.) On both operating
systems, a ClearCube splash screen is displayed during startup. This should be
visually verified when installing an I/Port on the desktop.
To verify whether the I/Port can connect with the Grid Center server, ping the Grid
Center Console system. On the NeoLinux I/Ports, open a
On the XPe I/Ports, run
port 6500 to be open. Microsoft Remote Desktop Protocol requires TCP ports 139
and 3389 to be open.
If the I/Port can reach the Grid Center Console via
client, you may need to reinstall the client software. Use ezRemote Manager to push
out the client, as Grid Center requires minimal client connectivity for a push to
succeed.
Note: The NeoLinux I/Ports need to be plugged into a live Ethernet connection at
startup for the network interface chip (NIC) to auto-initialize. If this does not
happen, the NIC can be started manually using the ezConnect client, or by
restarting the I/Port.
ping from a command window. Grid Center requires TCP
ping but not via the Grid Center
tty session to use ping.
I/Port Client Configuration
The default administrator ID/ password on the XPe I/Ports is
clearcube
. The default user ID/ password on the XPe I/Ports is
administrator /
user / clearcube
.
64 • Appendix A: Using Grid Center with e100 and Capio I/Ports Grid Center 4.11 Administrator’s Guide
Page 71

The default administrator ID/ password on the NeoLinux I/Ports is
A default user ID/ password is not provided on the on the NeoLinux I/Ports.
For security reasons, these passwords should be changed. User accounts can be set
up individually via RDP or at the local desktop by the administrator. In addition, Grid
Center and ezRemote Manager can execute scripts on multiple I/Ports, offering an
effective tool for updating authentication credentials. XPe uses the standard Windows
tools and methods for account and password maintenance. The NeoLinux Grid
Center client provides its own password maintenance capability.
root / clearcube
I/Port Software Updates
The Eon e100 and Capio One I/Ports use ezRemote Manager for operating system
updates. These brief procedures describe how to update or re-image Eon e100 and
Capio I/Ports. The ezRemote Manager User Manual provides complete details on
pushing software updates or re-imaging the I/Port.
To push a snapin:
1. In ezRemote Manager, select Neoware Appliances in the left pane.
2. From the Actions menu, select Assets.
3. In the window that is displayed, click the Password button and enter the
password for the I/Ports to be updated.
4. Highlight the I/Ports to receive the snapin.
5. Select the Snapin Manager icon (the icon with the red check mark).
6. Browse for the snapin and click OK.
.
To re-image:
1. In ezRemote Manager, select Neoware Appliances in the left pane.
2. From the Actions menu, select Assets.
3. In the window that is displayed, click the Password button and enter the
password for the I/Ports to be updated.
4. Highlight the I/Ports to receive the snapin.
5. Select the Software Update Manager icon (the icon with the floppy disk).
6. Browse for the image file and click OK.
The I8800 I/Port uses Grid Center for software updates. See Updates on page 55 for
more information. If your I8800 I/Port requires system re-imaging, contact ClearCube
Technical support (see Contacting Support on page 67).
Grid Center 4.11 Administrator’s Guide Appendix A: Using Grid Center with e100 and Capio I/Ports • 65
Page 72

Notes
When re-imaging an Eon e100 XPe I/Port, the initial system messages report that
NeoLinux is loading. This is correct. NeoLinux is used to begin the XPe installation.
When the installation is complete, the I/Port will restart in XPe.
Do not turn off power to the I/Port during a software update.
After updating or re-imaging an Eon e100 XPe I/Port, system response will be slower
until after the system saves its user settings the first time.
When updating Eon e100 and Capio One I/Ports, be aware that the Capio One has a
slower processor and will take longer to update.
If you use a KVM switch with an I/Port, overall system response will probably be
slower. This is an unavoidable consequence of using the KVM switch.
The I8800 and Eon e100 I/Ports use a write filter to prevent unwanted writes to the
flash memory of the I/Ports. The functionality is similar, but the write filter controls are
completely different. On both I/Ports, the ability to change the write filter is visible only
to the administrator.
The I8800 I/Port displays a write filter indicator in the system tray. When the write filter
is enabled (the flash cannot be written), the write filter indicator is a green dot in the
system tray. When the write filter is disabled (the flash can be written), the write filter
indicator is a red dot. Double-click on the Disable Write Filter icon (red circle) or
Enable Write Filter icon (green circle) on the administrator desktop to disable or
enable the write filter.
The Eon e100 I/Port also displays its write filter indicator in the system tray. When the
write filter is enabled (the flash cannot be written), the write filter icon has a red dot.
When the write filter is disabled (the flash can be written), the write filter icon has a
green dot. Double-click on the write filter indicator to change its state. The Eon e100
provides tooltips with its write filter icon to alert the user whether the flash can be
written.
66 • Appendix A: Using Grid Center with e100 and Capio I/Ports Grid Center 4.11 Administrator’s Guide
Page 73

Contacting Support
ClearCube
In the event you have any problems with your ClearCube software, please refer to our
Web site or contact ClearCube Technical Support for guidance.
support@clearcube.com Email address to ClearCube Technical Support
support.clearcube.com ClearCube Support Website
(866) 652-3400 Direct line in the US
+1 (512) 652-3400 Direct line from outside the US
Active Perl
ClearCube Grid Center 4.11 utilizes ActiveState Perl technology. ActivePerl is the
up-to-date, quality-assured Perl binary distribution from ActiveState. Current releases,
and other professional tools for open source language developers are available at
http://www.ActiveState.com/
The ActiveState Repository has a large collection of modules and extensions in
binary packages that are easy to install and use. To view and install these packages,
use the Perl Package Manager (PPM) which is included with ActivePerl.
Commercial support for ActivePerl is available through ActiveState at:
http://www.ActiveState.com/Support/Enterprise/
For peer support resources for ActivePerl issues see:
http://www.ActiveState.com/Support/
Neoware
Neoware documentation and software can be downloaded at:
http://www.neoware.com/manuals.html/
http://www.neoware.com/downloads/management.aspx
Acknowledgements
ClearCube Grid Center 4.11 utilizes ActiveState Perl technology.
Grid Center 4.11 Administrator’s Guide Contacting Support • 67
Page 74

This page intentionally left blank.
68 • Contacting Support Grid Center 4.11 Administrator’s Guide
Page 75

Index
A
ActiveState Perl
installing 5, 12
adding
Blade group 43
I/Port group 44
I/Ports to a group 45
Administration Console 18
configuring 29
installing 13
All-in-One Installer 7
allocating
Blades 47
I/Ports 47
allocation 41
dedicated 41
deleting 50
shared 41
spare 41
Allocation View 2, 22, 47
B
Blade
allocating 47
Blade group
adding Blades 43
creating 43
Blade health
viewing 59
C
Configuration View 2, 20, 30, 33, 34
configuring
Grid Center Administration Console 29
Grid Center Blade 32
Grid Center I/Port client 32
contacting support
ActivePerl 67
ClearCube 67
creating
Blade group 43
I/Port group 44
D
dedicated allocation 41
deleting
user mapping 50
Distributed Computing Infrastructure (DCI)
installing 5, 12
E
Edit Groups View 21
G
Grid Center
Administration Console 6
configuring Administration Console 29
installing 5
uninstalling Administrator Console 15
Grid Center Administration Console
installing 13
Grid Center Blade client
configuring 32
Grid Center client 6
Grid Center I/Port client
configuring 32
group
creating 42
Group Edit View 2, 45
I
I/Port
allocating 47
sparing 54
switching 53
I/Port group
adding I/Ports 45
creating 44
I/Port health
viewing 57
I/Port software
updating 55
installing
ActiveState Perl 5, 12
Administrator Console 5
Distributed Computing Infrastructure (DCI) 5, 12
Grid Center Administration Console 13
Grid Center Blade client 8
I/Port client 10
JRE 5, 12
Inventory and Health View 3, 23, 57
J
JRE
installing 5, 12
L
launching
Administration Console 18
Grid Center 4.11 Administrator’s Guide Index • 69
Page 76

S
shared allocation 41
spare allocation 41
sparing
I/Port 54
support
ActivePerl 67
ClearCube 67
switching
I/Port 53
Switching View 2, 21, 51
U
uninstalling
Administrator Console 13, 14, 15
Update View 3, 23, 55
updating
I/Port software 55
V
viewing
Blade health 59
I/Port health 57
70 • Index Grid Center 4.11 Administrator’s Guide
Page 77

Page 78

ClearCube Technology, Inc.
8834 Capital of Texas Highway North Austin, Texas 78759 voice 512.652.3500
www.clearcube.com
Rev. 7/31/2005P/N 020031-B
 Loading...