

Page 1
CD8620-Series/CD6620-Series
ClearCube Technology, Inc. www.clearcube.com (866) 652-3500 1 of 5
Package
Contents
CD8620- or CD6620-series thin client
Pedestal and thumb screw
Power adapter and power cable
This Quick Start Guide
Specifications
Processor: Intel Atom D2550 Dual Core 1.86 GHz
Chipset: Intel NM10
Memory: 1 × SODIMM, DDR3, up to 4 GB
Graphics: Integrated in Atom D2550
Audio: HD Audio VIA 1708S
Network: All models: 10/100/1000BASE-T Ethernet (RJ45)
CD6620-series also includes one of the following:
1000BASE-SX, LC connector (fiber SFP module)
10/100BASE-FX, LC connector (fiber SPF module)
1000BASE-T Ethernet (RJ45 SPF module)
Smart Card Reader: Models CD8624 and CD6624 only
BIOS: AMI UEFI BIOS (16 Mb SPI ROM)
USB: 4 × USB 2.0, 2 × USB 3.0
Storage: Flash SATA SSD module, up to 32 GB
Power: DC in 12 V/4 A external power adapter
Dimension: 230 mm (H) × 210 mm (D) × 57 mm (W)
Overview
Continued on next page
Page 2
CD8620-Series/CD6620-Series
ClearCube Technology, Inc. www.clearcube.com (866) 652-3500 2 of 5
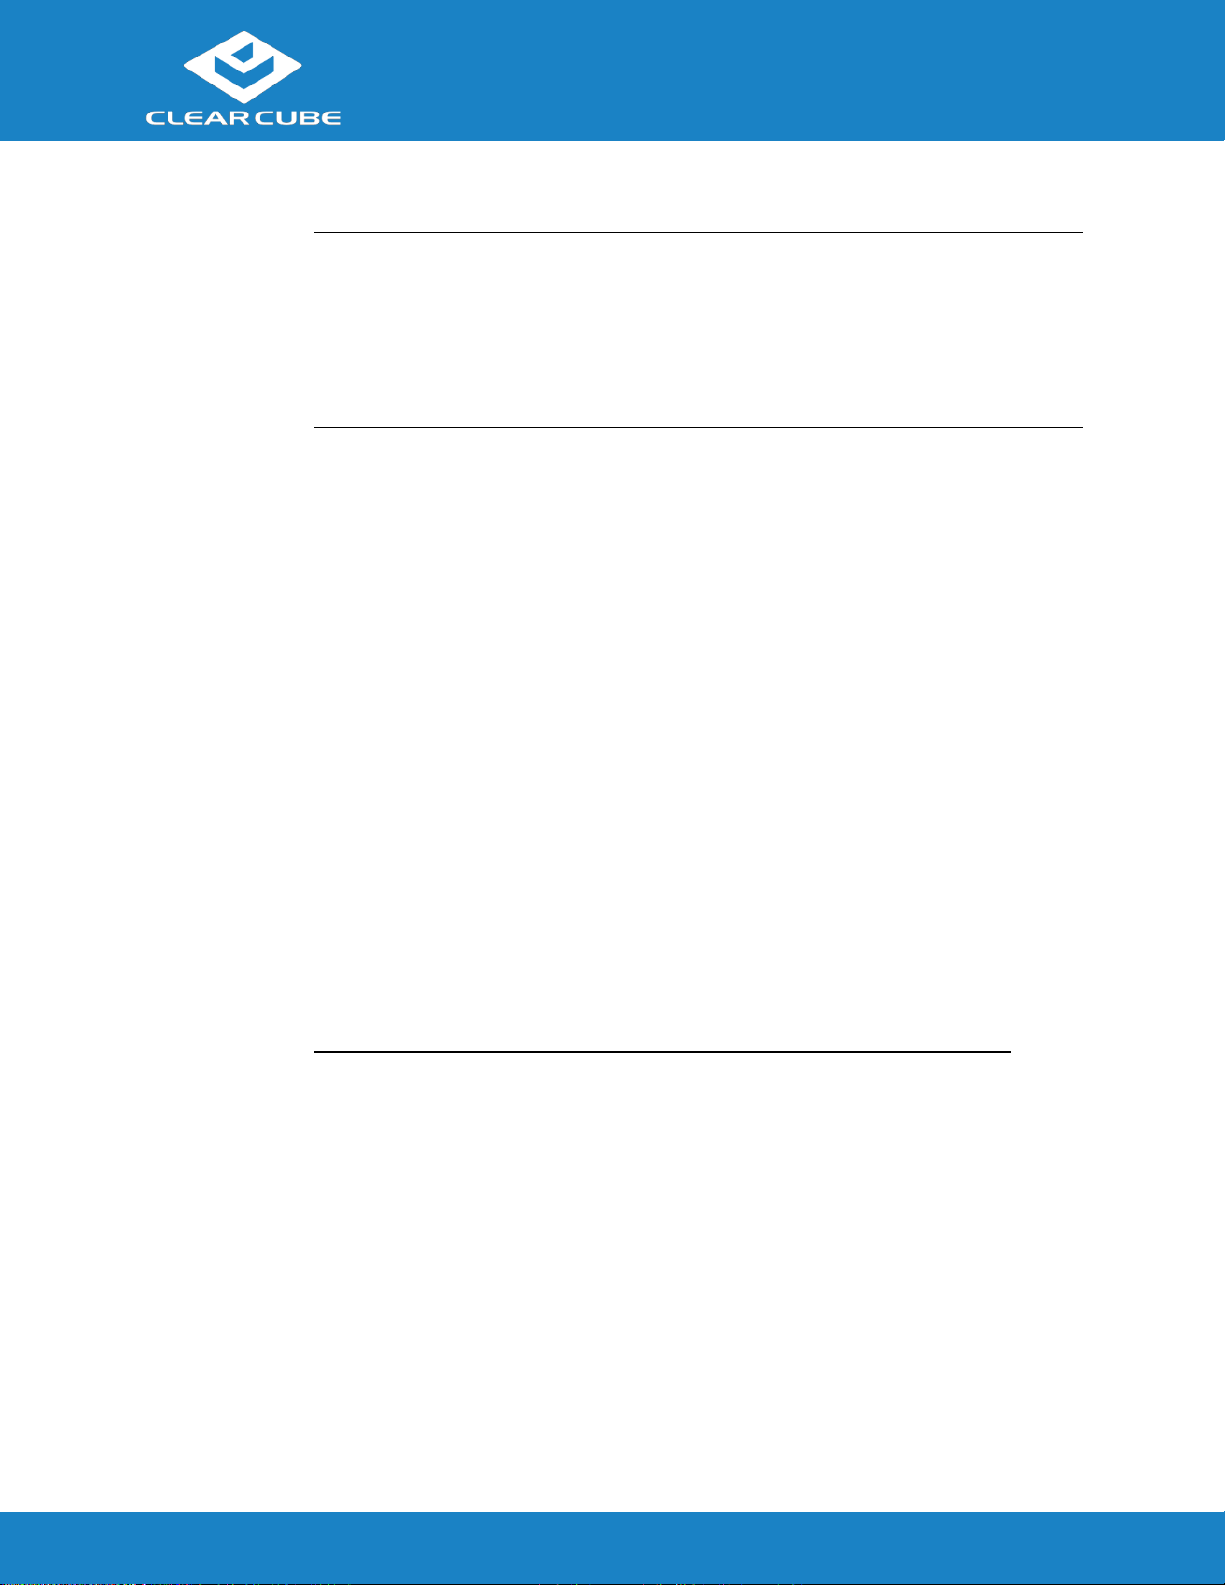
Features
The pictures below show CD8620- and CD6620-series thin client features. Some features
vary by model.
Thin Client
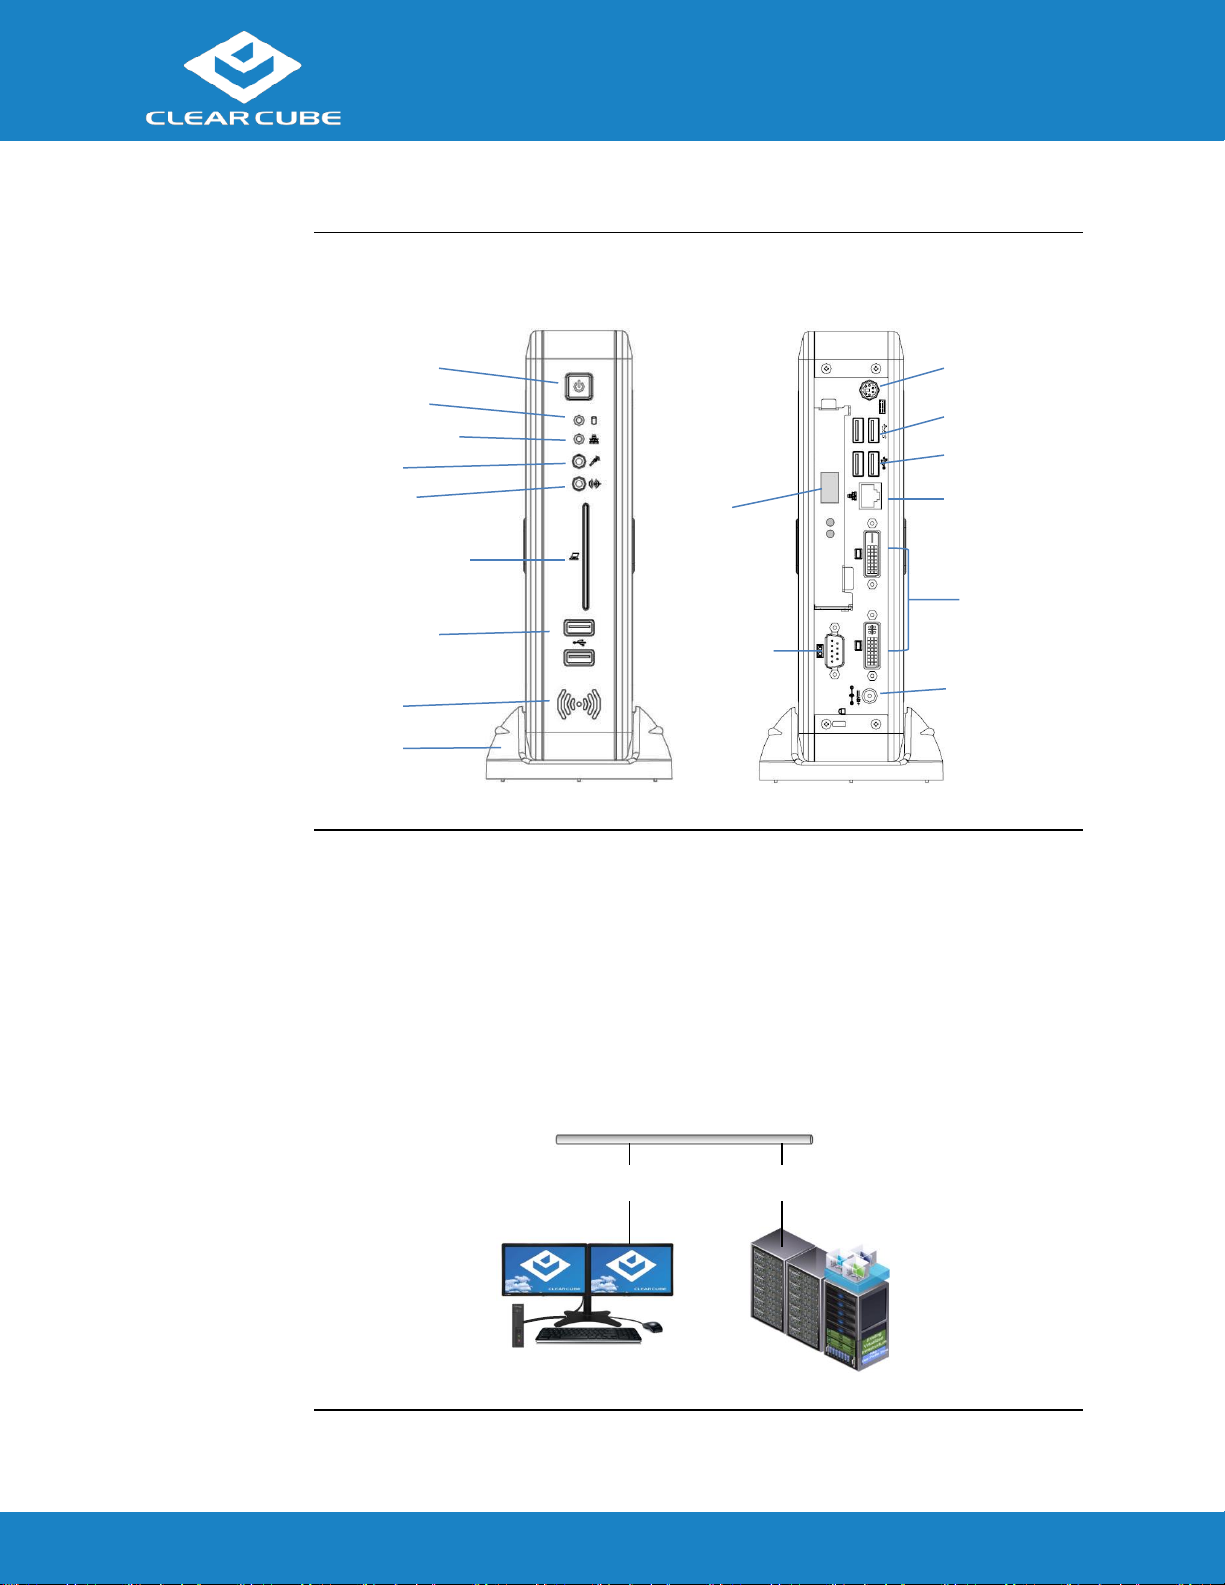
Overview
A Cloud Desktop, or thin client, is a remote computing device that connects a user’s
monitors, keyboard, mouse, speakers, and other peripherals to remote PC blades (computers)
and to virtual desktops (VMs). As shown below, computing resources are typically located in
remote data centers.
Thin clients enable users to work on a blade or VM as if it is a local PC using a remote
connection protocol. See the documentation for the remote protocol application that you use
for additional information.
HDD activity
Power button
Network activity
Audio in
Audio out
Smart card reader
(CD8624 and CD6624)
USB 2.0 ports
Speaker
Pedestal
USB 3.0 ports
PS/2 port
USB 2.0 ports
RJ45 LAN port
DVI ports
DC jack
COM port
SFP adapter
(CD662x only)
Network Infrastructure
Thin Client with
Monitors and Peripherals
Chassis with
Blades and VMs
Copper and Fiber Ethernet
(Network Media Varies by Model)
Overview, Continued
Page 3

CD8620-Series/CD6620-Series
ClearCube Technology, Inc. www.clearcube.com (866) 652-3500 3 of 5
Safety and
Precautions
Prevent ESD (electrostatic discharge) damage to smart card readers by
always discharging your body and smart card before using a reader (for
example, by touching a grounded, unpainted, metal object). ESD can vary
depending on many environmental conditions, including clothing that users
wear and how they handle smart cards. ESD damage can potentially cause
unsupported card reader behavior including failure. Always perform ESD prevention steps
before using the card reader.
Do not install the thin client in areas where it can become wet or be exposed to water.
Only use the power cord shipped with the thin client.
Ensure there is four inches of space surrounding the thin client. Inadequate ventilation can
damage the device.
Setting up a
Thin Client
The steps below show how to set up a thin client.
Step
Action
1
Carefully unpack the thin client and components. Ensure that you have
the following items:
Power cord (included)
USB mouse
USB keyboard
DVI monitors
2
Place the thin client in its pedestal and use the included thumb screw to
secure the pedestal to the thin client.
3
Connect a USB keyboard and mouse to the thin client (be sure that USB 2.0
and 3.0 connectors are connected to appropriate ports).
4
Connect an Ethernet cable to the Ethernet port on the rear of the thin client
and to the Ethernet port on the remote compute device or network device.
Models CD662x only: The network interfaces for the add-on SFP card (SFP
module) and the onboard RJ45 are both enabled. You can disable either
network interface from the BIOS.
5
Optionally, connect a printer to the thin client.
Thin Client Setup
Continued on next page
Page 4

CD8620-Series/CD6620-Series
ClearCube Technology, Inc. www.clearcube.com (866) 652-3500 4 of 5
Setting up a
Thin Client
(continued)
Step
Action
6
Connect the included power cord and AC adapter, and then plug the adapter
into the rear of the thin client. Continue by plugging the power cord into an
AC power outlet.
7
Power on the thin client by pressing the power button.
NOTE: The thin client displays the BIOS splash screen and a Windows
operating system animation, then the displays are blank. After several
moments, power off the thin client by pressing the power button, then power
it on again. A message is displayed showing that the Admin user password is
expired and must be changed. The existing Admin password is blank (an
empty value, as noted in User Accounts below).
8
If the thin client contains a smart card reader:
Install a smart card reader driver on the remote device to which users
connect. Drivers are available at www.clearcube.com/support.
Be sure that the Windows operating system Smart Card service
(SCardSvr) is running on the remote device to which users connect. See
operating system documentation for more information.
You can now use remote connection software to connect to a remote computing device.
User Accounts
Depending on configuration, thin clients can include Windows Embedded® Standard 7
operating system. The thin client boots to the Admin user and the default password is an
empty value (blank).
NOTE: Change administrator password immediately after logging in.
Thin Client Setup, Continued
Page 5

CD8620-Series/CD6620-Series
ClearCube Technology, Inc. www.clearcube.com (866) 652-3500 5 of 5
Additional
Information
ClearCube Sentral Administrator’s Guide describes how to use ClearCube Sentral to manage
thin clients, chassis, and related devices; perform connection brokering; and more.
Contacting
Support
Web site: www.clearcube.com/support
Email: support@clearcube.com
Phone: (512) 652-3400
Toll-free: (866) 652-3400
WEEE Disposal Guidelines
ClearCube at recycle@clearcube.com.
G0200168, Rev B 2014.07.17
Resources and Support
In the European Union, this electronic product falls under the European Directive (2002/96/EC) WEEE. When
it reaches the end of its useful life or is no longer wanted, dispose of it at an approved, designated recycling
or treatment facility. Check with your local authorities for proper disposal instructions. For assistance, contact
 Loading...