

Page 1
CD5011 ZERO+ Client
ClearCube Technology, Inc. www.clearcube.com (866) 652-3500 1 of 7
Package
Contents
CD5011 ZERO+ Client
Power adapter and power cable
This Quick Start Guide
Features
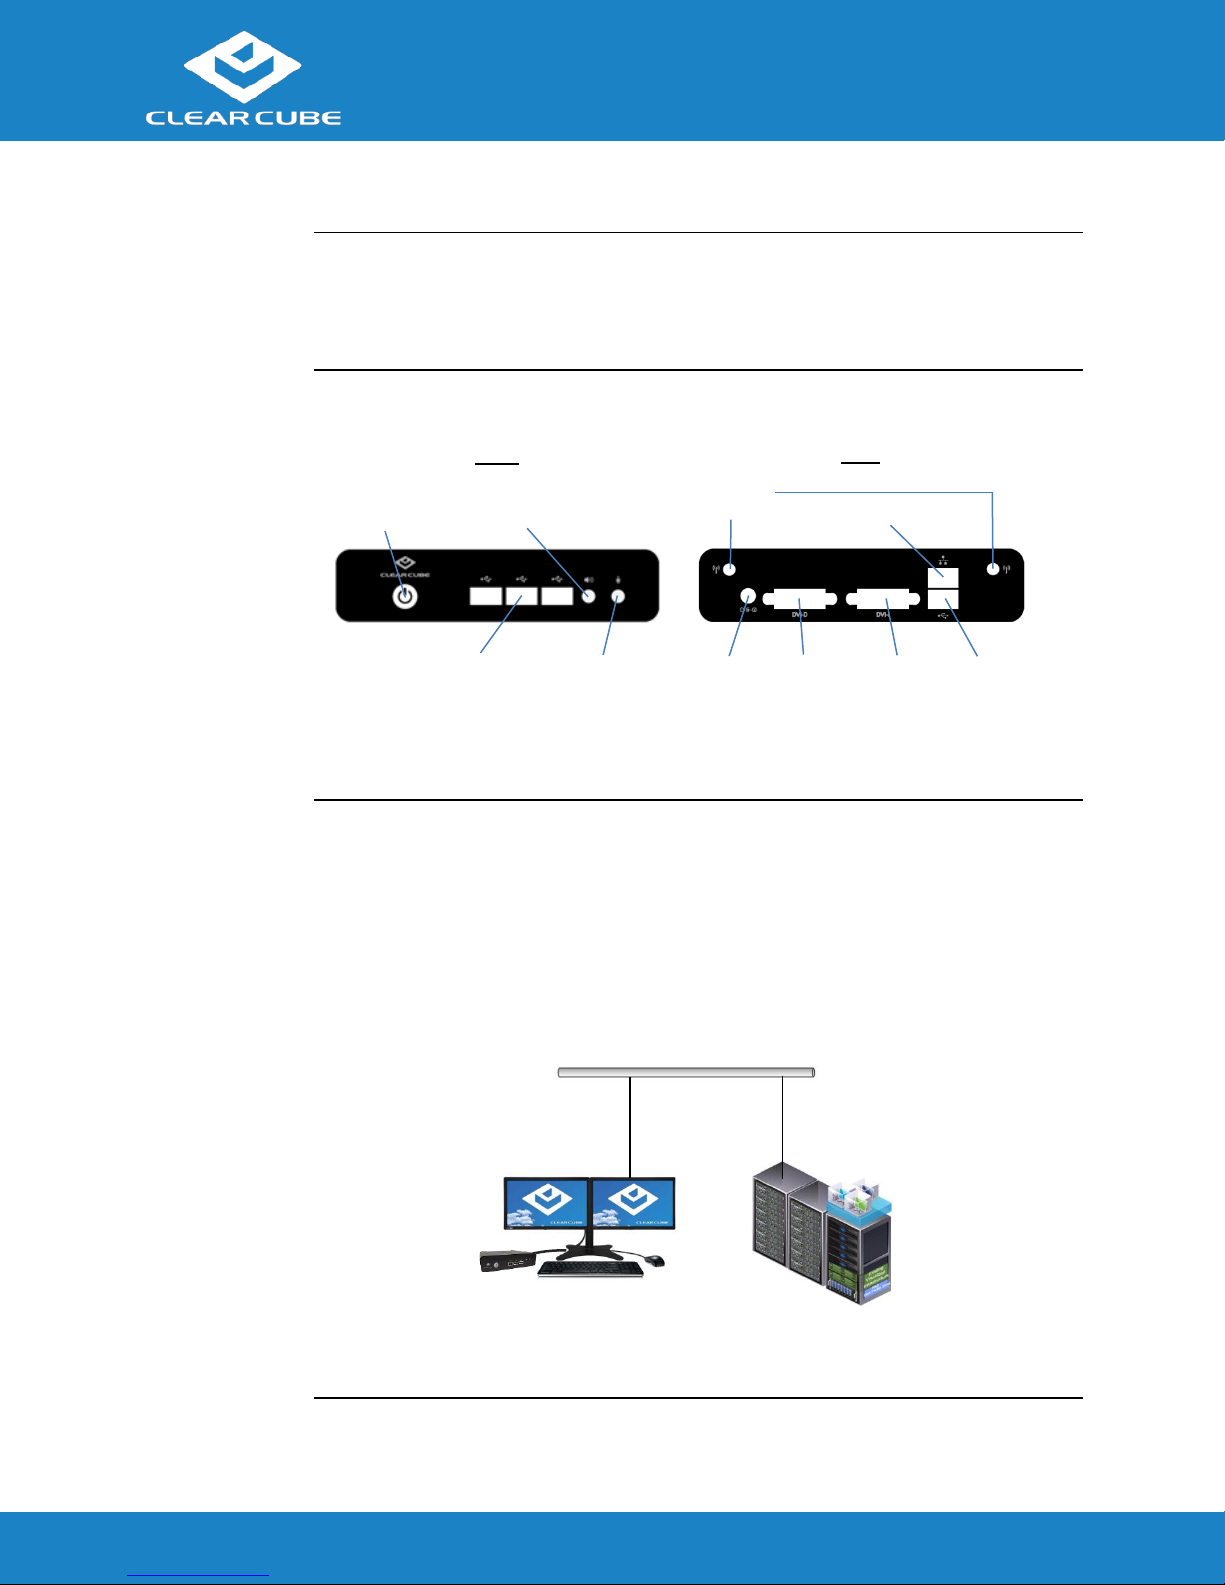
The pictures below show the features on the front and rear of the CD5011 ZERO+ Client.
Figure 1. Front and rear of ZERO+ Client
ZERO+ Client
Overview
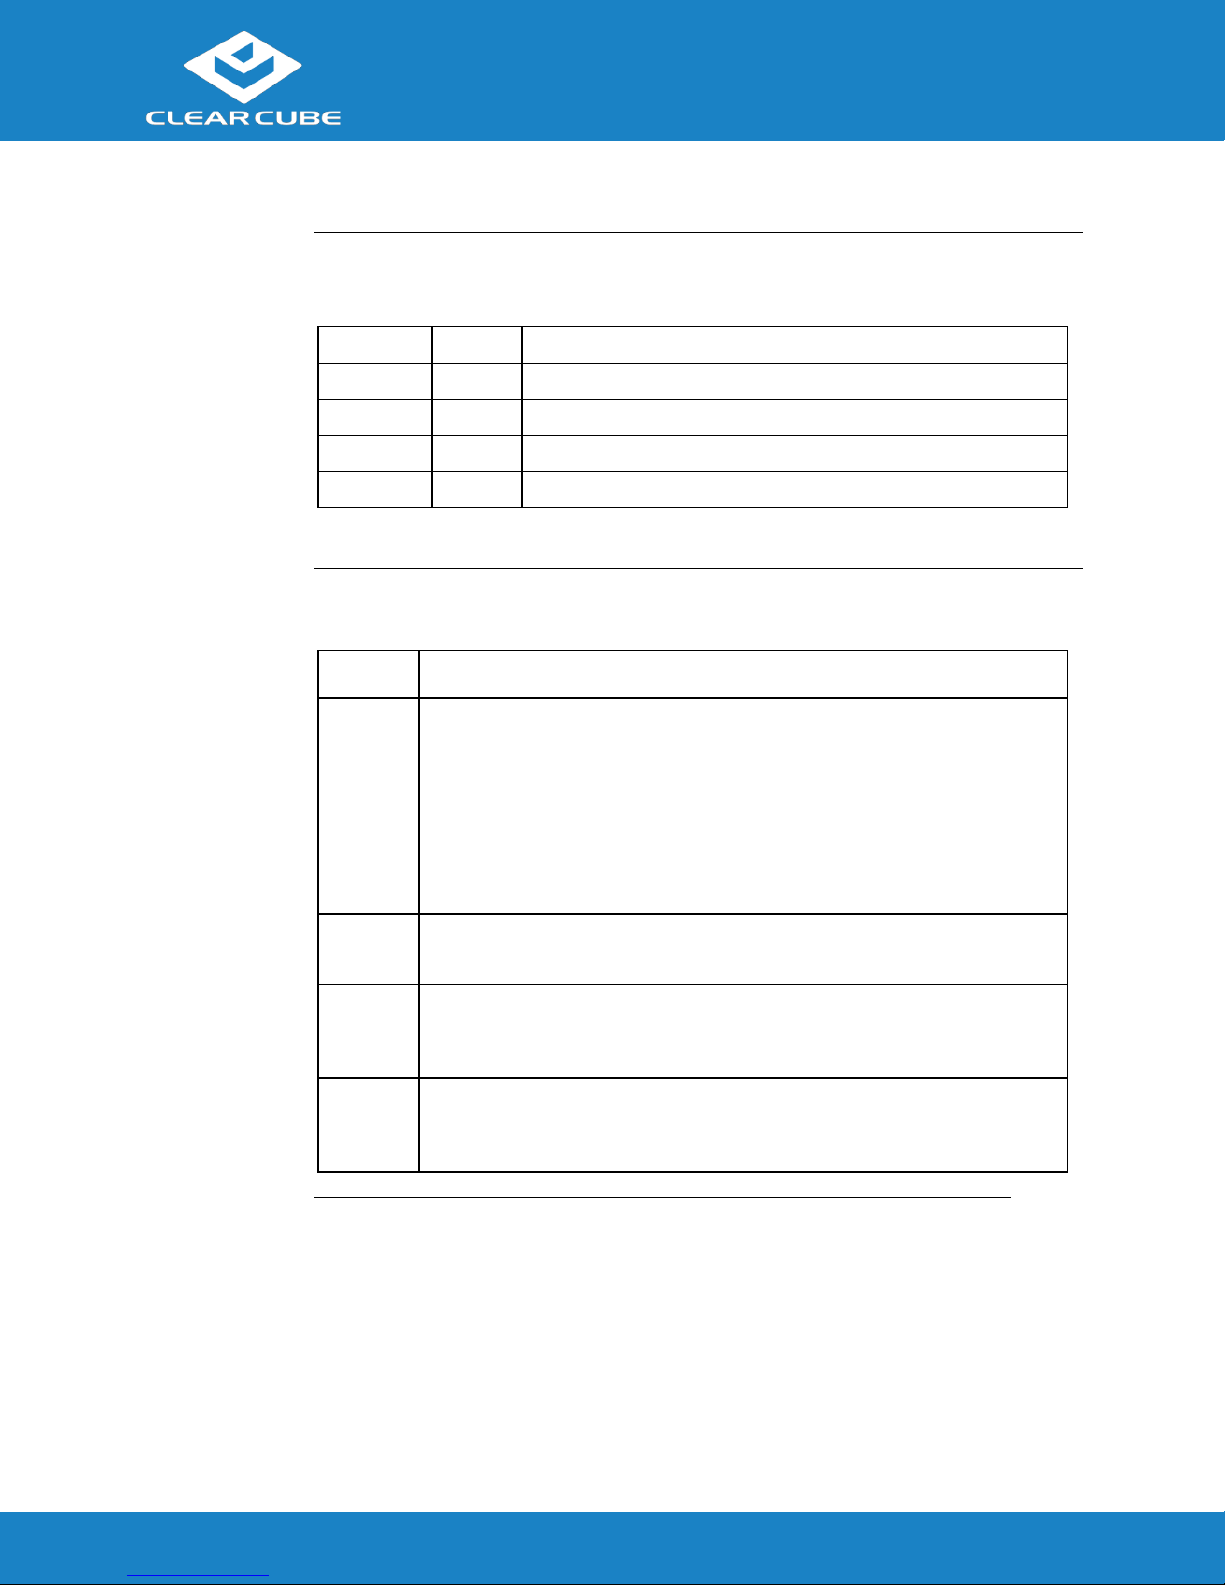
A ZERO+ Client is a remote computing device that connects a user’s monitors, keyboard,
mouse, speakers, and other peripherals to remote computers and to virtual desktops (VMs).
As shown below, computing resources are typically located in remote data centers.
ZERO+ Clients use a remote connection protocol to enable users to work on a blade or VM as
if it is a local PC. See the documentation for the remote protocol application that you use for
additional information.
Figure 2. Overview of ZERO+ Client architecture
Power button
USB 2.0 ports
Audio out
Audio in
DVI-I
DVI-D
Power
connector
Antenna
connectors
USB 3.0
LAN
Front
Rear
Chassis with
Blades and VMs
ZERO+ Client with
Monitors and Peripherals
Network Infrastructure
Ethernet
Overview
Page 2
CD5011 ZERO+ Client
ClearCube Technology, Inc. www.clearcube.com (866) 652-3500 2 of 7
Network
Requirements
The list below shows inbound ports to open for ZERO+ Client communication and management.
TCP/UDP
Port
Application
TCP
22
SSH, secure ZERO+ Client communication (if enabled)
TCP
23
ZERO+ Client communication using (if enabled)
TCP/UDP
80
HTTP, ZERO+ Client management access (if enabled)
TCP
443
HTTPS, ZERO+ Client management access (if enabled)
Setting up a
ZERO+ Client
The steps below show how to set up a ZERO+ client.
Step
Action
1
Carefully unpack the ZERO+ Client and components. Ensure that you have
the following items:
Power cord (included)
USB mouse
USB keyboard
DVI monitor(s)
2
Connect a USB keyboard and mouse to the ZERO+ Client (be sure that USB
2.0 and 3.0 connectors are connected to appropriate ports).
3
Connect an Ethernet cable to the Ethernet port on the rear of the ZERO+
Client and to the Ethernet port on the remote compute device or network
device (such as a network switch).
4
Optionally, connect any peripherals to the ZERO+ Client. If you
purchased a ZERO+ Client with an internal WLAN card, attach the
included antennae to the rear of ZERO+ Client.
ZERO+ Client Setup
Continued on next page
Page 3
CD5011 ZERO+ Client
ClearCube Technology, Inc. www.clearcube.com (866) 652-3500 3 of 7
Setting up a
ZERO+ Client
(continued)
Step
Action
5
Connect the included power cord and AC adapter, and then plug the adapter
into the rear of the ZERO+ Client. Continue by plugging the power cord into
an AC power outlet.
6
Power on the ZERO+ Client by pressing the power button.
You can now use a remote connection protocol to connect to a remote computing device.
Cloud Desktop OS
Configuration
Cloud Desktop OS is the operating system included with CD5011 ZERO+ Clients. See the
Cloud Desktop Quick Start Guide, included in your shipment, for details about setting up and
configuring Cloud Desktop OS. The quick start guide is also available from the ClearCube
Support site (www.clearcube.com/support/). From the Software drop-down menu, click
Cloud Desktop OS.
Connecting to
Wireless
Networks
Your ZERO+ Client includes an internal wireless LAN (WLAN, or Wi-Fi) card and
antennae. The table below shows how to connect to wireless networks (instructions assume
that wireless network infrastructure is in place).
Step
Action
1
From Cloud Desktop OS, press CTRL+ALT+w on your keyboard.
Result: a dialog box appears listing available wireless networks.
2
Click a wireless network listed in the Visible Wi-Fi networks area.
Result: if a password is required, a dialog box appears. Otherwise, the
ZERO+ Client joins the wireless network
3
If a password is requested, enter the wireless network password in the
Password text box (optionally, select Remember this network to log in
automatically). Click Join to join the wireless network.
ZERO+ Client Setup, Continued
Continued on next page
Page 4

CD5011 ZERO+ Client
ClearCube Technology, Inc. www.clearcube.com (866) 652-3500 4 of 7
Connecting to
Wireless
Networks
(continued)
The picture and list below detail wireless options available from the list of visible networks.
Figure 3. Visible Wi-Fi networks list and options
Connect to a hidden network
Administrators can prevent networks from appearing in the list of networks displayed after
pressing the network hotkey (CTRL+ALT+w). To connect to a network that is not
displayed, click the click here to join other network link. Click the network to connect to,
then type the network name (SSID) and password. (From the management menus, you can
change or disable this hotkey.)
To disable this hotkey from Cloud Desktop OS, click Input > Keyboard > Hotkeys. Clear
all values from the Show and connect to available WiFi networks field, making sure that
the field is empty. You can also change this and other hotkeys from the Cloud Desktop
Management application.
Delete remembered networks
Click Manage configured networks to display a dialog box containing remembered
wireless networks. You can delete any network entries from this list.
Reset wireless interface
If the ZERO+ Client is experiencing wireless network issues, you can click this link to
reset the wireless network adapter without rebooting the ZERO+ Client.
ZERO+ Client Setup, Continued
Page 5

CD5011 ZERO+ Client
ClearCube Technology, Inc. www.clearcube.com (866) 652-3500 5 of 7
The First-Time
Wizard
Cloud Desktop OS displays the First-Time Wizard the first time you power on a client or
after a factory reset. This wizard lets administrators create connections quickly by specifying
a minimum number of Connection attributes. After creating a Connection, administrators can
edit and create additional Connections using the OS’s Configuration application.
The section below shows each step in the First-Time Wizard.
First
Connection
and Password
This section assumes you are powering on a client for the first time. The table below shows
how to create a simple Connection and specify the administrator password.
Step
Action
1
Power on the ZERO+ Client.
Result: The ZERO+ Client displays the BIOS splash screen then boots to the
desktop. The First-Time Wizard starts and displays the Step 1 - Location and
keyboard screen.
2
From the drop-down menus, select values for the Time zone, Country, System
locale, and Keyboard layout fields.
3
Click Next.
Result: The First-Time Wizard displays the Step 2 - Create a connection
screen.
4
Click Mode to display a list of connection modes. Select the mode or
protocol for the connection you are creating.
5
In the Target field, type the host name, URL, or IP address of the connection
host or connection broker for the ZERO+ Client. For example, if you are
using VMware Horizon View, specify the connection server or security
server.
6
Optionally, specify a group name in the Resource field if the host target is
part of a resource group.
7
Optionally, select the Automatic start option to start the connection when
the ZERO+ Client is powered on.
8
Click Next.
Result: The First-Time Wizard displays the Step 3 - Set administrator
password screen.
Connecting to a Desktop
Continued on next page
Page 6

CD5011 ZERO+ Client
ClearCube Technology, Inc. www.clearcube.com (866) 652-3500 6 of 7
First
Connection
and Password
(continued)
Step
Action
9
Specify an administrator password. This is the password that administrators
use to access the OS’s Configuration application.
10
Click Finish.
Result: The First-Time Wizard displays a success message and places a
connection shortcut on the desktop. Click the Close button in the upper-right
portion of the screen to close the First-Time Wizard. (Desktop Connection
icons are enabled by default. You can change this setting from the
Configuration application.)
Next step: The Connection is placed on the desktop and is available from the Start menu (see
Figure 4). See the section below for information about starting a Connection. For more
information about configuration options, see Cloud Desktop OS Quick Start Guide.
Starting a
Connection
After creating a connection as shown above, users can start connections from the Start menu
or from a desktop icon (if desktop icons are enabled in the Configuration application). The
picture below shows a Connection desktop shortcut and a Connection listed in the
Session menu.
Figure 4. Connection (Sessions) shortcuts
The list below shows how to start a connection.
Click Start > Sessions, and then select a Connection. (Alternatively, you can right-click
an empty space on the desktop to display the Sessions menu.)
—OR—
Double-click the Connection desktop icon.
Administrators can permit or prohibit Connection icons from appearing on the desktop. Click
Start > Configuration and enter the administrator password. From the menu’s Management
area, click Connections > edit. Select an option from the Icon on desktop field.
ZERO+ Client Setup, Continued
Page 7

CD5011 ZERO+ Client
ClearCube Technology, Inc. www.clearcube.com (866) 652-3500 7 of 7
Additional
Information
Cloud Desktop Quick Start Guide details Cloud Desktop OS setup, configuration, and more.
From the ClearCube Support site (www.clearcube.com/support/), click the Software drop-
down menu, and then click Cloud Desktop OS.
Contacting
Support
Web site: www.clearcube.com/support
Email: support@clearcube.com
Phone: (512) 652-3400
Toll-free: (866) 652-3400
WEEE Disposal Guidelines
ClearCube at recycle@clearcube.com.
G0200188, Rev A
Resources and Support
In the European Union, this electronic product falls under the European Directive (2002/96/EC) WEEE. When
it reaches the end of its useful life or is no longer wanted, dispose of it at an approved, designated recycling
or treatment facility. Check with your local authorities for proper disposal instructions. For assistance, contact
 Loading...