

Page 1
Quick Reference Guide
DX410
6
8
3
5
1 2
4 7
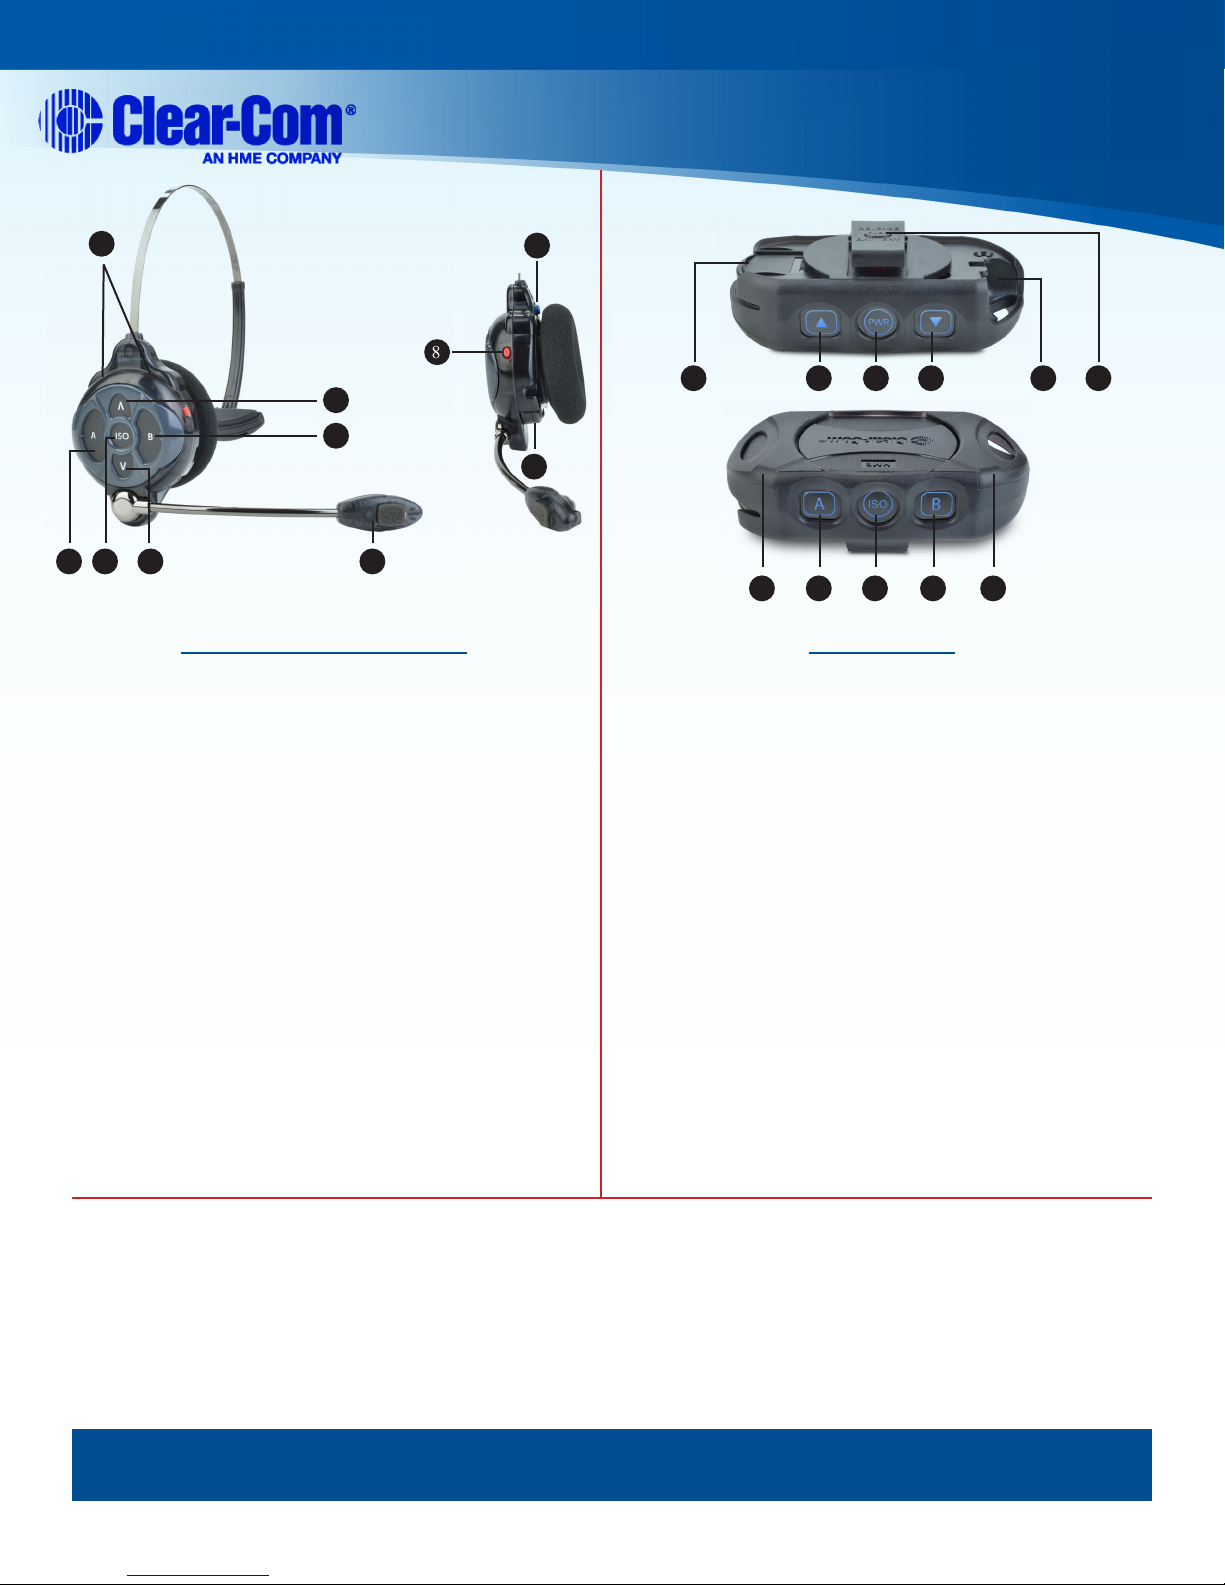
All-In-One Headset Belt Pack
1. Channel A (Intercom 1) button - Includes 2-wire
and 4-wire connections
2. ISO (Isolate) button - To All Wireless Headsets
and Belt Packs, Base, ISO Relay and AUX OUT
(if activated)
10
21 64 3 5
9
7 78 9 10
1. Battery
2. Increase Volume button (▲)
3. Decrease Volume button (▼)
4. PWR (Power) button
3. Increase Volume button (˄)
4. Decrease Volume button (˅)
5. Channel B (Intercom 2) button - Includes 2-wire
and 4-wire connections
6. Power/Mode lights
7. Microphone
8. Power button (On/Off)
9. Battery
10. Battery-release latch
5. Headset cable connector
6. Battery-release latch
7. Power/Mode lights
8. Channel A (Intercom 1) button - Includes 2-wire
and 4-wire connections
9. ISO (Isolate) button - To All Wireless Headsets
and Belt Packs, Base, ISO Relay and AUX OUT
(if activated)
10. Channel B (Intercom 2) button - Includes 2-wire
and 4-wire connections
Settings & Adjustments
All-In-One Headset Lights Off:
• Make certain the headset power is Off.
• Press and hold the B button while pressing and releasing the Power button.
Note: "Lights Off" is temporary. Lights return when power is cycled.
Belt Pack Sidetone Adjustment:
• Press and hold the A button while you repeatedly press up (▲) to increase or press down (▼) to decrease audio levels.
For technical support
In The Americas and Asia – Tel: +1.510.337.6600 or 1.800.462.4357 Menu option 1 • Hours: 8:00am-5:00pm Pacic Time • Email: SalesSupportUS@clearcom.com
In Europe, Middle East and Africa – Tel: +44.1223.815000 • Hours: 8:00am-5:00pm GMT • Email: SalesSupportEMEA@clearcom.com
Copyright © 2015 Clear-Com, LLC, an HM Electronics, Inc. company. All rights reserved.
Clear-Com, the Clear-Com logo and Clear-Com Concert are trademarks or registered trademarks of HM Electronics, Inc.
Part Number: 399G164 Rev A
Date: 12/4/15
Page 2

Quick Reference Guide
DX410
COMMUNICATOR
Registration
Power Switch
STATUS AUTO NULLREG
®
Audio Channel and
Auto-Null Controls
Local Headset
Controls
Register Belt Pack or All-In-One Headset
• Make certain the Belt Pack or Headset is turned Off.
• Press REG button on base station.
– STATUS display on the base station shows “o” for registration mode.
• On the Belt Pack and Headset, press and hold ISO while pressing POWER and then release all buttons.
– The power lights blink red, then green and then turn off. One power light remains green.
– The registration number will appear on the base station STATUS display.
AUTO NULL Adjustment (only if using 2-wire interface)
If echo is heard in wireless Belt Packs or All-In-One Headsets on A or B:
• Use pointed object (e.g. pen) to press and hold the A or B AUTO NULL button for 2 seconds.
CAUTION: Before pressing an AUTO NULL button, be certain there are no open microphones on the wired
system. Notify wired system users that a loud noise may occur in their headsets during the auto null adjustment.
The system may be out of operation for approximately 50 seconds during this adjustment.
Local Headset Communication
• SEL button selects communication with A, B or ISO.
– A, B or ISO lights indicate selection.
• TALK button
– Press and release quickly to “latch on” for open communication.
– Press and hold while talking for momentary communication – release when nished.
• VOLUME control adjusts the audio level in local headset ear piece.
• MIC LEVEL control adjusts the audio level going out from local headset microphone.
 Loading...