

Bedienungsanleitung/Garantie
Gebruiksaanwijzing • Manuel
Instrucciones de servicio • Istruzioni per l’uso
Instruction Manual • Instrukcja obsługi/Gwarancja
Használati utasítás • Інструкція з експлуатації
Руководство пользователя •
Küchenmaschine
Keukenmachine • Robot de cuisine • Robot de cocina
Robot da cucina • Kitchen machine • Urządzenie kuchenne • Konyhai robotgép
Кухонний комбайн • Кухонний комбайн •
KM 3573

ENGLISH
Contents
Location of Controls .................................................
User Manual .............................................................
Technical Specications ...........................................
Disposal ....................................................................
page
page
page
page
3
26
29
29
2
Übersicht der Bedienelemente
Locatie van bedieningselementen • Situation des commandes
Ubicación de los controles • Posizione dei comandi • Location of Controls
Розташування органів керування • Расположение элементов •
Lokalizacja kontrolek • A Kezelőszervek Elhelyezkedése
3
4

User manual
Thank you for selecting our product. We hope that you will
enjoy use of the appliance.
Symbols in this user manual
Important notes for your safety are marked distinctively. Pay
absolute attention to them to avoid accidents and damage to
the device:
WARNING:
Warns of dangers for your health and indicates potential risks
of injury.
CAUTION:
Indicates potential dangers for the device or other objects.
NOTE: Highlights tips and information for you.
General Notes
Read the operating instructions carefully before putting the
appliance into operation and keep the instructions including the
warranty, the receipt and, if possible, the box with the internal
packing. If you give this device to other people, please also
pass on the operating instructions.
• The appliance is designed exclusively for private use and
for the envisaged purpose. This appliance is not t for commercial use.
• Do not use it outdoors. Keep it away from sources of heat,
direct sunlight, humidity (never dip it into any liquid) and
sharp edges. Do not use the appliance with wet hands. If
the appliance is humid or wet, unplug it immediately.
• The device and the mains lead have to be checked regularly for signs of damage. If damage is found the device
must not be used.
• Use only original spare parts.
• In order to ensure your children’s safety, please keep all
packaging (plastic bags, boxes, polystyrene etc.) out of
their reach.
WARNING:
Don’t let small children play with foils for danger of suffocation!
Special safety instructions for this unit
WARNING: Risk of injury!
• Before replacement of accessories or additional parts which move
during operation, the device must be switched off and cut off from
the mains.
• Do not touch moving parts.
• Before switching on, make sure that the accessories attachment
has been installed correctly and is seated securely.
• Always disconnect the appliance from the supply if it is left unattended and before assembling, disassembling or cleaning.
• Do not repair the device by yourself. Please contact authorized
personnel. In order to avoid hazards, a damaged mains cable must
be replaced with an equivalent cable by the manufacturer, our customer service or any other qualied specialist.
• This appliance shall not be used by children.
• Keep the appliance and its cord out of reach of children.
• Children shall not play with the appliance.
26

WARNING: Risk of injury!
• Appliances can be used by persons with reduced physical, sensory or mental capabilities or lack of experience and knowledge if
they have been given supervision or instruction concerning use of
the appliance in a safe way and if they understand the hazards
involved.
CAUTION:
Do not immerse the device into water for cleaning. Please follow the
instructions as stipulated in the chapter “Cleaning”.
• Do not manipulate safety switches.
• Only process foodstuffs with this appliance.
• Misuse of the appliance for other purposes may cause injury.
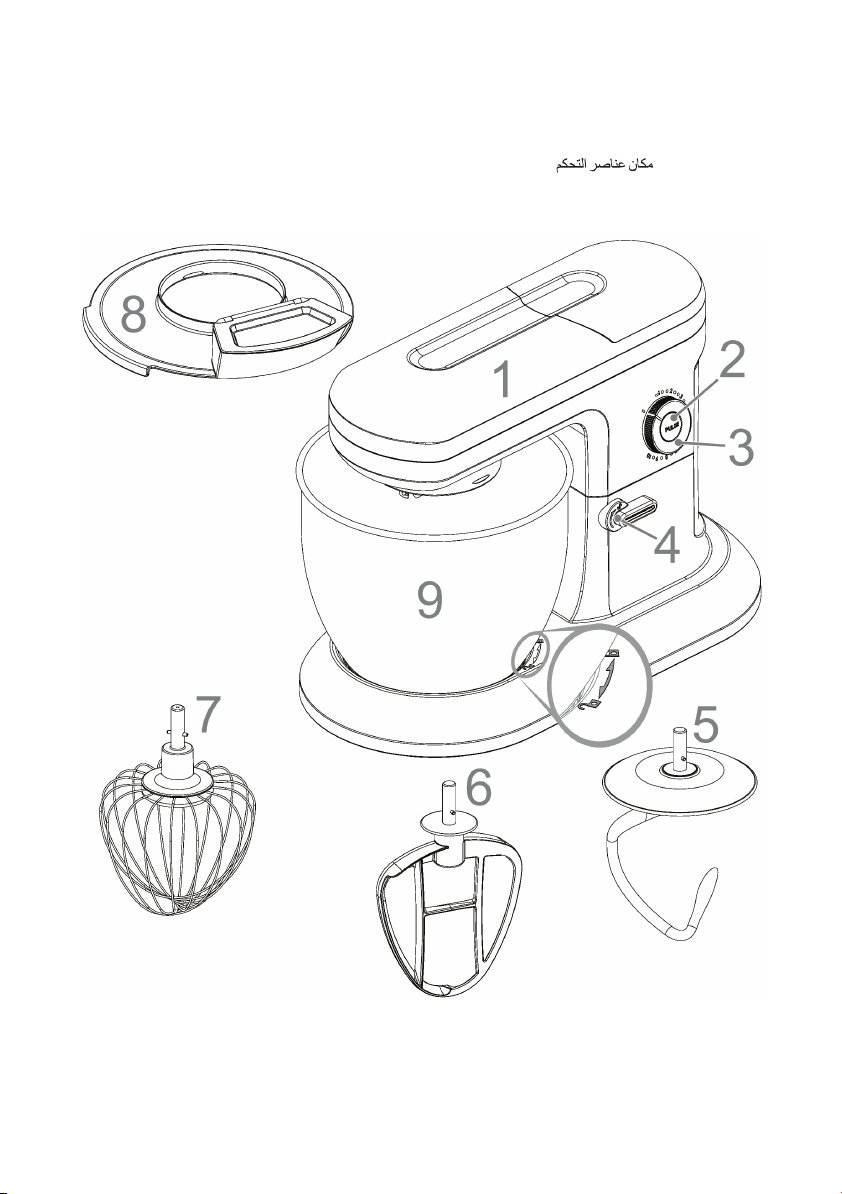
Location of Controls
1 Swivel arm
2 PULSE button
3 Control knob
4 Lever for lowering/raising the arm
5 Kneading hook
6 Mixing hook
7 Egg beater
8 Splash guard
9 Mixing bowl
Preparation
• Remove the appliance and all included accessories from
the box.
• In order to remove any production residue, clean all accessories before initial use as described under “Cleaning”.
Electrical Connection
• Ensure that your mains power corresponds with the
specications on the type label.
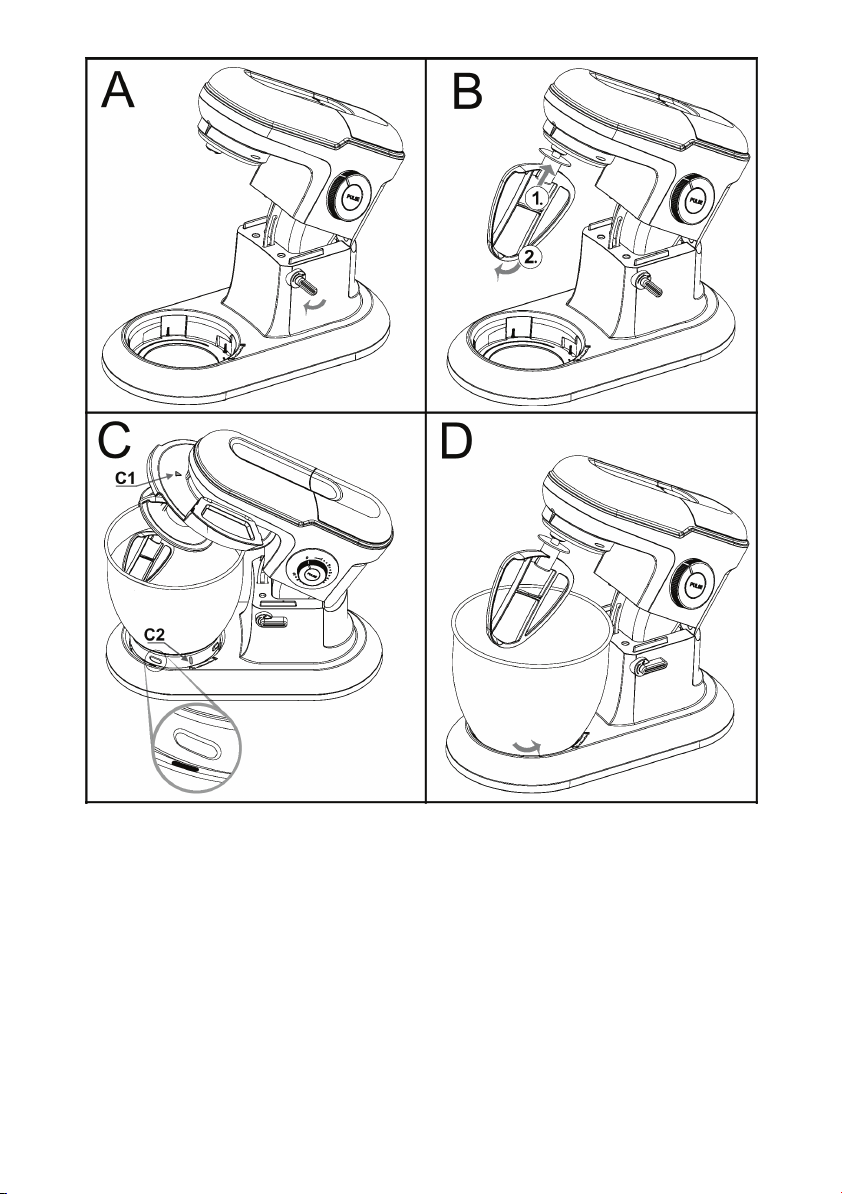
Use Instruction
Please refer to gures A to D.
1. Press the lever (4). Manually guide the swivel arm to the top
position.
2. If you need the splash guard, attach it now to the swivel arm
from below. The arrow mark (C1) point to the front of the
swivel arm.
3. Fit an attachment to the shaft. The cotter pin in the attachment ts into the shaft.
4. Push the attachment into the shaft using gentle pressure
and turn it anticlockwise.
5. Mixing bowl: refer to the C2 mark. Move this mark to the
symbol.
6. Turn the mixing bowl in the direction of the “ ” symbol.
7. Fill your ingredients into the mixing bowl.
8. Check whether the control knob is set to “0”.
9. Press the lever (4) to lower the arm. You must press onto
the arm from above, until it locks into the lowest position.
10. Connect the mains plug to a tested plug socket.
11. Select the speed using the table below.
Table Dough Types and Tools
Dough Type Tool Setting Amount
Heavy dough
(e.g. bread or
shortcrust)
Medium dough
(e.g. crepes or
cake batter)
Light dough (e.g.
cream, egg whites,
pudding)
Interval (e.g. folding in biscuit, egg
whites)
Kneading hook 1-4 max. 2 kg
Mixing hook 6-8 max. 4 kg
Egg beater 8-10 min. 200 ml
Egg beater PULSE max. 2 kg
max. 1 l
27

NOTE:
• Short time operation: With heavy dough do not operate
the appliance longer than 5 minutes and leave for
5 minutes to cool down.
• PULSE: Briey set the motor to the highest speed by
pressing this button.
Pulse operation
WARNING: Risk of injury!
• Always set the control knob to “0” if you want to interrupt
operation.
• Disconnect the plug from the mains if you want to change
the attachment.
• Wait for the attachment to come to a complete stop!
• If you activate the lever (4) during operation to raise the
arm, a safety switch deactivates the motor.
• The motor switches on again as soon as you lower the
swivel arm again!
End Operation and Remove Bowl
• Set the control knob to “0” after use. Disconnect the plug
from the mains.
• Press the lever (4) down for the arm to lift.
• Remove the tool.
• Give the mixing bowl one short turn clockwise to remove it.
• Loosen the dough with a spatula and remove it from the
mixing bowl.
• Clean all used components as described in chapter “Cleaning”.
Recommended Recipes
Sponge Mixture (Basic Recipe) Speed setting 3 - 4
Ingredients:
250 g soft butter or margarine, 250 g sugar, 1 sachet vanilla
sugar or 1 sachet Citro-Back, 1 pinch of salt, 4 eggs, 500 g
wheat our, 1 sachet baking powder, approx. 1/8-litre milk.
Preparation:
Place wheat our with the other ingredients in mixing bowl,
mix with mixing hook for 30 seconds at speed 1, then approx.
3 minutes at speed 3. Grease baking tin or lay out with baking
paper, ll in dough and bake. Before the cake is removed from
the oven, test to see if it is done. With a sharp wooden stick
pierce the centre of the cake. If no mixture sticks to it, the cake
is cooked. Turn the cake on to a cake grid and allow to cool.
Conventional Oven:
Slide: 2
Heat: Electric oven: top and bottom heat
175-200°, gas oven: setting 2-3
Baking time: 50-60 minutes
You can modify this recipe according to your taste, e.g. with
100 g raisins or 100 g nuts or 100 g grated chocolate. Nothing
limits your imagination.
Linseed Rolls Speed setting 1 - 2
Ingredients:
500-550 g wheat our, 50 g linseed, 3/8-litre water, 1 cube
yeast (40 g), 100 g low-fat curd, well drained, 1 teaspoon salt.
For brushing: 2 tablespoons water.
Preparation:
Soak linseed in 1/8-litre lukewarm water. Place the remaining
lukewarm water (1/4-litre) in mixing bowl, crumble the yeast
into it, add curd and mix well with kneading hook on speed setting 2. The yeast must be completely dissolved. Place our with
the soaked linseed and salt in mixing bowl. Knead on speed 1,
then change to speed 2 and knead another 3-5 minutes. Cover
dough and prove in a warm place for 45-60 minutes. Knead
again, take out of mixing bowl and shape 16 bread rolls from it.
Cover baking tray with wet baking paper. Place rolls on it, prove
for 15 minutes, brush with lukewarm water and bake.
Conventional Oven:
Slide: 2
Heat: Electric oven: top and bottom heat
200-220°(preheat for 5 minutes),
Gas oven: setting 2-3
Baking time: 30-40 minutes
Chocolate Crème Speed Setting 5 - 6
Ingredients:
200 ml cream, 150 g semi-sweet chocolate coating, 3 eggs,
50-60 g sugar, 1 pinch of salt, 1 sachet vanilla sugar, 1 tbs
brandy or rum, chocolate chips.
Preparation:
In the mixing bowl whisk the cream stiff with the eggbeater,
remove from the bowl and place in a cold place.
Melt the chocolate coating according to the instructions on the
packet or 3 minute in the microwave at 600 W. In the meantime, in the mixing bowl with the eggbeater, whisk eggs, sugar,
vanilla sugar, brandy or rum and salt to a foam. Add the molten
chocolate coating and evenly fold in at speed setting 5-6. Keep
some of the whipped cream for garnishing. Add the remaining
cream to the creamy matter and fold in with the pulse function.
Garnish chocolate crème and serve well chilled.
28

Cleaning
WARNING:
• Disconnect from mains power supply before cleaning.
• Do not submerge the appliance into water. This may lead to electric
shock or re.
CAUTION:
• Do not use a wire brush or other abrasive utensils for
cleaning.
• Do not use aggressive or abrasive cleaning agents.
Motor Housing
• Clean the housing only with a damp cloth and a squirt of
washing-up liquid.
Mixing bowl, kneading and mixing attachments
CAUTION:
The attachments are not suitable for dishwasher. Heat and
aggressive cleaning agents may warp or discolour the attach-
ments.
• Parts which have come into contact with food can be
rinsed out with water.
• Leave the parts to dry properly before re-assembling the
appliance.
Noise development
The sound pressure level in the ear of an operator (LpA) was
measured according to DIN EN ISO 3744.
Resulting sound pressure level: 80 dB(A) (no limit)
Technical Specications
Model: ............................................................................. KM 3573
Power supply: ..................................................220-240 V~ 50 Hz
Power consumption: .........................................................1200 W
Protection class: .......................................................................... II
Short time operation: .....................................................5 minutes
Net weight: .........................................................................2.35 kg
The right to make technical and design modications in the
course of continuous product development remains reserved.
This device complies with all current CE directives, such as
electromagnetic compatibility and low voltage directive and is
manufactured according to the latest safety regulations.
Disposal
Meaning of the “Wheelie Bin” Symbol
Take care of our environment, do not dispose of electrical appliances via the household waste.
Dispose of obsolete or defective electrical appliances via
municipal collection points.
Please help to avoid potential environmental and health
impacts through improper waste disposal.
You contribute to recycling and other forms of utilization of old
electric and electronic appliances.
Your municipality provides you with information about collecting
points.
29


KM 3573
Stand 03/14
 Loading...