

Page 1
DVD 628 HC
MP3
CD-R/RW
Bedienungsanleitung/Garantie
Instruction Manual/Guarantee • Instrucciones de servicio/Garantía (CD)
Istruzioni per l’uso/Garanzia (CD) • Gebruiksaanwijzing/Garantie (CD)
Instrukcja obsługi/Gwarancja (CD) • Návod k použití/Záruka (CD)
A használati utasítás/Garancia (CD)
DVD-Player
DVD Player • Reproductor DVD
Lettore DVD • DVD-speler
Odtwarzacz DVD • DVD-přehrávač
DVD-lejátszó
5....-05-DVD 628 Inhalt 01.09.2004 9:10 Uhr Seite 1
COMPACT
DIGITAL AUDIO
Page 2

2
5....-05-DVD 628 Inhalt 30.08.2004 15:48 Uhr Seite 2
Page 3

3
Inhalt
Contents • Indice • Índice
Inhoud • Spis treści
D
Bedienungsanleitung. . . . . . . . . . . . . . . . . . . . . . . . . . . . . . . . . . . . . . . . Seite 4
Übersicht Bedienelemente . . . . . . . . . . . . . . . . . . . . . . . . . . . . . . . . . . . Seite 8-9
Garantie . . . . . . . . . . . . . . . . . . . . . . . . . . . . . . . . . . . . . . . . . . . . . . . . . . Seite 28
GB
Instruction Manual . . . . . . . . . . . . . . . . . . . . . . . . . . . . . . . . . . . . . . . . . . Page 30
Control element overview . . . . . . . . . . . . . . . . . . . . . . . . . . . . . . . . . . . . Page 34-35
Guarantee . . . . . . . . . . . . . . . . . . . . . . . . . . . . . . . . . . . . . . . . . . . . . . . . Page 54
E
(CD)
Instrucciones de servicio . . . . . . . . . . . . . . . . . . . . . . . . . . . . . . . . . . . . . Página 56
Vista de conjunto Elementos de mando . . . . . . . . . . . . . . . . . . . . . . . . . Página 60-61
Garantia . . . . . . . . . . . . . . . . . . . . . . . . . . . . . . . . . . . . . . . . . . . . . . . . . . Página 80
I
(CD)
Istruzioni per l’uso . . . . . . . . . . . . . . . . . . . . . . . . . . . . . . . . . . . . . . . . . . Pagina 82
Descrizione dei singoli pezzi . . . . . . . . . . . . . . . . . . . . . . . . . . . . . . . . . . Pagina 86-87
Garanzia . . . . . . . . . . . . . . . . . . . . . . . . . . . . . . . . . . . . . . . . . . . . . . . . . Pagina 106
NL
(CD)
Gebruiksaanwijzing . . . . . . . . . . . . . . . . . . . . . . . . . . . . . . . . . . . . . . . . . Pagina 108
Overzicht bedieningselementen . . . . . . . . . . . . . . . . . . . . . . . . . . . . . . . Pagina 112-113
Garantie . . . . . . . . . . . . . . . . . . . . . . . . . . . . . . . . . . . . . . . . . . . . . . . . . . Pagina 132
PL
(CD
Instrukcja obsługi. . . . . . . . . . . . . . . . . . . . . . . . . . . . . . . . . . . . . . . . . . Strona 134
Przegląd elemetów obsługi . . . . . . . . . . . . . . . . . . . . . . . . . . . . . . Strona
138-139
Gwarancja . . . . . . . . . . . . . . . . . . . . . . . . . . . . . . . . . . . . . . . . . . . Strona 158
CZ
(CD)
Pehled obsluhovací prvky . . . . . . . . . . . . . . . . . . . . . . . . . . . . . . . . . . . Strana 160
Návod k pouití. . . . . . . . . . . . . . . . . . . . . . . . . . . . . . . . . . . . . . . . . Strana
164-165
Záruka . . . . . . . . . . . . . . . . . . . . . . . . . . . . . . . . . . . . . . . . . . . . . . Strana 184
H
(CD)
A hasznalati utasítás . . . . . . . . . . . . . . . . . . . . . . . . . . . . . . . . . . . . . . . Odal 186
A hasznalt elemek megtekintése . . . . . . . . . . . . . . . . . . . . . . . . . . . Odal
190-191
Garancia. . . . . . . . . . . . . . . . . . . . . . . . . . . . . . . . . . . . . . . . . . . . . Odal 210
5....-05-DVD 628 Inhalt 30.08.2004 15:48 Uhr Seite 3
Page 4

INHALTSVERZEICHNIS
Vorsichtsmaßnahmen................................................... 5
Sicherheitshinweise...................................................... 6
DEUTSCH
DVD-Player..................................................................... 7
Geeigneter Standort.................................................. 7
Einwandfreies Bild..................................................... 7
Abspielbare Discs...................................................... 7
Digitaler Audioausgang ............................................. 7
Analoger Audioausgang............................................ 7
Laserkopf-Überspannungsschutzsystem.................. 7
Anmerkungen zu Discs................................................. 7
Handhabung.............................................................. 7
Reinigung................................................................... 7
Lagerung ................................................................... 7
Beschreibung der Bedienelemente ............................. 8
Vorderansicht............................................................. 8
Rückansicht............................................................... 8
Beschreibung der Fernbedienung ............................... 9
Fernbedienung............................................................. 10
Geräte anschließen .....................................................11
System-Setup (Funktionseinstellungen) ..............21-25
Sprachen-Setup ......................................................21
Video-Setup............................................................. 22
Audio-Setup ............................................................ 23
More Audio-Setup................................................... 24
MP3-Funktion .............................................................. 26
JPEG-Dateien .............................................................. 26
Möglichkeiten zur Fehlerbehebung........................... 26
Technische Daten........................................................ 27
Garantie........................................................................ 28
Lautsprecher................................................................ 12
Anordnung der Lautsprecher...................................12
Anschluss der Lautsprecher ...................................... 13
Antennenanschlüsse................................................... 14
Stromanschluss........................................................... 15
Grundfunktionen.......................................................... 15
Radiobetrieb ................................................................ 16
DVD-Betrieb............................................................17-18
Funktionen ..............................................................18-21
4
05-DVD 628_D 4 30.08.2004, 15:44:06 Uhr
Page 5

VORSICHTSMASSNAHMEN
Das Blitzsymbol im Dreieck soll den Benutzer vor nicht
isolierter, „gefährlicher Spannung“ warnen, die
sich innerhalb des Gerätegehäuses befi ndet
und elektrische Schläge hervorrufen kann.
Das Ausrufezeichen im Dreieck weist auf wichtige Hin-
weise im mitgelieferten Handbuch in Bezug
auf Bedienungs- und Wartungsanweisungen
hin.
Warnung:
Setzen Sie das Gerät weder Feuchtigkeit noch Nässe
aus. Wegen der Gefahr eines elektrischen Schlages
darf das Gehäuse nicht geöffnet werden (Hochspannung). Nur qualifi ziertes Fachpersonal darf das Gerät
öffnen.
Achtung:
Stellen Sie sicher, dass der Netzstecker richtig in der
Steckdose steckt.
Achtung:
Der DVD-Receiver verfügt über ein Laser-System. Das
Gehäuse darf nicht geöffnet werden, da Sie sich dadurch
gefährlicher Laserstrahlung aussetzen könnten. Bei geöffnetem Gehäuse ist der Laserstrahl sichtbar. Schauen
Sie nie direkt in den Laserstrahl! Es dürfen nur die
hier aufgeführten Einstellungen und Vorgehensweisen
angewandt werden, da es sonst zu einer gefährlichen
Strahlungsbelastung kommen kann.
Notieren Sie die Modell- und Seriennummer. Sie fi nden
diese auf der Rückseite des Gerätegehäuses. Bewahren
Sie diese Informationen für spätere Zwecke auf.
DEUTSCH
(Wichtige Information, bitte aufbewahren.)
Achtung:
Gefahr eines elektrischen Schlages. Nicht öffnen!
Achtung:
Öffnen Sie weder Abdeckung noch Rückseite, um einen
elektrischen Schlag zu vermeiden. Es befi nden sich keine Teile im Gerät, die der Benutzer selber warten kann.
Ziehen Sie qualifi ziertes Fachpersonal zu Rate.
Lesen Sie die Bedienungsanleitung sorgfältig durch, um
die ordnungsgemäße Benutzung des Gerätes sicherzustellen. Heben Sie die Bedienungsanweisung auf jeden
Fall auf. Wenden Sie sich im Falle einer Wartung an eine
autorisierte Service-Stelle.
5
05-DVD 628_D 5 30.08.2004, 15:44:08 Uhr
Page 6

SICHERHEITSHINWEISE
Achtung:
Es ist wichtig, dass Sie die Bedienungsanleitung sorgfältig lesen und alle Anweisungen – auch die am Gerät
befi ndlichen – befolgen. Bewahren Sie die Bedienungs-
DEUTSCH
anleitung für spätere Zwecke auf.
Zubehör
Stellen Sie das Gerät nicht auf eine instabile Fläche (z.B.
Ständer, Rollwagen, Wandarm, Regal oder Tisch). Das
Gerät könnte herunterfallen und Personen oder Tiere
ernsthaft verletzen. Zudem könnte das Gerät beschädigt
werden.
Benutzen Sie ausschließlich stabile Stellfl ächen, die vom
Hersteller empfohlen werden oder die in Kombination mit
dem Gerät erhältlich sind. Bei der Aufstellung des Gerätes muss genau nach den Anweisungen des Herstellers
vorgegangen werden und das vom Hersteller empfohlene Montagezubehör verwendet werden.
Sollte das Gerät auf einem Rollwagen platziert werden,
muss dieser vorsichtig hin- und herbewegt werden.
Plötzliches Anhalten, kräftiges Schieben sowie unebene
Stellfl ächen können dazu führen, dass die Geräte-Rollwagen-Kombination umfällt.
Zusatzgeräte
Benutzen Sie keine Zusatzgeräte, die nicht ausdrücklich
genehmigt wurden, da dies Gefahren mit sich bringen
kann.
Reinigung
Vor der Reinigung muss der Netzstecker des Gerätes
aus der Steckdose gezogen werden. Benutzen Sie
zur Reinigung keine fl üssigen Reinigungsmittel oder
Sprühreiniger sondern ein angefeuchtetes Tuch.
Blitz
Als zusätzliche Schutzmaßnahme sollten Sie den
Netzstecker des Gerätes während eines Gewitters oder
wenn das Gerät längere Zeit nicht benutzt wird, aus der
Steckdose ziehen. Ebenfalls sollte das Antennen- oder
Kabelsystem ausgezogen werden. So kann ein Schaden
des Gerätes aufgrund von Gewitter und Hochspannung
verhindert werden.
Gegenstände und Flüssigkeiten
Es dürfen keine Gegenstände durch die Öffnungen des
Gerätes geschoben werden, da dadurch gefährliche
Spannungspunkte oder Überbrückungsteile berührt
werden könnten und so ein Brand oder Kurzschluss verursacht werden kann. Verschütten Sie keine Flüssigkeit
auf dem Gerät.
Überlastung
Wandsteckdosen, Verlängerungskabel oder zusätzliche
Steckdosen dürfen nicht überlastet werden, da die
Gefahr eines Brandes oder eines elektrischen Schlages
besteht.
Stromkabel
Die Stromkabel müssen so verlegt werden, dass sie
nicht im Wege sind bzw. dass sie nicht durch Gegenstände eingeklemmt werden. Besondere Beachtung
müssen die Kabel im Bereich von Stecker, Steckdose
und Geräteausgang fi nden.
Stromversorgung
Das Gerät darf nur mit der auf dem Markierungsschild
angegebenen Stromquelle betrieben werden. Sollten Sie
sich nicht sicher sein, welche Stromversorgung Sie zu
Hause haben, können Sie sich an den Händler oder die
örtliche Stromversorgungsfi rma wenden. Für Geräte, die
mit Batterie (oder einer anderen Energiequelle) betrieben
werden, fi nden Sie Hinweise in der Bedienungsanleitung. Dieses DVD-Home-Theatre wird mit AC 230 V/50
Hz betrieben. Stellen Sie das Gerät nicht sofort nach
dem Einstellen wieder aus. Warten Sie mindestens 10
Sekunden.
Wartung
Versuchen Sie nicht, das Gerät selber zu warten, da das
Öffnen oder Entfernen der Abdeckung Sie gefährlichen
Stromspannungen oder anderen Gefahren aussetzen
kann. Überlassen Sie jegliche Wartungsarbeiten qualifi ziertem Fachpersonal.
TV-System
Dieses Gerät ist mit Fernsehgeräten kompatibel, die
entweder das NTSC- oder das PAL-Farbsystem unterstützen.
Belüftung
Schlitze und Öffnungen im Gehäuse sind für die Belüftung und zur Sicherstellung eines ordnungsgemäßen
Betriebs des Gerätes sowie zum Schutz gegen Überhitzung vorgesehen. Diese Öffnungen dürfen auf keinen
Fall versperrt oder abgedeckt werden. Stellen Sie das
Gerät nicht auf weiche Stellfl ächen, wie z.B. Bett, Sofa,
Teppich, etc., da die Belüftung dann nicht funktionieren
kann. Das Gerät darf nicht in eine Einbaukonstruktion
(Einbauschrank, Regal etc.) gestellt werden, es sei denn,
eine ausreichende Belüftung ist gewährleistet. Das
Gerät sollte nicht in der Nähe von Wärmequellen, wie
z.B. Radiatoren, Wärmespeichern, Öfen oder anderen
hitzeerzeugenden Quellen platziert werden.
Von Wasser, Feuer und Magneten fernhalten
Halten Sie das Gerät fern von Blumenvasen, Badewannen, Waschbecken, usw. Wenn Flüssigkeit in das Gerät
gelangt, so kann dies zu ernsthaften Schäden führen.
Offenen Brandquellen, wie z. B. brennende Kerzen
dürfen nicht auf das Gerät.
Bringen Sie niemals magnetische Gegenstände wie zum
Beispiel Lautsprecher in die Nähe des Gerätes.
Kondensation
Unter folgenden Umständen kann sich Feuchtigkeit auf
der Linse bilden:
Sofort nach dem ein Heizer eingeschaltet wurde.
In einem dampfenden oder sehr feuchten Raum.
Wenn das Gerät von einer kalten Umgebung in eine
warme gebracht wird.
Wenn sich Feuchtigkeit im Innern des Gerätes gebildet
hat, kann es sein, dass das Gerät nicht mehr richtig
funktioniert. In diesem Falle, schalten Sie den Strom
aus und warten Sie ca. eine Stunde, bis die Feuchtigkeit
verdunstet ist.
6
05-DVD 628_D 6 30.08.2004, 15:44:09 Uhr
Page 7

DVD-PLAYER
ANMERKUNGEN ZU DISCS
Im folgenden Abschnitt erhalten Sie Informationen zur
bestmöglichen Einstellung Ihres DVD-Receiversystems.
Geeigneter Standort
Das Gerät sollte auf einer festen, ebenen Stellfl äche
platziert werden. Da der Magnetfl uss anderer Geräte
Störungen bei der Wiedergabe und/oder ein schlechtes
Bild erzeugen kann, sollte das Gerät nicht in der Nähe
von VCRs, Radios oder großen Lautsprechern stehen.
Falls das Gerät in einem Schrank aufgestellt wird, muss
an allen Seiten des Gerätes mindestens 2,5 cm Abstand
bleiben, damit eine ausreichende Belüftung gewährleistet ist.
Einwandfreies Bild
Ein DVD-Player ist ein Präzisionsgerät. Falls die optische
Abtastlinse und Teile des Disc-Laufwerks Schmutz
aufweisen oder abgenutzt sind, wird die Bildqualität
schlechter. Daher sollte der DVD-Player an einem sauberen, staubfreien Ort platziert werden.
Abspielbare Discs
Dieses DVD-Empfänger-System kann folgende DiscsTypen abspielen: DVD, MP3, CD, CD-R und CD-RW mit
der Möglichkeit zur Fehlerkorrektur. Es können ebenfalls
Foto-CDs und digitale Fotoalben angezeigt werden.
Es werden 8 Sprachen und bis zu 32 Untertitel sowie
verschiedene Blickwinkel unterstützt (abhängig von der
eingelegten Disc). Mit Hilfe der Bildschirmmenüs können
alle Einstellungen kinderleicht durchgeführt werden.
Digtialer Audioausgang
Das Gerät verfügt über einen Koaxialausgang, der es Ihnen ermöglicht, einen externen AV-Verstärker (6 Kanäle)
und einen Prozessor mit eingebautem Dolby-DigitalCode über ein einziges Kabel anzuschließen. So können
Sie bequem verschiedene DVDs, CDs und MP3-Discs
genießen.
Im folgenden werden wichtige Informationen zu Handhabung, Reinigung und Lagerung von Discs, die in diesem
Gerät abgespielt werden, gegeben.
Handhabung
• Berühren Sie nie die Abspielseite der Disc
• Heften Sie keine Zettel oder Klebestreifen an die
Disc.
• Kleben oder schreiben Sie nichts auf die Disc.
• Fassen Sie die Disc nur in der Mitte oder an den
Rändern an.
Reinigung
• Fingerabdrücke oder Verschmutzungen auf der Disc
können die Bild- und Tonqualität verschlechtern.
Reinigen Sie die Disc mit einem weichen Tuch von
innen nach außen.
• Sollten sich Verschmutzungen nicht entfernen lassen,
reinigen Sie die Disc vorsichtig mit einem angefeuchteten weichen Tuch und reiben Sie mit einem
trockenen Tuch nach.
• Benutzen Sie keine Reinigungsmittel, wie z.B. Verdünnung, Benzin, handelsübliche Reinigungsmittel
oder anti-statisches Spray für Vinyl-LPs.
Lagerung
• Bewahren Sie die Discs weder in direktem Sonnenlicht noch in die Nähe von Wärmequellen auf.
• Bewahren Sie die Discs nicht an feuchten oder staubigen Plätzen auf. Bewahren Sie die Disc in vertikaler
Position immer in der Hülle auf. Stellen Sie keine
Gegenstände auf die lose Disc, da diese sich dann
verbiegt und beschädigt werden kann.
Anmerkung:
Der Hersteller ist nicht für Schäden verantwortlich, die
durch unsachgemäße Behandlung einer Disc auftreten.
DEUTSCH
Analoger Audioausgang
Der integrierte Sechs-Kanal-Verstärker macht den
Anschluss eines externen Verstärkers überfl üssig und
ermöglicht die einfache Plug-and-Play Installation der
Lautsprecher.
Laserkopf-Überspannungsschutzsystem
Um die Lebensdauer des Laserkopfes zu verlängern, beinhaltet das Gerät ein einzigartiges Laserkopf-Überspannungsschutzsystem, das einen konstanten Laserstrom
sicherstellt.
7
05-DVD 628_D 7 30.08.2004, 15:44:10 Uhr
Page 8

Vorderseite - Funktionen
DEUTSCH
BESCHREIBUNG DER BEDIENELEMENTE
1. POWER
Bevor das Stromkabel mit der Steckdose verbun-
den wird, muss sichergestellt werden, dass alle
Anschlüsse richtig ausgeführt wurden. Sollte dies
der Fall sein, wird der Netzstecker vorsichtig in die
Steckdose gesteckt. Drücken Sie die POWER-Taste
an der Vorderseite des Gerätes, um es einzuschalten.
Beim Einschalten des Gerätes können aufgrund eines
kurzen Spannungsstoßes Störungen mit anderen
elektronischen Geräten, die am selben Stromkreis
angeschlossen sind, auftreten. In diesem Fall sollte
das Gerät an eine Steckdose mit einem anderen
Stromkreis angeschlossen werden.
2. OPEN/CLOSE
Im DVD-Modus hat diese Taste die Funktion, mit der
Wiedergabe zu beginnen.
3. II PLAY/PAUSE/AUTO
Im DVD-Modus hat diese Taste die Funktion, die
Wiedergabe oder die Pause zu starten.
Im Tuner-Modus kann durch Drücken dieser Taste ein
automatischer Suchlauf gestartet werden.
4. STOP/MEMO
Im DVD- Modus hat diese Taste die Funktion, die
Wiedergabe zu stoppen.
Im Tuner-Modus wird diese Taste benutzt, um einen
Sender zu speichern.
5. PAUSE/PRE/TUN
Im DVD-Modus hat diese Taste die Funktion, die
Wiedergabe zu unterbrechen.
Im Tuner-Modus wird diese Taste benutzt, um den
voreingestellten oder Tuning-Modus auszuwählen.
6. I PREV/DOWN
Im DVD-Modus können Sie durch Drücken dieser
Taste zum vorherigen Track springen.
Im Tuner-Modus hat diese Taste die Funktion, einen
Sendersuchlauf (rückwärts) durchzuführen.
7. I NEXT/UP
Im DVD-Modus können Sie durch Drücken dieser
Taste zum nächsten Track springen.
Im Tuner-Modus hat diese Taste die Funktion, einen
Sendersuchlauf (vorwärts) durchzuführen. (Abhängig
vom PRE/ TUN- Modus. Siehe Kapitel Radiobetrieb)
8. INPUT SIGNAL SOURCE (Eingangssignal)
Mit Hilfe dieser Taste können Sie eine geeigne-
te Eingangssignalquelle auswählen. (Anm.: Der
ausgewählte Eingang entspricht dem ausgewählten
Eingangsbuchse auf der Rückseite des Gerätes.)
9. VOLUME
Mit diesem Regler können Sie die Lautstärke des
Gerätes regulieren. Alle 6 Kanäle werden gleichzeitig
eingestellt.
Rückseite - Funktionen
1. ANTENNE
Anschlussbuchse für FM-Zimmerantenne und AM-
Rahmenantenne.
2. AUX IN
Eingangsbuchse für zwei zusätzliche Musikgeräte
(1 + 2).
3. AUDIO OUT
Buchse für die beiden rechten und linken Kanalaus-
gänge sowie für den Subwoofer-Ausgang.
4. VIDEO OUTPUT Im Setup muss bei der Einstellung
VIDEO OUTPUT S- VIDEO eingestellt sein.
5. S-VIDEO OUTPUT
6. REAR
Anschlussbuchse für den linken und rechten Sur-
round-Lautsprecher.
7. FRONT/MAIN
Anschlussbuchse für den linken und rechten Front-
/Hauptlautsprecher.
8. CENTER/SUBWOOFER
Anschlussbuchse für Center- und Subwoofer-Laut-
sprecher.
9. COAXIAL DIGITAL AUDIO OUTPUT
10. 230 V~50 Hz
Dieses Gerät wird mit einem AC-Stromkabel geliefert.
Der Netzstecker muss unbedingt trocken sein, wenn
er in die Steckdose gesteckt wird. Das Kabel darf
nicht zu sehr gespannt werden. Außerdem sollte
nicht auf das Kabel getreten werden.
11. OPTICAL OUTPUT
12. SCART OUTPUT
13. COMPONENT VIDEO OUTPUT
8
05-DVD 628_D 8 30.08.2004, 15:44:11 Uhr
Page 9
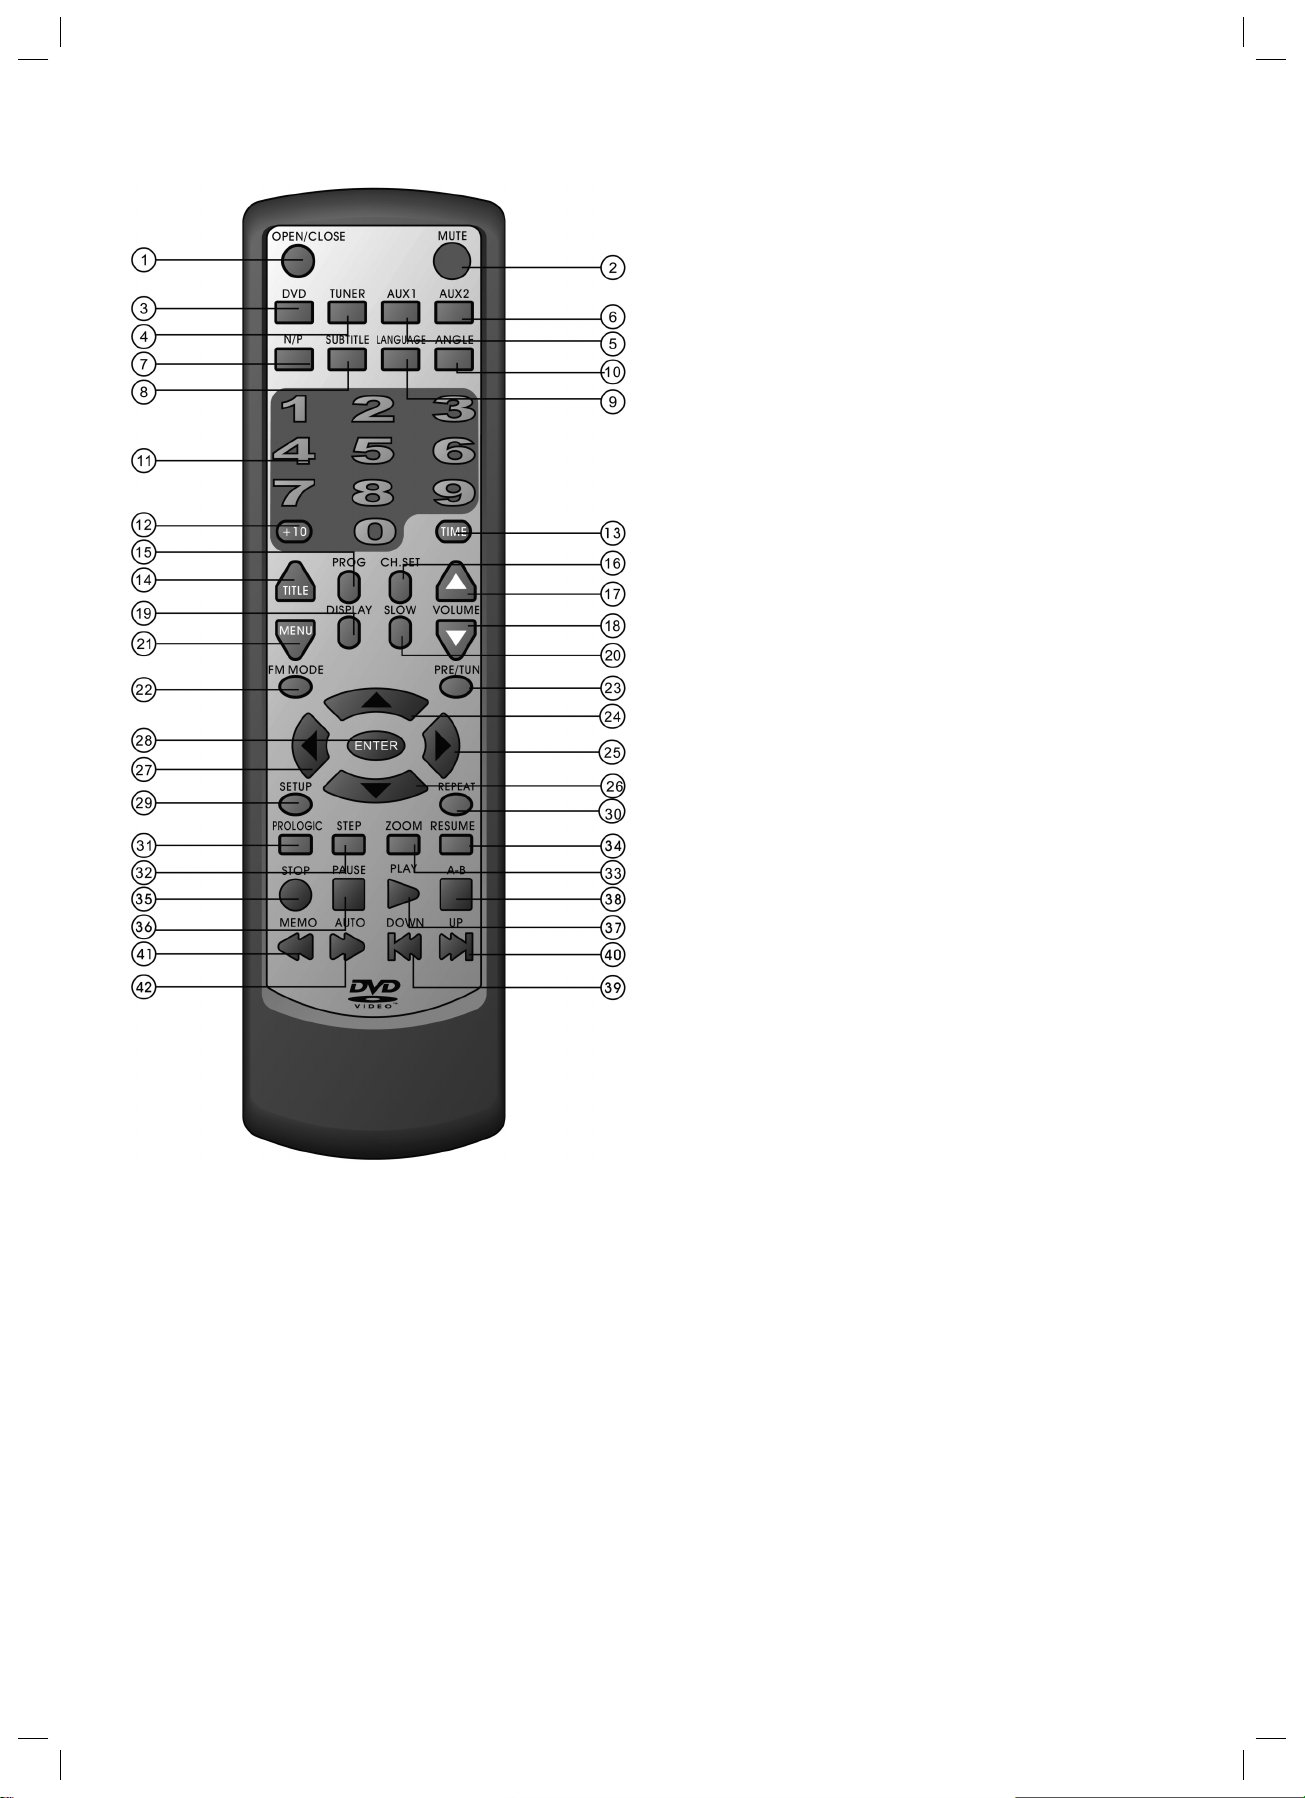
BESCHREIBUNG DER FERNBEDIENUNG
1. Öffnen/Schließen
2. Stummtaste (Mute)
3. DVD-Auswahl
4. AM/FM Tuner
5. Auswahl AUX 1 (Zusatzgerät 1)
6. Auswahl AUX 2 (Zusatzgerät 2)
7. Auswahl TV-Modus N/P
8. Untertitel
9. Sprache
10. Blickwinkel
11. Numerische Tasten 0-9
12. +10
13. Zeit
14. Titel
15. Programm
16. Auswahl Kanal
17. Lautstärke +
18. Lautstärke –
19. Bildschirmanzeige
20. Zeitlupe
21. Menü
22. FM Stereo/Mono
23. Preset/T uning
24. Scrolltaste oben
25. Scrolltaste rechts
26. Scrolltaste unten
27. Scrolltaste links
28. Enter-Taste
29. Setup
30. Wiederholung
31. Auswahl PROLOGIC
32. Step
33. Zoom
34. Resume-Wiedergabe
35. Stopp
36. Pause
37. Wiedergabe
38. A-B-Wiederholung
39. Rückwärts (Sendersuche/vorheriger Track)
40. Vorwärts (Sendersuche/nächster Track)
41. Memo (Speicher/Rückwärtssprung)
42. Auto (Automatische Suche/Vorwärtssprung)
DEUTSCH
9
05-DVD 628_D 9 30.08.2004, 15:44:12 Uhr
Page 10

FERNBEDIENUNG
Batterien einlegen
1. Drücken Sie die Abdeckung des Batteriefachs nach
DEUTSCH
unten, um sie zu entfernen.
2. Legen Sie zwei Batterien (Typ AAA) in das Batteriefach der Fernbedienung. Achten Sie darauf, dass
die Pole (+ und -) mit den Markierungen im Batteriefach übereinstimmen.
3. Schließen Sie die Abdeckung des Batteriefachs.
Anmerkungen:
• Benutzen Sie keine Batterien von verschiedenen
Herstellern. Außerdem sollten alte und neue Batterien
nicht gleichzeitig benutzt werden.
• Falls die Fernbedienung längere Zeit nicht benutzt
wird, sollten die Batterien herausgenommen werden,
um Schäden durch Korrosion zu vermeiden.
• Entfernen Sie verbrauchte Batterien sofort, um Schäden durch Korrosion zu vermeiden.
• Sollten die Batterien auslaufen, muss die Batteriefl üssigkeit aus dem Batteriefach entfernt und beide
Batterien ersetzt werden.
• Wechseln Sie immer beide Batterien zur selben Zeit
aus und benutzen Sie neue, aufgeladene Batterien.
• Die Lebensdauer der Batterien hängt von der Dauer
des Gebrauchs ab.
Benutzung der Fernbedienung
Richten Sie die Fernbedienung direkt auf den Sensor des
DVD-Receivers. Wird das Signal empfangen, funktioniert
das Gerät entsprechend. Die Fernbedienung kann ca. 7
m vom Sensor in einem Winkel von 30° bedient werden.
Anmerkungen
• Der Sensor darf weder direktem Sonnenlicht noch
starker Beleuchtung ausgesetzt sein. Dies könnte zu
Fehlfunktionen des Gerätes führen.
• Falls andere Fernbedienungen in der Nähe benutzt
werden oder die Fernbedienung in der Nähe von
Geräten, die Infrarot-Strahlen nutzen, eingesetzt wird,
können Störungen auftreten.
• Es sollte vermieden werden, Gegenstände auf die
Fernbedienung zu stellen, da dadurch versehentlich
eine Taste gedrückt, eine Funktion geändert und die
Lebensdauer der Batterie verkürzt werden könnte.
• Die Frontseite des DVD-Receivers sollte nicht mit
einem getönten Glas verkleidet werden, da dies den
normalen Betrieb der Fernbedienung stören könnte.
• Es sollten keine größeren Gegenstände zwischen
Fernbedienung und Fernsensor platziert werden,
da dadurch das Signal vom Gerät eventuell nicht
empfangen werden kann.
• Es sollte vermieden werden, die Fernbedienung
Nässe oder Feuchtigkeit auszusetzen.
• Die Fernbedienung darf nicht auseinandergebaut
werden.
Batterien
Eine falsche Benutzung der Batterien kann dazu führen,
dass diese auslaufen, korrodieren oder explodieren.
Achtung: Batterien gehören nicht in den Hausmüll. Bitte
geben Sie verbrauchte Batterien bei zuständigen Sammelstellen oder beim Händler ab.
Werfen Sie Batterien niemals ins Feuer.
10
05-DVD 628_D 10 30.08.2004, 15:44:13 Uhr
Page 11
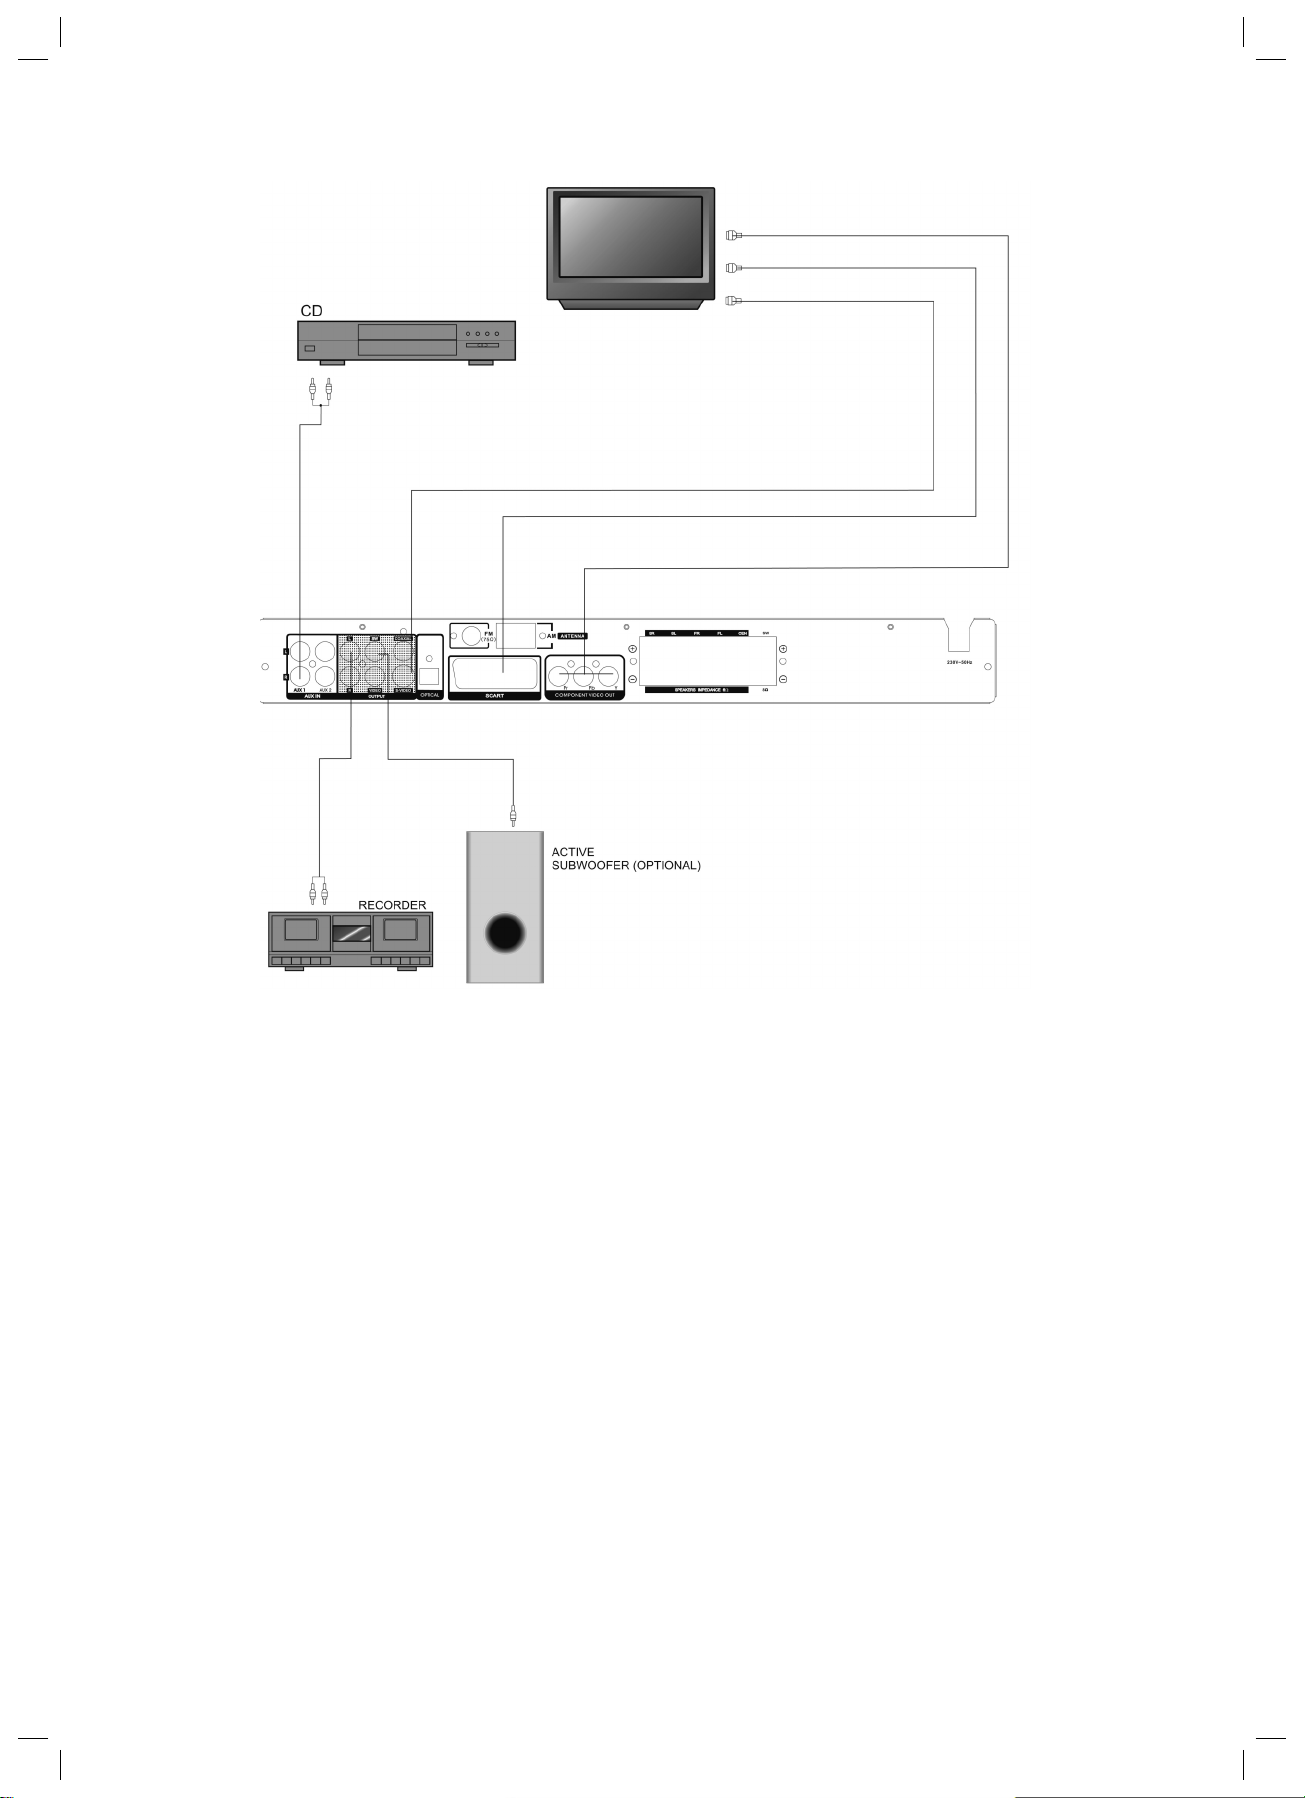
GERÄTE ANSCHLIESSEN
DEUTSCH
• Anschlussbuchsen für diesen DVD-Receiver befi nden
sich an der Rückseite des Gerätes. Lesen Sie die
Anweisungen der jeweiligen Gerätehersteller genau
durch und befolgen Sie diese beim Anschluss von
Video- und Audiogeräten an dieses Gerät.
• Erst wenn alle Anschlüsse ordnungsgemäß vorgenommen wurden, darf das Gerät an den Strom
angeschlossen werden.
• Die rote Buchse (mit R gekennzeichnet) dient zum
Anschluss des rechten Kanals. Die weiße Buchse (mit
L gekennzeichnet) dient zum Anschluss des linken
Kanals. Die gelbe Buchse ist für den Videoanschluss
vorgesehen. Überprüfen Sie, ob alle Anschlüsse fest
sind. Unkorrekte Anschlüssen können Geräusche,
Störungen oder sogar Schäden am Gerät verursachen.
• Das AV-Kabel darf nicht mit anderen Kabeln, wie z.B.
Strom- oder Lautsprecherkabel verbunden werden,
da dies zu einem Defekt des Gerätes führen kann.
11
05-DVD 628_D 11 30.08.2004, 15:44:14 Uhr
Page 12
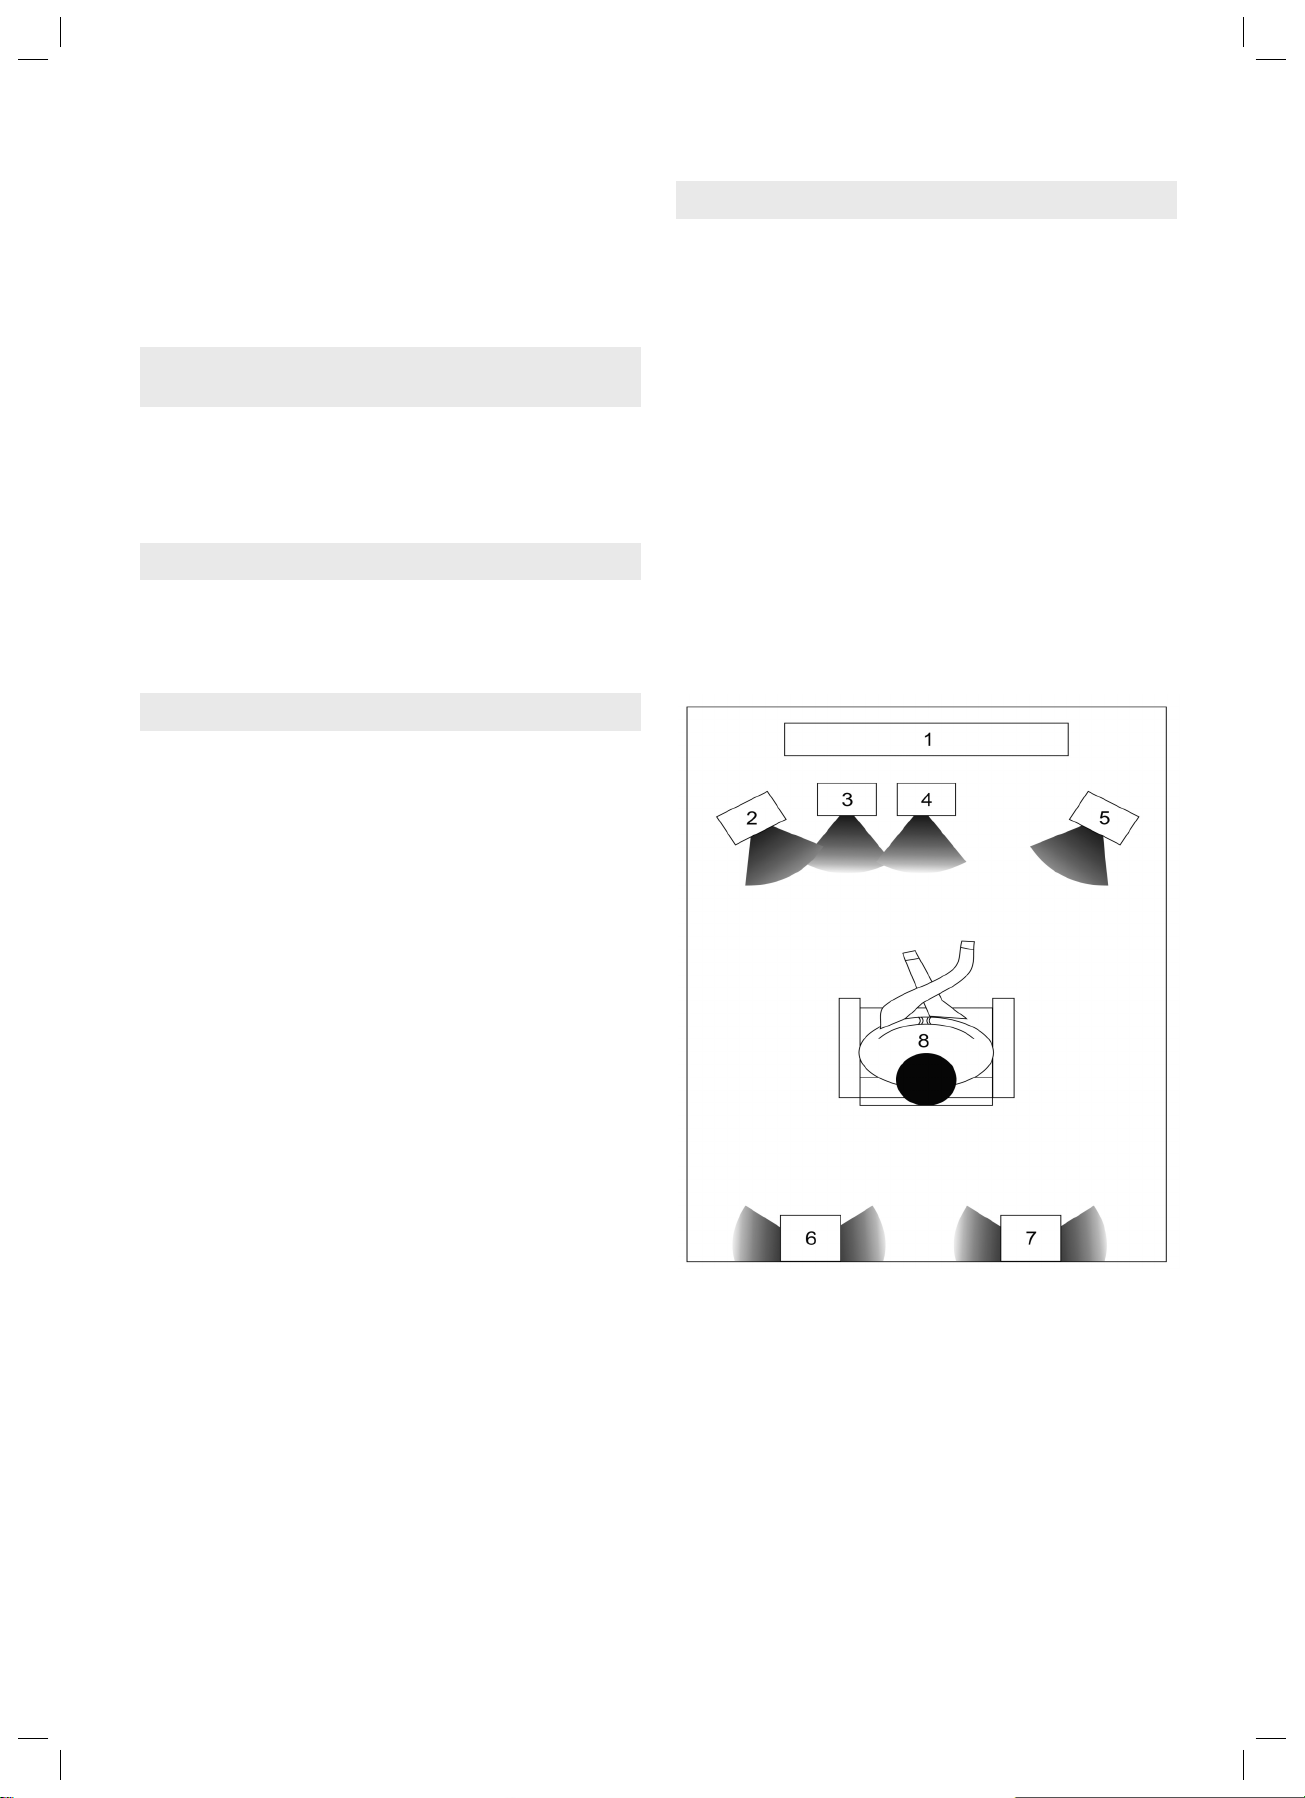
LAUTSPRECHER
Die richtige Konfi guration und Anordnung eines
Surround-Sound-Systems ist entscheidend für das
Klangergebnis. Um eine maximale Klangleistung zu
erzielen, sollten vor dem Anschluss der Lautsprecher die
DEUTSCH
Anweisungen bezüglich der Anordnung der Lautsprecher
befolgt werden.
Front- /Hauptlautsprecher (rechts und links, Center-Lautsprecher)
• Diese drei Lautsprecher liefern ein exzellentes
Klangbild und erhöhen den dynamischen Effekt der
Audiowiedergabe. Der Hauptdialog eines Filmes wird
über diese Lautsprecher wiedergegeben.
Rear- oder Surround-Lautsprecher
• Diese beiden Lautsprecher bieten dynamische 3-DKlangeffekte und schaffen eine räumliche Klangwiedergabe, da sie Hintergrundgeräusche hinzufügen.
Subwoofer-Lautsprecher
• Der Subwoofer ist ein kräftiger Bass-Lautsprecher,
durch den noch mehr Realitätsnähe geschaffen wird.
Anordnung der Lautsprecher
Die ideale Konfi guration des Surround-Sound-Systems
hängt von der Raumgröße und dem Wandmaterial ab.
Die Abbildung (siehe unten) zeigt eine typische Anordnung der verschiedenen Lautsprecher.
Hinweise:
• Front-/Hauptlautsprecher und Center-Lautsprecher
sollten auf derselben Höhe platziert werden. Sie
werden auf den Zuhörer ausgerichtet.
• 3-D-Surround- bzw. Rear-Lautsprecher sollten hinter
dem Zuhörer und zwar über der Ohrhöhe des Zuhörers an der Wand angebracht werden.
Der Subwoofer kann irgendwo im Raum aufgestellt werden, da er einen geringen Einfl uss auf das Klangerlebnis
des Zuhörers hat. Um einen optimalen Bass-Effekt zu
erzielen, wird empfohlen, den Subwoofer an das HomeTheatre-System anzuschließen.
Anmerkung: Um einen optimalen 3-D-Klangeffekt zu
erzielen, wird die Ausgabe der Center- und SubwooferLautsprecher auch über die Front- und Rear-Lautsprecher ausgegeben.
1. Fernsehgerät bzw. Bildschirm
2. Front-/Hauptlautsprecher (links)
3. Subwoofer
4. Center-Lautsprecher
5. Front-/Hauptlautsprecher (rechts)
6. 3-D-Surround-Lautsprecher (links)
7. 3-D-Surround-Lautsprecher (rechts)
8. Sitzposition des Zuschauers
12
05-DVD 628_D 12 30.08.2004, 15:44:14 Uhr
Page 13
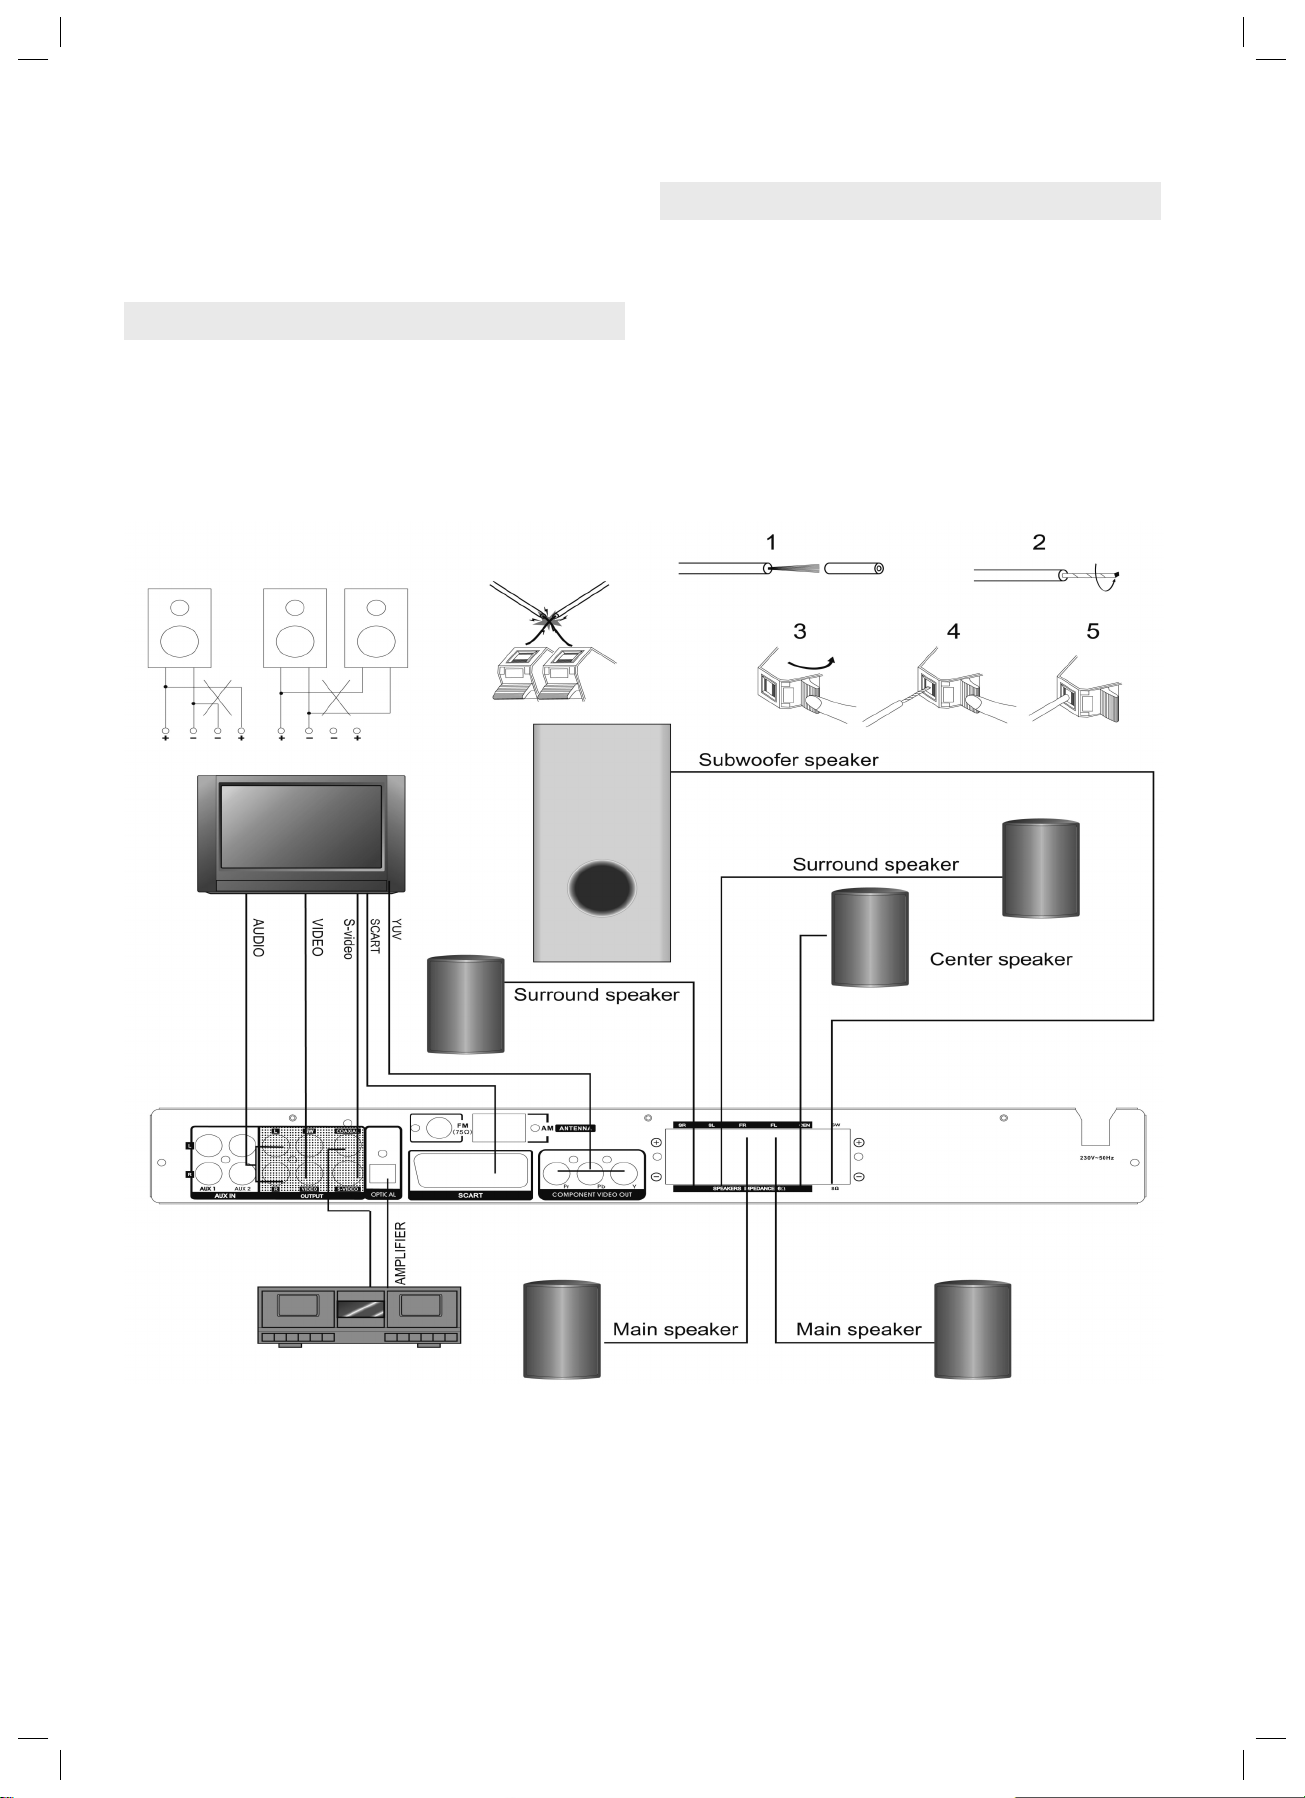
ANSCHLUSS DES LAUTSPRECHERSYSTEMS
Dieser sehr gut konzipierte DVD-Receiver liefert eine
optimale Klangqualität, wenn die verwendeten Lautsprecher innerhalb ihres Nenn-Impedanz-Bereiches
eingesetzt werden.
Wichtig
• Die Mindest-Impedanz der fünf Lautsprecher beträgt
6 Ohm; für den Subwoofer sind es 8 Ohm.
• Falls Sie nur einen Lautsprecher benutzen möchten
oder die Musik mono hören möchten, dürfen Sie die
einzelnen Lautsprecher rechts und links der Kanalanschlüsse nicht parallel schalten.
Lautsprecherkabel anschliessen
1. Entfernen Sie ca. 1 cm der Kabelisolierung.
2. Verdrehen Sie das Kabelende.
3. Öffnen Sie die Kabelklemme, indem Sie auf die
Lasche drücken.
4. Fügen Sie das Kabelende in die Klemme.
5. Lassen Sie die Lasche wieder los und überprüfen
Sie, ob das Kabel fest in der Klemme steckt.
Anmerkung:
Um einen Kurzschluss zu vermeiden, muss beim Anschluss der Lautsprecher auf die Plus- bzw. Minuspole
der Lautsprecherkabel geachtet werden.
DEUTSCH
13
05-DVD 628_D 13 30.08.2004, 15:44:15 Uhr
Page 14
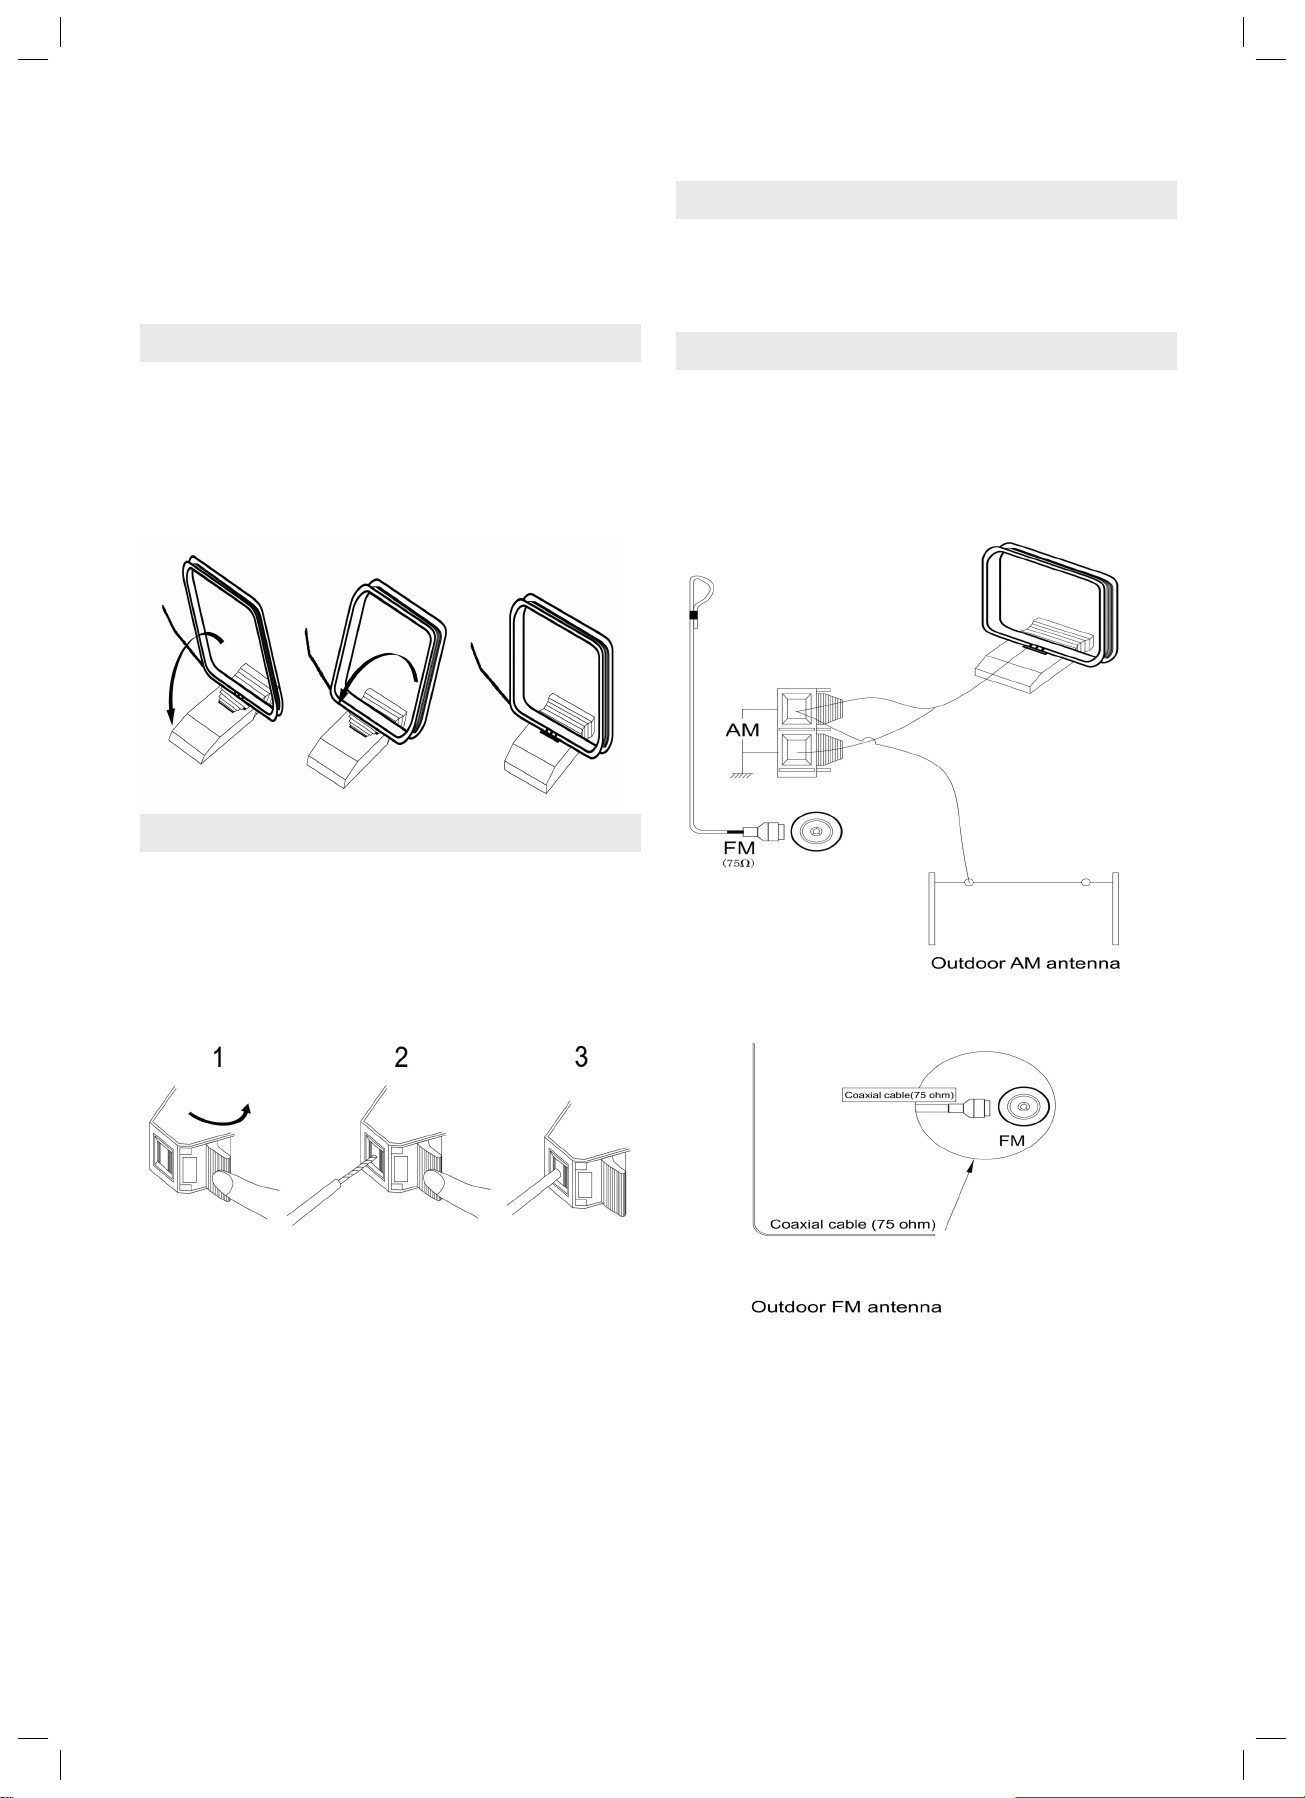
ANTENNENANSCHLÜSSE
In einigen Gebäuden bzw. unter bestimmten Umständen
kann es schwierig sein, Radiosignale zu empfangen.
Die mitgelieferten Antennen verbessern den Empfang
solcher Signale. Sie sind nur für den internen Gebrauch
DEUTSCH
gedacht.
AM-Rahmenantenne
Die AM-Rahmenantenne so ausrichten, dass ein guter
Empfang erzielt wird. Sie sollte so weit wie möglich
von DVD-Receiver, Fernsehgerät, Lautsprechern und
Stromkabeln entfernt platziert werden. Falls der Empfang
weiterhin schlecht ist, könnte eine Außenantenne erforderlich sein.
FM-Zimmerantenne
Die FM-Antenne so ausrichten, dass ein guter Empfang
erzielt wird. Die Antennenenden müssen so fi xiert werden, dass sie möglichst wenig verbogen werden.
FM-Zimmerantenne anschließen
1. Öffnen Sie die Kabelklemme, indem Sie auf die
Lasche drücken.
2. Fügen Sie das Kabelende ein.
3. Lassen Sie die Lasche wieder los und überprüfen
Sie, ob das Kabel fest in der Klemme steckt.
AM-Rahmenantenne anschließen
1. Lasche gedrückt halten
2. Kabelende in Loch einführen
3. Lasche loslassen
4. Antenne ausrichten
14
05-DVD 628_D 14 30.08.2004, 15:44:15 Uhr
Page 15

STROMANSCHLUSS
DEUTSCH
Bevor das Stromkabel in die Steckdose gesteckt wird,
müssen alle Anschlüsse nochmals genau überprüft
werden. Anschließend wird das Stromkabel vorsichtig in
die Steckdose gesteckt.
Drücken Sie die POWER-Taste an der Vorderseite des
Gerätes, um das Gerät einzuschalten. Die Anzeige
leuchtet auf.
GRUNDFUNKTIONEN
Klangquelle auswählen
1. Drücken Sie die entsprechende Funktionstaste (DVD,
AM/FM, AUX1, AUX2), um die gewünschte Klangquelle auszuwählen. Das passende Symbol erscheint
in der Anzeige.
2. Wenn die AM/FM-Taste gedrückt wird, wird der Kanal
wiedergegeben, der zuletzt gehört wurde.
Beim Einschalten des Gerätes können aufgrund eines
kurzen Spannungsstoßes Störungen mit anderen
elektronischen Geräten, die am selben Stromkreis
angeschlossen sind, auftreten. In diesem Fall sollte das
Gerät an eine Steckdose mit einem anderen Stromkreis
angeschlossen werden.
Lautstärkeregelung
Die Lautstärke kann entweder durch Drehen des großen
Lautstärkeknopfes an der Vorderseite des Gerätes geregelt werden oder durch Bedienen der entsprechenden
Taste auf der Fernbedienung.
Mute (Stummtaste)
Durch Drücken der MUTE-Taste werden die Lautsprecher vorübergehend stummgeschaltet. Durch erneutes
Drücken der Taste wird zur normalen Audio-Wiedergabe
zurückgekehrt.
15
05-DVD 628_D 15 30.08.2004, 15:44:16 Uhr
Page 16
DEUTSCH
RADIOBETRIEB
Sender einstellen
1. Drücken Sie die TUNER-Taste, um den gewünschten
Wellenbereich (AM oder FM) auszuwählen.
2. Mit Hilfe der UP- oder DOWN-Taste können Sie die
Sender suchen (Zuvor muss das Display über die
PRE/TUN- Taste auf die Sendefrequenz eingestellt
werden.). Durch jedes erneute Drücken ändert sich
die Frequenz. Sobald das Signal eines Senders
empfangen wird, erscheint dieser in der Anzeige.
3. Um auf schnellere Weise Sender zu fi nden, drücken
Sie die UP- oder DOWN-Taste zwei Sekunden lang.
Das Gerät startet einen automatischen Suchlauf.
Sobald ein Sender gefunden wurde, stoppt der automatische Suchlauf.
4. Um einen Sender zu speichern, drücken Sie die
MEMO-Taste. In der Anzeige erscheint vier Sekunden
lang die Speichernummer. Durch erneutes Drücken
der MEMO-Taste wird der Sender gespeichert.
Speichernummer
Wellenbereich Senderfrequenz I
5. Um während des Empfangs eines FM-Stereo-Programms die störenden Geräusche zu reduzieren,
drücken Sie die FM/Mode-Taste. Das Wort STEREO
erscheint nicht mehr in der Anzeige. Das Programm wird jetzt zur Geräuschreduzierung MONO
wiedergegeben. Um wieder zur Stereo-Wiedergabe
zurückzukehren, drücken Sie die FM-Taste erneut.
Automatischer Suchlauf
Das Gerät kann bis zu 50 verschiedene AM/ FM-Radiosender speichern.
1. Drücken Sie die AUTO-Taste. Das Wort AUTO erscheint im Display und der automatische Suchlauf wird
gestartet.
2. Die Sender werden in aufsteigender Reihenfolge
gespeichert. Es werden bis zu 50 Sender gespeichert.
Sobald ein Sender gespeichert wurde, erscheinen Speichernummer und Senderfrequenz vier Sekunden lang in
der Anzeige.
3. Sobald 50 Sender (AM oder FM) gespeichert wurden,
können keine weiteren Sender gespeichert werden.
Voreingestellte Sender wiedergeben
1. Drücken Sie die TUNER-Taste, um den gewünschten
Wellenbereich auszuwählen.
2. Drücken Sie anschließend die PRE/TUN- Taste, um
die Stationsspeicher im Display anzuzeigen.
3. Mit Hilfe der Nummerntasten können Sie die gewünschte Senderspeichernummer auswählen. Beispiel:
Um den unter #5 gespeicherten Sender wiederzugeben,
drücken Sie einfach die Nummerntaste 5; Sender #17
erhalten Sie durch Drücken der Nummerntaste 1 gefolgt
von der Nummerntaste 7.
4. Auf die mit Hilfe der Speicherfunktion gespeicherten
Sender kann auch durch Drücken der UP- oder DOWNTaste zugegriffen werden.
16
05-DVD 628_D 16 30.08.2004, 15:44:16 Uhr
Page 17
DVD-BETRIEB
Sobald das Gerät an einen Fernsehapparat oder ein
anderes Zusatzgerät angeschlossen ist, können Sie
DVD-Videos sowie Ihre Lieblings-CD und MP3-Dateien
genießen.
Wiedergabe einer DVD-Video-Disc
Stellen Sie das Fernsehgerät an und wählen Sie den
A/V-Modus aus. Falls das Fernsehgerät einen SCARTAnschluss hat, muss der SCART-Modus aus dem
TV-Menü gewählt werden. Stellen Sie den Verstärker
– falls angeschlossen – an. Wählen Sie den AC-3 oder
DVD-Modus aus.
Wiedergabe einer Audio-Disc
Stellen Sie das Audio-System ein und wählen Sie die
Eingangsquelle, die an den DVD-Player angeschlossen
ist, aus. Sollten Sie nicht die geeignete Ausrüstung für
einen Dolby Digital Surround-Klang haben, müssen Sie
im SETUP- Menü die Einstellung Ausgang Analog auf
2.1 ändern.
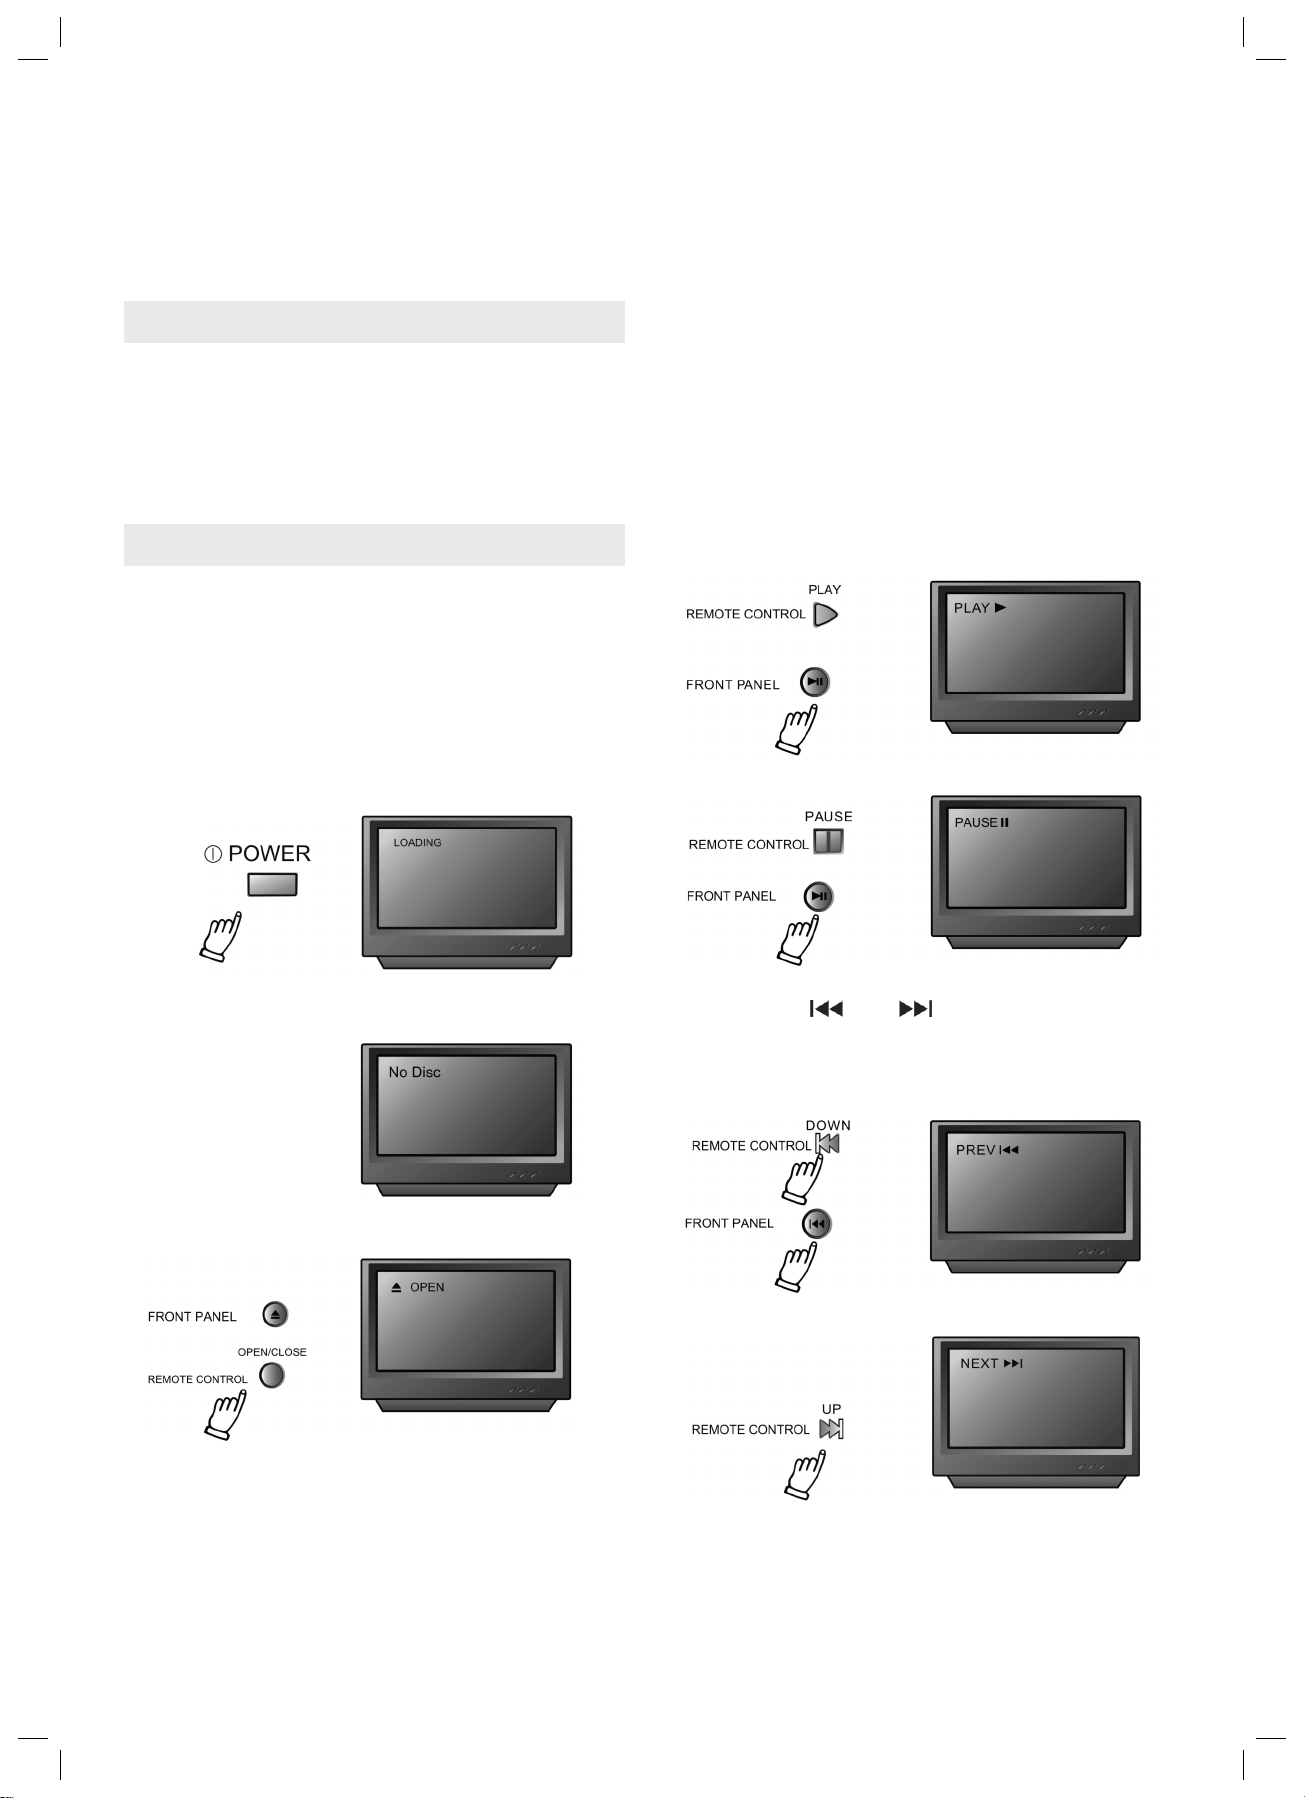
1. Drücken Sie die POWER-Taste an der Frontplatte. Auf
dem Bildschirm erscheint die Meldung DISC LOADING
(Disc laden).
5. Sobald die Disc gelesen wurde, beginnt das Gerät
mit der Wiedergabe. Bei der Wiedergabe einer DVD erscheint der DVD-Titel bzw das Menü. CD-Tracks werden
nacheinander wiedergegeben.
Anmerkung:
· Die Disc kann beschädigt werden, wenn sie nicht
richtig im Ladefach liegt. Dadurch kann es auch zu
einer Fehlfunktion des DVD-Players kommen. Legen
Sie nur 12cm oder 8cm DVDs oder CDs in das Ladefach.
· Ein Hin- und Herbewegen des DVD-Players während
der Wiedergabe kann zu Schäden an Disc und Player
führen. Um das Ladefach zu öffnen oder zu schließen
darf nur die OPEN/CLOSE-Taste auf der Fernbedienung oder der Frontplatte des Gerätes benutzt
werden.
Drücken Sie die PAUSE- Taste.
DEUTSCH
Falls keine Disc im Ladefach liegt, erscheint die Meldung: NO DISC (keine Disc) auf dem Bildschirm.
2. Drücken Sie die OPEN/CLOSE-Taste. Das Disc-Ladefach öffnet sich.
3. Legen Sie eine Disc ins Ladefach. Achten Sie darauf,
dass die CD/DVD mit der Abspielseite nach unten in der
Lade liegt.
4. Drücken Sie die OPEN/CLOSE-Taste erneut, um das
Ladefach zu schließen. Nach Schließen des Ladefachs
erscheint in der oberen linken Ecke des Bildschirms der
Disc-Typ.
6. PREV/NEXT Wiedergabe
Drücken Sie die
gen oder nächsten Track wiederzugeben. Durch Drücken
der PLAY-Taste wird wieder zur normalen Wiedergabe
zurückgekehrt.
Drücken Sie die PREV-Taste.
Drücken Sie die NEXT-Taste.
7. Schneller Vor- und Rücklauf (Fast Forward/Reverse)
Das Gerät verfügt sowohl über einen Schnellvorlauf und
–rücklauf mit folgender Beschleunigung: 2x, 4x, 8x, 16x.
oder Taste, um den vorheri-
17
05-DVD 628_D 17 30.08.2004, 15:44:17 Uhr
Page 18
DVD-BETRIEB
FUNKTIONEN
Bildschirmanzeige
DEUTSCH
Um diese Funktion zu aktivieren, müssen Sie nur auf
die oder -Taste auf der Fernbedienung drücken.
Die Geschwindigkeit wird mit jedem Drücken der Taste
beschleunigt. Drücken Sie die PLAY-Taste, um zur normalen Wiedergabe zurückzukehren.
Memory-Wiedergabe
Das Gerät ermöglicht Ihnen, die Wiedergabe zu stoppen und später genau an dieser Stelle fortzusetzen.
Drücken Sie die STOP-Taste, um die Wiedergabe zu
unterbrechen. Das Gerät speichert die Stelle, an der die
Wiedergabe gestoppt wurde. Drücken Sie die RESUME
oder PLAY -Taste, um die Wiedergabe an der Stelle fortzufahren, an der Sie gestoppt haben (gilt nicht für MP3).
Während der Wiedergabe einer Disc, kann der Status
verschiedener Funktionen, wie z.B. Titel, Tracknummer
sowie verschiedene Spielzeiten abgerufen werden.
1. Wenn Sie die DISPLAY-Taste einmal drücken,
erscheint der Titel, das Kapitel sowie die bereits abgespielte Zeit.
2. Nach erneutem Drücken der DISPLAY- Taste bei
VCD’s erscheint die verbleibende Zeit für den wiedergegebenen Titel.
3. Nach erneutem Drücken der DISPLAY- Taste bei
DVD’s erscheint die bereits abgelaufene Zeit des
Kapitels.
Zeitlupen-Wiedergabe
Dieser DVD-Receiver bietet auch die Möglichkeit, Discs
in Zeitlupe wiederzugeben. Durch wiederholtes Drücken
der SLOW-Taste wird die Wiedergabe-Geschwindigkeit
um 1/2, 1/4, 1/8, 1/16 langsamer. Drücken Sie die PLAYTaste, um zur normalen Wiedergabe zurückzukehren.
18
4. Nach erneutem Drücken der DISPLAY-Taste verschwindet die Anzeige.
05-DVD 628_D 18 30.08.2004, 15:44:18 Uhr
Page 19
FUNKTIONEN
N/P
Dieser DVD-Receiver unterstützt Videoausgänge verschiedener Systeme, dazu gehören auch Auto, NTSC
und PAL.
Falls das falsche System ausgewählt wurde, beginnt
das Bild zu fl ackern und wird farblos. Sollte dies der Fall
sein, müssen Sie die N/P-Taste (im Stoppmodus) auf
der Fernbedienung drücken und das richtige System
auswählen (NTSC für Nordamerika, PAL für Europa).
Weitere Informationen bezüglich des Ausgangsformats
entnehmen Sie bitte der Bedienungsanleitung Ihres
Fernsehgerätes.
Untertitel
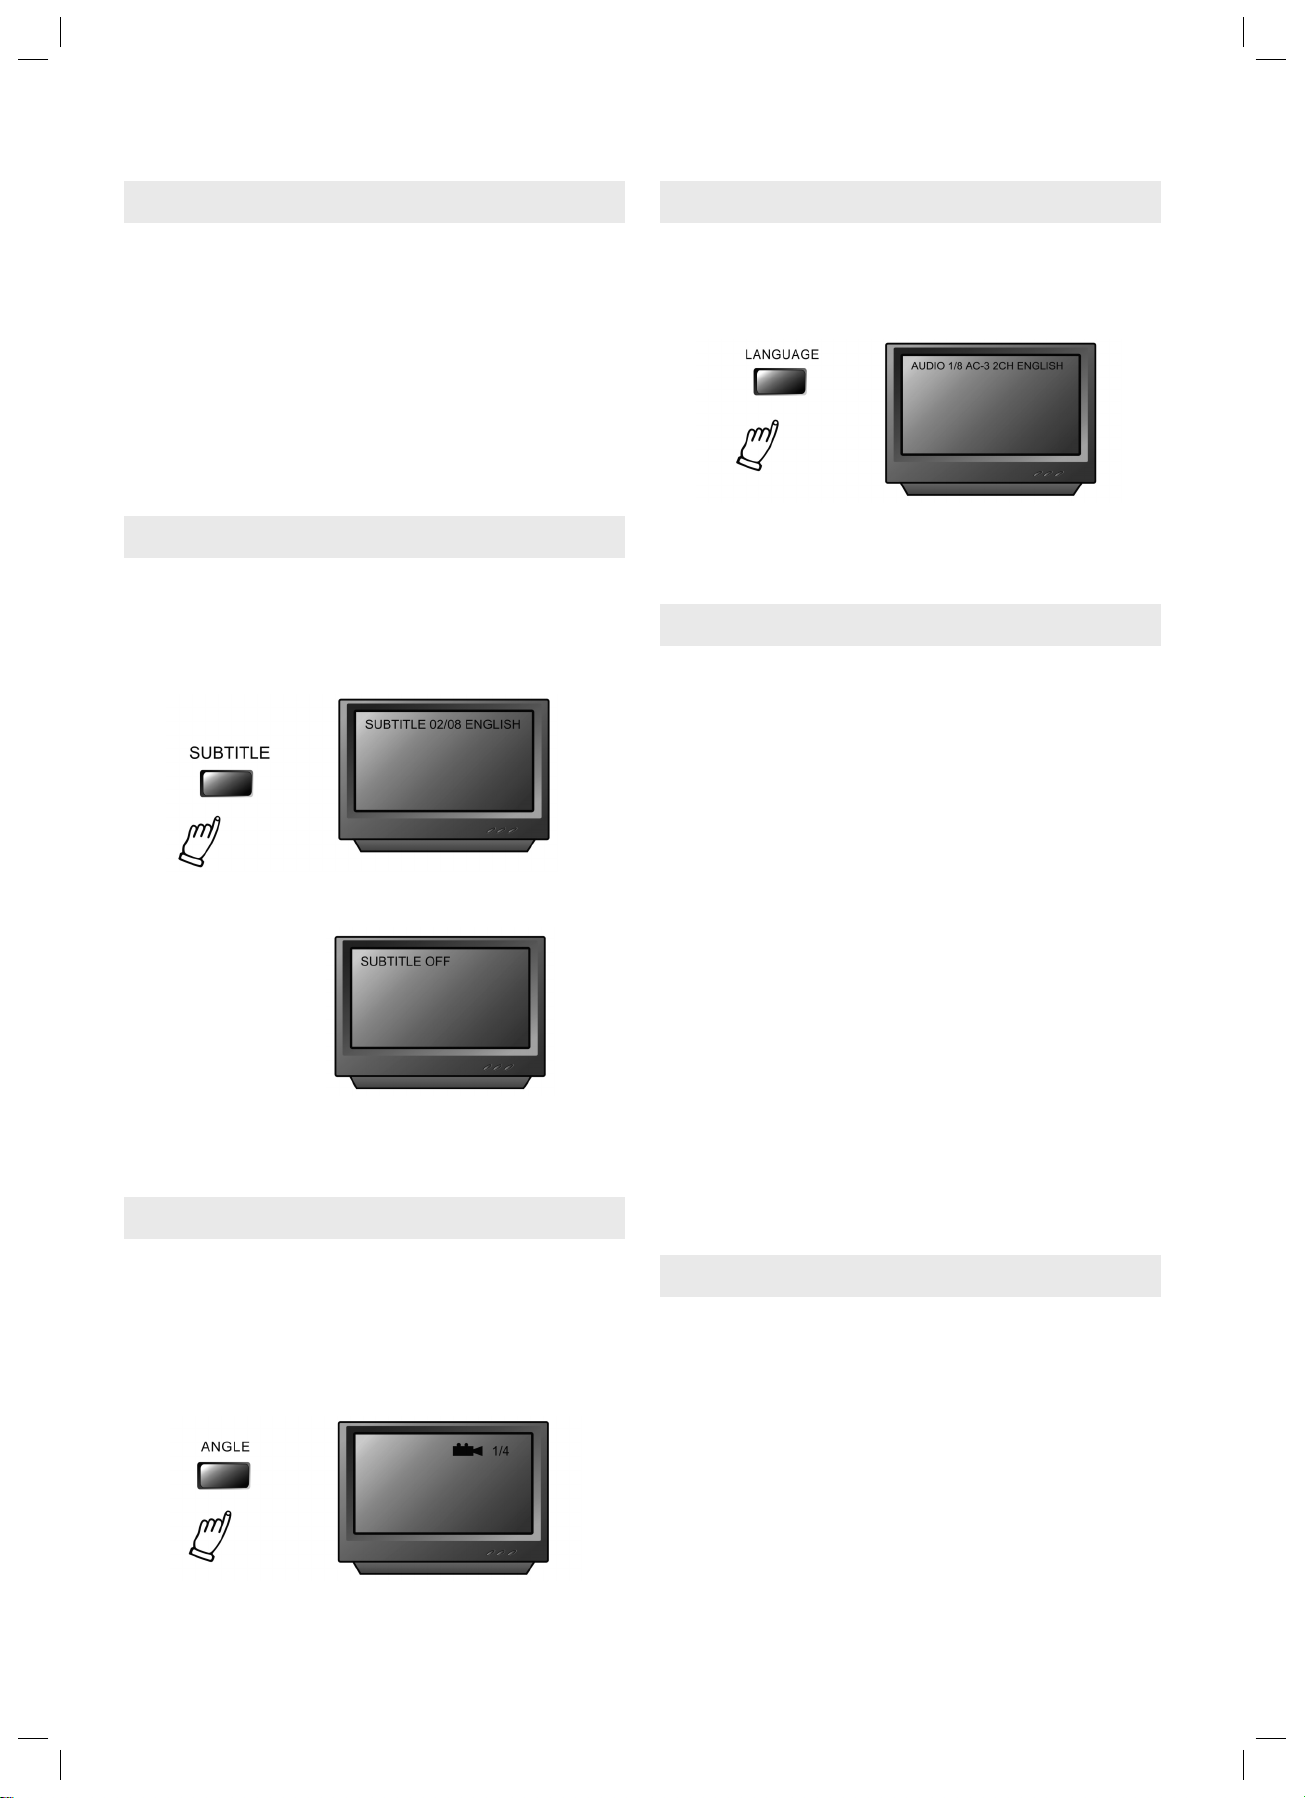
Sie haben bei diesem Gerät die Möglichkeit, bis zu 32
verschiedene Untertitel-Sprachen (abhängig von der
eingelegten Disc) einzustellen.
1. Drücken Sie die SUBTITLE- Taste so oft, bis die
gewünschte Sprache erscheint.
Sprachen
Es besteht die Möglichkeit, Filme in 8 verschiedenen
Sprachen (abhängig von der eingelegten Disc) zu zeigen.
1. Drücken Sie die LANGUAGE-Taste so oft, bis die
gewünschte Sprache erscheint.
Anmerkung:
Die eingelegte Disc muss über die Sprachen-Funktion
verfügen.
Titel auswählen
DVD-Discs sind normalerweise in Titel unterteilt, die
wiederum in Kapitel aufgeteilt werden. Dieses Gerät
ermöglicht es, einen bestimmten Titel zur Wiedergabe
auszuwählen. Falls die DVD über ein Titelmenü verfügt,
kann ein bestimmter Titel über diese Funktion oder über
die numerischen Tasten ausgewählt werden.
DEUTSCH
2. Um die Untertitel auszublenden, drücken Sie die SUBTITLE-Taste so lange, bis die Untertitel verschwinden.
Anmerkung:
Die eingelegte Disc muss über die Untertitel-Funktion
verfügen.
Kameraperspektiven
Es besteht die Möglichkeit, verschiedene Kameraperspektiven einzustellen.
1. Drücken Sie die ANGLE-Taste auf der Fernbedienung.
Durch mehrmaliges Drücken der ANGLE-Taste verändert
sich die Kameraperspektive jedes Mal erneut.
2. Sie können die ANGLE-Taste nur betätigen, wenn das
Blickwinkel-Symbol in der Anzeige aufl euchtet.
Titelmenüfunktion
1. Drücken Sie die TITLE-Taste. Auf dem Fernseh-Bildschirm erscheint ein Titelmenü.
2. Drücken Sie die entsprechende Scroll-Taste, um den
gewünschten Titel auszuwählen. Ein Titel kann auch
über die numerischen Tasten, durch Drücken der
entsprechenden Titelnummer, ausgewählt werden.
3. Drücken Sie die ENTER-Taste. Die Wiedergabe ab
Kapitel 1 des ausgesuchten Titels beginnt.
Anmerkung:
Einige Discs verfügen nicht über diese Funktion. Befolgen Sie ggf. die Anweisungen, die auf dem Bildschirm
erscheinen. In dieser Anleitung wird nur die grundsätzliche Vorgehensweise beschrieben. Je nach Inhalt der
DVD kann die Vorgehensweise unterschiedlich sein.
Wenn Sie eine VCD 2.0 abspielen, hat die TITLE-Taste
z.B. die Funktion, zum Menu zurückzukehren.
PROLOGIC SELECTOR
Drücken Sie im Stoppmodus die PROLOGIC- Taste, um
PROLOGIC ON oder OFF auszuwählen.
Anmerkung:
Die eingelegte Discs muss über die Kameraperspektiven-Funktion verfügen.
19
05-DVD 628_D 19 30.08.2004, 15:44:19 Uhr
Page 20
FUNKTIONEN
TIME- Funktion
Wird während der Wiedergabe die TIME- Taste gedrückt,
DEUTSCH
so öffnet sich das Suchen Menü. In der Zeile Zeit können
Sie mit den Nummerntasten ein Suchziel im Format HH:
MM:SS (H=Stunden, M=Minuten, S=Sekunden) eingeben. Drücken Sie nun die ENTER- Taste. Die Wiedergabe
wird ab dem gewählten Zeitpunkt gestartet.
In der Zeile Titel/ Kapitel können Sie mit den Zifferntasten ein nach Titel und Kapitel bestimmtes Suchziel
angeben. Mit der ENTER- Taste starten Sie dann die
Wiedergabe.
Lesezeichen setzen
Wird im Suchen Menü keine Eingabe gemacht, sondern
ein zweites Mal auf die TIME- Taste gedrückt, erscheint
das Menü Lesezeichen.
Dort wählen Sie mit den Pfeiltasten die Nummer des
Lesezeichens (1, 2 oder 3), wo Sie das Lesezeichen
setzen wollen, und drücken dann die ENTER- Taste
um die Spielzeit zu speichern. Bis zu drei verschiedene
Lesezeichen können gesetzt werden.
Wiedergabe eines gesetzten Lesezeichen
1. Drücken Sie zweimal die TIME- Taste.
2. Wählen Sie mit den Pfeiltasten das gewünschte
Lesezeichen an, von welchem Sie die Wiedergabe
starten möchten und drücken Sie die ENTER- Taste.
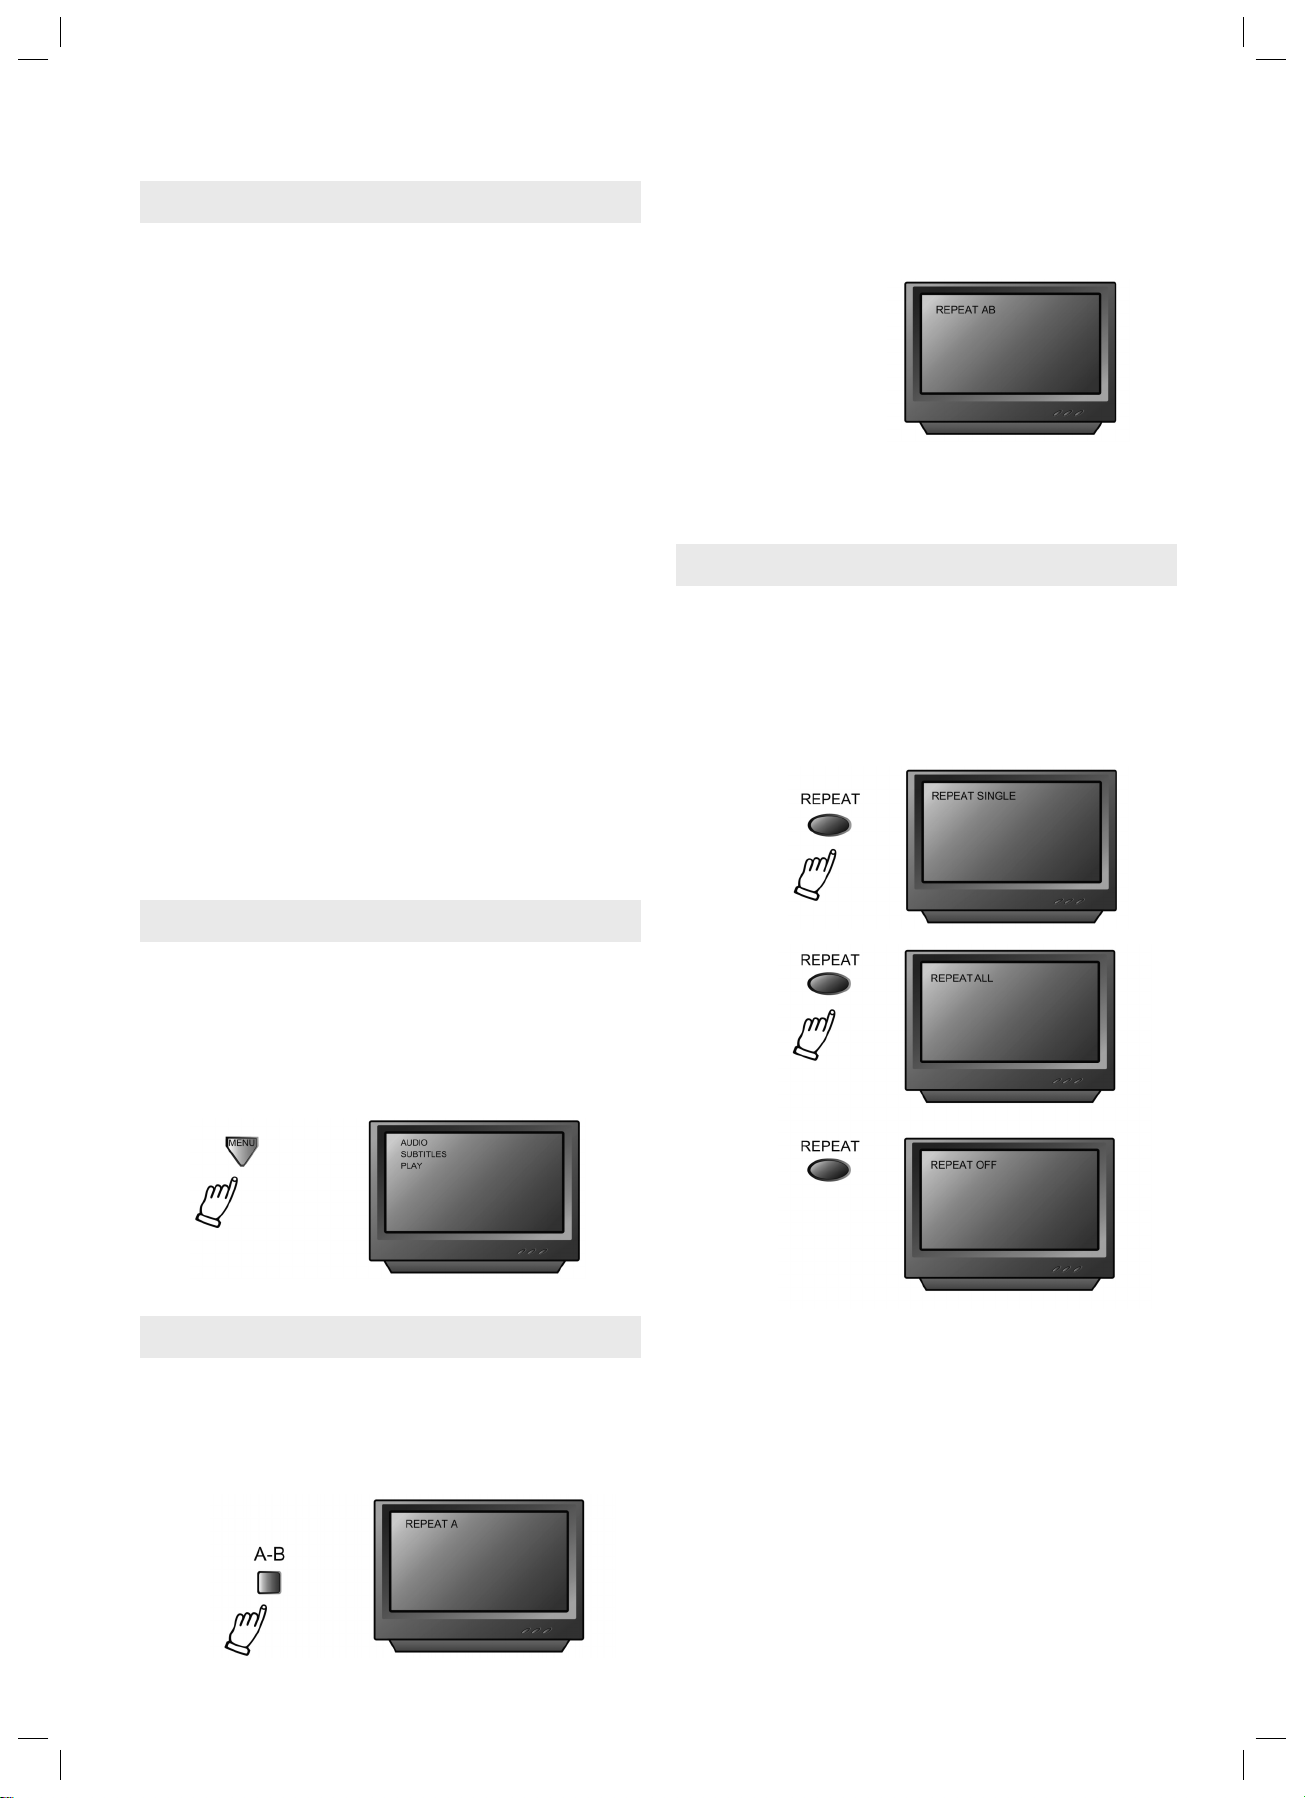
2. Drücken Sie die A-B-Taste erneut während der
Wiedergabe der Disc, um Punkt B (Endpunkt) festzulegen. Der Abschnitt zwischen A und B wird nochmals
wiedergegeben.
3. Drücken Sie die A-B-Taste ein drittes Mal, um die
Eingabe zu löschen.
Mehrfach-Wiederholung
Sie können die Wiedergabe bestimmter Titel, Kapitel/
Tracks oder Segmente mehrfach wiederholen. Es ist
sogar möglich, zwischen zwei zu wiederholenden Wiedergaben hin- und herzuschalten.
1. Wählen Sie den Titel, das Kapitel, etc, das wiederholt
werden soll, aus.
2. Drücken Sie die REPEAT-Taste.
Hinweis: Alle Lesezeichen werden gelöscht, wenn das
Gerät ausgeschaltet wird oder die Disc entnommen wird.
MENU/PBC
Wenn die PBC-Funktion eingeschaltet ist, kann ein
CD-Titel nur über das Hauptmenü ausgewählt werden.
Ist die PBC-Funktion ausgeschaltet, kann ein Titel
durch Eingabe der entsprechenden numerischen Taste
ausgewählt werden. Sobald die MENU-Taste während
der Wiedergabe einer DVD gedrückt wird, erscheint der
Menü-Inhalt der Disc.
A-B-Wiederholung
Die A-B-Wiederholung ermöglicht es Ihnen, beim
Abspielen einer DVD einen Abschnitt zwischen zwei bestimmten Punkten (A und B) nochmals wiederzugeben.
1. Drücken Sie die A-B-Taste während der Wiedergabe
der Disc, um Punkt A (Anfangspunkt) festzulegen.
Der Wiederholungs-Modus ändert sich mit jedem erneuten Drücken der REPEAT-Taste (z.B. Titelwiederholung,
Kapitelwiederholung, alles wiederholen, WiederholungsModus ausschalten).
Bei der Wiedergabe einer CD, erscheint nach Drücken
der REPEAT-Taste folgende Anzeige: TRACK ALL und
REPEAT OFF (alle Tracks wiederholen und Wiederholungsmodus ausschalten).
Bei der Wiedergabe einer MP3 kann nach Drücken der
REPEAT-Taste zwischen folgenden Modi gewählt werden: Single, Repeat one, Repeat Folder, Folder.
20
05-DVD 628_D 20 30.08.2004, 15:44:20 Uhr
Page 21
FUNKTIONEN
Zoom
Mit Hilfe der Zoom-Funktion kann ein Bild während der
normalen Wiedergabe oder während der Zeitlupenwiedergabe bis zu dreimal vergrößert werden. Drücken Sie
die ZOOM-Taste einmal, vergrößert sich das Bild zweifach, bei zweifachem Drücken vergrößert sich das Bild
dreifach und bei dreifachem Drücken vergrößert es sich
vierfach. Um zur normalen Wiedergabe zurückzukehren,
müssen Sie die ZOOM-Taste ein viertes Mal drücken.
Kanallautstärke (CH.SET)
Bei der Wiedergabe einer DVD können Sie durch Drücken dieser Taste und der VOLUME-Taste die Kanallautstärke einstellen.
SYSTEM-SETUP (FUNKTIONSEINSTELLUNGEN)
Volume und Mute (Lautstärke und Stummschaltung)
Die Lautstärke kann ganz einfach über die Fernbedienung eingestellt werden. Drücken Sie entweder die VOL+
Taste, um die Lautstärke zu erhöhen oder die VOLTaste, um die Lautstärke zu reduzieren. Um das Gerät
stumm zu schalten, drücken Sie die MUTE-Taste. Durch
erneutes Drücken der MUTE-Taste ist die Stummschaltung wieder aufgehoben.
Program (Programmierung)
Sie können bestimmte Tracks in der von Ihnen
gewünschten Reihenfolge abspielen. Wenn Sie die
PROG-Taste drücken, erscheint das Programm-Menü
auf dem Bildschirm. Mit Hilfe der numerischen Tasten
können Sie die gewünschten Tracks eingeben. Drücken
Sie die ENTER-Taste, um das programmierte Programm
wiederzugeben. Um die programmierte Wiedergabe zu
verlassen, drücken Sie erneut die PROG-Taste.
DEUTSCH
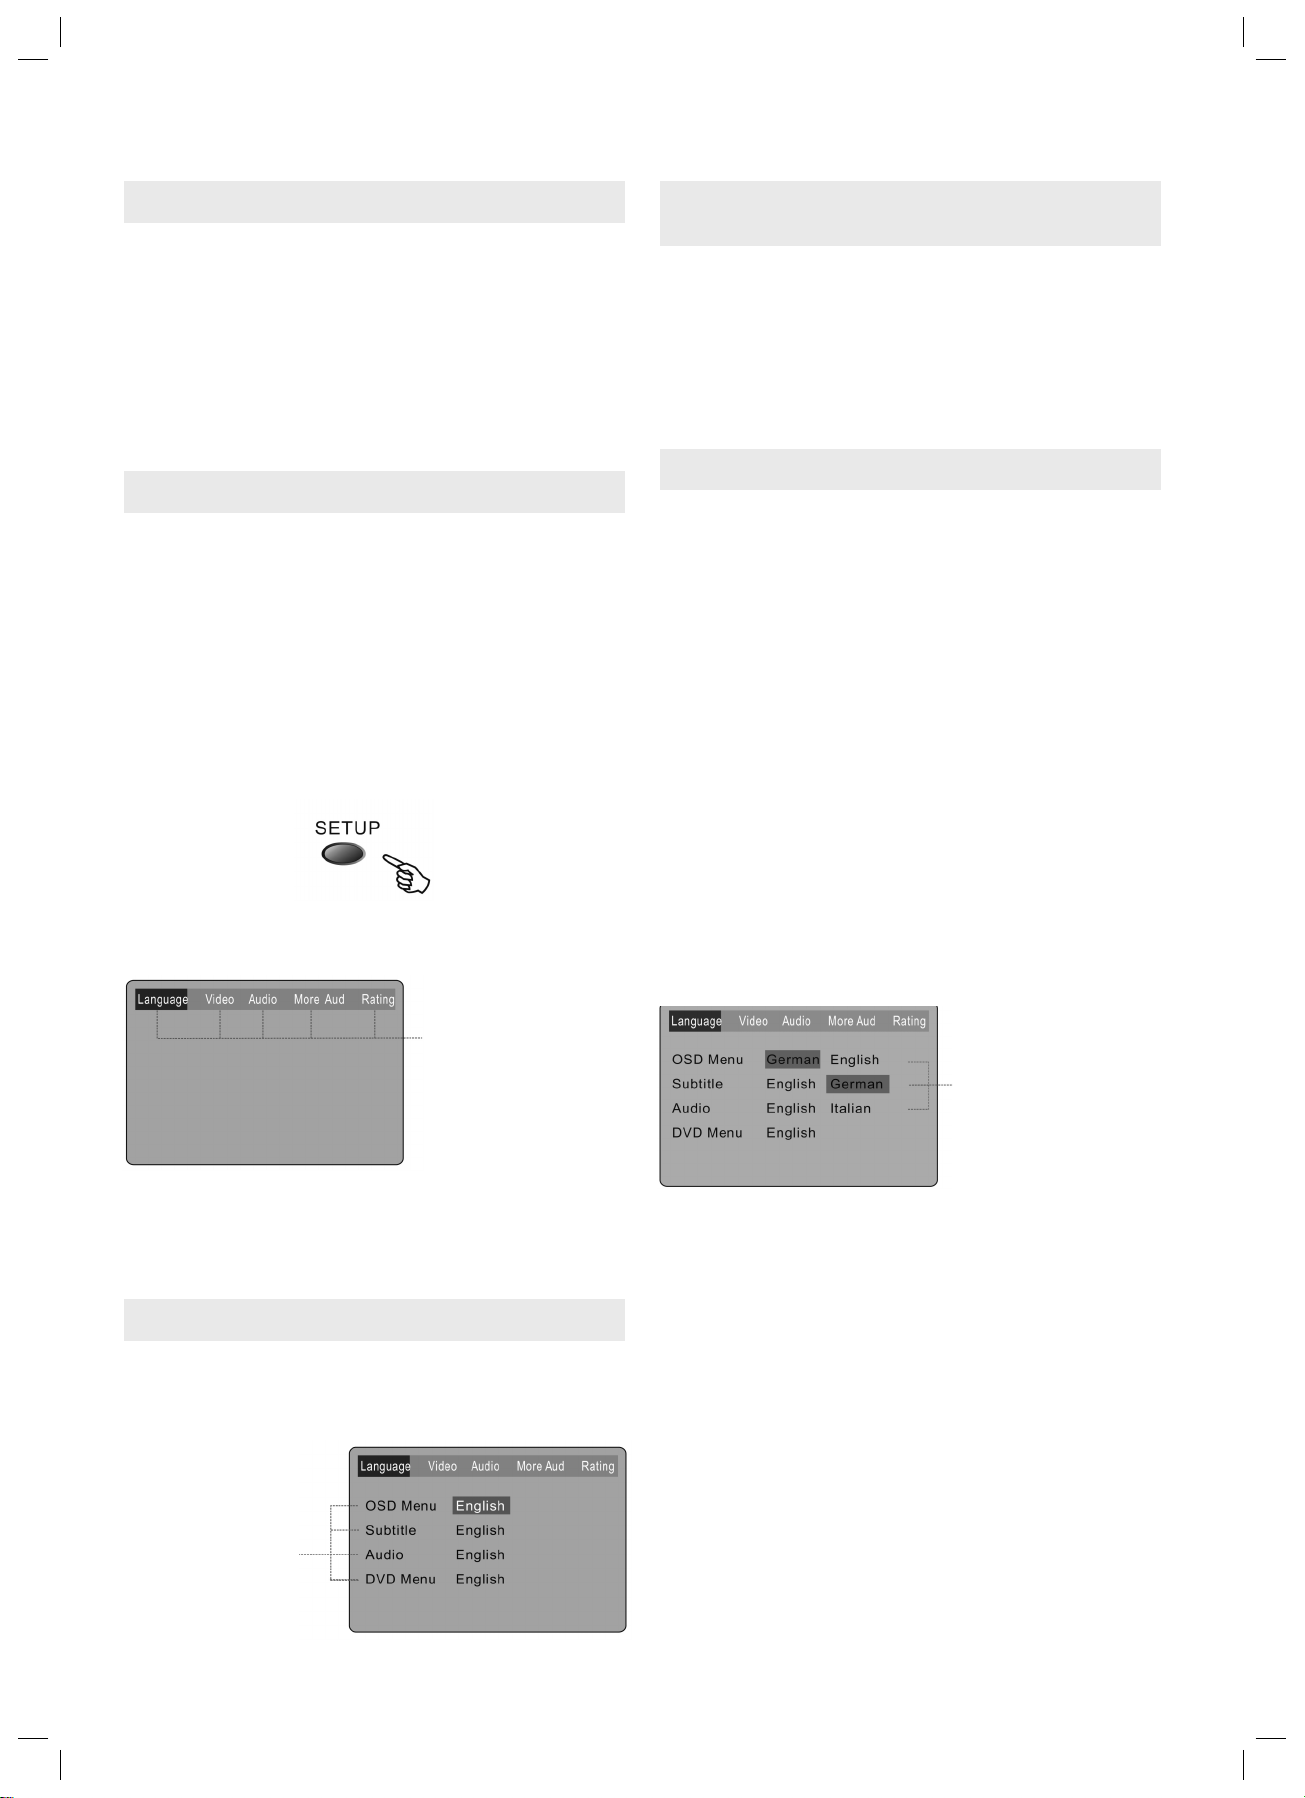
Sobald Sie SETUP im Stopp-Modus drücken, erscheint
auf dem Fernsehbildschirm das folgende Setup-Menü:
Drücken Sie um
zwischen den Menüpunkten zu wechseln.
A. Drücken Sie ENTER, um die Untermenüs anzuzeigen.
B. Drücken Sie SETUP, um das Setup-Menü zu verlas-
sen.
Sprachen-Setup (Language Setup)
Wählen Sie [Language] aus dem Setup-Menü und
drücken Sie anschließend die ENTER-Taste, um das
[Language]-Untermenü anzuzeigen:
A. Drücken Sie zum Einstellen ENTER oder
B. Drücken Sie um zum vorherigen Menü zurückzu-
springen.
C. Drücken Sie oder mehrfach, um zum Setup-
Menü zurückzukehren.
Wählen Sie [OSD Menu] und drücken Sie anschließend
die ENTER-Taste oder um das Untermenu des [OSDMenu] anzuzeigen:
Drücken Sie um
Ihre Auswahl zu ändern.
A. Drücken Sie zur Bestätigung ENTER.
B. Drücken Sie SETUP, um das Menü zu verlassen.
Drücken Sie
um den Menüpunkt
zu wechseln.
21
05-DVD 628_D 21 30.08.2004, 15:44:21 Uhr
Page 22
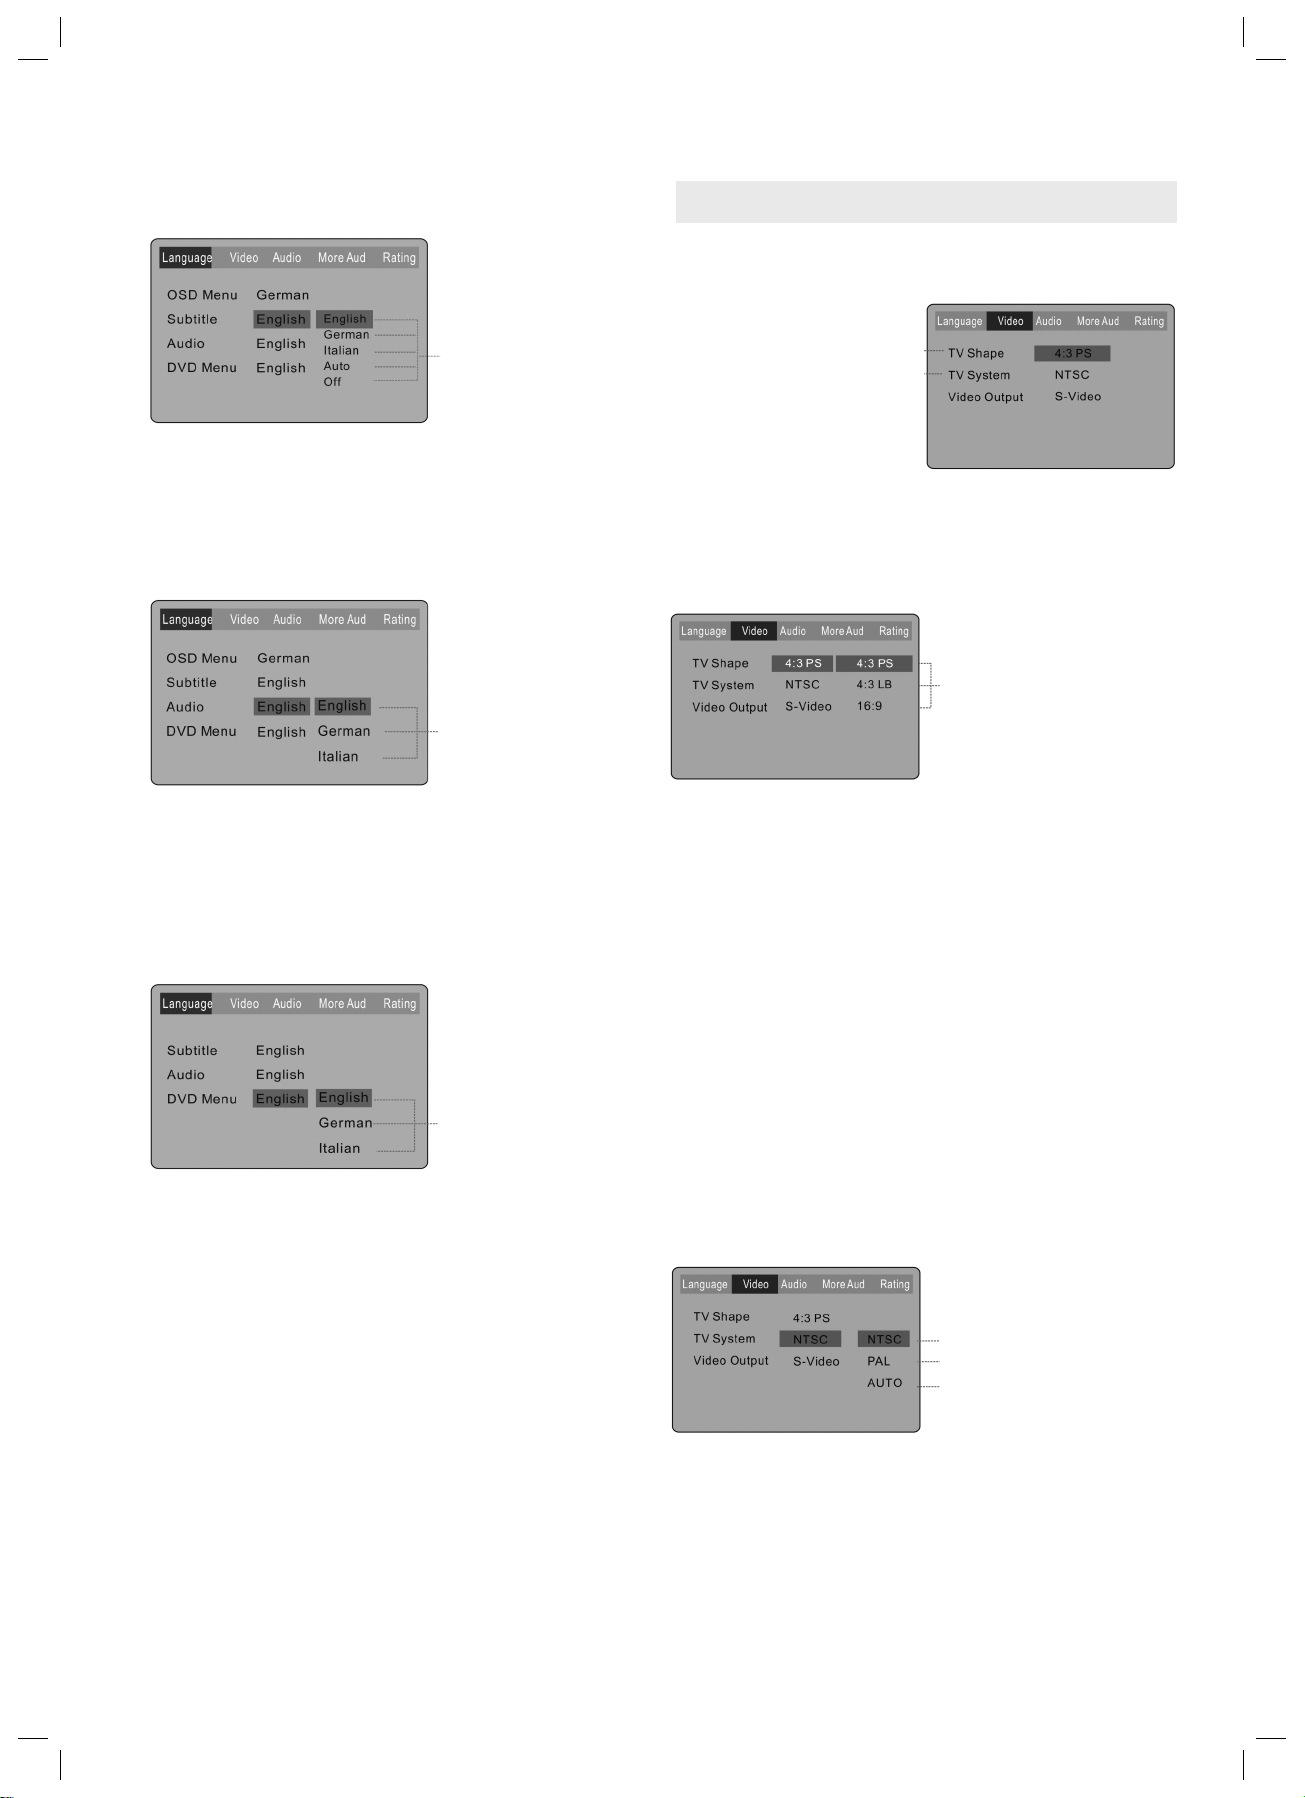
SYSTEM-SETUP (FUNKTIONSEINSTELLUNGEN)
Wählen Sie [Subtitle] und anschließend ENTER oder
um das [Subtitle] Untermenu anzuzeigen.
DEUTSCH
A. Drücken Sie zur Bestätigung ENTER.
B. Drücken Sie SETUP, um das Setup-Menü zu verlas-
sen.
Wählen Sie [Audio] und drücken Sie anschließend ENTER oder , um das [Audio] Untermenü anzuzeigen.
Drücken Sie
um Ihre Auswahl zu
ändern.
Anmerkung: Die
Untertitel-Sprachen
variierten je nach Disc.
Drücken Sie
um Ihre Auswahl zu
ändern.
Anmerkung: Die Audio-Sprachen variierten
je nach Disc.
Video-Setup
Wählen Sie [Video] aus dem Setup-Menü und drücken
Sie anschließend ENTER, um das [Video] Untermenü
anzuzeigen:
Drücken Sie um den
Menüpunkt auszuwählen.
A. Drücken Sie zur Eingabe ENTER.
B. Drücken Sie um zum Setup-Menü zurückzukehren.
Wählen Sie [TV Shape] und drücken Sie ENTER oder
um das [TV Shape] Untermenü anzuzeigen:
Drücken Sie um Ihr
Auswahl zu ändern.
A. Drücken Sie zur Bestätigung ENTER.
B. Drücken Sie SETUP, um das Setup-Menü zu verlas-
sen.
Wählen Sie [DVD Menu] und drücken Sie anschließend
ENTER oder , um das Untermenü des [DVD Menu]
anzuzeigen.
Drücken Sie
um Ihre Auswahl zu
ändern.
Anmerkung: Die
Menü-Sprachen variierten je nach Disc.
A. Drücken Sie zur Bestätigung ENTER.
B. Drücken Sie SETUP, um das Setup-Menü zu verlas-
sen.
A. Drücken Sie zur Bestätigung ENTER.
B. Drücken Sie SETUP, um das Setup-Menü zu verlas-
sen.
[4:3] Pan & Scan bezieht sich auf eine Bildwieder-
gabe, die teilweise unvollständig ist. Mit Pan & Scan
wird der gesamte Bildschirm ausgefüllt.
[4:3LB] Letter Box bezieht sich auf eine Bildwieder-
gabe, bei der oben und unten am Bildrand schwarze
Balken erscheinen.
[16:9]: Das Bild füllt den Bildschirm eines 16:9-Fern-
sehers aus (Wide screen).
Anmerkung: Nicht alle DVDs bieten eine Filmwie-
dergabe im Full-Screen-Format an. Falls dies nicht
der Fall ist, überspringt die Disc die Einstellung der
TV-Anzeige und gibt den Film im Letter-Box-Format
wieder.
Wählen Sie [TV-System] und drücken Sie ENTER oder
um das [TV-System] Untermenü anzuzeigen:
Drücken Sie um Ihre
Auswahl zu ändern.
A. Drücken Sie zur Bestätigung ENTER.
B. Drücken Sie SETUP, um das Setup-Menü zu verlassen.
[NTSC]: Wählen Sie NTSC, falls Sie an Ihrem Fern-
sehgerät das NTSC-Signalsystem eingestellt haben.
[PAL]: Wählen Sie PAL, falls Sie an Ihrem Fernsehge-
rät das PAL-Signalsystem eingestellt haben.
[AUTO]: Wählen Sie AUTO, falls Sie an Ihrem Fern-
sehgerät das AUTO- Signalsystem eingestellt haben.
22
05-DVD 628_D 22 30.08.2004, 15:44:22 Uhr
Page 23

SYSTEM-SETUP (FUNKTIONSEINSTELLUNGEN)
Wählen Sie [Video Output] und drücken Sie ENTER oder
um das [Video Out] Untermenü anzuzeigen.
A. Drücken Sie zur Bestätigung ENTER.
B. Drücken Sie SETUP, um das Setup-Menü
zu verlassen.
Anmerkung: Der Composite Video- und der
S-Video-Ausgang sind immer verfügbar.
[S-Video]: Wählen Sie S-Video, falls Sie den
DVD-Player über den Composite-Ausgang an den
Fernseher angeschlossen haben.
[YUV]: Wählen Sie YUV, wenn das DVD-Gerät über
den YUV-output am Fernseher angeschlossen ist.
[Y Pb Pr]: Wählen, wenn das DVD-Gerät am TV mit
progressive scan im Gebrauch ist.
Drücken Sie um Ihre
Auswahl zu ändern.
Hinweis: Falls Sie den Menüpunkt YPbPr angewählt
haben und Ihr Gerät nicht über Progressiv Scan verfügt,
sehen Sie nur noch einen schwarzen Bildschirm. Um aus
dieser Einstellung wieder zurück zu kommen, lesen Sie
Bitte unter Fehlerbehebung „Kein Bild“ nach.
Audio Setup
Mit Hilfe des Audio-Menüs können Sie die analogen und
digitalen Audioausgänge entsprechend der extern an
den Player angeschlossenen Geräte einstellen. Wenn Sie
den Player z.B. mit dem Fernsehgerät über eine StereoAudio-Buchse angeschlossen haben, sollten Sie Dolby
Digital und andere Einstellungen auf 2-Kanal einstellen,
um einem optimalen Stereoklang zu erzielen.
• Sie können das Audioformat für jede der folgenden
Quellen einstellen: Dolby Digital, MP3, CD und andere.
• Die DVD-Wiedergabe muss gestoppt werden, um die
Audio-Einstellungen vorzunehmen.
Ausgänge, z.B. bei Minidisc-Recordern.
RAW: zur Wiedergabe des 5.1 Kanal Digital Bit-
streams über optische/koaxiale Digital-Audio-Ausgänge, z.B. bei einem externen Verstärker mit einem
Dolby Digital Decoder.
OFF: um den Dolby Digital Decoder zu deaktivieren.
F. Drücken Sie SETUP zum Speichern und Verlassen
des Menüs.
• PCM steht für Pulse Code Modulation und ist eine
Standard 2-Kanal-Stereoformat, welches für Audio-
CDs verwendet wird.
• MP3-Einstellung
Gehen Sie die unten aufgeführten Schritte nacheinander
durch, um das ausgehende Digital-Audio-Format von
MP3-Tracks einzustellen (Anmerkung: Das Analogformat
ist auf 2-Kanal festgelegt):
A. Drücken Sie im Audio-Modus SETUP.
B. Wählen Sie Audio-Modus und drücken Sie ENTER.
C. MP3 wählen und ENTER drücken.
D. Digital-Ausgang einstellen:PCM (voreingestellt):
zur Wiedergabe eines 2-Kanal-Digitalklangs über
optische/koaxiale Digital-Audio-Ausgänge, z.B. bei
Minidisc-Recordern. OFF: um den Dolby Digital
Decoder zu deaktivieren.
E. Drücken Sie SETUP zum Speichern und verlassen
des Menüs.
DEUTSCH
AC-3-Einstellung
Gehen Sie die unten aufgeführten Schritte nacheinander
durch, um analoge und digitale Audioformate für ausgehende Dolby Digital 5.1 Soundtracks einzustellen:
A. Drücken Sie im Stopp-Modus SETUP.
B. Wählen Sie AUDIO und drücken Sie ENTER.
C. Wählen Sie AC3 und drücken Sie ENTER.
D. Analog-Ausgang einstellen:
6-Kanal (voreingestellt): zur Wiedergabe
eines Dolby Digital 5.1 Kanal Audioklangs
über die analogen 5.1 Kanal
Audioausgänge, z.B. bei einem 5.1
Kanal Verstärker.
2-Kanal: zur Wiedergabe eines 2-Kanal Stereoklangs über die Stereo-Audio-Ausgänge,
z.B. bei VCR oder TV.
E. Digital-Ausgang einstellen:
PCM (voreingestellt): zur Wiedergabe eines 2-Kanal-
Digitalklangs über optische/koaxiale Digital-Audio-
23
05-DVD 628_D 23 30.08.2004, 15:44:23 Uhr
Page 24
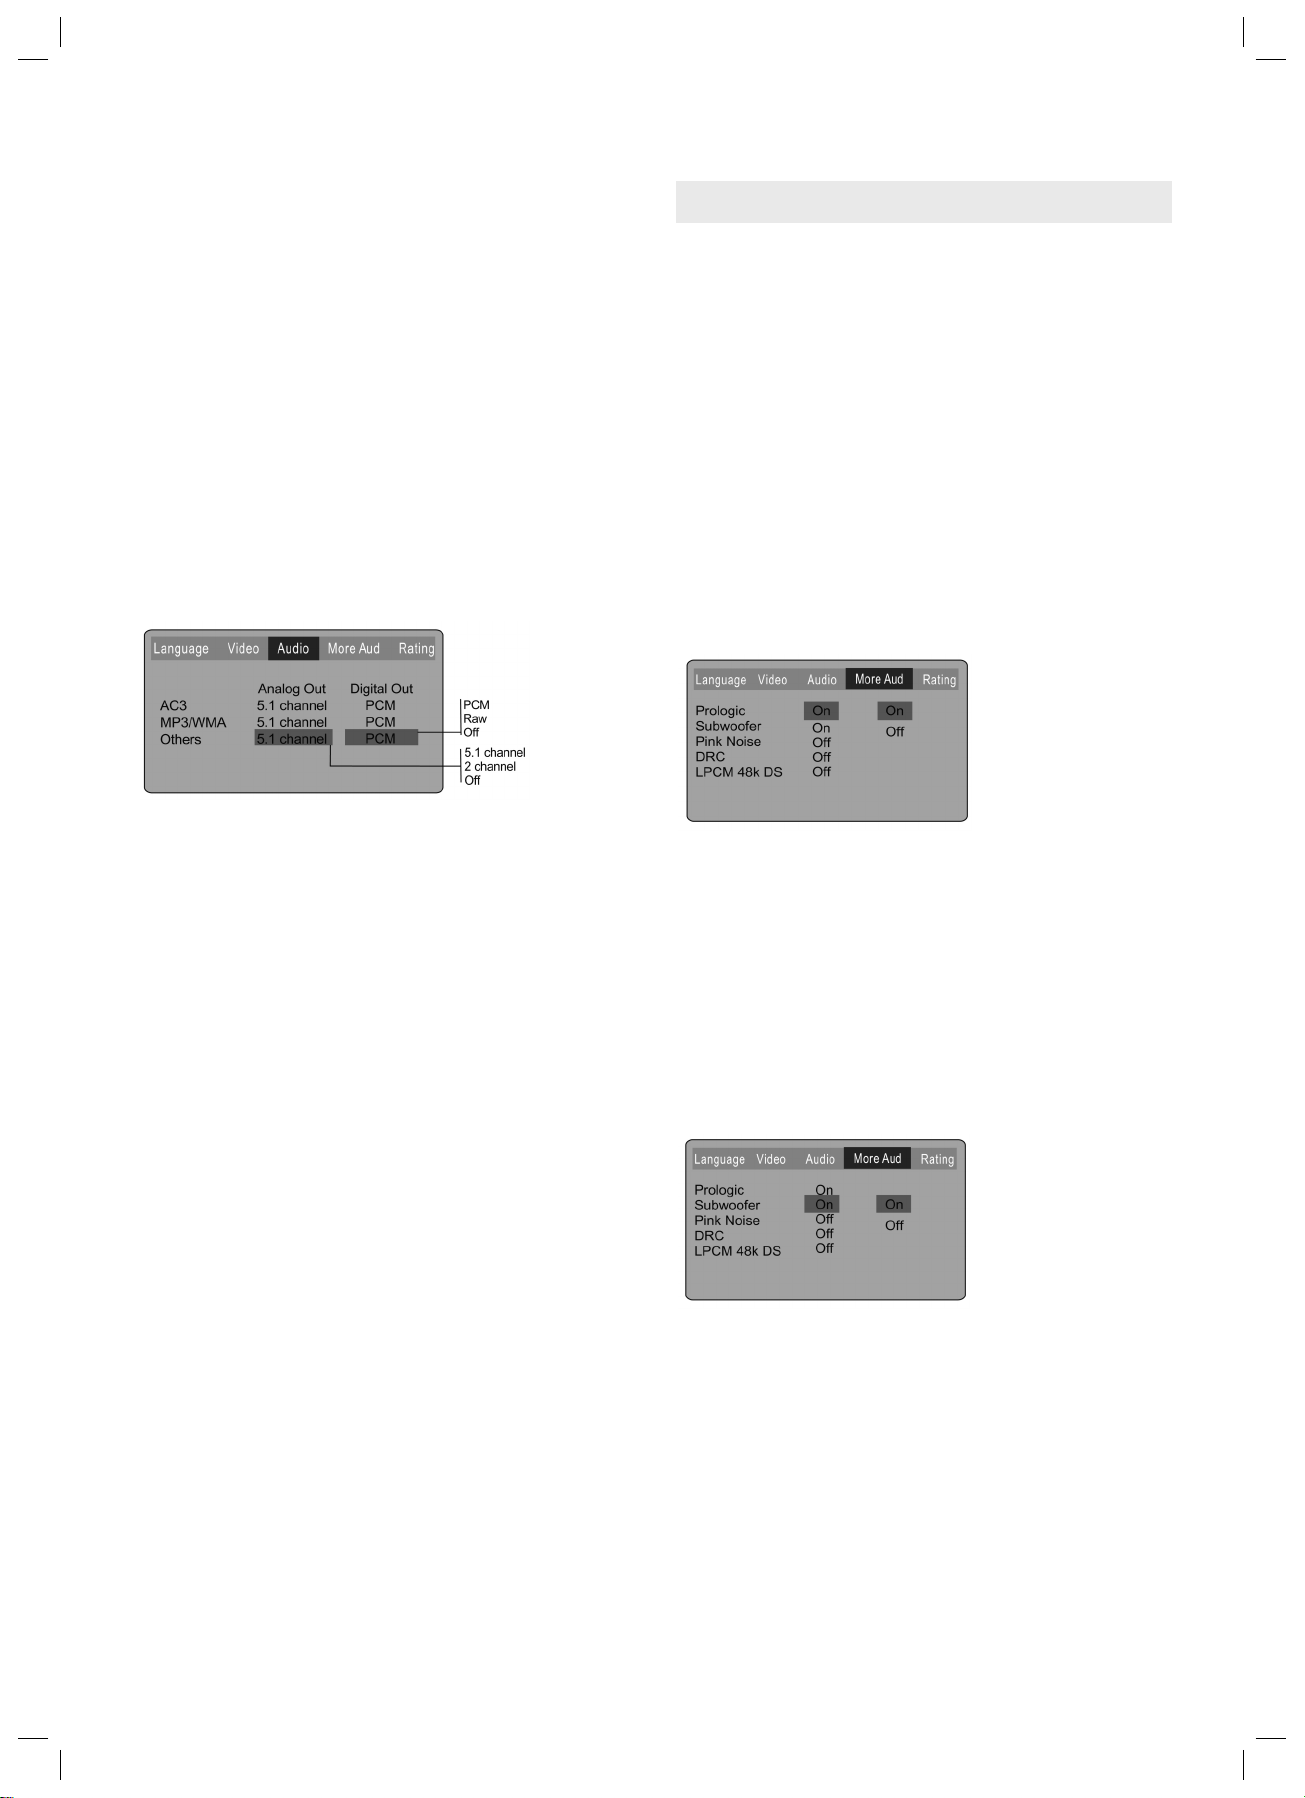
SYSTEM-SETUP (FUNKTIONSEINSTELLUNGEN)
Sonstige Einstellungen
Gehen Sie die unten aufgeführten Schritte nacheinander
durch, um die ausgehenden analogen und digitalen
Audioformate anderer Tracks einzustellen:
DEUTSCH
A. Drücken Sie im Stopp-Modus SETUP.
B. Wählen Sie Audio und drücken Sie ENTER.
C. Wählen Sie Andere und drücken Sie ENTER.
D. Analog-Ausgang einstellen:
2-Kanal (voreingestellt): zur Wiedergabe eines
2-Kanal-Stereo-Audioklangs über den Stereo-Audio-
Ausgang, z.B. bei einem VCR oder TV.
E. Digital-Ausgang einstellen (vom optischem Ausgang):
PCM (voreingestellt): zur Wiedergabe eines 2-Kanal-
Digitalklangs über optische/koaxiale Digital-Audio-
Ausgänge, z.B. bei Minidisc-Recordern.
OFF: um den Audioausgang „CD Others“ zu deakti-
vieren.
F. Drücken Sie SETUP zum Speichern und Verlassen
des Menüs.
Weitere Audio-Einstellungen (More Audio)
Zusätzlich beinhaltet das Audio-Menü Prologic- und
Subwoofer-Einstellungen.
Prologic-Einstellung
Der DVD-Player hat einen eingebauten Dolby-PrologicDecoder, um einen virtuellen 5.1-Kanal Surround-Klang
für PCM (Stereo)-Quellen zu erzeugen:
A. Drücken Sie im Stopp-Modus SETUP.
B. Wählen Sie „More Audio“ und drücken Sie ENTER.
C. Wählen Sie Prologic und drücken Sie ENTER.
D. Wählen Sie die gewünschte Prologic-Einstellung und
drücken Sie ENTER:
On: alle Audio-Soundtracks werden im Dolby-Prolo-
gic-Modus wiedergegeben.
Off: (voreingestellt): Die Dolby-Prologic-Decodierung
ist immer inaktiv.
E. Drücken Sie SETUP zum Speichern und Verlassen
des Menüs.
Subwoofer-Einstellung
Sie müssen im Menüsystem angeben, ob Ihr Audio-Setup einen Subwoofer beinhaltet oder nicht.
A. Drücken Sie im Stopp-Modus SETUP.
B. Wählen Sie „More Audio“ und drücken Sie ENTER.
C. Wählen Sie Subwoofer und drücken Sie ENTER.
D. Wählen Sie die gewünschte Subwoofer-Einstellung
und drücken Sie ENTER
On (voreingestellt): gibt an, dass Sie eine Subwoofer
für LFE-Signale (Niedrigfrequenzeffekte) nutzen.
E. Drücken Sie SETUP zum Speichern und Verlassen
des Menüs.
24
05-DVD 628_D 24 30.08.2004, 15:44:24 Uhr
Page 25
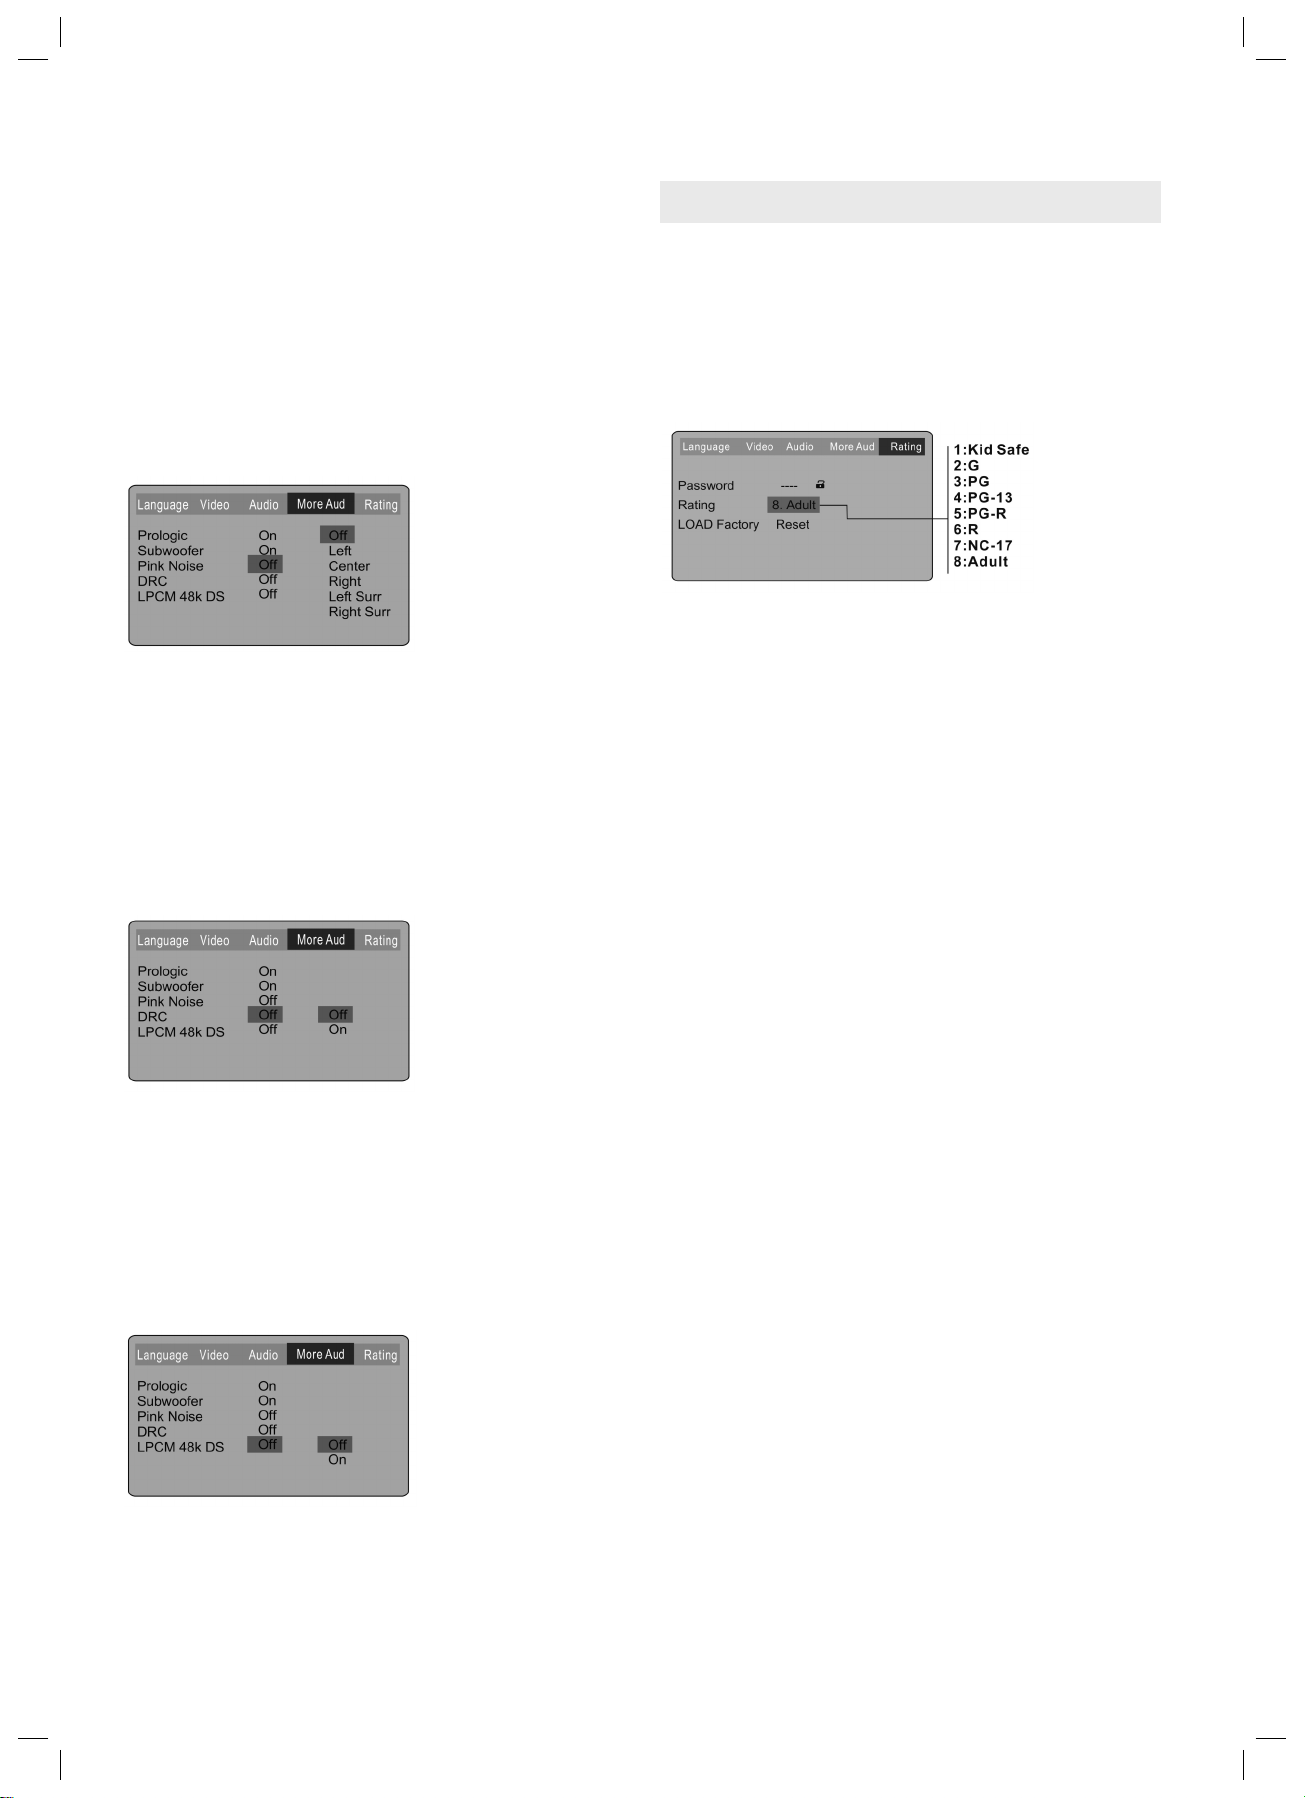
SYSTEM-SETUP (FUNKTIONSEINSTELLUNGEN)
Pink-Noise-Einstellung (Rosa Rauschen)
Bei der Pink-Noise-Einstellung ist der Testton
ausgeschaltet (Off) und man kann die verschiedenen
Kanälen wählen und testen (LEFT, CENTER, RIGHT,
RIGHT SURRROUND und LEFT SURROUND).
A. Drücken Sie im Stopp-Modus SETUP.
B. Wählen Sie „More Audio“ und drücken Sie ENTER.
C. Wählen Sie „Pink Noise“ und drücken Sie ENTER.
D. Wählen Sie die gewünschte Pink-Noise-Einstellung
und drücken Sie ENTER. Hier können die einzelnen
o.g. Kanäle getestet werden.
E. Drücken Sie SETUP zum Speichern und Verlassen
des Menüs.
DRC-Einstellung
DRC steht für Dynamic Range Control (dynamische
Anpassung).
A. Drücken Sie im Stopp-Modus SETUP.
B. Wählen Sie „More Audio“ und drücken Sie ENTER.
C. Wählen Sie DRC und drücken Sie ENTER.
D. Wählen Sie die gewünschte DRC-Einstellung und
drücken SIE ENTER.Wählen Sie zwischen OFF oder
ON.
E. Drücken Sie SETUP zum Speichern und Verlassen
des Menüs.
RATING- (LESE) Einstellung (Einstufung)
Das Rating-Menü ermöglicht, die Wiedergabe einer DVD
aufgrund der Rating-Einstellung zu sperren.
Passwort und Rating-Level einstellen
Der DVD-Player ermöglicht, die Wiedergabe ungeeigneter Inhalte mit einem Passwort-geschützen RatingSystem zu sperren (nicht alle Discs verfügen über diese
Funktion).
A. Drücken Sie im Stopp-Modus SETUP.
B. Wählen Sie „RATING (Lese) “ und drücken Sie EN-
TER.
C. Wählen Sie die RATING- (Sperre) Einstellung aus und
drücken Sie solange ENTER, bis der gewünschte RATING (Sperr)-Level eingestellt ist von 1 (am meisten
begrenzt) bis 8 (am wenigsten begrenzt).
Sollte schon ein Passwort eingestellt worden sein,
erscheint das Sperr-Symbol. Sie können kein Rating
auswählen, bis Sie das korrekte Passwort mit Hilfe
der 0-9-Tasten ausgewählt haben.
D. Passwort auswählen.
E. Mit Hilfe der 0-9-Tasten können Sie ein 4-stelliges
Passwort auswählen. Drücken Sie anschließend die
ENTER-Taste. Sobald das Sperr-Symbol verschwin-
det, wurde das richtige Passwort eingegeben.
F. Drücken Sie SETUP zum Speichern und Verlassen
des Menüs.
DEUTSCH
LPCM 48k DS-Einstellung
A. Drücken Sie im Stopp-Modus SETUP.
B. Wählen Sie „More Audio“ und drücken Sie ENTER.
C. Wählen Sie „LPCM 48k DS“ und drücken Sie ENTER.
D. Wählen Sie die gewünschte LPCM 48k DS-Einstel-
lung und drücken Sie ENTER.
OFF: LPCM 48k
ON: LPCM 96k.
E. Drücken Sie SETUP zum Speichern und Verlassen
des Menüs.
Nicht alle DVDs sind nach diesem System eingestuft.
DVDs, die höher eingestuft wurden als der von Ihnen
ausgewählte Level, können erst abgespielt werden, wenn
das richtige Passwort eingegeben wurde.
Falls Sie Ihr Rating-Passwort vergessen haben sollten,
können Sie den Speicher mit 0000 löschen. Das Passwort sollte für Kinder nicht zugänglich sein, da es die
Kindersicherung-Einstellung (PARENTAL LOCK) aufhebt.
25
05-DVD 628_D 25 30.08.2004, 15:44:25 Uhr
Page 26

MP3-FUNKTION
Was ist MP3
MP3 ist ein Audio-Komprimierungsmodus, der Level 3
des international gültigen Standards MPEG nutzt. Hierbei
ist das Soundsignal 12:1 komprimiert. Eine MP3-Disc
DEUTSCH
kann über 600 Minuten Musik bzw. mehr als 170 Titel
aufnehmen.
MP3 abspielen
Dateimenü zur MP3-Wiedergabe
Zur Wiedergabe einer MP3-Disc, können zwei Dateimenüs ausgewählt werden: „FILE LIST (Dateiliste), FOLDER
(Ordner)“. Drücken Sie hierzu die PROG-Taste.
1. FILE LIST
Hier können die Dateien, die wiedergegeben werden
sollen durch Drücken der UP/DOWN-Pfeiltasten
in Kombination mit der ENTER-Taste ausgewählt
werden. Die Dateien können auch direkt mit Hilfe der
numerischen Tasten und anschließendem Drücken
der ENTER-Taste ausgesucht werden.
2. FOLDER
Hier wird erst das Menü aufgezeigt und anschließend
können Sie mit Hilfe der Pfeiltasten (oben, unten,
rechts, links) und der ENTER-Taste ein Unterverzeichnis auswählen.
JPEG DATEIEN
JPEG ist das am meisten verbreitete Formatnorm zur
Komprimierung von Standbilddateien.
Selbst wenn die Bilder 15-20fach komprimiert sind,
haben sie noch eine gute Wiedergabequalität. Fast alle
Bildverarbeitungs-Softwareprogramme unterstützen
JPEG. Es ist das ideale Format zur Bildspeicherung und
sehr anwenderfreundlich. Dieses Gerät kann Picture-CDDateien, die im JPEG-Format erstellt wurden, lesen.
1. Sobald Sie die Disc einlegen, wird die Suche nach
der Disc-Information gestartet.
2. Drücken Sie die numerische Taste, um ein Bild auszuwählen.
3. Je nachdem, welches Bild Sie auswählen möchten,
sind Sie entweder mit der numerischen Taste oder
mit der Richtungstaste schneller.
Auswahl über Menü
1. Sobald Sie die Disc einlegen, wird die Suche nach
der Disc-Information gestartet und das Hauptmenü erscheint auf dem Bildschirm. Drücken Sie die
Nummerntaste 1, um das erste Bild aufzurufen und
bestätigen Sie mit der PLAY-Taste.
2. Mit Hilfe der Richtungstasten können Sie ein Bild
auswählen. Bestätigen anschließend mit der PLAYTaste.
3. Im Stopp-Modus können sie über die Richtungstasten weitere Bilder auswählen.
4. Wenn Sie im Stopp-Modus die erste Zeile rechts auswählen, können Sie durch Drücken der PLAY-Taste in
den oberen Bereichs des Menüs zurückkehren.
MÖGLICHKEITEN
DER FEHLERBEHEBUNG
Sollten bei Betrieb des DVD-Players Störungen auftreten,
können Sie zur Fehlerbehebung eine der genannten
Methoden anwenden.
Problem
Mögliche Fehlerbehebung
Kein Strom
1. Überprüfen Sie, ob der Netzstecker richtig in der
Steckdose steckt.
Kein Ton
1. Überprüfen Sie den Anschluss zwischen DVD-Player
und Fernsehgerät bzw. jedem anderen angeschlossenen Gerät.
2. Überprüfen Sie, ob bei Fernseher und Verstärker der
richtige Modus eingestellt ist.
Surround Lautsprecher verzerren.
Überprüfen Sie das Medium. Bei VCD bzw. S-VCD’s
kann es je nach Anwendung der Benutzersoftware
vorkommen, dass die Codierung der Hintergrundsignale
fehlerhaft sind.
Kein Bild
1. Überprüfen Sie den Anschluss zwischen DVD-Player
und Fernsehgerät bzw. jedem anderen angeschlossenen Gerät.
2. Überprüfen Sie, ob das Fernsehgerät eingeschaltet
ist.
3. Wenn Sie Progressiv Scan angewählt haben obwohl
Ihr Fernsehgerät dies nicht unterstützt, gehen Sie
bitte wie folgt vor:
1. Abschalten des Gerätes mit dem Netzschalter für
ca.10sec.
2. Einschalten des Gerätes u. warten bis der Einle-
sevorgang beendet ist.
3. „SETUP“ Taste drücken.
4. 1x „rechts“ Taste drücken
5. „ENTER“ Taste drücken
6. 2x „nach unten“ Taste drücken
7. „ENTER“ Taste drücken.
8. 3x „nach oben“ Taste drücken
9. „ENTER“ Taste drücken.
10. „SETUP“ Taste drücken, um das nun das wieder
sichtbare Menü zu verlassen.
Disc-Wiedergabe funktioniert nicht
1. Überprüfen Sie, ob die Disc mit der markierten Seite
nach oben im Ladefach liegt.
2. Überprüfen Sie, ob die Disc sauber ist. Sie darf
weder Staub, Schmutzpartikel oder Fingerabdrücke
aufweisen.
3. Überprüfen Sie, ob die Disc richtig im Ladefach liegt.
4. Überprüfen Sie, ob die Kindersicherungsfunktion
(Parental lock) eingeschaltet ist.
5. Überprüfen Sie, ob die Disc für einen Einsatz in Ihrer
Region bestimmt ist.
Fernbedienung funktioniert nicht
1. Überprüfen Sie die Batterien und tauschen Sie sie
ggf. aus.
2. Überprüfen Sie, ob sich keine Gegenstände zwischen
dem Fernsensor, der sich an der Frontseite des
Gerätes befi ndet, und der Fernbedienung befi nden.
3. Die Fernbedienung muss in Richtung des Sensors
am Gerät gehalten werden.
26
05-DVD 628_D 26 30.08.2004, 15:44:26 Uhr
Page 27

MÖGLICHKEITEN
DER FEHLERBEHEBUNG
Bild ist gestört
1. Überprüfen Sie, ob die Disc sauber ist und keine
Kratzer aufweist.
Kein Farbbild
1. Überprüfen Sie, ob der S-Anschluss beschädigt ist
(Pin verbogen).
MP3-Disc wird nicht wiedergegeben.
1. Benutzen Sie eine andere Software, um die Disc zu
brennen, da die verwendete Software-Version eventuell nicht mit dem DVD-Player kompatibel ist.
2. Benutzen Sie eine neuere Software-Version, wie z.B.
Audiostation 4, Easy CD Creator, To ast Titanium,
etc.
3. Stellen Sie sicher, dass die MP3-Datei nicht mit
einer variablen Bit-Rate kodiert wurde (z.B. von Real
Networks).
Hinweis: Die Wiedergabe anwenderseitig erstellter CD/
DVD kann durch die Vielzahl der verfügbaren Software
und CD/DVD-Medien nicht garantiert werden.
TECHNISCHE DATEN
DVD-Player
TV-System NTSC/PAL/AUTO
Kompatible Disc-Typen DVD, CD, MP3
CD-R, CD-RW
Aufl ösung > 500 Zeilen
Video S/N Ratio 65 db
Frequenzbereich fs (96 KHz/24 bit)
4 Hz-44 Hz: +/- 2 db
Audio S/N Ratio 95 db
Verzerrungsgrad < 0,01%
D/A-Wandler 192 KHz/24 bit
Videoausgang 1 Vp-p
S-Videoausgang Y: 1 Vp-p (75 ohm )
Audioausgang 2,0 V
5.1Kanal
Digitaler Audioausgang Optical, Koaxial
Anschlüsse YUV, Scart, CVBS, S-Video
2 Kanalausgang
FM-Tuner
Tuning-Bereich 87,5-108 MHz
S/N Ratio Y 46 db
Mono > 46 db
Stereo > 50 db (DIN)
Selektivität 50 db
THD
Mono 2%
Stereo 3%
Frequenzbereich 30 Hz-10 kHz +/- 1 db
Stereoaufl ösung 30 db (100 Hz-10 kHz)
AM-Tuner
Tuning-Bereich 522-1620 kHz
S/N Ratio 35 db
THD 3%
Verstärker
Verzerrungsbegrenzte Ausgangsleistung
Haupt-Lautsprecher 40W + 40W PMPO
Surround-Lautsprecher 40W + 40W PMPO
Center-Lautsprecher 40W PMPO
Subwoofer 150W PMPO
Frequenzbereich:
Hauptlautsprecher 200 Hz-20 kHz +7- 3 db
Surround-Lautsprecher 200 Hz-20 kHz +/- 3 db
Center-Lautsprecher 200 Hz-20 kHz +/- 3 db
Subwoofer 20 Hz-200 Hz +/- 3 db
S/N Ratio > 76 db
Eingangsempfi ndlichkeit 350 mv, 47 k
Kanalaufl ösung > 30 db (normal)
Fernbedienung
Transmitter Infrarot-Strahl
Signalbereich ca. 7 m
Energiequelle 2 AAA Batterien
Allgemeines
Stromversorgung AC 230 V-50 Hz
Stromverbrauch 60W
DEUTSCH
Da das Gerät ständig verbessert wird, behalten wir uns
das Recht vor, das Produkt-Design sowie dessen Spezifi kationen ohne vorherige Ankündigung zu ändern.
27
05-DVD 628_D 27 30.08.2004, 15:44:27 Uhr
Page 28

Dieses Gerät wurde nach allen zutreffenden, aktuellen
CE-Richtlinien geprüft, wie z.B. elektromagnetische
Verträglichkeit und Niederspannungsdirektive und wurde
nach den neuesten sicherheitstechnischen Vorschriften
gebaut.
DEUTSCH
Technische Änderungen vorbehalten!
GARANTIE
Wir übernehmen für das von uns vertriebene Gerät eine
Garantie von 24 Monaten ab Kaufdatum (Kassenbon).
Innerhalb der Garantiezeit beseitigen wir unentgeltlich
die Mängel des Gerätes oder des Zubehörs*), die auf
Material- oder Herstellungsfehler beruhen, durch Reparatur oder, nach unserem Ermessen, durch Umtausch.
Garantieleistungen bewirken weder eine Verlängerung
der Garantiefrist, noch beginnt dadurch ein Anspruch auf
eine neue Garantie!
Als Garantienachweis gilt der Kaufbeleg. Ohne diesen
Nachweis kann ein kostenloser Austausch oder eine
kostenlose Reparatur nicht erfolgen.
Im Garantiefall geben Sie bitte das komplette Gerät in
der Originalverpackung zusammen mit dem Kassenbon
an Ihren Händler.
Service
Clatronic International GmbH
Industriering Ost 40
D-47906 Kempen/Germany
Für technische Fragen haben wir für Sie folgende Telefon-Hotline eingerichtet:
0 21 52 / 20 06 – 666
Verschleißteile und Ersatzteile für unsere Unterhaltungselektronik (soweit diese nicht vom Fachmann ausgewechselt werden müssen) wie z. B. Fernbedienungen,
Bedienteilklappen, Lautsprecherblenden usw. können
Sie mit Angabe des Gerätetyps unter folgender e-mailAdresse bestellen:
hotline@clatronic.de
Interessieren Sie sich für weitere Clatronic-Produkte?
Besuchen Sie doch einmal unsere Homepage unter
www.clatronic.de oder www.clatronic.com
*) Schäden an Zubehörteilen führen nicht automatisch
zum kostenlosen Umtausch des kompletten Gerätes.
Wenden Sie sich in diesem Fall bitte an unsere Hotline!
Glasbruchschäden bzw. Brüche von Kunststoffteilen sind
grundsätzlich kostenpfl ichtig!
Sowohl Defekte an Verbrauchszubehör bzw. Verschleißteilen (z.B. Motorkohlen, Knethaken, Antriebsriemen,
Ersatzfernbedienung, Ersatzzahnbürsten, Sägeblättern
usw.), als auch Reinigung, Wartung oder der Austausch
von Verschleißteilen, fallen nicht unter die Garantie und
sind deshalb kostenpfl ichtig!
Die Garantie erlischt bei Fremdeingriff.
NACH DER GARANTIE
Nach Ablauf der Garantiezeit können Reparaturen
kostenpfl ichtig vom entsprechenden Fachhandel oder
Reparaturservice ausgeführt werden.
28
05-DVD 628_D 28 30.08.2004, 15:44:28 Uhr
Page 29

DEUTSCH
29
05-DVD 628_D 29 30.08.2004, 15:44:28 Uhr
Page 30

CONTENTS
Precautions.................................................................. 31
Safety Instructions ......................................................32
ENGLISH
DVD Player................................................................... 33
Suitable Setup Location.......................................... 33
Perfect Picture......................................................... 33
Playable Discs......................................................... 33
Digital Audio Output................................................ 33
Analogue Audio Output........................................... 33
Laser Head Overvoltage Protection System........... 33
Remarks on Discs .......................................................33
Handling .................................................................. 33
Cleaning................................................................... 33
Storage.................................................................... 33
Description of the Controls........................................ 34
Front View................................................................ 34
Rear View................................................................. 34
Description of the Remote Control............................ 35
Remote Control ...........................................................36
Connecting Devices.................................................... 37
System Setup (Function Settings).........................47-51
Language Setup...................................................... 47
Video Setup............................................................. 48
Audio Setup............................................................. 49
More Audio-Setups .................................................50
MP3 Function............................................................... 52
JPEG Files.................................................................... 52
Troubleshooting Possibilities ..................................... 52
Technical Data ............................................................. 53
Guarantee..................................................................... 54
Loudspeakers.............................................................. 38
Arranging the Loudspeakers................................... 38
Connecting the Loudspeakers................................... 39
Aerial Connections...................................................... 40
Power Connection....................................................... 41
Basic Functions........................................................... 41
Radio Operation .......................................................... 42
DVD Operation........................................................43-44
Functions.................................................................44-47
30
05-DVD 628_GB 30 30.08.2004, 15:41:49 Uhr
Page 31

PRECAUTIONS
The lightning symbol in the triangle is intended to warn
the user against non-insulated „hazardous
voltage“ within the housing of the device
which may cause electric shocks.
The exclamation mark in the triangle refers to important
information contained in the supplied manual relating to operating and maintenance
instructions.
Warning:
This device must not be exposed to moisture or
liquids. Due to the danger of an electric shock, the
housing must not be opened (high voltage). The device should only be opened by qualifi ed specialists.
Caution:
Please ensure that the mains plug is correctly inserted
into the power socket.
Caution:
The DVD receiver has a laser system incorporated into
it. The housing must not be opened, as this will cause
exposure to hazardous laser radiation. The laser beam
is visible when the housing is open. Never look directly
into the laser beam! Only the settings and procedures
described here may be used, as otherwise the device
may produce hazardous radiation.
Please note the model and serial number which is to be
found on the rear of the housing. This information should
be stored for future use.
(Important information - please store for future use.)
Caution:
Danger of electric shock. Do not open!
Caution:
In order to prevent an electric shock, do not open the
cover or the rear panel. There are no parts inside the device which can be serviced by the user. Always consult
qualifi ed specialists for advice.
ENGLISH
Please read these instructions carefully in order to
ensure that you know how to use the device correctly.
Please keep these instructions in a safe place. Contact
an authorised dealer if this device needs to be serviced.
31
05-DVD 628_GB 31 30.08.2004, 15:41:51 Uhr
Page 32

SAFETY INSTRUCTIONS
Caution:
It is important that you read through and follow these
instructions carefully, including those located on the
ENGLISH
device itself. Keep these instructions in a safe place for
future use.
Accessories
Do not place the device on an unstable surface (e.g.
stands, roller carriages, wall brackets, shelves or tables),
otherwise it is possible that the device will fall off and seriously injure people or animals. Furthermore, the device
itself might be damaged.
The device should only be placed on stable surfaces
which are recommended by the manufacturer or available in combination with the device. When the device
is being set up, the manufacturer’s instructions must
be carefully followed and the installation accessories
recommended by the manufacturer are to be used.
Should the device be placed on a roller carriage, this
must be moved to and fro with great care. Sudden braking, violent movements or uneven surfaces may lead to
the DVD player and roller carriage falling over.
Additional Devices
Do not use any additional devices that have not been
expressly approved, as this may prove hazardous.
Cleaning
Before the device is cleaned the mains plug must be
removed from the socket. Do not use any liquid detergents or sprays for cleaning the machine; a damp cloth
is suffi cient.
Power Supply
The device must only be operated with the power source
shown on the marking label. If you are not sure what
type of power supply you have at home, please contact
the dealer or your local power supply company. For
devices operated by battery (or another energy source),
information is to be found in the operating instructions.
This DVD Home Theatre system is operated on AC 230
V/50Hz. Once you have set up the device, please do not
turn it off immediately, but wait at least 10 seconds.
Maintenance
Please do not try to service the device yourself, as when
the cover is opened or removed you may be exposed
to dangerous voltages or other hazards. Please leave all
service work to qualifi ed specialists.
TV System
This device is compatible with television sets that support either the NTSC or PAL colour system.
Ventilation
Slits and other openings in the housing are provided
for the purposes of ventilation and to ensure correct
operation of the device, as well as protecting against
overheating. These openings must not be blocked or
covered over. Do not place the device on soft surfaces
such as a bed, settee or carpet etc, as the ventilation
system cannot work properly. The device must not be
placed in a built-in structure (built-in cupboard, shelves
etc.) unless suffi cient ventilation can be guaranteed. The
device should not be placed in the vicinity of sources of
heat such as radiators, heat storage units, ovens or other
heat-producing sources.
Lightning
As an additional protective measure the mains plug of
the device should be removed from the socket during a
thunderstorm or whenever the device is not going to be
used for a prolonged period. Similarly, the aerial or cable
system should also be removed. This will prevent damage to the device from a lightning strike and high voltage.
Other Objects and Liquids
No other objects must be inserted into the openings
of the device, as these may come into contact with
hazardous sources of high voltage or bridging parts and
cause a fi re or short circuit. Do not spill any liquid over
the device.
Overload
Wall sockets, extension leads or additional power sockets must not be overloaded, as this may lead to a risk
of fi re or electric shock.
Electric Leads
The electric leads must be positioned in such a way that
it is not possible for them to be tripped over and they are
not squeezed by other objects. Particular attention must
be paid to the leads in the vicinity of the plug, socket and
DVD player output.
Keep away from Water, Fire and Magnets
Please keep the device away from vases, baths, wash
basins etc. If liquid is allowed to enter the device, this
may result in serious damage. Open sources of fi re such
as burning candles must not be placed on the device.
Never place magnetic objects such as loudspeakers in
the vicinity of the device.
Condensation
Condensation may form under the lens under the following circumstances:
Immediately after a heater has been switched on; in a
steamy or very humid room; if the device is moved from
cold surroundings to a warm area.
If moisture has formed inside the device, it is possible
that it will no longer function correctly. In such cases please switch off the mains power supply and wait for approximately one hour until the moisture has evaporated.
32
05-DVD 628_GB 32 30.08.2004, 15:41:52 Uhr
Page 33

DVD-PLAYER
NOTES ON DISCS
The following section contains information on the best
possible settings for your DVD receiver.
Suitable Location
The device should be placed on a solid, fl at surface. As
the magnetic fl ux of other devices may disrupt playback
and/or produce poor picture quality, the device should
not be set up in the vicinity of video cassette recorders,
radios or large loudspeakers. If the device is placed in
a cupboard, a distance of at least 2.5 cm must remain
free on all sides of the device in order to ensure suffi cient
ventilation.
Perfect Picture
A DVD player is a precision device. If the optical scanning lens and parts of the disc drive are dirty or worn,
picture quality becomes worse. Therefore the DVD player
should always be placed in a clean location which is free
of dust.
Playable Discs
This DVD receiver system can play the following types
of disc: DVD, MP3, CD, CD-R and CD-RW with the possibility of error correction. Photo CDs and digital photo
albums can also be displayed. The device supports eight
languages and up to 32 subtitle languages, as well as
various viewing angles (depending on the disc being
played back). With the help of the on-screen menus all
settings can be easily changed.
Digtial Audio Output
The device has a coaxial output which makes it possible
to connect an external AV amplifi er (6 channels) and a
processor with built-in Dolby Digital code via a single
cable, thus enabling you to enjoy various DVDs, CDs and
MP3 discs.
The following section contains important information
on handling, cleaning and storing discs that are to be
played back in this device.
Handling
• Never touch the side of the disc which is to be play-
ed back.
• Do not attach any slips of paper or adhesive strips to
the disc.
• Do not stick or write anything on the disc.
• Only touch the disc in the middle or by the edges.
Cleaning
• Fingerprints or dirt on the disc may produce poorer
picture or sound quality. Clean the disc with a soft
cloth from the inside to the outside.
• If it is not possible to remove dirt, clean the disc
carefully with a soft moistened cloth and and then
rub with a dry cloth.
• Do not use any cleaning agents such as thinners,
petrol, commercially available detergents or antistatic
spray for vinyl LPs.
Storage
• Do not store the discs in direct sunlight or near sour-
ces of heat.
• Do not store the discs in moist or dusty locations.
Always store the disc vertically in its case. Do not
place any objects on loose discs, as these may then
bend and become damaged.
Note:
The manufacturer is not responsible for damage caused
by incorrect treatment of a disc.
ENGLISH
Analogue Audio Output
The integrated six-channel amplifi er means that it is not
necessary to connect an external amplifi er and allows for
simple plug-and-play installation of the loudspeakers.
Laser Head Overvoltage Protection System
In order to prolong the lifetime of the laser head, the device contains a unique laser head overvoltage protection
system that ensures a constant stream of laser light.
33
05-DVD 628_GB 33 30.08.2004, 15:41:53 Uhr
Page 34

Front – Functions
ENGLISH
DESCRIPTION OF THE CONTROLS
1. POWER
Before connecting the power lead to the socket
please ensure that all connections have been
correctly carried out. Then insert the mains plug into
the socket. Press the POWER button on the front
of the device to switch it on. When the device is
switched on, other electronic equipment on the same
power circuit may suffer from interference due to a
brief power surge. In this case the device should be
connected to a power socket on a different circuit.
2. OPEN/CLOSE
In DVD mode the function of this button is to open
and close the disc drawer. In tuner mode this button
is used to switch between PRE and TUNING.
3. II PLAY/PAUSE/AUTO
In DVD mode the function of this button is to start or
pause playback.
In tuner mode this button can be pressed to start the
automatic search function.
4. STOP/MEMO
In DVD mode the function of this button is to stop
playback.
In tuner mode this button is used to store a station.
5. PAUSE/PRE/TUN
In DVD mode the function of this button is to inter-
rupt playback.
In tuner mode this button is used to select the preset
or tuning mode.
6. I PREV/DOWN
In DVD mode the function of this button is to jump to
the previous track. In tuner mode this button is used
to perform a (reverse) station search.
7. I NEXT/UP
In DVD mode this button can be pressed to jump
to the next track. In tuner mode the function of this
button is to perform a (forward) station search (depending on the PRE/ TUN- mode, see the section on
radio operation).
8. INPUT SIGNAL SOURCE
With the help of this button you can select a suitable
input signal. (Note: The selected input corresponds
to the selected input socket on the rear of the device.)
9. VOLUME
With this control you can regulate the volume of the
device. All six channels are adjusted at the same time.
Rear - Functions
1. AERIAL
Aerial socket for FM room aerial and AM loop aerial.
2. AUX IN
Input socket for two additional music devices (1 + 2).
3. AUDIO OUT
Socket for the two right-hand and left-hand channel
outputs as well as for the subwoofer output.
4. VIDEO OUTPUT
In the setup menu S-VIDEO must be selected as the
VIDEO OUTPUT setting.
5. S-VIDEO OUTPUT
6. REAR
Connection socket for the left-hand and right-hand
surround loudspeaker.
7. FRONT/MAIN
Connection socket for the left-hand and right-hand
front/main loudspeaker.
8. CENTER/SUBWOOFER
Connection socket for centre and subwoofer
loudspeakers.
9. COAXIAL DIGITAL AUDIO OUTPUT
10. 230 V~50 Hz
This device is supplied with an AC power cable. It is
essential that the mains plug is dry when it is inserted
into the socket. The cable must not be under too
much tension. Furthermore, the cable should not be
walked on.
11. OPTICAL OUTPUT
12. SCART OUTPUT
13. COMPONENT VIDEO OUTPUT
34
05-DVD 628_GB 34 30.08.2004, 15:41:54 Uhr
Page 35

DESCRIPTION OF THE REMOTE CONTROL
1. Open/close
2. Mute button
3. DVD selection
4. AM/FM Tuner
5. Select AUX 1 (additional device 1)
6. Select AUX 2 (additional device 2)
7. TV mode N/P selection
8. Subtitles
9. Language
10. Viewing angle
11. Number buttons 0-9
12. +10
13. Time
14. Title
15. Programme
16. Canal selection
17. V olume +
18. V olume –
19. Onscreen display
20. Slow motion
21. Menu
22. FM Stereo/Mono
23. Preset/Tuning
24. Scroll button up
25. Scroll button right
26. Scroll button down
27. Scroll button left
28. Enter button
29. Setup
30. Repeat
31. PROLOGIC selection
32. Step
33. Zoom
34. Resume playback
35. Stop
36. Pause
37. Playback
38. A-B repeat
39. Reverse (station search/previous track)
40. Forwards (station search/next track)
41. Memo (store/reverse jump)
42. Auto (automatic search/forward jump)
ENGLISH
35
05-DVD 628_GB 35 30.08.2004, 15:41:55 Uhr
Page 36

REMOTE CONTROL
Inserting the Batteries
ENGLISH
1. Press down the cover of the battery compartment in
order to remove it.
2. Insert two batteries (type AAA) into the battery compartment of the remote control. Please ensure that
the poles (+ and -) correspond to the markings in the
battery compartment.
3. Close the cover of the battery compartment.
Note:
• Do not use batteries from different manufacturers.
Furthermore, old and new batteries should not be
used at the same time.
• If the remote control is not going to be used for a
prolonged period, the batteries should be removed in
order to prevent damage from corrosion.
• Remove used batteries immediately in order to avoid
damage from corrosion.
• If the batteries should leak, the battery fl uid must be
removed from the battery compartment and both
batteries replaced.
• Always replace both batteries at the same time and
use new batteries that are fully charged.
• The lifetime of the batteries depends on the level of
use.
Using the Remote Control
Point the remote control directly at the sensor of the
DVD receiver. If the signal is received, the device will
react accordingly. The remote control can be operated
up to approximately 7 m from the sensor at an angle of
up to 30°.
Note:
• The sensor must not be exposed to direct sunlight or
strong illumination, as this could cause the device to
malfunction.
• If other remote controls are used in the same area, or
the remote control is operated near to devices which
use infrared rays, interference may occur.
• Please avoid placing objects on the remote control,
as otherwise a button could be pressed by accident,
a function modifi ed and the lifetime of the batteries
shortened.
• The front of the DVD receiver should not be lined
with tinted glass, as this might interfere with normal
operation of the remote control.
• No large objects should be placed between the
remote control and the remote sensor on the DVD
receiver, as this may prevent the signal from reaching
the device.
• Please avoid exposing the remote control to liquids
or moisture.
• The remote control must not be dismantled.
Batteries
Incorrect use of the batteries may result in them leaking,
corroding or exploding.
Note:
Batteries should not be disposed of in normal domestic
waste. Please return used batteries to the appropriate collection points or to the dealer where they were
bought.
Never throw batteries into a fi re.
36
05-DVD 628_GB 36 30.08.2004, 15:41:57 Uhr
Page 37

CONNECTING DEVICES
ENGLISH
• Connection sockets for this DVD receiver are located
on the rear of the device. Please read the instructions
of the respective device manufacturer carefully and
follow these instructions when connecting video and
audio machines to this DVD receiver.
• Only when all connections have been carried out correctly should the device be connected to the power
supply.
• The red socket (marked with an R) is used for
connecting the right-hand channel. The white socket
(marked with an L) is used to connect the left-hand
channel. The yellow socket is for the video connection. Check that all connections are tight. Incorrect
connections may cause noise, interference or even
damage to the device.
• The AV cable must not be connected to other cables
such as power or loudspeaker cables as this may
cause the device to malfunction.
37
05-DVD 628_GB 37 30.08.2004, 15:41:57 Uhr
Page 38

LOUDSPEAKERS
The correct confi guration and arrangement of a surround
sound system is decisive for the sound that is produced.
In order to achieve the best possible sound, the instruc-
ENGLISH
tions concerning the arrangement of the loudspeakers
should be followed before they are connected.
Front/Main Loudspeakers (Right and Left, Centre
Loudspeakers)
• These three loudspeakers produce excellent sound
characteristics and increase the dynamic effect of
audio playback. The main dialogue of a fi lm is heard
through these loudspeakers.
Rear or Surround Loudspeakers
• These two loudspeakers offer dynamic 3-D sound
effects and create spatial sound playback as they
add background noises to the main speakers.
Subwoofer Loudspeaker
• The subwoofer is a powerful bass loudspeaker which
gives the sound even more realistic characteristics.
Arranging the Loudspeakers
The ideal confi guration of the surroundsound system depends on the size of the room and the wall materials.The
illustration below shows a typical arrangement of the
various loudspeakers.
Note:
• Front/main loudspeakers and centre loudspeakers
should be placed at the same height. They are pointed in the direction of the listeners.
• 3-D surround and rear loudspeakers should be
attached to the wall behind the listeners above the
level of their ears.
The subwoofer can be placed anywhere in the room as
it has only a small effect on the sound characteristics
heard by the listeners. In order to achieve an optimum
bass effect, it is recommended that the subwoofer be
connected to the Home Theater system.
Note: In order to achieve an optimum 3-D sound effect,
the output from the centre and subwoofer loudspeaker is
is also heard through the front and rear loudspeakers.
1. Television set or screen
2. Front/main loudspeaker (left)
3. Subwoofer
4. Centre loudspeaker
5. Front/main loudspeaker (right)
6. 3-D surround loudspeaker (left)
7. 3-D surround loudspeaker (right)
8. Sitting position of the listener
38
05-DVD 628_GB 38 30.08.2004, 15:41:58 Uhr
Page 39

CONNECTING THE LOUDSPEAKER SYSTEM
This cleverly designed DVD receiver produces ideal
sound quality when the loudspeakers are used within
their nominal impedance range.
Important
• The minimum impedance of the fi ve loudspeakers is
6 ohms; for the subwoofer it is 8 ohms.
• If you would like to use only one loudspeaker or
listen to the music in mono, you should not connect
the individual loudspeakers on the left and right of
the channel connections in parallel.
Connecting the Loudspeaker Cables
1. Remove approximately 1 cm of the cable insulation.
2. Turn over the cable end.
3. Open the cable clamp by pressing the lug.
4. Insert the end of the cable into the clamp.
5. Release the lug and check whether the cable is fi rmly
in the clamp.
Note:
In order to avoid a short circuit, care must be taken that
when the loudspeakers are connected the plus and
minus poles of the loudspeaker cables are connected
accordingly.
ENGLISH
39
05-DVD 628_GB 39 30.08.2004, 15:41:58 Uhr
Page 40

AERIAL CONNECTIONS
In some buildings or under certain circumstances it may
be diffi cult to receive radio signals. The supplied aerials
improve the reception of such signals. These are only
ENGLISH
intended for internal use.
AM Loop Aerial
The AM loop aerial should be aligned until good
reception is achieved. The aerial should be placed as
far as possible from the DVD receiver, television set,
loudspeakers and power cables. If reception is still poor,
an external aerial may be necessary.
FM Room Aerial
Line up the FM aerial in such a way that good reception
is obtained. The ends of the aerial must be fi xed in place
such that they are bent as little as possible.
Connecting the FM Room Aerial
1. Open the cable clamp by pressing on the lug.
2. Insert the end of the cable.
3. Release the lug again and check whether the cable is
fi xed fi rmly in the clamp.
Connecting an AM Loop Aerial
1. Keep the lug pressed down.
2. Insert the end of the cable into the hole.
3. Release the lug.
4. Line up of the aerial.
40
05-DVD 628_GB 40 30.08.2004, 15:41:59 Uhr
Page 41

POWER CONNECTION
ENGLISH
Before the power cable is inserted into the socket, all
connections should be checked again thoroughly. Then
the power cable is inserted carefully into the socket.
Press the POWER switch on the front of the device in
order to switch it on. The display lights up.
BASIC FUNCTIONS
Selecting the Sound Source
1. Press the corresponding function button (DVD, AM/
FM, AUX1, AUX2) to select the desired sound source.
The appropriate symbol appears in the display.
2. If the AM/FM button is pressed, the last channel that
was heard is switched on again.
When the device is switched on, a brief power surge
may cause interference to other electronic equipment
connected to the same power circuit. In this case the
device should be connected to a power socket on a
different circuit.
Volume Control
The volume can be regulated either by turning the large
volume knob on the front of the device or by pressing
the corresponding button on the remote control.
Mute
When the MUTE button is pressed the loudspeakers are
switched off temporarily. When the button is pressed
a second time, the device returns to normal audio
playback.
41
05-DVD 628_GB 41 30.08.2004, 15:41:59 Uhr
Page 42

ENGLISH
RADIO OPERATION
Tuning in to Stations
1. Press the TUNER button to select the desired frequency range (AM or FM).
2. With the help of the UP or DOWN button it is possible to search for radio stations (the display must
be set to the transmitting frequency beforehand by
means of the PRE/TUN button). Each time the button
is pressed the frequency changes. As soon as the
signal of a radio station is received, this appears in
the display.
3. A faster way to fi nd radio stations is to press the UP
or DOWN button for two seconds. The device then
starts the automatic station search. As soon as a
station has been found the automatic station search
stops.
4. To store a station, press the MEMO button. The
storage location number appears in the display for
four seconds. If the MEMO button is pressed again,
the station is stored.
Storage number
Frequency range Station frequency I
Automatic Search
The device can store up to 50 different AM/FM radio
stations.
1. Press the AUTO button. The word AUTO appears
in the display and the automatic search function is
started.
2. The stations are stored in ascending order. Up to 50
stations are stored. As soon as a station has been
stored, the storage number and station frequency
appear in the display for four seconds.
3. When 50 stations (AM or FM) have been stored it is
not possible to store any further stations.
Playing back preset Stations
1. Press the TUNER button to select the desired frequency range.
2. Then press the PRE/TUN button to show the station
storage locations in the display.
3. Using the number buttons it is now possible to select
the desired station storage location number. For example: In order to play back the station stored under
#5, simply press button number 5; station #17 can be
listened to by pressing button number 1 followed by
button number 7.
4. The stations stored using the storage function can
also be listened to by pressing the UP or DOWN
button.
5. In order to reduce any interference while an FM
stereo programme is being received, press the
FM/Mode button. The word STEREO disappears
from the display. The programme is now played back
in MONO to reduce interference. To return to stereo
playback, press the FM button again.
42
05-DVD 628_GB 42 30.08.2004, 15:41:59 Uhr
Page 43

DVD OPERATION
As soon as the device is connected to a television set
or other auxiliary device you can watch or listen to DVD
videos, your favourite CD or MP3 fi les.
Playing back a DVD Video Disc
Turn on the television set and select A/V mode. If the
television set has a SCART connection, the SCART
mode must be selected from the television menu. Switch
on the receiver if one is connected. Then select AC-3 or
DVD mode.
Playing back an Audio Disc
Turn on the audio system and select the input source
connected to the DVD player. If you do not have the
appropriate equipment for Dolby Digital surround sound,
it is necessary to change the analogue output setting in
the SETUP menu to 2.1.
1. Press the POWER button on the front panel. The message DISC LOADING appears on the screen.
5. As soon as the disc has been read the device begins
playback. During playback of a DVD, the DVD title and
the menu appear. CD tracks are played back one after
the other.
Note:
• The disc may be damaged if it is not positioned correctly in the drawer. This may also result in the DVD
player malfunctioning. Only 12 cm or 8 cm DVDs or
CDs should be placed in the drawer.
• If the DVD player is moved during playback, this may
result in the disc and player being damaged. Only the
OPEN/CLOSE button on the remote control or front
panel of the device should be used to open or close
the drawer.
Press the PAUSE button.
ENGLISH
If there is no disc in the drawer, the message NO DISC
appears on the screen.
2. Press the OPEN/CLOSE button. The disc drawer
opens.
3. Insert a disc into the drawer. Please ensure that
the CD/DVD is located with the playback side facing
downwards.
6. PREV/NEXT Playback
Press the I or I button to play back the previous
or next track. Pressing the PLAY button returns the
device to normal playback.
Press the PREV button.
Press the NEXT button.
4. Press the OPEN/CLOSE button again to close the
drawer. Once the drawer has closed the type of disc
appears in the top left-hand corner of the screen.
05-DVD 628_GB 43 30.08.2004, 15:42:00 Uhr
7. Fast Forward and Reverse
The device has a fast forward and reverse function with
the following speeds: 2x, 4x, 8x, 16x.
43
Page 44

DVD OPERATION
FUNCTIONS
Onscreen Display
ENGLISH
To activate this function it is only necessary to press the
or button on the remote control. The speed is
increased each time the button is pressed. Press the
PLAY button to return to normal playback.
Memory Playback
With this device it is possible to stop playback at a certain position and to continue from this position at a later
time. Press the STOP button to interrupt playback. The
device stores the position at which playback has been
stopped. Press the RESUME or PLAY button to continue
playback at the point where it was stopped (this does
not apply to MP3 playback).
While a disc is being played back the status of various
functions, such as the title, track number and different
playing times, can be called up.
1. If the DISPLAY button is pressed once, the title, chapter and time that has elapsed appear on the screen.
2. For VCDs: After the DISPLAY button has been
pressed a second time, the remaining time for the title
being played back appears on the screen.
3. For DVDs: After the DISPLAY button has been
pressed a second time, the chapter time that has
elapsed appears on the screen.
Slow Motion Playback
This DVD receiver is able to play back discs in slow
motion. When the SLOW button is pressed repeatedly,
the playback speed is reduced to 1/2, 1/4, 1/8 and 1/16.
Press the PLAY button to return to normal playback.
44
4. If the DISPLAY button is pressed again, the onscreen
display disappears.
05-DVD 628_GB 44 30.08.2004, 15:42:01 Uhr
Page 45

FUNCTIONS
N/P
This DVD receiver supports video outputs of various
systems, including Auto, NTSC and PAL.
If the wrong system has been selected, the picture
begins to fl icker and loses colour. If this should happen,
press the N/P button (during stop mode) on the remote
control and select the correct system (NTSC for North
America, PAL for Europe). For further information on the
output format, please see the operating instructions of
your television set.
Subtitles
With this device it is possible to display up to 32 different
subtitle languages (depending on the disc that has been
inserted).
1. Press the SUBTITLE button repeatedly until the desired language appears.
Languages
It is possible to show fi lms in eight different languages
(depending on the disc that has been inserted).
1. Press the LANGUAGE button repeatedly until the
desired language appears.
Note:
The inserted disc must have been recorded in the desired language.
Selecting Titles
DVDs are normally subdivided into titles, which in turn
are split into chapters. This device is able to select a
certain title for playback. If the DVD has been recorded
with a title menu, a specifi c title can be selected using
this function or the number buttons.
ENGLISH
2. In order to switch off the subtitles, press the SUBTITLE button repeatedly until the subtitles disappear.
Note:
The inserted disc must also have the subtitle function.
Camera Perspectives
It is possible to set various camera perspectives.
1. Press the ANGLE button on the remote control. Pressing the ANGLE button repeatedly changes the camera
perspective each time.
2. The ANGLE button only works if the viewing angle
symbol lights up in the display.
Title Menu Function
1. Press the TITLE button. A title menu appears on the
television screen.
2. Press the corresponding scroll button to select the
desired title. A title can also be selected using the
number buttons by pressing the corresponding title
number.
3. Press the ENTER button. Playback begins from
chapter 1 of the selected title.
Note:
Some discs do not have this function. If necessary,
follow the instructions on the screen. Only the basic procedure is described in these instructions. The procedure
may vary depending on the content of the DVD. If you
play back a VCD 2.0 the function of the TITLE button, for
example, is to return the device to the menu.
PROLOGIC SELECTOR
In stop mode, press the PROLOGIC button to select
PROLOGIC ON or OFF.
Note:
The inserted discs must be able to display different
camera perspectives.
45
05-DVD 628_GB 45 30.08.2004, 15:42:02 Uhr
Page 46

FUNCTIONS
TIME Function
ENGLISH
If the TIME button is pressed during playback, the
„Search“ menu opens. In the „Time“ line it is possible to
use the number buttons to enter a time in the format HH:
MM:SS (H=hours, M=minutes, S=seconds). Now press
the ENTER button. Playback starts from the selected
time. In the „Title/Chapter“ line it is possible to use the
number buttons to enter a starting point from a specifi c
title and chapter. Then press the ENTER button to start
playback.
Setting Bookmarks
If no entry is made in the “Search” menu, but instead the
TIME button is pressed a second time, the “Bookmarks”
menu appears.
Now use the arrow buttons to select the number of the
bookmark (1, 2 or 3) which you would like to set and
then press the ENTER button to store the playing time.
Up to three different bookmarks can be set.
Playing back from a Bookmark
1. Press the TIME button twice.
2. Use the arrow buttons to select the desired bookmark from which you would like to start playback and
then press the ENTER button.
2. Press the A-B button again while the disc is being
played back to defi ne point B (end point).
The section between A and B is played back again.
3. Press the A-B button a third time to delete the entry.
Multiple Repeat
Certain titles, chapters/tracks or segments can be repeated several times. It is even possible to switch between
two items that are to be played back repeatedly.
1. Select the title, chapter etc, that is to be repeated.
2. Press the REPEAT button.
Note: All bookmarks are deleted when the device is switched off or the disc removed.
MENU/PBC
When the PBC function is switched on, a CD title can
only be selected via the main menu. If the PBC function
is switched off, a title can be selected by entering the
corresponding number button. If the MENU button is
pressed while a DVD is being played back, the menu
contents of the disc appear on the screen.
A-B-Repeat
The A-B repeat function makes it possible to repeat playback of a section of a DVD between two certain points
(A and B).
1. Press the A-B button while the disc is being played
back in order to defi ne point A (starting point).
The repeat mode changes each time the REPEAT button
is pressed (e.g. title repeat, chapter repeat, repeat all,
switch off repeat mode).
While a CD is being played back the following display
appears after the REPEAT button is pressed: TRACK ALL
and REPEAT OFF (repeat all tracks and switch off repeat
mode).
When an MP3 is being played back and the REPEAT
button pressed, the following modes can be selected:
Single, Repeat one, Repeat Folder, Folder.
46
05-DVD 628_GB 46 30.08.2004, 15:42:03 Uhr
Page 47

FUNCTIONS
Zoom
With the help of the zoom function a picture can be
enlarged up to three times during normal playback or during slow motion playback. Press the ZOOM button once
to double the size of the picture. Press again to enlarge
the picture to three times its normal size and a third time
to make it appear four times bigger than normal. In order
to return to normal playback, press the ZOOM button a
fourth time.
Channel Volume (CH.SET)
When a DVD is being played back, it is possible to adjust
the channel volume by pressing this button and the
VOLUME button.
SYSTEM-SETUP (FUNCTION SETTINGS)
Volume and Mute
The volume can be easily adjusted using the remote control. Press either the VOL+ button to increase the volume
or the VOL- button to reduce it. In order to switch off the
sound, press the MUTE button. When the MUTE button
is pressed again, the mute function is cancelled.
Program (Programming)
It is possible to play back certain tracks in any order. If
the PROG button is pressed, the program menu appears
on the screen. Using the number buttons you can enter
the desired tracks. Press the ENTER button to play back
the programmed tracks. In order to leave the programmed playback, press the PROG button again.
ENGLISH
If the SETUP button is pressed during stop mode, the
following setup menu appears on the television screen:
Press to move
between the menu
items.
A. Press ENTER to display the submenus.
B. Press SETUP to leave the setup menu.
Language Setup
Select [Language] from the setup menu and then press
the ENTER button to display the [Language] submenu:
A. Press ENTER or to set.
B. Press to return to the previous menu.
C. Press or repeatedly to return to the setup menu.
Select [OSD Menu] and then press the ENTER button or
to display the submenu of the [OSDMenu]:
Press to change
your selection.
A. Press ENTER to confi rm.
B. Press SETUP to leave the menu.
Press to
change the menu
item.
47
05-DVD 628_GB 47 30.08.2004, 15:42:04 Uhr
Page 48

SYSTEM-SETUP (FUNCTION SETTINGS)
Select [Subtitle] and then ENTER or to display the
[Subtitle] submenu.
ENGLISH
Press to change
your selection.
Note: The subtitle
languages vary depending on the disc.
A. Press ENTER to confi rm.
B. Press SETUP to leave the setup menu.
Select [Audio] and then press ENTER or to display the
[Audio] submenu.
Press to change
your selection.
Note: The audio languages vary depending
on the disc.
Video Setup
Select [Video] from the setup menu and then press
ENTER to display the [Video] submenu:
Press to select the
menu item.
A. Press ENTER to set.
B. Press to return to the setup menu.
Select [TV Shape] and press ENTER or to display the
[TV Shape] submenu:
Press to change your
selection.
A. Press ENTER to confi rm.
B. Press SETUP to leave the setup menu.
Select [DVD Menu] and then press ENTER or to display the submenu of the [DVD Menu].
Press to change
your selection.
Note: The menu languages vary according to
the disc.
A. Press ENTER to confi rm.
B. Press SETUP to leave the setup menu.
A. Press ENTER to confi rm.
B. Press SETUP to leave the setup menu.
[4:3] Pan & Scan refers to a type of picture display
which is partially incomplete. With Pan & Scan the
entire screen is fi lled out.
[4:3LB] Letter Box refers to a type of picture display
where black stripes appear at the top and bottom of
the picture.
[16:9]: The picture fi lls the screen of a 16:9 television
set (wide screen).
Note:
Not all DVDs offer fi lm playback in full-screen format. If
this is not the case, the disc ignores the setting of the
television display and plays the fi lm back in letter-box
format.
Select [TV-System] and press ENTER or to display the
[TV-System] submenu:
Press to change your
selection.
A. Press ENTER to confi rm.
B. Press SETUP to leave the setup menu.
[NTSC]: Select NTSC if you have set the NTSC signal
system on your television set.
[PAL]: Select PAL if you have set the PAL signal
system on your television set.
[AUTO]: Select AUTO if you have set the AUTO signal
system on your television set.
48
05-DVD 628_GB 48 30.08.2004, 15:42:05 Uhr
Page 49

SYSTEM-SETUP (FUNCTION SETTINGS)
Select [Video Output] and press ENTER or to display
the [Video Out] submenu.
A. Press ENTER to confi rm.
B. Press SETUP to leave the setup menu.
Note: The composite video and S-video output are
always available.
[S-Video]: Select S-video if you have connected the
DVD player to the television set via the composite
output.
[YUV]: Select YUV if the DVD player is connected to
the television set via the YUV output.
[Y Pb Pr]: Select this if the DVD player is used with
progressive scan.
Press to change your
selection.
Note: If you have selected the menu item YPbPr and
your device does not have progressive scan, you will
only see a blank screen. In order to alter this setting,
please read the section “No Picture” under “Troubleshooting”.
F. Press SETUP to store and leave the menu.
ENGLISH
• PCM stands for Pulse Code Modulation and is a
standard 2-channel stereo format used for audio
CDs.
MP3 Settings
Follow the steps below in the following order to set the
outgoing digital audio format of MP3 tracks (note: the
analogue format is set to 2-channel):
A. Press SETUP in audio mode.
B. Select audio mode and press ENTER.
C. Select MP3 and press ENTER.
D. Set the digital output: PCM (preset): for playing back
2-channel digital sound via optical/coaxial digital
audio outputs, e.g. with MiniDisc recorders. OFF: for
deactivating the Dolby Digital decoder.
E. Press SETUP to store and leave the menu.
Audio Setup
With the help of the audio menu you can set the analogue and digital audio outputs according to the auxiliary
devices connected to the player. If you have connected
the player to the television set via a stereo audio socket
for example, you should set Dolby Digital and other
settings to 2-channel in order to obtain optimum stereo
sound.
- You can set the audio format for each of the following
sources: Dolby Digital, MP3, CD and others.
- DVD playback must be stopped to carry out the
audio settings.
AC-3 Settings
Please follow the steps stated below in the following
order to set analogue and digital audio formats for outgoing Dolby Digital 5.1 soundtracks:
A. Press SETUP in stop mode.
B. Select AUDIO and press ENTER.
C. Select AC3 and press ENTER.
D. Setting the analogue output:
6-channel (preset): for playing back Dolby Digital 5.1
channel audio sound via the analogue 5.1 channel
audio outputs, e.g. with a 5.1 channel amplifi er.
2-channel: for playing back 2-channel stereo sound
via the stereo audio outputs, e.g. with a VCR or TV.
E. Setting the digital output:
PCM (preset): for playing back 2-channel digital
sound via optical/coaxial digital audio outputs, e.g.
with MiniDisc recorders.
RAW: for playing back the 5.1 channel digital bit-
stream via optical/coaxial digital audio outputs, e.g.
for an external amplifi er with a Dolby Digital decoder.
OFF: for deactivating the Dolby Digital decoder.
49
05-DVD 628_GB 49 30.08.2004, 15:42:06 Uhr
Page 50

SYSTEM-SETUP (FUNCTION SETTINGS)
Other Settings
Please follow the steps listed below in this order to set
the outgoing analogue and digital audio formats of other
ENGLISH
tracks:
A. Press SETUP in stop mode.
B. Select “Audio” and press ENTER.
C. Select “Others” and press ENTER.
D. Setting the analogue output:
2-channel (preset): for playing back 2-channel stereo
audio sound via the stereo audio output, e.g. for a
VCR or TV.
E. Setting the digital output (of the optical output):
PCM (preset): for playing back 2-channel digital
sound via optical/coaxial digital audio outputs, e.g.
with MiniDisc recorders.
OFF: for deactivating the audio output “CD Others”.
F. Press SETUP to store and leave the menu.
Other Audio Settings (More Audio)
In addition, the audio menu contains Prologic and subwoofer settings.
Prologic Settings
The DVD player has a built-in Dolby Prologic decoder
to produce virtual 5.1-channel surround sound for PCM
(stereo) sources:
A. Press SETUP in stop mode.
B. Select “More Audio” and press ENTER.
C. Select Prologic and press ENTER.
D. Select the desired Prologic setting and press ENTER:
On: all audio soundtracks are played back in Dolby
Prologic mode.
Off: (preset): Dolby Prologic decoding is always
inactive.
E. Press SETUP to store and leave the menu.
Subwoofer Settings
It is necessary to state in the menu system whether your
audio setup includes a subwoofer.
A. Press SETUP in stop mode.
B. Select “More Audio” and press ENTER.
C. Select “Subwoofer” and press ENTER.
D. Select the desired subwoofer setting and press
ENTER.
On (preset): This means that you are using a sub-
woofer for LFE signals (low-frequency effects).
E. Press SETUP to store and leave the menu.
50
05-DVD 628_GB 50 30.08.2004, 15:42:07 Uhr
Page 51

SYSTEM-SETUP (FUNCTION SETTINGS)
Pink Noise Settings
During pink noise adjustment the test sound is switched
off (Off) and the various channels can be selected and
tested (LEFT, CENTER, RIGHT, RIGHT SURROUND and
LEFT SURROUND).
A. Press SETUP in stop mode.
B. Select “More Audio” and press ENTER.
C. Select “Pink Noise” and press ENTER.
D. Select the desired pink noise setting and press EN-
TER. Here the individual channels named above can
be tested.
E. Press SETUP to store and leave the menu.
DRC Settings
DRC stands for Dynamic Range Control (dynamic
adjustment).
A. Press SETUP in stop mode.
B. Select “More Audio” and press ENTER.
C. Select “DRC” and press ENTER.
D. Select the desired DRC setting and press ENTER.
Choose between OFF and ON.
E. Press SETUP to store and leave the menu.
RATING (READ) Settings
The „Rating“ menu makes it possible to block playback
of a DVD on the basis of the rating setting.
Settings the Password and Rating Level
With this DVD player it is possible to block playback of
unsuitable material with a rating system that is protected
by a password (not all discs have this function).
A. Press SETUP in stop mode.
B. Select “RATING (Read)” and press ENTER.
C. Select the RATING (block) settings and press ENTER
repeatedly until the desired RATING (block) level has
been set, from 1 (greatest restrictions) to 8 (minimum
restrictions).
If a password has already been set, the block symbol
appears. It is not possible to select a rating until you
have selected the correct password using the 0-9
buttons.
D. Select password.
E. Using the 0-9 buttons you can enter a 4-fi gure
password . Then press the ENTER button. When the
block symbol disappears the correct password has
been entered.
F. Press SETUP to store and leave the menu.
ENGLISH
LPCM 48k DS Settings
A. Press SETUP in stop mode.
B. Select “More Audio” and press ENTER.
C. Select “LPCM 48k DS” and press ENTER.
D. Select the desired LPCM 48k DS setting and press
ENTER.
OFF: LPCM 48k
ON: LPCM 96k.
E. Press SETUP to store and leave the menu.
Not all DVDs are categorised according to this system.
DVDs that have been given a higher classifi cation than
the level selected by you can only be played back if the
correct password has been entered.
If you have forgotten your rating password you can delete the memory with 0000. The password should not be
made accessible to children, as it cancels the parental
lock setting.
51
05-DVD 628_GB 51 30.08.2004, 15:42:08 Uhr
Page 52

MP3-FUNCTION
What is MP3?
MP3 is an audio compression mode using Level 3 of the
international MPEG standards. The sound signal is com-
ENGLISH
pressed to a level of 12:1. An MP3 disc can comprise
600 minutes of music or more than 170 tracks.
TROUBLESHOOTING
If problems occur during operation of the DVD player,
you can use one of the following methods to correct
them.
Problem
Possible fault correction
Playing MP3s
File Menu for MP3 Playback
For the playback of an MP3 disc, two fi le menus can be
selected: „FILE LIST“ and „FOLDER“. Press the PROG
button to access them.
1. FILE LIST
Here the fi les which are to be played back can be
selected by pressing the UP/DOWN arrow buttons
in combination with the ENTER button. The fi les can
also be selected directly with the help of the number
buttons and then pressing the ENTER button.
2. FOLDER
Here the menu is initially displayed. With the help
of the arrow buttons (up, down, right, left) and the
ENTER button a submenu can be selected.
JPEG FILES
JPEG is the most common format standard for compressing fi xed-image fi les.
Even if the images are compressed 15-20 times, their
quality is still good. Almost all image processing software
programs support JPEG. It is the ideal format for image
storage and very user-friendly. This device can read
Picture-CD fi les produced in JPEG format.
1. Once the disc has been inserted, the search for disc
information is started.
2. Press the number button in order to select an image.
3. Depending on which image you would like to select,
the number button or the direction button will be
faster.
Selection via Menu
1. Once the disc has been inserted the search for disc
information is started and the main menu appears on
the screen. Press number button 1 to call up the fi rst
image and confi rm with the PLAY button.
2. With the help of the direction buttons you can select
an image. Then confi rm with the PLAY button.
3. In stop mode you can select further pictures using
the direction buttons.
4. If the fi rst line on the right is selected in stop mode,
you can return to the upper section of the menu by
pressing the PLAY button.
No power
1. Check whether the mains plug is correctly inserted in
the socket.
No sound
1. Check the connection between the DVD player and
television set and each other connected device.
2. Check whether the correct mode is set for the television and amplifi er.
Surround loudspeakers are distorted.
Check the medium. In the case of VCDs and S-VCDs it
is possible that the coding of the background signals is
faulty, depending on the application of the user software.
Radio operation: RDS display appears and disappears
Under critical reception conditions the RDS display
changes with the frequency display. This is not a fault.
No picture
1. Check the connection between the DVD player and
television set and each other connected device.
2. Check whether the television set is switched on.
3. If you have selected Progressive Scan although
this is not supported by your television set, please
proceed as follows:
1. Switch off the device by the mains switch for
approximately 10 sec.
2. Switch on the device and wait until the read-in
procedure is fi nished.
3. Press the “SETUP” button.
4. Press the “right” button once.
5. Press the “ENTER” button.
6. Press the “down” button twice.
7. Press the “ENTER” button.
8. Press the “up” button three times.
9. Press the “ENTER” button.
10. Press the “SETUP” button to leave the menu
which is now visible.
Disc playback does not work
1. Check whether the disc has been inserted in the
drawer with the marked side facing upwards.
2. Check whether the disc is clean. It must not be covered with dust, particles of dirt or fi ngerprints.
3. Check whether the disc is placed correctly in the
drawer.
4. Check whether the parental lock function is switched
on.
5. Check whether the disc is designated for use in your
region.
Remote control does not work
1. Check the batteries and replace them if necessary.
2. Check whether any objects are located between the
remote sensor located on the front of the device and
the remote control.
3. The remote control must be pointed in the direction
of the sensor on the device.
52
05-DVD 628_GB 52 30.08.2004, 15:42:09 Uhr
Page 53

TROUBLESHOOTING
Picture interference
1. Check whether the disc is clean and free of scratches.
No colour picture
1. Check whether the S connection is damaged (pin
bent).
MP3 disc is not played back
1. Use different software to burn the disc as it is possible that the software version used is not compatible
with the DVD player.
2. Use a later software version, for example Audiostation 4, Easy CD Creator, Toast Titanium, etc.
3. Ensure that the MP3 fi le has not been coded with a
variable bit rate (e.g. from Real Networks).
Note:
The playback of CDs and DVDs produced by the user
cannot be guaranteed due to the large number of software versions and CD/DVD media available.
TECHNICAL DATA
DVD Player
TV system NTSC/PAL/AUTO
Compatible disc types DVD, CD, MP3
CD-R, CD-RW
Resolution > 500 lines
Video S/N ratio 65 db
Frequency range fs (96 KHz/24 bit)
4 Hz-44 Hz: +/- 2 db
Audio S/N ratio 95 db
Frequency range < 0,01%
D/A converter 192 KHz/24 bit
Video output 1 Vp-p
S video output Y: 1 Vp-p (75Ω )
Audio output 2,0 V
5.1Channel
Digital audio output optical, coaxial
Connections YUV, Scart, CVBS, S-video
2 channel output
FM Tuner
Tuning range 87,5-108 MHz
S/N ratio Y 46 db
Mono > 46 db
Stereo > 50 db (DIN)
Selectivity 50 db
THD
Mono 2%
Stereo 3%
Frequency range 30 Hz-10 kHz +/- 1 db
Stereo resolution 30 db (100 Hz-10 kHz)
AM Tuner
Tuning range 522-1620 kHz
S/N ratio 35 db
THD 3%
Amplifi er
Distortion-restricted power
Main loudspeakers 40W + 40W PMPO
Surround loudspeakers 40W + 40W PMPO
Centre loudspeaker 40W PMPO
Subwoofer 150W PMPO
Frequency Range:
Main loudspeakers 200 Hz-20 kHz +7- 3 db
Surround loudspeakers 200 Hz-20 kHz +/- 3 db
Centre loudspeaker 200 Hz-20 kHz +/- 3 db
Subwoofer 20 Hz-200 Hz +/- 3 db
S/N ratio > 76 db
Input sensitivity 350 mv, 47 k
Channel resolution > 30 db (normal)
Remote Control
Transmitter infrared beam
Signal range approx. 7 m
Energy source 2 AAA batteries
General
Power supply AC 230 V-50 Hz
Power consumption 60W
ENGLISH
As the device is continuously being improved, we
reserve the right to modify the product design and its
specifi cations without prior notice.
53
05-DVD 628_GB 53 30.08.2004, 15:42:10 Uhr
Page 54

This device has been tested according to all relevant current CE guidelines, such as electromagnetic compatibility and low voltage directives, and has been constructed
in accordance with the latest safety regulations.
ENGLISH
Subject to technical changes without prior notice!
Guarantee
The device supplied by our Company is covered by a
24 month guarantee starting on the date of purchase
(receipt).
During the life of the guarantee any fault of the device or
its accessories *) ascribable to material or manufacturing
defects will be eliminated free of charge by repairing or,
at our discretion, by replacing it. The guarantee services
do not entail an extension of the life of the guarantee nor
do they give rise to any right to a new guarantee!
Proof of the guarantee is provided by the proof of
purchase. Without proof of purchase no free replacement
or repair will be carried out.
For repairs or replacement during the life of the guarantee return the device in its original packing together with
the proof of purchase to your dealer.
*) Damage to accessories does not mean automatic free
replacement of the whole machine. In such cases please
contact our hotline. Broken glass or breakage of plastic
parts are always subject to a charge.
Defects to consumables or parts subject to wearing
(e.g. motor pistons, kneading blades, drive shafts, spare
remote control, spare toothbrushes, saw blades, etc.) as
well as cleaning, maintenance or the replacement of said
parts are not covered by the guarantee and hence are
to be paid!
The guarantee lapses in case of unauthorized tampering.
After the expiry of the guarantee
After the expiry of the guarantee repairs can be carried
by the competent dealer or repair service against the
payment of the ensuing costs.
54
05-DVD 628_GB 54 30.08.2004, 15:42:11 Uhr
Page 55

ENGLISH
55
05-DVD 628_GB 55 30.08.2004, 15:42:11 Uhr
Page 56

INDICE
Medidas de precaución .............................................. 57
Indicaciones de seguridad ......................................... 58
ESPA ÑOL
Reproductor DVD........................................................ 59
Ubicación adecuada................................................ 59
Imagen intacta......................................................... 59
Discos reproducibles............................................... 59
Salida de audio digital............................................. 59
Salida de audio analógica .......................................59
Sistema de protección contra sobretensiones
para la cabeza de láser ........................................... 59
Notas acerca de discos.............................................. 59
Manejo..................................................................... 59
Limpieza ..................................................................59
Almacenamiento...................................................... 59
Descripción de los elementos de mando.................. 60
Panel delantero........................................................ 60
Panel trasero ........................................................... 60
Descripción del mando a distancia ........................... 61
Mando a distancia....................................................... 62
System-Setup (Ajustes de funciones) ..................73-77
Setup de idiomas .................................................... 73
Setup de video ........................................................ 74
Setup de audio........................................................ 75
Más setup de audio................................................. 76
Funciones MP3............................................................ 78
Archivos JPEG............................................................. 78
Posibilidades para la reparación de fallos................ 78
Datos técnicos............................................................. 79
Garantía........................................................................ 80
Conexión de los aparatos........................................... 63
Altavoces...................................................................... 64
Posicionamiento de los altavoces........................... 64
Conexión de los altavoces ......................................... 65
Conexión de las antenas ............................................ 66
Toma de corriente ....................................................... 67
Funciones básicas....................................................... 67
Funcionamiento de radio ........................................... 68
Funcionamiento DVD .............................................69-70
Funciones................................................................70-73
56
05-DVD 628_E 56 30.08.2004, 15:42:39 Uhr
Page 57

MEDIDAS DE PRECAUCIÓN
El rayo en el triángulo está destinado a advertir al
usuario sobre una “tensión peligrosa” y no
aislada en el interior del aparato y que podría
provocar un choque eléctrico al usuario.
El signo de exclamación en el triángulo está destinado
a llamar la atención sobre notas importantes
que se encuentran en este manual referente a
instrucciones de uso y de mantenimiento.
Aviso:
No exponga el aparato ni a la humedad ni a la lluvia.
Por el peligro de un electrochoque no se puede abrir
la carcasa (Alta tensión). Solamente personal técnico
cualifi cado debe abrir el aparato.
Atención:
Asegúrese que la clavija de red esté bien introducida en
la caja de enchufe.
Atención :
El reproductor DVD dispone de un sistema láser. La
carcasa no se debe abrir, ya que podría salir radiación
lasérica dañina. Teniendo la carcasa abierta es visible el
rayo láser. ¡Nunca fi je su mirada hacia el rayo láser!
Solamente se pueden aplicar los ajustes y los procedimientos indicados en este manual, ya que si no se podría
llegar a una peligrosa exposición a la radiación.
Tome nota del número de modelo y de serie. Estas
indicaciones se encuentran en la parte posterior de la
carcasa del aparato. Guarde esta información para fi nes
posteriores.
(Información importante, por favor guardar.)
Atención:
Peligro de electrochoque. ¡No abrir !
Atención:
Para evitar un electrochoque no abra ni la cubierta ni la
parte trasera. En el aparato no se encuentran ningunas
piezas que podrían ser cuidadas por el usuario. Tome
consejo de personal técnico cualifi cado.
ESPAÑOL
Debe leer con atención el manual de instrucciones, para
asegurar el manejo debido del aparato. De todas formas
debe guardar bien el manual. Para trabajos de mantenimiento tome contacto con un concesionario autorizado.
57
05-DVD 628_E 57 30.08.2004, 15:42:47 Uhr
Page 58

INDICACIONES DE SEGURIDAD
Atención:
Es importante que lea cuidadosamente el manual de
instrucciones y que cumpla todas las instrucciones
ESPAÑOL
–también las que están indicadas en el aparato-. Guarde
el manual de instrucciones para fi nes posteriores.
Accesorio
No ubique el aparato sobre una superfi cie inestable (p.ej.
pie, mesa con ruedas, soporte mural, estantería o mesa).
El aparato podría caerse y dañar seriamente a personas
o a animales. Además se podría estropear el aparato.
Utilice exclusivamente superfi cies estables que han sido
recomendadas por el fabricante o que son obtenibles en
combinación con el aparato. Al colocar el aparato hay
que proceder exactamente como lo indica el fabricante
y utilizar el accesorio de montaje recomendado por el
fabricante.
En caso de que vaya a colocar el aparato sobre una
mesa con ruedas, debe mover ésta con cuidado. La
repentina parada, el fuerte empuje así como las superfi cies desniveladas pueden llevar a cabo que se caiga la
combinación de mesa rodante y aparato.
Aparatos adicionales
No utilice aparatos adicionales que no hayan sido expresamente aprobados, ya que podrían traer peligros.
Limpieza
Antes de la limpieza tiene que sacar la clavija del aparato
de la caja de enchufe. Para la limpieza no utilice materiales de limpieza líquidos o limpiadores por pulverización,
sino un paño humedecido.
Protección contra rayos
Como medida de protección adicional debería retirar la
clavija de la caja de enchufe durante una tormenta o al
no utilizar el aparato durante algún tiempo. Además debería estar estirado el sistema de antena y de cable. De
esta forma se puede evitar el daño del aparato a causa
de una tormenta o de alta tensión.
Objetos o líquidos
No se pueden introducir objetos por las rendijas del
aparato, ya que podrían hacer contacto con peligrosos
puntos de tensión o piezas de puente y de esta forma
provocar un incendio o un cortocircuito. No derrame
líquido sobre el aparato.
Sobrecarga
Cajas de enchufe mural, cables de prolongación o cajas
de enchufe adicionales no se deben sobrecargar, ya que
existe el peligro de un incendio o de un electrochoque.
Cable eléctrico
Los cables eléctricos se deben colocar de tal manera
que no estorben, es decir que no estén engrapados por
otros objetos. Peculiar atención deben tener los cables
en la zona de la clavija, caja de enchufe y salida del
aparato.
Alimentación de corriente
El aparato sólo se debe poner en marcha con la fuente
de corriente indicada en la etiqueta de marcación. Si no
está seguro sobre el tipo de alimentación de corriente
que tiene en casa, puede dirigirse a su concesionario o a
la empresa suministradora de corriente de su municipio.
Para aparatos, que se accionen con pilas (u otra fuente
de corriente), encontrará indicaciones en el manual. Este
aparato DVD-Home-Theatre se acciona con AC 230V/50
Hz. No desconecte el aparato justo después de haberlo
conectado. Espere por lo menos 10 segundos.
Mantenimiento
No intente realizar el mantenimiento del aparato por su
propia cuenta, ya que al abrir o al retirar la cubierta se
puede exponer a voltajes peligrosos o a otros peligros.
Encargue a un técnico especialista para hacer el mantenimiento.
Normas de televisión
Este aparato es compatible con televisores que soportan
las normas televisivas NTSC o PAL.
Aireación
Rendijas o hendiduras en el aparato están previstas para
la aireación y para asegurar un debido funcionamiento
del aparato así como para proteger el aparato contra sobretensión. En ningún caso se pueden cubrir o bloquear
estas aberturas. No coloque el aparato sobre superfi cies
suaves, como p.ej. cama, sofá, moqueta etc. ya que
entonces no puede funcionar la aireación. El aparato
no se debe colocar en una construcción empotrada
(armario empotrado, estantería empotrada etc.), si no
está asegurada la ventilación sufi ciente. El aparato no se
debe ubicar cerca de fuentes de calor como p.ej. radiadores, acumuladores térmicos, estufas u otras fuentes
que generen calor.
Mantener alejado de agua, fuego e imánes
Mantenga el aparato apartado de fl oreros, bañeras, lavabos etc.. En caso de que penetre líquido en el aparato,
podría originar daños serios. Fuentes directas de incendio como p.ej. velas encendidas no se deben colocar
sobre el aparato. Nunca coloque objetos magnéticos,
como p.ej. altavoces, en la cercanía del aparato.
Condensación
Bajo estas circunstancias se puede formar humedad
sobre la lente:
En el momento que se conecte un calefactor.
En un cuarto con vapor o muy húmedo.
Si el objeto ha sido transportado de un ambiente frío a
un ambiente caliente.
Si se ha formado humedad en el interior del aparato,
puede ocurrir que el aparato no funcione debidamente.
En este caso, desconecte la corriente y espere aprox.
una hora hasta que se haya evaporizado la humedad.
58
05-DVD 628_E 58 30.08.2004, 15:42:47 Uhr
Page 59

DVD-PLAYER
NOTAS ACERCA DE DISCOS
En siguiente apartado recibirá información sobre el
óptimo ajuste de su sistema receptor DVD.
Ubicación adecuada
El aparato debería ser ubicado sobre una superfi cie
segura y llana. Debido a que el fl ujo magnético de
otros aparatos podrían originar perturbaciones en la
reproducción y/o una mala imagen, evite que el aparato
esté cerca de grabadoras de video, radios o altavoces
grandes. Si el aparato está ubicado en un armario, debe
haber por todos los lados del aparato por lo mínimo un
espacio libre de 2,5 cm, de forma que se pueda garantizar una aireación sufi ciente.
Imagen intacta
Un reproductor DVD es un aparato de precisión. En caso
de que la lente óptica de exploración o parte de la unidad de disco muestren suciedad o estén desgastadas,
se empeorará la calidad de imagen. Por ello, se debería
ubicar el reproductor en un sitio limpio y libre de polvo.
Discos reproducibles
Este sistema receptor DVD puede reproducir siguientes
tipos de disco : DVD, MP3, CD, CD-R y CD-RW con la
posibilidad de corrección de errores. Además se pueden
mostrar discos compactos gráfi cos y álbumes digitales
de fotos. Se soportan 8 idiomas y hasta 32 subtítulos
así como diferentes ángulos de perspectiva (dependiendo del disco introducido). Con ayuda de los menús de
pantalla se pueden realizar todos los ajustes de manera
muy fácil.
Salida de audio digital
El aparato dispone de una salida coaxial que le posibilita
conectar con un sólo cable un amplifi cador-AV (6 canales) y un procesor con código Dolby-Digital integrado.
De este modo puede disfrutar con comodidad de diferentes DVDs, CDs y discos MP3.
En los siguientes apartados se indicarán información importante acerca del manejo, limpieza y almacenamiento
de discos que sean reproducidos en este aparato.
Manejo
• Nunca toque la cara a reproducir del disco.
• No pegue papelitos o cintas adhesivas en el disco.
• No pegue o escriba nada sobre el disco.
• Solamente toque el disco por el centro o por los
lados.
Limpieza
• Huellas dactilares o impurezas en el disco pueden
empeorar la calidad de imagen y de sonido. Limpie el
disco con un paño humedecido del interior hacia los
bordes.
• En caso de que no se dejarán quitar las impurezas,
limpie el disco cuidadosamente con un suave paño
humedecido y seque éste con un paño seco.
• No utilice detergentes como p.ej. diluentes, bencina,
detergentes comerciales o sprays antiestáticos para
discos fonográfi cos de vinilo.
Almacenamiento
• No almacene los discos ni bajo la luz solar directa o
cerca de fuentes de calor.
• No almacene los discos cerca de sitios húmedos
o polvorientos. Almacene los discos en su funda y
siempre de forma vertical. No ubique objetos encima
del disco suelto, ya que éste se podría deformar y
estropear.
Nota:
El fabricante no se responsabiliza de daños que hayan
sido originados por el tratamiento inadecuado de un
disco.
ESPAÑOL
Salida de audio analógica
El amplifi cador integrado de seis canales hace innecesaria la conexión de un amplifi cador externo y posibilita
una simple instalación Plug-and-Play de los altavoces.
Sistema de protección contra sobretensiones para la
cabeza de láser
Para alargar la duración de la cabeza de láser, contiene
el aparato un único sistema de protección contra sobretensiones que asegura un constante fl ujo láser .
59
05-DVD 628_E 59 30.08.2004, 15:42:48 Uhr
Page 60

DESCRIPCION DE LOS ELEMENTOS DE MANDO
Panel delantero – Funciones
ESPAÑOL
1. POWER
Antes de conectar el cable eléctrico con la caja de
enchufe, se debe asegurar que todas las conexiones
hayan sido realizadas correctamente. Si esto es el
caso, se introduce con cuidado la clavija de la red
en la caja de enchufe. Para la conexión, presione
la tecla POWER en la parte frontal del aparato. Al
conectar el aparato puede ocurrir que, causada por
una breve sacudida eléctrica, se originen perturbaciones con otros aparatos electrónicos que estén
conectados al mismo circuito eléctrico. En este caso
debería conectar el aparato en otra caja de enchufe
con otro circuito eléctrico.
2. OPEN/CLOSE
En el modo DVD esta tecla tiene la función de abrir o
de cerrar el portadisco.
3. 왘II PLAY/PAUSE/AUTO
En el modo-DVD está tecla tiene la función de iniciar
la reproducción o la pausa.
En el modo-Tuner presionando esta tecla se iniciará
una búsqueda acelerada automática.
4. STOP/MEMO
En el modo-DVD está tecla tiene la función de parar
la reproducción.
En el modo-Tuner se utiliza esta tecla para grabar un
emisor.
5. PAUSE/PRE/TUN
En el modo-DVD esta tecla tiene la función de inter-
rumpir la reproducción.
En el modo-Tuner se utiliza esta tecla para seleccio-
nar el preajustado o el modo-Tuning.
6. I왗왗 PREV/DOWN
En el modo DVD puede saltar al título anterior, presi-
onando esta tecla. En el modo tuner tiene esta tecla
la función de realizar una búsqueda de emisores (en
retroceso).
7. 왘왘I NEXT/UP
En el modo DVD puede saltar al próximo título, presi-
onando esta tecla. En el modo tuner tiene esta tecla
la función de realizar una búsqueda de emisores
(en avance). (Dependiendo del modo PRE/TUN. Vea
capítulo funcionamiento de radio).
8. INPUT SIGNAL SOURCE
Con ayuda de esta tecla puede seleccionar una
fuente de señal de entrada apropiada. (Nota: La
entrada seleccionada corresponde al jack de entrada
seleccionado en la parte trasera del aparato)
9. VOLUME
Con este regulador puede ajustar el volumen del
aparato. Todos los 6 canales se ajustarán al mismo
tiempo.
Panel trasero – Funciones
1. ANTENA
Jack de conexión para antena interior FM y antena
de cuadro AM.
2. AUX IN
Jack de entrada para dos aparatos de música adicio-
nales (1+2).
3. AUDIO OUT
Jack para ambas salidas de cable derecha e iz-
quierda así como para la salida del altavoz de bajos
cúbico.
4. VIDEO OUTPUT
En el setup tiene que estar ajustado S-VIDEO en el
ajuste VIDEO OUTPUT.
5. S-VIDEO OUTPUT
6. REAR
Jack de conexión para el altavoz envolvente izquier-
do y derecho.
7. FRONT/MAIN
Jack de conexión para el altavoz central/frontal
izquierdo y derecho.
8. CENTER/SUBWOOFER
Jack de conexión para altavoz center y subwoofer.
9. COAXIAL DIGITAL AUDIO OUTPUT
10. 230 V~50 Hz
Este aparato es suministrado con un cable eléctrico-
AC. La clavija de red tiene que estar incondicionalmente seca, al introducirla en la caja de enchufe. El
cable no debe estar demasiado tensado. Además no
se debería pisar encima del cable.
11. OPTICAL OUTPUT
12. SCART OUTPUT
13. COMPONENT VIDEO OUTPUT
60
05-DVD 628_E 60 30.08.2004, 15:42:48 Uhr
Page 61

DESCRIPCION DEL MANDO A DISTANCIA
1. Abrir/Cerrar
2. Tecla de supresión de sonido (Mute)
3. Selección-DVD
4. Tuner AM/FM
5. Selección AUX 1 (Aparato adicional 1)
6. Selección AUX 2 (Aparato adicional 2)
7. Selección norma televisiva N/P
8. Subtítulo
9. Idioma
10. Angulo
11. Teclas numéricas 0-9
12. +10
13. Hora
14. Título
15. Programa
16. Selección canal
17. V olume +
18. V olume –
19. Indicación de pantalla
20. Cronolupa
21. Menú
22. FM Stereo/Mono
23. Preset/Tuning
24. Tecla de navegación arriba
25. Tecla de navegación derecha
26. Tecla de navegación abajo
27. Tecla de navegación izquierda
28. Tecla-Enter
29. Setup
30. Repetición
31. Selección PROLOGIC
32. Step
33. Zoom
34. Reproducción Resume
35. Stop
36. Pause
37. Reproducción
38. Repetición-A-B
39. En retroceso (Búsqueda de emisores/título anterior)
40. En avance (Búsqueda de emisores/título próximo)
41. Memo (Memoria/salto hacia atrás)
42. Auto (Búsqueda automática/salto hacia adelante)
ESPAÑOL
61
05-DVD 628_E 61 30.08.2004, 15:42:49 Uhr
Page 62

MANDO A DISTANCIA
Introducir pilas
1. Para apartar la cubierta de la cámara para pilas,
ESPAÑOL
presione ésta hacia abajo.
2. Introduzca dos pilas (Tipo AAA) en la cámara para
pilas del mando a distancia. Tenga atención que los
polos (+ y -) coincidan con las marcaciones en la
cámara para pilas.
3. Cierre la cubierta de la cámara pilas.
Notas :
• No utilice pilas de distintos fabricantes. Además no
se deberían utilizar pilas viejas y nuevas al mismo
tiempo.
• En caso de que no vaya a utilizar el mando a distancia durante un tiempo, deberían sacarse las pilas,
para evitar daños por corrosión.
• Retire de inmediato pilas desgastadas, para evitar
daños por corrosión.
• En caso de que se hayan derramado las pilas, se
debe quitar el líquido de la cámara para pilas y ser
sustituidas las pilas.
• Siempre cambie las pilas al mismo tiempo y utilice
nuevas pilas cargadas.
• La duración de las pilas depende de la duración del
uso.
Uso del mando a distancia
El mando a distancia debe ser orientado directamente
hacia el sensor del receptor DVD. Cuando se reciba la
señal, funcionará el aparato de forma correspondiente. El mando a distancia puede ser accionado en una
distancia de aprox. 7m y en un ángulo de 30°.
Notas
• El sensor no puede ser expuesto a radiación solar directa o a una fuerte iluminación. Esto podría originar
funciones erróneas del aparato.
• En caso de que se utilicen otros mandos a distancia
en la proximidad o se utilice el mando a distancia en
la proximidad de aparatos que usen rayos infrarrojos,
se podrían ocasionar perturbaciones.
• Se debería evitar colocar objetos sobre el mando
a distancia, ya que de esta forma se podría pulsar
equivocadamente una tecla, cambiar una función y
disminuir la duración de la pila.
• La parte frontal del DVD-Player no se debería revestir
con un vidrio de color, ya que podría perturbar el
funcionamiento normal del mando a distancia.
• No se deberían colocar objetos grandes entre el
mando a distancia y el sensor, ya que podría ocurrir
no recibir la señal del aparato.
• Debería evitar exponer el aparato a humedad o a
lluvia.
• No se debe desmontar el mando a distancia.
Pilas
El uso erróneo de las pilas puede originar que éstas se
derramen, corroen o exploten.
Atención:
Las pilas no pertenecen a los desechos caseros. Se
ruega llevar las pilas usadas a puntos de recolección o a
su concesionario. Nunca tire las pilas al fuego.
62
05-DVD 628_E 62 30.08.2004, 15:42:50 Uhr
Page 63

CONEXIÓN DE LOS APARATOS
ESPAÑOL
• Jacks de conexión para este reproductor DVD se
encuentran en la parte trasera del aparato. Lea con
atención las indicaciones de los correspondientes
aparatos y manténgase a ellos a la hora de conectar
los aparatos audio y video a su aparato.
• Antes de poder conectar su aparato a la red, deben
estar realizadas todas las conexiones de forma debida.
• El jack rojo (indicado con R) sirve para la conexión
del canal derecho. El jack blanco (indicado con L)
sirve para la conexión del canal izquierdo. El jack
amarillo está previsto para la conexión de video. Supervise, si todas las conexiones están ajustadas de
forma fi ja. Conexiones incorrectas pueden ocasionar
ruidos, perturbaciones o incluso daños en el aparato.
• El cable-AV no se puede empalmar con otros cables
como p.ej. cable eléctrico o cable de altavoz, ya que
podría ocasionar un defecto en el aparato.
63
05-DVD 628_E 63 30.08.2004, 15:42:50 Uhr
Page 64

ALTAVOCES
La confi guración y el posicionamiento correcto de un
sistema de sonido envolvente es decisivo para el resultado de sonido. Para conseguir el mejor resultado de
sonido, se debería tener en cuenta, antes de la conexión
ESPAÑOL
de los altavoces, siguientes notas referente al posicionamiento de los altavoces.
Altavoz frontal / central (derecha e izquierda,
altavoz central)
• Estos tres altavoces dan un excelente sonido y aumentan el efecto dinámico de la reproducción audio.
El diálogo principal de una película se reproduce
mediante estos altavoces.
Altavoz trasero o envolvente
• Estos dos altavoces ofrecen efectos de sonido tridimensionales logrando la reproducción tridimensional
de sonido, ya que añaden ruidos de fondo.
Altavoz de bajos cúbico
• El altavoz de bajos cúbico es un altavoz de tonos
bajos, consiguiendo todavía más proximidad a la
realidad.
Posicionamiento de los altavoces
La confi guración idónea del sistema de sonido envolvente depende del tamaño del cuarto y del material de la
pared. La imagen (vea abajo) indica un posicionamiento
típico de los distintos altavoces.
Notas:
• Los altavoces frontales y centrales deberían ser ubicados a la misma altura. Se orientan hacia el oyente.
• Los altavoces envolventes y traseros deberían estar
ubicados en la pared detrás del oyente, por encima
de la altura del oído del oyente.
El altavoz de bajos cúbico se puede ubicar en cualquier
sitio del cuarto, ya que infl uye de forma mínima sobre el
resultado de sonido del oyente. Para conseguir un óptimo resultado de tonos bajos, se recomienda conectar el
altavoz de bajos cúbico al sistema de cine de casa.
Nota: Para conseguir un óptimo efecto de sonido
tridimensional, se puede ajustar también la salida de los
sonidos del altavoz central y de bajos cúbico mediante
los altavoces frontales y traseros.
1. Televisor es decir pantalla
2. Altavoz frontal/principal (izquierda)
3. Altavoz de bajos cúbico
4. Altavoz central
5. Altavoz frontal/principal (derecha)
6. Altavoz envolvente tridimensional (izquierda)
7. Altavoz envolvente tridimensional (derecha)
8. Ubicación del espectador
64
05-DVD 628_E 64 30.08.2004, 15:42:50 Uhr
Page 65

CONEXIÓN DEL SISTEMA DE ALTAVOCES
Este reproductor-DVD, que está muy bien diseñado,
produce una óptima calidad de sonido, si los altavoces
utilizados se aplican dentro de su gama de impedancia
nominal.
Importante
• La impedancia mínima de los 5 altavoces es de 6
ohmios, para el altavoz de bajos cúbico es 8 ohmios.
• En caso de que quiera utilizar solamente un altavoz
o escuchar la música en mono, no debe conmutar
de forma paralela cada altavoz a la izquierda y a la
derecha de la conexión de canal.
Conexión cable de altavoz
1. Quite aprox. 1 cm de aislamiento de cable.
2. Retuerce el terminal del cable.
3. Abra el sujetacables presionando la presilla.
4. Coloque el terminal del cable en el sujetacables.
5. Suelte la presilla y supervise, si el cable está bien
sujetado en la presilla.
Nota:
Para evitar un cortocircuito, se debe tener atención a la
hora de conectar los altavoces con el polo positivo y el
polo negativo de cada cable de altavoz.
ESPAÑOL
65
05-DVD 628_E 65 30.08.2004, 15:42:51 Uhr
Page 66

CONEXIÓN DE LAS ANTENAS
En algunos edi cios o bajo determinadas circunstancias
es dí cil recibir señales de radio. Las antenas suminis-
tradas mejoran la recepción de dichas señales. Están
destinadas para el uso interno.
ESPAÑOL
Antena de cuadro-AM
Oriente la antena de cuadro-AM de tal manera que con-
siga una buena recepción. Debería estar ubicada lo más
lejos posible del reproductor-DVD, televisor, altavoces y
cables eléctricos. Si todavía no se ha conseguido una
buena recepción, puede ser que necesite una antena
exterior.
Antena interior-FM
Oriente la antena interior-FM de tal manera que consiga
una buena recepción. Los terminales del cable se tienen
que jar de tal manera que sean doblados lo menos
posible.
Conexión antena interior-FM
1. Abra el sujetacables presionando la presilla.
2. Introduzca el terminal del cable.
3. Suelte la presilla y supervise, si el cable está bien
sujetado en la presilla.
Conexión antena de cuadro-AM
1. Mantenga la presilla presionada
2. Introducir el terminal del cable en el agujero
3. Soltar la presilla
4. Orientar la antena
66
05-DVD 628_E 66 30.08.2004, 15:42:51 Uhr
Page 67

TOMA DE CORRIENTE
ESPAÑOL
Antes de introducir el cable eléctrico en la caja de enchufe, tiene que supervisar de nuevo y de forma exacta
todas las conexiones. A continuación se introducirá con
cuidado el cable eléctrico en la caja de enchufe.
FUNCIONES BÁSICAS
Selección de la fuente de sonido
1. Presione la correspondiente tecla de función (DVD,
AM/FM, AUX1, AUX2), para seleccionar la fuente de
sonido deseada.
2. Si se presione la tecla AM/FM, se reproducirá el
canal, que haya sido escuchado por último.
Presione la tecla POWER en la parte frontal del aparato,
para conectar el aparato. La indicación se ilumina. Al
conectar el aparato puede ocurrir que, causada por una
breve sacudida eléctrica, se originen perturbaciones con
otros aparatos electrónicos que estén conectados al
mismo circuito eléctrico. En este caso debería conectar
el aparato en otra caja de enchufe con otro circuito
eléctrico.
Regulación del volumen
El volumen se puede regular girando el botón de volumen grande en la parte frontal de aparato o accionando
la tecla correspondiente en el mando a distancia.
Mute (Tecla de supresión)
Presionando la tecla-MUTE se suprime de forma temporal el sonido de los altavoces. Presionando de nuevo
la tecla, se volverá a obtener la reproducción normal de
audio.
67
05-DVD 628_E 67 30.08.2004, 15:42:52 Uhr
Page 68

ESPAÑOL
FUNCIONAMIENTO DE RADIO
Ajustar los emisores
1. Presione la tecla-TUNER para seleccionar la gama
de frecuencia deseada (AM o FM).
2. Con ayuda de la tecla-UP o -DOWN puede buscar el
emisor (anteriormente se tiene que ajustar mediante
la tecla-PRE/TUN el display a la frecuencia de emisión). Cada vez que presione de nuevo, se cambiará
la frecuencia. En el momento que se reciba la señal
del emisor, aparecerá éste en el display.
3. Para encontrar más rápido el emisor, presione
la tecla-UP o –DOWN durante dos segundos. El
aparato iniciará una búsqueda acelarada automática.
En el momento que se haya encontrado un emisor, la
búsqueda acelarada automática se parará.
4. Para grabar un emisor, presione la tecla-MEMO.
En el display aparecerá durante cuatro segundos el
número de memoria. Presionando de nuevo la teclaMEMO se grabará el emisor.
Número de memoria
Banda de frecuencia Frecuencia de emisión
Búsqueda acelerada automática
El aparato puede grabar hasta 50 diferentes emisores de
radio-AM/FM.
1. Presione la tecla-AUTO. La palabra AUTO aparecerá
en el display y la búsqueda acelerada automática se
iniciará.
2. Se grabarán los emisores en orden ascedente. Se
grabarán hasta 50 emisores. En el momento que se
grabe un emisor, aparecerá durante 4 segundos el
número de memoria y la frecuencia de emisión en el
display.
3. En el momento que se hayan grabado los 50 emisores (AM o FM), no se podrán grabar más emisores.
Reproducir emisores preajustados
1. Presione la tecla-TUNER para seleccionar la banda
de frecuencia deseada.
2. A continuación presione la tecla-PRE/TUN, para
mostar la estación de memoria en el display.
3.
Con ayuda de las teclas numéricas puede elegir el
número de memoria del emisor deseado. Ejemplo:
Para reproducir el emisor grabado bajo el número #5,
presione simplemente la tecla numérica 5; obtendrá
el emisor #17, si presiona la tecla numérica 1 seguida
de la tecla numérica 7.
4. También se podrán acceder a los emisores grabados
con ayuda de la función de memoria, presionando la
tecla-UP o –DOWN.
5. Para reducir ruidos molestos durante la recepción
de un programa FM en estéreo, presione la tecla
-FM/Mode. La palabra STEREO no aparecerá en el
display. El programa se reproducirá ahora en MONO
para minimizar los ruidos. Para volver a la reproducción en estéreo, presione de nuevo la tecla-FM.
68
05-DVD 628_E 68 30.08.2004, 15:42:52 Uhr
Page 69

FUNCIONAMIENTO DVD
En el momento que haya conectado su aparato a un
televisor o a otro aparato adicional, podrá disfrutar de
sus DVDs, así como de sus discos compactos favoritos
y de sus archivos-MP3.
Reproducción de un disco DVD-Video
Encienda el televisor y elija el modo-A/V. En caso de que
su televisor disponga de un scart, tiene que ser elegido
el modo-SCART en el menú de televisión. Encienda el
amplifi cador –en caso de que esté conectado-. Elija el
modo-AC-3 o DVD.
Reproducción de un disco-Audio
Ajuste el sistema-Audio y elija la fuente de entrada que
está conectada al reproductor-DVD. En caso de que no
tuviese el equipo adecuado para un sonido envolvente
Dolby Digital, debe cambiar en el menú-SETUP el ajuste
salida analógica a 2.1.
1. Presione la tecla-POWER en el panel frontal. En el
display aparecerá la notifi cación DISC LOADING
(cargar disco).
5. En el momento que se haya registrado el disco,
comenzará el aparato con la reproducción. Al
reproducirse un DVD aparecerá el título del DVD es
decir el menú. Los títulos de un disco compacto se
reproducirán uno detrás del otro.
Nota:
• Se puede dañar el disco, si no está colocado de
forma correcta en el portadisco. También puede
originar una función errónea en el reproductor-DVD.
Solamente coloque en el portadisco DVDs o CDs de
12cm o 8cm.
• El movimiento del reproductor-DVD durante la
reproducción, puede originar daños en el disco como
en el reproductor. Para abrir o cerrar el portadisco
solamente se debe accionar la tecla-OPEN/CLOSE
del mando a distancia o del panel frontal de aparato.
Presione la tecla-PAUSE.
ESPAÑOL
En caso de que no haya ningún disco en el portadisco,
aparecerá en la pantalla a notifi cación: NO DISC (ningún
disco).
2. Presione la tecla-OPEN/CLOSE. Se abrirá el portadisco.
3. Coloque un disco en el portadisco. Tenga atención
que se coloque el CD/DVD con la cara a reproducir
hacia abajo.
6. Reproducción PREV/NEXT.
Presione la tecla I왗왗 o 왘왘I para reproducir el título
anterior o próximo. Presionando la tecla-PLAY se volverá
a la reproducción normal.
Presione la tecla-PREV.
Presione la tecla-NEXT.
4. Presione de nuevo la tecla-OPEN/CLOSE, para
cerrar el portadisco. Después de cerrar el portadisco,
aparecerá el tipo de disco en la esquina izquierda de
la parte superior de la pantalla.
05-DVD 628_E 69 30.08.2004, 15:42:53 Uhr
7. Avance y retroceso acelerado (Fast Forward/
Reverse). El aparato dispone de un avance como de
un retroceso acelerado con siguiente aceleración: 2x,
4x, 8x, 16x.
69
Page 70

FUNCIONAMIENTO DVD
FUNCIONES
Visualización de pantalla
ESPAÑOL
Para activar esta función, solamente tiene que presionar
sobre la tecla 왘왘 o 왗왗 del mando a distancia. Con cada
pulsación de la tecla, se acelerará la velocidad. Presione
la tecla-PLAY, para retornar a la reproducción normal.
Reproducción-Memory
El aparato le posibilita parar la reproducción y poder
continuar más tarde en este mismo punto. Presione
la tecla-STOP para interrumpir la reproducción. El
aparato memoriza el punto, en él que ha sido parada la
reproducción. Presione la tecla-RESUME o PLAY para
continuar con la reproducción en el punto donde ha sido
parada por usted (no es válido para MP3).
Durante la reproducción de un disco, se puede llamar el
estado de diferentes funciones como p.ej. título, número
de título así como diferentes duraciones de reproducción.
1. Si presiona una vez la tecla-DISPLAY, aparecerá el
título, el capítulo así como el tiempo transcurrido de
reproducción.
2. Presionando de nuevo la tecla-DISPLAY en VCDs
aparecerá el tiempo restante de reproducción del
título reproducido.
Reproducción en cronolupa
Este reproductor-DVD le ofrece la posibilidad de
reproducir discos en cronolupa. Presionando de forma
repetida la tecla-SLOW, se ralentiza la velocidad por 1/2,
1/4, 1/8, 1/16. Presione la tecla-Play, para retornar a la
reproducción normal.
3. Presionando de nuevo la tecla-DISPLAY en DVDs
aparecerá el tiempo ya transcurrido del capítulo.
4. Presionando de nuevo la tecla-DISPLAY desaparecerá la indicación.
70
05-DVD 628_E 70 30.08.2004, 15:42:54 Uhr
Page 71

FUNCIONES
N/P
Este reproductor-DVD soporta salidas de video de
diferentes normas, como pueden ser entre otras Auto,
NTSC y PAL.
En caso de que se haya elegido la norma errónea, la
imagen empezará a parpadear y se quedará sin color.
En caso de que esto ocurriese, tiene que presionar la
tecla-N/P (en el modo Stopp) en el mando a distancia y
elegir la norma correcta (NTSC para América del Norte,
PAL para Europa). Más información referente al formato
de salida se podrá extraer del manual de instrucciones
de su televisor.
Subtítulo
Con este aparato tiene la posibilidad de ajustar hasta
32 diferentes idiomas para el subtítulo (dependiendo del
disco introducido).
1. Presione la tecla-SUBTITLE tantas veces hasta que
aparezca el idioma deseado.
Idiomas
Existe la posibilidad de mostrar películas en 8 diferentes
idiomas (dependiendo del disco introducido).
1. Presione la tecla-LANGUAGE tantas veces, hasta
que aparezca el idioma deseado.
Nota:
El disco introducido tiene que disponer sobre la función
de idiomas.
Selección de título
Por lo general están los discos DVD divididos en títulos y
estos a su vez están divididos en capítulos. Este aparato
le posibilita elegir un título determinado para su reproducción. Si el DVD dispone de un menú de título, se
podrá elegir un título determinado mediante esta función
o mediante las teclas numéricas.
ESPAÑOL
2. Para suprimir los subtítulos, presione la tecla-SUBTITLE hasta que desaparezca el subtítulo.
Nota:
El disco introducido tiene que disponer sobre la función
de subtítulo.
Angulos de cámara
Existe la posibilidad de ajustar diferentes ángulos de
cámara.
1. Presione la tecla-ANGLE en el mando a distancia.
Presionando varias veces la tecla-ANGLE se cambiará la perspectiva de cámara cada vez de nuevo.
2. Solamente podrá accionar la tecla-ANGLE, si el
símbolo de ángulo se ilumina en la pantalla.
Función menú de título
1. Presione la tecla-TITLE. En la pantalla del televisor
aparecerá un menú de título.
2. Presione la tecla de navegación correspondiente,
para elegir el título deseado. También se puede
seleccionar un título a través de las teclas numéricas,
presionando el número de título correspondiente.
3. Presione la tecla-ENTER. Se iniciará la reproducción
a partir del capítulo 1 del título seleccionado.
Nota:
Algunos discos no disponen de esta función. En caso de
que sea necesario, atienda a las instrucciones que aparezcan en la pantalla. En este manual sólo se describe el
procedimiento fundamental. Dependiendo del contenido,
puede cambiar el procedimiento. Si reproduce un VCD
2.0 por ejemplo, tiene la tecla-TITLE la función de volver
al menú.
PROLOGIC SELECTOR
Presione en el modo Stopp la tecla-PROLOGIC, para
poder elegir PROLOGIC ON o OFF.
Nota:
El disco introducido tiene que disponer sobre la función
de ángulo de cámara.
71
05-DVD 628_E 71 30.08.2004, 15:42:55 Uhr
Page 72

FUNCIONES
Función-TIME
Si presiona durante la reproducción la tecla-TIME,
ESPAÑOL
se abrirá el menú de búsqueda. En la fi la hora podrá
introducir con las teclas numéricas un objeto de búsqueda en el formato HH:MM :SS (H=Horas, M=Minutos,
S=Segundos). Presione ahora la tecla-ENTER. La
reproducción se iniciará a partir del momento elegido.
En la fi la título/capítulo puede introducir con las teclas
numéricas un objeto de búsqueda concreto según título
y capítulo. Con la tecla-ENTER iniciará la reproducción.
Poner marcador
Si no se inserta nada en el menú de búsqueda, sino
se presiona una segunda vez la tecla-TIME, aparecerá
el menú marcador. Aquí debe elegir con las teclas de
fl echa (1,2 o 3) el número de marcador, donde quiera poner su marcador y presionar la tecla-ENTER para grabar
la duración de reproducción. Se puede poner hasta tres
diferentes marcadores.
Reproducción de un marcador puesto
1. Presione dos veces la tecla-TIME.
2. Elija con las teclas de fl echa el marcador deseado,
de donde quiera que se inicie la reproducción y
presione la tecla-ENTER.
2. Presione la tecla-A-B durante la reproducción del
disco, para determinar el punto B (punto fi nal). La
sección entre A y B se reproducirá otra vez.
3. Presione la tecla-A-B por tercera vez, para borrar la
insertación.
Repetición múltiple
Puede repetir la reproducción de determinados títulos,
capítulos/títulos o segmentos de forma múltiple. Incluso
es posible conmutar entre dos reproducciones que se
están reproduciendo por repetida vez.
1. Elija el título, capítulo etc. que quiera que sea repetido.
2. Presione la tecla-REPEAT.
Nota: Todos los marcadores serán eliminados al
desconectar el aparato o al retirar el disco.
MENU/PBC
Si la función-PBC está conectada, solamente se podrá
seleccionar un título de CD a través del menú principal. Si la función-PBC está desconectada, se podrá
seleccionar un título introduciendo la tecla numérica
correspondiente. En el momento que mantenga la teclaMENU presionada durante la reproducción, aparecerá el
contenido de menú del disco.
Repetición-A-B
La repetición-A-B le posibilita durante la reproducción
de un DVD, repetir la reproducción de una sección entre
dos puntos determinados (A y B).
1. Presione la tecla-A-B durante la reproducción del
disco, para determinar el punto A (punto inicial).
El modo de repetición se cambia cada vez que presione
la tecla-REPEAT (p.ej. repetición de título, repetición de
capítulo, repetir todo, desconectar modo de repetición).
Al reproducir un CD, aparecerá después de presionar
la tecla-REPEAT siguiente indicación: TRACK ALL y
REPEAT OFF (repetir todos los títulos y desconectar el
modo de repetición).
Al reproducir un MP3 se puede elegir entre siguientes
modos al haber presionado la tecla-REPEAT: Single,
Repeat one, Repeat Folder, Folder.
72
05-DVD 628_E 72 30.08.2004, 15:42:56 Uhr
Page 73

FUNCIONES
Zoom
Con ayuda de la función-ZOOM se puede ampliar una
imagen hasta tres veces, durante la reproducción normal
o durante la reproducción de cronolupa. Si presiona
una vez la tecla-ZOOM se agrandará la imagen por
dos veces, al presionar por segunda vez la tecla, se
agrandará la imagen por tres veces y al presionar una
tercera vez el aumento será por cuatro veces. Para retornar de nuevo a la reproducción normal, debe presionar la
tecla-ZOOM una cuarta vez.
Volumen de canal (CH.SET)
Al reproducir un DVD puede ajustar el volumen de canal,
presionando esta tecla y la tecla-VOLUME.
SYSTEM-SETUP (AJUSTES DE FUNCIÓN)
Volume y Mute (Volumen y supresión del sonido)
El volumen se puede regular simplemente a través
del mando a distancia. Presione la tecla VOL+, para
aumentar el volumen o la tecla VOL-, para reducir el volumen. Para suprimir el sonido, presione la tecla-MUTE.
Presionando de nuevo la tecla-MUTE se desactivará la
supresión de sonido.
Program (Programación)
Puede reproducir determinados títulos en un orden
deseado. Si presiona la tecla-PROG, aparecerá el menúPROGRAM en la pantalla. Con ayuda de las teclas numéricas podra insertar los títulos deseados. Presione la
tecla-ENTER, para reproducir el programa programado.
Para abandonar la reproducción programada, presione
de nuevo la tecla-PROG.
ESPAÑOL
En el momento que haya presionado SETUP en el modoStopp, aparecerá en la pantalla siguiente menú-Setup:
Presione ▲▼ para
conmutar entre los
diferentes puntos de
menú.
A. Presione ENTER, para mostar los submenús.
B. Presione SETUP, para abandonar el menú-SETUP.
Setup-Idiomas (Language Setup)
Elija (Language) del menú-Setup y presione a continuación la tecla-ENTER, para mostrar el submenú-(Language):
A. Presione para el ajuste ENTER o
B. Presione
C. Presione 왗 o ▲ varias veces, para retornar al menú-
Setup.
Elija (OSD Menu) y presione a continuación la tecla-ENTER o ►, para mostrar el submenú (OSD-Menu):
A. Para la con rmación, presione ENTER.
B. Para abandonar el menú, presione SETUP.
왗 para saltar al menú anterior.
►
Presione ▲▼ para
cambiar su selección.
Presione ▲▼ para
cambiar el punto de
menú.
73
05-DVD 628_E 73 30.08.2004, 15:42:57 Uhr
Page 74

SYSTEM-SETUP (AJUSTES DE FUNCIÓN)
Elija (Subtitle) y presione a continuación la tecla-ENTER
o ►, para mostrar el submenú (Subtitle):
ESPAÑOL
A. Para la confi rmación, presione ENTER.
B. Para abandonar el menú, presione SETUP.
Elija (Audio) y presione a continuación la tecla-ENTER o
►, para mostrar el submenú (Audio):
Presione ▲▼ para
cambiar su selección.
Nota: Los idiomas de
subtítulo varian dependiendo del disco.
Presione ▲▼ para
cambiar su selección.
Nota: Los idiomas-audio varian dependiendo
del disco.
Video Setup
Elija (Video) del menú-Setup y presione a continuación
la tecla-ENTER para mostrar el submenú (Video):
Presione ▲▼ para seleccionar el punto del menú.
A. Para la con rmación, presione ENTER.
B. Para abandonar el menú, presione SETUP.
Elija (TV Shape) y presione a continuación la tecla-ENTER o ►, para mostrar el submenú (TV Shape):
Presione ▲▼ para cambiar su selección.
A. Para la con rmación, presione ENTER.
B. Para abandonar el menú, presione SETUP.
Elija (DVD Menu) y presione a continuación la
tecla-ENTER o ►, para mostrar el submenú (DVD
Menu):
Presione ▲▼ para
cambiar su selección.
Nota: Los idiomas del
menú varian dependiendo del disco.
A. Para la con rmación, presione ENTER.
B. Para abandonar el menú, presione SETUP.
A. Para la confi rmación, presione ENTER.
B. Para abandonar el menú, presione SETUP.
(4:3) Pan & Scan se refi ere a una reproducción de
imagen que en parte está incompleta. Con Pan &
Scan se rellenará la pantalla completa.
(4:3LB) Letter Box se refi ere a una reproducción de
imagen en la cual se mostrarán barras negras en la
parte inferior y superior de la pantalla.
(16:9) La imagen rellena la pantalla de un televisor
16:9 (Wide screen).
Nota: No todos los DVDs ofrecen la reproducción de
imagen en un formato Full-Screen (Pantalla completa).
Si esto no es el caso, el disco se saltará el ajuste de la
indicación televisiva y reproducirá la película en formato
Letter-Box.
Elija (TV-System) y presione a continuación la tecla-ENTER o ►, para mostrar el submenú (TV-System):
Presione ▲▼ para cambiar su selección.
A. Para la confi rmación, presione ENTER.
B. Para abandonar el menú, presione SETUP.
(NTSC): Elija NTSC en caso de que tenga ajustado
en su televisor el sistema de señal NTSC.
(PAL): Elija PAL en caso de que tenga ajustado en su
televisor el sistema de señal PAL.
(AUTO): Elija AUTO en caso de que tenga ajustado
en su televisor el sistema de señal AUTO.
74
05-DVD 628_E 74 30.08.2004, 15:42:58 Uhr
Page 75

SYSTEM-SETUP (AJUSTES DE FUNCIÓN)
Elija (Video Output) y presione a continuación la teclaENTER o ►, para mostrar el submenú (Video Output):
A. Para la confi rmación, presione ENTER.
B. Para abandonar el menú, presione SETUP.
Nota: La salida S-Video y la salida Composite Video
están siempre disponibles.
(S-Video): Elija S-Video en caso de que tenga
conectado su reproductor-DVD a través de la salidaComposite en su televisor.
(YUV): Elija YUV en caso de que su reproductor-DVD
esté conectado a través del output-YUV en el televisor.
(Y Pb Pr) : Elija esta opción si el reproductor-DVD en
el televisor está en uso con progressive scan.
Presione ▲▼ para seleccionar el punto del menú.
Nota: Si ha elegido el punto de menú YPbPr y su
aparato no dispone sobre Progressiv Scan, solamente
verá una pantalla negra. Para salir de este ajuste, se
ruega leer en el apartado .Reparación de fallos. el punto
"Ninguna imagen".
Audio-setup
Con ayuda del menú-Audio podrá ajustar tanto salidas
audio analógicas como digitales en correspondencia a
los aparatos externos conectados a su reproductor. Si
tiene el reproductor p.ej. conectado con el televisor a través de una clavija-audio-estéreo, debería ajustar Dolby
Digital y otros ajustes a 2-canal, para obtener un óptimo
sonido estéreo.
• Puede ajustar el formato audio entre otras para todas
las fuentes que a continuación se detallan: Dolby
Digital, MP3, CD etc.
• Se tiene que parar la reproducción DVD para poder
ajustar los ajustes-audio.
E.
PCM (preajustado): Para la reproducción de un sonido digital 2-Canal a través de salidas Digital-Audio
ópticas/coaxiales, p.ej. en una grabadora minidisquete.
RAW : Para la reproducción del bitstream digital 5.1
Canal a través de salidas Digital-Audio ópticas/
coaxiales, p.ej. en amplifi cadores externos con un
decodifi cador Dolby Digital.Bitstreams via optisch/
coaxiale digitaal-audio-uitgangen, bijv. bij een exter-
ne versterker met een Dolby Digital Decoder.
OFF : om de Dolby Digital Decoder te deactiveren.
F. Presione SETUP para grabar y abandonar el menú.
• PCM signifi ca Pulse Code Modulation y es un
formato estándar 2-Canal-Estéreo que se utiliza para
discos compactos audio.
Ajuste MP3
Pase los siguientes puntos uno por uno para ajustar el
formato-audio-digital de títulos MP3 (Nota : El formato
analógico está determinado en canal-2):
A. Presione en el modo-Audio SETUP.
B. Elija el modo-Audio y presione ENTER.
C. Elija MP3 y presione ENTER.
D. Ajuste la salida-digital: PCM (preajustado): Para la
reproducción de un sonido digital 2-Canal a través
de salidas Digital-Audio ópticas/coaxiales, p.ej. en
una grabadora minidisquete. OFF : Para desactivar el
decodifi cador Dolby Digital.
E. Presione SETUP para grabar y abandonar el menú.
ESPAÑOL
Ajuste-AC-3
Pase los siguientes puntos uno por uno para ajustar
formatos audio analógicos y digitales para soundtracks
Dolby Digital 5.1:
A. Presione en el modo-Stopp SETUP.
B. Elija AUDIO y presione ENTER.
C. Elija AC3 y presione ENTER.
D. Ajustar la salida-analógica:
6-Canal (preajustado): Para la reproducción de un
sonido audio Dolby Digital 5.1 Canal a través de
las salidas audio analógicas 5.1 Canal, p.ej. en un
amplifi cador 5.1 Canal.
2-Canal: Para la reproducción de un sonido estéreo
2-Canal a través de las salidas Stereo-Audio, p.ej.
en VCR o TV.
75
05-DVD 628_E 75 30.08.2004, 15:42:59 Uhr
Page 76

SYSTEM-SETUP (AJUSTES DE FUNCIÓN)
Otros ajustes
Pase los siguientes puntos uno por uno para ajustar
formatos audio analógicos y digitales de otros títulos:
A. Presione en el modo-Stopp SETUP.
ESPAÑOL
B. Elija AUDIO y presione ENTER.
C. Elija Andere y presione ENTER.
D. Ajustar la salida-analógica:
2-Canal (preajustado): Para la reproducción de un
sonido estéreo 2-Canal a través de las salidas Ste-
reo-Audio, p.ej. en VCR o TV.
E. Ajuste la salida-digital (de la salida óptica):
PCM (preajustado): Para la reproducción de un so-
nido digital 2-Canal a través de salidas Digital-Audio
ópticas/coaxiales, p.ej. en una grabadora minidis-
quete.
OFF: Para desactivar la salida audio “CD Others”.
F. Presione SETUP para grabar y abandonar el menú.
Más ajustes audio (More Audio)
El menú-Audio contiene adicionalmente ajustes de
Prologic y de Subwoofer.
Ajuste-Prologic
El reproductor-DVD tiene un decodifi cador Dolby-Prologic integrado, para producir un virtual sonido envolvente
5.1-Canal para fuentes PCM (estéreo):
A. Presione en el modo-Stopp SETUP.
B. Elija “MORE AUDIO” y presione ENTER.
C. Elija Prologic y presione ENTER.
D. Elija el ajuste-Prologic deseado y presione ENTER.
On: Todos los títulos audio serán reproducidos en el
modo Dolby-Prologic.
Off: (preajustado): La decodifi cación Dolby-Prologic
está siempre desactivada.
E. Presione SETUP para grabar y abandonar el menú.
Ajuste-Subwoofer
Tiene que indicar en el sistema menú, si su Setup-Audio
dispone de un altavoz de bajos cúbico (subwoofer) o no.
A. Presione en el modo-Stopp SETUP.
B. Elija “MORE AUDIO” y presione ENTER.
C. Elija Subwoofer y presione ENTER.
D. Elija el ajuste-Subwoofer deseado y presione ENTER.
On (preajustado): Indica que está utilizando un sub-
woofer para señales-LFE (efectos de baja frecuencia).
E. Presione SETUP para grabar y abandonar el menú.
76
05-DVD 628_E 76 30.08.2004, 15:43:00 Uhr
Page 77

SYSTEM-SETUP (AJUSTES DE FUNCIÓN)
Ajuste-Pink-Noise (Ruido rosa)
En el ajuste Pink-Noise está desconectado (Off) el tono
de prueba y se puede seleccionar los diferentes canales
y realizar pruebas (LEFT, CENTER, RIGHT, RIGHT SURROUND y LEFT SURROUND).
A. Presione en el modo-Stopp SETUP.
B. Elija “MORE AUDIO” y presione ENTER.
C. Elija “Pink Noise” y presione ENTER.
D. Elija el ajuste-Pink-Noise deseado y presione ENTER.
Aqui se pueden realizar pruebas de los respectivos
canales arriba indicados.
E. Presione SETUP para grabar y abandonar el menú.
Ajuste-DRC
DRC signifi ca Dynamic Range Control (Adaptación
dinámica).
A. Presione en el modo-Stopp SETUP.
B. Elija “MORE AUDIO” y presione ENTER.
C. Elija DRC y presione ENTER.
D. Elija el ajuste-DRC deseado y presione ENTER. Elija
entre OFF o ON.
E. Presione SETUP para grabar y abandonar el menú.
Ajuste-RATING (Clasifi cación de lectura)
El menú-Rating posibilita, bloquear la reproducción de un
DVD a razón del ajuste-Rating.
Ajustar contraseña y nivel-Rating
El reproductor-DVD la facilita poder bloquear la reproducción de contenidos inadecuados con un sistemaRating que funciona con una contraseña (no todos los
discos disponen sobre esta función).
A. Presione en el modo-Stopp SETUP.
B. Elija “RATING (lectura)” y presione ENTER.
C. Elija el ajsute “RATING (bloqueo)” y presione ENTER
hasta que se haya ajustado el nivel de bloqueo
deseado, de 1 (mayor limitación) hasta 8 (menor
limitación).
En caso de que ya se haya introducido una
contraseña, aparecerá el símbolo de bloqueo. No
podrá seleccionar ningún Rating, hasta que no haya
seleccionado la contraseña correcta con ayuda de
las teclas 0-9.
D. Seleccionar una contraseña.
E. Con ayuda de las teclas 0-9 puede seleccionar una
contraseña de 4 dígitos. A continuación presione
la tecla-ENTER. Habrá introducido la contraseña
correcta, en el momento que desaparezca el símbolo
de bloqueo.
F. Presione SETUP para grabar y abandonar el menú.
ESPAÑOL
Ajuste-LPCM 48k DS
A. Presione en el modo-Stopp SETUP.
B. Elija “MORE AUDIO” y presione ENTER.
C. Elija “LPCM 48k DS” y presione ENTER.
D. Elija el ajuste-LPCM 48k DS deseado y presione
ENTER.
OFF: LPCM 48k
ON: LPCM 96k.
E. Presione SETUP para grabar y abandonar el menú.
No todos los DVDs están clasifi cados según este sistema. DVDs que se hayan clasifi cado en un nivel más alto
del que usted ha elegido, solamente se podrán reproducir al introducir la contraseña correcta.
En caso de que haya olvidado su contraseña-Rating,
podrá borrar la memoria con 0000. La contraseña no debería ser accesible para niños, ya que suprimiría el ajuste
de bloqueo de los padres (PARENTAL LOCK).
77
05-DVD 628_E 77 30.08.2004, 15:43:01 Uhr
Page 78

FUNCIONES MP3
Qué es MP3
MP3 es un modo de compresión audio que utiliza el nivel
3 del estándar MPEG que tiene validez internacional. En
este caso la señal audio está comprimida 12:1. Un disco
ESPAÑOL
MP3 puede grabar música durante más de 600 minutos,
es decir grabar más de 170 títulos.
Reproducir MP3
Menú de archivo para la reproducción MP3
POSIBILIDADES PARA LA
REPARACIÓN DE FALLOS
Si al poner el reproductor-DVD en marcha se produciesen algunos fallos, puede aplicar para su reparación uno
de los métodos indicados.
Problema
Posible reparación
No hay corriente
1. Supervise si la clavija de la red está bien introducida
en la caja de enchufe.
Para la reproducción de un disco MP3 se pueden elegir
dos menús de archivo: “FILE LIST (Lista de archivo),
FOLDER (archivador)”. Para ello presione la tecla-PROG.
1. FILE LIST
Aquí se pueden seleccionar los archivos que se
quieran reproducir con las teclas de fl echa-UP/
DOWN en combinación con la tecla-ENTER. Los archivos también se pueden seleccionar con ayuda de
las teclas numéricas y presionando a continuación la
tecla-ENTER.
2. FOLDER
Aquí se mostrará primero el menú y a continuación
podrá con ayuda de las teclas de fl echa (arriba, abajo, derecha, izquierda) y la tecla-ENTER seleccionar
un subdirectorio.
ARCHIVOS JPEG
JPEG es la norma de formato más difundida en respecto
a la compresión de archivos de imagen fi ja. Incluso cuando las imágenes están comprimidas de 15 a 20 veces
más, la calidad de reproducción es buena. Casi todos
los programas de procesamiento de imagen soportan
JPEG. Es el formato idóneo para la grabación de imágenes y muy fácil de usar. Este aparato realiza la lectura
de archivos de pintura que hayan sido elaborados en
formato-JPEG.
1. En el momento que introduzca el disco compacto se
iniciará la búsqueda de la información de disco.
2. Presione la tecla numérica, para elegir una imagen.
3. Dependiendo de la imagen que quiera seleccionar,
será usted más rápido con la tecla númerica o con la
tecla de fl echa.
Selección a través de menú
1. En el momento que introduzca el disco compacto
se iniciará la búsqueda de la información de disco y
el menú principal aparecerá en la pantalla. Presione
la tecla numérica 1, para llamar la primera imagen y
confi rme con la tecla-PLAY.
2. Con ayuda de las teclas de fl echa puede seleccionar
una imagen. Confi rme a continuación con la teclaPLAY.
3. En el modo-Stopp puede seleccionar más imágenes
con las teclas de fl echa.
4. Si seleccione la primera fi la a la derecha en el modoStopp, puede, presionando la tecla-PLAY, retornar a
la parte superior del menú.
No hay sonido
1. Supervise la conexión entre reproductor-DVD y
televisor, es decir con todos los demás aparatos
conectados.
2. Supervise si en el televisor como en el amplifi cador
está ajustado el mismo modo.
Altavoz envolvente distorsionado
Supervise el medio. En VCD es decir S-VCDs puede
ocurrir, dependiendo de la aplicación del soporte lógico
del usuario, que la codifi cación de las señales de fondo
estén defectuosas.
Funcionamiento de radio: Indicación-RDS La indicación
se va y viene.
En condiciones de recepción críticas la indicación-RDS
con la indicación de frecuencia se va y viene. Esto no es
ningún defecto.
No hay imagen
1. Supervise la conexión entre reproductor-DVD y
televisor, es decir con todos los demás aparatos
conectados.
2. Supervise si el televisor está conectado.
3. Si ha elegido Progressiv Scan aunque su televisor no
lo soporta, proceda de siguiente manera:
1. Desconecte el aparato con el conmutador de
alimentación para aprox. 10 segundos.
2. Conecte el aparato y espere hasta que haya
fi nalizado el procedimiento de lectura.
3. Presione la tecla “SETUP”.
4. Presione 1x la tecla “derecha”
5. Presione la tecla “ENTER”
6. Presione 2x tecla “hacia abajo”
7. Presione la tecla “ENTER”
8. Presione 3x la tecla “hacia arriba”
9. Presione la tecla “ENTER”
10. Presione la tecla “SETUP” para abandonar el
menú que está ahora de nuevo visible.
La reproducción de disco no funciona
1. Asegúrese que el disco compacto está colocado con
la etiqueta hacia arriba.
2. Asegúrese que el disco está limpio. No debe tener
polvo, suciedad ni huellas dactilares.
3. Supervise si el disco está bien colocado en el portadisco.
4. Supervise si el bloqueo de los padres (Parental lock)
está conectado.
5. Supervise si su disco está destinado para su región.
78
05-DVD 628_E 78 30.08.2004, 15:43:02 Uhr
Page 79

POSIBILIDADES PARA LA
REPARACIÓN DE FALLOS
No funciona el mando a distancia
1. Supervise las pilas y en caso de que sea necesario
recambie éstas.
2. Supervise que no haya ningún objeto que estorbe
entre el sensor del televisor que se encuentra en la
parte frontal del aparato y el mando a distancia.
3. El mando a distancia se tiene que orientar en dirección del sensor del aparato.
La imagen está deformada
1. Supervise si el disco está limpio y si no tiene rayaduras.
No hay imagen de color
1. Supervise si el conectador-S está estropeado (Pin
doblado).
No se reproduce el disco MP3
1. Utilice otro soporte lógico, para grabar el disco, ya
que posiblemente la versión del soporte lógico que
está utilizando no es compatible con el reproductorDVD.
2. Utilice una versión de soporte lógico más nueva,
como p.ej. Audiostation 4, Easy CD Creator, To ast
Titanium, etc..
3. Asegúrese que el archivo MP3 no haya sido codifi cado con un juego de bitios variable (p.ej. de Real
Networks).
Nota: La reproducción de CD/DVD elaborados en otro
lugar no se puede garantizar, ya que existe múltiple de
variedad de soporte lógico como de medios CD/DVD.
DATOS TÉCNICOS
Reproductor DVD
Normas televisivas NTSC/PAL/AUTO
Tipo de discos compatibles DVD, CD, MP3
CD-R, CD-RW
Resolución > 500 líneas
Video S/N Ratio 65 db
Gama de frecuencias fs (96 KHz/24 bit)
4 Hz-44 Hz: +/- 2 db
Audio S/N Ratio 95 db
Grado de distorsión < 0,01%
D/A-Transformador 192 KHz/24 bit
Salida de vídeo 1 Vp-p
Salida de vídeo-S Y: 1 Vp-p (75Ω )
Salida de audio 2,0 V/+/- 9V
5.1 Kanal
Salida de audio digital Optico, Coaxial
Conexiones YUV, Scart, CVBS, S-video
2 salida de canal
FM-Tuner
Gama de sintonización 87,5-108 MHz
S/N Ratio Y 46 db
Mono > 46 db
Stereo > 50 db (DIN)
Selectividad 50 db THD
Mono 2%
Stereo 3%
Gama de frecuencias 30 Hz-10 kHz +/- 1 db
Selectividad estereo 30 db (100 Hz-10 kHz)
AM-Tuner
Gama de sintonización 522-1620 kHz
S/N Ratio 35 db
THD 3%
Amplifi cador
Potencia de salida limitada en distorsión
Altavoz principal 40W + 40W PMPO
Altavoz envolvente 40W + 40W PMPO
Altavoz central 40W PMPO
Altavoz de bajos cúbico 150W PMPO
Gama de frecuencias
Altavoz principal 200 Hz-20 kHz +7- 3 db
Altavoz envolvente 200 Hz-20 kHz +/- 3 db
Altavoz central 200 Hz-20 kHz +/- 3 db
Altavoz de bajos cúbico 20 Hz-200 Hz +/- 3 db
S/N Ratio > 76 db
Sensibilidad de entrada 350 mv, 47 k
Selectividad de canal > 30 db (normal)
Mando a distancia
Transmisor Rayo infrarrojo
Àrea de señal ca. 7 m
Fuente de energía Pilas 2 AAA
Generalidades
Alimentación de corriente AC 230 V-50 Hz
Consumo de corriente 60W
ESPAÑOL
Dado que el aparato está sometido a continuas mejoras,
nos reservamos el derecho de cambiar el diseño del
producto como sus especifi caciones sin tener que
comunicarlo con anterioridad.
79
05-DVD 628_E 79 30.08.2004, 15:43:02 Uhr
Page 80

GARANTÍA
Para el aparato comercializado por nosotros nos responsabilizamos con una garantía de 24 meses a partir de la
fecha de compra (factura de compra).
ESPAÑOL
Durante el período de garantía nos encargamos gratuítamente de los defectos del aparato y de los accesorios*),
que se hayan originado por defectos del material o de
la fabricación. Dependiendo de nuestra estimación se
realizará una reparación o un cambio. ¡Los servicios de
garantía no prolangan la garantía, ni se incia por ello un
período nuevo de garantía!
Como comprobante para la garantía es válido la factura
de compra. Sin este comprobante no se podrá realizar
un cambio o una reparación gratuíta.
En el caso de garantía lleve el aparato base en el embalaje original y la factura de compra a su concesionario.
*)Los accesorios se someten a la obligación legal de
cambio (6 meses) y no conllevan al cambio gratuíto del
aparato entero.¡En este caso no se debería envíar el
aparato entero, sino, trás ponerse en contacto con su
concesionario, solamente enviar o pedir el accesorio
defecto! ¡Respecto a roturas de cristal no se hará cargo
el fabricante !
Defectos en los accesorios de uso o en las piezas de
desgaste (p.ej. escobillas de carbón del motor, varillas
amasadoras, correas de transmisión, mando a distancia
de repuesto, cepillos de dientes de repuesto, hojas de
sierra etc.), como también la limpieza, mantenimiento
o el recambio de piezas de desgaste no recaen en la
garantía e irán al cargo del cliente!
En caso de intervención ajena se expira la garantía.
DESPUÉS DE LA GARANTÍA
Después de haber expirado la garantía se pueden
realizar las reparaciones por el concesionario o por el
servicio de reparaciones. Los gastos irán al cargo del
cliente.
80
05-DVD 628_E 80 30.08.2004, 15:43:03 Uhr
Page 81

ESPAÑOL
81
05-DVD 628_E 81 30.08.2004, 15:43:03 Uhr
Page 82

INDICE
Misure di sicurezza ..................................................... 83
Norme di sicurezza...................................................... 84
ITALIANO
DVD Player................................................................... 85
Ubicazione appropriata........................................... 85
Perfezione delle immagini........................................ 85
Dischi riproducibili................................................... 85
Uscita audio digitale................................................ 85
Uscita audio analogica............................................ 85
Sistema di protezione a testina laser contro
le sovratensioni........................................................ 85
Osservazioni in merito ai dischi................................. 85
Modalità d’uso......................................................... 85
Pulizia ......................................................................85
Magazzinaggio ........................................................ 85
Descrizione degli elementi di comando.................... 86
Veduta frontale ........................................................ 86
Veduta posteriore ....................................................86
Descrizione del telecomando..................................... 87
Telecomando................................................................ 88
Impostazione del sistema (impostazione
delle funzioni)........................................................99-103
Impostazione della lingua........................................ 99
Impostazione della funzione video........................ 100
Impostazione della funzione audio........................ 101
Ulteriori impostazioni audio................................... 102
Funzione MP3 ............................................................ 104
File JPEG.................................................................... 104
Possibilità di risoluzione delle anomalie................. 104
Dati tecnici................................................................. 105
Garanzia ..................................................................... 106
Collegamento degli apparecchi................................. 89
Altoparlanti................................................................... 90
Disposizione degli altoparlanti................................. 90
Collegamento del sistema di altoparlanti ................. 91
Collegamento delle antenne ...................................... 92
Collegamento alla rete elettrica................................. 93
Funzioni di base........................................................... 93
Modalità di funzionamento radio............................... 94
Modalità DVD..........................................................95-96
Funzioni...................................................................96-99
82
05-DVD 628_I 82 30.08.2004, 15:16:07 Uhr
Page 83

MISURE DI SICUREZZA
Il simbolo del fulmine contenuto all’interno di un triango-
lo ha lo scopo precipuo di avvertire l’utente
circa il pericolo rappresentato da pericolose
tensioni isolati all’interno dell’alloggiamento
dell’apparecchio e in grado di causare scosse
elettriche.
Il simbolo del punto esclamativo contenuto all’interno di
un triangolo richiama l’attenzione dell’utente
su importanti avvertenze in merito alle
modalità d’uso e in materia di manutenzione
dell’apparecchio, contenute nel manuale
fornito in dotazione.
Avvertenza:
Non esporre l’apparecchio a umidità. A causa
del pericolo di scosse elettriche non è consentito
aprire l’apparecchio (pericolo di alta pensione).
L’apparecchio può essere aperto esclusivamente da
parte del personale tecnico qualifi cato.
Attenzione:
Accertarsi che la spina di rete sia collegata correttamente alla presa corrispondente.
Annotare il codice del modello e il numero di serie, i
quali sono indicati sul lato posteriore dell’alloggiamento
dell’apparecchio. Si consiglia quindi di conservare queste informazioni per eventuali casi di necessità futuri.
(Informazioni importanti: si raccomanda di conservarle.)
Attenzione:
Pericolo di scosse elettriche. Non aprire!
Attenzione:
Si raccomanda di non aprire la copertura né il lato posteriore allo scopo di evitare scosse elettriche. All’interno
dell’apparecchio non sono presenti componenti che possono essere riparati direttamente dall’utente. Si consiglia
pertanto di rivolgersi a personale tecnico qualifi cato.
ITALIANO
Attenzione:
Il DVD Receiver è dotato di un sistema laser.
L’apparecchio non deve essere aperto, in quanto l’utente
si esporrebbe in questo modo a pericolose radiazioni
laser. Quando si apre l’alloggiamento, il raggio laser è visibile. Non volgere mai lo sguardo direttamente verso
il raggio laser! È consentito applicare esclusivamente
le impostazioni e le procedure qui illustrate, poiché, in
caso contrario, si possono generare pericolosi fenomeni
di radiazioni.
Si raccomanda di leggere attentamente le istruzioni
per l’uso allo scopo precipuo di garantire un utilizzo
conforme dell’apparecchio. Conservare in ogni caso
le istruzioni per l’uso. Qualora si riveli necessario un
intervento di manutenzione, rivolgersi a uno dei centri di
assistenza tecnica autorizzati.
83
05-DVD 628_I 83 30.08.2004, 15:16:16 Uhr
Page 84

NORME DI SICUREZZA
Attenzione:
È importante che le istruzioni per l’uso vengano lette accuratamente e che tutte le istruzioni fornite – ivi incluse
le indicazioni applicate direttamente sull’apparecchio
ITALIANO
– vengano adeguatamente osservate. Si consiglia di
conservare le istruzioni per l’uso per eventuali casi di
necessità futuri.
Accessori
Non posizionare l’apparecchio su superfi ci instabili (per
esempio su supporti, carrelli, bracci di supporto a parete,
mensole o tavole). L’apparecchio potrebbe infatti cadere e
ferire gravemente persone o animali. Inoltre, si potrebbero
così causare danneggiamenti dello stesso dispositivo.
Servirsi esclusivamente di superfi ci stabili raccomandate dal costruttore o che possono essere acquistate
in abbinamento con lo stesso apparecchio. Durante la
fase di installazione del dispositivo è necessario operare
esattamente in conformità alle istruzioni fornite dal
costruttore, nonché utilizzare gli accessori di montaggio
raccomandati dal costruttore medesimo.
Nel caso specifi co in cui l’apparecchio venga installato
su un carrello, è indispensabile usare cautela nello spostamento di quest’ultimo. Qualora di arresti bruscamente
il carrello o lo si sposti con eccessiva forza, nonché nel
caso in cui si faccia uso di superfi ci d’appoggio non
piane, potrebbero verifi carsi ribaltamenti della combinazione carrello-apparecchi.
Apparecchi accessori
Si raccomanda di non utilizzare apparecchi accessori che
non siano stati espressamente autorizzati in tal senso. In
caso contrario, potrebbero generarsi situazioni di pericolo.
Pulizia
Prima di procedere alla pulizia è necessario staccare la spina dell’apparecchio dalla presa corrispondente. Ai fi ni delle
operazioni di pulizia, si consiglia di non utilizzare detergenti
liquidi o a spruzzo, bensì di servirsi di un panno umido.
Fulmini
Come ulteriore misura di protezione si consiglia di
staccare la spina dell’apparecchio dalla presa corrispondente durante i temporali o nel caso in cui suddetto
apparecchio non venga utilizzato per intervalli di tempo
prolungati. Analogamente, è opportuno riporre il sistema
dell’antenna o il sistema di cavi. È in questo modo possibile evitare eventuali danneggiamenti dell’apparecchio
dovuti a temporali e all’alta tensione.
Oggetti e liquidi
Non è consentito accostare oggetti alle aperture
dell’apparecchio, in quanto si potrebbe in questo modo
entrare a contatto con pericolosi punti sottoposte a
tensione o punti di cavallottaggio causando, di conseguenza, lo sviluppo di incendi o di cortocircuiti. Evitare di
versare liquidi sull’apparecchio.
Sovraccarico
Le prese a parete, le prolunghe e le prese supplementari
non devono essere soggette a condizioni di sovraccarico, in quanto sussiste il pericolo di incendi o di scosse
elettriche.
Cavi elettrici
I cavi elettrici devono essere disposti in modo da non
causare alcun intralcio e da non poter essere intrappolati
da altri oggetti. Particolare attenzione è deve essere
necessariamente prestata ai cavi in corrispondenza dei
connettori, delle prese e delle uscite dell’apparecchio.
Alimentazione elettrica
L’apparecchio deve essere messo in funzione esclusivamente con la fonte di energia elettrica indicata sulla
targhetta di contrassegnazione. Nel caso sussistano
dubbi in merito al tipo di alimentazione elettrica di cui si
dispone, è possibile rivolgersi l proprio rivenditore oppure
alla società locale di distribuzione di energia elettrica. Per
quanto concerne gli apparecchi azionati mediante batterie
(o con un’altra sorgente energetica), sono fornite avvertenze
nelle stesse istruzioni per l’uso. Questo DVD-Home-Theatre è azionato attraverso AC 230 V/50 Hz. Si consiglia
di non disattivare immediatamente l’apparecchio dopo
l’impostazione. Attendere almeno 10 secondi.
Manutenzione
Si raccomanda di non tentare di eseguire interventi
di manutenzione, in quanto l’apertura o la rimozione
della copertura può causare l’esposizione a pericolose
tensioni di corrente o ad altre condizioni di pericolo. Per
l’effettuazione degli interventi di manutenzione è indispensabile rivolgersi a personale tecnico qualifi cato.
Sistema televisivo
Questo dispositivo è compatibile con apparecchi televisivi che
supportano il sistema a colori NTSC oppure il sistema PAL.
Ventilazione
Le fessure e le aperture presenti a livello
dell’alloggiamento sono previste ai fi ni della ventilazione
nonché allo scopo di garantire il corretto funzionamento dell’apparecchio e per la protezione contro casi
di riscaldamento eccessivo. È assolutamente vietato
bloccare o coprire queste aperture. Non posizionare mai
l’apparecchio su superfi ci d’appoggio molle quali, per
esempio, letti, divani, tappeti, ecc., in quanto il sistema
di ventilazione non potrebbe in questo caso funzionare.
L’apparecchio non deve essere installato in strutture a
incasso (mobili a incasso, scaffali, ecc.) fatta eccezione
per il caso in cui sia possibile garantire una suffi ciente aerazione. Si consiglia altresì di non posizionare
l’apparecchio in prossimità di sorgenti di calore, quali,
per esempio, radiatori, accumulatori termici, forni o altri
fonti di calore.
Tenere a distanza da acqua, fuoco e magneti
Tenere l’apparecchio a distanza dai vasi di fi ori, dalle vasche
da bagno, dai lavandini, ecc. Nel caso in cui del liquido
penetri all’interno dell’apparecchio, possono insorgere gravi
danni. Non è consentito posizionare sull’apparecchio fonti
di incendio aperte quali, per esempio, le candele accese.
Non accostare mai all’apparecchio gli oggetti magnetici
quali, per esempio, gli altoparlanti.
Condensazione
Nei seguenti casi si potrebbe formare della condensa
sulla lente. Immediatamente dopo l’attivazione di un
fi lamento caldo. All’interno di un locale molto umido o
soggetto a vaporizzazione. L’apparecchio è stato traslocato da un ambiente freddo a un ambiente caldo.
Qualora si sia generata dell’umidità all’interno
dell’apparecchio, può accadere che l’apparecchio non
funzioni più correttamente. In questo caso si consiglia
di disattivare l’alimentazione elettrica e di attendere ca.
un’ora, fi nché l’umidità non sia evaporata.
84
05-DVD 628_I 84 30.08.2004, 15:16:18 Uhr
Page 85

DVD PLAYER
Il seguente paragrafo fornisce informazioni in merito alle
impostazioni ottimali relative al proprio sistema DVD
receiver.
Ubicazione appropriata
Si consiglia di posizionare l’apparecchio su una superfi cie d’appoggio piana e solida. Poiché il fl usso magnetico
degli altri apparecchi può causare l’insorgere di anomalie
nella riproduzione e/o in termini di qualità delle immagini,
si consiglia di non installare l’apparecchio in prossimità
di VCR, radio o di grossi altoparlanti. Nel caso specifi co
in cui l’apparecchio venga collocato in un mobile, è
necessario operare in modo da garantire su ogni lato
dell’apparecchio una distanza minima di 2,5 cm al fi ne di
assicurare una suffi ciente ventilazione.
Perfezione delle immagini
I DVD Player sono apparecchi di precisione. Nel caso cui
la lente di scansione e i componenti del lettore di dischi
presentino impurità o qualora essi siano usurati, la qualità delle immagini ne risulta compromessa. Si consiglia
pertanto di posizionare il DVD Player in un luogo pulito e
privi di polvere.
Dischi riproducibili
Questo sistema di ricezione DVD è in grado di riprodurre
i seguenti tipi di dischi: DVD, MP3,CD, CD-R, e CD-RW
con la possibilità di effettuare una correzione degli errori.
È inoltre possibile visualizzare CD di foto e album fotografi ci digitali. Sono supportate 8 lingue, nonché fi no a
32 sottotitoli e diversi angoli di osservazione (in funzione
dello specifi co tipo di disco inserito). Con l’ausilio dei
menu visualizzati sullo schermo è possibile effettuare tutte le operazioni di impostazione con estrema semplicità.
Uscita audio digitale
Questo apparecchio dispone di un’uscita coassiale, la
quale consente di collegare un amplifi catore AV esterno
(6 canali) e un processore con Dolby Digital Code integrato attraverso un unico cavo. In questo modo è possibile riprodurre comodamente DVD, CD e dischi MP3.
OSSERVAZIONI IN MERITO
AI DISCHI
La seguente sezione offre importanti informazioni in
materia di modalità d’uso, pulizia e magazzinaggio dei
dischi che possono essere riprodotti attraverso questo
apparecchio.
Modalità d’uso
• Non toccare mai il lato di riproduzione del disco.
• Non incollare foglietti di carta o adesivi sul disco.
• Non incollare nulla né scrivere sul disco.
• Afferrare il disco esclusivamente in corrispondenza
della centrale oppure sui bordi.
Pulizia
• La presenza di impronte digitali o di impurità sul disco possono compromettere la qualità delle immagini
e della funzione audio. Pulire il disco dall’interno
verso l’esterno servendosi di un panno morbido.
• Nel caso in cui non sia possibile rimuovere le impurità, pulire il disco con cautela servendosi di un panno
umido e asciugarlo quindi con un panno asciutto.
• Non utilizzare detergenti quali, per esempio, diluenti,
benzina, detergenti d‘uso comune oppure spray
antistatici per LP in vinile.
Magazzinaggio
• Si raccomanda di non esporre direttamente i dischi al
sole e di non conservarli in prossimità di sorgenti di
calore.
• Non conservare i dischi in luoghi umidi o polverosi.
Conservare sempre i dischi all’interno del corrispondente involucro protettivo e in posizione verticale.
Non appoggiare oggetti sui dischi senza involucro
protettivo, in quanto, in caso contrario, questi ultimi
potrebbero piegarsi o subire danneggiamenti.
Nota:
il costruttore non assume alcuna responsabilità per gli
eventuali danni causati dall’uso non conforme dei dischi.
ITALIANO
Uscita audio analogica
L’amplifi catore a sei canali integrato rende superfl uo
l’utilizzo di un amplifi catore esterne e consente la semplice installazione plug and play degli altoparlanti.
Sistema di protezione a testina laser contro le sovratensioni
Allo scopo precipuo di prolungare la durata utile della
testina laser, l’apparecchio è dotato di un sistema di
protezione a testina laser contro le sovratensioni assolutamente originale e azionato attraverso una costante
corrente laser.
85
05-DVD 628_I 85 30.08.2004, 15:16:20 Uhr
Page 86

Lato anteriore – Funzioni
ITALIANO
DESCRIZIONE DEGLI ELEMENTI DI COMANDO
1. POWER
Prima di effettuare il collegamento del cavo di alimentazione alla presa corrispondente, è necessario accertarsi
che tutti i collegamenti siano stati effettuati correttamente. In caso affermativo, si deve collegare la spina di
rete alla presa, operando con cautela. Premere il tasto
POWER sul lato anteriore dell’apparecchio allo scopo
di attivarlo. Quando si mette in funzione l’apparecchio
potrebbero verifi carsi – a causa di brevi colpi di tensione
– delle interferenze con altri dispositivi elettronici
collegati al medesimo circuito elettrico. In questo caso
specifi co, si consiglia di collegare l’apparecchio a un
altro circuito elettrico.
2. OPEN/CLOSE
Nella modalità DVD questo tasto ha la funzione di
avviare la fase di riproduzione o di attivare la pausa.
3. II PLAY/PAUSE/AUTO
Nel modulo DVD questo tasto ha la funzione di inizia-
re la riproduzione o la pausa.
Premendo questo tasto si può iniziare una ricerca
automatica nel modulo tuner.
4. STOP/MEMO
Nel modulo DVD questo tasto ha la funzione di
fermare la riproduzione.
Nel modulo tuner si usa questo tasto per memorizza-
re un trasmittente.
5. PAUSE/PRE/TUN
Nel modulo DVD questo tasto ha la funzione di inter-
rompere la riproduzione.
Nel modulo tuner si usa questo tasto per scegliere il
trasmittente prescelto oppure il modulo tuning.
6. I PREV/DOWN
Nella modalità DVD è possibile premere questo
tasto per tornare al brano precedente. Nella modalità (tuner) ha la funzione di avviare la ricerca di
un’emittente (ricerca a ritroso).
.7. I NEXT/UP
Nella modalità DVD è possibile premere questo tasto
per portarsi in corrispondenza del brano successivo.
Nella modalità (tuner) ha la funzione di avviare la
ricerca di un’emittente (ricerca in avanzamento). (In
funzione della modalità PRE/TUN. Si veda a questo
proposito quanto riportato al capitolo “Modalità radio”).
8. INPUT SIGNAL SOURCE
Con l’ausilio di questo tasto è possibile selezio-
nare un’appropriata sorgente di segnali di ingresso (nota: l’ingresso selezionato corrisponde alla
presa di ingresso selezionata sulla parte posteriore
dell’apparecchio stesso).
9. VOLUME
Attraverso questo regolatore è possibile impostare
il volume dell’apparecchio. Tutti i 6 canali vengono
impostati simultaneamente.
Lato posteriore - Funzioni
1. ANTENNA
Presa di collegamento per l’antenna interna FM e per
l’antenna a quadro AM.
2. AUX IN
Presa di ingresso per due apparecchi musicali sup-
plementari (1 + 2).
3. AUDIO OUT
Presa per le due uscite del canale destra e sinistra,
nonché per l’uscita subwoofer.
4. VIDEO OUTPUT
Nella modalità di Setup è necessario che
nell’impostazione VIDEO OUTPUT sia stata l’opzione
S-VIDEO.
5. S-VIDEO OUTPUT
6. REAR
Presa per l’altoparlante surround destro e sinistro.
7. FRONT/MAIN
Presa per l’altoparlante frontale/principale destro e
sinistro.
8. CENTER/SUBWOOFER
Presa per l’altoparlante center e subwoofer.
9. COAXIAL DIGITAL AUDIO OUTPUT
10. 230 V~50 Hz
Questo apparecchio viene fornito unitamente a un
cavo di alimentazione AC. La spina di rete deve essere assolutamente asciutta quando viene inserita nella
presa corrispondente. Accertarsi che il cavo non sia
molto teso. Evitare inoltre di calpestare il cavo.
11. OPTICAL OUTPUT
12. SCART OUTPUT
13. COMPONENT VIDEO OUTPUT
86
05-DVD 628_I 86 30.08.2004, 15:16:21 Uhr
Page 87

DESCRIZIONE DEL TELECOMANDO
1. Aprire/chiudere
2. Tasto di silenziamento (Mute)
3. Selezione DVD
4. Sintonizzatore AM/TM (tuner)
5. Selezione AUX 1 (apparecchio supplementare 1)
6. Selezione AUX 2 (apparecchio supplementare 2)
7. Selezione della modalità TV N/P
8. Sottotitoli
9. Lingua
10. Angolo d’osservazione
11. Tasti numerici 0-9
12. +10
13. Ora
14. Titolo
15. Programma
16. Selezione del canale
17. V olume +
18. V olume –
19. Display sul video
20. Rallentatore
21. Menu
22. FM stereo/mono
23. Preset/sintonizzazione
24. Tasto di scorrimento verso l’alto
25. Tasto di scorrimento verso destra
26. Tasto di scorrimento verso il basso
27. Tasto di scorrimento verso sinistra
28. Tasto di invio (enter)
29. Impostazione (setup)
30. Ripetizione
31. Selezione PROLOGIC
32. Step
33. Ingrandimento/riduzione (zoom)
34. Prosecuzione della riproduzione (resume)
35. Stop
36. Pausa
37. Riproduzione
38. Ripetizione A-B
39. Procedura a ritroso (ricerca di emittenti/brano
precedente)
40. Procedura in avanzamento (ricerca di emittenti/brano
succes sivo)
41. Memo (memoria/spostamento a ritroso)
42. Modalità automatica (ricerca automatica/
spostamento in avanti)
ITALIANO
87
05-DVD 628_I 87 30.08.2004, 15:16:24 Uhr
Page 88

TELECOMANDO
Inserimento delle pile
1. Premere verso il basso la copertura dello scomparto
ITALIANO
portabatterie allo scopo precipuo di rimuoverlo.
2. Inserire due pile (di tipo AAA) nello scomparto
portabatterie del telecomando. Accertarsi che i poli
(+ e -) coincidano con le marcature indicato nello
scomparto portabatterie.
3. Chiudere la copertura dello scomparto portabatterie.
Osservazioni:
• Si raccomanda di non utilizzare pile di diversi costruttori. Si consiglia inoltre di non utilizzare simultaneamente pile vecchie e nuove.
• Nel caso in cui il telecomando non venga utilizzato
per intervalli di tempo prolungati, è preferibile estrarre
le pile per evitare il rischio di danneggiamenti provocati dalla corrosione.
• Le pile scariche devono essere rimosse immediatamente dallo scomparto allo scopo di evitare il rischio
di danneggiamenti provocati dalla corrosione.
• Nel caso in cui si verifi chino fuoriuscite dalle pile, è
necessario eliminare il liquido delle pile dallo scomparto portabatterie, nonché sostituire entrambe le
pile.
• Si raccomanda di sostituire sempre entrambe le pile
simultaneamente e di sostituirle quindi con nuove
pile cariche.
• La durata utile delle pile dipende dalla durata dell’uso
fatto.
Modalità d’uso del telecomando
Orientare il telecomando direttamente verso il sensore
del ricevitore DVD. Nel caso in cui il segnale venga
correttamente ricevuto, l’apparecchio funziona in modo
conforme. Il telecomando può essere utilizzato con un
angolo di 30° a una distanza di ca. 7 m dal sensore.
Osservazioni
• Il sensore non deve essere esposto all’azione diretta
del sole o di altre fonti luminose intense. In caso contrario, possono verifi carsi anomalie di funzionamento
dell’apparecchio.
• Nel caso in cui altri telecomandi vengano utilizzati
nelle vicinanze o qualora si faccia utilizzo del telecomando in oggetto nelle vicinanze di apparecchi che
si avvalgono di raggi infrarossi, possono insorgere
fenomeni di interferenza.
• Evitare di posizionare oggetti sul telecomando, in
quanto in questo modo possono essere premuti
accidentalmente dei tasti, si possono modifi care
delle funzioni e si potrebbe di conseguenza diminuire
la durata utile delle pile.
• Il lato frontale del ricevitore DVD non deve essere
rivestito con vetro colorato, poiché questo potrebbe
compromettere il normale funzionamento del telecomando.
• Tra il telecomando e il sensore del televisore non devono essere posizionati oggetti di grandi dimensioni,
in quanto in questo modo il segnale potrebbe non
essere ricevuto dall’apparecchio.
• Evitare di esporre il telecomando all’umidità.
• Non è consentito smontare il telecomando.
Pile
L’utilizzo non corretto delle pile può causare la fuoriuscita del liquido corrispondente, la loro corrosione o
l’esplosione delle stesse.
Attenzione!
Le pile non devono essere gettate nei rifi uti domestici. Si
raccomanda di consegnare le pile scariche presso i centri di raccolta competenti o presso il proprio rivenditore.
Non gettare mai le pile nel fuoco.
88
05-DVD 628_I 88 30.08.2004, 15:16:28 Uhr
Page 89

COLLEGAMENTO DEGLI APPARECCHI
ITALIANO
• Le prese di collegamento relative a questo ricevitore
DVD si trovano sul lato posteriore dell’apparecchio.
Si consiglia di leggere attentamente le istruzioni
fornite dal costruttore dell’apparecchio in oggetto e
di attenersi scrupolosamente ad esse durante le operazioni di collegamento di dispositivi video e audio a
questo apparecchio.
• L’apparecchio può essere collegato alla rete di
alimentazione elettrica esclusivamente dopo che tutti
i collegamenti siano stati effettuati in modo corretto.
• La presa rossa (contrassegnata con la lettera R)
serve ai fi ni del collegamento del canale destro. La
presa bianca (contrassegnata con la lettera L) serve
ai fi ni del collegamento del canale sinistro. La presta
gialla è stata concepita per il collegamento video.
Accertarsi che tutti i collegamenti siano stati effettuati
in modo sicuro. Se realizzati in modo non corretto, i
collegamenti possono provocare l’insorgere di rumori, anomalie e causare addirittura il danneggiamento
dell’apparecchio.
• Il cavo AV non deve essere collegato ad altri cavi,
quali, per esempio il cavo di allacciamento alla rete
elettrica o il cavo dell’altoparlante. In caso contrario,
possono insorgere anomalie di funzionamento a
livello dell’apparecchio.
89
05-DVD 628_I 89 30.08.2004, 15:16:30 Uhr
Page 90

ALTOPARLANTI
La confi gurazione e la disposizione corrette di un
sistema audio Surround sono determinanti ai fi ni delle
prestazioni ottenute in termini audio. Allo scopo di ottenere le massime prestazioni audio, prima di procedere al
ITALIANO
collegamento degli altoparlanti, è necessario seguire le
istruzioni relative alla disposizione degli altoparlanti.
Altoparlante frontale/principale (sul lato destro e
sul lato sinistro, altoparlante centrale)
• Questi tre altoparlanti forniscono un’eccellente
prestazione in termini di audio e incrementano
l’effetto dinamico della riproduzione sonora. I dialoghi
principali dei fi lm sono trasmessi attraverso questi
altoparlanti.
Altoparlante posteriore o altoparlante Surround
• Questi due altoparlanti offrono dinamici effetti
audio 3D e creano condizioni di riproduzione audio
spaziale, in quanto essi aggiungono anche i rumori di
sottofondo.
Altoparlante subwoofer
Disposizione degli altoparlanti
La confi gurazione ideale del sistema audio Surround
dipende dalle dimensioni del locale nonché dal materiale
di composizione delle pareti. L’illustrazione (si veda in
basso) mostra una tipica disposizione dei diversi altoparlanti in oggetto.
Avvertenze:
• L’altoparlante frontale/principale e l’altoparlante
centrale devono essere posizionati alla medesima
altezza e risultano orientati verso l’uditore.
• L’altoparlante Surround 3D e l’altoparlante posteriore
devono essere posizionati dietro l’uditore, al di sopra
del livello delle orecchie dell’uditore medesimo, e
devono essere installati alla parete.
L’altoparlante subwoofer può essere posizionato in una
postazione qualunque all’interno del locale, in quanto
esso infl uisce in modo soltanto minimo sulle prestazioni
audio. Per poter ottenere un effetto di audio basso ottimale, si consiglia di collegare l’altoparlante subwoofer al
sistema Home Theatre.
• L’altoparlante subwoofer costituisce un potente altoparlante basso, attraverso il quale è possibile creare
effetti di riproduzione ancora più verosimili.
Osservazione: allo scopo di ottenere un ottimale effetto
audio 3D, la riproduzione dell’altoparlante centrale e
dell’altoparlante subwoofer ha luogo anche attraverso
l’altoparlante posteriore e l’altoparlante frontale.
1. Apparecchio televisivo o schermo
2. Altoparlante frontale/centrale (lato sinistro)
3. Subwoofer
4. Altoparlante centrale
5. Altoparlante frontale/centrale (lato destro)
6. Altoparlante Surround 3D (lato sinistro)
7. Altoparlante Surround 3D (lato destro)
8. Posizione dell’uditore
90
05-DVD 628_I 90 30.08.2004, 15:16:32 Uhr
Page 91

COLLEGAMENTO DEL SISTEMA DI ALTOPARLANTI
Questo ricevitore DVD, concepito in modo ottimale,
fornisce ottime prestazioni in termini di qualità audio,
qualora gli altoparlanti utilizzati si trovino all’interno
dell’ambito di impedenza nominale.
Importante!
• Il valore minimo di impedenza dei cinque altoparlanti
corrisponde a 6 ohm. Nel caso specifi co del dispositivo subwoofer si tratta invece di un valore pari a 8
ohm.
• Qualora si desideri utilizzare un solo altoparlante o
nel caso in cui si voglia ascoltare musica mono, non
è possibile attivare in parallelo i singoli altoparlanti a
destra e a sinistra dei collegamenti dei canali.
Collegamento dei cavi degli altoparlanti
1. Rimuovere circa 1 cm dell’isolamento del cavo.
2. Torcere l’estremità del cavo.
3. Aprire il fermaglio del cavo premendo la linguetta
corrispondente.
4. Inserire l’estremità del cavo nel fermaglio.
5. Rilasciare quindi la linguetta e accertarsi che il cavo
sia saldamente inserito nel fermaglio.
Osservazione:
allo scopo precipuo di evitare l’insorgere di cortocircuiti,
è necessario prestare attenzione ai poli positivi e negativi
dei cavi degli altoparlanti durante la fase di collegamento
degli stessi altoparlanti.
ITALIANO
91
05-DVD 628_I 91 30.08.2004, 15:16:33 Uhr
Page 92

COLLEGAMENTO DELLE ANTENNE
Nel caso specifi co di alcuni edifi ci e in determinate
condizioni può essere diffi cile ricevere i segnali radio. Le
antenne fornite in dotazione ottimizzano le condizioni di
ricezione di questi tipi di segnali e sono state concepite
ITALIANO
esclusivamente ai fi li del loro utilizzo all’interno di locali.
Antenna quadro AM
L’antenna quadro AM deve essere orientata in modo
da ottenere buone condizioni di ricezione. Deve essere
posizionata il più lontano possibile dal ricevitore DVD,
dal televisore, dagli altoparlanti e dai cavi di allacciamento alla rete elettrica. Qualora la ricezione continui ad
essere cattiva anche in questo caso, potrebbe essere
necessario utilizzare un’antenna esterna.
Antenna interna FM
L’antenna quadro FM deve essere orientata in modo
da ottenere buone condizioni di ricezione. Le estremità
dell’antenna devono essere fi ssate in modo tale per cui
esse possano essere piegate il meno possibile.
Collegamento dell’antenna interna FM
1. Aprire il fermaglio del cavo premendo la linguetta
corrispondente.
2. Inserire l’estremità del cavo nel fermaglio.
3. Rilasciare quindi la linguetta e accertarsi che il cavo
sia saldamente inserito nel fermaglio.
Collegamento dell’antenna quadro AM
1. Tenere premuta la linguetta.
2. Inserire nel foro l’estremità del cavo.
3. Rilasciare la linguetta.
4. Orientare correttamente l’antenna.
92
05-DVD 628_I 92 30.08.2004, 15:16:36 Uhr
Page 93

COLLEGAMENTO ALLA RETE ELETTRICA
ITALIANO
Prima di collegare il cavo di allacciamento alla rete
elettrica alla presa corrispondente, è necessario controllare nuovamente e con precisione tutti i collegamenti.
Successivamente, si può procedere al collegamento del
cavo di allacciamento alla rete elettrica alla rispettiva
presa, operando con cautela.
Premere il tasto POWER sul lato anteriore
dell’apparecchio allo scopo di attivare l’apparecchio
stesso. In questo modo, il display si illumina.
FUNZIONI DI BASE
Selezione della sorgente audio
1. Premere il corrispondente tasto funzionale (DVD,
AM/FM, AUX1, AUX2), allo scopo di selezionare la
sorgente audio desiderato. Il simbolo corrispondente
viene così visualizzato sul display.
2. Se si preme il tasto AM/FM, viene riprodotto l’ultimo
canale ascoltato.
Quando si mette in funzione l’apparecchio potrebbero
verifi carsi – a causa di brevi colpi di tensione – delle
interferenze con altri dispositivi elettronici collegati al
medesimo circuito elettrico. In questo caso specifi co, si
consiglia di collegare l’apparecchio a una presa appartenente a un altro circuito elettrico.
Regolazione del volume
Il volume può essere regolato attraverso la rotazione
della grossa manopola relativa all’impostazione del
volume situata sul lato anteriore dell’apparecchio oppure
azionando il tasto corrispondente sul telecomando.
Funzione di silenziamento (tasto Mute)
Premendo il tasto MUTE è possibile attivare temporaneamente la funzione di silenziamento degli altoparlanti.
Qualora si prema nuovamente questo tasto, è possibile
tornare alla modalità di normale riproduzione audio.
93
05-DVD 628_I 93 30.08.2004, 15:16:39 Uhr
Page 94

ITALIANO
MODALITÀ DI FUNZIONAMENTO RADIO
Impostazione delle emittenti
1. Premere il tasto TUNER allo scopo di selezionare
l’ambito d’onde desiderato (AM oppure FM).
Con l’ausilio del tasto UP o del tasto DOWN è possibile
2.
ricercare le emittenti (dapprima è necessario tuttavia
impostare il display sulla frequenza di emissione
servendosi del tasto PRE/TUN). Ogniqualvolta si prema
il tasto in oggetto, si modifi ca la frequenza. Non appena
si riceva il segnale di un’emittente, questo stato di
ricezione viene visualizzato sul display.
3. Per trovare rapidamente una determinata emittente,
tenere premuto per due secondi il tasto UP oppure il
tasto DOWN. L’apparecchio avvia in questo modo la
procedura di ricerca automatica. Non appena venga
trovata un’emittente, suddetta procedura di ricerca
automatica si arresta.
4. Per poter memorizzare una determinata emittente,
premere il tasto MEMO. Sul display viene visualizzato per quattro secondi il numero della posizione di
memoria. Premendo nuovamente il tasto MEMO, si
memorizza l’emittente in oggetto.
Numero della posizione di memoria
Ambito d’onde Frequenza dell’emittente
5. Per poter ridurre il disturbo rappresentato dalla
presenza di rumori durante la fase di ricezione di un
programma stereo FM, premere il tasto FM/Mode. Il
messaggio ”STEREO” non viene più visualizzato sul
display e viene riprodotto quindi il programma per la
riduzione dei rumori di disturbo MONO. Per tornare
alla modalità di riproduzione stereo, è suffi ciente
premere nuovamente il tasto FM.
Ricerca automatica
L’apparecchio può memorizzare un numero massimo di
50 diverse stazioni radiofoniche AM/FM.
1. Premere il tasto AUTO. Sul display viene visualizzato
il messaggio “AUTO” e viene avviata la procedura di
ricerca automatica.
2. Le emittenti vengono memorizzate in ordine crescente. È possibile registrare un numero massimo di
emittenti pari a 50. Non appena l’emittente in oggetto
viene memorizzata, sul display vengono visualizzati
per quattro secondi il numero della posizione di
memoria e la frequenza di emissione.
3. In seguito alla memorizzazione di 50 emittenti (AM
oppure FM) non sarà più possibile registrare alcuna
ulteriore emittente.
Riproduzione delle emittenti preimpostate
1. Premere il tasto TUNER allo scopo di selezionare
l’ambito d’onde desiderato.
2. Successivamente, premere il tasto PRE/TUN allo
scopo di visualizzare sul display la posizione di
memoria relativa alla stazione.
3. Con l’ausilio dei tasti numerici è possibile selezionare
il numero corrispondente alla posizione di memoria
dell’emittente. Per esempio: per riprodurre l’emittente
memorizzata in corrispondenza della posizione #5,
è suffi ciente premere il tasto numerico 5; per la
riproduzione dell’emittente registrata in corrispondenza della posizione #17 è necessario azionare in
successione il tasto numerico 1 e il tasto numerico 7.
4. Per poter accedere all’emittente registrata attraverso
la funzione di memorizzazione, è anche possibile
premere il tasto UP oppure il tasto DOWN.
94
05-DVD 628_I 94 30.08.2004, 15:16:41 Uhr
Page 95

MODALITÀ DVD
Non appena l’apparecchio venga collegato a un televisore oppure a un altro dispositivo supplementare, è
possibile godersi i propri DVD e i fi le MP3 o i propri CD
preferiti.
Riproduzione di un DVD
Attivare il televisore e selezionare la modalità A/V. Nel
caso in cui l’apparecchio televisivo disponga di un collegamento SCART, è necessario selezionare la modalità
SCART dal menu televisivo. Attivare l’amplifi catore, qualora quest’ultimo sia stato collegato. Selezionare quindi
la modalità AC3 oppure la modalità DVD.
Riproduzione di un disco audio
Impostare il sistema audio e selezionare la sorgente di
ingresso collegata al DVD Player. Se non avete l’ attrezzatura necessaria per suono Dolby Digital Sorround, è
necessario alterare l’ impostazione dell’ uscita analoga
su 2.1, nel menu SETUP.
1. Premere il tasto POWER sulla piastra frontale. Sullo
schermo viene visualizzato il messaggio DISC LOADING (caricamento del disco in corso).
5. Al termine della lettura del disco, l’apparecchio avvia
la fase di riproduzione. Durante la riproduzione di un
DVD, viene visualizzato il titolo del DVD e il menu. I
vari brani di un CD vengono riprodotti in successione.
Osservazione:
• Nel caso in cui non vengano inseriti correttamente
nello scomparto di caricamento, i dischi possono
essere danneggiati. Questo può inoltre provocare
un’anomalia di funzionamento del DVD Player. Si
raccomanda di utilizzare in tal senso esclusivamente
DVD o CD da 12 cm oppure 8 cm.
•
Lo spostamento del DVD Player durante la fase di riproduzione può provocare il danneggiamento del disco
e dello stesso apparecchio. Per poter aprire oppure
chiudere il cassetto di caricamento, si deve utilizzare
esclusivamente il tasto OPEN/CLOSE sul telecomando
oppure la piastra frontale dell’apparecchio.
Premere il tasto PAUSE.
ITALIANO
Nel caso in cui non sia presente alcun disco nel cassetto di caricamento corrispondente, sullo schermo viene
visualizzato il messaggio NO DISC (nessun disco).
2. Premere il tasto OPEN/CLOSE. In questo modo si
apre il cassetto di caricamento del disco.
3. Inserire un disco nel cassetto di caricamento. Accertarsi che il CD/DVD sia stato inserito con il lato di
riproduzione rivolto verso il basso.
Premere nuovamente il tasto OPEN/CLOSE allo scopo
4.
di chiudere il cassetto di caricamento. In seguito alla
chiusura del cassetto, nell’angolo a sinistra in alto dello
schermo viene visualizzato il tipo di disco in oggetto.
6. Riproduzione PREV/NEXT
Premere il tasto I oppure I, allo scopo di ripro-
durre il brano precedente oppure il brano successivo.
Azionando il tasto PLAY, è possibile tornare alla
modalità di riproduzione normale.
Premere il tasto PREV.
Premere il tasto NEXT.
7. Funzione di avanzamento e riavvolgimento rapido
(fast forward/reverse).
L’apparecchio dispone sia di una funzione di avanz-
amento rapido sia della funzione di riavvolgimento
rapido con la seguente accelerazione: 2x, 4x, 8x, 16x.
95
05-DVD 628_I 95 30.08.2004, 15:16:44 Uhr
Page 96

MODALITÀ DVD
ITALIANO
Per poter attivare questa funzione, è suffi ciente azionare
il tasto o oppure il tasto sul telecomando.
Ogniqualvolta si prema questo tasto, si incrementa la
velocità. Azionare il tasto PLAY per tornare alla modalità
di riproduzione normale.
Riproduzione di Memory
FUNZIONI
Visualizzazione sullo schermo
Durante la fase di riproduzione di un disco, è possibile
visualizzare lo stato relativo a diverse funzioni quali, per
esempio, il titolo, il numero del brano, nonché diversi
tempi di riproduzione.
1. Premendo una volta il tasto DISPLAY, vengono
visualizzati il titolo, il capitolo, nonché il tempo di
riproduzione già trascorso.
2. Azionando nuovamente il tasto DISPLAY per i VCD,
viene visualizzato il tempo di riproduzione rimanente
per il titolo in oggetto.
L’apparecchio consente di arrestare la fase di riproduzione e di proseguirla successivamente a partire esattamente dal punto di interruzione. Premere il tasto STOP,
per interrompere la fase di riproduzione. L’apparecchio
memorizza in questo modo il punto in corrispondenza del quale la riproduzione è stata precedentemente
interrotta. Se desiderate continuare la riproduzione dove
l’ avete interrotta, premete il tasto RESUME o PLAY (Non
vale per MP3).
Riproduzione a rallentatore
Questo apparecchio ricevitore DVD offre anche la
possibilità di eseguire una riproduzione a rallentatore
dei dischi. Premendo ripetutamente il tasto SLOW, la
velocità di riproduzione viene diminuita di 1/2, 1/4, 1/8,
1/16 volte.
3. Azionando nuovamente il tasto DISPLAY per i DVD,
viene visualizzato il tempo di riproduzione già trascorso per il capitolo in oggetto.
4. Premendo nuovamente il tasto DISPLAY, il display
scompare.
96
05-DVD 628_I 96 30.08.2004, 15:16:48 Uhr
Page 97

FUNZIONI
N/P
Questo apparecchio ricevitore e DVD supporta le uscite
video di diversi sistemi, ivi inclusi i tipi Auto, NTSC e PAL.
Nel caso in cui sia stato selezionato il sistema errato,
le immagini iniziano a tremolare e a divenire incolore. In
questo caso specifi co è necessario premere il tasto N/P
(in modalità di arresto) sul telecomando e selezionare
quindi il sistema corretto (NTSC per l’America settentrionale, PAL per l’Europa). Ulteriori informazioni in merito al
formato delle uscite sono fornite dalle istruzioni per l’uso
del proprio televisore.
Sottotitoli
Questo apparecchio offre la possibilità di impostare fi no
a 32 lingue differenti per i sottotitoli (in funzione dello
specifi co tipo di disco inserito).
1. Premere ripetutamente il tasto SUBTITLE fi nché non
venga visualizzata la lingua desiderata.
2. Per disattivare la funzione di visualizzazione dei
sottotitoli, azionare ripetutamente il tasto SUBTITLE
fi nché i titoli non scompaiano.
Osservazione:
il disco inserito deve disporre della funzione di sottotitoli.
Prospettive della telecamera
È possibile impostare diverse prospettive per la telecamera.
1. Premere il tasto ANGLE sul telecomando. Ogniqualvolta si azioni il tasto ANGLE, si modifi ca la prospettiva della telecamera.
2. Il tasto ANGLE deve essere azionato soltanto quando
sul display si illumina il simbolo dell’angolo di osservazione.
Lingue
I fi lm possono essere riprodotti in 8 diverse lingue (in
funzione dello specifi co tipo di disco inserito).
1. Premere ripetutamente il tasto LANGUAGE fi nché
non venga visualizzata la lingua desiderata.
Osservazione:
Il disco inserito deve disporre della funzione relativa alla
lingua.
Selezione del titolo
I dischi DVD sono di norma suddivisi in titoli, i quali
includono a loro volta una struttura a capitoli. Questo
apparecchio consente di selezionare un determinato
articolo ai fi ni della riproduzione. Nel caso in cui il DVD
disponga di un menu per i titoli, è possibile selezionare
un determinato titolo attraverso questa funzione oppure
servendosi dei tasti numerici.
Funzione di menu per titoli
1. Premere il tasto TITLE. Sullo schermo del televisore
viene in questo modo visualizzato il menu dei titoli.
2. Azionare il corrispondente tasto di scorrimento allo
scopo precipuo di selezionare il titolo desiderato. I
titoli possono essere selezionati anche con l’ausilio
dei tasti numerici oppure premendo il numero corrispondente al titolo in oggetto.
3. Premere il tasto di invio (ENTER). Ha in questo modo
inizio la fase di riproduzione a partire dal capitolo 1
del titolo selezionato.
Osservazione:
alcuni dischi non dispongono di questa funzione. Se
necessario, seguire le indicazioni visualizzate sullo schermo. Nelle presenti istruzioni per l’uso viene illustrato
esclusivamente la procedura di base. Questa procedura
può variare a seconda dello specifi co contenuto del DVD
in oggetto. Per esempio, nel caso in cui si riproduca un
VCD 2.0, il tasto TITLE ha la funzione di ritorno al menu.
PROLOGIC SELECTOR
ITALIANO
Nella modalità di arresto premere il tasto PROLOGIC per
selezionare PROLOGIC ON oppure OFF.
Osservazione:
Il disco inserito deve disporre della funzione di prospettiva della telecamera.
97
05-DVD 628_I 97 30.08.2004, 15:16:51 Uhr
Page 98

FUNZIONI
Funzione TIME
Nel caso in cui venga premuto il tasto TIME durante la
fase di riproduzione, viene visualizzato il menu di ricerca.
ITALIANO
Nella riga dell’ora è possibile inserire un oggetto di ricerca
con formato HH:MM:SS (H = ore; M = minuti; S = secondi)
servendosi semplicemente dei tasti numerici. Successivamente, premere il tasto di invio, in modo tale da avviare
la fase di riproduzione a partire dal punto corrispondente
all’ora selezionata.
Nella riga del titolo/capitolo è possibile inserire un oggetto
di ricerca defi nito in base al titolo e al capitolo, servendosi
dei tasti numerici. Azionando quindi il tasto di invio, si avvia
la fase di riproduzione.
Impostazione di un segnalibro
Nel caso in cui non venga inserito alcun dato nel menu di
ricerca, bensì si azioni una seconda volta il tasto TIME,
viene visualizzato il menu Segnalibro. Servendosi dei tasti
direzionali, selezionare qui il numero del segnalibro (1, 2
oppure 3) dove si intende posizionare il segnalibro, quindi
premere il tasto di invio per memorizzare il tempo di riproduzione. È possibile impostare un numero massimo di tre
differenti segnalibri.
Riproduzione di un segnalibro precedentemente impostato
1. Premere due volte il tasto TIME.
Servendosi dei tasti direzionali, selezionare il segnalibro
2.
desiderato, a partire dal quale si intende avviare la fase
di riproduzione, quindi premere il tasto di invio.
Avvertenza: Quando si disattiva l’apparecchio oppure
nel caso in cui si estrae il disco vengono cancellati tutti
i segnalibri.
2. Azionare nuovamente il tasto A-B durante la fase di
riproduzione del disco allo scopo di defi nire il punto
B (punto fi nale). La sezione compresa tra i due punti
A e B viene in questo modo nuovamente riprodotta.
3. Premere per la terza volta il tasto A-B per poter
cancellare i dati inseriti.
Molteplice ripetizione
È possibile riprodurre più volte determinati titoli, capitoli/
brani oppure segmenti. Inoltre, è addirittura possibile
spostarsi tra due riproduzioni da ripetersi.
1. Selezionare il titolo, il capitolo, ecc., che deve essere
riprodotto.
2. Azionare il tasto REPEAT.
MENU/PBC
In seguito all’attivazione della funzione PBC è possibile
selezionare un determinato titolo di un CD esclusivamente attraverso il menu principale. Nel caso in cui la
funzione PBC sia disattivata, è possibile selezionare
un determinato titolo digitando il corrispondente tasto
numerico. Non appena si azioni il tasto MENU durante
la fase di riproduzione di un DVD, viene visualizzato il
contenuto del menu del disco in oggetto.
Ripetizione A-B
La funzione di riproduzione A-B consente di riprodurre
nuovamente una determinata sezione tra due specifi ci
punti (A e B) durante l’esecuzione di un DVD.
1. Durante la riproduzione del disco in oggetto, premere
il tasto A-B per defi nire il punto A (punto di inizio).
La modalità di riproduzione varia ogniqualvolta si prema
il tasto REPEAT (per esempio, ripetizione del titolo, ripetizione del capitolo, ripetizione integrale, disattivazione
della modalità di ripetizione).
Durante la fase di riproduzione di un CD, in seguito
all’azionamento del tasto REPEAT viene visualizzato
quanto segue: TRACK ALL e REPEAT OFF (ovvero
rispettivamente ripetizione di tutti i brani e disattivazione
della modalità di ripetizione).
Durante la fase di riproduzione di un MP3, in seguito
all’azionamento del tasto REPEAT è possibile selezionare
una delle seguenti modalità: Single, Repeat one, Repeat
folder, Folder.
98
05-DVD 628_I 98 30.08.2004, 15:16:54 Uhr
Page 99

FUNZIONI
Zoom
Con l’ausilio della funzione di zoom è possibile ingrandire fi no a tre volte una determinata immagine durante la
normale fase di riproduzione oppure durante la modalità
di riproduzione a rallentatore. Premere una volta il tasto
ZOOM per raddoppiare le dimensioni dell’immagine. Azionando questo tasto due volte, si ingrandisce l’immagine
in oggetto di tre volte, mentre premendo il tasto tre volte,
si aumentano le dimensioni dell’immagine di quattro
volte. Per tornare alla normale modalità di riproduzione, è
necessario premere una quarta volta il tasto ZOOM.
Volume del canale (CH.SET)
Durante la fase di riproduzione di un DVD è possibile
impostare il volume del canale premendo questo tasto e
azionando il tasto VOLUME.
IMPOSTAZIONE DEL SISTEMA (IMPOSTAZIONE DELLE FUNZIONI)
Volume e Mute (Volume e funzione di silenziamento)
Il volume può essere regolato semplicemente con
l’ausilio del telecomando. Premere il tasto VOL+ allo
scopo di incrementare il livello del volume, oppure il
tasto VOL- per diminuire il volume. Per poter attivare la
funzione di silenziamento dell’apparecchio, azionare il
tasto MUTE. Premendo nuovamente il tasto MUTE, si
disattiva di nuovo la funzione di silenziamento.
Program (Programmazione)
È possibile riprodurre determinati brani nella successione
desiderata. Premendo il tasto PROG, viene visualizzato
sullo schermo il menu dei programmi. Con l’ausilio dei
tasti numerici è possibile indicare i brani desiderati.
Azionare quindi il tasto di invio allo scopo di riprodurre
il programma impostato. Per poter uscire dalla modalità
di riproduzione programmata, è necessario azionare
nuovamente il tasto PROG.
ITALIANO
Non appena si azioni il tasto SETUP nella modalità di
arresto, sullo schermo del televisore viene visualizzato il
seguente menu di impostazione (setup):
Premere per
spostarsi tra due
opzioni di menu.
A. Premere il tasto di invio per visualizzare i sottomenu.
B. Premere SETUP, per uscire dal menu di impostazione
(Setup).
Impostazione della lingua (language stop)
Selezionare [Language] nel menu di impostazione (Setup)
e azionare successivamente il tasto di invio allo scopo di
visualizzare il sottomenu [Language].
A. Premere il tasto di invio oppure il tasto ai fi ni
dell’impostazione.
B. Premere , per tornare al menu precedente.
C. Premere oppure , per tornare al menu di im-
postazione.
Selezionare [OSD Menu] e premere successivamente il
tasto di invio oppure il tasto , per visualizzare il sottomenu di [OSD Menu]:
Premere per
modifi care la selezione
effettuata.
A. Azionare il tasto di invio ai fi ni della conferma
dell’operazione effettuata.
B. Azionare il tasto SETUP, per poter uscire dal menu.
Premere
per portarsi in
corrispondenza di
un’altra opzione di
menu.
99
05-DVD 628_I 99 30.08.2004, 15:16:58 Uhr
Page 100

IMPOSTAZIONE DEL SISTEMA (IMPOSTAZIONE DELLE FUNZIONI)
Selezionare [Subtitle] e premere successivamente il tasto
di invio oppure il tasto , per visualizzare il sottomenu
[Subtitle]:
ITALIANO
A. Azionare il tasto di invio ai fi ni della conferma
dell’operazione effettuata.
B. Azionare il tasto SETUP, per poter uscire dal menu di
impostazione.
Selezionare [Audio] e premere successivamente il tasto
di invio oppure il tasto , per visualizzare il sottomenu
[Audio]:
A. Azionare il tasto di invio ai fi ni della conferma
dell’operazione effettuata.
B. Azionare il tasto SETUP, per poter uscire dal menu di
impostazione.
Selezionare [DVD Menu] e premere successivamente il
tasto di invio oppure il tasto , per visualizzare il sottomenu [DVD Menu]:
A. Azionare il tasto di invio ai fi ni della conferma
dell’operazione effettuata.
B. Azionare il tasto SETUP, per poter uscire dal menu di
impostazione.
Impostazione della funzione video
Selezionare [Video] nel menu di impostazione (Setup) e
premere successivamente il tasto di invio, per visualizzare il sottomenu [Video]:
Premere per selezionare l’opzione di menu.
Premere per
modifi care la selezione
effettuata.
Osservazione: le
lingue dei sottotitoli
variano a seconda del
disco in oggetto.
Premere per
modifi care la selezione
effettuata.
Osservazione: le
lingue della funzione audio variano a
seconda del disco in
oggetto.
Premere per
modifi care la selezione
effettuata.
Osservazione: le
lingue dei menu variano a seconda del disco
in oggetto.
A. Azionare il tasto di invio ai fi ni dell’inserimento dei
dati.
B. Azionare il tasto , per poter tornare al menu di
impostazione.
Selezionare [TV Shape] e premere successivamente il
tasto di invio oppure il tasto , per visualizzare il sottomenu [TV Shape]:
Premere per modifi care la selezione effettuata.
A. Azionare il tasto di invio ai fi ni della conferma
dell’operazione effettuata.
B. Azionare il tasto SETUP, per poter uscire dal menu di
impostazione.
[4:3] Pan & Scan si riferisce a una riproduzione delle
immagini parzialmente non completa. Attraverso la
funzione Pan & Scan consente di riempire l’intero
schermo.
[4:3LB] Letter Box si riferisce a una riproduzione delle
immagini con la quale vengono visualizzate barre
nere in corrispondenza del bordo superiore e del
bordo inferiore delle immagini.
[16:9]: in questo caso l’immagine copre l’intera
superfi cie dello schermo di un televisore 16:9 (wide
screen).
Osservazione:
non tutti i DVD offrono una riproduzione dei fi lm con
formato a tutto schermo (full screen). In caso diverso da
questa impostazione, il disco salta l’impostazione della
visualizzazione televisiva e riproduce il fi lm in formato
Letter Box.
Selezionare [TV System] e premere successivamente il
tasto di invio oppure il tasto , per visualizzare il sottomenu [TV System]:
Premere per modifi care la selezione effettuata.
A. Azionare il tasto di invio ai fi ni della conferma
dell’operazione effettuata.
B. Azionare il tasto SETUP, per poter uscire dal menu di
impostazione.
[NTSC]: selezionare l’opzione NTSC nel caso in cui
sul proprio televisore sia stato impostato il sistema di
segnali NTSC.
[PAL]: selezionare l’opzione PAL nel caso in cui sul
proprio televisore sia stato impostato il sistema di
segnali PAL.
[AUTO]: selezionare l’opzione AUTO nel caso in cui
sul proprio televisore sia stato impostato il sistema di
segnali AUTO.
100
05-DVD 628_I 100 30.08.2004, 15:17:01 Uhr
 Loading...