

Page 1
Bedienungsanleitung/Garantie
Istruzioni per l’uso/Garanzia
Instruction Manual/Guarantee
Instrukcja obsługi/Gwarancja
A használati utasítás/garancia
Home Cinema / DVD Kombination
Home Cinema/DVD Combinazione
Home Cinema/DVD Combination
Zestaw kina domowego i DVD
Házi mozi/DVD kombináció
DVD 608 HC
MP3
CD-R/RW
5....-05-DVD 608 HC D 01.06.2004 10:03 Uhr Seite 1
COMPACT
DIGITAL AUDIO
Page 2
Sicherheitshinweise
Vorsicht: Der DVD/CD-Player ist ein Lasergerät der Klasse I. Somit funktioniert dieser DVD/CD-Player unter Verwendung eines sichtbaren Laserstrahls, der bei direkter
Ausrichtung ein gefährliches Strahlungsrisiko birgt. Bitte
stellen Sie sicher, dass der DVD/CD-Player nur gemäß
Anleitung eingesetzt wird.
W
arnhinweis:
Um das Risiko eines Brandes oder Stromschlags zu vermindern, diesen Player nicht Feuchtigkeit oder Regen
aussetzen.
Dieses Produkt enthält ein Niedrig-EnergieLaserbauteil.
Sicherheitsinformation
Merke:
Dieses Gerät ist nur für den Betrieb in einem gemäßigten
Klima konstruiert. Schließen Sie das Gerät nur an eine
Wechselspannung von 220-240V/50Hz an. Unter anderen Umständen kann es nicht benutzt werden.
Ac
htung:
Der DVD Spieler ist ein Produkt der Laserklasse 1.
Das Gerät benutzt einen unsichtbaren Laserstrahl, der
gefährliche Strahlungen verursachen kann. Vergewissern
Sie sich, dass Sie das Gerät ordnungsgemäß und der
Anleitung entsprechend benutzen.
Wenn das Gerät an einer Schutzkontaktsteckdose angeschlossen ist, gehen Sie bitte nicht mit den Augen zu nah
an die Öffnung des Gerätes und sehen Sie nicht ins Innere des Spielers.
Benutzung der Bedienelemente, Einstellungen oder jegliche Anwendungsformen, die von den in dieser Anleitung
beschriebenen abweichen, können dazu führen, dass Sie
sich gefährlichen Strahlungen aussetzen.
Öffnen sie keine Abdeckungen und reparieren Sie das
Gerät nicht selbst. Wenden Sie sich an qualifiziertes
Fachpersonal für die Wartung und Reparatur dieses
Gerätes.
W
arnung:
Um Risiken wie Feuer oder Elektroschock vorzubeugen,
setzen Sie das Gerät bitte nicht Regen oder Feuchtigkeit
aus.
Um Risiken wie Feuer oder Elektroschock oder unangenehme Störungen zu vermeiden, benutzen Sie bitte nur
empfohlenes Zubehör.
Vorsichtsmaßnahmen
Bitte lesen Sie diese Vorsichtsmaßnahmen sorgfältig
durch, bevor Sie dieses Gerät benutzen.
Sc
hutz des Netzkabels
Um Fehlfunktionen des Gerätes zu vermeiden und zum
Schutz vor Stromschlägen, Feuer oder Verletzung von
Personen, beachten Sie bitte folgendes:
Ziehen Sie am Netzstecker und nicht am Kabel.
Berühren Sie den Netzstecker oder das Kabel niemals
mit nassen Händen.
Halten Sie das Netzkabel von Heizgeräten fern.
Stellen Sie niemals einen schweren Gegenstand auf das
Stromkabel.
Versuchen Sie niemals, das Netzkabel zu reparieren oder
selbst zu ersetzen. Der Austausch des Netzkabels darf
nur durch eine elektrotechnisch unterwiesene Person
durchgeführt werden!
P
ositionierung
Vermeiden Sie es, das Gerät in folgender Umgebung aufzustellen:
Bei direktem Sonnenlicht oder Heizgeräten oder in
geschlossenen Fahrzeugen.
Bei hohen Temperaturen (über 35°C) oder hoher
Luftfeuchtigkeit (über 90%).
In extrem staubiger Umgebung.
Ansonsten könnten interne Teile ernsthaft beschädigt
werden.
Bei Nic
htbenutzung:
Schalten Sie das Gerät aus, wenn Sie es nicht benutzen.
Sollten Sie das Gerät für längere Zeit nicht benutzen, ziehen Sie bitte den Netzstecker aus der
Schutzkontaktsteckdose.
Nic
ht die Finger oder andere Gegenstände in das
Gerät stecken
Das Berühren interner Teile dieses Gerätes ist gefährlich
und kann zu ernsthafter Beschädigung des Gerätes
führen. Versuchen sie nicht, das Gerät auseinander zu
nehmen.
Legen Sie keine Fremdkörper in die CD Lade.
V
on Wasser, Feuer und Magneten fernhalten
Halten Sie das Gerät fern von Blumenvasen, Badewannen, Waschbecken, usw. Wenn Flüssigkeit in das Gerät
gelangt, so kann dies zu ernsthaften Schäden führen.
Offenen Brandquellen, wie z. B. brennende Kerzen dürfen
nicht auf das Gerät.
Bringen Sie niemals magnetische Gegenstände wie zum
Beispiel Lautsprecher in die Nähe des Gerätes.
Belüftung Stapeln
Halten Sie zur Belüftung einen Abstand von 5 cm rund
um das Gerät.
2
5....-05-DVD 608 HC D 01.06.2004 10:03 Uhr Seite 2
Page 3

Verdecken Sie keine Lüftungsöffnungen mit Gegenständen, wie Zeitschriften, Tischdecken, Vorhängen usw..
Stellen Sie das Gerät in horizontaler Stellung auf und
stellen Sie keine schweren Dinge auf das Gerät.
Stellen Sie das Gerät nicht auf Verstärker oder andere
Geräte, die sich erhitzen könnten.
K
ondensation
Unter folgenden Umständen kann sich Feuchtigkeit auf
der Linse bilden:
Sofort nach dem ein Heizer eingeschaltet wurde.
In einem dampfenden oder sehr feuchten Raum.
Wenn das Gerät von einer kalten Umgebung in eine warme gebracht wird.
Wenn sich Feuchtigkeit im Innern des Gerätes gebildet
hat, kann es sein, dass das Gerät nicht mehr richtig funktioniert. In diesem Falle, schalten Sie den Strom aus und
warten Sie ca. eine Stunde, bis die Feuchtigkeit verdunstet ist.
W
enn es zu störenden Geräuschen im Fernseher
kommt, während eine Sendung empfangen wird.
Je nach den Empfangsbedingungen, können im Fernsehbildschirm Störungen erscheinen während Sie eine Fernsehsendung ansehen und das Gerät eingeschaltet ist.
Dies ist keine Fehlfunktion des Gerätes oder des Fernsehers. Schalten Sie das Gerät aus, wenn Sie eine
Fernsehsendung ansehen wollen.
3
Hergestellt unter Lizenzvergabe der Dolby Latoratories.
"Dolby" sowie das doppelte D-Symbol sind Handelsmarken der Dolby Laboratories.
Diskart Markenlogo Aufzeichnungs-Art Diskgröße Maximale Laufzeit
12 cm
ca. 240 min. (einseitig bespielt)
DVD Audio + Video
ca. 480 min. (doppelseitig bespielt)
08 cm
ca. 080 min. (einseitig bespielt)
ca. 160 min. (doppelseitig bespielt)
12 cm 74 Min.
AUDIO-CD Audio
8 cm 20 Min.
Wiedergabefähige Disks
Dieser DVD-Player kann folgende Diskarten mit den entsprechenden Logos wiedergeben:
Verwendbare Disks:
Bereichscode
Sowohl der DVD-Player, als auch die Disk sind nach Bereichen codiert. Diese Bereichscodes müssen in der Reihenfolge übereinstimmen, damit die Disk abgespielt werden kann. Passen die Codes nicht, kann die Disk nicht
wiedergegeben werden.
Der Bereichscode für diesen Player ist auf der Rückseite des Geräts angegeben.
Dolby Digital Disk DTS Disk Digital Audio Stereo-Disk NTSC-System PAL-System
Disk in USA, Kanada in GB,
Japan, Südkorea, Frankreich
etc. Australien, etc.
COMPACT
DIGITAL AUDIO
DIGITAL
SOUND
STEREO NTSC PAL
5....-05-DVD 608 HC D 01.06.2004 10:03 Uhr Seite 3
Page 4

4
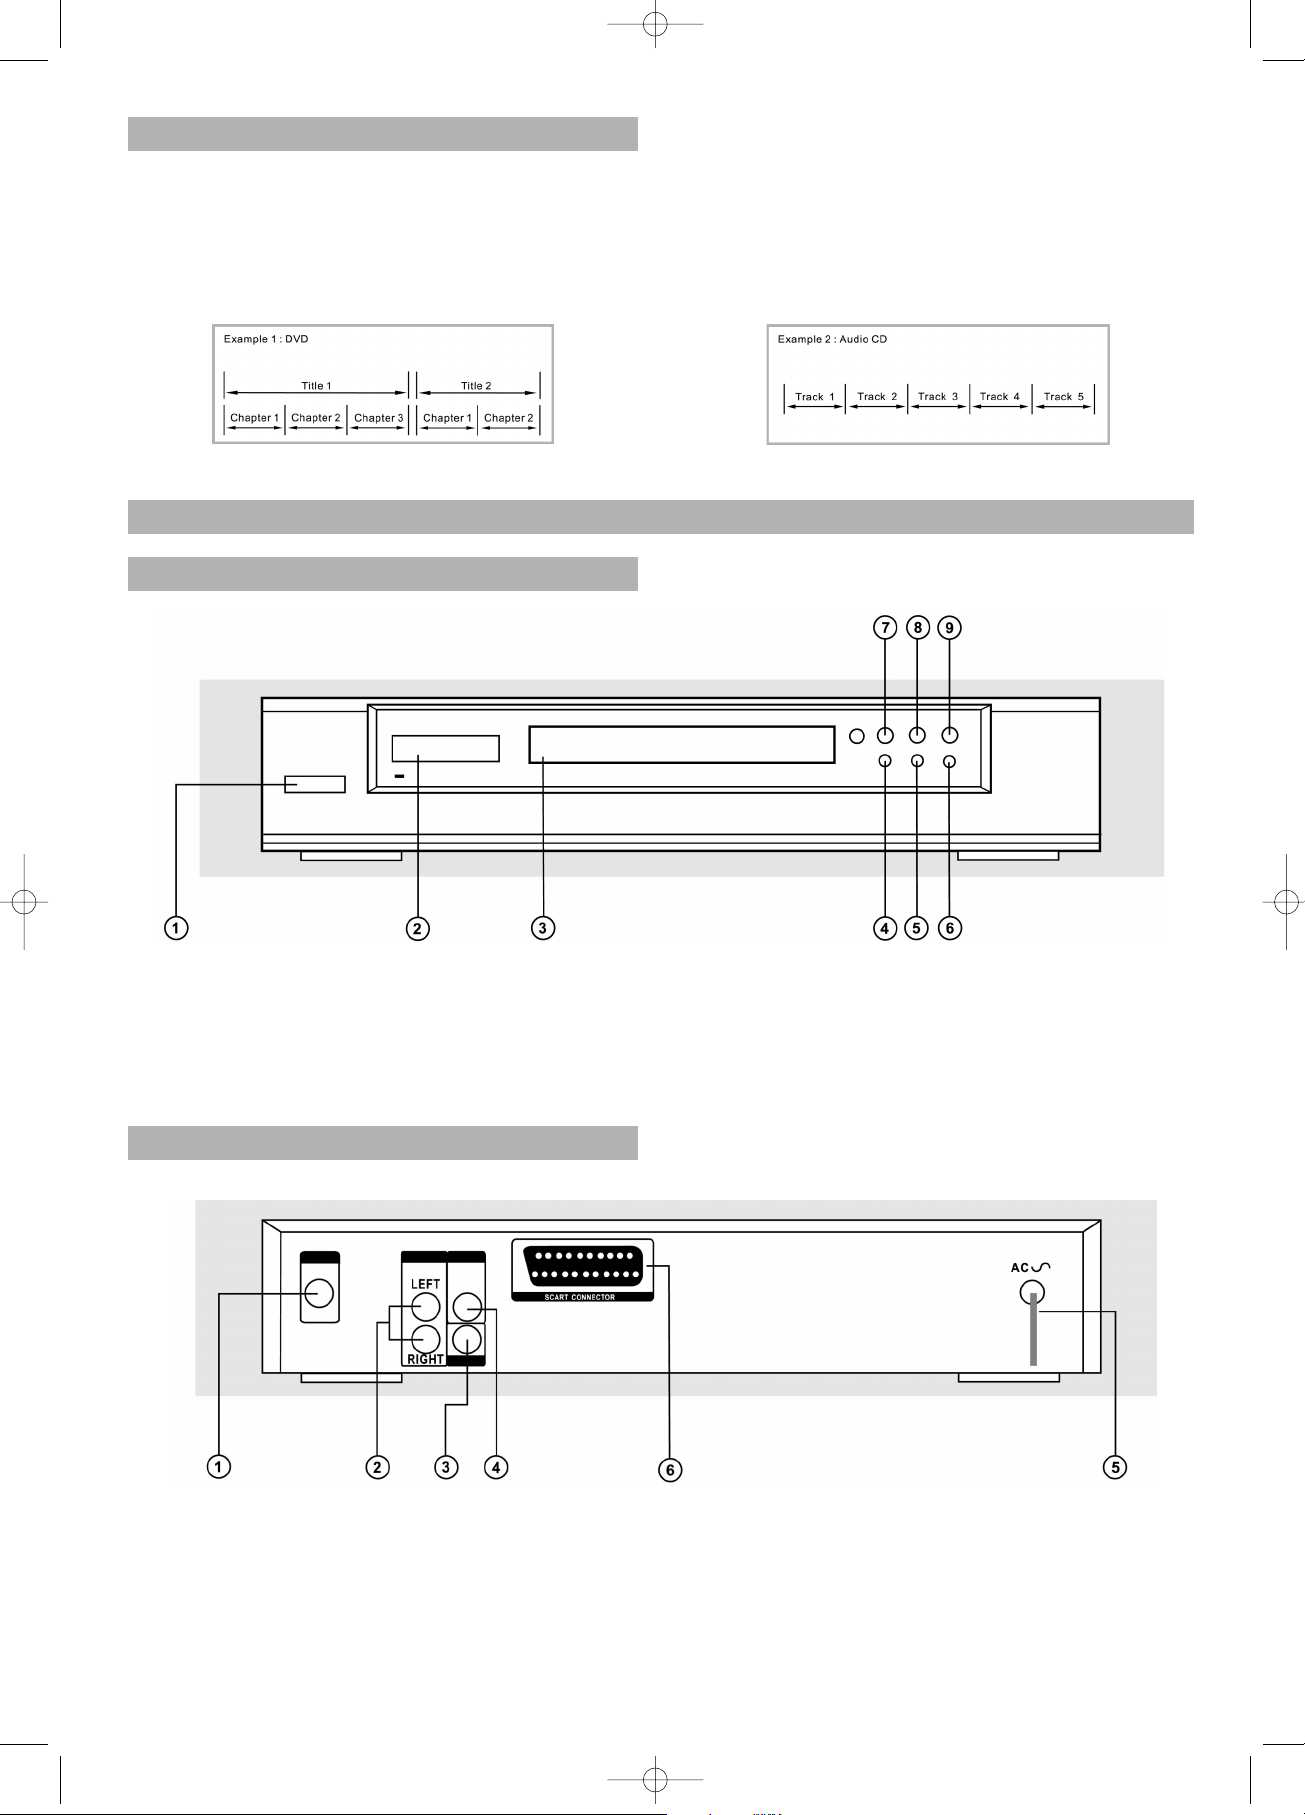
1. DIGITAL OUT – COAXIAL - Anschluss von
Audiogeräten mit Digital-Coaxial-Eingang.
2. Rechte und linke Audio-Ausgangsbuchsen
- Zum Anschluss an einen Stereoverstärker
3. S-VIDEO Ausgang - Anschluss eines TV-Gerätes mit
S-VHS-Videoeingang
4. VIDEO Ausgang
- Anschluss eines TV-Gerätes mit Video-Ausgang.
5. Wechselstrom-Netzanschlusskabel
- Anschluss an eine Standardsteckdose.
6. SCART Ausgang
- Anschluss eines TV-Gerätes mit SCART-Eingang.
1. POWER-Schalter –
Umschalten von Power auf Standby-Modi
2. Display
3. CD-Schublade
4. OPEN/CLOSE –
Öffnen und Schließen der CD-Schublade
5. PREV – Springen auf das vorherige Kapitel/Spur
6. NEXT – Springen auf das nächste Kapitel/Spur
7. PLAY – Wiedergabe starten
8. PAUSE – Wiedergabe unterbrechen
9. STOPP – Unterbrechen der Wiedergabe
Beschreibung
Vordere Bedientafel
Rückwärtige Bedientafel
Diskstruktur
Eine DVD-Video-Disk besteht aus einzelnen "Titeln", wobei jeder Titel wiederum in verschiedene "Kapitel" unterteilt sein kann (siehe Beispiel 1). Wenn eine Disk zum
Beispiel mehrere Filme enthält, kann jeder Film seine eigene Titelnummer haben und noch einmal in einige Kapitel unterteilt sein.
Auf der anderen Seite bestehen Audio-CDs aus "Spuren"
(Tracks) (siehe Kapitel 2).
Im allgemeinen hat jede Spur eine eigene Track-Nummer
(bei einigen Disks sind die jeweiligen Tracks nochmals
durch Index-Nummern gegliedert).
5....-05-DVD 608 HC D 01.06.2004 10:03 Uhr Seite 4
Page 5
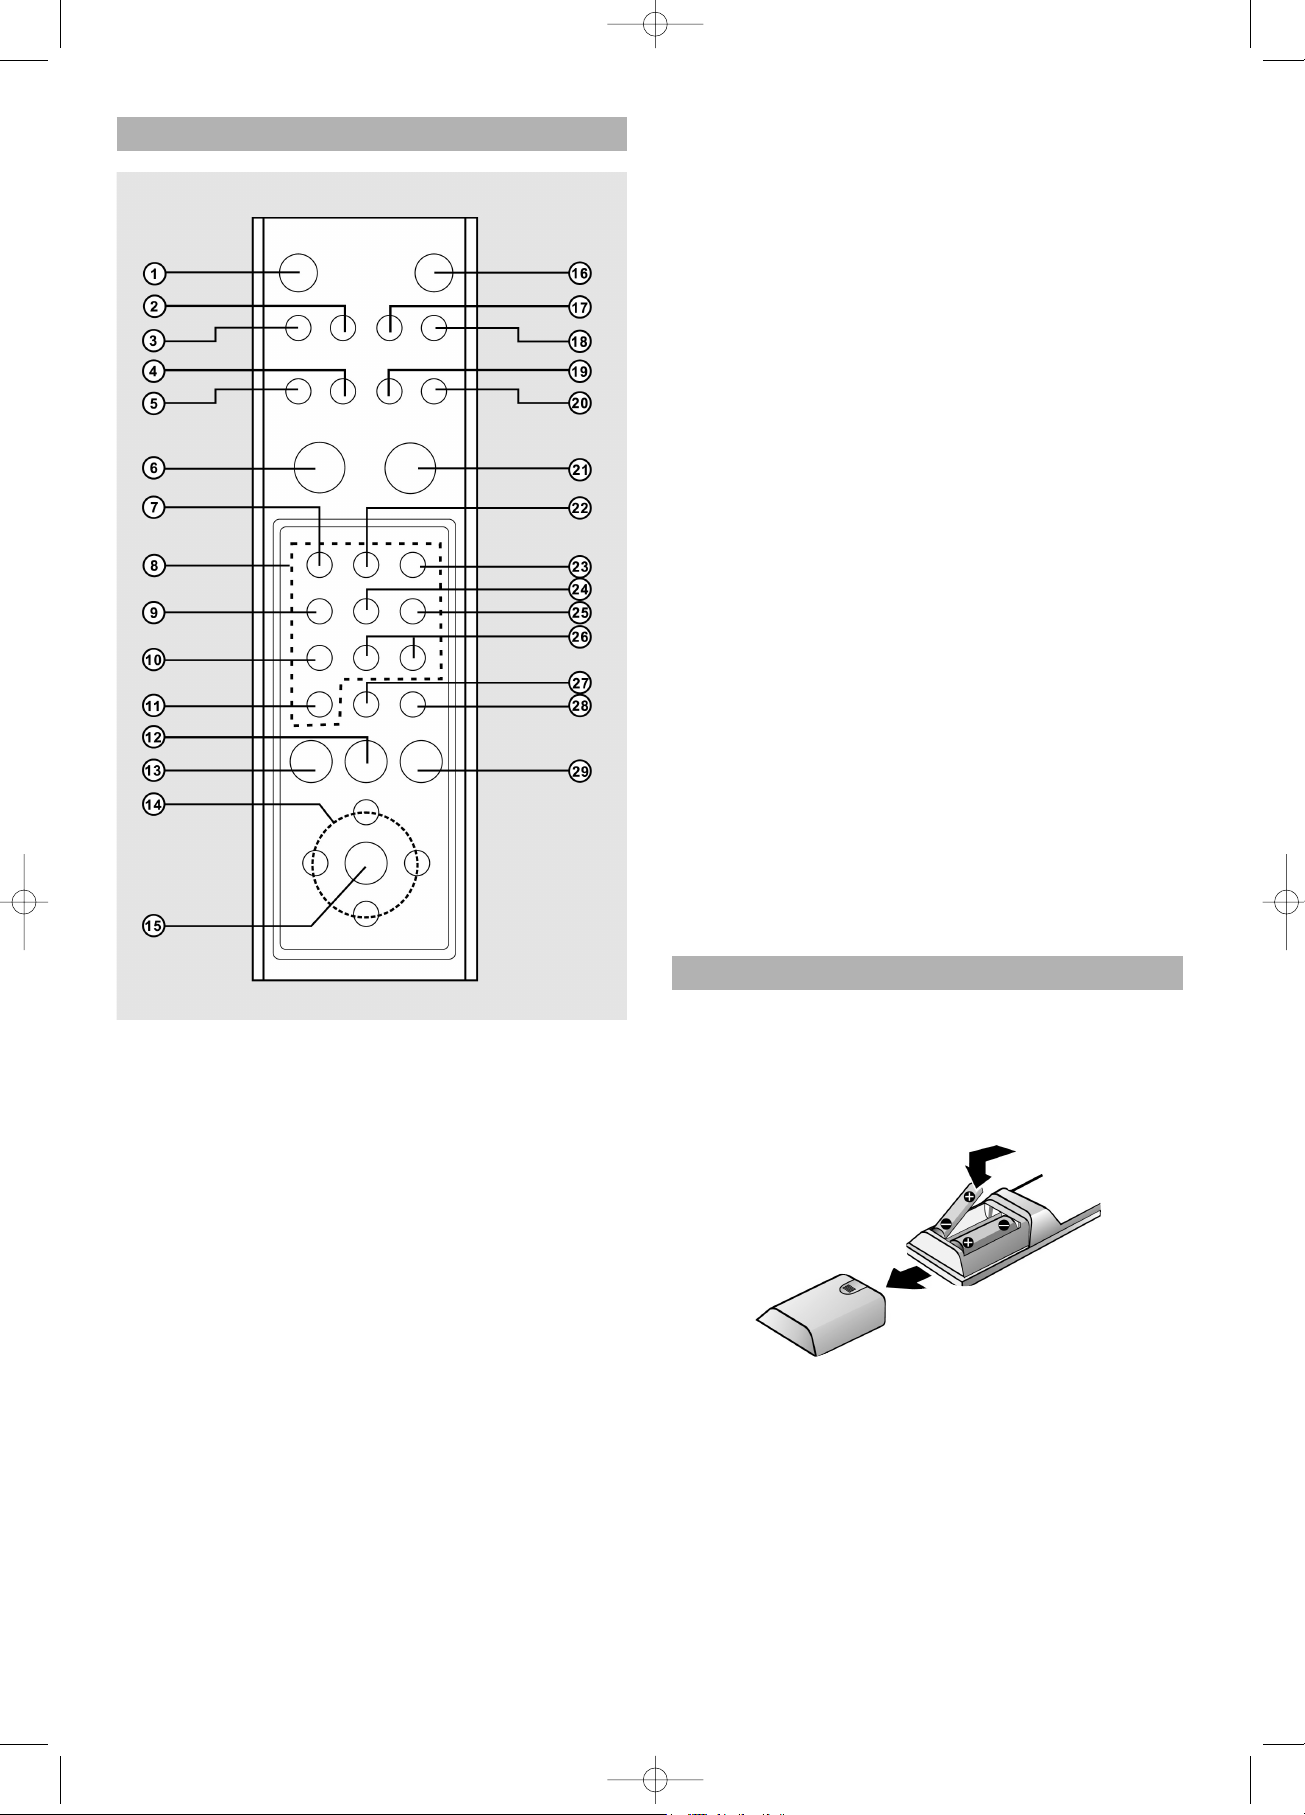
Fernbedienung
1. POWER - Umschalten auf Standby-Modus
2. TITLE/PBC
- Druck auf die Taste führt zum DVD-Titel-Menü
3. DVD-Menü/RETURN
- Druck auf die Taste führt zum DVD-Disk-Menü
- Rückkehr zum vorherigen Menü.
4. DIGEST (nur VCD und CD)
- Zwecks Vorschau einer VCD/CD-Spur drücken.
5. PROGRAM
- Druck auf die Taste führt zum Programm-Modus.
6. PLAY - zum Starten der Wiedergabe
7. ZOOM - zum Vergrößern des Bildes
8. Zifferntasten (0 – 9)
- zum Anwählen eines nummerierten Menüpunktes
9. ANGLE - zum Auswählen eines DVD-Kamerawinkels
10.AUDIO - Auswahl einer Audiosprache
11.BOOKMARK
12.NEXT
- Druck auf die Taste führt zum nächsten Kapitel bzw.
zur nächsten Spur
13.PREV
- Druck auf die Taste führt zum vorherigen Kapitel
bzw. vorherigen Spur
14.Pfeiltasten (links/rechts/auf/ab)
zum Auswählen eines Menüpunktes
15.ENTER
- Menüauswahl durch Drücken der Taste bestätigen
16.DISPLAY
- Druck auf die Taste während der Wiedergabe führt
zur Anzeige aktueller Diskinformationen auf dem
Bildschirm
17.SUBTITLE - Auswahl einer Untertitelsprache
18.MUTE
- Stummschalten durch einmaliges Drücken, Rückkehr
zum Ton durch nochmaliges Drücken
19.SETUP
- Taste drücken zum Öffnen bzw. Schließen des
Setup-Menüs
20.GOTO
- Aufsuchen eines bestimmten Kapitels oder Wiedergabezeit
21.STOP- Unterbricht die Wiedergabe
22.REPEAT
- zum Wiederholen eines Kapitels, Titels, Spur oder
Disk Taste drücken.
23.REPEAT A-B
- zum Wiederholen eines bestimmten Abschnitts Taste
drücken
24.SHUFFLE
- zum Abspielen der Tracks in zufälliger Reihenfolge.
25.PAUSE/STEP
- vorrübergehende Unterbrechung der
Wiedergabe/Bild-für-Bild-Wiedergabe
26.SLOW - für langsamen Vor-/Rücklauf der DVD.
27.REV
- für die Rückwärtssuche während der Wiedergabe.
28.FWD/CLEAR
- für die Vorwärtssuche während der Wiedergabe.
- eingegebene Auswahl löschen
29.SHIFT
- durch Drücken wird die auf der Oberfläche
aufgedruckte Funktion mit der entsprechenden Taste
kombiniert.
Batterie einlegen (Fernbedienung)
Sie können den Player mit der mitgelieferten Fernbedienung steuern. Legen Sie zwei R6 (AA)-Batterien entsprechend der angegebenen Polrichtung in das Batteriefach
ein. Wenn Sie die Fernbedienung verwenden möchten,
richten Sie diese auf den Remote-Sensor am Gerät.
Hinweise
- Die Fernbedienung nicht an extrem heißen oder
feuchten Orten aufbewahren.
- Neue und alte Batterien nicht vermischen.
- Die Fernbedienung nicht direktem Sonnenlicht oder
Beleuchtungsvorrichtungen aussetzen. Dies kann zu
Störungen bei der Bedienung des Players führen.
- Wenn die Fernbedienung über einen längeren
Zeitraum nicht benutzt wird, Batterien entfernen, um
Schäden aufgrund auslaufender Batterien oder Korrosion zu verhindern.
5
5....-05-DVD 608 HC D 01.06.2004 10:03 Uhr Seite 5
Page 6

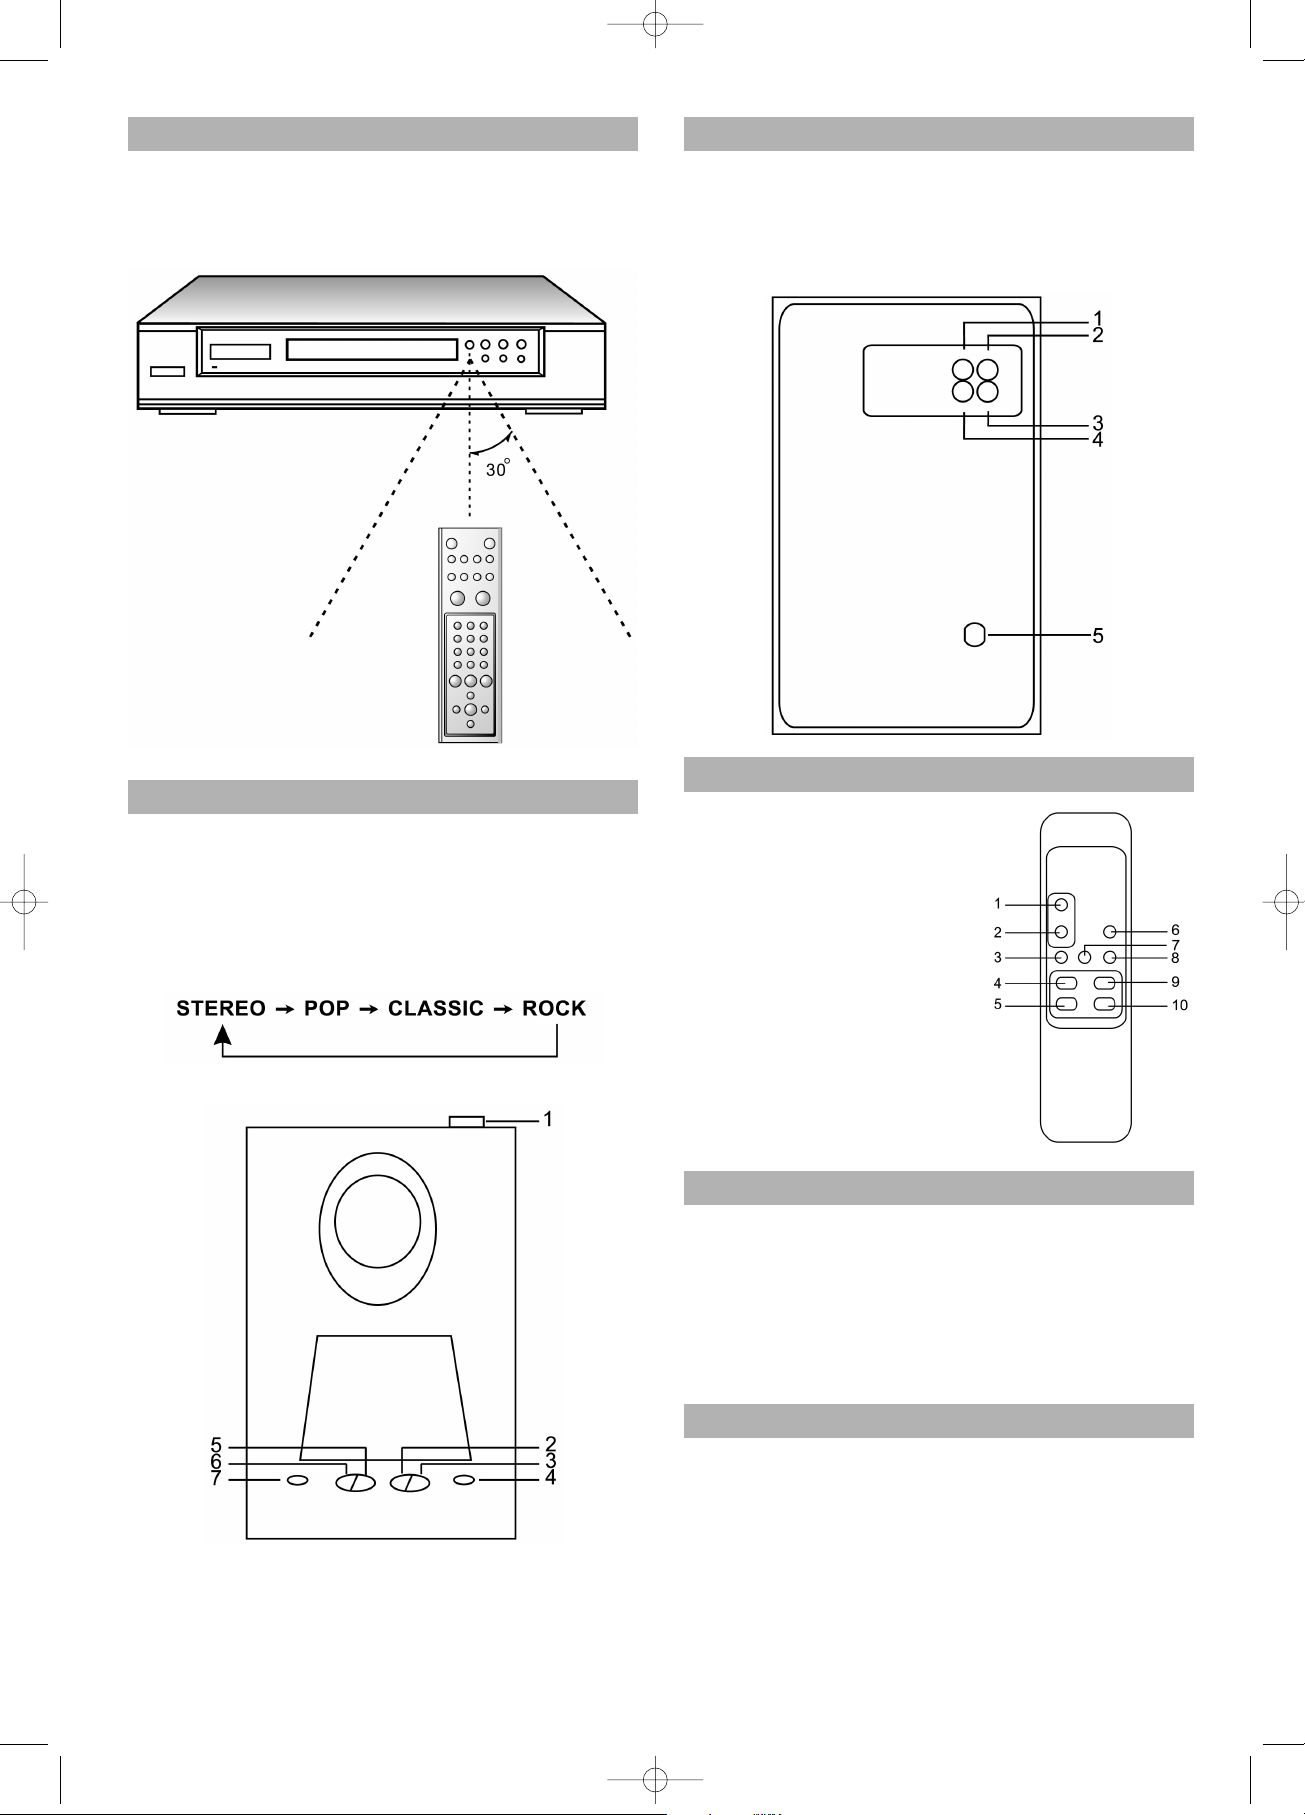
Reichweite der Fernbedienung
Die Fernbedienung kann in einer Entfernung von bis zu
ca. 5 Metern in gerader Richtung verwendet werden.
Außerdem kann sie innerhalb eines horizontalen Winkels
von 30 ° zum Remote-Sensor eingesetzt werden.
Vordere Bedientafel (Subwoofer)
1. EIN-/AUS-Schalter
2. Hauptlautstärke ab
3. Hauptlaufstärke auf
4. Stumm
5. Bass-Lautstärke auf
6. Bass-Lautstärke ab
7. Modus
Rückwärtige Bedientafel (für Subwoofer)
1. Linker Audioeingang
2. Rechter Audioeingang
3. Rechter Lautsprecherausgang
4. Linker Lautsprecherausgang
5. AC-Anschlusskabel
Fernbedienung (für Subwoofer)
1. Stummschaltung Ein
(Mute on)
2. Stummschaltung Aus
(Mute off)
3. Rock-Soundeffekt
4. Hauptlautstärke auf
5. Hauptlautstärke ab
6. Stereo-Soundeffekt
7. Klassik-Soundeffekt
8. Pop-Soundeffekt
9. Bass-Lautstärke auf
10.Bass-Lautstärke ab
Komponenten
Subwoofer . . . . . . . . . . . . . . . . . . . . . . . . . . . . . . .1 Stück
RCA-Kabel für Eingang
(DVD-Gerät an Subwoofer) . . . . . . . . . . . . . . . . . .1 Stück
Satelliten-Lautsprecher . . . . . . . . . . . . . . . . . . . . .2 Stück
RCA-Kabel für
Satelliten-Lautsprecher . . . . . . . . . . . . . . . . . . . . .2 Stück
Anwendungstips
1. Bevor Sie das Gerät einschalten, bringen Sie erst
sämtliche Funktionen in die Aus- bzw. Minimalstellung.
2. Regeln Sie die Lautstärke auf das Ihnen zusagende
Niveau.
3. Regeln Sie die Bass-Lautstärke auf das Ihnen zusagende Niveau.
4. Bringen Sie zum Ausschalten erst sämtliche Funktionen in die Aus- bzw. Minimalstellung.
6
5....-05-DVD 608 HC D 01.06.2004 10:03 Uhr Seite 6
Page 7

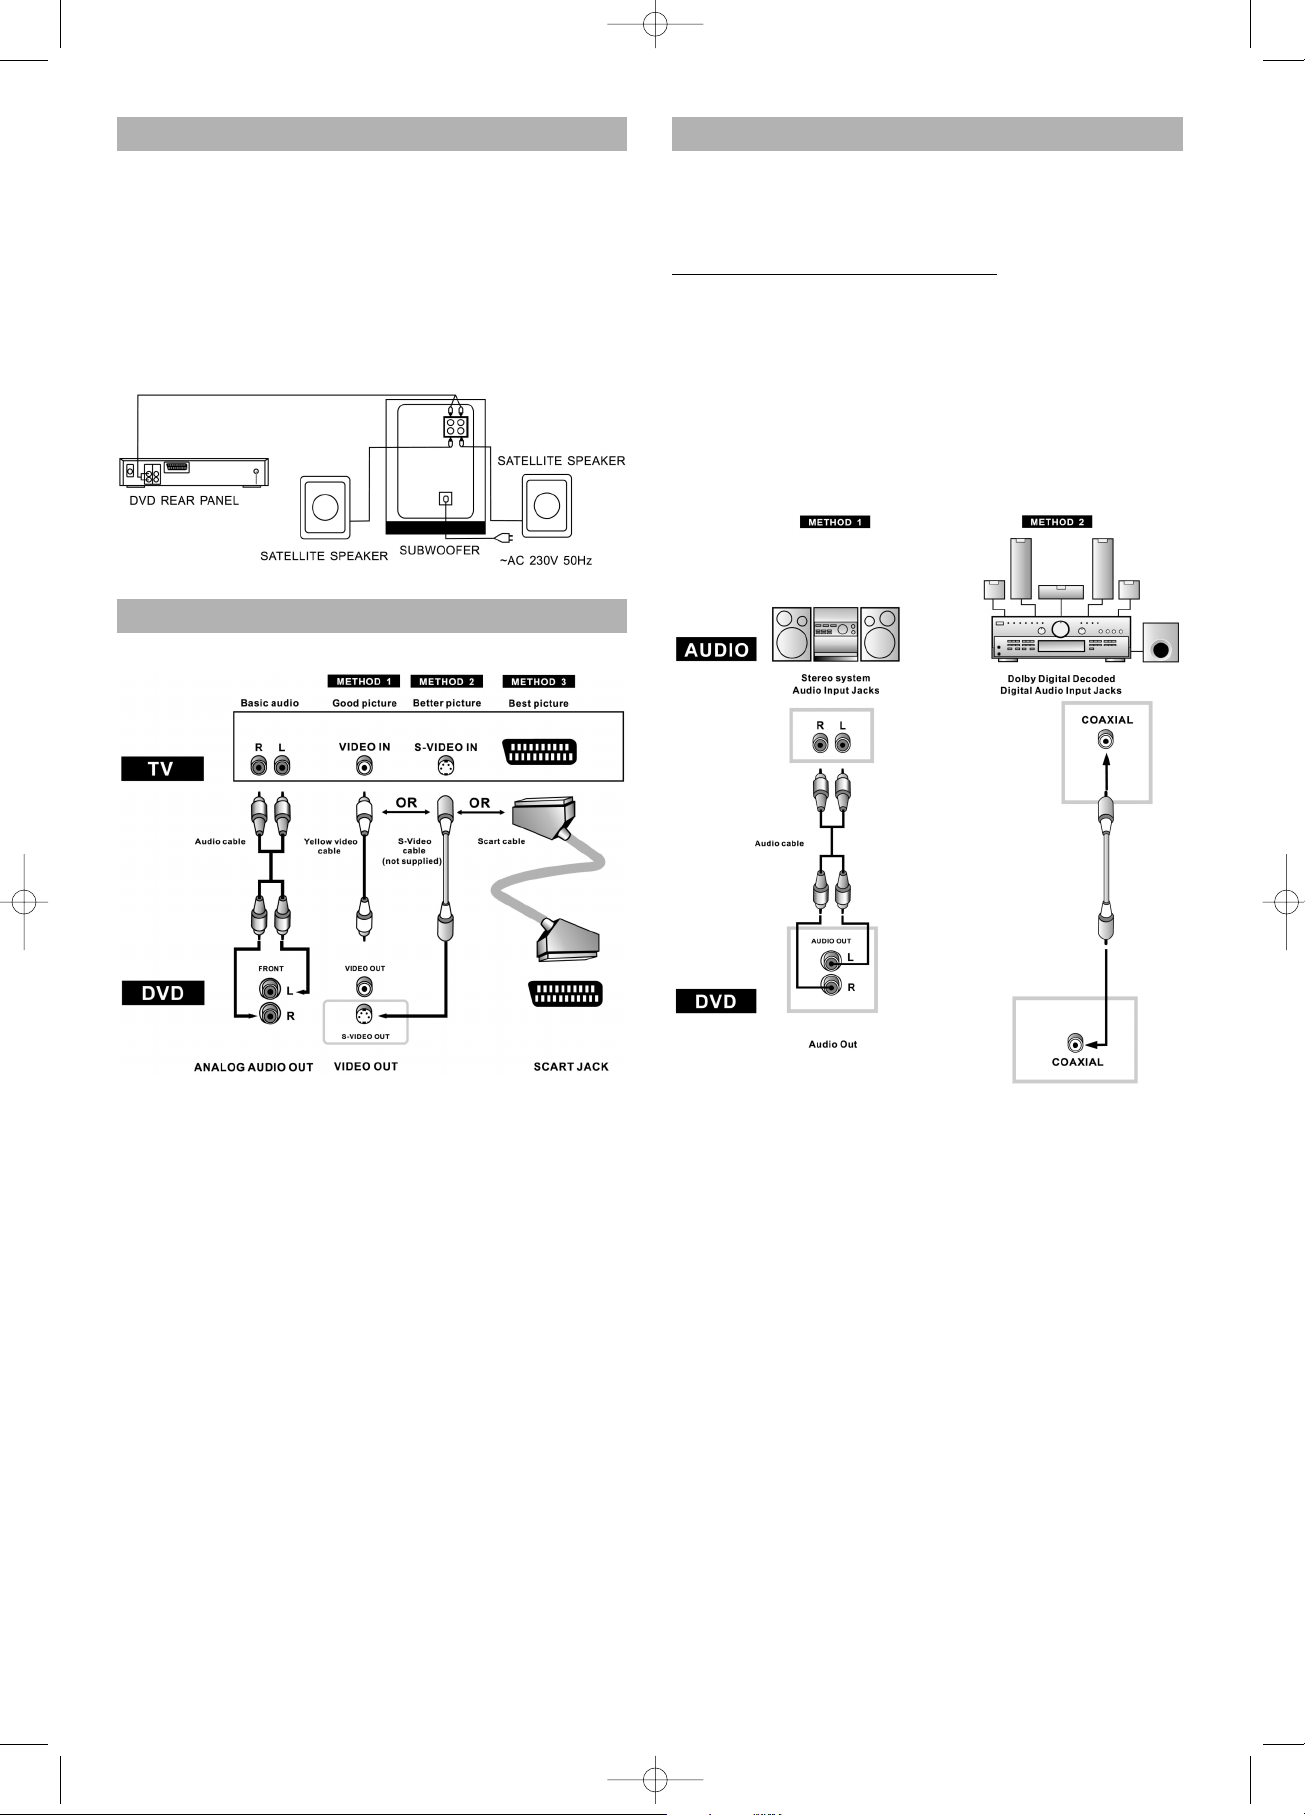
Installationsanleitung
1. Schließen Sie die Verbindungskabel für die Satellitenlautsprecher an den Audio Ausgängen der rückwärtigen Subwoofer Bedientafel an.
2. Schließen ein Ende des Signalverbindungskabels in
die Ausgangsbuchse (Audio Out) des DVD Players an.
Dann das andere Ende mit der Eingangsbuchse (Audio In) an der Rückseite des Subwoofer-Gehäuses
verbinden.
3. Den Stecker in die Steckdose stecken.
Anschluss eines Fernsehgerätes (für Video)
Methode 1 DVD-Player mit
TV-Gerät mit Video-Eingang
Methode 2 DVD-Player mit
TV-Gerät mit S-Video-Eingang
Methode 3 DVD-Player mit
TV-Gerät mit Scart-Eingang
(Audio & Video)
Anschluss an eine Audio-Anlage
Das folgende Diagramm zeigt Beispiele für Anschlusswege, die normalerweise zum Anschließen eines DVD-Players an TV-Geräte mit anderer Audio-Ausstattung verwendet werden.
V
or Anschluss des DVD-Players
- sicherstellen, dass vor dem Anschließen eines weiteren Gerätes alle Geräte der Anlage ausgeschaltet
sind.
- Die Bedienungsanleitung Ihres TV-Gerätes, Stereoanlage sowie der anderen Geräte, die an den DVD-Player angeschlossen werden sollen, genau durchlesen.
Methode 1 DVD-Player + Stereoanlage
Methode 2 DVD-Player + Verstärker mit
Dolby Digital Decoder/DTS-Decoder
7
5....-05-DVD 608 HC D 01.06.2004 10:04 Uhr Seite 7
Page 8
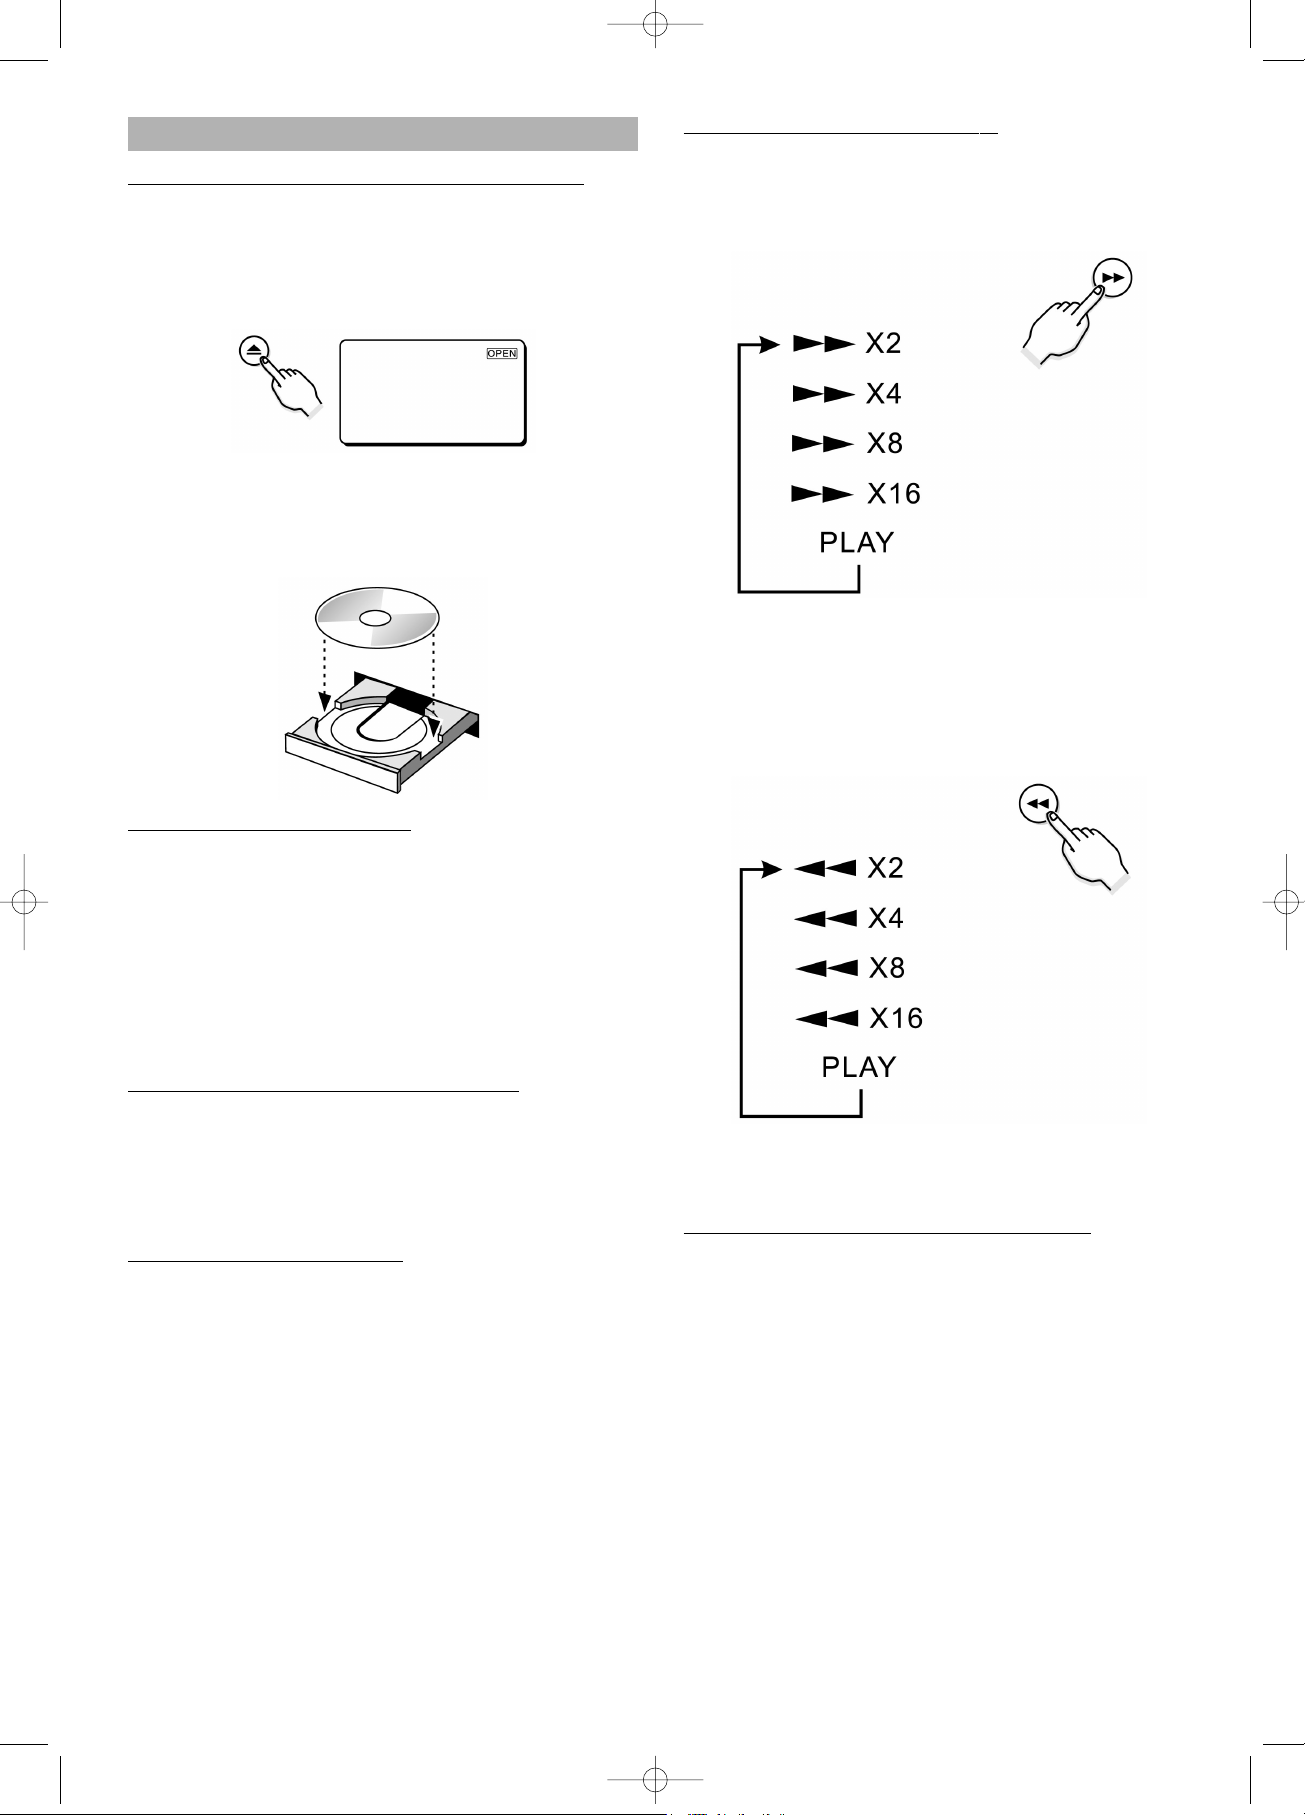
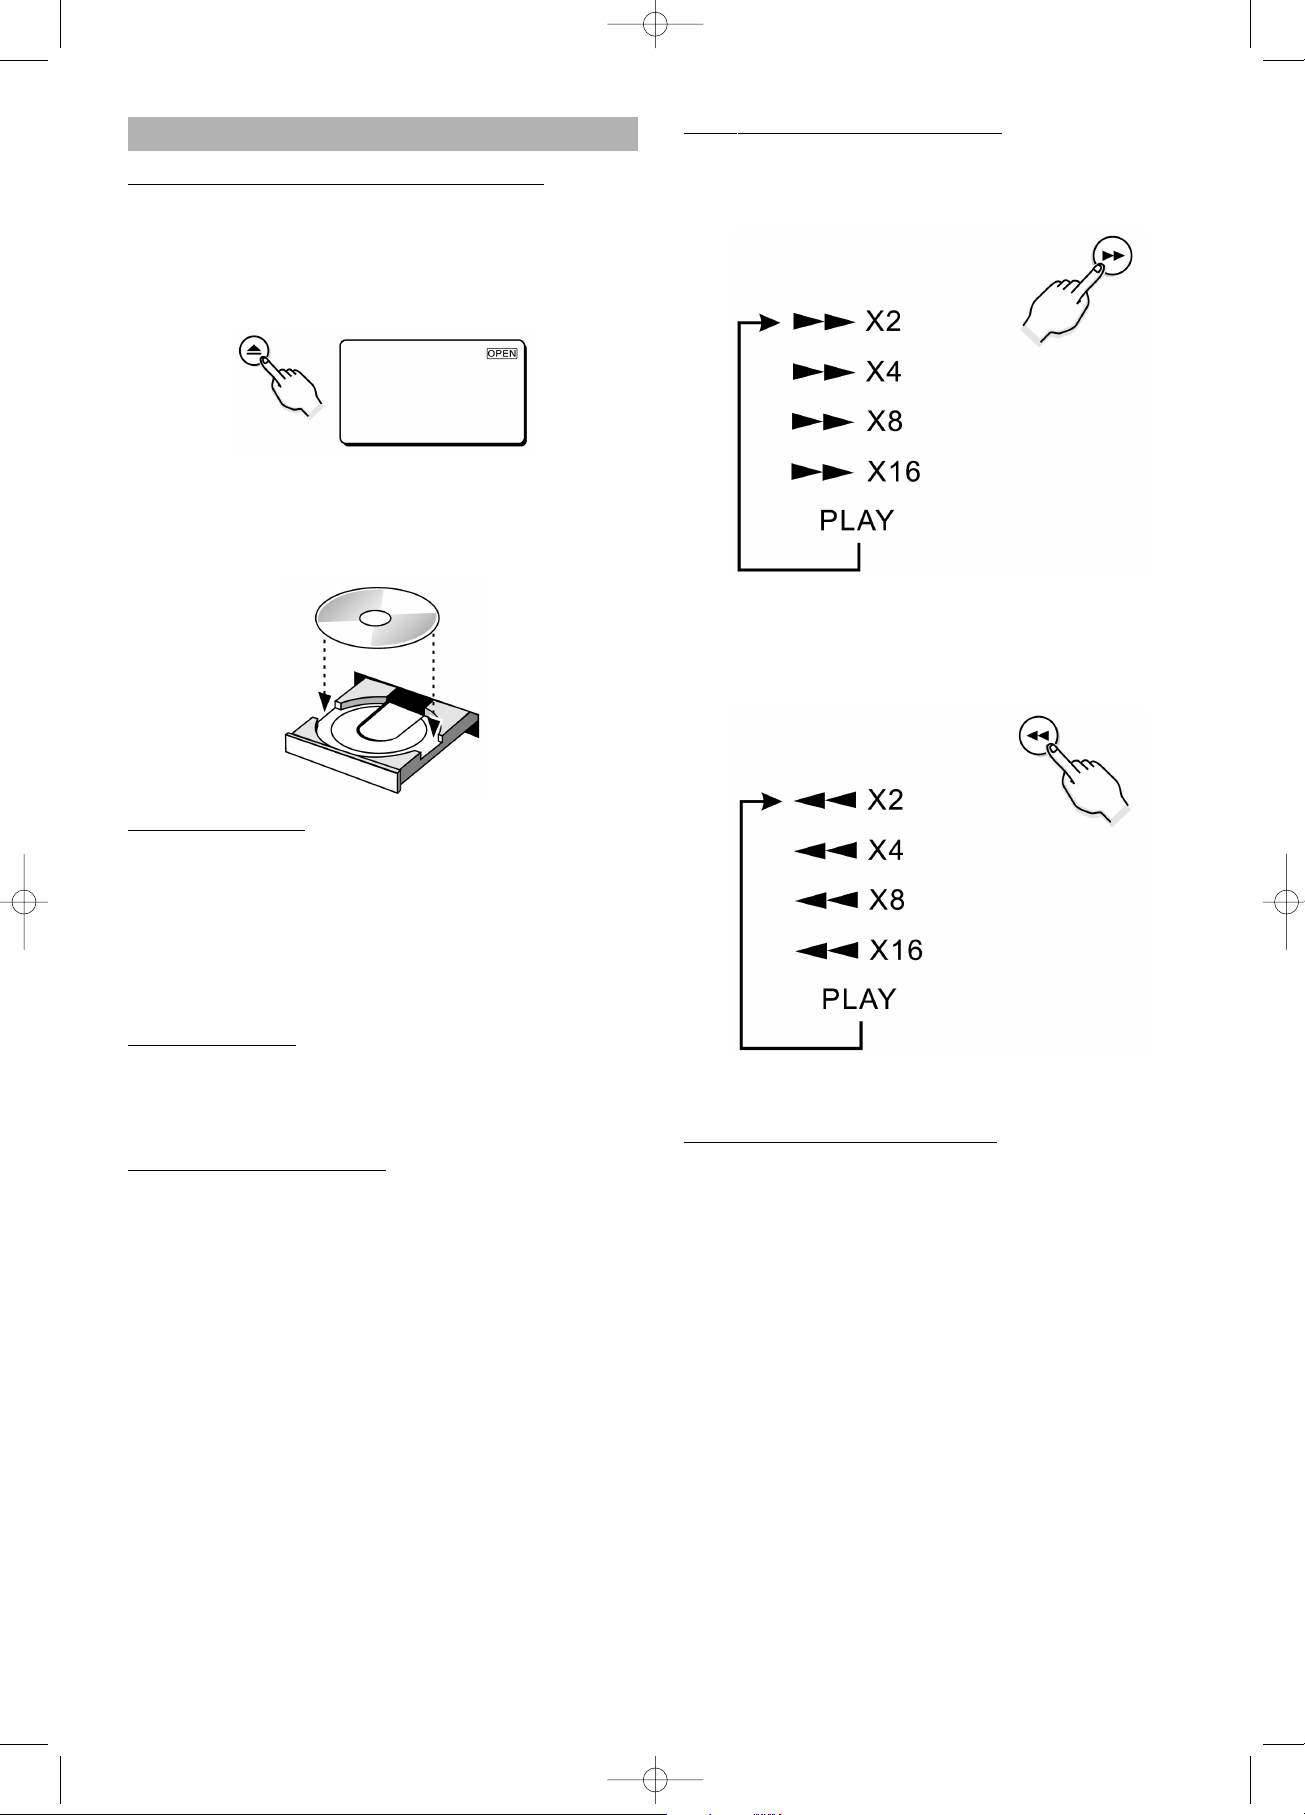
Normale Wiedergabe
Einschalten des Players und Abspielen der Disk
- Den Powerknopf drücken. Wenn sich eine Disk in der
Diskschublade befindet, startet der Player mit der
Wiedergabe, sobald die Power-Taste gedrückt wird.
- Zum Wechseln oder Einlegen einer Disk zum Öffnen
der Schublade die OPEN/CLOSE-Taste drücken.
- Sobald die Disk eingelegt ist, zum Schließen der
Schublade nochmals die OPEN/CLOSE-Taste
drücken. Sobald diese geschlossen ist, startet der
Player mit der Wiedergabe der Disk.
Unterbrec
hen der Wiedergabe
- Zum Unterbrechen der Wiedergabe und Anzeigen des
LOGO-Bildes einmal die STOP-Taste drücken. Der
Player speichert die Stelle, an der die Wiedergabe unterbrochen wird.
- Zum Fortsetzen der Wiedergabe ab der
Unterbrechungsstelle nochmals die PLAY-Taste
drücken.
- Wird die STOP-Taste zweimal gedrückt, wird die Wiederaufnahmefunktion gelöscht.
P
ausenfunktion während der Wiedergabe
- Um während der Wiedergabe die Pausenfunktion zu
nutzen, die PAUSE/STEP-Taste einmal drücken. Der
Ton ist im PAUSE-Modus stumm geschaltet.
- Zum Fortsetzen der Wiedergabe die PLAY-Taste
drücken.
Einz
elbild-Anzeige (nur DVD)
- Zum Unterbrechen der Wiedergabe die PAUSE-Taste
drücken.
- Nochmals die PAUSE-Taste drücken, um zur nächsten
Bildeinstellung vorwärts zu schalten.
- Zum Fortsetzen der normalen Wiedergabe die PLAYTaste drücken.
Suc
he vorwärts/Suche rückwärts
- Um die Disk schnell vorwärts zu durchsuchen die
FWD-Taste drücken. Die Geschwindigkeit kann durch
weiteres Drücken der Taste gewählt werden. (2x, 4x,
8x, 16x, normal) bei DVDs und bei VCDs.
- Zum Fortsetzen der Wiedergabe die PLAY-Taste
drücken.
- Um die Disk schnell rückwärts zu durchsuchen die
REV-Taste drücken. Die Geschwindigkeit kann durch
weiteres Drücken der Taste gewählt werden. (2x, 4x,
8x, 16x, normal) bei DVDs und bei VCDs.
- Zum Fortsetzen der Wiedergabe die PLAY-Taste
drücken.
Wieder
gabe in Zeitlupe vorwärts/rückwärts
- Um die Disk in Zeitlupe vorwärts laufen zu lassen, die
SLOW-Forward-Taste drücken.
- Jedes Mal, wenn die SLOW-Forward-Taste gedrückt
wird, ändert sich das Zeitlupentempo (1/2x, 1/4x, 1/8x,
1/16x normale Geschwindigkeit bei DVDs).
- Zum Fortsetzen der normalen Wiedergabe die PLAYTaste drücken.
- Um die Disk in Zeitlupe rückwärts laufen zu lassen,
die SLOW-Backward-Taste drücken.
- Jedes Mal, wenn die SLOW-Backward-Taste gedrückt
wird, ändert sich das Zeitlupentempo (1/2x, 1/4x, 1/8x,
1/16x, normale Geschwindigkeit bei DVDs)
- Zum Fortsetzen der normalen Wiedergabe die PLAYTaste drücken.
8
5....-05-DVD 608 HC D 01.06.2004 10:04 Uhr Seite 8
Page 9
Springen zum nächsten/vorherigen Kapitel/Spur
- Um an den Anfang des nächsten Kapitels (DVD) oder
Spur (Audio-CD) zu springen, die NEXT-Taste
drücken.
- Um zum vorherigen Kapitel (DVD) oder den Anfang
der laufenden Spur (Audio-CD) zu springen, die
PREV-Taste drücken.
- Um zur vorherigen Spur zu springen (Audio-CD), die
PREV-Taste zweimal drücken.
Überprüf
en der Restlaufzeit
- zum Prüfen der bereits abgelaufenen Spieldauer bzw.
der Restlaufzeit die DISPLAY-Taste gemäß Abbildung
drücken.
Wiedergabe Wiederholen
Wiedergabe/Abspielen wiederholen
- zum Wiederholen des Kapitels, Titels sowie der
gesamten DVD-Disk; bzw. Spur und gesamten CDDisk die REPEAT-Taste drücken.
TITLE REPEAT ON/
REP-ALL – gesamten Titel wiederholen
Wenn die Wiedergabe den Endtitel der CD erreicht hat, startet
die Wiedergabe nochmals von
vorn.
CHAPTER – laufendes Kapitel wiederholen
Wenn die Wiedergabe am Ende
des laufenden Kapitels angelangt
ist, springt die Wiedergabe zum
Anfang des Kapitels zurück.
REP-ONE – laufende Spur/Song wiederholen
Wenn die Wiedergabe das Ende
der laufenden Spur/Songs
erreicht hat, springt die Wiedergabe an den Anfang der
Spur/Song zurück.
Wieder
gabe wiederholen AB
- Am Anfang des zu wiederholenden Abschnitts (Punkt
A) die A-B-Taste einmal drücken.
- Am Ende des zu wiederholenden Abschnitts (Punkt
B), die A-B-Taste nochmals drücken.
- Der Player kehrt automatisch zu
Punkt A zurück und startet die
nochmalige Wiedergabe des ausgewählte Abschnitts (A – B).
(Abbildung)
- Um die Wiederholung des
Abschnitts A – B zu löschen, die
A-B-Taste ein drittes Mal drücken.
Die normale Wiedergabe wird fortgesetzt
9
5....-05-DVD 608 HC D 01.06.2004 10:04 Uhr Seite 9
Page 10
Programmierte Wiedergabe
- Die PROGRAM-Taste drücken und mittels der Zifferntasten an der Fernbedienung die TITEL- bzw.
KAPITEL-Nummer eingeben (0–9). Die OSD-Anzeige
zeigt folgendes an:
- Den Punkt Programmieren anwählen und über die
Pfeiltasten den Cursor auf START setzen, dann zum
Starten der Wiedergabe die ENTER-Taste drücken.
- Die Programmierfunktion kann in gleicher Weise auch
für Audio-CDs verwendet werden.
Zufällig
e Wiedergabe (SHUFFLE) nur für CD
- während der Wiedergabe die SHUFFLE-Taste
drücken, um zwischen ON und OFF hin- und
herzuschalten. Die Einstellungen lauten wie folgt:
ON = Zufallsmodus eingeschaltet. Wenn die Wieder-
gabe am Ende der laufenden Spur angekommen ist, springt sie auf eine zufällige Spur weiter.
OFF = Zufallsmodus ausgeschaltet. Bildschirmanzei-
ge OFF (Zuerst die STOP-Taste drücken, bevor dies genutzt werden kann).
Verwendung von DISK-MENÜS und TITEL
Öffnen des Disk-Menüs
- Sie können die Menüs zwecks Auswahl der Hörsprache, Untertitelsprache, etc. verwenden. Die Inhalte der
DVD-Menüs variieren von Disk zu Disk.
1. Während der Wiedergabe die DVD-Menütaste
drücken. Das Menü wird angezeigt.
2. Mit den Pfeiltasten (auf/ab) bzw. (rechts/links) die verschiedenen Punkte ansteuern.
3. Die ENTER-Taste drücken: - der gewählte Punkt wird
wiedergegeben.
V
erwendung des Titel-Menüs
- Bei DVDs, die mehrere Titel enthalten, können Sie so
die Titel eines jeden Films anzeigen.
- Wie diese Funktion arbeitet und ob Sie unterstützt
wird ist abhängig von der DVD.
AUDIO-Sprache / Untertitelsprache
(gilt nur für DVD-Disks)
Auswahl der Audio-Sprache
- Zwecks Auswahl verschiedener Hörsprachen die AUDIO-Taste drücken (z. B. Englisch, Französisch, Spanisch, Deutsch..., abhängig von der Anzahl der auf der
DVD-Disk gespeicherten Sprachen).
A
uswahl der Untertitel-Sprache
- Zwecks Auswahl der verschiedenen
Untertitelsprachen die SUBTITLE-Taste drücken (z. B.
Englisch, Französisch, Spanisch, Deutsch..., abhängig
von der Anzahl der auf der DVD-Disk gespeicherten
Untertitelsprachen).
ZOOM
- Während der Wiedergabe mehrmals die ZOOM-Taste
drücken, um die Bildgröße zu verändern (2fach, 3fach,
4fach, 1/2fach, 1/3fach, 1/4fach).
- Wenn ein Bild vergrößert ist, können Sie die Ansicht
mit den Pfeiltasten (Auf/Ab, Links/Rechts) verschieben
und den von Ihnen gewünschten Teil anzeigen.
Winkel
- Während der Wiedergabe die ANGLE-Taste drücken,
um den gewünschten Winkel anzuwählen.
- Diese Funktion ist nur bei Disks aktiv, auf denen mehrere Szenen aus verschiedenen Kamerawinkeln aufgenommen wurden.
Direktzugriff auf einen Titel,
ein Kapitel oder Zeitpunkt
- die GOTO-Taste drücken.
- Jedes Mal, wenn die Taste gedrückt wird, erfolgt die
Wiederholung gemäß folgender Abbildung:
- Der Player springt sofort an den gewünschten Punkt.
- Bei der Wiedergabe einer VCD2.0. Die GOTO-Taste
drücken, um einen Such-Modus anzuwählen (Disc Time(Laufzeit)/Track Time(Spurzeit)/Track Number
(Spurnummer)
- Bei CD-Disks die GOTO-Taste drücken und die Spurnummer eingeben.
Buchzeichen (Bookmark)
- Über die Buchzeichen-Funktion können Sie Teile einer
DVD oder VCD auswählen, damit Sie die Stelle zu einem späteren Zeitpunkt schneller wiederfinden. (Der
Player unterstützt bis zu 12 Buchzeichen).
10
5....-05-DVD 608 HC D 01.06.2004 10:04 Uhr Seite 10
Page 11
- Während der Wiedergabe die BOOKMARK-Taste
drücken und die Buchzeichen-Übersicht wird
angezeigt.
- Durch Drücken der PLAY-Taste markiert der Player die
Stelle.
- Wenn Sie mehr als eine Stelle markieren möchten,
wählen Sie mit den Pfeiltasten ein leeres Feld und
drücken dann noch einmal die PLAY-Taste.
- Drücken Sie nocheinmal die BOOKMARK-Taste um
die Buchzeichen-Übersicht zu schließen.
- Zum Löschen eines Buchzeicheneintrags dorthin gehen und die CLEAR-Taste drücken.
DIGEST-Wiedergabe (DVD)
- Die DIGEST-Taste drücken, es erscheint das folgende
Menü.
- Zum Auswählen eines der Punkte TITLE DIGEST,
CHAPTER DIGEST, TITLE INTERVAL und CHAPTER
INTERVAL sowie BOOKMARK die AUF-/AB-Tasten
verwenden. Und dann die ENTER-Taste drücken.
– TITLE DIGEST: Der Film wird entsprechend der
Anzahl der darin enthaltenen
Titel in mehrere Abschnitt
unterteilt. Jeder der 6 Teil-Bildschirme zeigt einen Teiltitel.
– CHAPTER DIGEST: Der Titel wird entsprechend der
darin enthaltenen Kapitel in
mehrere Teile unterteilt.
– TITLE INTERVAL: Der aktuelle Titel wird in mehre-
re Abschnitte gleicher Laufzeit
(10 Minuten) unterteilt. Jeder
der Teil-Bildschirme zeigt einen
der Teilbereiche an.
– CHAPTER INTERVAL: Das aktuelle Kapitel wird in
mehrere Abschnitte mit gleicher
Laufzeit unterteilt.
- Zur Auswahl des von Ihnen gewünschten Fensters die
Zifferntasten bzw. Pfeiltasten benutzen und dann mit
ENTER bestätigen.
- Es können am Bildschirm gleichzeitig bis zu 6 Fenster
(Titel oder Kapitel) angezeigt werden. Sie können über
die NEXT-Taste und anschließendes Drücken der
11
5....-05-DVD 608 HC D 01.06.2004 10:04 Uhr Seite 11
Page 12
ENTER-Taste die nächsten 6 Titel oder Kapitel
anwählen, wenn der Film mehr als 6 Unterabschnitte
hat.
DIGEST-Wiedergabe (VCD)
- Drücken Sie während der Wiedergabe die DIGEST-Taste. Das folgende Menü erscheint.
- Mit den Auf-/Ab-Tasten einen der Punkte TRACK, DIGEST. DISC INTERVAL, TRACK INTERVAL
anwählen. Dann mit ENTER bestätigen.
- Zur Auswahl des von Ihnen gewünschten Fensters die
Pfeiltasten benutzen und dann mit ENTER bestätigen.
- Es können am Bildschirm gleichzeitig bis zu 6 Fenster
angezeigt werden. Um NEXT anzuwählen, die Pfeiltasten drücken. Dann mit ENTER die nächsten 6
Fenster anwählen, sofern der Film mehr als 6 Unterabschnitt hat.
- Bei CD audio unterstützt diese Funktion nur das Anspielen (SCAN). Der Player wird dann nacheinander
die ersten 6 Sekunden jeder Spur wiedergeben.
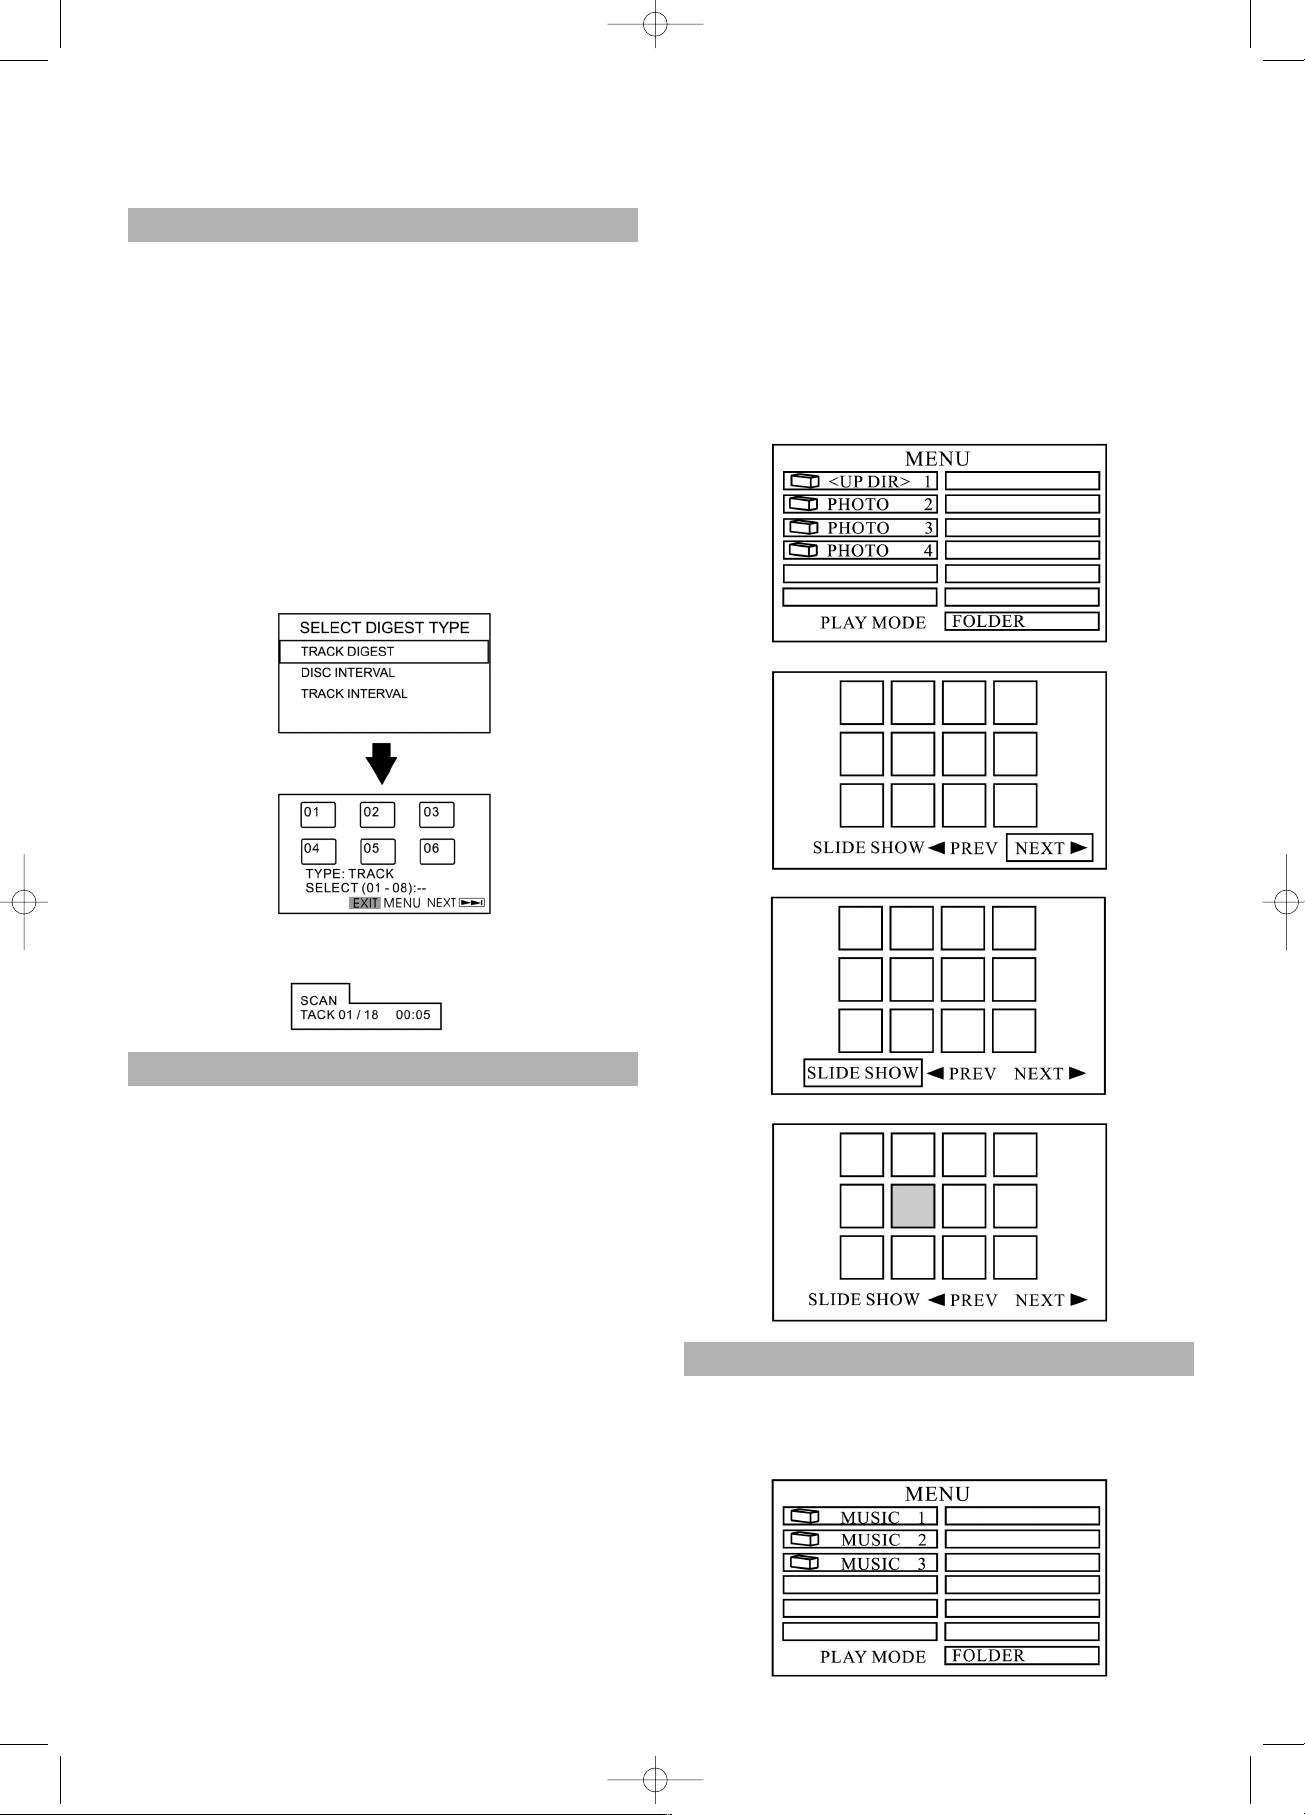
JPEG – Wiedergabe
Einige CDs können auch Bilder im JPEG-Format enthalten. Es kann z. B. vorkommen, dass Sie einen Fotofilm
entwickeln ließen, dessen Aufnahmen in JPEG-Format
vorliegen. Dann können Sie diese JPEG-Dateien über
diesen Player anzeigen.
Einige nützliche Hinweise in diesem Zusammenhang:
- Wenn Sie eine Disk mit JPEG-Dateien einlegen, werden die für die Wiedergabe zur Verfügung stehenden
Dateien oder Bilder am Bildschirm angezeigt.
- Die Auswahl des Ordners bzw. der Datei erfolgt über
die AUF/AB-Pfeiltasten, zum Bestätigen ENTER
drücken.
- Nach Öffnen einer JPEG-Datei erscheint nach einigen
Sekunden automatisch die nächstfolgende Datei. Um
das JPEG-Bild länger auf dem Bildschirm zu halten,
die PAUSE-Taste drücken, um die Abfolge zu
unterbrechen.
- Während der Wiedergabe zum Drehen oder Blättern
die Pfeiltasten benutzen.
- Zum Vergrößern oder Verkleinern eines Bildes
während der Wiedergabe die ZOOM-Taste drücken.
Zum Vergrößern des Bildes die FWD-Taste drücken.
Zum Verkleinern der Bildgröße die REV-Taste
drücken.
- Zum Ausschalten der ZOOM-Funktion nochmals die
ZOOM-Taste drücken und die Bildgröße kehrt zum
normalen Bild zurück.
- Während der Wiedergabe die STOP-Taste drücken.
Es werden am TV-Bildschirm jedes Mal 12 Bilder angezeigt, über die Pfeiltasten PREV oder NEXT
anwählen, dann ENTER drücken.
- Zum Umschalten in den Diashow-Modus am
Bildschirm den Punkt “slide show” anwählen. Der
Player beginnt die Show mit dem ersten Bild.
- Zur Auswahl des Bildes die Pfeiltasten verwenden,
dann mit ENTER bestätigen. Dann schaltet das Gerät
in den Diashow-Modus und beginnt bei dem
ausgewählten Bild.
MP3 – Wiedergabe
Dieses Gerät verfügt über einen eingebauten MP3-Decoder. Sie können damit MP3-Spuren (-dateien) wiedergeben, die auf CD-R oder CD-RW aufgezeichnet sind.
12
5....-05-DVD 608 HC D 01.06.2004 10:04 Uhr Seite 12
Page 13
Wiedergabe starten
- Es wird empfohlen, dass Sie Ihr TV-Gerät einschalten,
wenn Sie eine MP3-Disk wiedergeben wollen.
1. Zum Laden der Disk die OPEN/CLOSE-Taste
drücken.
- Im Menü erscheinen die Folder und die Dateien im
Root Directory.
2. Mit den Pfeiltasten Auf/Ab den gewünschten
Musikordner anwählen, mit ENTER bestätigen.
3. Zur Auswahl einer Songdatei nochmals die Auf/Ab-Tasten benutzen, dann zum Starten der Wiedergabe der
Songdatei die ENTER-Taste drücken.
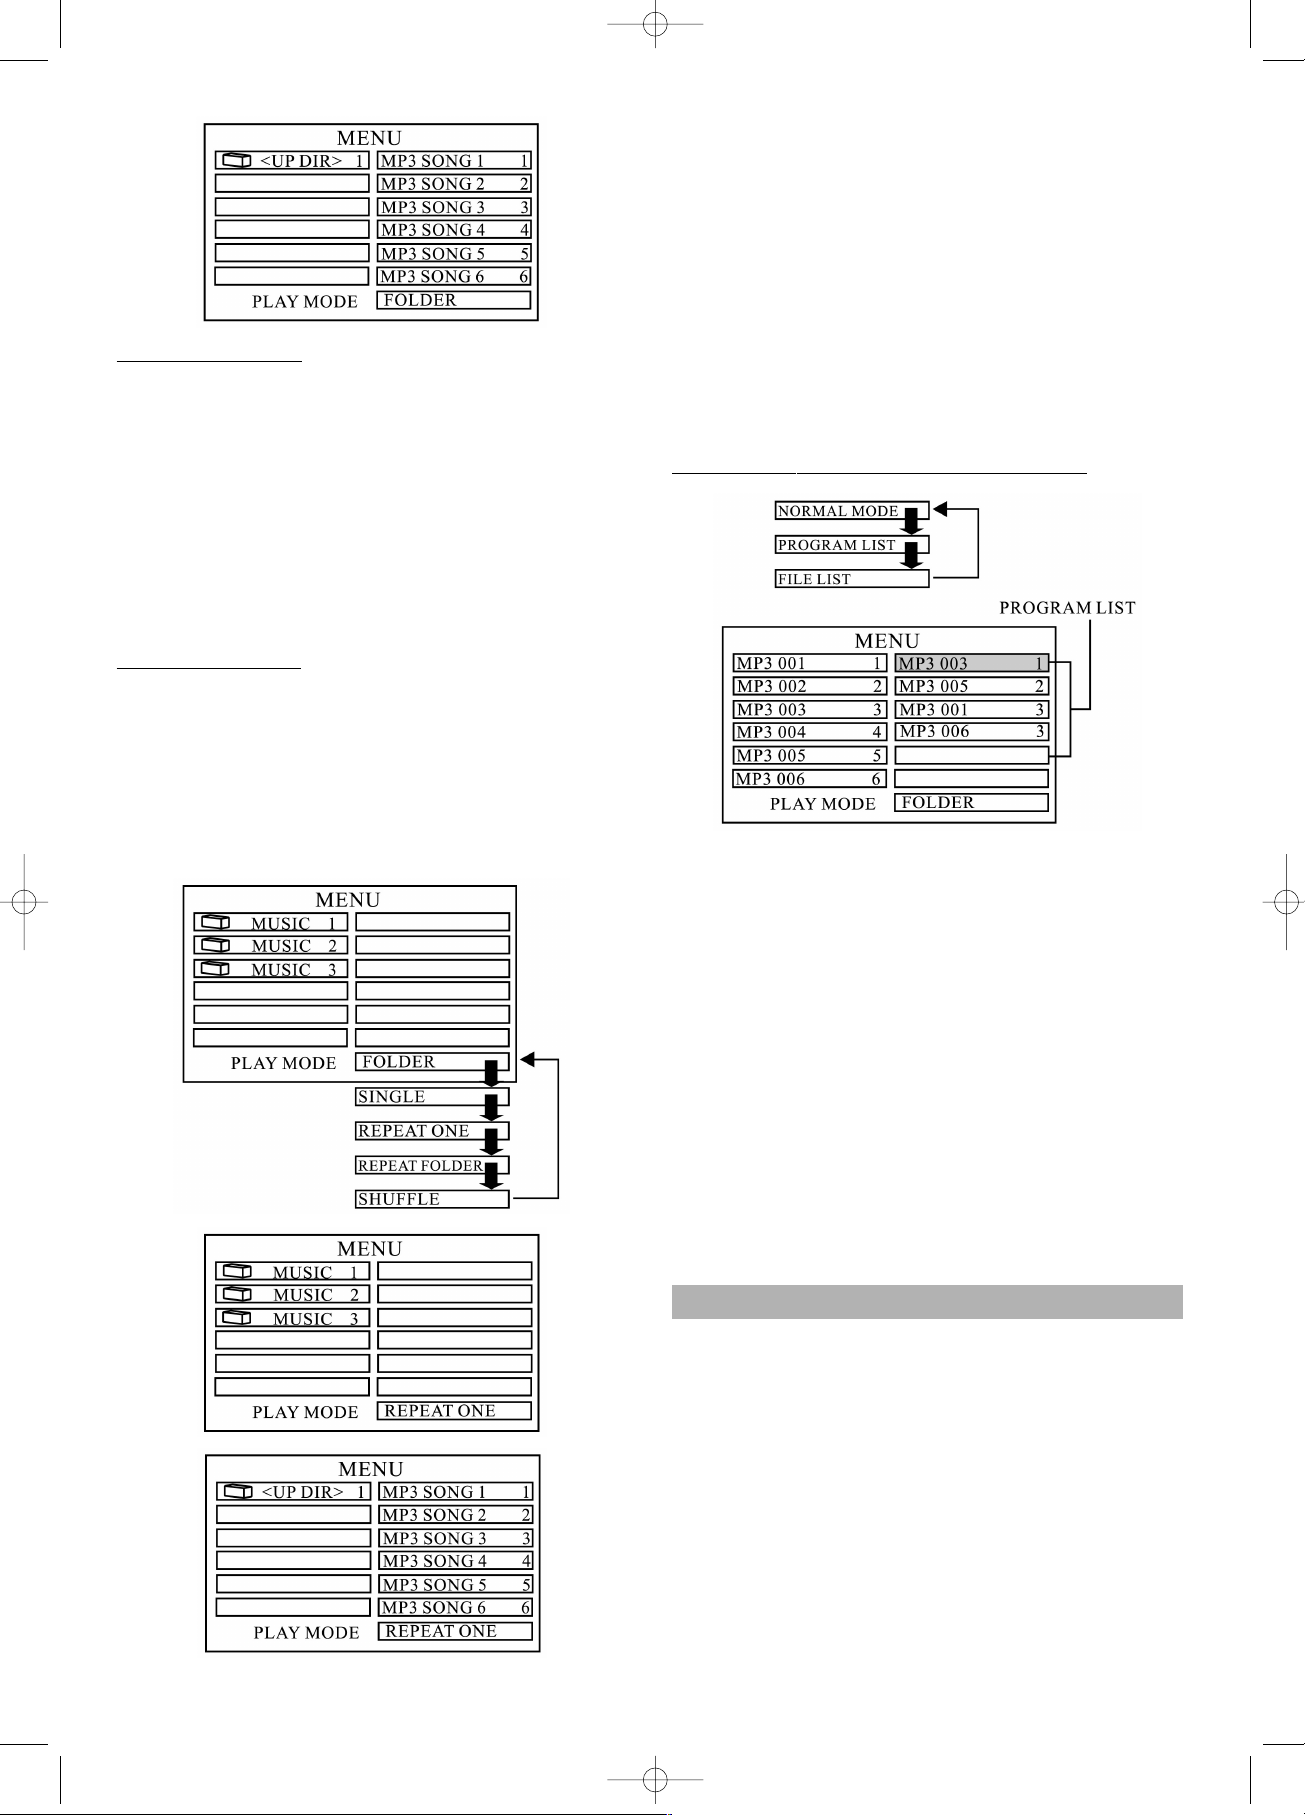
Wieder
gabe-Modus
- Am TV-Bildschirm erscheint die dem gewählten
Modus entsprechende Anzeige.
1. Zur Auswahl des Wiedergabe-Modus die Pfeiltasten
benutzen.
2. Mit den Rechts/Links-Tasten den gewünschten Musikordner wählen und mit ENTER bestätigen.
3. Mit den Pfeiltasten die Songdatei auswählen und mit
ENTER bestätigen.
Hinweis:
A. FOLDER (Ordner)
Alle Dateien im aktuellen Ordner werden nacheinander einmal wiedergeben.
B. SINGLE
Es wird die ausgewählte Datei wiedergegeben.
C. REPEAT ONE
Die ausgewählte Datei wird wiederholt.
D. REPEAT FOLDER
Alle Dateien des aktuellen Ordners werden
wiederholt.
E. SHUFFLE
Es erfolgt eine zufällige Titelauswahl in der zu spielenden Datei.
Pr
ogrammierte Wiedergabe einer MP3-Datei
– Das Menü zweigt die Folder und Dateien im Root-Ver-
zeichnis.
1. Die Programmier-Taste drücken.
– Jedes Mal, wenn die Programmier-Taste gedrückt
wird.
– PROGRAM LIST (Programmliste) anwählen.
2. Zum Auswählen der ersten Datei, die dem Programm
hinzugefügt werden soll, die Pfeiltasten verwenden.
Die ENTER-Taste drücken.
– Die ausgewählten Dateien erscheinen in der Pro-
grammliste.
3. Über die Auf-/Ab-Tasten die Datei auswählen und
dann zum Starten der Wiedergabe die PLAY- oder
ENTER-Taste drücken.
– Nachdem alle programmierten Dateien abgespielt
wurden, wird die Wiedergabe gestoppt.
– Es können bis zu 100 Dateien programmiert wer-
den.
SETUP MENÜ
Das SETUP Menü ermöglicht es Ihnen, die Einstellung
Ihres DVD-Players gemäß Ihren Wünschen
vorzunehmen, indem Sie verschiedene bevorzugte Sprachen wählen, eine Elternschranke errichten, Symbole
und Bildschirmschoner aktivieren oder ausschalten, die
Art Ihres Fernsehbildschirms einstellen und so weiter. Suchen Sie sich unten das entsprechende Menü aus und
finden Sie die entsprechende Seite, auf der die Kenndaten der gewählten Menü-Option beschrieben sind.
13
5....-05-DVD 608 HC D 01.06.2004 10:04 Uhr Seite 13
Page 14
1. Die SETUP-Taste drücken
2. Über die Auf/Ab-Pfeiltasten das Menü oder die Anzeigen auswählen.
3. Zum Bestätigen des angewählten hell hinterlegten
Punktes die ENTER-Taste drücken.
Im STOP- oder Wiedergabe-Modus (im DVD-Modus) die
SETUP-Taste drücken .
- Das SETUP-Menü wird angezeigt.
- Zwecks Auswahl die Pfeiltasten Auf/Ab benutzen und
zum Bestätigen die ENTER-Taste drücken.
- Über das SETUP-Menü können allgemeine
Einstellungen, Lautsprecher, Audio und bevorzugte
Funktionen eingestellt werden.
- Zum Verlassen des SETUP-Menüs
Die Ab-Taste drücken, um den Punkt EXIT SETUP anzuwählen.
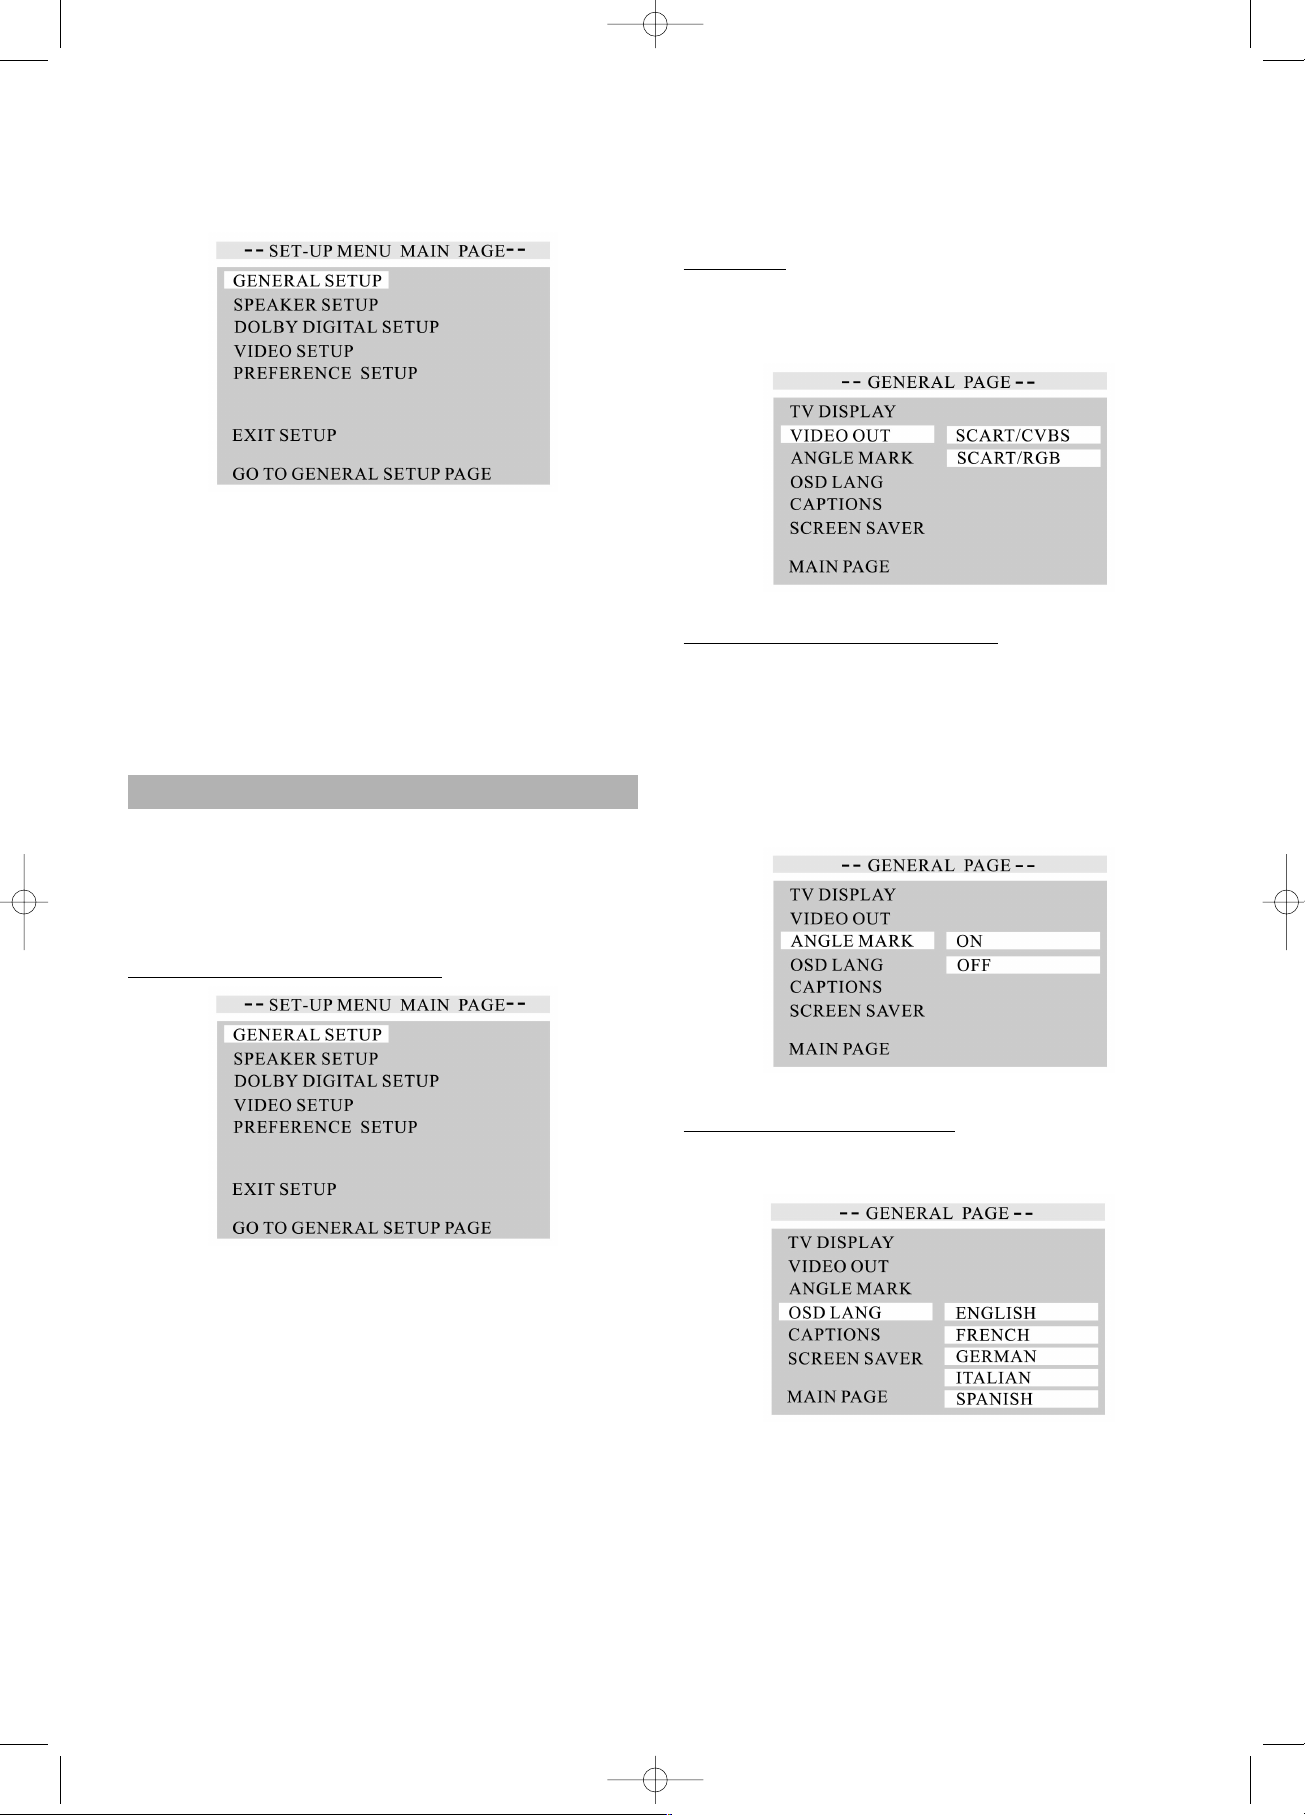
Allgemeine Einstellungen
Im SETUP-Menü den Punkt Allgemeine Einstellungen
anwählen und dann mit Hilfe der Pfeiltasten die
gewünschte Option anwählen und durch die Menüs/Anzeigen steuern, jeweils zum Bestätigen die ENTER-Taste
drücken.
Einstellen der Bildsc
hirmanzeige
NORMAL/PS: Pan scan. Diesen Punkt wählen, wenn
das Gerät an ein konventionelles TVGerät angeschlossen ist. Bei Videofilmen,
die im Pan-Scan-Format aufgezeichnet
sind, wird bei der Wiedergabe der rechte
und linke Rand abgeschnitten.
NORMAL/LB: Letter box. Diesen Punkt wählen, wenn
das Gerät an einen normalen Fernseher
angeschlossen ist. Breitbildaufnahmen
werden am Bildschirm mit einem
schwarzen Band am oberen und unteren
Bildrand angezeigt.
WIDE: Diesen Punkt anwählen, wenn das Gerät
an ein Breitbild-TV-Gerät angeschlossen
ist.
Hinweis:
Die anzeigbare Bildgröße ist auf der DVD-Disk voreingestellt. Deshalb kann es vorkommen, dass das wiedergegebene Bild einiger DVD-Disks nicht mit der von Ihnen
gewählten Bildgröße übereinstimmt.
VIDEO Out
Den Farb-Video-Typ auswählen, der zu ihrem Anschlusstyp passt:
SCART/CVBS or SCART/RGB
Einstellen der
Winkel-Markierung
- Einige DVDs sind mit mehreren Videokameras aus
verschiedenen Blickwinkeln aufgenommen, so dass
Sie bei der Wiedergabe einen Winkel auswählen können.
ON – den Winkel öffnen
OFF – den Winkel schließen
- Die Disk muss mit einer Winkel-Markierung versehen
sein, dann kann diese Funktion genutzt werden.
Einstellen der OSD-Sprac
he.
- Sie können die Sprache der Bildschirmanzeige (ON
SCREEN DISPLAY, OSD) wählen.
14
5....-05-DVD 608 HC D 01.06.2004 10:04 Uhr Seite 14
Page 15
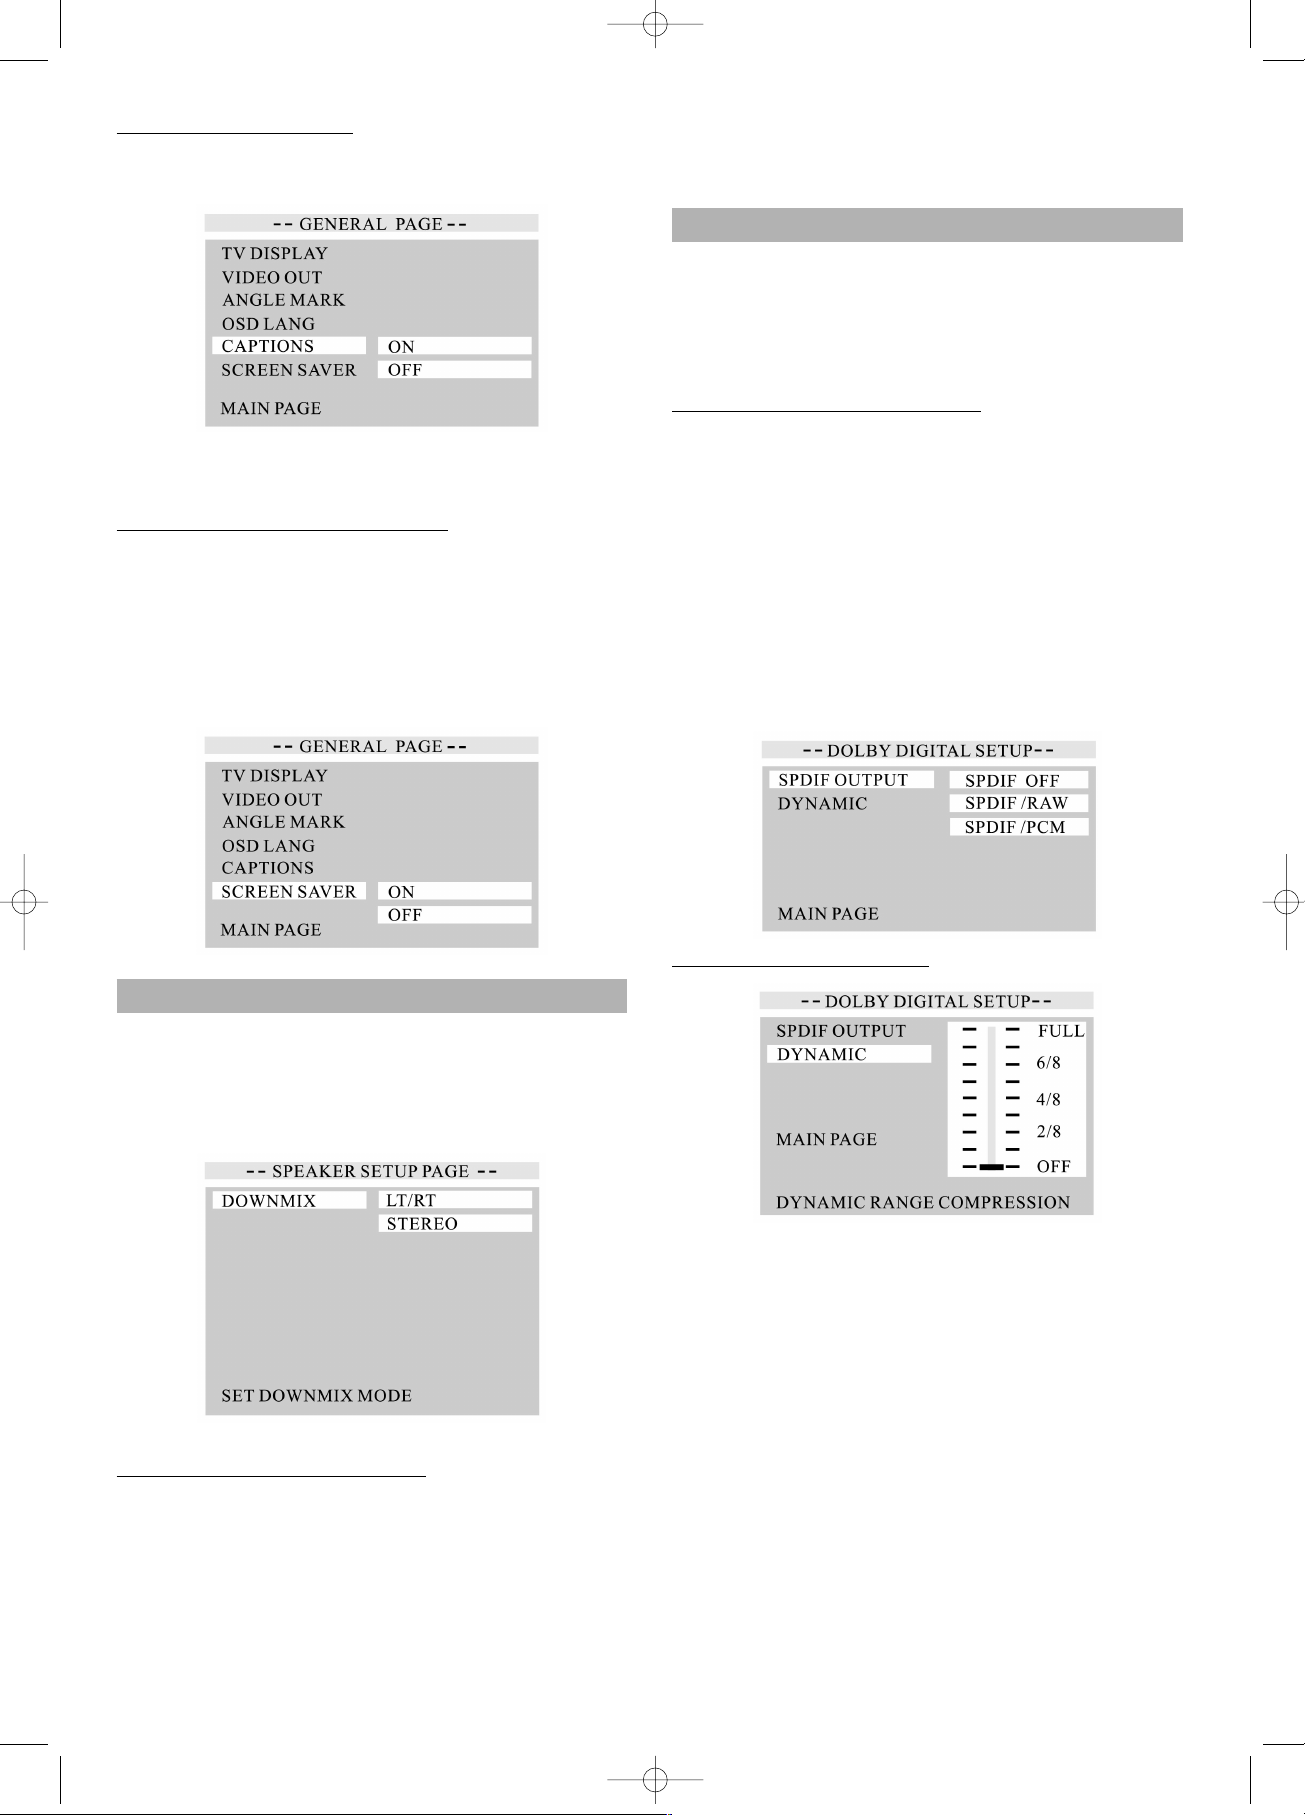
Einstellen von Symbolen
ON – Öffnen der Option.
OFF – Schließen der Option.
Das TV-Gerät muss über die Funktion zum Schließen der
Symbole verfügen.
Einstellen des Bildsc
hirmschoners
Wenn keine Disk eingelegt ist oder die Wiedergabe für einige Zeit unterbrochen wurde, schaltet das Gerät
automatisch die Funktion „Bildschirmschoner“ ein. Dann
wird der Fernsehschirm schwarz, nur das DVD-Logo bewegt sich über den Schirm. Diese Funktion schützt den
Fernsehschirm, so dass dieser auch bei langer Einschaltzeit keinen Schaden nimmt.
Lautsprecher-Einstellung
- Zur Auswahl der Lautsprechereinstellung die Auf/AbTasten nutzen und dann mit ENTER bestätigen.
- Links steht der Hauptkatalog, rechts die Unterpunkte.
- Mit der Rechts/Links-Taste die Unterpunkte anwählen
und mit ENTER bestätigen.
Einstellen des DO
WNMIX-Modus
Zum Anwählen des Punktes DOWNMIX die Auf-/Ab-Tasten benutzen (wenn Sie den Player an einen Multichannel-Receiver anschließen). Für jeden Punkt stehen
folgende Einstellungen zur Verfügung:
- DOWNMIX: LT/RT oder STEREO
- Wenn der Player an eine Stereoanlage mit Dolby Pro
Logic Decoder angeschlossen ist, LT/RT (left/right)
wählen.
- Wenn der Player an einen Stereoverstärker
angeschlossen ist, der mit Dolby Digital oder DTS
kompatibel ist, den Punkt STEREO wählen.
DOLBY DIGITAL Einstellung
- Mit den Auf/Ab-Tasten die AUDIO-Einstellung wählen
und mit ENTER bestätigen.
- Links steht der Hauptkatalog, rechts die Unterpunkte.
- Mit den Rechts-/Links-Tasten die Unterpunkte
anwählen und mit ENTER bestätigen.
1.
Einstellen des SPDIF-OUTPUT
- Über die Auf/Ab-Pfeiltasten den Punkt SPDIF OUT
anwählen, mit ENTER bestätigen.
- Über die Auf/Ab-Tasten einen der Punkte SPDIF
OFF, SPDIF/RAW oder SPDIF/PCM anwählen und
mit ENTER bestätigen.
- Wenn keine externen Audio-Geräte angeschlossen
sind, den Punkt SPDIF OFF anwählen.
- Wenn der Player über ein Coaxialkabel (nicht mit-
geliefert) an eine Heimkinoanlage 5.1 angeschlossen ist, den Punkt SPDIF RAW anwählen.
- Zum Aktivieren des internen Dolby Digital
Decoders dieses Players den Punkt SPDIF PCM
anwählen.
2.
Einstellen der Dämpfung
- Dynamischer Dämpfungsbereich
Über den Bereich der dynamischen Dämpfung
werden Lautstärkeänderungen reduziert, indem Sie
den Unterschied zwischen lauten und leisen Tönen
festlegen.
Mit den Pfeiltasten Auf/Ab den dynamischen Dämpfungsbereich zwischen 1/8 und FULL (Voll) einstellen, bzw. diesen ausschalten (OFF), dann zum Bestätigen die
ENTER-Taste drücken.
Um den vollen Bereich der aufgezeichneten Tonbreite zu
hören, wählen Sie OFF oder eine niedrige Dämpfungsrate wie 1/8 oder 2/8. Um die Lautstärkedifferenz zwischen
lauten und leisen Szenen zu minimieren, wählen Sie eine
höhere Rate wie 6/8 oder FULL.
15
5....-05-DVD 608 HC D 01.06.2004 10:04 Uhr Seite 15
Page 16
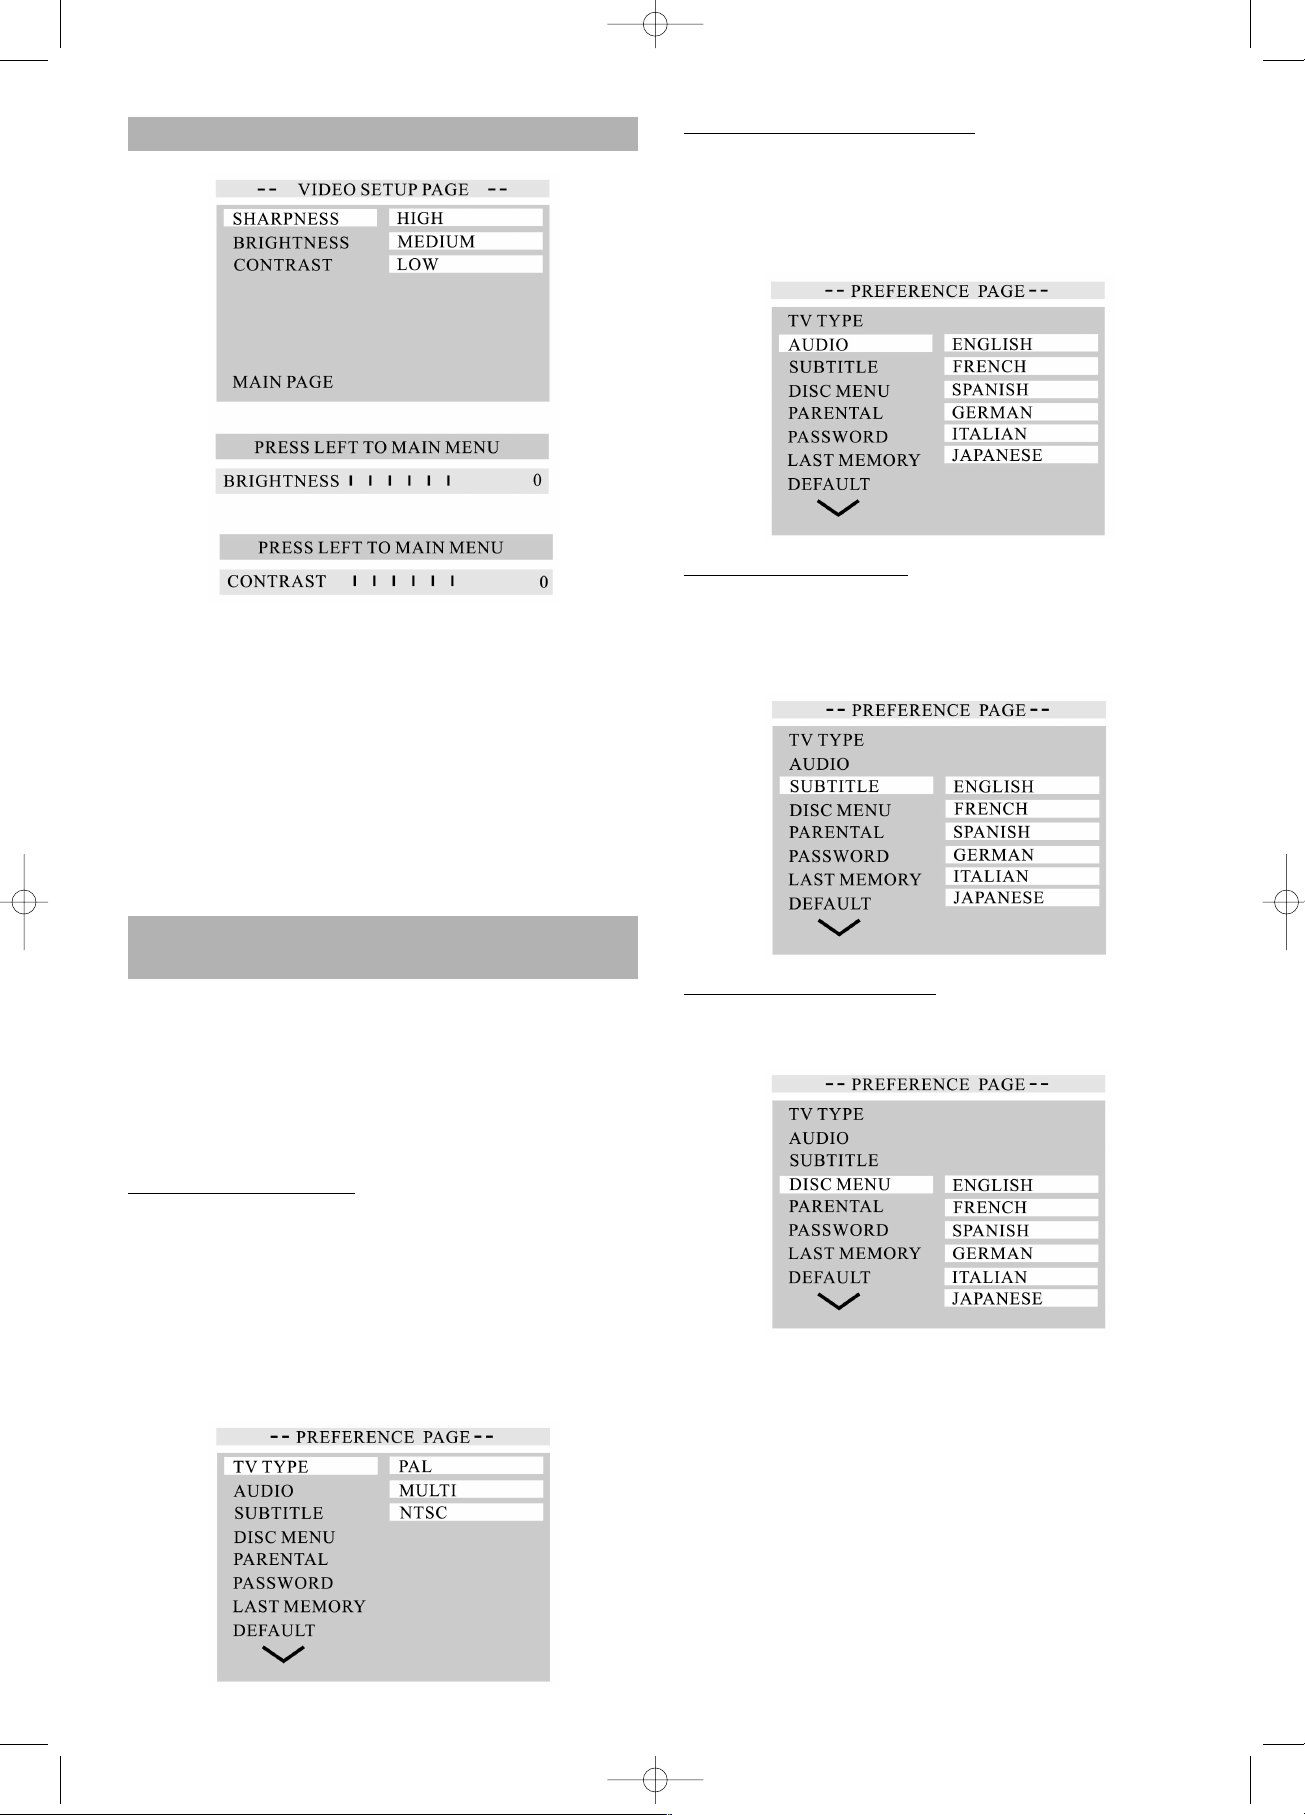
VIDEO SETUP
Im Setup-Menü den Punkt Video Setup anwählen und mit
ENTER bestätigen.
• Mit den Auf/Ab-Tasten die Punkte Schärfe, Helligkeit,
Kontrast anwählen und dann die Rechts-Taste drücken.
• Die Links-Taste drücken, um zurückzukehren und
dann je nach Erfordernis eine andere Bildeinstellung
auswählen.
Für Schärfe stehen frei verschiedene Niveaus zur Verfügung: hoch, mittel, niedrig.
Für HELLIGKEIT steht der Bereich von -20 bis +20 zur
Verfügung.
Für KONTRAST liegt der Bereich zwischen -16 und +16.
Benutzerdefinierte Einstellungen (Nur im
STOP-Modus oder bei offener Schublade)
Mit den Auf/Ab-Pfeiltasten den Punkt PREFERENCES
SET UP anwählen und mit ENTER bestätigen.
- Links steht der Hauptkatalog, rechts die Unterpunkte.
Über die Rechts/Links-Pfeiltasten die Unterpunkte
ansteuern und mit ENTER bestätigen.
Fernseher
typ (TV TYPE)
Stellen Sie den Videoausgang so ein, dass er dem
System des Fernsehers entspricht, an den das Gerät angeschlossen wird:
1. Ist der verwendete Fernseher ein PAL, wählen Sie das
PAL Ausgangssignal;
2. Handelt es sich um einen NTSC, wählen Sie das NTSC Ausgangssignal;
3. Oder wählen Sie MULTI, wenn Ihr Fernseher ein Multi-System hat.
Einstellen der A
UDIO-Funktion
- Die Audio-Funktion hängt von der Disk ab, nur die
Disk unterstützt das Sprachformat, so dass die AudioEinstellung funktionieren kann. Wenn die Disk zum
Beispiel über Englisch und Deutsch verfügt, können
Sie aus den beiden Formaten wählen.
Einstellen der Unter
titel
- Die Untertitel werden am Bildschirm angezeigt und
hängen ebenfalls von der wiedergegeben Disk ab. Sie
können nur die Untertitelsprache anzeigen, die die
Disk unterstützt.
Einstellen des DISC MENU
- Auch die Einstellung der Sprache für die Disk-Menüs
hängt von der verwendeten Disk ab.
16
5....-05-DVD 608 HC D 01.06.2004 10:04 Uhr Seite 16
Page 17
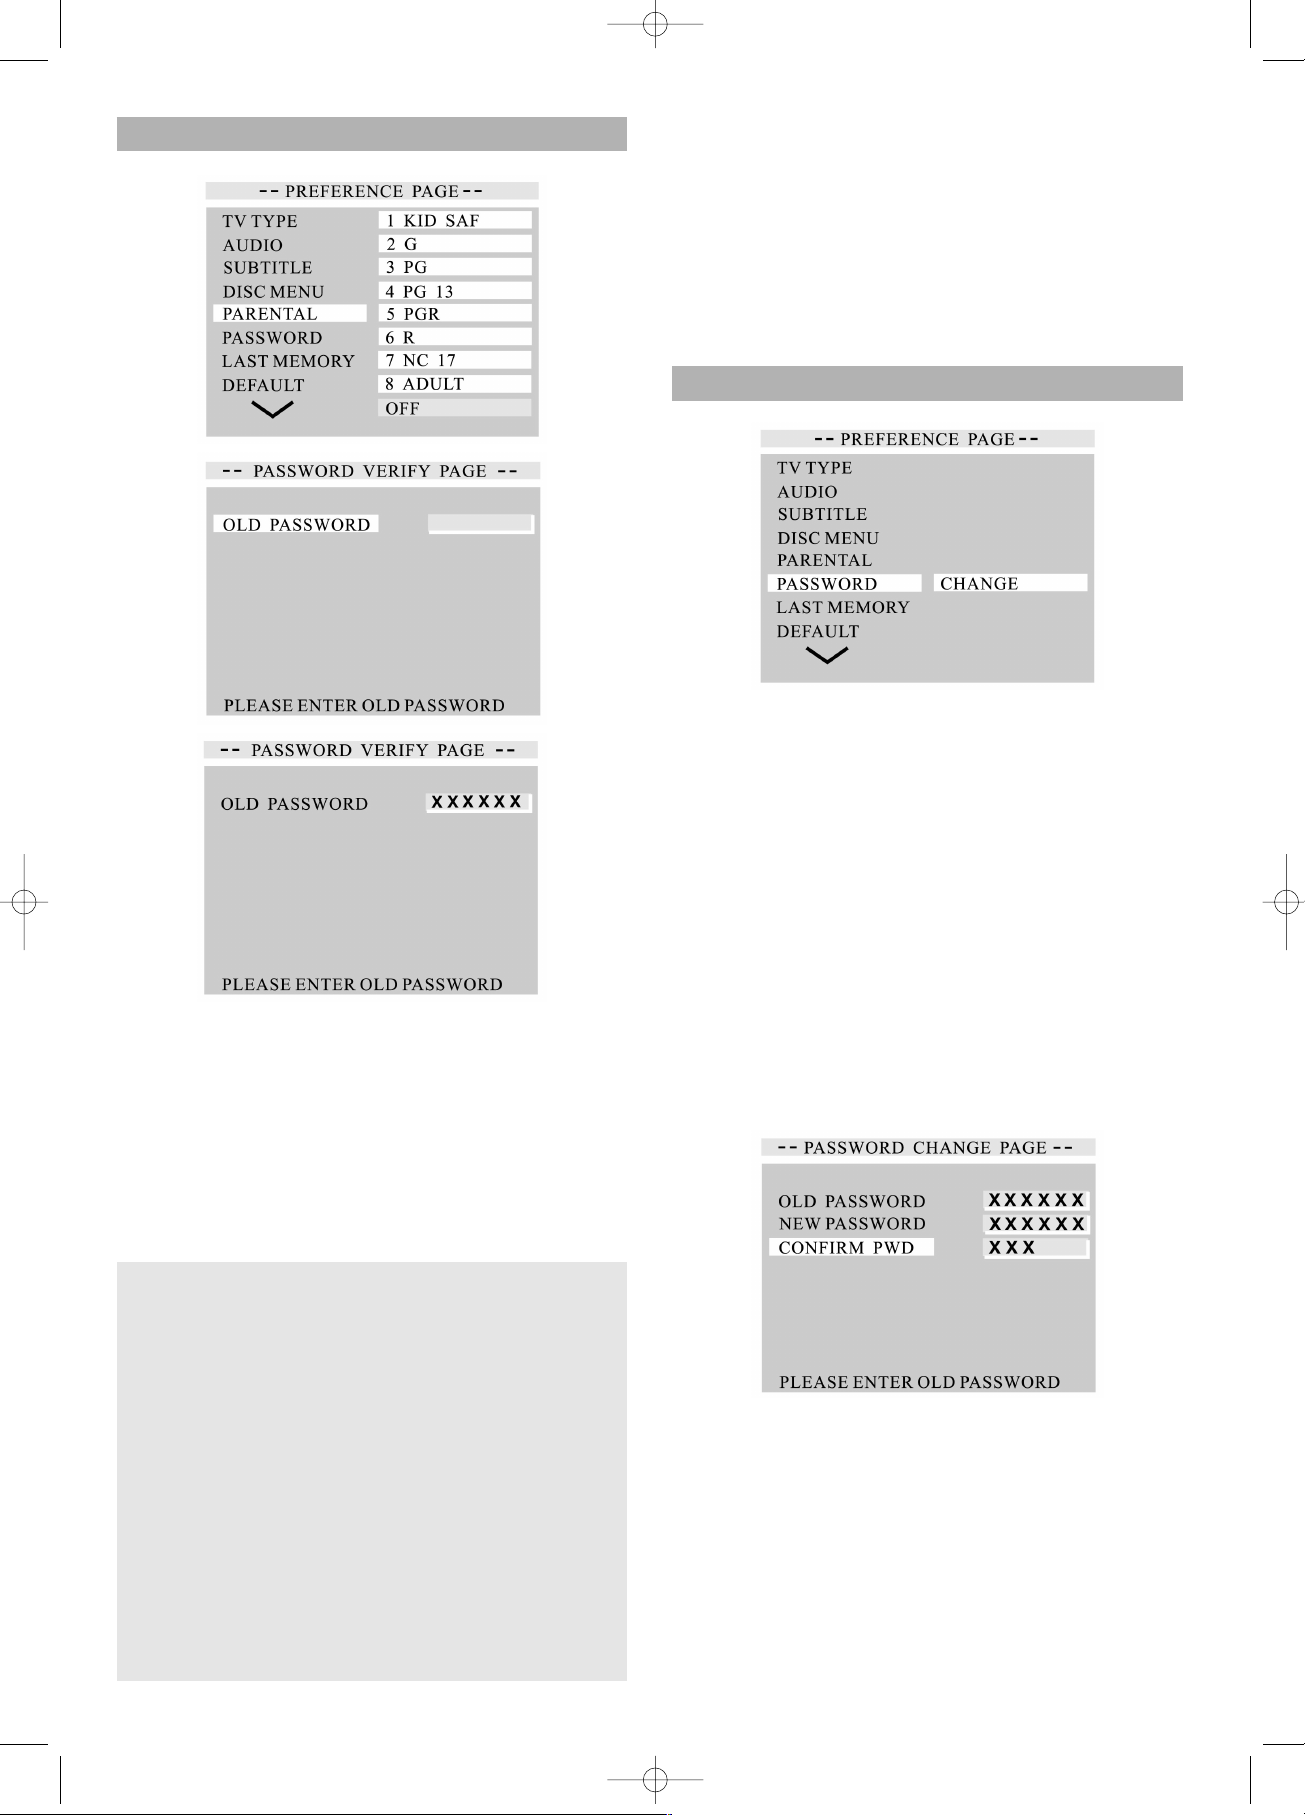
Einstellen der Elternsperrfunktion
Auswahl der Elternsperrfunktion. Rechte Taste drücken.
– Über die Auf/Ab-Pfeiltasten das Niveau der
Elternsperre auswählen (1–8), dann mit ENTER
bestätigen, bzw. durch Anwahl des Punkte OFF die Elternsperre ausschalten.
– Über die Zifferntasten Ihr 6-stelliges Passwort einge-
ben, dann ENTER drücken. Sie können nun keine
DVD-Disks abspielen, die im Rating höher liegen, als
das von Ihnen ausgewählte Niveau, außer Sie
löschen die Elternsperrfunktion wieder.
Erläuterung der Klassifizierung nach Altersstufen
- KID SAFE – Kindersicher: auch für Kinder unbedenklich.
- G – Allgemeines Publikum: als unbedenklich für alle Altersstufen empfohlen
- PG – Elterliche Begleitung empfohlen
- PG 13 – Material für Kinder unter 13 Jahren ungeeignet.
- PG+R – Elterliche Begleitung mit Einschränkung: Es wird
empfohlen, dass Eltern ihren Kindern unter 17 Jahren
verbieten, diesen Film zu sehen, bzw. Kinder nur unter
Überwachung eines Erwachsenen oder Elternteils das
Ansehen erlauben.
- R – Eingeschränkt: unter 17 Jahren nur in Begleitung eines Elternteils oder einer erwachsenen Aufsichtsperson
- NC-17 – nicht für Kinder unter 17 Jahren.
- ADULT – Nur für Erwachsene; sollte aufgrund von sexuellen Darstellungen, Gewalt oder der Sprache nur von
Erwachsenen angesehen werden.
Hinweis: Die Elternsperrfunktion ist eine relativ neue
Funktion, die auf DVD-Disks gespeichert ist. Zur Zeit beinhalten nur sehr wenige DVD-Titel (wenn überhaupt) in
der Gegend von Australien und Neuseeland diese
Elternsperrfunktion.
“OLD PASSWORD” : Sie müssen in der “PASSWORD”
Einstellung ein neues Passwort eingeben oder das “SUPERUSER PASSWORD”, d. h. die Kombination “136900”
verwenden.
Einstellen des Passwortes
Die Elternkontrolle beschränkt die Wiedergabe von
DVDs, wenn eine DVD einer höheren Einstufung
entspricht, als das elterlich ausgewählte Niveau.
Um das Elternniveau so einzustellen, dass die DVD nicht
angesehen werden kann, wenn das Rating überschritten
wurde, siehe Abschnitt PARENTAL CONTROL LEVELS.
Zum Auswählen des Passworts die Auf-/Ab-Pfeiltasten
verwenden. Der Punkt CHANGE wird hervorgehoben und
mit ENTER bestätigt.
- Neben dem alten Passwort wird ein Feld hervorgehoben.
- Über die Zifferntasten Ihr altes 6stelliges Passwort
eingeben. Das Feld neben NEUES Passwort wird automatisch hervorgehoben.
- Über die Zifferntasten ein neues 6stelliges Passwort
Ihrer Wahl eingeben. Das Feld neben CONFIRM PWD
wird automatisch hervorgehoben.
- Mit den Zifferntasten das gleiche 6stellige Passwort
eingeben, dass Sie für das NEUE Passwort eingegeben hatten.
- Zum Speichern des neuen Passwortes die ENTERTaste drücken.
HINWEIS: Wenn Sie diesen DVD-Player das erste Mal
benutzen, zum Übergehen des Punktes “OLD PASSWORD” einfach die ENTER-Taste drücken. Das neue
NEW PASSWORD für diesen DVD-Player eingeben.
17
5....-05-DVD 608 HC D 01.06.2004 10:05 Uhr Seite 17
Page 18
Zum Löschen des 6stelligen Passwortes im Fall, dass
Sie Ihr Passwort vergessen, folgende Schritte befolgen:
1. Auf der Änderungsseite die 6stellige Nummer eingeben “136900” (SUPERUSER PASSWORD) und dann
die ENTER-Taste drücken.
2. Ein neues Passwort eingeben.
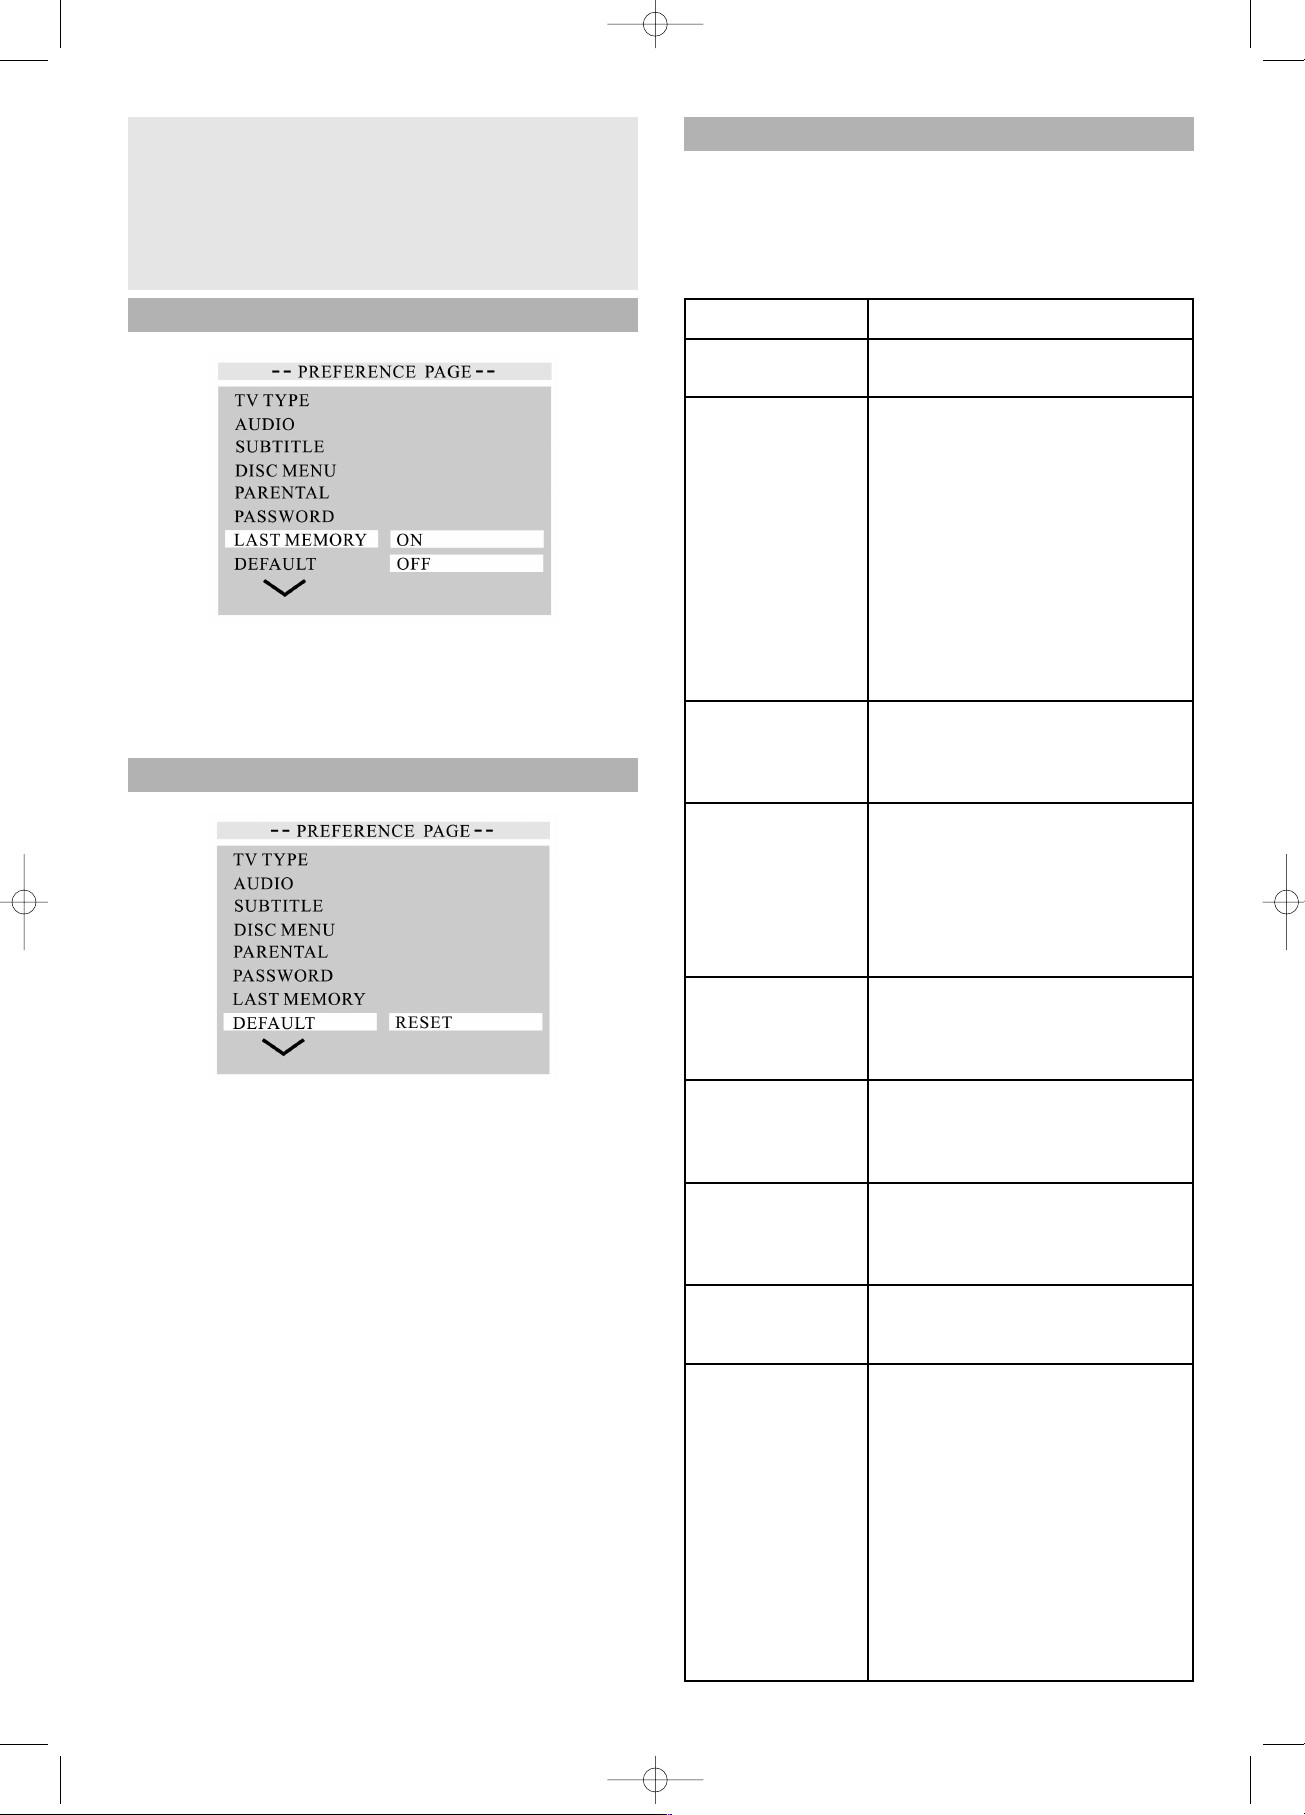
LAST MEMORY (letzter Speicher)
Zur Auswahl des Punktes LAST MEMORY die Ab-/
Rechts-Pfeiltasten verwenden.
- Die Auf-/Ab-Taste verwenden um ON oder OFF auszuwählen, dann mit ENTER bestätigen.
Nulleinstellung
Um die ursprünglichen Einstellungen des Players wiederherzustellen, folgende Schritte befolgen.
Zum Anwählen des Punktes DEFAULT die Ab-/RechtsPfeiltasten benutzen.
Der Punkt RESET wird unterlegt. Mit ENTER bestätigen.
- Die Originaleinstellung des Players wird wieder hergestellt.
Störungsbehebung
Bevor Sie den Kundendienst für dieses Gerät rufen, suchen Sie in der nachfolgenden Tabelle nach der
möglichen Fehlerquelle. Mit ein paar einfachen Tests oder
kleineren Einstellungen können Sie eventuell das
Problem beheben und korrekte Funktion zurückerlangen.
Symptom (häufig) Abhilfe
Kein Strom Stecken Sie den Netzstecker in die
Steckdose.
• Keine Wiedergabe, selbst wenn
PLAY gedrückt
wird.
• Wiedergabe beginnt, stoppt jedoch sofort wieder.
• Es hat sich Kondensation gebildet: Warten Sie ca. 1 bis 2 Stunden, bis das Gerät getrocknet ist.
• Das Gerät kann nur die
folgenden Medien abspielen:
DVDs,Video CDs, CDs, MP3s
und JPEGs .
• Vergewissern Sie sich, dass die
CD mit dem Etikett nach oben
eingelegt ist.
• Die CD ist vielleicht verschmutzt
und muß gereinigt werden.
Kein Bild. • Vergewissern Sie sich, dass das
Gerät korrekt angeschlossen ist.
• Vergewissern Sie sich, dass der
Fernseher auf “Video” gestellt ist.
• Kein Ton.
• Verzerrter Ton.
• Vergewissern Sie sich, dass das
Gerät korrekt angeschlossen ist.
• Vergewissern Sie sich, dass der
Fernseher und die Stereoanlage
korrekt eingestellt sind.
• Stellen Sie den Hauptlautstärkeregler über die Fernbedienung.
Bild ist bei Schnellvorlauf oder
Schnellrücklauf
verzerrt.
Das Bild wird in diesem Falle
manchmal ein wenig verzerrt, was
völlig normal ist.
Kein schnelles vorwärts (oder schnelles rückwärts) Abspielen.
Einige CDs haben Sektore, die das
schnelle vorwärts (oder rückwärts)
Abspielen nicht zulassen.
Kein 4:3
(16:9) Bild.
Wählen Sie die korrekte
Einstellung, die den Eigenschaften
Ihres Fernsehers ("TV Aspects")
entspricht.
Kein
Surround Sound.
Wählen Sie die korrekte
Einstellung unter “Audio Output”,
die Ihrer Stereoanlage entspricht.
Keine Bedienung
über die
Fernbedienung
möglich.
• Prüfen Sie, ob die Batterien korrekt entsprechend der Polarität
(+ und -) eingelegt sind.
• Die Batterien sind leer: Ersetzen
Sie sie mit neuen.
• Die Batterien sind leer: Ersetzen
Sie sie mit neuen.Halten Sie die
Fernbedienung in Richtung auf
den Sensor, wenn Sie sie bedienen.
• Benutzen Sie die Fernbedienung
nicht weiter als 5 Meter vom Sensor am Gerät entfernt.
18
5....-05-DVD 608 HC D 01.06.2004 10:05 Uhr Seite 18
Page 19
Symptom (häufig) Abhilfe
Tasten funktionslos
(am Gerät und /
oder auf der Fernbedienung).
• Entfernen Sie etwaige Hindernisse zwischen der Fernbedienung
und dem Sensor am Gerät.
• Schalten Sie das Gerät aus und
wieder ein. Ansonsten, schalten
Sie das Gerät aus, ziehen Sie
den AC-Netzstecker und verbinden Sie ihn dann wieder.
(Vielleicht funktioniert das Gerät
aufgrund von äußeren Umständen wie Gewitter oder statische
Elektrizität, usw. nicht richtig.)
Menü-Bildschirm
wird nicht oder nur
teilweise auf dem
Fernsehbildschirm
angezeigt.
Wählen Sie den entsprechenden
Bildschirmtyp aus, in dem Sie sich
nach der Bedienungsanleitung des
Fernsehers richten.
Keine Farbe Stellen Sie den TV-Typ auf die
deutsche Farbnorm Pal ein.
Betätigen Sie dazu die SETUP- Taste um in das Menü zu gelangen.
Zu Ihrer Information:
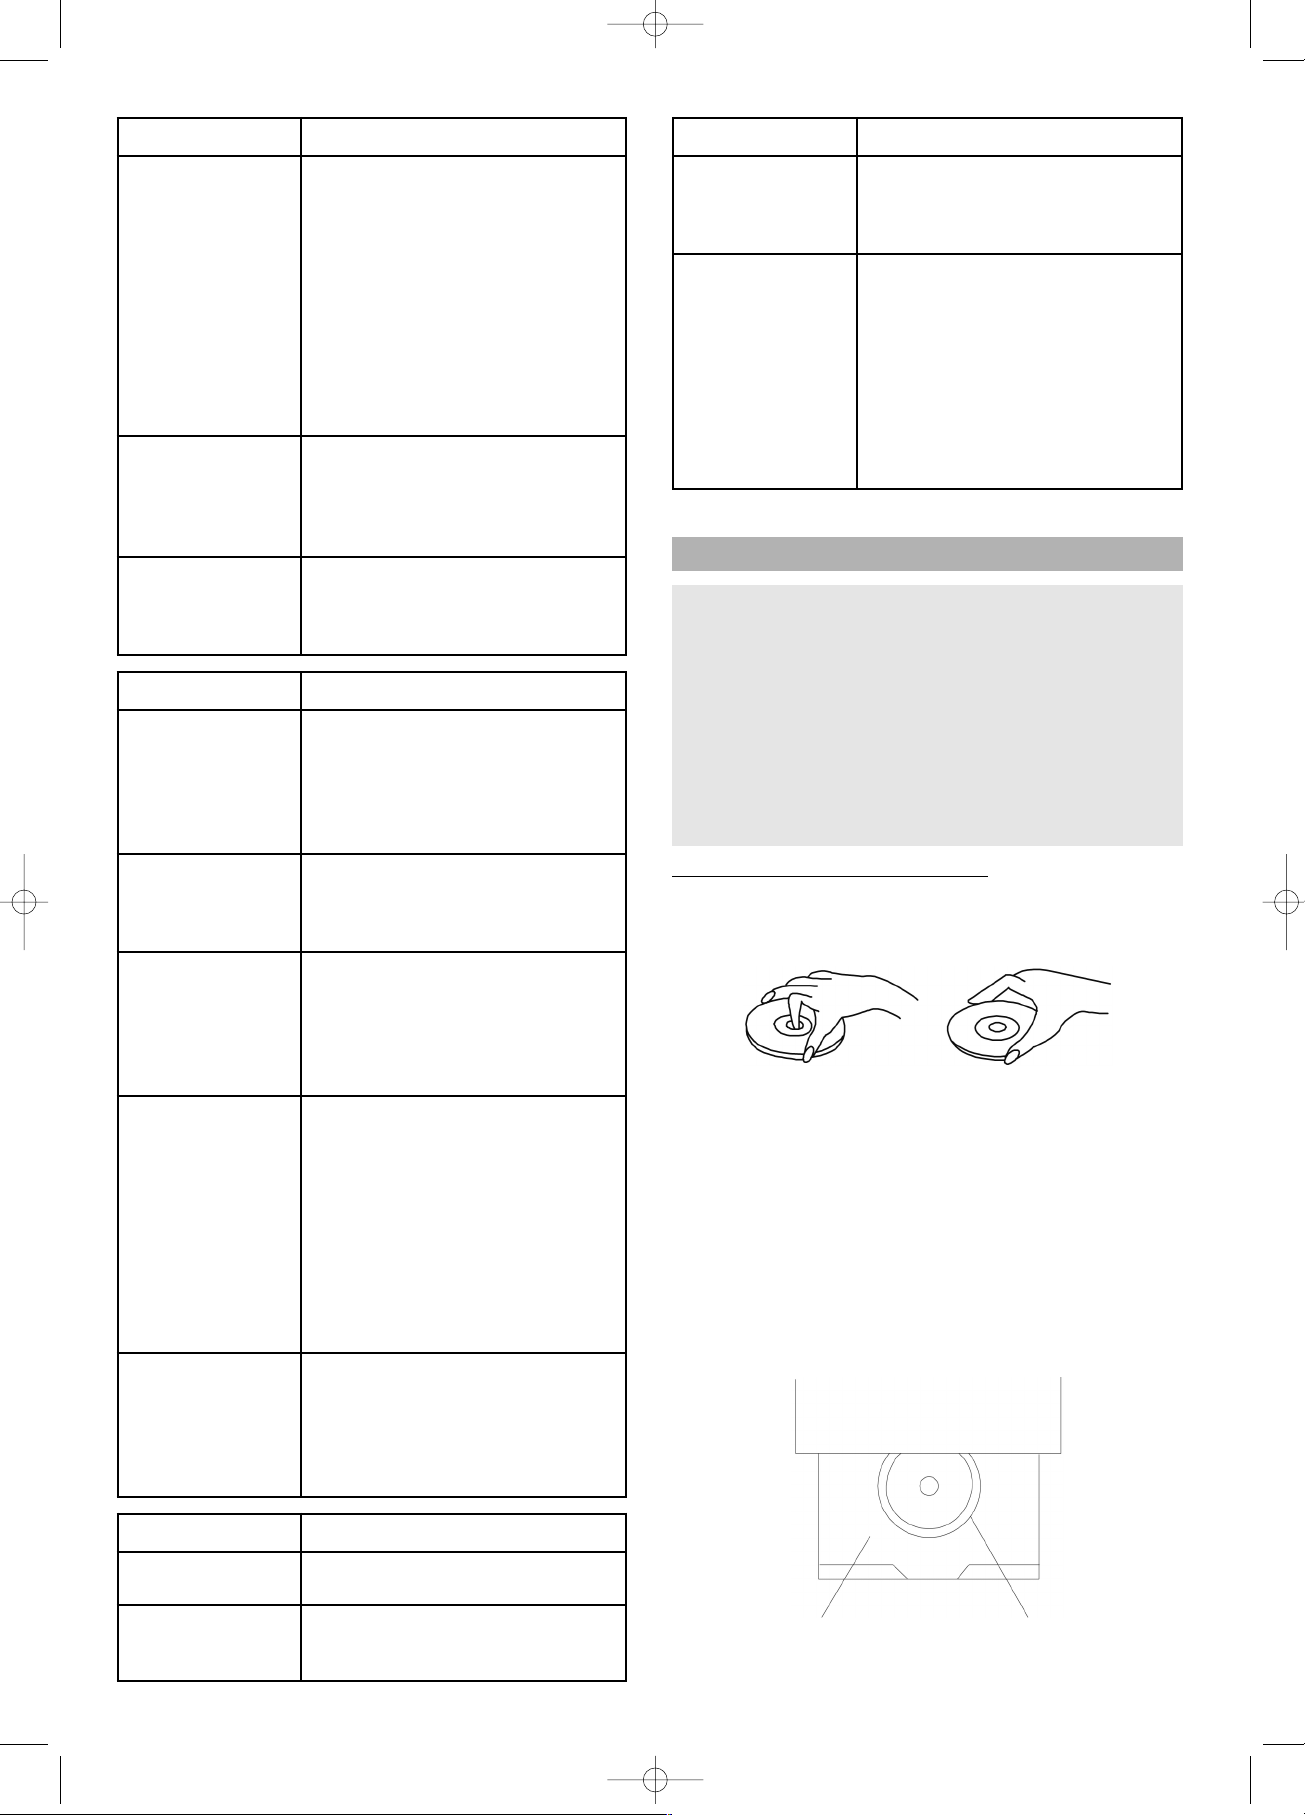
Handhabung und Pflege von CDs
Vorsichtsmaßnahmen bei der Handhabung
• Halten Sie die CD an den Rändern, so dass die Oberfläche nicht von Fingerabdrücken verunreinigt wird.
Fingerabdrücke, Schmutz und Kratzer können zum
Springen und zu Verzerrungen führen.
• Schreiben Sie nicht mit einem Kugelschreiber oder
anderem Schreibutensil auf die etikettierte Seite.
• Benutzen Sie kein Schallplatten-Reinigungsspray,
Benzin, Verdünner, Antistatik-Flüssigkeit oder irgendwelche anderen Lösungsmittel.
• Passen Sie auf, dass Sie die CD nicht fallen lassen
oder biegen.
• Legen Sie niemals mehr als eine CD in das CD- Fach
ein.
• Versuchen Sie nicht, die Tür zu schließen, wenn die
CD nicht korrekt in das CD- Fach eingelegt ist.
CD-FACH
X
CD
19
Symptom (DVD) Abhilfe
Audio Soundtrack
und / oder Untertitel-Sprache ist
nicht die in der
Grundeinstellung
ausgewählte.
Wenn die Audio Soundtrack und /
oder Untertitel-Sprache auf der CD
nicht existiert, wird die in der
Grundeinstellung ausgewählte
Sprache nicht zu hören / sehen
sein.
Die Anzeige
erscheint in französisch (Beispiel)
Die Einstellung der Menüs steht
auf französisch bei “Disc Languages” (Disketten-Sprachen). Französisch auswählen.
Keine Untertitel • Untertitel erscheinen nur bei
DVDs, auf denen Untertitel aufgenommen sind.
• Untertitel wurden vom Fernsehbildschirm gelöscht. Drücken Sie
die „SUBTITLE“-Taste.
Es wird keine alternativer Audio Soundtrack (oder Untertitel) Sprache
ausgewählt.
• Es wird keine alternative Sprache
ausgewählt bei CDs, auf denen
nicht mehr als eine Sprache aufgenommen wurde.
• Bei einigen CDs kann die
alternative Sprache nicht mit der
AUDIO oder SUBTITLE Taste
ausgewählt werden.Versuchen
Sie sie vom DVD Menü
auszuwählen, wenn eines verfügbar ist.
Winkeln kann nicht
gewechselt
werden.
Diese Funktion hängt von der Verfügbarkeit der Software ab. Selbst
wenn eine DVD unterschiedliche
Winkelaufnahmen hat, so gibt es
diese vielleicht nur bei bestimmten
Szenen (wenn die ANGLE Anzeige
Symptom (Video CD)
Abhilfe
Es spielt kein
Menü.
Diese Funktion geht nur bei Video
CDs mit Playback Control.
VCD/ SVCD spielt
nicht ab.
Schalten Sie mit der Menue- Taste,
bei eingelegter CD, die PBC- Funktion um.
Symptom (Video CD)
Abhilfe
CDRW`s spielen
nicht ab
CDRW`s dürfen nicht mit Festplatten- Simulationstools wie Packed
CD, In CD oder ähnlichen
Programmen beschrieben sein.
CDR´s und
CDRW´s spielen
nicht oder nur mit
Fehlern ab.
Die Fehlerrate von CDR- und
CDRW- Medien ist abhängig:
• vom Medientyp
• vom Brennprogramm (eventuell
UPDATE durchführen)
• vom Brenner und dessen
Firmware (eventuell UPDATE
durchführen)
• vom der Brenngeschwindigkeit
(je niedriger, desto besser)
Dieses Produkt ist mit einer Copyright-Schutztechnik
ausgestattet, die durch bestimmte amerikanische Patentansprüche bzw. andere geistige Urheberrechte in
Besitz der Macrovision Corporation bzw. anderer Inhaber von Rechten geschützt ist. Die Verwendung dieser
Copyright-Schutztechnik darf nur mit Genehmigung
der Macrovision Corporation erfolgen und ist auf die
Heimvorführung bzw. andere beschränkte Vorführsituationen limitiert, außer dies wird von der Macrovision
Corporation ausdrücklich genehmigt. Das Zerlegen
oder Auseinandernehmen ist verboten.
5....-05-DVD 608 HC D 01.06.2004 10:05 Uhr Seite 19
Page 20
Definition der Begriffe
Angle (Winkel)
Auf einigen DVDs sind Szenen, die gleichzeitig aus einer
Reihe verschiedener Blickwinkel aufgenommen wurden
(die gleich Szene von vorne, von links, von rechts, usw.).
Bei solchen DVDs, kann die ANGLE Taste benutzt
werden, um die Szene aus den verschiedenen Blickwinkeln zu sehen.
Chapter Number (Kapiteln
ummer)
Diese Nummern sind auf DVDs aufgenommen. Ein Titel
ist in viele Sektionen eingeteilt, die jeder eine Nummer
besitzen und bestimmt Stellen der Videopräsentation
können über diese Nummern schnell gesucht und gefunden werden.
D
VD
Dieser Ausdruck bezieht sich auf optische CDs mit hoher
Dichte, auf denen mit Digital-Signalen Bild- und Tonaufnahmen hoher Qualität aufgenommen wurden. Durch einen neue Video Kompressionstechnik (MPEG) und Aufnahmetechnik mit hoher Dichte, können auf DVDs ästhetisch angenehm anzusehende Videos über lange Zeit
aufgenommen werden (es kann z. B. ein gesamter Spielfilm darauf aufgenommen werden).DVDs bestehen aus
zwei 0,6 mm dünnen Disketten. Je höher die Dichte, desto mehr Information kann darauf aufgenommen werden.
Eine DVD hat eine größere Kapazität als eine einseitige
1,2 mm dicke Diskette. Dadurch, dass zwei dünne Disketten zusammenhängen, gibt es irgendwann in der Zukunft
die Möglichkeit der doppelseitigen Wiedergabe mit noch
längeren Spielzeiten.
PBC (Pla
yback Control)
Diese ist auf Video CDs (Version 2.0) aufgenommen. Die
Szenen oder Information kann über den Fernsehbildschirm mit Hilfe des auf dem Bildschirm erscheinenden
Menüs interaktiv angesehen (oder angehört) werden.
Subtitle (Unter
titel)
Dieses sind gedruckte Zeilen, die unten auf dem
Bildschirm erscheinen und den Dialog übersetzen oder
erklären. Untertitel sind auf DVDs aufgenommen.
Time (Zeit) Nummer
Zeigt die auf der DVD aufgenommene Spielzeit an. Wenn
eine DVD zwei oder mehrere Filme enthält, sind die Filme
nummeriert als Titel 1, Titel 2, usw.
T
rack (Spur) Nummer
Diese Nummer beziehen sich auf Spuren, die auf Video
CDs und CDs aufgenommen sind. Sie ermöglichen das
schnelle Suchen und Finden von spezifischen Spuren (z.
B. Lieder).
Video CD
Diese enthalten Bild- und Tonaufzeichnungen, die qualitativ mit denen einer Videokassette zu vergleichen ist. Dieses Gerät unterstützt auch Video CDs mit
Playback Control (Version 2.0)
• Sorgen Sie dafür, dass Sie die CD stets in ihrer Originalhülle aufbewahren, wenn Sie sie nicht benutzen.
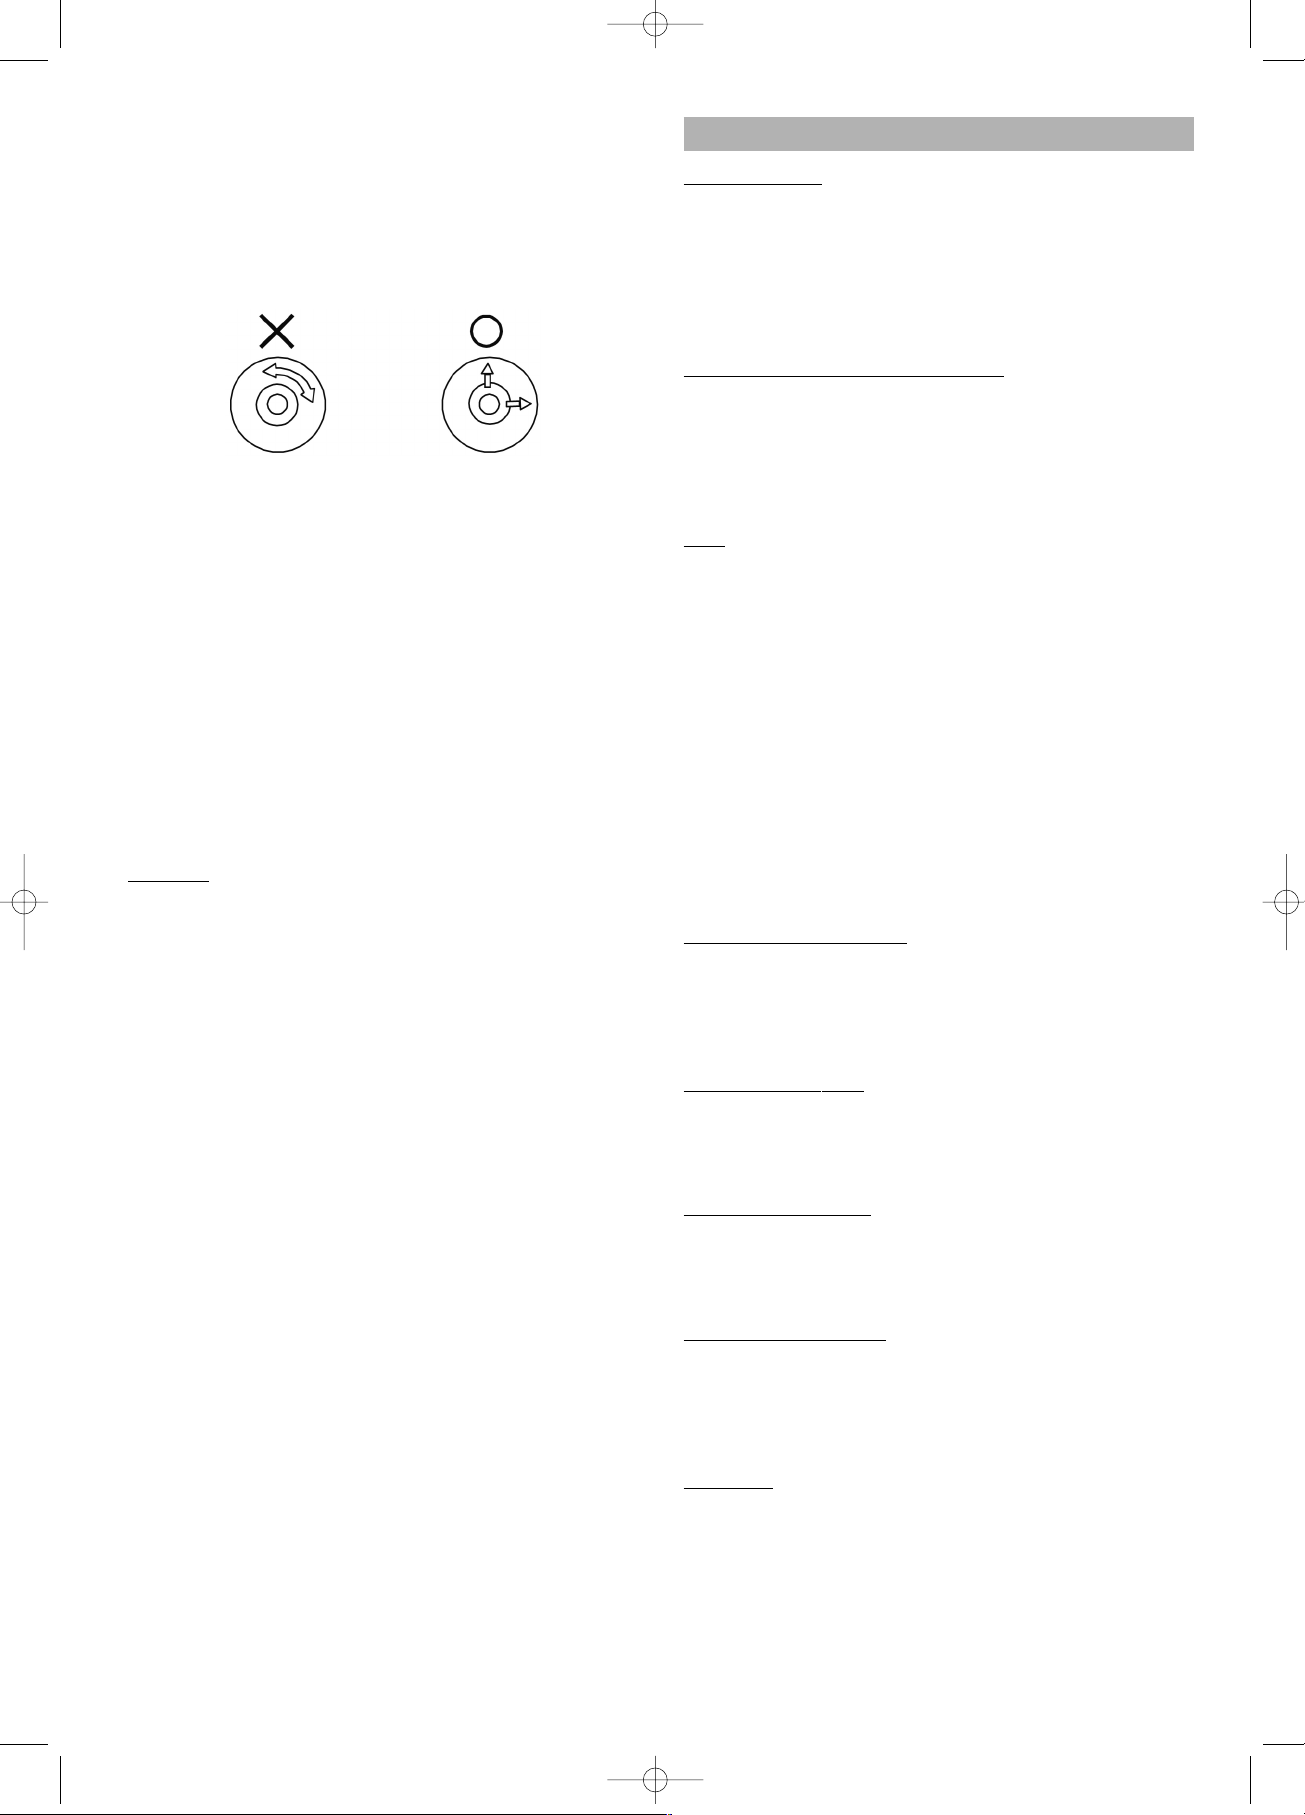
Wenn die Oberfläche verschmutzt ist
• Wischen Sie die CD sanft mit einem weichen, feuchten (nur Wasser) Tuch ab.
• Beim Abwischen von CDs, bewegen Sie das Tuch bitte stets von der Mitte der CD zur Außenkante hin.
(Wenn Sie die CD kreisförmig abwischen, verursachen Sie kreisförmige Kratzer, die zu Geräuschen
auf der CD führen.)
• Wird eine CD von einer kalten Umgebung in eine wärmere gebracht, kann es sein, dass sich auf der CD
Feuchtigkeit bildet.Wischen Sie die Feuchtigkeit mit
einem weichen, trockenen, fusselfreien Tuch ab, bevor
Sie die CD benutzen.
Inkorrekte CD Lagerung
Sie können die CD beschädigen, wenn Sie sie an folgenden Orten aufbewahren:
• direktem Sonnenlicht ausgesetzt
• feuchten oder staubigen Orten
• Orten die einer unmittelbaren Hitzequelle oder
Heizung ausgesetzt sind.
W
artung
• Vergewissern Sie sich, dass Sie vor jeder Wartung
das Gerät ausschalten, und dass das Gerät nicht eingesteckt ist.
• Wischen Sie das Gerät mit einem trockenen, weichen
Tuch ab. Sollten die Oberflächen extrem verschmutz
sein, wischen Sie diese mit einem Tuch, das in eine
schwache Seifenlauge getaucht und gut ausgewrungen wurde, ab und wischen Sie danach mit einem
trockenen Tuch nach.
• Benutzen Sie niemals Alkohol, Benzin, Verdünner,
Reinigungsflüssigkeiten oder andere Chemikalien.
Verwenden Sie keine Pressluft, um Staub zu beseitigen.
20
5....-05-DVD 608 HC D 01.06.2004 10:05 Uhr Seite 20
Page 21

Technische Daten
Netzanforderungen AC 230 V, 50 Hz
Stromverbrauch 20W
Signalsystem NTSC/PAL
Gewicht 2,3 kg
Abmessungen L 430 x B 240 x H 70 mm
Betrieb im
Temperaturbereich +5° bis +35°C
Betrieb im
Feuchtigkeitsbereich 5 bis 90 %
(kein Kondenswasser)
Abspielbare Disks
1. DVD-VIDEO-Disks 12 cm einseitig,
einlagig
12 cm einseitig,
doppellagig
12 cm doppelseitig,
einlagig
2. Compact-Disks
(CD-DA, MP3-CD) 12 cm Disk
8 cm Disk
S Video-Ausgang
Y Output-Level 1 Vp-p (75 Ohm)
C Output-Level 0,30 Vp-p (75 Ohm)
Anzahl der Anschlüsse 1
Video-Ausgang
Output-Level 1 Vp-p (75 Ohm)
Ausgangsbuchse Typ RCA
Anzahl der Anschlüsse 1
Audio-Ausgang
Output-Level 2 Vrms (1kHz, 0 db)
Ausgangsbuchse Typ RCA
Kenndaten des Audio-Signalausgangs
1. S/N-Rate
CD audio 90 dB (EIAJ)
2. Dynamikbereich
DVD (Linear audio) 80 dB
CD audio 80 dB (EIAJ)
3. Gesamte
harmonische Verzerrung THD + SN 70 dB
Digital Audio-Ausgang
Ausgangsbuchsen
Coaxial-Digital-Ausgang Typ RCA
Die Spezifikationen können Änderungen unterliegen.
Gewicht und Abmessungen sind Näherungswerte.
Technische Daten des Subwoofers
Ausgangsleistung: 20W Subwoofer,
12W Satellitenlautsprecher
THD = 10%
SUB: 100Hz
SAT: 1kHz
Lautsprechereinheit: Subwoofer: 5”
Satellit: 2.5”x2
Impedanz: 4 Ohm
Frequenz-Response: Subwoofer: 30 – 120Hz
Satellit: 100 – 15kHz
Netzanschluss: ~AC230V / 50Hz
Trennung: ≥45dB
Signal-Rausch-Verhältnis: ≥60dB
Die Spezifikationen können Änderungen unterliegen. Gewicht und Abmessungen sind Näherungswerte.
21
5....-05-DVD 608 HC D 01.06.2004 10:05 Uhr Seite 21
Page 22

Dieses Gerät wurde nach allen zutreffenden, aktuellen
CE-Richtlinien geprüft, wie z.B. elektromagnetische Verträglichkeit und Niederspannungsdirektive und wurde
nach den neuesten sicherheitstechnischen Vorschriften
gebaut.
Technische Änderungen vorbehalten!
Garantie
Wir übernehmen für das von uns vertriebene Gerät eine
Garantie von 24 Monaten ab Kaufdatum (Kassenbon).
Innerhalb der Garantiezeit beseitigen wir unentgeltlich die
Mängel des Gerätes oder des Zubehörs*), die auf Material- oder Herstellungsfehler beruhen, durch Reparatur
oder, nach unserem Ermessen, durch Umtausch. Garantieleistungen bewirken weder eine Verlängerung der Garantiefrist, noch beginnt dadurch ein Anspruch auf eine
neue Garantie!
Als Garantienachweis gilt der Kaufbeleg. Ohne diesen
Nachweis kann ein kostenloser Austausch oder eine kostenlose Reparatur nicht erfolgen.
Im Garantiefall geben Sie bitte das Grundgerät in der Originalverpackung zusammen mit dem Kassenbon an Ihren
Händler.
*) Schäden an Zubehörteilen führen nicht automatisch
zum kostenlosen Umtausch des kompletten Gerätes.
Wenden Sie sich in desem Fall bitte an unsere Hotline!
Glasbruchschäden bzw. Brüche von Kunststoffteilen sind
grundsätzlich kostenpflichtig!
Sowohl Defekte an Verbrauchszubehör bzw. Verschleißteilen (z.B. Motorkohlen, Knethaken, Antriebsriemen, Ersatzfernbedienung, Ersatzzahnbürsten, Sägeblättern
usw.), als auch Reinigung, Wartung oder der Austausch
von Verschleißteilen, fallen nicht unter die Garantie und
sind deshalb kostenpflichtig!
Die Garantie erlischt bei Fremdeingriff.
Nach der Garantie
Nach Ablauf der Garantiezeit können Reparaturen
kostenpflichtig vom entsprechenden Fachhandel oder
Reparaturservice ausgeführt werden.
Service für unsere Haushaltsartikel
und Unterhaltungselektronik
Zu technischen Fragen oder zur Bestellung von
Verschleißteilen (soweit diese nicht vom Fachmann ausgewechselt werden müssen), wie z.B. Ersatzkannen,
Staubsaugerfilterbeutel, Fernbedienung usw. können Sie
sich, mit Angabe des Gerätetyps, an unsere HotlineAdresse wenden:
hotline@clatronic.de
Interessieren Sie sich für weitere Clatronic-Produkte?
Besuchen Sie doch einmal unsere Homepage unter
www.clatronic.de oder www.clatronic.com
22
5....-05-DVD 608 HC D 01.06.2004 10:05 Uhr Seite 22
Page 23

23
5....-05-DVD 608 HC D 01.06.2004 10:05 Uhr Seite 23
Page 24

SAFETY INFORMATION
CAUTION: DVD/CD PLAYER IS A CLASS 1 LASER
PRODUCT. HOWEVER, THIS DVD/CD PLAYER USES A
VISIBLE LASER BEAM WHICH COULD CAUSE
HAZARDOUS RADIATION EXPOSURE IF DIRECTED.
BE SURE TO OPERATE THE DVD/CD PLAYER
CORRECTLY AS INSTRUCTED.
W
ARNING:
TO REDUCE THE RISK OF FIRE OR ELECTRIC
SHOCK, DO NOT EXPOSE THIS PLAYER TO RAIN OR
MOISTURE
THIS PRODUCT CONTAINS A LOW POWER
LASER DEVICE.
Safety Information
Please Note:
This device is designed only for use in a temperate climate. It must only be connected to an alternating current
supply of 220-240V/50Hz. The device must not be used
under any other circumstances.
Impor
tant:
• The DVD player is a class 1 laser product.The device
uses an invisible laser beam which may produce hazardous rays. Please ensure that you use the device
only for the purposes for which it is designed and in
accordance with instructions.
• When the device is connected to a standard mains power socket do not put your eyes too close to the opening in the device and do not look inside the player.
• Any use of the operating controls, any settings or use
of the device which deviate from those described in
these instructions may result in your being exposed to
the hazardous rays.
• Do not open any covers or repair the device yourself.
Please contact qualified specialists if this device requires maintenance or repairs.
W
arning:
• In order to avoid risks such as fire or electric shock,
please do not expose the device to rain or moisture.
• In order to avoid risks such as fire, electric shock or interference, please use only the recommended accessories.
Precautions
Please read these precautions carefully before using the
device.
Pr
otection of the Mains Lead
In order to prevent the device from malfunctioning and to
protect against electric shocks, fire or injury, please note
the following:
• Always remove the plug by pulling the plug itself and
not the lead.
• Never touch the mains plug or lead with wet hands.
• Keep the mains lead away from heaters.
• Never put a heavy object on the electric lead.
• Never try to repair or replace the mains lead yourself.
The mains lead may only be replaced by a qualified electrician!
P
ositioning
Please avoid setting up the device in the following surroundings:
• In direct sunshine, where there is exposure to heaters
or in closed vehicles.
• In high temperatures (over 35° C) or high humidity
(over 90%).
• In extremely dusty surroundings.
Otherwise internal parts may be seriously damaged
When the de
vice is not being used:
• Please turn the device off when it is not being used.
• Should you not use the device for a prolonged period,
please remove the mains plug from the socket.
Do not inser
t your fingers or other objects
into the device
• Touching internal parts of this device is dangerous
and may result in serious damage to the device. Do
not try to take the device apart.
• Do not insert any foreign bodies into the CD drawer.
K
eep away from water, fire and magnets
• Keep the device away from vases, baths, wash basins
etc. If liquid enters the device this may cause serious
damage.
• Open sources of fire, such as burning candles, must
not be placed on the device.
• Never place magnetic items, such as loudspeakers, in
the vicinity of the device.
V
entilation
• Please maintain a free space of 5 cm around the device to ensure adequate ventilation.
• Do not cover any ventilation slits with objects such as
magazines, tablecloths, curtains etc.
• Please position the device horizontally and do not place any heavy items on it.
• Do not place the device on amplifiers or other devices
which may heat up.
24
5....-05-DVD 608 HC GB 01.06.2004 10:10 Uhr Seite 24
Page 25

Condensation
In the following situations moisture may develop on the
lens:
• Immediately if a heater is switched on.
• In a steaming or very damp room.
• If the device is transferred from cold to warm surroundings.
If moisture has formed inside the device, it is possible
that the device will no longer function correctly. In this case please turn off the power and wait for approximately
one hour until the moisture has evaporated.
What to do if there is tele
vision interference while
you are watching a programme.
Depending on the reception conditions there may be interference to the television picture when you are watching
a television programme and the device is switched on.
This is not a malfunction of the device or television.
Switch the device off if you want to watch a television programme.
25
Manufactured under license from Dolby Laboratories.
“Dolby” and the double-D symbol are trademarks of Dolby Laboratories.
Disc Types Marks Recording Types Disc Size Max. Playing Time
12 cm
Approx. 240 min. (Single-sided)
DVD Audio + Video
Approx. 480 min. (Double-sided)
08 cm
Approx. 080 min. (Single-sided)
Approx. 160 min. (Double-sided)
12 cm 74 Min.
AUDIO-CD Audio
8 cm 20 Min.
DISC FOR PLAYBACK
This DVD player is capable of playing the following types of discs with the corresponding logos:
Usable Discs:
Region Code
Both the DVD player and the disc are coded by region.
These regional codes must match in order for the disc to
play. If the codes do not match, the disc will not play.
The Region Number for this player is describer on the
rear panel of the player.
Dolby Digital disc DTS Disc Digital Audio Stereo disc NTSC broadcast PAL broadcast
disc system in USA, system in U.K.,
Canada, Japan, France,
South Korea, etc. Australia, etc.
COMPACT
DIGITAL AUDIO
DIGITAL
SOUND
STEREO NTSC PAL
5....-05-DVD 608 HC GB 01.06.2004 10:10 Uhr Seite 25
Page 26
26
1. DIGITAL OUT – COAXIAL - Connect to
audio equipment with digital-coaxial audio input.
2. Right and left audio output jacks Connect to a stereo amplifier
3. S-VIDEO OUT Connect to a TV with SVHS video input.
4. VIDEO OUT
- Connect to a TV with video input.
5. AC POWER CORD
- Connect to a standard AC outlet.
6. SCART OUT
- Connect to a TV with SCART input.
1. POWER-Switch –
Switch over from power to standby modes
2. Display
3. DISC TRAY
4. OPEN/CLOSE – To open or close the disc tray
5. PREV – Press to skip to the previous chapter/track.
6. NEXT – Press to skip to the next chapter/track.
7. PLAY – To start disc playback.
8. PAUSE – To interrupt disc playback.
9. STOPP – To stop playing the disc.
DESCRIPTION
Front Panel
Rear Panel
Disc structure
A DVD video disc consists of “title”, and each title may be
divided into some “chapters” (See Example 1.)
For example, if a DVD disc contains some movies, each
movie may have its own title number, and it may be
further divided into some chapters.
On the other hand, Audio CD consist of “tracks”. (See
Example 2.) In general, each track has it own track
number. (On some discs, each track may also be divided
by indexes.)
5....-05-DVD 608 HC GB 01.06.2004 10:10 Uhr Seite 26
Page 27

Remote Control Unit
1. POWER
– To switch to standby mode.
2. TITLE/PBC
– Press to access a DVD’s title menu.
3. DVD MENU/RETURN
– Press to access a DVD’s Disc menu.
– Go back to previous menu.
4. DIGEST (VCD and CD only)
– Press to preview VCD/CD track.
5. PROGRAM
– Press to access program mode.
6. PLAY
– Press to start playback.
7. ZOOM – Press to enlarge the picture.
8. NUMBER BUTTONS (0 – 9)
– Select numbered item in a menu.
9. ANGLE – Select a DVD camera angle.
10.AUDIO – Select an audio language.
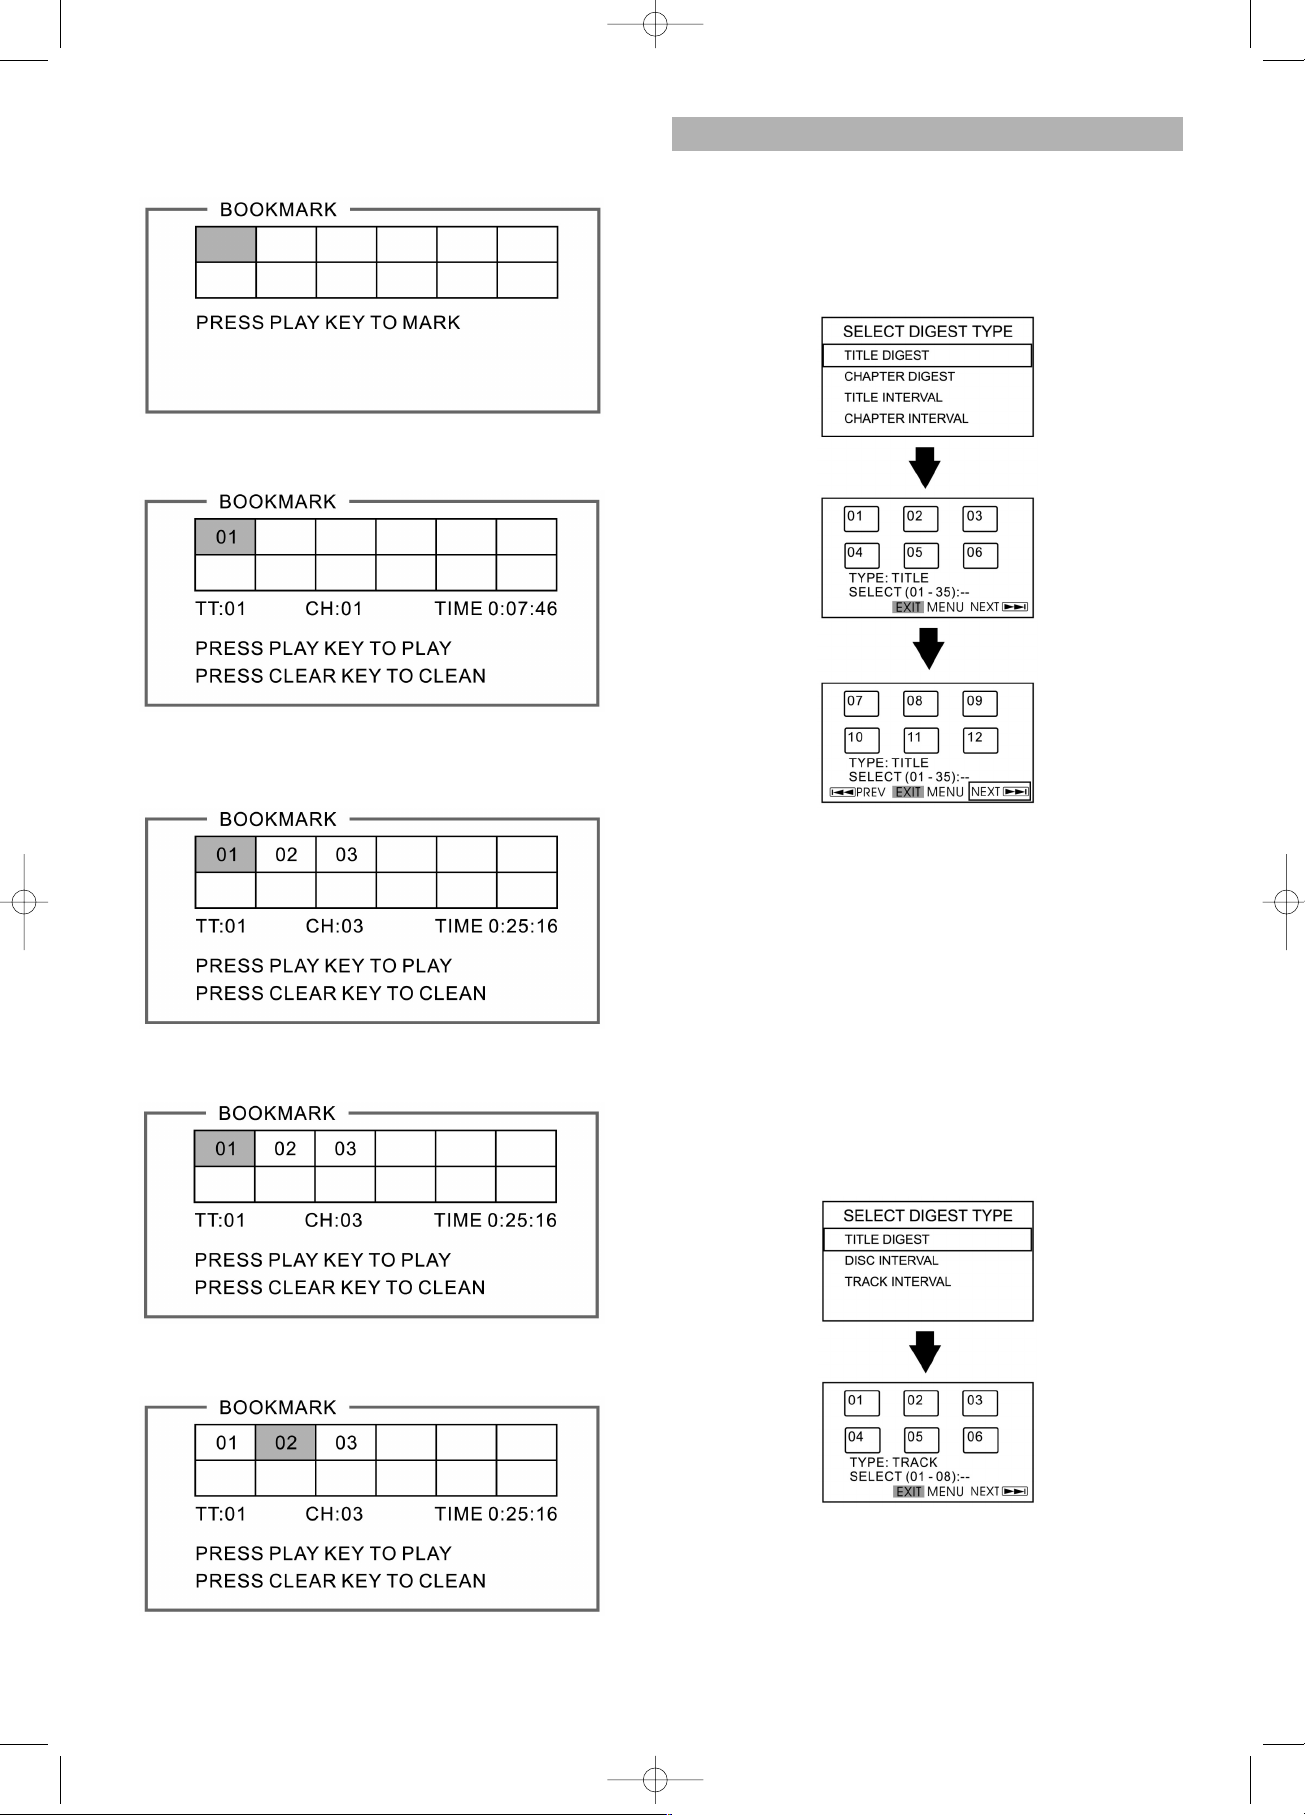
11.BOOKMARK
12.NEXT
– Press to go to the next chapter or track.
13.PREV
– Press to go to the previous chapter or track.
14.(left/right/up/down)
select an item in the menu.
15.ENTER
– Acknowledge menu selection.
16.DISPLAY
– Press during playback to see current disc informati-
on or the TV screen.
17.SUBTITLE
– Select a subtitle language.
18.MUTE
– Press to silence the volume, press again to restore
the volume.
19.SETUP
– Press to access or remove the setup menu of the
player
20.GOTO
– Press to search for a specific chapter or playing
time.
21.STOP
– Press to stop playback.
22.REPEAT
– Press to play a chapter, title, track or disc repeatedly.
23.REPEAT A-B
– Press to repeat a specific segment.
24.SHUFFLE
– Press to play track in random order.
25.PAUSE/STEP
– Pause playback temporarily/frame-by-frame play-
back.
26.SLOW
– Press to play slow reverse/forward playback of DVD.
27.REV
– Press to search backward during playback.
28.FWD/CLEAR
– Press to search forward during playback.
– Clear input selections.
29.SHIFT
– Press to number lock on the buttons with number
printed on the surface.
Insert Batteries (Remote Control Unit)
You can control the player with the supplied remote
control unit. Insert two R6 (size AA) batteries by matching
the + and – markings inside the compartment. When
using the remote unit, point it at the
remote sensor on the player.
Notes:
• Do not leave the remote control unit in the extremely
hot or humid place.
• Do not use a new battery with an old one.
• Do not expose the remote sensor to direct light from
the sun or lighting apparatus. Doing so may cause a
malfunction in controlling the player.
• If you do not use the remote control unit for an extended period of time, remove the batteries to avoid possible damage from battery leakage and corrosion.
27
5....-05-DVD 608 HC GB 01.06.2004 10:10 Uhr Seite 27
Page 28
Range of Operation of the Remote Control
The remote control can be used up to approximately
5 meters in a straight line.
It can also be operated at a horizontal angle of up to 30°
from the remote sensor.
Front Panel (for Subwoofer)
1. Power switch
2. Master volume down
3. Master volume up
4. Mute
5. Bass volume up
6. Bass volume down
7. Mode
Back Panel (for Subwoofer)
1. Left audio input
2. Right audio input
3. Right audio output
4. Left audio output
5. AC power cord
Remote Control (for Subwoofer)
1. Mute select
2. Play select
3. Rock sound effect
4. Main volume up
5. Main volume down
6. Stereo sound effect
7. Classic sound effect
8. Pop sound effect
9. Bass volume up
10.Bass volume down
COMPONENTS
Subwoofer . . . . . . . . . . . . . . . . . . . . . . . . . . . . . . . . . .1pc
RCA Cable for Input
(DVD unit to Subwoofer) . . . . . . . . . . . . . . . . . . . . . . .1pc
Satellite Speaker . . . . . . . . . . . . . . . . . . . . . . . . . . . . .2pc
RCA Cable for Satellite Speaker . . . . . . . . . . . . . . . . .2pc
USING TIPS
1. Press all the function button to original or mini position
then turn the power on.
2. Adjust the control button to your satisfied level.
3. Adjust the BASS button to your satisfied level.
4. Press all button to minimum or original position, then
turn power off when the system is not on work.
28
5....-05-DVD 608 HC GB 01.06.2004 10:10 Uhr Seite 28
Page 29
INSTALLATION GUIDE
1. Connect the satellite link cable with the signal output
port at the back board of the Subwoofer.
2. Insert one end of the signal input cable into the output
port of audio player.Then connect another end with
input port at the back of the subwoofer cabinet.
3. Plug the connect for power.
CONNECTION TO A TV (FOR VIDEO)
METHOD 1 DVD Player + TV with Video input jack
METHOD 2 DVD Player + TV with S-Video input jack
METHOD 3 DVD Player + TV with Scart input jack
(Audio & video)
CONNECTION TO AN AUDIO SYSTEM
The following diagram shows examples of connections
commonly used to connect the DVD player to TV sets
with other audio equipment.
Bef
ore Connecting the DVD player
• Be sure to turn off the power to all components in the
system before connecting another component.
• Refer to the instruction Manuals for your TV, stereo system and other components to be connected to the
DVD player.
METHOD 1 DVD Player + Stereo System
METHOD 2 DVD Player + Amplifier with Dolby Digital
Decoder/DTS Decoder
29
5....-05-DVD 608 HC GB 01.06.2004 10:10 Uhr Seite 29
Page 30
BASIC PLAYBACK
Powering on the player and playing the disc
• Press POWER button. If there is a disc in the tray, the
player will begin to play it once the power is on.
• Press OPEN / CLOSE button to open the tray to either
change the disc or insert a disc.
• Once the disc is in the tray, press OPEN/CLOSE
button to close the tray. Once closed, the player will
begin to play the disc.
Stopping pla
yback
• Press STOP button once to stop playback and show
the logo screen. The player memorizes the location
where playback is stopped, if last memory is ON.
• Press PLAY button to resume playback from the location where playback is stopped.
• When the STOP button is pressed twice. the resume
function will be cleared.
P
ausing playback
• Press PAUSE / STEP button once to pause playback.
The sound is mutted during PAUSE mode.
• Press PLAY button to resume normal playback.
Single Stepping (D
VD only)
• Press PAUSE button to pause playback.
• Press PAUSE button again to single step forward to
the next picture frame.
• Press PLAY button to resume normal playback.
Sear
ch Forward/Search backward
• Press FWD button to fast forward through the disc.
The speed can be selected by pressing the key further
(2x, 4x, 8x, 16x, normal) for DVD and VCD.
• Press PLAY button to resume normal playback.
• Press REV button to fast reverse through the disc.
The speed can be selected by pressing the key further
(2x, 4x, 8x, 16x, normal) for DVD and VCD.
• Press PLAY to resume normal playback.
Slo
w motion Forward / Backward
• Press SLOW forward button to play a disc in slow motion.
• Each time the SLOW forward button is pressed, the
slow motion speed changes (1/2x, 1/4x, 1/8x, 1/16x
normal speed for DVD).
• Press PLAY button to resume normal playback.
• Press SLOW backward button to play a disc in slow
reverse.
• Each time the SLOW backward button is pressed, the
slow reverse speed changes (1/2x, 1/4x, 1/8x, 1/16x,
normal speed for DVD)
• Press PLAY button to resume normal playback.
30
5....-05-DVD 608 HC GB 01.06.2004 10:10 Uhr Seite 30
Page 31

Skipping to the Next / Previous chapter/track
• Press NEXT button to skip forward to the beginning of
the next chapter (DVD) or track (Audio CD).
• Press PREV button once to skip backward to the previous chapter (DVD) or beginning of the current track
(Audio CD).
• Press PREV button twice to skip backward to the previous track (Audio CD).
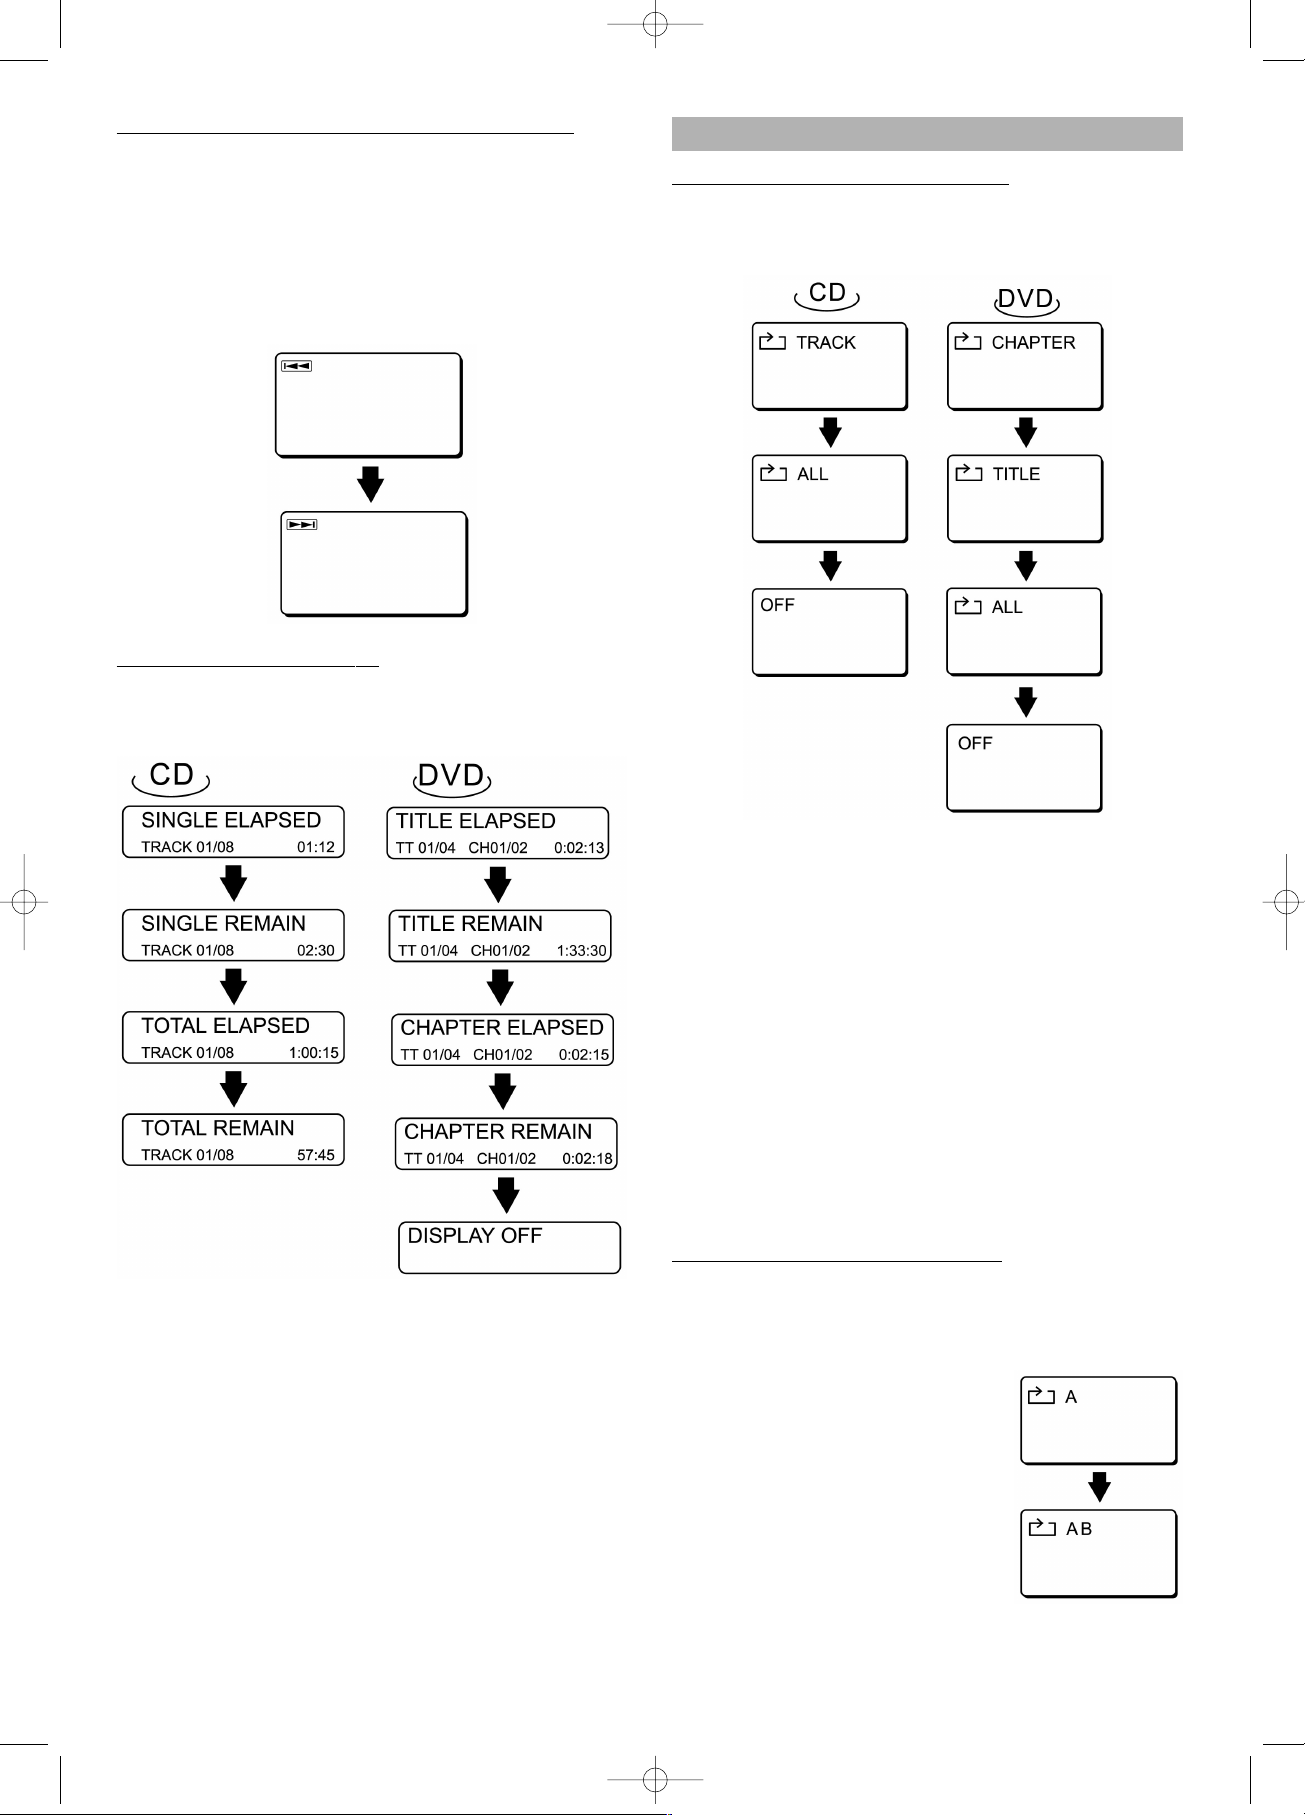
Chec
king the Remaining Time
• Press the DISPLAY button to check the elapsed time
and remaining time as illustrated.
REPEAT PLAY
Repeat Viewing / Listening
• Press REPEAT button to repeat the chapter, title and
all for DVD disc; track and all for CD disc.
TITLE REPEAT ON /
REP-ALL – repeat entire title
When playback reaches the end
title of the disc, playback
resumes at the beginning.
CHAPTER – repeat current chapter
When playback reaches the end
of the current chapter, playback
jumps back to the beginning of
the chapter.
REP-ONE – repeat current track / song
When playback reaches the end
of the current track / song, playback jumps back to the beginning
of the track / song.
A
B Repeat playback
• Press A – B button once at the beginning of the segment (point A) you want to play repeatedly.
• Press A – B button again at the end of the segment
(point B).
• The player automatically returns to
point A and starts repeat playback
of the selected segment (A – B).
• Press A – B button a third time to
disable repeat A – B playback and
allow playback to continue in normal.
31
5....-05-DVD 608 HC GB 01.06.2004 10:10 Uhr Seite 31
Page 32

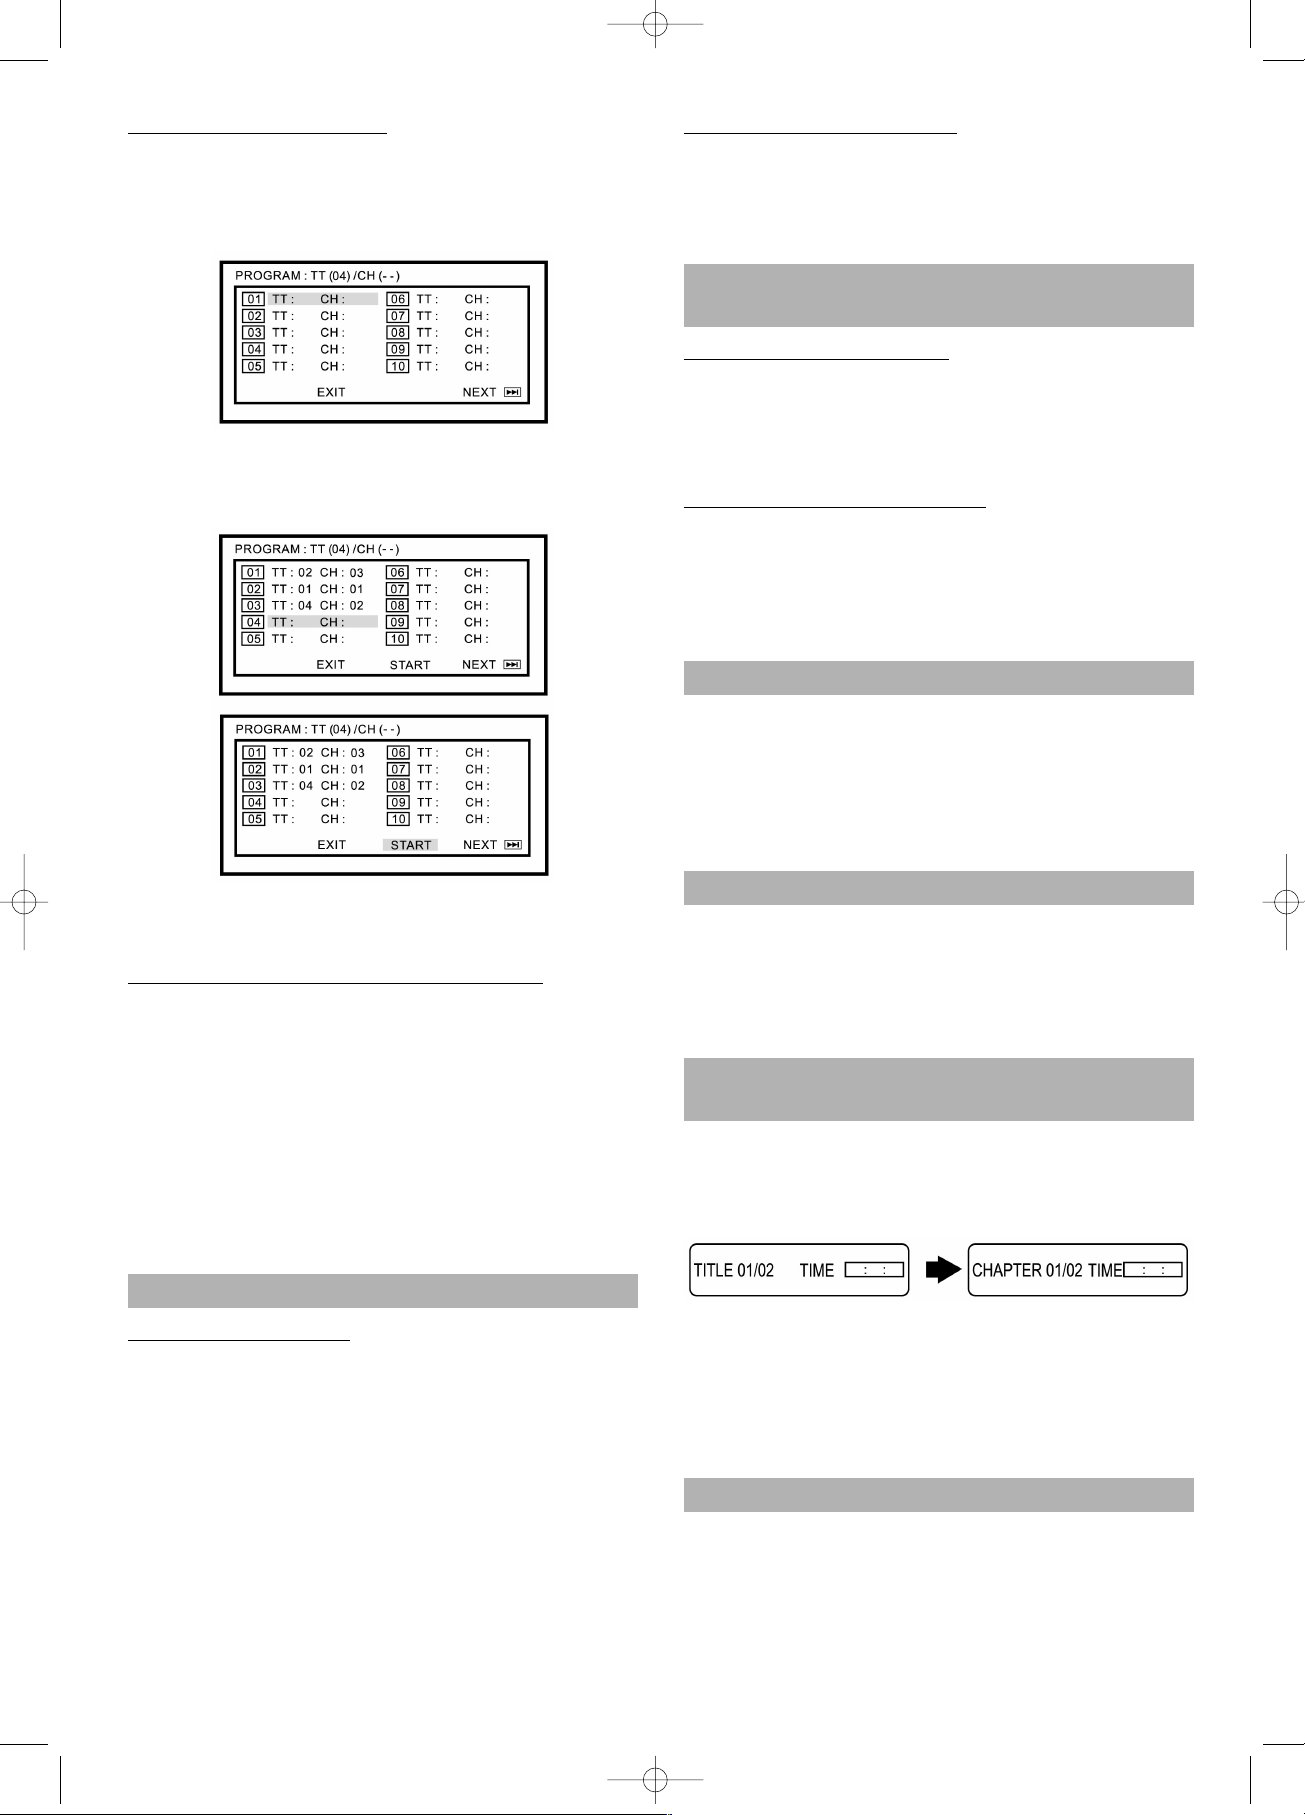
PROGRAM PLAY
• Press PROGRAM button and enter TITLE and CHAPTER number with the number buttons (0–9) on the remote control. The OSD will display the following:
• Select program and press Up / Down, Left / Right buttons to move the cursor to START and press ENTER
button to play the program.
• The program function can be applied in the same way
for audio CD.
RANDOM PLA
Y(shuffle)–For CD only
• Press SHUFFLE button during playback to toggle between ON and OFF. The setting are as follow:
ON = Random mode enabled.When playback rea-
ches the end of the current track, playback
jumps to a random track.
OFF = Random model disabled. (OSD) off. (Must
press STOP key first before to use)
USING DISC MENU / TITLE
To select the disc menu
• You can use the menus for the audio language, subtitle language, etc. DVD menu contents differ from disc
to disc.
1. Press the DVD MENU button during playback.The
menu screen appears.
2. Use the up/down or left/right button to access the different features.
3. Press the ENTER button
• The selected item will play.
Using the
Title Menu
• For DVD’s containing multiple titles, you can view the
title of each movie.
• If and how this function is working depends on the
respective DVD.
AUDIO LANGUAGE / SUBTITLE LANGUAGE
(only applicable to DVD disc)
Selecting the Audio Language
• Press AUDIO button to select different audio
languages (eg. English, French, Spanish, German,
......depending on the number of languages recorded
on a DVD disc).
Selecting the Subtitle Langua
ge
• Press SUBTITLE button to select different subtitle
languages (eg. English, French, Spanish, German,
.....depending on the number of languages recorded
on a DVD disc).
ZOOM
• Press ZOOM button repeatedly during playback to
select zoom 2x, 3x, 4x, 1/2x, 1/3x, 1/4x to change the
size of the picture.
• While an image is enlarged, you can use UP/DOWN,
LEFT/RIGHT buttons to shift the view and display the
part you wanted.
ANGLE
• Press the ANGLE button during playback to select the
desired angle.
• This function only works with discs on which multiple
scenes were shot from different angles.
MOVE TO A TITLE, CHAPTER OR
TIME DIRECTLY
• Press the GOTO button.
• Each time the button is pressed, it repeats as shown
below.
• The player will jump to the desired location immediately.
• In VCD2.0 playback. Press GOTO button to choose a
search mode (Disc Time/Track Time/Track Number)
• In CD discs, press GOTO button and enter the track
number.
Bookmark
• The bookmark function lets you select parts of a DVD
or VCD, so that you can quickly find the section at a
later time. (The player can support up to 12
bookmarks.)
32
5....-05-DVD 608 HC GB 01.06.2004 10:10 Uhr Seite 32
Page 33

• Press the BOOKMARK button during playback and
the bookmark table will be shown.
• Press the PLAY button, the player will mark the location.
• If you want to mark more than one location, use the
Up/Down, Left/Right button to choose another empty
box and press PLAY button.
• Press the BOOKMARK button again to close the
bookmark table.
• To clear a bookmark entry, go to that location and
press CLEAR button.
DIGEST PLAY (DVD)
• Press the DIGEST button and the following menu will
appear.
• Press the Up/Down button to select TITLE DIGEST,
CHAPTER DIGEST, TITLE INTERVAL and CHAPTER
INTERVAL and BOOKMARK and then press ENTER
button.
– TITLE DIGEST: The movie will be divided into
several parts according to the
number of titles it contains.
Each of the 6 sub screens will
show one of the divided titles.
– CHAPTER DIGEST: The title will be divided into se-
veral parts according to the
number of chapters it contains.
– TITLE INTERVAL: The current title will be divided
into several parts with same
length in time (10 minutes).
Each of the sub-screens will
show one of the divided parts.
– CHAPTER INTERVAL: The current chapter will be divi-
ded into several segments of
the same time length.
• Press the number, Up / Down, Left / Right buttons to
select the window you’d like to see, and press the
ENTER button.
33
5....-05-DVD 608 HC GB 01.06.2004 10:10 Uhr Seite 33
Page 34

• Up to 6 windows (titles or chapters) can be displayed
on the screen at a time.You may select NEXT and
then press ENTER button for the next 6 titles of chapters if the movie has more than 6.
DIGEST PLAY (VCD)
• During play, press the DIGEST button. The following
menu will appear.
• Press the up/down buttons to select TRACK, DIGEST.
DISC INTERVAL, TRACK INTERVAL. Then press
ENTER button.
• Press Up / Down or Left / Right buttons to select the
window you’d like to see, and press the ENTER button.
• Up to 6 windows can be displayed on the screen at a
time. Press the Up / Down or Left / Right buttons to
select NEXT. Then press ENTER button for the next 6
windows if the movie has more than 6.
• For CD audio, this function only supports intro play
(scan). The player will play the first 6 seconds of each
track sequentially.
JPEG Playback
Some CD-Rs may contain pictures in a JPEG format. For
example, you may have photographic film developed with
pictures stored in JPEG format. Then you can playback
those JPEG files in this player.
Some useful features are described below:
• When you insert a disc with JPEG files, the files or
pictures available for playback will be listed on the
screen.
• Press UP / DOWN buttons to select the folder or file
and press ENTER.
• After you open one JEPG file, each subsequent file
will appear automatically for a few seconds. To keep
the JEPG image on the screen longer, press PAUSE
button to pause the image.
• During playback, press UP / DOWN, LEFT / RIGHT to
rotate or flip the image.
• You may press ZOOM button to enlarge or reduce an
image during playback. Press NEXT button to enlarge
the image. Press PREV button to reduce the image’s
size.
• Press zoom again to turn off zoom function and the
image’s size become normal.
• During playback, press STOP button. 12 pictures will
be shown on the TV screen each time. If there are more than 12 pictures, press Up / Down or Left / Right
buttons to select PREV or NEXT, then press ENTER.
• Choose “slide show” on the screen to change to slide
show mode.The player will start showing from the first
picture.
• Press Up / Down, Left / Right buttons to select the picture, then press ENTER and it will shift to slide show
mode starting with the picture selected.
MP3 Playback
This system has a built in MP3 decoder.You can playback
MP3 tracks (files) recorded on CD-R, CD-RW.
34
5....-05-DVD 608 HC GB 01.06.2004 10:10 Uhr Seite 34
Page 35

Starting playback
• It is recommended you turn on you TV when playing
back an MP3 disc.
1. Press the OPEN/CLOSE button to load a disc.
– The menu will show up the folders and the files in
root directory.
2. Use the UP/DOWN buttons to select the desired music folder, then press ENTER.
3. Use the UP/DOWN buttons again to select a song file.
Press ENTER to begin playback of the song file.
PLA
Y MODE
– The indication corresponding to the selected mode
appears on the TV screen.
1. Use the LEFT/RIGHT and UP/DOWN buttons to select play mode.
2. Use the LEFT/RIGHT buttons to select the desire
music folder, then press ENTER.
3. Use the LEFT/RIGHT and UP/DOWN buttons to select the song file, then press ENTER.
NOTE :
A. FOLDER
All the files in the current folder will be played once in
sequence.
B. SINGLE
The selected file will be played.
C. REPEAT ONE
The selected file will be repeated.
D. REPEAT FOLDER
All the files in the current folder will be repeated.
E. SHUFFLE
The file to be played will be selected randomly.
T
o program play an MP3 file
– The menu will show up the folders and the files in root
directory.
1. Press the program button.
– Each time the program button is pressed.
– Select PROGRAM LIST
2. Use the Up/Down buttons to select the first file to add
to the program. Press the enter button.
– The selected files appear in the program list.
3. Use the Up/Down buttons to select the file, then press
PLAY button or ENTER button to start playback.
– After all programmed files are played. Play is stop-
ped.
– Up to 100 files can be programmed.
SETUP MENU
The SETUP MENU let you to customize the DVD player
by allowing you to select various language preferences,
set up a parental level, turn captions and screen saver on
and off, adjust what type of television screen you have
and more. Below, find the menu, and then find the corresponding page that describes the features of the selected
menu option.
35
5....-05-DVD 608 HC GB 01.06.2004 10:10 Uhr Seite 35
Page 36

1. Press the SETUP button.
2. Press the UP/DOWN buttons to select the
menus/screens.
3. Press the ENTER button to select the highlighted
option.
Press SET UP in the stop or playback mode (in DVD mode).
• The SET-UP menu is display
• Press UP/DOWN buttons to select, and press ENTER
button to enter.
• The SETUP menu operation, can set up the general,
speaker, audio, and perferences.
• To exit SETUP menu.
Press DOWN button to select the EXIT SETUP to exit.
General Setup
Select GENERAL SETUP in the SETUP MENU and then
select the desired option using the cursor buttons to navigate through the menus/screens and press the ENTER
button to select.
Set up the
TV DISPLAY
NORMAL/PS: Pan scan. Select when the unit is
connected to a conventional TV. Video
material formatted in the Pan Scan style
is played back with the left and right edges are cut off.
NORMAL/LB: Letter Box. Select when the unit is
connected to a normal TV. Wide-screen
images are shown on the screen with a
black band at the top and bottom.
WIDE: Select when the unit is connected to a wi-
de-screen TV.
Note:
The displayable picture size is preset on the DVD disc.
Therefore the playback picture of some DVD discs may
not conform to the picture size you select.
VIDEO Out
Select the color video type to fit your connector type:
SCART/CVBS or SCART/RGB
Set up ANGEL MARK
– Some DVD disc is record by serval video camera from
the different angles to take, when playback, can select
the one of the angle to watch.
ON open the angle
OFF close the angle
– The disc must have the angle mark, the set up can
work.
Set up the OSD LANG
– You can select the TV display language.
36
5....-05-DVD 608 HC GB 01.06.2004 10:10 Uhr Seite 36
Page 37

Set up CAPTIONS
ON – open the option.
OFF – close the option.
The TV set must support closed captions function.
Set up SCR SA
VER
When no disc or playback stop some time, the unit will
automatic open the Screen saver function.This time the
screen will become black, only the DVD patten move on
the screen. This function is protect the TV screen long time display will be hurt.
Speaker Setup
• Press UP/DOWN button to select the SPEAKER
SET UP and press ENTER.
• The left is the main catalog, the right is the children
catalog.
• Press LEFT/RIGHT button to enter the children catalog and press ENTER to confirm.
Set up the DO
WNMIX MODE
Press the Up- or Down button to select DOWNMIX (if you
connect the player to a Multichannel Receiver)
The following settings are available for each item:
• DOWNMIX: LT/RT STEREO or OFF
• Choose LT/RT (left/right) if the Player is connected to
a Stereo that has a Dolby Pro Logic decoder.
• Choose STEREO if you connected the Player to a
Stereo amplifier that is not Dolby Digital or DTS compatible,
DOLBY DIGITAL Setup
• Press UP/DOWN button to select the AUDIO SET UP
and press ENTER.
• The left is the main catalog, the right is the children
catalog.
• Press LEFT/RIGHT button to enter the children catalog and press ENTER to confirm.
1.
Set up the SPDIF-OUTPUT
• Press UP/DOWN button to select SPDIF OUT, then
press ENTER.
• Press UP/DOWN button to select SPDIF OFF,
SPDIF/RAW, or SPDIF/PCM, then press ENTER.
• Choose SPDIF OFF if no external audio equipment is
connected.
• Select SPDIF RAW if the player is connected to a 5.1
home theatre system by a coaxial cable (not
supplied).
• Select SPDIF PCM to enable the internal Dolby Digital
decoder of this player.
2.
Set up the COMPRESSION
– Dynamic Range Compression
Dynamic Range Compression reduces volume change by letting you adjust the difference between soft
and loud sounds.
Press UP/DOWN button to set Dynamic Range Compression to 1/8 through FULL or to turn it OFF, then press
ENTER.
To hear the full range of range of sounds as recorded,
choose OFF or a lower ratio such as 1/8 or 2/8.To minimize the difference in volume between lound segments
and quiet scenes, choose a higher ratio such as 6/8 or
FULL.
37
5....-05-DVD 608 HC GB 01.06.2004 10:10 Uhr Seite 37
Page 38

VIDEO SETUP
Select video setup in the setup menu then press ENTER
button.
• Press Up- or Down button to select sharpness,
brightness, contrast then press right button.
• Press left button to go back and select another picture
setting as needed.
For sharpness, choose high, medium, low 3 different levels.
For BRIGHTNESS, the range is -20 to +20.
For CONTRAST, the range is -16 to +16.
Preference Setup
(Only in the STOP mode or open the tray.)
Press UP/DOWN button to select the PREFERENCES
SET UP and press ENTER.
– The left is the main catalog, the right is the children
catalog.
Press LEFT/RIGHT button to enter the children catalog
and press ENTER to confirm.
Set up the
VIDEO (TV Type)
Please adjust the Video Out in this way, that he meets the
system of the TV, the model will be connected to.
1. If you are using a PAL television set, select the PAL
output signal;
2. If you are using an NTSC television, select the NTSC
output signal;
3. Select MULTI if your television set has a multisystem.
Set up the A
UDIO
- The audio is decide by disc, only the disc support the
language format, the audio set up just can work. For
example, the disc have English and German two
FORMATS, you can select the English or German is
decide the disc.
Set up the SUBTITLE
- Subtitle is the words of the disc play audio, as same
the audio set up, must the disc support, the sub-title
just can work.
Set up the DISC MENU
– Set up the disc menu subtitle language, it is decide
the disc.
38
5....-05-DVD 608 HC GB 01.06.2004 10:10 Uhr Seite 38
Page 39

Set up the PARENTAL
Parental lock will be selected. Press Right button.
– Press Up- or Down button to select a parental control
level (1–8),then press enter or select off to completely
turn off the parental controls.
– Press the number buttons to enter your 6-digit
password as requested, then press ENTER.You cannot play DVD discs rated higher than the level you selected unless you cancel the parental lock function.
RATING EXPLANATIONS
• KID SAF – Kid safe; it is safe even for kids.
• G – General Audience; recommended as acceptable
for viewers of all ages.
• PG – Parental Guidance suggested.
• PG 13 – Material is unsuitable for children under age 13.
• PG-R – Parental Guidance-restricted; recommended
that parents restrict children under age 17 from viewing or allow children to view only when supervised
by a parent or adult guardian.
• R – Restricted, under 17 requires accompanying
parent or adult guardian.
• NC-17 – NO children under age 17; not recommended viewing for children under age 17.
• ADULT – Mature material; should be viewed only by
adults due to graphic sexual material, violence, or
language.
Notes: Parental control is a relatively new feature encoded into DVD discs. Currently very few DVD titles (if any)
include parental control in the Australia and New Zealand
region.
“OLD PASSWORD” :You need in “PASSWORD” setting to
set the NEW PASSWORD or use SUPERUSER
PASSWORD” “136900”.
Set up the PASSWORD
Parental control limits viewing of DVDs when a DVD has
movie rating that exceeds the parental level you selected.
To adjust the PARENTAL level so that DVDs cannot be
played if the level has exceed, see PARENTAL
CONTROL LEVELS. Press Down- and Right button to
select password, CHANGE will be highlighted and then
press ENTER.
• A box beside OLD password will be highlighted.
• Press the number buttons to enter your Old 6-digit
password.The box beside NEW password will be highlighted automatically.
• Press the number buttons to enter new 6-digit
password of your choice. The box beside CONFIRM
PWD will be highlighted automatically.
• Press the number buttons to enter the same new 6digit password you just entered for the NEW
PASSWORD.
• Press ENTER to save the new password.
NOTES: When first time to use this DVD player, “OLD
PASSWORD” just press ENTER to bypass. Enter the
NEW PASSWORD for this DVD player.
To clear 6-digit password if you forget your password,
follow the procedure below.
1. At the change page enter 6-digit number “136900”
(SUPERUSER PASSWORD) and then press
ENTER.
2. Enter a new password.
39
5....-05-DVD 608 HC GB 01.06.2004 10:10 Uhr Seite 39
Page 40

LAST MEMORY
Press the Down- and Right button to select LAST
MEMORY.
• Press the Up- or Down button or to select ON or OFF,
then press ENTER.
DEFAULT
To restore the original settings of the player, follow the
steps below.
Press the Down- and Right button to select DEFAULT.T.
RESET will be highlighted. Press ENTER.
• The original settings of the player will be restored.
Troubleshooting
Before calling customer service if you have problems with
this device, please search for the possible fault in the table below. With a few simple tests or minor adjustments
you may be able to rectify the problem so that the device
functions correctly again.
Symptom (frequent)
Remedy
No power Insert the mains plug into the
socket.
• No playback
even if PLAY is
pressed.
• Playback begins
but stops again
immediately.
• Condensation has formed: Wait
approx. 1 to 2 hours until the device has dried out.
• The device can only play back
the following media: DVDs, video
CDs, CDs, MP3s and JPEGs.
• The disc may be dirty and require
cleaning.
• Ensure that the disc has been inserted with the label facing
upwards.
No picture. • Ensure that the device is properly
connected.
• Ensure that the television is turned to "video".
• No sound.
• Distorted sound
• Ensure that the device is properly
connected.
• Ensure that the television and
stereo system have been
adjusted correctly.
• Adjust the main volume via the
remote control.
The picture is
distorted during
fast forward or
fast rewind.
In this case the picture is
sometimes a little distorted - this is
normal.
No fast forward
(or fast rewind)
playback.
Some discs have sectors which do
not allow fast forward (or reverse)
playback.
No 4:3
(16:9) picture.
Select the correct setting
corresponding to the
characteristics of your television
("TV Aspects").
No
Surround Sound.
Select the correct setting under
"Audio Output" corresponding to
your stereo system.
No operation
possible via the remote control.
• Check whether the batteries have
been inserted with the correct polarity (+ and -).
• The batteries are flat and must
be replaced.
• Point the remote control in the direction of the sensor on the device.
• Do not use the remote control at
a distance of more than 5 metres
from the sensor
40
5....-05-DVD 608 HC GB 01.06.2004 10:10 Uhr Seite 40
Page 41

Symptom (frequent)
Remedy
Buttons do not
work (on the device
and/or on the
remote control).
• Remove any obstacles between
the remote control and the sensor on the device.
• Switch the device off and then on
again. Alternatively, switch the
device off, remove the mains plug
and re-insert it in the socket (it is
possible that the device is not
working due to external circumstances such as a thunderstorm
or static electricity etc.).
Menu screen is
not or only partially displayed on the
television screen.
Select the corresponding type of
screen according to the operating
instructions of the television set.
No colour Turn the TV type to the German
colour norm PAL. Confirm the SETUP button to return to the menu.
For your Information:
How to Handle and Care for your CDs
Handling Precoutions
• Hold the CD by the edges so that the surface is not
covered in fingerprints.
Fingerprints, dirt and scratches may cause the CD to
jump and distort the sound.
• Do not write on the label side with a ballpoint pen or
other writing utensil.
• Do not use any record cleaning spray, petrol, diluting
agent, antistatic fluid or any other kind of solvent.
• Please ensure that you do not bend or drop the CD.
• Never insert more than one CD into the CD compartment.
• Do not try to close the door if the CD has not been
correctly inserted into the CD compartment.
CD COMPARTMENT
X
CD
41
Symptom (DVD) Remedy
Audio soundtrack
and/or subtitle language is not the
one selected in the
basic setup.
If the audio soundtrack and/or subtitle language is not on the disc, the
language selected in the basic settings cannot be heard or seen.
The display
appears in French
(for example).
The setting in the menus under "Disc Languages" is French. Select
French.
No subtitles. • Subtitles only appear on DVDs
on which subtitles have been recorded.
• Subtitles have been switched off
from the television picture. Press
the "SUBTITLE" button.
No alternative audio soundtrack (or
subtitle) language
is selected.
• No alternative language is selected on discs on which only one
language has been recorded.
• On some discs the alternative
language cannot be selected with
the AUDIO or SUBTITLE button.
Try to select it from the DVD menu if there is one.
Angles cannot be
changed.
This function depends on the availability of the software. Even if a DVD
has been recorded from different
angles, these may only be available
for certain scenes (when the
ANGLE symbol lights up on the de-
Symptom (Video CD)
Remedy
There is no menu This function is only possible with
video CDs with Playback Control.
VCD/ SVCD does
not play back.
With the disc inserted, switch over
the PBC function using the menu
button.
Symptom (Video CD)
Remedy
CD-RWs do not
play back.
CD-RWs must not be written with
hard disc simulation tools such as
Packed CD, In CD or similar
programmes.
CD-Rs and CDRWs do not play
back, or only play
back with errors.
The error rate of CD-R and CD-RW
media depends on:
• the media type
• the writing program (possibly
carry out an UPDATE)
• the writer and its firmware (possibly carry out an UPDATE)
• the writing speed (the lower the
better)
This product is equipped with copyright protection
technology which is itself protected by specific American patent claims and other intellectual copyrights in
the possession of the Macrovision Corporation and
other holders of rights. Use of this copyright protection
technology is only permitted with the authorisation of
the Macrovision Corporation and is limited to home
and other restricted performance situations unless express approval is given by the Macrovision Corporation. Dismantling or disassembly of this protection technology is prohibited.
5....-05-DVD 608 HC GB 01.06.2004 10:10 Uhr Seite 41
Page 42

Definition of Terms
Angle
On some DVDs there are scenes that have been
recorded simultaneously from a number of different viewing angles (the same scene from the front, the left, the
right etc.). With such DVDs the ANGLE button can be
pressed to see the scene from the various angles.
Chapter Number
These numbers are recorded on DVDs. A title is divided
up into many sections, each of which has a number. Specific sections of the video presentation can be quickly found using these numbers.
D
VD
This term refers to optical CDs of a high-density on which
high-quality picture and sound recordings have been made using digital signals. Through the use of a new video
compression technique (MPEG) and a high-density recording technique it is possible to record long and aesthetically pleasing videos on DVDs (for example, an entire
feature film can be recorded). DVDs consist of two 0.6
mm-thin discs. The greater the density, the more information can be recorded. A DVD has a greater capacity than
a single-side 1.2 mm-thick disc. The fact that two thin discs are combined means that at some time in the future it
will be possible to have double-sided playback with even
longer playback times.
PBC (Pla
yback Control)
This is recorded on video CDs (version 2.0).The scenes
or information can be seen (or heard) interactively via the
television screen using the menu that appears on the
screen.
Subtitles
These are printed lines of text that appear at the bottom
of the screen and translate or explain the dialogue. Subtitles are recorded on DVDs.
Time Number
This shows the running time recorded on the DVD. If a
DVD contains two or more films, the films are numbered
as title 1, title 2, etc.
T
rack Number
This number refers to tracks recorded on video CDs and
CDs. They make it possible to search for and find specific
tracks (e.g. songs) very quickly
Video CD
Video CDs contain picture and sound recordings whose
quality is comparable to a video cassette.This device also supports video CDs with Playback Control (version
2.0).
• Please make sure that you always store the CD in its
original case when not being used.
If the Surface is Dirty
• Wipe the CD gently with a soft, moist (water only)
cloth.
• When wiping CDs always move the cloth from the
centre of the CD to the outer edge.
(If you wipe the CD in a circular manner you will cause
circular scratches which will produce noises on the
CD.)
• If a CD is moved from cold to warm surroundings it is
possible that moisture will form on the CD. Wipe off
the moisture with a soft, dry cloth that is free of fluff
before inserting the CD.
Incorrect CD Storage
You may damage the CD if you store it in the following locations:
• exposed to direct sunlight
• damp or dusty locations
• locations exposed to a direct source of heat or
heating.
Maintenance
• Please ensure that before any maintenance is carried
out the device is switched off and the plug removed
from the power supply.
• Wipe the device with a dry, soft cloth. Should the surfaces become extremely dirty, please wipe them with
a cloth that has been immersed in a weak soapy water
solution and then wrung out before wiping off with a
dry cloth.
• Never use alcohol, petrol, diluting agent, cleaning
liquid or other chemicals. Do not use any compressed
air to remove dust.
42
5....-05-DVD 608 HC GB 01.06.2004 10:10 Uhr Seite 42
Page 43

SPECIFICATIONS
Power Requirement AC 230V, 50Hz
Power Consumption 20W
Signal System NTSC/PAL
Weight 2.3kg
Dimensions
430(L) x 240(W) x 70(H)mm
Operating
Temperature Range +5° to +35°c
Operating
Humidity Range 5 to 90%
(no condensation)
Discs Played
1. DVD-VIDEO disc 12cm single-sided,
single-layer
12cm single-sided,
dual-layer
12cm double-sided,
single-layer
2. Compact Disc
(CD-DA, MP3-CD) 12cm disc
8cm disc
S Video Output
Y output level 1 Vp-p (75W)
C output level 0.30 Vp-p (75W)
Number of connectors 1
Video Output
Output level 1 Vp-p (75W)
Output connector RCA type
Number of connectors 1
Audio Output
Output Level 2 Vrms (1kHz, 0db)
Output connector RCA type
Audio Signal Output Characteristics
1. S/N ratio
CD audio 90db (EIAJ)
2. Dynamic range
DVD (Linear audio) 80db
CD audio 80db (EIAJ)
3. Total hamonic distortion THD + SN 70db
Digital Audio Output
Output connectors
Coaxial digital output RCA type
Specifications are subject to change without notice.
Weight and dimensions are approximate.
SPECIFICATIONS FOR SUBWOOFER
Output power: 20W Subwoofer,
12W Satellites
THD = 10%
SUB: 100Hz
SAT: 1kHz
Speaker Unit: Subwoofer : 5”
Satellite : 2.5”x2
Impedance : 4 ohm
Frequence Response: Subwoofer: 30 – 120Hz
Satellite: 100 – 15kHz
Power supply: ~AC230V / 50Hz
Separation: ≥45dB
S/N: ≥60dB
Specifications are subject to change without notice.
Weight and dimensions are approximate.
43
5....-05-DVD 608 HC GB 01.06.2004 10:10 Uhr Seite 43
Page 44

44
This device has been tested according to all relevant current CE guidelines, such as electromagnetic compatibility
and low voltage directives, and has been constructed in
accordance with the latest safety regulations.
Subject to technical changes without prior notice!
Guarantee
The device supplied by our Company is covered by a
24 month guarantee starting on the date of purchase
(receipt).
During the life of the guarantee any fault of the device or
its accessories *) ascribable to material or manufacturing
defects will be eliminated free of charge by repairing or,
at our discretion, by replacing it. The guarantee services
do not entail an extension of the life of the guarantee nor
do they give rise to any right to a new guarantee!
Proof of the guarantee is provided by the proof of purchase. Without proof of purchase no free replacement or repair will be carried out.
For repairs or replacement during the life of the guarantee return the device in its original packing together with
the proof of purchase to your dealer.
*) Damage to accessories does not mean automatic free
replacement of the whole machine. In such cases please
contact our hotline. Broken glass or breakage of plastic
parts are always subject to a charge.
Defects to consumables or parts subject to wearing (e.g.
motor pistons, kneading blades, drive shafts, spare remote control, spare toothbrushes, saw blades, etc.) as well
as cleaning, maintenance or the replacement of said
parts are not covered by the guarantee and hence are to
be paid!
The guarantee lapses in case of unauthorized tampering.
After the expiry of the guarantee
After the expiry of the guarantee repairs can be carried
by the competent dealer or repair service against the
payment of the ensuing costs.
5....-05-DVD 608 HC GB 01.06.2004 10:10 Uhr Seite 44
Page 45

45
5....-05-DVD 608 HC GB 01.06.2004 10:10 Uhr Seite 45
Page 46

i Avvertenze di sicurezza
Attenzione: Il lettore DVD/CD è un prodotto laser della
classe I. Accertarsi che il lettore DVD/CD venga impiegato solo conformemente alle istruzioni.
A
vviso di pericolo:
per evitare il rischio di un incendio o di corto circuito non
esporre questo lettore a umidità o pioggia.
Questo prodotto contiene un componente laser
a bassa energia.
Informazioni di sicurezza
Nota:
Questo apparecchio è stato progettato per funzionare in
un clima moderato. Collegare l’apparecchio solo ad una
tensione alternata di 220--240V/50Hz. In altre condizioni
non può essere utilizzato.
Attenzione:
Il lettore DVD è un prodotto della classe laser 1. L’apparecchio utilizza un raggio laser invisibile che può causare
radiazioni pericolose. Accertarsi che l’utilizzo
dell’apparecchio sia conforme e corrisponda alle istruzioni d'uso. Se l’apparecchio è collegato ad una presa con
contatto di terra, non avvicinarsi troppo con gli occhi all’apertura dell’apparecchio e non guardare all’interno del
lettore. Uso dei comando, impostazioni o qualsiasi altra
forma d’applicazione che differisca da quanto descritto in
queste istruzioni d'uso può causare l’esposizione dell’utente a radiazioni pericolose. Non aprire i coperchi e non
riparare l’apparecchio direttamente. Per la manutenzione
e la riparazione di questo apparecchio rivolgersi a personale specializzato qualificato.
P
ericolo:
Per prevenire rischi come incendio o corto circuito non
esporre l’apparecchio a pioggia o umidità.
Per evitare rischi come incendio, corto circuito o elettroshock utilizzare solo gli accessori consigliati.
Precauzioni
Prima di utilizzare questo apparecchio, leggere
attentamente le seguenti precauzioni .
Pr
otezione del cavo di allacciamento alla rete
elettrica
Per evitare cattivi funzionamenti dell’apparecchio e per
proteggere le persone da corti circuiti, incendio o lesioni,
osservare quanto segue:
Non staccare la spina tirando il cavo.
Non toccare mai la spina o il cavo con le mani bagnate.
Tenere il cavo di alimentazione lontano da radiatori.
Non posare mai oggetti pesanti sul cavo di alimentazione.
Non tentare mai di riparare o sostituire il cavo rete direttamente. La sostituzione del cavo di alimentazione può essere effettuata solo da persone addestrate in materia di
elettrotecnica.
P
osizionamento
Evitare di montare l’apparecchio nei seguenti ambienti:
con esposizione diretta ai raggi solari, in prossimità di radiatori o in veicoli chiusi.
A temperature elevate (oltre 35°C) o in presenza di alta
umidità atmosferica (oltre 90%).
In ambienti estremamente polverosi.
Altrimenti potrebbero risultare seriamente danneggiate
parti interne dell’apparecchio.
Nel caso di in
utilizzo:
Spegnere l’apparecchio se non lo si usa.
Se l’apparecchio non viene utilizzato per un lungo
periodo di tempo staccare la spina dalla presa con contatto di terra.
Non infi
lare le dita o altri oggetti nell’apparecchio
Toccare parti interne dell’apparecchio è pericoloso e può
provocare danni seri all’apparecchio. Non tentare di
smontare l’apparecchio direttamente.
Non inserire corpi estranei nel vano CD.
T
enere lontano da acqua, fuoco e magneti
Tenere l’apparecchio lontano da vasi di fiori, vasche da
bagno, lavandini ecc. Se penetrano liquidi nell’interno, l’apparecchio può riportare gravi danni. Non mettere sull’apparecchio oggetti combustibili, per esempio candele
accese.
Non portare mai oggetti magnetici, come per esempio altoparlanti, vicino all’apparecchio.
Aerazione
Per l’aerazione tenere libero uno spazio di 5 cm attorno
all’apparecchio.
Non coprire le aperture per l’aerazione con oggetti come
riviste, tovaglie, tende ecc.
Porre l’apparecchio in posizione orizzontale; non posare
oggetti pesanti sull’apparecchio.
Non mettere l’apparecchio su amplificatori o altri
apparecchi che potrebbero riscaldarsi.
46
5....-05-DVD 608 HC I 01.06.2004 10:16 Uhr Seite 46
Page 47

Condensazione
In queste circostanze può formarsi umidità sulla lente:
- subito dopo l’accensione di un radiatore
- in un locale con vapore o molto umido
- quando l’apparecchio viene trasportato da un ambiente
freddo in un ambiente caldo.
Se si è formata umidità nell’interno dell’apparecchio, può
darsi che l’apparecchio non funzioni più correttamente.
In questo caso staccare la spina e attendere ca. un’ora
finché l’umidità è evaporata.
Se ci sono fruscii durante una trasmissione
A seconda delle condizioni di ricezione, nello schermo televisivo possono presentarsi disturbi mentre si guarda
una trasmissione televisiva e l’apparecchio è acceso.
Questo non è un cattivo funzionamento dell’apparecchio
o del televisore.
Se si desidera guardare una trasmissione televisiva,
spegnere l’apparecchio.
47
Prodotto sotto licenza della Dolby Laboratories.
"Dolby” e il simbolo DD sono marchi della Dolby Laboratories.
Tipo di disco Logo Tipo di registrazione Misura disco Durata massima
12 cm
ca. 240 min. (registrazione su un lato)
DVD Audio + Video
ca. 480 min. (registrazione su due lati)
08 cm
ca. 080 min. (registrazione su un lato)
ca. 160 min. (registrazione su due lati)
12 cm 74 Min.
AUDIO-CD Audio
08 cm 20 Min.
Dischi riproducibili
Questo lettore DVD può riprodurre i seguenti tipi di dischi con i corrispettivi logo.
Dischi utlizzabili:
Codice regione
Sia il lettore DVD che il disco sono codificati secondo le
regioni. Per poter riprodurre il disco questi codici regione
devono coincidere nella successione. Se i codici non corrispondono, il disco non può essere riprodotto.
Il codice regione per questo lettore è riportato sul retro dell’apparecchio.
Dolby Digital Disk DTS Disk Digital Audio Stereo-Disk NTSC-System PAL-System
Disk USA, Canada, GB, Francia,
Giappone, Australia,
Corea del sud, ecc. ecc.
COMPACT
DIGITAL AUDIO
DIGITAL
SOUND
STEREO NTSC PAL
5....-05-DVD 608 HC I 01.06.2004 10:16 Uhr Seite 47
Page 48

48
1. DIGITAL OUT – COAXIAL
- Collegamento di apparecchi audio con ingresso digitale coassiale.
2. Prese di uscita audio destra e sinistra - Per il collegamente a un amplificatore stereofonico
3. Uscita S-Video - Collegamento di un apparecchio TV
con entrata video SVHS
4. Uscita VIDEO - Collegamento di un apparecchio TV
con entrata video.
5. Cavo di allacciamento rete corrente alternata
- Collegamento ad una presa standard
6. Uscita SCART - Collegamento di un apparecchio TV
con entrata SCART
1. Interruttore POWER – Commutazione dalla modalità
Power alla modalità standby
2. Display
3. Vano CD:
4. OPEN/CLOSE –
Aprire e chiudere il vano CD
5. PREV – Passare al capitolo/traccia precedente
6. NEXT – Passare al capitolo/traccia successivir
7. PLAY – Avviare la riproduzione
8. PAUSE – Interrompere la riproduzione
9. STOPP – Interrompere la riproduzione
Descrizione
Tavola comandi anteriore
Tavola comandi posteriore
Struttura disco
Un DVD Video è composto da singoli "titoli” e ogni titolo
può essere a sua volta suddiviso in vari "capitoli” (v.
esempio 1). Se un disco contiene, per esempio, più film,
ogni film può avere il suo numero titolo ed essere suddiviso ulteriormente in alcuni capitoli.
Sull’altro lato ci sono Audio-CD da "tracce” (track)
(v. cap. 2).
In genere ogni traccia ha un suo numero di track (per alcuni dischi i relativi track sono ulteriormente suddivisi da
numeri di indice).
5....-05-DVD 608 HC I 01.06.2004 10:16 Uhr Seite 48
Page 49

Telecomando
1. POWER
- Commutazione in Stand by
2. TITLE/PBC
- Premendo il tasto si passa al menu titoli DVD
3. DVD-Menu/RETURN
- Premendo il tasto si passa al menu disco DVD
- Ritorno al menu precedente.
4. DIGEST (solo VCD e CD)
- Premere per l’anteprima di una traccia VCD/CD.
5. PROGRAM
- Premendo il tasto si passa al modo programma.
6. PLAY
- per avviare la riproduzione
7. ZOOM
- per ingrandire l’immagine
8. Tasti cifra (0 – 9)
- per selezionare un punto menu numerato
9. ANGLE
- per selezionare un angolo della telecamera DVD
10. AUDIO
- Selezione di una lingua audio
11. BOOKMARK
12. NEXT
- Premendo il tasto si passa al capitolo successivo
ovvero alla traccia successiva
13. PREV
- Premendo il tasto si passa al capitolo precedente
ovvero alla traccia precedente
14. Tasti freccia (sinistra/destra/su/giù) per selezionare
un punto del menu
15. ENTER
- Confermare la selezione del menu premendo il tasto
16. DISPLAY
- Premendo il tasto durante la riproduzione si visualizzano sul monitor le informazioni attuali del disco
17. SUBTITLE
- Selezione di una lingua dei sottotitoli
18. MUTE
- Silenziamento rapido premendo una volta, ritorno
all’audio premendo un’altra volta
19. SETUP
- Premere il tasto per aprire ovvero chiudere il menu
Setup
20. GOTO
- Ricerca di un determinato capitolo o tempo di riproduzione
21. STOP
- Interrompe la riproduzione
22. REPEAT
- premere il tasto per ripetere un capitolo, un titolo,
una traccia o un disco.
23. REPEAT A-B
- premere il tasto per ripetere una determinata sezione
24. SHUFFLE
- per riprodurre i track in successione casuale.
25. PAUSE/STEP
- sospensione temporanea della riproduzione/riproduzione immagine per immagine
26. SLOW
- per l’avanzamento / il ritorno rapido di DVD.
27. REV
- per la ricerca indietro durante la riproduzione.
28. FWD/CLEAR
- per la ricerca in avanti durante la riproduzione.
- cancellare la selezione immessa
29. SHIFT
- premendo questo tasto si combina la funzione stampata sulla superficie con il corrispettivo tasto.
Inserire la batteria (telecomando)
Si può comandare il lettore con il telecomando accluso
alla fornitura. Inserire due batterie (AA) R6 nel vano
batterie conformemente alla direzione dei poli indicata.
Quando si desidera utilizzare il telecomando
orientarlo verso il sensore remoto
sull’apparecchio.
Note
- Non custodire il telecomando in luoghi estremamente
caldi o umidi.
- Non combinare batterie nuove e vecchie.
- Non esporre il telecomando alla luce diretta del sole o
a dispositivi di illuminazione. Ciò può provocare guasti
nel comando del lettore.
49
5....-05-DVD 608 HC I 01.06.2004 10:16 Uhr Seite 49
Page 50

- Se non si usa il telecomando per un periodo di tempo
più lungo, togliere le batterie per evitare danni a causa
di ossidazione o corrosione delle stesse.
Raggio d’azione del telecomando
l telecomando può essere impiegato in una distanza fino
a ca. 5 metri in direzione rettilinea. Inoltre può essere
usato all’interno di un angolo orizzontale di 30° rispetto al
sensore remoto.
Pannello di comando anteriore (subwoofer)
1. Interruttore di attivazione/disattivazione (ON/OFF)
2. Volume principale Più
3. Volume principale Meno
4. Silenziamento
5. Volume dei toni bassi Più
6. Volume dei toni bassi Meno
7. Modalità
Pannello di comando posteriore (per subwoofer)
1. Ingresso audio sinistro
2. Ingresso audio destro
3. Uscita dell’altoparlante destro
4. Uscita dell’altoparlante sinistro
5. Cavo di collegamento AC
Telecomando (per subwoofer)
1. Circuito di muting ON (Mute
on)
2. Circuito di muting OFF (Mute
off)
3. Effetto audio rock
4. Volume principale Più
5. Volume principale Meno
6. Effetto audio stereofonico
7. Effetto audio classico
8. Effetto audio pop
9. Volume toni bassi Più
10.Volume toni bassi Meno
Componenti
Subwoofer . . . . . . . . . . . . . . . . . . . . . . . . . . . . . . .1 unità
Cavo RCA per ingresso
(apparecchio DVD sul subwoofer) . . . . . . . . . . . . .1 unità
Altoparlante satellite . . . . . . . . . . . . . . . . . . . . . . . .2 unità
Cavo RCA per altoparlante satellite . . . . . . . . . . . .2 unità
Consigli per l’applicazione
1. Prima di attivare l’apparecchio, impostare tutte le funzioni sul parametro OFF e sulla regolazione minima.
2. Regolare il volume, impostandolo sul livello desiderato.
3. Regolare il volume dei toni bassi, impostandolo sul livello desiderato.
4. Prima di disattivare l’apparecchio, é necessario
impostare tutte le funzioni sul parametro OFF e sulla
regolazione minima.
50
5....-05-DVD 608 HC I 01.06.2004 10:16 Uhr Seite 50
Page 51

Istruzioni per l’installazione
1. Collegare il cavo di allacciamento dell’altoparlante satellite alle uscite audio del pannello di comando
posteriore del subwoofer.
2. Collegare un’estremità del cavo di collegamento di
segnale alla presa di uscita (audio Out) del DVD player. Successivamente, collegare l’altra estremità del cavo alla presa di ingresso (audio In) al lato posteriore
dell’alloggiamento del subwoofer.
3. Inserire la spina nell’apposita presa.
Collegamento di un televisore (per video)
Metodo 1 lettore DVD con apparecchio TV con entrata
video
Metodo 2 lettore DVD con apparecchio TV con entrata
video S
Metodo 3 lettore DVD con apparecchio TV con entrata
Scart (Audio & Video)
Collegamento ad un impianto audio
Il seguente diagramma indica esempi per vie di collegamento che normalmente vengono impiegate per collegare un lettore DVD ad apparecchi TV con un’altra dotazione audio.
Prima del collegamento del lettore D
VD
- Prima del collegamento di un altro apparecchio accertarsi che tutti gli apparecchi dell’impianto siano spenti.
- Leggete attentamente le istruzioni d'uso del vostro
apparecchio TV, dell’impianto stereo e di tutti gli altri
apparecchi che devono essere collegati al lettore
DVD.
Metodo 1 Lettore DVD + impianto stereo
Metodo 2 lettore DVD + amplificatore con decoder Dolby
Digital/decoder DTS
51
5....-05-DVD 608 HC I 01.06.2004 10:16 Uhr Seite 51
Page 52

Riproduzione normale
Accendere il lettore e riprodurre i dischi
- Premere il tasto Power. Se il disco si trova nel vano disco, il lettore avvia la riproduzione non appena si preme il tasto Power.
- Per sostituire o inserire un disco aprire il vano
premendo il tasto OPEN/CLOSE.
- Appena il disco è inserito, chiudere il vano premendo
il tasto OPEN/CLOSE. Appena è chiuso il lettore avvia
la riproduzione del disco.
Interr
ompere la riproduzione
- Per interrompere la riproduzione e visualizzare
l’immagine LOGO premere una volta il tasto STOP. Il
lettore salva il punto in cui la riproduzione è stata
interrotta purché sia attiva la funzione "salva ultima
impostazione”.
- Per continuare la riproduzione dal punto di interruzione premere ancora una volta il tasto PLAY.
- Se si preme due volte il tasto STOP, la funzione di riregistrazione viene cancellata.
Funzione pausa durante la ripr
oduzione
- Per usare la funzione pausa durante la riproduzione,
premere una volta il tasto PAUSE/STEP. Nel modo
PAUSE l’audio è in mute.
- Per continuare la riproduzione premere il tasto PLAY.
Displa
y a una sola immagine (esclusivamente
per i DVD)
- Per interrompere la fase di riproduzione, premere il
tasto PAUSE.
- Premendo nuovamente il tasto PAUSE, si avanza alla
successiva impostazione dell’immagine.
- Per proseguire la normale fase di riproduzione, azionare il tasto PLAY.
Ricer
ca avanti/indietro
- Per cercare rapidamente nel disco avanzando premere il tasto FWD. La velocità può essere selezionata
continuando a premere il tasto (2x, 4x, 8x, 16x,
normale) nei DVD/ nei VCD.
- Per continuare la riproduzione premere il tasto PLAY.
- Per cercare rapidamente nel disco indietro premere il
tasto REV. La velocità può essere selezionata
continuando a premere il tasto (2x, 4x, 8x, 16x,
normale) nei DVD/ nei VCD.
- Per continuare la riproduzione premere il tasto PLAY.
Ripr
oduzione al rallentatore avanti/indietro
- Per far avanzare il disco al rallentatore premere il tasto
SLOW-Forward.
- Ogni volta che si preme il tasto SLOW-Forward cambia il tempo del rallentatore (1/2x, 1/4x, 1/8x, 1/16x velocità normale nei DVD).
- Per continuare la riproduzione normale premere il
tasto PLAY.
- Per far ritornare indietro il disco al rallentatore premere il tasto SLOW-Backward.
- Ogni volta che si preme il tasto SLOW-Backward cambia il tempo del rallentatore (1/2x, 1/4x, 1/8x, 1/16x velocità normale nei DVD).
- Per continuare la riproduzione normale premere il
tasto PLAY.
52
5....-05-DVD 608 HC I 01.06.2004 10:16 Uhr Seite 52
Page 53

Passare a capitolo/traccia successivi/precedenti
- Per passare all’inizio del capitolo successivo (DVD) o
della traccia successiva (Audio-CD), premere il tasto
NEXT.
- Per passare al capitolo precedente (DVD) o all’inizio
della traccia attuale (Audio-CD), premere il tasto
PREV.
- Per passare alla traccia precedente (Audio-CD)
premere due volte il tasto PREV.
Contr
ollare la durata residua
- Per controllare il tempo di riproduzione già trascorso
ovvero il tempo residuo premere il tasto DISPLAY come nella figura.
Ripetere la riproduzione
Ripetere la riproduzione
- per ripetere il capitolo, titolo o tutto il DVD oppure per
ripetere la traccia e tutto il CD premere il tasto
REPEAT.
TITLE REPEAT ON/
REP-ALL – ripetere tutto il titolo
Quando la riproduzione ha raggiunto il titolo finale del CD, la
riproduzione riprende dall’inizio.
CHAPTER – ripetere il capitolo attuale
Quando la riproduzione è al termine del capitolo attuale, riprende dall’inizio del capitolo.
REP-ONE – ripetere la traccia/il brano attuale
Quando la riproduzione è al termine della traccia/del brano
attuale, riprende dall’inizio della
traccia/del brano.
Ripetere la ripr
oduzione A –– B
- All’inizio della sezione da ripetere (punto A) premere
una volta il tasto A-B.
- Alla fine della sezione da ripetere (punto B) premere
di nuovo il tasto A - B.
- Il lettore ritorna automaticamente
al punto A e riavvia la riproduzione
della sezione selezionata (A - B).
- Per ripetere la sezione A – B premere una terza volta il tasto A - B.
La riproduzione normale continua.
53
5....-05-DVD 608 HC I 01.06.2004 10:16 Uhr Seite 53
Page 54

Riproduzione programmata
- Premere il tasto PROGRAM e inserire quindi il numero del TITOLO o del CAPITOLO (0-9) servendosi dei
tasti numerici sul telecomando. Il display OSD visualizza quanto riportato di seguito:
- Selezionare l’opzione Programmazione, quindi posizionare il cursore sull’opzione START servendosi dei
tasti direzionali. Per avviare la fase di riproduzione,
premere quindi il tasto di invio (ENTER).
- La medesima funzione di programmazione può essere utilizzata allo stesso modo anche per i CD audio.
Ripr
oduzione casuale (shuffle) solo per CD)
- Durante la riproduzione premere il tasto SHUFFLE
per passare tra ON e OFF. Le impostazioni sono le seguenti:
ON = modo riproduzione casuale attivo. Quando la
riproduzione è al termine della traccia attuale,
continua su una traccia a caso.
OFF = modo riproduzione casuale inattivo. Scherma-
ta OFF (Premere il tasto STOP prima che possa essere utilizzato).
Impiego di DISC-MENÜ e TITLE
Aprire il menu del disco
- Si possono utilizzare i menu per selezionare la lingua
dell’audio, dei sottotitoli ecc. I contenuti dei menu DVD
variano da disco a disco.
1. Durante la riproduzione premere il tasto menu DVD. Il
menu viene visualizzato
2. Con i tasti freccia (su/giù) o (ds./sin.) comandare i vari
punti.
3. Premere il tasto ENTER: - il punto selezionato viene
riprodotto.
Utilizzo del men
u titoli
- Nei DVD che contengono più titoli si possono visualizzare
i titoli di ogni film così:
- Come opera questa funzione e se è supportata dipende
dal DVD.
Lingua AUDIO / Lingua sottotitoli
(vale solo per dischi DVD)
Selezione della lingua audio
- Per selezionare le varie lingue audio premere il tasto AUDIO (p.e.inglese, francese, spagnolo, tedesco…, a
seconda del numero di lingue memorizzate sul DVD).
Selezione della lingua dei sottotitoli
- Per selezionare le varie lingue dei sottotitoli premere il
tasto SUBTITLE (p.e.inglese, francese, spagnolo, tedesco…, a seconda del numero di lingue di sottotitoli memorizzate sul DVD).
ZOOM
- Durante la riproduzione premere più volte il tasto ZOOM
per modificare le dimensioni dell’immagine (1,5 volte, 2
volte, 3 volte).
- Quando un’immagine è ingrandita, si può spostare la visualizzazione con i tasti freccia (su/giù, sin./ds.) e visualizzare la parte desiderata.
Angolo
- Durante la riproduzione premere il tasto ANGLE per selezionare l’angolo desiderato.
- Questa funzione è attiva solo in dischi in cui più scene sono state riprese da diverse angolazioni.
Accesso diretto ad un titolo,
capitolo o momento
- Premere il tasto GOTO.
- Ogniqualvolta si prema questo tasto, la riproduzione ha
luogo secondo quanto indicato dalla seguente illustrazione:
- Il lettore si porta immediatamente in corrispondenza del
punto desiderato.
- Durante la riproduzione di un VCD2.0 premere il tasto
GOTO per selezionare una modalità di ricerca (Disc
Time(durata)/Track Time(tempo della traccia)/Track Number (numero della traccia).
- Nel caso in cui si tratti di CD, premere il tasto GOTO e inserire quindi il numero della traccia.
Segnalibro (bookmark)
- Attraverso la funzione di segnalibro é possibile
contrassegnare delle parti di un DVD o di un VCD in modo da poterle nuovamente trovare con rapidità in un
secondo momento. (Il lettore supporta un numero massimo di 12 segnalibri).
- Durante la fase di riproduzione, premere il tasto BOOKMARK per visualizzare lo schema complessivo dei segnalibri.
54
5....-05-DVD 608 HC I 01.06.2004 10:16 Uhr Seite 54
Page 55

- Premendo il tasto PLAY, il lettore seleziona la parte in
oggetto.
- Nel caso in cui si desideri contrassegnare più parti,
selezionare un campo vuoto mediante i tasti direzionali, quindi premere nuovamente il tasto PLAY.
- Azionare nuovamente il tasto BOOKMARK per chiudere la finestra dello schema complessivo dei segnalibri.
- Per cancellare uno dei segnalibri, portarsi in
corrispondenza della parte in questione, quindi
premere il tasto CLEAR.
Riproduzione DIGEST (DVD)
- Premere il tasto DIGEST. In questo modo viene visualizzato il seguente menu.
- Per selezionare una delle opzioni TITLE DIGEST,
CHAPTER DIGEST, TITLE INTERVAL e CHAPTER
INTERVAL, nonché BOOKMARK, utilizzare i tasti
PIÚ/MENO. Successivamente, azionare il tasto ENTER.
– TITLE DIGEST: Il film é suddiviso in diverse se-
zioni conformemente al numero
complessivo dei titoli contenuti.
Ognuno dei 6 schermi parziali
visualizza un titolo.
– CHAPTER DIGEST: Il titolo é suddiviso in diverse
parti in funzione dei capitoli ivi
contenuti.
– TITLE INTERVAL: Il titolo corrente é suddiviso in
diverse sezioni di uguale durata
(10 minuti). Ognuno degli
schermi parziali visualizza un
settore parziale.
– CHAPTER INTERVAL: Il capitolo corrente é suddiviso
in diverse sezioni di uguale durata.
- Per selezionare la finestra selezionata, é necessario
utilizzare i tasti numerici e i tasti direzionali, quindi
confermare azionando il tasto ENTER.
- Sullo schermo è possibile visualizzare
simultaneamente un numero massimo di 6 finestre (titoli o capitoli). Servendosi del tasto NEXT e premendo
successivamente il tasto ENTER, selezionare i 6 successivi titoli o capitoli, nel caso in cui il film contenga
più di 6 sottosezioni.
55
5....-05-DVD 608 HC I 01.06.2004 10:17 Uhr Seite 55
Page 56

Riproduzione DIGEST (VCD)
- Durante la riproduzione, premere il tasto DIGEST. Viene in questo modo visualizzato il menu seguente.
- Servendosi dei tasti Più/Meno, selezionare una delle
opzioni TRACK, DIGEST. DISC INTERVAL, TRACK
INTERVAL. Successivamente, confermare l’operazione mediante ENTER.
- Per selezionare la finestra desiderata, utilizzare i tasti
direzionali e confermare successivamente mediante il
tasto ENTER.
- Sullo schermo è possibile visualizzare
simultaneamente un numero massimo di 6 finestre.
Per selezionare NEXT, premere i tasti direzionali. Successivamente, selezionare, mediante il tasto ENTER,
le 6 finestre successive, nel caso in cui il film contenga più di 6 sottosezioni.
- Nel caso specifico dei CD audio, questa funzione supporta esclusivamente l’inizio della riproduzione
(SCAN). Il lettore riproduce in questo modo in successione i primi 6 secondi di ogni traccia.
Riproduzione JPEG
Alcuni CD possono contenere anche immagini nel formato JPEG.
Può accadere per esempio che abbiate fatto sviluppare
una pellicola fotografica le cui riprese esistono nel formato JPEG. Allora si possono visualizzare questi file JPEG
con questo lettore.
Alcune note utili in questo contesto:
- Quando si inserisce un dico con file JPEG, i file o immagini a disposizione per la riproduzione vengono visualizzati sullo schermo.
-
La scelta della cartella ovvero del file avviene tramite i
tasti freccia
su/giù
, per confermare premere ENTER.
- Trascorsi alcuni secondi dopo l’apertura di un file
JPEG compare automaticamente il file successivo. Al
fine di trattenere l’immagine JPEG più a lungo sullo
schermo, premere il tasto PAUSE per interrompere la
successione.
- Durante la riproduzione usare i tasti freccia per girare
o sfogliare.
- Per ingrandire o rimpicciolire una determinata immagine durante la fase di riproduzione, premere il tasto
ZOOM. Per ingrandire l’immagine, azionare il tasto
FWD. Per ridurre le dimensioni dell’immagine, premere invece il tasto REV.
- Per disattivare la funzione ZOOM, premere
nuovamente il tasto ZOOM. In questo modo, vengono
ripristinate le dimensioni normali dell’immagine.
- Durante la fase di riproduzione, azionare il tasto
STOP. Sullo schermo del televisore vengono
visualizzate ogni volta 12 immagini. Servendosi dei tasti direzionali, selezionare PREV oppure NEXT, quindi
premere il tasto ENTER.
- Per passare alla modalità Diashow, selezionare l’opzione „slide show“. Il lettore inizia a visualizzare
(Show) la prima immagine.
- Per selezionare l’immagine, utilizzare i tasti direzionali, quindi confermare mediante il tasto ENTER.
Successivamente, l’apparecchio passa alla modalità
Diashow, iniziando dall’immagine selezionata.
56
5....-05-DVD 608 HC I 01.06.2004 10:17 Uhr Seite 56
Page 57

Riproduzione MP3
Questo apparecchio dispone di un decoder MP3 integrato. Così si possono riprodurre le tracce (file) MP3
registrate su CD-R o CD-RW.
A
vviare la riproduzione
- Quando si vuole riprodurre un disco MP3 si consiglia
di accendere l’apparecchio TV.
1. Per caricare il disco premere il tasto OPEN/CLOSE.
- Nel menu compaiono le cartelle e i file nella directory
principale.
2. Con i tasti freccia su/giù selezionare la cartella musicale desiderata, quindi confermare con ENTER.
3. Per selezionare un file song utilizzare di nuovo i tasti
su/giù, poi premere il tasto ENTER per avviare la
riproduzione del file song.
Modo di ripr
oduzione
- Sullo schermo TV compare la schermata
corrispondente al modo selezionato.
1. Per scegliere il modo di riproduzione utilizzare i tasti
freccia.
2. Con i tasti freccia ds./sin. selezionare la cartella musicale desiderata e confermare con ENTER.
3. Con i tasti freccia selezionare il file song desiderato e
confermare con ENTER.
Nota: Per ripetere le funzioni FOLDER REPEAT, DISC,
DISC REPEAT, DISC SCAN, SINGLE, FOLDER, REPONE (ripetizione di un brano) premere il tasto REPEAT
del telecomando.
Avvertenza:
A. FOLDER (cartella)
Tutti i file contenuti nella cartella corrente vengono riprodotti una volta in successione.
B. SINGLE
Viene riprodotto il file selezionato.
C. REPEAT ONE
Il file selezionato viene ripetuto.
D. REPEAT FOLDER
Tutti i file contenuti nella cartella corrente vengono ripetuti.
E. SHUFFLE
Viene effettuata la selezione casuale di un titolo all’interno del file da riprodurre.
Ripr
oduzione programmata di un file MP3
- Il menu ripartisce le cartelle e i file nella cartella root.
1. Premere il tasto di programmazione.
- Ogniqualvolta si prema il tasto di programmazione
- selezionare PROGRAM LIST (elenco di programmi).
2. Per selezionare il primo file che deve essere aggiunto
al programma, servirsi dei tasti direzionali. Successivamente, premere il tasto ENTER.
- I file selezionati vengono in questo modo visualizzati
all’interno dell’elenco dei programmi.
3. Servendosi dei tasti Più/Meno, selezionare il file, quindi premre il tasto PLAY oppure il tasto ENTER per
avviare la riproduzione.
57
5....-05-DVD 608 HC I 01.06.2004 10:17 Uhr Seite 57
Page 58

- Una volta completata la riproduzione di tutti i file programmati, la procedura di riproduzione si arresta.
- É possibile programmare sino a 100 file.
MENU SETUP
Il menu SETUP consente di effettuare l’impostazione del
DVD secondo i desideri dell’utente, selezionando varie
lingue, attivando la sicura bambini, attivando o disattivando simboli e screen saver, impostando il tipo di schermo
eccetera. Cercare verso il basso il corrispettivo menu e
trovare la pagina corrispondente dove sono descritti i dati
caratteristici dell’opzione di menu desiderata.
1. Premere il tasto SETUP
2. Con i tasti freccia su/giù selezionare il menu o le
schermate.
3. Per confermare il punto con sfondo chiaro selezionato
premere il tasto ENTER.
Nel modo STOP o di riproduzione (modo DVD) premere il tasto SETUP:
- Il menu SETUP viene visualizzato.
- Per la scelta utilizzare i tasti freccia su/giù e per confermare premere il tasto ENTER.
- Tramite il menu SETUP si possono eseguire impostazioni generali, altoparlanti, audio e funzioni preferite.
- Per uscire dal menu SETUP premere il tasto freccia
giù e selezionare EXIT SETUP.
Impostazioni generali
Nel menu SETUP selezionare il punto Impostazioni generali e poi l’opzione desiderata servendosi dei tasti freccia,
quindi comandare i menu/le schermate, per confermare
premere il tasto ENTER.
Impostazione della sc
hermata
NORMAL/PS: Pan scan. Selezionare questo punto se l’-
apparecchio è collegato ad un
apparecchio TV convenzionale. Nei
videofilm registrati nel formato Pan scan
nella riproduzione vengono tagliati il bordo destro e sinistro.
NORMAL/LB: Letter box. Selezionare questo punto se
l’apparecchio è collegato ad un
apparecchio TV normale. Le riprese panoramiche vengono visualizzate sullo
schermo con una striscia nera sul bordo
superiore e inferiore dell’immagine.
WIDE: Selezionare questo punto se
l’apparecchio è collegato ad un
apparecchio TV a ripresa panoramica.
Nota:
La dimensione immagine visualizzabile è preimpostata
sul disco DVD. Perciò può accadere che l’immagine riprodotta di alcuni dischi DVD non coincida con quella selezionata dall’utente.
VIDEO Out
Selezionare il modello video a colori appropriato per il
proprio tipo di collegamento:
SCART/CVBS oppure SCART/RGB
Impostazione dell’indice angolo
- Alcuni DVD sono stati ripresi con più videocamere da
diversi angoli visivi, quindi nella riproduzione si può
selezionare un angolo.
ON – aprire l’angolo
OFF – chiudere l’angolo
- Per poter utilizzare questa funzione il disco deve essere dotato di un indice angolo.
Impostazione della lingua OSD
.
- Si può selezionare la lingua della schermata (ON
SCREEN DISPLAY, OSD).
58
5....-05-DVD 608 HC I 01.06.2004 10:17 Uhr Seite 58
Page 59

Impostazione dei simboli
ON – aprire l’opzione.
OFF – chiudere l’opzione.
L’apparecchio TV deve disporre della funzione per chiudere i simboli.
Impostazione dello screen sa
ver
- Se non sono inseriti dischi o se la riproduzione è stata
interrotta per un po’ di tempo, l’apparecchio passa automaticamente alla funzione "Screen saver”. Il televisore diventa nero e sullo schermo si muove solo il logo DVD. Questa funzione protegge il televisore in modo che non consegua danni anche nel caso rimanga
acceso a lungo.
Impostazione altoparlanti
- Per selezionare l’impostazione degli altoparlanti utilizzare i tasti su/giù e poi confermare con ENTER.
- A sinistra sta il catalogo principale, a destra i
sottopunti
- Con il tasto freccia ds./sin. selezionare i sottopunti e
confermare con ENTER.
Impostazione del modo DO
WNMIX
Per selezionare l’opzione DOWNMIX, utilizzare i tasti
Più/Meno (nel caso in cui si colleghi il lettore a un Multichannel Receiver). Per ogni opzione sono a disposizione le seguenti impostazioni:
- DOWNMIX: LT/RT oppure STEREO
- Nel caso in cui il lettore sia collegato a un impianto
stereofonico con Dolby Pro Logic Decoder, selezionare LT/RT (sinistra/destra).
- Nel caso in cui il lettore sia collegato a un amplificato-
re stereofonico compatibile a Dolby Digital oppure a
DTS, selezionare l’opzione STEREO.
Impostazione DOLBY DIGITAL
- Con i tasti freccia su/giù selezionare l’impostazione
AUDIO e confermare con ENTER.
- A sinistra sta il catalogo principale, a destra i
sottopunti
- Con i tasti freccia ds./sin. selezionare i sottopunti e
confermare con ENTER.
1.
Impostazione SPDIF-OUTPUT
- Con i tasti freccia su/giù selezionare il punto SPDIF
OUT e confermare con ENTER.
- Con i tasti freccia su/giù selezionare uno dei punti
SPDIFOFF, SPDIF/RAW o SPDIF/PCM e confermare
con ENTER.
- Nel caso in cui non sia collegato alcun apparecchio
audio esterno, selezionare l’opzione SPDIF OFF.
- Qualora il lettore sia collegato a un impianto cinematografico domestico 5.1 mediante un cavo coassiale
(quest’ultimo non é fornito in dotazione), selezionare
l’opzione SPDIF RAW.
- Per attivare il decodificatore Dolby Digital interno di
questo lettore, selezionare l’opzione SPDIF PCM.
2.
Impostazione dell’attenuazione
- Zona dinamica di attenuazione
Mediante la zona di attenuazione dinamica si riducono
le variazioni di volume fissando la differenza tra toni
alti e bassi.
Con i tasti freccia su/giù accendere la zona dinamica
di attenuazione tra 1/8 e FULL (pieno), oppure spegnere (OFF), poi premere il tasto ENTER per
confermare.
Per ascoltare tutta la zona della larghezza di banda
per il suono registrata, selezionare OFF o un velocità
di attenuazione 1/8 o 2/8. Per ridurre al minimo la differenza di volume tra scene ad alto volume e scene a
basso volume selezionare una velocità più alta, come
6/8 o FULL.
59
5....-05-DVD 608 HC I 01.06.2004 10:17 Uhr Seite 59
Page 60

IMPOSTAZIONE DEL VIDEO
Nel menu Setup selezionare l’opzione Video Setup e confermare l’operazione azionando ENTER.
• Servendosi dei tasti Più/Meno, selezionare i parametri
di definizione, luminosità e contrasto, quindi premere il
tasto di destra.
• Premere il tasto di sinistra per tornare indietro, quindi
selezionare un’altra impostazione relativa alle immagini a seconda delle proprie particolari esigenze.
Per quanto concerne la definizione, sono disponibili tre
livelli: alto, medio e basso.
Per la LUMINOSITÁ é disponibile un ambito di valori
compreso tra -20 e +20.
Nel caso del parametro di CONTRASTO, l’ambito di valori consentito è incluso tra -16 e +16.
Impostazioni definite dall’utente
(Solo nel modo STOP o a vano aperto)
Con i tasti freccia su/giù selezionare il punto
PREFERENCES SET UP e confermare con ENTER.
- A sinistra sta il catalogo principale, a destra i
sottopunti
Con i tasti freccia ds./sin. selezionare i sottopunti e confermare con ENTER.
Tipo di tele
visore (TV TYPE)
Impostare l’uscita video in modo che corrisponda al sistema del televisore a cui viene collegato l’apparecchio:
1. Se il televisore impiegato è un PAL, selezionare il segnale d’uscita PAL;
2. Se il televisore impiegato è un NTSC, selezionare il
segnale d’uscita NTSC;
3. Oppure selezionare MULTI se il vostro televisore ha
un sistema multi.
Impostazione della funzione A
UDIO
- La funzione audio dipende dal disco: se il disco supporta il formato lingua, l’impostazione audio può funzionare. Se il disco dispone, per esempio, di inglese e
tedesco, si può scegliere tra questi due formati.
Impostazione dei sottotitoli
- I sottotitoli vengono visualizzati sullo schermo e dipendono altresì dal disco riprodotto. Si può visualizzare la
lingua dei sottotitoli supportata dal disco.
Impostazione del DISC MENU
- Anche l’impostazione della lingua per i menu dei
dischi dipende dal disco in uso.
60
5....-05-DVD 608 HC I 01.06.2004 10:17 Uhr Seite 60
Page 61

Impostazione della sicura bambini
Selezione della funzione di blocco.Premere il tasto di destra.
- Servendosi dei tasti direzionali Più/Meno, selezionare
il livello del sistema di blocco (1-8), quindi confermare
l’operazione azionando il tasto ENTER oppure disattivare il sistema di blocco selezionando l’opzione OFF.
- Attraverso i tasti numerici, inserire la propria password
a 6 caratteri, quindi premere il tasto ENTER. Non è
possibile riprodurre dischi DVD con un rating superiore al livello selezionato, fatta eccezione per il caso in
cui si annulli nuovamente la funzione di blocco.
Spiegazione della classificazione secondo fasce
d’età
- KID SAFE – sicuro per bambini: sicuro anche per
bambini
- G – Pubblico generale sicuro per tutte le fasce d’età
- PG – Si consiglia la presenza di un genitore
- PG 13 – Materiale non adatto a bambini sotto i
13 anni
- PG+R – Si consiglia la presenza di un genitore con
limiti: Si consiglia ai genitori di vietare la visione di
questo film a ragazzi sotto i 17 anni ovvero permetterla solo in presenza di un adulto o di un genitore.
- R – Limite: sotto i 17 anni solo in presenza di un genitore o di un adulto
- NC-17 – non adatto a ragazzi sotto i 17 anni
- ADULT – Solo per adulti; a ragione di scene sessuali,
di violenza o per l’uso della lingua, solo per adulti.
- NO PARENTAL – Spegnere la sicura bambini.
Nota: La funzione di blocco per i genitori è una funzione
relativamente nuova, memorizzata sul disco dvd. Al momento esistono ben pochi dvd (semmai) in Australia e
Nuova Zelanda che contengano questa funzione di blocco.
„OLD PASSWORD“ : nell’impostazione „PASSWORD“ é
necessario inserire una nuova password oppure la cosiddetta „SUPERUSER PASSWORD“, ovvero la
combinazione „136900“.
Impostazione della password
Il sistema di controllo per genitori si limita alla riproduzione di DVD nel caso in cui un determinato DVD corrisponda a un livello superiore a quello selezionato dai genitori.
Per quanto concerne il livello di blocco da impostare in
modo che non sia possibile vedere il DVD qualora venga
oltrepassato il rating, si rimanda a quanto riportato alla
sezione PARENTAL CONTROL LEVELS. Per la selezione
della password, servirsi dei tasti direzionali Più/Meno.
L’opzione CHANGE viene in questo modo evidenziata.
Confermare l’operazione mediante il tasto ENTER.
- Viene visualizzato un campo accanto alla vecchia
password.
- Servendosi dei tasti numerici, inserire la vecchia password a 6 caratteri. Il campo accanto a NUOVA
password viene evidenziato automaticamente.
- Servendosi dei tasti numerici, inserire una nuova password a 6 caratteri. Il campo accanto a CONFIRM
PWD viene evidenziato automaticamente.
- Servendosi dei tasti numerici, inserire la medesima
password a 6 caratteri che è stata inserita coma NUOVA password.
- Per memorizzare la nuova password, premere il tasto
ENTER.
AVVERTENZA: quando si utilizza questo DVD player per
la prima volta, premere semplicemente il tasto ENTER
per ignorare l’opzione „OLD PASSWORD“. Inserire la
nuova password (NEW PASSWORD) per questo DVD
player.
61
5....-05-DVD 608 HC I 01.06.2004 10:17 Uhr Seite 61
Page 62

Per cancellare la password a 6 caratteri, per esempio
nel caso in cui la password sia stata dimenticata, effettuare le operazioni illustrate ai seguenti punti:
1. Sulla pagina delle modifiche, inserire il codice a 6 caratteri „136900“ (SUPERUSER PASSWORD), quindi
premere il tasto ENTER.
2. Inserire la nuova password.
LAST MEMORY (ultimamemoriza)
Ai fini della selezione dell’opzione LAST MEMORY, utilizzare i tasti direzionali Meno/destra.
- Utilizzare il tasto Più/Meno per selezionare le opzioni
ON oppure OFF, quindi confermare azionando il tasto
ENTER.
Azzeramento
Per ripristinare le impostazioni predefinite del lettore, effettuare le operazioni illustrate di seguito.
Per selezionare l’opzione DEFAULT, utilizzare i tasti direzionali Meno/destra.
L’opzione RESET viene in questo modo evidenziata. Confermare l’operazione mediante il tasto ENTER.
- Viene in questo modo ripristinata l’impostazione predefinita del lettore.
Eliminazione guasti
Prima di contattare il servizio assistenza cercare la possibile causa del guasto in questa tabella. Con alcuni semplici test o impostazioni più piccole si può eventualmente
eliminare il problema e ripristinare la funzione corretta.
Sintomo (frequente) Rimedio
Manca corrente Inserire il cavo di alimentazione
nella presa.
• Nessuna riproduzione benché il
tasto PLAY sia
premuto.
• La riproduzione
inizia e si arresta
subito.
• Nell’apparecchio si è depositata
condensa: Attendere ca. 1 - 2 ore
finché l’apparecchio si è asciugato.
• Questo apparecchio può
riprodurre solo i seguenti media:
DVD,Video CD, CD, MP3 e
JPEG.
• Forse il CD è sporco e deve essere pulito.
• Accertarsi che il CD sia stato inserito con l’etichetta rivolta verso
l’alto.
Nessuna
immagine
• Accertarsi che l’apparecchio sia
collegato correttamente.
• Accertarsi che il televisore sia impostato su "Video”.
• Non c'è audio
• Audio alterato
• Accertarsi che l’apparecchio sia
collegato correttamente.
• Accertarsi che il televisore e lo
stereo siano impostati
correttamente.
• Impostare il regolatore volume
principale tramite il telecomando.
Nell’avanzamento/r
itorno rapido l’immagine è deformata.
In questo caso l’immagine talvolta
è un po’ deformata, cosa che è del
tutto normale.
Non è possibile l’avanzamento (o il
ritorno) rapido.
Alcuni CD hanno settori che non
consentono l’avanzamento (o il ritorno rapido).
Nessuna immagine
di 4:3 (16:9)
Scegliere l' impostazione corretta
che corrisponda alle caratteristiche
del rispettivo televisore ("TV
Aspects").
Nessun surround
sound.
In "Audio Output” selezionare l’impostazione corretta che corrisponde al vostro impianto stereo.
Il telecomando non
funziona.
• Controllare che le batterie siano
state inserite con la polarità corretta (+ e -).
• Le batterie sono scariche: sostituirle con nuove.
• Durante l’uso del telecomando,
rivolgere il medesimo in direzione
del sensore remoto.
• Non usare il telecomando ad oltre 5 metri di distanza dal sensore
dell’apparecchio.
62
5....-05-DVD 608 HC I 01.06.2004 10:17 Uhr Seite 62
Page 63

Sintomo (frequente) Rimedio
Tasti privi di funzione (dell’apparecchio e/o del telecomando).
Rimuovere eventuali ostacoli tra il
telecomando e il sensore dell’apparecchio. Spegnere e riaccendere
l’apparecchio. Altrimenti spegnere
l’apparecchio, staccare la spina AC
e ricollegarlo. (Forse l’apparecchio
non funziona correttamente a causa di circostanze esterne, come
temporali o elettricità statica, ecc.).
La schermata del
menu non viene visualizzata o viene
visualizzata solo
parzialmente sullo
schermo del televisore.
Selezionare il corrispettivo tipo di
schermo servendosi delle istruzioni
d'uso del televisore.
Nessun colore Impostare il tipo di TV sul colore
norma tedesco Pal. Azionare a
questo scopo il tasto SETUP per
entrare nel menu.
Informazioni utente:
Utilizzo e cura di CD
Precauzioni nell’utilizzo
• Tenere i CD solo sul bordo per evitare di sporcare la
superficie con impronte di dita. Impronte di dita,
sporco e graffi possono causare salti e deformazioni.
•
Non scrivere con biro o altre penne sul lato etichettato.
• Non usare spray per la pulizia, benzina, solventi, liquidi per impedire la carica elettrostatica o altri solventi.
• Fare attenzione a non lasciar cadere i CD né piegarli.
• Non inserire mai più di un CD nel vano CD.
• Non cercare di chiudere lo sportello se il CD non è inserito correttamente nel vano CD.
CD-FACH
X
CD
63
Sintomo (DVD) Rimedio
Il track sound audio
e / o la lingua dei
sottotitoli non corrisponde a quella
dell’impostazione
principale
Se il track sound audio e/ o la lingua dei sottotitoli non esiste sul
CD, non sarà possibile sentirla /
vederla nell’impostazione principale.
Il messaggio compare in francese
(esempio).
L’impostazione del menu è in francese in "Disc Languages” (lingua
del disco). Selezionare francese.
Nessuna
visualizzazione di
sottotitoli.
• I sottotitoli compaiono solo in
DVD in cui i sottotitoli sono stati
registrati.
• I sottotitoli sono stati cancellati
dallo schermo del televisore. Premere il tasto "SUBTITLE”.
Non si riesce a selezionare una lingua sound track
audio (o sottotitolo)
alternativa.
• Non viene selezionata una lingua
alternativa se sul CD non è stata
registrata più di una lingua.
• In alcuni CD la lingua alternativa
non può essere selezionata con il
tasto AUDIO o SUBTITLE. Cercare di selezionarla dal menu
DVD se è a disposizione un menu.
L’angolo visivo non
può essere
cambiato.
Questa funzione dipende dalla disponibilità del software. Anche se un
DVD ha diverse registrazioni di
angoli visivi, forse queste registrazioni ci sono solo in determinate
scene (dove la spia ANGLE sull’apparecchio lampeggia.)
Sintomo (Video-CD) Rimedio
Non c'è menu Questa funzione c’è solo in Video
CD con Playback Control.
VCD/ SVCD non
legge.
Con il tasto Menu trasformare la
funzione PBC a CD inserito.
Symptom (Video CD)
Rimedio
CDRW non funzionano
I CDRW non possono essere scritti
con tool di simulazione dischi rigidi,
come CD compressi, CD o
programmi simili.
CDR e CDRW non
funzionano o solo
con errori.
La quota di errori di media CDR e
CDRW dipende:
• dal tipo di media
• dal programma di masterizzazione (eventualmente effettuare UPDATE)
• dal masterizzatore e dal suo firmware (eventualmente effettuare
UPDATE)
• dalla velocità del masterizzatore
(più bassa è meglio è)
Questo prodotto comprende una tecnica per la protezione dei diritti d’autore che sono protetti mediante diritti di
brevetto nel quadro di determinati brevetti US e altri diritti di proprietà intellettuale di proprietà della
Macrovision Corporation e altri aventi diritto. L’impiego di
questa tecnica di protezione del diritto d’autore deve essere autorizzato dalla Macrovision Corporation ed è limitato esclusivamente all’utilizzo privato o altrimenti,
salvo espressa autorizzazione da parte della Macrovision Corporation. Il disassemblaggio o smontaggio sono
vietati.
5....-05-DVD 608 HC I 01.06.2004 11:04 Uhr Seite 63
Page 64

Glossario
Angle (Angolo)
In alcuni DVD ci sono scene che sono state filmate contemporaneamente da diversi angoli visivi (la stessa scenda da davanti, sinistra, destra, ecc.). In questi DVD si può
utilizzare il tasto ANGLE per osservare queste scene da
vari angoli visivi.
Chapter Number (n
umero capitolo)
Questi numeri sono registrati su DVD. Un titolo è suddiviso in molte sezioni, ognuna delle quali ha un numero e
determinati punti della presentazione video possono essere cercati e trovati rapidamente mediante questi numeri.
D
VD
Questa espressione si riferisce a CD ottici con alta densità sui quali sono state registrate riprese video e stereo
di alta qualità con segnali digitali. Grazie ad una nuova
tecnica di compressione video (MPEG) e una tecnica di
registrazione ad alta densità, sui DVD si possono
registrare video esteticamente gradevoli da guardare e di
lunga durata (per esempio si può registrare un intero
film). I DVD sono composti da due sottili dischetti da 0,6
mm. Quanto più alta è la densità, maggiore è il numero di
informazioni che si possono registrare. Un DVD ha una
capacità maggiore di un dischetto registrabile su un solo
lato di 1,2 mm di spessore. In questo modo, due sottili dischetti collegati, in futuro ci sarà la possibilità della riproduzione doppia con durate di riproduzione ancora più
lunghe.
PBC (Pla
yback Control )
E’ registrato su Video CD (versione 2.0). Le scene o informazioni si possono vedere (o sentire) mediante lo schermo televisivo servendosi del menu interattivo che compare sullo schermo.
Sutbtitle (sottotitoli)
Sono righe stampate che compaiono in basso sullo
schermo e traducono o spiegano il dialogo. I sottotitoli sono registrati su DVD.
Numer
o time (tempo)
Visualizza la durata di registrazione sul DVD. Se un DVD
ha due o più film, i film sono numerati come titolo 1, titolo
2, ecc.
Numer
o track (traccia)
Questi numeri si riferiscono a tracce che sono registrate
su Video CD e CD. Consentono la ricerca rapida di tracce
specifiche (p.e. canzoni).
Video-CD
Contengono registrazioni video e audio qualitativamente
paragonabili con quelle di una videocassetta. Questo apparecchio può elaborare anche Video-CD con Playback
Control (versione 2.0).
• Quando non è in uso custodire sempre il CD nella sua
custodia originale.
Se la superficie è sporca
• Pulire i CD con movimenti dolci servendosi di un panno morbido inumidito (solo acqua).
• Nella pulizia dei CD muovere sempre il panno dal centro del CD verso il bordo esterno.
(Se si puliscono i CD con movimenti circolari, questi
movimenti causano graffi che hanno come
conseguenza fruscii nella riproduzione dei CD.)
• Se un CD viene trasportato da un ambiente freddo in
uno più caldo può darsi che sul CD si formi umidità.
Prima di usare il disco pulirlo con un panno morbido,
asciutto e privo di peluzzi.
Custodia scorretta dei CD
I CD possono riportare danni se vengono conservati nei
seguenti luoghi:
• esposizione diretta alla luce del sole
• luoghi umidi o polverosi
• luoghi esposti ad una fonte diretta di calore o radiatori.
Manutenzione
• Prima di ogni operazione di manutenzione accertarsi
che l’apparecchio venga spento e non sia collegato alla corrente di rete.
• Pulire l’apparecchio con un panno morbido e asciutto.
Se le superfici sono molto sporche, pulirle con un panno prima immerso in una delicata soluzione di sapone
e ben strizzato, quindi ripassare con un panno asciutto.
• Non usare alcol, benzina, diluenti e nemmeno liquidi
detergenti o altre sostanze chimiche. Non utilizzare
aria compressa per rimuovere la polvere.
64
5....-05-DVD 608 HC I 01.06.2004 10:18 Uhr Seite 64
Page 65

Dati tecnici
Requisiti di rete AC 230 V, 50 Hz
Consumo di corrente 20W
Sistema segnali NTSC/PAL
Peso 2,3 kg
Misure Lungh. 430 x largh. 240 x alt. 70 mm
Funzionamento nel
margine di temperatura +5° bis +35°C
Funzionamento nel
margine di umidità 5 - 90 % (no condensa)
Dischi riproducibili:
1. DVD-VIDEO
12 cm un lato, monostrato
12 cm un lato, doppio strato
12 cm due lati, monostrato
2. Compact-Disc (CD-DA, MP3-CD)
12 cm disco
8 cm disco
Uscita S-Video
Y Output-Level 1 Vp-p (75 Ohm)
C Output-Level 0,30 Vp-p (75 Ohm)
Numero dei collegamenti 1
Uscita video
Output-Level 1 Vp-p (75 Ohm)
Presa d’uscita tipo RCA
Numero dei collegamenti 1
Uscita audio
Output-Level 2 Vrms (1kHz, 0 db)
Presa d’uscita tipo RCA
Dati caratteristici dell’uscita segnale audio
1. Velocità S/N
CD audio 90 dB (EIAJ)
2. Campo dinamico
DVD (audio lineare) 80 dB
CD audio 80 dB (EIAJ)
3. Deformazione armonica totale THD + SN 70 dB
Uscita audio digitale
Prese d’uscita
Uscita digitale coassialetipo RCA
Dati tecnici del subwoofer
Potenza di uscita: 20W subwoofer,
12W altoparlante satellite
THD = 10%
SUB: 100Hz
SAT: 1kHz
Altoparlante: Subwoofer: 5“
Satellite: 2.5“x2
Impedenza: 4 ohm
Risposta di frequenza: Subwoofer: 30 - 120Hz
Satellite: 100 - 15kHz
Allacciamento alla rete: ~AC230V / 50Hz
Interruzione: =45dB
Rapporto segnale-disturbo: =60dB
Le specifiche possono subire variazioni. Peso e misure
sono valori approssimativi.
65
5....-05-DVD 608 HC I 01.06.2004 10:18 Uhr Seite 65
Page 66

Questo apparecchio è stato controllato sulla base di tutte
le direttive CE attuali in vigore in questo settore, quali per
esempio la normativa in materia di compatibilità elettromagnetica e la direttiva in materia di bassa tensione, ed è
stato costruito conformemente alle norme di sicurezza
più moderne.
Con riserva di apportare modifiche tecniche.
Garanzia
Per l’apparecchio da noi messo in commercio ci assumiamo una garanzia di 24 mesi dalla data di acquisto (scontrino).
Durante la garanzia noi ci impegniamo ad eliminare gratuitamente i guasti dell’apparecchio o degli accessori*),
dovuti a difetti di materiale o di fabbricazione, riparandoli
o, a nostra discrezione, sostituendoli. Le prestazioni in
garanzia danno luogo a una proroga della garanzia né
danno diritto ad una nuova garanzia!
Per la garanzia è sufficiente lo scontrino di acquisto. Senza questo scontrino non sussiste il diritto né ad una sostituzione né ad una riparazione gratuita.
Nel caso si ricorra alla garanzia, restituire al rivenditore
l’apparecchio completo in ogni sua parte, nell’imballaggio
originale unitamente allo scontrino.
*) Danni agli accessori non giustificano automaticamente
lo scambio gratuito dell’apparecchio completo. Si prega di
mettersi in contatto con la nostra centrale telefonica. Danni alle parti di vetro oppure fratture ai pezzi di materia
plastica sono obbligatoriamente a spese del cliente.
La riparazione di pezzi d’uso ovvero soggetti a
logoramento (cursori, ganci impastatori, cinghie di
trasmissione, telecomandi di ricambio, spazzolini di
ricambio, lame di seghe ecc.) come anche operazioni di
pulizia e manutenzione o la sostituzione di pezzi soggetti
a logoramento non rientrano nella garanzia e quindi sono
a pagamento!
La garanzia si annulla nel caso di intervento da parte di
terzi.
Dopo la garanzia
Al termine della garanzia le riparazioni possono essere
eseguite dietro pagamento dal corrispettivo negozio specializzato o servizio riparazioni.
66
5....-05-DVD 608 HC I 01.06.2004 10:18 Uhr Seite 66
Page 67

67
5....-05-DVD 608 HC I 01.06.2004 10:18 Uhr Seite 67
Page 68

68
Wskazówki bezpieczeństwa
Ostrożnie: Odtwarzacz płyt DVD/CD jest urządzeniem
klasy 1. Oznacza to, że odtwarzacz ten funkcjonuje przy zastosowaniu widocznego promienia laserowego,
który przy bezpośrednim nastawieniu stanowi niebezpieczne ryzyko napromieniowania. Należy zapewnić,
aby odtwarzacz używany był zawsze zgodnie z
instrukcją.
Ostrzeżenie:
W celu uniknięcia ryzyka zapłonu lub porażenia
prądem nie podawać odtwarzacza wpływom wilgoci
lub deszczu.
Niniejszy produkt wyposażony jest w układ
niskoenergetyczny.
Informacja bezpieczeństwa
Pamiętaj:
Odtwarzacz skonstruowany jest do pracy w łagodnym
klimacie. Podłączyć wyłącznie do napięcia zmiennego
o wartości 220-240V/50Hz. W innych przypadkach nie
można z niego.
Uwaga:
Odtwarzacz DVD jest produktem klasy 1.
To urządzenie posługuje się niewidocznym
promieniem laserowym, który może spowodować niebezpieczne promieniowanie. Zapewnić, aby odtwarzacz
używany był zawsze poprawnie i zgodnie z
pouczeniem. Jeżeli odtwarzacz podłączony został do
gniazda wtykowego z zestykiem uziemiającym nie wolno zbliżać się oczami za blisko do otworu odtwarzacza
i zaglądać do wnętrza urządzenia odtwarzającego.
Używanie elementów obsługi, nastawianie lub jakiekolwiek inne formy używanie niezgodne z opisanymi w instrukcji obsługi mogą doprowadzić do narażenie się
na napromieniowanie. Nie otwierać żadnych pokryw i
nie przeprowadzać własnoręcznie żadnych napraw.
Przeprowadzanie konserwacji i naprawy zlecać zawsze
wykwalifikowanym fachowcom.
Ostrzeżenie:
W celu uniknięcia ryzyka zapłonu lub porażenia
prądem nie podawać odtwarzacza wpływom deszczu
lub wilgoci.
W celu uniknięcia ryzyka zapłonu lub porażenia
prądem lub zakłóceń stosować wyłącznie zalecony
osprzęt.
Przepisy bezpieczeństwa
Przed rozpoczęcie korzystania z odtwarzacza należy
dokładnie zaznajomić się z przepisami
bezpieczeństwa.
Zabezpieczenie przewodu sieciowego
W celu uniknięcia i zabezpieczenia się przed
porażeniem prądowym, ogniem lub skaleczeniem osób
prywatnych należy postępować jak następuje:
Nie pociągać za wtyczkę i przewód zasilania.
Nie dotykać nigdy wtyczki i kabla zasilanie mokrymi
rękami.
Umiejscowić kabel zasilania z dala od grzejników.
Nie ustawiać nigdy żadnych ciężkich przedmiotów na
kablu zasilania.
Nie próbować nigdy samowolnej naprawy lub wymiany
kabla zasilania. Przeprowadzenie wymiany kabla zasilanie zlecać zawsze elektronicznie wyszkolonemu personelowi!
Ustawianie
Unikać ustawienia odtwarzacza w następujących warunkach:
Nagrzewanie bezpośrednimi promieniami słonecznymi
lub urządzeniami grzewczymi lub zamkniętymi pojazdami.
Temperaturę warunkach panowania wysokiej temperatury ponad 30°C) lub dużej wilgotności powietrza (ponad 90%).
W wyjątkowo zakurzonym otoczeniu.
W przeciwnych przypadkach grozi to poważnym
uszkodzeniem odtwarzacza.
Nieużywane urządzenie:
Nieużywane urządzenie należy wyłączyć.
W przypadku dłuższego okresu nie używania należy
wyciągnąć wtyczkę z gniazda wtykowego z zestykiem
uziemiającym.
Nie wkładać do odtwarzacza palców lub innych
przedmiotów
Dotykanie wewnętrznych części urządzenia jest niebezpieczne i może doprowadzić do jego poważnego uszkodzenia. Nie podejmować się samowolnego
rozbierania urządzenia.
Nie wkładać żadnych ciał obcych do kieszeni płyt CD.
Chronić przed wodą, ogniem i magnetyzmem
Odtwarzacz ustawiać z daleka od wazonów na kwiaty,
wanien, umywalek, itp.. Wtargnięcie wody do wnętrza
odtwarzacza może doprowadzić do wyrządzenia
poważnych uszkodzeń.
Na urządzeniu nie wolno ustawiać otwartych źródeł
ognia, jak np. palących się.
Nie umieszczać nigdy w pobliżu urządzenia magnetycznych przedmiotów jak np. głośników.
5....-05-DVD 608 HC PL 01.06.2004 10:24 Uhr Seite 68
Page 69

69
Zabezpieczenie wentylacji
W celu zabezpieczenia wentylacji zachować ze wszystkich stron 5 cm odstęp od innych ścian.
Nie przykrywać otworów wentylacyjnych żadnymi przedmiotami, jak np. gazetami, obrusami, zasłonami, itp..
Odtwarzacz ustawić na płaskim podłożu i nie ustawiać
na nim żadnych ciężkich przedmiotów.
Nie ustawiać odtwarzacza na wzmacniaczu lub innych
rozgrzewających się urządzeniach.
Kondensacja
Następujące warunki mogą spowodować odkładanie
się wilgoci na soczewce:
Wkrótce po włączeniu grzejnika.
W parującym lub bardzo wilgotnym pomieszczeniu.
Przy przeniesieniu urządzenia z zimnego do ciepłego
otoczenia.
Zawilgocenie urządzenia może zakłócić funkcjonowanie odtwarzacza.
W takich przypadkach należy wyłączyć prąd i odczekać
około 1 godziny do momentu odparowania wilgoci.
Przy pojawieniu się przeszkadzających dźwięków
w telewizorze podczas oglądania programu
W zależności od warunków odbioru, przy włączonym
odtwarzaczu, możliwe jest powstawanie zakłóceń
ekranu podczas oglądania programu telewizyjnego.
Nie oznacza to błędnego funkcjonowania odtwarzacz
czy też telewizora.
Przy oglądaniu programu telewizyjnego należy
wyłączyć odtwarzacz.
Dyski do odtwarzania
Niniejszy odtwarzacz DVD umożliwia odtwarzanie następujących rodzajów płyt kompaktowych z odpowiednim znakiem firmowym (Logo):
Dyski możliwe do odtwarzania:
DIGITAL
SOUND
STEREO NTSC PAL
Rodzaj płyty Znak firmowy Rodzaj odtwarzania
Wielkość płyty
Maks. czas odtwarzania
12 cm
ok. 240 min. (nagranie jednostronne)
DVD Audio + Video
ok. 480 min. (nagranie dwustronne)
08 cm
ok. 080 min. (nagranie jednostronne)
ok. 160 min. (nagranie dwustronne)
12 cm 74 min.
AUDIO-CD Audio
08 cm 20 min.
COMPACT
DIGITAL AUDIO
Wyprodukowane na licencji firmy Dolby Laboratories.
„Dolby„ i podwójny symbol DD są znakami handlowymi firmy Dolby Laboratories.
Kod regionalny
Tak odtwarzacz DVD jak i płyta DVD są regionalnie zakodowane. Wymagana jest zgodność kolejności kodu
regionalnego w celu odtwarzania płyt. Przy
niezgodności kodu niemożliwe jest odtwarzanie.
Kod regionalny niniejszego odtwarzacza podany
jest z tyłu urządzenia.
Dolby Digital Disk DTS Disk Digital Audio Stereo-Disk System NTSC System PAL
Disk w USA, w Anglii,
Kanadzie, Japonii, Francji,
Płd. Korei, itd. Australii, itd.
5....-05-DVD 608 HC PL 01.06.2004 10:24 Uhr Seite 69
Page 70

70
1. DIGITAL OUT – COAXIAL – przyłącze dla aparatów
Audio z wejściem cyfrowo współosiowym.
2. Lewe i prawe gniazdka wyjściowe audio
- do podłączenia wzmacniacza stereo
3. Wyjście S-VIDEO – przyłącze dla telewizora z
wejściem SVHS-VIDEO
4. Wyjście VIDEO - przyłącze dla telewizora z
wyjściem VIDEO
5. Kabel sieciowy dla prądu zmiennego – przyłącze do
standardowego gniazda wtykowego
6. Wyjście SCART - przyłącze dla telewizora z
wejściem SCART
1. Przełączanie z pozycji Power (Włączony) do pozycji
Standby (czuwanie)
2. Displej
3. Kieszeń dla płyt CD
4. OPEN/CLOSE – do otwierania/zamykania kieszeni
płyt CD
5.
PREV – przeskok do poprzedniego rozdziału/ścieżki
6. NEXT – przeskok do następnego rozdziału/ścieżki
7. PLAY – start odtwarzania
8. PAUSE – przerwanie odtwarzania
9. STOPP – przerwanie odtwarzania
Opis
Przednie pole obsługi
Tylne pole obsługi
Struktura dysku
Każda płyta video DVD składa się z „Tytułów“, przy
czym wszystkie tytuły mogą być podzielone na różne
„Rozdziały” (patrz. Przykład 1). Jeżeli na pojedynczej
płycie zostało nagranych np. kilka filmów wtedy
każdemu filmowi może być przydzielony własny nr tytułu z podziałem na poszczególne rozdziały.
W innych przypadkach płyty audio CD podzielone są
na „Ścieżki” (Tracks) (patrz rozdział 2).
Ogólnie każda ścieżka oznaczona jest numerem (w przypadku niektórych płyt ścieżki podzielone są jeszcze
na ponumerowane indeksy).
5....-05-DVD 608 HC PL 01.06.2004 10:24 Uhr Seite 70
Page 71

71
Pilot zdalnego sterowania
1. POWER – przełączenie do stanu Standby (stan oczekiwania)
2. TITLE/PBC
- naciśnięcie przycisku powoduje wywołanie menu
„Tytuły DVD”
3. Menu DVD/RETURN
- naciśnięcie przycisku powoduje wywołanie menu
płyty DVD – powrót do poprzedniego menu.
4. DIGEST (tylko dla płyt VCD i CD)
- naciskać dla przeglądu ścieżek płyt VCD/CD.
5. PROGRAM
- naciśnięcie przycisku prowadzi do opcji
programów.
6. PLAY - rozpoczęcie odtwarzania
7. ZOOM - powiększanie obrazu
8. Przyciski numeryczne (0 – 9) - przywołanie ponumerowanego punktu menu
9. ANGLE - wybieranie ujęcia kamery DVD
10. AUDIO - wybór języka Audio
11. BOOKMARK
12. NEXT - naciśnięcie przycisku prowadzi do
następnego rozdziału wzgl. ścieżki
13. PREV - naciśnięcie przycisku prowadzi do poprzedniego rozdziału wzgl. poprzedniej ścieżki
14. Przyciski strzałkowe (w lewo/w prawo/do góry/w
dół) do wybieranie punktu menu
15. ENTER
- naciśnięcie powoduje potwierdzenie wyboru menu
16. DISPLAY
- naciśnięcie przycisku podczas odtwarzania powoduje wyświetlanie na ekranie aktualnych informacji dysku
17. SUBTITLE - wybór dowolnego języka podtytułów
18. MUTE
- wyłączenie głosu przez jednorazowy przycisk, przywrócenie dźwięku przez ponowny nacisk
19. SETUP
- nacisnąć przycisk dla otwarcia wzgl. zamknięcia menu Setup (menu konfiguracji)
20. GOTO
- przeglądanie docelowego rozdziału lub czasu odtwarzania
21. STOP – przerwanie odtwarzania
22. REPEAT
- nacisnąć przycisk dla powtórzenia pewnego
rozdziału, tytułu, ścieżki lub płyty
23. REPEAT A-B
- nacisnąć przycisk dla powtórzenia danego odcinka
24. SHUFFLE
- dla przegrywanie ścieżek w przypadkowej kolejności
25. PAUSE/STEP
- tymczasowe przerwanie odtwarzania/odtwarzanie
obraz za obrazem
26. SLOW – dla powolnego przegrywania płyt DVD do przodu/do tyłu
27. REV
- dla wstecznego szukania podczas odtwarzania
28. FWD/CLEAR
- dla szukania do przodu podczas odtwarzania – skasowania zapisanego wyboru
29. SHIFT
- naciśnięcie powoduje przydzielenie odpowiedniemu
przyciskowi funkcji wydrukowanej na powierzchni.
Wkładanie baterii (pilot zdalnego sterowania)
Odtwarzacz można sterować przy za pomocą dostarczonego pilota zdalnego sterowania. Do fachu baterii
włożyć odpowiednio z polaryzacją
dwie baterie typu R6 (AA). Przed
zastosowaniem pilota należy
zaprogramować go na czujniku
Remote odtwarzacza.
Wskazówka
- Nie przechowywać pilota nich miejscach bardzo na-
grzanych lub zawilgoconych.
- Nie mieszać nowych baterii ze starymi.
- Nie poddawać pilota bezpośredniemu działaniu
promieni słonecznych lub urządzeń oświetlających.
Może to spowodować zakłócenia przy obsłudze
odtwarzacza.
- Jeżeli pilot nie będzie używany przez dłuższy czas
wtedy należy wyjąć baterie w celu uniknięcia wylewu
baterii lub korozji.
5....-05-DVD 608 HC PL 01.06.2004 10:24 Uhr Seite 71
Page 72

72
Zasięg pilota zdalnego sterowania
Pilot może być używany w odległości ok. 5 metrów w
kierunku prostolinijnym. Poza tym wewnątrz obszaru
poziomego kąta do 30°, na czujnik Remote.
Przedni panel obsługi (Subwoofer - głośnik
niskotonowy)
1. Przełącznik WŁ/WYŁ
2. Główny regulator głośności w dół
3. Główny regulator głośności w górę
4. Wyciszenie
5. Regulator basów w górę
6. Regulator basów w dół
7. Tryb pracy
Tylni panel obsługi (głośnik niskotonowy)
1. Lewe wejście audio
2. Prawe wejście audio
3. Prawe wyjście na głośnik
4. Lewe wyjście na głośnik
5. Kabel przyłączeniowy prądu zmiennego
Pilot zdalnego sterowania
(głośnik niskotonowy)
1. Przełącznik „Wyciszenie wł.”
(Mute on)
2. Przełącznik „Wyciszenie
wył.” (Mute off)
3. Efekty dźwiękowe - Rock
4. Główny regulator głośności
w górę
5. Główny regulator głośności
w dół
6. Efekty dźwiękowe -Stereo
7. Efekty dźwiękowe - Klasyka
8. Efekty dźwiękowe - Pop
9. Regulator basów w górę
10.Regulator basów w dół
Elementy urządzenia
Głośnik niskotonowy . . . . . . . . . . . . . . . . . . .1 sztuka
Kabel RCA na wejściu (przyłączenie DVD
do głośnika niskotonowego) . . . . . . . . . . . . .1 sztuka
Głośnik satelitarny . . . . . . . . . . . . . . . . . . . . .2 sztuka
Kabel RCA dla głośnika satelitarnego . . . . . . .2 sztuka
Porady dla użytkownika
1. Przed włączeniem urządzenia, należy ustawić
wszelkie funkcje w pozycji wyłączonej lub minimum.
2. Głośność dostosować do pożądanego poziomu.
3. Regulację basów dostosować do pożądanego
poziomu.
4. Przed wyłączeniem urządzenia, należy ustawić wszelkie funkcje w pozycji wyłączonej lub minimum.
5....-05-DVD 608 HC PL 01.06.2004 10:24 Uhr Seite 72
Page 73

73
Instrukcja podłączenia
1. Podłączyć kable przyłączeniowe głośników satelitarnych do wyjść audio na tylnym panelu głośnika
niskotonowego (Subwoofer).
2. Podłączyć jeden koniec kabla sygnałowego do
gniazdka wyjściowego (Audio Out) odtwarzacza
DVD. Następnie drugi koniec podłączyć do gniazdka wejściowego (Audio In) na tylnej stronie obudowy
głośnika niskotonowego.
3. Włożyć wtyczkę do gniazdka.
Dołączenie aparatu telewizyjnego
(dla Video)
Metoda 1 odtwarzacz DVD z aparatem telewizyjnym z
wejściem Video
Metoda 2 odtwarzacz DVD z aparatem telewizyjnym z
wejściem S-Video
Metoda 3 odtwarzacz DVD z aparatem telewizyjnym z
wejściem SCART (Audio & Video)
Dołączenie do aparatów Audio
Poniższy szkic pokazuje przykłady sposobów dołączenia, które stosowane są normalnie do dołączenia odtwarzacza DVD do aparatu telewizyjnego z innym wyposażeniem Audio.
Przed podłączeniem odtwarzacza DVD
- Upewnić się, że przed podłączeniem następnego
urządzenia wszystkie urządzenia zostały.
- Zaznajomić się dokładnie z instrukcjami obsługi
własnego aparatu telewizyjnego, aparatury stereo
jak i innych urządzeń przeznaczonych do połączenia z odtwarzaczem DVD.
Metoda 1
Odtwarzacz DVD + wieża stereo
Metoda 2
Odtwarzacz DVD + wzmacniacz
z dekoderem Dolby Digital
Decoder/ DTS
5....-05-DVD 608 HC PL 01.06.2004 10:24 Uhr Seite 73
Page 74

74
Normalne odtwarzanie
Włączenie odtwarzacza i przegrywanie płyt
- Nacisnąć przycisk POWER. Jeżeli z kieszenie nie
wyjęto starej płyty wtedy odtwarzacz rozpoczyna w
momencie startu z jego odtwarzaniem.
- Nacisnąć przycisk OPEN/CLOSE w celu wymienienia lub włożenia płyty do otworu kieszeni.
- Po włożeniu płyty nacisnąć ponownie przycisk
OPEN/CLOSE w celu zamknięcia kieszeni. Po zamknięciu szuflady rozpoczyna się automatyczne odtwarzanie płyty.
Przerwanie odtwarzania
- W celu przerwania odtwarzania i wyświetlenia znaku
firmowego „LOGO” nacisnąć przycisk STOP.
Odtwarzacz zachowuje pamięci pozycję, w której
przerwano odtwarzanie pod warunkiem.
- W celu wznowienia odtwarzania od miejsca jej
przerwania nacisnąć ponownie przycisk PLAY.
- Dwukrotne naciśnięcie przycisku STOP powoduje
wygaszenie funkcji kontynuacji odtwarzania.
Funkcja „Pauza” podczas odtwarzania
- W celu korzystania z funkcji pauzy nacisnąć raz przycisk PAUSE/STEP. W opcji PAUSE wyłączony jest
dźwięk.
- W celu kontynuacji odtwarzania nacisnąć przycisk
PLAY.
Stopklatka (tylko DVD)
- W celu zatrzymania odtwarzania nacisnąć przycisk
PAUZA.
- Aby przejść do kolejnej klatki, należy ponownie nacisnąć przycisk PAUZA.
- W celu kontynuowania odtwarzania nacisnąć przycisk PLAY.
Szukanie do przodu/do tyłu
- Naciśnięcie przycisku FWD powoduje szybkie przeszukiwanie do przodu. Prędkość wybierana jest przez
dalsze naciskanie przycisku przy płytach DVD (2x,
4x, 8x, 16x, normalnie)/ przy płytach VCD (1x, 2x,
3x, 4x, normalnie).
- Dla kontynuacji odtwarzania nacisnąć przycisk
PLAY.
- Naciśnięcie przycisku REV powoduje szybkie przeszukiwanie do tyłu. Prędkość wybierana jest przez
dalsze naciskanie przycisku przy płytach DVD (2x,
4x, 8x, 16x, normalnie)/ przy płytach VCD (1x, 2x,
3x, 4x, normalnie).
- Dla kontynuacji odtwarzania nacisnąć przycisk
PLAY.
Odtwarzanie w zwolnionym tempie wyświetlania
do przodu/do tyłu
- Naciśnięcie przycisku SLOW-Forward umożliwia
odtwarzanie w zwolnionym tempie do przodu.
- Każdorazowe przyciśnięcie przycisku SLOWForward zmienia prędkość zwolnionego tempa
(1/2x, 1/4x, 1/8x, 1/16x, normalna prędkość przy
DVD).
- Dla kontynuacji odtwarzania w normalnym tempie
odtwarzania nacisnąć przycisk PLAY.
- Naciśnięcie przycisku SLOW-Backward umożliwia
odtwarzanie w zwolnionym tempie do tyłu.
- Każdorazowe przyciśnięcie przycisku SLOW-Backward zmienia prędkość zwolnionego tempa (1/2x,
1/4x, 1/8x, 1/16x, normalna prędkość przy DVD)
- Dla kontynuacji odtwarzania w normalnym tempie
odtwarzania nacisnąć przycisk PLAY.
5....-05-DVD 608 HC PL 01.06.2004 10:24 Uhr Seite 74
Page 75

75
Skok do następnego/poprzedniego
rozdziału/ścieżki
- Naciśnięcie przycisku NEXT powoduje skok do
początku następnego rozdziału (DVD) lub ścieżki
(audio CD).
- Naciśnięcie przycisku PREV powoduje skok do poprzedniego rozdziału (DVD) lub początku odtwarzanej ścieżki (audio CD).
- Dwukrotne naciśnięcie przycisku PREV powoduje
powrót do poprzedniej ścieżki (audio CD).
Sprawdzanie pozostałego czasu odtwarzania
- W celu sprawdzenia już przegranego czasu
odtwarzania względnie pozostałego czasu
odtwarzania nacisnąć przycisk DISPLAY zgodnie
z poniższym szkicem.
Powtórzenie odtwarzania
Powtórzenie odtwarzania/przegrywania
- Naciśnięcie przycisku REPEAT powoduje powtarzanie rozdziału, tytułu jak też całej płyty DVD, wzgl.
całej płyty CD.
TITLE REPEAT
ON/REP-ALL – powtórka całego tytułu Jeżeli
płyta CD przegrana została do
końca wtedy następuje powtarzanie przegrywania od początku.
CHAPTER – powtórzyć przegrywany
rozdział Przy osiągnięciu końca
odtwarzania rozdziału wtedy
następuje powrót do odtwarzania od początku rozdziału.
REP-ONE – powtórzyć odtwarzaną
ścieżkę/piosenkę Przy
osiągnięciu końca odtwarzania
ścieżki/piosenki wtedy
następuje powrót do odtwarzania od początku ścieżki/piosenki.
Powtórzyć odtwarzanie A
–– B
- Na początku rozdziału do powtórzenia (punkt A)
nacisnąć przycisk A-B.
- Na końcu rozdziału do powtórzenia (punkt B) nacisnąć powtórnie
przycisk A-B.
- Odtwarzacz powraca automatycznie do punktu A i rozpoczyna
odtwarzanie wybranego
odcinka(A–B).
- W celu skasowania powtarzania
odtwarzania odcinka A–B nacisnąć po raz trzeci przycisk A–B.
Następuje kontynuacja normalnego odtwarzania.
5....-05-DVD 608 HC PL 01.06.2004 10:24 Uhr Seite 75
Page 76

76
Zaprogramowane odtwarzanie
- Nacisnąć przycisk PROGRAM i za pośrednictwem
przycisków numerycznych na pilocie zdalnego
sterowania wprowadzić numer tytułu lub rozdziału
(0–9). Wyświetlacz OSD pokazuje następujący komunikat:
- Wybrać pozycję Programowanie i za pomocą przycisków strzałkowych ustawić kursor w pozycji
START, następnie w celu rozpoczęcia odtwarzania
nacisnąć przycisk ENTER.
- Tą funkcję programowania można w ten sam
sposób wykorzystać do płyt CD audio.
Przypadkowe odtwarzanie (shuffle) tylko dla płyt
CD
- nacisnąć podczas odtwarzania przycisk SHUFFLE w
celu przełączania pomiędzy ON i OFF. Nastawianie
przeprowadzać jak następuje:
ON = włączona opcja przypadkowa. Jeżeli
odtwarzanie doszło do końca
przegrywanej ścieżki wtedy następuje
skok do dalszego odtwarzania
przypadkowej ścieżki.
OFF = wyłączona opcja przypadkowa.
Wskazówka na ekranie OFF (przed
zastosowaniem poprzedzić
naciśnięciem przycisku STOP).
Zastosowanie menu i tytułów płyt
Otwieranie menu dysku
- Menu można zastosować do wyboru języka: mówionego, podtytułów, itp.. Zawartość menu płyty zmienia się od dysku do dysku.
1. Nacisnąć podczas odtwarzania przycisk MENUDVD. Menu zostaje wyświetlone.
2. Przyciskami strzałkowymi (w górę/w dół) wzgl. (w
prawo/w lewo) wybierać poszczególne punkty.
3. Nacisnąć przycisk ENTER: - wybrany punkt zostaje
odtwarzany.
Zastosowanie menu tytułów
- Przy DVD zawierających większą ilość tytułów
możliwe jest wyświetlenie tytułu każdego filmu.
- Rodzaj pracy tej funkcji i jej ewentualne wspieranie
zależne jest od DVD.
Język AUDIO / język podtytułów
(tylko dla płyt DVD)
Wybór języka Audio
- Nacisnąć przycisk AUDIO w celu wyboru pomiędzy
różnymi językami mowy (np. angielskiej, francuskiej,
hiszpańskiej, niemieckiej, …, w zależności od ilości
języków zapisanych na płycie DVD).
Wybór języka podtytułów
- Nacisnąć przycisk SUBTITLE w celu wyboru
pomiędzy różnymi językami podtytułów mowy (np.
angielskiej, francuskiej, hiszpańskiej, niemieckiej…,
w zależności od ilości języków podtytułów
zapisanych na płycie DVD).
ZOOM
- Naciskać kilkakrotnie podczas odtwarzanie przycisk
ZOOM w celu zmiany wielkości obrazu (1,5-krotnie,
2-krotnie, 3-krotnie).
- Po powiększeniu obrazu możliwe jest przesunięcie
jego wyglądu przy użyciu przycisków strzałkowych
(w górę/w dół, w prawo/w lewo) i wyświetlenie
wybranej osobiście części obrazu.
Kąt ujęcia obrazu
- Nacisnąć podczas odtwarzania przycisk ANGLE celu
wyboru własnego kąta ujęcia obrazu.
- Funkcja ta jest aktywna tylko przy płytach, przy
których niektóre sceny zapisane zostały z różnymi
ujęciami kamery.
Bezpośredni wybór dowolnego tytułu,
rozdziału lub momentu
- Nacisnąć przycisk GOTO
- Za każdym razem, kiedy ten przycisk jest naciskany,
następuje powtarzanie zgodnie z następującym
wzorcem:
- Odtwarzacz przeskakuje natychmiast do żądanego
miejsca.
- Przy odtwarzaniu z nośnika VCD2.0. nacisnąć przycisk GOTO, aby wybrać tryb przeszukiwania Disc Time (czas dysku)/Track Time (czas ścieżki)/Track
Number (numer ścieżki).
- W przypadku płyt CD nacisnąć przycisk GOTO i
wprowadzić numer ścieżki.
Znaczniki (Bookmark)
- Dzięki funkcji Znaczniki można wybrać daną część
na DVD lub VCD, aby móc ją w łatwy sposób odszukać w przyszłości (można wprowadzić do 12
znaczników).
5....-05-DVD 608 HC PL 01.06.2004 10:24 Uhr Seite 76
Page 77

77
- W trakcie odtwarzania nacisnąć przycisk
BOOKMARK – pojawi się spis znaczników.
- Przez naciśnięcie Przycisku PLAY odtwarzacz
znaczy to miejsce.
- Jeśli chcecie Państwo zaznaczyć więcej niż jedno
miejsce, należy wybrać przyciskiem strzałkowym
puste pole i nacisnąć raz jeszcze przycisk PLAY.
- Aby zamknąć podgląd znaczników, należy nacisnąć
raz jeszcze przycisk BOOKMARK.
- Aby skasować wprowadzone znaczniki, należy przejść do nich i nacisnąć przycisk CLEAR.
Odtwarzanie DIGEST (DVD)
- Nacisnąć przycisk DIGEST, pojawi się następujące
menu.
- Aby wybrać jedną z następujących pozycji: TITLE
DIGEST, CHAPTER DIGEST, TITLE INTERVAL i
CHAPTER INTERVAL albo BOOKMARK, zastosować
przyciski w górę/w dół. Następnie nacisnąć
przycisk ENTER.
– TITLE DIGEST: Film zgodnie z ilością
zawartych na nim tytułów
zostanie podzielony na kilka
odcinków. Każdy z sześciu
częściowych ekranów pokazuje jeden z tych tytułów.
– CHAPTER DIGEST: Tytuł zostaje zgodnie z ilością
zawartych rozdziałów podzielony na tyleż części
– TITLE INTERVAL: Aktualny tytuł zostaje podzie-
lony na szereg odcinków o
tym samym czasie odtwarzania (10 minut). Każdy z
częściowych ekranów pokazuje jeden obszar.
– CHAPTER INTERVAL: Aktualny rozdział zostaje pod-
zielony na szereg odcinków o
tym samym czasie odtwarzania.
5....-05-DVD 608 HC PL 01.06.2004 10:24 Uhr Seite 77
Page 78

78
- W celu wyboru żądanego okna, naciskać przyciski
numeryczne, ewentualnie strzałkowe, a następnie
potwierdzić przyciskiem ENTER.
- Na ekranie może się wyświetlać jednocześnie do 6
okien (tytuł lub rozdział). Jeśli film składa się z
więcej niż sześciu podrozdziałów, to za pomocą przycisku NEXT, a następnie naciśnięcia przycisku
ENTER, można wybrać następnych 6 okien (tytuł
lub rozdział).
Odtwarzanie w trybie DIGEST (VCD)
- W trakcie odtwarzania nacisnąć przycisk DIGEST.
Pojawi się następne menu.
- przyciskami w górę/w dół wybrać jedną z funkcji:
TRACK, DIGEST. DISC INTERVAL, TRACK
INTERVAL. Potwierdzić przyciskiem ENTER.
- W celu wyboru żądanego okna, naciskać przyciski
strzałkowe, a następnie potwierdzić przyciskiem
ENTER.
- Na ekranie może się wyświetlać jednocześnie do 6
okien. Aby wybrać NEXT, nacisnąć przycisk
strzałkowy. Następnie za pomocą ENTER wybrać 6
kolejnych okien, o ile film ma więcej niż sześć
podrozdziałów.
- W przypadku płyt CD audio, funkcja ta dostępna
jest tylko przy odtwarzaniu (SCAN). Odtworzone
zostanie pierwsze 6 sekund każdej ścieżki.
Odtwarzanie JPEG
Niektóre płyty CD zawierają też obrazy w formacie
JPEG. Może się np. zdarzyć, że przekazano zlecenie
na wywołanie filmu fotograficznego ze zdjęciami w formacie JPEG. W takich przypadkach możliwe jest
odtworzenie tych plików w niniejszym odtwarzaczu.
W związki z tym kilka pożytecznych wskazówek:
- Po włożeniu płyty z plikami JPG następuje wyświetlenie na ekranie wszystkich dostępnych plików lub
zdjęć.
- Wyboru foldera wzgl. pliku dokonuje się przy użyciu
przycisków strzałkowych w górę/w dół, potwierdzenia dokonuje się przyciskiem ENTER.
- po otwarciu pliku JPEG wyświetlane są po upływie
kilku sekund wszystkie kolejne pliki. Dla dłuższej
obserwacji poszczególnego zdjęcia JPG nacisnąć
przycisk PAUSE dla przerwania automatycznego
wyświetlania.
- Przyciski strzałkowe naciskać podczas odtwarzania
w celu obracania lub przekartkowania.
- W celu zmniejszenia lub powiększenia obrazu w
czasie odtwarzania nacisnąć przycisk ZOOM. W celu powiększenia nacisnąć przycisk FWD. W celu
pomniejszenia obrazu nacisnąć przycisk REV.
- Aby wyłączyć funkcję ZOOM, jeszcze raz nacisnąć
przycisk ZOOM – wielkość obrazu wróci do stanu
normalnego.
- W czasie odtwarzania nacisnąć przycisk STOP. Na
ekranie telewizora pojawi się za każdym razem 12
zdjęć. Przy pomocy przycisków strzałkowych dokonać wyboru PREV lub NEXT, a następnie nacisnąć
przycisk ENTER.
- W celu przełączenia się do trybu przeglądu
przeźroczy, należy wybrać na ekranie pozycję „slide
show”. Odtwarzacz rozpocznie przeglądanie
przeźroczy od pierwszego zdjęcia.
- W celu wyboru zdjęcia naciskać przyciski strzałkowe, a następnie potwierdzić przyciskiem ENTER.
Urządzenie przełączy się w tryb przeglądu
przeźroczy i rozpocznie wyświetlanie od wybranego
zdjęcia.
5....-05-DVD 608 HC PL 01.06.2004 10:24 Uhr Seite 78
Page 79

79
Odtwarzanie MP3
Niniejszy odtwarzacz dysponuje w budowanym
dekoderem formatu MP3. Umożliwione jest przez to
odtwarzanie ścieżek (plików) formatu MP3 zapisanych
na płytach CD-R lub CD-RW.
Zastartowanie odtwarzania
- Zaleca się włączenie telewizora przy zamiarze odtworzenia płyty MP3.
1. Przycisk OPEN/CLOSE naciskać w celu wkładania
lub wyjmowania płyty.
- Folder i pliki ukazują się w menu w katalogu
głównym (Root Directory).
2. Wybrać przyciskami strzałkowymi w górę/w dół
zażyczony folder muzyczny, potwierdzić przyciskiem
ENTER.
3. Przy wyborze pliku piosenki ponownie skorzystać z
przycisków górę/w dół, następnie nacisnąć
przycisk ENTER w celu rozpoczęcia odtwarzania pliku utworu.
Opcja odtwarzania
- Na ekranie wyświetlany jest odpowiedni obraz
wybranej opcji.
1. Przyciski strzałkowe służą do wyboru opcji
odtwarzania.
2. Przyciskami w prawo/w lewo wybrać zażyczony folder muzyczny i potwierdzić przyciskiem ENTER.
3. Przyciskami strzałkowymi wybrać plik piosenki i
potwierdzić wybór przyciskiem ENTER.
Wskazówka:
A. FOLDER (katalog)
Wszystkie pliki w aktualnym katalogu będą
jednokrotnie odtwarzane jeden po drugim.
B. SINGLE
Odtwarzany jest wybrany plik.
C. REPEAT ONE
Wybrany plik jest powtarzany.
D. REPEAT FOLDER
Wszystkie pliki w aktualnym katalogu będą powtarzane.
E. SHUFFLE
Następuje przypadkowa kolejność wyboru tytułów
w odtwarzanym katalogu.
Programowane odtwarzanie pliku MP3
5....-05-DVD 608 HC PL 01.06.2004 10:24 Uhr Seite 79
Page 80

80
– W menu katalogi i pliki pokazywane są w spisie.
1. Nacisnąć przycisk programowania.
– Za każdym razem, kiedy zostanie naciśnięty
przycisk programowania.
– Wybrać PROGRAM LIST (zaprogramowana lista).
2. Aby wybrać pierwszy plik, który ma być dodany do
listy, nacisnąć przycisk strzałkowy. Nacisnąć przycisk ENTER.
– Wybrane pliki pojawią się na zaprogramowanej liście
3. Przyciskami w górę/w dół wybrać plik, a w celu
rozpoczęcia odtwarzania nacisnąć przycisk PLAY
lub ENTER.
– Po odtworzeniu wszystkich zaprogramowanych pli-
ków, odtwarzanie zostaje zatrzymane.
– Można zaprogramować do 100 plików.
MENU SETUP (KONFIGURACJA)
Menu SETUP umożliwia ustawienie własnego odtwarzacz DVD zgodnie z życzeniem wyboru języków,
instalacji blokady rodzicielskiej, aktywacji lub włączania symboli i wygaszacza ekranu, rodzaju nastawienia
wygaszacza ekranu telewizyjnego itd.. przeszukując
odpowiednie menu można znaleźć odpowiednią stronę,
na której opisane są parametry wybranej opcji menu.
1. Nacisnąć przycisk SETUP
2. Przyciskami strzałkowymi w górę/w dół wybrać menu lub plik informacyjny.
3. Nacisnąć przycisk ENTER w celu potwierdzenia
wybranego jasno podświetlonego punktu.
Naciskanie przycisku SETUP w opcji STOP lub odtwarzania (w opcji DVD).
- Wyświetlanie menu SETUP.
- Wybierać za pomocą przycisków strzałkowych w
górę/w dół i potwierdzać przyciskiem ENTER.
- Za pomocą menu SETUP możliwe jest nastawianie
ogólne, głośników, Audio i wybranych funkcji.
- W celu opuszczenia menu SETUP naciskać przycisk
w dół aż do wyboru punktu EXIT SETUP.
Nastawianie ogólne
Wybrać w menu SETUP punkt Nastawianie ogólne i
następnie przy pomocą przycisków strzałkowych
zażyczoną opcję, zawsze dla potwierdzenia naciskać
przycisk ENTER.
Nastawianie opcji obrazu ekranu
NORMAL/PS: Pan scan. Wybrać ten punkt, jeżeli odt-
warzacz dołączony jest do konwencjonalnego aparatu telewizyjnego. Filmy
Video nagrane w formacie Pan-Scan
odtwarzane są z obcinaniem prawego i
lewego brzegu.
NORMAL/LB: Wybrać ten punkt, jeżeli odtwarzacz
dołączony jest do normalnego telewizora. Filmy szerokoekranowe odtwarzane są z czarnym obrzeżem w górnej i
dolnej krawędzi ekranu.
WIDE: Wybrać ten punkt, jeżeli odtwarzacz
dołączony jest do szerokooekranowego aparatu telewizyjnego.
Wskazówka:
Rodzaj wielkości wyświetlanego obrazu jest zaprogramowane na płycie DVD. Dlatego możliwym jest, że
odtwarzany obraz niektórych płytach DVD nie
odpowiada wybranej uprzednio wielkości.
VIDEO out
Wybrać typ kolorowego wideo, pasujący do Państwa
typu podłączenia:
SCART/CVBS lub SCART/RGB
5....-05-DVD 608 HC PL 01.06.2004 10:25 Uhr Seite 80
Page 81

81
Nastawianie znakowania kąta ujęcia
- Niektóre płyty DVD zaprogramowane są z większą
ilością ujęć kamery tak, że przy odtwarzaniu możliwy jest wybór kąta oglądanie sceny.
ON – otworzyć kąt ujęcia
OFF – zamknąć kąt ujęcia
- Z funkcji tej można korzystać wyłącznie w przypadkach, gdy dyski oznaczone są znakiem kąta.
Nastawianie języka OSD.
- Możliwy jesz wybór języka obrazu ekranowego (ON
SCREEN DISPLAY, OSD).
Nastawianie symboli
ON – otworzyć opcję.
OFF – zamknąć opcję.
Aparat telewizyjny musi dysponować funkcją do zamykania symboli.
Nastawianie wygaszacza ekranu
- W przypadku, gdy nie włożono żadnej płyty lub
odtwarzanie przerwano na dłuższy czas następuje
włączenie funkcji „Wygaszacz ekranu”. Ekran
zaciemnia się całkowicie i po całym ekranie przesuwa się znak firmowy Logo DVD. Funkcja ta służy
do ochrony ekranu telewizyjnego tak, że nawet przy
dłuższych przerwach jest on zabezpieczony przed
uszkodzeniem.
Nastawianie głośników
- Przyciskami w górę/w dół wybrać opcję nastawiania
głośników i potwierdzić wybór przyciskiem ENTER.
- Po lewej stronie umieszczono katalog główny, po
prawej podpunkty.
- Przyciskiem w prawo/w lewo wybrać odpowiedni
podpunkt i potwierdzić przyciskiem ENTER.
Nastawianie trybu DOWNMIX
Do wyboru funkcji DOWNMIX wykorzystać przyciski w
górę/w dół (jeśli odtwarzacz ma być podłączony do
odbiornika wielokanałowego). Dla każdej funkcji
dostępne są następujące ustawienia:
- DOWNMIX: LT/RT lub STEREO
- Jeśli odtwarzacz podłączony jest do urządzenia
stereo z dekoderem typu Dolby Pro Logic, należy
wybrać ustawienie LT/RT (lewo/prawo).
- Jeśli odtwarzacz podłączony jest do wzmacniacza
stereo, kompatybilnego z Dolby Digital lub DTS,
wybrać ustawienie STEREO.
Nastawianie DOLBY DIGITAL
- Przyciskami w górę/w dół wybrać nastawienie audio i potwierdzić przyciskiem ENTER.
- Po lewej stronie umieszczono katalog główny, po
prawej podpunkty.
- Przyciskiem w prawo/w lewo wybrać odpowiedni
podpunkt i potwierdzić przyciskiem ENTER.
1. Nastawianie SPDIF-OUTPUT
- Przyciskami strzałkowymi w górę/w dół wybrać
punk SPDIF OUT i potwierdzić przyciskiem ENTER.
- Przyciskami strzałkowymi w górę/w dół wybrać jeden z punktów OFF, SPDIF/RAW lub SPDIF/PCM i
potwierdzić przyciskiem ENTER.
- Jeśli nie podłączono żadnych zewnętrznych urządzeń audio, wybrać ustawienie SPDIF OFF.
- Jeśli odtwarzacz podłączony jest za pośrednictwem
kabla współosiowego (nie dostarczony w zestawie)
do kina domowego klasy 5.1, wybrać ustawienie
SPDIF RAW.
5....-05-DVD 608 HC PL 01.06.2004 10:25 Uhr Seite 81
Page 82

82
- Do aktywowania wewnętrznego dekodera Dolby Digital wybrać ustawienie SPDIF PCM.
2. Nastawianie tłumienia
- Zakres dynamicznego tłumienia
Poprzez zakres dynamicznego tłumienia realizuje
się redukcję zmian głośności poprzez ustalanie
zróżnicowania pomiędzy głośnymi i cichymi
dźwiękami.
Nastawić przyciskami strzałkowymi w górę/w dół
zakres dynamicznego tłumienia w granicach
pomiędzy 1/8 i FULL (maks.), wzgl. wyłączyć tłumienie (OFF), następnie dla potwierdzenia nacisnąć
przycisk ENTER.
W celu odbierania całego zakresu zapisanych
dźwięków należy wybrać opcję OFF lub niski stopień
tłumienia jak np. 1/8 lub 2/8. W celu osiągnięcia
zróżnicowania głośności pomiędzy głośnymi i
cichymi dźwiękami należy wybrać większy stopień
tłumienia jak np. 6/8 lub FULL.
VIDEO SETUP (Ustawienie wideo)
W menu Setup wybrać Video Setup i potwierdzić przyciskiem ENTER.
- Za pomocą przycisku w górę/w dół wybrać funkcje
ostrość, jasność, kontrast i potwierdzić przyciskiem
„w prawo”.
- Nacisnąć przycisk „w lewo“, aby powrócić i wybrać
wg uznania inne ustawienie obrazu.
W przypadku funkcji OSTROŚĆ do dyspozycji są trzy
poziomy: wysoki, średni, niski.
W przypadku funkcji JASNOŚĆ do dyspozycji jest zakres od -20 do +20.
W przypadku funkcji KONTRAST do dyspozycji jest zakres od-16 do +16.
Nastawienia użytkownika (Tylko w opcji
STOP lub przy otwartej kieszeni)
Wybrać przyciskami strzałkowymi w górę/w dół
wybrać punkt PREFERENCES SET UP i potwierdzić przyciskiem ENTER.
- Po lewej stronie umieszczono katalog główny, po
prawej podpunkty.
Przyciskiem w prawo/w lewo wybrać odpowiedni podpunkt i potwierdzić przyciskiem ENTER.
Typ telewizora (TV TYPE)
Nastawić wyjście Video zgodnie z systemem
telewizora, do którego dołączony będzie odtwarzacz:
1. Przy telewizorze w systemie PAL wybrać sygnał
wyjściowy PAL;
2. W przypadku systemu NTSC wybrać sygnał
wyjściowy NTSC;
3. Lub też wybrać MULTI, jeżeli dysponuje się telewizorem wielosystemowym.
Nastawianie funkcji AUDIO
- Funkcja Audio zależna jest od płyty wspierającej
format języka, tylko przy wspieraniu możliwe jest
funkcjonowanie nastawienia audio. Jeżeli płyta zawiera np. angielski i niemiecki wtedy wybór języka
ograniczony jest do tych dwóch.
5....-05-DVD 608 HC PL 01.06.2004 10:25 Uhr Seite 82
Page 83

83
Nastawianie podtytułów
- Podtytuły wyświetlane są na ekranie i ich istnienie
jest też zależne od wyposażenia płyty. Możliwe jest
wyświetlanie tylko języków podtytułów wspieranych
przez dysk.
Nastawianie MENU-DISC
- Także i w tym przypadku nastawianie języka zależne
jest od zastosowanej płyty.
Nastawianie blokady rodzicielskiej
Wybór funkcji blokady rodzicielskiej. Nacisnąć prawy
przycisk.
– Za pomocą przycisków strzałkowych w górę/w dół
wybrać poziom blokady rodzicielskiej (1–8),
potwierdzić przyciskiem ENTER. Tą funkcję można
wyłączyć przez wybór pozycji OFF.
– Za pomocą przycisków numerycznych wprowadzić
6-cyfrowy kod i potwierdzić przyciskiem ENTER. W
tym trybie nie można odtwarzać żadnych płyt DVD,
które pozycjonowane są wyżej niż wybrany poziom,
aż do momentu skasowania funkcji blokady
rodzicielskiej.
Objaśnienia klasyfikacji wg granic wiekowych
- KID SAFE – Bezpieczne dla dzieci: a także bez szkody dla dzieci.
- G – Ogólna publiczność: zalecane jako nieszkodliwe dla wszystkich grup wiekowych
- PG – zalecone towarzyszenie rodziców
- PG 13 – Materiał nie nadający się dla dzieci
poniżej 13 lat.
- PG+R – Towarzyszenie rodziców z ograniczeniem:
zaleca się żeby rodzice zabronili oglądania filmu
własnym dzieciom poniżej 17 lat, wzgl. albo
dozwolone jest oglądanie filmu dzieci, ale pod kontrolą rodziców lub rodzica.
- R – Ograniczony: poniżej 17 lat wyłącznie w
towarzystwie jednego z rodziców lub upoważnionej
do tego dorosłej osoby.
- NC-17 – zabronione dla dzieci poniżej 17 lat.
- ADULT – Tylko dla dorosłych; z powodu scen seksualnych, brutalnych lub ze względu na dialogi dozwolony wyłącznie do oglądanie przez dorosłe
osoby.
- NO PARENTAL – Wyłączyć blokadę rodzicielską.
Wskazówka: Funkcja ochrony (blokady) rodzicielskiej,
zapisywana na dysku DVD, jest stosunkowo nowa.
Obecnie bardzo mało płyt DVD (jeśli w ogóle jakieś) w
rejonie Australii i Nowej Zelandii zawiera powyższą
funkcję ochrony rodzicielskiej.
„OLD PASSWORD”(stare hasło): w ustawieniu
„PASSWORD” należy wprowadzić nowe hasło lub też
zastosować hasło „SUPERUSER PASSWORD”, wprowadzając kombinację „136900”.
5....-05-DVD 608 HC PL 01.06.2004 10:25 Uhr Seite 83
Page 84

84
Ustawienie hasła blokady rodzicielskiej
Blokada rodzicielska ogranicza możliwość odtwarzania
z DVD, jeżeli jakaś płyta pozycjonowana jest wyżej niż
ustawiony przez rodziców poziom.
Aby ustawić poziom blokady w sposób, który umożliwi
niepożądane odtwarzanie, patrz rozdział POZIOMY
BLOKOADY RODZICIELSKIEJ. Do wyboru hasła należy
naciskać przyciski w górę/w dół. Zostanie pokazana
funkcja CHANGE, którą należy potwierdzić naciskając
przycisk ENTER.
- Obok starego hasła pojawi się puste pole.
- Wprowadzić przyciskami numerycznymi stare sześciomiejscowe hasło. Kursor ustawi się automatycznie w polu NOWEGO hasła.
- Wprowadzić przyciskami numerycznymi nowe sześciocyfrowe hasło. Kursor ustawi się automatycznie
w polu potwierdzenie nowego hasła CONFIRM PWD
- Wprowadzić przyciskami numerycznymi to samo
sześciocyfrowe hasło, które zostało wprowadzone
w pozycji NOWE hasło.
- Aby zapamiętać nowe ustawienia, nacisnąć przycisk
ENTER.
UWAGA: Przy pierwszym użyciu odtwarzacza DVD, aby
pominąć pozycję „OLD PASSWORD” (stare hasło), należy nacisnąć przycisk ENTER. Następnie można wprowadzić nowe hasło - NEW PASSWORD.
Aby wykasować hasło w przypadku jego
zapomnienia, należy postępować zgodnie z poniższą
instrukcją:
1. Na stronie zmian wprowadzić następujący 6-cyfrowy numer „136900” (SUPERUSER PASSWORD), a
następnie nacisnąć przycisk ENTER.
2. Wprowadzić nowe hasło.
LAST MEMORY (ostatnio zapamiętane)
Aby wybrać pozycję LAST MEMORY, należy naciskać
przyciski w dół/w prawo.
- Za pomocą przycisków w górę/w dół wybrać ustawienie ON (włączony) lub OFF (wyłączony), a
następnie nacisnąć przycisk ENTER.
Ustawienie fabryczne
Aby powrócić do fabrycznych ustawień odtwarzacza,
należy wykonać następujące kroki.
W celu wyboru pozycji DEFAULT (ustawienia domyślne)
wykorzystać przyciski strzałkowe w górę/w prawo.
Kursor ustawi się w pozycji RESET. Potwierdzić
przyciskiem ENTER.
- Przywrócone zostaną fabryczne ustawienia odtwarzacza.
Rozwiązywanie problemów
Przed skontaktowaniem się z serwisem należy najpierw
poszukać w poniższej tabeli ewentualnej przyczyny
błędu. Kilkoma prostymi testami lub małymi nastawieniami można ewentualnie naprawić błąd i przywrócić
poprawne funkcjonowanie.
5....-05-DVD 608 HC PL 01.06.2004 10:25 Uhr Seite 84
Page 85

85
Problem (DVD) Rozwiązanie
Audio Soundtrack i
/ lub język podtytułów są niezgodne z wybranymi nastawieniami podstawowymi
Jeżeli brak na płycie CD Audio Soundtrack i / lub języka podtytułów
wtedy nie można słyszeć/widzieć
wybranego języka zaprogramowanego w nastawieniu podstawowym.
Informacja pojawia
się w języku francuskim (przykład).
Nastawienie menu wybrane jest na
język francuski w punkcie "Disc Languages” (język płyty). Nastawić
język francuski.
Brak podtytułów. • Podtytuły wyświetlane są tylko pr-
zy płytach DVD na których
zostały one nagrane.
• Podtytuły są skasowane przez
ekran telewizora. Nacisnąć przycisk "SUBTITLE".
Niemożliwość wyboru alternatywnego języka (lub podtytułów)
Soundtrack-Audio.
• Przy płytach CD, na których tylko
jeden język jest niemożliwe
wybieranie języków
alternatywnych.
• W przypadku niektórych płyt CD
nie ma możliwości wyboru alternatywnego języka przyciskami
AUDIO lub SUBTITLE. Spróbować
nastawienia poprzez menu DVD,
jeżeli jest ono dostępne.
Brak możliwości
zmiany kąta ujęcia.
Funkcja ta jest zależna od
odpowiedniego oprogramowania.
Nawet, gdy płyta DVD dysponuje
różnymi ujęciami kamery to są one
przydzielone ewentualnie tylko niektórym scenom (przy wyświetleniu na
odtwarzaczu informacji ANGLE.)
Problem (częsty) Rozwiązanie
Brak prądu Wsunąć na nowo wtyczkę do
gniazda.
• Brak odtwarzania
nawet w
przypadku przyciskania PLAY.
• Odtwarzanie
zaczyna i
natychmiast
kończy.
• Osadziła się woda kondensacyjna: odczekać jedną do dwóch
godzin aż do wyschnięcia
odtwarzacza.
• Odtwarzacz może przegrywać tylko następujące formaty: DVD, Video CDs, CDs, MP3s i JPEGs.
• Płyta CD może być zabrudzona i
należy ją wyczyścić.
• Upewnić się, że płyta CD została
włożona etykietą do góry.
• Brak obrazu • Sprawdzić czy odtwarzacz został
poprawnie dołączony.
• Sprawdzić czy telewizor został przełączony na "Video”.
• Brak dźwięku
• Zniekształcony
dźwięk
• Sprawdzić czy odtwarzacz został
poprawnie podłączony.
• Sprawdzić czy telewizor i układ
stereo są poprawnie nastawione.
• Ustawić główny głośnik ponad pilotem zdalnego sterowania.
Zniekształcony obraz podczas szybkiego przewijania w
przód i w tył.
Obraz w takich przypadkach ulega
niewielkiemu zniekształceniu, jest to
normalne.
Szybkie przewijanie
do przodu (albo do
tyłu) jest niemożliwe.
Pewne płyta CD posiadają segmenty uniemożliwiające szybkie przewijanie do przodu (lub do tyłu).
Brak obrazu w formacie 4:3 (16:9)
Przeprowadzić poprawne nastawienia zgodne z parametrami własnego
telewizora ("TV Aspects").
Brak dźwięku Surround Sound.
• Wybrać poprawne nastawienia
pod "Audio Output” odpowiednie
dla własnego urządzenia.
Pilotem zdalnego
sterowanie nie
można
przeprowadzić
żadnych
nastawień.
• Sprawdzić poprawność włożenia
baterii odpowiednio do polaryzacji
(+ i -).
• Baterie są wyładowane; wymienić
baterie na nowe.
• Podczas przełączanie kierować
pilota zdalnego sterowania na
czujnik zdalnego sterowania
• Używać pilota zdalnego sterowania w odległości poniżej 5 metrów
od czujnika odtwarzacza.
Przyciski nie
funkcjonują (na
odtwarzaczu i / lub
na pilocie zdalnego
sterowania)
• Usunąć wszystkie przeszkody pomiędzy pilotem zdalnego sterowania i czujnikiem odtwarzacza. Odtwarzacz wyłączyć i ponownie
włączyć. W ostateczności
wyłączyć odtwarzacz, wyciągnąć
z gniazda wtyczkę AC i połączyć
wszystko na nowo. (Możliwe jest,
że odtwarzacz nie funkcjonuje
właściwie z powodu przyczyn zewnętrznych jak burza lub naładowania elektrostatyczne.).
Problem (częsty) Rozwiązanie
Całkowity lub
częściowy brak
wyświetlania na
ekranie telewizora
menu ekranu.
Wybrać odpowiedni typ ekranu wg
instrukcji obsługi telewizora.
Brak kolorów Ustawić typ TV na niemiecką normę
kolorów systemu Pal. Nacisnąć przy
tym przycisk SETUP In celu otwarcia
menu
5....-05-DVD 608 HC PL 01.06.2004 10:25 Uhr Seite 85
Page 86

86
• Przeniesienie płyty CD z zimnego do ciepłego
otoczenia może spowodować osadzanie się wilgoci
na jej powierzchni. Przed użyciem płyty CD zmyć
wilgoć miękką, suchą, niewłóknistą szmatką.
Niewłaściwe przechowywanie płyt CD
Można doprowadzić do uszkodzenia płyt CD przechowując je w miejscach takich jak:
• bezpośrednio nagrzewane promieniami słonecznymi
• zawilgoconych lub zakurzonych
• narażonych na bezpośrednie oddziaływanie źródeł
ciepła lub grzejników.
Konserwacja
• Przed każdą konserwacją zapewnić wyłączenie odtwarzacza i odłączenie od zasilani sieciowego.
• Odtwarzacz obmywać suchą, miękką szmatką. W
przypadku dużego zabrudzenia powierzchni
obmywać szmatką zanurzoną w słabym roztworze
mydlanym i dobrze wyciśniętą i natychmiast wysuszyć suchą szmatką.
• Zabronione jest używanie alkoholu, benzyny,
rozpuszczalników, cieczy rozpuszczalnikowych lub
innych środków chemicznych. Do usuwania kurzu
nie stosować nigdy sprężonego powietrza.
Definicja pojęć
Angle (kąt ujęcia)
Niektóre płyty DVD zawierają sceny ujmowane z wielu
różnych kątów (ta sama scena z ujęciem z przodu, z
lewej strony, z prawej strony, itd.). W przypadku takich
płyt DVD możliwe jest korzystanie z przycisku ANGLE
w celu oglądanie scen pod różnymi kątami widzenia.
Chapter Number (numer rozdziału)
Numery te nagrane są na płytach DVD. Każdy tytuł
podzielony jest na kilka ponumerowanych sekcji, co
umożliwia to szybkie odnalezienie pewnych pozycji prezentacji Video.
DVD
Pojęcie to nawiązuje do optycznych płyt CD z wysokim
zagęszczeniem, na których możliwe jest nagrywanie
cyfrowymi sygnałami wysokiej jakości obrazów i
dźwięków. Dzięki nowej technologii zagęszczania Video
(MPEG) i technice nagrywania z dużym zagęszczeniem
możliwe jest nagrywanie przez dłuższy czas na płytach
DVD estetycznie przyjemnych do oglądanie filmów
video (możliwe jest np. nagranie całego filmu
pełnometrażowego). Płyta DVD składa się z dwóch
dysków o grubości 0,6 mm. Im większe jej zagęszczenie tym więcej informacji można na niej zapisać. Płyta
DVD ma większą pojemność aniżeli 1,2 mm płyta CD.
Fakt, że obydwie cienkie płyty połączone są wzajemnie umożliwia w kiedyś w przyszłości zapisywanie obu
stron w celu osiągnięcia jeszcze dłuższego czasu odtwarzania..
PBC (kontrola Playback)
Opcja ta nagrana jest na CD-video (wersja 2.0). Sceny
lub informacje można oglądać (lub wysłuchać) interaktywnie w telewizorze za pomocą wyświetlanego na
ekranie menu.
Dla informacji:
Traktowanie i konserwacja płyt CD
Kroki ostrożności przy traktowaniu płyt
• Płyty CD ujmować wyłącznie na brzegach tak oby
powierzchni górnej nie pobrudzić dotykając palca-
mi. Odciski palców, brud i zadrapania mogą doprowadzić do skoków i zniekształceń.
• Nie pisać długopisem lub innymi przyborami do pisania po stronie z etykietą.
• Nie używać żadnych rozpylacza do czyszczenia
płyt, benzyny, rozpuszczalników, cieczy antystatycznych lub innych środków rozpuszczających.
• Uważać, aby nie dopuścić do upuszczenia lub
wygięcia płyty CD.
• Do kieszeni CD wkładać zawsze tylko jedną płytę.
SZUFLADKA CD
X
PŁYTA CD
• Nie próbować zamykania drzwi przed upewnieniem
się o poprawnym ułożeniu płyty CD w jej fachu.
Przy zabrudzonej powierzchni
• Przetrzeć płytę CD miękką, wilgotną (tylko woda)
szmatką.
• Przy przecieraniu płyty CD przesuwać szmatkę zawsze od środka płyta do jej brzegów.
(W przypadku okrężnego zmywania można
doprowadzić do zadrapań powodujących zakłócenia dźwięku płyty CD.)
Produkt ten zawiera technikę dla ochrony praw autorskich, chronioną przez patenty w ramach specjalnych
patentów amerykańskich i inne intelektualne własności w posiadaniu firmy Macrovision Corporation jak też
prawnych właścicieli. Używanie tej techniki ochrony
praw autorskich możliwe jest wyłącznie po autoryzacji
firmy Macrovision Corporation i dozwolone wyłącznie
dla użytku domowego i innych mediów obrazowych o
ograniczonym zapotrzebowaniu, z wyjątkiem przypadku, gdy zostało to z firmą Macrovision Corporation
jednoznacznego inaczej ustalone. Rozbieranie i
demontaż są zabronione.
5....-05-DVD 608 HC PL 01.06.2004 10:25 Uhr Seite 86
Page 87

Subtitle (podtytuły)
Te wydrukowane wiersze wyświetlane są na dole ekranu i tłumaczą lub objaśniają dialogi. Podtytuły nagrane
są na płytach DVD.
Time Numer (Nr czasu)
Wyświetla na ekranie nagrany na płycie czas
odtwarzanie płyty DVD. Jeżeli płyta DVD zawiera dwa
lub więcej filmów wtedy filmy te są ponumerowane jako
tytuł 1, tytuł 2 itd.
Track Numer (Nr ścieżki)
Numer ten odnosi się di ścieżek nagranych na płytach
CD-video i płytach CD. Numery ścieżek umożliwiają
szybkie wyszukanie i znalezienie specyficznej ścieżki
(np. piosenki).
CD-video
Taka płyta zawiera nagrania obrazu i dźwięku, które jakościowo można porównywać z kasetami video.
Odtwarzacz wspiera też CD-video funkcją Playback
Control (wersja 2.0)
Dane techniczne
Zasilanie AC 230 V, 50 Hz
Zużycie prądu 20W
System sygnałów NTSC/PAL
Waga 2,3 kg
Wymiary
(długość x szerokość x wysokość) 430 x 240 x 70
mm
Zakres dopuszczalnej temperatury +5° do +35°C
Zakres wilgotności
roboczej 5 do 90 % (bez wody kondensacyjnej)
Dyski możliwe do odtwarzania
1. Płyty DVD-VIDEO
12 cm jednostronne, jednowarstwowe
12 cm jednostronne, dwuwarstwowe
12 cm dwustronne, jednowarstwowe
2. Płyta kompaktowe (CD-DA, MP3-CD)
płyta 12 cm
płyta 8 cm
Wyjście S Video
Y Output-Level (poziom wyjścia Y) 1 Vp-p (75 Ohm)
C Output-Level (poziom wyjścia C) 0,30 Vp-p (75 Ohm)
Ilość przyłączy 1
Wyjście Video
Output-Level (poziom wyjścia) 1 Vp-p (75 Ohm)
Gniazdo wyjścia typu RCA
Ilość przyłączy 1
Wyjście Audio
Output-Level (poziom wyjścia) 2 Vrms (1kHz, 0 db)
Gniazdo wyjścia typu RCA
Dane znamionowe wyjścia sygnałów audio
1. Stosunek sygnału do szumu (S/N)
CD audio 90 dB (EIAJ)
2. Zakres dynamiki
DVD (audio liniowe) 80 dB
CD audio 80 dB (EIAJ)
3. Całkowite zniekształcenie
harmoniczne THD + SN 70 dB
Cyfrowe wyjście audio
Gniazda wyjścia
Wyjście cyfrowe, współosiowe typu RCA
Specyfikacje podlegają prawu do zmian.
Wartości ciężaru i wymiarów są wartościami
przybliżonymi.
87
5....-05-DVD 608 HC PL 01.06.2004 10:25 Uhr Seite 87
Page 88

Parametry techniczne głośnika
niskotonowego
Moc wyjściowa: 20W
głośnik niskotonowy
12W głośnik satelitarny
THD = 10%
SUB: 100Hz
SAT: 1kHz
Głośnik: niskotonowy: 5”
satelitarny: 2.5”x2
impedancja: 4 Ohm
Charakterystyka
częstotliwościowa: głośnik niskotonowy:
30 – 120Hz
satelitarny:
100 – 15kHz
Podłączenie sieciowe: ~AC230V / 50Hz
Separacja: ≥45dB
Stosunek sygnału do
szumu: ≥60dB
Specyfikacje podlegają prawu do zmian.
Wartości ciężaru i wymiarów są wartościami
przybliżonymi.
Niniejsze urządzenie odpowiada wymaganiom normy
bezpieczeństwa użytkowania oraz spełnia wymagania
dyrektywy niskonapięciowej i kompatybilności elektromagnetycznej.
Zastrzega się prawo do zmian technicznych!
WARUNKI GWARANCJI
Przyznajemy 24 miesiące gwarancji na produkt licząc
od daty zakupu.
W tym okresie będziemy bezpłatnie usuwać w terminie
14 dni od daty dostarczenia wadliwego sprzętu z kartą
gwarancyjną do miejsca zakupu wszystkie uszkodzenia
powstałe w tym urządzeniu na skutek wady
materiałów lub wadliwego wykonania, naprawiając
oraz wymieniając wadliwe części lub (jeśli uznamy za
stosowne) wymieniając całe urządzenie na nowe.
Sprzęt do naprawy powinien być dostarczony w komplecie wraz z dowodem zakupu oraz z ważną kartą
gwarancyjną do sprzedawcy w miarę możliwości w
oryginalnym opakowaniu lub innym odpowiednim dla
zabezpieczenia przed uszkodzeniem. W razie braku
kompletnego opakowania fabrycznego, ryzyko uszkodzenia sprzętu podczas transportu do i z miejsca zakupu
ponosi reklamujący.
Naprawa gwarancyjna nie dotyczy czynności przewidzianych w instrukcji obsługi, do wykonania których
zobowiązany jest użytkownik we własnym zakresie i na
własny koszt.
Gwarancja nie obejmuje:
• mechanicznych, termicznych, chemicznych uszkodzeń sprzętu i wywołanych nimi wad,
• uszkodzeń powstałych w wyniku działania sił
zewnętrznych takich jak wyładowania atmosferyczne, zmiana napięcia zasilania i innych zdarzeń losowych,
• nieprawidłowego ustawienia wartości napięcia elektrycznego, zasilanie z nieodpowiedniego gniazda
zasilania,
• sznurów połączeniowych, sieciowych, żarówek, baterii, akumulatorów,
• uszkodzeń wyrobu powstałych w wyniku niewłaściwego lub niezgodnego z instrukcją jego użytkowania, przechowywania, konserwacji, samowolnego
zrywania plomb oraz wszelkich przeróbek i zmian
konstrukcyjnych dokonanych przez użytkownika lub
osoby niepowołane,
• roszczeń z tytułu parametrów technicznych wyrobu,
o ile są one zgodne z podanymi przez producenta,
• prawidłowego zużycia i uszkodzeń, które mają nieistotny wpływ na wartość lub działanie tego urządzenia.
Karta gwarancyjna bez pieczątki sklepu, daty
sprzedaży, nie wypełniona, źle wypełniona, ze śladami
poprawek, nieczytelna wskutek zniszczenia, bez możliwości ustalenia miejsca sprzedaży oraz dołączonego
dowodu zakupu jest nieważna.
Korzystanie z usług gwarancyjnych nie jest możliwe po
upływie daty ważności gwarancji. Gwarancja na części
lub całe urządzenie, które są wymieniane kończy się,
wraz z końcem gwarancji na to urządzenie.
88
5....-05-DVD 608 HC PL 01.06.2004 10:25 Uhr Seite 88
Page 89

Wszystkie inne roszczenia, wliczając w to odszkodowania są wykluczone chyba, że prawo przewiduje inaczej.
Roszczenia wykraczające poza tą umowę nie są
uwzględniane przez tą gwarancję.
Gwarancja na sprzedany towar konsumpcyjny nie
wyłącza, nie ogranicza ani
nie zawiesza uprawnień kupującego wynikających z
niezgodności towaru z umową.
Gwarancja oraz zawarte w niej warunki obowiązują na
terenie Rzeczpospolitej Polskiej.
89
5....-05-DVD 608 HC PL 01.06.2004 10:25 Uhr Seite 89
Page 90

Biztonsági figyelmeztetések
Vigyázat: A DVD/CD-lejátszó az I. lézerosztályba tartozó készülék. Ez a DVD/CD-lejátszó tehát látható lézersugár alkalmazásával működik, amely közvetlen
ráirányulás esetén veszélyes sugárzási kockázatot rejt.
Ügyeljen rá, hogy a DVD/CD-lejátszót csak az útmutató
szerint használják!
Felhívás:
Annak érdekében, hogy csökkenjen a tűz keletkezésének vagy az áramütésnek a kockázata, ezt a lejátszót
nem szabad nedvesség vagy eső hatásának kitenni.
Ez a termék kis energiájú lézeres alkatrészt
foglal magában.
Biztonsági tájékoztató
Emlékeztetőül:
Ezt a készüléket mérsékelt égövi használatra tervezték.
Csak 220-240V/50Hz-es váltóáramú feszültségre szabad kapcsolni. Más körülmények között nem használható.
Figyelem:
A DVD lejátszó az 1. lézerosztályba tartozó termék.
A készülék láthatatlan lézersugarat használ, amely sugárveszélyt okozhat. Csak szabályszerűen, az
útmutatónak megfelelő módon használja a készüléket!
Amikor a készülék földelt konnektorba van
csatlakoztatva, ne vigye a szemét túl közel a készülék
nyílásához, és ne nézzen bele a lejátszó belsejébe!
A kezelőelemeknek a jelen leírásban olvashatótól eltérő
használata, olyan beállítások és egyéb alkalmazási módok, amelyek az útmutatóban foglaltaktól eltérnek, azt
eredményezhetik, hogy Ön sugárveszélynek teszi ki
magát.
Ne nyisson ki egyetlen lefedett részt se, és ne javítsa
maga a készüléket! A készülék karbantartása és javítása céljából forduljon zakemberhez!
Figyelmeztetés:
Az olyan kockázatok megelőzése végett, mint a tűz
vagy az áramütés, ne tegye ki a készüléket esőnek
vagy nedvességnek!
Az olyan kockázatok elkerülése végett, mint a tűz, az
áramütés vagy kellemetlen zavarok, csak ajánlott tartozékokat használjon!
Elővigyázatossági intézkedések
Olvassa végig gondosan ezeket az elővigyázatossági
intézkedéseket, mielőtt a készüléket használatba
venné!
A csatlakozó kábel védelme
Hogy a készülék hibás működését elkerülje, és ki ne
tegyemagát az áramütés, tűz vagy személyi sérülés
veszélyének, vegye figyelembe a következőket:
Mindig a dugasznál, ne pedig a kábelnél fogva húzza ki
a készüléket a konnektorból! Soha ne fogja meg a dugaszt vagy a kábelt vizes kézzel!
Tartsa fűtőtestektől távol a csatlakozó kábelt! Soha ne
tegyen rá nehéz tárgyakat!
Ne próbálja a csatlakozó kábelt javítani, vagy saját
kezűleg cserélni! A csatlakozó kábel cseréjét csak
elektrotechnikailag képzett személy végezheti!
Elhelyezés
Kerülje a készülék elhelyezését az alábbi környezetben:
Közvetlen napsugárzásnak kitéve, fűtőkészülékek mellett agy zárt járművekben.
Magas hőmérsékletnek (több mint 35°C) vagy nagy
páratartalomnak (több mint 90%) kitéve.
Rendkívül poros környezetben.
Ellenkező esetben egyes belső alkatrészek súlyosan
károsodhatnak.
Használaton kívül:
Ha nem használja a készüléket, kapcsolja ki!
Ha hosszabb időn át nem használja a készüléket,
húzza ki a csatlakozó dugaszt a földelt konnektorból!
Ne dugja se az ujját, se semmilyen tárgyat a kés
-
zülékbe!
A készülék belső alkatrészeinek az érintése veszélyes,
és azzal a következménnyel járhat, hogy a készülék komolyan károsodik. Ne próbálja a készüléket szétszedni!
Ne tegyen oda nem való tárgyakat a CD-tartó fiókba!
Víztől, tűztől és mágnesektől távol tartandó
Tartsa távol a készüléket virágvázáktól, fürdőkádaktól,
mosdókagylóktól stb.! Ha folyadék kerül a készülék
belsejébe, a készülék súlyos károsodását okozhatja.
Nyílt lángot, pl. égő gyertyákat nem szabad a készülékre állítani!
Soha ne vigyen a készülék közelébe mágneses tárgyakat, például hangszórókat!
Szellőzés
Szellőzés céljából tartsa szabadon a készülék 5 cm-es
körzetét!
Ne fedjen el egyetlen szellőzőnyílást se tárgyakkal, pl.
folyóiratokkal, asztalterítőkkel, függönyökkel stb.!
Vízszintes helyzetben állítsa fel a készüléket, és ne
tegyen rá semmilyen nehéz tárgyat!
Ne állítsa a készüléket erősítőre vagy más olyan
készülékre, amelyik felhevülhet!
90
5....-05-DVD 608 HC H 01.06.2004 10:31 Uhr Seite 90
Page 91

Csapadékvíz
Az alábbi körülmények között pára csapódhat le a lencsén:
Közvetlenül azután, hogy bekapcsoltak valamilyen
fűtőkészüléket. Gőzölgő vagy nagyon párás helyiségben.
Ha hideg környezetből melegbe viszik át a készüléket.
Ha nedvesség képződik a belsejében, előfordulhat, hogy a készülék nem működik rendesen.
Ilyenkor kapcsolja ki az áramot, és várjon kb. egy órát,
míg a nedvesség el nem párolog.
Ha műsor vétele közben zavaró zúgások
jelentkeznek a tévékészülékben
Az adott vételi viszonyoktól függően zavarok jelentkezhetnek a tévé képernyőjén, miközben valamelyik
műsort nézi, és a DVD-lejátszó is be van kapcsolva. Ez
nem a készülék vagy a tévé működési zavarának a jele.
Amikor tévéműsort kíván nézni, kapcsolja ki a
készüléket!
91
Készült a Dolby Laboratories licence alapján.
A "Dolby", valamint a kettős D szimbólum a Dolby Laboratories védjegyei.
Lemezfajta Márkalogó Felvételi mód
Lemezméret
Maximális játékidő
12 cm
kb. 240 perc. (egy oldali műsorral)
DVD Hang + kép
kb. 480 perc. (mindkét oldali műsorral)
08 cm
kb. 080 perc. (egy oldali műsorral)
kb. 160 perc. (mindkét oldali műsorral)
12 cm 74 perc.
AUDIO-CD Hang
08 cm 20 perc.
Lejátszható lemezek
Ez a DVD-lejátszó a megfelelő logóval ellátott alábbi lemezfajták lejátszására képes:
Használható lemezek:
Területkód
Mind a DVD-lejátszó, mind a lemezek a területnek
megfelelő kódszámokkal vannak ellátva. Ezeknek a
területkódoknak sorrendben egyezniük kell ahhoz,
hogy a DVD lejátszható legyen. Ha a kódszámok nem
illeszkednek, a lemezt nem lehet lejátszani.
Ennek a lejátszónak a kódszáma a készülék
hátlapján olvasható.
Dolby Digital Disk DTS Disk Stereo-Disk NTSC-System PAL-System
Digital Audio (az USA-ban, (Nagy-Britanniában,
Disk Kanadában, Franciaországban,
Japánban, Ausztráliában
Dél-Koreában stb.)
stb.)
COMPACT
DIGITAL AUDIO
DIGITAL
SOUND
STEREO NTSC PAL
5....-05-DVD 608 HC H 01.06.2004 10:31 Uhr Seite 91
Page 92

92
1. DIGITAL OUT – COAXIAL
- csatlakoztatás digital-coaxial bemenettel ellátott
audio-készülékekre.
2. Jobb- és baloldali kimeneti audio kapcsolóhüvely
- Sztereo erősítőhöz való csatlakoztatásra
3. S-VIDEO kimenet
- SVHS-videobemenettel ellátott tévékészülék csatlakoztatása
4. VIDEO kimenet
- video-kimenettel ellátott tévékészülék
csatlakoztatása
5. Váltóáramú csatlakozó kábel
- csatlakoztatás standard konnektorba
6. SCART kimenet
- SCART-bemenettel ellátott tévékészülék
csatlakoztatása
1. Átkapcsolás Power-ről Standby-üzemmódra
2. Display
3. CD-fiók
4. OPEN/CLOSE – A CD-fiók nyitása és zárása
5. PREV – ugrás a következő fejezetre/barázdára
6. NEXT – ugrás a következő fejezetre/barázdára
7. PLAY – a lejátszás indítása
8. PAUSE – a lejátszás megszakítása
9. STOP – a lejátszás megszakítása
Leírás
Elülső kezelőpanel
Hátulsó kezelőpanell
Lemezszerkezet
A DVD-videokorong egyes „címekből” áll, ezek a címek
pedig különböző „fejezetekre”tagolódhatnak (lásd 1.
példa). Ha valamelyik korong több filmet tartalmaz,
minden egyes filmnek lehet saját címszáma, és ezen
belül még néhány fejezete is.
Másrészt az audio CD-k „barázdákból” (tracks) állnak
(lásd 2. fejezet).
Általában minden barázdának megvan a maga trackszáma (néhány korong esetén az adott trackek még indexszámokra is továbbtagolódnak).
5....-05-DVD 608 HC H 01.06.2004 10:31 Uhr Seite 92
Page 93

Távkapcsoló
1. POWER
- átkapcsolás standby-üzemre
2. TITLE/PBC
- a gomb megnyomása a DVD-címmenübe visz
3. DVD-menü/RETURN
- a gomb megnyomása a DVD-diskmenübe visz
- visszatérés az előző menübe
4. DIGEST (csak VCD-re és CD-re érvényes)
- a VCD/CD-barázda előzetes megtekintéséhez
5. PROGRAM
- a programozó üzemmódot nyitja meg
6. PLAY
- a lejátszás megindításához
7. ZOOM
- a kép nagyítására
8. Számjegyes gombok (0 – 9)
- a számozott menüpontok kijelölésére
9. ANGLE
- a DVD-kameraállás kiválasztására
10. AUDIO
- a hanglejátszás nyelvének kiválasztására
11. BOOKMARK
12. NEXT
- a gomb megnyomása a következő fejezethez, ill.
következő barázdához visz
13. PREV
- a gomb megnyomása az előző fejezethez, ill. az
előző barázdához visz
14. Nyíllal jelölt gombok (balra/jobbra/fel/le) a menüpontok kijelölésére
15. ENTER
- a menükijelölés megerősítésére
16. DISPLAY
- ha lejátszás közben megnyomja a gombot, a képernyőn megjelenik az aktuális lemezinformáció
17. SUBTITLE
- a feliratozás nyelvének kiválasztására
18. MUTE
- egyszer megnyomva a hang elnémul,ismét megnyomva, a hang újra hallható
19. SETUP
- a beállító (setup) menü megnyitására és zárására
20. GOTO
- egy bizonyos fejezet vagy játékidőpont
megkeresésére
21. STOP
- megszakítja a lejátszást
22. REPEAT
- egy-egy fejezet, cím, barázda vagy teljes lemez
megismétléséhez kell megnyomni
23. REPEAT A-B
- egy bizonyos szakasz megismétléséhez kell megnyomni
24. SHUFFLE
- a barázdák tetszőleges sorrendben való
lejátszására
25. PAUSE/STEP
- a lejátszás átmeneti megszakítása/képről képre
lépegető lejátszás
26. SLOW
- a DVD lassított előre- vagy visszaforgatására
27. REV
- keresés visszafelé a lejátszás alatt
28. FWD/CLEAR
- keresés előre a lejátszás alatt
- a bevitt kijelölés törlése
29. SHIFT
- ennek megnyomása a felületre nyomtatott funkciót kombinálja a megfelelő gombbal.
Elem behelyezése (távkapcsoló)
A készülék a hozzá adott távkapcsolóval vezérelhető.
Helyezzen az elemtartó rekeszbe két R6-os (AA)
elemet a megadott polaritásnak megfelelően. Ha a távkapcsolót kívánja használni, irányítsa a készülék Remote-érzékelőjére!
Figyelmeztetések
- Ne tartsa a távkapcsolót rendkívül meleg vagy
párás helyeken!
- Ne keverjen benne régi és új elemeket!
- Ne tegye ki a távkapcsolót közvetlen napsugárzásnak vagy világítótestek fényének! Ez zavarokat
okozhat a lejátszó kezelésekor.
93
5....-05-DVD 608 HC H 01.06.2004 10:31 Uhr Seite 93
Page 94

- Ha hosszabb időn át nem használják a
távkapcsolót, ki kell venni belőle az elemeket,
nehogy az elemek kifutása vagy a korrózió károkat
okozzon benne.
A távkapcsoló hatótávolsága
A távkapcsoló legfeljebb kb. 5 méteres távolságból
egyenes irányban használható.
Ezenkívül a vízszinteshez képest 30 °-os szögben a
Remote-érzékelőre irányítva működik.
Elülső kezelőtábla (mélynyomó)
1. BE / KI kapcsoló
2. Fő hangerő fel
3. Fő hangerő le
4. Némítás
5. Basszus-hangerő fel
6. Basszus-hangerő le
7. Üzemmód
Hátsó kezelőtábla (mélynyomóhoz)
1. Baloldali audio bemenet
2. Jobboldali audio bemenet
3. Jobboldali hangszóró bemenet
4. Baloldali hangszóró bemenet
5. AC-csatlakozókábel
Távirányító (mélynyomóhoz)
1. Némítás Be (Mute on)
2. Némítás Ki (Mute off)
3. Rock-hangeffektus
4. Fő hangerő fel
5. Fő hangerő le
6. Sztereo-hangeffektus
7. Klasszikus hangeffektus
8. Pop hangeffektus
9. Basszus-hangerő fel
10.Basszus-hangerő le
Komponensek
Mélynyomó . . . . . . . . . . . . . . . . . . . . . . . . . . .1 darab
RCA-kábel bemenethez (DVD-készülék a
mélynyomóhoz) . . . . . . . . . . . . . . . . . . . . . . . .1 darab
Szatellit-hangszórók . . . . . . . . . . . . . . . . . . . .2 darab
RCA-kábel szatellit-hangszórókhoz . . . . . . . . .2 darab
Használati típusok
1. Mielőtt bekapcsolja a készüléket, kapcsoljon ki, ill.
állítson minimumra minden funkciót.
2. Állítsa be a hangerőt az Ön számára megfelelő szintre.
3. Állítsa be a basszus-hangerőt az Ön számára megfelelő szintre.
4. Kikapcsoláshoz először valamennyi funkciót
kapcsolja ki, ill. állítsa minimumra.
94
5....-05-DVD 608 HC H 01.06.2004 10:32 Uhr Seite 94
Page 95

Telepítési utasítás
1. Csatlakoztassa ezután a szatellit-hangszóró
összekötőkábelét a hátsó mélynyomó-kezelőtábla
audio kimeneteire.
2. Csatlakoztassa a jeltovábbító kábel egyik végét a
DVD-lejátszó kimeneti kapcsolóhüvelyéhez (Audio
Out). A másik végét kösse össze a bemeneti kapcsolóhüvellyel (Audio In) a mélynyomó-ház
hátoldalán.
3. Dugja be a csatlakozót a konnektorba.
Tévékészülék csatlakoztatása (videohoz)
1. módszer: DVD-lejátszó video-bemenettel ellátott
tévékészülékkel
2. módszer: DVD-lejátszó S-video bemenettel
ellátott tévékészülékkel
3. módszer: DVD-lejátszó scart-bemenettel (audio &
video) ellátott tévékészülékkel
Csatlakoztatás audio-berendezéshez
A következő diagramm olyan csatlakoztatási módozatokra mutat példákat, amilyeneket olyan esetben használnak, amikor más hangvisszaadó felszereléssel ellátott
tévékészülékekhez csatlakoztatják a DVD-lejátszót.
A DVD-lejátszó csatlakoztatása előtt
- biztosítandó, hogy további készülék csatlakoztatása
előtt a berendezéshez tartozó minden készülék ki
legyen kapcsolva.
- Pontosan végig kell olvasni a tévékészülék, a sztereó-berendezés, valamint minden más olyan
készülék kezelési tasítását, amelyet a DVDlejátszóval össze kívánnak kötni.
1. módszer: DVD-lejátszó + sztereó-berendezés
2. módszer: DVD-lejátszó + Dolby Digital dekóder-
rel/DTS-dekóderrel ellátott erősítő
95
5....-05-DVD 608 HC H 01.06.2004 10:32 Uhr Seite 95
Page 96

Rendes lejátszás
A lejátszó bekapcsolás és a lemez lejátszása
- Nyomja meg a Power-gombot! Ha van lemez a lemeztartóban, nyomban megkezdődik a lejátszása,
mihelyt a Power-gombot megnyomják.
- Ha cserélni akarja a lemezt, vagy újat kíván etenni,
az OPEN/CLOSE-gombot megnyomva, nyissa ki a
fiókot!
- Miután behelyezte a lemezt, a fiók zárásához
nyomja meg ismét az OPEN/CLOSE-gombot! Mihelyt a fiók becsukódott, megkezdődik a lemez lejátszása.Player mit der Wiedergabe der Disk.
A lejátszás megszakítása
- Ha a lejátszást félbe akarja szakítani és a logó-képet megjeleníteni, nyomja meg egyszer a STOPgombot.
- Ha a lejátszást attól a helytől kívánja folytatni, ahol
megszakította, nyomja meg még egyszer a PLAYgombot!
- Ha kétszer nyomja meg a STOP-gombot, ezzel törli
az újrakezdési funkciót.
Szünetfunkció a lejátszás alatt
- Ha a szünetfunkciót kívánja használni a lejátszás
alatt, egyszer nyomja meg a PAUSE/STEP-gombot!
A hang PAUSE-üzemmódban elnémul.
- A lejátszás folytatásához a PLAY-gombot kell megnyomni.
Állókép-megjelenítés (csak DVD)
- A lejátszás megszakításához nyomja meg a PAUSE-
gombot.
- Nyomja meg újra a PAUSE-gombot hogy a követke-
ző állóképhez tovább lépjen.
- A normál lejátszás folytatásához nyomja meg a
PLAY-gombot.
Keresés előre /keresés visszafelé
- Ha előremenetben gyorsan végig akarja nézni a lemezt, nyomja meg az FWD-gombot! A gomb ismételt megnyomásával megválasztható a sebesség
DVD-knél (2x, 4x, 8x, 16x, normál) és VCD-knél.
- A lejátszás folytatásához a PLAY-gombot kell megnyomni.
- Ha hátramenetben gyorsan végig akarja nézni a lemezt, nyomja meg a REV-gombot! A gomb ismételt
megnyomásával megválasztható a sebesség DVDknél (2x, 4x, 8x, 16x, normál) és VCD-knél.
- A lejátszás folytatásához a PLAY-gombot kell megnyomni.
Lassított lejátszás előre/visszafelé
- Ha lassított ütemben akarja a lemezt előre forgatni,
nyomja meg a SLOW-Forward-gombot!
- A SLOW-Forward-gomb minden
egyesmegnyomására változik a lassítás üteme
(1/2x, 1/4x, 1/8x, 1/16x, normál sebesség DVD-k
esetén).
- A normál ütemű lejátszás folytatásához a PLAYgombot kell megnyomni.
- Ha lassított ütemben akarja a lemezt visszafelé forgatni, nyomja meg a SLOW-Backward-gombot!
- A SLOW-Backward-gomb minden egyes
megnyomására változik a lassítás üteme (1/2x,
1/4x, 1/8x, 1/16x, normál sebesség DVD-k
esetén).
- A normál ütemű lejátszás folytatásához a PLAYgombot kell megnyomni.
96
5....-05-DVD 608 HC H 01.06.2004 10:32 Uhr Seite 96
Page 97

Ugrás a következő /előző fejezetre /barázdára
- Ha a következő fejezet (DVD) vagy barázda (audioCD) elejére akar ugrani, a NEXT-gombot kell megnyomni.
- Ha az előző fejezet (DVD) vagy az éppen játszott
barázda (audio-CD) elejére akar ugrani, a PREVgombot kell megnyomni.
- Ha az előző barázdára akar ugrani (audio-CD),
kétszer kell megnyomni a PREV-gombot.
A hátralévő műsoridő ellenőrzése
- a már lefutott, ill. a még hátralévő műsoridő
ellenőrzése céljából nyomja meg a DISPLAY-gombot az ábra szerint!
Lejátszás ismétlése
A műsor/lejátszás megismétlése
- a fejezet, cím, valamint a teljes DVD-korong; ill. a
barázda és a teljes CD megismétléséhez a REPEATgombot kell megnyomni.
TITLE REPEAT ON/
REP-ALL – a teljes cím megismétlése
Amikor a lejátszás elérte a CDn lévő utolsó címet, újra kezdődik elölről.
CHAPTER – a futó fejezet megismétlése
Amikor a lejátszás a futó fejezet
végére ért, visszaugrik a fejezet
elejére.
REP-ONE – a játszott barázda /nóta megis-
métlése Amikor a lejátszás az
éppen játszott barázda/nóta
végére ért, visszaugrik a
barázda/nóta elejére.
Lejátszás ismétlése A
–– B-ig
- A megismétlendő szakasz elején (az „A” ponton)
egyszer kell megnyomni az A-B-gombot.
- A megismétlendő szakasz végén (a „B” ponton)
még egyszer meg kell nyomni az A-B-gombot.
- A készülék automatikusan visszamegy az „A” pontra, és újra
megindítja a kiválasztott szakasz
(A – B) lejátszását.
- Ha le akarja törölni az A – B szakasz ismétlését, nyomja meg
harmadszor is az A-B-gombot!
Folytatódik a rendes lejátszás.
97
5....-05-DVD 608 HC H 01.06.2004 10:32 Uhr Seite 97
Page 98

Programozott lejátszás
- Nyomja meg a PROGRAM-gombot, és a távirányító
számbillentyűi segítségével adja meg a CÍM ill. FEJEZET számát (0–9). Az OSD-kijelzés a
következőket mutatja:
- Válassza ki a Programozás pontot, és a nyilakkal vigye a kurzort a START-ra, utána a lejátszás
elindításához nyomja meg az ENTER-gombot.
- A programozási funkció ugyanilyen módon használható audio-CD-khez is.
Véletlenszerű lejátszás (shuffle) csak VCD-re
- a lejátszás alatt a SHUFFLE-gombot kell megnyom-
ni az ON és az OFF közötti ide-odakapcsoláshoz.
A beállítások a következők:
ON = a véletlen üzemmód be van kapcsolva. Ami-
kor az éppen játszott barázda lejátszása befejeződött, a lejátszás a következő véletlenszerűen kiválasztott barázdára ugrik tovább.
OFF = a véletlen üzemmód ki van kapcsolva.
Megjelenítés a képernyőn. OFF (csak akkor
ha használható, ha előbb megnyomták a
STOP-gombot).
A LEMEZMENÜK és CÍMEK használata
A lemezmenü megnyitása
- E menük használatával lehet megválasztani a hall-
ható nyelvet, a feliratozás nyelvét stb. A DVDmenük tartalma lemezenként változó.
1. Lejátszás közben meg kell nyomni a DVD-
menügombot. Megjelenik a menü.
2. A nyíllal jelölt gombokkal (fel/le) ill. (jobbra/balra)
lehet a különböző menüpontok között navigálni.
3. Miután megnyomja az ENTER-gombot, a készülék
a kiválasztott pont szerint működik tovább.
A címmenük használata
- Olyan DVD-k esetében, amelyek több címet tartalmaznak, ennek segítségével jeleníthető meg az
egyes filmek címe.
- Hogy ez a funkció működik-e, és hogy támogatja-e
a készülék, az a DVD-től függ.
AUDIO-nyelv / feliratozási nyelv
(csak DVD-kre érvényes)
Az audio-nyelv kiválasztása
-
A hallható szöveg nyelvének (pl. angol, francia,
spanyol, német stb.) megválasztása végett nyomja
meg az AUDIO-gombot! A hallgatható nyelvek száma
attól függ, hogy hányat vettek fel az adott DVD-re.
A feliratok nyelvének megválasztása
- A feliratok nyelvének (pl. angol, francia, spanyol,
német stb.) megválasztása végett nyomja meg az
AUDIO-gombot! A feliratozási nyelvek száma attól
függ, hogy hányat vettek fel az adott DVD-re.
ZOOM
- Lejátszás alatt nyomja meg többször a ZOOMgombot, ha változtatni akarja a kép nagyságát
(1,5-szeresére, 2-szeresére, 3-szorosára).
-
Amikor a kép meg van nagyítva, a nyíllal jelölt gombokkal (fel/le, jobbra/balra) lehettologatni a nézetet,
hogy a kívánt részlet legyen látható a képernyőn.
Látószög
- Lejátszás közben nyomja meg az ANGLE-gombot,
hogy ki tudja választani a kívántlátószöget.
- Ez a funkció csak olyan lemezek esetében aktív,
amelyekre egyes jeleneteket többkameraállásból is
felvettek.
Egy-egy cím, fejezet vagy időpont közvetlen
elérhetősége
- megnyomja a GOTO-gombot.
- A gomb minden megnyomásával ismétlés történik a
következő ábra szerint:
- A lejátszó azonnal a kívánt pontra ugrik.
- VCD2.0 lejátszásakor nyomja meg a GOTO-gombot
a keresési mód kiválasztásához (Disc Time(futási
idő)/Track Time(sáv-idő)/Track Number (sáv-szám)
- CD-lemezeknél nyomja meg a GOTO-gombot, és
adja meg a sáv számát.
Könyvjelző (bookmark)
- A könyvjelző funkcióval egy DVD vagy VCD részeit
lehet kiválasztani, hogy később ezt a pontot gyorsabban meg lehessen találni. (A lejátszó maximum
12 könyvjelzőt támogat).
98
5....-05-DVD 608 HC H 01.06.2004 10:32 Uhr Seite 98
Page 99

- Lejátszás közben nyomja meg a BOOKMARK-gombot, és megjelenik a könyvjelzők áttekintése.
- A PLAY-gomb megnyomásával a lejátszó megjelöli a
helyet.
- Ha Ön egynél több pontot szeretne megjelölni,
válasszon ki a nyilakkal egy üres mezőt, és nyomja
meg ezután még egyszer a PLAY-gombot.
- Nyomja meg még egyszer a BOOKMARK-gombot a
könyvjelző-nézet bezárásához.
- Könyvjelző-bejegyzés törléséhez keresse ki azt, és
nyomja meg a CLEAR-gombot.
DIGEST-lejátszás (DVD)
- Nyomja meg a DIGEST-gombot, és megjelenik a
következő menü.
- A TITLE DIGEST, CHAPTER DIGEST, TITLE INTERVAL és CHAPTER INTERVAL valamint a BOOKMARK
pontok egyikének kiválasztásához használja a FEL/LE-gombokat. Ezután nyomja meg az ENTER-gombot.
– TITLE DIGEST: A film a benne lévő címek
számának megfelelően több
szakaszra van osztva. A 6-részes képernyőoldal mindegyike
egy részcímet mutat.
– CHAPTER DIGEST: A cím a benne lévő
fejezeteknek megfelelően
több részre van osztva.
– TITLE INTERVAL: Az aktuális cím azonos futási-
dejű (10 perces) szakaszokra
van osztva. A rész-képernyők
mindegyike a résztartományok
egyikét mutatja.
– CHAPTER INTERVAL: Az aktuális fejezet több
azonos futásidejű szakaszra
van osztva.
- A kívánt ablak kiválasztásához használja a számbillentyűket ill. a nyilakat, majd erősítse meg az ENTER-rel.
- A képernyőn egyidejűleg maximum 6 ablak (cím
vagy fejezet) jelenhet meg. A NEXT-gombbal és az
ENTER ezt követő lenyomásával ki lehet választani a
következő 6 címet vagy fejezetet, ha a film 6-nál
több alszakasszal rendelkezik.
99
5....-05-DVD 608 HC H 01.06.2004 10:32 Uhr Seite 99
Page 100

DIGEST-lejátszás (VCD)
- Nyomja meg lejátszás közben a DIGEST-gombot.
Megjelenik a következő menü.
- Válassza ki a fel/le gombokkal a TRACK, DIGEST.
DISC INTERVAL, TRACK INTERVAL-pontok egyikét,
és erősítse meg utána az ENTER-rel.
- A kívánt ablak kiválasztásához használja a nyilakat,
és utána erősítse meg a választást az ENTER-rel.
- A képernyőn egyidejűleg maximum 6 ablak
jeleníthető meg. A NEXT kiválasztásához használja a
nyilakat. Ezután válassza ki az ENTER-rel a következő 6 ablakot, ha a film 6-nál több alszakasszal rendelkezik.
- Audio CD-nél ez a funkció csak a belehallgatást támogatja (SCAN). A lejátszó ekkor egymás után
lejátssza minden sáv első 6 másodpercét.
JPEG-lejátszás
Vannak olyan CD-k, amelyek JPEG-formátumú képeket
is tartalmaznak.
Előfordulhat például, hogy Ön előhívatott egy
fotófilmet, és a rajta lévő felvételek JPEG-formátumban
állnak rendelkezésre. Ilyenkor ezeket a JPEG-fájlokat
ezen a lejátszón meg tudja jeleníteni.
Néhány hasznos tanács ezzel kapcsolatban:
- Amikor betesz egy JPEG-fájlokat tartalmazó
lemezt, megjelenik a képernyőn a megjeleníthető
fájlok vagy képek listája.
- A megfelelő rendezőt, ill. fájlt az FEL/LE nyilakkal
jelölt gombokkal lehet kijelölni, és a választást az
ENTER megnyomásával kell megerősíteni.
- Egy-egy JPEG-fájl megnyitása után néhány másod-
perc elteltével automatikusan megjelenik a
következő fájl. Ha hosszabb ideig kívánja a JPEGképet a képernyőn tartani, nyomja meg a PAUSEgombot, hogy megszakítsa a képváltást!
-
Ha bemutatás közben el akarja fordítani a képet,
vagy lapozni akar, használja a nyíllal jelölt gombokat!
- A kép lejátszás közbeni nagyításához vagy
lekicsinyítéséhez nyomja meg a ZOOM-gombot. A
kép nagyításához nyomja meg az FWD-gombot. A
képméret lekicsinyítéséhez nyomja meg a REVgombot.
- A ZOOM-funkció kikapcsolásához nyomja meg újra
ZOOM-gombot, és a képméret visszatér a normál
képhez.
- Nyomja meg lejátszás közben a STOP-gombot. A
TV-képernyőn minden alkalommal 12 kép jelenik
meg; válassza ki a nyilakkal a PREV vagy NEXT-et,
és utána nyomja meg az ENTER-t.
- A diavetítésre való átkapcsolásához válassza ki a
képernyőn a “slide show“ pontot. A lejátszó az első
képpel kezdi a vetítést.
- A képek kiválasztásához használja a nyilakat, utána
erősítse meg az ENTER-rel. A készülék ezután átvált
diavetítésre; a vetítés a kiválasztott képnél kezdődik.
MP3 – lejátszás
Ebben a készülékben beépített MP3-dekóder van. Ezzel le lehet játszani az olyan MP3-as barázdákat (fájlokat), amelyek CD-R-re vagy CD-RW-re vannak írva.
100
5....-05-DVD 608 HC H 01.06.2004 10:32 Uhr Seite 100
 Loading...